
Regardless of what type of website you run, it’s bound to have dozens (if not hundreds) of outbound links. As time passes, some of those links might stop being relevant or become broken, so it’s crucial that you keep track of them.
You can always create a list of all the links you’ve added to your website, but that’s not practical. A better approach is to use a tool that helps you track outbound links, such as Google Analytics. In this article, we’ll talk about why it’s important to keep tabs on these links, and teach you how to do it with the aforementioned tool. Let’s get to work!
Why It’s Important to Track Your Outbound Links
If you’re a regular Elegant Themes reader, you’ve probably noticed we include a lot of outbound links in most of our pieces. This is to help you find related content that you might find interesting, and to support the information we present. In fact, most websites will link to external content at least to some degree.
The problem is, it’s often hard to keep track of all the links you add to your websites. This can cause you a few problems down the line:
- Websites might go offline. Not all websites stick around forever. This may lead you to to unwittingly linking users to sites that no longer exist, which can hurt your SEO.
- Content could become outdated. Some content might stop being relevant or useful as time passes. When that happens, you’ll want to replace those outbound links with newer ones.
Additionally, by tracking your outbound links, you’re also not able to monitor their Click-Through Rates (CTR). This can help you determine where best to place links, and optimize their anchor text.
In any case, the best approach to tackling this is to find a tool that can help you compile all your outbound links. There are plenty of services you can use to monitor those links and see how they’re performing. Let’s talk about how to use one of them.
How to Track Your Website’s Outbound Links (In 3 Steps)
For this section, we’re going to focus on how to track outbound links using Google Analytics. We chose this approach for a few reasons. First off, it’s always a good idea to use an analytics tool for your website and Google Analytics is one of the best options on offer. Secondly, using Google Analytics provides you with a lot more benefits than merely being able to track outbound links. For example, it enables you to monitor the performance of your links, which is one of the benefits we mentioned earlier.
One way you can do this is by manually adding JavaScript to your Google Analytics tracking code. However, we’re going to show you an approach that is cleaner, and has the added benefit of helping you learn how to use the Google Tag Manager, which is another handy tool.
In order to follow this process, you will need to have a Google Analytics account set up to work with WordPress. If you haven’t set one up already, do this now.
Step #1: Configure Google’s Tag Manager to Monitor Outbound Link Clicks
Even if you’re familiar with Google Analytics, you may not know how to use Google Tag Manager or what it does. In short, Google Tag Manager is a tool that can help you customize the Google Analytics JavaScript code on your website. With it, you can track complex events through a simple tags system. In this section, we’re going to teach you how to use Tag Manager to set up outbound link tracking with Google Analytics.
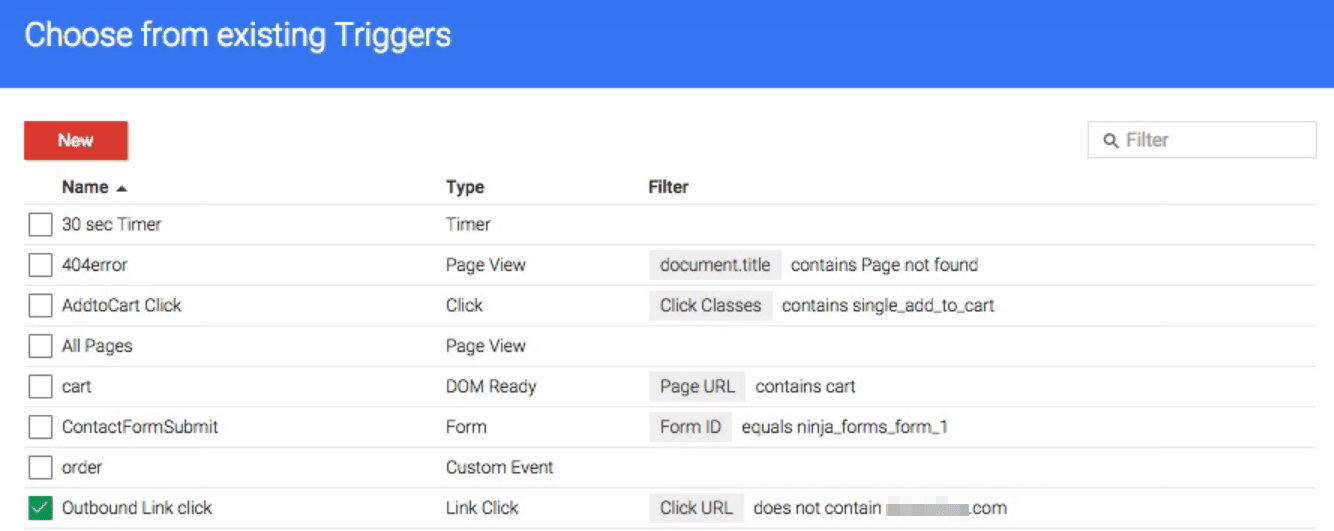
To get started, create a Google Tag Manager account and link it to your website. Once you’ve done that, open Google Tag Manager dashboard and look for the tab reading Triggers. Click on it and hit the New button at the top of the screen:
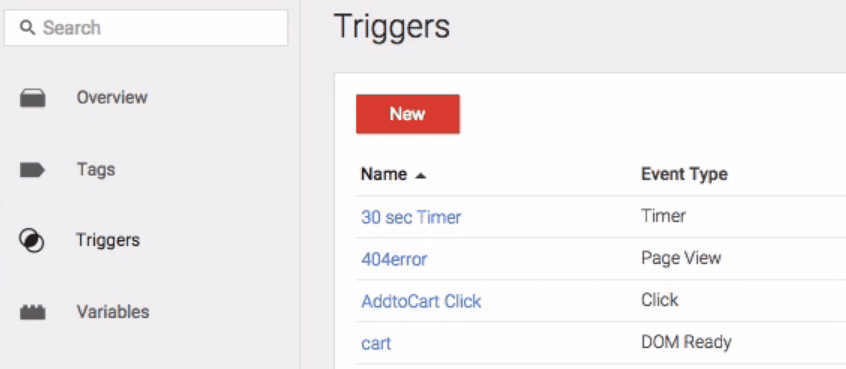
Triggers are conditions that determine whether or not a tag is activated. In this case, the trigger will be used to track when an outbound link is clicked. Start by setting a name for your new trigger, for example Outbound Link Clicks to make the purpose clear. While you’re at it, you should also set the Click option to Choose Event, then move on the Configure Trigger section and choose the option that reads Link Click:
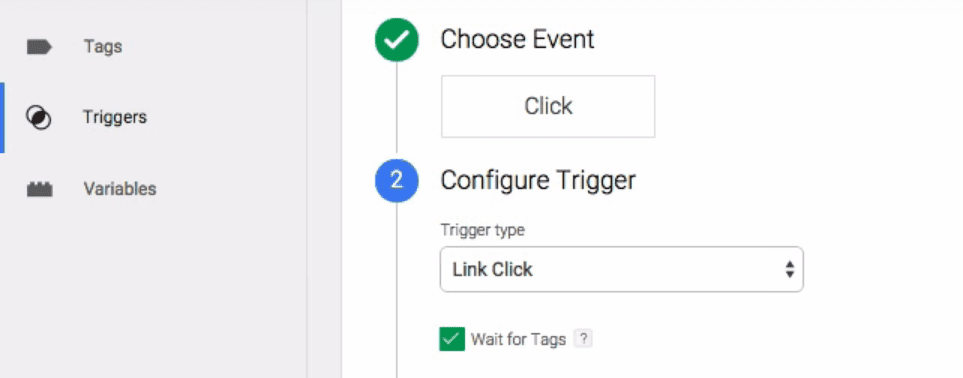
So far, we’ve set up a trigger that activates when someone clicks on a link within your website. Now we’re going to get a bit more specific. Look for the Enable When section and input the following settings in order, Page URL > matches RegEx > .*:

This tells Google Analytics to track this type of event on all pages on your site. All that’s left now is indicate what type of links it should track. To do that, go to the Fire On section and choose the Some Clicks option. Configure it to fire using the criteria Click URL > does not contain > yourdomain.com:

This configures the trigger so that it only track when someone clicks a link that doesn’t include your domain. You should, of course, replace the yourdomain.com placeholder with your own site’s URL. When you’re done, click on Save Trigger.
We just set up our event’s trigger! All you have to do now to start tracking is link it to Google Analytics.
Step #2: Link Your New Trigger to Google Analytics
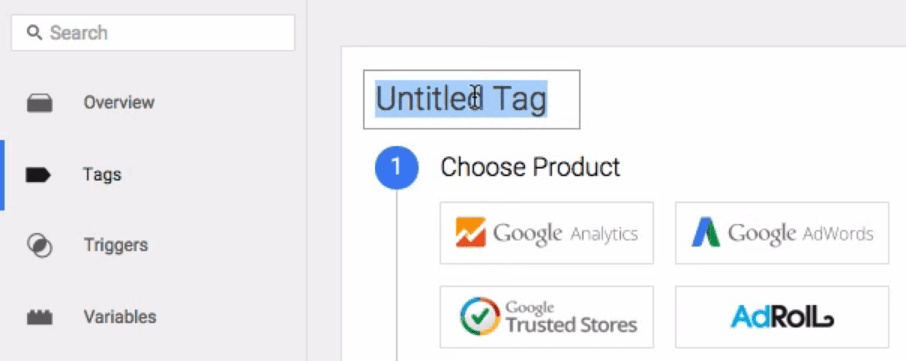
Google Tag Manager works with several tools, not just Google Analytics, so you need to manually link your new trigger to your Google Analytics account before it starts to work. To do that, return to your Google Tag Manager dashboard and go to the Tags tab. On the next screen, name your tag and choose Google Analytics as the product:
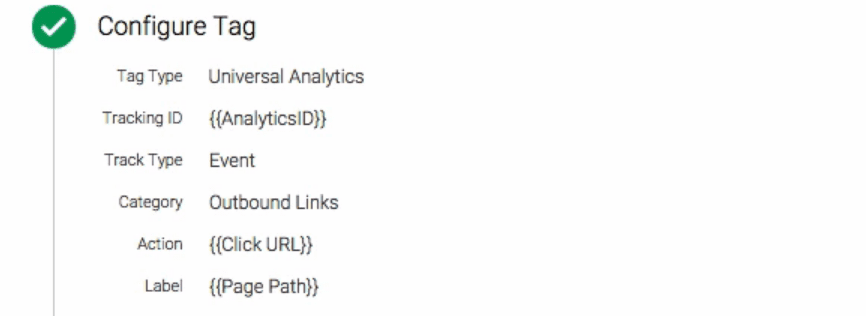
Now, set Universal Analytics under the Tag Type heading, assuming you’re using that implementation on your website (which you should be). Further on, type {{AnalyticsID}} under Tracking ID.
This is where things get a bit tricky. Here you’ll see a section called Event Tracking Parameters. Inside, you need to add a number of settings exactly as we describe them. Choose Outbound Links under Category, then type {{Click URL}} under Action, and {{Page Path}} right beneath Label:
Finally, scroll down to the Fire On section and click on the More option:

On the next screen, you’ll see a list of all your custom triggers. You should see the trigger you set up during step number one here:
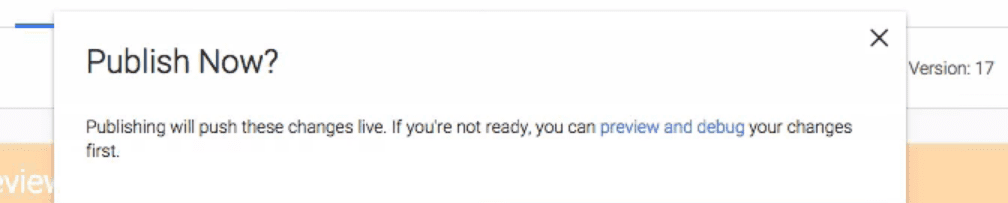
Choose that trigger and click on the Create Tag button. Your new tag is now ready to be published, which you can do by clicking the red Publish button at the top of your Google Tag Manager dashboard:
With that, you’ve completed the setup portion of this tutorial!
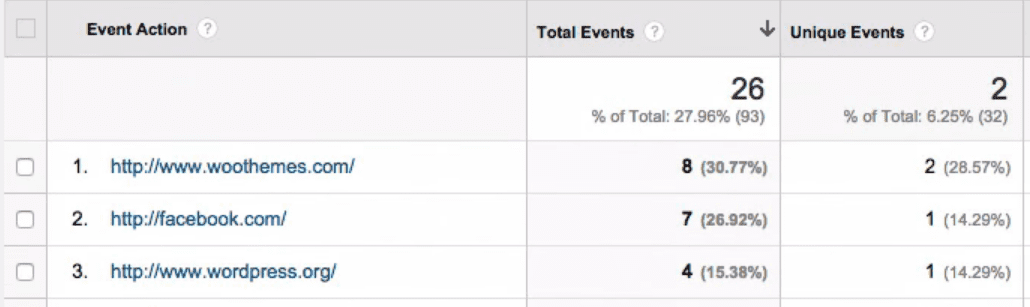
Step #3: Monitor Your Site’s Outbound Links From Your Google Analytics Console
During the first two steps, you created a custom Google Analytics event you can monitor from your dashboard. If you want to see it in action, you’ll need to let your website accrue some data beforehand. After waiting a while, go to your Google Analytics dashboard and navigate to your Behavior > Events > Overview tab. Here you’ll be able to monitor your outbound links’ performance by looking at the Top Events section at the bottom of the page:
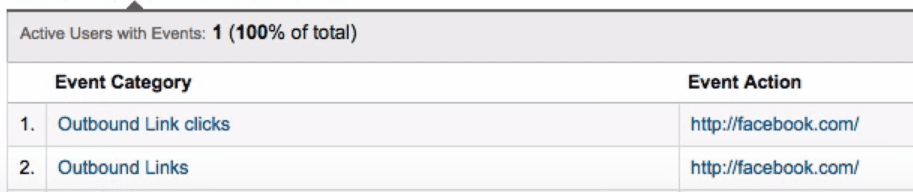
Likewise, you can also monitor real-time data concerning outbound clicks by going to the Real-Time > Events tab on your dashboard:
You can now use this tab to monitor the performance of your outbound links. You should take some time to check your top performers to see if the links are broken and evaluate whether you need to replace them.
Conclusion
Outbound links are of the most powerful resources at your disposal to help your visitors find other content that might help them. However, sometimes websites will drop off the map or content will become outdated. Without a tracking tool, it’s hard to stay on top of these issues.
As far as tracking tools go, we’re big fans of Google Analytics. Once you integrate it with WordPress, here’s how to use it to track outbound links from your website:
- Configure Google’s Tag Manager to monitor outbound link clicks.
- Monitor your site’s outbound links from your Google Analytics console.
Do you have any questions about how to track outbound links with Google Analytics? Ask away in the comments section below!
Article image thumbnail by Sammby / shutterstock.com.


interesting post 🙂 if you click on the event action in analytics (the outbound link url) does it show more details, like which page on your site the link was clicked from?
Hi John Hughes,
Nice post, most of the outbound links point to google analytics :)))
This is a very detailed tutorial on how to use the google webmaster tool.
Thank you for the info I typically use Google webmasters tool to track backlink but this is great way within dashboard. Keep up improving divi
Hi Yasmin. You’re welcome. Thanks for your comment. 🙂
thank you. Monitor Your Site’s Outbound Links From Your Google Analytics Console
Hi and thanks for this explanation. Like all things Google, Tag Manager has changed quite a bit since this post. Sadly, I am unable to implement this great functionality because the changes require choosing from displayed choices for such things as triggers and variables. I was unable to fill in the blanks as described above.
Hello Neil. Thanks for your comment.
There does appear to have been some changes made to the interface so the process is a bit more streamlined now. For example, when you go to add a new tag, you can link it to Google Analytics using the Tag Configuration tab, then set a trigger separately through the Triggering section.
To configure the tag to track outbound links, choose ‘Clicks’ and then ‘Just Links’ from the list of events Google Tag Manager enables you to choose from. After this, enable the ‘Check Validation’ setting and set the event to trigger for URLs that don’t contain your site’s domain.
Hope this helps.
I recommend adding Click URL does not begin with:
javascript:
mailto:
tel:
…to exclude these links from your tracking of outbound links!