
There are plenty of reasons why you’d need to merge two WordPress blogs together. For example, one might have stalled in growth, or you may have acquired a new website and all of its content. Whatever the reason, you definitely don’t want to lose your Search Engine Optimization (SEO) rankings during this process.
Fortunately, you can merge two WordPress blogs with relative ease. In this article, we’ll first explore why you’d want to merge two blogs, then guide you through the process of doing so in five steps, all without affecting your SEO rankings.
Let’s get started!
Why You Would Want to Merge Two WordPress Blogs
To put it simply, merging two WordPress blogs involves taking all the content from one and setting it up on another to create one blog. Of course, it’s easier said than done, but it’s actually simpler to implement than you’d imagine.
Combining two blogs together might seem unnecessary, but there are actually a number of benefits, such as:
- Reducing your workload. Managing one WordPress blog is easier than two – you can’t argue with math!
- Improving your library of content. In some cases, having one website with an extensive library of content might be preferable than multiple smaller ones (as long as their topics are related, that is).
If you’ve considered doing this in the past but were putting it off for one reason or another, now’s the perfect time to do so. Let’s talk about how to pull it off.
How to Merge Two WordPress Blogs Without Losing SEO Rankings (In 5 Steps)
Naturally, you should back up both of your WordPress sites before moving on – particularly the one that’s about to receive your new content. That way, if something goes wrong during the process, you can start again from the top.
Also, make sure both of your sites have an identical permalink structure set up before moving forward. Otherwise, it won’t be possible to pull off the merger without impacting your SEO rankings.
Finally, throughout these five steps, we’ll refer to your old blog as “Blog A”, and your new blog as “Blog B” in order to avoid confusion.
Step #1: Export Your WordPress Content as an XML File
WordPress comes with a built-in feature that enables you to export all your content – sans images – including post, pages, and custom post types. Since we’re merging two sites, we’ll take all of our content along with us.
To do this, head to the WordPress dashboard of Blog A. Then, go to Tools > Export. Pick the All Content option from the Choose what to export section, then hit the Download Export File button:
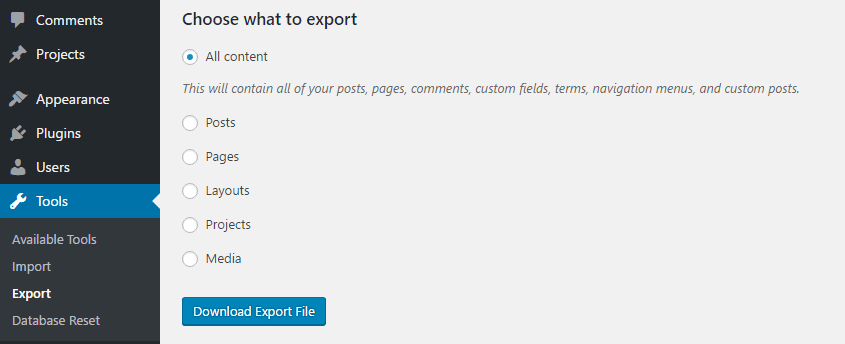
This will trigger the download of an Extensible Markup Language (XML) file. In there, you’ll find a stripped down version of all your content, including its structure. However, as we mentioned earlier, WordPress’ export feature doesn’t handle images by default. Don’t worry, though – we’ll tackle that issue later on.
For now, let’s check out what you can do with your new XML file.
Step #2: Import Your WordPress Content to Your New Blog
It should come as no surprise that WordPress also packs an import feature, which is what we’re going to use now. Head to the Tools > Import tab on Blog B’s dashboard, locate the WordPress option at the very bottom, and click Install Now:
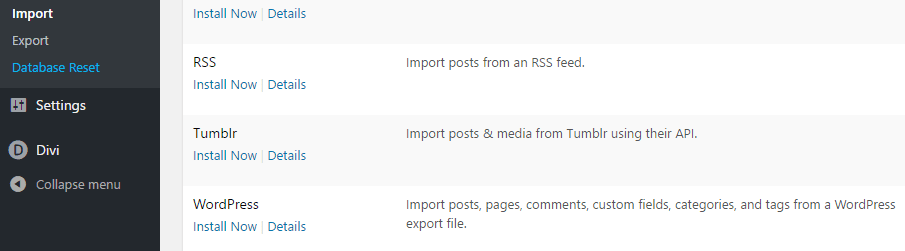
Each importer on this list requires a plugin to work, so sit back for a few moments while WordPress sets it up for you. Once it’s done, the Install Now link will be replaced by one reading Run Importer.
Clicking this link will send you to a new page where you’ll be prompted to upload an XML file to kick off the importing – or in this case, merging – process. Choose the file you downloaded during step one, and click the blue Upload file and import button:
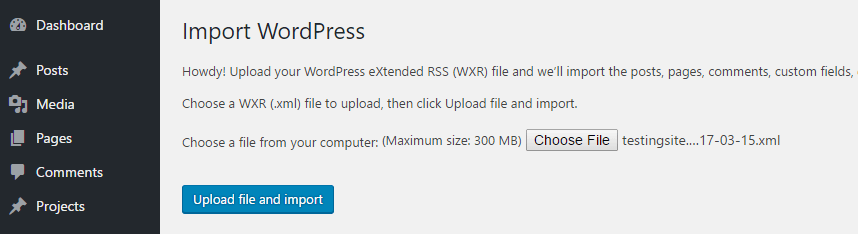
This process may take a while depending on how much content there is to import. Once it’s ready, you’ll be sent to a new page, which brings us to step number three.
Step #3: Assign Your Imported Content to a User
At this stage, WordPress will ask you whether you want to keep the original authors for your imported content or replace them. This means you can either assign all of your ‘new’ items to an existing user on your site, or create a new one for the purpose.
You’ll see the Assign Authors prompt once the import process has finished – simply pick the option you prefer and type in a new username if necessary:
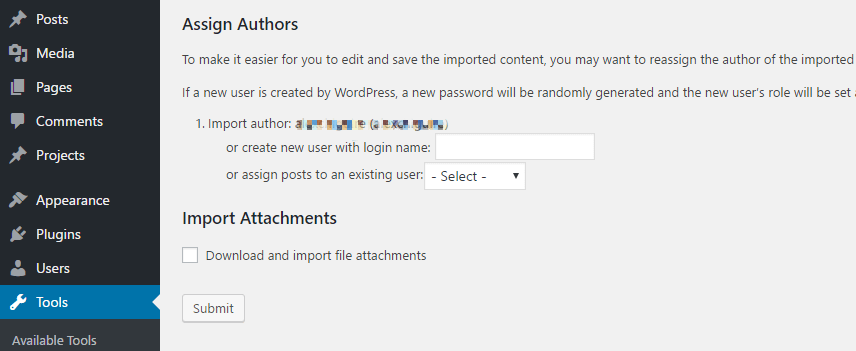
If you’d rather keep the original author information for all of your imported content, leave both options blank.
As you may have noticed, there’s also an option to import your attachments right below the Assign Authors section. This setting is slightly inaccurate since it doesn’t actually import anything, it just links to the original attachments from your old blog (which is not ideal from an SEO perspective).
For now, check the box next to this setting, then click the Submit button. We’ll fix the SEO issue once we’ve merged both blogs.
Step #4: Set Up URL Redirects
Now you’ve successfully imported all of the content from your old blog, it’s time to figure out what to do with it. Leaving it will just take away potential traffic from your new one. However, taking it offline right away isn’t an option either since you’d lose all of the SEO benefits you’ve earned over time. In this case, the best solution is to set up a site-wide redirect so that anyone visiting Blog A will be forwarded to Blog B.
Using your favorite File Transfer Protocol (FTP) client (such as FileZilla), navigate to Blog A’s root directory, open the .htaccess file, then add the following snippet at the top:
#Options +FollowSymLinks

RewriteEngine on

RewriteRule ^(.*)$ http://www.yournewwordpresssite.com/$1 [R=301,L]
Naturally, the URL in the snippet above is just a placeholder, so you’ll need to replace it with the address of Blog B. When you’re ready, save your changes.
Once you’ve set up the redirect, all of the people who find Blog A via search engines will be automatically diverted to Blog B. Over time, the flow of traffic to Blog A should die down and when it does, you can pull the plug on it without impacting your SEO.
Step #5: Import Your Images
As we alluded to earlier, importing your images is a little tougher than importing your content. If you’d rather not have to replace each image manually, keep reading!
First, you’ll need to download all of the media files from Blog A via FTP. You’ll find them in the wp-content/uploads directory.
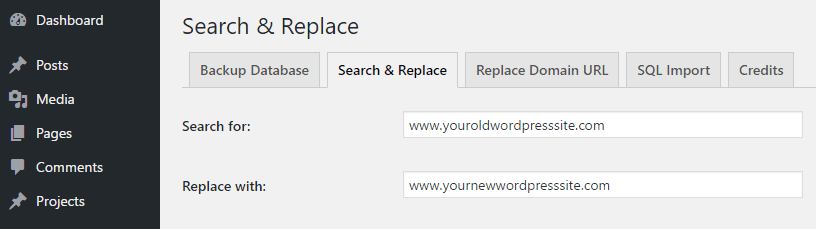
Next, you’ll need to upload those files to the same directory for Blog B. All that’s left is to replace the links currently pointing to Blog A. To pull this off, we’ll use the Search and Replace plugin:

Install and activate the plugin, then go to Tools > Search & Replace on Blog B’s WordPress dashboard. Find the Search & Replace tab, then take a look at the Search for and Replace with fields. You’ll want to include the URL of Blog A in the former, and Blog B in the latter:
Doing this will replace all of the instances of Blog A in your imported content’s URLs. That includes images and even internal links, which means you get to kill two birds with one stone.
After filling out both fields, click on the Do Search & Replace button at the bottom of the page, and sit back while the plugin does its work. When it’s done, your merger will be officially complete!
What to Do If Your Blogs Don’t Merge Correctly
By now, we’ve covered all of the steps for pulling off a successful migration. However, each WordPress site is different, and there’s always a chance that something might go wrong for one reason or another.
First off, if your new site is displaying any large-scale bugs, your best bet might be to restore it to its old state using the backup you made beforehand. However, if you’re just facing a minor error (such as your imported images not displaying correctly), there’s no need for a restore. The main issue will likely be a typo that’s been introduced while using the Search & Replace plugin. To remedy this, you can safely use the plugin to search your site again and find the error.
Finally, depending on the number of categories and tags on Blog A, you might be left with a bit of a mess on Blog B – in other words, you may simply either have too many posts, or have duplicates to wade through. In this case, it’s a simple process to merge some of them.
Conclusion
Merging two websites together sounds intimidating, but WordPress makes the process remarkably easy. In fact, it’s the kind of thing that you could pull off in a matter of hours – meanwhile, your SEO rankings will remain untouched.
In this piece, we’ve shown you how to merge two WordPress blogs, without losing any SEO benefits. Let’s quickly recap the steps:
- Export your WordPress content as an XML file.
- Import your content to your new blog.
- Assign the imported content to an author(s).
- Set up URL redirects.
- Import your images.
Do you have any questions about how to merge two WordPress blogs together? Ask away in the comments section below!
Article thumbnail image by ByEmo / shutterstock.com


Thanks for this information. I’ve successfully merged my two sites and they are working properly from one dashboard. Nice Job
Thanks Rahul! We’re glad this method worked out for you. 🙂
John,
Question. If I wanted to copy the old posts from “Blog A” (old) which has the Custom Structure permalink but the new “Blog B” uses Day and Name, can I change Blog A to the Blog B / Day and Name or should I use a redirect Plug In? I would like to shut down Blog A eventually.
Thanks!!!
Hi Darren! It’s hard for us to say without seeing your exact setup. As long as both sites share the same permalink structure, you should be good to go!
5 steps…. thank you!!
This post makes everything so much easier, bookmarked for future reference time and again 🙂
Always key to not effect SEO, so thank you for sharing!
You’re welcome, Phil! We’re glad you found the post so helpful. 🙂
Thank you for this great tutorial. I have a question: In the .htaccess redirect, do you need to keep /$1 at the end of my blog’s URL? And do I need to add redirects for all my posts & pages as well?
You’re welcome, Andrej! You’ll need to replace the placeholder URL, but still append “$1” to it. In a nutshell, this makes sure your posts and pages redirect properly, without any extra steps.
I also imported articles using wordpress too, is very expensive and easier than others. Even if the article had been so, it would be easy if you want to immediately see our article posting just now.
SEO rankings will be down at least for a while. Also the 301 redirect from the old empty domain will not be transferred 100% to the new blog. However the fact that the content will be accessible in the same format/url will be an advantage for SEO continuity.
very much informative Sir…
Thanks! 🙂
good..
good
Hi John, great post!
Would it be possible to set the 301 redirect as domain forwarder/redirect in my hosting provider’s dashboard?
I mean would it give the SEO the same result?
Hi Joffry! You’ll have to check with your host about the best way to implement a 301 redirect. You can do so without negatively impacting SEO in the long term, as long as you observe certain best practices. Check out this article for more information: https://moz.com/learn/seo/redirection .