
It’s not an exaggeration to say that Snagit has made my daily routine more efficient three times over, if not more. At its base, Snagit is screen capture software. But when you use it for a bit, you will see it’s a bit more than that. If you’re a blogger and haven’t checked out Snagit yet, I am going to tell you why you should at least give it a look.
Screen Capture Software? That’s It?
No, that’s not it. And because of being branded that way, a lot of folks (myself included) didn’t see what the big deal was. After all, MacOS has Grab, and Windows has the Snipping Tool. We can resize images easily in Photoshop, GIMP, Paint.NET, whatever. Not to mention any kind of arrows, notes, resizing, and effects could be done in any of those as well.
Why would you pay $49.95 for something that you could ostensibly do with the Print Screen button?
Because Snagit just kind of does it better. And more than that, you don’t have to bounce between multiple programs. That in itself is a life-changer. Snagit also automatically puts captures into the editor, eliminating the extra step of finding and loading the new file you created.
Plus, Techsmith offers a free trial, so you can see for yourself whether or not it’s worth picking up. (It’s what I personally did, and I bought the full version before my time ran out.)
For this article, I want to walk you through some of Snagit’s primary features, primarily the ones that the Content Team uses for the Elegant Themes blog on a day-to-day basis.
Features Overview
Snagit does a lot, like I said, and the Snagit Editor UI itself is intuitive. You learn what stuff does almost immediately. The UI has 5 major components, and you will be interacting with most of the time.
- The Toolbar
- Quick Styles and Tool Properties
- Effects (color adjustment, dimming, borders, etc.)
- Image Resolution Adjustment
- Recent Captures
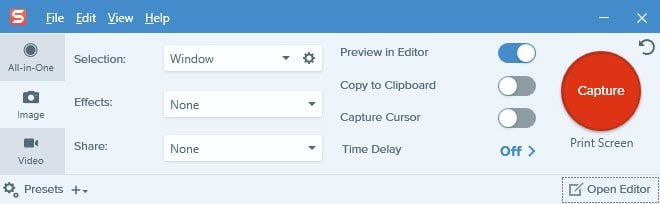
Additionally, Snagit has a Capture tool. It is screen-capture software, after all. You probably won’t use this one much directly because you can set up multiple keyboard shortcuts. The primary uses of Snagit Capture for me are changing from recording a single image to a video, adding a time delay for a hover pop-up, or capturing the cursor. And setting up those keyboard shortcuts.
Shortcuts
If you ask me, the best feature of Snagit are the keyboard shortcuts. When you click on the Presets button in Snagit Capture, you’re given the option of which keyboard shortcuts you want to set. If you want a new kind of shortcut, click the +, and you can pick from any of the capture options in the window above.
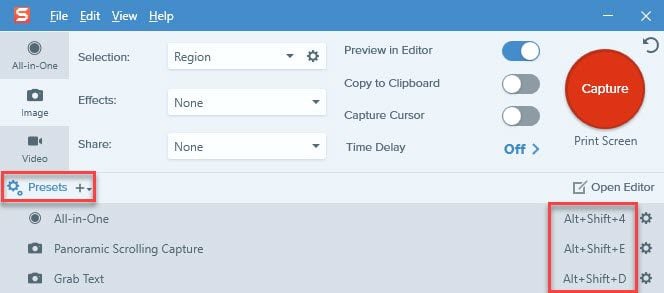
Personally, I use All-in-One about a hundred times more than any thing else in the app. I mapped mine to Alt-Shift-4 to mimic the built-in CMD-Shift-4 screen capture on MacOS. You can also set the Preferences on Mac to use the built-in Grab shortcut to put the screencap in the Snagit Editor before it’s saved elsewhere. That option is more useful than you’d expect.
Once all of that is set up, you’ll probably spend very little time in this part of the program.
The Snagit Editor
The primary part of the app is the Editor. That’s probably apparent. There is a very small learning curve with Snagit if you’re coming from software like Photoshop or PaintShop Pro because the UI is much simplified. Once you’re used to the layout, grabbing and annotating screenshots will become second nature.
As soon as you capture any part of the screen, you’re free to edit, annotate, stylize, crop, or whatever else you want to do before you save it.
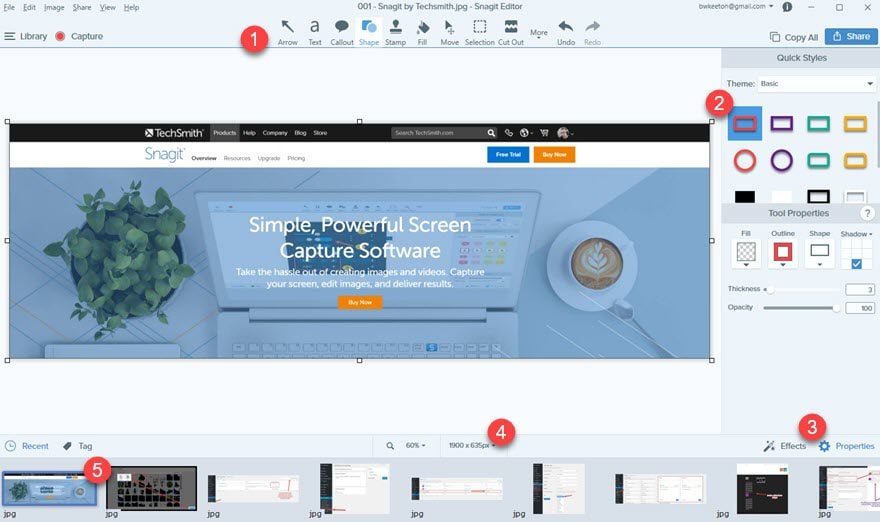
The Toolbar
Get used to these toolbar icons. You’re going to be clicking on them a lot You can easily swap between any number of tools very quickly so you can edit your screencap and move on. As soon as you click one, wherever you click and drag on the image, that tool will do it’s thing. If the Arrow tool is highlighted, you draw an arrow from point A to point B. The Text button lets you choose the size of your text box the same way.
In general, the tools are all pretty self-explanatory, but here’s an example image of the 13 most important tools in action.
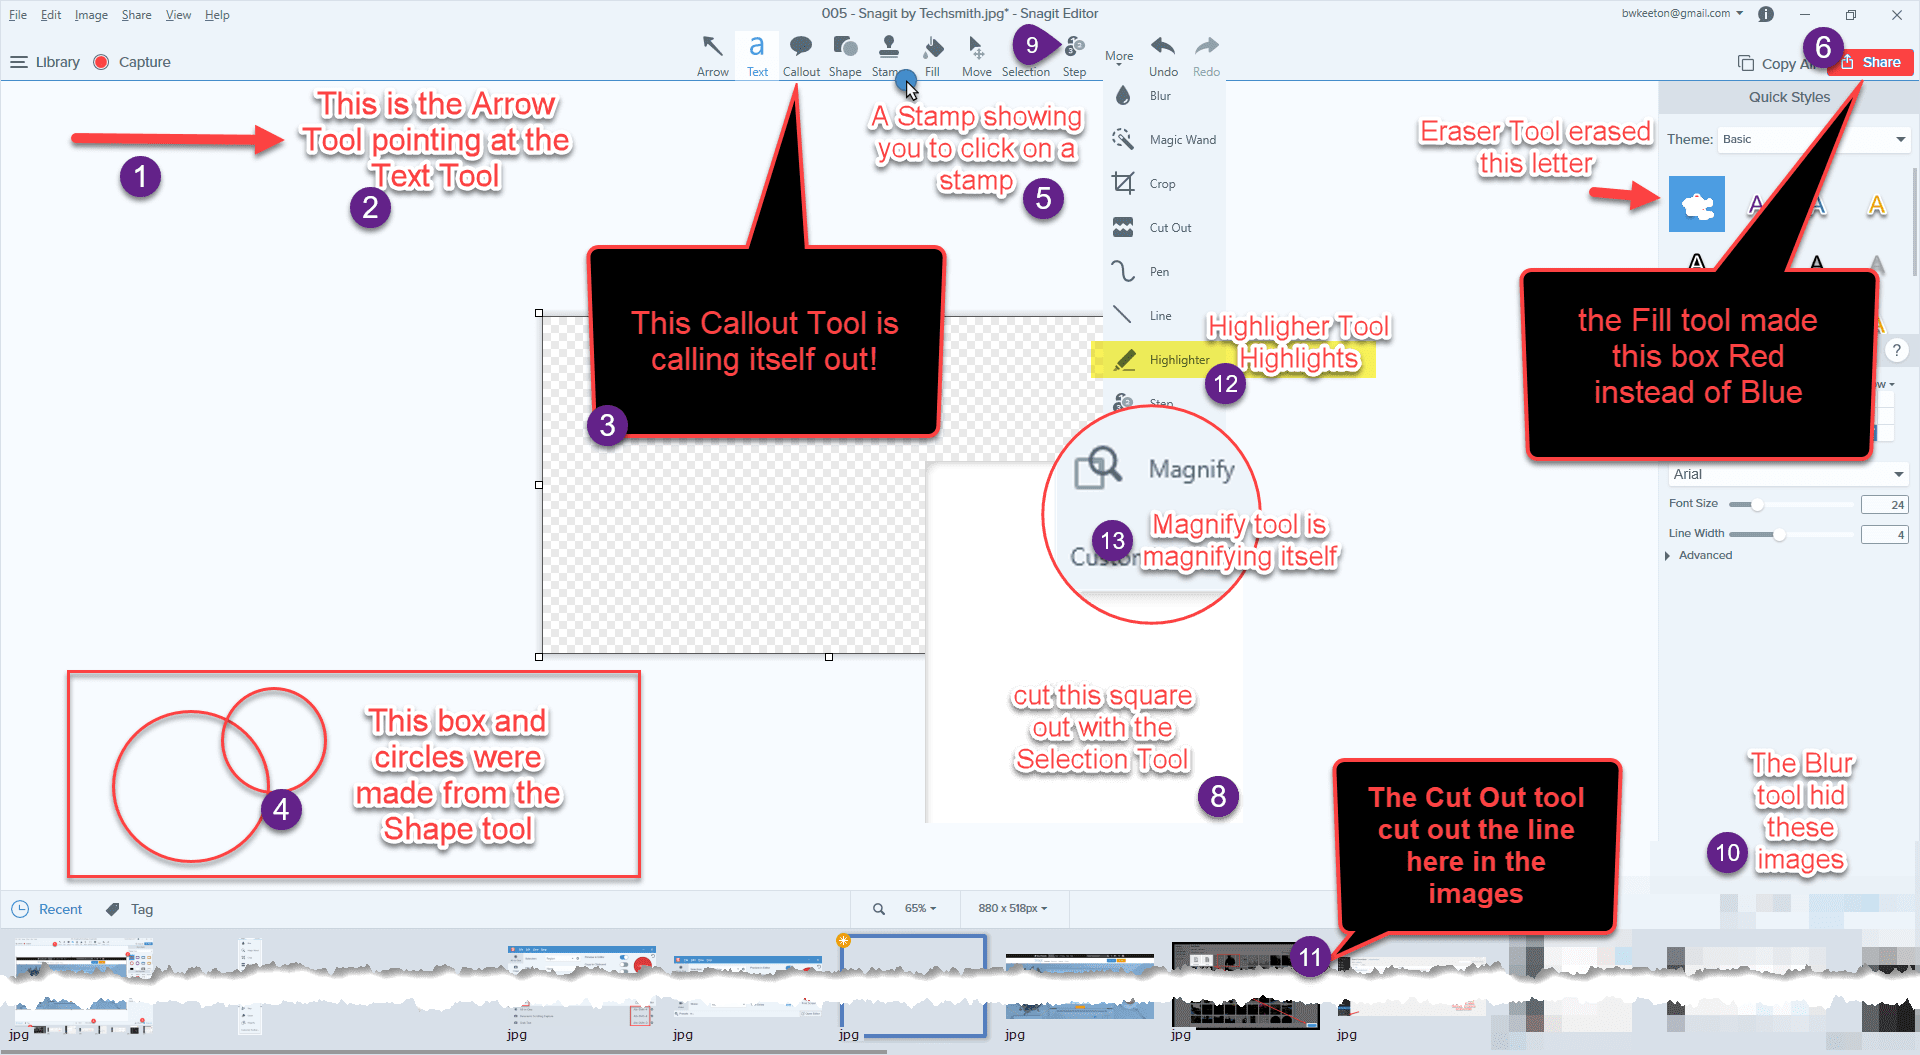
Breaking the Tools Down
- Arrow – The number 1 tool in Snagit. It points at things. When you’re trying to make a point or call a reader’s attention, quickly being able to point at it is imperative. Combine it with the Text tool or the Shape tool, and you have 90% of your Snagit edits right there.
- Text – Drag your mouse to make a text box wherever you want to annotate any part of the image. You can adjust the colors and outline and text size to make it visible over any background.
- Callout – Think of this one as a combined Arrow and Text tool. You can change the bubble’s shape to really call attention to something. Use this when you need to make a bigger statement than just an arrow can do.
- Shape – Squares and circles are the real draw here. When an arrow or a callout won’t cut it, you can’t go wrong with putting a box around it. This tool is pretty much tied with the Arrow tool in terms of versatility and amount of use. It’s just too easy to put a box around something you want to talk about.
- Stamp – Mostly used to indicate where a person should click during a tutorial, Techsmith also offers stamps for many different occasions. You can use these like social media stickers to brighten up your images and give your edits a little personality and flair. Or just stick to the cursors and clicks. Up to you.
- Fill – It’s everyone’s favorite Paint Bucket tool! When you want something that’s one color to be another color…dump a bucket of paint on it! But really, that’s what Fill does: it fills in any space that’s one single color with another single color.
- Move (unpictured) – Use this to adjust the positioning of any other additions you’ve made, such as a Callout or a Text Box, or even an Arrow that needs to be shifted.
- Selection – You can cut out, move, or remove any portion of the image. You have two options for what happens to the space afterward: a transparent space left behind or an algorithmic autofill (which is great if you’re trying to remove an element without indicating you’ve done so).
- Step (under More) – Pick a size and a color, and you can label each step of a process. Numbering occurs automatically, and you can adjust the shape and color of each marker individually. All of the numbers in the image above are step markers.
- Blur (under More) – If you don’t want to simply remove an aspect with the Selection tool, you can blur it out. You can make it fuzzy or you can use the digital squares. You can see the squares in the image above were used to blur out some images. I have also blurred various pieces in images throughout the article.
- Cut Out (under More) – The Cut Out tool lets you cut out (go figure) vertical or horizontal areas of the scren. You pick a section, and the tool simply removes it. The image above shows a jagged edge, but you can choose what style you want. I primarily use this tool to remove empty sections from screenshots that make resizing and annotating ugly or awkward.
- Highlighter (under More) – Like the Shape tool, but only square and in translucent colors. It simply highlights anything behind it, exactly like a highlighter marker would do in your old biology textbooks.
- Magnify (under More) – The Magnify tool makes a selected portion of the image larger. This is fantastic when a high-resolution image needs to have a very tiny element addressed while still being able to see it in context of the whole.
That’s Not Even All of Them!
However, those are the main ones you will use. The ones listed under the More tab are generally more specialized tools that you won’t be using over and over and over again during the course of a project. They might be one-offs (such as providing steps or blurring an element). Whichever one you’re using is displayed directly to the left of the More tab (where the #9 marker is pointing in the image above).
As you can see just from the examples in this article so far (all of which have been made using Snagit), the app does a lot more than simply capturing screens. That said, there are a few more things that might make it a worthwhile investment for your blogging.
Quick Styles and Tool Properties
To the right of the main editing area, you see the Quick Styles/Tool Properties column. Snagit has quite a few preset style for your tools (such as a red arrow, yellow circle, or 24pt purple text). You can also edit any of the properties you want.
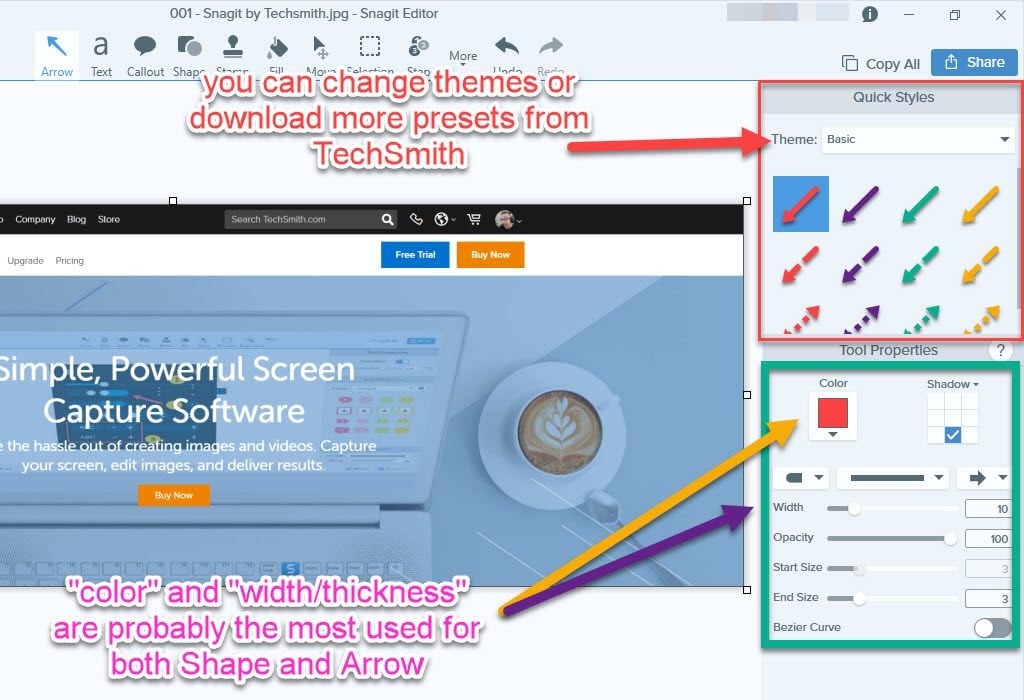
The Color, Width, and Thickness tools may be the most used ones for both Arrow and Shape. You will also see a lot of use for those with the Step tool, as well. Some shapes and colors don’t work as well for some tutorials as they do with others.
Effects
The Effects column is really robust, too. Like the Quick Styles and Tool Properties, you get Quick Effects and then customizable ones underneath those. In this example, the Embossed Watermark effect was placed at the top-left corner of this image using the Divi logo, and the picture of the lady has been adjusted with from being naturally colored to having a purple tone.

Resolution Change
We have a set size for images here on the ET blog: 880px wide. You can just type in what you want the new size to be, and it’s there. Honestly, this is the #1 used feature in Snagit for us, even over the editing. It’s much less of a pain to resize quickly than in Photoshop, which is what I was personally using before. Primarily because whenever I take a screenshot, it opens automatically in the editor. You might be surprised at how much that spoils you. I was.
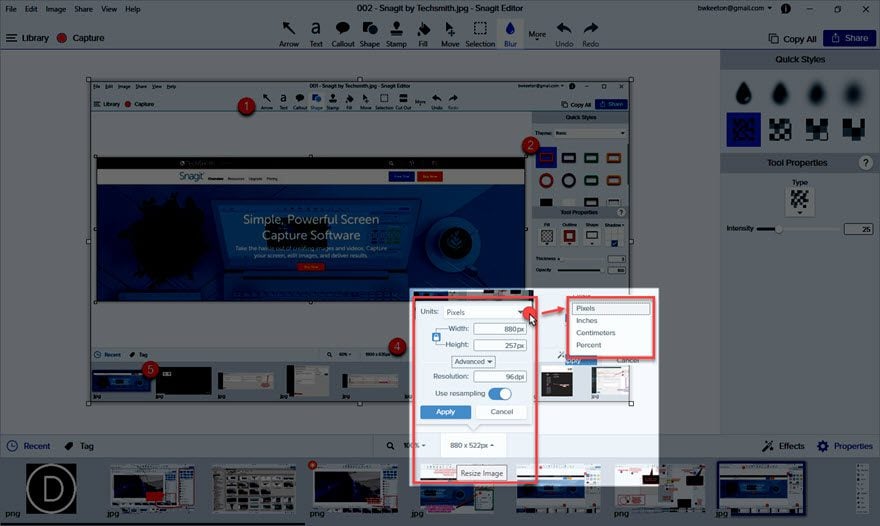
Note: I used the Spotlight and Magnify tool under Effects to dim the background here while keeping the zoom to 100% (no magification).
Recent Captures
Finally, we have one of the other featuers that might spoil you: a constant stream of your recent captures. You can scroll through them, close them, copy and paste between them. But most importantly, you keep them in your Snagit Library until you purge it. So even after you save/export the final image, you can go back and re-edit the image as many times as you need. Even weeks later. (Speaking from experience on that one; it’s really, really nice).
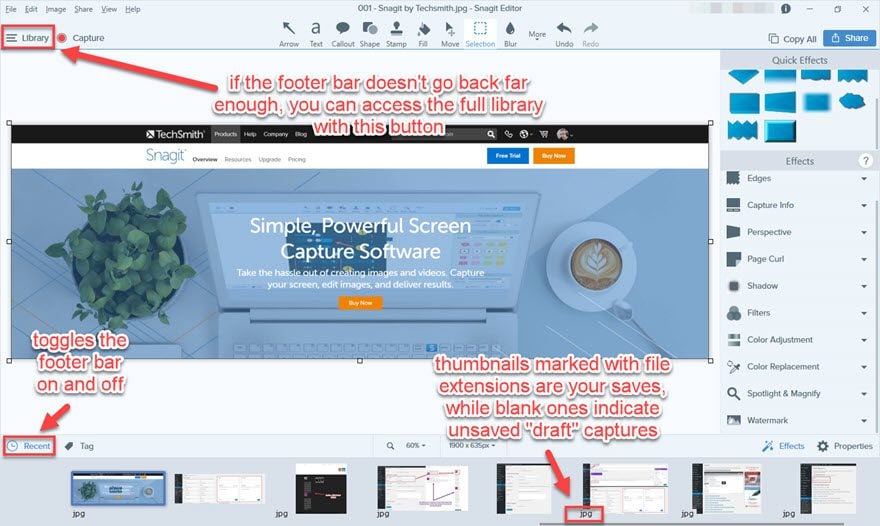
The footer bar lets you scroll through your most recent captures, and you can see which are your saves and which are drafts (the ones with file extensions are yours, while blank ones are drafts). You can press the Recent button in the lower-left to toggle the bar on and off, and the Library button in the top-left of the window opens the full Snagit Library, with every capture you’ve taken. (Unless you’ve purged the Library manually.)
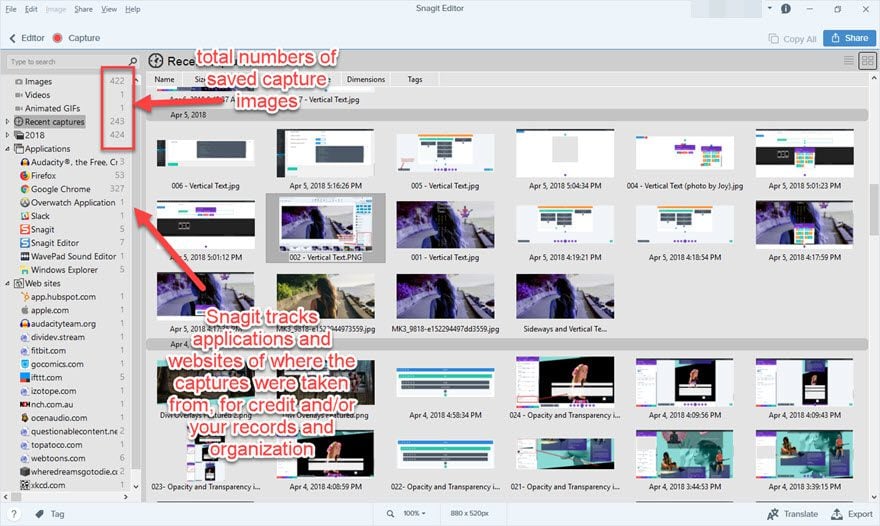
Snagit tracks the applications and websites from which you have captures images, as well as the dates and total number of captures. This is great for crediting images (it’s easy to forget where you got a screenshot if you take a lot of them like the Content Team does). The feature gives your organization a boost, too, in case you need to quickly go back and find a specific image. Snagit has a tag system, too, so you can label and sort and file the days away.
What Do You Think?
Those are the primary features of Snagit that we bloggers tend to use. As you can see, the app does a lot more than just taking a picture of your screen. If you find yourself editing a lot of images for your blogs like the Content Team does for our posts, it may be worth looking into the free trial of Snagit. After a few days of use, you may just find it worth snagging your own copy.
Do you use Snagit as a blogger?
Article featured image by Nadia Snopek / shutterstock.com


Thanks for the post! I’ve bought Snagit but don’t really use it as I kind of need admin permissions on my computer! 🙂 However, I’d like to know how i can design beautiful blog images like ElegantThemes. They have amazing blog post images that are just so visually appealing. I understand that they were created in Photoshop or Illustrator, but could you suggest some alternatives
I use Snagit all of the time and it is really good. I sometimes make gifs and as long as they are less than 30 seconds long, they are good.
editing images, videos and gifs is easy in Snagit.
I used to use the scroll feature but it has essentially stopped working for me. that’s a pity because scrolling can save a lot of effort.
It’s worth giving it a try. The Screen Capture is excellent and the Software performs well compared to ScreentoGif for example.
I love the way the video capture and editing has improved over the versions. I rarely have to open Camtasia anymore. I can capture a video stream and trim the beginning and the end. I love that for doing captures of the wildlife camera feeds.
For business, I use the screen capture and image resizing for my clients’ images to put into promotional materials.
I love SnagIt and recommend it often.
i want to learn more about elegantthemes it’s one of the greatest!!
SPAM… just SPAM
Snagit is cool however I would go with camtasia these days.
I’ve used Snagit in the past, but as I hardly ever need to record videos and do all post-processing of screenshots in Photoshop, I switched to Greenshot a couple years ago.
Greenshot is free and has a basic image editor with quite a few features for those screenshots that won’t get post-processing in Photoshop. Also, the editor lets you move or remove the ‘captured’ cursor if you don’t like where it is in the screenshot, or you can change the stacking order to place it above a ‘highlight’ or ‘rectangle’ for example.
The feature I probably like most about Greenshot though, is that I can repeat a region capture using Shift + Print Screen. With this, I can very quickly take screenshots of a lot of steps for manuals or tutorials.
By the way: if you’re on an up-to-date Windows 10 machine and all you need is a quick screenshot, just hit the Windows-key and Shift and S at the same time to get a quick region capture that’ll save to the clipboard. It’s not fancy, but also doesn’t require extra software 🙂
It’s no exaggeration to say that Snagit has made my daily routine more effective three times. In essence, Snagit is screen capture software. But when you use it a little, you’ll see that it’s a little more. If you are a blogger and have not yet tested Snagit Start using now. Thanks for the article.
Cool article. I’m using Snagit since 1995. started with the Windows versions and assimilated to Mac OS in 2010. Computing without Snagit is only a half-life.
In your post, I found a function I’ve never used. Now the day starts better.
Many thanks.
It’s beautiful, will buy soon. thank you for the detailed review.
I’ve been using Snagit for years. I often use it to show clients step by step instructions how to do something. I take the screenshot, use the arrow to point to what to click, use the text tool if needed to explain the action, etc. – Then using the copy all option (which copies the current Snagit window contents) I cut & paste into the email to my client. My clients love the visual step by step with pictures.
Useful for a lot of other everyday tasks as well.
I’m definitely going to update my snagit software. The improvements I’m seeing from the update are amazing! Thank you so much for sharing.
Nice article. I was also like thinking I didn’t need a screen capture software but Snagit has improved my productivity no end. I bought it to help me capture screen grabs for the books I write as well as in my blogs and tutorials. I quickly found out it could do so much more. The scrolling screen capture which I couldn’t see you mention is excellent. You can capture entire web pages just by scrolling down the screen.
I also use the video screen capture if I have to report software bugs or problems. You can upload the video to Screencast and securely share it when reporting the bug.
I wouldn’t be without Snagit now.
You are absolutely right. The Scrolling Screen capture is really a fantastic tool. It was one of those tools that just barely didn’t make my cut for space in the article, but it’s absolutely something I use every day (or maybe every other).
I also use Nimbus for that, too. It’s a Chrome extension that sometimes grabs websites a little more cleanly than Snagit does when it’s scrolling. If you ever have issues with the scroll, try Nimbus. It’s not my go-to, but it’s a great backup.
Gonna have to try it.
Thanks for the heads up.
Not so much!
Wasn’t something that worked for you?
thanks very informative..