
After taking OpenShot, the open-source video editor, for a spin I bring you an overview and review of its interface, tools, and possibilities. For a free video editor, it seems pretty complete. But you’ll only know if it suits your needs if you try it out. Looking at comments on their YouTube channel I found that sometimes the program was slow or crashed regularly but I was lucky enough to not have that happen to me. Maybe the newest update fixed those bugs or perhaps regular users have experienced issues I didn’t run into while testing. Either way, keep reading to see what OpenShot has to offer and some suggested tutorials at the end to get you started.
The Story Behind OpenShot
OpenShot was created by Jonathan Thomas back in 2008 when he couldn’t find the perfect video editor for his new Ubuntu set up. On the OpenShot website, he tells the story of how OpenShot came to be, which is quite a nice touch, to be honest. Jonathan documented the whole process on his blog, which is still online for anyone to read. It makes sense since OpenShot is an open-source video editor, that he would also share the journey of creating it.
11 years later OpenShot is now on version 2.4.4 and is available for free download on Linux, Window, and Mac. The source code is available for download of course under open course legislations.
When looking for tutorials on OpenShot, most of what I found was by Jonathan himself. He publishes videos about how to use the software on his YouTube channel.
Let’s move on to how OpenShot looks and works.
The OpenShot Interface
The interface of the OpenShot Video Editor is similar to other video editors. The video window is at the top right, the timeline is at the bottom and the tools and media are on the left. What stands out about the OpenShot interface is that the windows can be closed, moved around and rearranged. This can be confusing for some but all the windows can be brought back to the front by navigating to the ‘view’ tab.
Let’s take a deeper look at the default set up, the way it looks when you first log in. This is on a Mac.
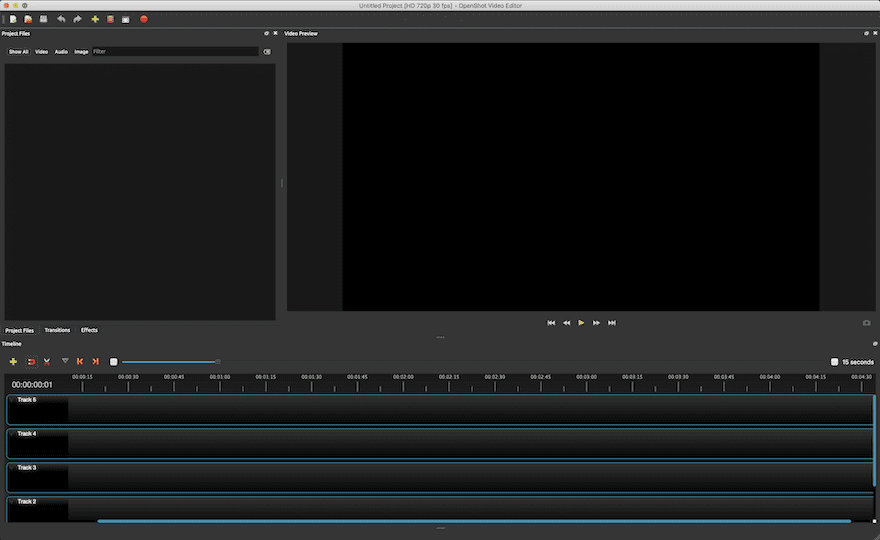
The Video Viewer Window
This is the area where you can preview the video as you build it. It replays ok when there aren’t many clips but if there are a lot, it can be a little slow. The size of the window is adjusted with a draggable tab, it can also be hidden if necessary to give more space to the timeline.
The Project Files Window
The project files window is the square area underneath the main toolbar. This is where you keep all the files you’ll add to a video; images, clips, and audio. It can be toggled between icon and list view. You can drag and drop or use the green plus button to bring in media. Most file types are supported or import into OpenShot. There’s no need to convert anything beforehand.
Below the project files window are three tabs: Project Files, Transitions, Effects. This is where you access the available transitions and effects and where any new ones you add, are stored.
The Timeline Window
The timeline window opens up with 5 available tracks but the user guide says you can add as many as you want. To add the media from the project window, there are two options.
- Drag from the project files window to the timeline.
- Select in the project files window and right-click to select the ‘add to timeline’ option.
- Select a group of clips in the project files window, set it in the order you want it on the timeline and add them all together in that order.
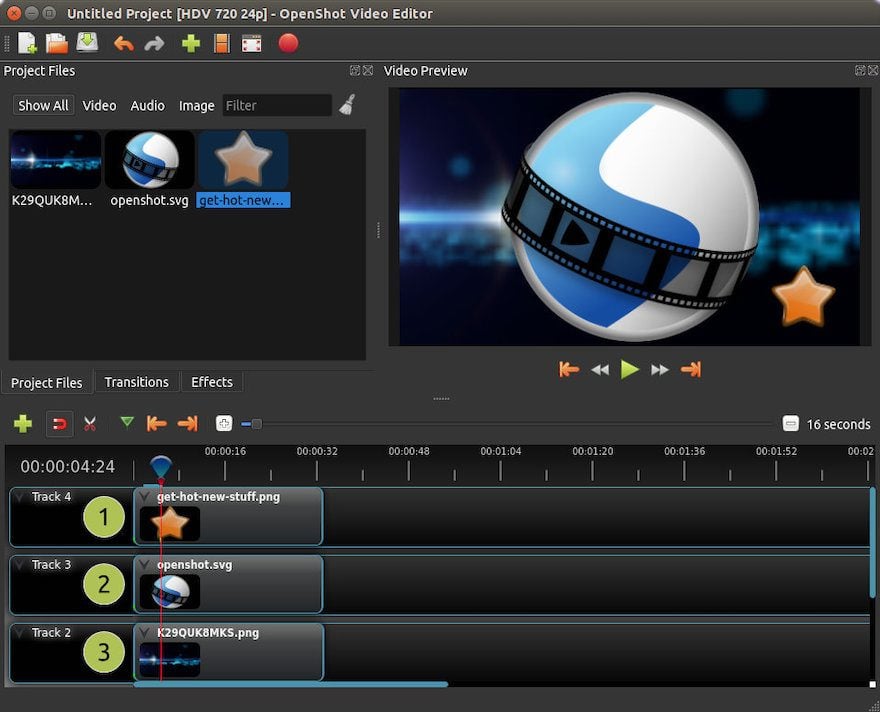
The clips on the timeline can be moved around freely to change the order or to move them from one track to another. There is a toggle that lets you snap media together without overlapping but you can still place the media anywhere you like. It’s also pretty simple to duplicate and move to another place on the timeline or another track. If animations or effects have been added to a clip, the duplicated clip will also have them.
The Properties Window
This window opens for the first time when you click on a media clip in the timeline. There’s a lot that can be done in the properties panel, like cropping, flipping, and rotating. This is also the place to control the volume on each clip so that you can take out any sounds that came in with the video and you don’t want in your final video. There are other things that can be controlled in the properties window for more detailed editing.
Trimming, Clipping, and Slicing
Most videographers and video editors will tell you that these are the most important tools in video editing software. The OpenShot tools to trim, clip, and slice media are relatively easy to use and have considerably detailed controls. There are plenty of options for trimming edges and sections of clips, slicing clips at the playhead and more options. The OpenShot user guide lists all the different ways that it can be achieved and Jonathan has a tutorial on all the possibilities as well.
Overlapping, Transitions, Effects, and Animations
Overlapping clips instantly creates a fade transition which you can then adjust by clicking on it. More transitions are available in the tab under the project files window but can also be opened as a different window. Adding new transitions and effects is achieved through the effects tab. Each effect can be dragged into the timeline wherever you want it.
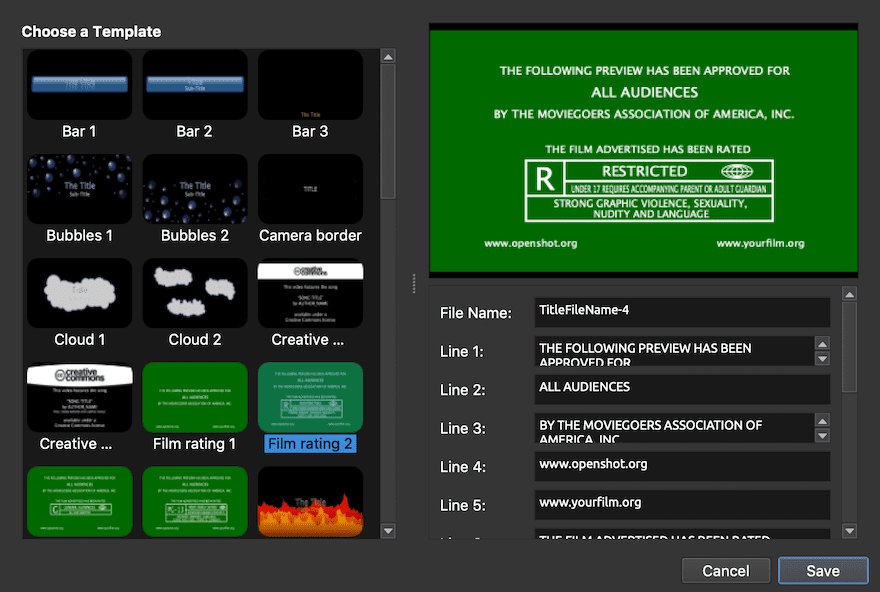
Titles and 3D Titles
Adding titles and 3D titles is simple but surprisingly, the titles aren’t on the dashboard. They are in the top menu bar. There’s a tab just for titles. You can choose between regular flat titles and 3D titles. For 3D titles to work, you need to have the latest version of Blender downloaded as well.
The Open Source Angle to OpenShot
As it states in the name, OpenShot is open-source software. This means that developers can download all the source code and change, distribute and use however they want. The OpenShot team has a good system for developers to send in bug fixes or new features for the program. All the information for that is on the website.
Tutorials to get you started
Getting started with any new software is easier when there are great tutorials available. First of all, Jonathan has lots of great tutorials on his YouTube channel.
For example this one:
And this one:
Unfortunately, there aren’t many tutorials by other users, but this one is quite good about overlaying videos with OpenShot.
Last Thoughts
After testing OpenSource, reading the user guide and doing some editing tests, I have some last thoughts.
It’s definitely a plus that OpenShot is a cross-platform software which means that one video can be edited on the Windows version, the Linux version or Mac version.
The user guide is also pretty in-depth with all the documentation it provides.
A definite con is that you can’t make a square or vertical video or Instagram or Stories. I did find some fixes on Reddit for vertical videos though.
In terms of features, OpenShot is quite robust for being free. It’s no Adobe After Effects but it’s truly great free software.
Conclusion
With so many video editors available, it’s hard to know which one is the right fit for your needs. More often than not, the most influential factor is your budget, followed closely by what type of video you want to create. The best way to settle on a video editor is to try as many as possible. Why not try OpenShot?
Let us know what you think after taking it for a spin.
Featured Image via ProStockStudio / shutterstock.com


I was looking for a good video editor, and then while searching I saw your blog and honestly downloaded this tool and used it. I really loved this tool and would definitely recommend to others. Thank you for your review on this tool.
After reading your comment, I wanted to try DaVinci Resolve. After down loading the file for Linux, I started install on two Linux laptops. The install went without a hitch on both laptops. While it started up on the Linux Mint laptop, the program would not run on Ubuntu Studio. While Resolve opened in Linux Mint it would not load mkv files and could not pull the video from an mp4 file. Conclusion? I will keep OpenShot running on my computers.
While I have not tried out OpenShot, I HAVE quite a bit of experience with four other professional-grade video editors, including Camtasia, PowerDirector, Premiere Pro, and DaVinci Resolve. Of them all, the winner by far in the power vs. pricing category is DaVinci Resolve. Their basic version, which up until just a few years ago sold to professional film production companies for more than $200,000, is now absolutely FREE. To verify this, read up on articles about Grant Petty, their CEO. To put icing on the cake, they have an outstanding set of free PDF manuals to teach you how to use it. Ever since the film industry moved from actual film to digital production, DaVinci Resolve has been the industry go-to for color correction and color grading. They now also have integrated motion graphics and 3D graphics and a complete DAW (digital audio workstation) at no additional charge. By contrast, Adobe uses three different applications to accomplish the same thing. If you are on a budget, but truly want some awesome power and have the motivation to spend time learning the program, you should look closely at BlackMagic’s DaVinci Resolve.
yea
You’re missing the point, those are big proprietary commercial products with lots of money and power behind them, openshot is a free open source project.