
Audacity is one of the top audio editing apps available today. Part of the reason for that, is that it’s free to download and use because it’s open source. The other part is that it’s powerful and fully capable of putting together professional audio just as well as Adobe Audition or Apple’s Pro Tools. Regardless of your experience as a podcaster, knowing how to edit a podcast in Audacity is a skill you’ll want to work on. We want to walk you through the basics of the program, and also show you some best practices so that your audio is as crisp and clean as anything else you pipe through your headphones from a major studio.
Subscribe To Our Youtube Channel
Getting Started Learning How to Edit a Podcast in Audacity
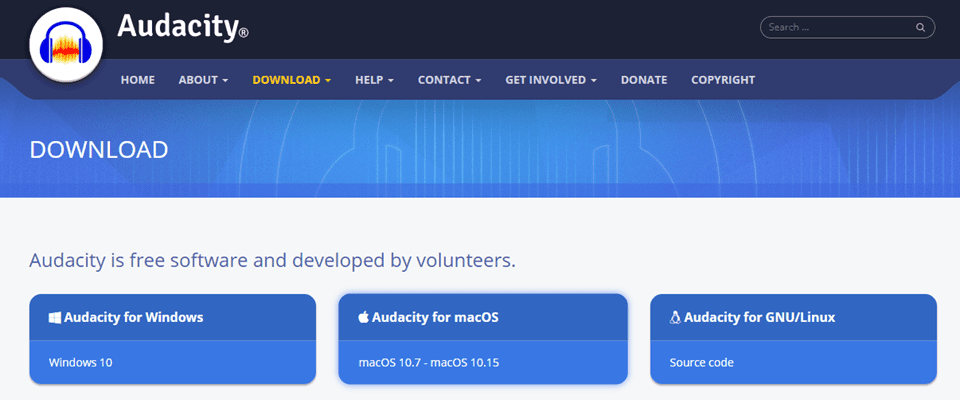
Regardless of your platform, Audacity has a release for it. The developers consistently update the clients for Mac, Windows, and Linux, which is also another benefit to using this one over a different audio editor. You will have the same options and same UI regardless of where you’re working. If you’re a podcaster on the go, that’s a pretty fantastic perk.
The installation process is simple for each OS, and when you boot the program up for the first time, you are presented with the same interface, regardless. It may look a little cluttered and chaotic, but it’s actually very efficient and convenient once you’re used to it.
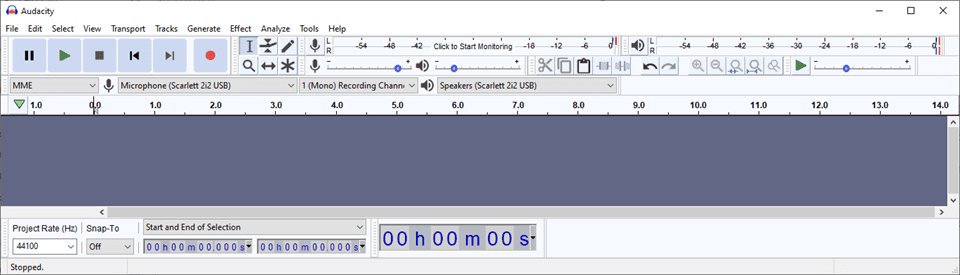
Most of the major features you need are in sight, and the menu structure for Audacity is surprisingly intuitive. Open-source software is not always the most user-friendly, and the Audacity team has really improved on that over the years.
The Basics
We’re going to be covering quite an array of features for how to edit a podcast in Audacity, but we’re going to start out with the basics that we feel everyone should know before moving into the more advanced parts of podcast creation such as eq, noise reduction, and that sort of thing.
Open vs Import
Just briefly, we want to touch on the difference between the Open command and the Import. When you choose File – Open, you are opening a new instance of that file. Any time you use Open, a new Audacity window will appear with that file’s waveforms in it.
Import on the other hand, brings that file into the current window as an additional track (or tracks).
And as an added bonus, if you happen to use the wrong one, no worries. You can copy/paste waveforms and tracks between instances of Audacity.
Choosing Mono over Stereo
You may be asking yourself, why would they be telling me to use mono tracks over stereo? Which is a valid question. While stereo may sound better in most cases, the answer is that mono and stereo don’t matter nearly as much with podcasting and spoken audio in general. Bitrate matters the most.
If you’re doing a highly produced podcast with sound effects and music, stereo may be the way to go with a higher bitrate. But for most people with a single mic who are interviewing someone else with a single mic, mono tracks work really well.
When you’re looking at the main DAW (digital audio workstation) for Audacity, you will see a dropdown menu that lets you choose the number of recording channels.

Choose to set 1 (Mono) Recording Channel as the default, and you’re good to go. Now, whenever you press the record button, it will be mono unless changed.
Additionally, when you add a new track to the recording, you can choose 1 or 2 channels.
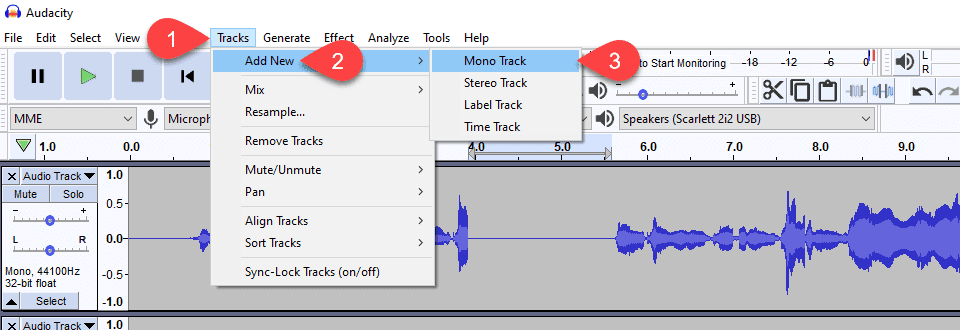
Just go to Tracks – Add New – Mono Track.
Splitting a Stereo Track
If you’re given a stereo track and you need to make it mono, that’s very simple. All you have to do is click the arrow drop down on the track itself.
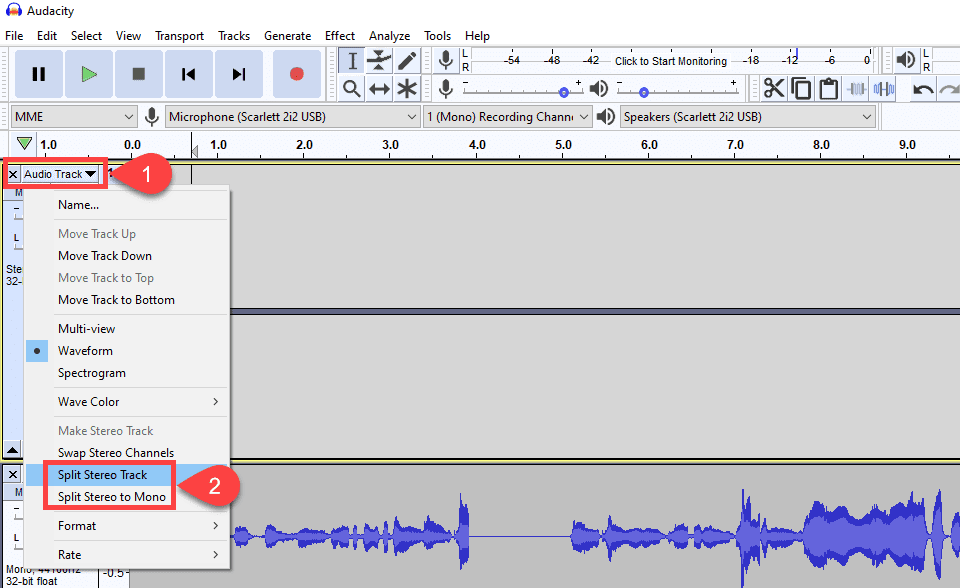
Then you have the option to Split Stereo Track or Split Stereo Track to Mono. While these appear to do the same thing, they’re actually quite different. When you choose Split Stereo Track, that just takes the two different sides of stereo data and pulls them apart. You still have full access to the entire waveform as it was recorded on both the left and right side. It will be designated as a Left or a Right track, with the audio panned to that side, respectively.
When you choose Split Stereo Track to Mono, you are actually summing those tracks into a single piece of audio and panning it to the center. You can read an incredibly in-depth guide to summing and the mono vs stereo debate in the NPR handbooks for podcast and audio producers.
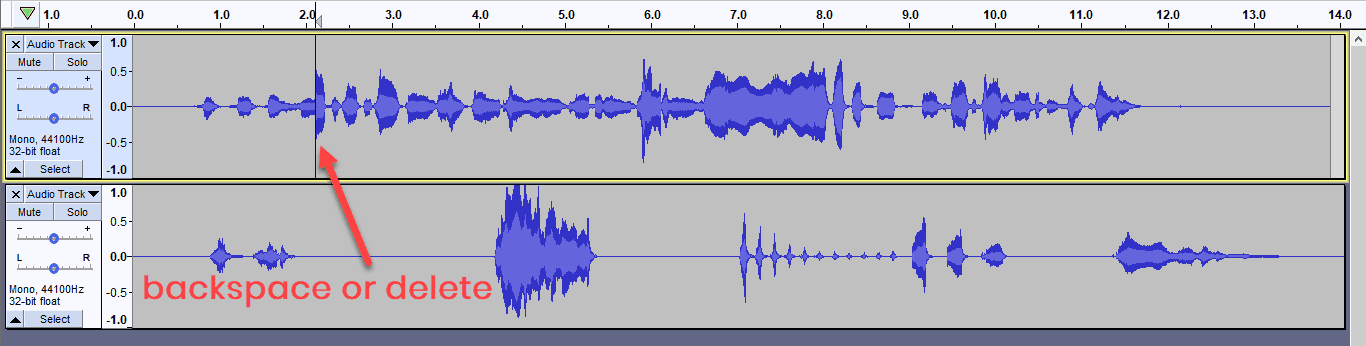
Deleting a Section of a Waveform
The single most common actual edit you’re going to make to an audio file in Audacity is deleting part of the waveform. And doing so is incredibly easy and simple, too. All you have to do is click and drag the selection you want to remove.
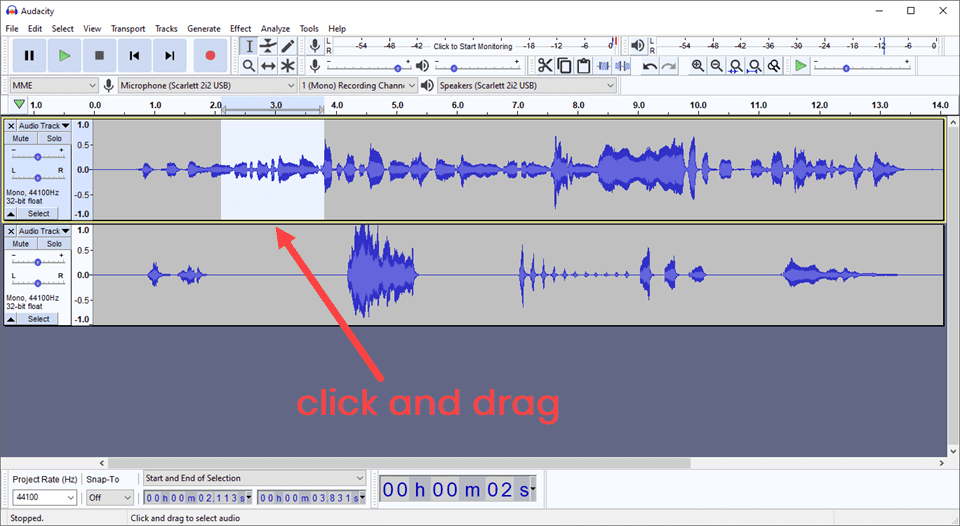
Then you just press backspace or delete, and it’s gone.
Now keep in mind that when you delete a section from a single waveform, the length is adjusted accordingly. When you have a single track, that’s just fine. But when you have two, such as from two separate hosts or a host and a guest, that means that audio that once did not overlap, now (probably) does.
So there are two solutions to this particular issue.
Solution 1 – Cut Both Tracks Simultaneously
The first is simply to drag your cursor into the second waveform to keep the timestamp selections lined up.
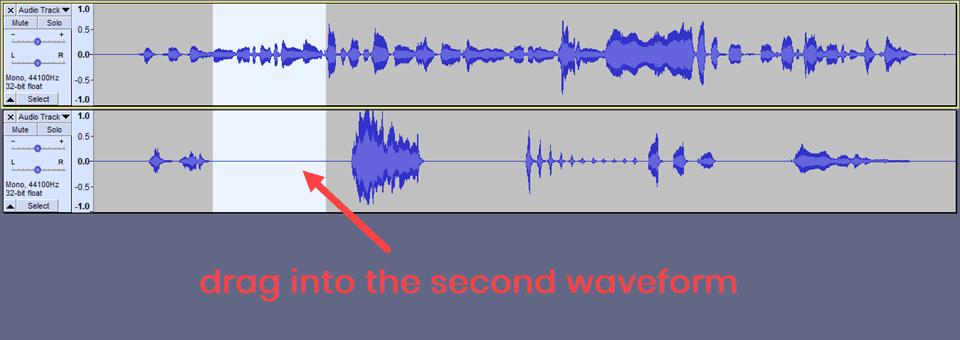
When you delete the section of audio, you delete it from both tracks, maintaining their length and not overlapping any audio.
Soltution 2 – Sync-Locked Tracks
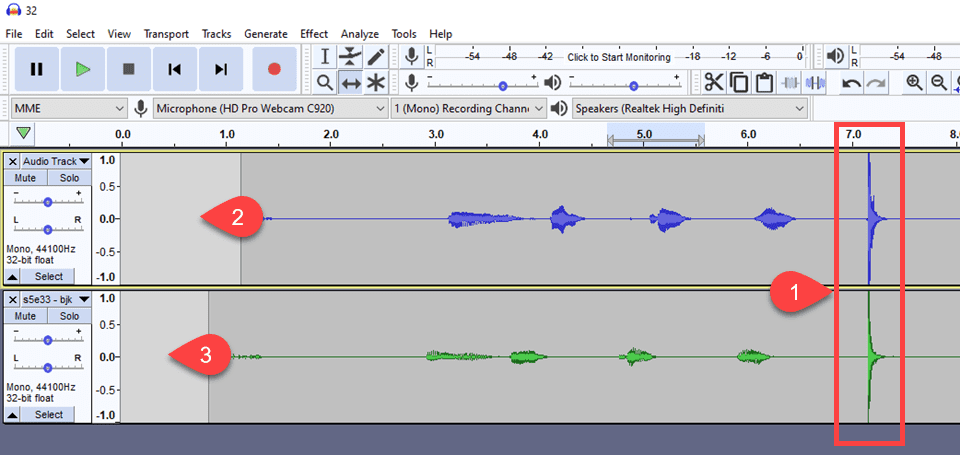
It’s incredibly easy to think you’ve dragged into the second or third track, but you haven’t. By time time you get to the end and start mixing, you realize the audio has drifted irrevocably, and you have to start over. It’s a nightmare. Thankfully, some of the newer releases of Audacity have a feature called Sync Locking. And it is glorious.

Under the Tracks menu, toggle Sync-Lock Tracks on. Then, when you select any section of a track, you will automatically select the same segment from another track. Regardless of whether you dragged your cursor into it or not.
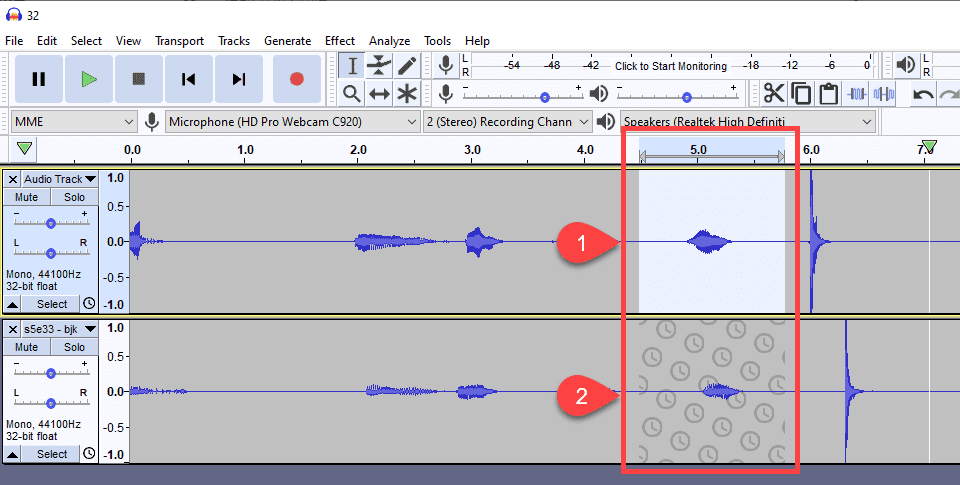
As you can see, the sync-locked tracks are indicated by an underlay of clock icons. They work differently, though, than a simple highlight. As you can manipulate the timestamp for any synced tracks, but the same action does not always apply. For instance, applying an effect such as normalization, noise reduction, or generating silence will only apply to the original track, not the synced ones. But deleting a portion will delete from all synced tracks simultaneously.
Manipulating sync-locked tracks is a much more powerful tool than just this, and the Audacity documentation shows how to use the tool across multiple track groups.
How to Generate Silence in a Track
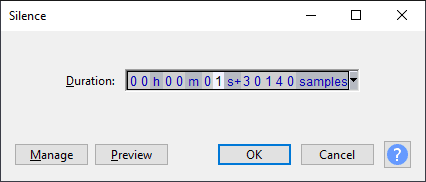
Speaking of generating silence, sometimes you want to add some time to breathe (literally) in your audio. To add that dead air in to a track, just place your cursor where you want the empty silence to begin. Select Generate from the menu and click Silence. You can also highlight a section of any number of waveforms that you want, and it will replace any audio within that selection with silence.
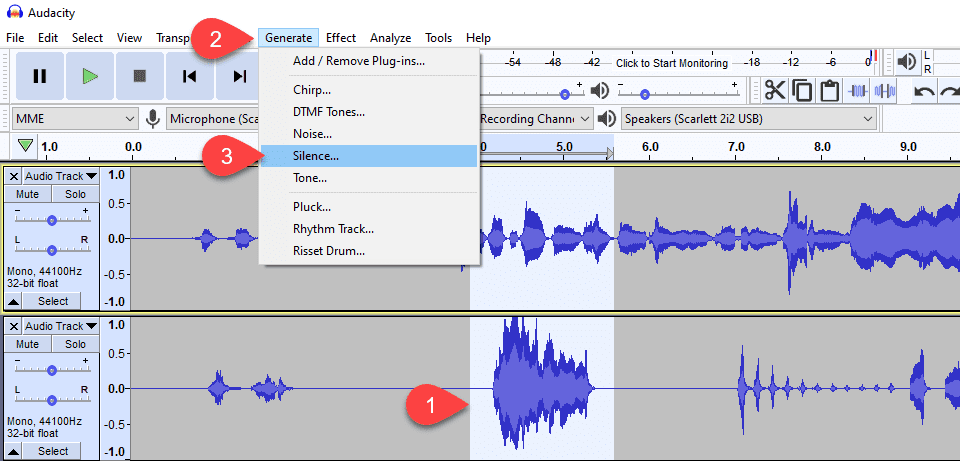
The amount of silence will be pre-filled out based on the highlighted section. If you didn’t select a section, you can simply type in the length you want to add.
And when you press OK this time, instead of whatever filled that space on the track, it’s dead air.
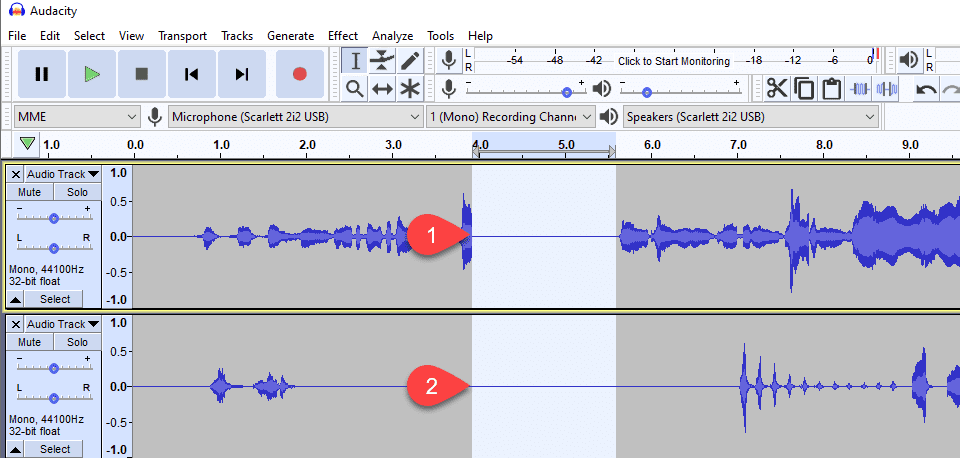
This is a good method to use, too, if you want to just edit out a little audio without worrying about track sync or audio drifting out of sync. Because you can generate silence over audio to replace it, it’s a safer method than simply deleting part of a waveform.
How to Edit a Podcast Using the Time Shift Tool
The time shift tool can be accessed by either pressing F5 or selecting its icon in the quick menu. It is represented by the double-sided arrow.

What this tool does is let you move a track in its entirety up or down the timeline. The audio is not adjusted, only shifted. This tool is useful in making sure that everything is lined up with your audio tracks. A good practice is for all participants who have their own tracks perform a countdown-then-clap to make sure things are synced up with all tracks.
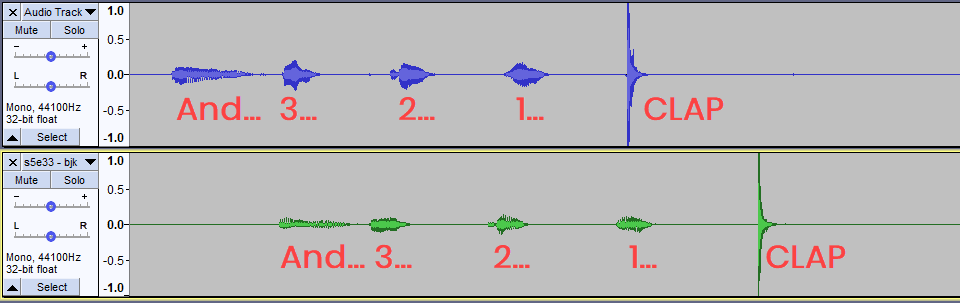
Using the time shift tool is the best way to then make sure the audio is precisely lined up where it goes.
Note that while the claps are now lined up, the audio before is not. That’s okay. It will either be silenced or deleted. Additionally, note the beginning of the tracks. Even though they no longer align, they are functionally silent where there is no waveform at all.

More than likely, however, you will be sync-locking the tracks and deleting the audio anyway.
How to Edit a Podcast’s Intro and Outro Music
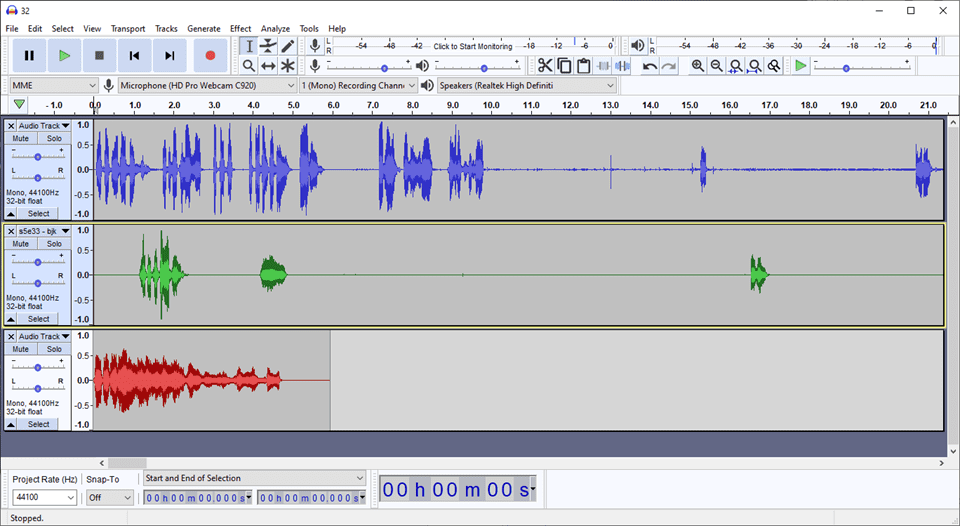
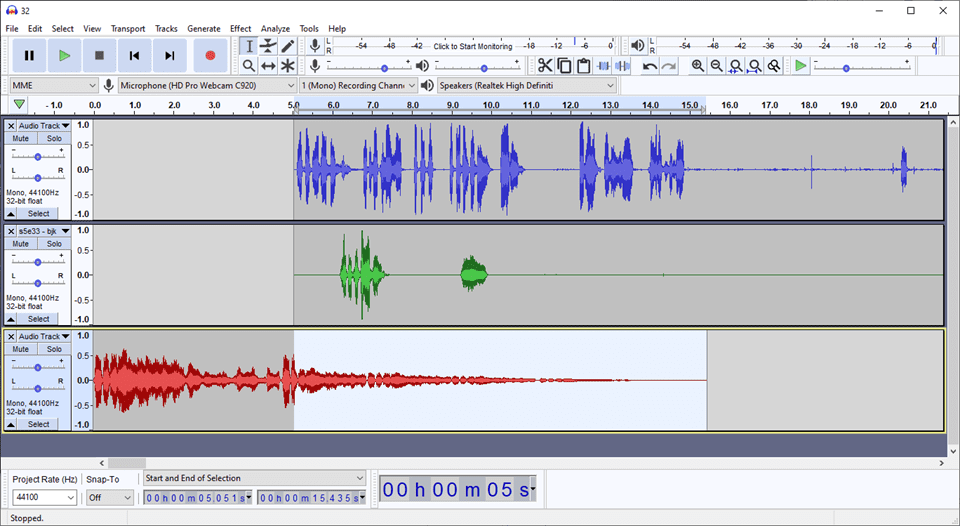
One of the last basic elements of learning how to edit a podcast is adding in the music and sound effects. It’s actually pretty simple to do, though it can be a little intimidating at first. To begin with you will want to create at least one extra track than your voices. So if you have two tracks, one for you and one for a guest, then you need to have a third (at least) for intro/outro music. If you already have the music saved as a separate file, just use File – Import to add it in as a separate track.
If not, you can hit CTRL-V (or CMD-V) if you want to paste it in from a different track or instance of Audacity. You will probably see something similar to this when you’re ready.
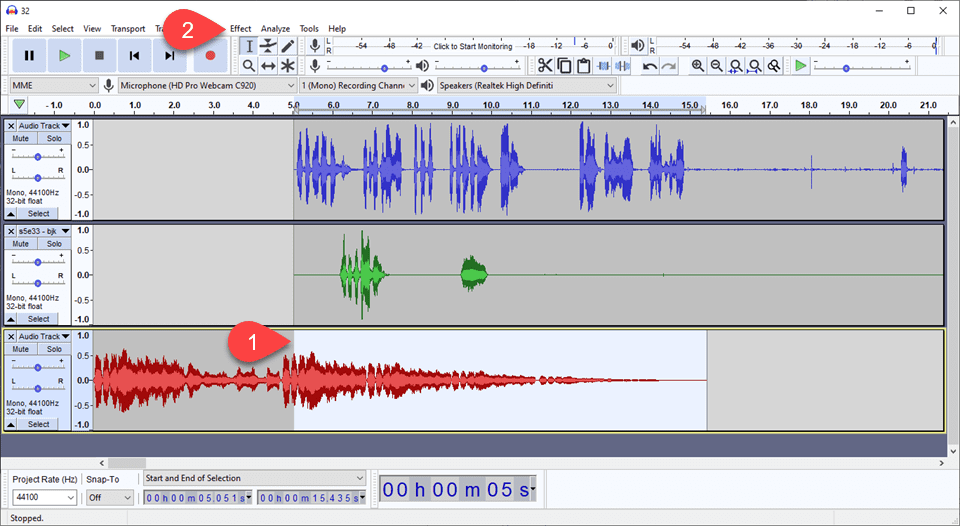
We use the time shift tool and the amplify and fade in/out effects to do this. First, we want to shift the beginning of our speech enough to let the intro music play uninterrupted.

Now, we want our voices to overlay the music as it fades out, instead of just immediately stopping. Then, we highlight the portion of the music we want to fade out, beginning where our voices start. We have found that the best amount of music before voices start is 5 seconds because if you have a pre-roll add and someone fast-forwards through it, your voices have a little bit of a buffer before they get clipped.
Once you’ve shifted the audio, choose Effects – Fade Out from the menu.
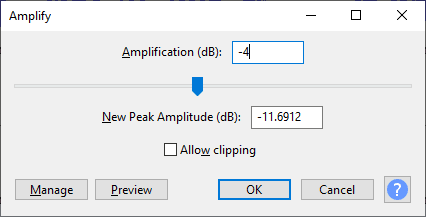
You can apply Fade Out more than once to the same portion, if the first fade doesn’t get it to the level you want. If the song is still too loud, we can go into the Effects menu again and select Amplify here, too. The Amplify tool, as we will discuss below, is not only for increasing volume, but also reducing it. We tend to reduce a fade out effect by -4 db in this case.
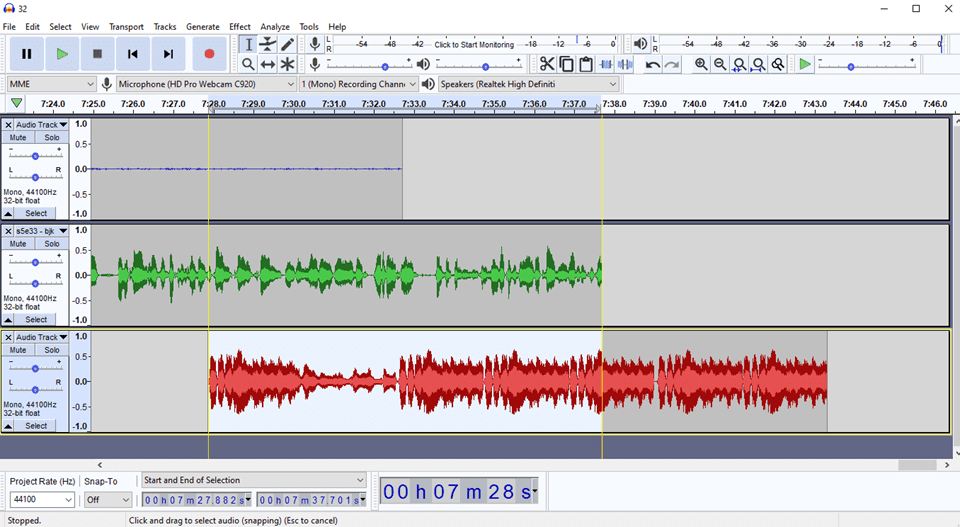
Afterward, the waveform for the music should look like this and sound great, like a quick voice-over as the intro fades out and then right into the show.
The Outro
The outro music is pretty much the same, only in reverse. You will either paste or import the music and time-shift it to line up with the ends of the other audio tracks.
Then use Effects – Fade In on the highlighted portion. For outro music that plays under your voice, we like 10-15 seconds.

This indicates the end of the episode is coming, that you might have some interesting information to wrap up with, and gives your listeners enough time to grab their device and get ready to select the next podcast in their queue. Nothing is worse than something autoplaying that you don’t want autoplaying. Indicating you’re finishing up is just a nice thing to do for your listeners.
Advanced Editing Tips and Tools
Outside of the basics we’ve covered above, there’s a lot that Audacity does to not only let you edit the audio in terms of content, but also quality. You have access to a ton of effects and various tools that can increase the quality of your podcast as much or more than any cutting and time adjustment will. To really know how to edit a podcast, these are essential.
We do suggest using the majority of these coming tips and tools on each podcast you edit so that you maintain a consistent sound quality.
Use Presets
In many cases, Audacity comes with a lot of default settings that work well enough. For new folks learning how to edit a podcast, those will be enough. However, once you get a little more comfortable, you’ll find settings that work for you as you tweak them here and there. Or you will find a whole preset solution for equalization or leveling that you want to use each and every time.
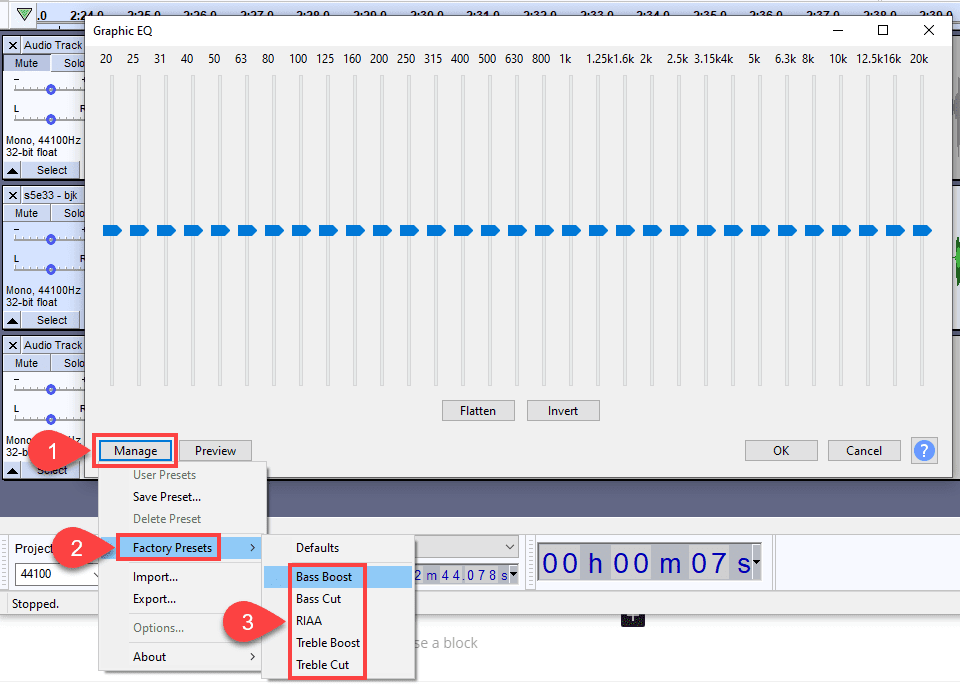
Under most of the effect windows, you will find a Manage button.
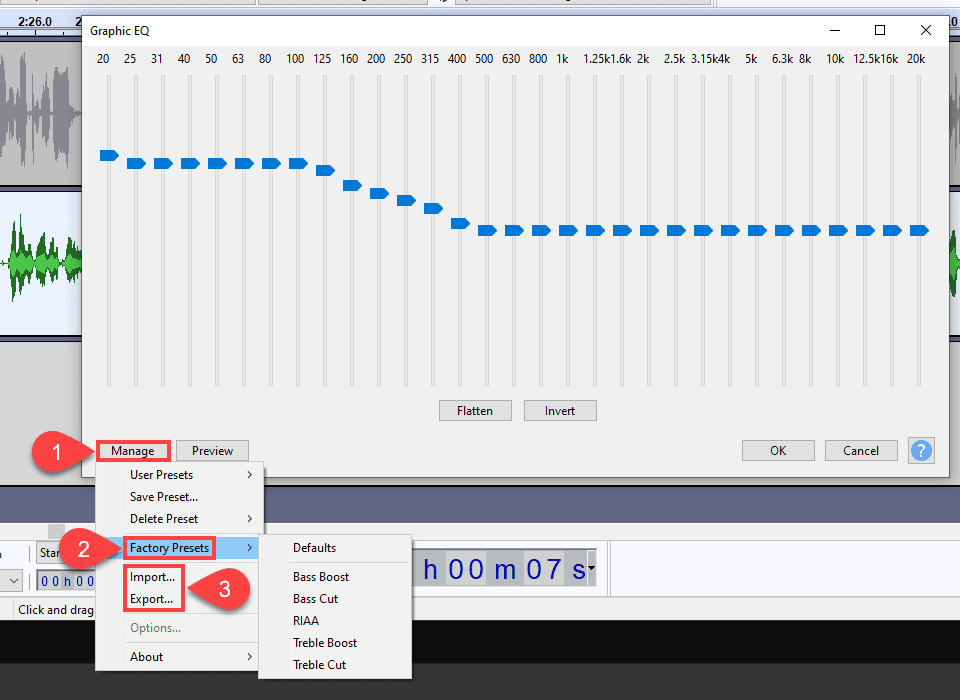
Under that, you will find the Save Preset which does just what it says. You find any that you save under the User Presets for later use. If there are other presets aside from the default, they will be listed under the Factory Presets option, and then Import and Export are fairly straightforward.
Outside of the ones that you set yourself, various websites have them for download so that you can import presets and get to editing immediately.
Noise Reduction
One of the most useful tools for any podcast editor is noise reduction. It won’t get rid of ummms and ahhhs from you or your guests. But it will get rid of some grunts, wheezes, and breath sounds, if used correctly.
The primary function, however, is to remove background noise from your audio track. Like a fan in the background or keyboard typing while you’re recording. Or something else that just hums all the time. Like a neighbor who mows their lawn every Tuesday night at the same time you’ve choose to record your podcast for nearly 5 years. (Oddly specific, right?) These kinds of noises typically show up as a long, low-peaked part of the waveform. (Especially when you compare them to speech or music.)
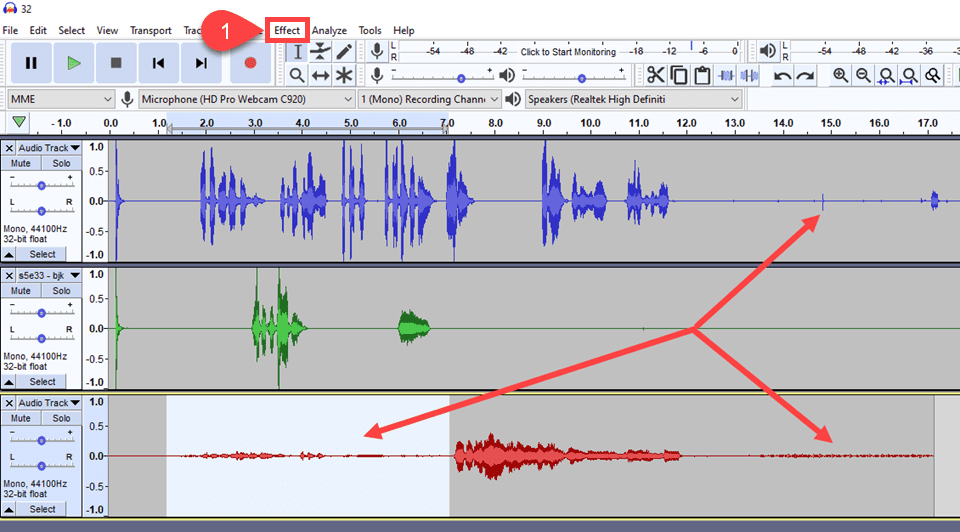
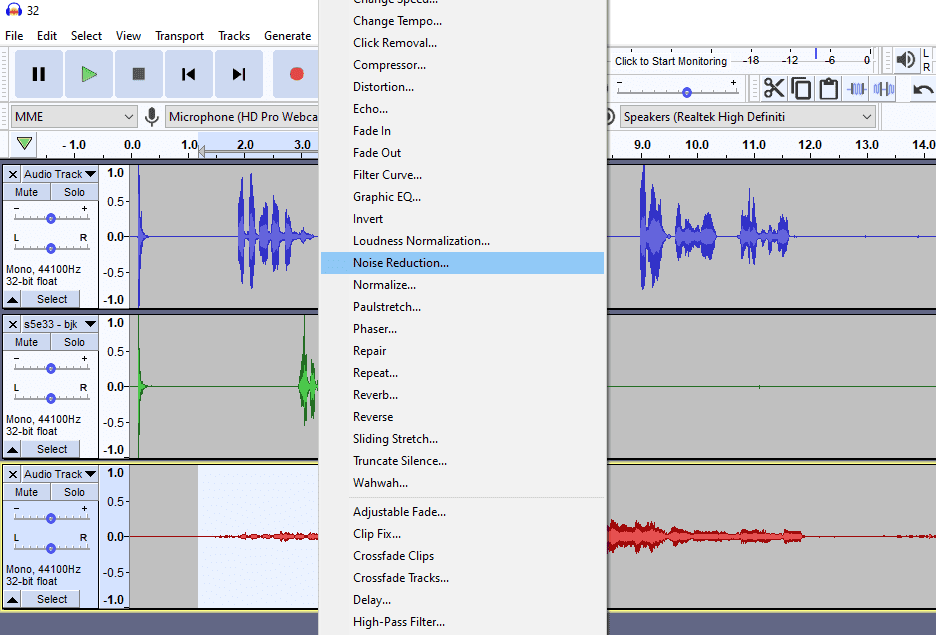
To use the Noise Reduction tool, simply highlight one of the sections of that you want to muffle and reduce, as shown in the image above. Then, go to Effect and find Noise Reduction from the hilariously long list of effects that appears. (We cut about 1/3 of the effects off for the screenshot below from a 1920×1080 screenshot. That list is long.)
Now, you will be creating the Noise Profile for the sound you want to remove. Just click the button to create the profile from whatever part of the waveform you have highlighted. If nothing is highlighted, you get no profile.
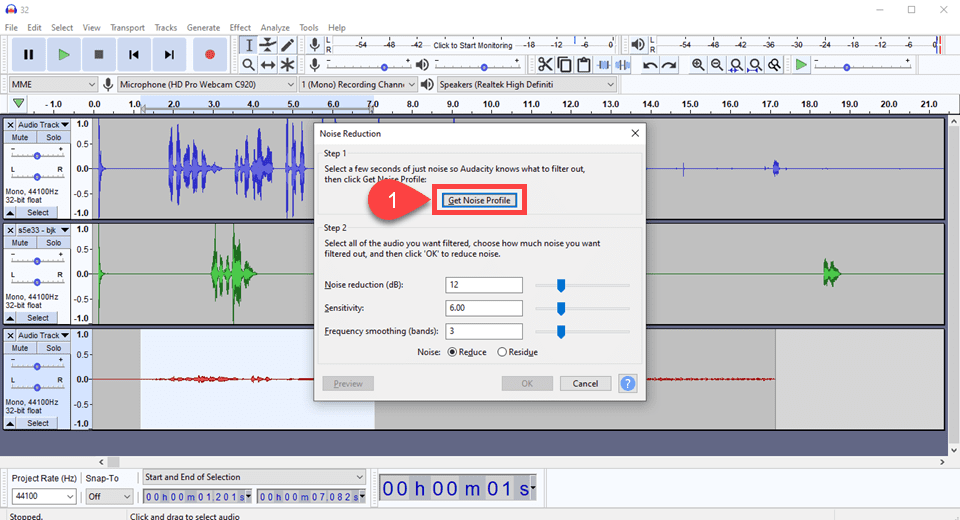
After that processes, you’re still not done yet. You need to select what part of the track you want to apply that noise profile to. Or in different words, which part of the track you want to reduce the noise in. For the most part, we highlight the entire track and apply the noise profile unilaterally. Just don’t apply the profile more than twice to any area of the track. It loses a massive and noticeable amount of quality after that.
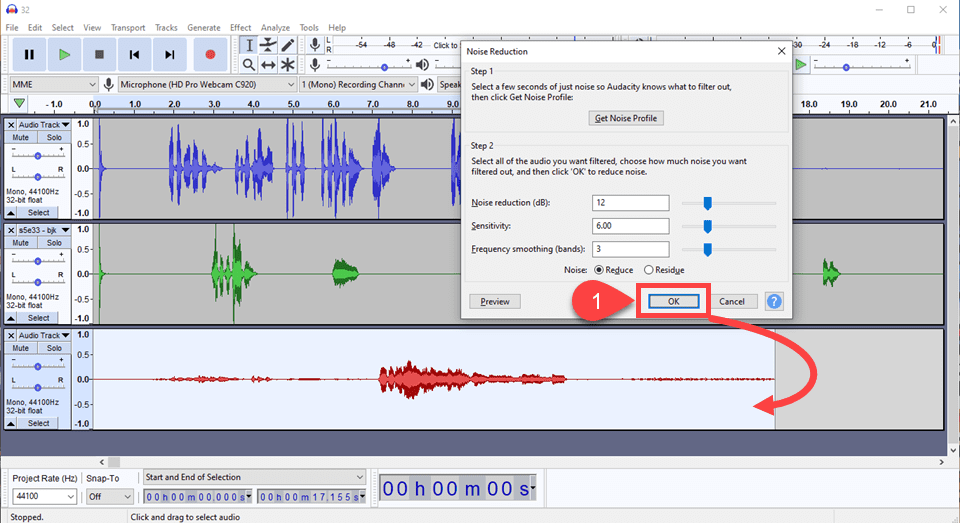
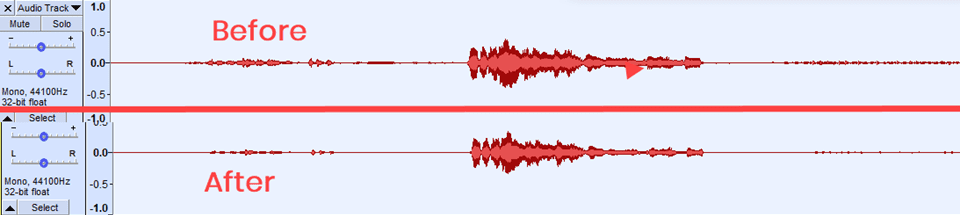
Once you run, you will see a noticeable difference in the size of the waveforms. The process reduces the noise profile across the board.
How to Edit a Podcast’s Track Volume
Okay. Let’s take a second and say that this part is complicated. And for untrained audio engineers, the concepts are eerily similar. However, the actual science behind them is quite different, even though they’re all used to adjust the volume of a part or the whole of a track. This is the best one-shot breakdown of them we’ve seen:
Amplify: Amplify will increase the volume of the section you choose. It will do this even if it is beyond the clipping range of the track. Obviously this should only be used when you have a very quiet track and you know that raising the volume won’t clip.
Normalize: This is very similar to amplify, but will correct DC offsets in your track. Normalize also allows you to set the maximum amplitude. For a comparison, see here
Compression: This is a whole new beast. There are entire books written on compression, but in a nutshell what this does is make the loud parts quieter and the quiet parts louder. This allows you to reduce the total dynamic range of the audio and will in most cases create an effect of the sound being louder.
Amplify
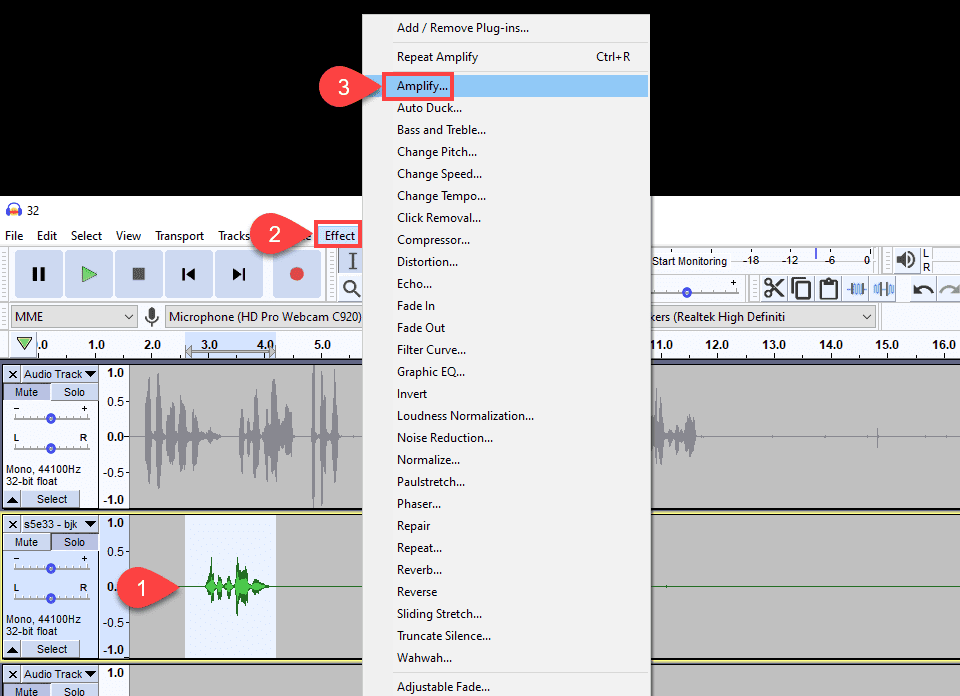
In our experience, using Amplify has rarely been worth it for an entire track. The increase or reduction is fantastic when you need to spot-edit. But when you’re working on the track as a whole or a finished product, avoid Amplify. When you want to change a certain part of your track’s volume, you just highlight that section, and go to Effect – Amplify.
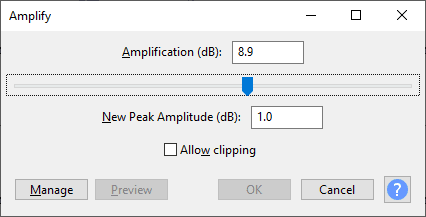
Then choose the amount you want to amp it up or down (in decibels).
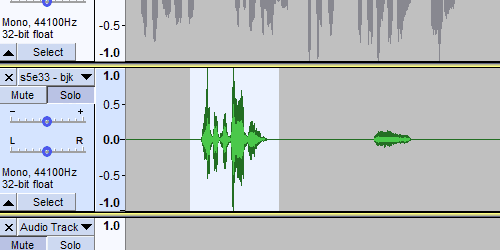
And voila! You’ve made that part of the waveform much louder (and in the case of this example, horrible to listen to).
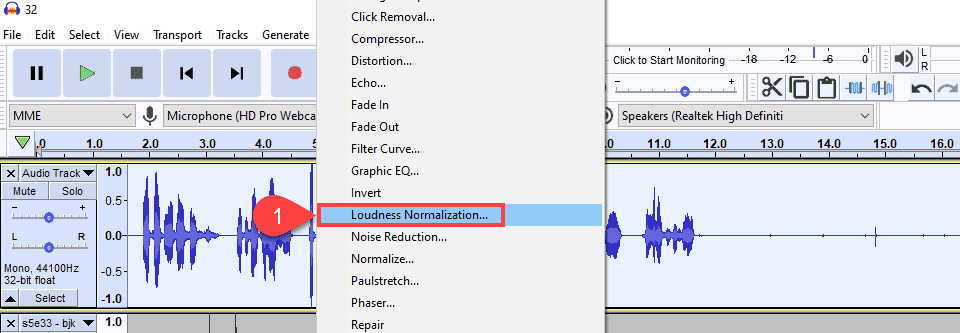
Loudness Normalization
For many of you, you’ll be using loudness normalization the most. In many cases, it’s the simplest and easiest way to get multiple tracks to be the same base loudness. This is done in LUFS (Loudness Units relative to Full Scale), and you want to aim for between -16 and -20 LUFS, according to the Audio Engineers Society. There is no hard and fast rule, but for years the standard was -16 LUFS for podcasts, so that’s what we’re going with here.
First of all, select the tracks you want to normalize to the same volume. Then go to Effect – Loudness Normalization.
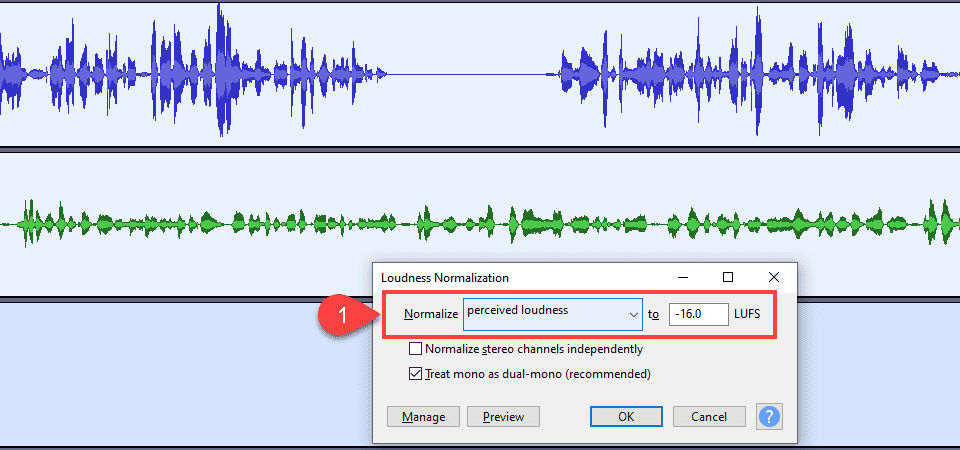
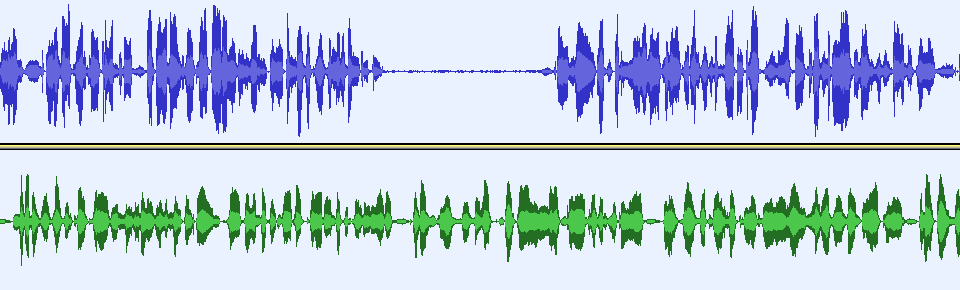
Then choose to set the desired level to -16 LUFS in the pop up.
And here are the same sections of the tracks after the -16 LUFS normalization:
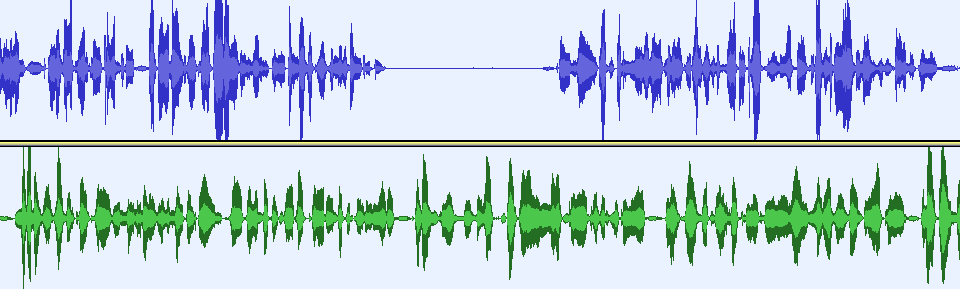
What this did, mostly, was bring the quieter one to the level of the louder track.
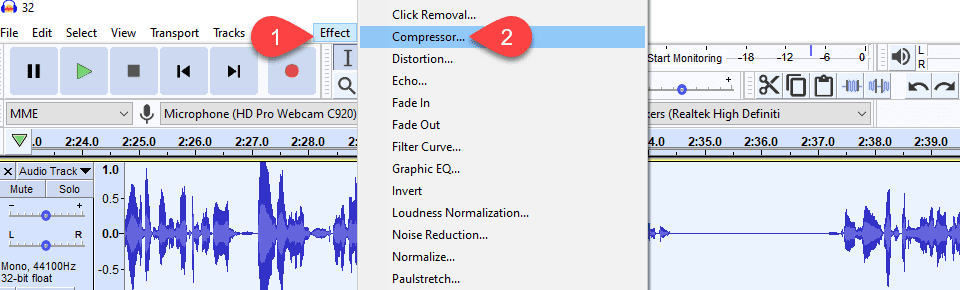
Compression
Now, arguably, compression is the tool that anyone learning how to edit a podcast should be using. It may be most effective to keep your sound leveled out. However, it’s a much more complicated tool than either of the others, and it takes a good long time to become an expert on compression. Begin the same way you did above. Highlight your tracks, then go to Effect – Compressor.
You then see this options panel:
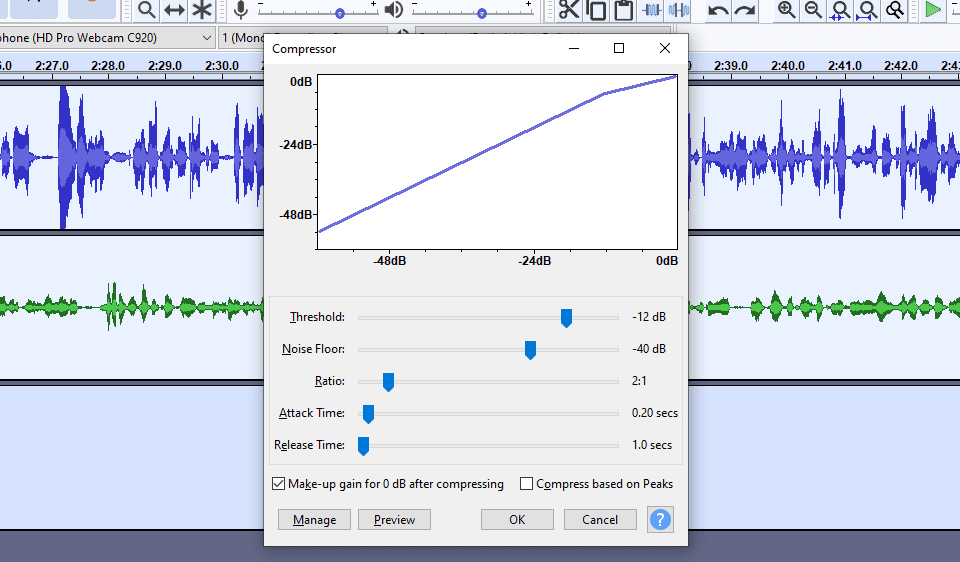
With just the default settings, this is what the waveform will look like. You can probably see this is a little more even than simply using the loudness normalizer.
The file leveled by the compressor sounds the best out of these three, we think, too. However, because of the one-size-fits-all nature of the compression, you might not have consistent results with your guests’ or co-hosts’ audio. Because of that, we recommend these tools.
Auphonic.com
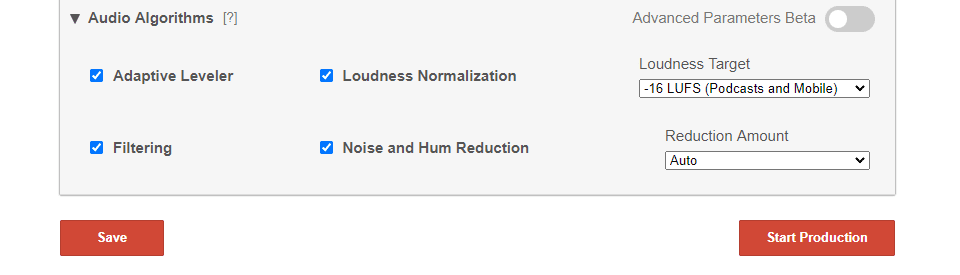
Auphonic is a noise reduction and leveler service that has made our lives so much easier. Just upload your file and check all the boxes at the bottom, and Auphonic will run a dynamic, algorithm-based compressor and normalizer on your file.
It has, in our experience, put out some incredibly high-quality files.
Chris’s Dynamic Compressor
A free plugin for Audacity itself, you can use Chris’s Dynamic Compressor. While it does technically have many more settings than the default Audacity compressor, The Audacity to Podcast has an absolutely wonderful tutorial on setting it up and how to get the most out of it. So if you want to learn more bout that, definitely give that episode a listen.
Equalization
Now, equalization (or EQ) is one of the most important aspects of knowing how to edit a podcast, and that’s why we’ve saved it until this deep into the post to mention it. Because it’s intense and important, and we wanted you to get the other stuff out of the way before diving in here. From the Audacity documentation itself on EQ, it’s…
…a way of manipulating sounds by Frequency. It allows you to increase the volume of some frequencies and reduce others. This is a more advanced form of the EQ and Tone controls on many audio systems.
As an example of equalization, the curve defined by the slider settings shown below changes the balance of high and low frequencies in the audio, boosting the low frequencies. The default setting is flat with all the sliders set at 0 dB.
The chart they mention is this:
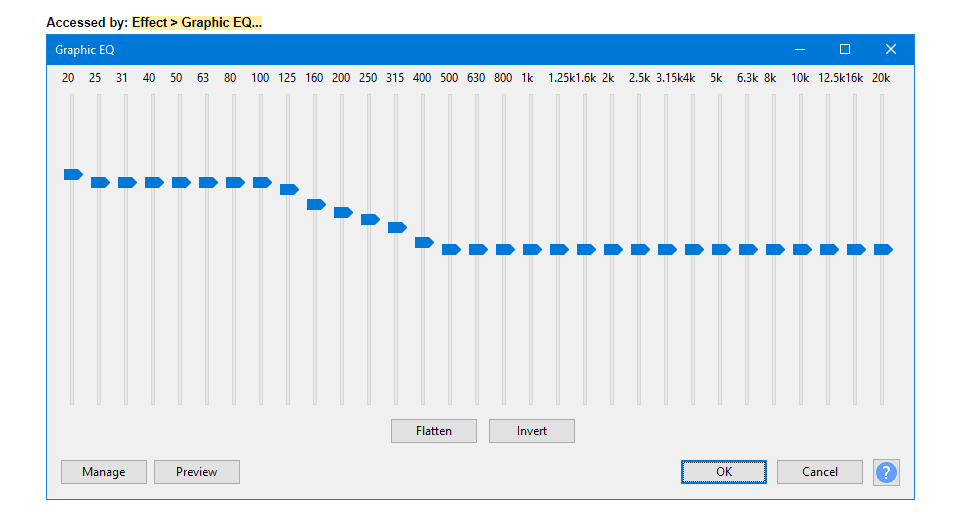
Like most of the other stuff in this section, you will find Graphic EQ under the Effect menu in Audacity. Just highlight the audio you need to equalize and click the menu item.
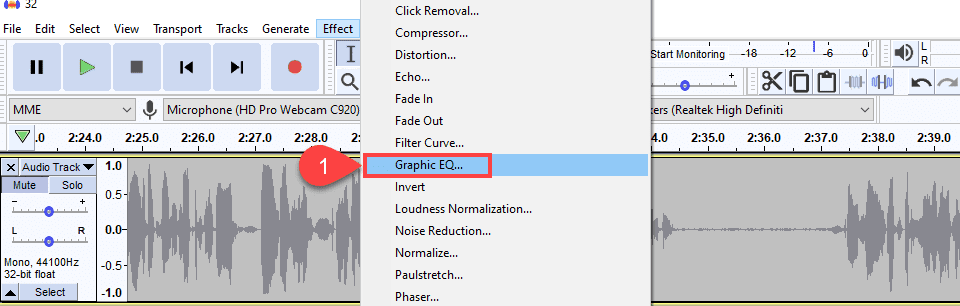
You’ll get a completely flat window instead of the curve, as pictured above. But you also have access to the Manage button, which contains the Factory Presets menu, where you can choose if you need to boost or cut the bass or treble, or even use the default RIAA standard EQ. The RIAA preset is intended for music, not spoken word. S keep that in mind.
While these presets may work for you, there is a good chance that you will need one specifically tailored to voice and spoken audio content. For instance, the RIAA preset looks like this:
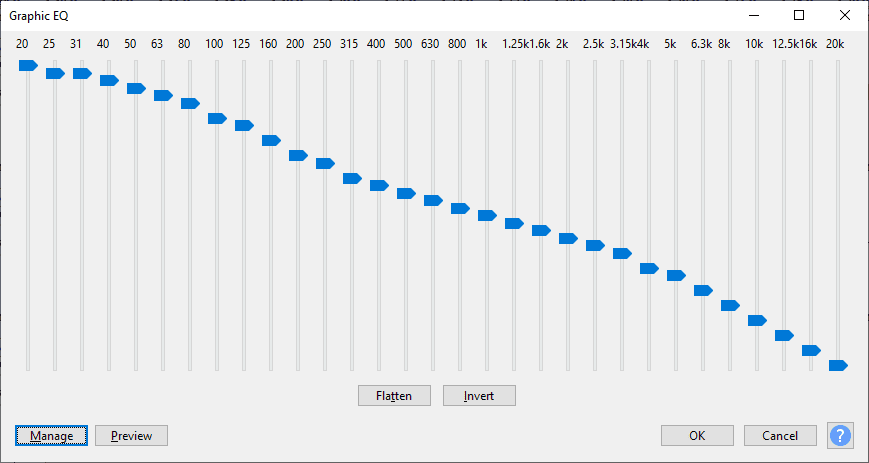
And this setting makes voice sound like it’s being spoken through a pillow. Same for the bass and treble boosts, honestly (at least for my own voice). After reading these two fantastic pieces on equalization, one from Techwalla and the other from Infinite JLB, this is the setting that made my own voice sound less muffled and far more clear.
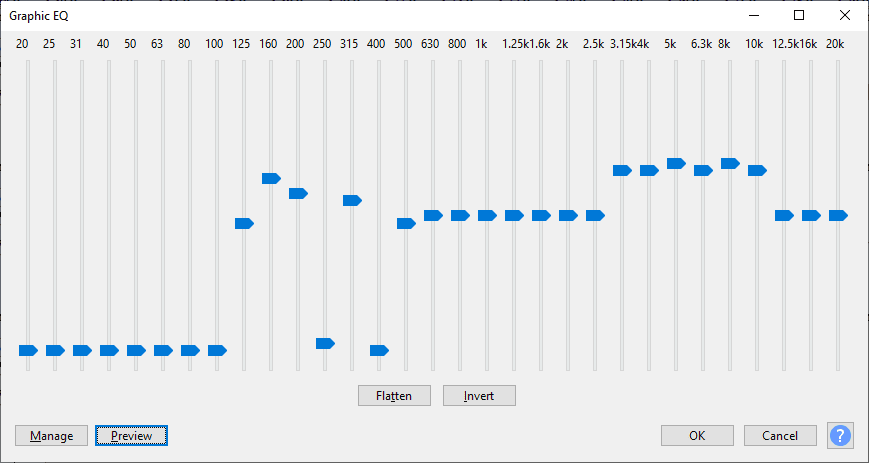
A bit different, huh? Basically, I used the left end of the graph to lowered the bass that was booming in the mic. The middle section boosts the clarity of spoken word just a bit. And then, on the right side, I boosted the treble in my voice just a little. My voice then sounded deep like it really is. It did not seem muffled by the mic filters or distance. The settings enhanced the treble in my voice so that it was clear and crisp through the speakers.
Once you’ve found a setting that works for you and your guests/co-hosts, save it as a preset under the Manage button so you can apply it each and every time.
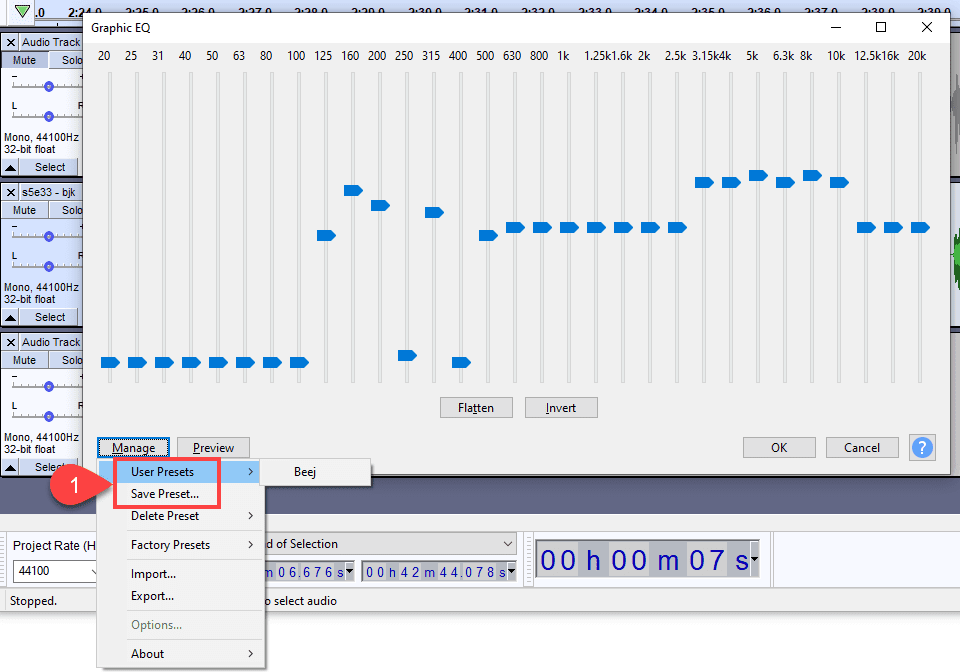
Just press Save Preset to give it a name, and it will show up under User Presets from then on so that you can select it as necessary. It may be a good idea to follow the advice from the links above to have different male, female, music, etc. presets to apply to different tracks.
Wrapping Up with How to Edit a Podcast in Audacity
As you can see, a lot goes into how to edit a podcast. From files to timestamps to equalization and leveling, hitting record is only the first step. Luckily, Audacity is an easy to use product, so it’s quick to pick up and learn. With it being free, you can tinker with it at your own pace, learning the ins and outs and best practices without feeling as though you have an investment to make the most of or a subscription period looming. Whether you’re just learning how to edit a podcast or simply looking to swap audio editing apps, we highly recommend Audacity. It really is one of the strongest pieces of open-source software we know of.
What does your workflow for editing podcasts look like?
Featured Image via Fleur_de_papier / shutterstock.com


Thanks so much for the detail of this post – really appreciate. I have been using Audacity a little for my podcasts and recordings and this post is useful for me to easily learn a few more tricks and settings. Thanks!