
For bloggers, it’s not just about words anymore. No, the multimedia aspect of the job is every bit as important as the writing. You can have the most eloquent prose in the world, but if your audience sees a wall of text, they’re likely not going to read it. Images and videos that supplement and break up your text not only make it so that your content is easier to consume, but also easier to understand. Even if you’re not a video creator, having basic image creation and editing skills can be the difference in a decent-enough post and a must-read one. Greenshot is an open-source image capture/editing app that lets even the least design-inclined content creator spruce up their content like a pro.
Subscribe To Our Youtube Channel
Greenshot: Open-Source and Loving It
At some point in a blogger’s tenure, they will have to capture and edit images. In the Old Days, we had to press Print Screen, open up MS Paint, then press CTRL-V to paste the copied screen into the (limited) editor. Tech has come a long way since then, and now there are a number of ways to capture, edit, and share screenshots. Life as a blogger and content creator has never been better, really.
Greenshot is part of the reason for this. While there are premium choices such as SnagIt and Camtasia out there, if you are on a budget or simply don’t feel as though you would get your money’s worth out of a premium product, Greenshot is likely going to be your best bet.
What Does Greenshot Offer?
As with any software, the features are what matter most, and after that, the ease of use. Greenshot offers pretty much every feature that its premium competitors do, but in our experience, the UX is a little lacking in comparison. However, when taken on its own and outside of the context of free vs premium, Greenshot is extraordinary.
The primary way people interact with Greenshot is via the context menu that pops up whenever you press Print Screen or any other special keybind that you set. Doing this will not only bring up the capture window, but also the menu.
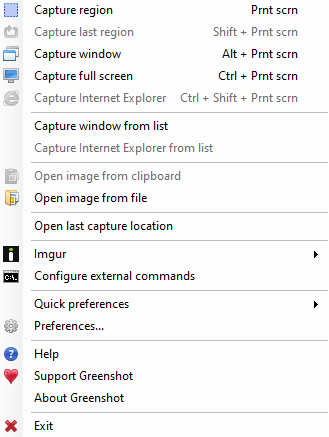
From this point, you get yet another context menu. The most common choice is likely going to be Open in Image Editor. However, either Save As and Save Directly will also get a lot of use, too. We should note that when using Save Directly, you will not have the option to choose the location or file name. As it says in parentheses, the preferred file output settings will be used and can be changed in your overall Greenshot preferences.
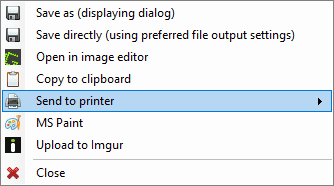
You can also see the Upload to Imgur option on the menu. During installation, you have the option of installing other sharing plugins such as Jira and Confluence.
The Greenshot Image Editor
As we said, the real meat-and-potatoes of Greenshot is the editor. You will spend the vast majority of your time poking around these menus.
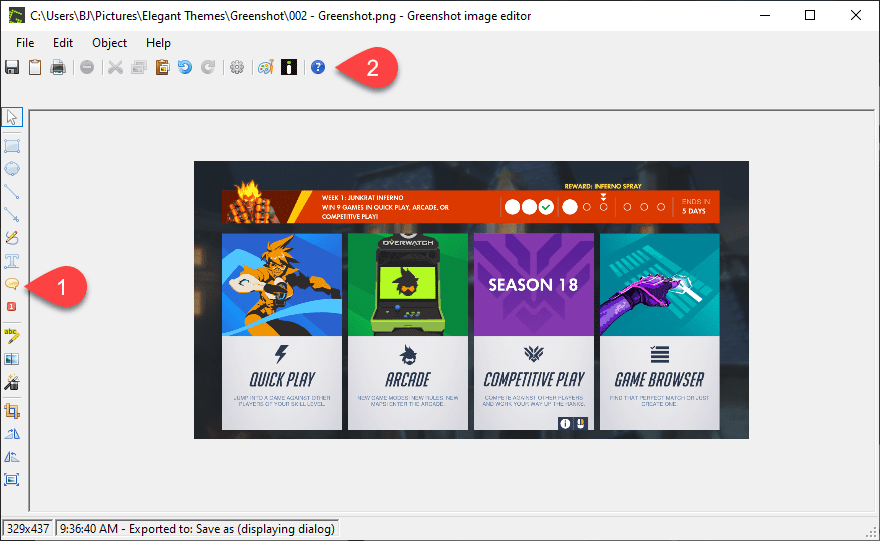
To the left of the editor are the tools you have access to within Greenshot, and the top hotbar are your traditional tools such as Undo, Print, Save, etc. The top of the left-hand hotbar are shortcuts to the most-used features (which can also be found under the Object menu because they are how you interact with the object you’ve captured).
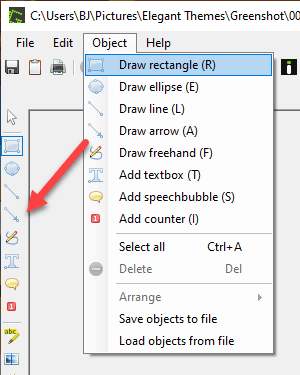
Object Drawing Tools
Most users who need a screencap app use it for one of three reasons (outside of actually capturing the screenshot):
- annotating screenshots
- cropping screenshots
- creating composite screenshots
Annotating screenshots comes in a wide variety of styles, but predominantly, bloggers who write tutorials and have need of them use shapes, lines, and arrows to indicate the important parts of images. Greenshot separates these into distinct tools, each nicely keybound to an easy-to-remember keypress.
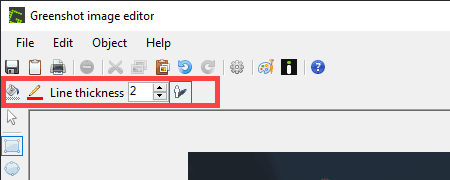
When anyone of these tools has been selected and used to annotate an image (as in the image above), a new toolbar will appear letting you control the fill color (transparent in the image above), the thickness of the exterior shape, color of the shape, and whether or not there is a drop-shadow (no, in the image above). The same options appear for all of the shapes and tools for Object manipulation.
Note that Arrow, Counter, and Speech Bubble also have options for start/end points, font size, font family, and/or alignment, respectively.

Counter is used for numbering, such as step-by-step instruction.
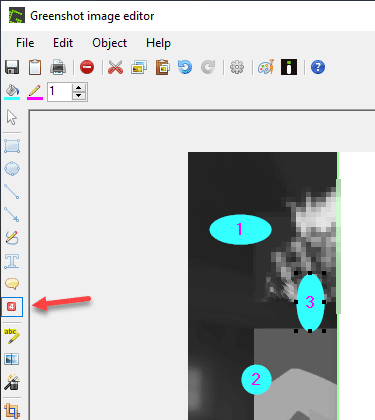
Each click gives you a larger number, and you can adjust the shape as you want within the circle/ellipse shape.
Additional Tools
Other tools that you will find useful as a blogger are at the bottom of the left-hand toolbar.
From top to bottom:
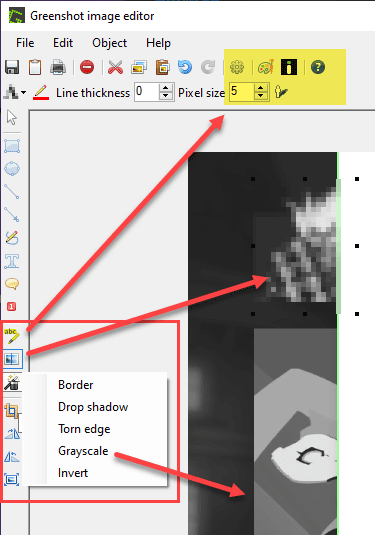
- Highlighter places a translucent color block over content you want to draw attention to
- Obfuscation is a blur/pixelization tool
- Effects is a menu of various styles you can apply to the image, both for coloring and decoration
- Cropping is just that: cropping the image down to a specific area
- Rotation turns the entire image
- Resize adjust the entire image’s size, not just a cropped area
These are equally important to the drawing tools above. Cropping and resizing are especially important for bloggers, and being able to obfuscate data and images is necessary when dealing with a lot of different kinds of content — such as those using copyrighted images, API keys, usernames and passwords, and so on.
Downsides
It should come as no surprise that you will need to make if you choose Greenshot over a premium screencap app. In general, they’re not that obtrusive enough to make you not consider using it. But we think they’re worth mentioning.
First of all, you must select the pointer tool to interact with a placed object. Meaning that if you place a text box and want to resize it, you must select the pointer tool first. Otherwise, you will create another text box. Same for counter and so on. Each successive click does not select the object, but instead places a new instance of the tool.
Secondly, Greenshot has no drag-to-select tool. This exclusion means that you can’t simply drag your mouse over an area to select it for copying/cutting or to select multiple elements within it. Those must be done with the pointer/crop tools. It’s not a bad thing, necessarily, but it does make the UX a little clunky.
In that same vein, you cannot select outside the image itself and drag in to start a shape flush with the edge. In SnagIt, if you were to need a shape that started in a corner or was flush with the edge of an image, you could drag slightly outside and into the image. The app starts to draw the shape as soon as the cursor moves into drawable space. That doesn’t happen in Greenshot. Many people may not miss this particular feature, but for those who use this particular method, it breaks the workflow.
Wrapping Up
Open-source software doesn’t get much better than Greenshot. Not only is it fast and stable, it’s free, too. Except for Mac, in which case it’s $1.99 because it’s on the App Store. If you’re a blogger and you do any kind of image manipulation at all, Greenshot is the way to go. And hopefully we’ve shown you that using it is simple and painless, and that you can find a powerful alternative to more expensive commercial apps.
What is your favorite thing about Greenshot?
Article featured image by defmorph / shutterstock.com


Greenshot is a great tool. I have been using it for a few years already. I like all of its features, especially the quick option to upload your screenshot to Imgur.
It does look like a good app but unfortunately they have no plans to create a version for Linux.
With the upcoming cessation of support for Windows 7 on January 14, 2020, perhaps an article on an open source Linux screen capture app would be good. My research indicates that anywhere between 39% and 50% of the World’s computers are using Windows 7.
Thanks for the post.
Great little program that I had not seen before. I particularly liked that you can bring the graphic so easily into other programs like the Office pack. I will dfinately explore this more. Thank you!