
Updating the design of a full layout pack sounds simple until you realize you have to change the same styles across five or six different pages. As these styles are applied as static values, even a small update, like changing the font or adjusting section padding, becomes time-consuming when done page by page.
But what if you could update all those repeated styles in just a few clicks? That’s exactly what Find And Replace does in Divi 5. Whether you’re swapping out fonts, replacing colors, or adjusting spacing, this feature helps you make layout-wide changes instantly. We’ll show you how to use it to clean up and restyle an entire layout pack.
What Is Find And Replace In Divi 5
Find And Replace is a feature in Divi 5 that lets you quickly update repeated style values across your layout. Whether it’s a font, a color code, padding, or even a shadow effect, you can now change that value once and apply it across multiple elements.
So, how does this actually work? It starts with any module in the Visual Builder. Hover over a style field like text color or font size, and you’ll see a three-dot icon. Click that (or right-click the field) and select Find & Replace.
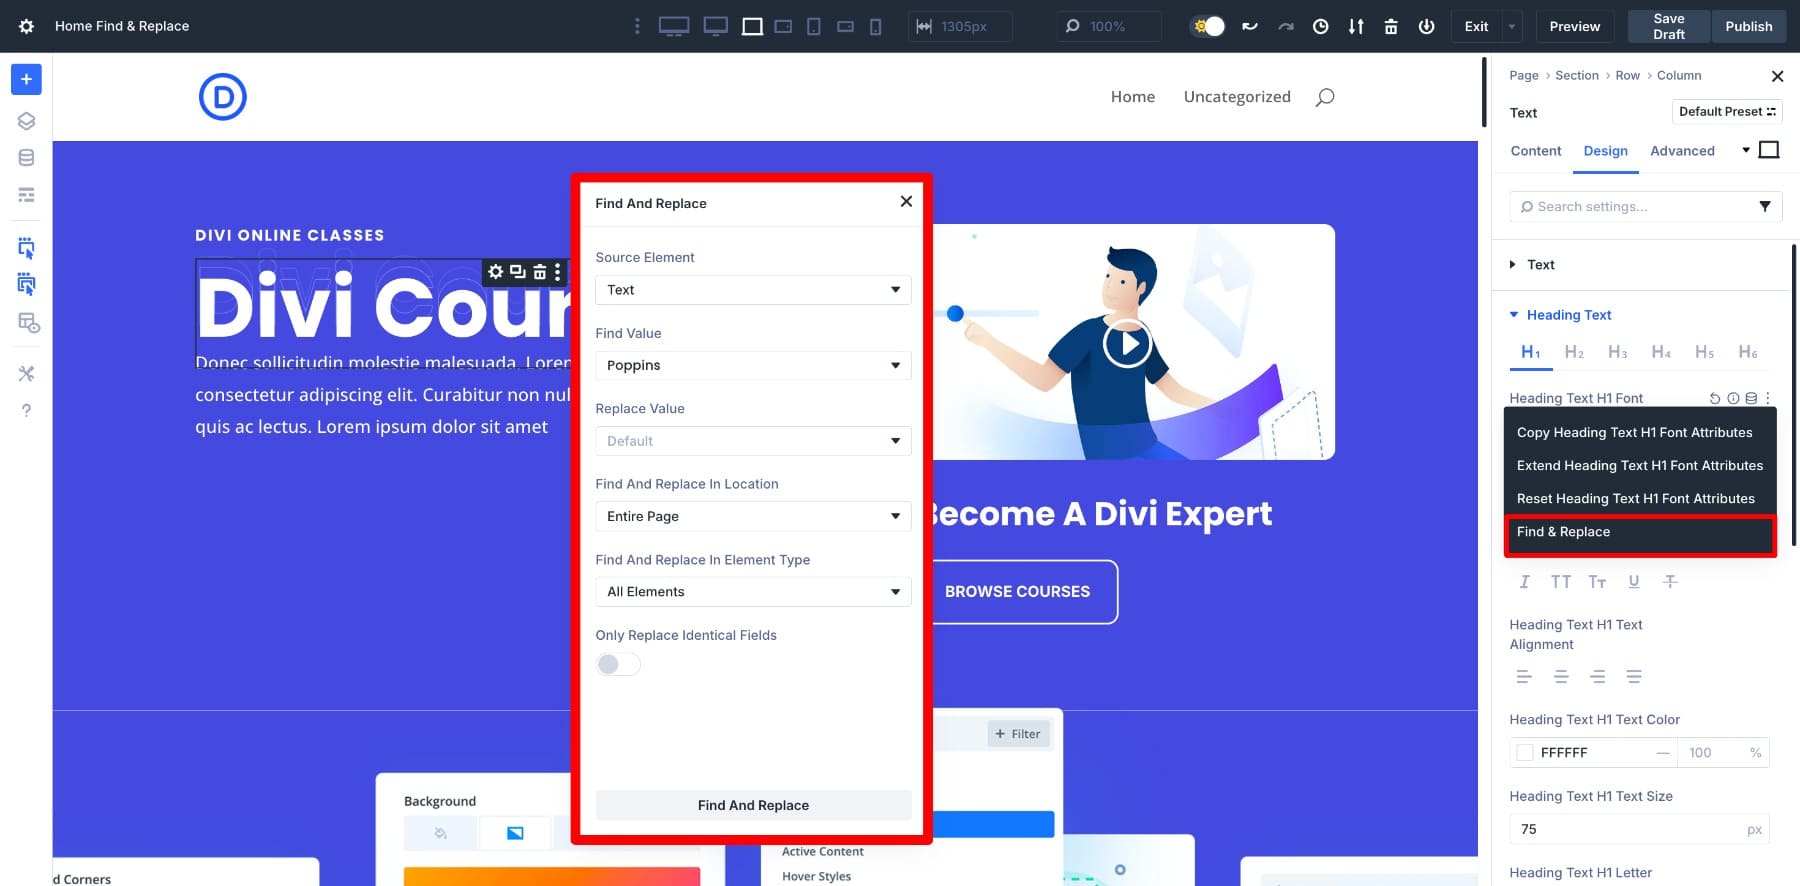
This opens a panel where you define what value to replace, what the new value should be, and where to apply the change. You can keep it focused on just that module, expand it to the entire section, or go layout-wide across the page.
Once you experience this workflow, you’ll understand why it’s such a helpful tool. Instead of hunting through dozens of modules to change the same color or font, you make one targeted update and watch it ripple across your entire layout in seconds. But to really unlock Find And Replace’s potential, you need to see how it works with Design Variables, which changes everything.
How Find And Replace Helps Update Layout Styles Faster
We’ll walk through two scenarios: first, a basic Find And Replace operation, then the same task using Design Variables (this one’s the secret weapon).
Using Find And Replace In Divi 5
The process is straightforward: trigger it from any style field, choose what to replace, and apply the change across multiple modules. Let’s walk through it with a real example.
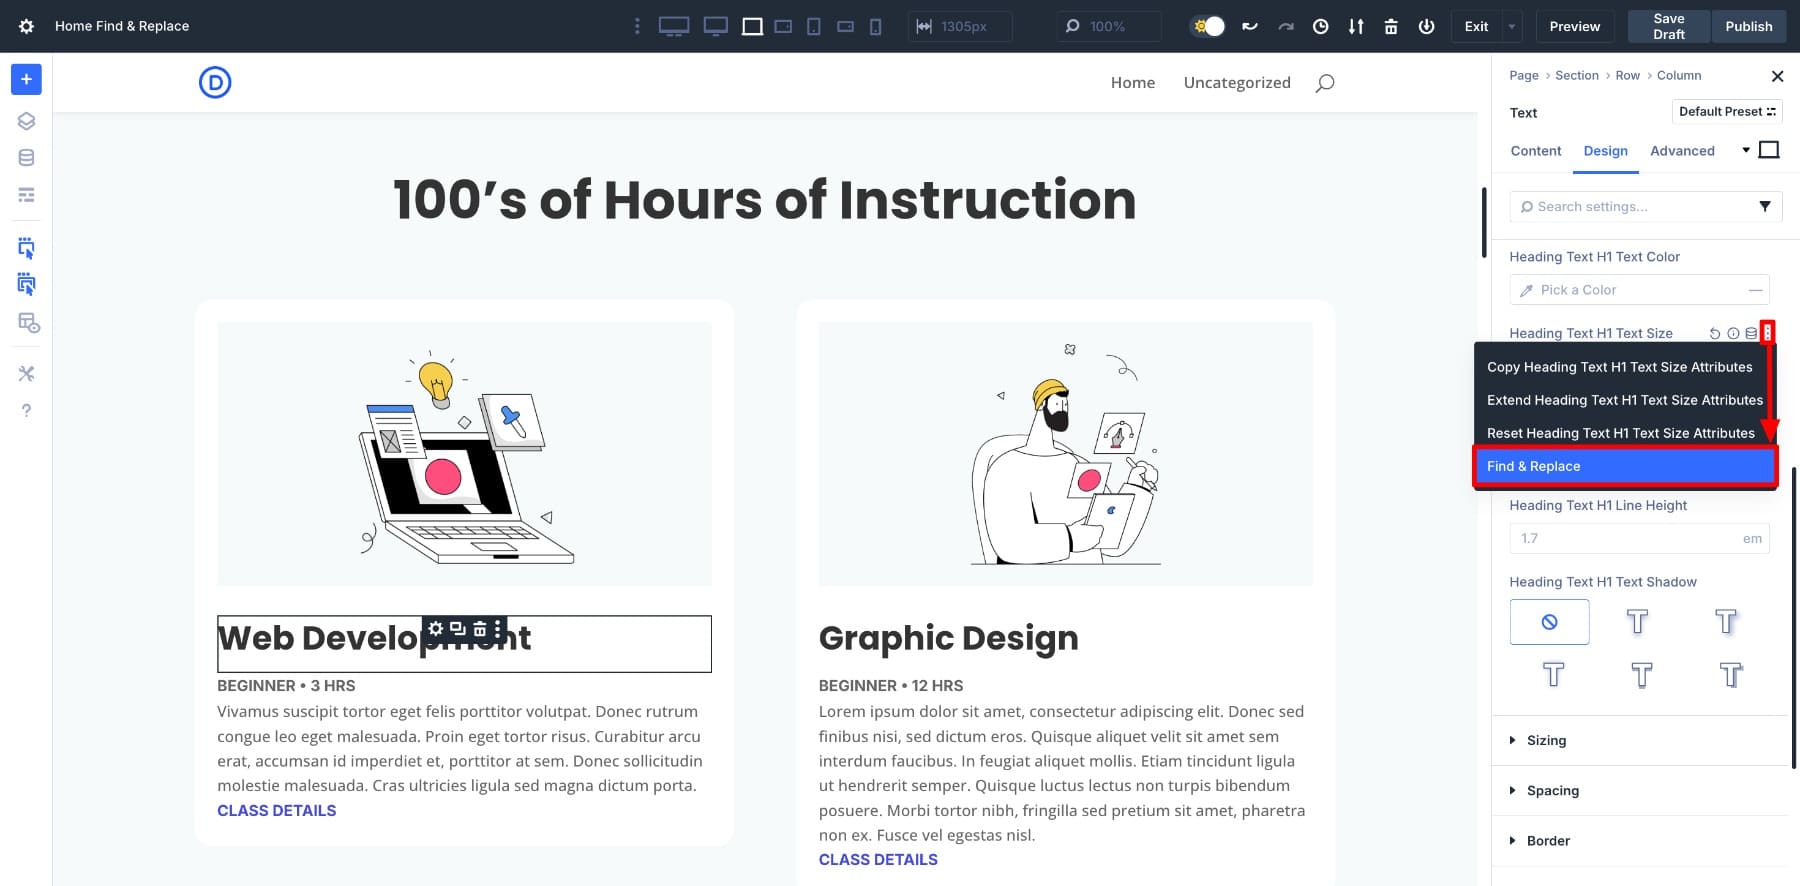
Say you want to increase the font size of all your page headings. Start by clicking on any heading module inside the Visual Builder. Go to Settings > Design > Heading Text > Heading Text H1 Font Size. Right-click or hover over to find the Find & Replace option among others.
This opens the Find And Replace panel with many options:
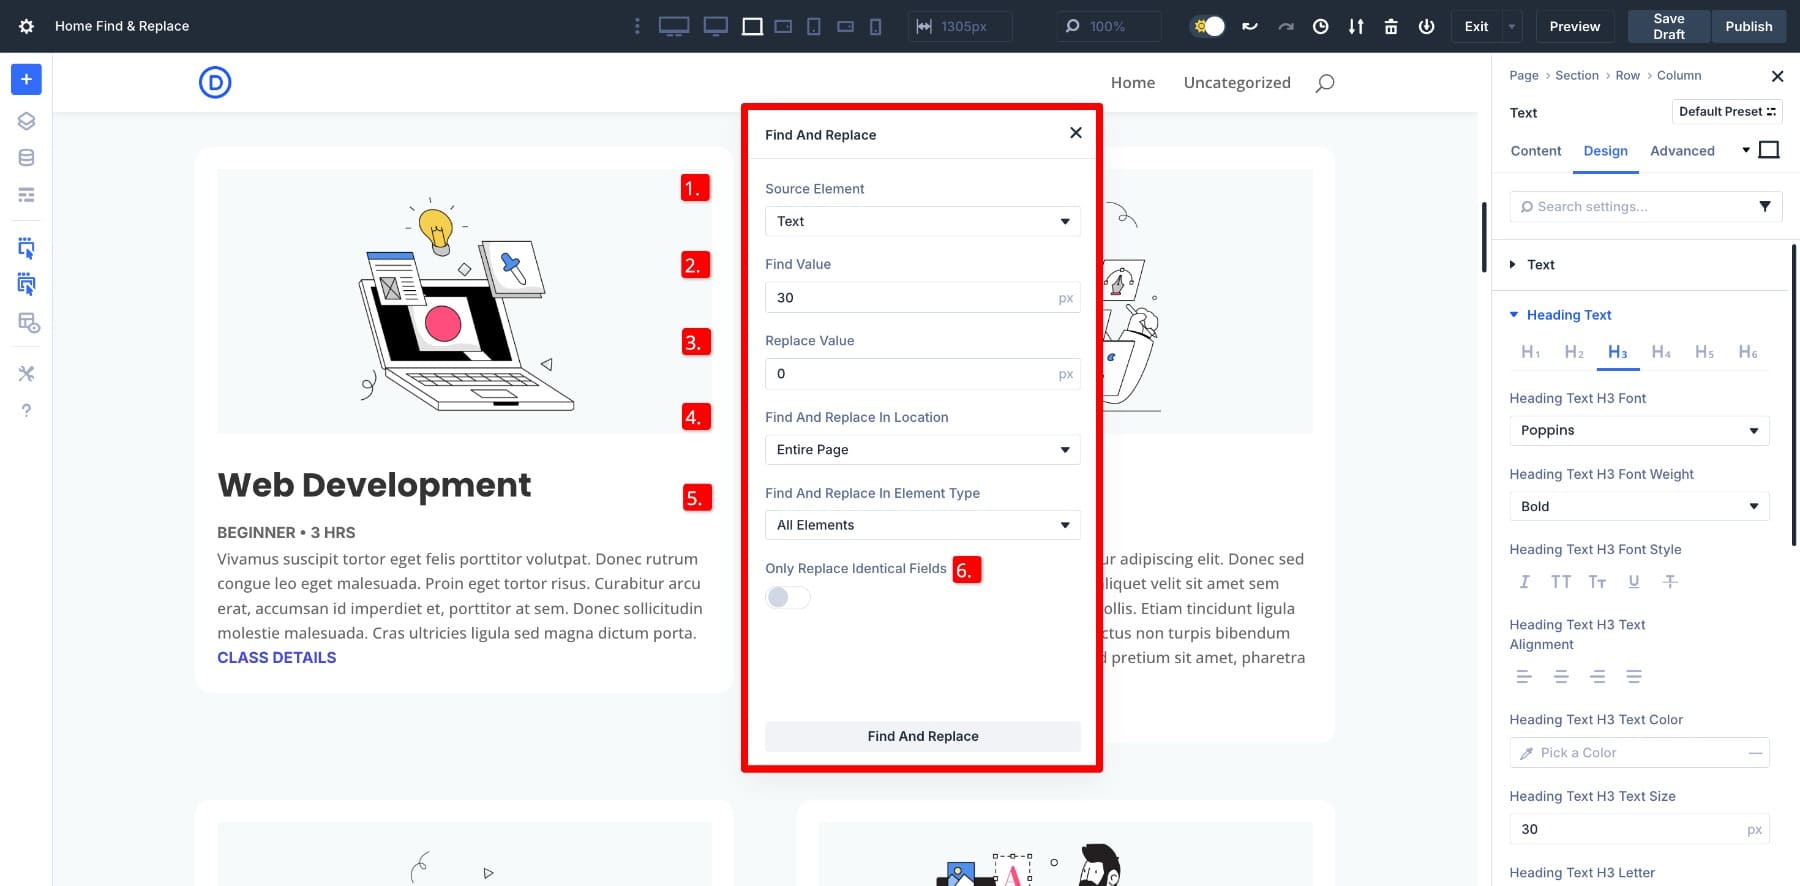
- (1) Source Element: This defines the setting you’re targeting, such as text size, color, or padding. It’s automatically selected based on where you opened the panel.
- (2) Find Value: The current value used across your layout. This could be a font size like 30px, a color code like #000000, or any other design setting. This gets automatically added.
- (3) Replace Value: The new value you want to apply. Divi searches for the matching value and replaces it with this one.
- (4) Find And Replace In Location: Choose where the change should be applied. You can limit it to a single module, its section, or the entire page.
- (5) Find And Replace In Element Type: Decide which modules the change should affect. You can apply it to all modules or only specific types like buttons, text, or blurbs.
- (6) Only Replace Identical Fields: Turn this on to update only fields that exactly match the find value. This helps avoid accidental changes to unrelated elements.
For example, we’re replacing the font size from 30px to a fluid clamp(20px, 4vw, 50px). We’ve selected Entire Page and All Elements since we want to update all headings on the page.
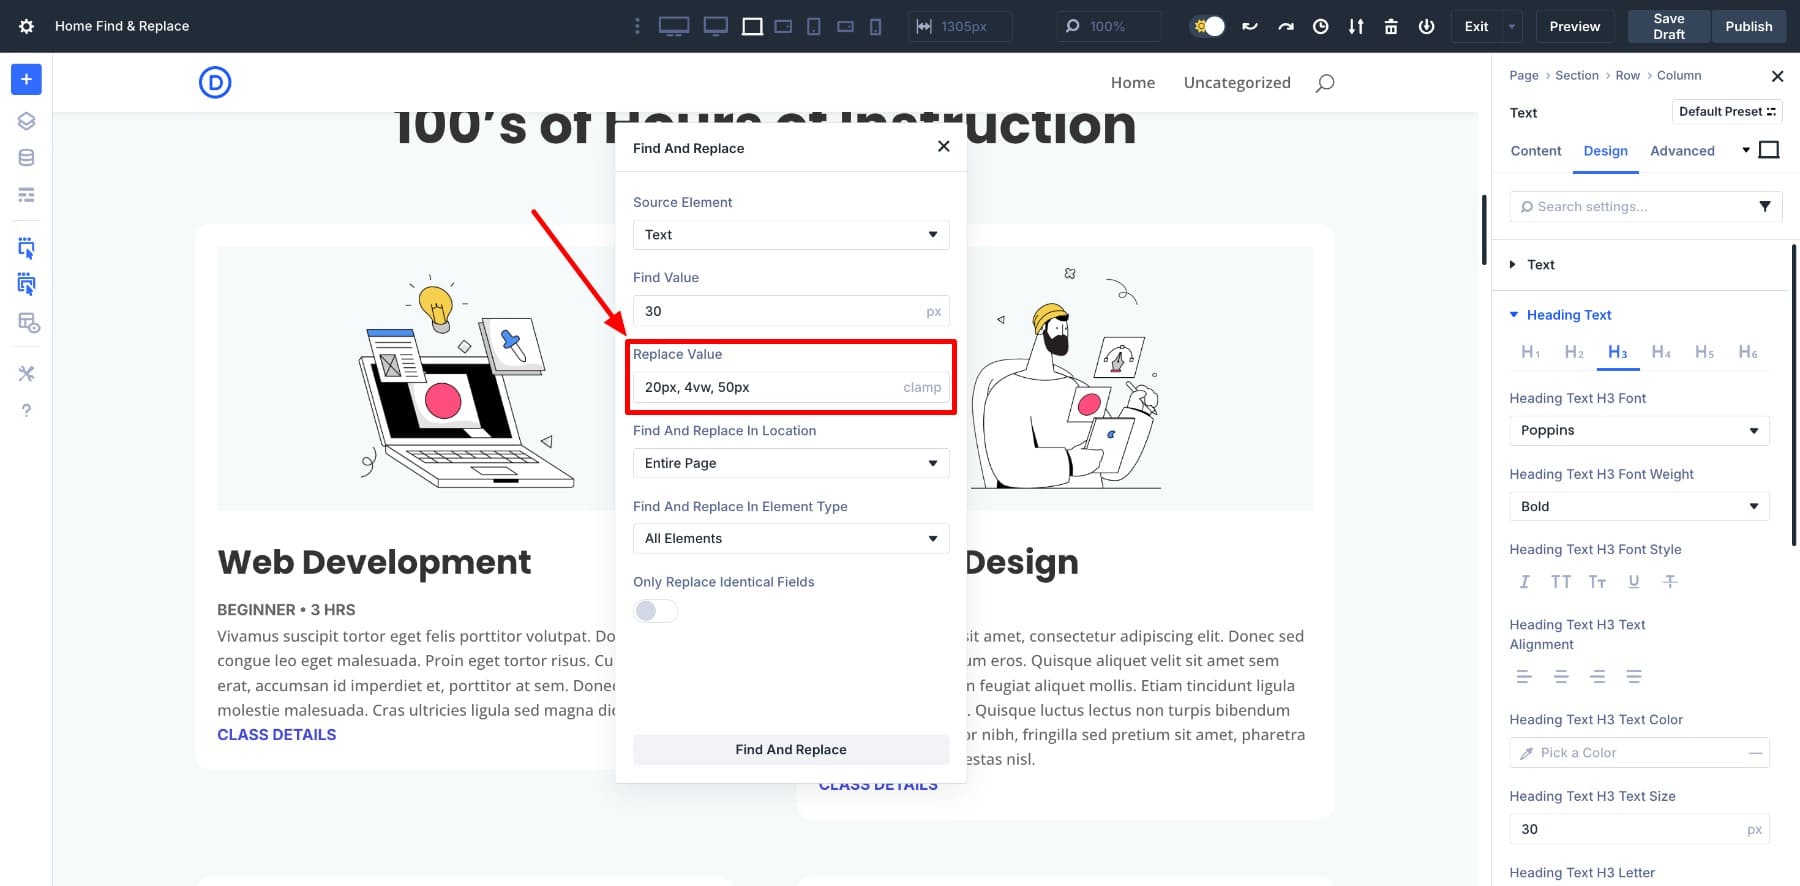
Click the Find And Replace button, and watch what happens. All headings with 30px font size now have a fluid clamp() value.
The other headings remained unchanged because Divi only updates values that match exactly within your selected scope. No manual editing required, and not even accidental changes to unrelated elements. This accuracy makes it perfect for cleaning up default styles in layout packs.
Learn Everything About Divi’s Find And Replace
Using Design Variables In Find And Replace
Find And Replace becomes even more powerful when paired with Design Variables. Instead of replacing a static value with another static value, you can replace it with a saved variable from the Variable Manager. This builds a consistent design system that’s easy to update later.
Let’s continue with the same example, updating all heading font sizes. But this time, instead of replacing 30px with a direct clamp value, we’ll replace it with a variable named H3 Font Size.
First, create the variable. Open the Variable Manager from the left sidebar and go to the Number column. Name your variable, assign a value, and save.
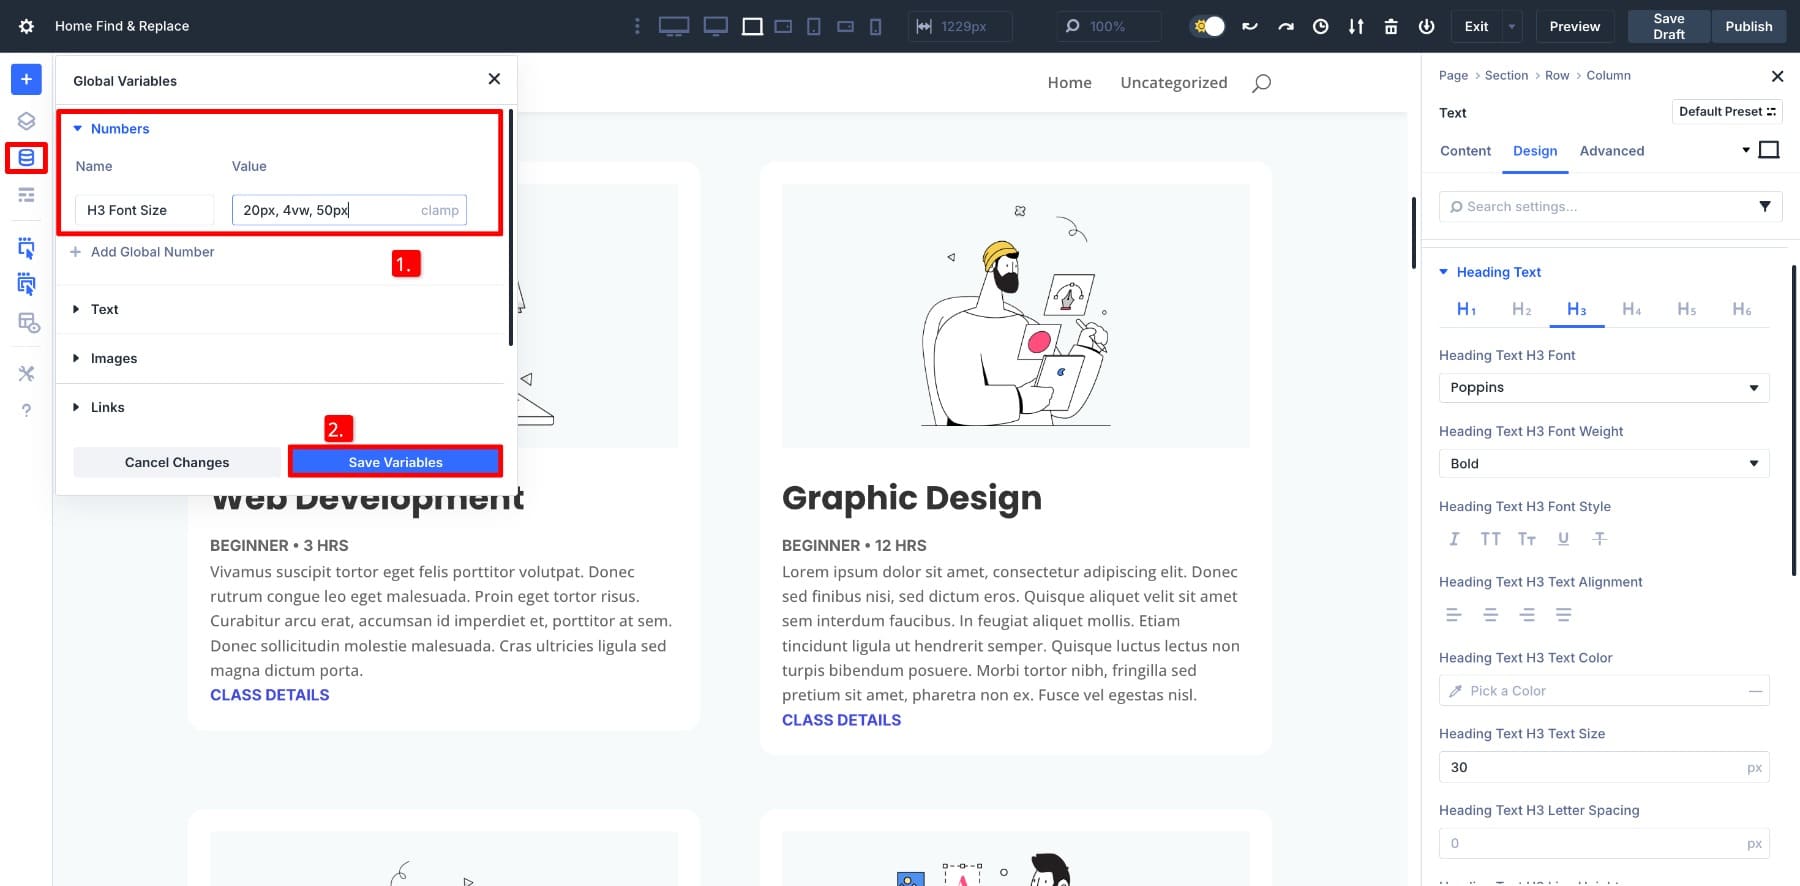
This makes the variable available across all font size fields. Now comes the magic: you can use it directly in the Find And Replace panel to assign the saved variable to all heading font sizes at once.
Open the Find And Replace panel like before. In the Replace Value field, hover over the input and click the Variable Manager icon. Select your saved variable, H3 Font Size, and continue with the same settings.
Click Find And Replace to apply the change. All headings that use 30px will now reference the H3 Font Size variable instead of a fixed number.
Here’s where it gets interesting. Need to adjust this font size later? Go to the Variable Manager, open the H3 Font Size variable, and change the value. Update the clamp to clamp(24px, 5vw, 60px), and every heading using this variable updates automatically.
There is no need to repeat Find And Replace. With one update, your layout adjusts everywhere the variable is used.
This combination of Find And Replace and Design Variables makes updating entire layout packs so efficient, and we’ll follow this process in this tutorial. You’ll define your design variables once, then use Find And Replace to switch from static values to saved variables on all pages. After that, updating becomes effortless.
Learn Everything About Divi’s Design Variables
Ready to put this into practice? You’ll need Divi 5 to use both Find And Replace and Design Variables. The builder has been completely rebuilt for faster performance and smarter workflows.
How To Replace Styles Across A Layout Pack
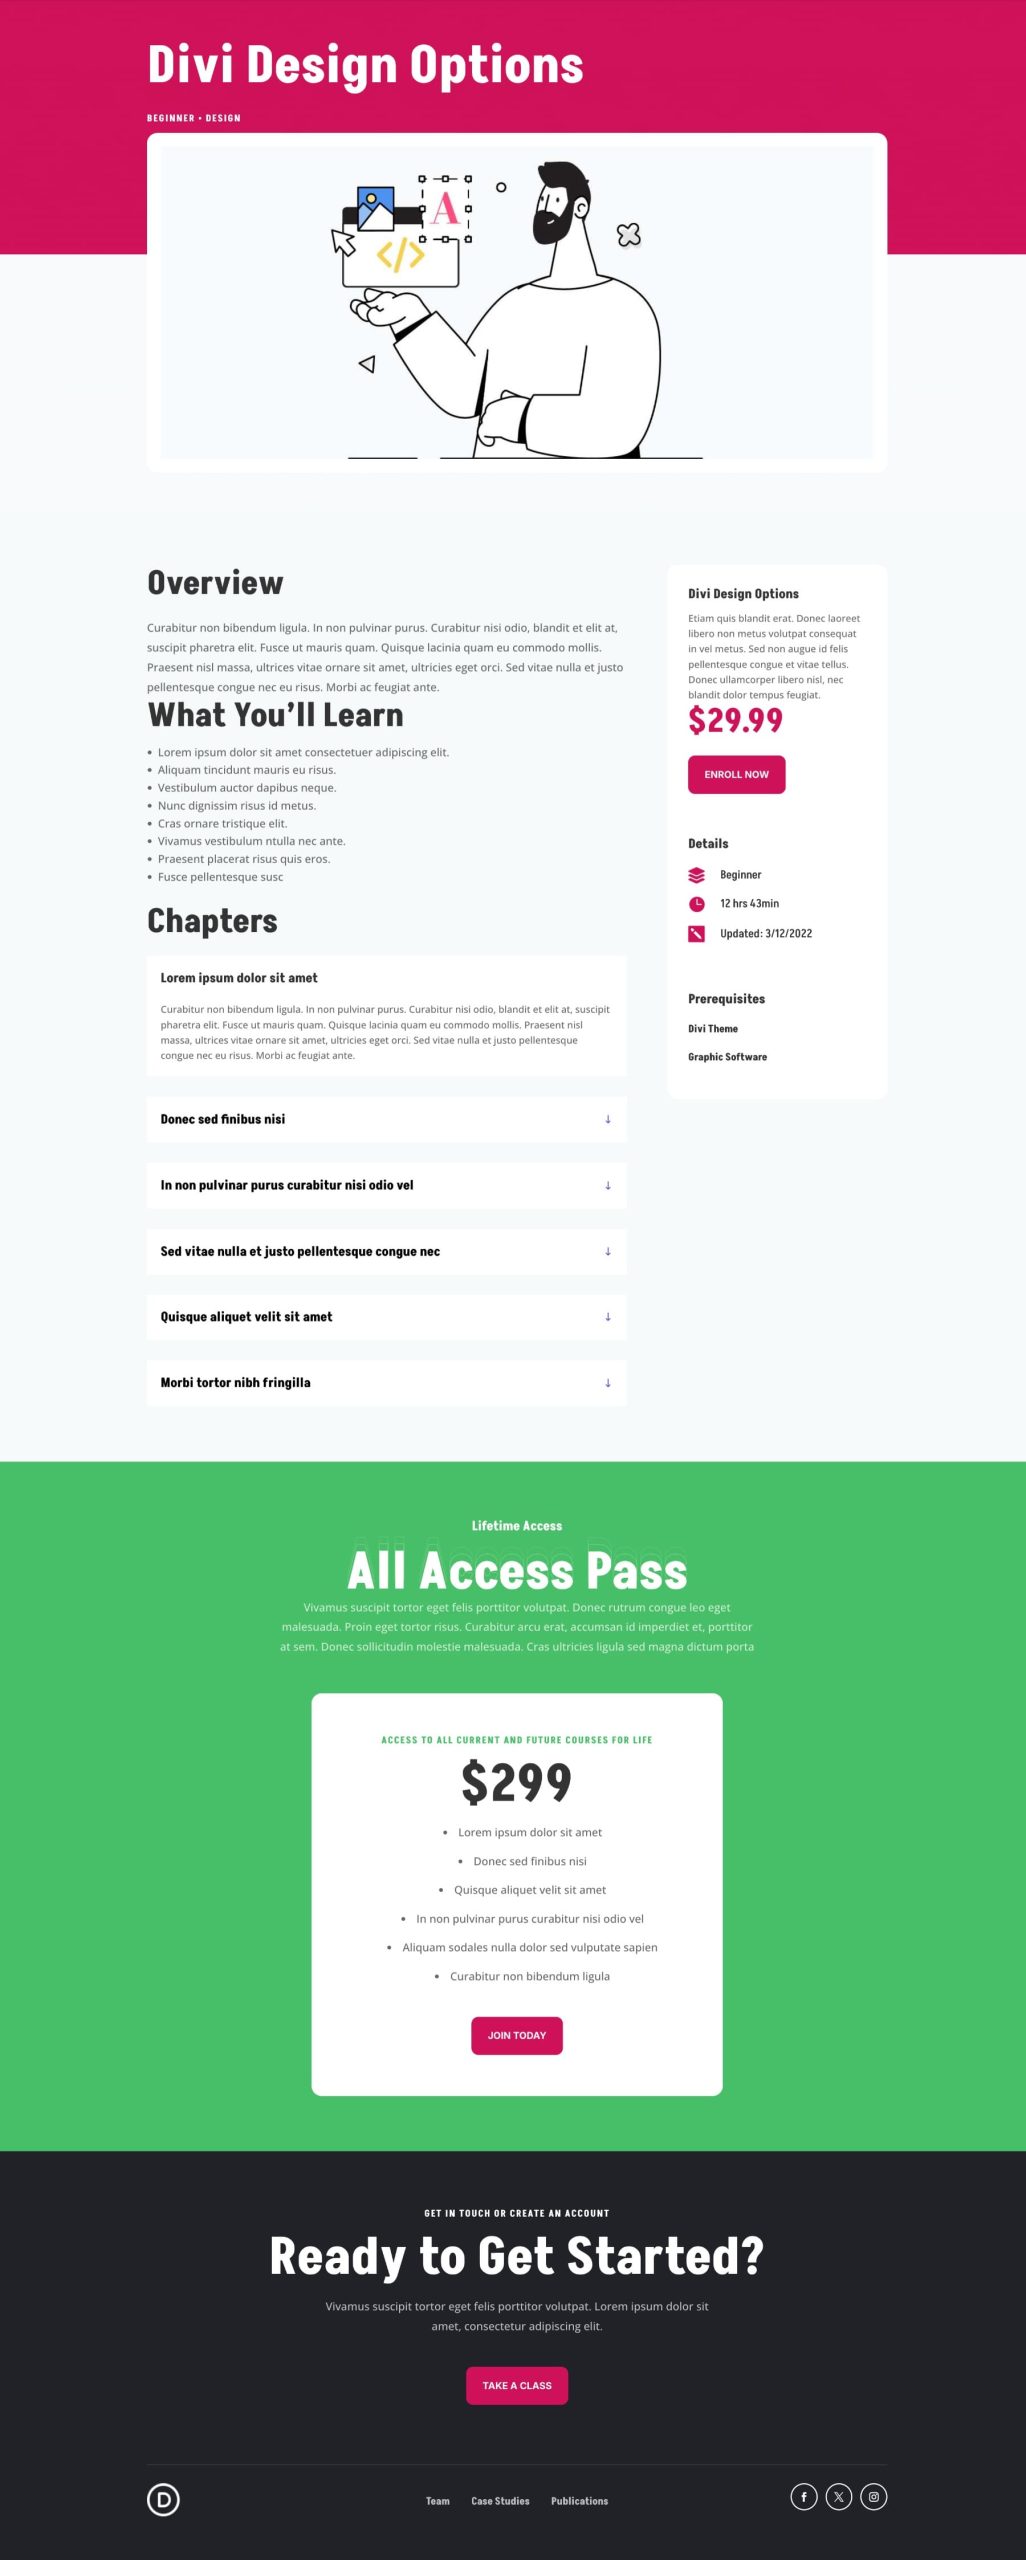
Now that you know how Find And Replace works and how to pair it with Design Variables, let’s put it into action on a real layout pack. For our example, we’ll import the Learning Management System, which includes multiple pages like Home, About, Contact, Course Landing, and Pricing.
Each page uses the same fonts, colors, and spacing, but all as static values. In the tutorial below, we’ll update these across all pages, turn them into variables, and connect everything to a central design system.
1. Audit Your Layout’s Design Styles
Before you start replacing anything, take a few minutes to review your layout pack. Open each page and quickly list all the design styles that repeat, like font sizes, button colors, text spacing, section padding, and border styles. Here’s what I found after reviewing the LMS layout:
- Font Sizes: 30px is used for all H3 headings, and 48px for H2s across multiple pages
- Fonts: Poppins is used consistently for all headings
- Primary Button: Background color is #4449E0 with white text
- Padding: Most sections use 60px top and bottom
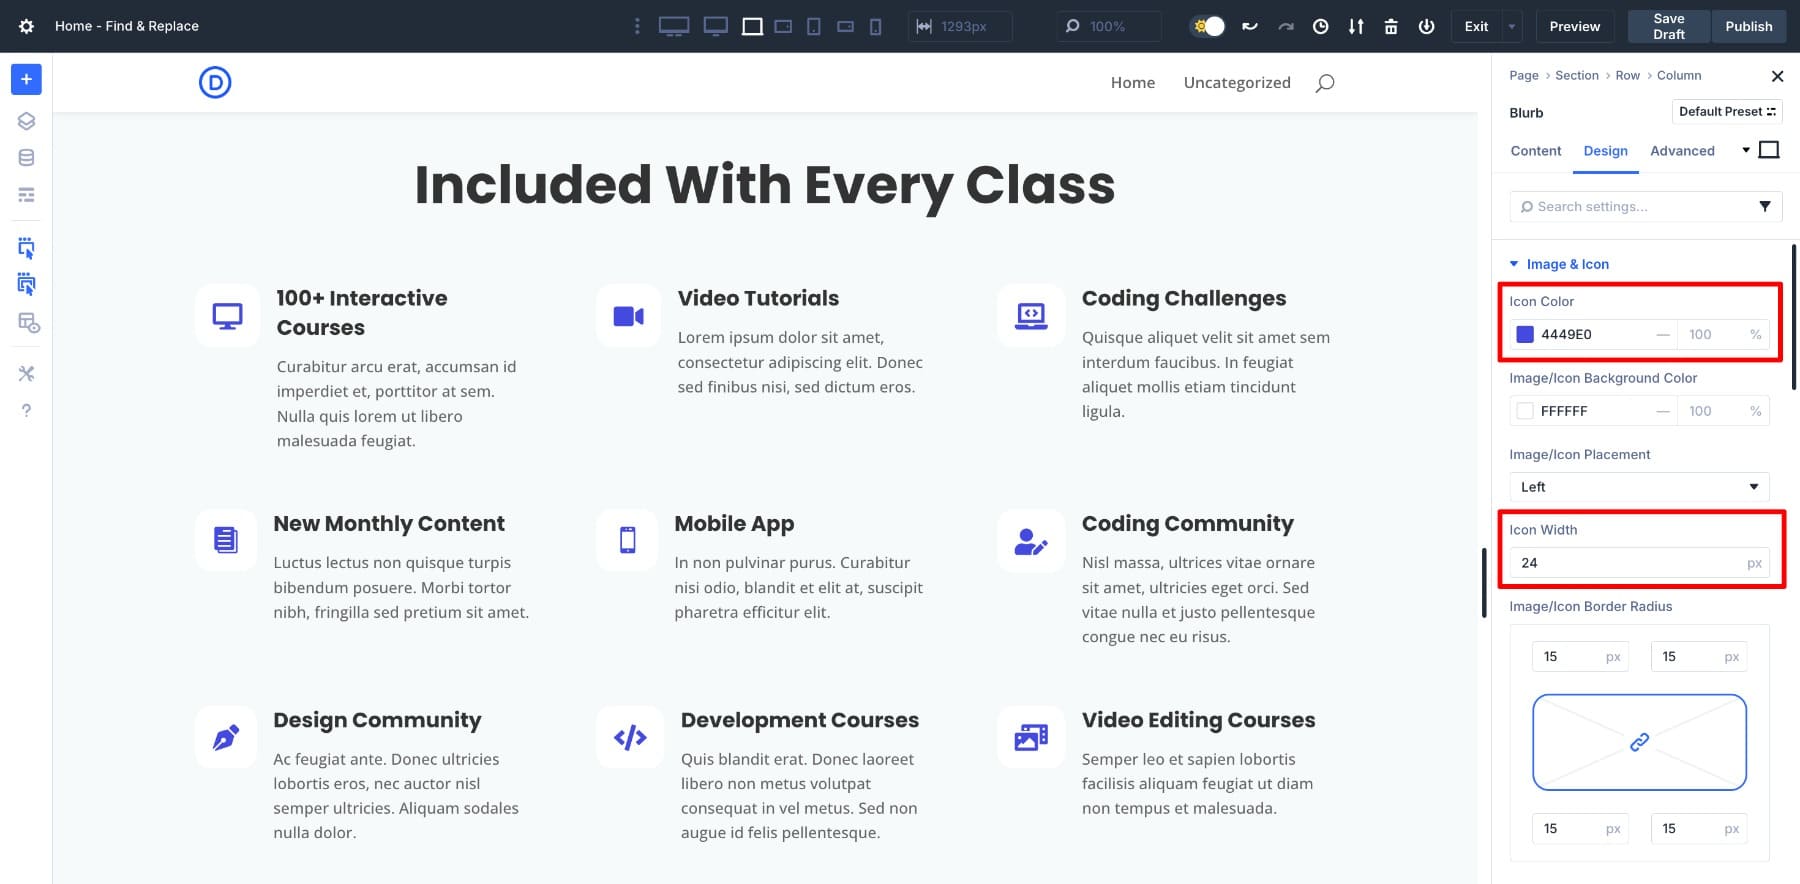
- Blurb Icons: Icon size is set to 24px
- Blurb Borders: No border is applied to blurb modules
- Section Backgrounds: The green color #47BE68 appears on the footer section of almost every page
These are all manually entered as static values inside each module. For example, the Blurb module uses #4449E0 for the icon color and a width of 24px.
Once you identify repeated styles like these, you’ll know exactly what to convert into Design Variables.
This audit step creates the foundation for everything that follows. It helps you build a systematic approach that keeps your layout consistent and maintainable.
2. Save Your Design Variables
Once you’ve audited your layout and noted the repeating styles, the next step is creating Design Variables of your preferred values. This lets you turn hardcoded styles into reusable tokens, making your layout easier to update later. After we’ve saved all our values, we’ll replace the current ones with ours.
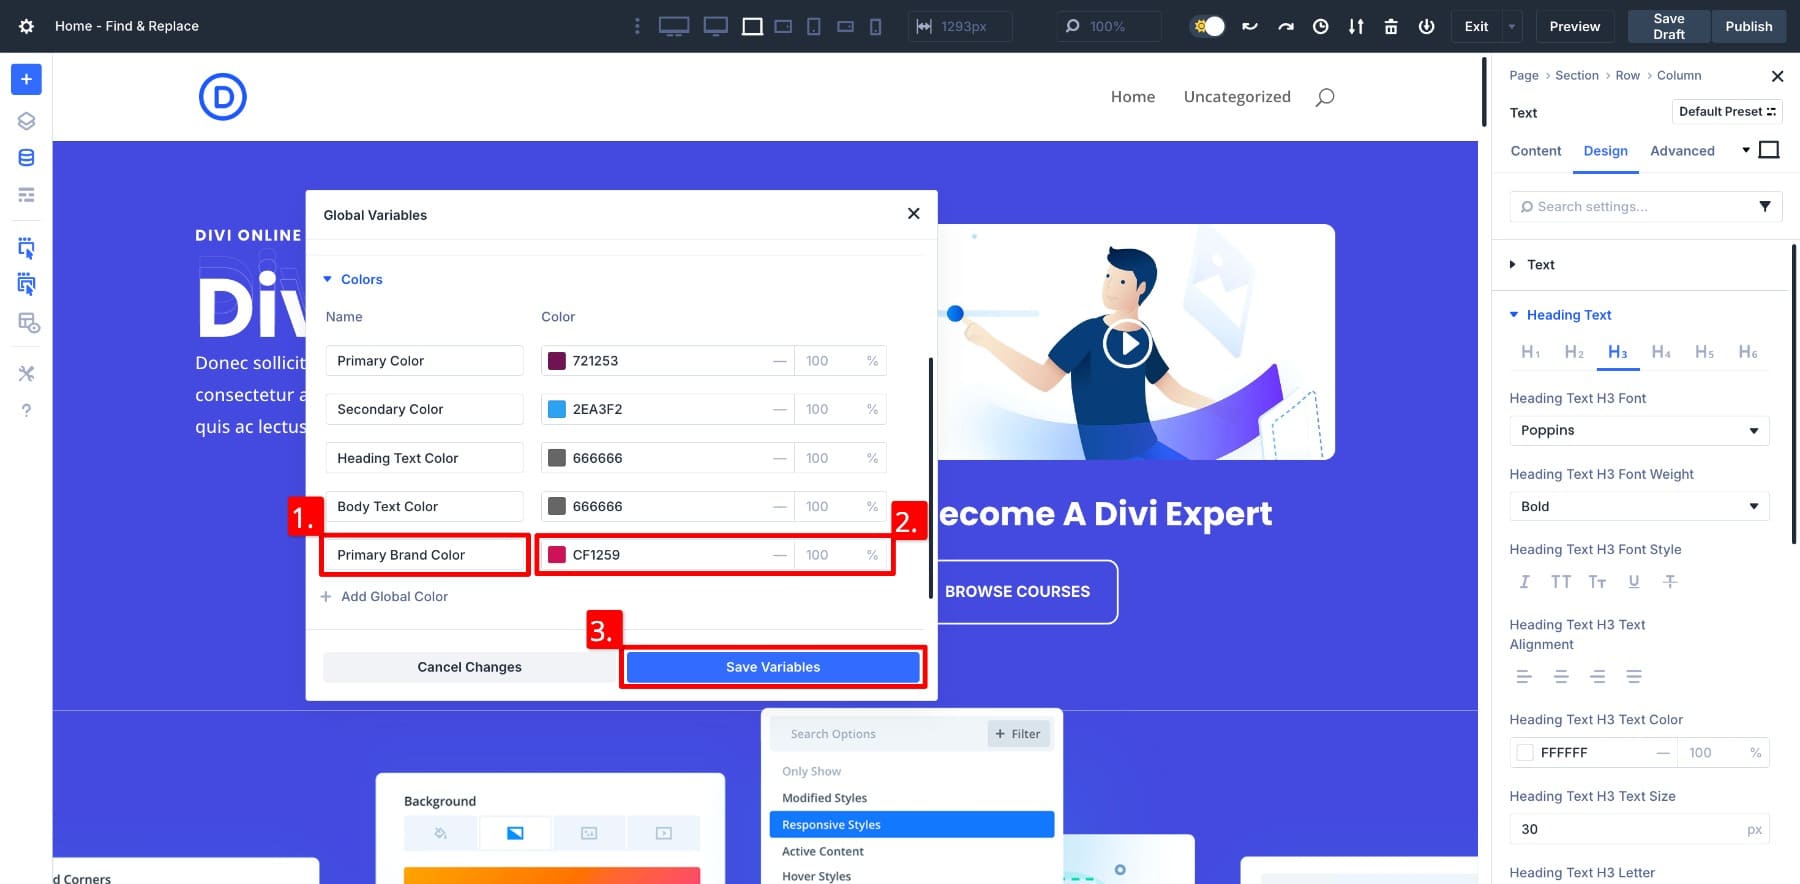
Creating A Color Variable
In the example earlier, I found that the blurb icons use the color #4449E0, but I want to switch that to my primary brand color, #6C012A. To do so, I’ll create a Color Variable.
Go to the Variable Manager from the left sidebar, then open the Color column.

Scroll down and click the + Add Global Color option. Name your variable and enter a value. Click Save Variables, and it’s done.
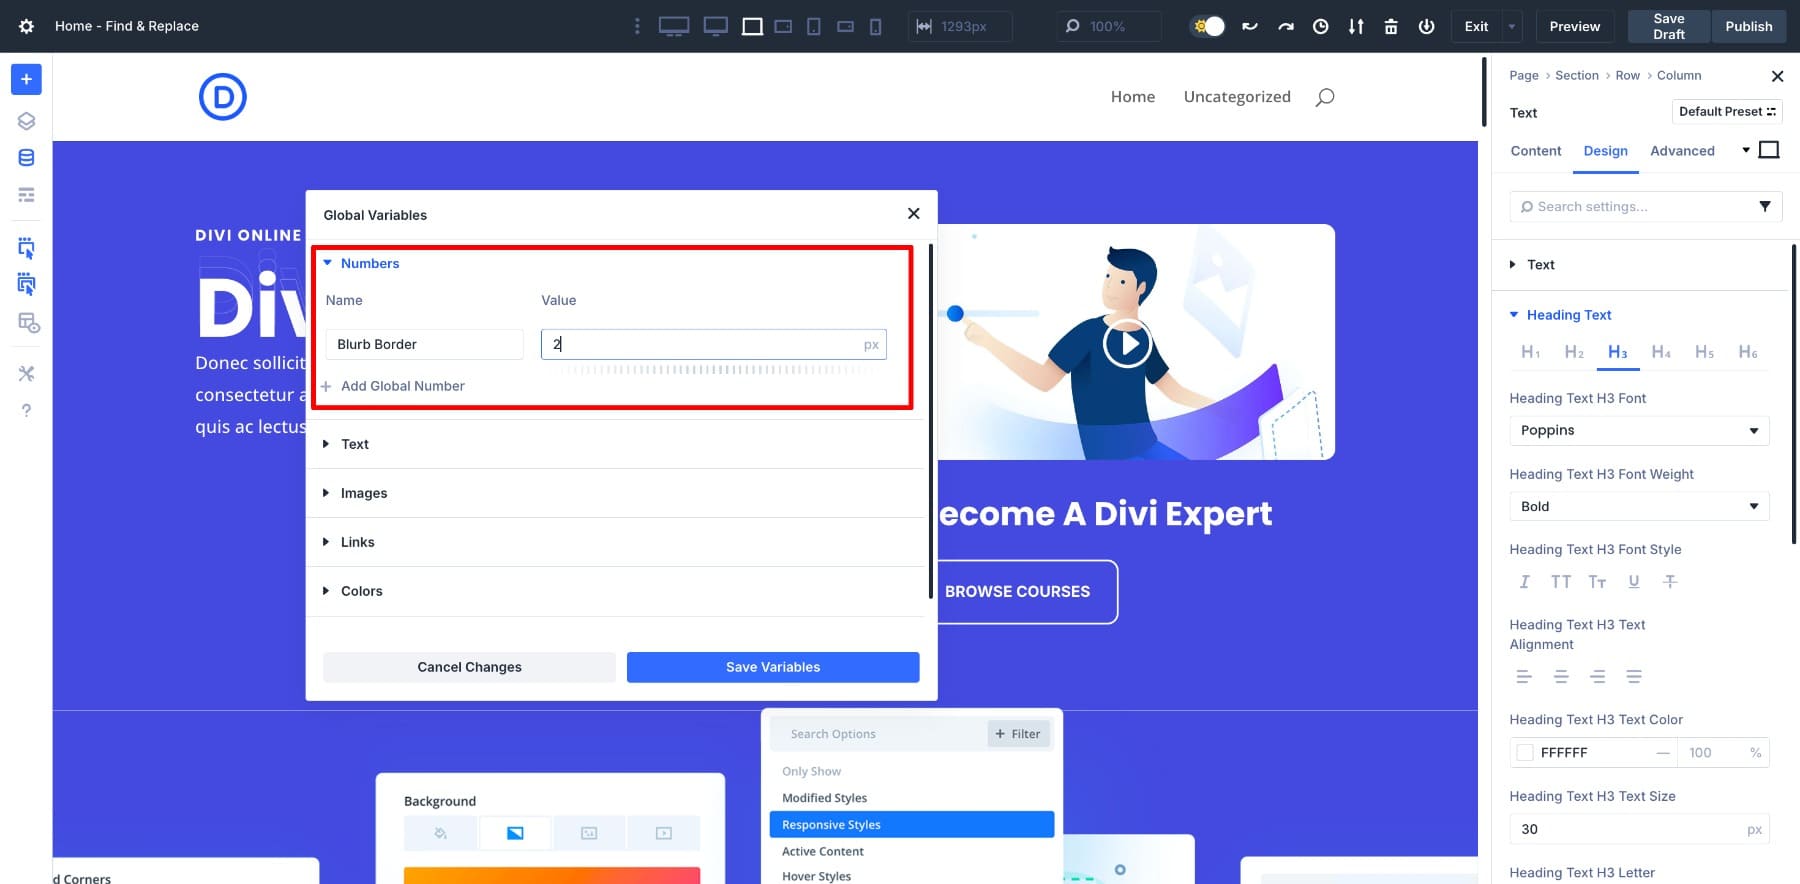
Creating A Number Variable
Next, I want to add a 2px border around blurbs, so I’ll need a Number Variable. The process is similar, but in a different column. Go to the Number column. Click + Add Global Number, name your variable, assign a value, and save.
Creating A Font Variable
I also want to change all the heading fonts to Askhar, my brand font. This requires a Font variable. Navigate to the Font column, create a new variable, assign a name, choose a font, and save.
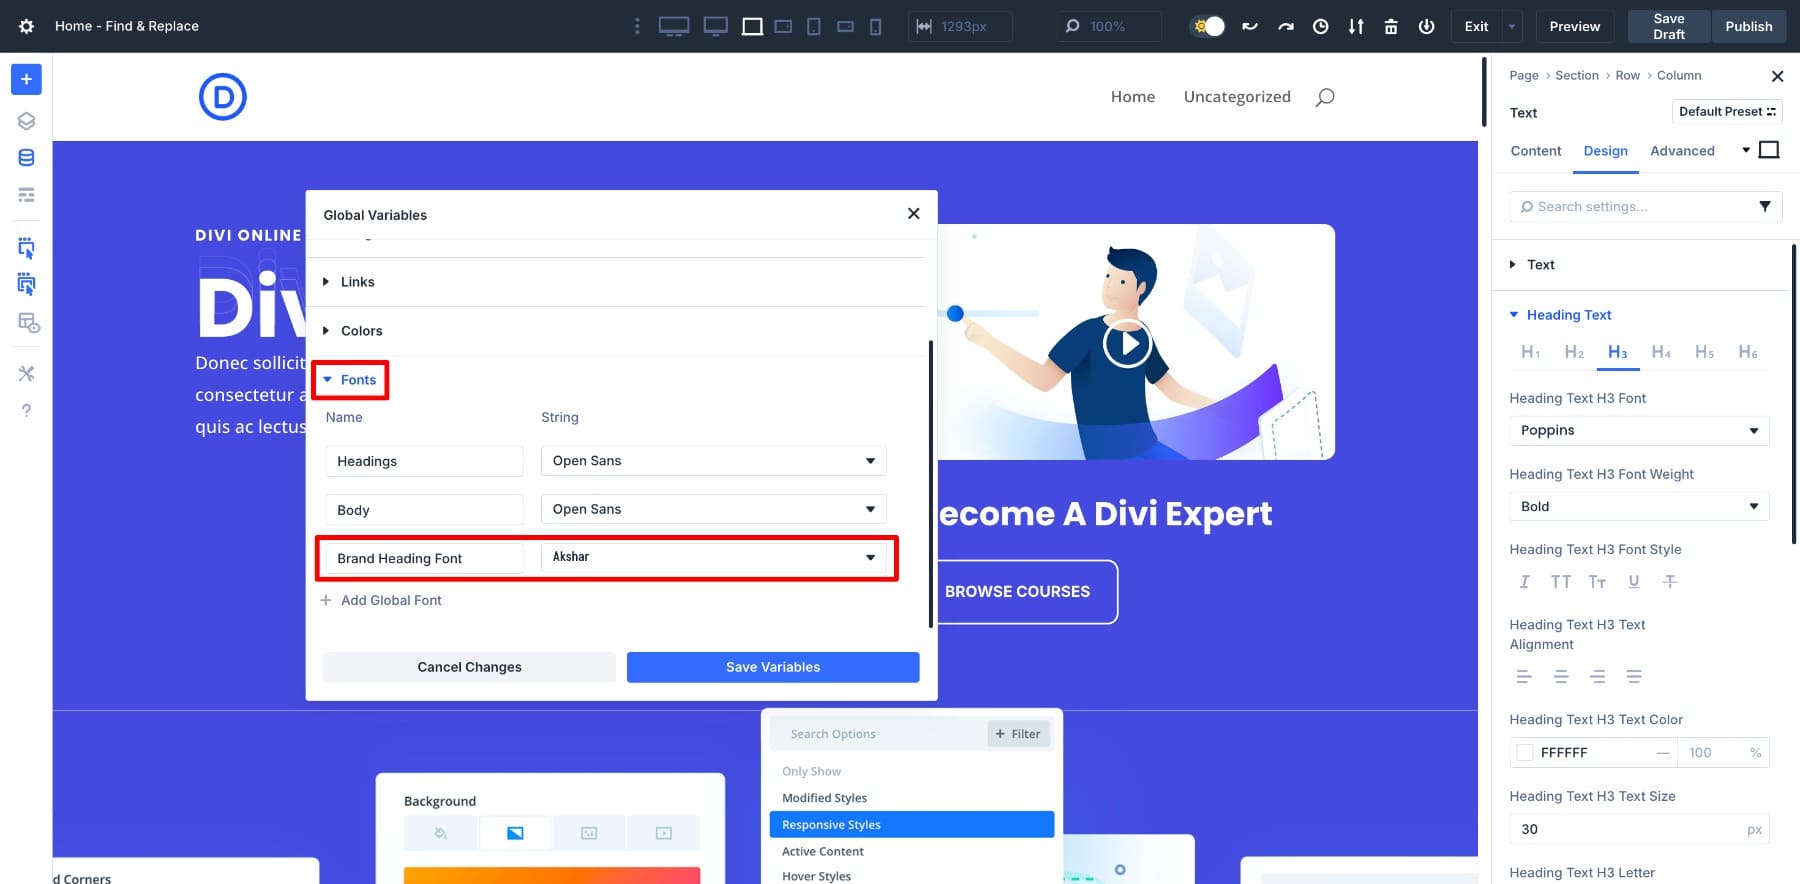
It’s done. This font will now be selectable in all heading text fields throughout the layout.
Follow the same process for the rest of your audit findings, like section padding, other heading sizes, or additional brand colors. Each repeated style from your layout can (and should) become a variable.
That way, you don’t have to remember hex codes, font names, or specific values. They live in your Variable Manager and follow you across modules and pages. And best of all, you can use Find And Replace to apply them layout-wide, which we’ll do next.
3. Use Find And Replace To Apply Variables
Here’s the most interesting part we’ve been waiting for. With our variables saved, changing the styles of this entire layout is quick and easy. Let’s see how.
Changing The Icons’ Colors
First, let’s change the icons’ color to our saved Primary Brand Color variable. Navigate to the Blurb’s settings > Design > Image & Icon. Now, hover over the Icon Color option and click on the three dots. Choose Find & Replace.
![]()
On the Find And Replace panel, all you need to do is hover over to locate the Variable Manager icon and select your variable.
And just like that, all the icons have a new color. I could have also done it the other way, by assigning my brand color as a static value instead of saving a Design Variable, but we added an extra step to simplify future updates.
How? Imagine you’ve modified all your layout pages but want to switch your brand color. No need to feel overwhelmed about revisiting all pages or doing it module by module. Since you already saved a brand color Design Variable, you only need to change the value to update it site-wide.
Changing All Headings Font
Next, let’s switch all heading fonts to my brand font. Access any heading’s Settings > Design > Title Text. Hover over Title Font and open Find & Replace. In the Replace Value column, assign your Brand Heading Font variable.
Updating Border Width Of All Blurb Modules
For the border width update, I’ll use my Blurb Module variable. The process remains consistent. Navigate to any Blurb’s Border settings, open Find & Replace, choose your variable, and apply.
After you’ve switched all static values with your Design Variables, you’ll have linked your layout styles directly to variables. This means if you ever want to change the brand color, tweak heading typography, or adjust border widths, you won’t have to redo the replacements. Just update the variable, and all linked elements will instantly adjust.
Bonus Step: Create And Save Presets (Optional)
While Find And Replace and Design Variables give you a solid foundation, there’s an optional step that builds on this system even further. Presets let you package complete styles and reuse them anywhere with just one click.
Once you’re satisfied with your base variables, you can take it one step deeper and create presets for more granular styling. This isn’t necessary for the core process we just walked through, but it’s worth exploring if you want maximum efficiency.
Let’s say you like to add a Shadow effect to all your Blurbs, so you designed the perfect shadow style for your Blurb module. Instead of manually copying this style each time, you can save it as a preset.
Done. This preset now appears in the Presets dropdown of every module. You can apply it to other modules instantly; there is no need to redo spacing, borders, shadows, or any other design tweaks.
What makes presets even more powerful is their flexibility. You can create preset groups for different setting combinations for better workflow optimization and granular control. For instance, you might have one preset group for Button Styles with variations like Primary Light, Primary, and Primary Light Outline, each containing different combinations of backgrounds, borders, and spacing.
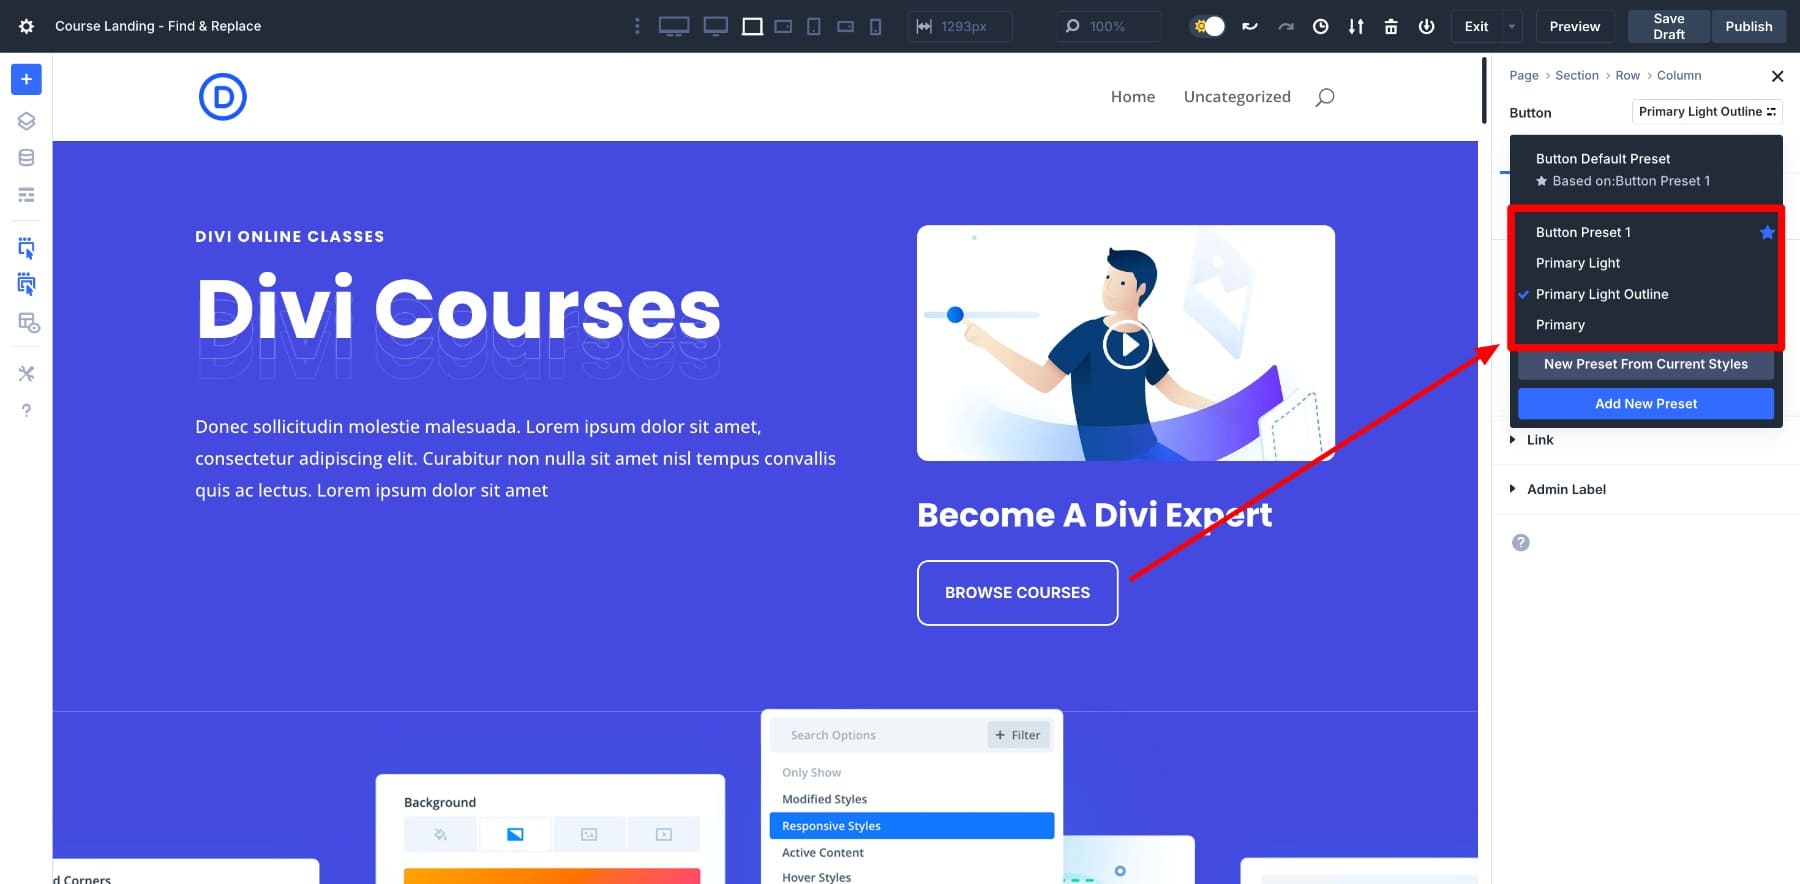
This way, you maintain consistency while having options for different contexts. Presets are especially useful when your layout has 10+ modules using the same style. Instead of relying on memory or manual edits, you standardize everything upfront.
Learn Everything About Divi’s Option Group Presets
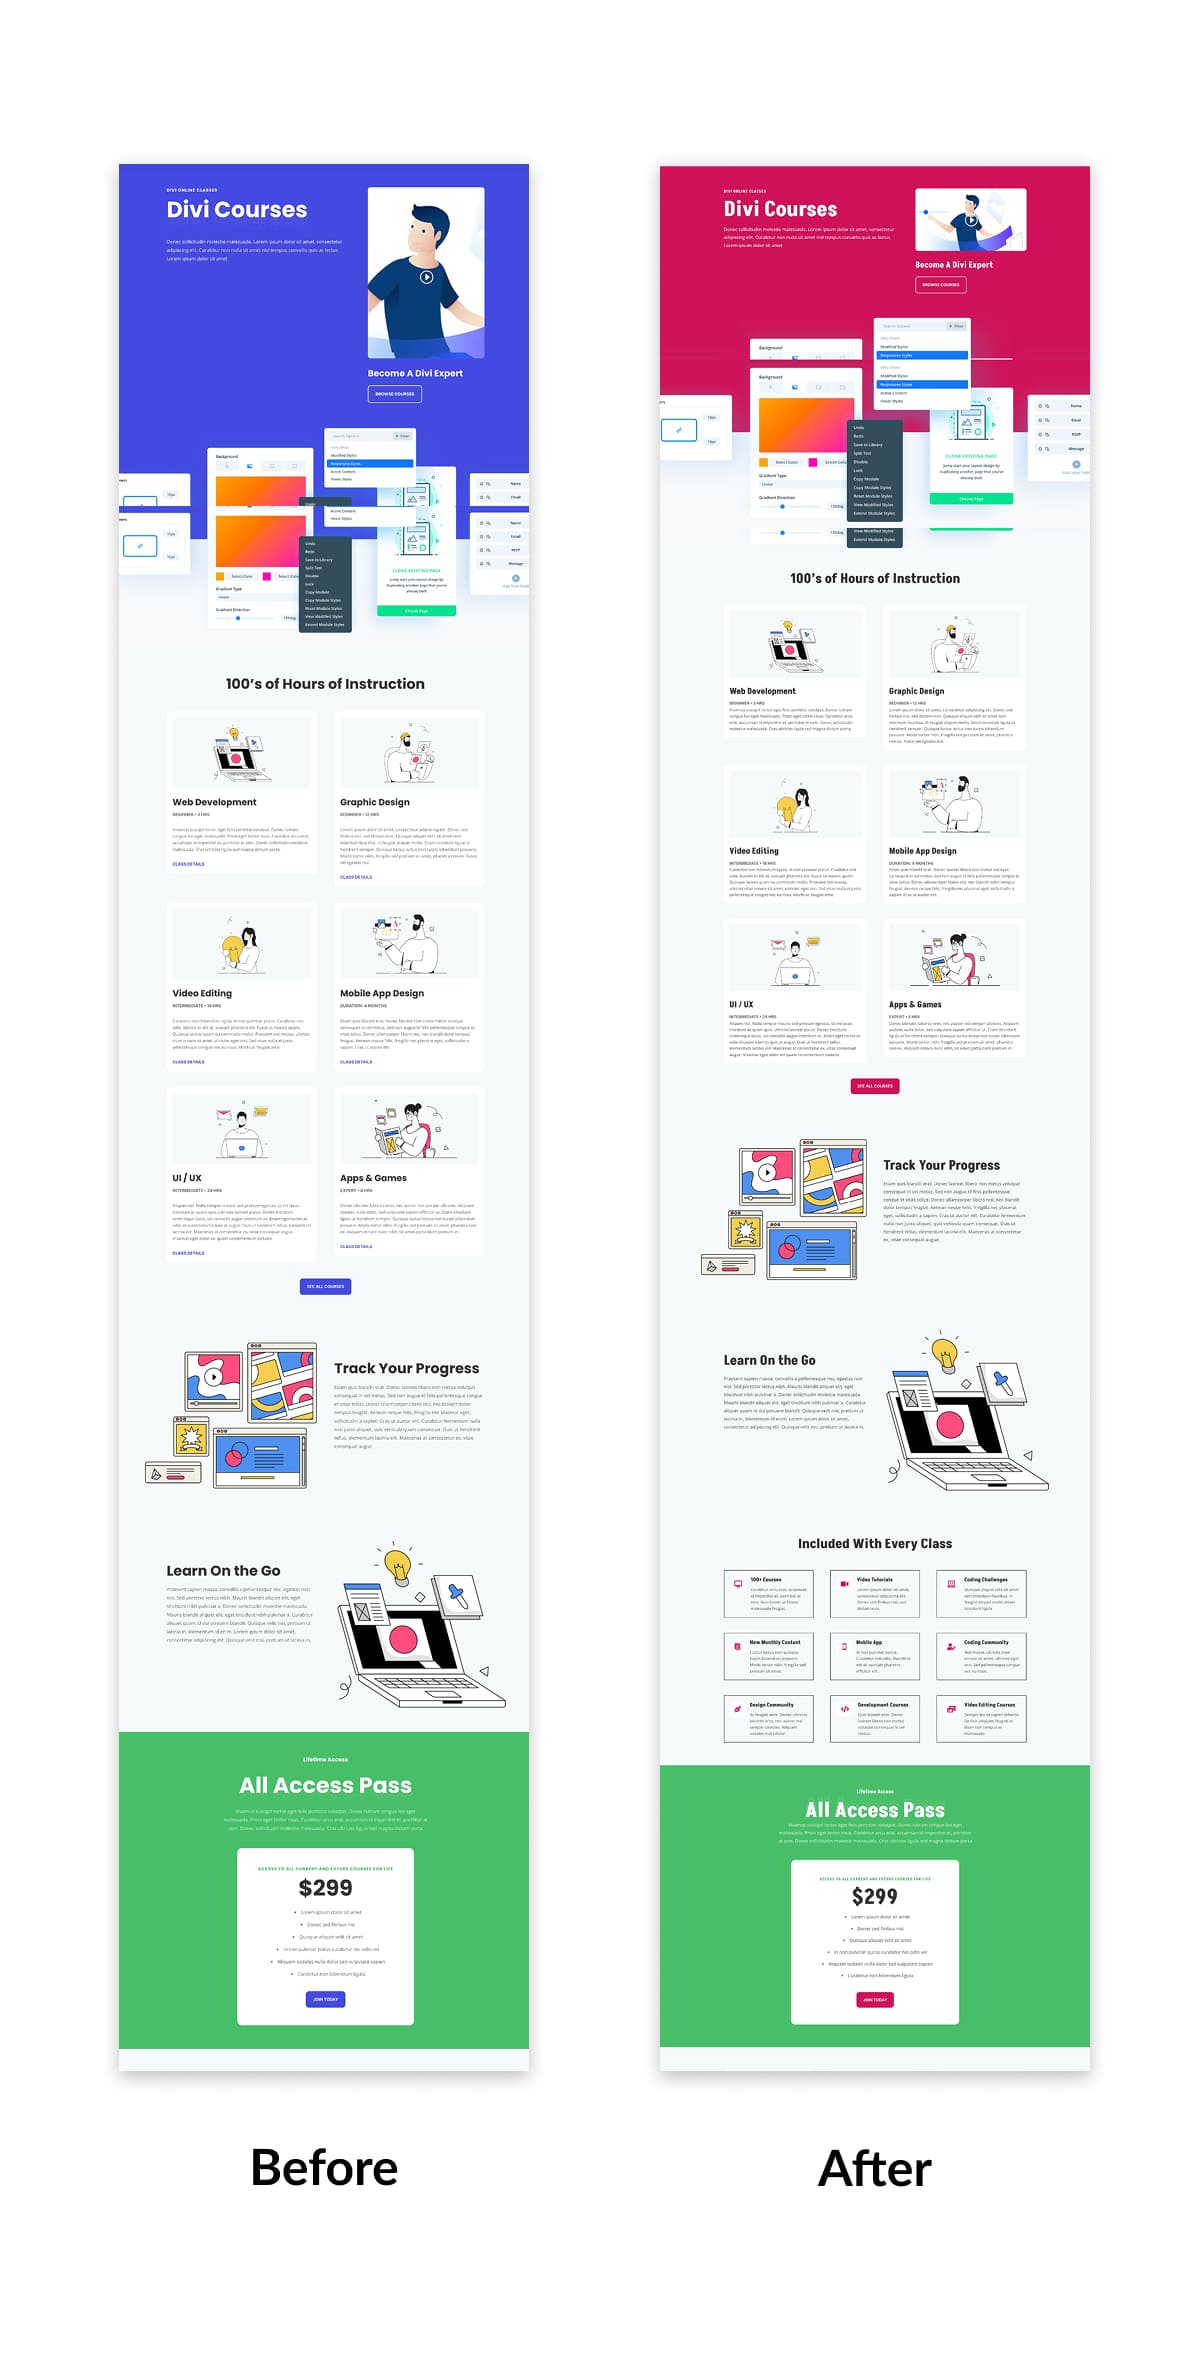
After applying all the saved Design Variables, here’s how the before and after versions look:
4. Apply The Same Process To Other Pages
Once your Design Variables and Presets are set up, updating the rest of your layout pack becomes much faster.
Take the Course Landing Page, for example. You’ll see the same static values used here, heading fonts, button colors, blurb borders, icon colors, and more. Again, instead of manually tweaking each setting, open the relevant module, trigger Find & Replace, and assign the matching Design Variable.
Repeat this process for each repeating style across all your pages. When you’re done, your entire layout pack will be connected to variables and presets, making future edits nearly effortless.
Updated course landing page using Divi’s Find & Replace and Design Variables
Make Layout-Wide Edits In Seconds With Find And Replace
Setting up Design Variables and learning Find And Replace in Divi 5 might take some upfront time. But once you’ve done it for one layout pack, you’ll never want to go back to manually clicking through dozens of modules.
We transformed an entire layout pack from scattered static values to a connected design system. What took us minutes with Find & Replace would have taken hours doing it the old way, module by module, page by page.
This isn’t just about saving time on this project. You’re building a design system that will make every future Divi project faster and more consistent.


Leave A Reply