
Your headline is usually the first thing people read when they’re visiting your website. Besides having a really good headline, it’s also important to make people notice and actually read whatever it is you’re showing them. Headlines usually don’t go unnoticed because of their size and central position in the hero section, but if you want to take it one step further and literally make the headline pop, this tutorial is for you.
We’re going to combine Divi and its animation settings to create a headline that stands out and grabs the attention of your visitors. We’ll divide the headline into 5 pieces and create a flash effect that’ll make your visitors want to follow the movement and read what’s being shared.
Let’s get to it!
- 1 Preview
-
2
Let’s Start Recreating!
- 2.1 Add New Section
- 2.2 Add Row #1
- 2.3 Add Text Module #1
- 2.4 Clone Text Module x4
- 2.5 Change Duplicate #1
- 2.6 Change Duplicate #2
- 2.7 Change Duplicate #3
- 2.8 Change Duplicate #4
- 2.9 Add Negative Margin to Each Text Module Except the First One
- 2.10 Transform Row
- 2.11 Add Row #2
- 2.12 Add Title Text Module to Column 2
- 2.13 Add Divider Module to Column 2
- 2.14 Add Description Text Module to Column 2
- 2.15 Add Button Module to Column 2
- 3 Preview
- 4 Final Thoughts
Preview
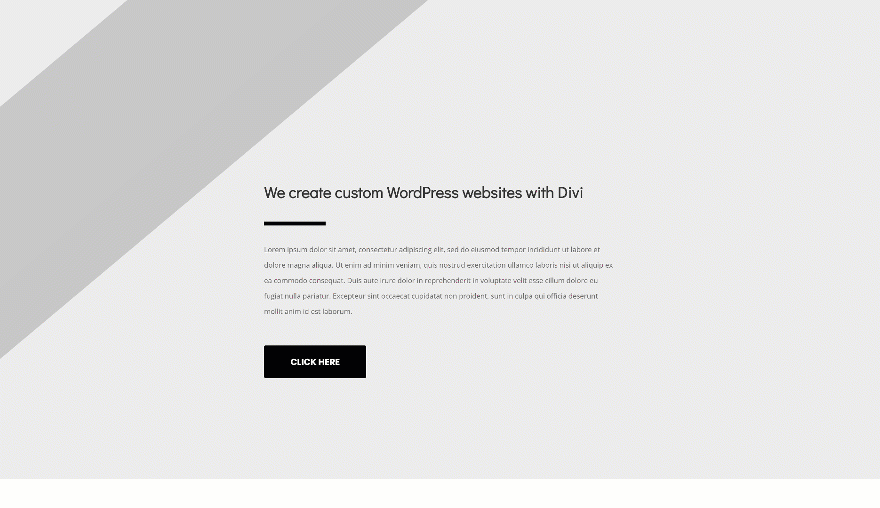
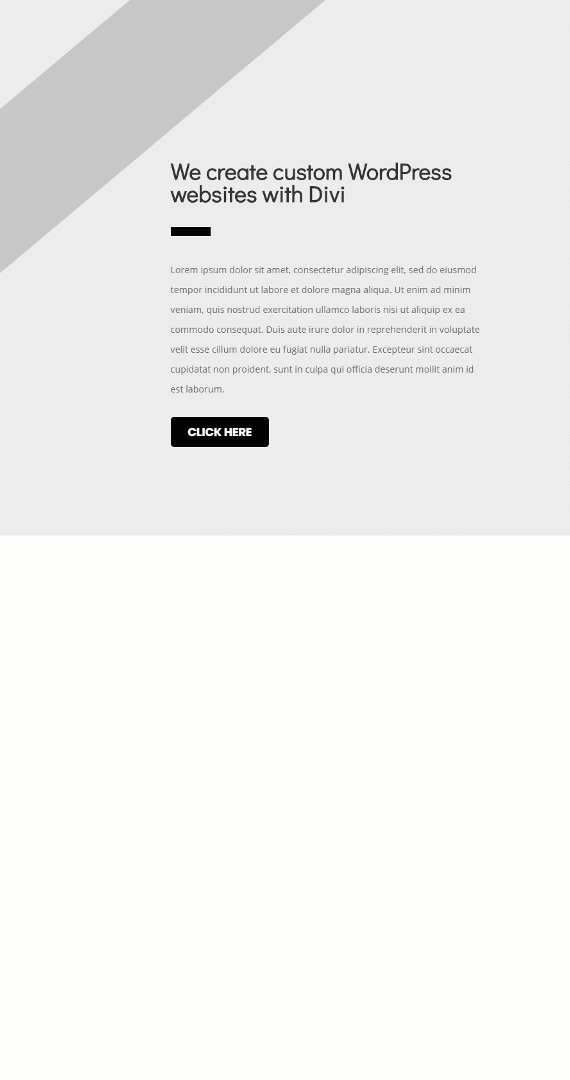
Before we dive into the tutorial, let’s take a quick look at the outcome on different screen sizes.
Desktop
Mobile
Let’s Start Recreating!
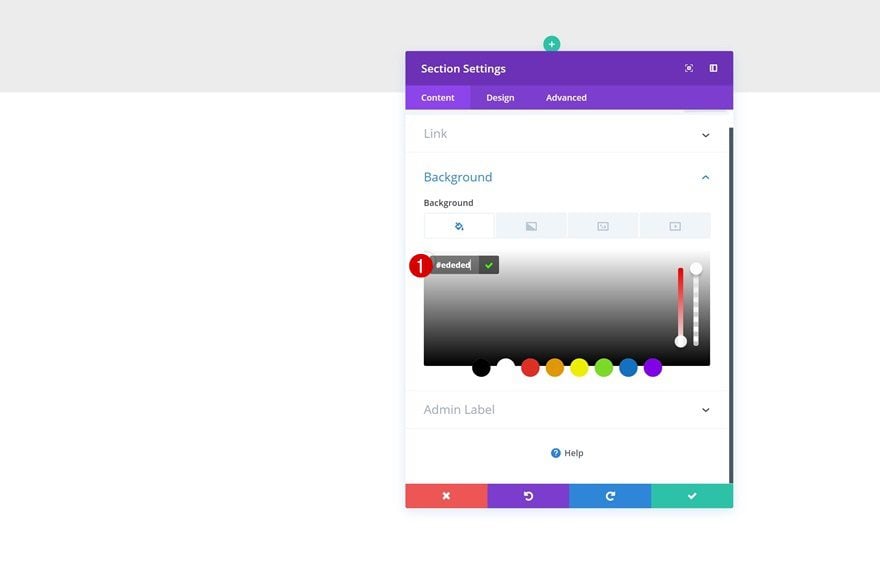
Add New Section
Background Color
Let’s start creating! Create a new page and add a regular section to it. Open the section settings and change the background color.
- Background Color: #ededed
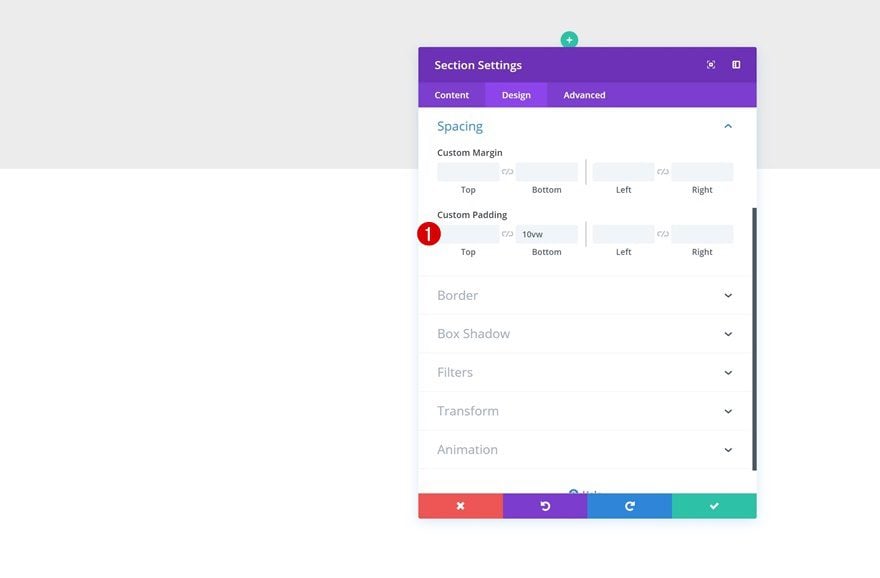
Spacing
Then, go to the spacing settings of the section and add some custom bottom padding.
- Bottom Padding: 10vw
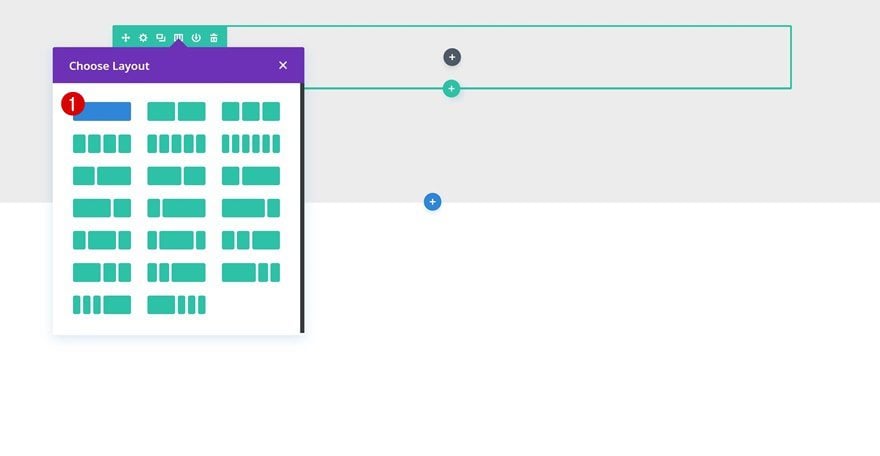
Add Row #1
Column Structure
Continue by adding a new row using the following column structure:
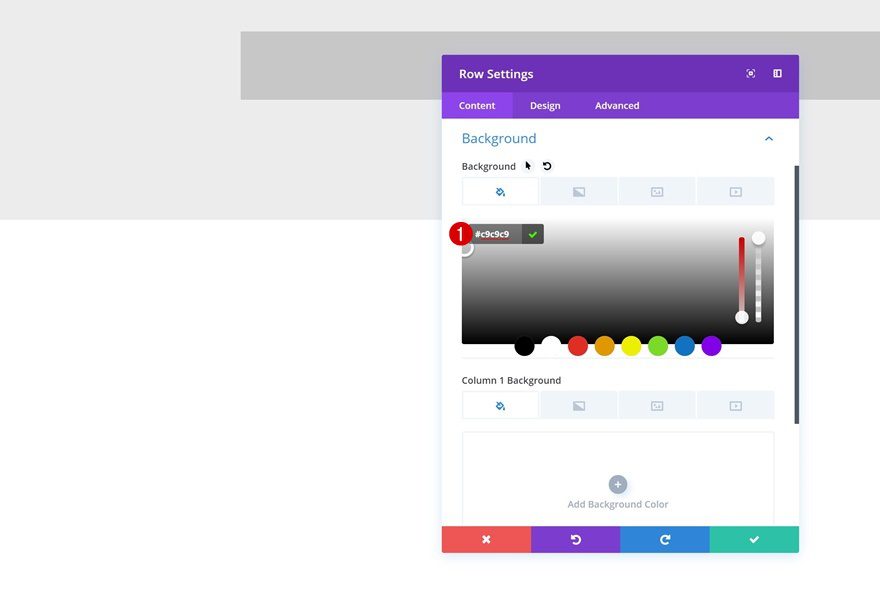
Background Color
Without adding any modules yet, open the row settings and change the row background color.
- Background Color: #c9c9c9
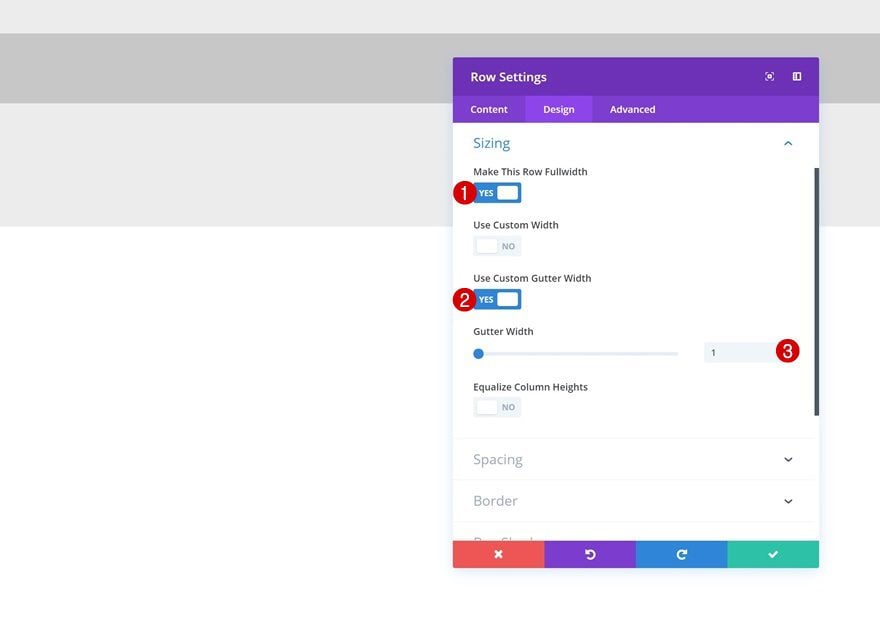
Sizing
Go to the sizing settings next and allow the row to take up the entire width of the screen.
- Make This Row Fullwidth: Yes
- Use Custom Gutter Width: Yes
- Gutter Width: 1
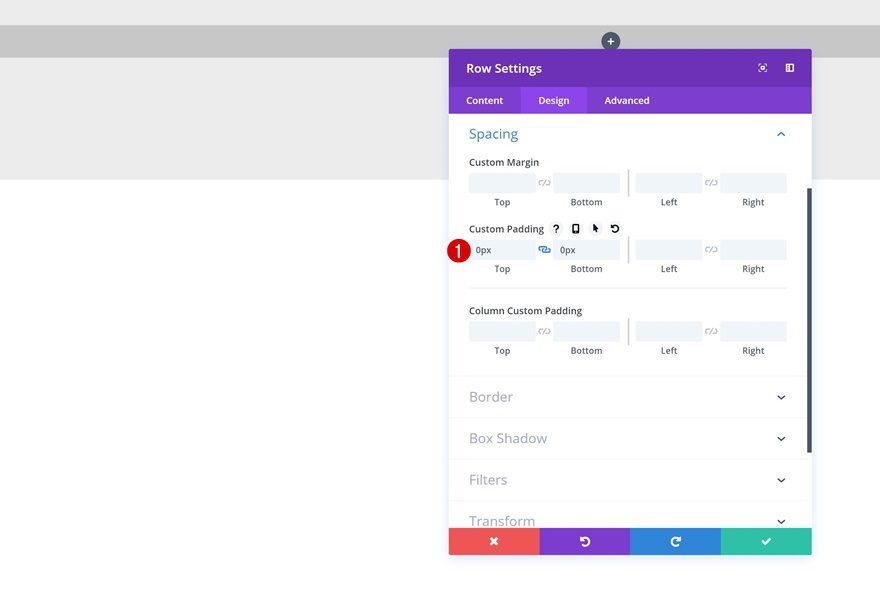
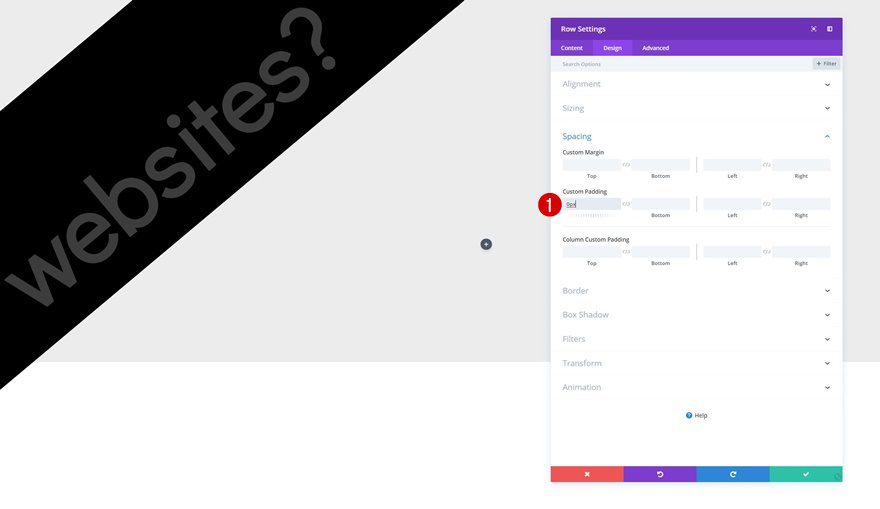
Spacing
Remove the default top and bottom padding of the row as well.
- Top Padding: 0px
- Bottom Padding: 0px
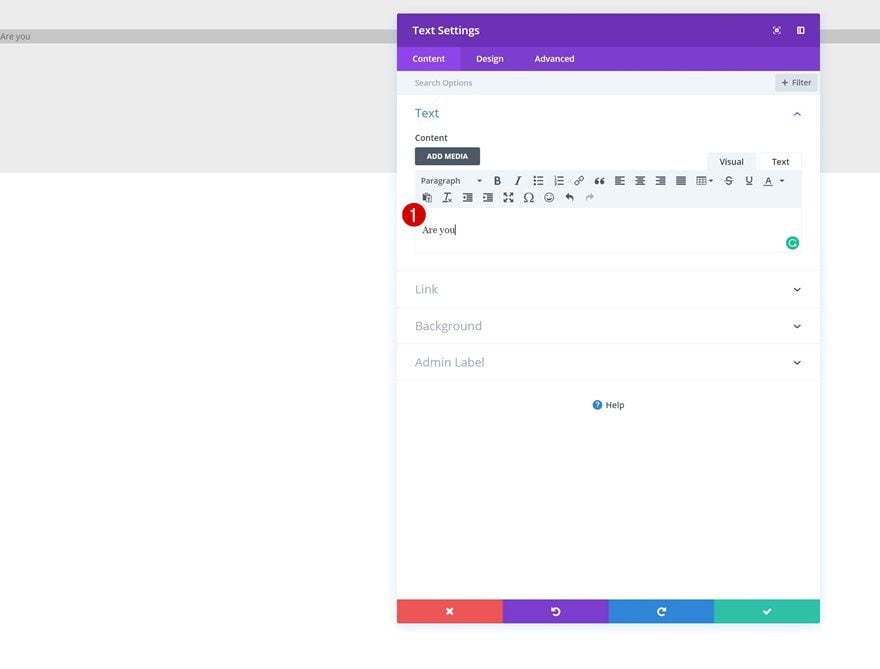
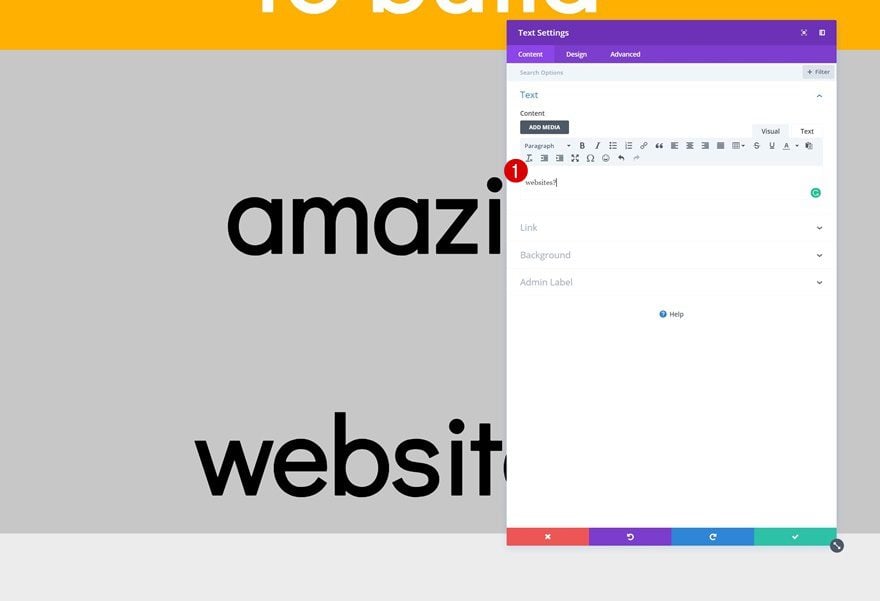
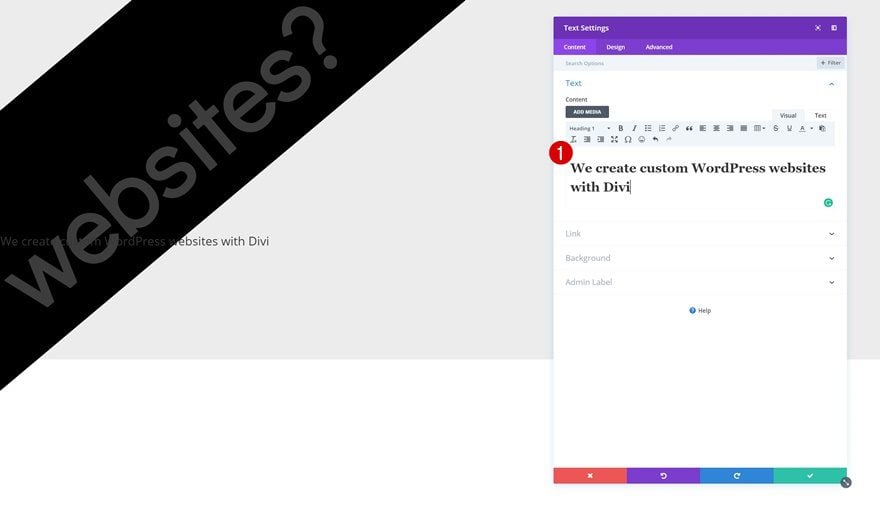
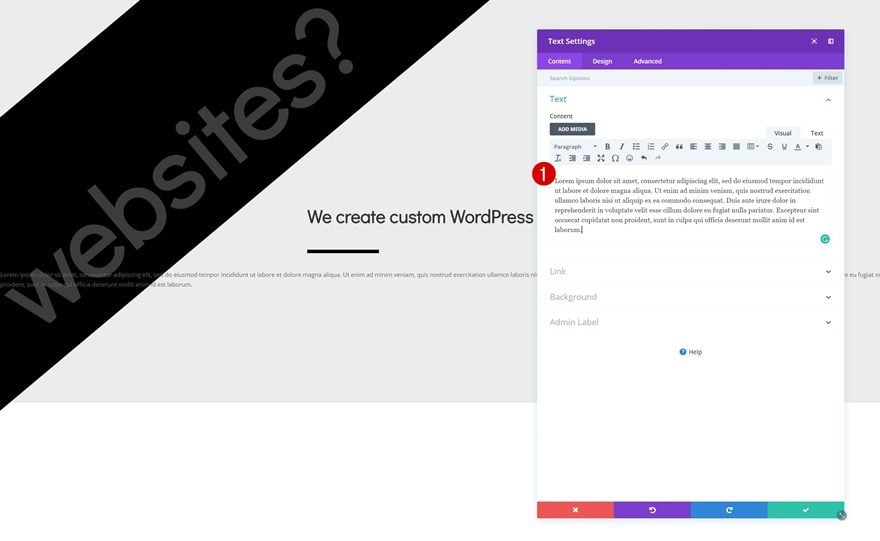
Add Text Module #1
Add Content
Time to start adding modules! The first module we need is a Text Module. Enter the first part of your headline to the content box using the paragraph text style.
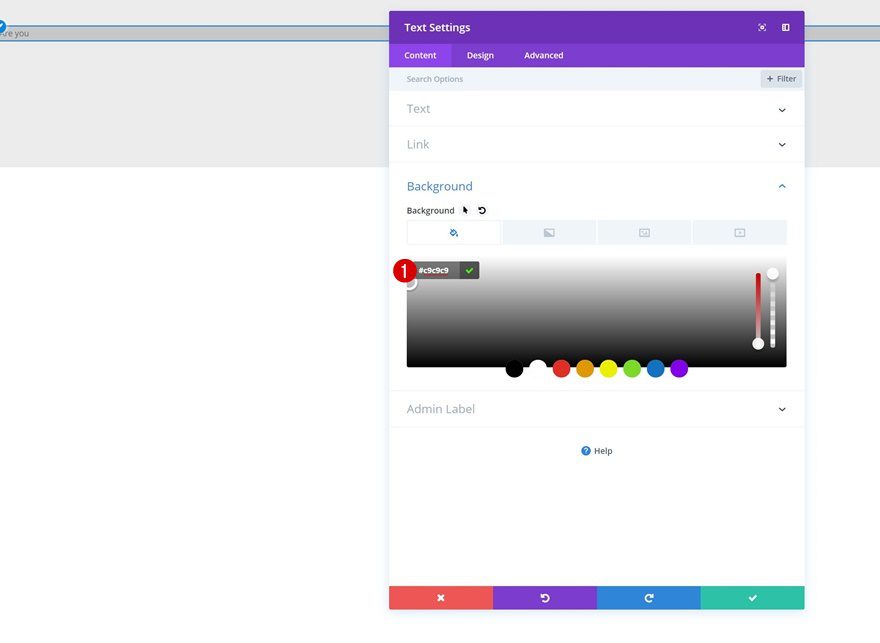
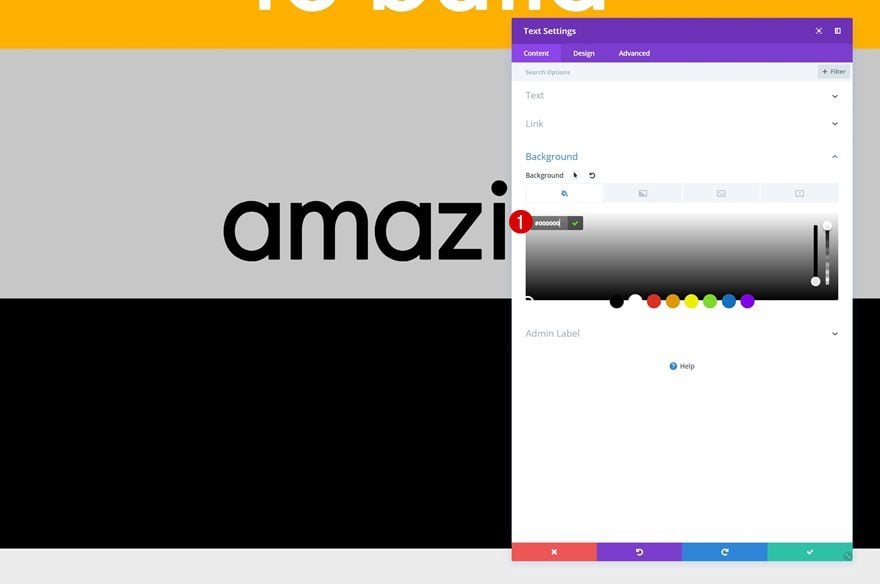
Background Color
Then, go to the background settings of the module and add a background color.
- Background Color: #c9c9c9
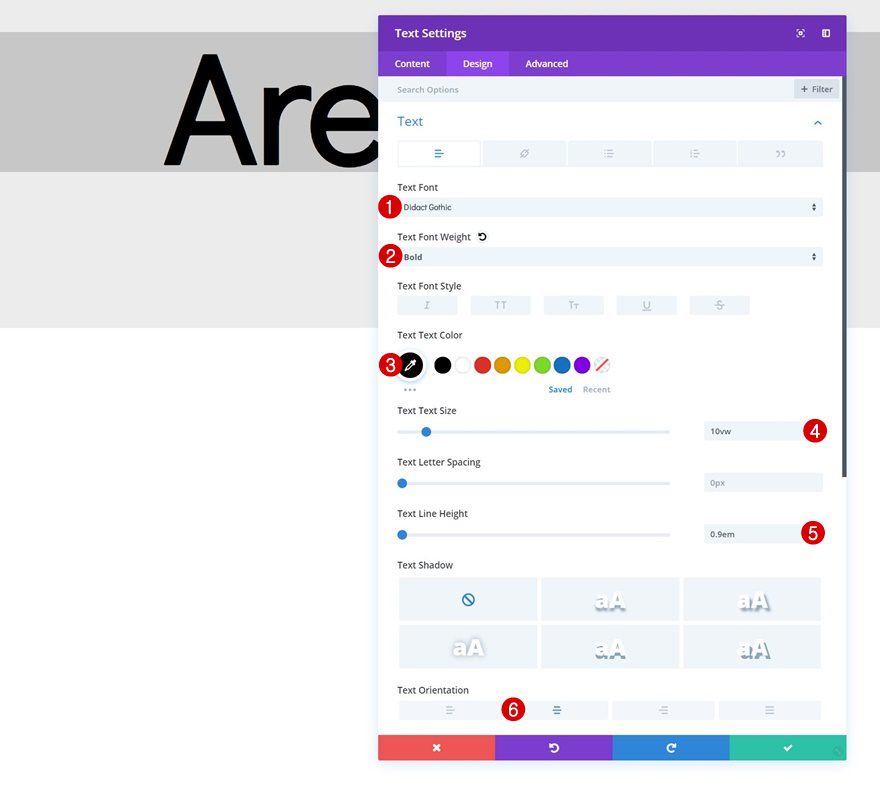
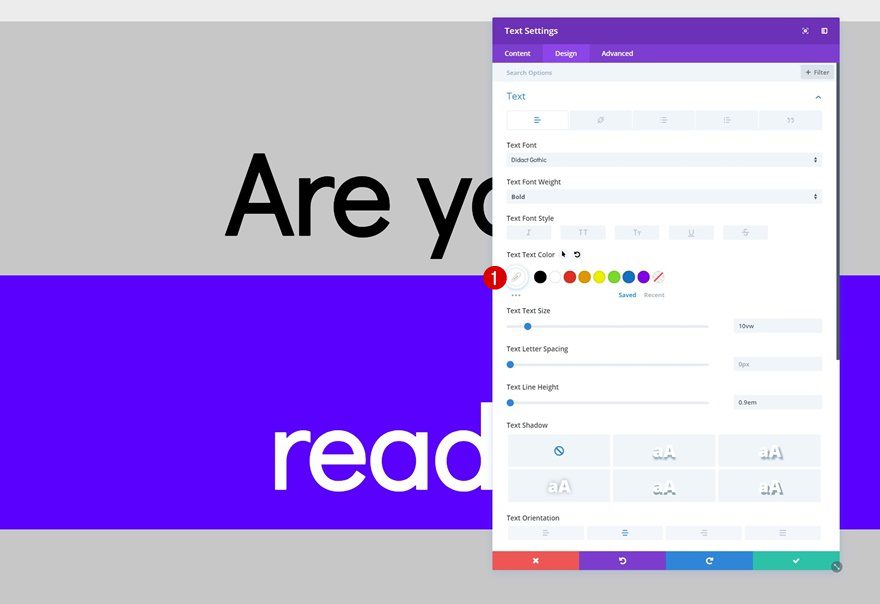
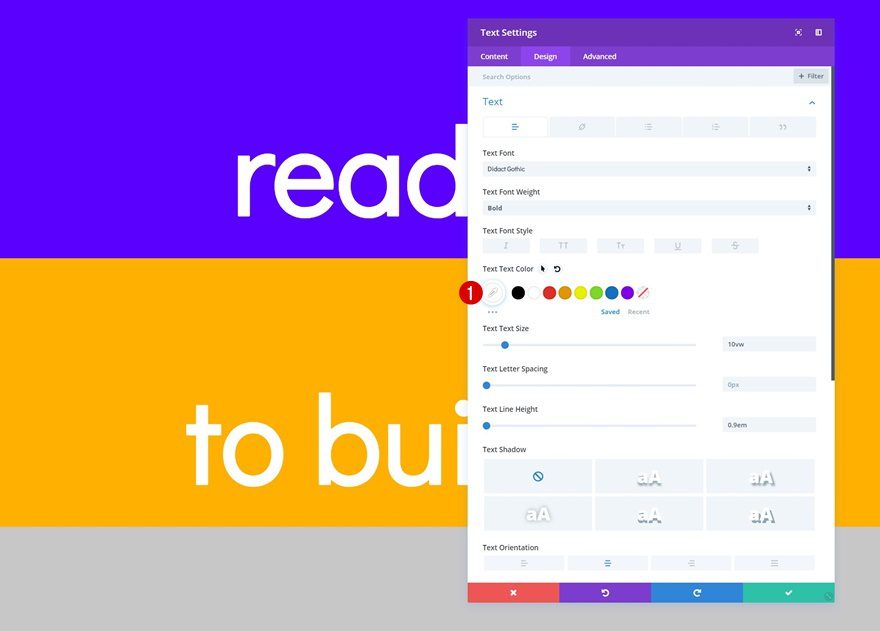
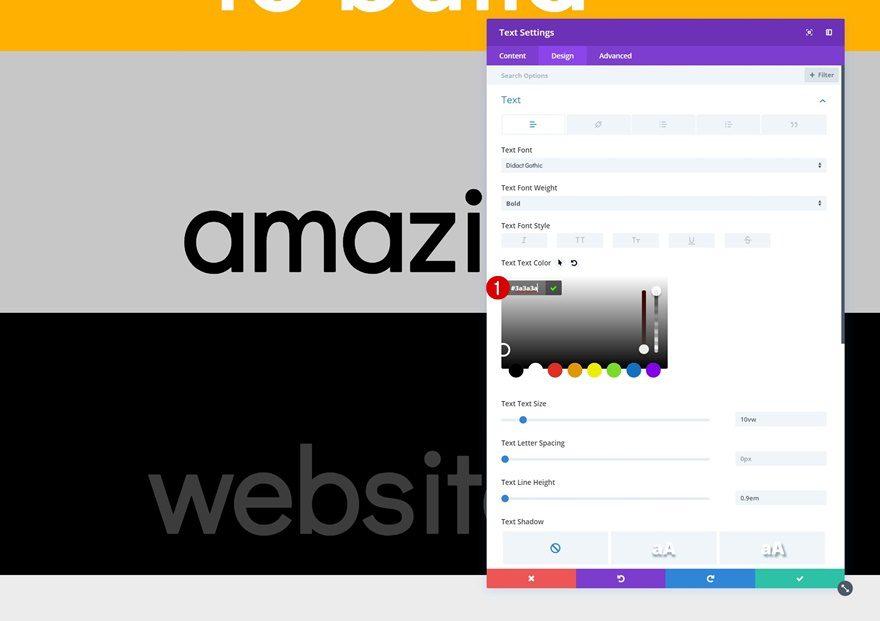
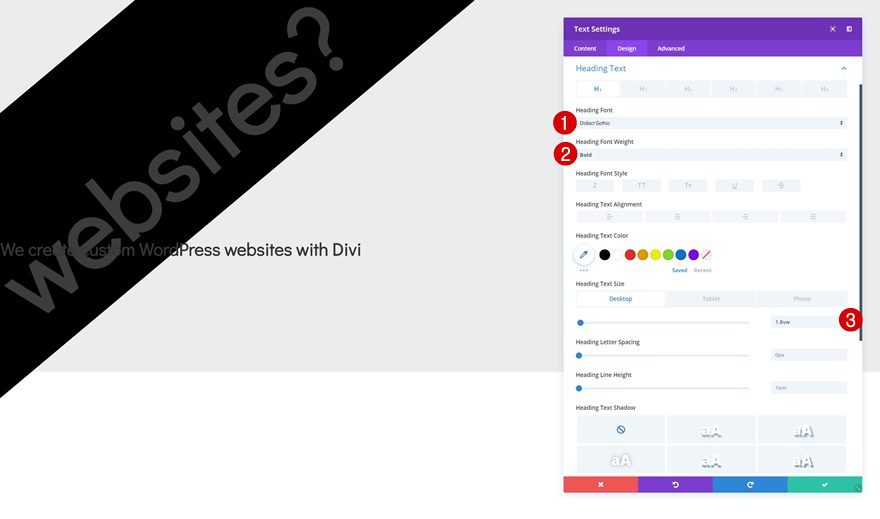
Text Settings
Change the text settings in the design tab too.
- Text Font: Didact Gothic
- Text Font Weight: Bold
- Text Color: #000000
- Text Size: 10vw
- Text Line Height: 0.9em
- Text Orientation: Center
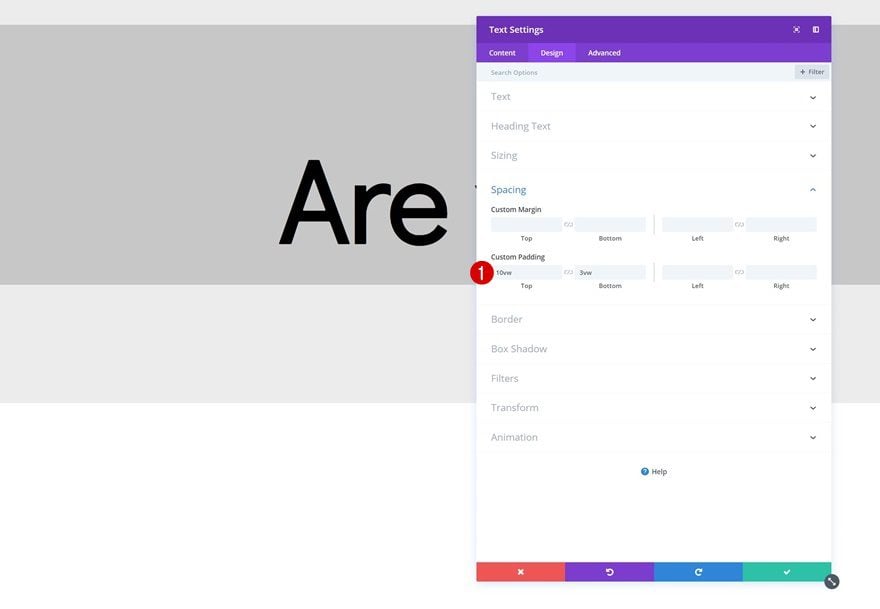
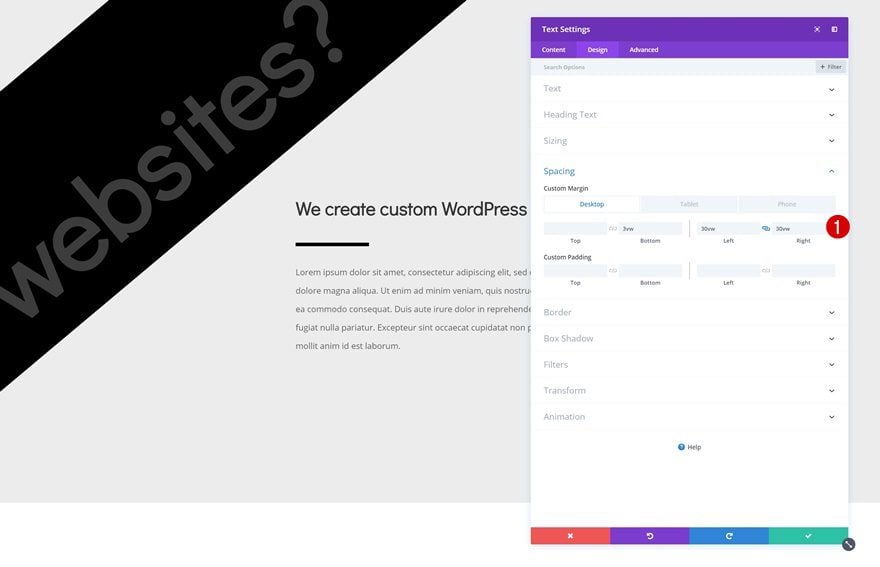
Spacing
And create the shape you want using custom top and bottom padding.
- Top Padding: 10vw
- Bottom Padding: 3vw
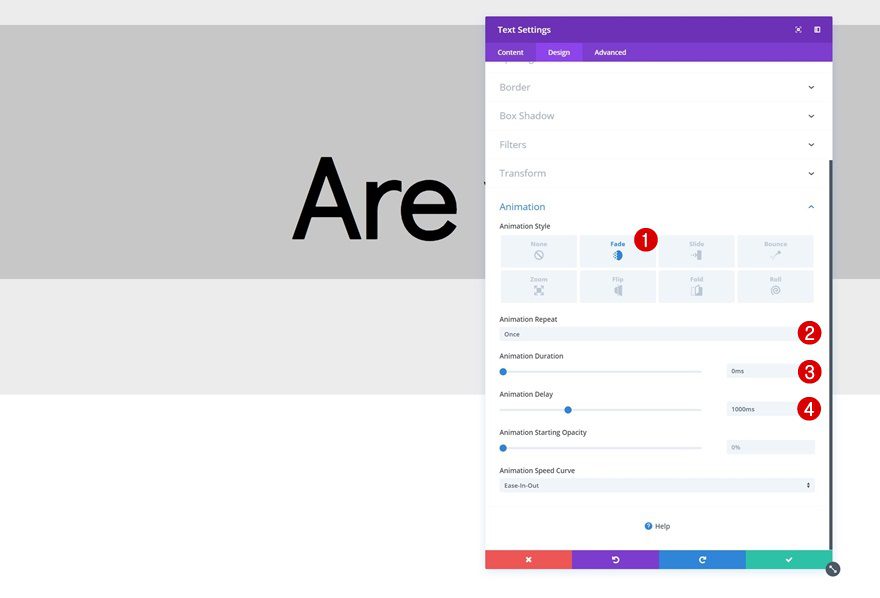
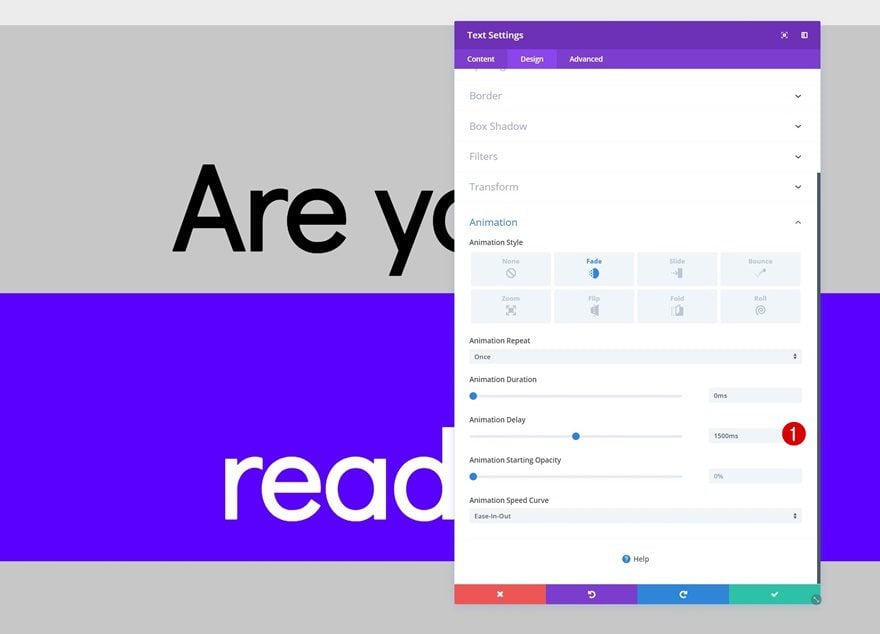
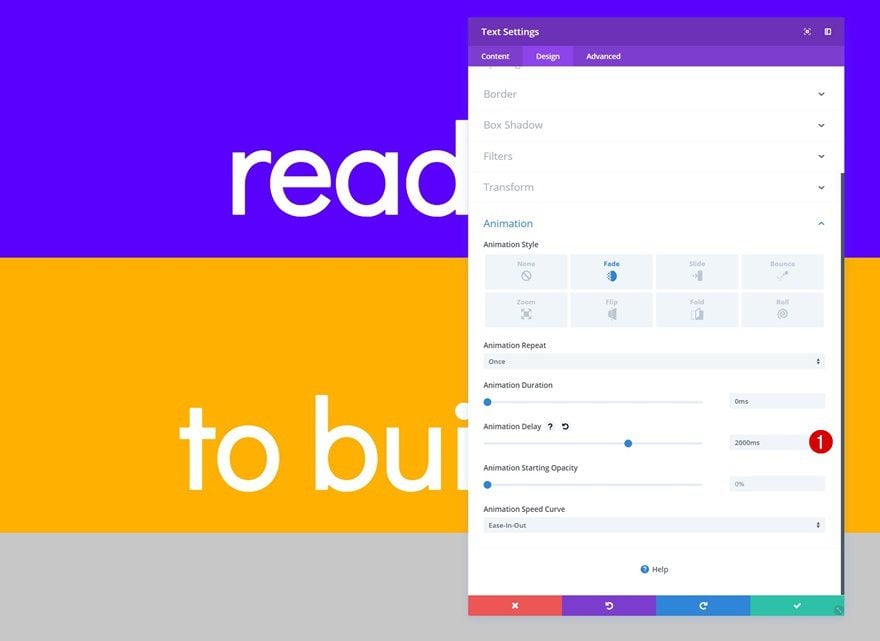
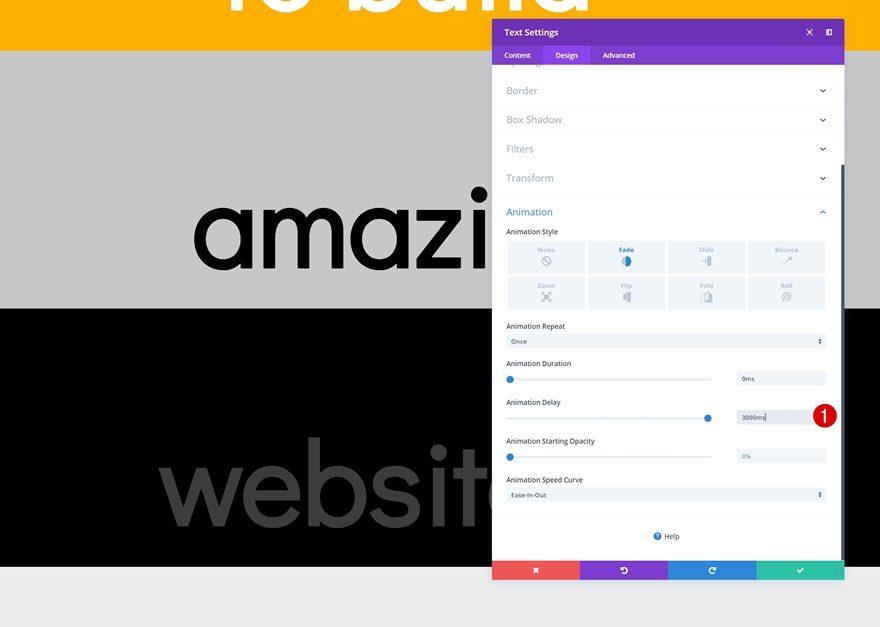
Animation
Last but not least, we’re going to add an animation. It’s important to make sure the animation duration and starting opacity are zero. This will allow the text module to show up with a flash effect.
- Animation Style: Fade
- Animation Repeat: Once
- Animation Duration: 0ms
- Animation Delay: 1000ms
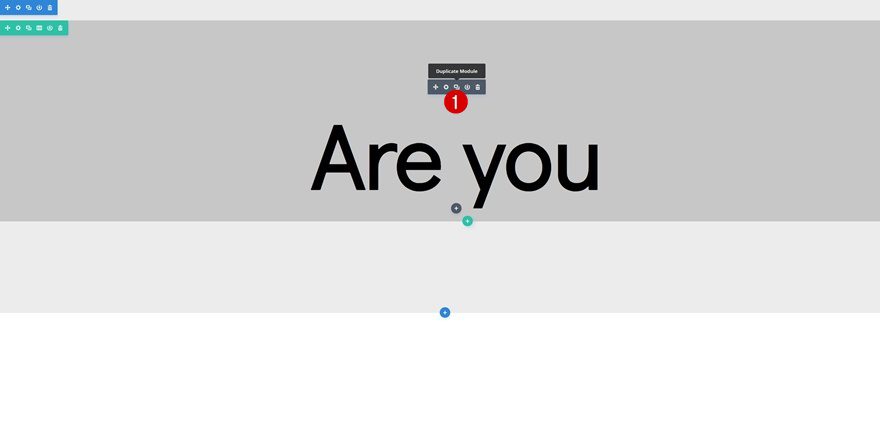
Clone Text Module x4
Once you’re done modifying the first Text Module, you can go ahead and clone the module up to as many times as you want, depending on the length of your headline. For each part of the headline which you want to show up with a flash effect, you’ll need a separate Text Module. For this example, we’ll need 4 extra modules.
Change Duplicate #1
Content
Change the copy of the first duplicate.
Background Color
Along with the background color.
- Background Color: #5900ff
Text Color
Change the text color into white.
- Text Color: #ffffff
Animation
And increase the animation delay in the animation settings. This will allow your visitors to have enough time to read the previous Text Module before this one shows up.
- Animation Delay: 1500ms
Change Duplicate #2
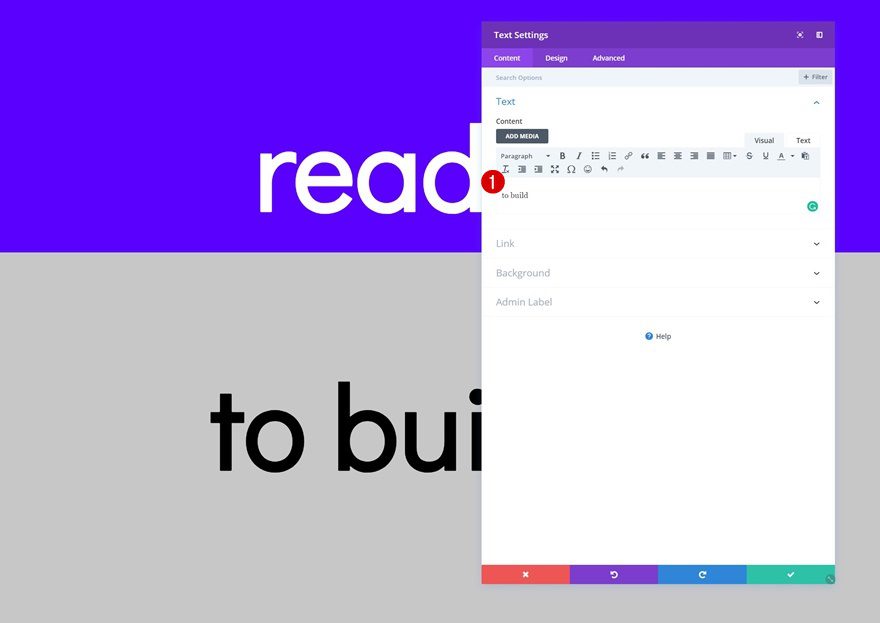
Content
Change the content of the second duplicate next.
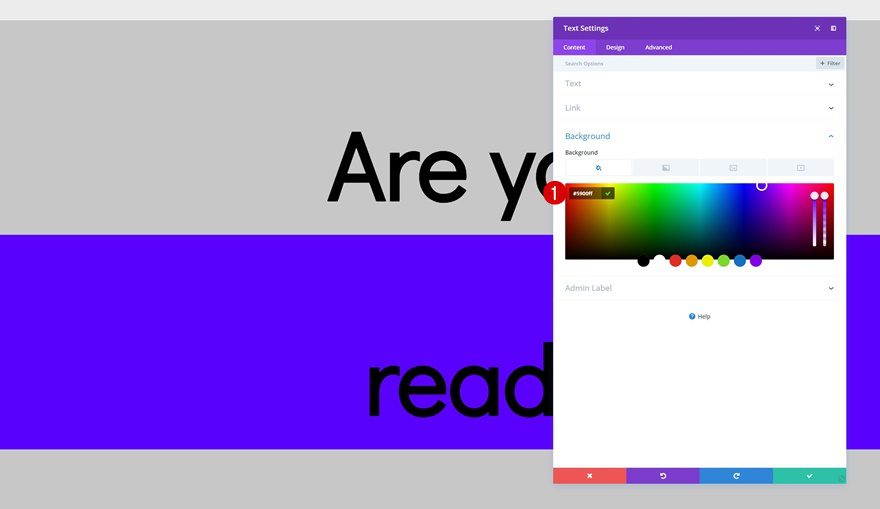
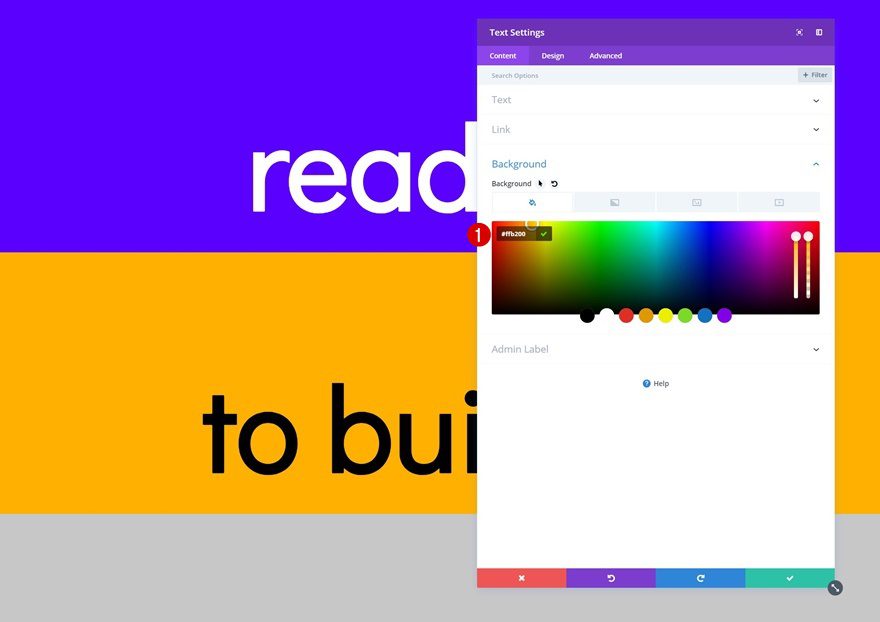
Background Color
Along with the background color.
- Background Color: #ffb200
Text Color
And the text color too.
- Text Color: #ffffff
Animation
Again, we’ll make sure that the animation delay is higher than the animation delay that was used for the two previous modules. We’re leaving 500ms in between each one of them to give people enough time to read.
- Animation Delay: 2000ms
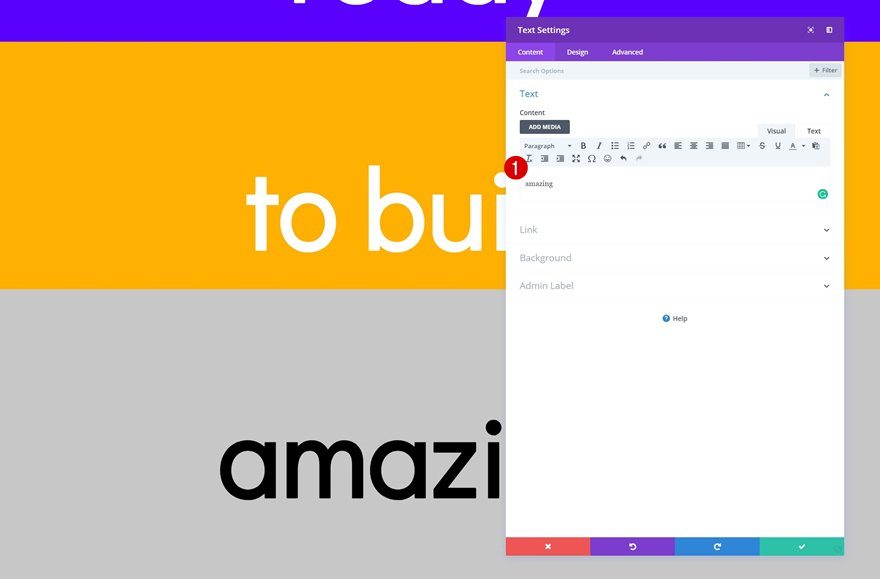
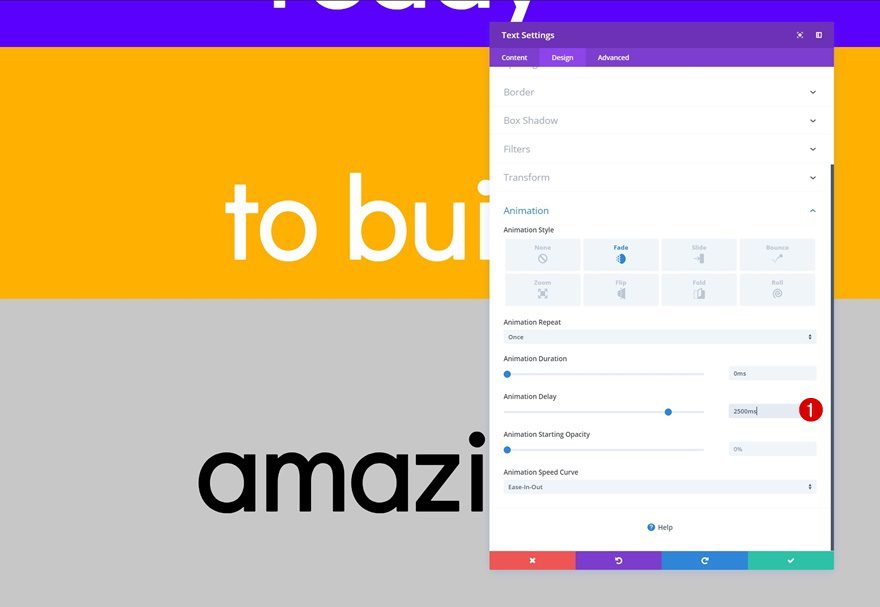
Change Duplicate #3
Content
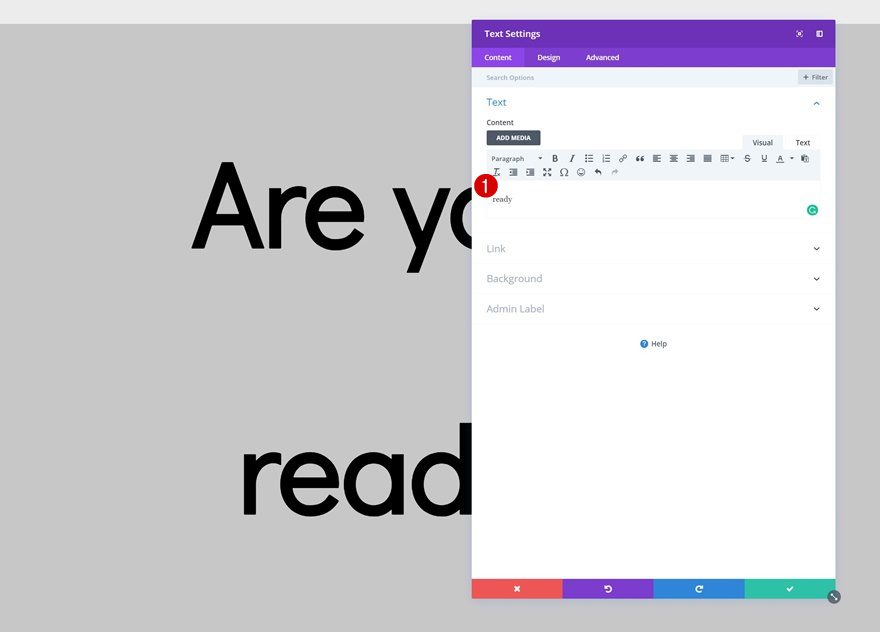
Continue by changing the content of the third duplicate.
Animation
Along with the animation delay.
- Animation Delay: 2500ms
Change Duplicate #4
Content
On to the next and last duplicate. Change the content.
Background Color
Along with the background color.
- Background Color: #000000
Text Color
Modify the text color too.
- Text Color: #3a3a3a
Animation
And increase the animation delay in the animation settings.
- Animation Delay: 3000ms
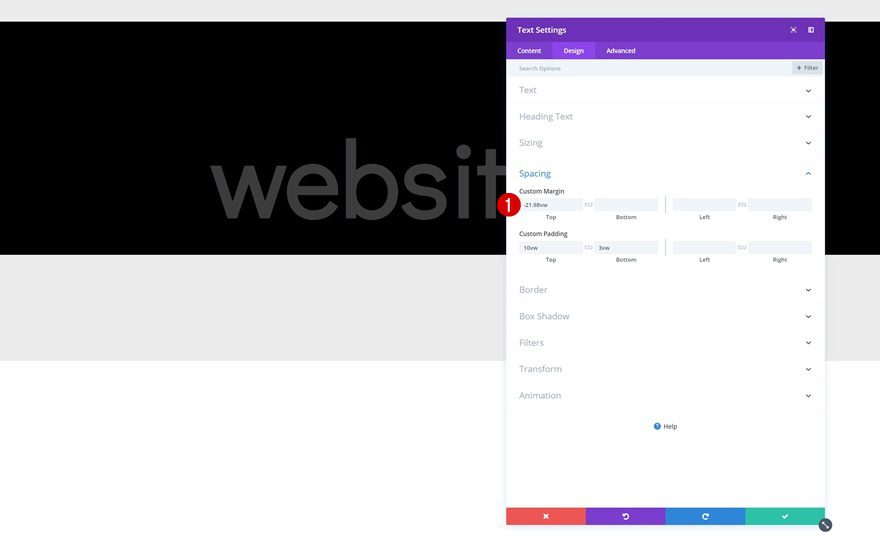
Add Negative Margin to Each Text Module Except the First One
Once you’re done customizing all Text Modules, you can go ahead and create an overlap. To create this overlap, we’re going to add some negative top margin to each one of the duplicate Text Modules. In other words, we’re making sure all the modules that come after the first module appear on top of that first Text Module.
- Top Margin: -21.98vw
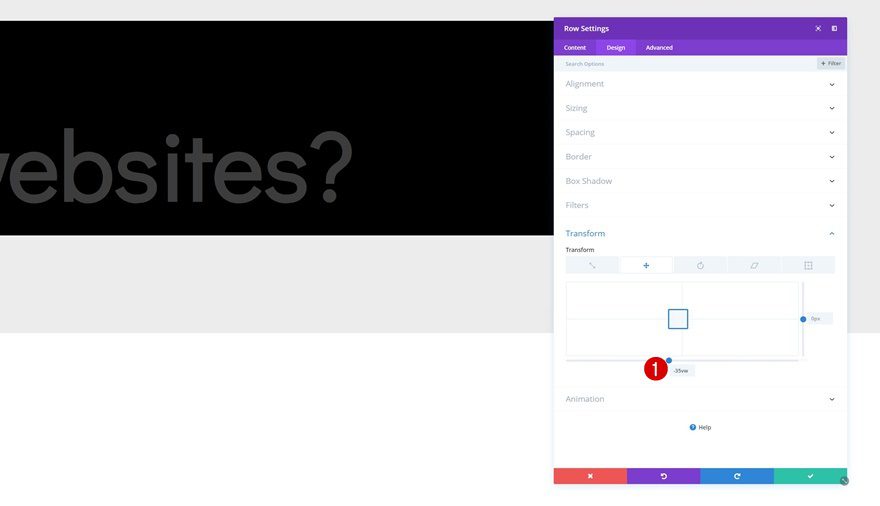
Transform Row
Transform Translate
Continue by transforming the entire row, starting with the transform translate settings.
- Bottom: -35vw
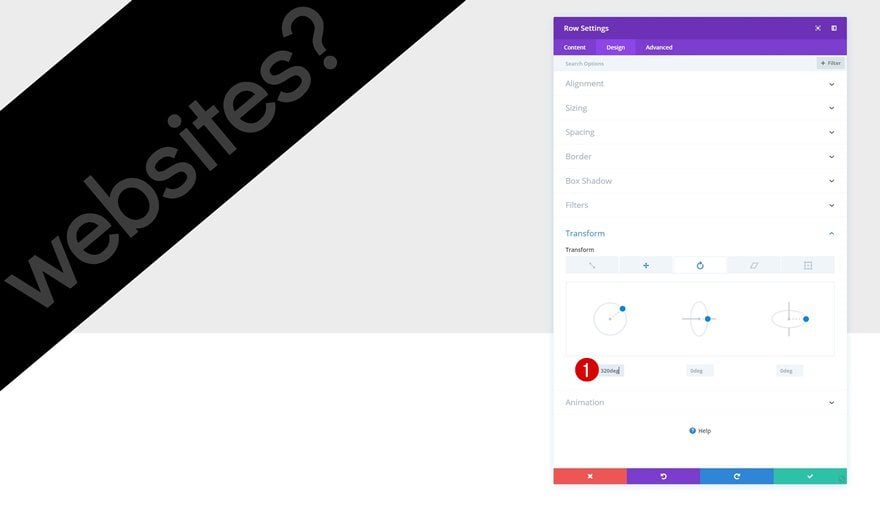
Transform Rotate
Modify the transform rotate values too.
- Left: 320deg
Add Row #2
Column Structure
On to the second row! Now that we have the headline effect in place, we can start adding the remaining modules. Add a new row using the following column structure:

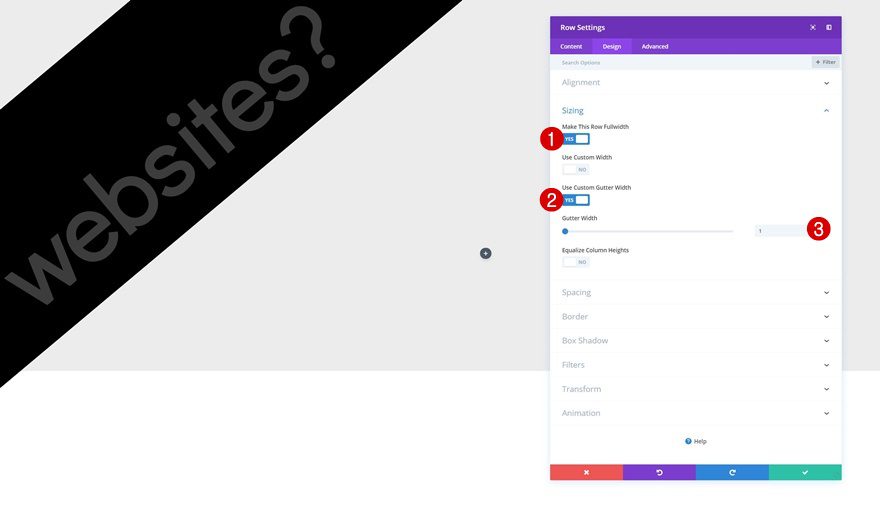
Sizing
Without adding any modules yet, open the row settings and allow the row to take up the entire width of the screen in the sizing settings:
- Make This Row Fullwidth: Yes
- Use Custom Gutter Width: Yes
- Gutter Width: 1
Spacing
Remove the default top padding of the row next.
- Top Padding: 0px
Add Title Text Module to Column 2
Add H1 Content
Time to start adding modules! The first module we need is a title Text Module. Add some H1 content of your choice.
H1 Text Settings
Then, go to the design tab and change the H1 text settings.
- Heading Font: Didact Gothic
- Heading Font Weight: Bold
- Heading Text Size: 1.8vw (Desktop), 3.8vw (Tablet), 4vw (Phone)
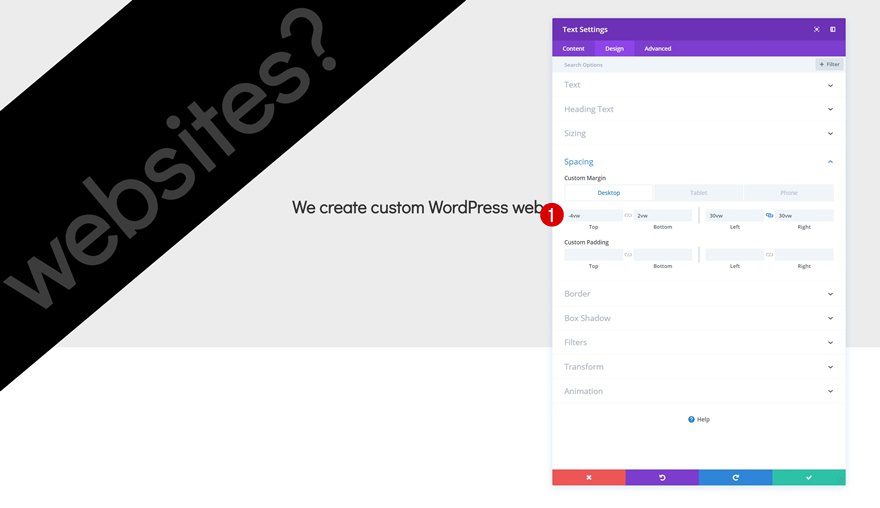
Spacing
Add some custom margin values to the spacing settings.
- Top Margin: -4vw
- Bottom Margin: 2vw
- Left Margin: 30vw
- Right Margin: 30vw (Desktop), 15vw (Tablet & Phone)
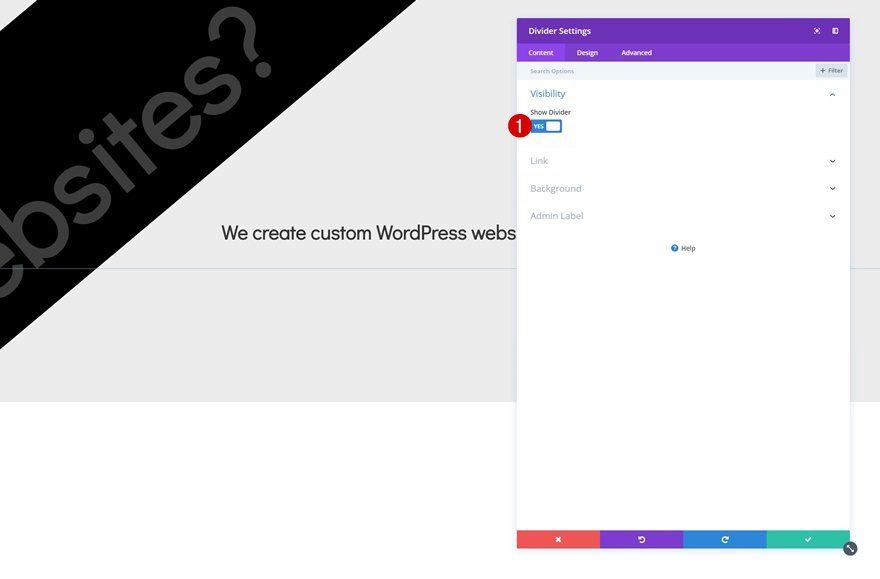
Add Divider Module to Column 2
Visibility
The next module we need is a Divider Module. Make sure the ‘Show Divider’ option is enabled.
- Show Divider: Yes
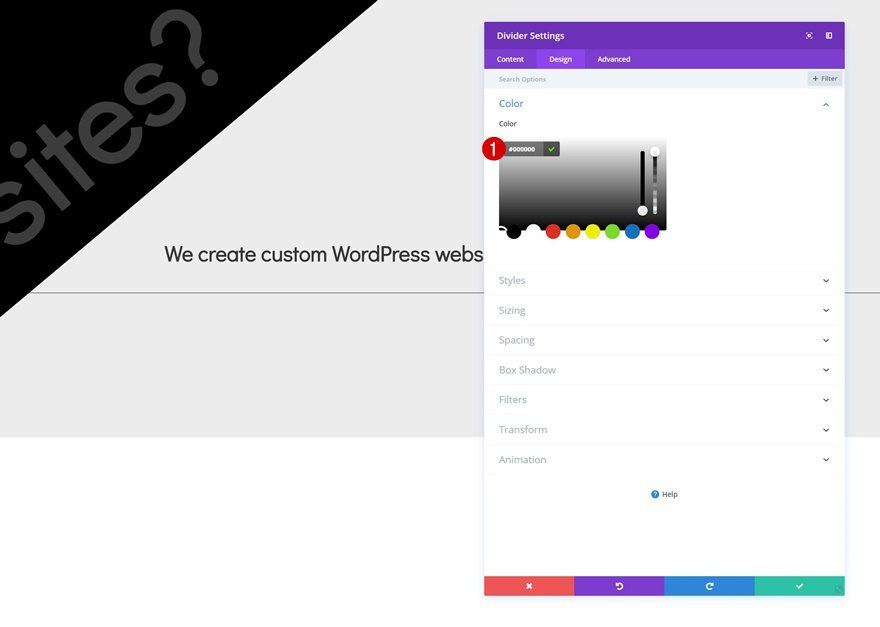
Color
Then, go to the design tab and change the divider color.
- Color: #000000
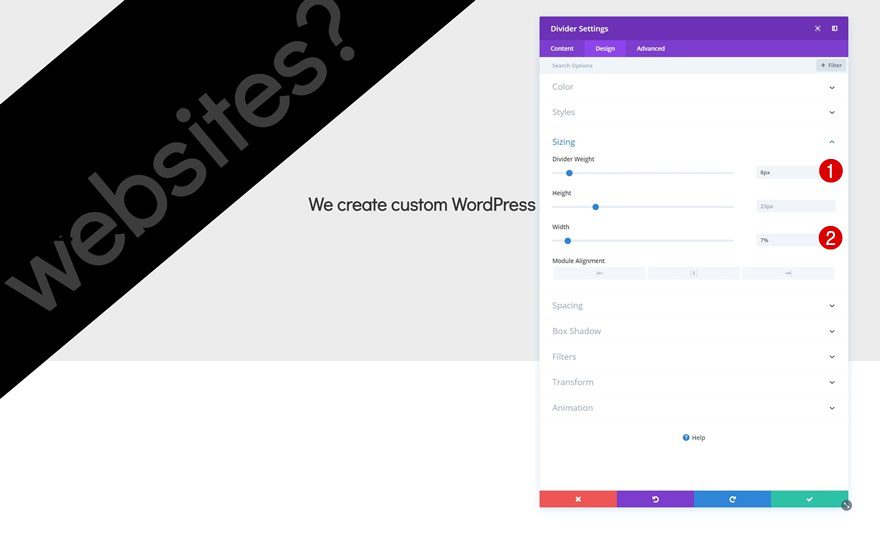
Sizing
Modify the sizing settings too.
- Divider Weight: 8px
- Width: 7%
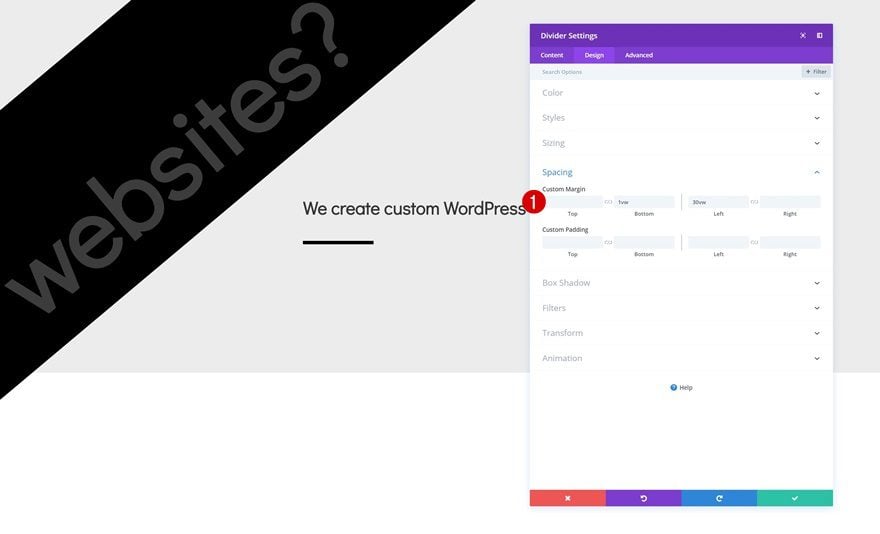
Spacing
Along with the spacing settings.
- Bottom Margin: 1vw
- Left Margin: 30vw
Add Description Text Module to Column 2
Add Content
The next module we need is another Text Module. Enter some content of your choice.
Text Settings
Then, modify the text settings in the design tab.
- Text Size: 0.8vw (Desktop), 1.3vw (Tablet), 1.6vw (Phone)
- Text Line Height: 2.2em

Spacing
Add some custom margin values in the spacing settings too.
- Bottom Margin: 3vw
- Left Margin: 30vw
- Right Margin: 30vw (Desktop), 15vw (Tablet & Phone)
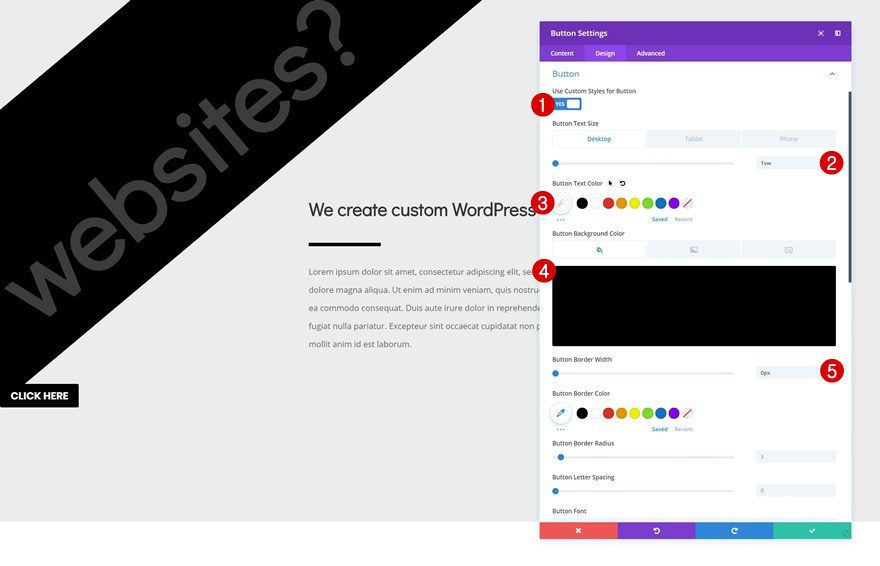
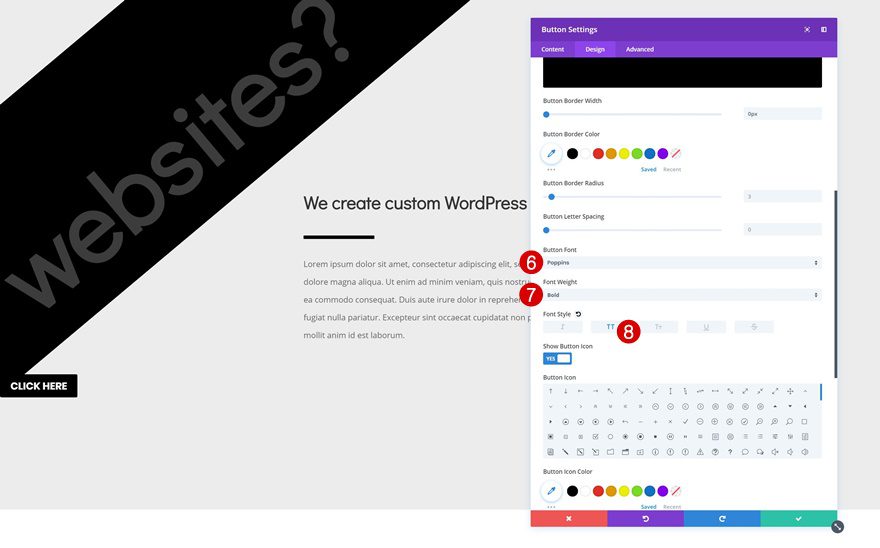
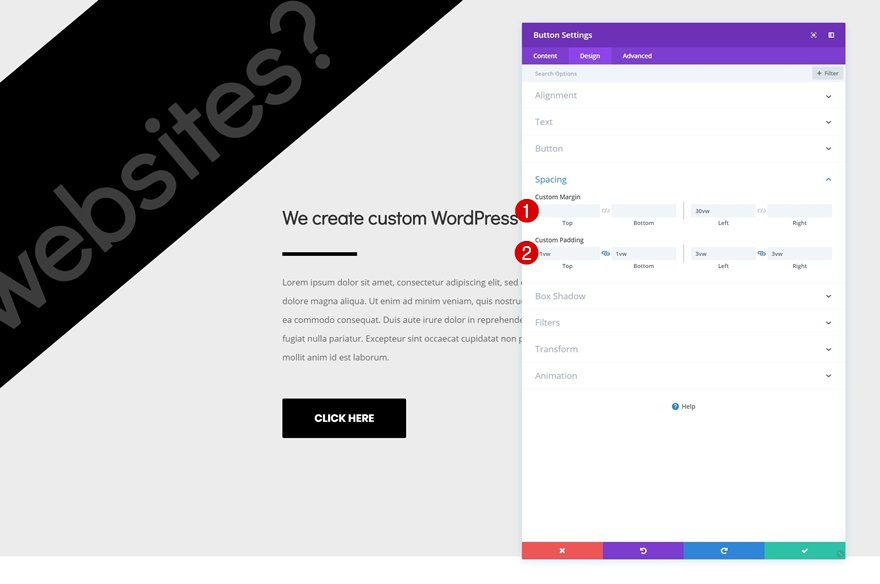
Button Settings
On to the next and last module, which is a Button Module. Add some copy of your choice and change the button settings accordingly:
- Use Custom Styles for Button: Yes
- Button Text Size: 1vw (Desktop), 1.5vw (Tablet), 2vw (Phone)
- Button Border Width: 0px
- Button Font: Poppins
- Font Weight: Bold
- Font Style: Uppercase
Spacing
Go to the spacing settings and add some custom margin and padding values, and you’re done!
- Left Margin: 30vw
- Top Padding: 1vw
- Bottom Padding: 1vw
- Left Padding: 3vw
- Right Padding: 3vw
Preview
Now that we’ve gone through all the steps, let’s take a final look at the outcome across different screen sizes.
Desktop
Mobile
Final Thoughts
In this post, we’ve shown you how to make your headline pop using Divi’s built-in options only. This is a great technique for grabbing the attention of your visitors and communicating your message in an original way. If you have any questions or suggestions, make sure you leave a comment in the comment section below!


Thanks for sharing such information trick and its really very helpful to me.
Thanks for this awesome tutorial
Hello,
I applied this tutorial and everything works perfectly
except the first text module “Are You” which is out of frame,
and therefore does not appear.
I redid the settings with some modifications but
I only made the problem worse 🙂
I will still look, but otherwise the effect is really interesting
since it is not a gif animation with images.
Thank you
Google translate fr to en
Hi,
I had a similar issue. In my case, since I had ads between my page content and header, the entire Headline row was bleeding outside the section container.
Solution:
I added the following CSS under Section settings > Advanced > Custom CSS > Main Element
overflow:hidden;
Hope this helps!
P.S. Thanks DV for the great tutorial.
Idem j’ai essayé 1055562 combinaisons différentes pour faire fonctionner le loop mais impossible :/
Hello,
Very good ideas
Thank you
Any chance to have the json file ?
Hi, probably i do something wrong but… how can i loop the animation?
I like animations very much to designing my blog posts especially review articles with HD screenshots.
After reading thousands of positive reviews about ElegentThmes, I would like to buy one of your product for my affiliate blog.
ElegentThemes are a great resource to design WordPress blog when someone doesn’t have coding knowledge.
I have been blogging 5+ blog and thinking to buy Lifetime Package for designing my all blogs with Divi.
Thanks for creating a grateful product
Thank you for providing a great content to your blog. I’ve learned a lot from your post and I am starting to apply your great knowledge with my site.
Can we download it? Thank you
NICE POST
Thanks for above information I am just looking to make new website of Photography.
Its very helpful.
Can Members download Jason files for this ?
Nicely done…
This is an awesome effect! Faleminderit 😉
Great article
Thanks
Please post a JSON file. Thank you so much 🙂
Sorry but the effect doesn’t work… something is missing in order for the content to flash.
Also, on my DIVI builder I do not have the option “transform”:! Is this an add on? or a plugin?
You need to update to the latest Divi version. The transform option is on the latest release. You will not get the flashing effect without the transform option. The preview in this tutorial is a GIF, and therefore it loops. I have not tested this on any Divi site yet, but I do not think it loops after all headlines has flashed once. Therefore, the preview can be a bit misleading.
It’s an update.
It´s look like very great. Thank you for this amazing feature.
Of course I built it immediately.
But the loop does not start again from the beginning.
The idea looks great. However it doesn’t loop. It just flashes through the cycle once and then stops. I even tried changing the animation Repeat setting to loop and it doesn’t make a difference.
You are the best for me. Your posts are ever great and amazing. Thank you very munch
Awesome! Now make that into a module, thanks!
Amazing Job ! Thanks for the tips 😀
Hi,
I enjoy your tuts. This one brings another wind of freshness to our sites . Thanks !
Any chance to have the json file ?
Patrick
@Donjete That is a pretty awesome Headline Animation effect. I really love it. You are #TotallyAwesome.
You should make it as a download.
Thank You very much !