
Sticky headers can be effective for keeping your menu and other important CTAs accessible for users. But sometimes sticky headers can become distracting, especially for large headers on smaller screen sizes. Usually, we resort to shrinking the header and/or hiding elements in the sticky state to create more space for content. However, creating a toggle tab for those sticky headers could be a great alternative. Including a small toggle tab under the sticky header gives users the option to hide/show that sticky header whenever they want. In this tutorial, we are going to show you how to create a toggle tab for a sticky header in Divi.
Let’s get started!
Sneak Peek
Here is a quick look at the Sticky Header Toggle Tab we’ll build in this tutorial. Notice how the toggle tab becomes visible once the user scrolls beyond the height of the header. Then the user can toggle the sticky header by clicking the tab. Once the user scrolls back to the top of the page, the header is made visible and the tab is hidden.
And here is a codepen demonstrating this same concept.
Download the Toggle Tab for Sticky Header Template for FREE
To lay your hands on the designs from this tutorial, you will first need to download it using the button below. To gain access to the download you will need to subscribe to our newsletter by using the form below. As a new subscriber, you will receive even more Divi goodness and a free Divi Layout pack every Monday! If you’re already on the list, simply enter your email address below and click download. You will not be “resubscribed” or receive extra emails.

To import the template to your Divi Library, do the following:
- Navigate to the Divi Theme Builder.
- Click the Portability Icon at the top right of the page.
- In the portability popup, select the import tab.
- Choose the download file from your computer.
- Then click the import button.
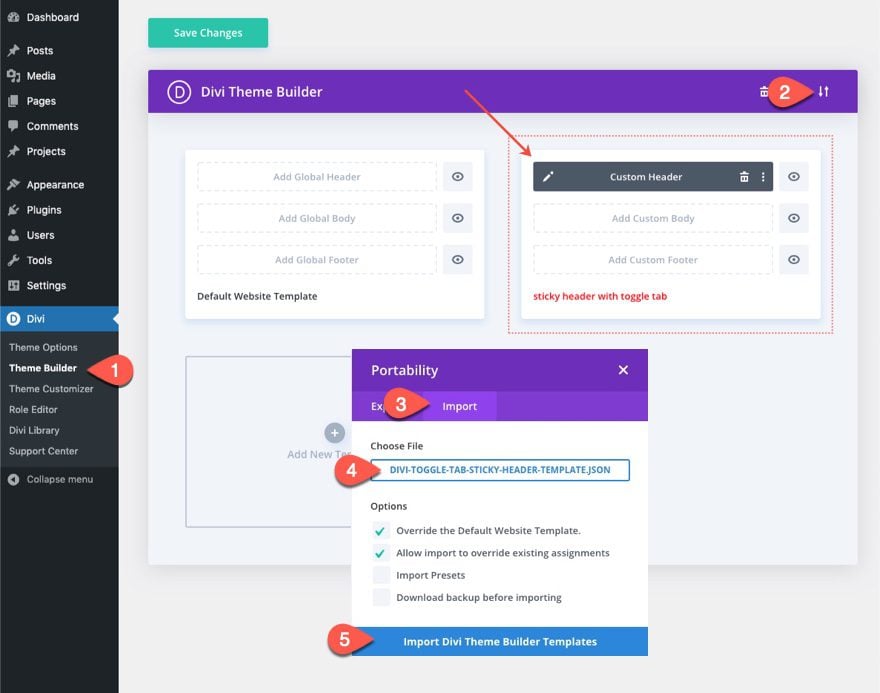
Once done, the template will be available in the Divi Theme Builder.
From there, you can open the template settings and assign the template to any or all pages of your website to test out the results. Or you can click open the header template editor to edit the template layout.
Let’s get to the tutorial, shall we?
Part 1: Uploading the Premade Header Template to the Divi Theme Builder
To speed up the building process for this tutorial, we are going to use a premade header which is free to download from our blog.
Download the Template
To get the premade header template, go to the post featuring our FREE Header and Footer Template for Divi’s Interpreter Layout Pack.

Then enter your email address inside email option. Once done, you will see the “Download the Files” button. Click on the button to download the file.
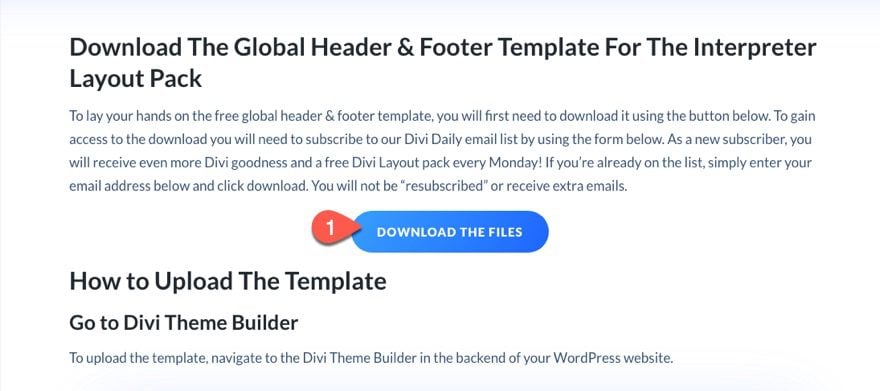
Once the file is downloaded, unzip the JSON file.
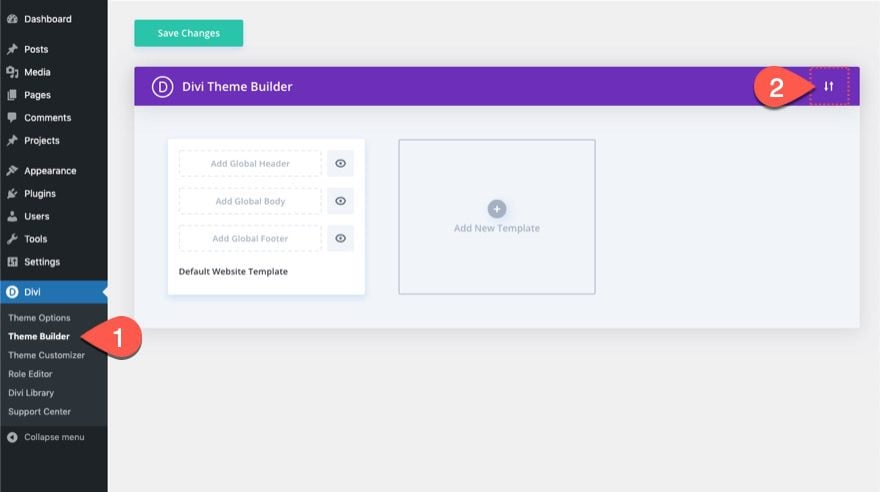
Import the Template
Next, navigate to Divi > Theme Builder. And click the portability icon at the top right of the page.
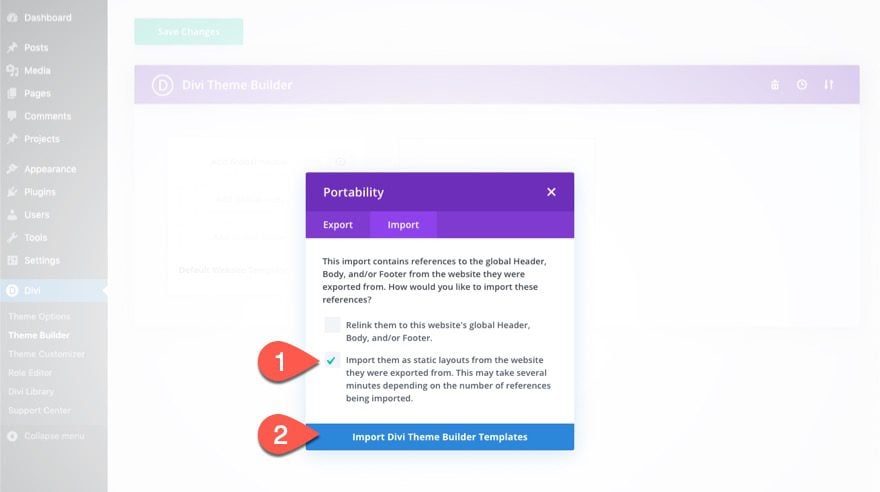
Select the Import tab, choose the JSON file you just unzipped, uncheck the options and click the import button.
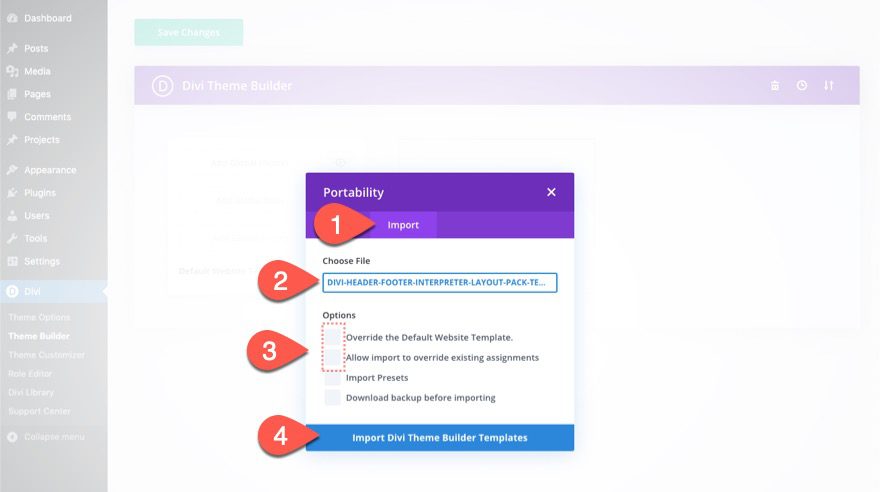
Next, select the option “Import them as static layouts…” and click the Import button again.
Open the Header Template Editor
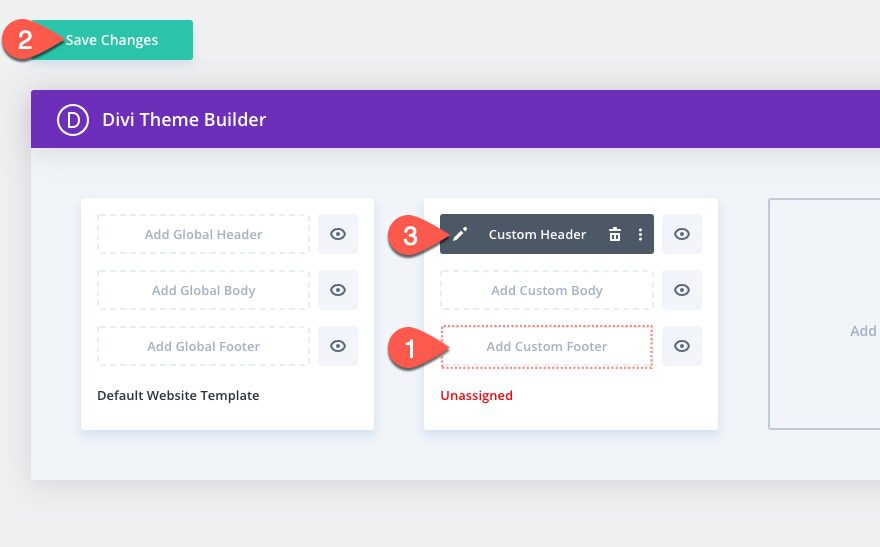
Once the template has been loaded to the theme builder, delete the footer of the template and click save changes. Then click the edit icon to edit the custom header of the template.
Open Layers Modal and Delete Existing Code Module
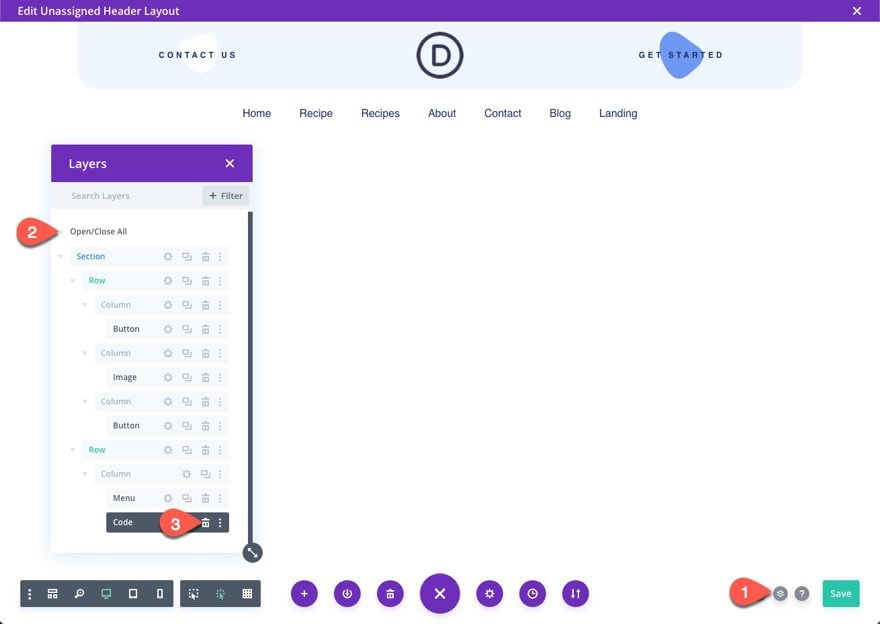
In the header layout editor, open the settings menu at the bottom of the page, and click the layers view icon to open the layers modal. This will help us access our Divi elements easier going forward.
In the layers modal, click the Open/Close All toggle so you can see all the Divi Elements. In the second row of the section, delete the code module. We won’t need this custom code for this tutorial.
Part 2: Creating a The Sticky Header with Toggle Tab in Divi
The Section Settings
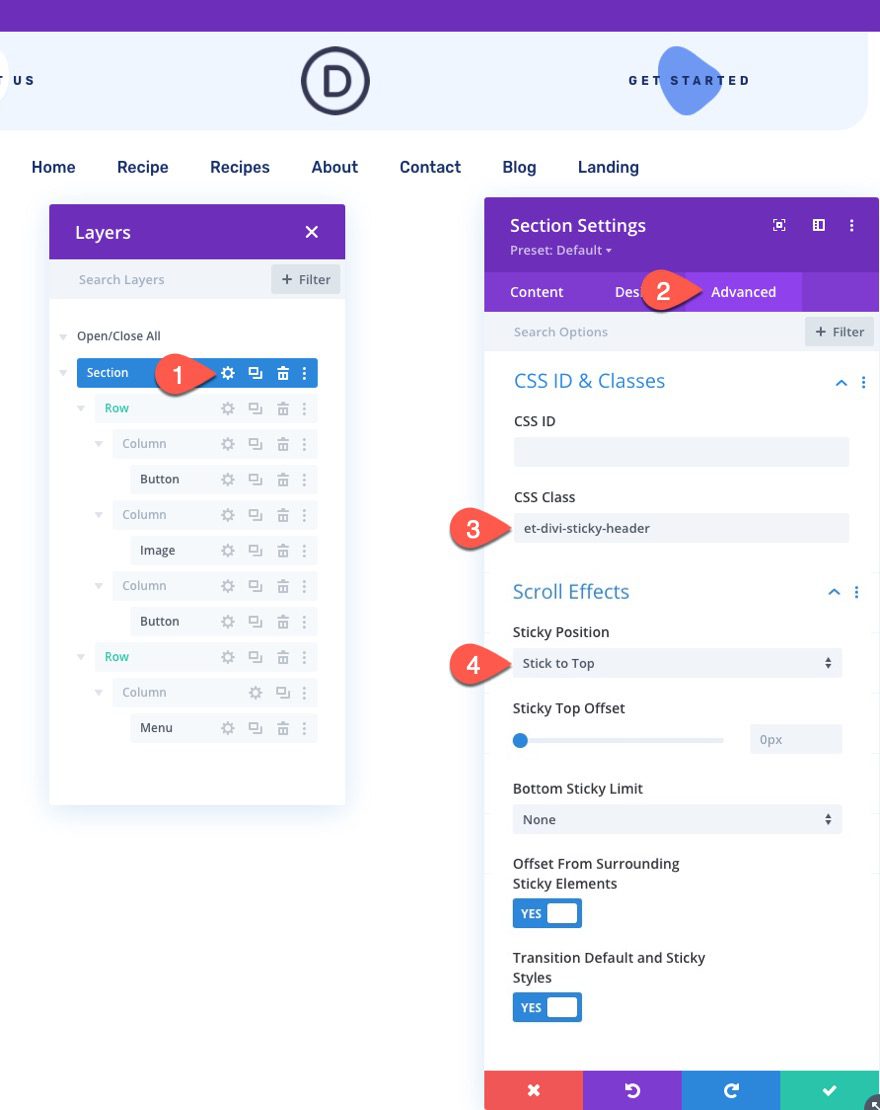
For this header, we are going to make the entire section sticky so that the header will stick to the top of the page when scrolling. We will also give the section a custom CSS Class to target later on with our custom code.
Open the section settings and update the following:
- CSS Class: et-divi-sticky-header
- Sticky Position: Stick to Top
Creating the Toggle Tab with a Blurb Module
Next, we are going to create our toggle tab using a blurb module.
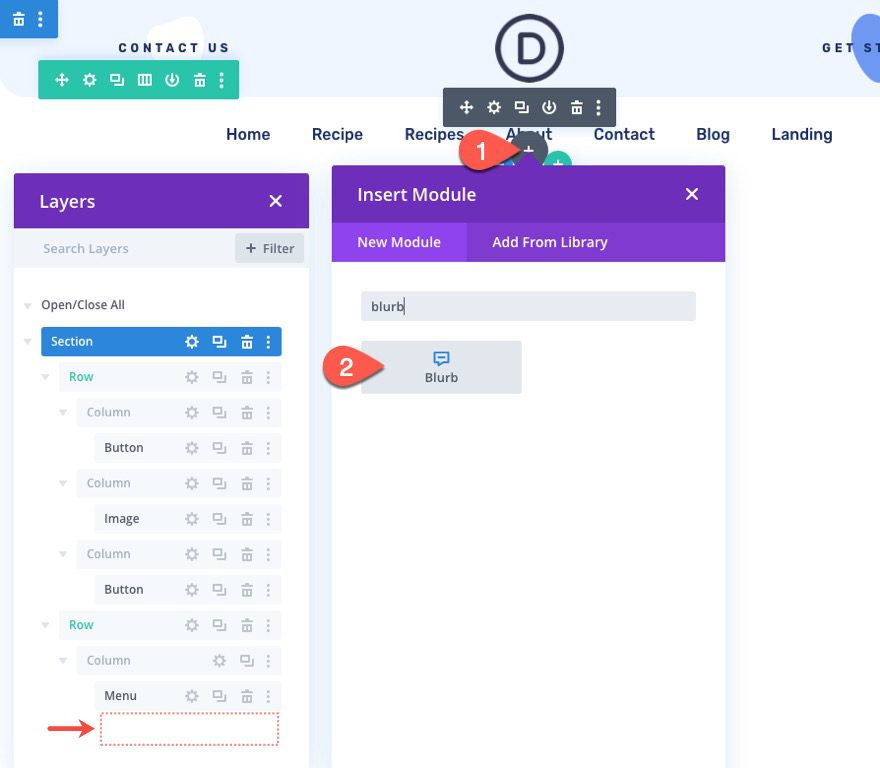
To do this, add a new blurb module at the very bottom of the second row under the menu module.
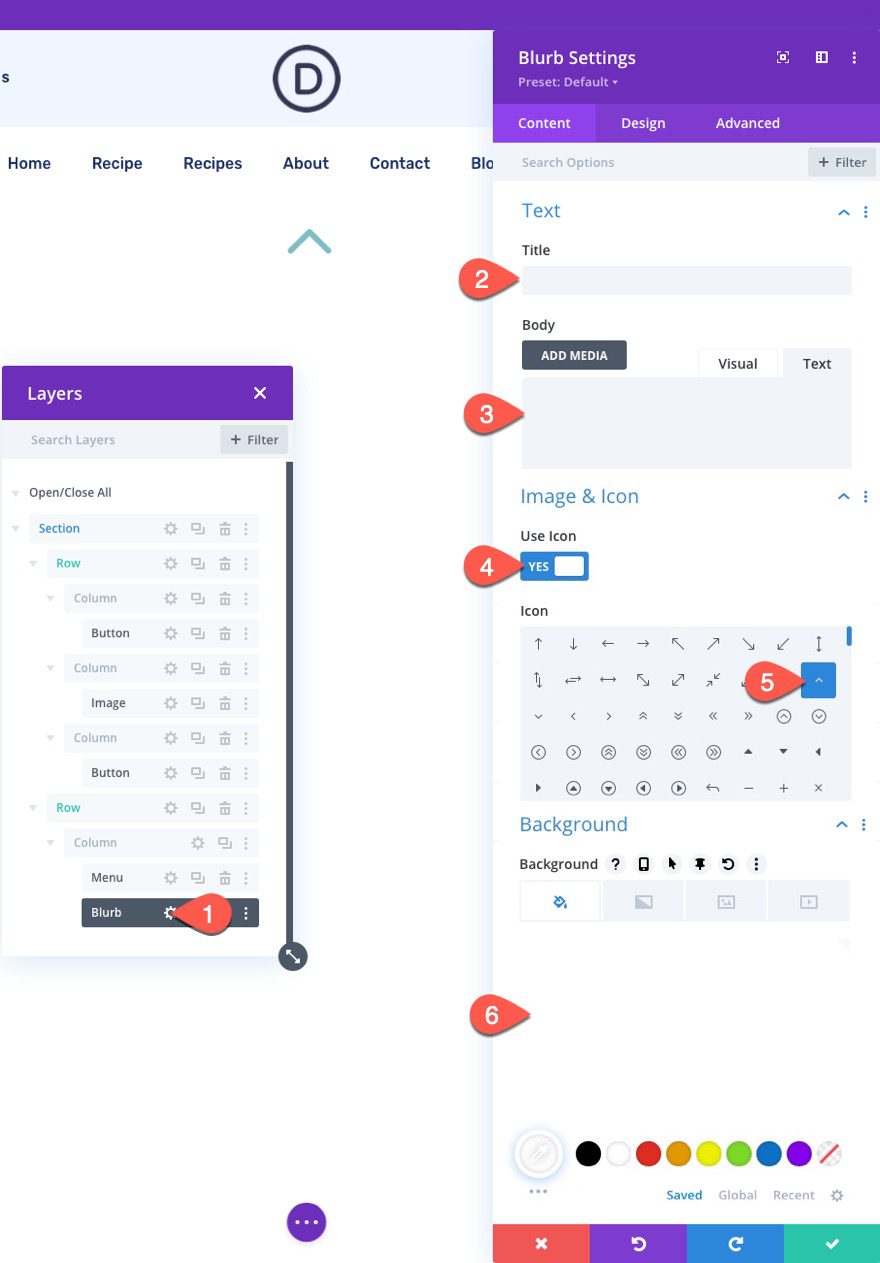
Then open the blurb settings and update the content as follows:
- delete Title content
- delete Body content
- Use Icon: YES
- Icon: up arrow (see screenshot)
- Background Color: #ffffff
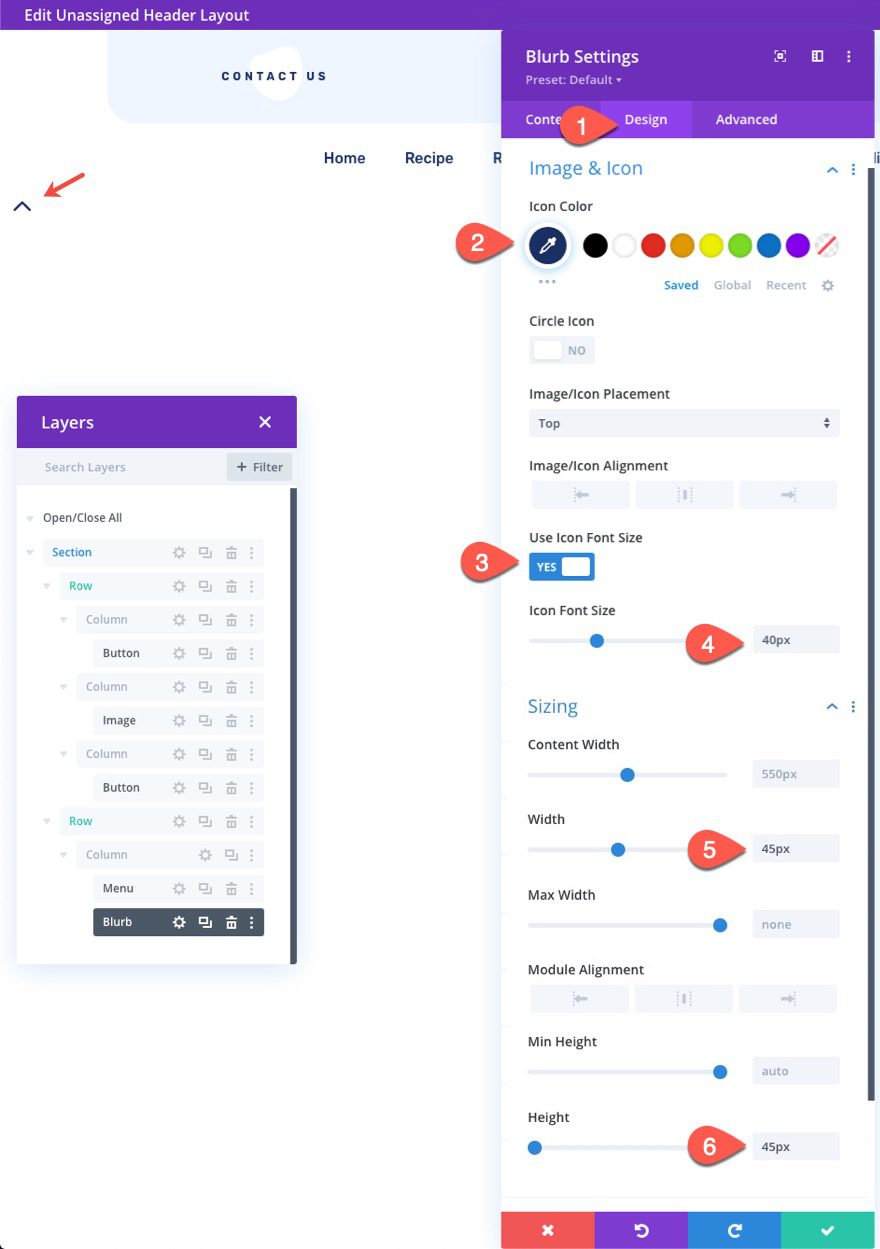
Under the design tab, update the following:
- Icon Color: #1a3066
- Use Icon Font Size: YES
- Icon Font Size: 40px
- Width: 45px
- Height: 45px
- Margin: 0px
- Rounded Corners: 12px bottom left, 12px bottom right
- Transform Translate X Axis: 100%
- Image/Icon Animation: No Animation
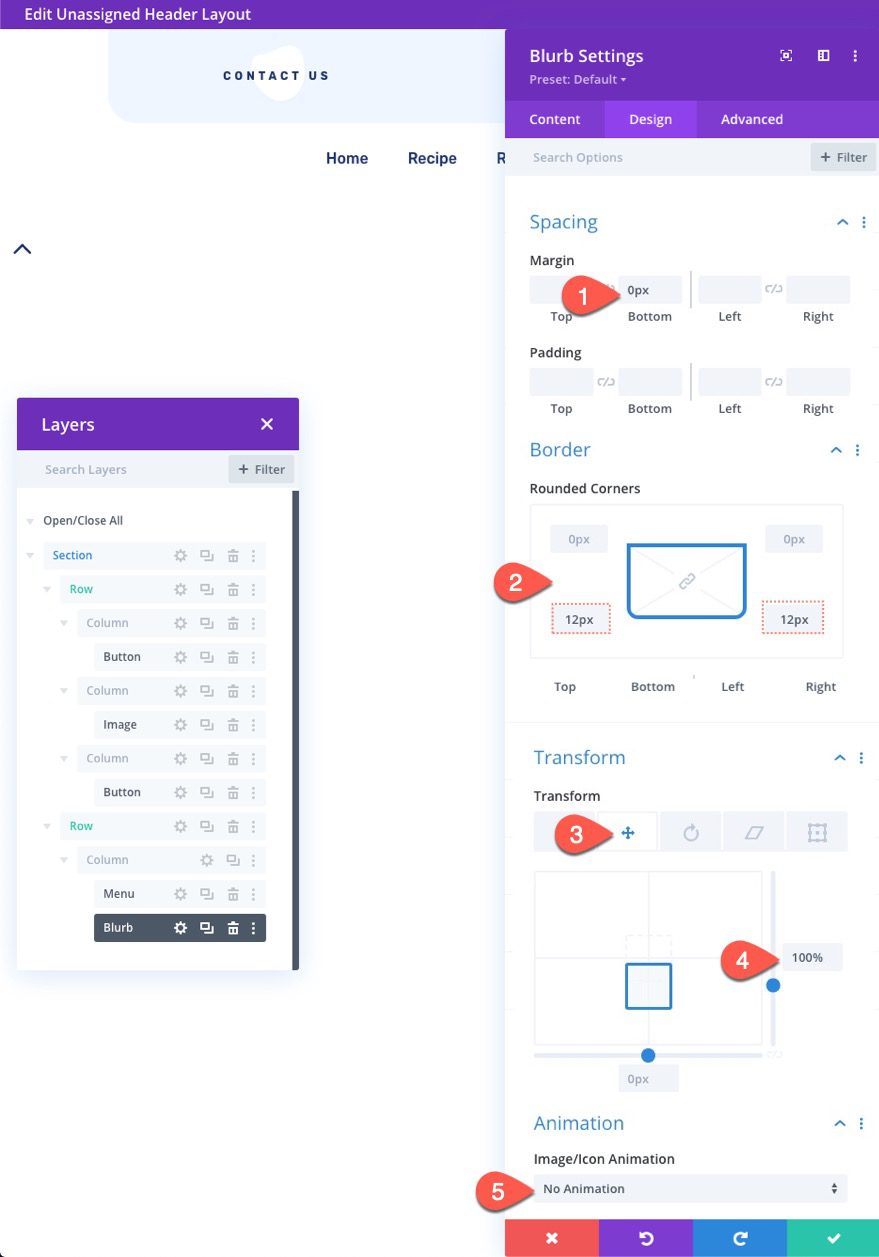
NOTE: With the transform translate Y set to 100%, the icon will move down exactly 100% of the icon’s height (45px).
Under the Advanced tab, update the following:
- CSS Class: et-divi-sticky-toggle
- Position: Absolute
- Location: bottom right
- Horizontal Offset: 20px
- Z Index: -1
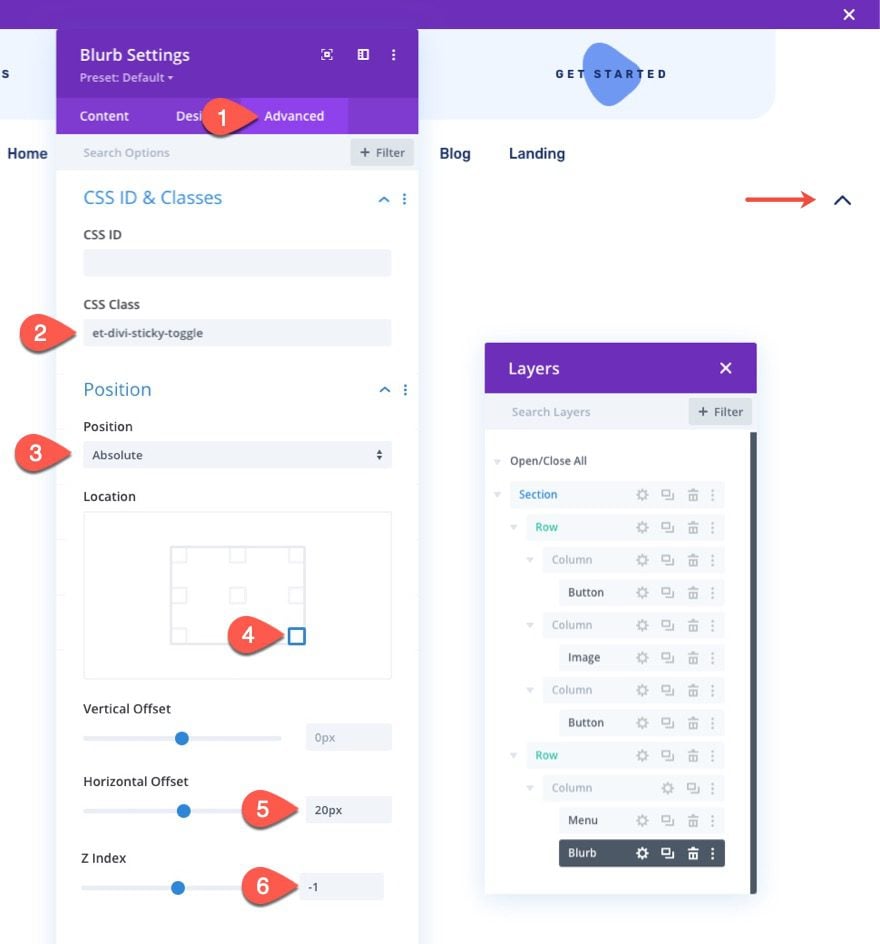
Now that the blurb has an absolute position (with the transform translate Y 100%), the blurb (toggle tab) will sit right below the entire header section. This is important so that the toggle tab will remain visible/clickable when we show/hide the header when clicking the toggle tab.
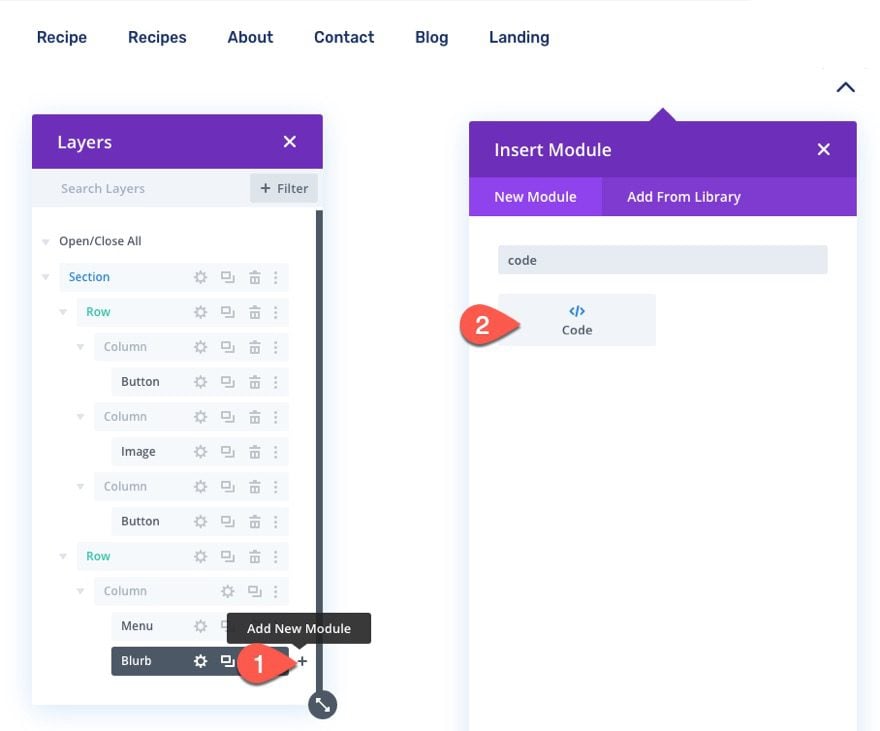
Add the Custom Code
To add the functionality we need for this sticky header toggle, we will need to add some custom CSS and JQuery.
To do this we will add a new code module below the blurb module.
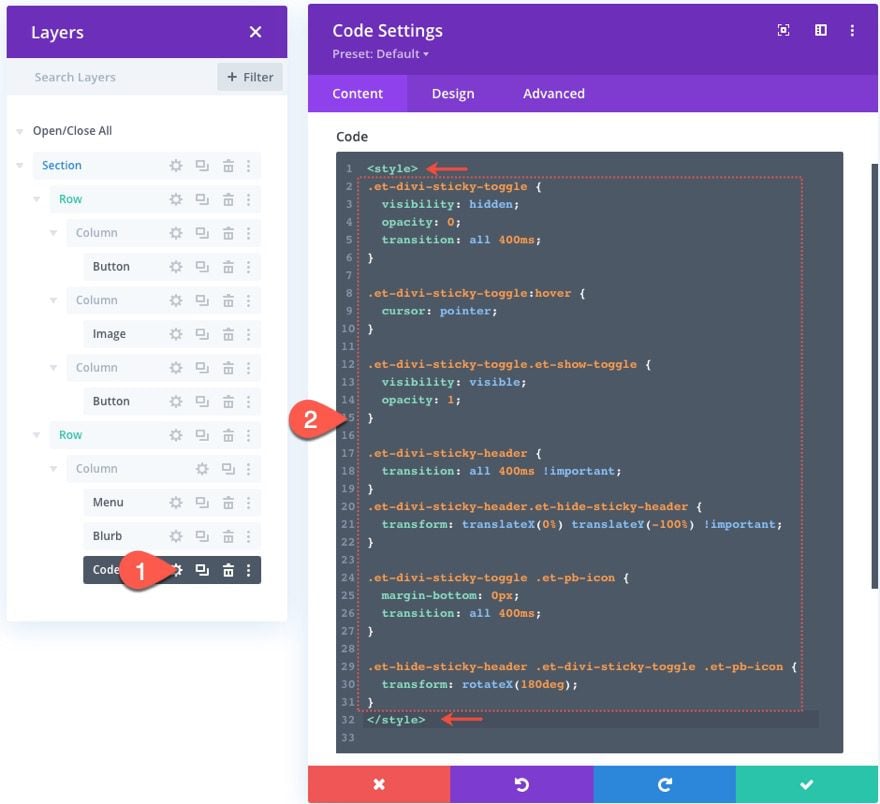
Inside the code content box, paste the following CSS making sure to wrap the code in the necessary style tags.
.et-divi-sticky-toggle {
  visibility: hidden;
  opacity: 0;
  transition: all 400ms;
}

.et-divi-sticky-toggle:hover {
  cursor: pointer;
}

.et-divi-sticky-toggle.et-show-toggle {
  visibility: visible;
  opacity: 1;
}

.et-divi-sticky-header {
  transition: all 400ms !important;
}
.et-divi-sticky-header.et-hide-sticky-header {
  transform: translateX(0%) translateY(-100%) !important;
}

.et-divi-sticky-toggle .et-pb-icon {
  margin-bottom: 0px;
  transition: all 400ms;
}

.et-hide-sticky-header .et-divi-sticky-toggle .et-pb-icon {
  transform: rotateX(180deg);
}
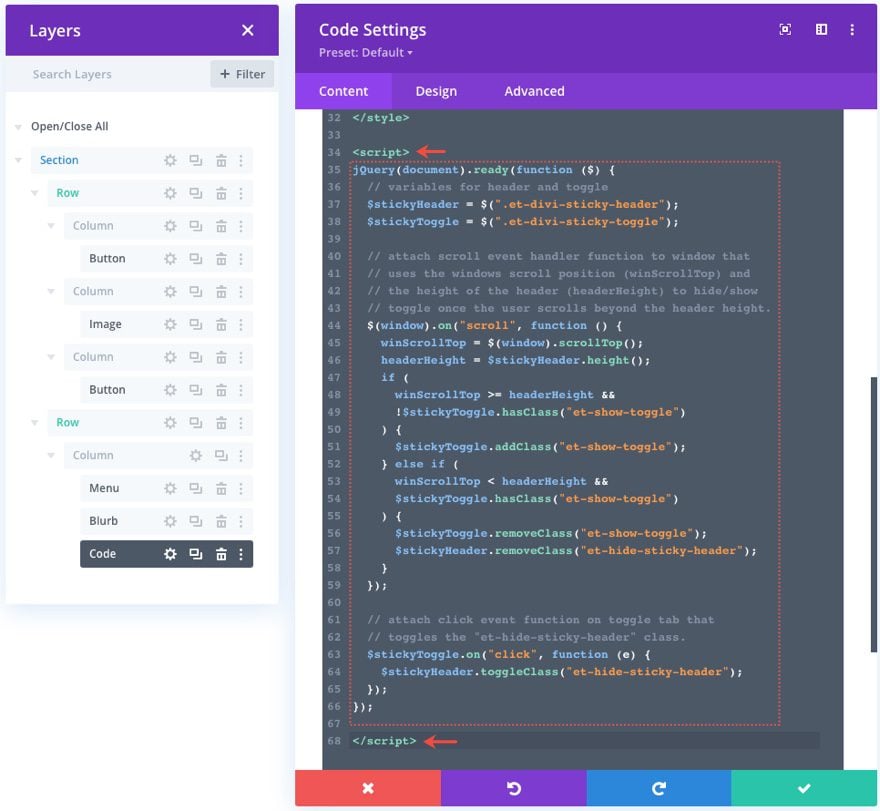
Under the ending script tag surrounding the custom CSS, paste the following JQuery making sure to wrap the code in the necessary script tags.
jQuery(document).ready(function ($) {
  // variables for header and toggle
  $stickyHeader = $(".et-divi-sticky-header");
  $stickyToggle = $(".et-divi-sticky-toggle");

  // attach scroll event handler function to window that
  // uses the windows scroll position (winScrollTop) and
  // the height of the header (headerHeight) to hide/show
  // toggle once the user scrolls beyond the header height.
  $(window).on("scroll", function () {
    winScrollTop = $(window).scrollTop();
    headerHeight = $stickyHeader.height();
    if (
      winScrollTop >= headerHeight &&
      !$stickyToggle.hasClass("et-show-toggle")
    ) {
      $stickyToggle.addClass("et-show-toggle");
    } else if (
      winScrollTop < headerHeight &&
      $stickyToggle.hasClass("et-show-toggle")
    ) {
      $stickyToggle.removeClass("et-show-toggle");
      $stickyHeader.removeClass("et-hide-sticky-header");
    }
  });

  // attach click event function on toggle tab that
  // toggles the "et-hide-sticky-header" class.
  $stickyToggle.on("click", function (e) {
    $stickyHeader.toggleClass("et-hide-sticky-header");
  });
});
Final Result
To view the final result, you will need to assign the template with the new header to a page or all pages of your website.
To do this, save the layout and exit the header template editor.
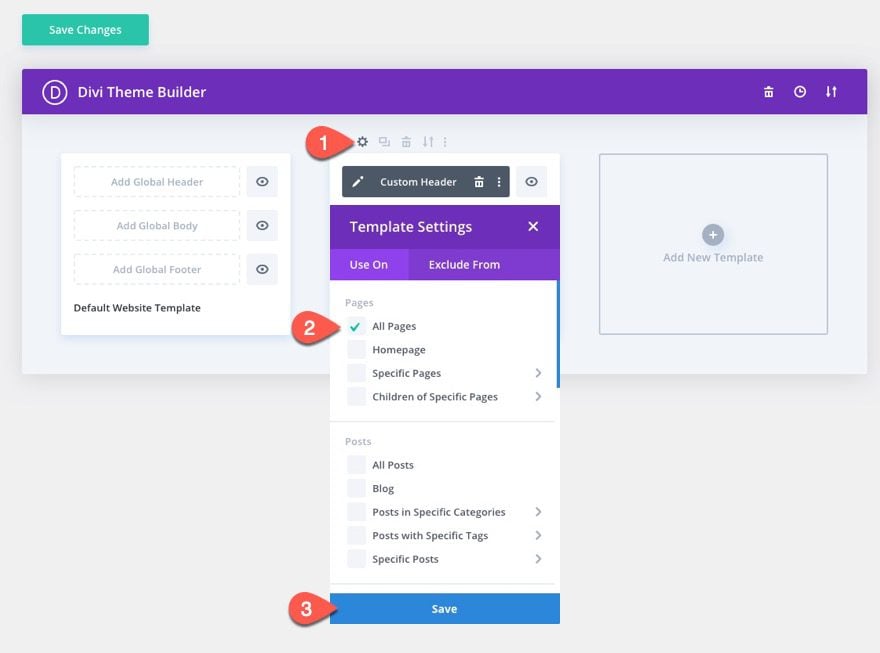
Then open the template settings (the gear icon) for the template with the new sticky toggle tab header. Under the Use On tab, select All Pages and click the Save button.
IMPORTANT: This will show the header on all pages of your website. So make sure you are using a staging site and not your live website.
Now, open any page on your website to see the result.
Here is a preview of what it will look like on desktop, tablet, and phone.
Final Thoughts
In this tutorial, we showed you how to create a toggle tab for a sticky header. This can be a helpful solution both for developers that want to keep important sticky header content accessible to users and also for users that want to hide or show that header whenever they want. Hopefully, this will come in handy for a future project!
I look forward to hearing from you in the comments.
Cheers!


Could you show how to alter the code to work with a sticky footer please? I have been trying to work out how to optionally dismiss a sticky section in my footer all week! Haha
Still no reply? that’s odd. Mostly the guys at Elegant are at your service real quick…
Could you show how to alter the code to work with a sticky footer please? I have been trying to work out how to optionally dismiss a sticky section in my footer all week! Haha
This would involve a number of adjustments but could work. It would take some time to figure out the solution. Maybe this would be a good future tutorial. Of the top of my head, I think you would need to replace the winScrollTop variable to something like this…
But that may not work.
Sorry I couldn’t be more helpful at this time.
I’d love to see a follow-up tutorial to this one for the footer. I think it’s more common to have a sticky CTA in the footer that people would want to dismiss than the header anyway.
I hope it is something that can be posted soon, I am sure you have a long list of posts in the pipeline though so I’ll just cross my fingers and in the meantime, I will try and work things out from your suggestions.
Cheers,
Nick,
Actually, maybe this sticky footer drawer toggle tutorial is what you need…
https://www.elegantthemes.com/blog/divi-resources/how-to-design-a-floating-footer-drawer-in-divi
I wrote it before sticky options were native to Divi but the same concept applies.