
Knowing how to create a flow chart layout in Divi opens up many opportunities for communicating processes and ideas on a website. In some cases, flow charts can be used to explain extremely complex ideas involving a large number of items. On a website, however, these more complex flow charts can be difficult to achieve, especially if you want it to be responsive.
In this tutorial, we are going to show you how to create a practical flow chart layout that you can use on your website that is simple, effective, and responsive. Basically, we are going to get creative with Divi borders, dividers, blurbs, and transform options to create a flow chart layout you can easily customize for your own needs. Plus, we are only going to use Divi’s built-in options to create it, so you don’t have to worry about adding custom code or plugins.
Let’s get started!
- 1 Sneak Peek
- 2 Download the Layout for FREE
- 3 Download For Free
- 4 What You Need to Get Started
-
5
How to Create a Flow Chart Layout in Divi
- 5.1 Step 1: Creating a Row with a Centered Blurb
- 5.2 Step 2: Creating the Connector Row with Vertical Line and Arrow
- 5.3 Step 3: Creating a Row with Adjacent Flow Chart Blurbs and Arrows
- 5.4 Step 4: Adding Another Connector Row
- 5.5 Step 5: Customizing the Flow with a Right Border Line Connector
- 5.6 Step 6: Updating the Row with a Left Border Line Connector
- 6 Final Result
- 7 Final Thoughts
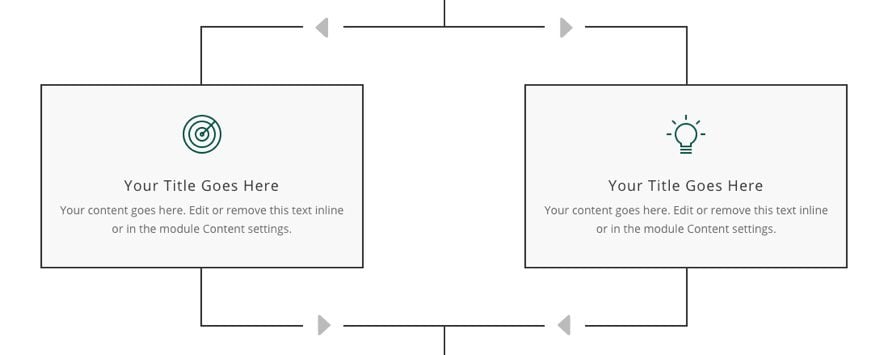
Sneak Peek
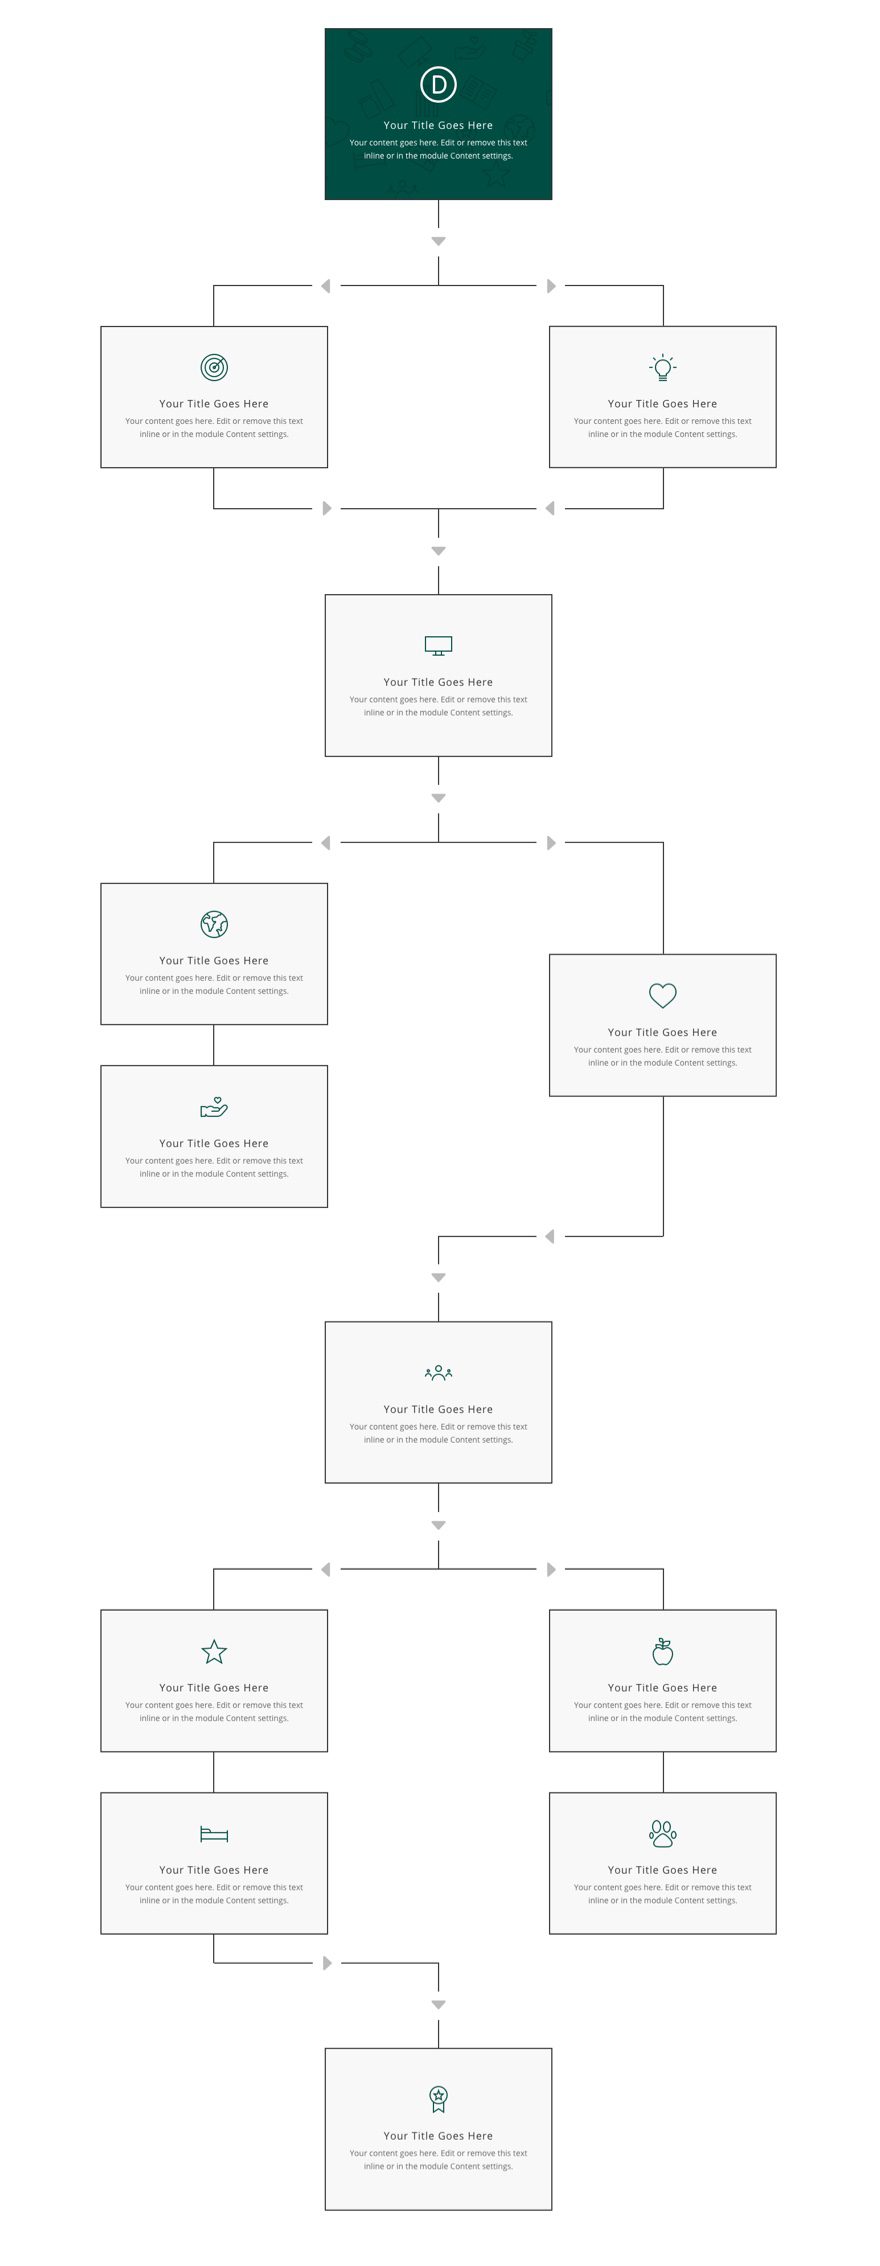
Here is a quick look at the flow chart design we’ll build in this tutorial.
Download the Layout for FREE
To lay your hands on the designs from this tutorial, you will first need to download it using the button below. To gain access to the download you will need to subscribe to our newsletter by using the form below. As a new subscriber, you will receive even more Divi goodness and a free Divi Layout pack every Monday! If you’re already on the list, simply enter your email address below and click download. You will not be “resubscribed” or receive extra emails.

To import the section layout to your Divi Library, navigate to the Divi Library.
Click the Import button.
In the portability popup, select the import tab and choose the download file from your computer.
Then click the import button.

Once done, the section layout will be available in the Divi Builder.
Let’s get to the tutorial, shall we?
What You Need to Get Started

To get started, you will need to do the following:
- If you haven’t yet, install and activate the Divi Theme.
- Create a new page in WordPress and use the Divi Builder to edit the page on the front end (visual builder).
- Choose the option “Build From Scratch”.
After that, you will have a blank canvas to start designing in Divi.
How to Create a Flow Chart Layout in Divi
Step 1: Creating a Row with a Centered Blurb

To begin creating the flow chart layout in Divi, we’ll start with creating a row that contains a centered blurb. This will be the first item in the flow chart.
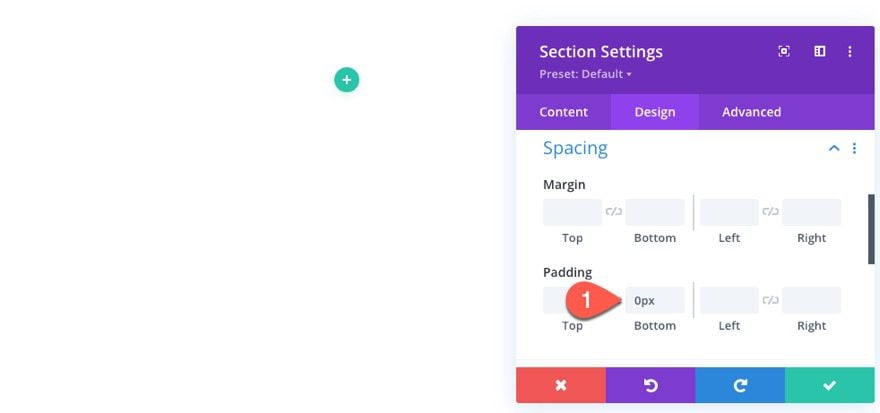
The Section Padding
First, open the section settings for the default section and set the bottom padding to 0px.
The Row
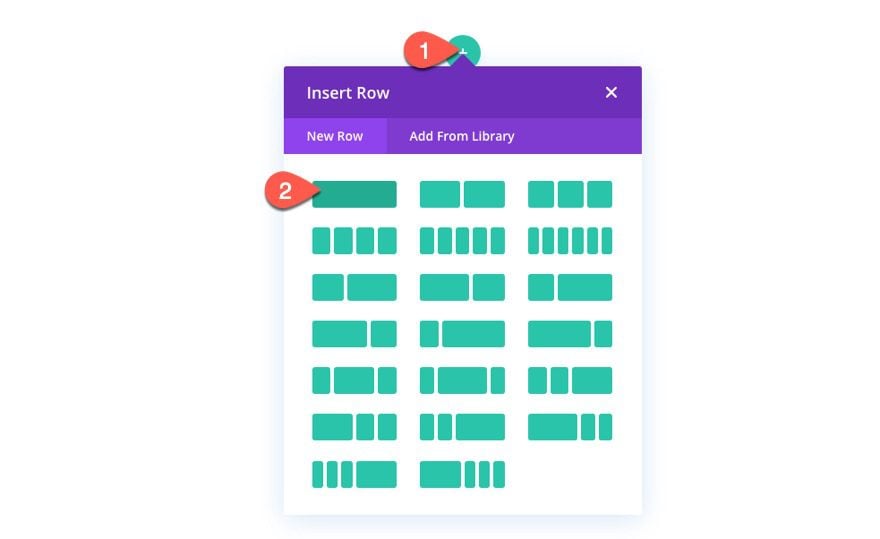
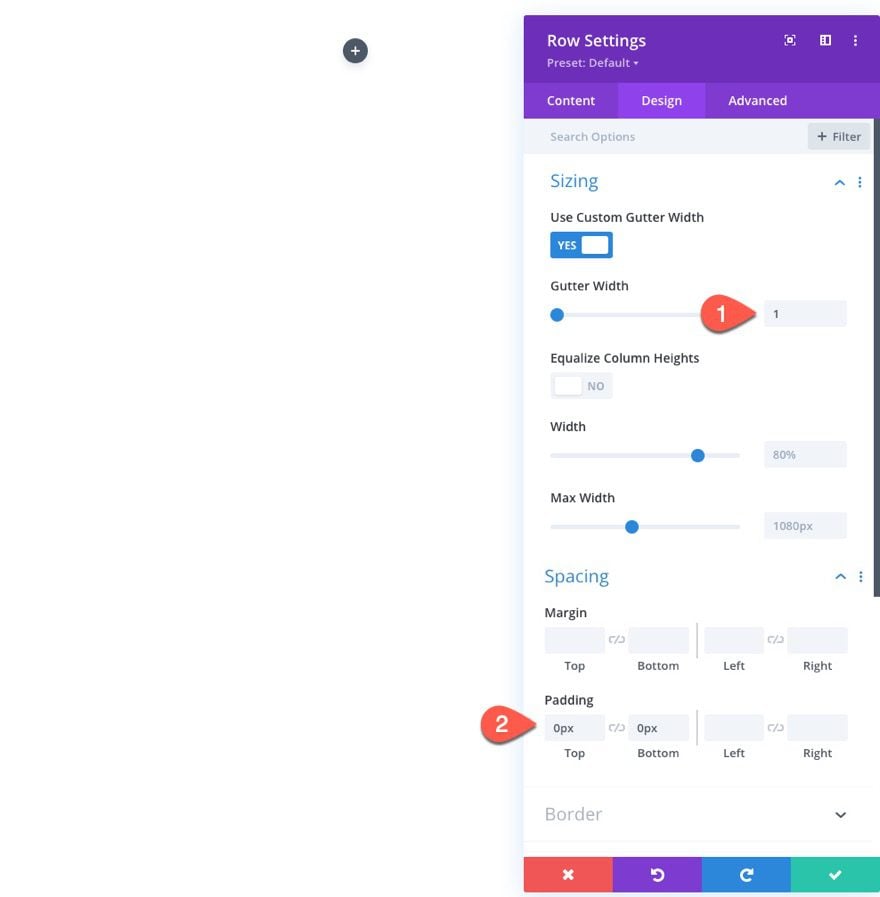
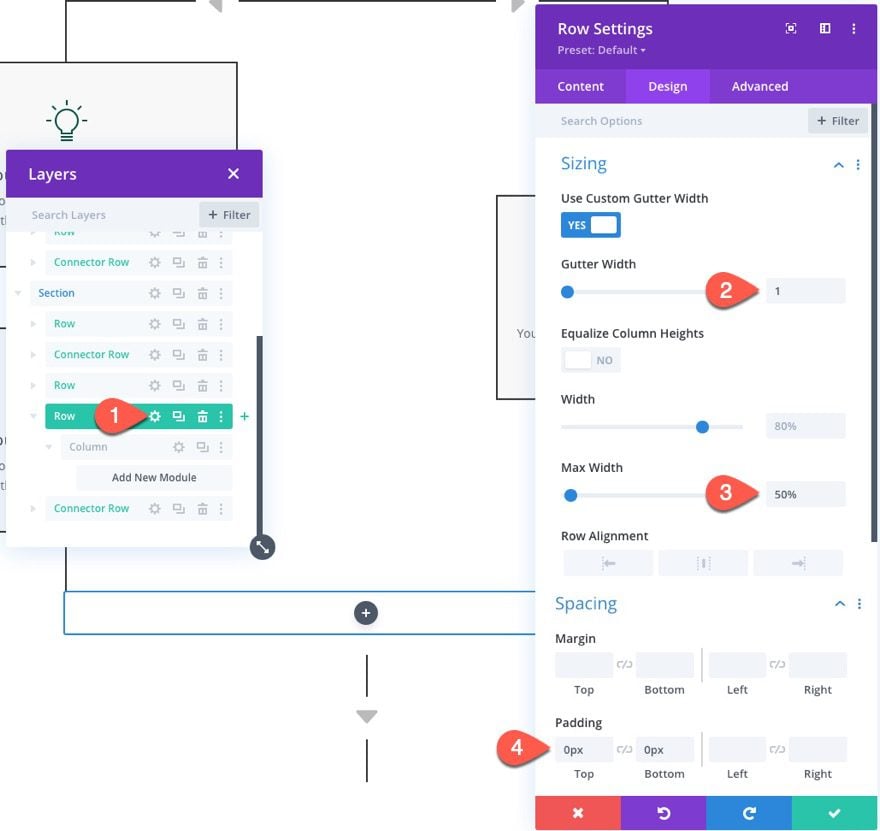
Inside the section, add a one-column row.
Open the row settings and update the following design settings:
- Gutter Width: 1
- Padding: 0px top, 0px bottom
These two design settings will be used for all rows in this flow chart layout in order to make sure no extra space is added between modules and rows.
The Blurb Module Design
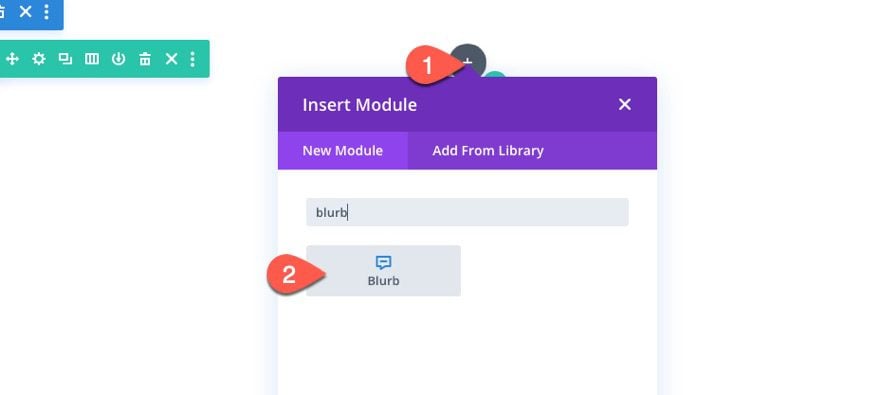
To create our first flow chart item, we are going to use a blurb module.
Add a new blurb module to the row.
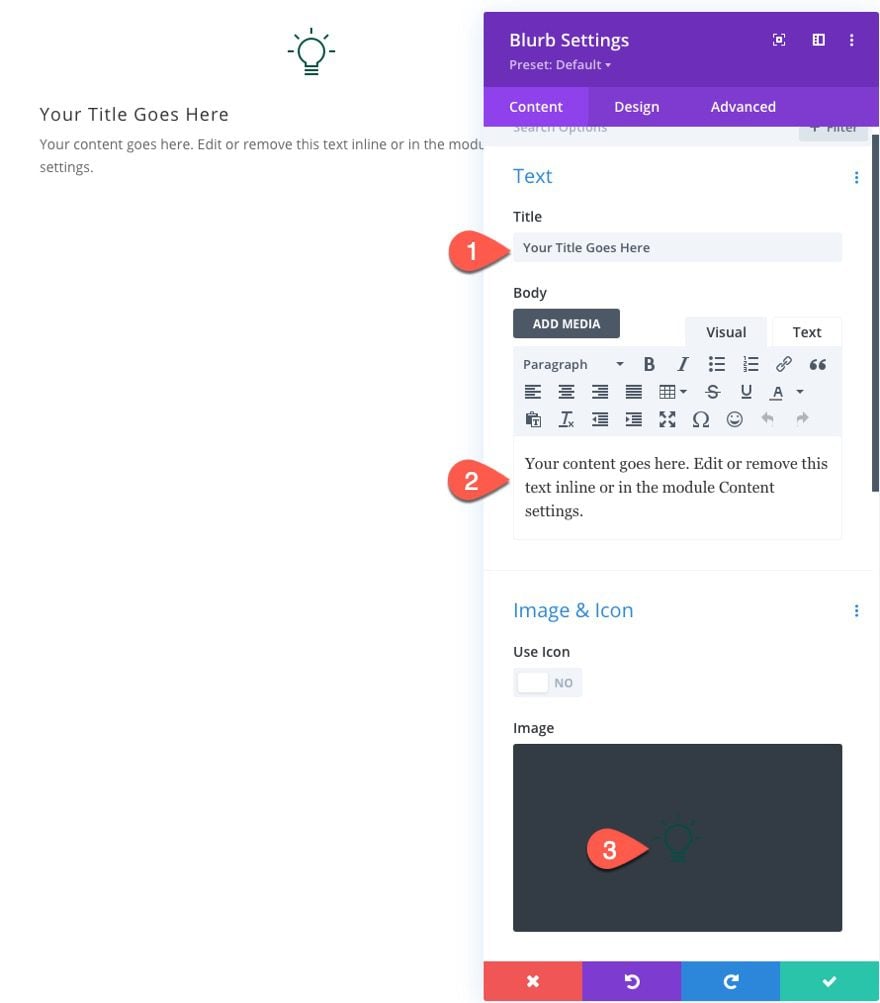
Blurb Settings
Open the blurb settings. Under the content tab, you can keep the default Title and Body text.
Then update the image with a small icon image or use one of the built-in Divi Icons. For this tutorial, I will be using icons from the Crowdfunding Layout Pack.
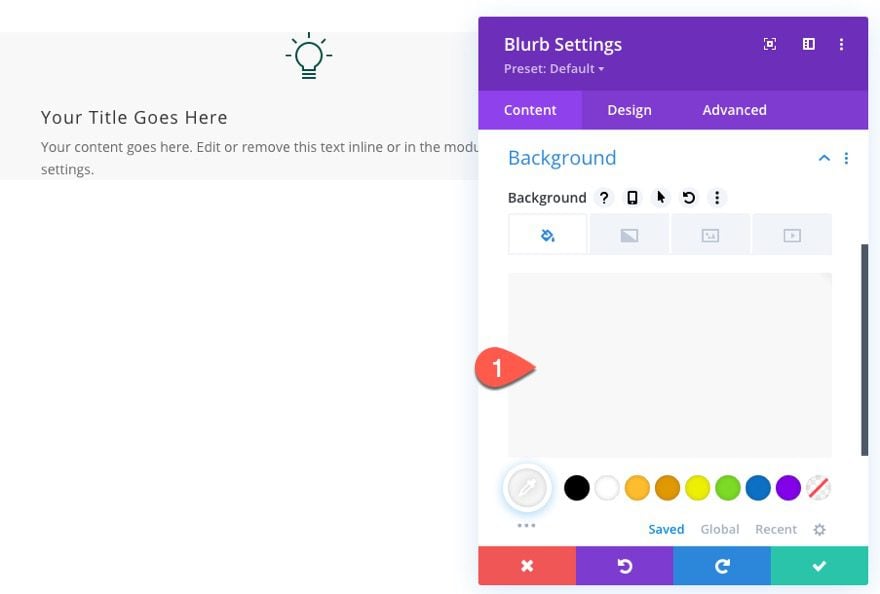
Then give the blurb a background color:
- Background Color: #f8f8f8
Under the design tab, update the following:
- Text Alignment: Center
- Max Width: 400px (desktop and tablet), 90% (phone)
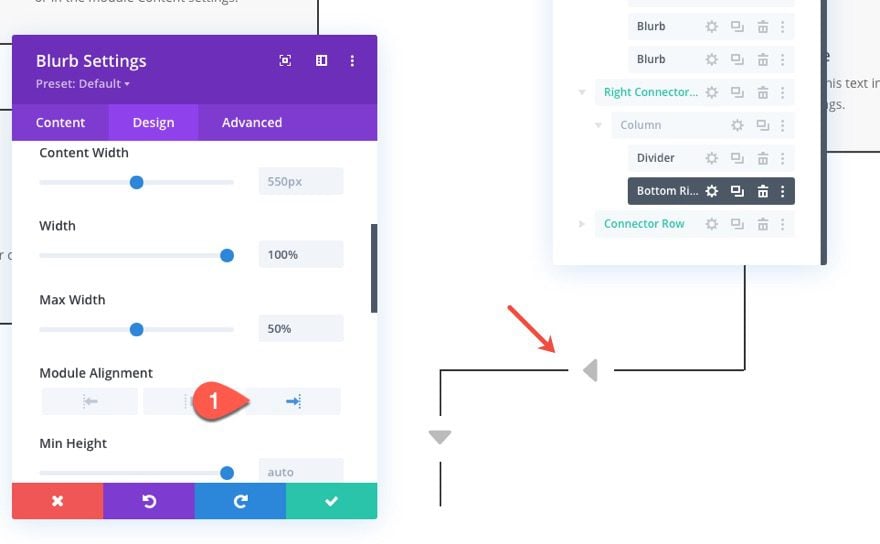
- Module Alignment: Center
- Padding: 6% top, 6% bottom, 3% left, 3% right
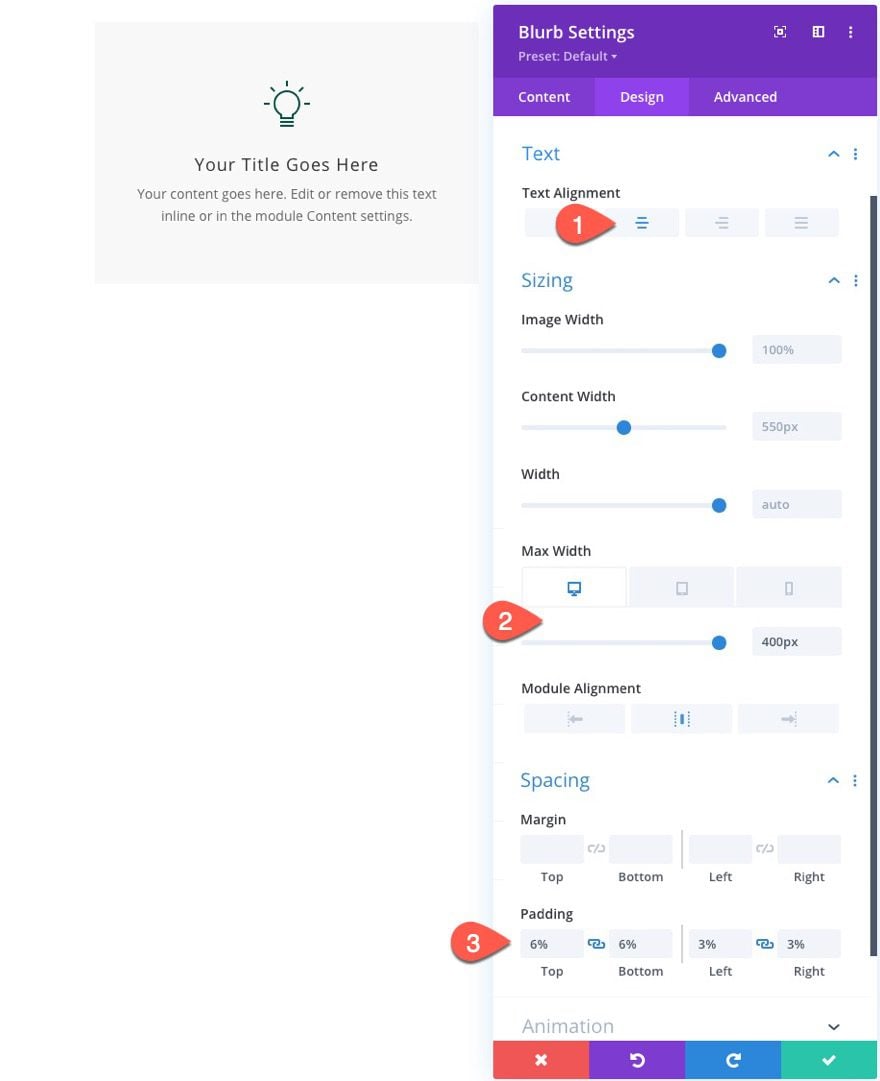
NOTE: This blurb size will be shared by all blurbs in the flow chart layout. This size works for this layout because the flow chart will never have more that two adjacent (side by side) blurbs. This allows us to keep the design responsive and look great on tablet and phone as well.
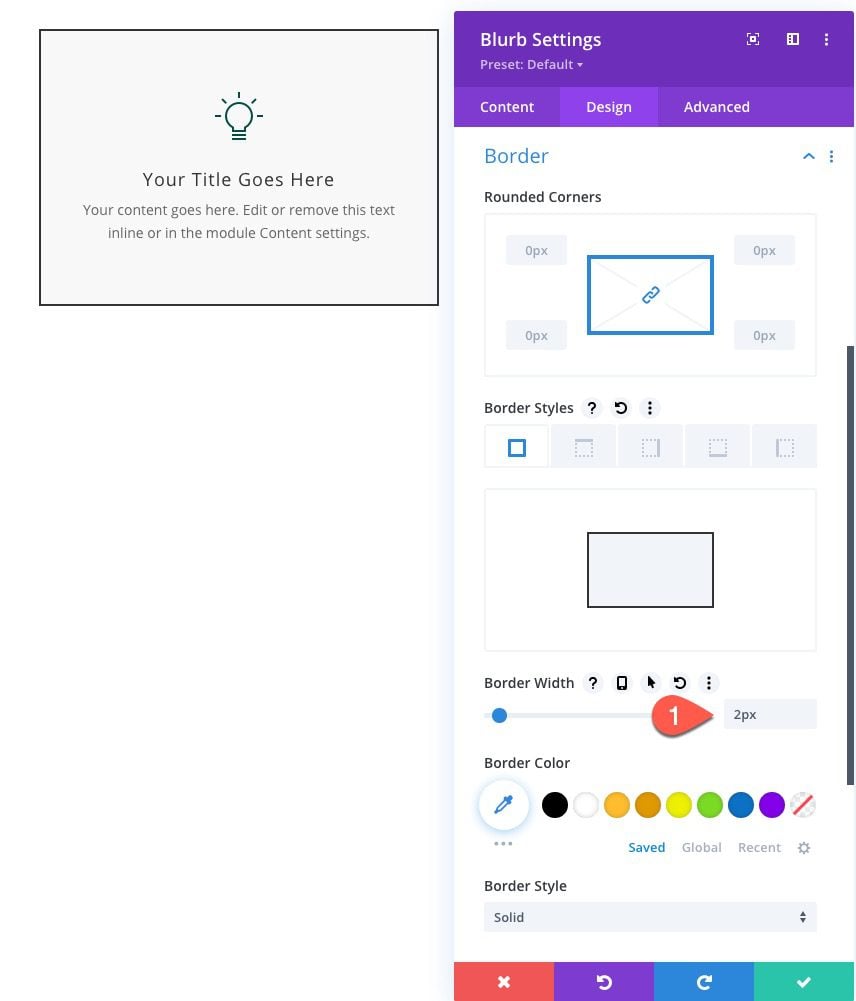
Next, give the blurb a border as follows:
- Border Width: 2px
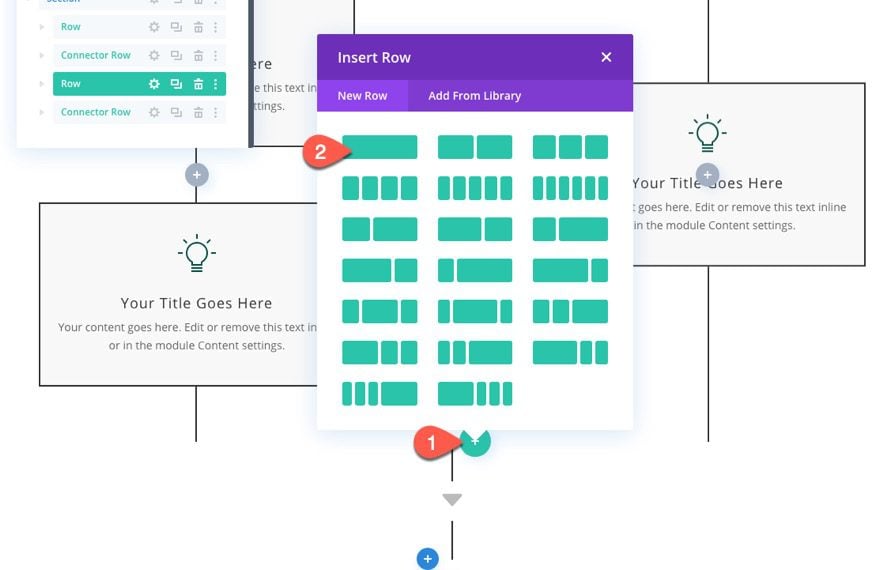
Step 2: Creating the Connector Row with Vertical Line and Arrow

For the next part of our flow chart layout, we are going to create a connector row that has a centered vertical line and arrow. This row will be used to connect rows of flow chart content that need to continue down the page.
In this case, we want to start the flow chart by adding a line and arrow below the previous row with the centered blurb module.
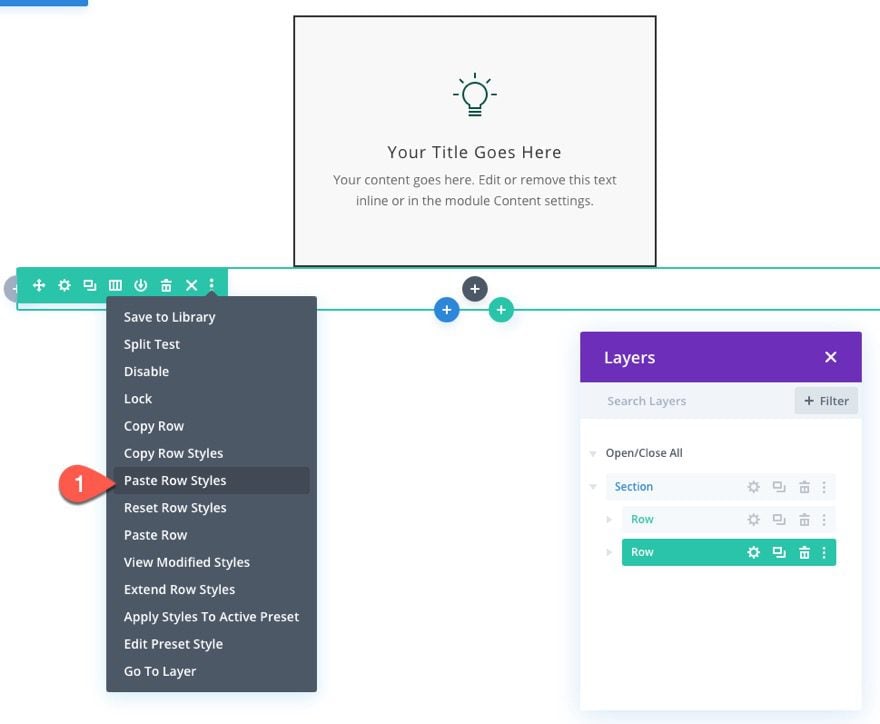
Create New Row and Copy/Paste Row Styles from Previous Row
To do this, add a new one-column row under the previous row.

Using the “More options” menu (or right-click options), copy the row styles from the previous row above and paste them to the new row.
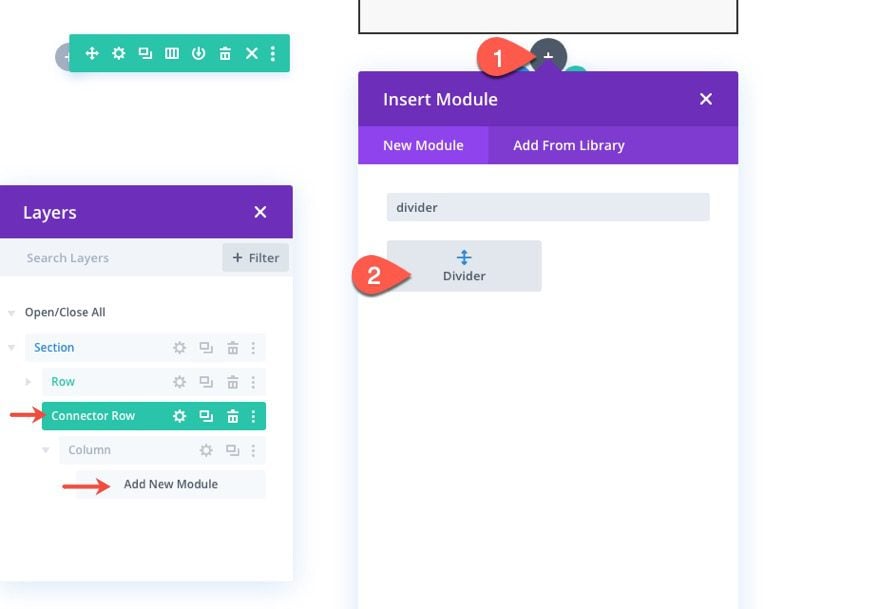
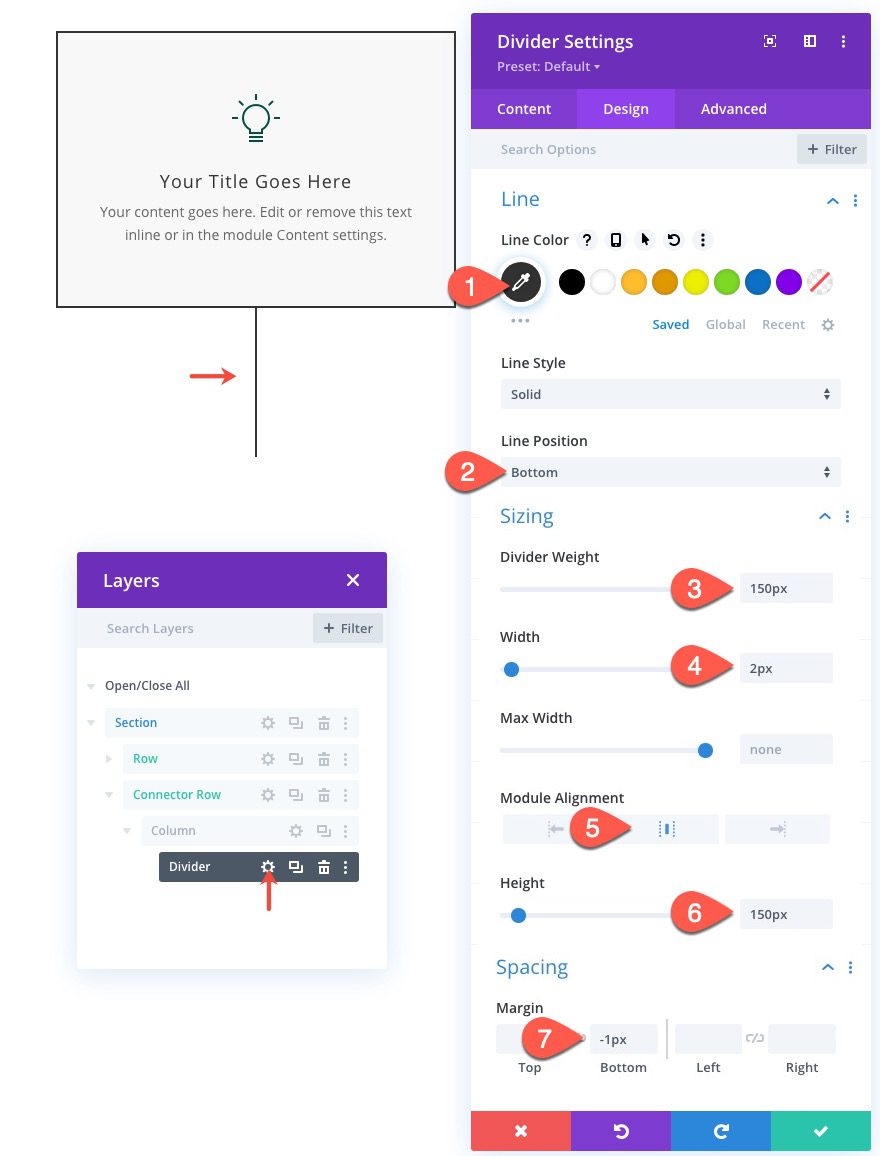
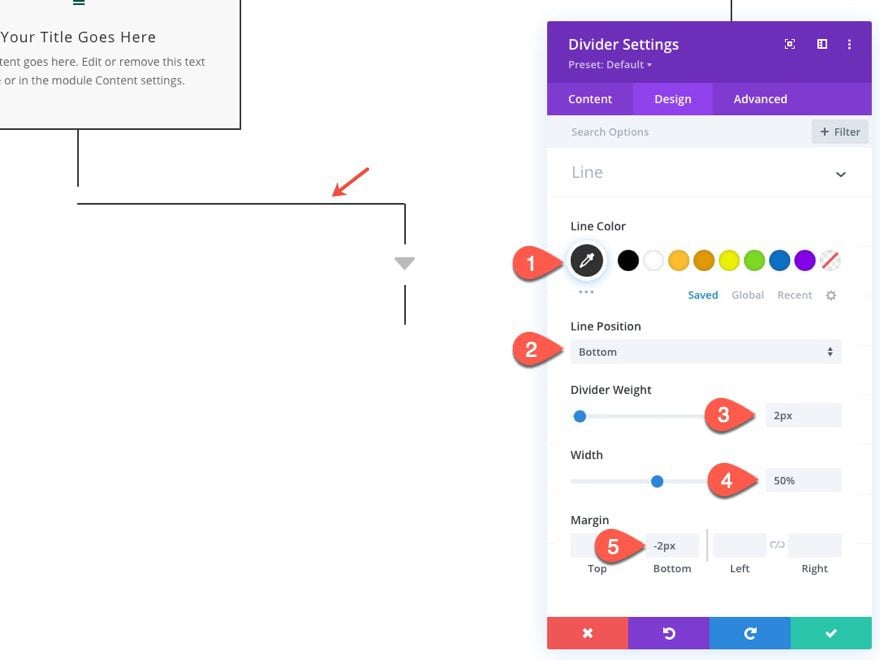
Creating a Vertical Line Divider
To create the vertical line divider, add a new divider module to the row.
Under the divider settings, update the design settings as follows:
- Line Color: #333333
- Line Position: Bottom
- Divider Weight: 150px
- Width: 2px
- Module Alignment: Center
- Margin: -1px bottom
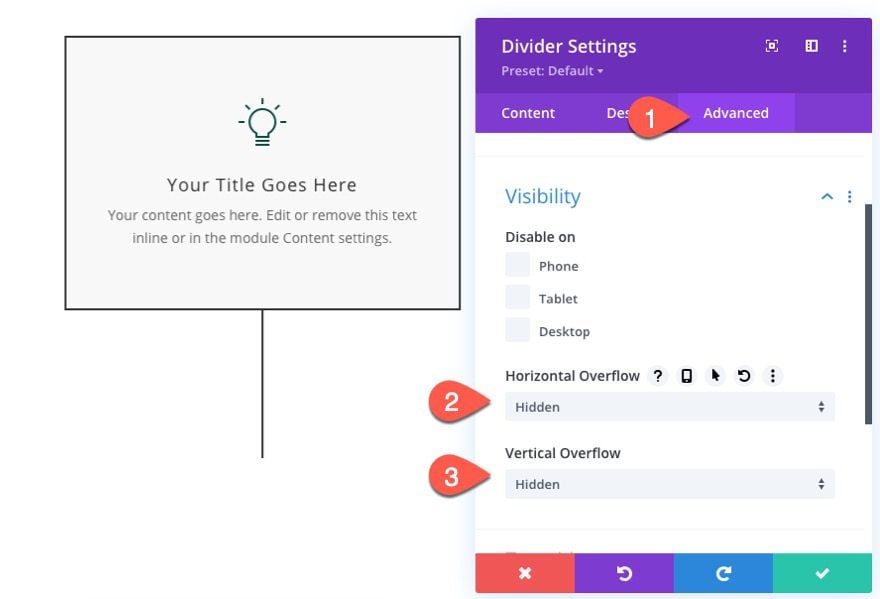
Under the advanced tab, hide the overflow as follows:
- Horizontal Overflow: Hidden
- Vertical Overflow: Hidden
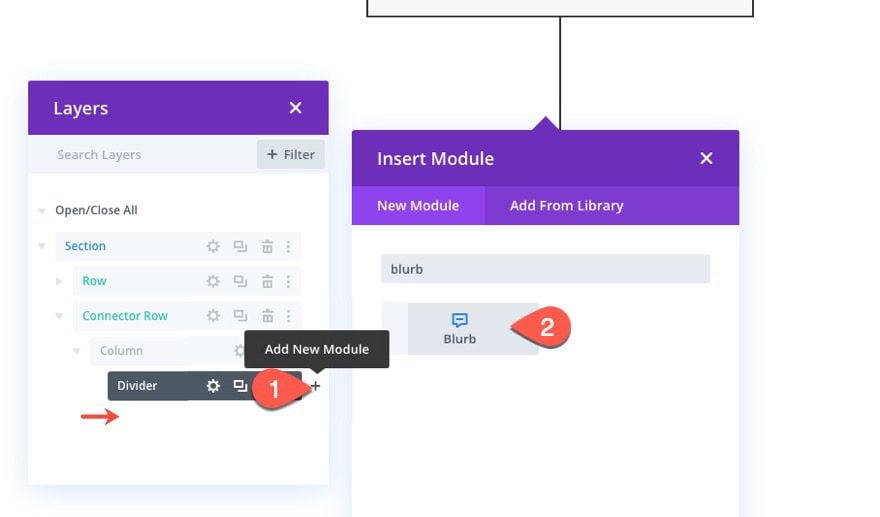
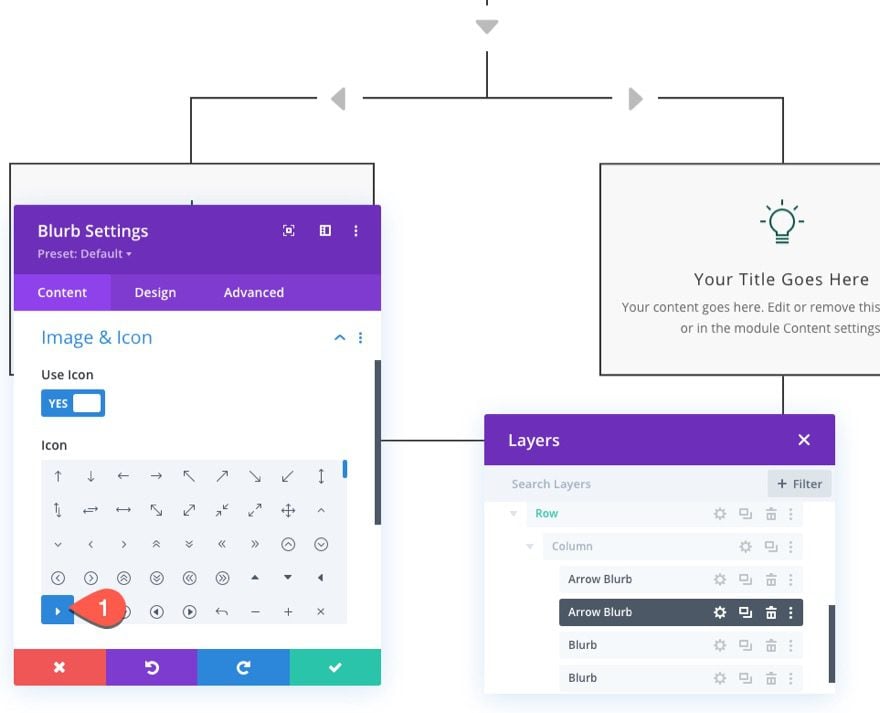
Creating an Arrow with a Blurb Module
Next we are going to create an arrow icon to sit on top of the divider line using a blurb module.
To create the arrow, add a new blurb module under the divider.
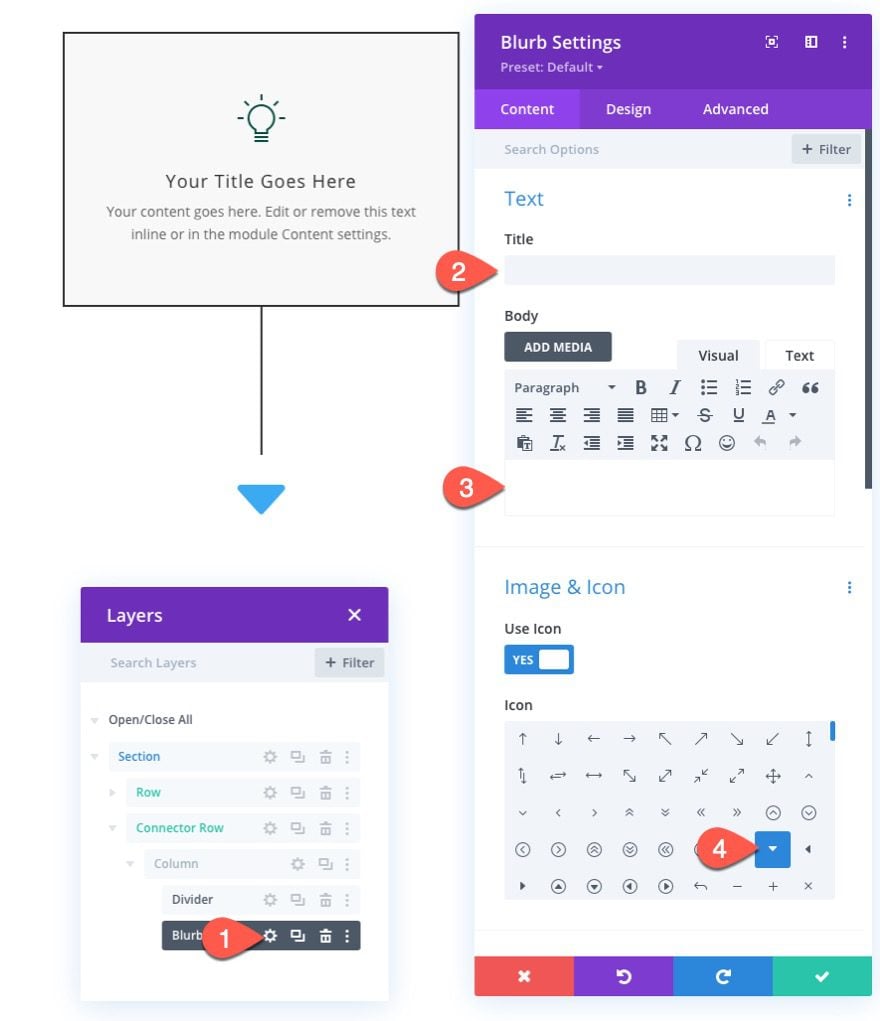
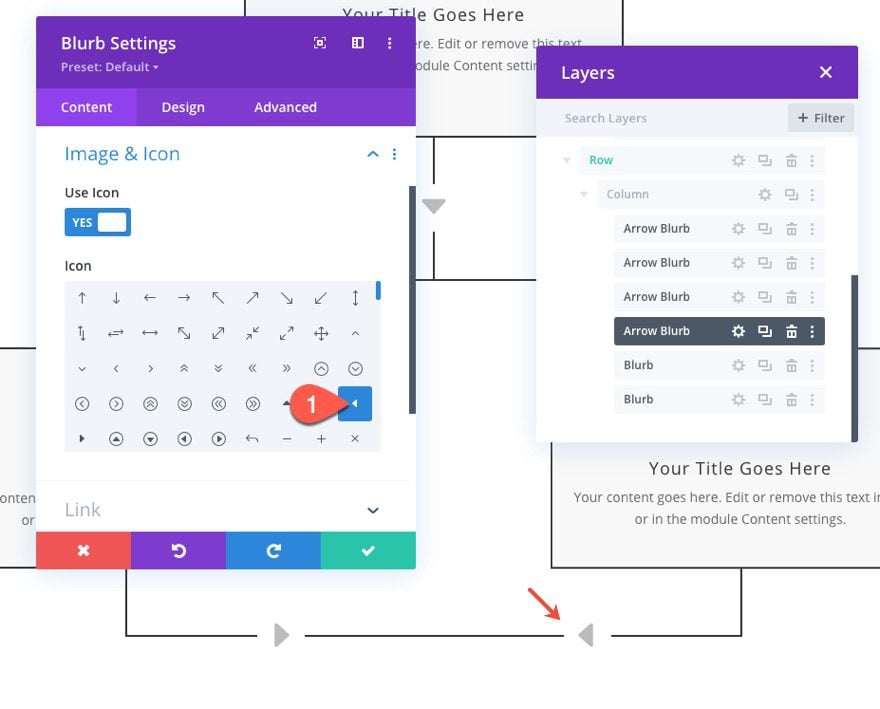
Arrow Blurb Settings
Under the blurb settings, take out the default title and body text and click to use the bottom arrow icon (see screenshot).
Under the design tab, update the following:
- Icon Color: #bbbbbb
- Image/Icon Alignment: center
- Icon Font Size: 50px (desktop), 40px (tablet and phone)
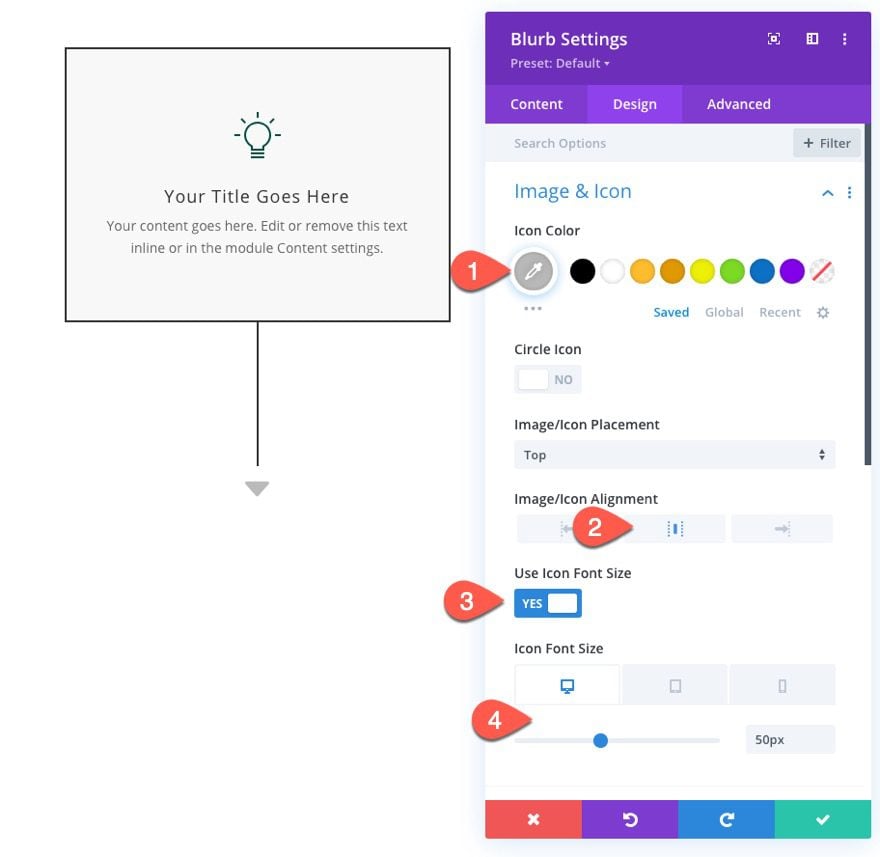
- Max Width: 50%
- Module Alignment: center
- Height: 50px (desktop), 40px (tablet and phone)
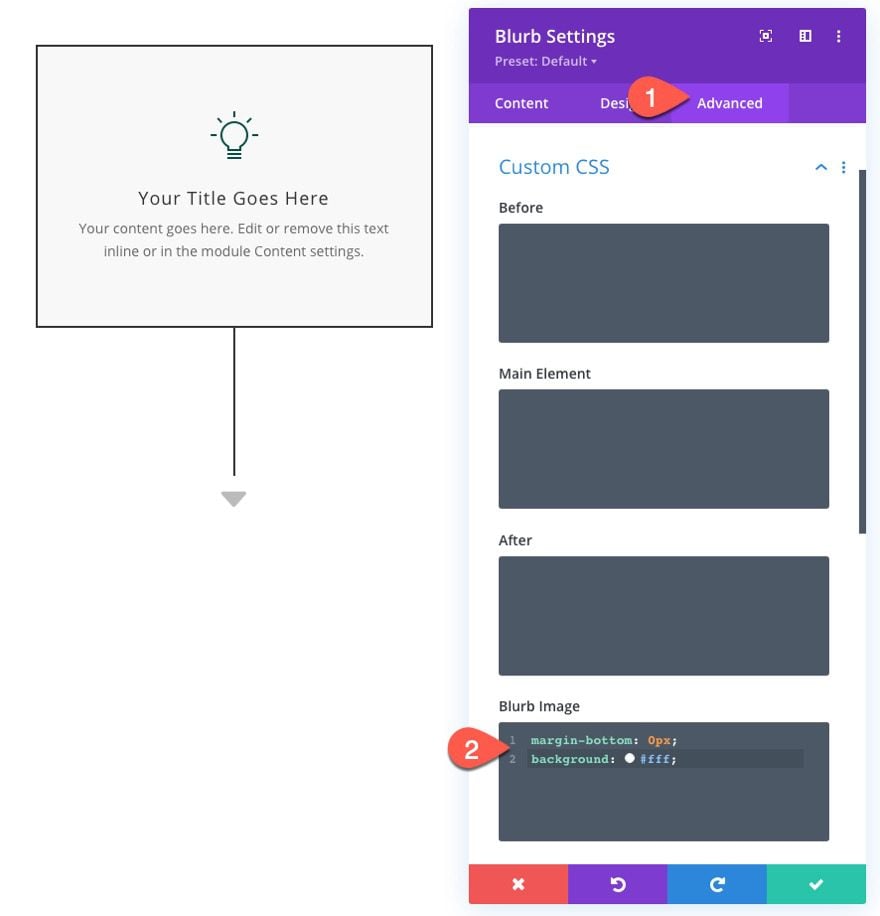
Under the advanced tab, add the following CSS to the Blurb Image:
margin-bottom: 0px;
background: #ffffff;
This will take out the default margin of the blurb and add a white background in order to create the appearance of space between the icon and the line once we position the icon on top of the line.
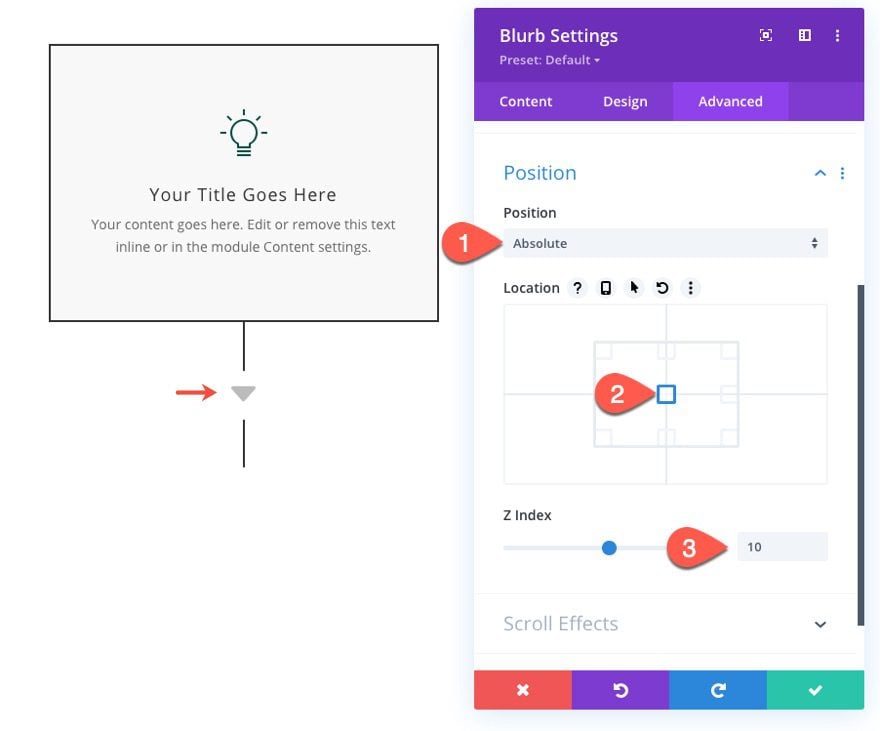
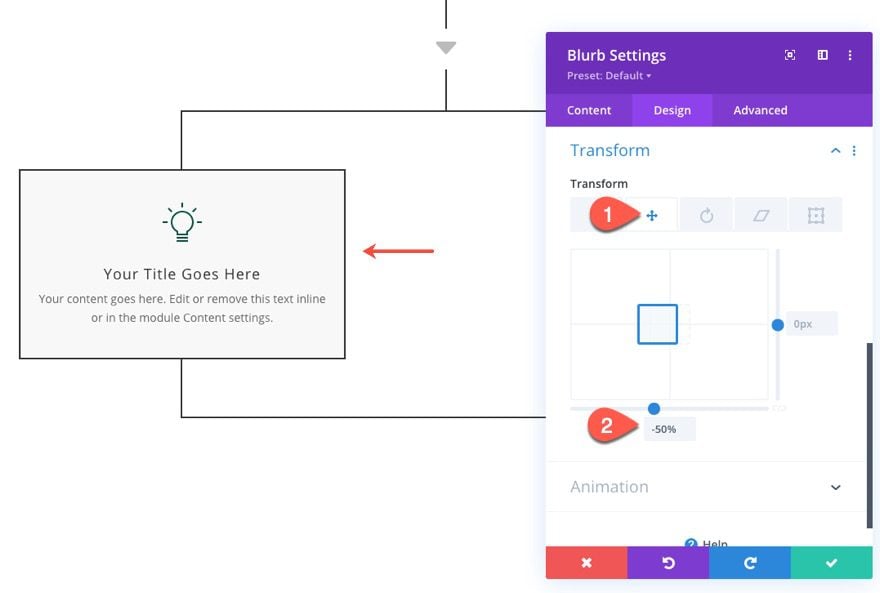
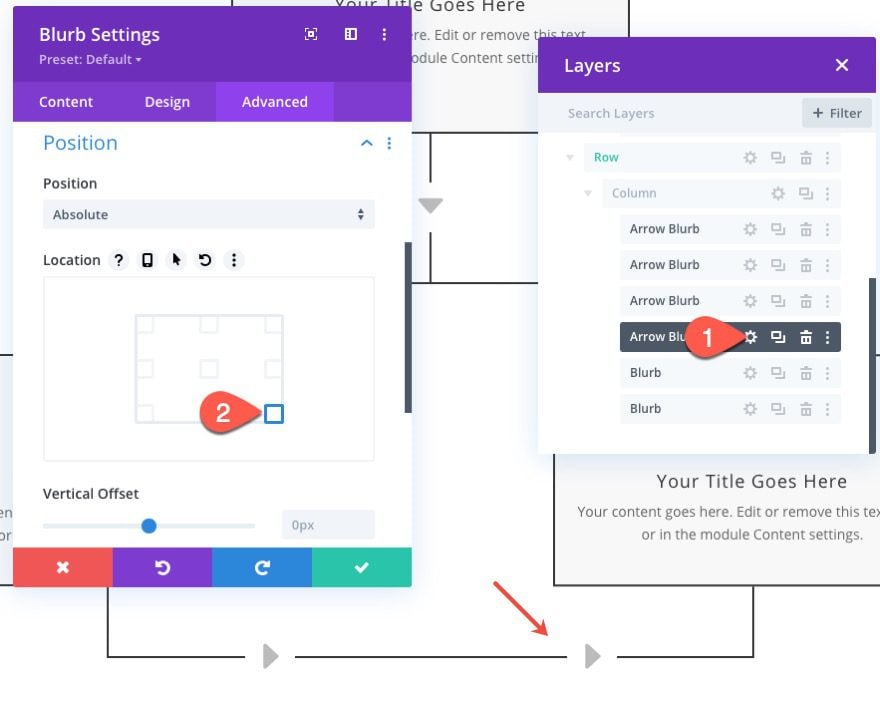
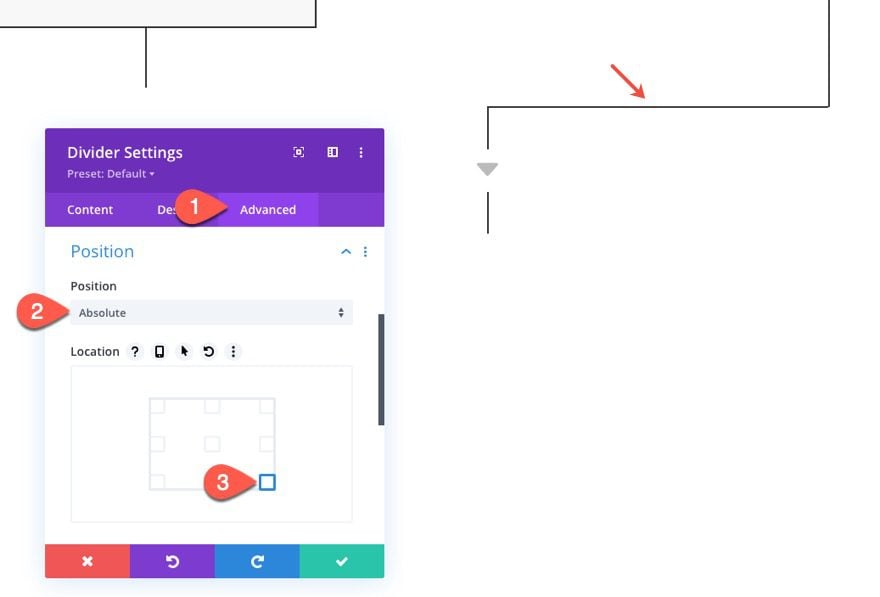
To position the arrow on top of the line, update the following:
- Position: Absolute
- Location: Center
- Z Index: 10
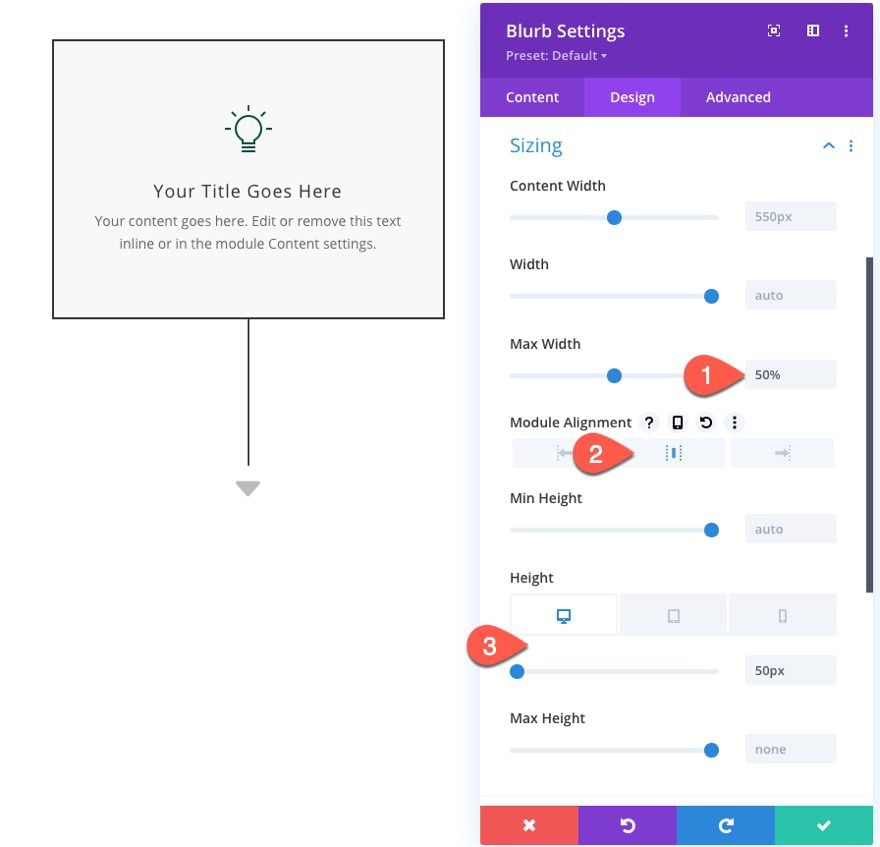
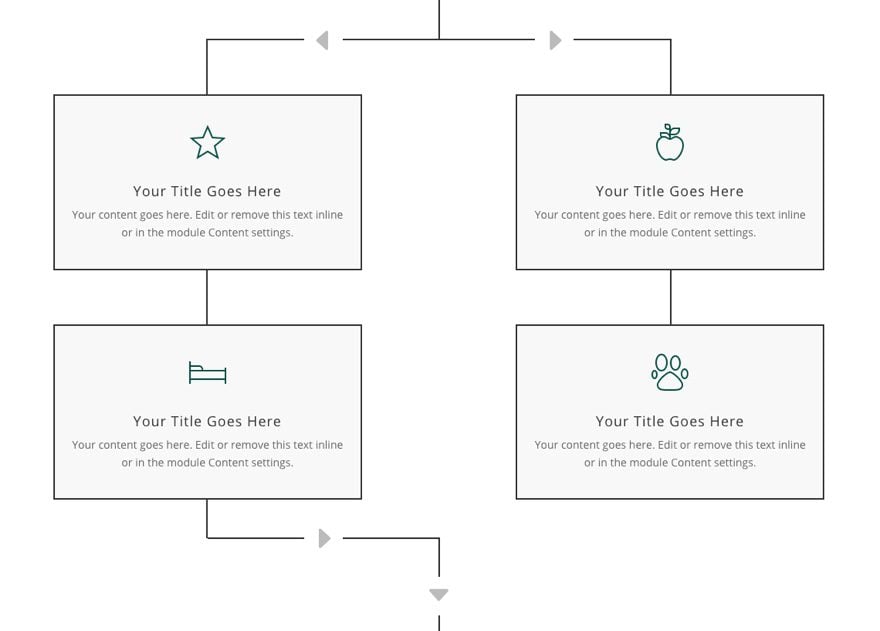
Step 3: Creating a Row with Adjacent Flow Chart Blurbs and Arrows
Once the connector row is complete, we will add another row of multiple adjacent blurbs to continue the flow chart design.
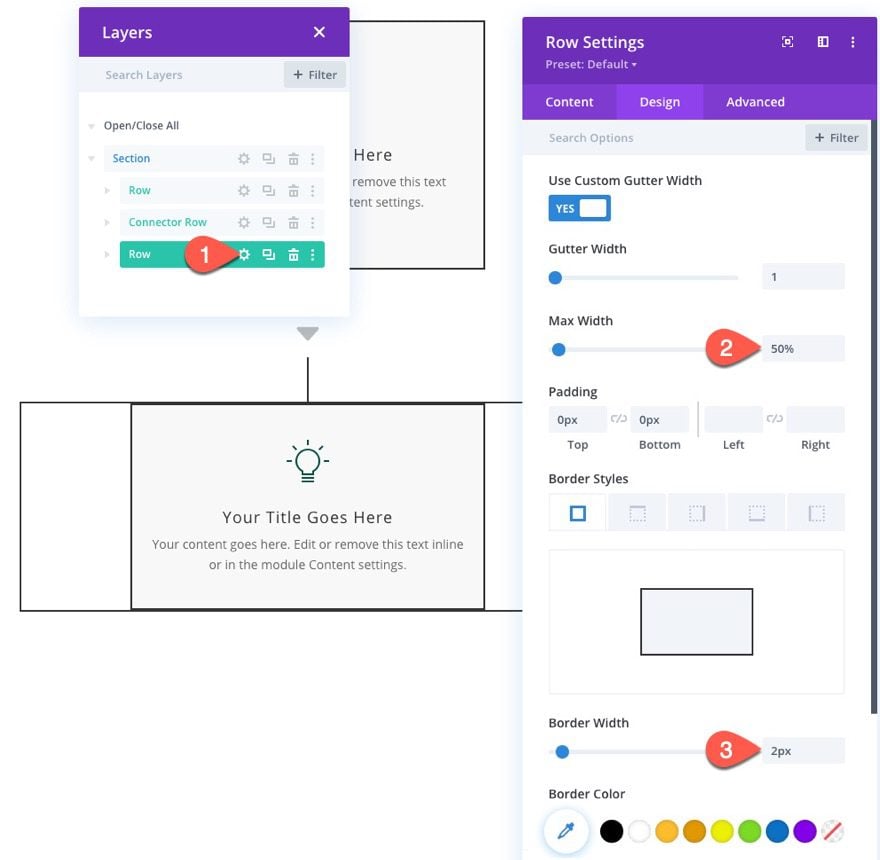
To add the row, simply copy and paste the first row (the row with a centered blurb we created at the top of the layout) under the connector row.
Open the row settings and update the following:
- Max Width: 50%
- Border Width: 2px
The 50% max-width is important for the layout to work responsively. It will make sure the blurbs that are overflowing to the right and left of the row will not exceed the browser width.
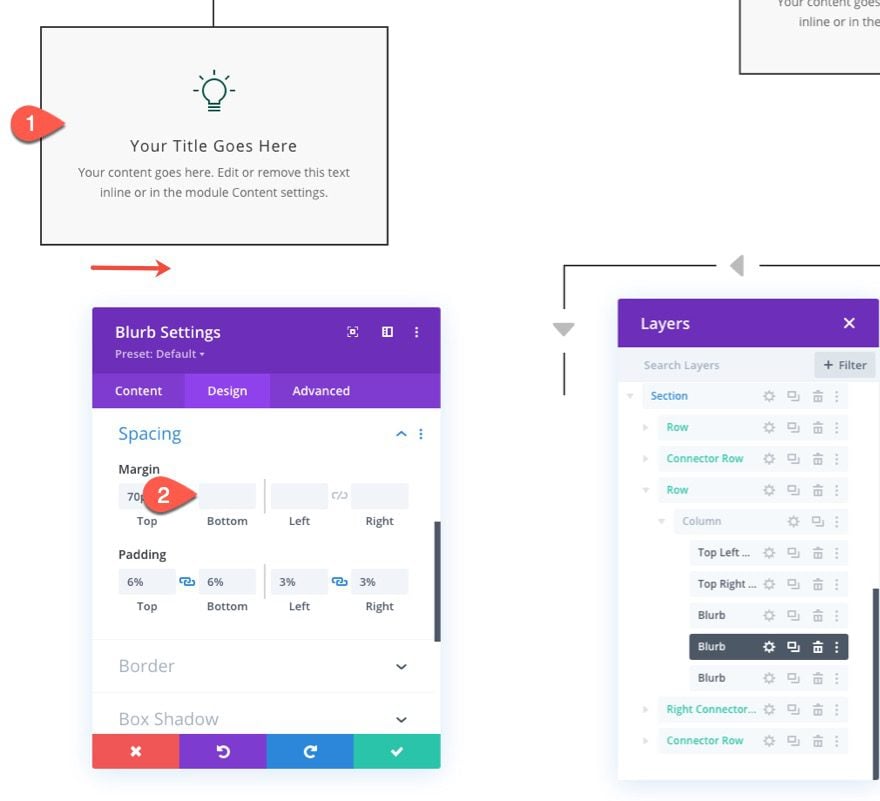
Creating a Flow Chart Blurb on the Left Border Line
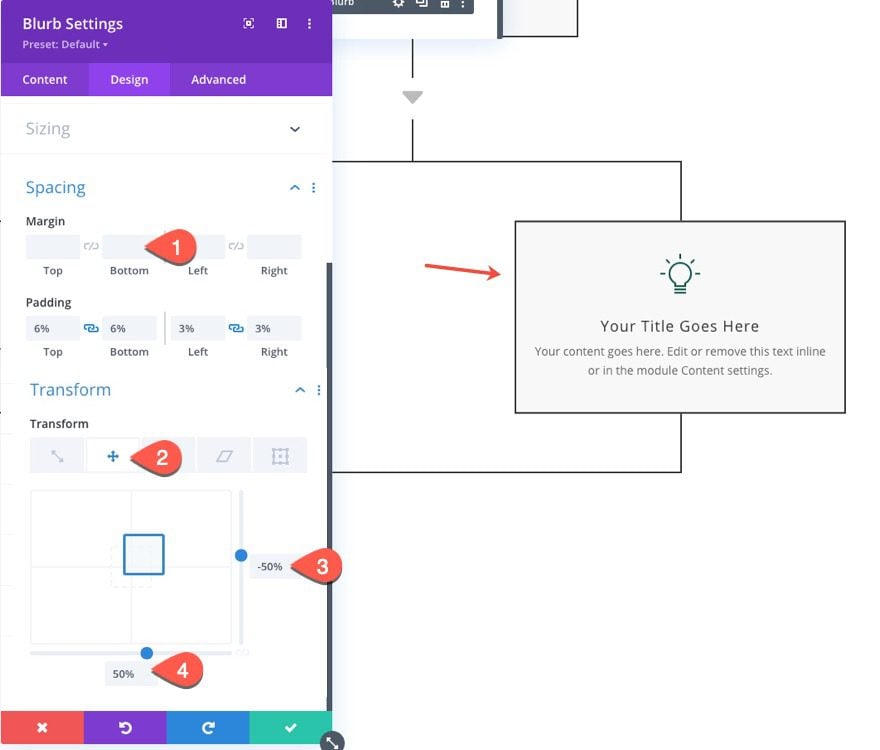
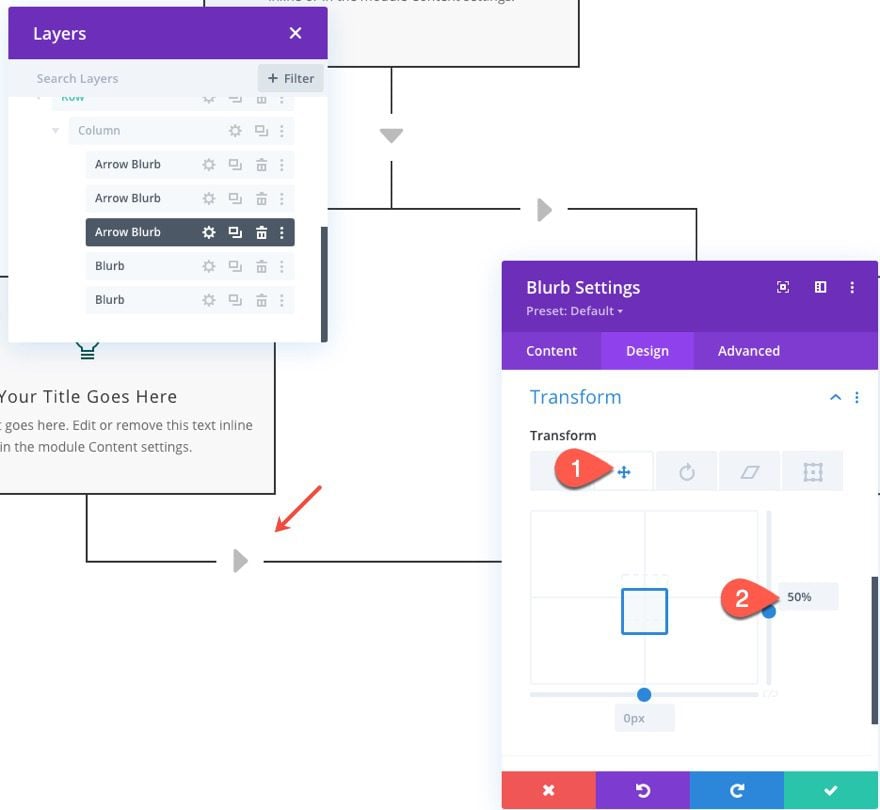
Now that our border is added to the row, we are going to position the blurb on top of the left border line.
To do this, update the following design settings:
- Module Alignment: Left
- Margin: 70px top, 70px bottom
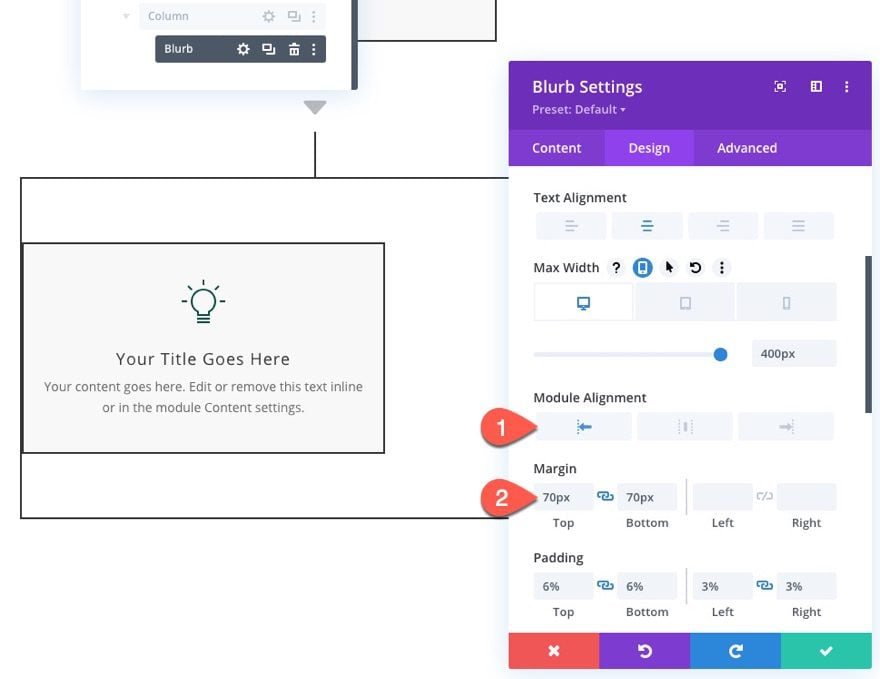
- Transform Translate X Axis: -50%
This is the key to making the blurb sit horizontally centered on top of the border line.
Creating an Adjacent Flow Chart Blurb on the Right Border Line
To add another blurb on the right border line, duplicate the existing blurb.
To position the blurb on the right border line, go to the advanced tab and give it an absolute position:
- Position: Absolute
- Location: Right Center
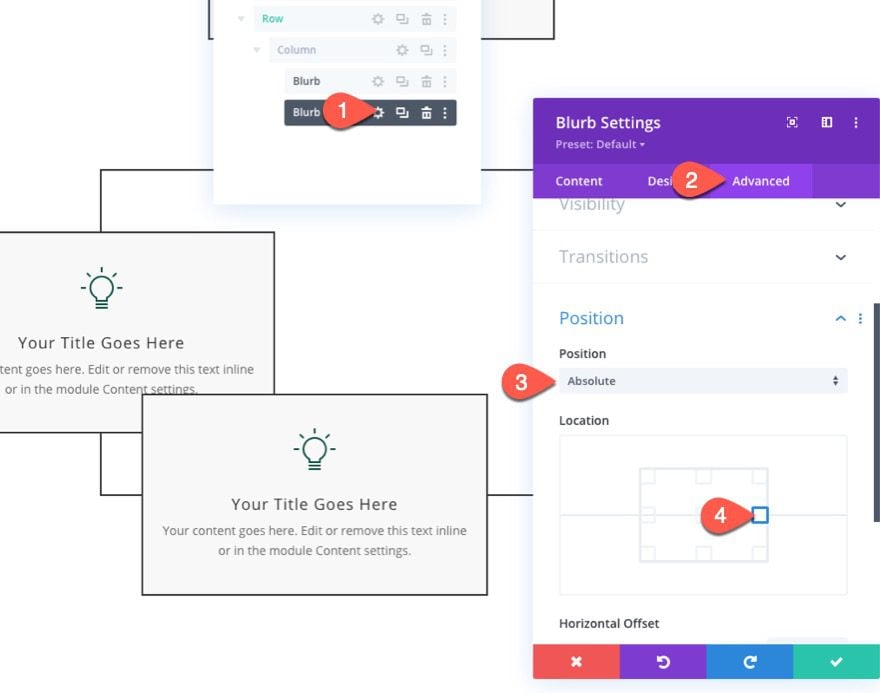
Then update the margin and transform translate options as follows:
- Margin: none
- Transform Translate Y axis: -50%
- Transform Translate X axis: 50%
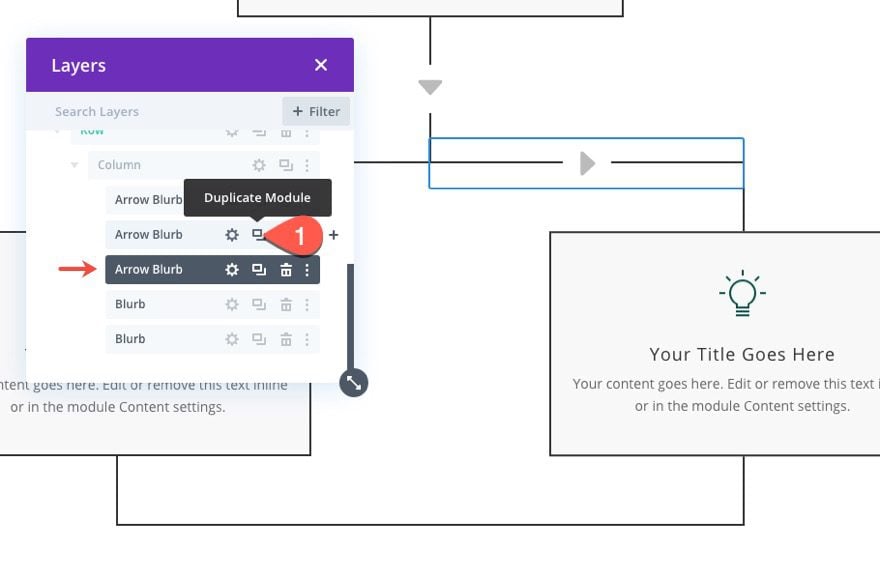
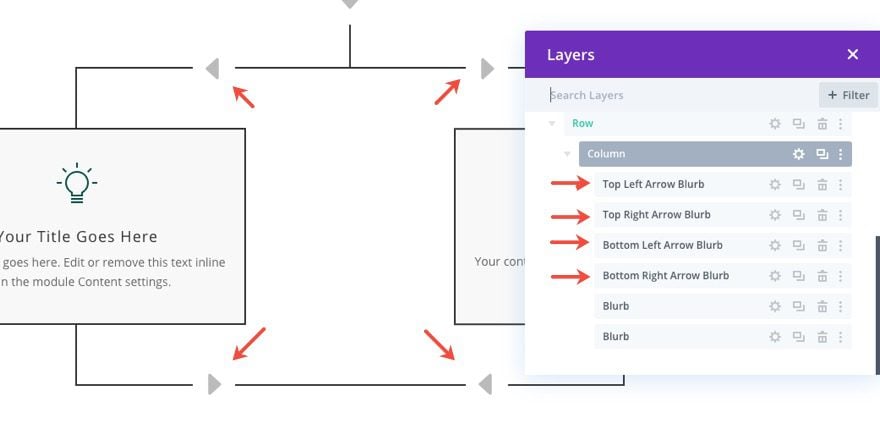
Adding Arrow Blurbs to the Corners on Each Border Line
To make the flow chart more clear about the direction the lines are progressing, we will add additional arrow icons on the border lines of the row.
Top Left Arrow
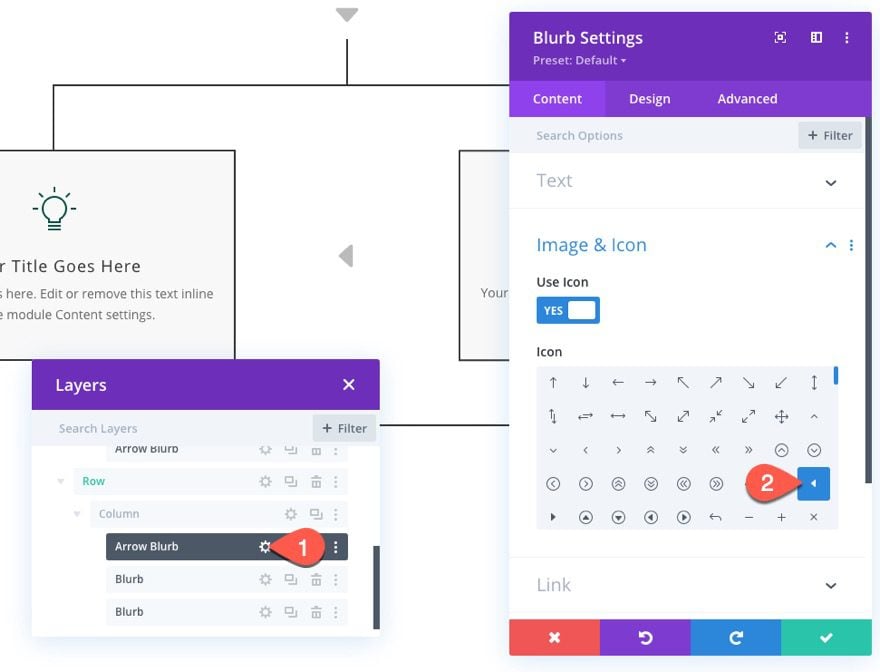
To add an arrow to the top left border line, duplicate the arrow blurb we created in the connector row and drag it into the row containing the adjacent blurbs.
Open the duplicate arrow blurb and change the icon to a left arrow.
Then update the position location of the arrow blurb:
- Location: Top Left
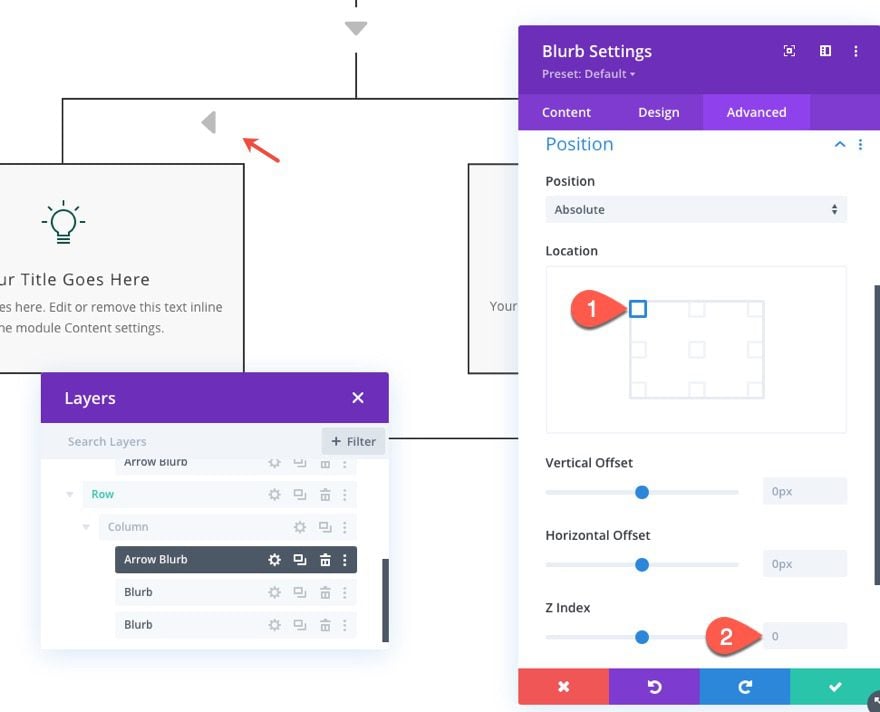
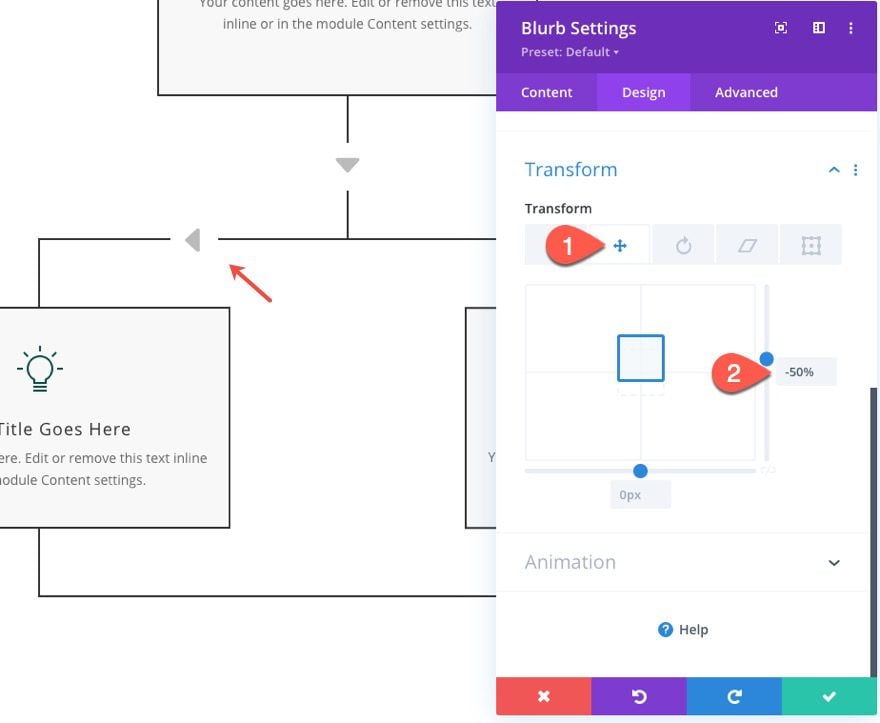
Finally, update the transform translate option as follows:
- Transform Translate Y axis: -50%
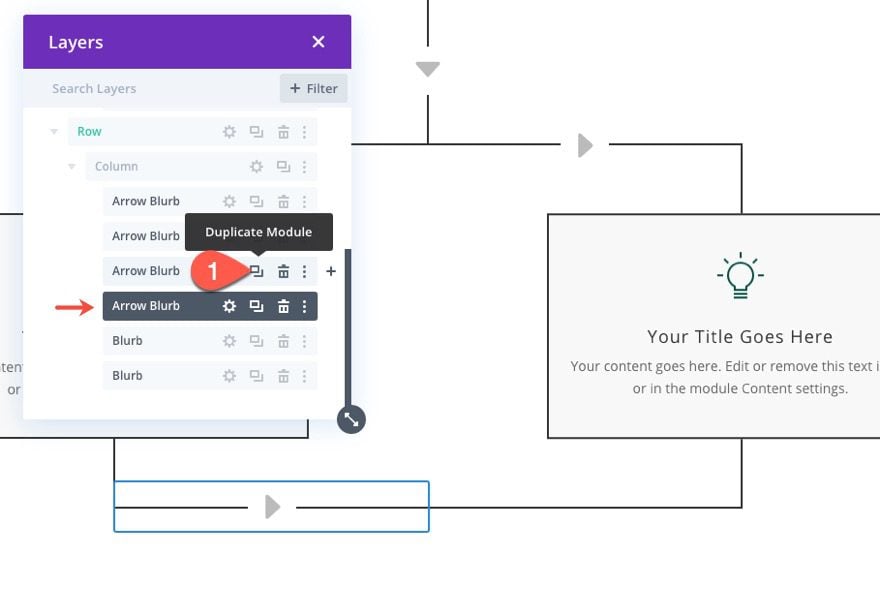
Top Right Arrow
To create an arrow that sits on the top right border line, duplicate the “top left” arrow we just created. Then open the settings and change the position location:
- Location: Top Right

Also, update the arrow icon with a right arrow.
Bottom Left Arrow
To create an arrow that sits on the bottom left border line, duplicate the “top right” arrow we just created.
Then open the settings and change the position location:
- Location: Bottom Left

Next, update the transform translate option:
- Transform Translate Y axis: 50%
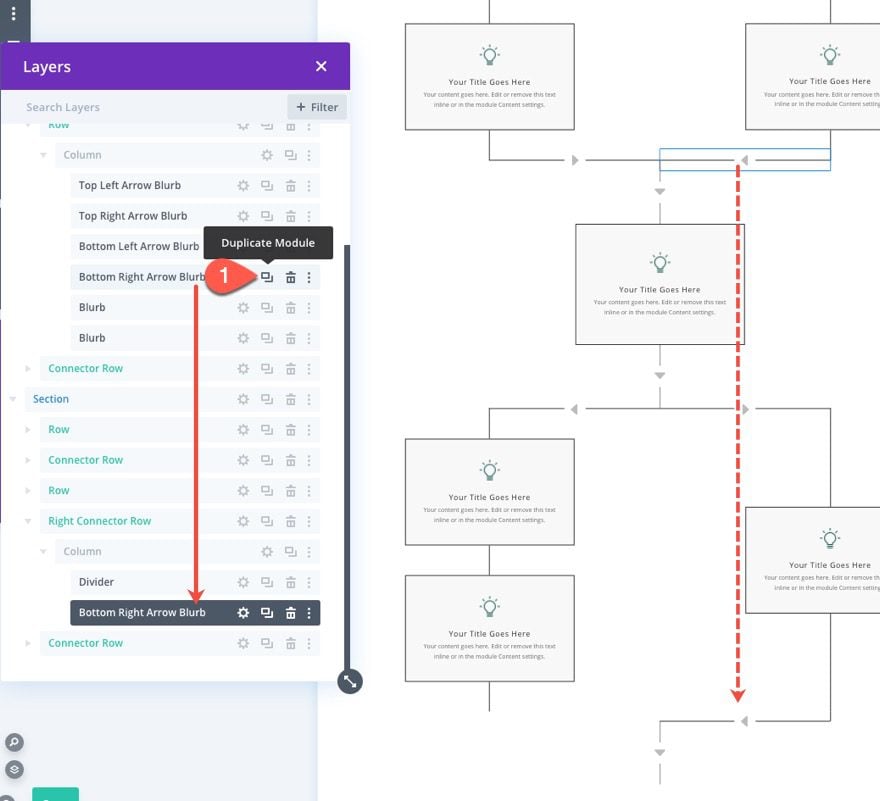
Bottom Right Arrow
To create an arrow that sits on the bottom right border line, duplicate the “bottom left” arrow we just created.
Then open the settings and change the position location:
- Location: Bottom Right
Also, update the arrow icon with a left arrow.
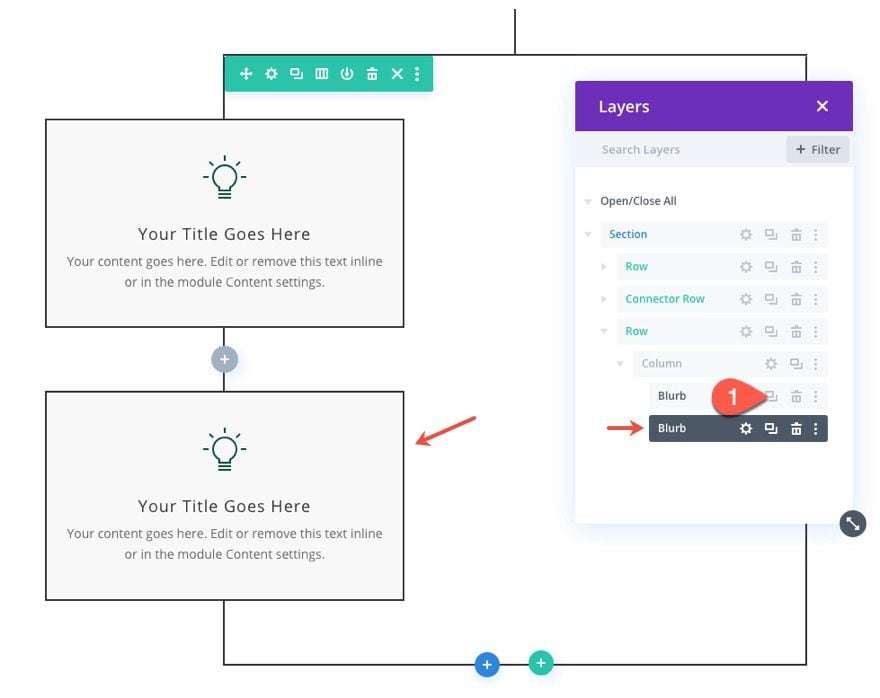
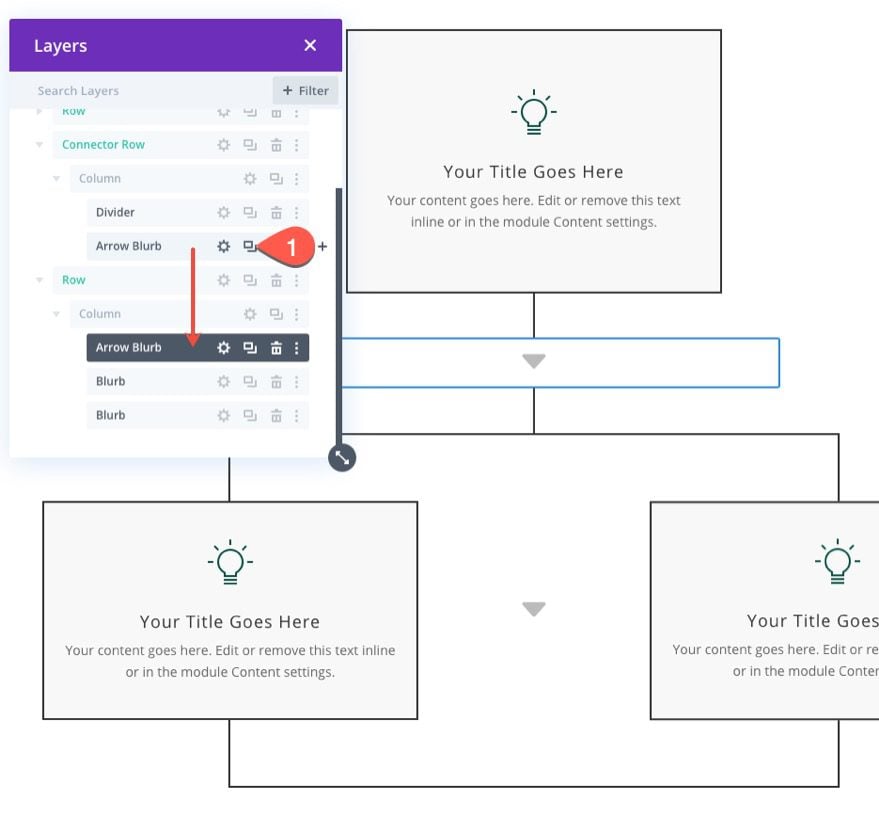
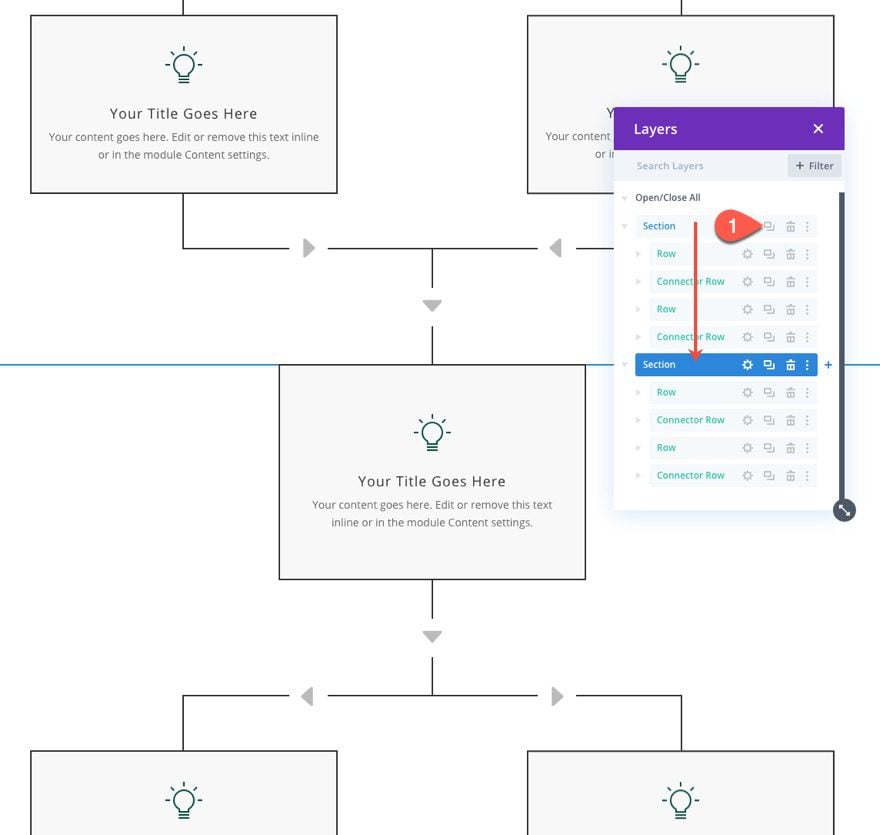
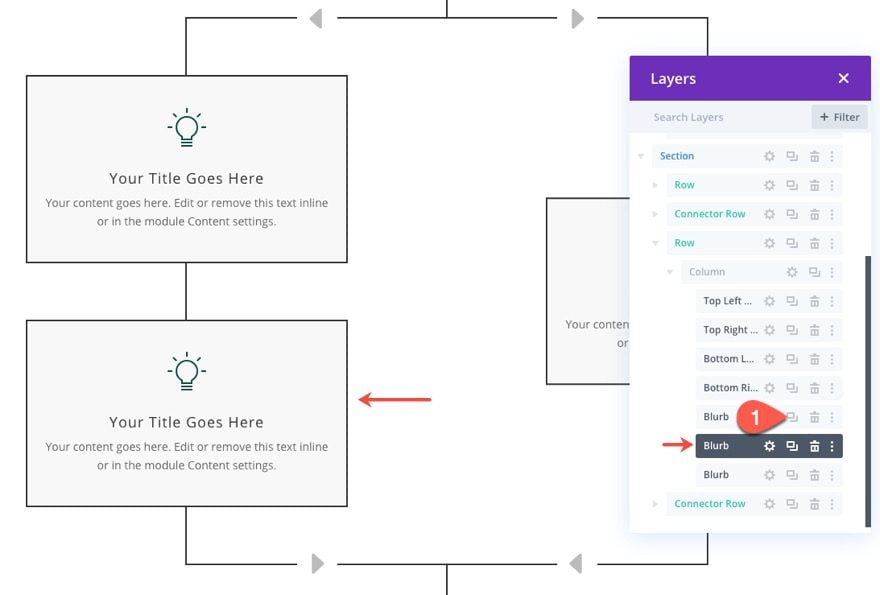
Once all the arrows have been placed, you can update the labels of each using the layers view.
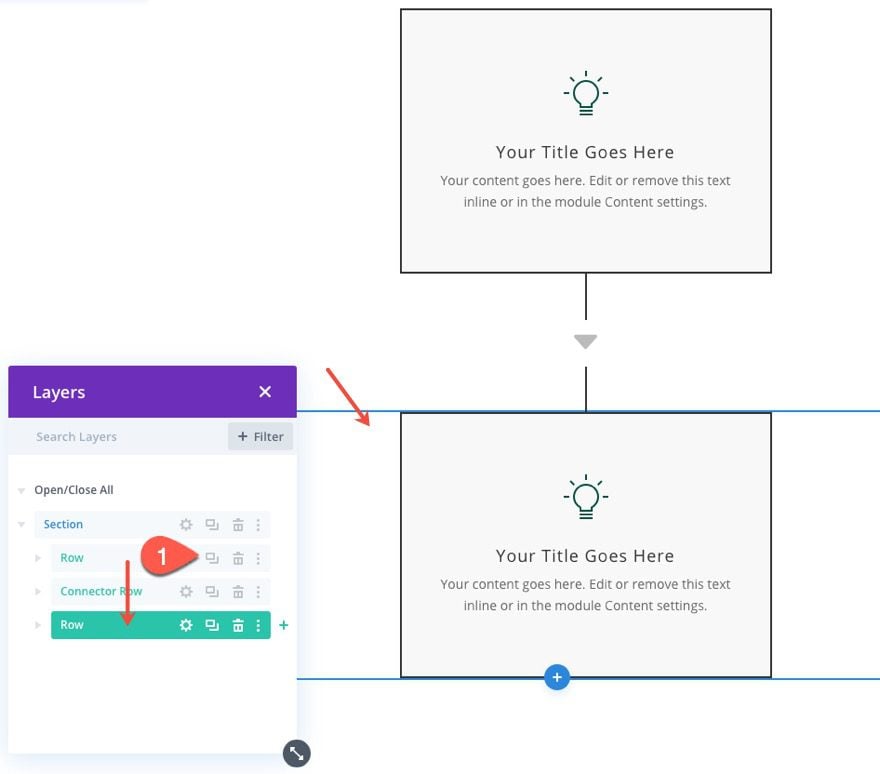
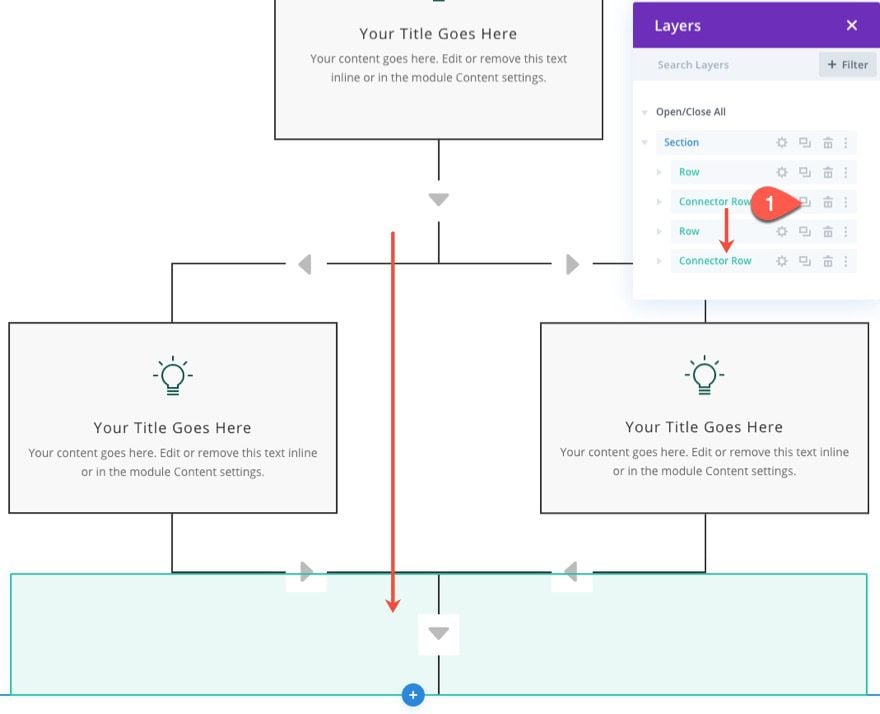
Step 4: Adding Another Connector Row

Once we have completed the row with the two adjacent flow chart blurbs and all of the arrows, we can continue the flow chart by adding another connector row.
To do this, duplicate the connector row we created above and paste it below the row containing the adjacent flow chart blurbs.
Step 5: Customizing the Flow with a Right Border Line Connector

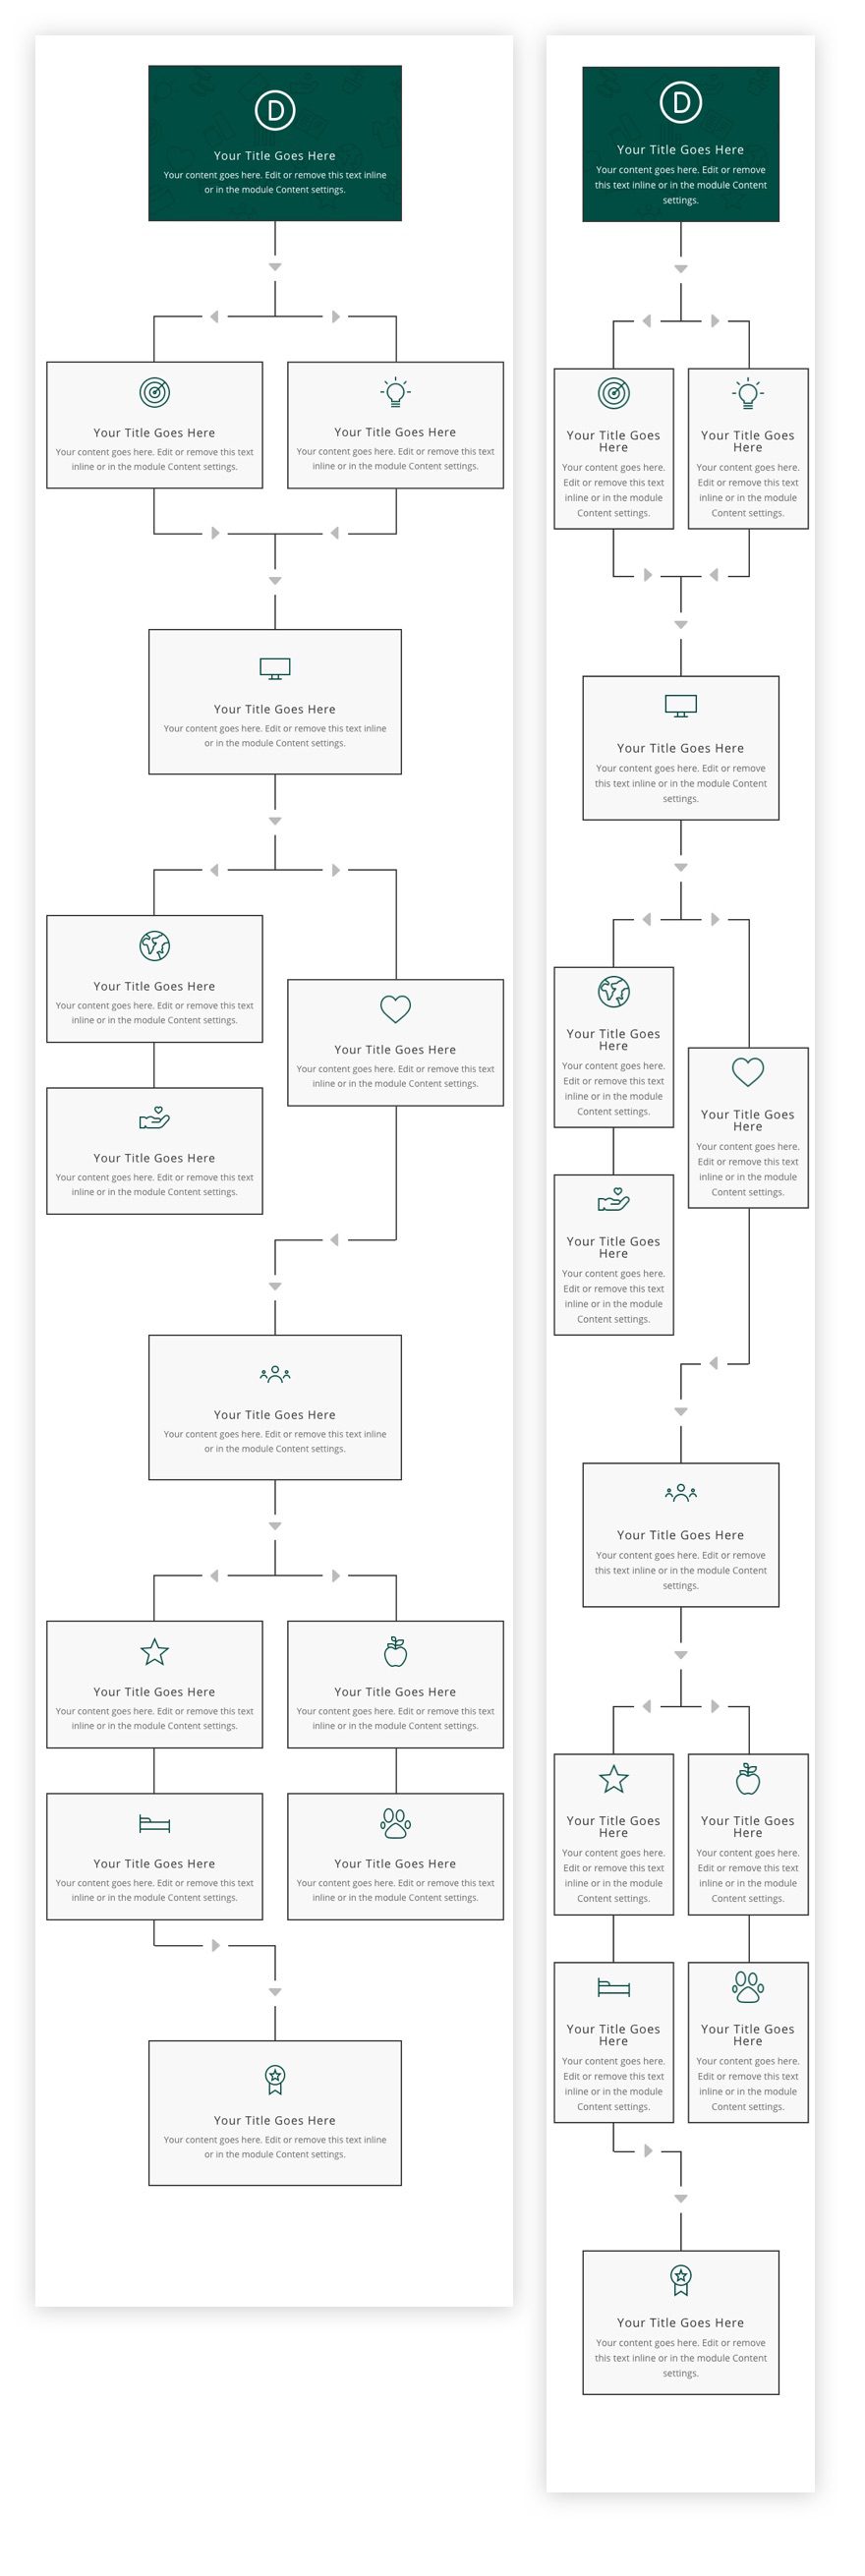
In the existing flow chart design, the flow starts with the top item and then branches out to the right and left adjacent items and then comes back to the middle and proceeds to the next centered item. To customize the flow, we are going to duplicate the section so that we can customize the flow chart to come to a stop on the left adjacent blurb item(s) and continue from the right blurb item.
Duplicate Section
To do this, first duplicate the entire section of flow chart content.
Add Another Left Blurb Item
In the duplicate (bottom) section, locate the left blurb in the row containing the two adjacent blurbs. Then duplicate the left blurb to create a new one directly under it.
Delete Bottom Arrows and Border
Next, delete the bottom left arrow and the bottom right arrow blurbs.
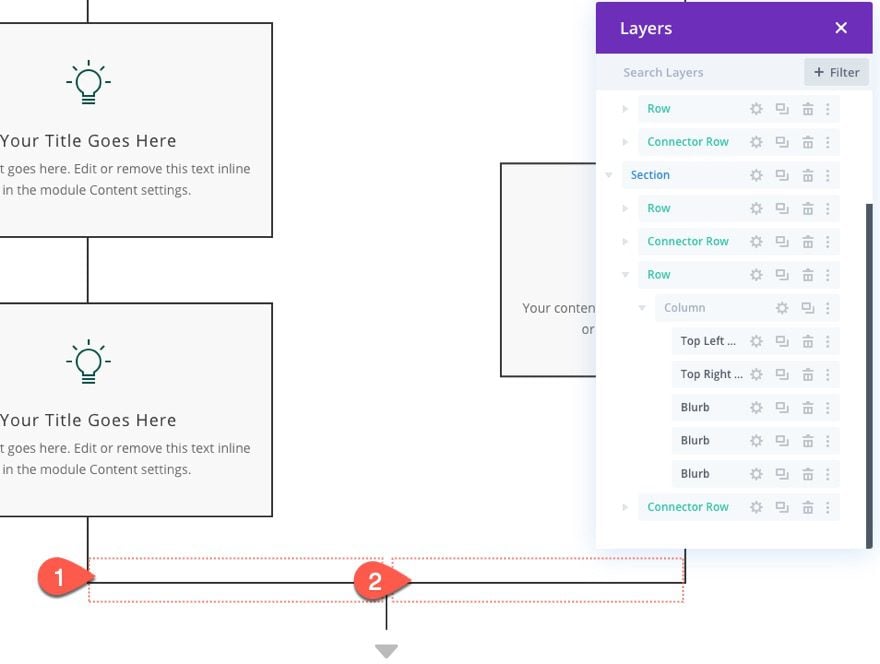
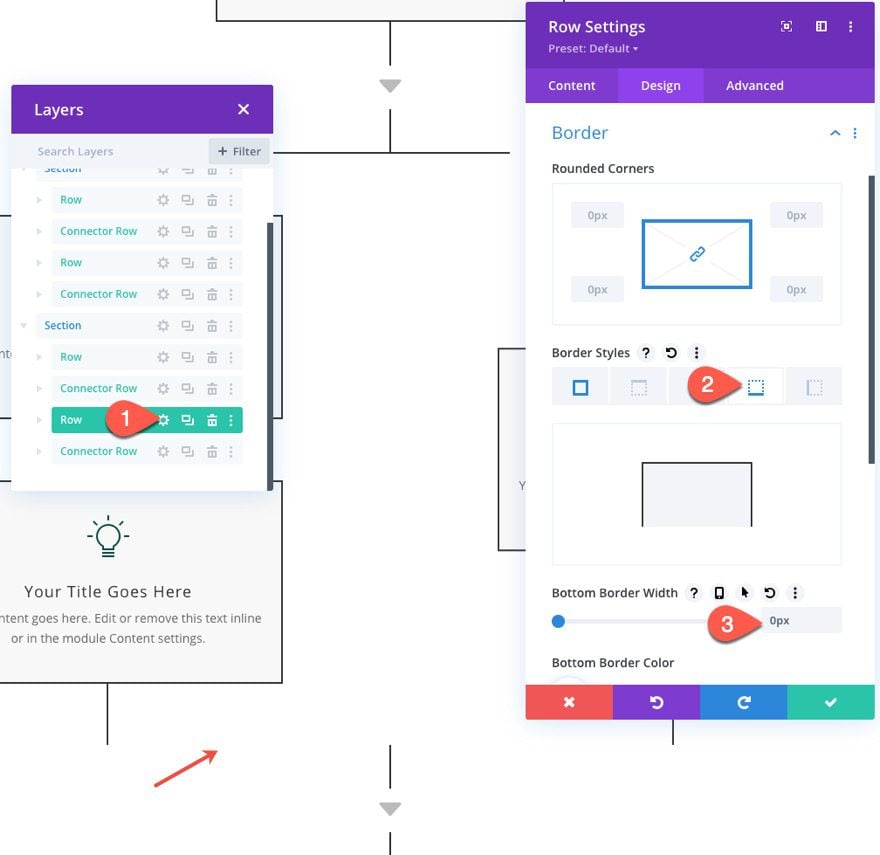
Open the row settings for the row containing the multiple blurbs and take out the bottom border:
- Bottom Border Width: 0px
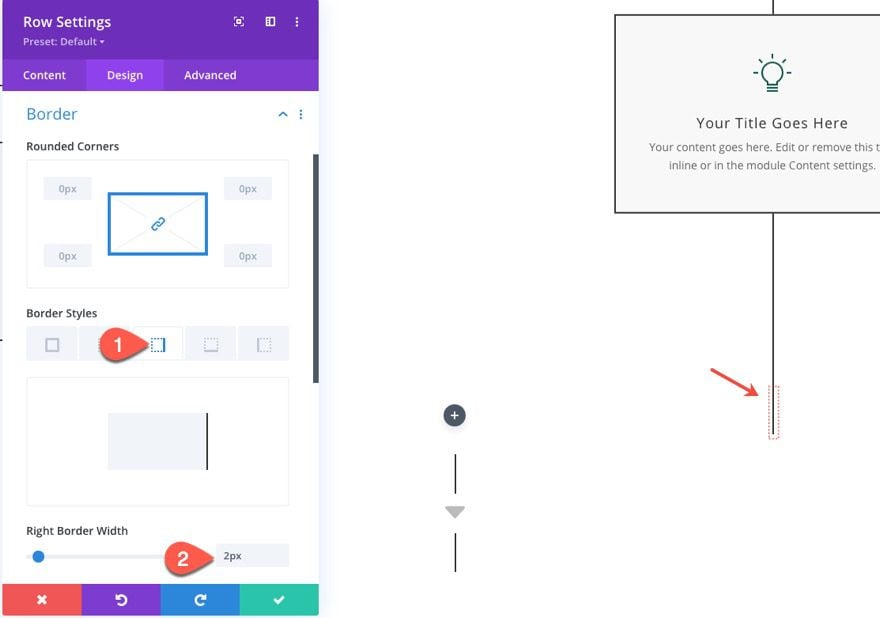
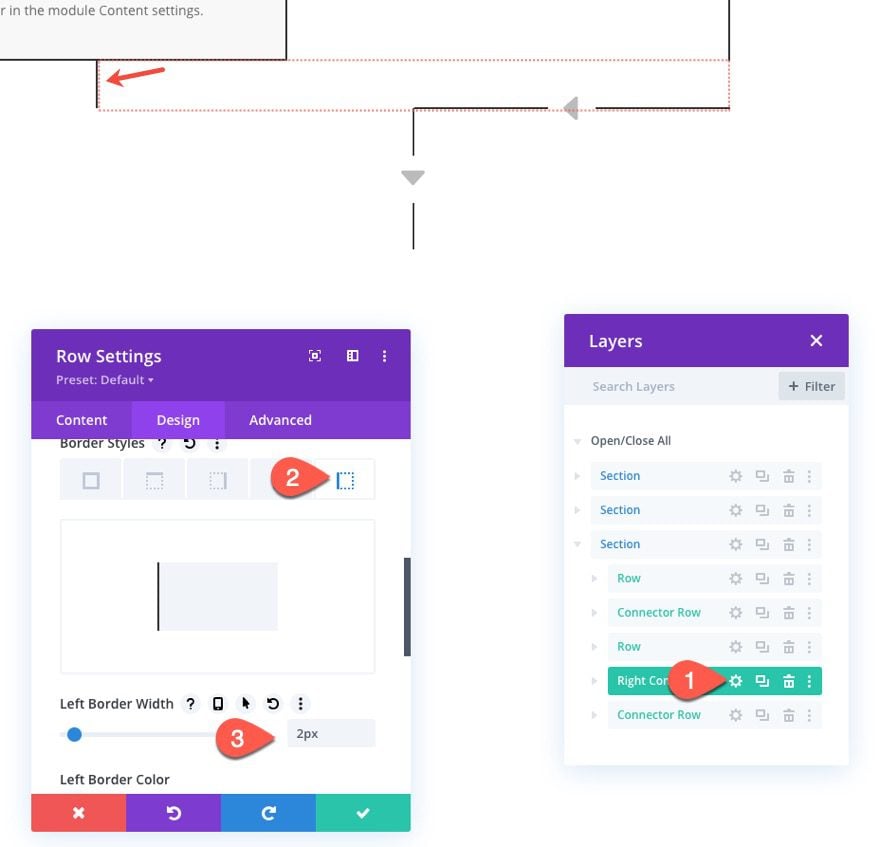
Create a Row with a Right Border Line Connector
Now we want to customize the design of the flow chart with a right border line connector that will connect the right border line of the row with the connector row below.
To do this, we are going to create another row and add a customized divider line and arrow blurb on the right side.
Add a new one-column row below the existing row with the three blurbs.
Update the design settings of the row as follows:
- Gutter Width: 1
- Max Width: 50%
- Padding: 0px top, 0px bottom
Next, add a right border to the row.
- Right Border Width: 2px
Then add a divider module to the row.
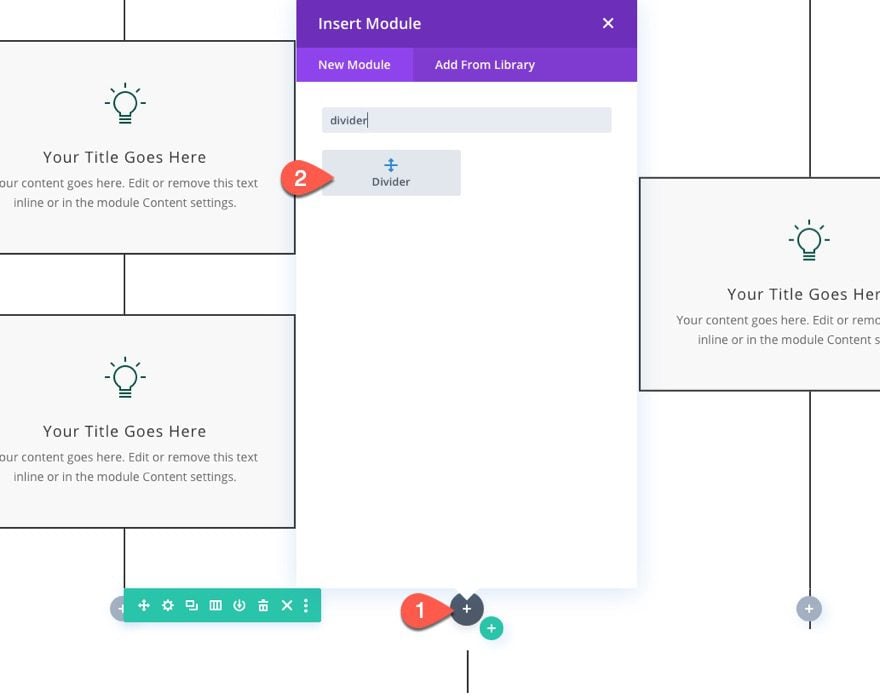
Update the divider settings as follows:
- Line Color: #333333
- Line Position: Bottom
- Divider Weight: 2px
- Width: 50%
- Margin: -2px bottom
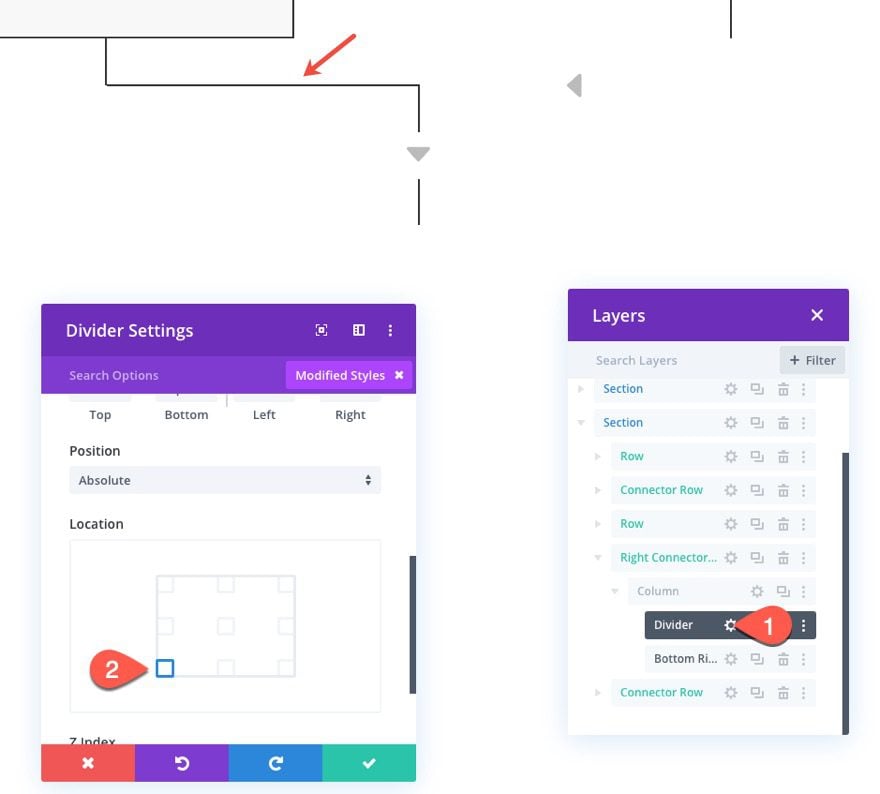
Under the advanced tab, update the divider position:
- Position: Absolute
- Location: Bottom Right
Once the divider is in place, copy the bottom right arrow blurb from the third row in the first section and paste it in the row with the right divider line.
Open the settings of the arrow blurb you just duplicated and moved and update the following:
- Position: default
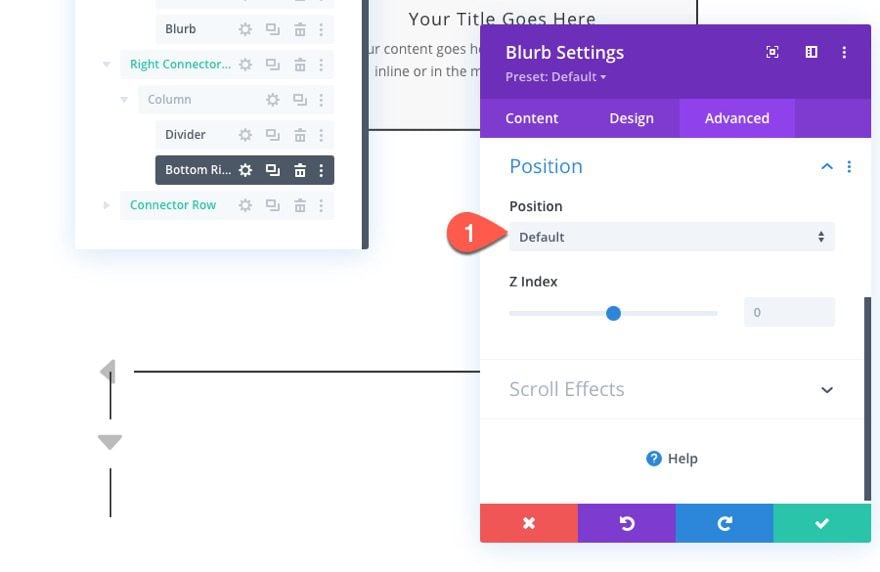
- Module Alignment: right
Stopping the Flow of the Left Border Line
Right now, there is some of the left border line exposed under the bottom left blurb. To hide it, simple take out the bottom margin of that bottom blurb.
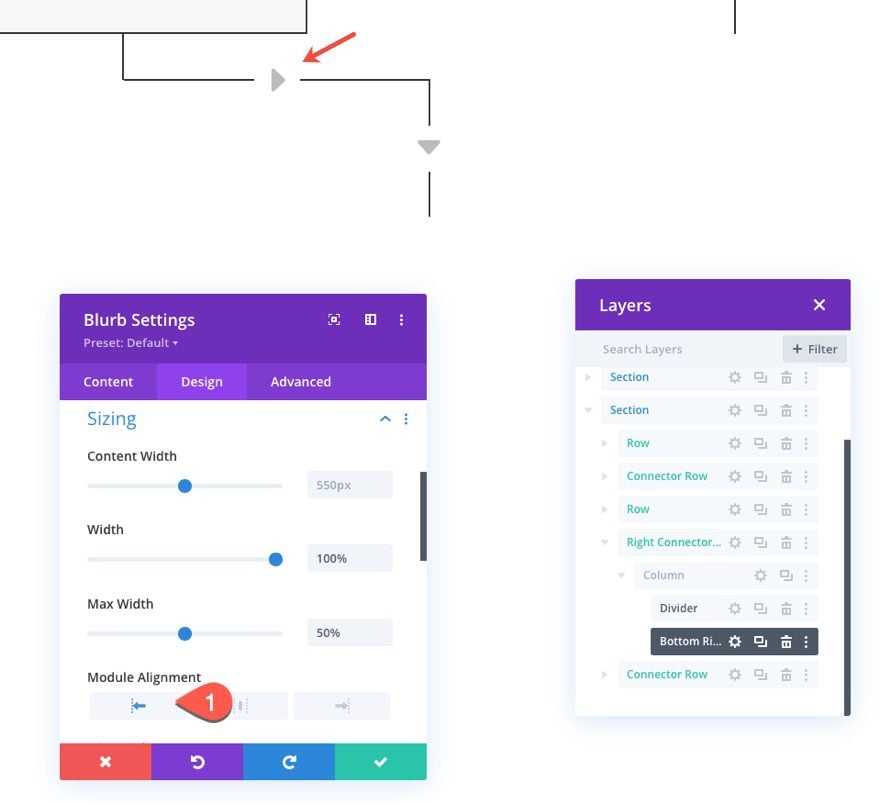
Step 6: Updating the Row with a Left Border Line Connector
Your Flow Chart may also need to have a left border line connector as well. To create it, we can update the row with the right border line connector as follows:
- Left Border Width: 2px
- Right Border Width: 0
Update the divider inside the row with a new location:
- Location: Bottom Left
Then update the alignment of the arrow blurb:
- Module Alignment: Left
And change the icon to a right arrow.
Final Result
Check out the final result. I went ahead and duplicated the second section and added the left border line connector to it so that you can see both.
Final Thoughts
In this tutorial, we created a useful flow chart layout that anyone can use to communicate process and ideas to visitors with a stunning responsive design. Use it to showcase the process of services or design, create an infographic, or lead customers through content in a new way. Hopefully, it will come in handy for your next project.
I look forward to hearing from you in the comments.
Cheers!


wow amazing !
is it possible to have 3 columns and still have a responsive result?
hey Jason this is wonderful, however, I have the same question as Fulvio, can I do a 3-column responsive design by just say, reducing the size of the blurb, or what would you recommend?