
We all love new subscribers to our email list. And one of the primary ways to get new subscribers is to provide your visitors with a well designed email opt-in form. That’s why in this tutorial, I’m going to show you how to achieve five different designs with the Divi email opt-in module to help spark your imagination as to what is possible with this powerful and flexible module.
Sneak Peek
Here is a preview of the five Divi Email Opt-in Module designs we will be tackling today.
#1 Shadow Stacks Opt-in

#2 Big and Minimal Opt-in

#3 Skinny Opt-in
#4 Book Offer Opt-in

#5 Cut-out Frame Opt-in

What You Need to Get Started
Subscribe To Our Youtube Channel
For this tutorial, all you will need is Divi. We will be building each one from scratch so no need for a premade layout. However, I will be using a few images from some of our layout packs but you can use your own if you want.
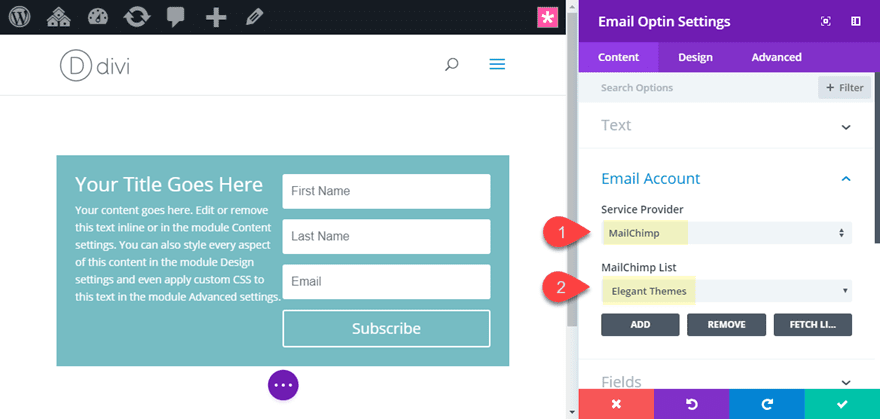
Also, it is important to know that you will not be able to see the optin form fields on the live site until you assign an email provider/list to your email opt-in module. You can do this in your email optin settings under Email Account.
Now let’s get to those designs!
#1 Shadow Stacks Opt-in
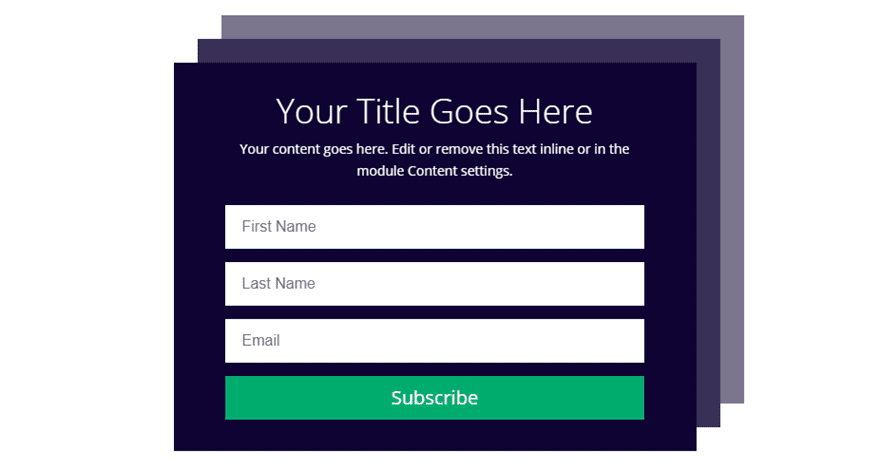
This design adds two box shadows to the Divi email opt-in module for a unique stacking effect that makes the form pop. The first box shadow is added to the email opt-in module and the second box shadow is added to the row which has a custom size and border to make it work.
Here is how it’s done.
First create a new section with a one-column row and add the email opt-in module to the row.
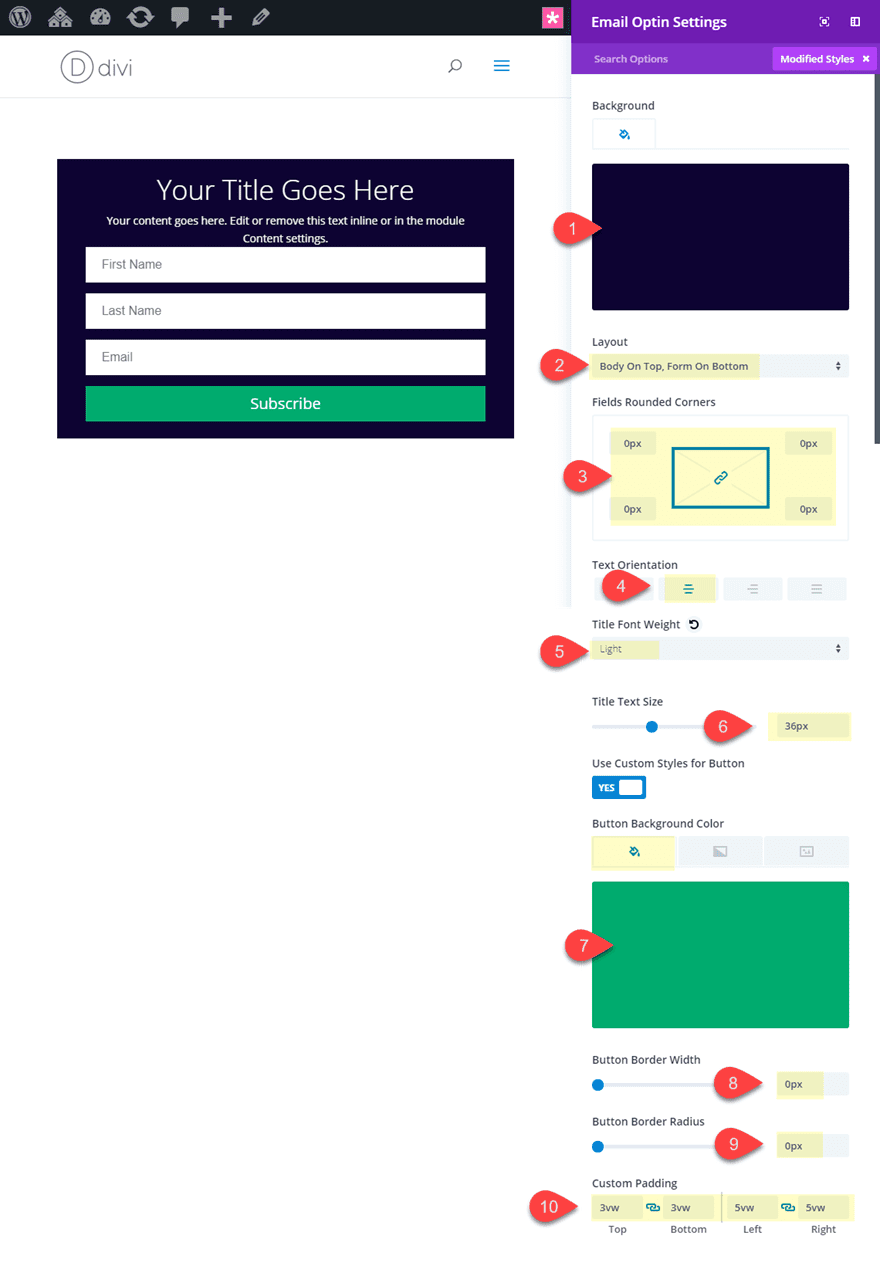
Open the email opt-in settings and update the following:
Background Color: #1a0a38
Layout: Body On Top, Form On bottom
Fields Rounded Corners: 0px
Text Orientation: Center
Title Font Weight: Light
Title Text Size: 36px
Button Text Color: #ffffff
Button Background Color: #00ac69
Button Border Width: 0px
Button Border Radius: 0px
Custom Padding: 3vw top, 3vw bottom, 5vw left, 5vw right
Now let’s add our first box shadow layer behind our email opt-in module.
Box Shadow: see screenshot
Box Shadow Horizontal Position: 25px
Box Shadow Vertical Position: -25px
Shadow Color: rgba(26,10,56,0.82)
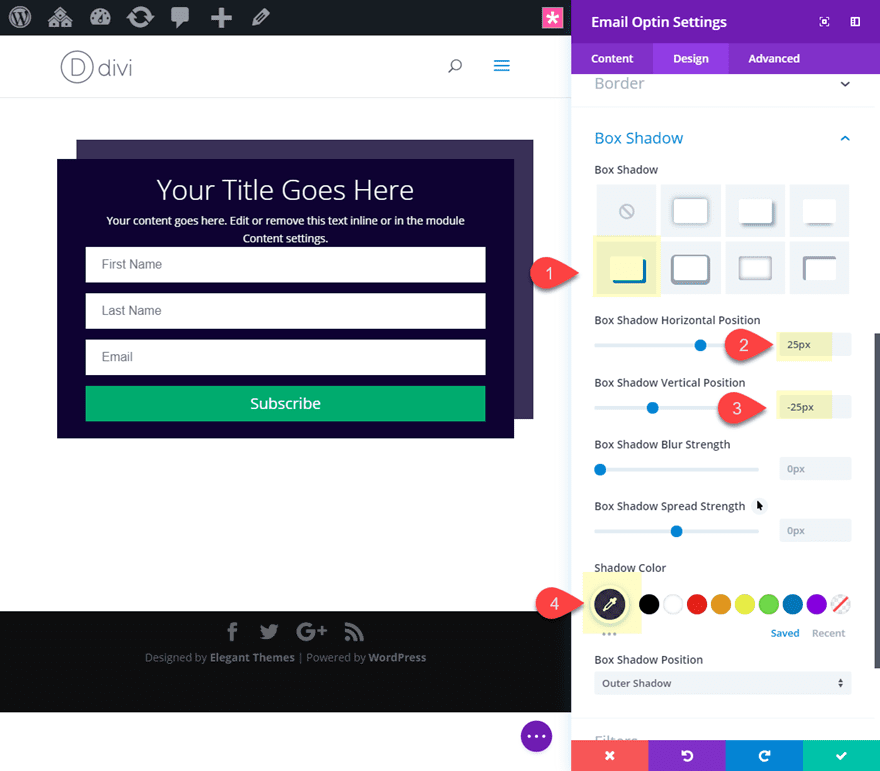
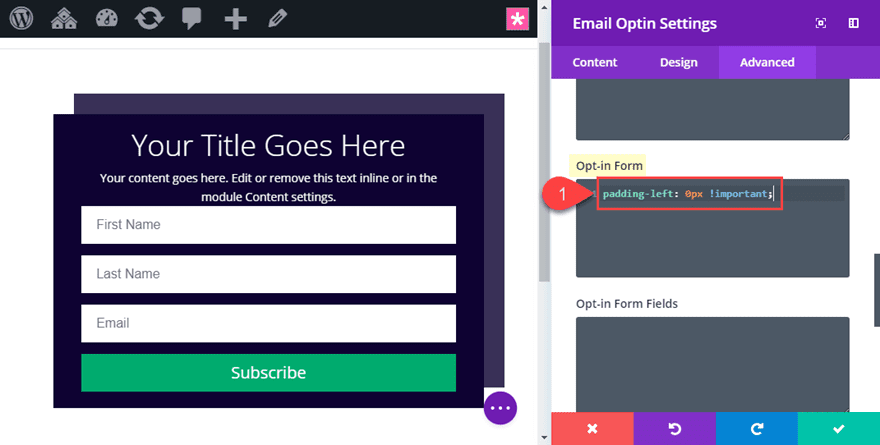
Now let’s add a small snippet of custom CSS in order to take out the left padding that is added to the form by default. Go to the advanced tab and add the following CSS under Opt-in Form.
padding-left: 0px !important;
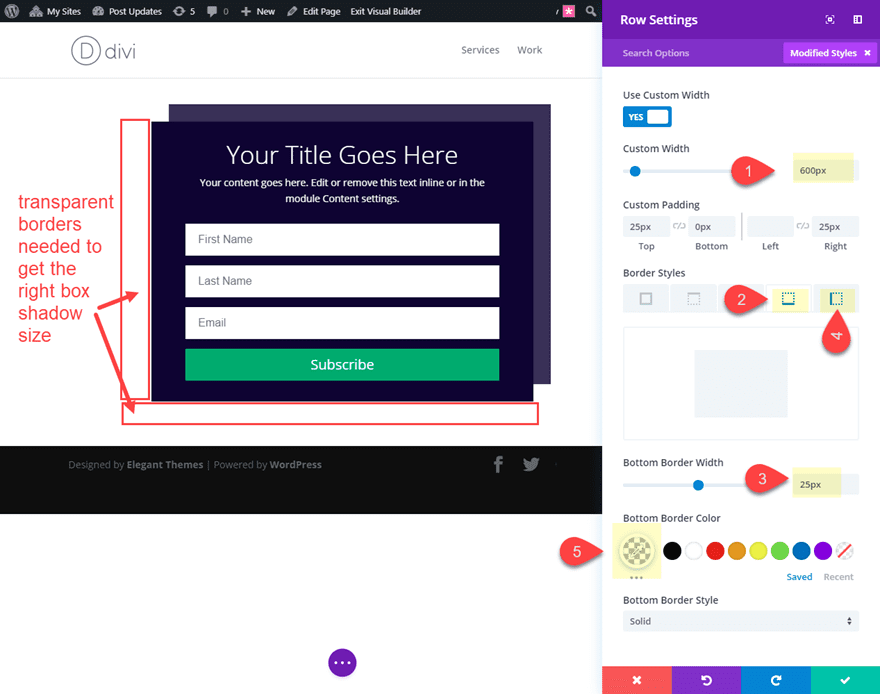
That takes care of the email opt-in module settings. Now let’s edit our row. Open the row settings and update the following:
Custom Width: 600px
Custom Padding: 25px top, 0px bottom, 25px right
Bottom Border Width: 25px
Bottom Border Color: rgba(0,0,0,0)
Left Border Width: 25px
Left Border Color: rgba(0,0,0,0)
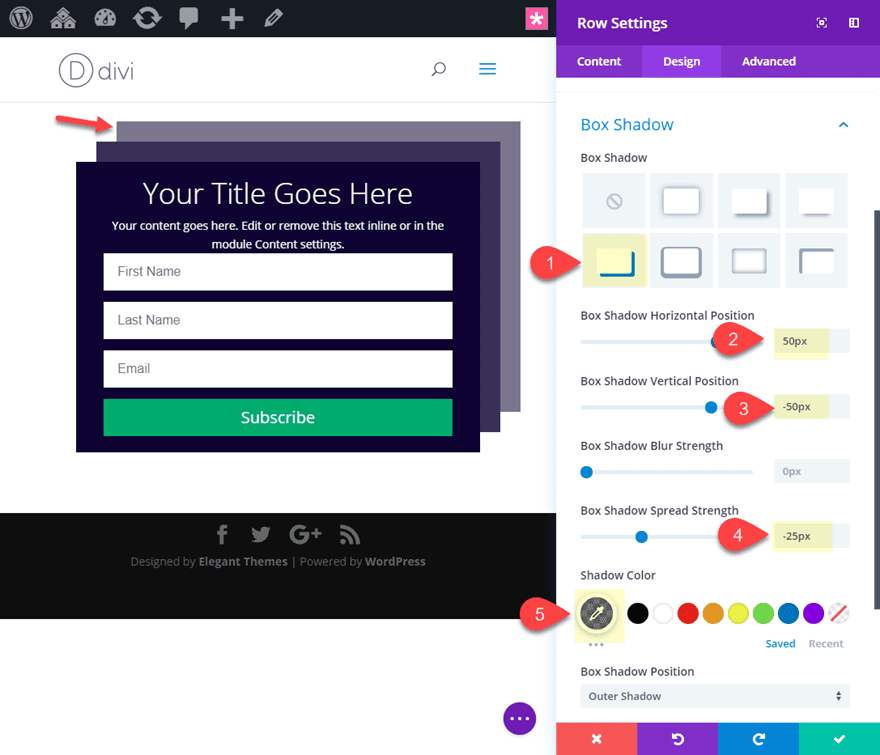
Now we can add the box shadow to the row.
Box Shadow: see screenshot
Box Shadow Horizontal Position: 50px
Box Shadow Vertical Position: -50px
Box Shadow Spread Strength: -25px
Shadow Color: rgba(26,10,56,0.55)
Now let’s check out the final design.
#2 Big and Minimal Opt-in
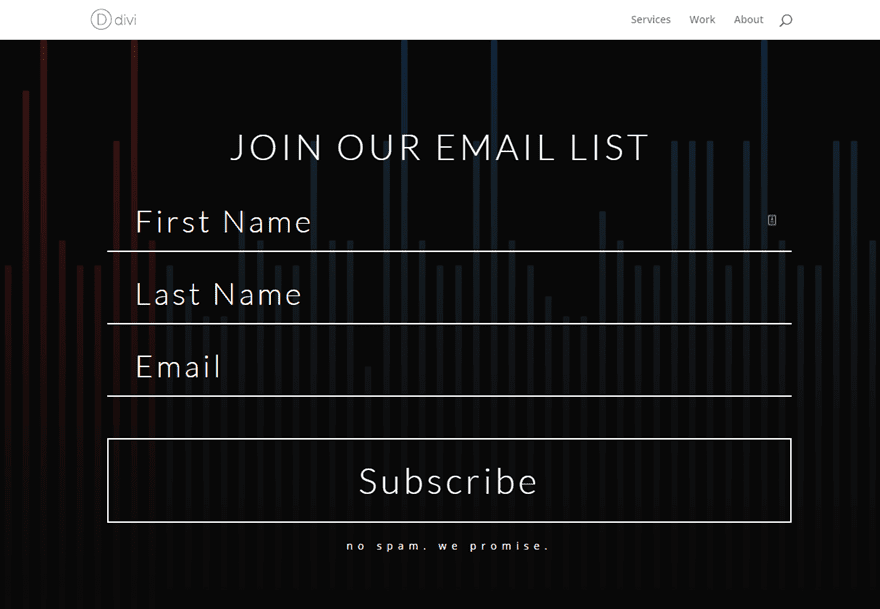
This email opt-in design is minimal, clean, and big. The form fields scale with the size of the browser so that it looks great on all devices. And it’s not too big that it forces the user to scroll.
Here’s how to do it.
First create a new section with a one-column row and add the email opt-in module to the row.
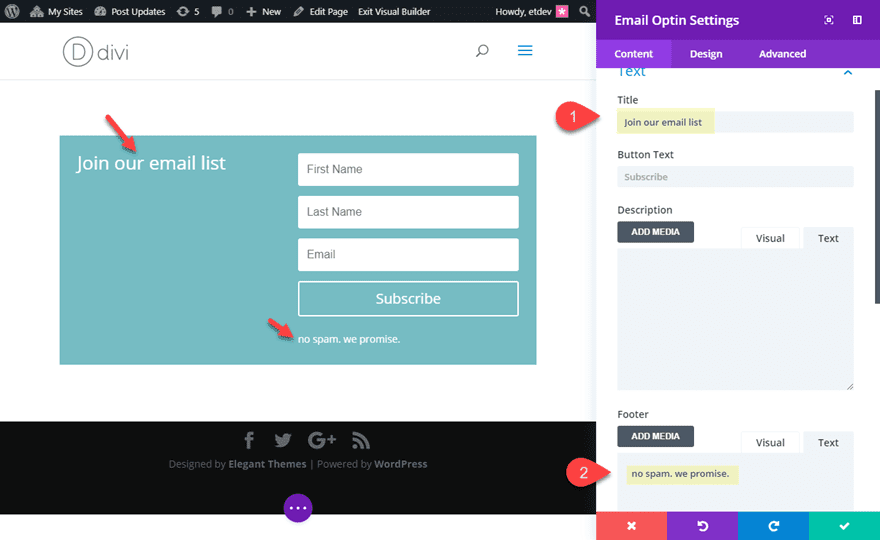
Open the email opt-in settings and update the content to include your Title and Footer text.
Then update the background with a dark color or image:
Background color: #121212
Background Image: This is optional. I’m using one from the Podcast Layout Pack
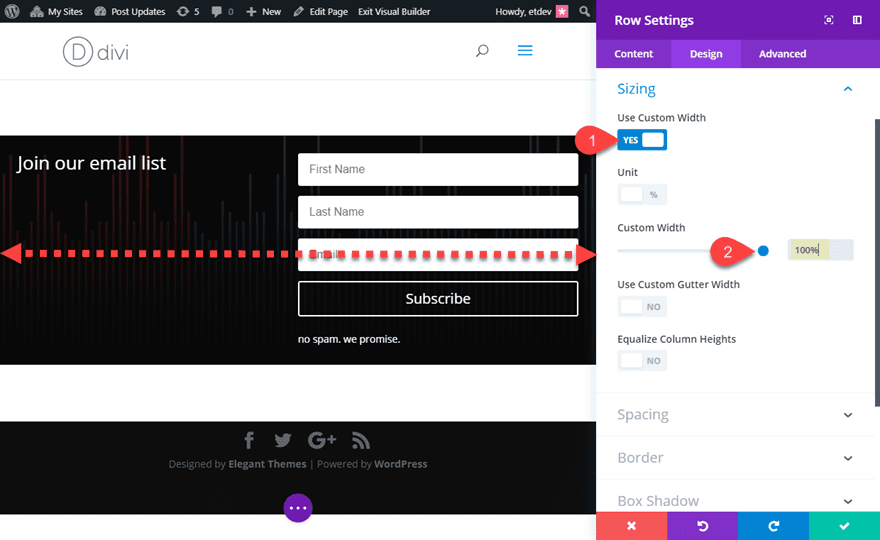
Before we continue over to the design tab for more customization, we need to make room for the large form elements we will be adding. To do this, go to the row settings and update the following:
Custom Width: 100%
Tip: Using a 100% custom width is a great way to make sure your design doesn’t get any right or left margin on mobile. If you use the “Make Fullwidth” option, your max width will be 89% so you will still have margins on mobile.
Now jump back into the Email Opt-in Module Settings and update the following design:
Layout: Body On Top, Form On bottom
Form Field Background Color: rgba(0,0,0,0)
Fields Rounded Corners: 0px
Fields Bottom Border Width: 2px
Fields Bottom Border Color: #ffffff
Text Orientation: Center
Title Font: Lato
Title Font Weight: Light
Title Font Style: TT
Title Text Size: 4vw
Title Line Height: 1em
Field Text Color: #ffffff
Field Font: Lato
Field Font Weight: Light
Field Text Size: 3.5vw
Field Letter Spacing: 0.1em
Field Line Height: 1.3em
Body Letter Spacing: 0.5em
Button Text Size: 4vw
Button Border Radius: 0px
Button Letter Spacing: 0.1em
Button Font: Lato
Font Weight: Light
Custom Padding: 10vw top, 10vw bottom, 10vw left, 10vw right
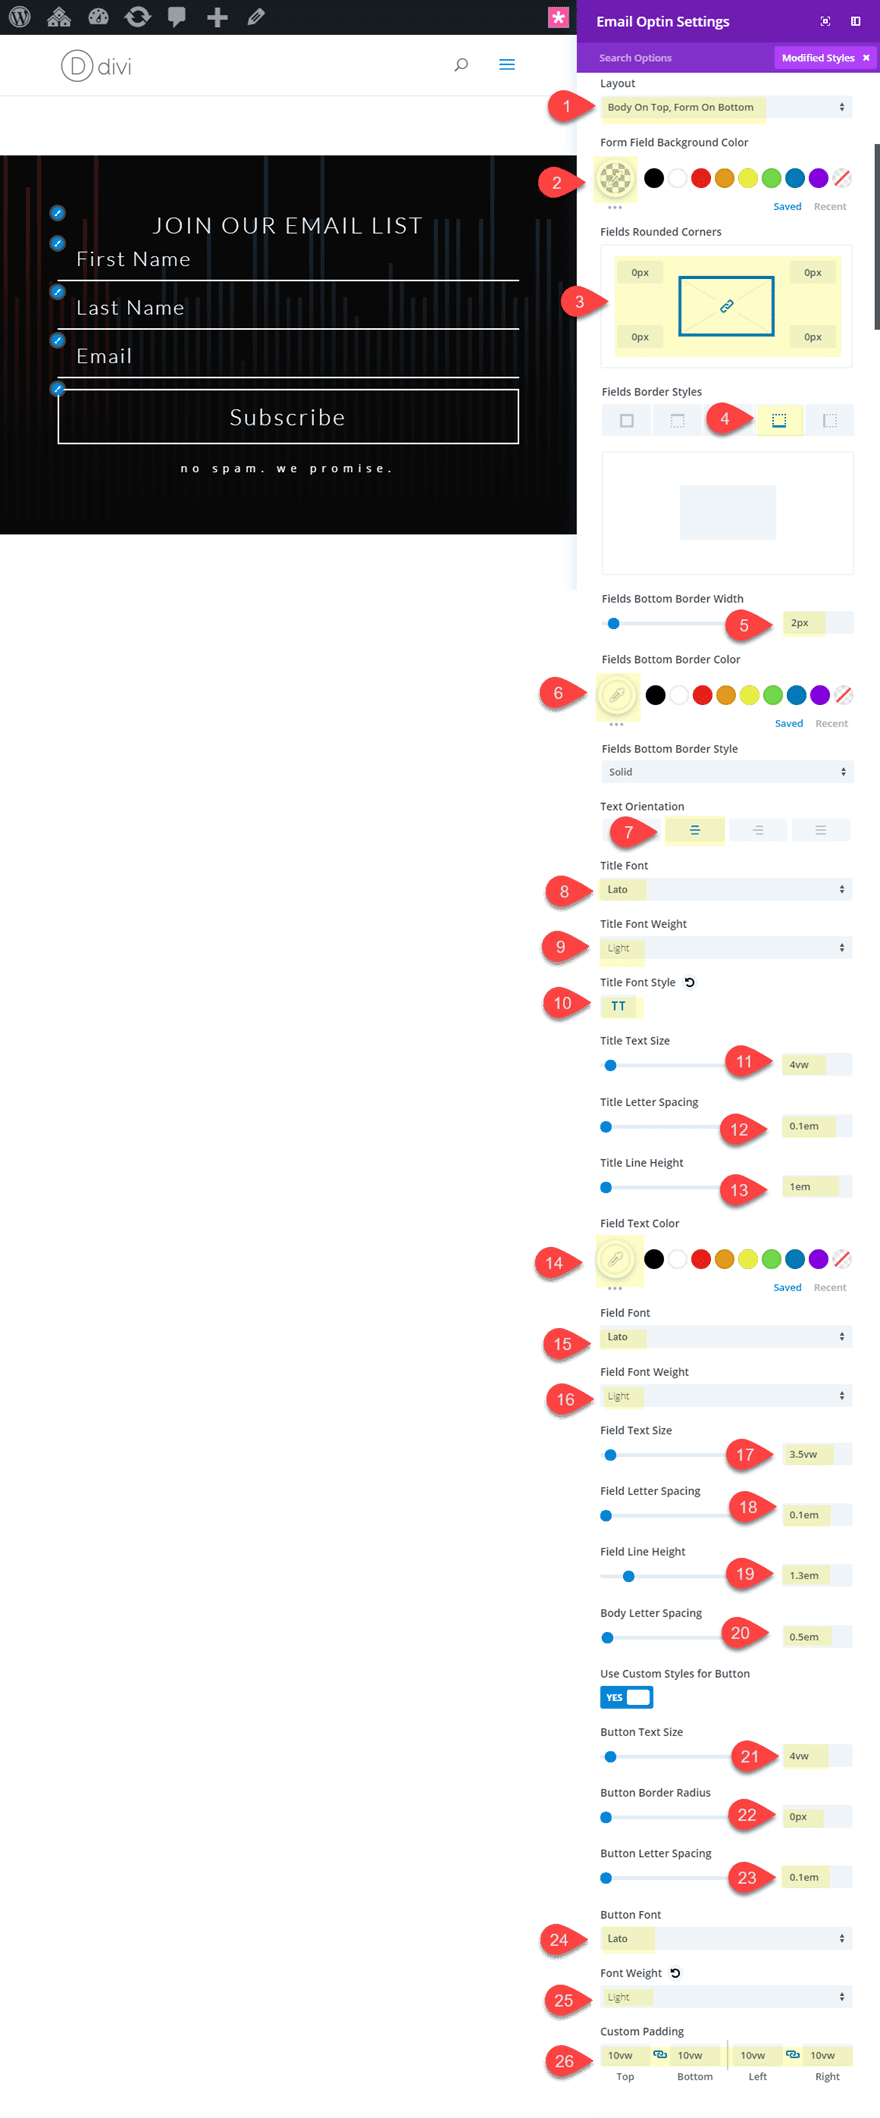
Notice the use of the vw length unit for font size combined with the em length unit for line height and letter spacing. This allows the text and design to scale seamlessly when adjusting your browser.
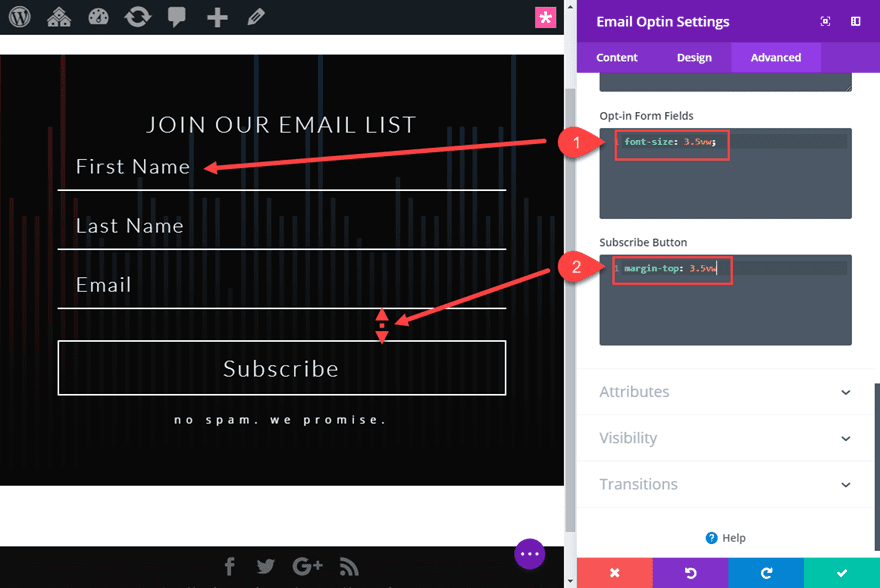
The last step is includes a few snippets of custom CSS to polish off the design. Go to the advanced tab and add the following Custom CSS under Opt-in Form Fields:
font-size: 3.5vw;
This will allow the size of the text when typing to match the placeholder text in your form fields.
Then let’s add some custom margin above the button to give it a little breathing room. Add the following under Subscribe Button:
margin-top: 3.5vw;
Now let’s check out the final design.
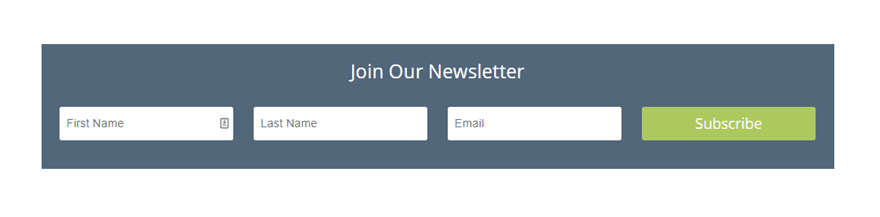
#3 Skinny Opt-in

This next design is sure to be a popular solution for companies and blogs looking to save some vertical space on their posts or landing pages. Even though Divi’s Email Opt-in module is best for more traditional vertical forms, you can actually convert the form to a skinny horizontal form with just a small snippet of CSS.
Here’s how to do it.
Create a new section with a one-column row and add the email opt-in module to the row.
Open the email opt-in settings and update the content to include a Title but nothing else.
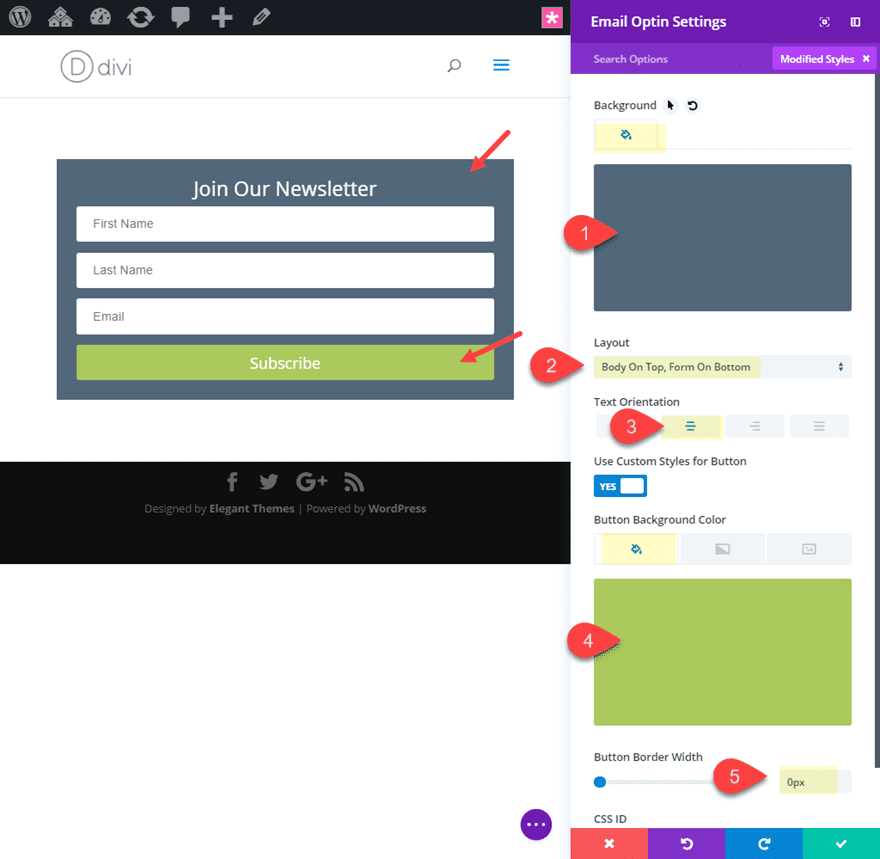
Then update the design with a background and a button color as follows:
Background Color: #54677d
Layout: Body On Top, Form On Bottom
Text Orientation: Center
Button Background Color: #b0c94f
Button Border Width: 0px
Now it’s time for the custom CSS. Since we want the skinny form design only on desktop (and not on mobile), we will be adding the CSS to the page (under page settings) using a Custom CSS ID to target the form style.
To do this, go to the advanced tab and give the opt-in module a custom CSS ID.
CSS ID: skinny
This will be used to target this form with the external CSS we will add to the page.
Now open the Divi Builder page settings and add the following CSS under the Advanced tab.
@media (min-width: 980px){
#skinny.et_pb_newsletter .et_pb_newsletter_fields {
  flex-wrap: nowrap !important;
}
#skinny.et_pb_newsletter .et_pb_newsletter_fields>* {
  flex-basis: 23%;
}
}

#skinny .et_pb_newsletter_form {
  padding-left: 0px;
}

Since Divi already uses flex to style the form on the backend, this CSS takes out the flex-wrap property that causes the form fields to align vertically. The result is a horizontal layout of the form fields. Adjusting the flex-basis property to 23% basically sets the width of each of the form fields. And because we added the CSS inside a media query, the design will only happen on desktop with the default layout of the form displaying on mobile.
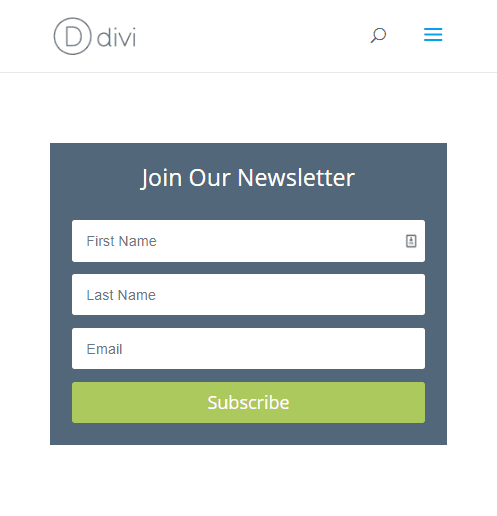
Here is the final design.
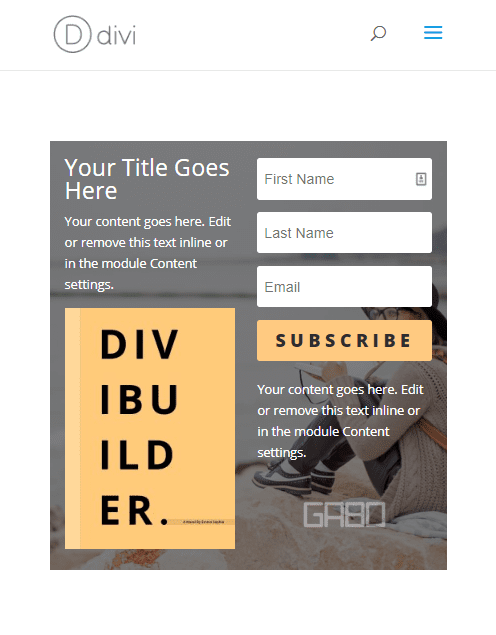
#4 Book Offer Opt-in
This design incorporates a few images within the email opt-in module for the purposes of promoting a free book offer for signing up. To do this, all you need to do is add an image using the built-in wysiwyg editor for adding description and footer content. It is true that you can accomplish this same design by combining the email opt-in module with other modules in a two column row, but I thought it would be helpful to show how to do it all in the same module.
Here’s how to do it.
Create a new section with a one-column row and add the email opt-in module to the row.
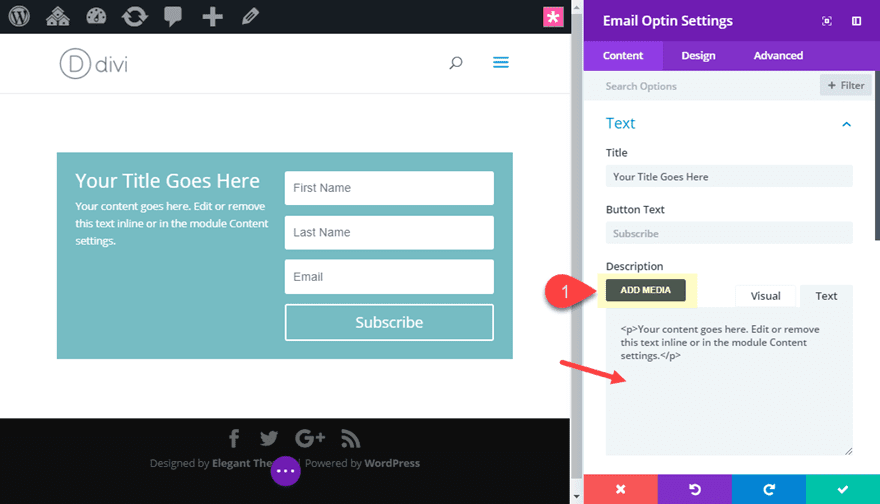
Open the email opt-in settings and stay in the content tab.
Under description, shorten the default text to only a couple of sentences. Then add an image from your media library by clicking the Add Media button.
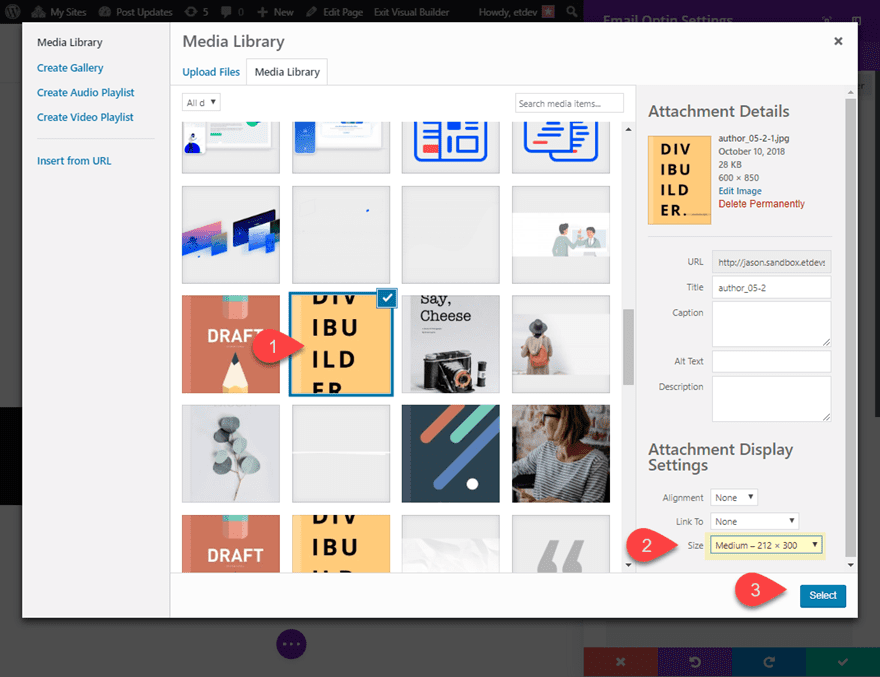
You want to make sure the image is no more than about 200px wide. For this example, I’m using the medium size of the image.
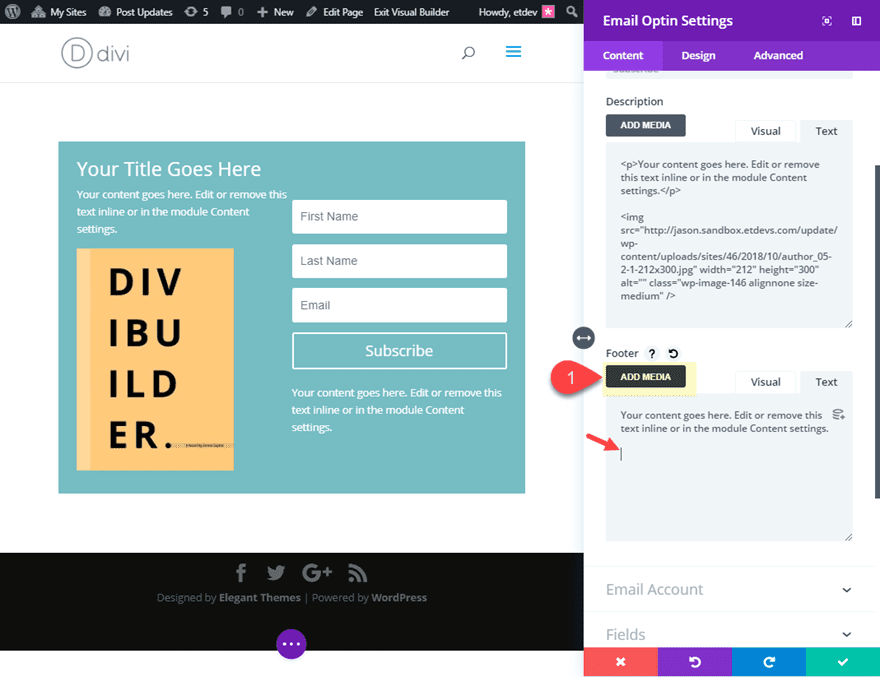
Under Footer, add a few sentences for the footer text content and then click the Add Media button to add a logo image under the text (this is optional of course).
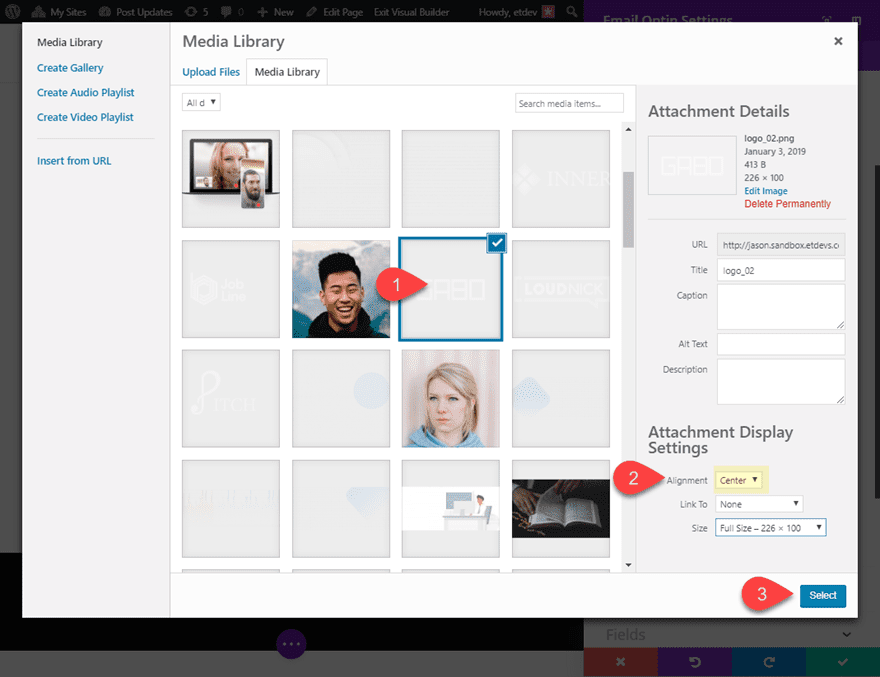
To make sure the image is centered, set the alignment option to center when adding the image from the media library.
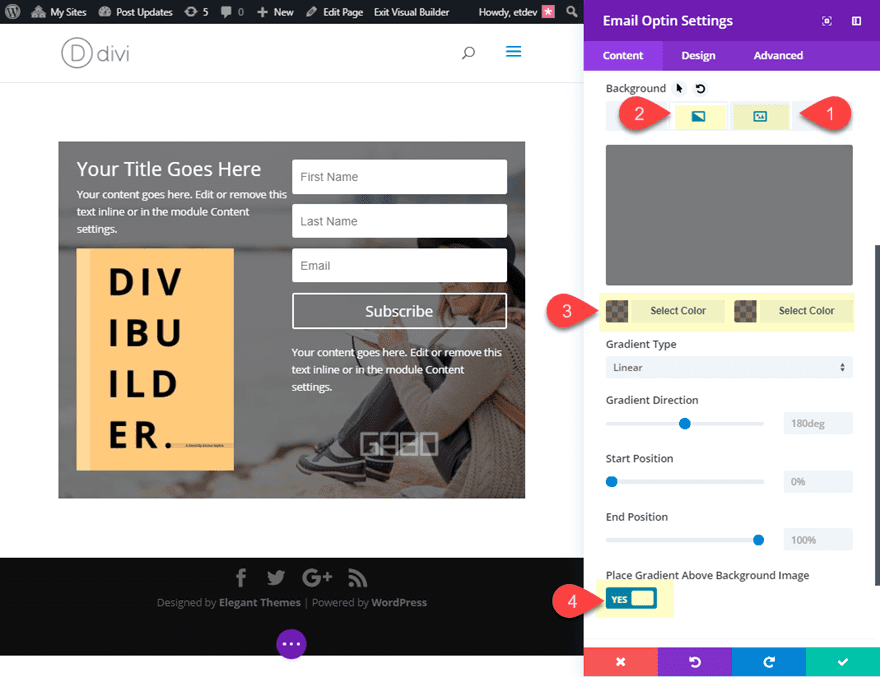
Now you are ready to update the rest of the design. Start by giving the module a background image and a background gradient above the image to make the text more readable.
Background image: [add image]
Background Gradient Left Color: rgba(0,0,0,0.5)
Background Gradient Right Color: rgba(0,0,0,0.5)
Place Gradient Above Background Image: YES
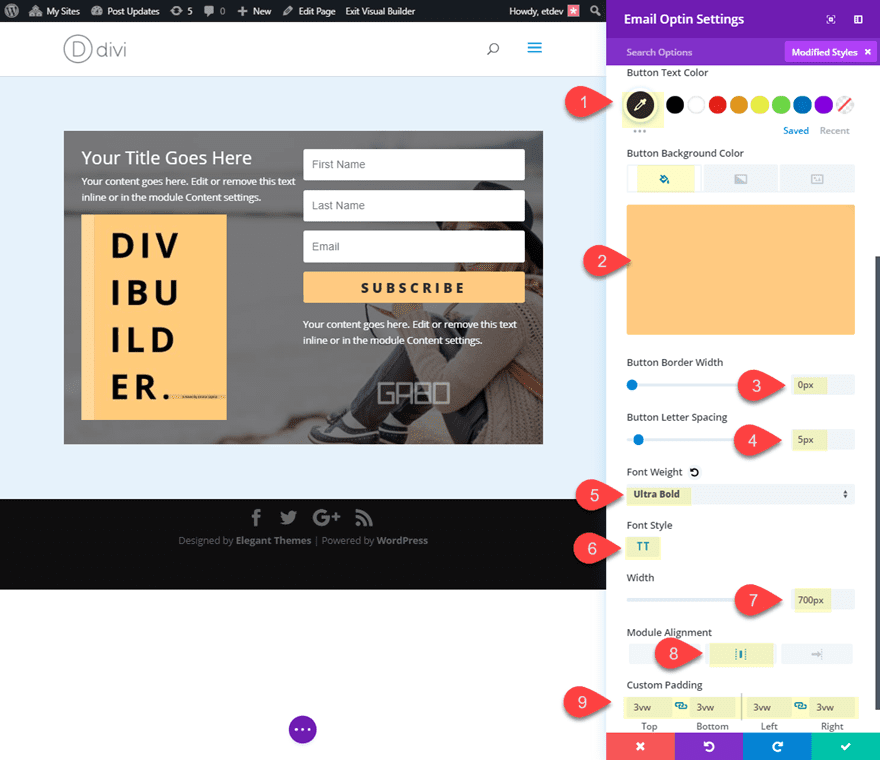
Then update the rest of the design as follows:
Button Text Color: #333333
Button Background Color: #ffcb7a
Button Border Width: 0px
Button Letter Spacing: 5px
Font Weight: Ultra Bold
Font Style: TT
Width: 700px
Module Alignment: center
Custom Padding: 3vw top, 3vw bottom, 3vw left, 3vw right
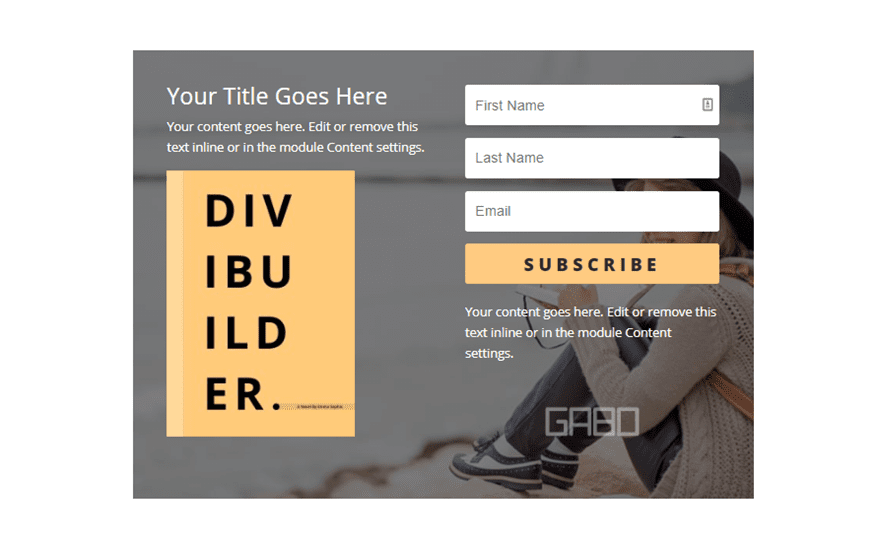
Here is the final design.
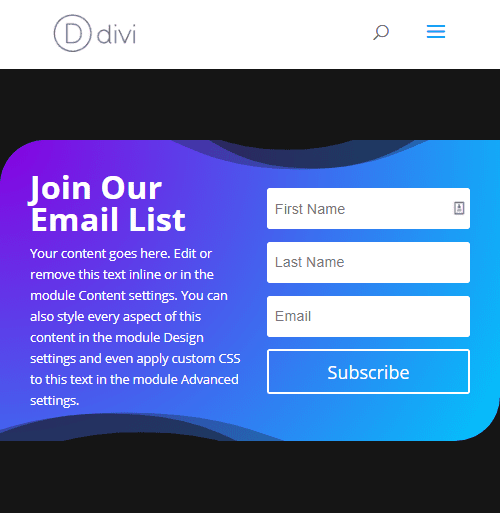
#5 Cut-out Frame Opt-in
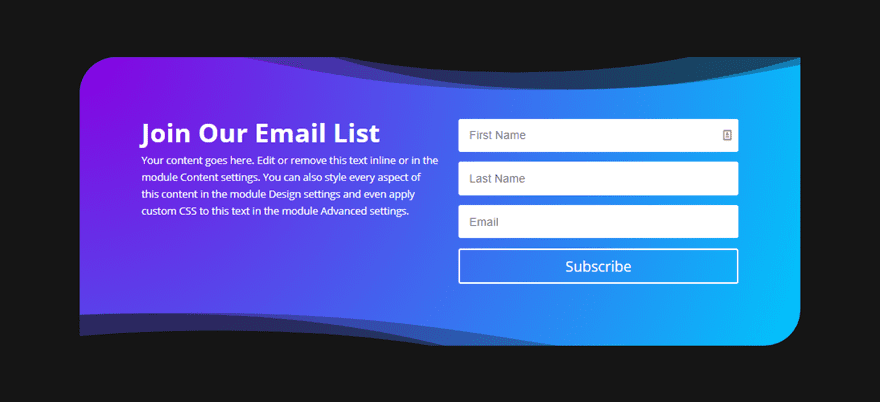
This simple design technique is a great way to give your email opt-in a unique look. The trick is to use section dividers that have the same color as the section background. Then by adjust the height of the dividers, you can overlap the email opt-in form in order to cut out the edges in a unique way for nice framing effect.
Here is how to do it.
Create a new section with a one-column row and add the email opt-in module to the row.
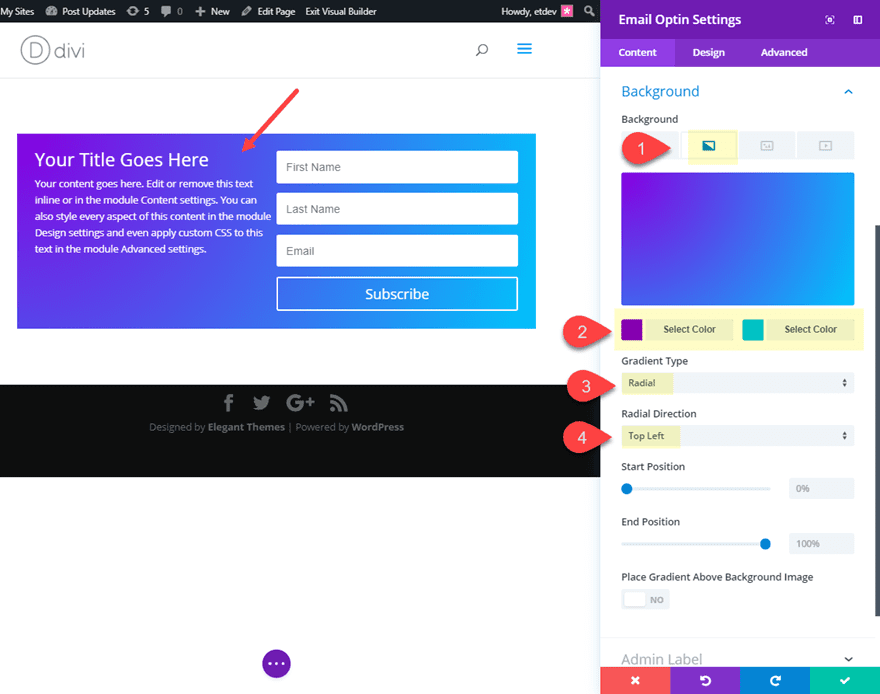
Open the email opt-in settings and give your module a background gradient.
Background Gradient Left Color: #8300e9
Background Gradient Right Color: #06c8ff
Gradient Type: Radial
Radial Direction: Top Left
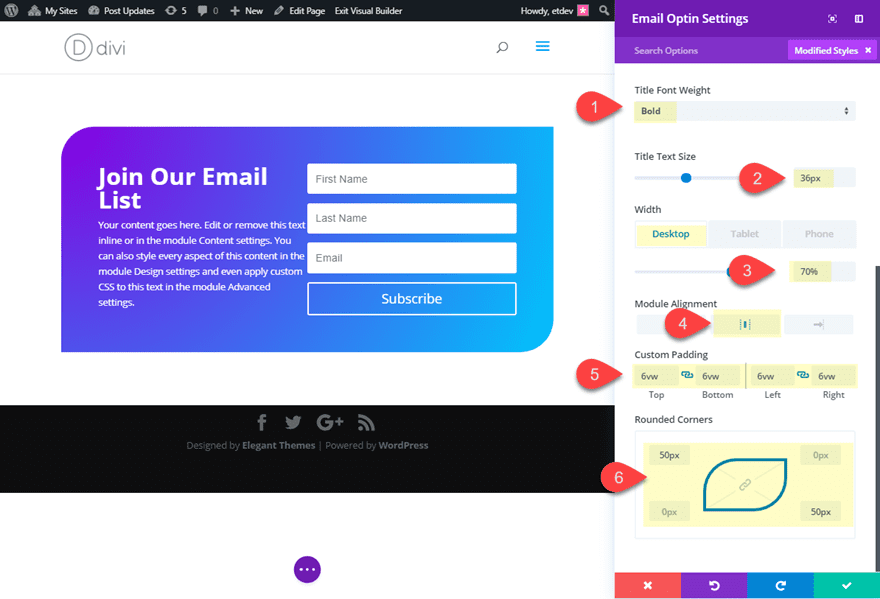
Then update the rest of the design as follows:
Title Font Weight: Bold
Title Text Size: 36px
Width: 70% (desktop), 100% (tablet and smartphone)
Module Alignment: center
Custom Padding: 6vw Top, 6vw Bottom, 6vw Left, 6vw Right
Rounded Corners: 50px top left, 0px top right, 50px bottom right, 0px bottom left
Save your settings.
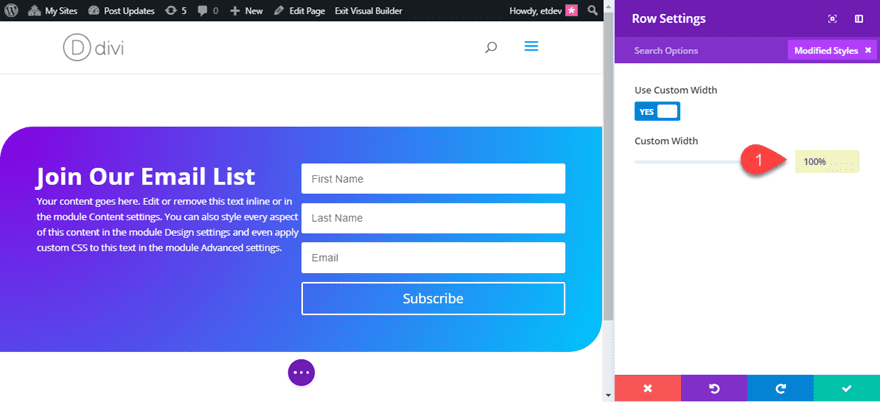
Then update your row settings with a custom width.
Custom Width: 100%
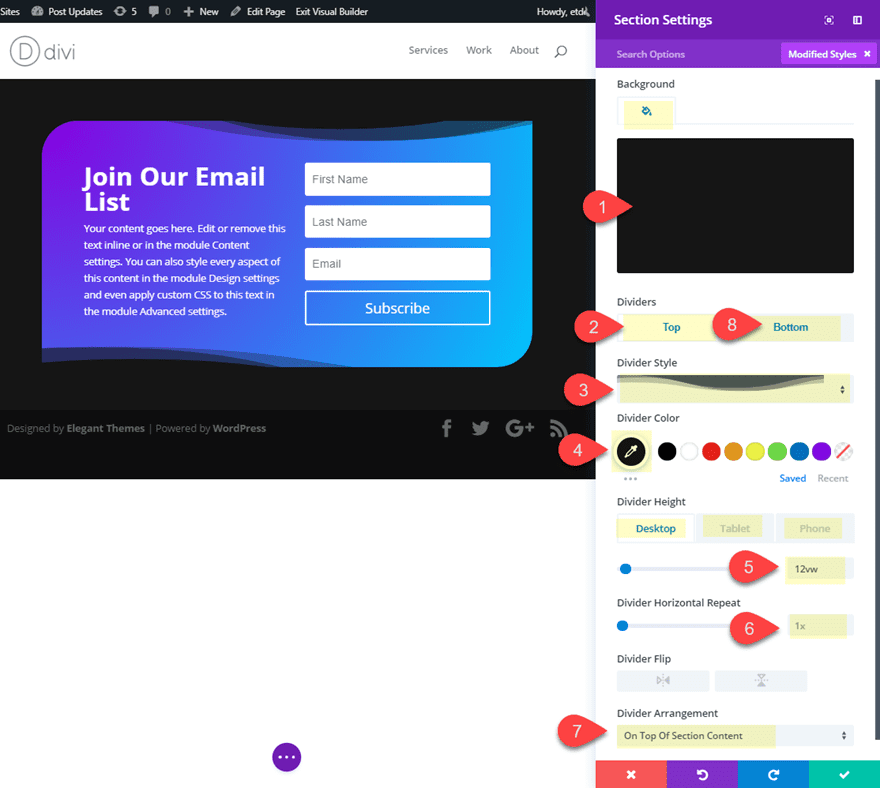
Now we are ready to customize the section setting to add our cut-out frame effect with those section dividers.
Open the section settings and update the following:
Background Color: #222222
Top Divider Style: see screenshot
Top Divider Color: #222222 (make sure this matches the section background color)
Top Divider height: 12vw (desktop), 150px (tablet and smartphone)
Top Divider Arrangement: On Top Of Section Content
Bottom Divider Style: see screenshot
Bottom Divider Color: #222222 (make sure this matches the section background color)
Bottom Divider height: 12vw (desktop), 150px (tablet and smartphone)
Bottom Divider Horizontal Repeat: 0.8x
Bottom Divider Flip: vertical and horizontal
Bottom Divider Arrangement: On Top Of Section Content
Now let’s check out the final design.
Check out post on creating unique frame designs for more on this design technique.
Final Thoughts
These email opt-in designs are really just the tip of the iceberg when you think about all the style options available within Divi. I purposefully kept the designs simple enough to give you the broad strokes of what you can do. Feel free to explore more polished designs on your own by adding new fonts, colors, and hover effects. And don’t forget to have some fun in the process.
I look forward to hearing from you in the comments.
Cheers!


Hi Jason,
Thanks for sharing knowledgeable information about “5 Email Opt-in Designs You Can Create with Divi’s Email Opt-in Module”. Keep posting like this article.
Brilliant!
Not the designs, though they are great, but creating the ability to jump directly to the style I WANT TO CREATE and not have to slog through all five to get to just one.
Hope the other contributors catch on.
Thanks!!
Thanks Randy! I feel your pain. haha
Great, thanks.
But a little question: how can I add checks for GDPR?
I can add it with your plugin, blow, but I don’t know how add it in email module.
Thanks
I would love to know that too, its bugging me for a long time
These look great! Any plans to add Drip integration?
Thanks, Jane. Not sure about that one. But I would think that it would be best to have your email marketing platform handle the drip sequence anyway.
I will say we have some nice designs here.
I used the Skinny Opt-in and following the article, it’s working perfectly. Now all I need is for people to start subscribing to my newsletter and everything will be perfect. Can you maybe write an article on how to make awesome newsletters that people would love to read.
So glad it was helpful for you, Alex. And thanks for the suggestion! I’ll keep that in mind.