
Composable Settings and Nested Option Presets work together to make Divi 5 design systems more flexible and reusable. Composable Settings unlock extra design controls for module sub-elements, such as a Blurb image, Call To Action button, or form field. Nested Option Presets keep those styles connected so they can be reused across modules instead of recreated by hand.
Together, they turn saved styles into a system you can reuse across your site and update from one place when colors, spacing, borders, or other shared design decisions change.
- 1 What Are Composable Settings In Divi 5?
- 2 What Are Option Group Presets?
- 3 How Nested Option Presets Work
- 4 Using Composable Settings And Nested Presets Together
-
5
Build A System With Both Features
- 5.1 Step 1: Toggle Design Options On A Sub-Element
- 5.2 Step 2: Style The Sub-Element With Design Variables
- 5.3 Step 3: Create Option Group Presets
- 5.4 Step 4: Create An Option Group Preset With Nested Option Presets
- 5.5 Step 5: Save The Full Module As An Element Preset
- 5.6 Step 6: Use Local Overrides When Needed
- 6 Stack Presets For Granular Control
- 7 Manage The System With Preset Manager
- 8 Real-World Ways To Combine These Features
- 9 Best Practices For Composable Settings And Nested Presets
- 10 Get More Out Of Divi 5’s Preset System
What Are Composable Settings In Divi 5?
Divi modules are built from smaller parts. A Blurb module includes an image, title, and body text. A Call To Action module includes a button. A Testimonial module includes an image, author text, body text, and other sub-elements. In older workflows, each sub-element came with a fixed set of design controls. If a button, image, title, or icon did not include the option group you needed, custom CSS was often the only way forward.
Composable Settings changes that. It lets you enable additional Divi design option groups for module sub-elements, such as Sizing, Spacing, Border, Animation, Transform, Filters, and more. The settings do not appear by default. That keeps the panel clean. When you need more control, hover over a sub-element option group and click the Toggle Options icon.
Once enabled, the new option groups appear inside that sub-element’s settings. From there, they work like normal Divi design controls. You can style a title with a border, add spacing to a button, animate an image, or give a sub-element its own sizing rules without writing CSS.
This matters because sub-elements can now participate in the same design system as full modules.
What Are Option Group Presets?
Divi groups design settings by type. Background, Border, Spacing, Sizing, Box Shadow, Filters, Transform, Typography, and Button settings are all examples of option groups.
An Option Group Preset saves one of those groups as a reusable style. Instead of remembering the exact border width, radius, and color every time, you save those border settings once and apply the preset anywhere a compatible Border group appears.
Option Group Presets are useful because they are not limited to one module type. A Border preset created on a Blurb title can also be used on an Image module, Button option group, Call To Action module, or any other place with a compatible Border group.
That makes the preset the source of truth. The style belongs to the preset, not to one isolated module.
How Nested Option Presets Work
Element Presets save the full design of an element or module. Option Group Presets save specific groups of settings. Nested presets connect those two layers.
For example, an Element Preset for a Blurb can include Option Group Presets for the image border, title spacing, body typography, and module background. When you apply the Blurb Element Preset to another Blurb, those nested presets come with it.
Nested Option Presets take the idea even further. You can build smaller presets and nest them into larger option presets. A border style might be made from smaller presets for radius, width, and color. That combined border preset can then be used inside a button preset, a card preset, or a full module preset.
Why Nesting Matters
Without nesting, similar styles often get copied across modules. That works at first, but it becomes hard to maintain. If a client wants sharper corners, a different border width, or a new brand color, every copied style becomes another place to edit.
Nested presets solve that by keeping shared decisions connected.
For example:
- A Border Radius Pill preset controls rounded corners.
- A Border Width Medium preset controls border thickness.
- A Border Color Primary preset controls the border color.
- Those presets combine into a Primary Pill Border preset.
- That border preset is used inside a Primary Button preset.
- The button preset is nested inside a Call To Action Element Preset.
If the brand color changes, you update the color source once. Every connected preset can follow that change instead of forcing you to edit each module one by one.
Using Composable Settings And Nested Presets Together
Composable Settings gives you access to more controls. Nested Option Presets make those controls reusable. That combination is where the power is.
If you only use Composable Settings, you can style a sub-element more deeply, but those styles may still live in one module. If you only use presets, you can reuse existing settings, but you are limited to the option groups already available on that element.
Together, they let you unlock the right controls on a sub-element, style those controls with Design Variables, save the result as presets, and nest those presets into larger module-level systems. The workflow looks like this:
- Use Composable Settings to enable the option groups you need.
- Style those groups with Design Variables where possible.
- Save focused Option Group Presets for reusable design decisions.
- Nest smaller presets into larger option presets.
- Nest those option presets inside Element Presets.
- Use the Preset Manager to manage the full system over time.
This creates a design chain that is flexible, reusable, and easier to update.
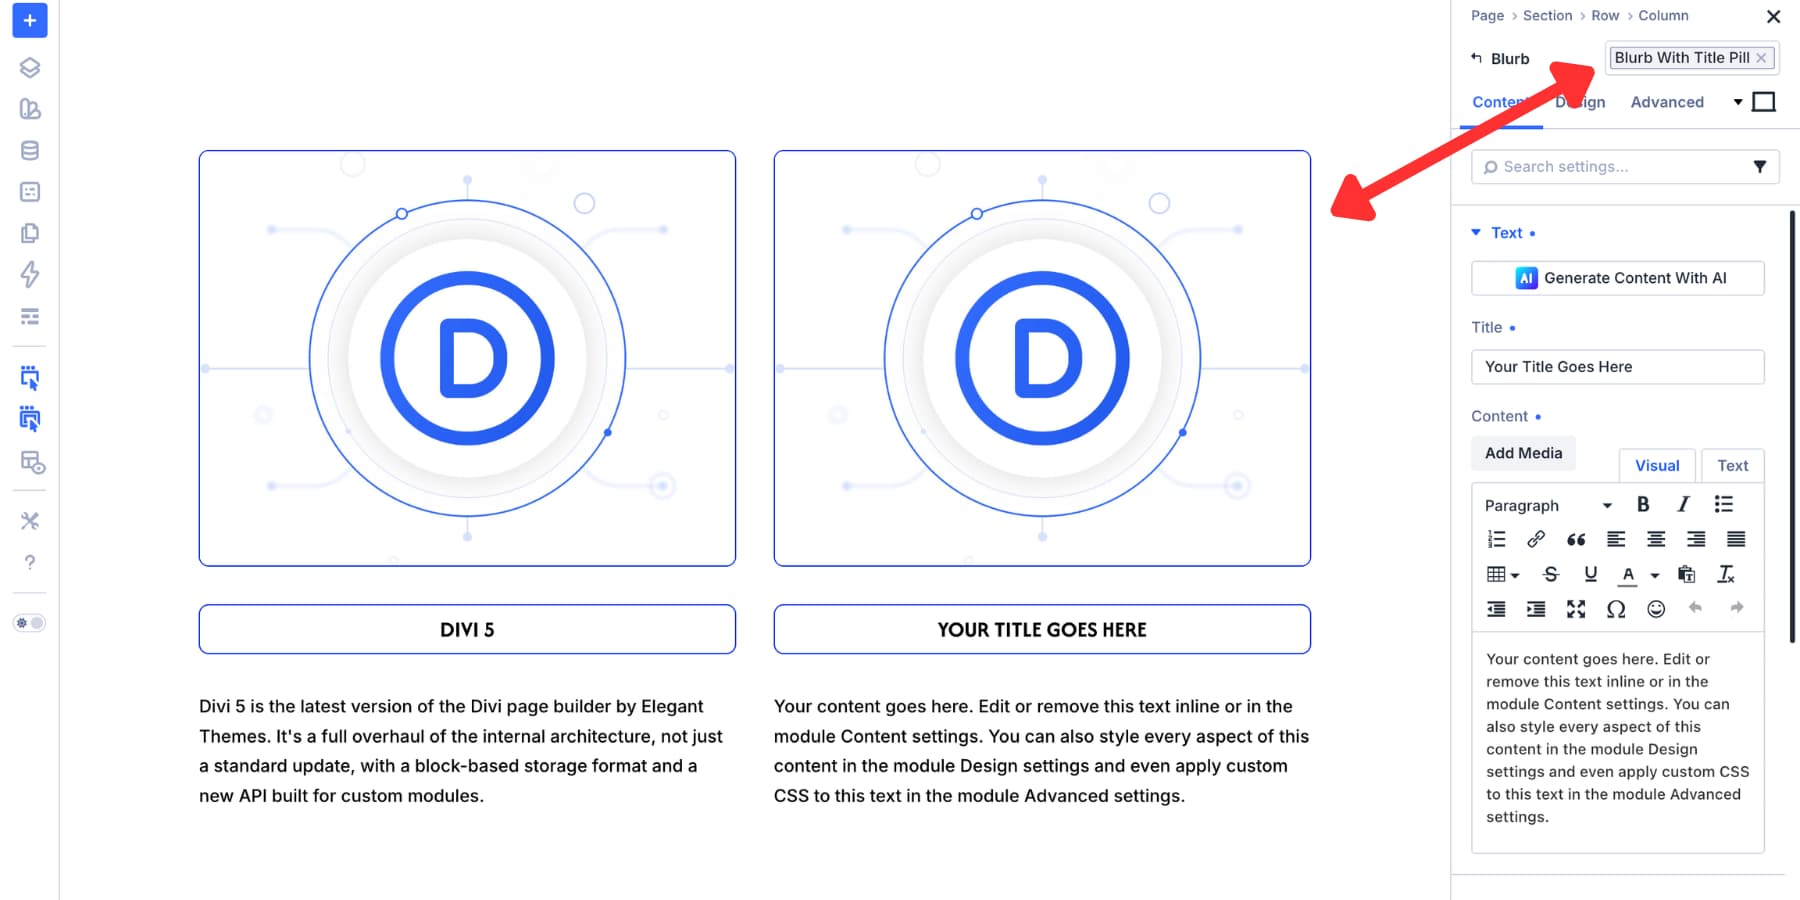
Build A System With Both Features
Let’s put the workflow into practice with the Blurb module. It is a good example because it includes multiple sub-elements: image, title, and body text. We will enable extra design controls for the title, style those controls with Design Variables, save them as Option Group Presets, nest those presets into a title preset, and then save the full Blurb as an Element Preset.
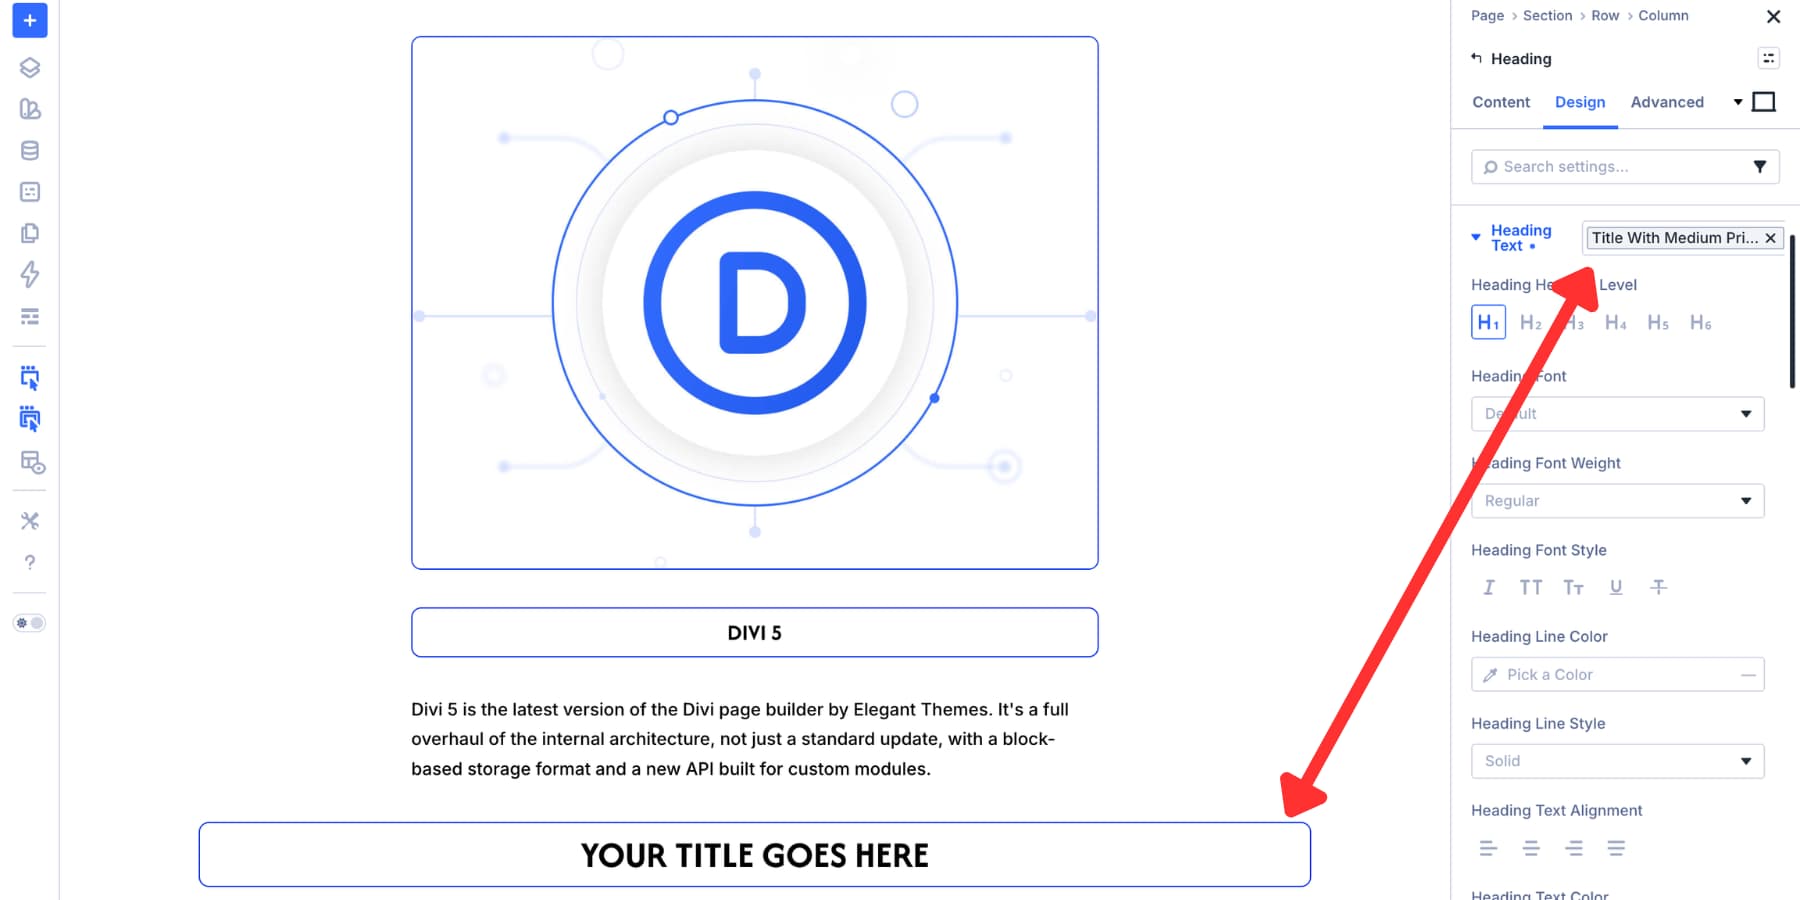
Step 1: Toggle Design Options On A Sub-Element
Open a Blurb module and go to the Title Text option group in the Design tab. By default, you will see the standard text controls.
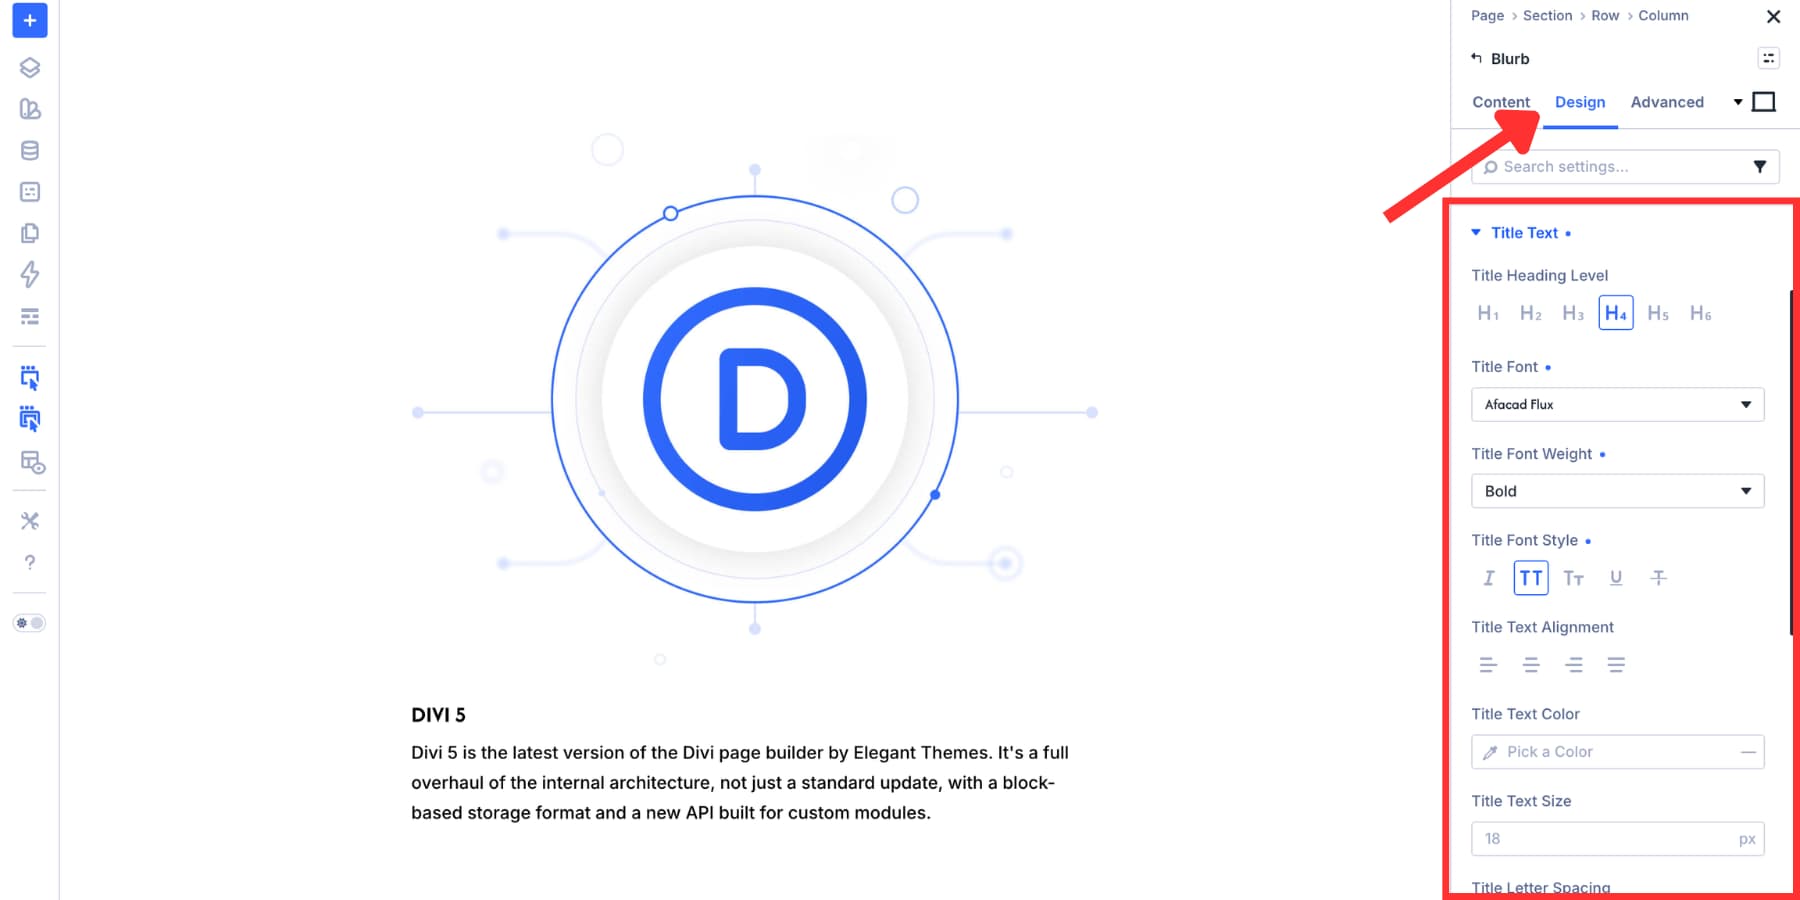
Hover over the Title Text option group header. The Toggle Options icon appears on the right.
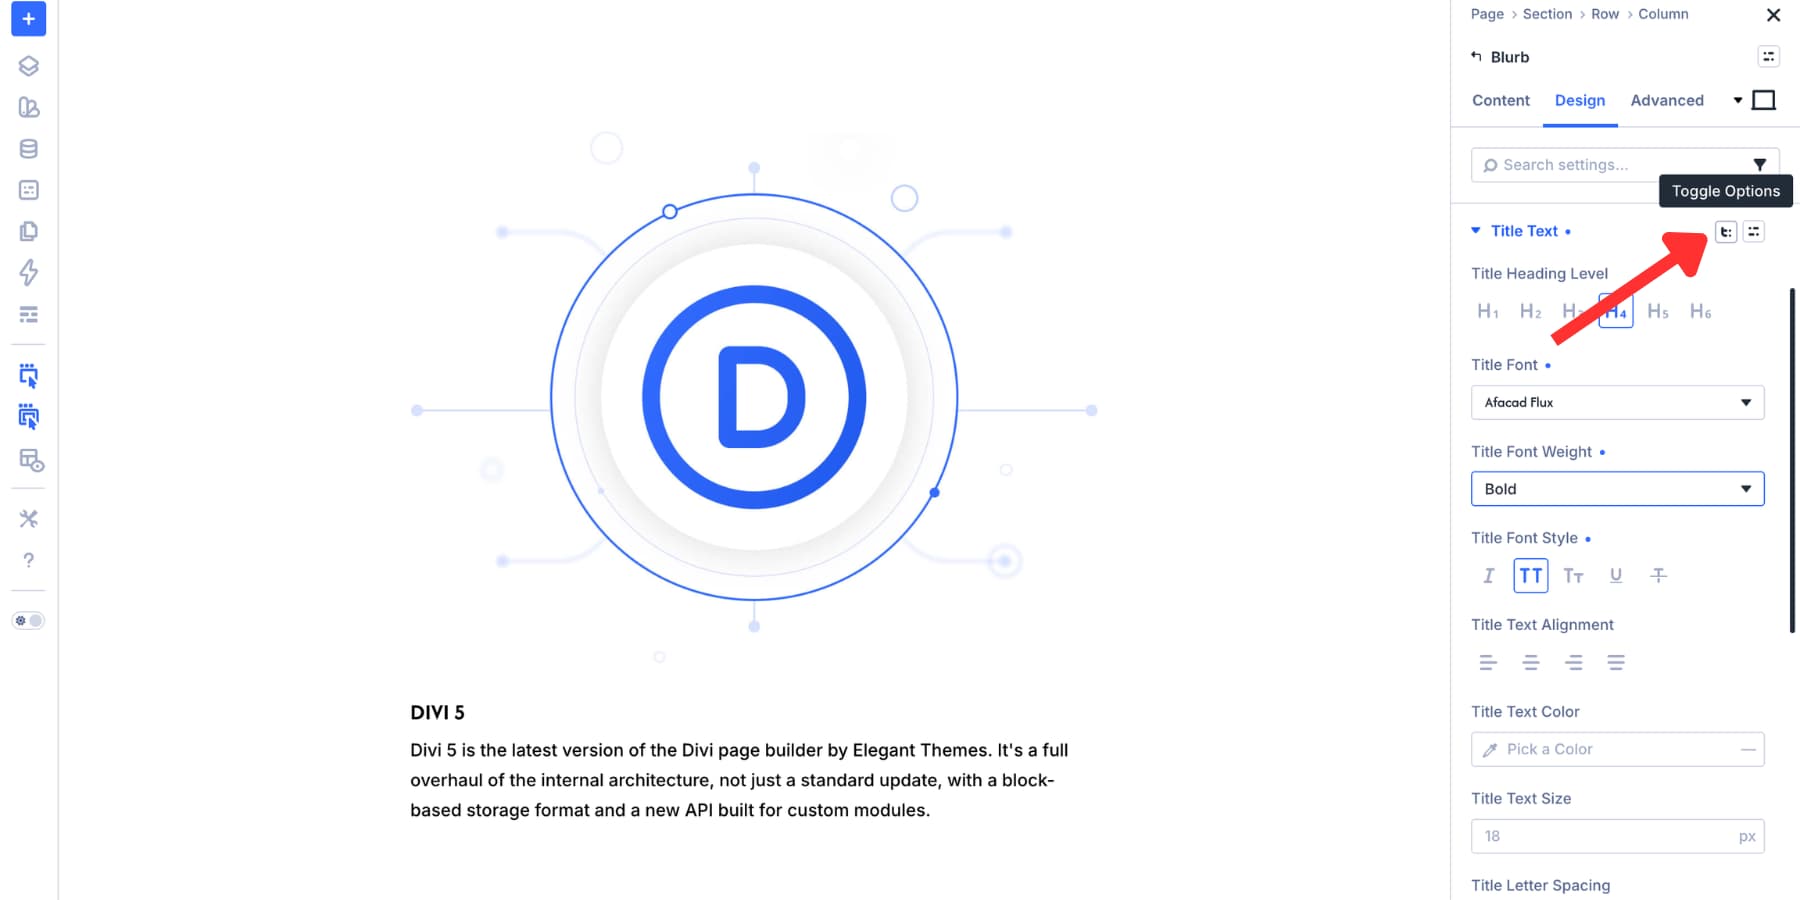
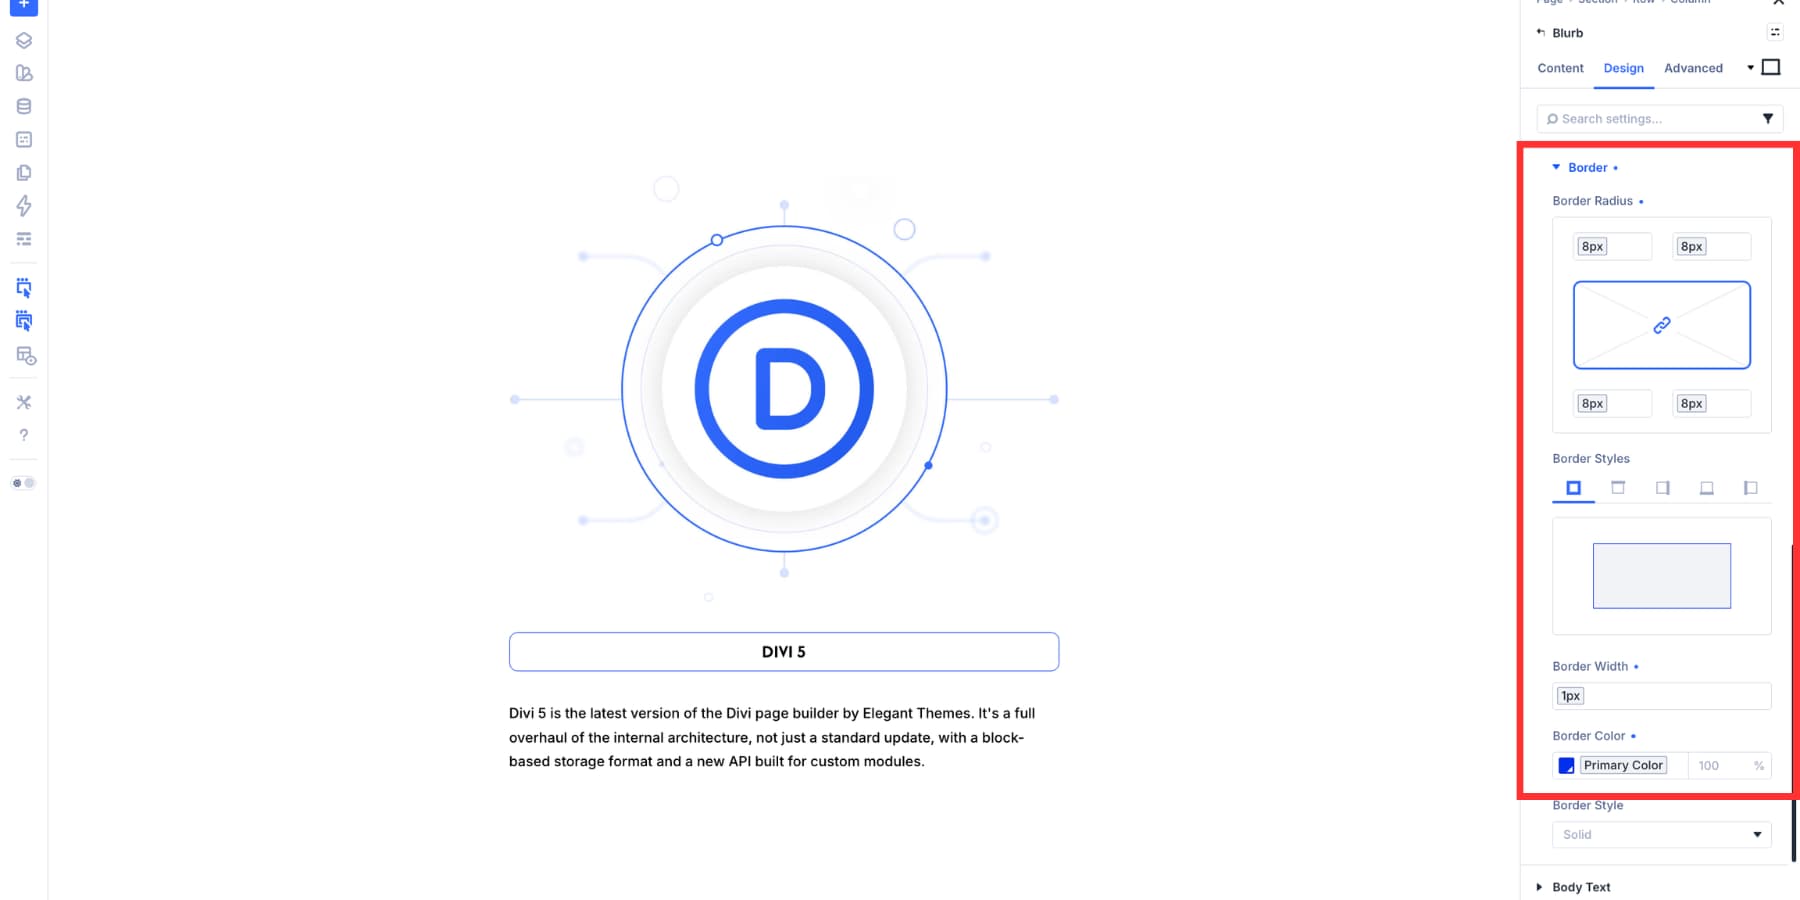
Click the icon to open the list of additional option groups. For this example, enable Spacing and Border, then save the selection.
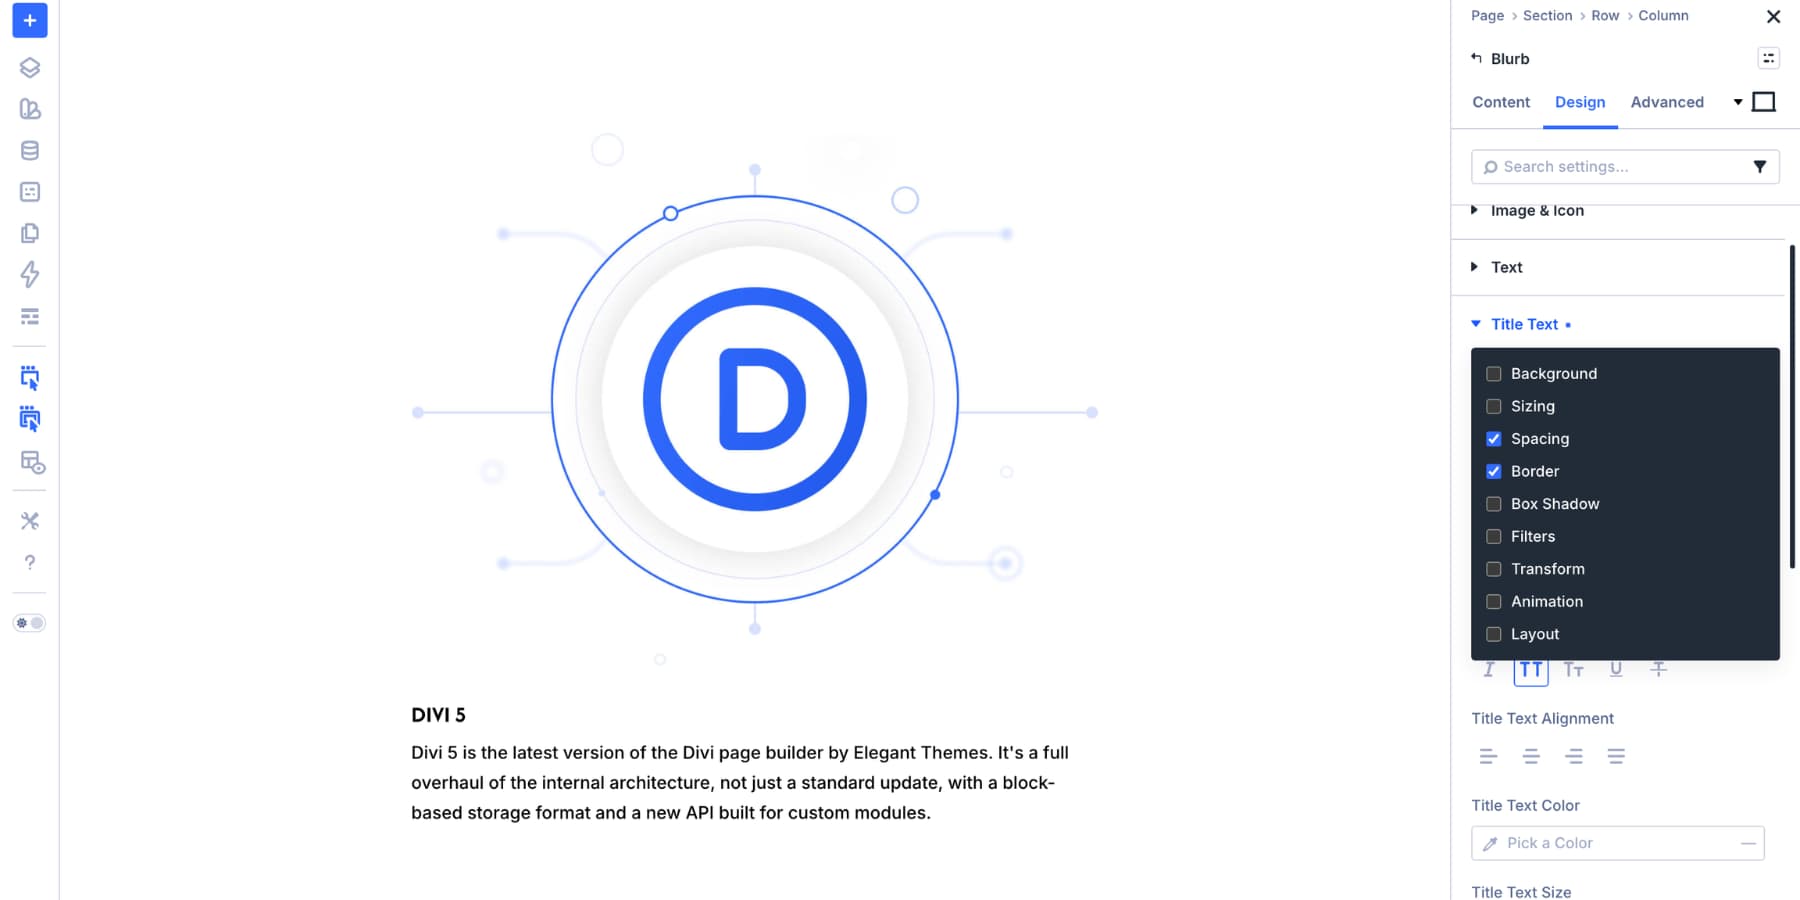
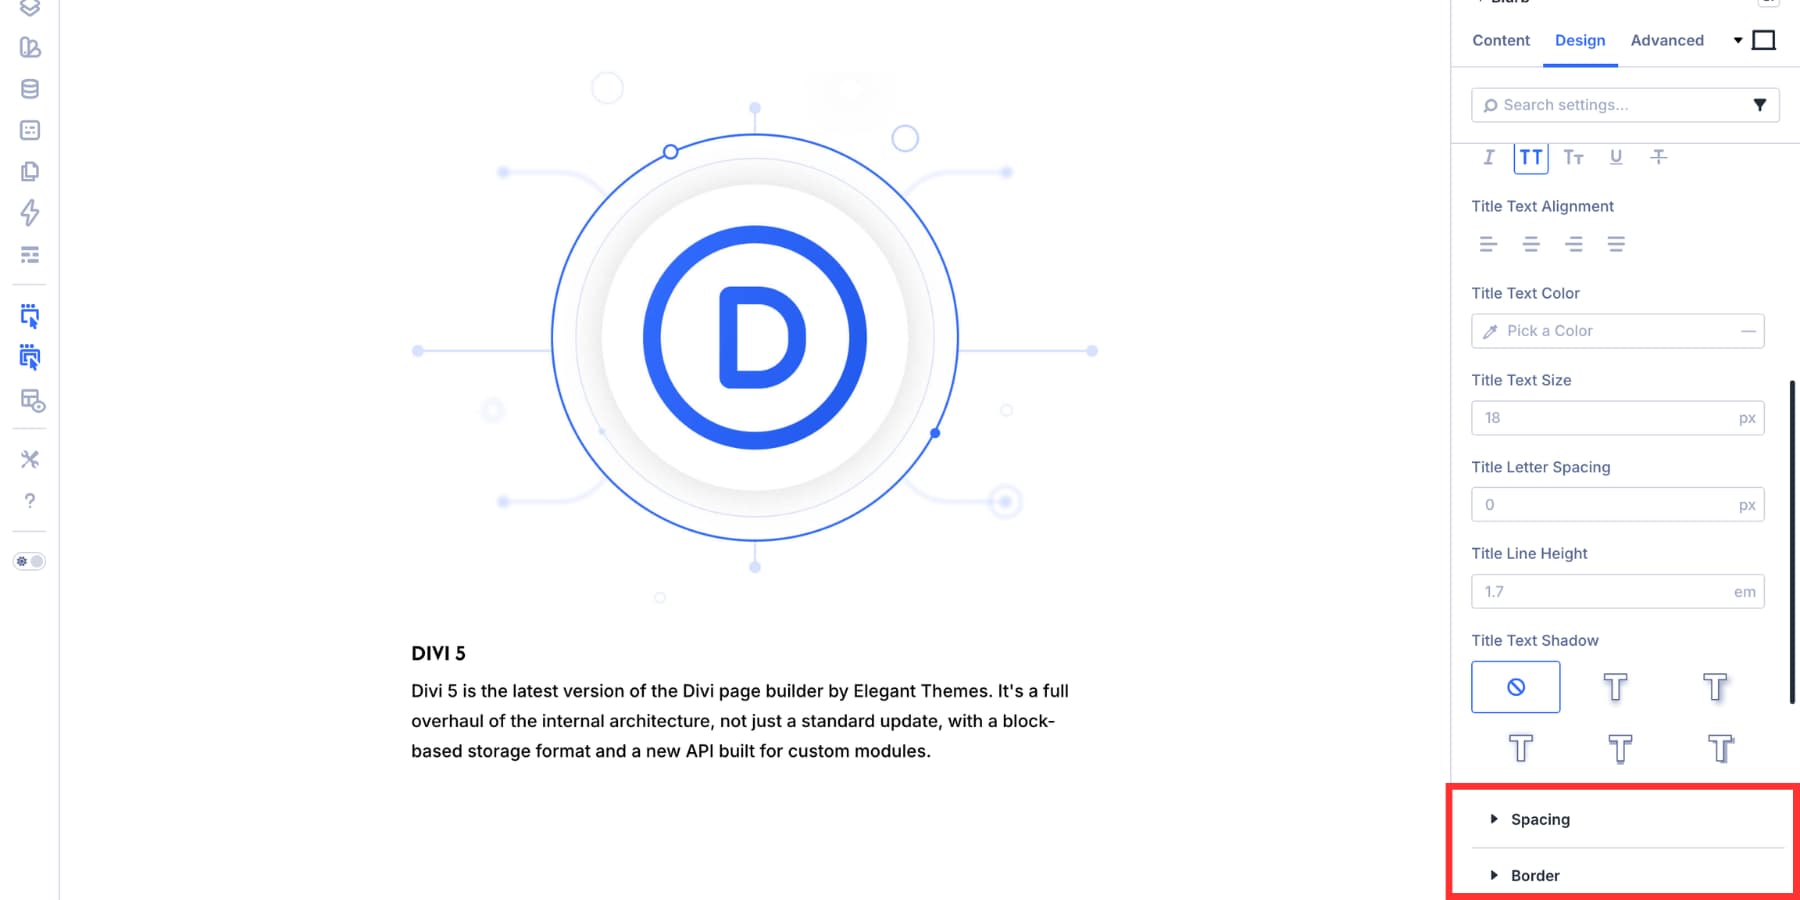
The Spacing and Border option groups now appear inside the Title Text group.
The same process works for other sub-elements, such as the Blurb image and body text. Enable only the option groups the design needs so the settings panel stays focused.
Step 2: Style The Sub-Element With Design Variables
After enabling the new option groups, style the title. For a scalable system, avoid hard-coded values when you can use Design Variables instead. For example, use a color variable for the title border and a spacing variable for padding or margin. That keeps the title connected to your broader design system.
This gives you one central source for important values. If the brand color, spacing scale, or border width changes later, the connected styles can update without rebuilding every Blurb.
Step 3: Create Option Group Presets
Now save the styles you just created.
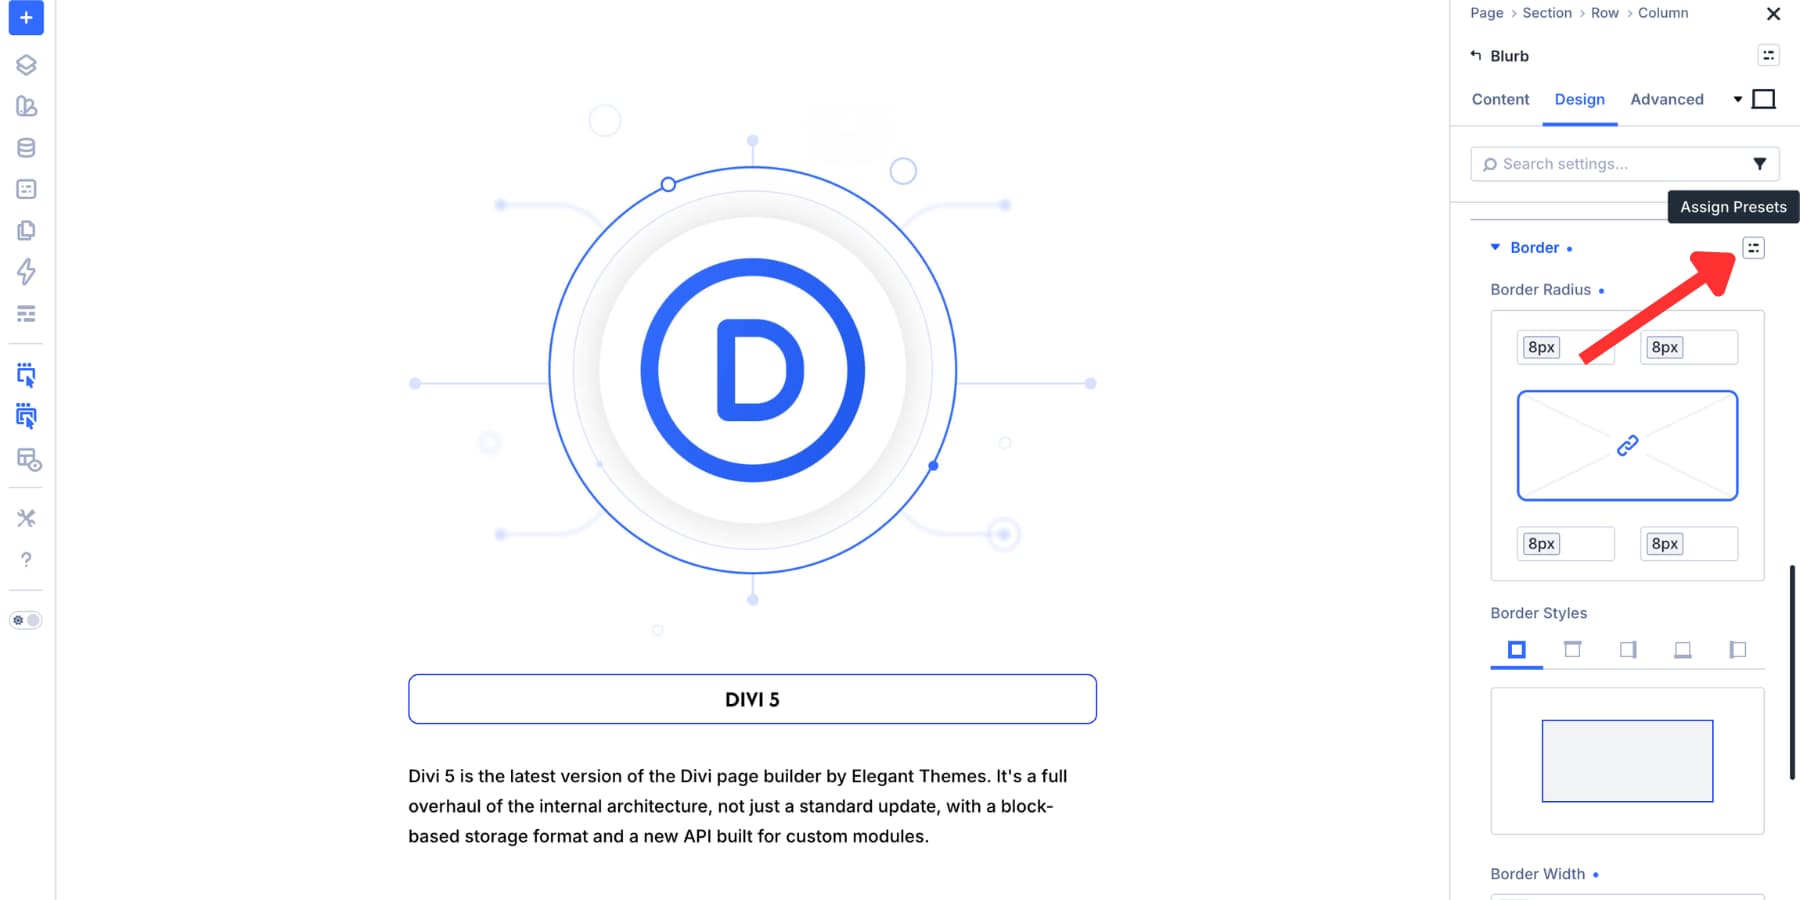
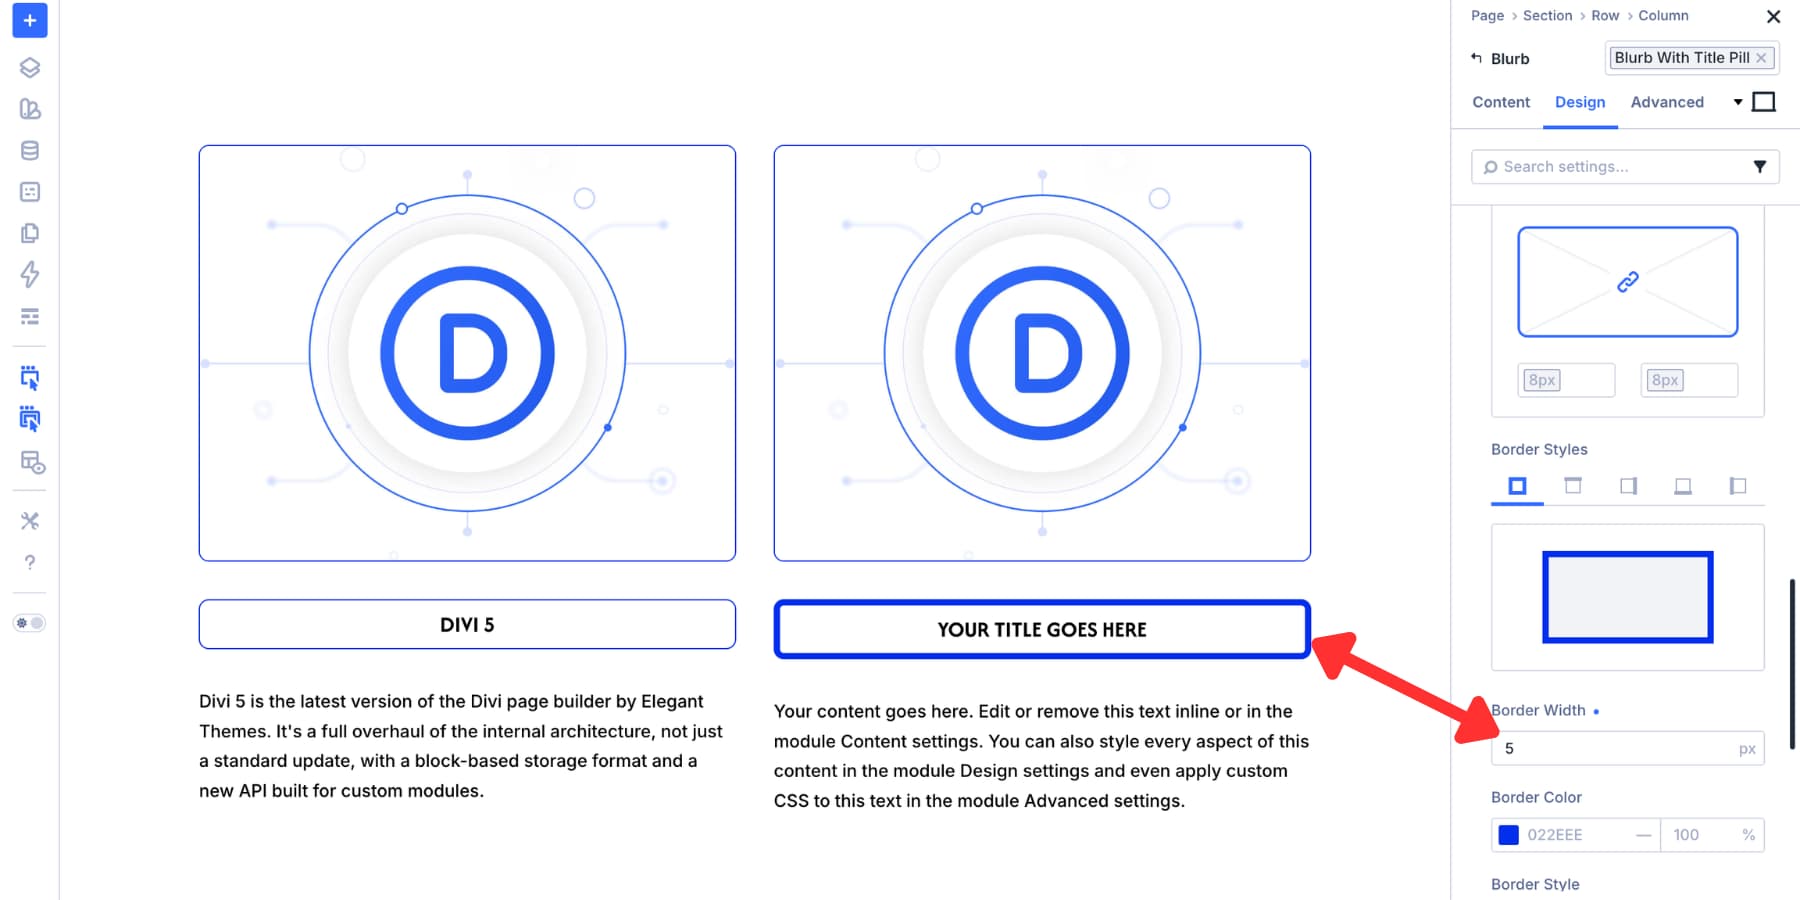
Hover over the Border option group inside Title Text. Click the preset icon, choose New Preset From Current Styles, give the preset a clear name, and save it. For example, you might name it Border Medium Primary.
Repeat the same process for Spacing. A name like Padding 10 or Title Padding Small works better than a vague name like Custom Spacing.
Because these are Option Group Presets, they can be reused anywhere the same group exists. Open another module with a Border group, and your Border Medium Primary preset can appear there too.
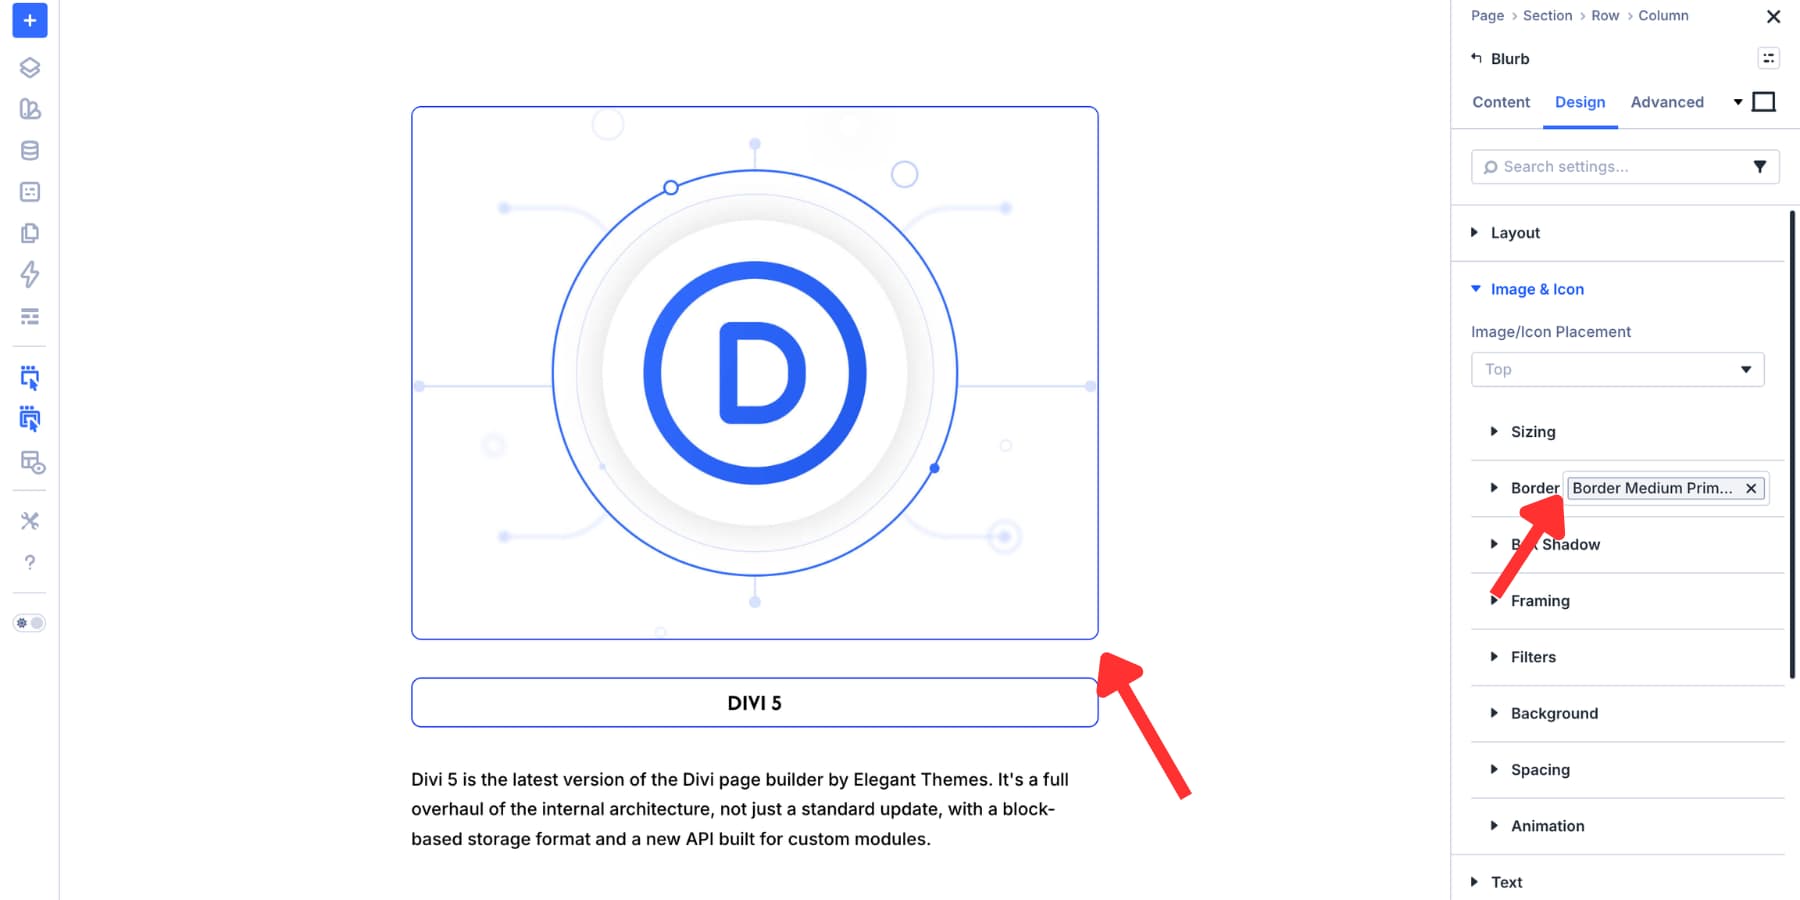
If the Border or Spacing group is not visible on a sub-element, use Composable Settings to enable it first. Toggle the option group, then apply the preset.
Step 4: Create An Option Group Preset With Nested Option Presets
At this point, you have smaller presets for the Title Text border and spacing. The next step is to save the full Title Text design with those smaller presets nested inside it. Hover over the Title Text option group header and click the preset icon. Choose New Preset From Current Styles, then give the preset a role-based name.
For example, use Title Pill Primary or Title Text Bordered.
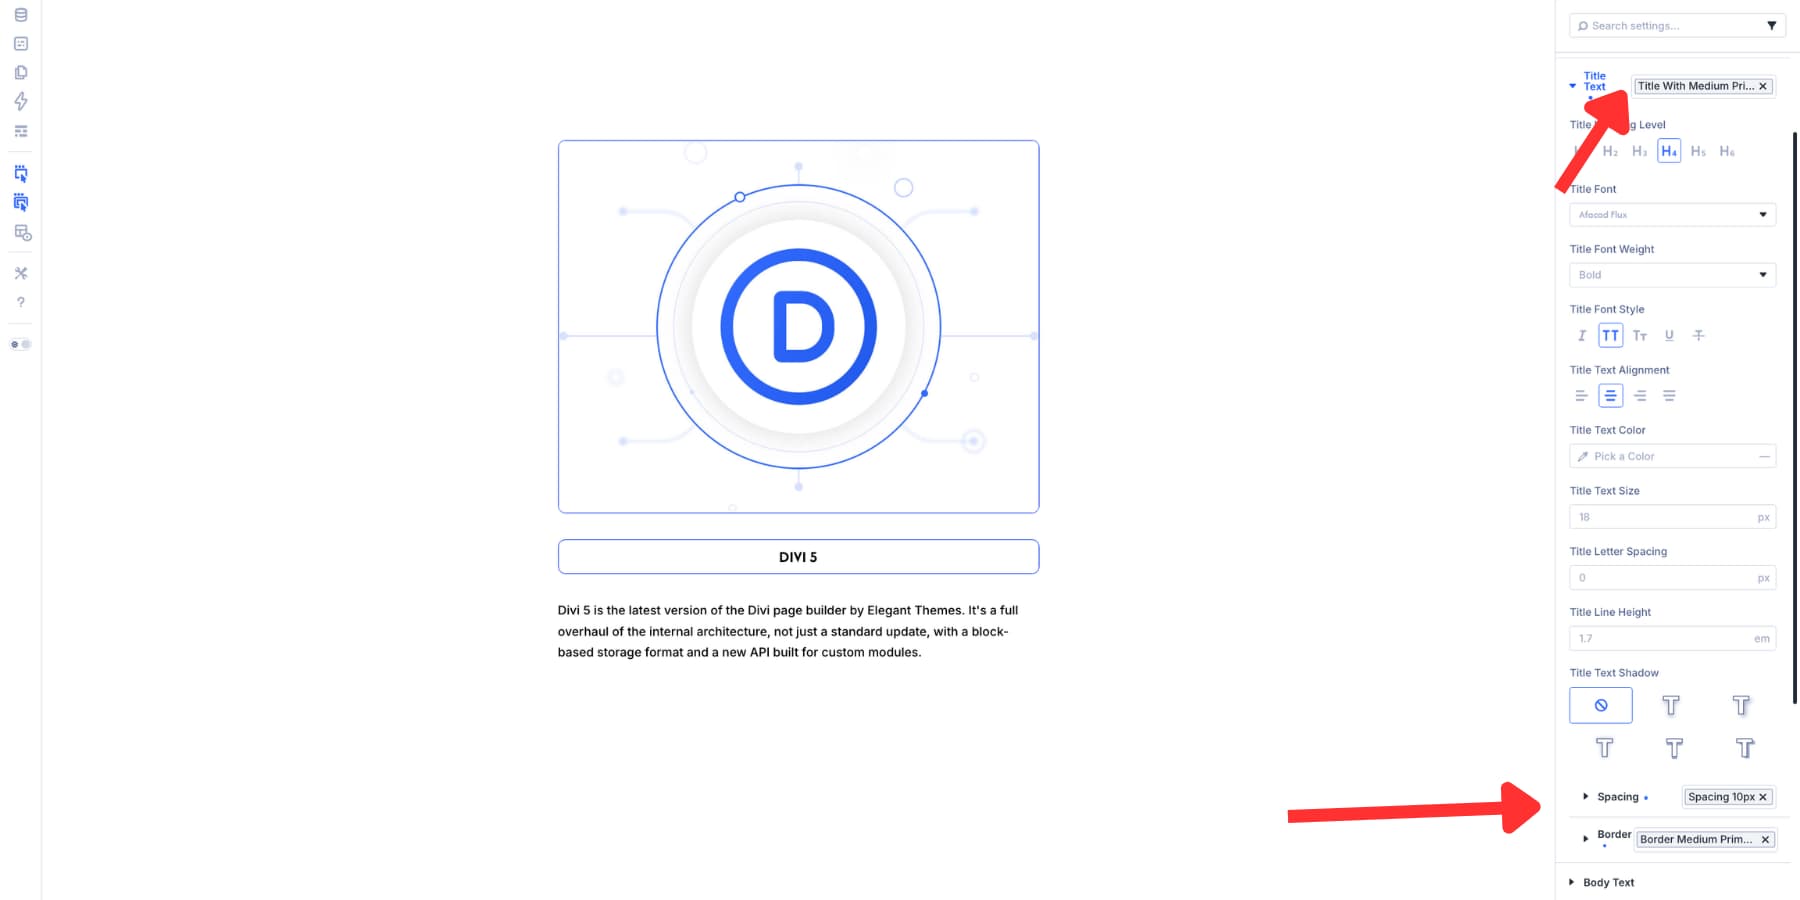
Role-based names are easier to reuse than names tied to one module. Title Pill Primary tells you what the preset does. Blurb Title Style 1 only tells you where it started.
You can now apply this title preset to compatible text option groups in other modules. If the nested Spacing and Border groups do not appear by default, enable them with Toggle Options before applying the preset.
The full title styling transfers in one workflow, including the smaller nested presets.
Step 5: Save The Full Module As An Element Preset
Now bring the full Blurb into the system. Back in the Blurb module, open the module-level preset menu. Create a new Element Preset and give it a clear name, such as Blurb Card With Title Pill.
The Element Preset can save the module layout, image settings, title text, body text, background, spacing, and the nested presets used inside the title.
Apply that Element Preset to another Blurb, and the full design stack comes with it. At this point, the system has several layers:
- A Design Variable stores the border color.
- A Border Option Group Preset uses that variable.
- A Title Text preset nests the border and spacing presets.
- A Blurb Element Preset includes the Title Text preset.
Update the Design Variable, and the value can travel through the connected presets. Update the Border preset, and every element using that preset can follow. Update the Blurb Element Preset, and every Blurb using it can inherit the change.
That is the difference between a saved style and a connected design system.
Step 6: Use Local Overrides When Needed
A preset system should be flexible. Not every module needs to look identical. If one Blurb needs a different title color, adjust that value locally. The local override affects that Blurb only. The rest of the preset system remains intact.
If you keep making the same override across several modules, do not leave it as repeated local edits. Turn it into a new preset variant instead.
Stack Presets For Granular Control
Nesting connects presets inside other presets. Stacking lets you apply multiple presets to the same element or option group. This is useful when you want smaller, focused presets that can be combined in different ways.
For example, instead of one border preset that contains radius, width, and color, create separate presets:
- Border Radius Pill
- Border Width Medium
- Border Color Primary
Stack all three on the same Border group, and the final border can look the same as one larger preset. The difference is control. If the brand color changes, update the color preset. Radius and width stay untouched.
This stacking logic can work at different levels. You can stack Option Group Presets, sub-element presets, or Element Presets. A Blurb might use one preset for base layout, another for typography, and another for a dark theme variant.
Think of stacking as a visual-builder version of utility classes. You combine small, focused design decisions instead of creating a new full preset for every variation.
Manage The System With Preset Manager
As your preset library grows, use the Preset Manager to keep it organized. The Preset Manager gives you a central place to view and manage Element Presets and Option Group Presets across the site.
Use it to rename presets, duplicate them, edit them, remove old ones, and find the preset you need without opening every module on the page. It also helps when you are building reusable systems for multiple projects. You can build a preset library on one Divi 5 site, export it, and import it into another project.
For agencies and freelancers, that turns the preset library into a reusable production asset instead of a one-site convenience.
Real-World Ways To Combine These Features
The Blurb example shows the full workflow, but the same pattern works across many Divi builds.
A Call To Action module often has a button that needs more than default styling. Use Composable Settings to enable additional option groups when needed, such as Transform, Animation, Sizing, or Border. Then save those button styles as Option Group Presets and nest them inside a Call To Action Element Preset. New CTA sections can start with the same button style automatically.
Blurb Images
A Blurb image may need a border, shadow, transform, filter, or hover treatment. If the option group you need is not visible, enable it with Composable Settings. Save the image treatment as one or more Option Group Presets, then include those presets in a Blurb Element Preset. Every new Blurb can use the same image behavior without rebuilding it manually.
Form Fields
Divi 5’s newer form field options include dedicated groups for Input, Checkbox, and Radio styling. You can combine those form option groups with Design Variables and Presets to create consistent field styles, focus states, borders, and spacing.
For deeper form work, pair this workflow with field presets and focus editing so form states stay consistent across Contact Forms, Email Optins, Login forms, and WooCommerce forms.
Cards And Layout Sections
Cards often share the same background, border, shadow, and spacing logic. Build those as focused Option Group Presets, then nest them inside Element Presets for Blurbs, Call To Action modules, Pricing Tables, or custom card layouts.
This keeps repeated visual patterns consistent even when the content changes.
Best Practices For Composable Settings And Nested Presets
A flexible design system still needs structure. Use these habits to keep your presets useful instead of messy.
- Start with Design Variables: Use variables for colors, spacing, sizes, and other values that may change later.
- Enable only what you need: Composable Settings are powerful, but too many visible groups can make the panel harder to use.
- Name presets by role: Names like Border Radius Pill or Card Shadow Soft are easier to reuse than names like Blurb Border 2.
- Keep small presets focused: Smaller presets are easier to stack, nest, and update.
- Use Element Presets for complete patterns: Save the full module only when the whole structure should travel together.
- Turn repeated overrides into variants: If the same local edit happens more than once, it probably deserves its own preset.
- Review your preset library regularly: Rename unclear presets and remove old experiments that are no longer used.
The goal is not to create the most presets possible. The goal is to create the fewest presets that still give you flexible, repeatable control.
Get More Out Of Divi 5’s Preset System
Composable Settings and Nested Option Presets are powerful on their own. Together, they help you build systems instead of isolated styles. Composable Settings unlock the controls you need on module sub-elements. Option Group Presets save those controls as reusable decisions. Nested presets connect those decisions to larger patterns. Element Presets carry the full pattern across the site.
That structure takes more thought upfront, but it pays off when a project changes. A client updates the brand color. A border radius needs to change. A card style needs a new shadow. Instead of editing dozens of modules manually, you update the right variable or preset and let the system do the work.
Build the system once, keep it organized, and it becomes easier to make every future Divi 5 site more consistent from the start.


This would al be great if it would work. At the moment it is not reliable, too many preset bugs that prevent the settings from being applied in the builder, or the front end or both. I can’t believe that the core of the new design system doesn’t get the highest bug fixing priority.