")
Whether you’re a professional photographer or an amateur shutterbug, adding Topaz Photo AI to your toolkit might be a good idea. Powered by AI, it offers a quick and easy method to enhance and upscale images like magic. Its unique features and its superior solutions for image noise and blur make Topaz Photo AI a tool worth exploring. This guide will review some of the key features of the software and how to start using it to improve your own photos.
What is Topaz Photo AI?
Topaz Photo AI (Topaz) is a desktop software developed to leverage the power of artificial intelligence for photo editing tasks. What sets Topaz Photo AI apart is its ability to understand the context and content of your photos using machine learning and other algorithms. Some of the popular features include denoising, deblurring, and upscaling. Topaz Labs, the creator of Topaz Photo AI, combined their popular Gigapixel AI, Sharpen AI, and Denoise AI apps to form the comprehensive package that is Topaz Photo AI, presenting more than what meets the eye.
Topaz Photo AI is compatible with both Windows and Mac computers. It also operates with other widely used editing programs such as Photoshop, Lightroom, and Capture One Pro. Harnessing the power of artificial intelligence, Topaz Photo AI empowers you with the capability to enhance photo quality substantially. Whether you have old photos needing noise repair or action shots that require deblurring, Topaz Photo AI should be your go-to. It delivers outstanding editing performance while ensuring the original photo quality remains unaltered.
Key Features of Topaz Photo AI
Topaz Photo AI shines as a leading photo editing tool. Let’s examine some of its key features to understand better what makes this AI product excel in its field.
User Interface
A standout feature of Topaz AI is its easy-to-understand interface. Everything you need is laid out and easily accessible for professionals and hobbyists alike.
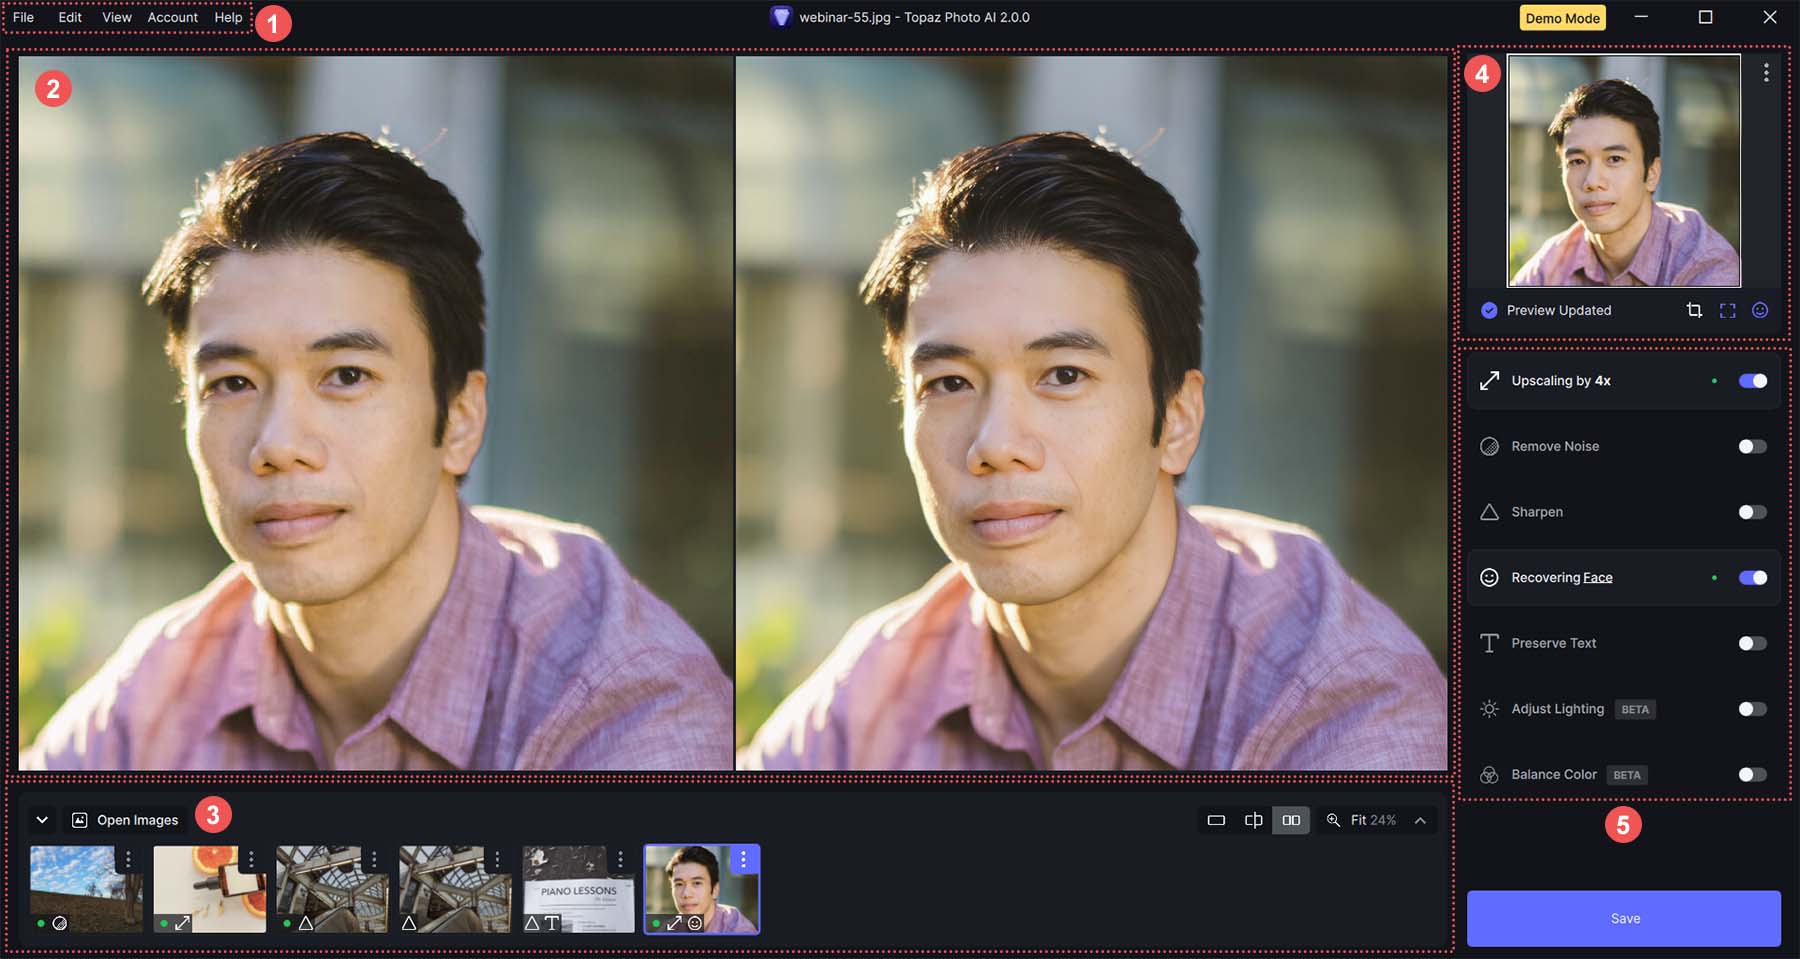
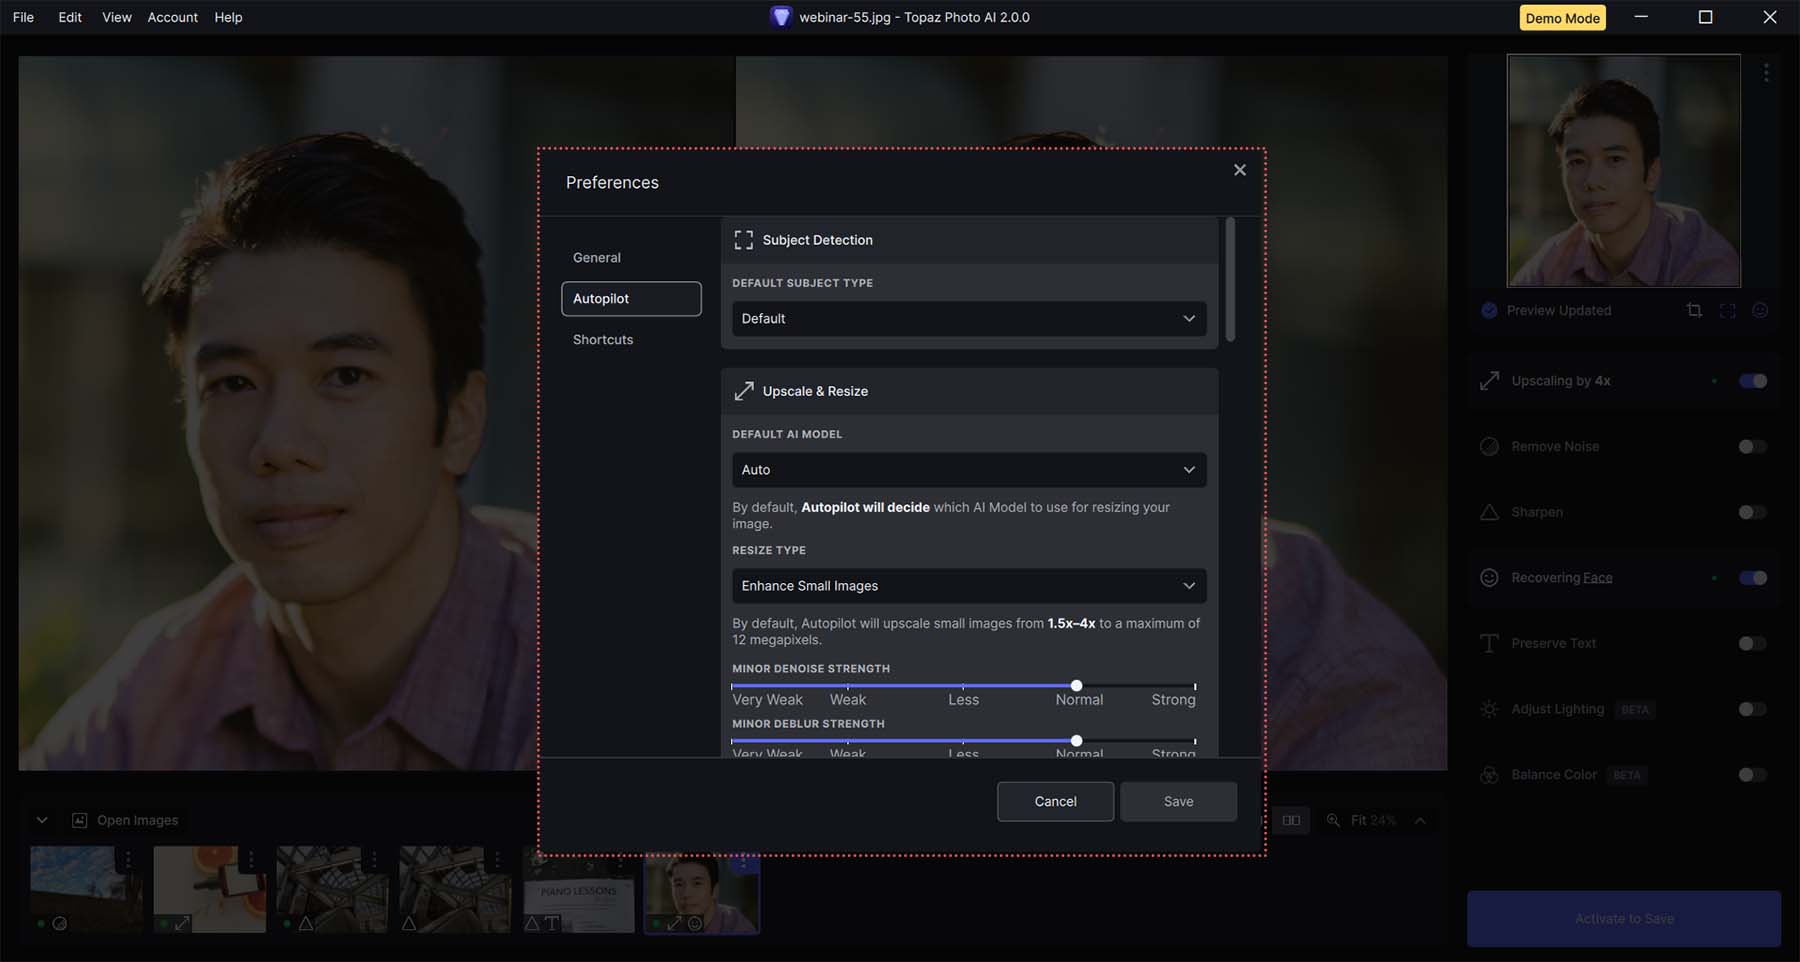
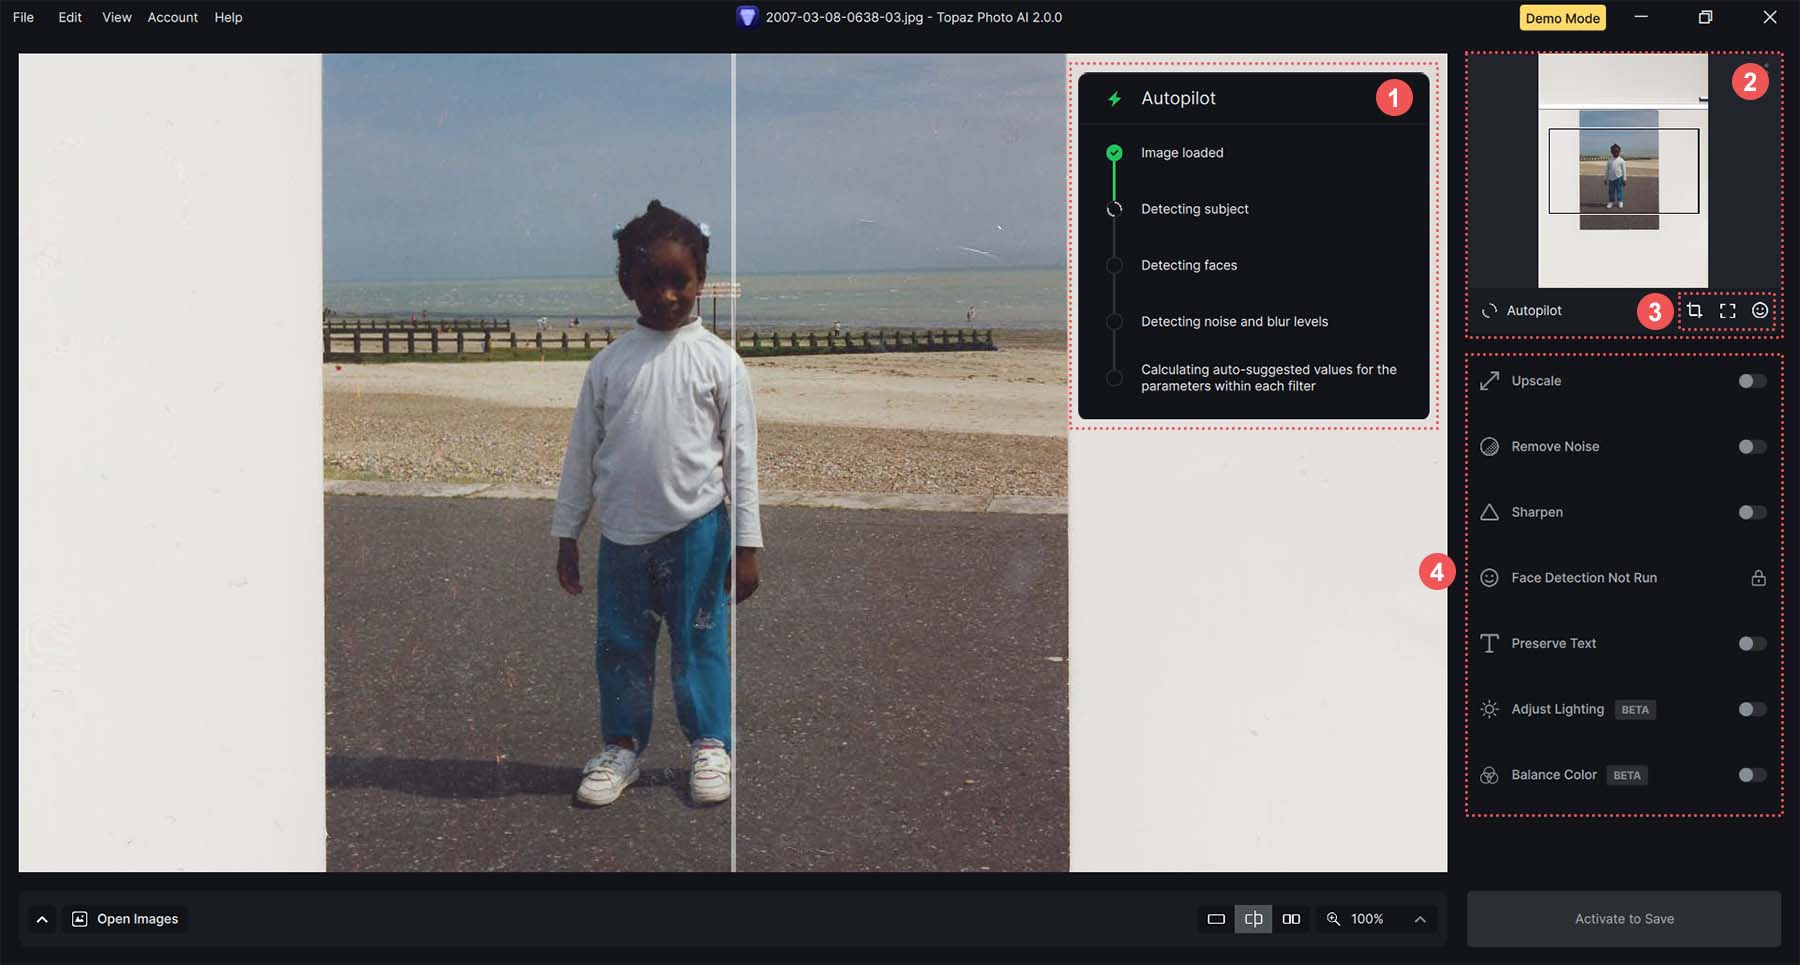
- This is the main menu for the Topaz AI program. From here, you can activate and update your Topaz license. Additionally, you can access your program preferences (like adjusting Autopilot’s settings), change the layout of your Topaz, and more.
- The main viewing area allows you to preview your original and edited images. You can zoom in and out, preview the images side by side, split view, or use your mouse/scroll wheel to go to specific parts of your image.
- In the bottom bard, you can see past images that you’ve uploaded. You can also hover over each image and see its Autopilot settings, as well as see the changes that you’ve applied to each individual image.
- At the top of the right sidebar is a mini-preview screen of the selected image. You can use this to pan throughout your file quickly.
- All your editing options are nicely placed in the right sidebar adjacent to the main viewing area. You can easily toggle each setting on and off. Additionally, you can use sliders and buttons to enhance your images.
Autopilot
When you import your first image into Topaz Photo AI, the Autopilot feature gets to work.
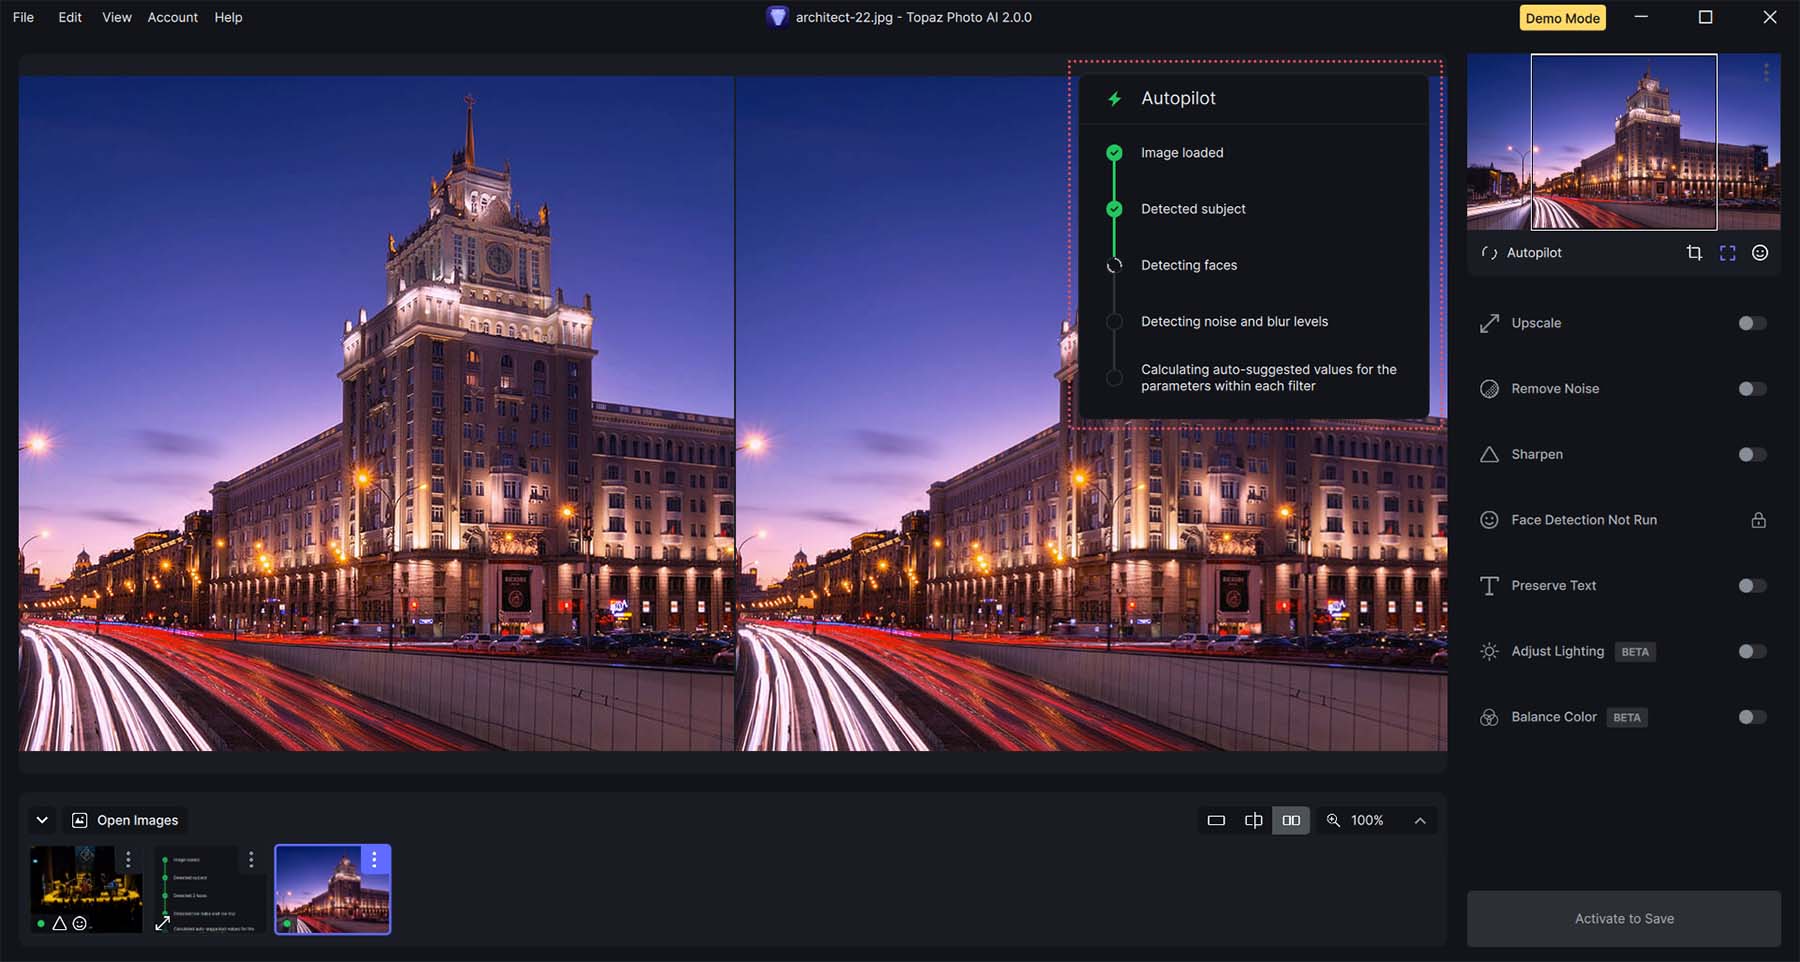
Autopilot is engineered to optimize your uploaded images automatically. When you import your images into Topaz, Autopilot performs extensive checks to ascertain the best optimization strategy. The Autopilot’s role involves setting up a preliminary list of settings that lay the groundwork for additional editing.
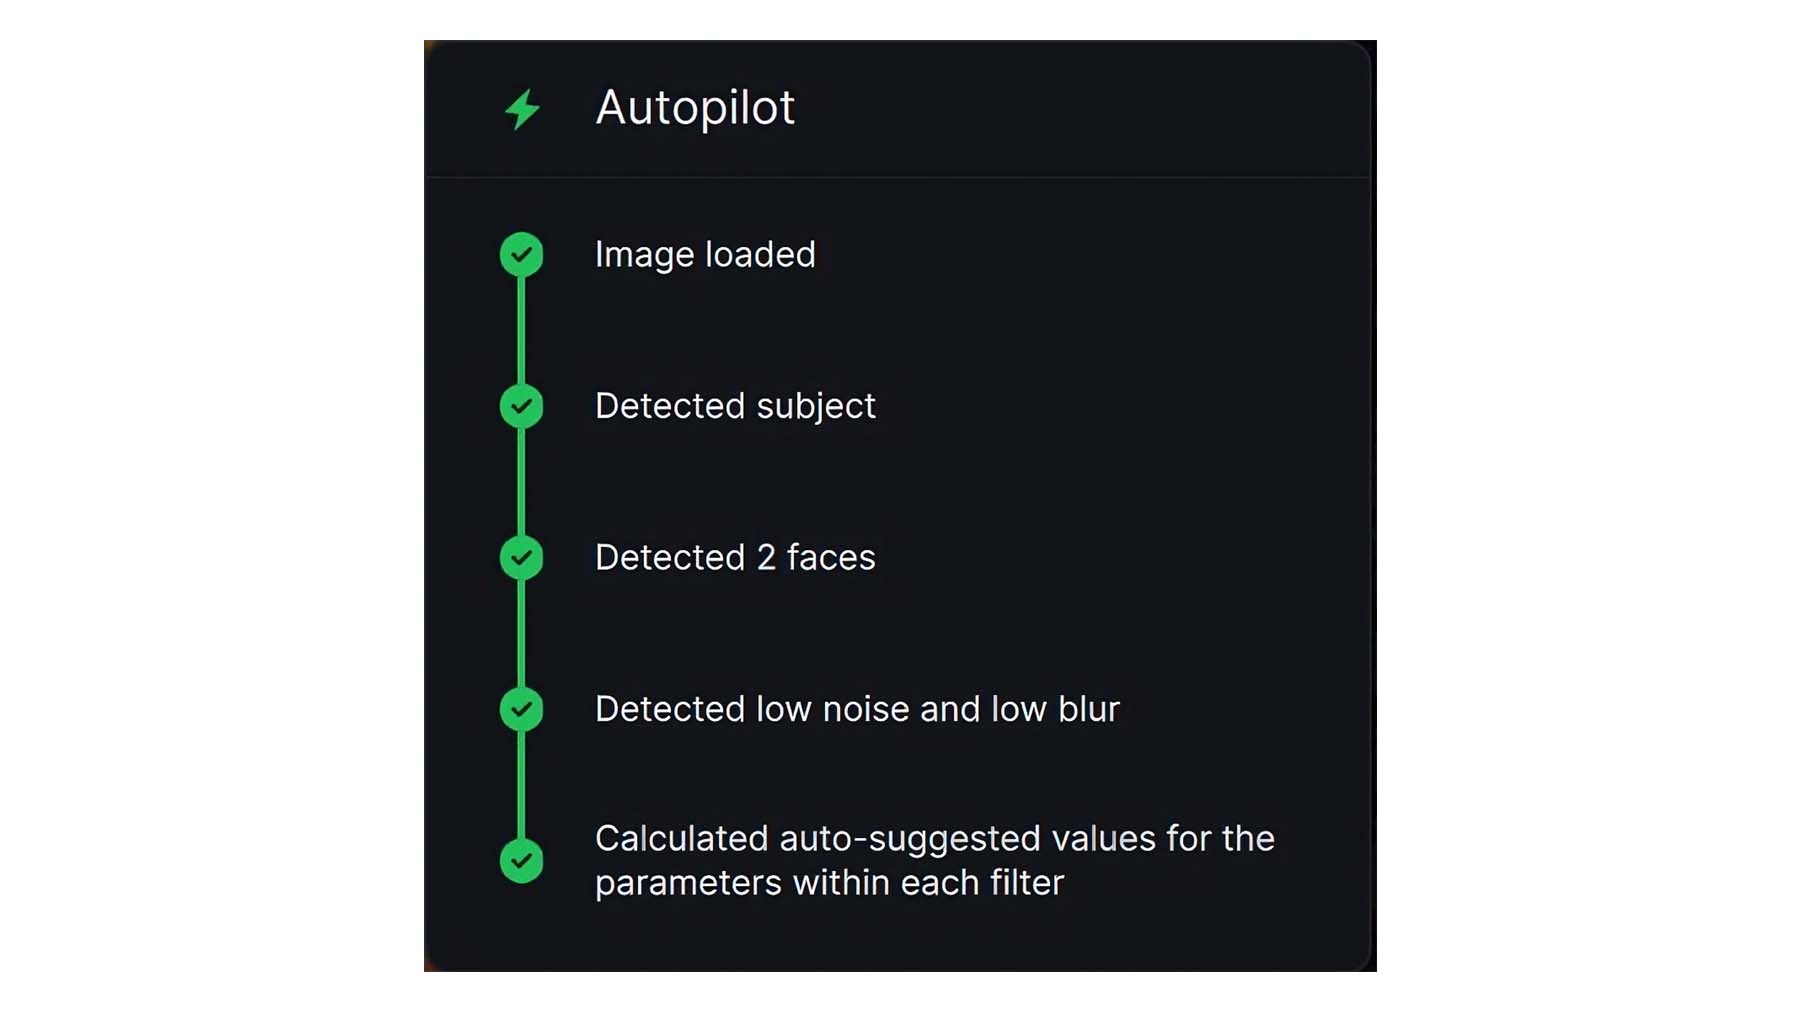
One of the most significant advantages of the Autopilot is its ability to offer a robust starting point when fine-tuning your images. This feature eliminates the overwhelming task of finding the ideal settings combination for your uploaded images. In the preferences menu, you can set up the initial settings that Autopilot should use. You can also set the range of values it should use for each setting that it may use.
Despite Autopilot’s significant assistance, it is a feature that cannot be disabled. Consequently, this handy tool will activate every time you upload an image, which some may find mildly irritating.
Upscaling
Upscaling increases an image’s dimensions while preserving or improving its resolution. Topaz Photo AI can expand the size of your images up to six times their initial size. You can also input your desired pixel dimensions and select your favored AI model to enhance your photos. Additionally, Topaz Photo AI offers unique blur, noise, and compression balance settings. This allows you to achieve an optimal balance between quality and size for your pictures.
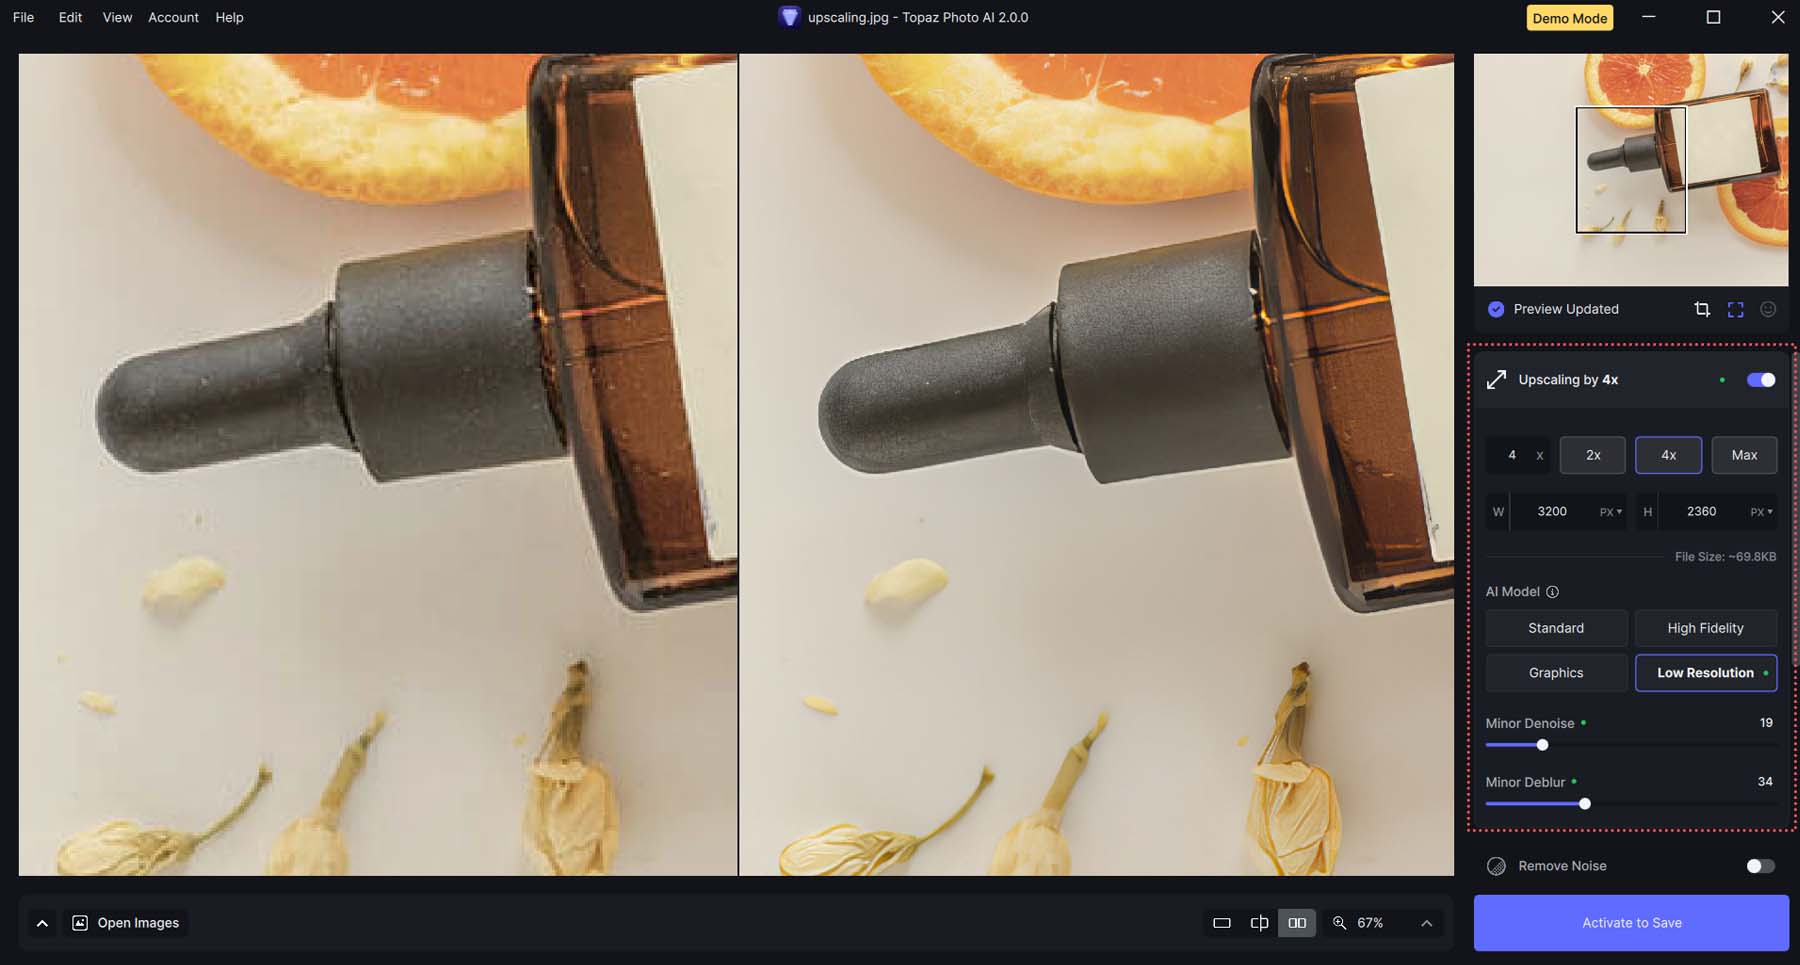
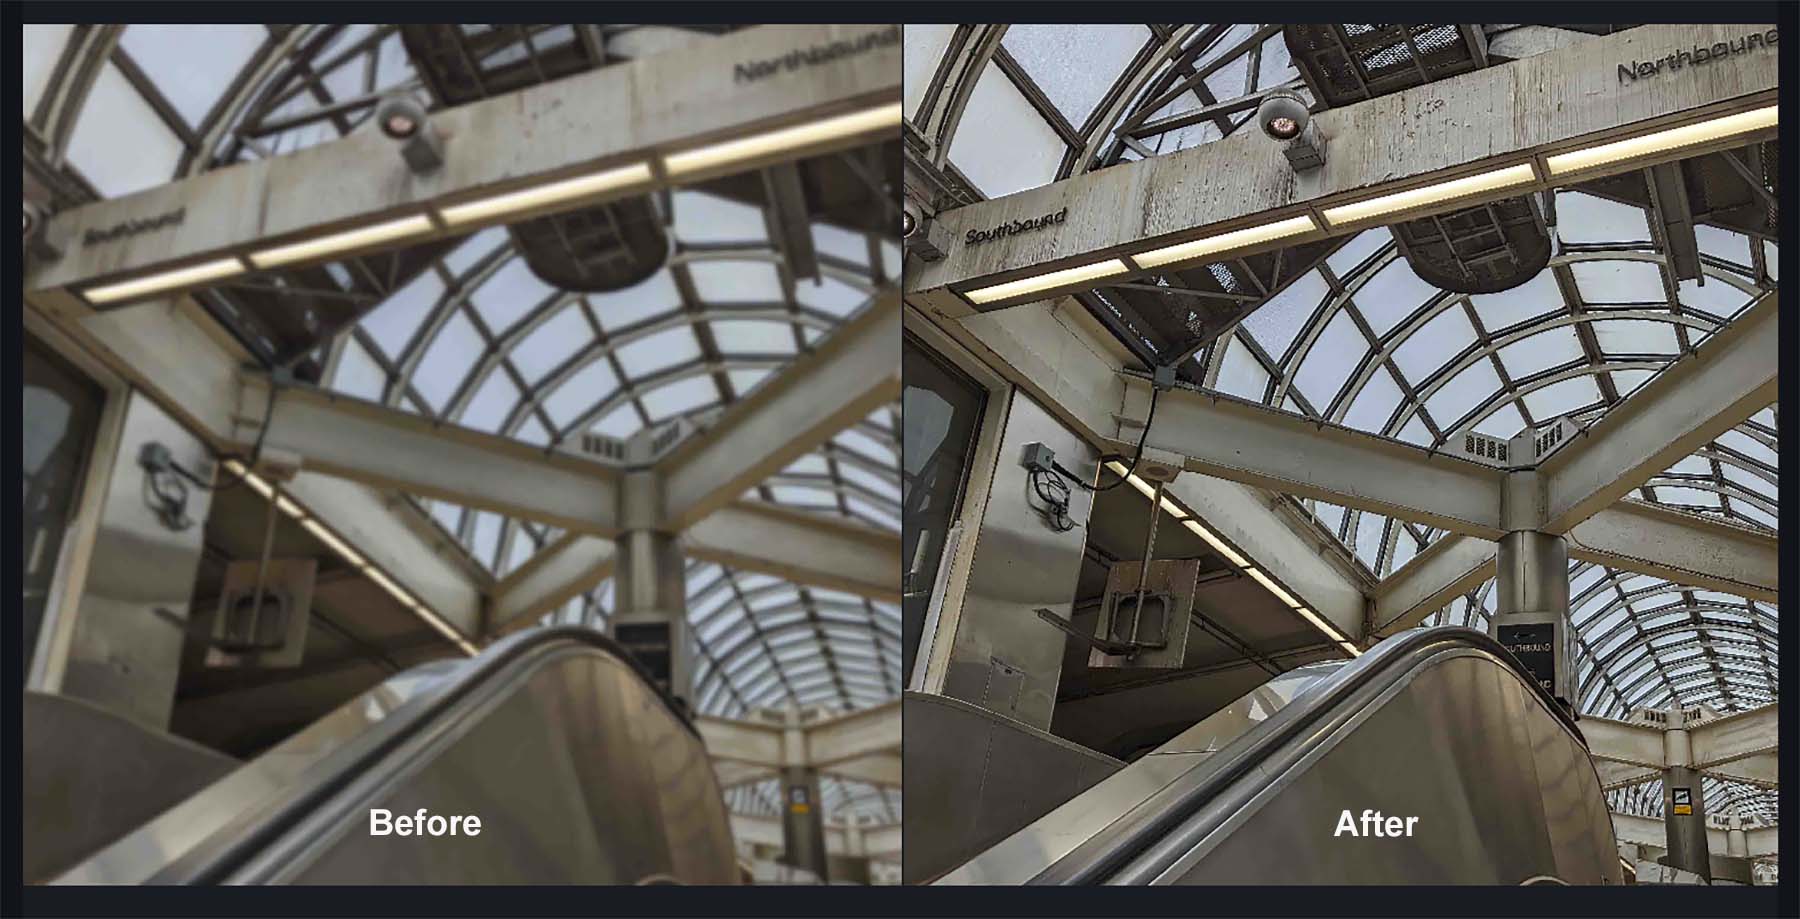
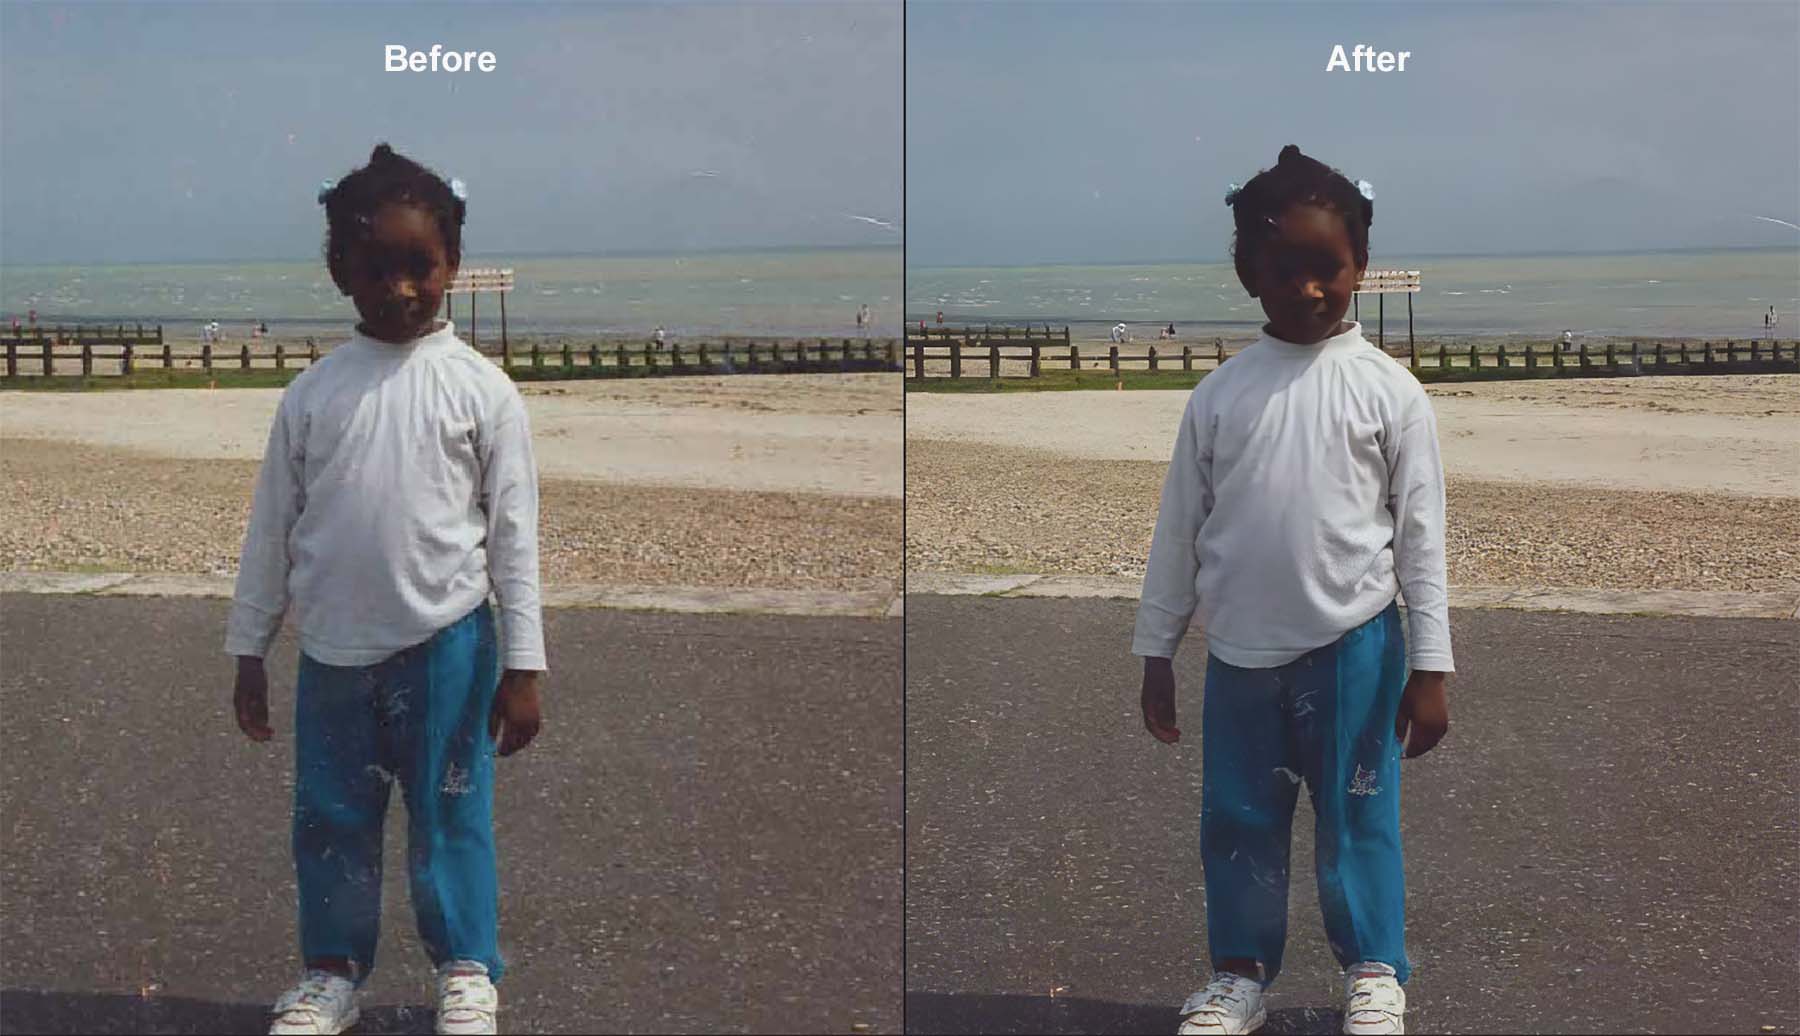
In the example below, the original dimensions of the photo to the left were 800px by 590px. Topaz managed to increase its dimensions to 3200px by 2360px while also reducing the pixelation of the photo. Furthermore, Topaz kept the file size quite small, even though the dimensions of the size increased alongside its quality.

Additionally, Topaz reduced the file size of the finished product, even though it increased the quality of the photo and made the photo less blurry in the process.
Noise Removal and Reduction
Removing noise from photos is a crucial feature that Topaz Photo AI executes impressively.
Topaz’s Remove Noise feature effectively detects and rectifies noise generated by high ISO or substandard lighting conditions. As a user, you control the AI model’s level and strength. Plus, you can preserve as much original detail as you wish during the denoising process.
Whether you want to enhance just the subject in your photo or improve the whole image, you have five AI models at your disposal. These models are designed to make your photos sharper and more defined.
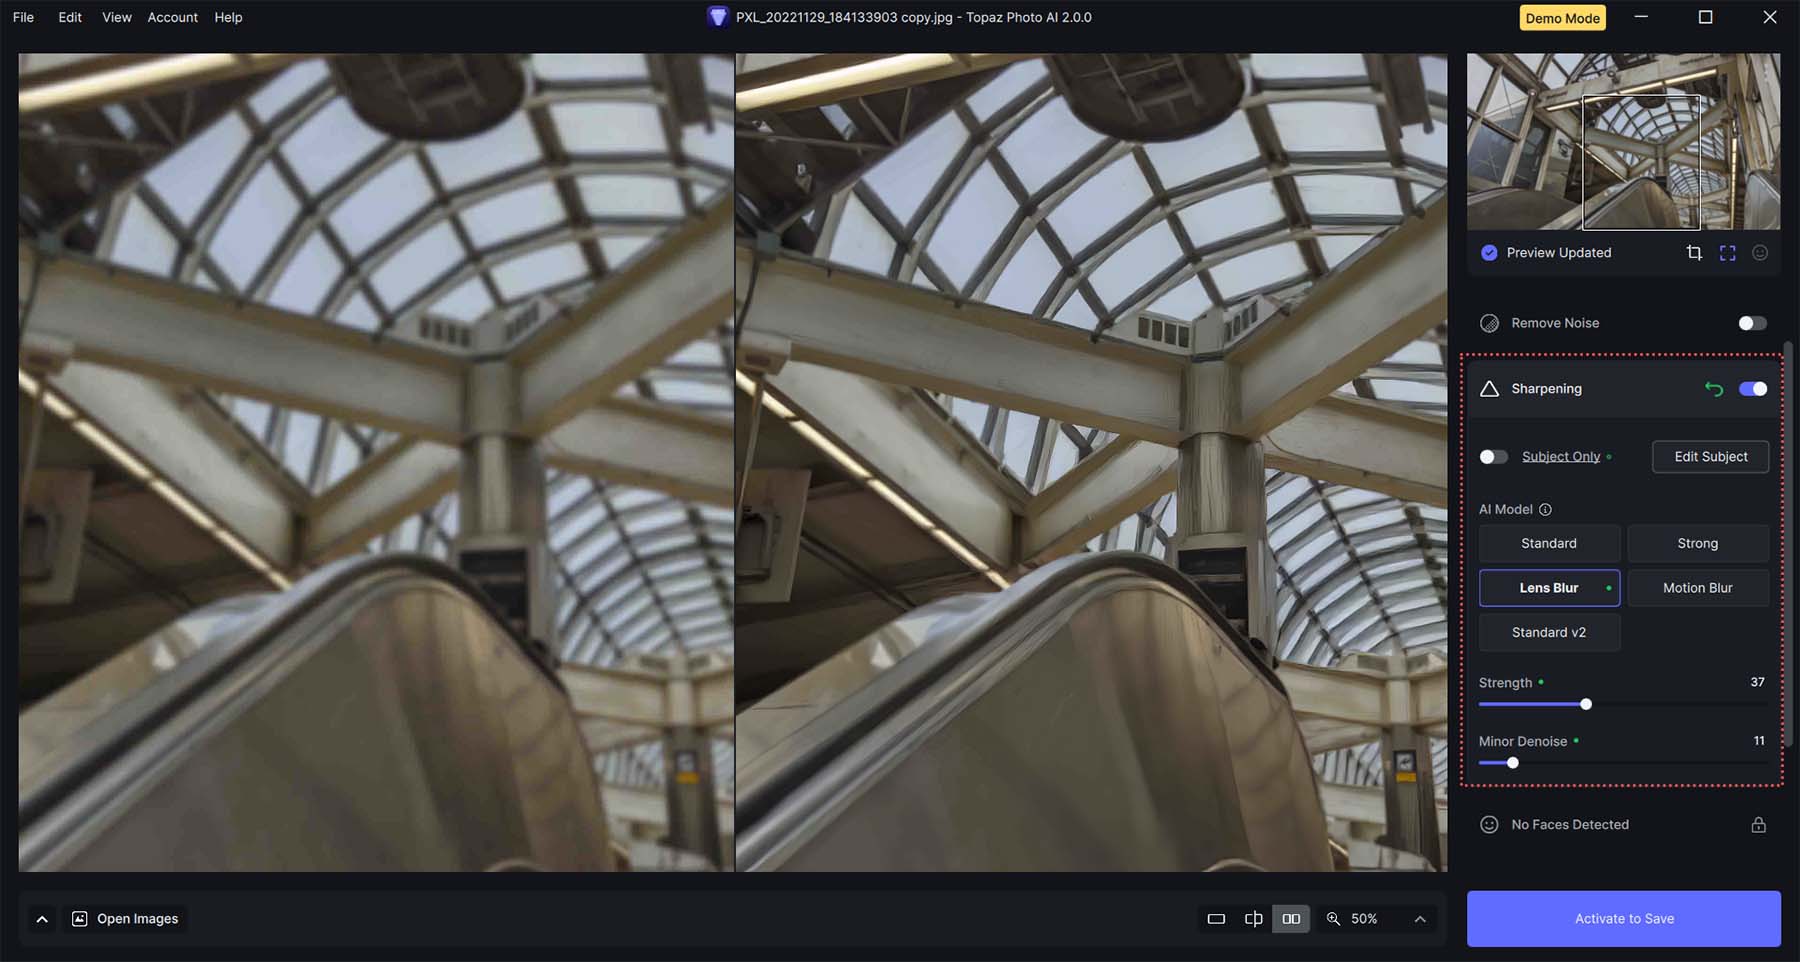
Topaz Photo AI can overlay its denoising feature with its sharpening function. You have complete control over many aspects of the sharpening process through sliders.
Topaz Photo AI can combine its denoising feature with its sharpening function, giving you complete control over many aspects of the sharpening process through sliders.
Recovering Faces
Topaz AI can determine how much processing should take place on the faces that are detected.
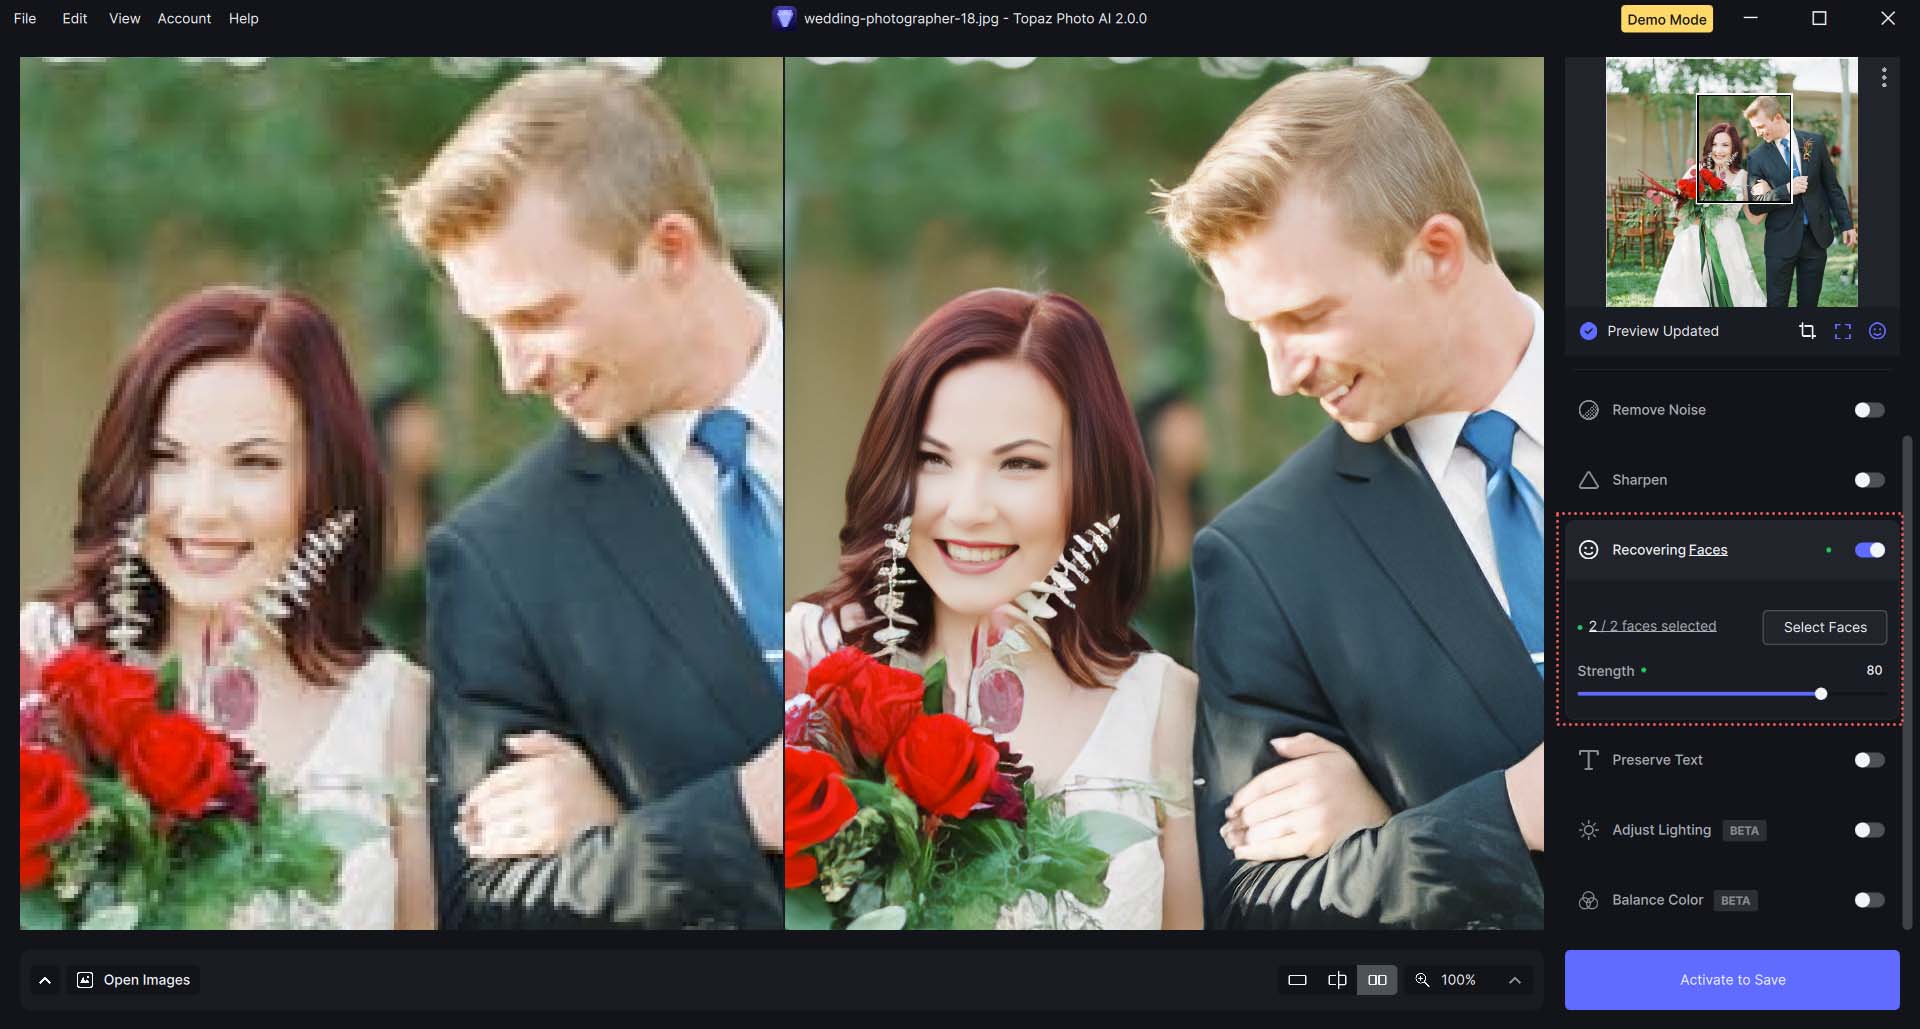
With this feature, you can even select specific faces for custom edits or remove faces from being edited at all.
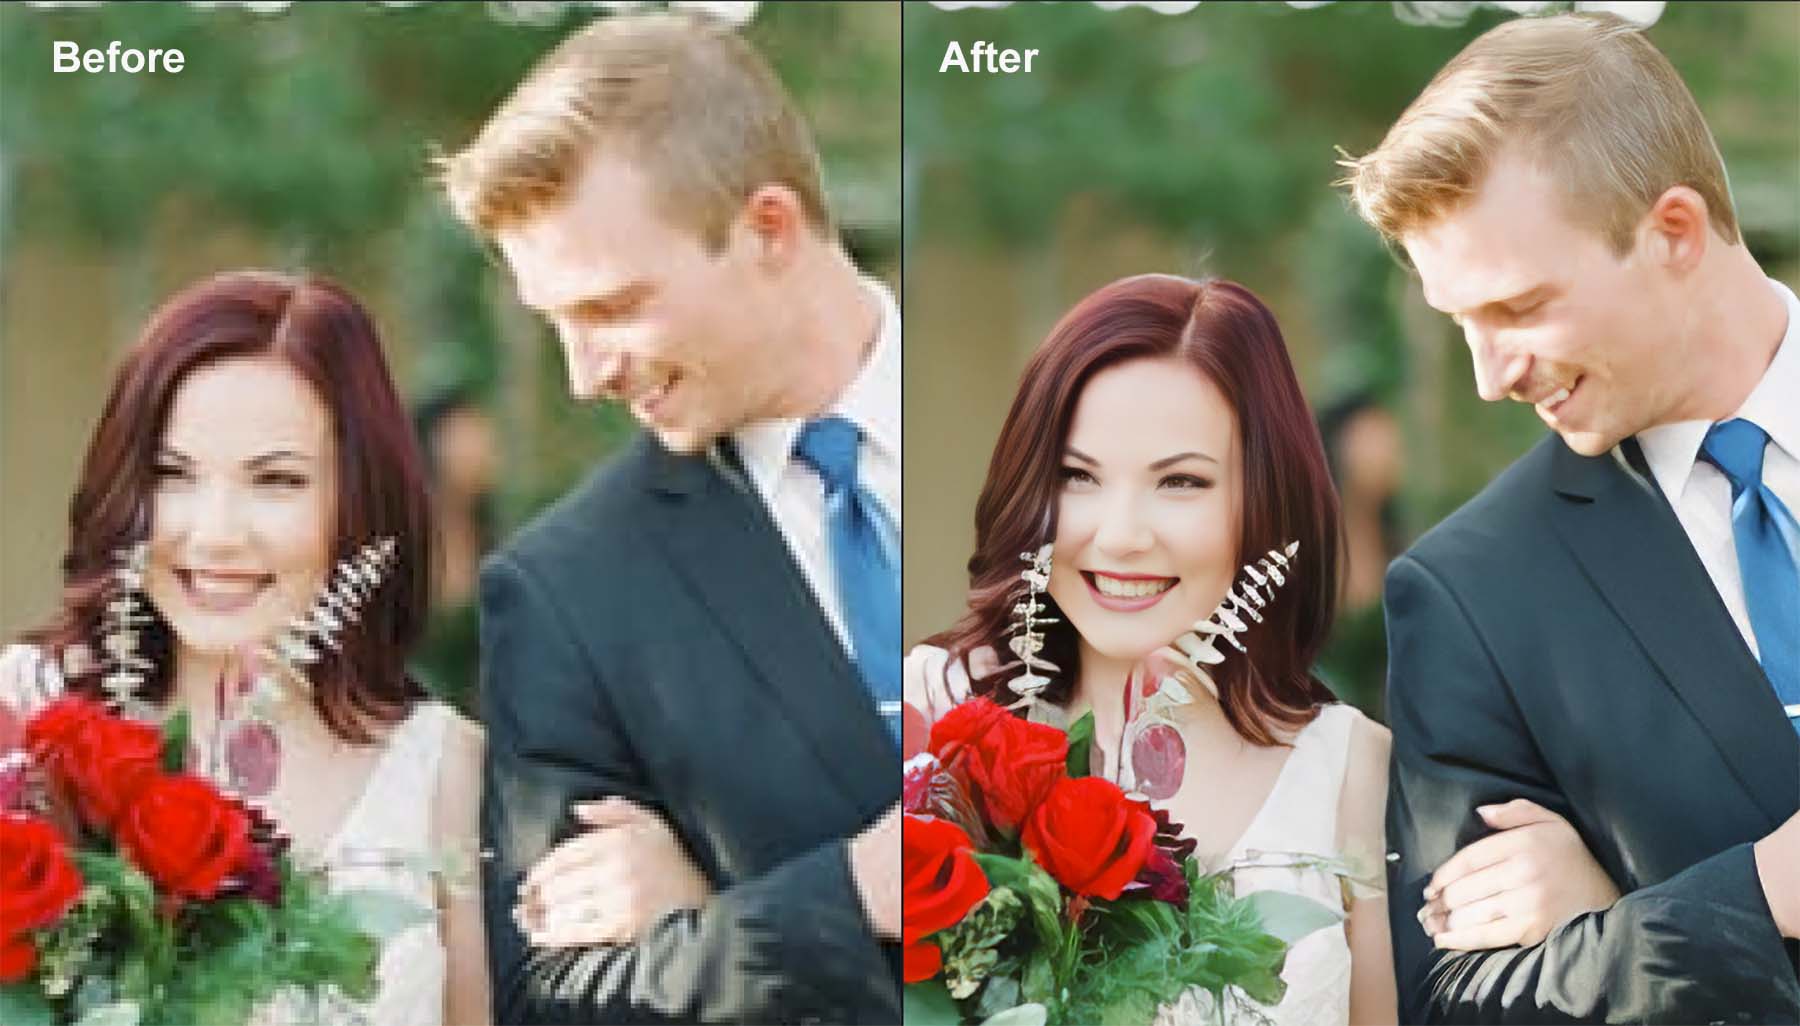
Notice, with the Recovering Faces effect, we can enhance, smooth, and improve the low-resolution quality of this photo without impacting the hair or the surroundings in the photo. This effect is best used alongside the Upscale feature.
Preserve Text
The Preserve Text feature enables you to select areas of text where you don’t want any edits or filters applied.
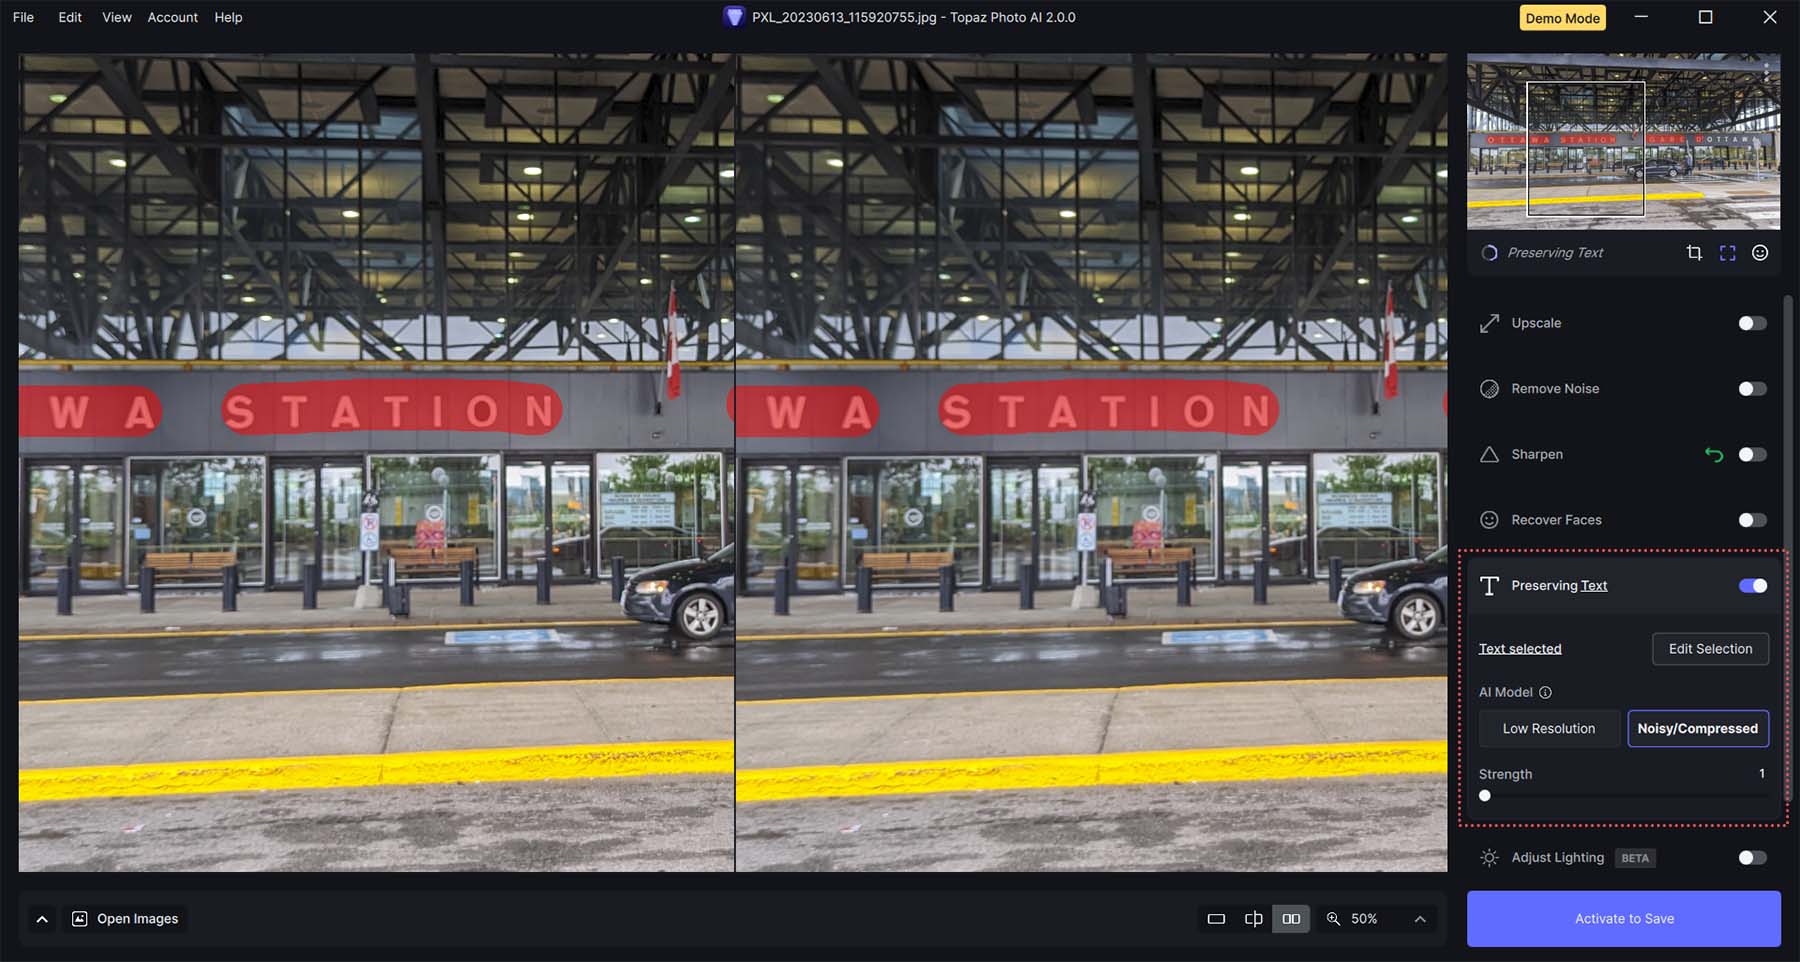
Some image adjustments and modifications may warp your text while optimizing your image. This feature enables you to preserve any text you wish to remain unchanged.
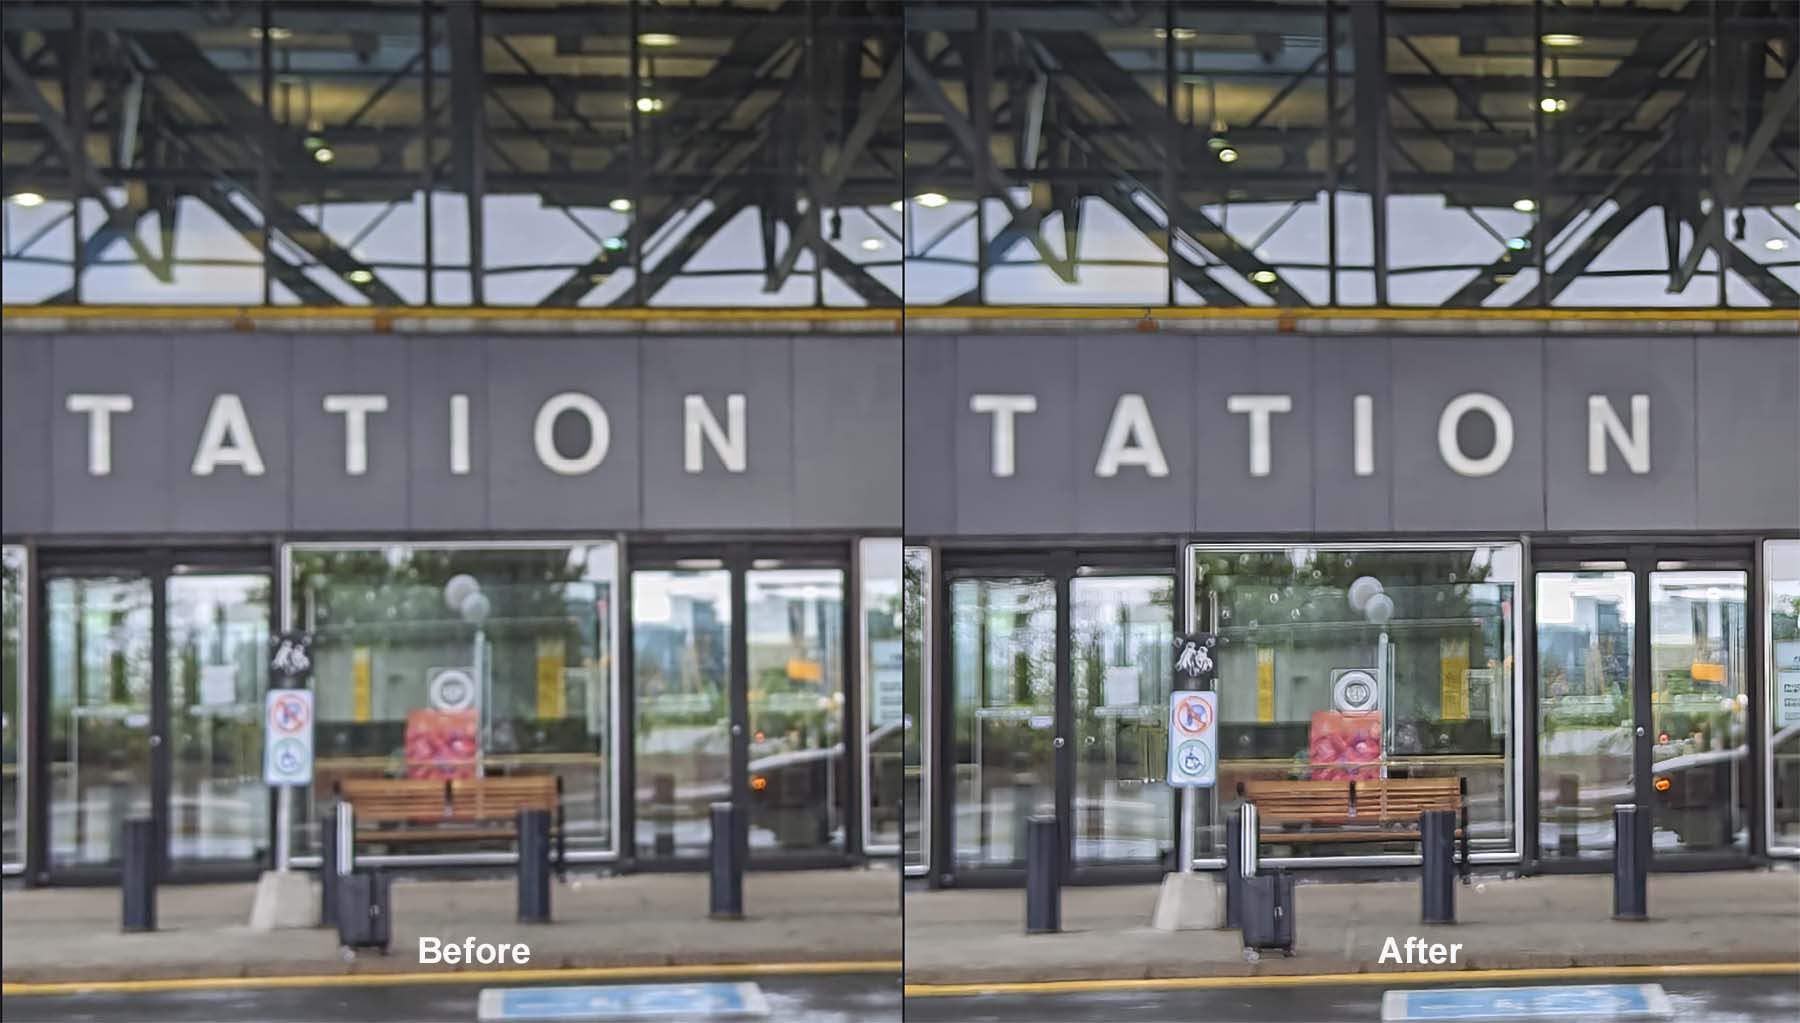
Notice in the aftermath that the text is slightly more legible than before. While it’s not perfect, it does a great job on larger text and thicker fonts without too much obstruction.
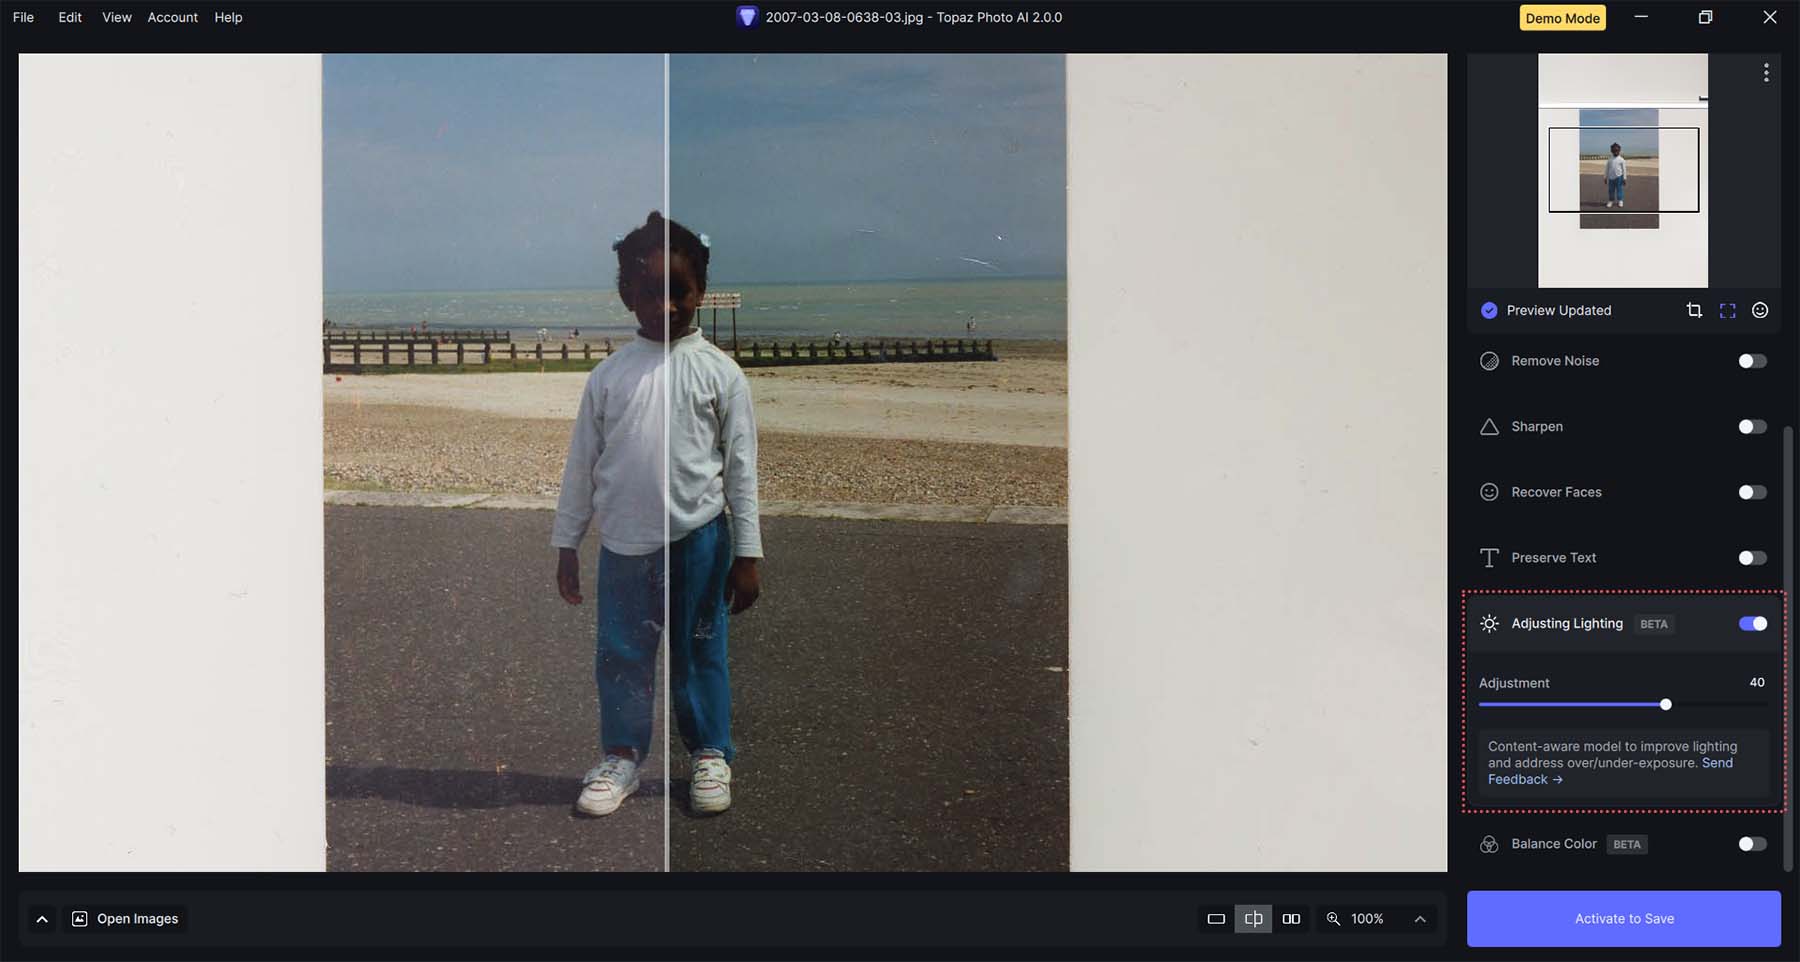
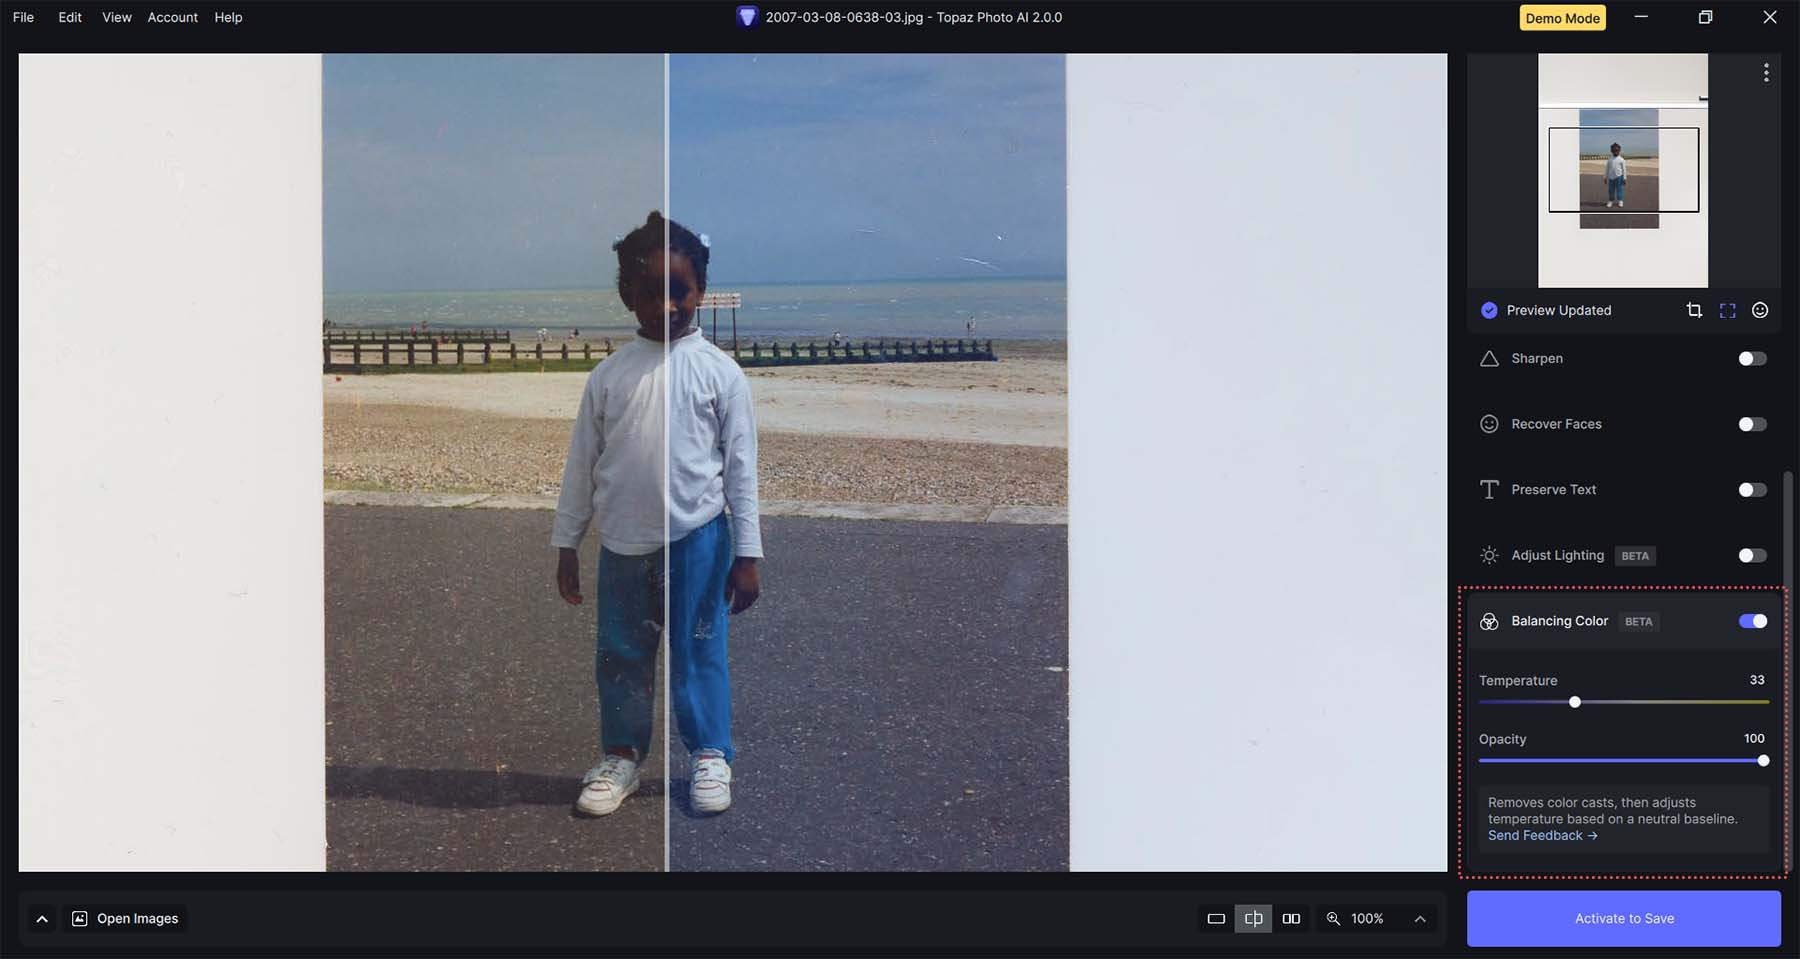
Beta Features: Adjust Lighting & Color Balance
Adjust Lighting and Color Balance are two new features that are still in beta, but you can still implement them in photo editing. The Adjust Lighting feature rectifies both over and under-exposure in an image.
The Balancing Color feature works to manage the temperature of a photo. Whether you want your photo cooler or warmer, this feature controls the transparency and balance of this.
Now that we’ve done a thorough walk-through of the main features of Topaz Photo AI, here’s quick overview of the top features that you can expect to enjoy in this powerful AI photo editing program:
| Topaz Photo AI Feature | Description |
|---|---|
| Autopilot | Initial checks and settings that Topaz Photo AI applies to images when they are first imported into the project |
| Upscaling | Increase the size and quality of your image |
| Noise Removal and Reduction | Reduce and remove noise objects in your images |
| Sharpening | Sharpen your entire image, or individual subjects in your image |
| Face Detection & Recovery | Detect and separately edit faces that are detected in an image |
| Preserve Text | Save text from edits and filters applied by the program |
| Adjust Lighting | Corrects both under and over exposure in a photo |
| Color Balance | Control the tempreture (warmth/coolness) of your imported image |
Now that we’re familiar with the features of Topaz Photo AI, let’s walk through the program and see some of these settings in action.
Getting Started with Topaz Photo AI
You’ll need to download and install Topaz Photo AI on your computer to use it. Great news – it’s compatible with both Mac and Windows systems. Let’s dive into exploring this fully-equipped software in this guide. Although the demo provides an opportunity to explore all the features, remember that you’ll need to purchase a license to download and save your edits.
1. Purchase, Download, and Install Topaz Photo AI
Visit the Topaz Labs website. Then, click Downloads from the main menu. On the downloads page, under Topaz Photo AI, select the operating system that works best for you.
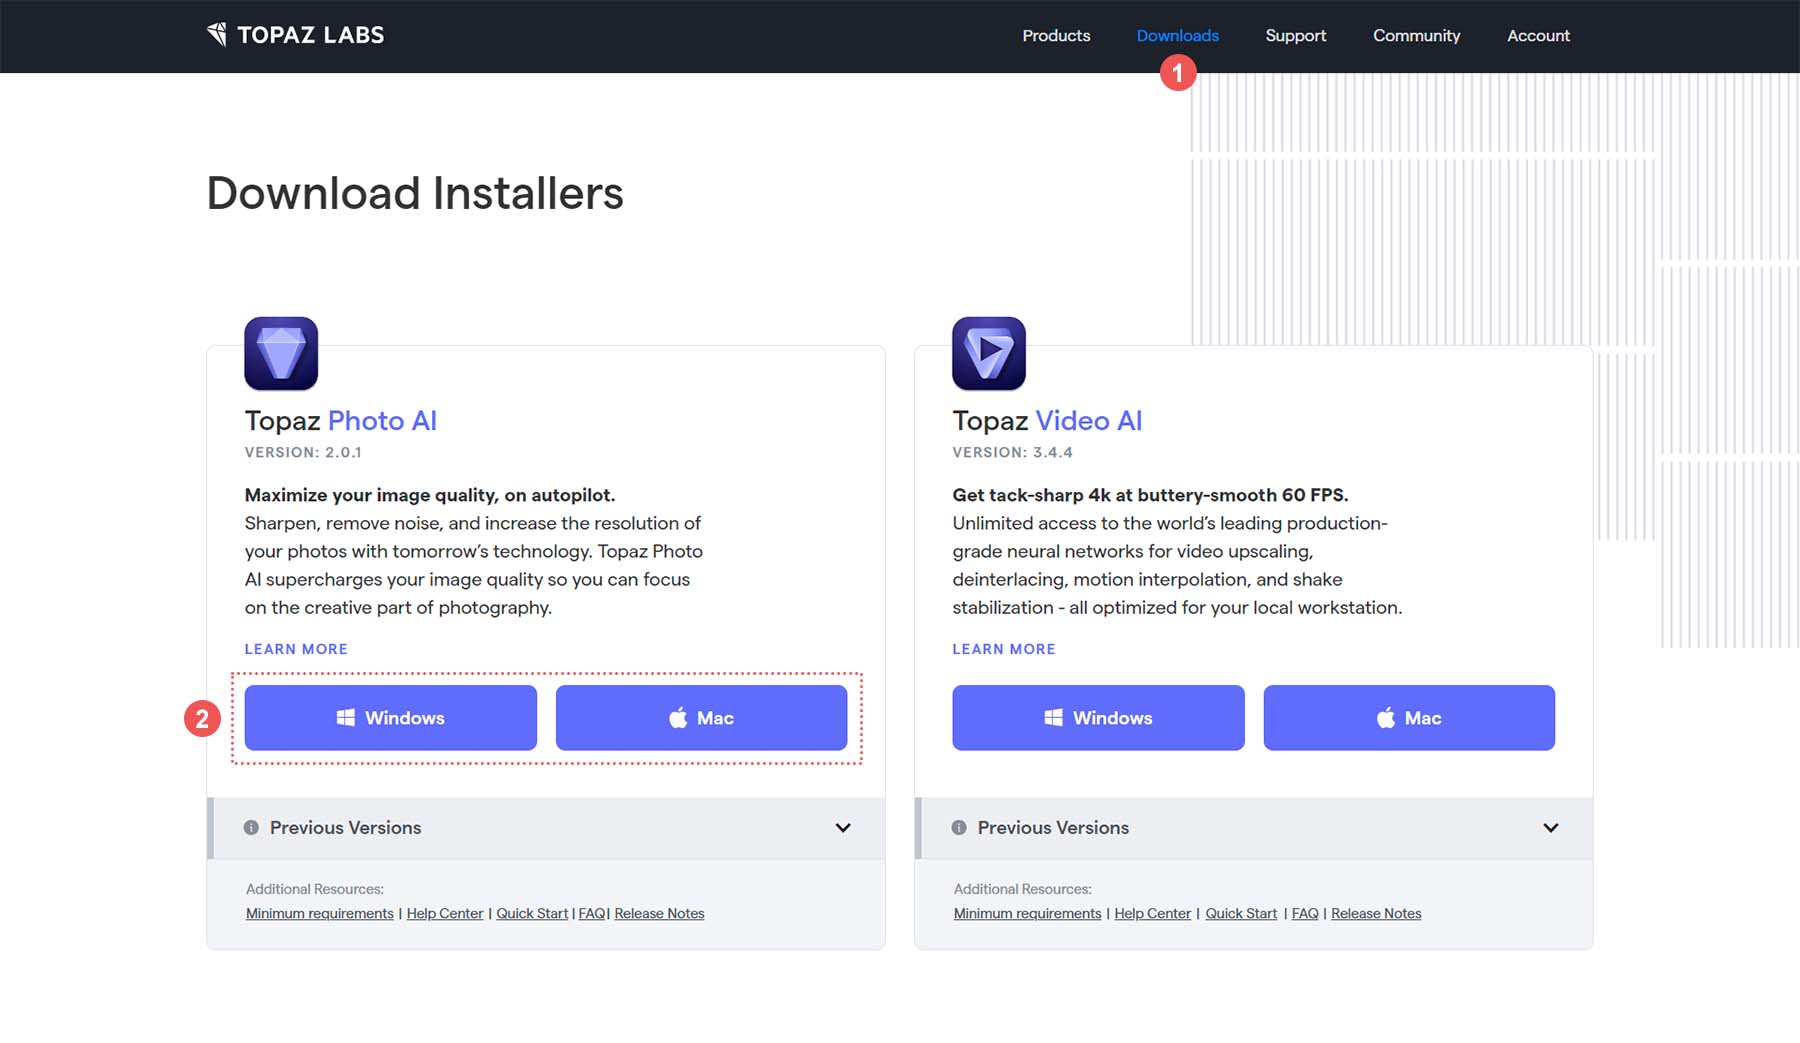
Follow your operating system’s usual program installation process. Once the program is installed on your computer, open it. Now, we can start optimizing some images!
2. Activate & Import Your First Image
Once you have opened Topaz, click the blue Activate button and enter your license key. You can purchase a license key directly on the Topaz Photo AI website. (If you don’t have a license key or aren’t ready to purchase, you can always select “Free Demo” to try it out beforehand. )
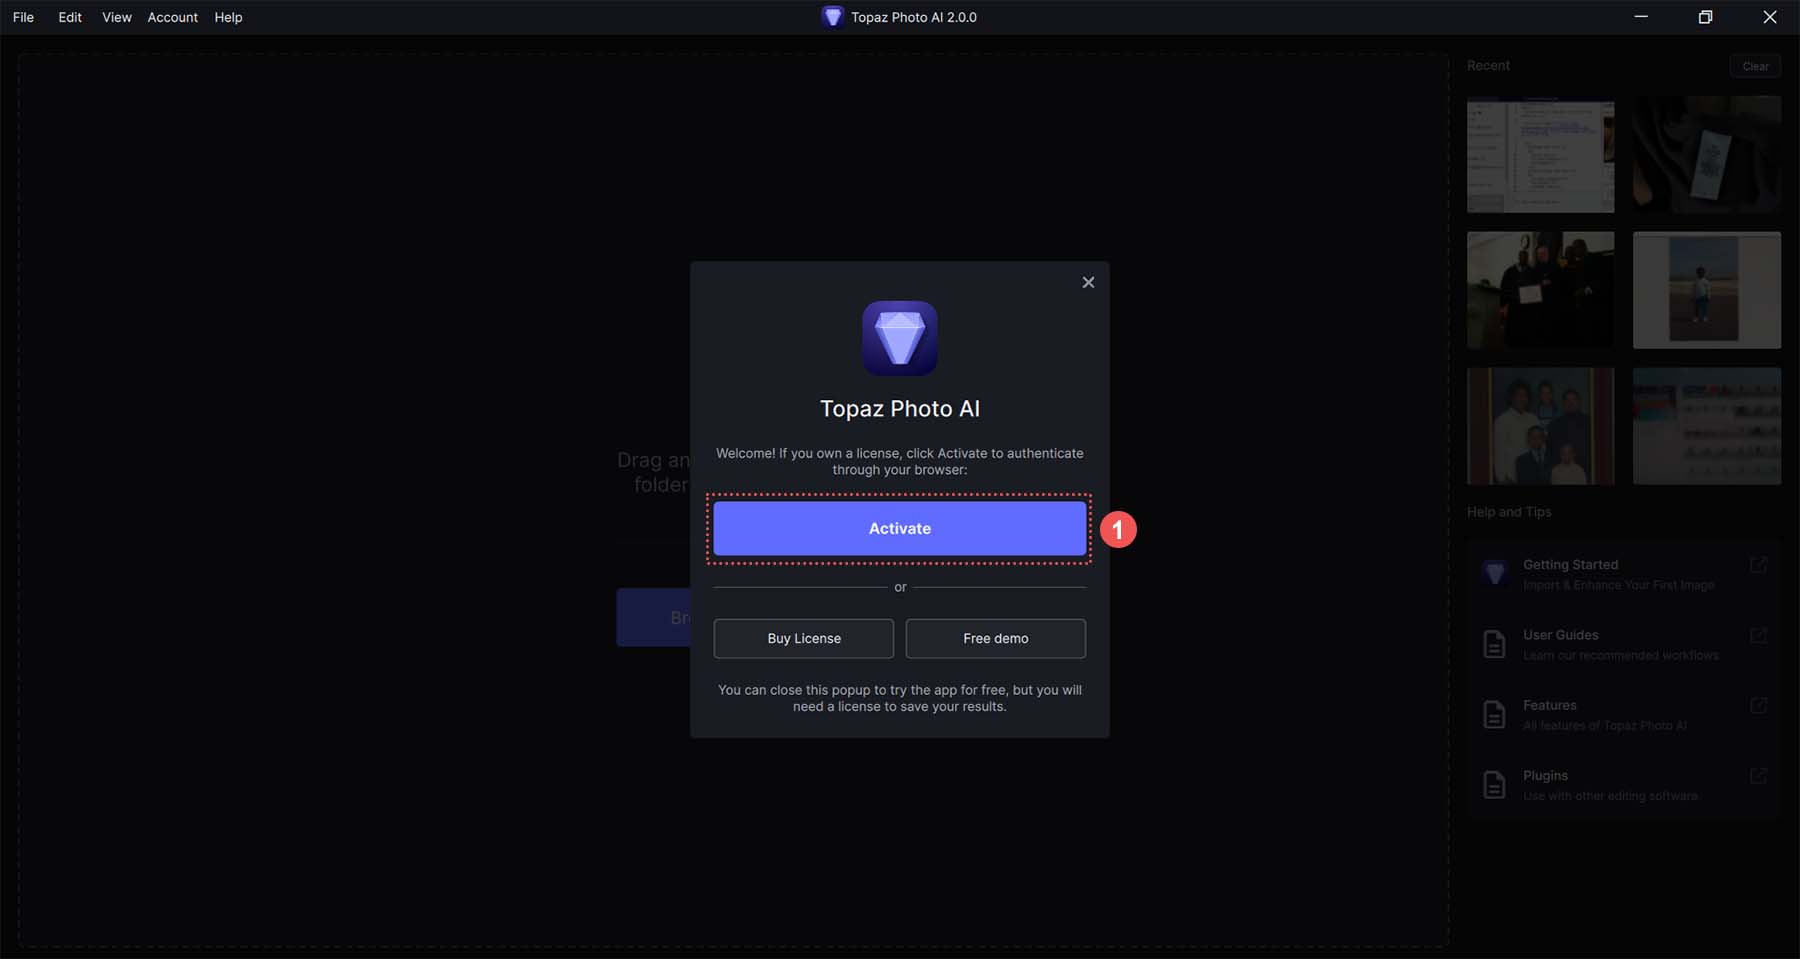
Then you will be redirected to log in to your Topaz account, where you can verify your purchase.
Upon entering the Topaz editing screen, this is what you’ll see:
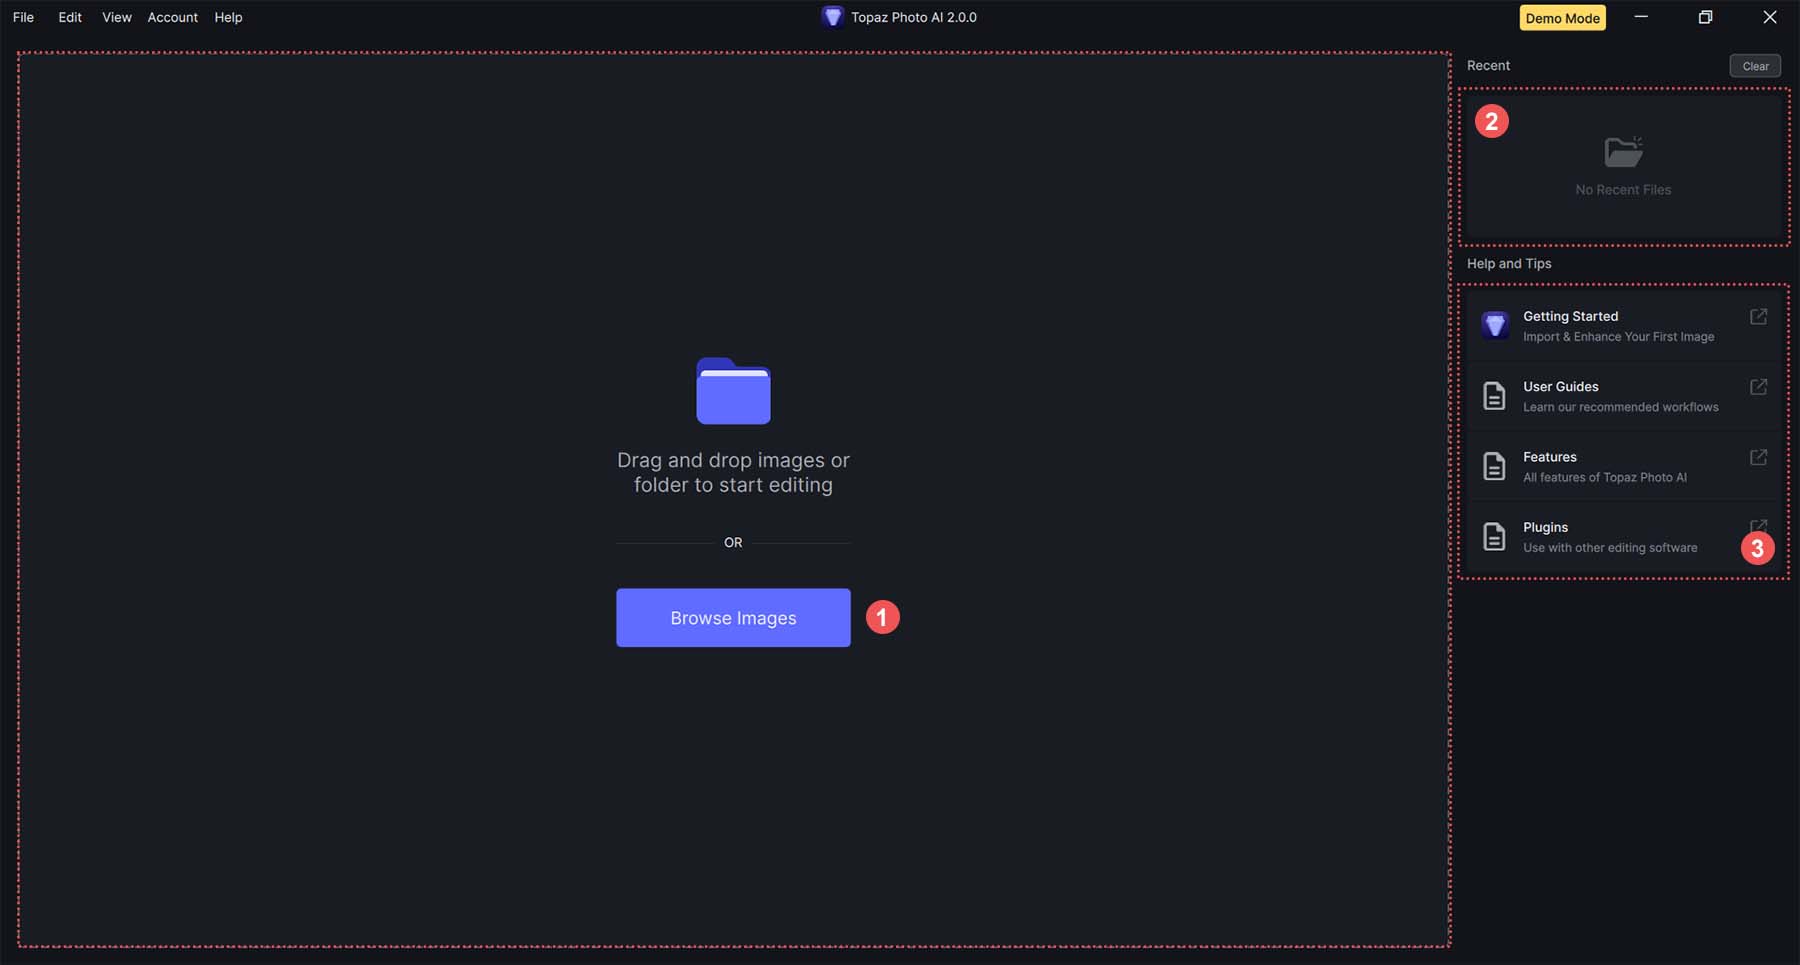
The main section on the left-hand side is where you can preview your edits alongside the original version of your images. You’ll see a section on the right showing you your recent images. Finally, you’ll be presented with the documentation for the program. Up next, let’s try editing an image.
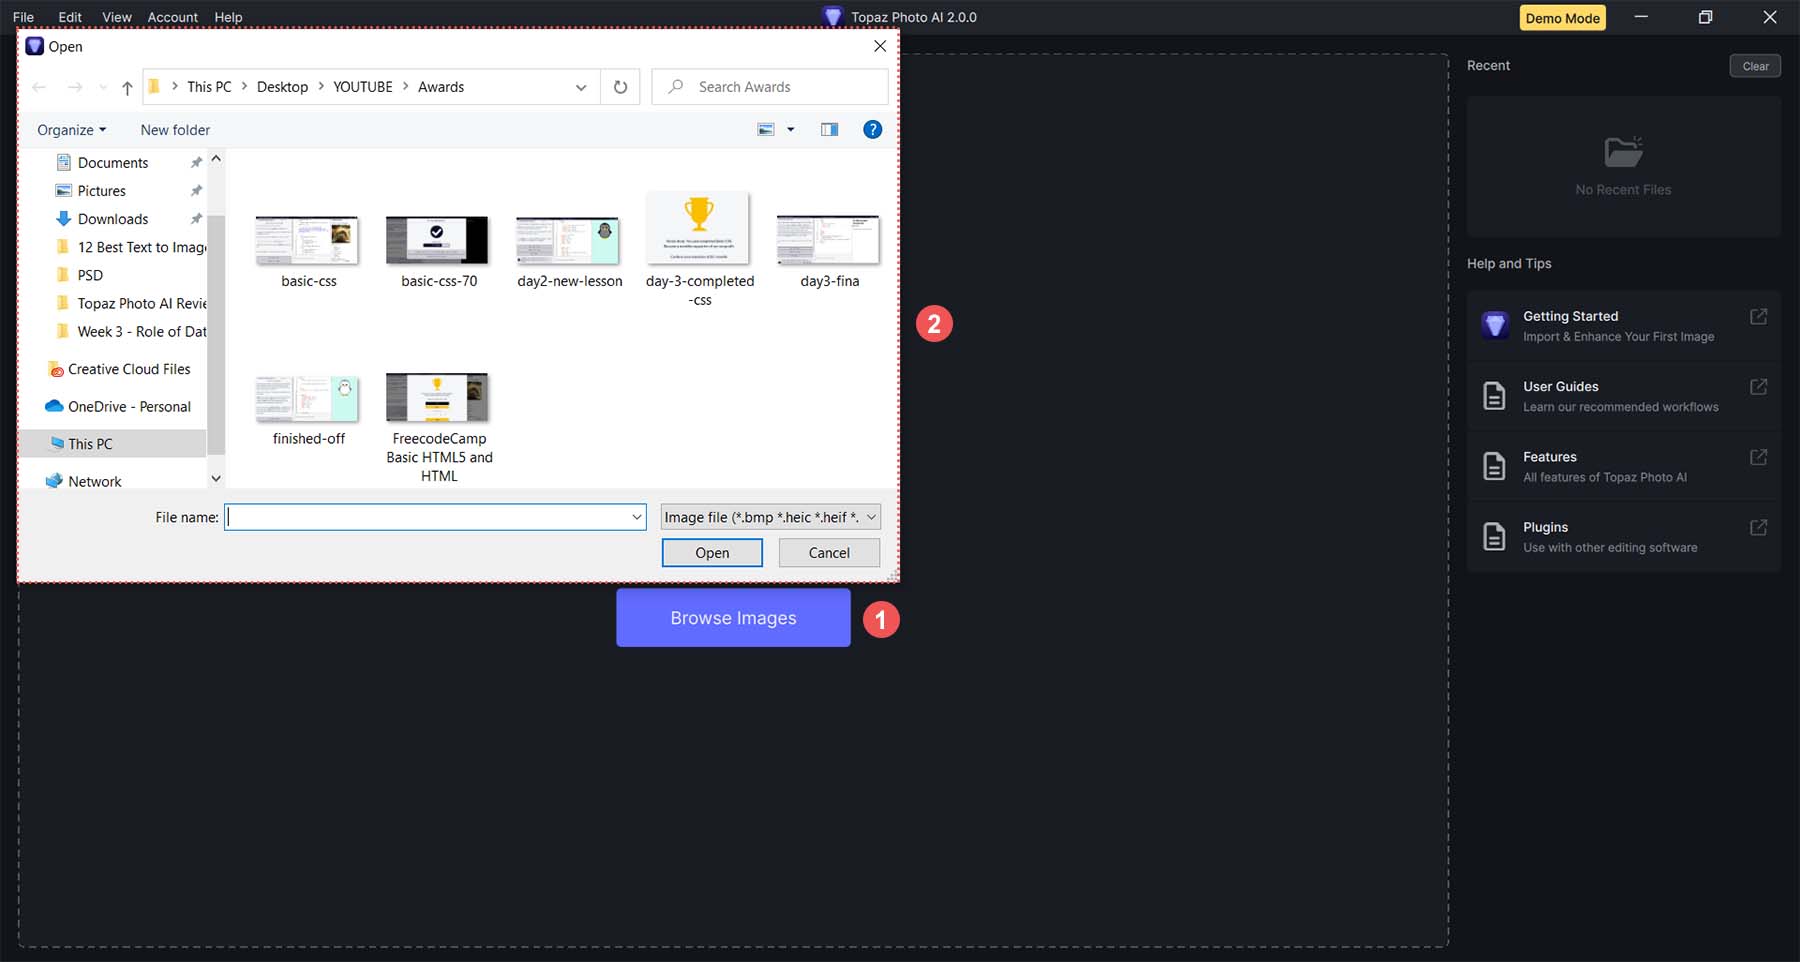
To import an image – or batch of images – into Topaz, click the blue Browse Images button. This will open up your file system, where you can browse through the images on your hard drive. Alternatively, you can drag and drop images from your computer into Topaz.
After importing your images, this is what the Topaz interface now looks like:
As you’ll notice, our workspace has changed. Here’s what’s different:
- Autopilot: As soon as you import your images into Topaz, Autopilot starts working, analyzing your images and setting up a preliminary set of edits that you can use as is or adjust to your specifications.
- View Finder: The viewfinder lets you move through different areas of your image.
- Subject Selection: These icons let you decide where to apply your image’s edits. You can choose a specific subject, work on the image as a whole, or select a specific face from the image.
- Image Editing Settings: All the powerful settings that make Topaz Photo AI an outstanding AI tool now appear. You can use the toggle to activate each setting and individually customize the options provided as you edit your image.
With our new settings and our image imported, let’s test the capabilities of Topaz’s AI image optimization settings.
3. Adjust Your Settings
By default, Topaz’s Autopilot will apply a base level of settings to your image upon import. In our example, Autopilot upscaled our image:
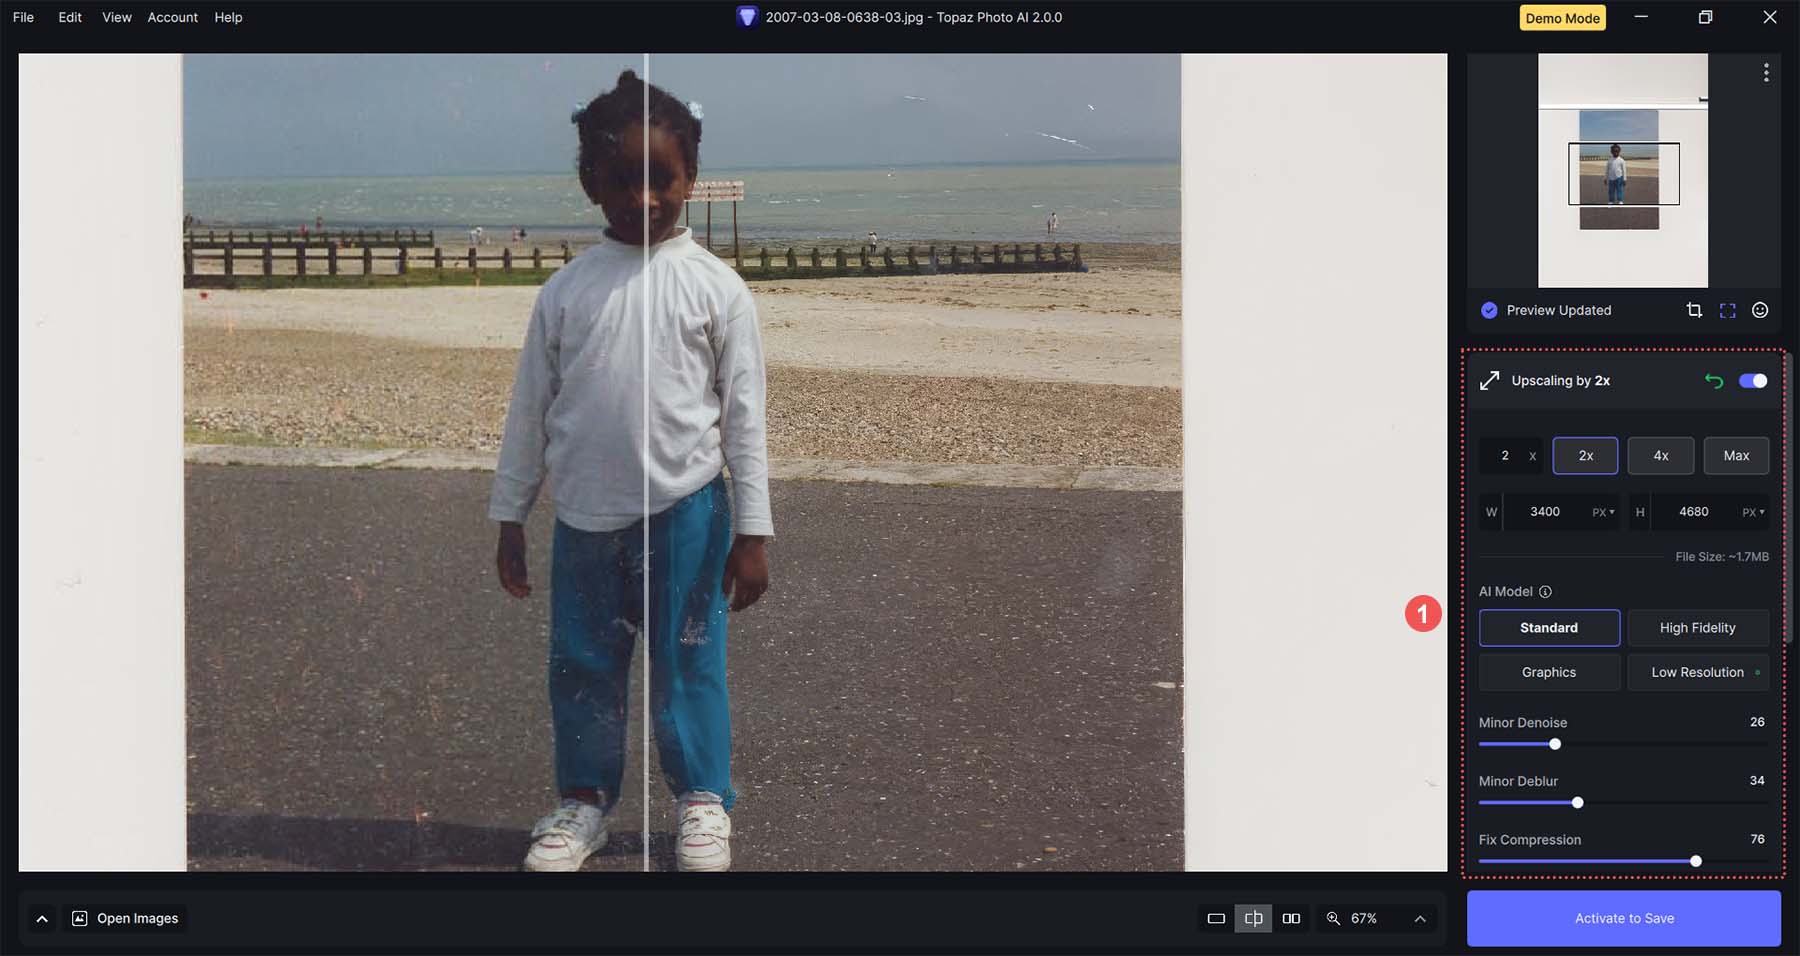
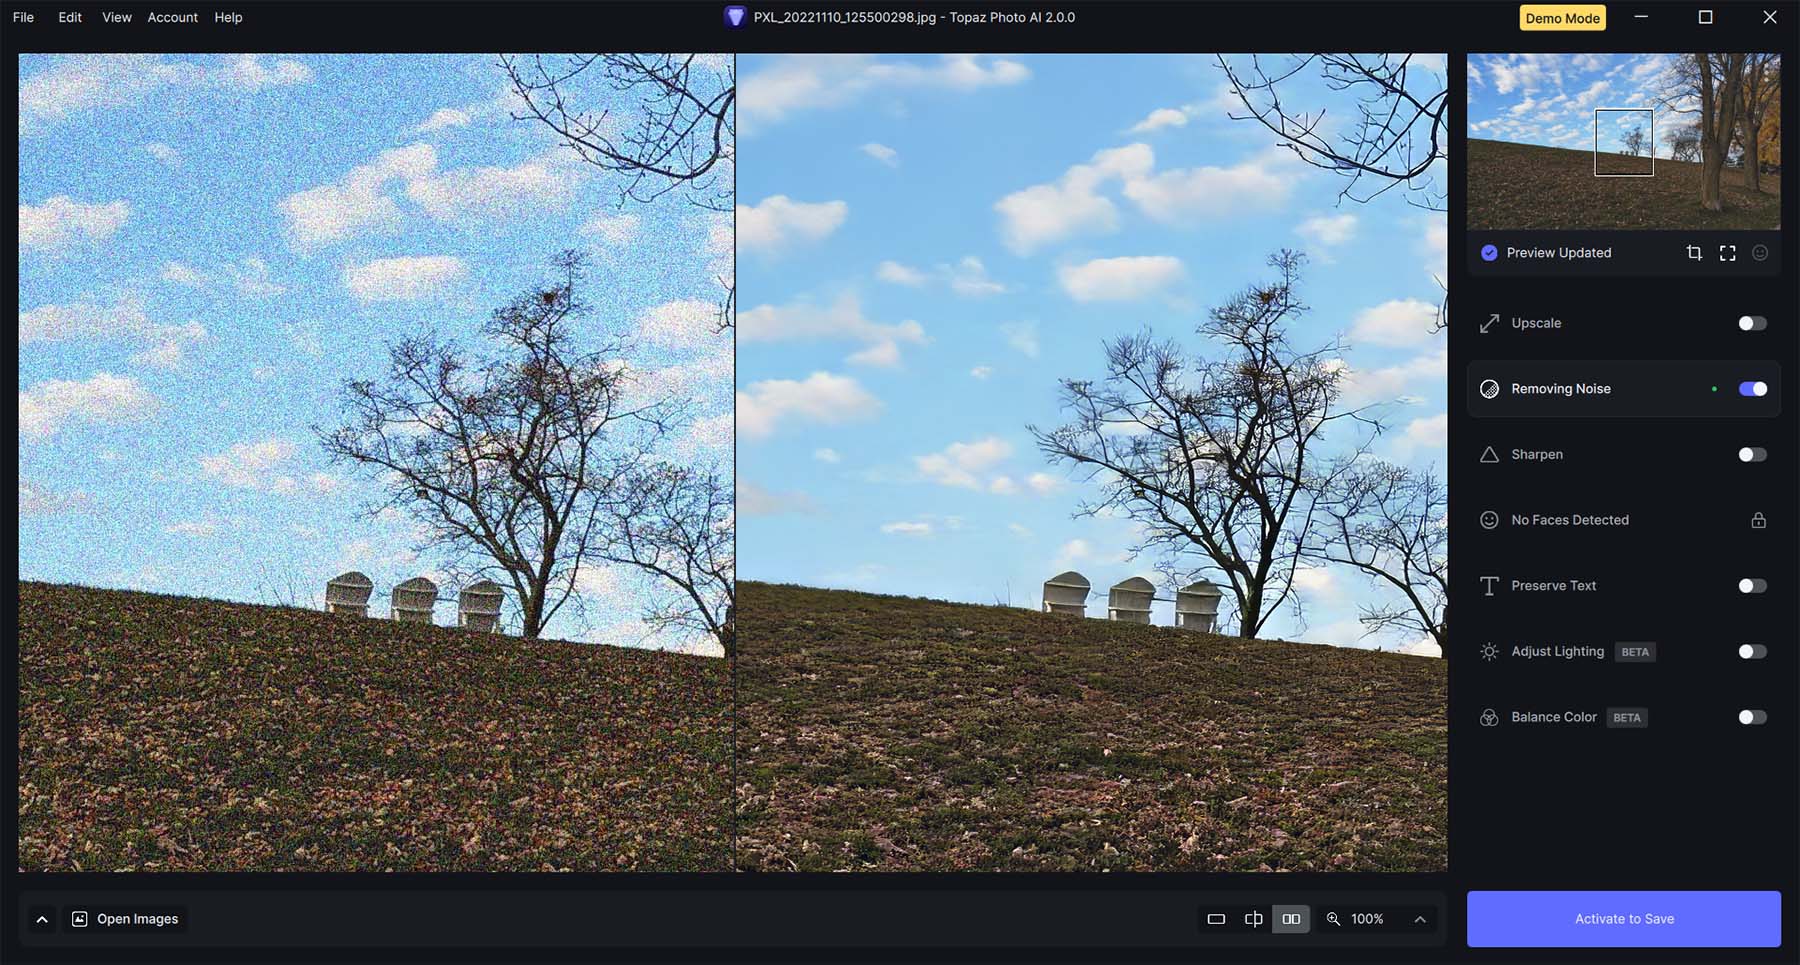
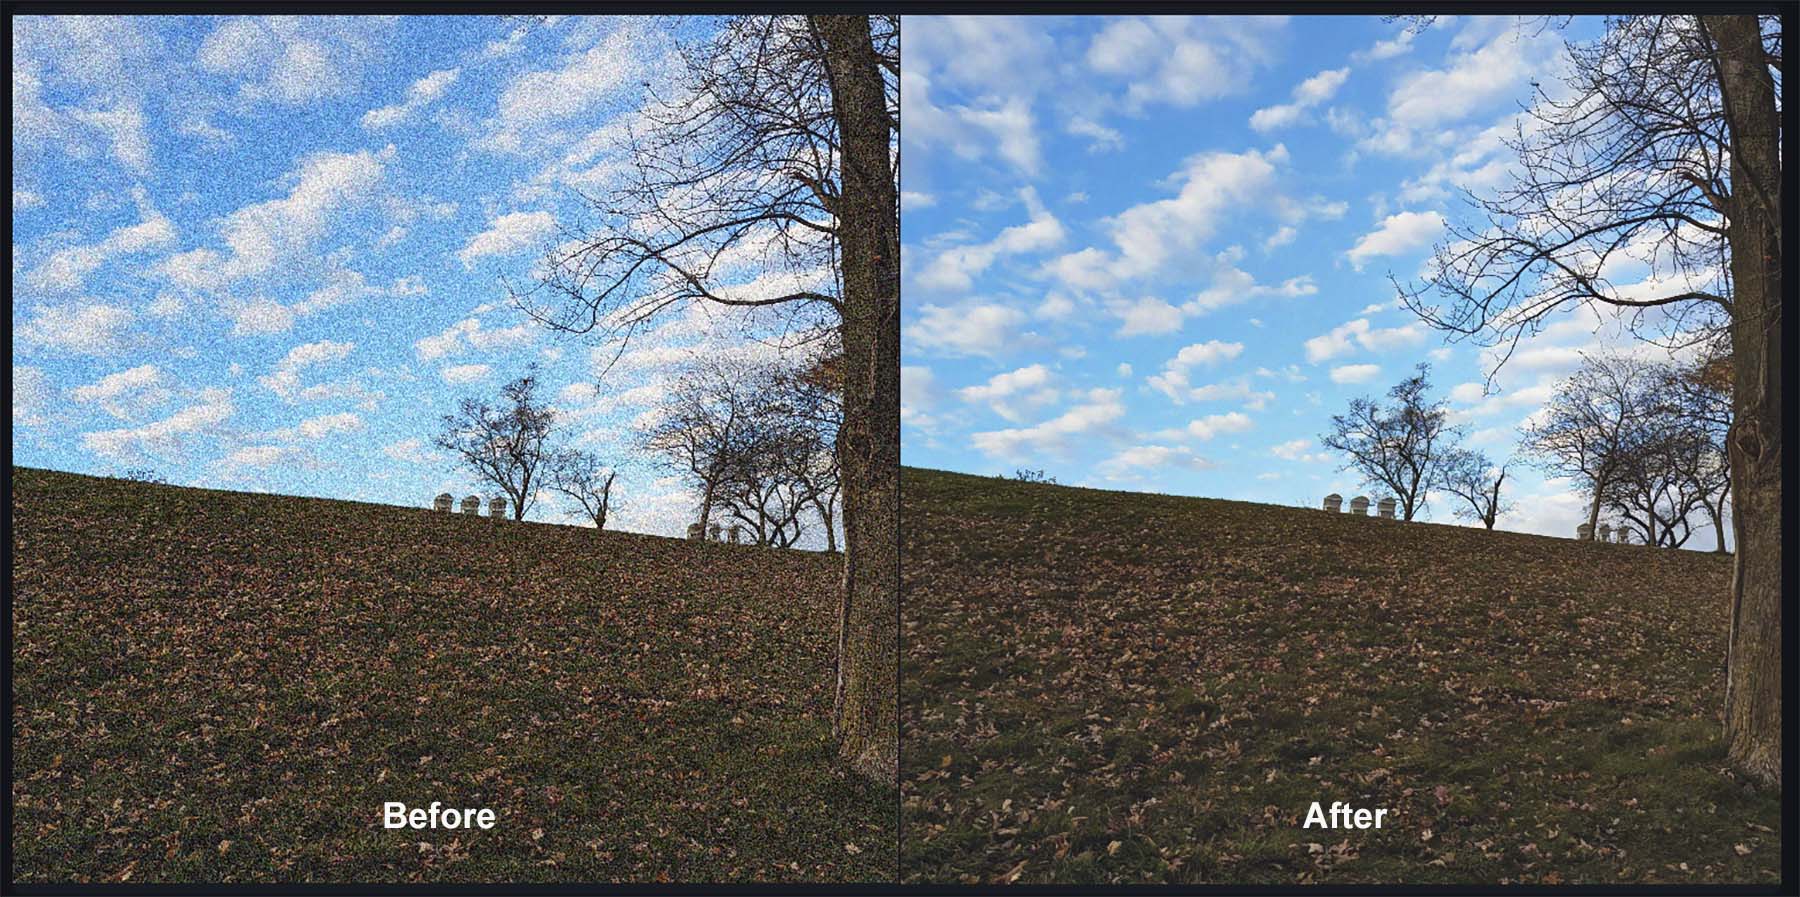
The unedited version appears to the left, and our edits appear on the right. We’ll leave those settings as is. Notice that Topaz made our image sharper as it enlarged the image. Next, let’s remove some of the noise in our photo. Click on the Noise toggle.
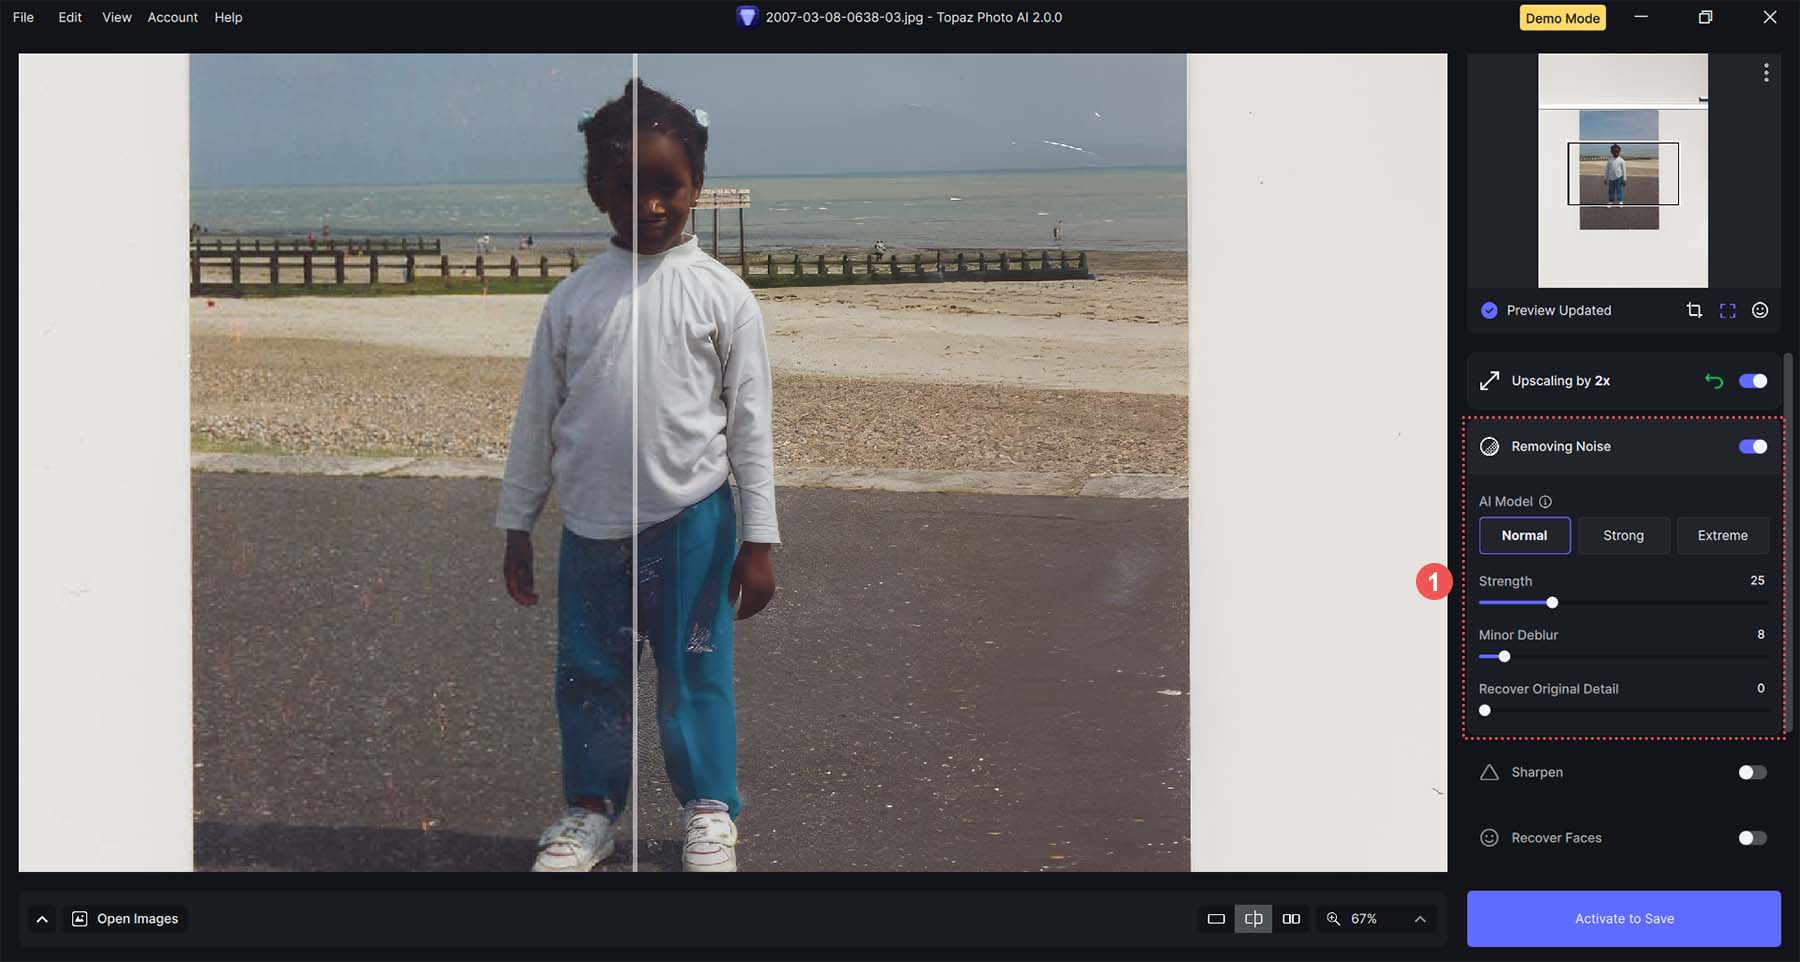
Let’s use the Normal AI Model and keep the strength at 25, with minor deblurring set to 8. When you compare the sky, you’ll notice that the pixelation has greatly reduced. You’ll also notice that the grass and fence are more defined and greener. The clothes are sharper and more vibrant from just a few settings in Topaz AI. Here is what our final image looks like with all our settings in place:
4. Save and Export Your Image
If using the free demo, you’ll need to purchase a license for Topaz Photo AI to save and export the new, optimized image. Let’s take a look at some of the exporting options available.
You can batch export a group of photos or export a single image with Topaz.
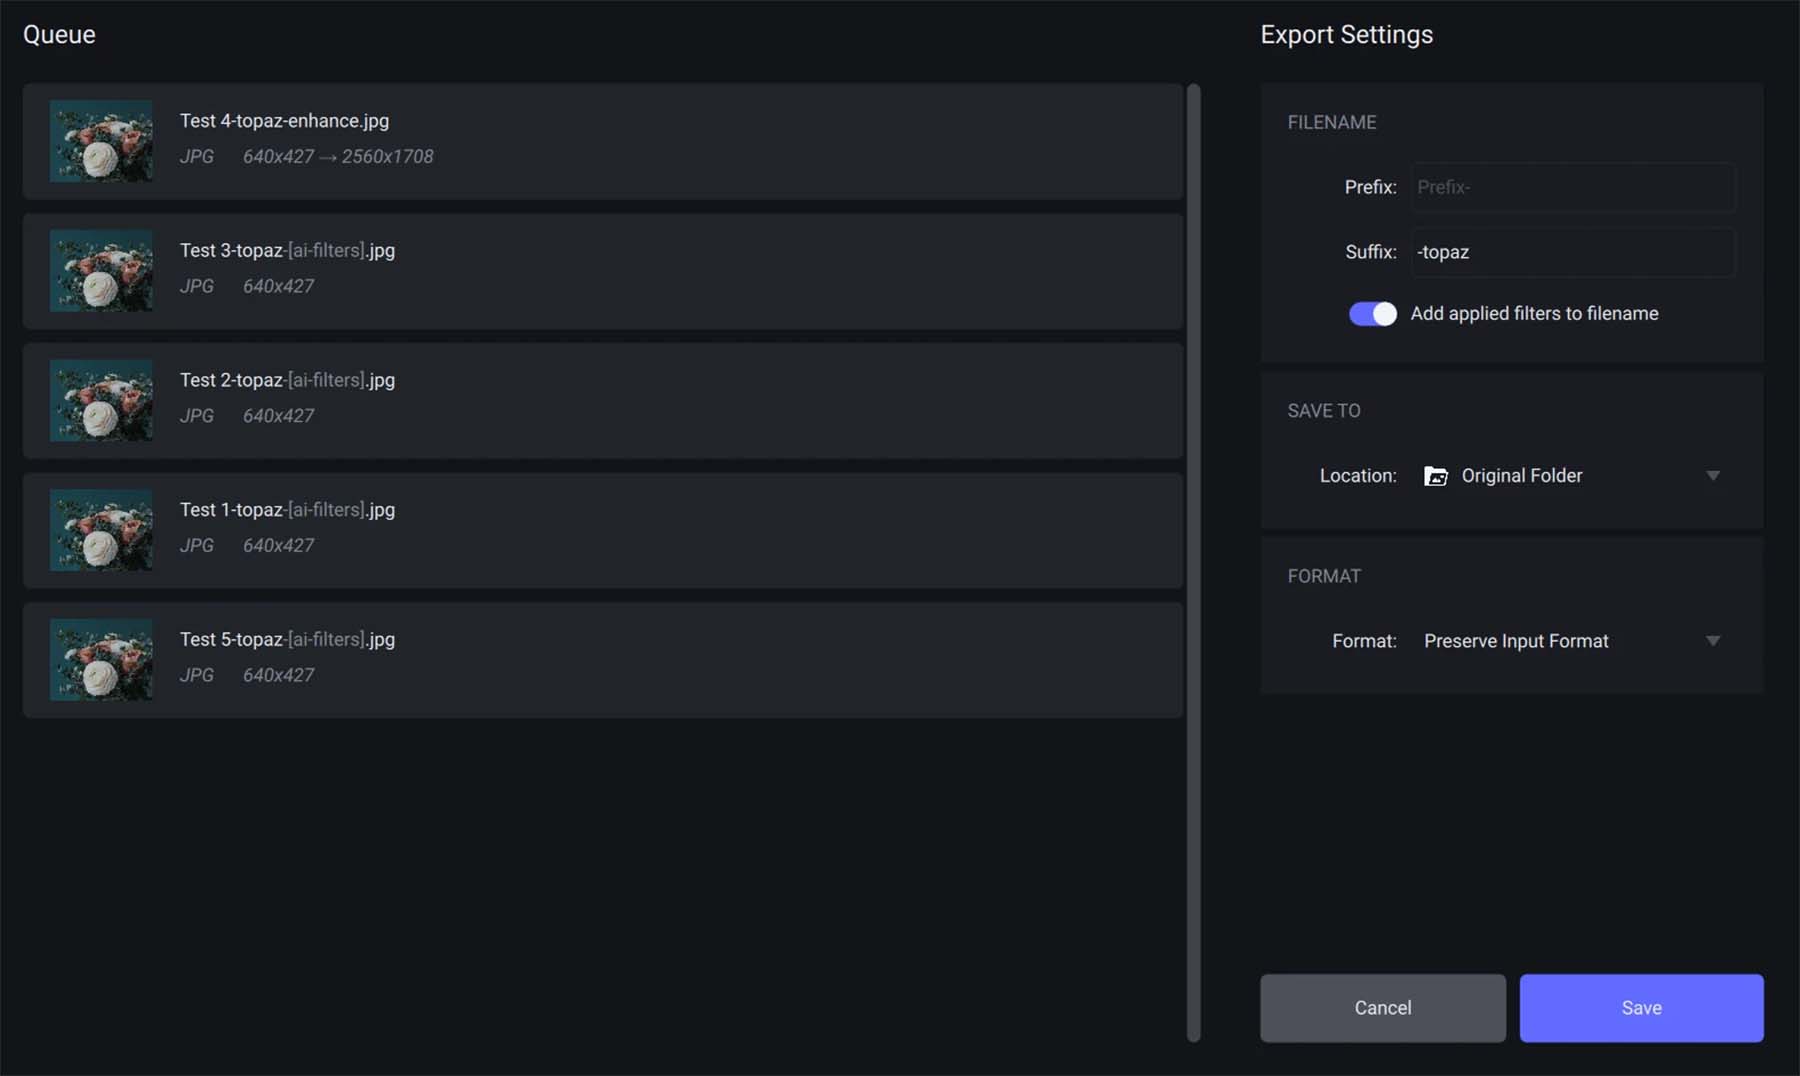
Topaz allows you to determine the location for saving your image and the export format. You can export your images in JPG, PNG, TIFF, or DNG formats, with the latter solely applicable to RAW files. However, if you’re utilizing Topaz via an external program through its plugin, the responsibility to handle exporting your image falls on that respective program.
After exporting and testing out Topaz, let’s see some of the benefits and areas of improvement of this AI image editing tool.
Topaz Photo AI Pricing
Topaz Photo AI maintains a simple pricing structure. Each license, for $199, is allocated to one device. This includes all the features and image quality apps (Denoise AI, Gigapixel AI, Sharpen AI) in one platform and one year of unlimited upgrades. You’ll be eligible for a discount if you’re a returning customer who has previously purchased Gigapixel AI, Sharpen AI, or DeNoise AI individually.
You can still purchase individual apps if you like: Denoise AI for $79, Gigapixel for $99, and Sharpen AI for $79. Each of them includes one year of unlimited upgrades. However, for the value you get for all three apps in Topaz Photo AI, it hardly seems worth it to buy a single app, especially if you are looking for the best results.
The payment process is seamless with PayPal, credit cards, or Google Pay as accepted payment methods, whether you’re buying or renewing a license.
In addition to its full-license product, Topaz also offers a free trial of its Topaz Photo AI software. This lets you fully explore and scrutinize the product’s features before purchasing. However, it’s worth noting that you won’t be able to export your final work until you obtain a license key.
Pros and Cons of Using Topaz AI
One of the advantages of using Topaz is the simplicity of its interface. It is straightforward to see where your adjustments originate, what effect you’ve utilized, and the extent of their application. The Autopilot feature is a great tool for those unfamiliar with photo editing to appreciate. Moreover, Topaz AI allows you to export your work in myriad ways, enabling you to use your edited photos where you think fit. Additionally, as its main focus is photo editing, Topaz AI is a tool that hones in on what it does best. It gives you all the features you could think of when enhancing photos for your professional or personal life.
Conversely, the limitation of this image enhancer is also one of its disadvantages; it only handles photo editing. While competitors like Photoshop let you create images, edit photos, and form animated GIFs, Topaz AI exclusively works on photo enhancement. Nevertheless, compared to a closer competitor like Lightroom, Topaz AI has the advantage of using AI. Being AI-powered, Topaz cuts out much of the manual labor required to work with complex programs like Lightroom, Capture One, and others in the field.
Let’s assess the positives and negatives of this software. That way, we can determine if it genuinely stands among the best AI image enhancers available.
| Areas of Concern | Pros | Cons |
|---|---|---|
| AI Models Used | Provides a number of AI models that can be used depending on the feature in use | Choosing different AI models could provide adverse results or confusion for beginners |
| Time Investment | Allows you to save time with AI-powered image enhancement features | AI can remove the nuance that comes with photo editting, skipping fine details that are noticed by human editors |
| Results | Provides high-quality results for noise reduction, upscaling and image sharpening | Depending on the settings uses, you run the risk of creating over-processed images |
| User Interface | A very easy-to-use interface with effective tools that both beginners and professionals will appreciate | Could provide a learning curve to those who are unfamiliar with professional grade photo editing studios and software |
| Features | The agile list of features that Topaz has effectively optimize images and give you many options and settings to edit your images | Features are limited to photo editing only; photo manipulation or creation are not provided |
| Support | Provides live chat as well as a thorough online documentation | Documentation misses certain key explaination and examples for features like Preserve Text feature |
| Pricing Model | One-time fee, no recurring fees included | Free trial doesn't let you export edits |
Conclusion
Topaz Photo AI fundamentally utilizes AI to enhance the realm of photo editing. Although it’s a tool concentrated solely on photo enhancement and upscaling, it makes a valuable addition to every photo editor’s array of tools. Its compatibility with other photo editing and image creation tools makes it more beneficial, helping to shape a comprehensive photo editor. Topaz Photo AI makes a worthy choice for those considering incorporating an AI-powered image improvement tool into their studio.
If you’re looking for more AI photo enhancers or AI-powered tools for your photography or content creation project, check out our list of the best tools for your business.


Hi , I had Topaz for a few months and I am not convinced about the results there is times when the results are very bad .
Thank you.