

Last week we introduced Divi 2.4, the biggest upgrade in Divi history and a giant leap forward for our most popular WordPress theme. There are so many great features to explore in this update that it was hard to describe them all on the release post, which is why we have decided to do a 2-week series of informational blog posts that will aim to teach you how to take full advantage of Divi 2.4 and its new options. In part ten of this series, I’m going to explore the new Custom CSS options and how you can use them alongside the Divi Library in lieu of adding custom css with a child theme.
- 1 The All New Custom CSS Tabs in Divi 2.4
- 2 Section & Row Custom CSS Options
- 3 Use Pseudo Elements to Add a Section Divider
- 4 Style The Section Container Via the “Main Element” Field
- 5 Custom Row CSS
- 6 Custom Module CSS Gives You More Control Than Ever Before
- 7 Create Rounded Blurb Images with CSS
- 8 Add Custom Borders To Any Module with Custom CSS
- 9 Use CSS Filters On Any Module!
- 10 Using Custom Module CSS With The Divi Library To Decrease Development Time
- 11 A Step By Step Example
- 12 All of The Above Without Ever Leaving Divi
The All New Custom CSS Tabs in Divi 2.4
Sections, Rows, & Modules all have their very own Custom CSS tabs in the Divi Builder. This lets you add custom css to your page and even more specifically, directly to individual elements on the page. There is nothing wrong with doing this via a child theme or within the Elegant Themes ePanel, but you might find yourself using those methods far less with these new features at your fingertips.
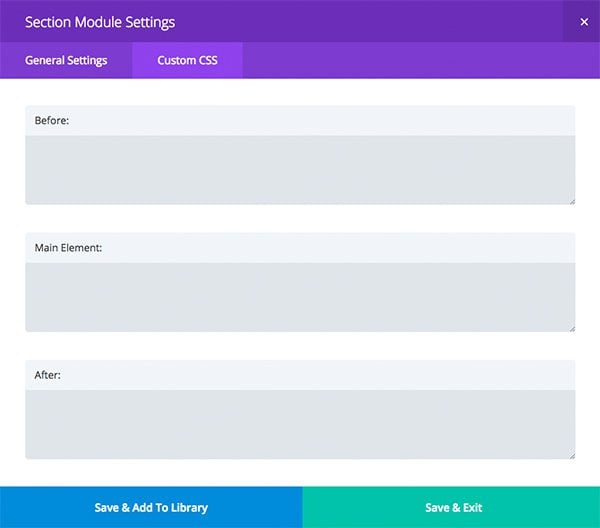
Section & Row Custom CSS Options
Sections and Rows let you define custom css for the main element, which is the whole section or row element in the html, and both the :after and :before pseudo elements. Check out a few examples below.
Use Pseudo Elements to Add a Section Divider
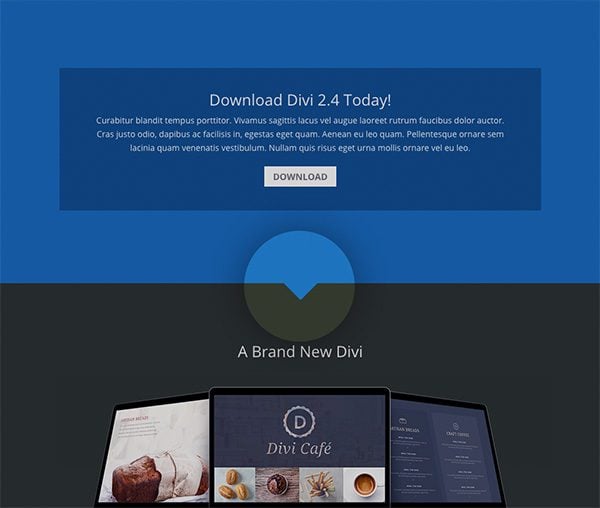
Ive added CSS to the section’s After field to create a carrot that points to the next section. This element is made from a square shape that is the same color of the section background color, and then rotated 45%.
display: block;
position: absolute;
content: '';
width: 40px;
height: 40px;
bottom: -20px;
left: 50%;
margin-left: -20px;
background-color: #1e73be;
-ms-transform: rotate(45deg);
-webkit-transform: rotate(45deg);
transform: rotate(45deg);
z-index: 1;
Style The Section Container Via the “Main Element” Field
Here, I’ve added a transparent inset shadow to give my section a nice transparent border effect.
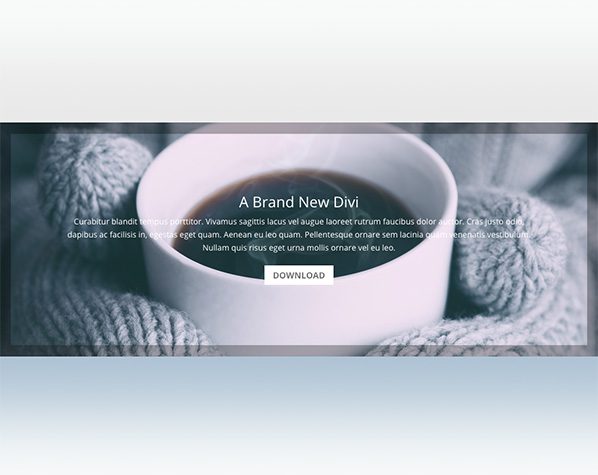
-webkit-box-shadow: inset 0px 0px 0px 20px rgba(0, 0, 0, 0.3);
-moz-box-shadow: inset 0px 0px 0px 20px rgba(0, 0, 0, 0.3);
box-shadow: inset 0px 0px 0px 20px rgba(0, 0, 0, 0.3);
Custom Row CSS
Adding custom css to rows will style the container that holds its columns and modules. I’ve added a simple border and some custom padding to add a nice box around the contents of the row.
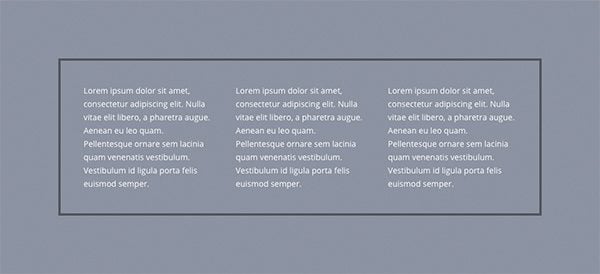
border: 4px solid rgba(0,0,0,0.4);
padding: 40px;
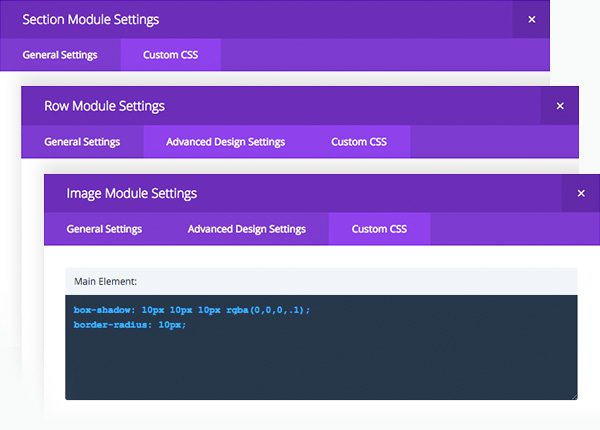
Custom Module CSS Gives You More Control Than Ever Before
In addition to being able to add custom css to a module’s outer container and its pseudo elements, you can also add styles to individual pieces of a module. I will go over a few examples below and even show you how the Divi Library can take these examples to a whole new level of awesome.
Create Rounded Blurb Images with CSS
This CSS gives the blurb image a large border radius, effectively constraining your images to perfect circles if your images happen to be perfect squares to begin with. I’ve even added a bit of spacing between the blurb image and title by increasing the image’s bottom margin.
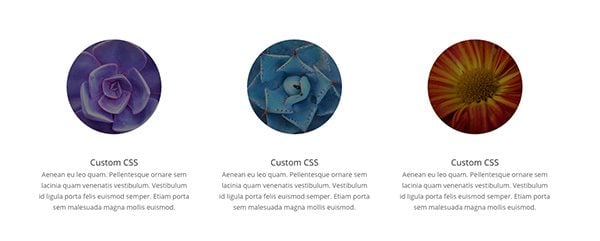
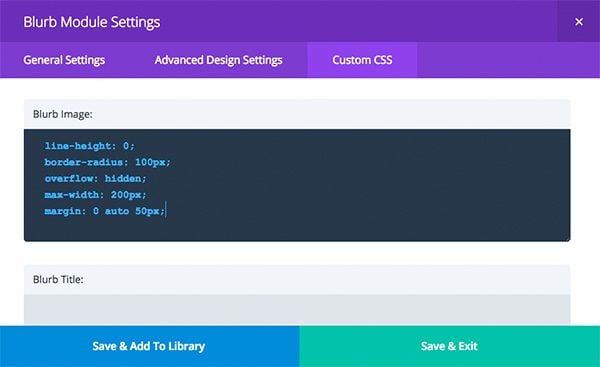
line-height: 0;
-webkit-border-radius: 100px;
-moz-border-radius: 100px;
border-radius: 100px;
overflow: hidden;
xmax-width: 200px;
margin: 0 auto 50px;
Add Custom Borders To Any Module with Custom CSS
Here, I’ve simply added a top double-border and some custom padding to text modules. This is an easy way to bring attention to a block of text.
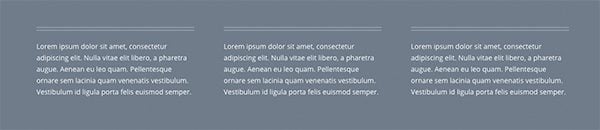
border-top: 4px double rgba(255,255,255,0.5);
padding-top: 20px;
Use CSS Filters On Any Module!
CSS filters work great for things like images, team member portraits, and even Google Maps.
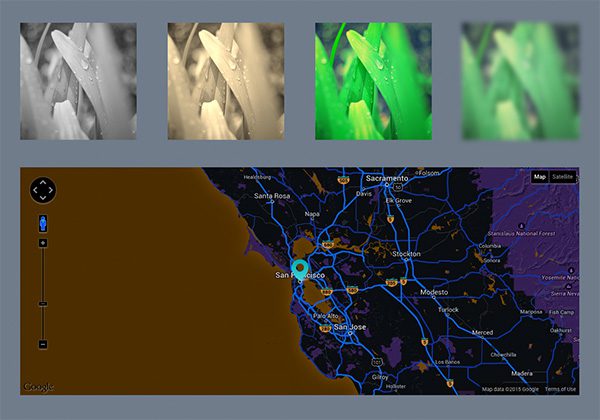
From left to right, the css filters are as follows: Grayscale, Sepia, Saturation, Blur, Invert. You can change the values in the parentheses to achieve different levels of these effects. Simply add any of the styles below to the Main Element CSS field of any module.
Grayscale
-webkit-filter: grayscale(1);
filter: grayscale(1);
Sepia
-webkit-filter: sepia(1);
filter: sepia(1);
Saturate
-webkit-filter: saturate(2);
filter: saturate(2);
Blur
-webkit-filter: blur(5px);
filter: blur(5px);
Invert
-webkit-filter: invert(1);
filter: invert(1);
Using Custom Module CSS With The Divi Library To Decrease Development Time
If you achieve an awesome effect with custom css, such as the grayscale filter or circular blurb image, and you think you might use it again, simply save it to your Divi Library for later use. If the custom css is the only thing you want to save, choose to only save the Custom CSS Tab when you are prompted to do so.
Anytime you want to add a module with that effect, just add it to the page from your library, and no matter what content you place in that module, your custom css will still take effect. If you think you might even edit that saved css down the road, you can set it up as a global module. Then, any time you need to edit the CSS, you only have to do it once.
A Step By Step Example
Say I added some custom css to make the portrait in a testimonial module grayscale. Now I want this effect to take place across my entire website anytime I add a new testimonial module to my page. Here is how I would set this up using Custom CSS and the Divi Library.
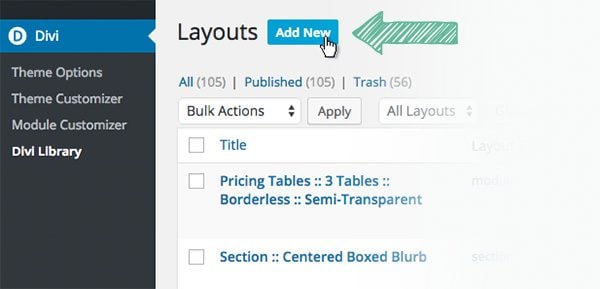
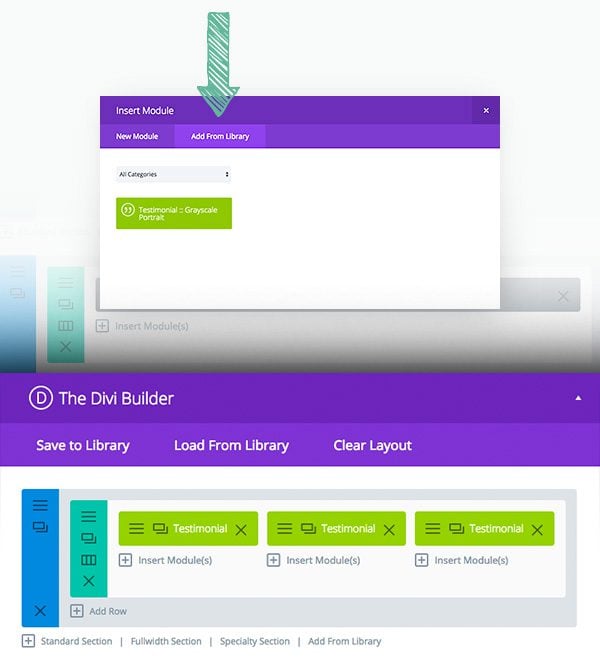
Step 1. Create A Testimonial Module
This can be done from right inside your Divi Library or on a real page. Either will do. I am going to do this via the Divi Library because I haven’t started building my site yet. After navigating the the Divi Admin Tab, select the Divi Library link and choose to Add New.
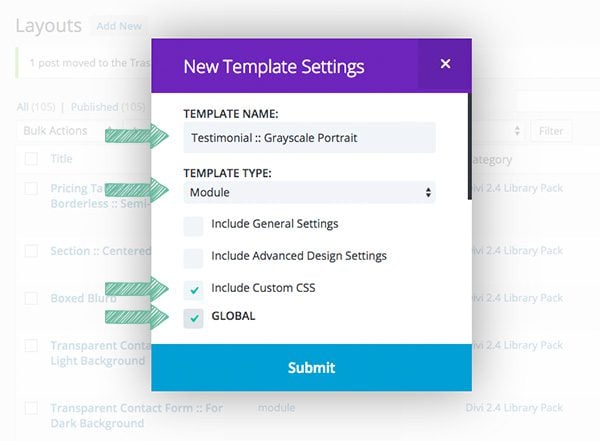
Choose Your Settings – I named my module appropriately, told the library that I want to make a module, that I only want to include its Custom CSS tab, and I want it to be Global (in case I want to update my testimonial portrait filter in the future).
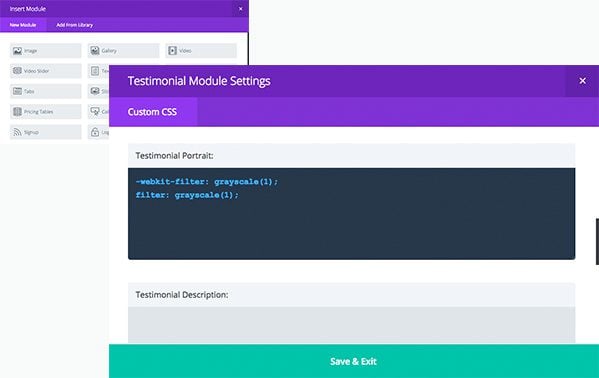
Submit & Configure – After submitting I am prompted to choose a module (I chose a testimonial module) and then I am immediately taken to the CSS tab since it is the only tab I chose to sync. After I place my css filter into the Testimonial Portrait field, I can Save and update my new library item.
Step 2. Add The Saved Library Element into a Layout
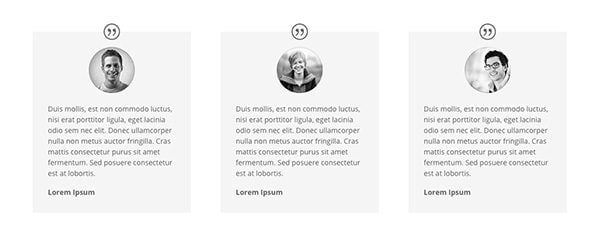
Since I created this module from within the Divi Library, I need to make a new page for my testimonials. I want to add three testimonials so I added my new global module into each column of a 3 column row.
Step 3. Save and Preview Your Awesome Work!
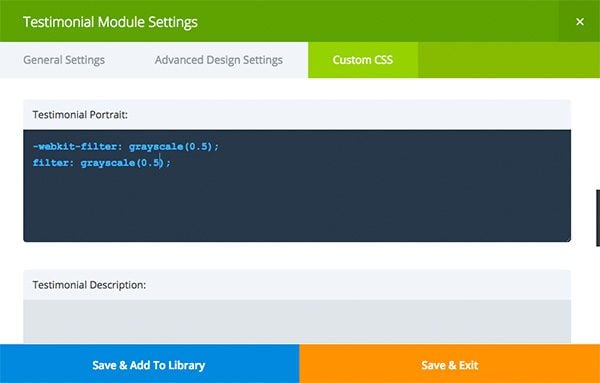
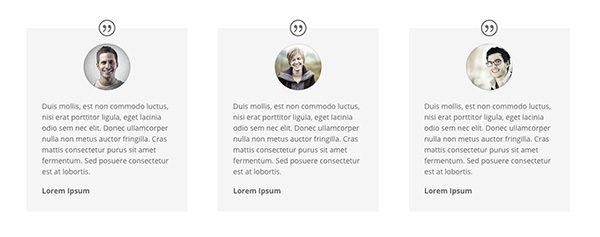
Reviewing & Modifying – After looking at these, I think that the images need a little more color, so I am going to decrease the filter level to 50%. All I have to do is open the settings of a testimonial module and change my filter amount to 0.5. Note that the CSS Tab is green, telling me that it is the only global tab in this module.
After saving the module and updating my page, I can see that all instances of my global testimonial module have portrait images with a 50% grayscale filter. Beautiful.
All of The Above Without Ever Leaving Divi
It’s hard to believe we just did all of that with native Divi tools. This is only one example of how you can use Custom CSS and the Divi Library to improve your workflow. Not to mention being able to export your Divi Library for use on other websites.


Hello im trying to use a display: block for the url on the Blurb module. This does not seem to work.
I have made the blurb in a box shape and need the whole box to have the hyperlink. The above method does not work. Can anyone please advise.
Hi, a user just spotted a mistake in the above code to make rounded blurb images; where it says:
line-height: 0;
-webkit-border-radius: 100px;
-moz-border-radius: 100px;
border-radius: 100px;
overflow: hidden;
xmax-width: 200px;
margin: 0 auto 50px;
It should say:
line-height: 0;
-webkit-border-radius: 100px;
-moz-border-radius: 100px;
border-radius: 100%;
overflow: hidden;
max-width: 200px;
margin: 0 auto 50px;
Thought I should let you know 😉
Oops! forgot to correct the other px to % LOL
This is just what I want, but is there a way to remove filter on hover? Can someone help me with the code?
thanks.
hello
just a question why section background on option to repeat !
and how to repeat it !?
I REALLY Wish there was a www. with a huge list of raw CSS code I code just copy and paste into my web projects with out having to learn a lot os CSS.
Like K.I.S.S. – copy and paste simple
Any ideas for a link to a list of raw CSS awesome code?
To make images circular in a blurb there is an error in the code. ‘xmax-width: 200px;’ change this to ‘max-width: 200px;’ otherwise the pictures will not show up as a perfect circle.
The images in this post no longer display
I was looking for more info on how the custom CSS tab worked and I hit the mother lode. 🙂 I incorporated the carrot and shadowbox in a divider that once was an image created in Photoshop. Now my client doesn’t has to be a graphic designer.
NONE of the images are showing. I need this, please. thanks
You are right Gary Harding. I cannot see the images either…
Yes, no images, plz fix 🙂
I had the same problem… the image files are http and the rest of the site is https. Just remove the “s” from site URL and the page loads fine.
Wow. This wordpress theme is very impressive. and I will use it on my new website
Does anyone know how to add custom css so that I can make the logo have an absolute position? Ie so it is placed over the header and hangs down into the body of the page?
You know if you’re going to allow comments (which BTW I notice lately on posts about features yo have stopped)..it would be nice if the AUTHOR of said post or someone from ET would reply to all the real questions PAYING customers posted in here.
And befor you say go to the support forums, save your breath..all you have is the same 9 or 10 people in there spewing the same company line that everything that doesn’t work is the customer’s fault and that any request involving CSS is a customization that is beyond support role..yet if DIVI just provided the settings on the admin side for all of the things it promises it can do “without the need for code” as you claim…. then there would be no problem.
Guess you’re too busy making Divi Podcasts to have time to improve your product and back up your claims.
I have tried copy/paste these codes in several areas and none have made any changes. It seems like assigning a border to a picture should be very simple. I have no idea what I could be missing here.
Hey Michael, sorry about that. The best place for us to help you out with that will be in the support forums. Just log into your member’s area and click on support.
Great post, thank you. I have successfully managed to add a border to one of my modules using CSS following the instructions in the post.
But does anyone know how I can stop an image module within a page from showing on mobiles?
The image looks fine on desktops but the responsive layout puts it in the wrong place on mobiles so it would be better if it wasn’t showing at all.
Have googled the problem and tried several suggestions but none of them are working.
Any help would be much appreciated as I’m very new to this.
Hi,
I’m trying to remove the ‘Divi’ logo that appears on top left of my home page, (and also my ‘About’ page). Where can you edit this in CSS? Thanks!
Ruvini.
No need to edit the CSS just to add a logo. Go to theme options and you can simply upload the image file you’d like to replace the Divi Logo with.
I love the CSS idea. I wish it worked. I’ve built 3 websites with Divi and the CSS portion only works on about 1 in 20 of the implementations. The same code string that works in the Chrome inspect window doesn’t work in the Custom CSS window.
Drop the code into the WP CSS panel and it works immediately.
can you add shortcode to the before and after to use other plugins like hide this?
It would be goof to have an option to filter your blog posts within the module, say by post category, with ajax, so that the posts don’t reload on another page, much like the woo commerce nav menu
I strongly agree. Have you figured out how to filter by category John?
I have a question, how can i configure my pages to post the images i want when i share it on facebook, it post the content with an image of other content…
Is it possible to change the background of a specific page or post via css? This is different than the theme customization since I am trying to have different background(s) based on the page/post – so post A to have different background than page B.
Any thoughts / tips ?
I’m not understanding how the “individual css fields” is any easier than just updating a child theme. With a child theme, everything is centralized, organized and in ONE location.
Not only do I feel restricted to with the use of DIVI now. But now you are trying to elimate the need for child themes? What happens when a clients messes up a page? What happens when a site goes corrupt? A child theme is pretty solid in that it’s not really going anywhere (and you can restore a backup).
Don’t get me wrong, I greatly appreciate ALOT of the new features. I LOVE DIVI. But shouldn’t we be addressing those developers who have ALREADY used child themes and find them breaking all clients sites with an update. Shouldn’t we address the need for compatible child themes with this new divi update as some developers are going to go beyond in design and php to develop a site and like to keep things organized…and centralized.
Am I alone on this or what?
Hi,
This is great. Most of examples shown I actually used using child theme creating.
Only thing I was struggling with is to style map pointer. Is there such possibility?
Cheers
Hi,
Awesome stuff, but I have 1 question: I tried the sepia coloring on a blurb row, and the funny part is that 2 out of 3 got the sepia, the other one did not. I made one, and copied them, didnt work. I made the first one a library item, didnt work either. What goes wrong? I can’t imagine this only works on testimonials?
Thanks,
Helen
Hi,
Does anyone know how I can set the color of links in the body text? It was easy in Divi_2_3 but it seems to have been left out of the upgrade.
I’m assuming it’s to be done via CSS. I’ve spent ages trying different CSS in the modules and in the ePanel but no luck.
I want the active link color to be #0274BE and the hover color to be #ff9900.
I’d be very grateful for any help – Dummies Guide to… 🙂
Many thanks.
You should be able to set the active link color by following Divi > Theme Customizer > General Settings > Typography > and changing the Body Link Color to #0274BE.
Then add the following to your Divi > Theme options > ePanel > Custom CSS:
a:hover { color: #ff9900; /* link hover */ }
I’m not a programmer and I don’t understand CSS but I just copied and pasted the CSS code to add a shadow border around my call to action. It worked fisrt time and was so easy. Thanks for some great articles in this Divi series. I’m so pleased that I switched to using the Divi theme.
Wow, the css part of this post is absolutely great !
Thanks. 🙂
This is great for people who understand all of the coding. And this kind of post really helps so we can see how it can be used.
I know some CSS and I’ve often used it backwards. What I mean by that is, instead of understanding the code and knowing how to write it from scratch, I know enough to go in and tweak stuff to make some cosmetic changes. The hardest part of this, often, is determining what to change, so that you change just what you want to change without making lots of other unexpected changes.
I think a set of tutorials and a code library would be a great addition to this — if you’re looking for a way to get people to upgrade from the Personal to the Developer level, this would be a great thing to add.
This is great, very useful! Would also love to see more examples – the border elements especially. These little touches can make such a big difference. Thanks again.
This is great. Thanks.
Nice these CSS examples. I would like to see more examples. For instance CSS examples for the image module. Actually for every module would be very nice.
Great article and wonderful to see the integration of CSS so closely linked in a way that makes it easier for us non-programmer types.
I assume that references like below inform the different browser / screen sizes?
-webkit-border-radius: 100px;
-moz-border-radius: 100px;
border-radius: 100px;
Different browsers, but not different screen sizes. 🙂
Is something like this here also possible with Divi?
http://tympanus.net/Tutorials/SlopyElements/
Every day, it just gets better and better. Thank you Kenny and ET!
Another great post, congrats!!!
Great tutorial!! Just wondering if there’s a way to do a media query in these sections or if you can only do that in the custom CSS panel.
Did they ever answer this? (I have the same question)
I’m not sure. This may be a question best asked in the forum.
A bundle of awesomeness that is! 🙂 Thanks Kenny for yet another useful guide!
I still dont understand what the “before” “main” and “after” are for in the CSS. I expected to find a brief explanation here but didnt see one.
Can someone please explain. Thanks
@ Badgeroi
W3schools give a lot of how to’s explainations on html and CSS.
http://www.w3schools.com/css/css_pseudo_elements.asp
Hi Badgeroi,
Before and After pseudo elements are there to be used to as starting and finishing points of any given section, row or module. They can be used to add various kind of styling by using CSS and content: property just like Kenny showcased above by creating that down arrow at the bottom of the section.
Sorry, but that explanation uses concepts this noobie doesn’t get.
+1 I just need an example of code that goes into each of these three boxes.
All I would like to do is round and shadow my images just like the example above, so I did EXACTLY what it says above
I put this in the main element field where my image module is:
border-radius: 30px;
box-shadow: inset 0px 0px 0px 20px rgba(0, 0, 0, 0.3);
This does NOTHING to my image… 🙁 Please help!
I’ve been a member for years but have been using another theme/framework for the client sites we build. I recently had a client ask for a Divi based site so I’ve been digging into it and I am really impressed.
I think Divi will become a major part of our business.
This customization part should take another 2days because these are the core headup we really need as Divi2.4 is now to me a case study since I’ve been wrestling to replicate the stack layout of grid for one of the sample site showcased…
Thank you Kenny.
Cheers!
Fantastic. Love these help posts!
Excellent learning tutorial. Well done. Will Elegant Themes be creating an accessible css library where us novice can use and learn the css structure needed to create and style better? That would be a really helpful resource for a beginner. Are you aware of any other similar resource libraries that we can use and learn from? Thanks. -M
I would recommend you learn from the best at this site:https://css-tricks.com/snippets/
There are so many examples on this site that if you google up how to do a specific thing in CSS you most likely get the answer from this site.
Jaime,
I looked at the css-tricks.com site and I see there are a lot of examples. Excuse a noobie’s question – but for every example there they show both html and css. Do we need both pieces of code, and if so where does the html go?
e.g. https://css-tricks.com/snippets/css/corner-ribbon/
Many thanks!
The example you took (link in your comments) will not work as there are multiple classes (6) in the CSS part.
What you need to put in the Custom CSS Tab is the content (the part between { } brackets) from ONE of those classes (but you need the 6 to achieve the rendering).
In addition, you’ll need the html part to achieve the layout of that ribbon….
To achieve what you want you(ll need to put ALL the classes in the custom CSS from the ePanel and use the CODE module on your page to copy the html as shown in the example (and replace “NEWS” with your text).
In addition, I strongly advise to add a prefix to all the classes as some of those are quiet standard and could potentially be used by plugins.
Ex : all instances of .wrapper should be prefixed with .evelyn-wrapper (you can replace evelyn with your own prefix).
Anyway.. those are already some more advanced techniques and I strongly recommend to first learn basic html and css before doing this (as I did actually).
Evelyn, I’m not a coding expert by any means, but I believe the HTML portion of the coding is taken care of by Divi. The HTML part tells it what part of the code the CSS applies to (which is what Divi now does by providing these spots where we can add the CSS code). So, all you need is the CSS.
Someone correct me if I’m wrong about that.
Beelissa,
Thank you, that makes sense! I appreciate you taking the time to reply!
Evelyn
How do I target a specific element within a module using the Custom CSS tab? For example, if I want to add a shadow to just the H2 element in a text module?
I know how to do this in epanel… but can’t figure out how to do this in the Custom CSS tab.
You can’t !
The specific CSS created in the Custom CSS Tab is targeted to be rendered in a class .et_pb_text_# (for the “Text” module and where # is a number auto generated (I guess)).
To achieve what you want to do… you would have to build some hierarchy like
.et_pb_text_# h2 {your CSS trick;}
and that is not possible in the CSS tab.
You would then still use epanel (or a custom.css in a child theme) to add a class like :
.myccs-h2-shadow h2 {
text-shadow: 2px 5px 9px rgba(99, 99, 99, 1);
}
and put myccs-h2-shadow (without the starting point and without the h2) in the CSS Class field (general settings Tab) of :
– a specific module to apply the created CSS to… that module only
– a specific row to apply it to all the modules of that row
– a section to apply it to all rows and modules of that section
If my understanding is correct (new Divi features) you may also create a new module layout based on the “Text” one (containing the class as specified above) and save it in the Global Library to make it available “on demand” when creating new pages and posts.
Voilà …
Eric
Can you provide a CSS rule that will force sliders to conform to a fixed aspect ratio, say 3×2 or 16×9? I ask because the height of sliders seems to be determined by the largest amount of text in a given slide. But as a photographer, I don’t want any text at all.
I’ve gotten around this with a kludge of adding empty carriage returns (which often vanish) or small periods. But given all the control that Divi 2.4 affords, it doesn’t make sense that I cannot control the window in which my images will display.
I absolute agree that this is a problem. I searched for documentation on this subject and sort of gave up the hole slider. Maybe ET need a photographer in the staff to understand the need for showing pictures just as they are, and pull the photographers name from IPTC or other fields and add them under the photo.
+1
+1 This seems so incredibly basic I’m astounded we all have to keep bringing it up.
+1
+1
Hi Jim,
You can follow these steps:
1- go to module customizer
2- goto full width slider
3- change the top and bottom padding to a higher value.
For me that did work with 16:9 pics.
Be aware that I used the full width slider module.
Hope this works for you too!
Kind regards,
Joffry
+1 when showing artist works they dont want text on their images either. Maybe someone can help solve this riddle. I would like to have outside text boxes linked to its partnered image in a slider. So when the image changes so does the descriptive text linked to that image. Any help out there would be most appreciated. Thanks. -M
Another awesome post. Thanks!!
Really nice post. Its a really great idea to propose custom css for module.
You should create an other post with example of custom css like hover and transition.
Thank you a good job for divi 2.4
great.. needed this post
thanks