")
Fonts play an essential role in the design of your website. They set the tone for the design and overall aesthetic and can either enhance or hinder its look and feel. Once you have chosen the font sets for your website, you’ll need to know how to change them. There are multiple ways to change fonts in WordPress. How you change them depends on a number of factors including what type of theme you use, whether you will require a plugin, or if you plan to add them manually. In this post, we’ll discuss each method and show you how to change fonts in WordPress. Let’s get started.
- 1 What are Web Fonts?
-
2
How to Change Fonts in WordPress (8 Ways)
- 2.1 1. Using the Theme Customizer Options to Change Fonts in WordPress
- 2.2 2. Changing Fonts Using WordPress Full Site Editing
- 2.3 3. Changing WordPress Fonts with the Block Editor
- 2.4 4. Using a Plugin to Change Fonts in WordPress
- 2.5 5. Using the Divi Theme Builder to Change Fonts
- 2.6 6. How to Add a Custom Font in WordPress Manually
- 2.7 7. Adding a New Custom Font in WordPress Full Site Editing Theme
- 2.8 8. Adding a New Custom Font in WordPress Using Divi
-
3
Tips and Best Practices When Changing Fonts in WordPress
- 3.1 Optimize Your Fonts
- 3.2 Choose Good Fonts
- 3.3 Consider Those With Accessibility Concerns
- 3.4 FAQs For Changing Web Fonts in WordPress
- 3.5 How many fonts should I use?
- 3.6 Can I use downloaded fonts in WordPress?
- 3.7 Can I change fonts in the Twenty Twenty-Two theme?
- 3.8 Are there good options to change fonts in WordPress with plugins aside from the one demonstrated in this post?
- 4 Wrapping Things Up
What are Web Fonts?
Web fonts are provided by Google, Adobe, FontSpace, and others. They give you the ability to embed fonts into your website to change the design. Unlike desktop fonts, web fonts are stored in the cloud. When a visitor hits your site, web fonts are pulled in dynamically from the font provider. They are displayed on your website within a matter of seconds when optimized correctly. Web fonts are a quick and easy way to use multiple fonts without having to embed them into your website.
The 4 Web Font Types
Similar to desktop fonts, there are four major font types:
- Serif: Serif fonts are usually only suitable for use on headings because of their embellishments, which are usually located on the top and bottom of each letter.
- Sans Serif: Alternatively, Sans Serif fonts can be used on both headings and body text because they are clean and easy to read.
- Script: Script fonts should generally be used sparingly due to their whimsical appearance.
- Display: Lastly, display fonts are typically bold and chunky fonts, so they should be used in a limited capacity for headings, but never as body text.
Using Web Fonts in WordPress
There are a few ways to use web fonts in WordPress. You can embed them manually, use a plugin, or use your theme’s settings, whether it is a full site editing block theme, a generic WordPress theme, or a theme which uses a theme builder. In most cases, developers will resort to using Google Fonts in WordPress because they are free and easy to integrate.
How to Change Fonts in WordPress (8 Ways)
How you change fonts in WordPress can be achieved in a number of ways. Certain premium themes like Divi have a built-in font manager with Google fonts automatically loaded. Additionally, Divi allows you to enable all Google font subsets in the theme options, in case you want all of them to be included.
In some other themes aside from Divi, you can use the customizer settings to change the theme’s default fonts. Depending on the theme, there could be limited fonts available with this method. If you are using full site editing (FSE) block themes such as Twenty Twenty-Two, you can add them into the theme.json file. Additionally, you can install a font manager plugin, or use the Gutenberg block editor. Lastly, you can manually add them. Let’s take a look at how to change fonts in WordPress using each method.
1. Using the Theme Customizer Options to Change Fonts in WordPress
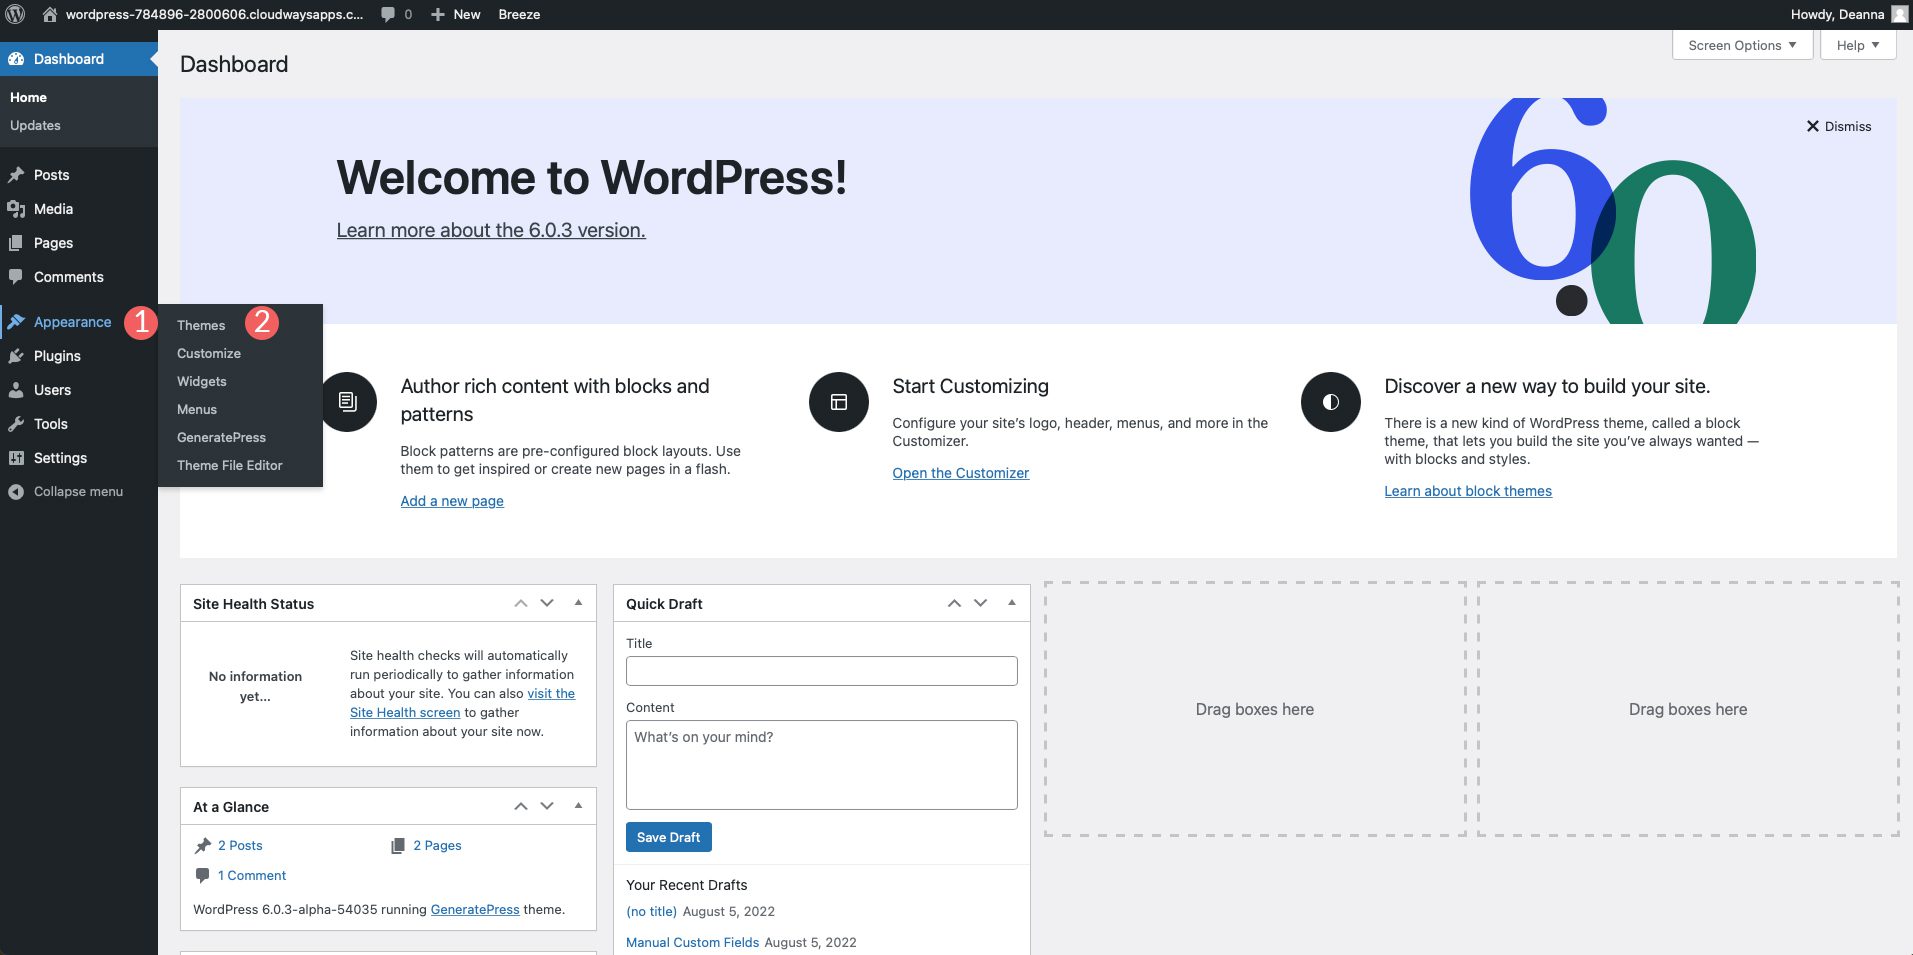
When using the WordPress theme customizer, there are a few options depending on your theme. As an example, we’ll use the Genesis theme to change the default font. Log in to your WordPress panel. Navigate to Appearance > Customize.
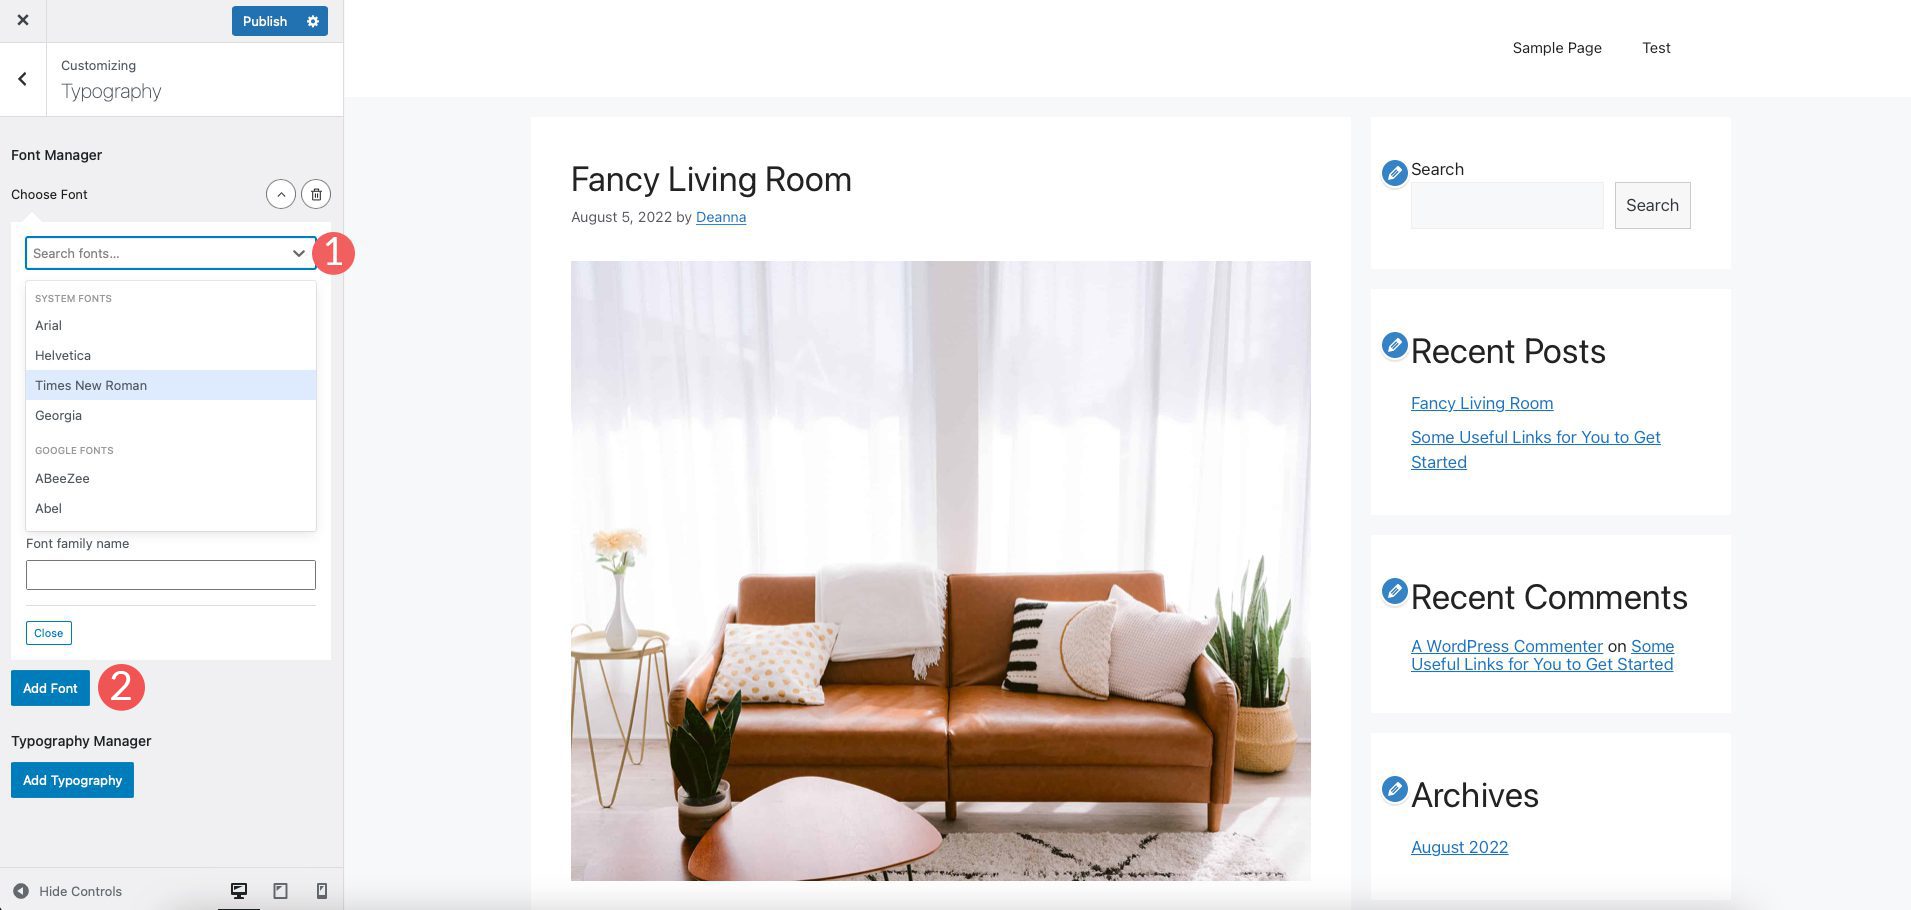
When the customizer screen appears, click on Typography. There will be two options including Font Manager and Add Typography. Under the first option, click to activate the dropdown menu. From there, you can scroll through or search for a specific font to use on your site. Once you chose a font, click the Add Font button to add the font to your site. You can repeat the steps to add additional fonts that can be assigned to certain elements
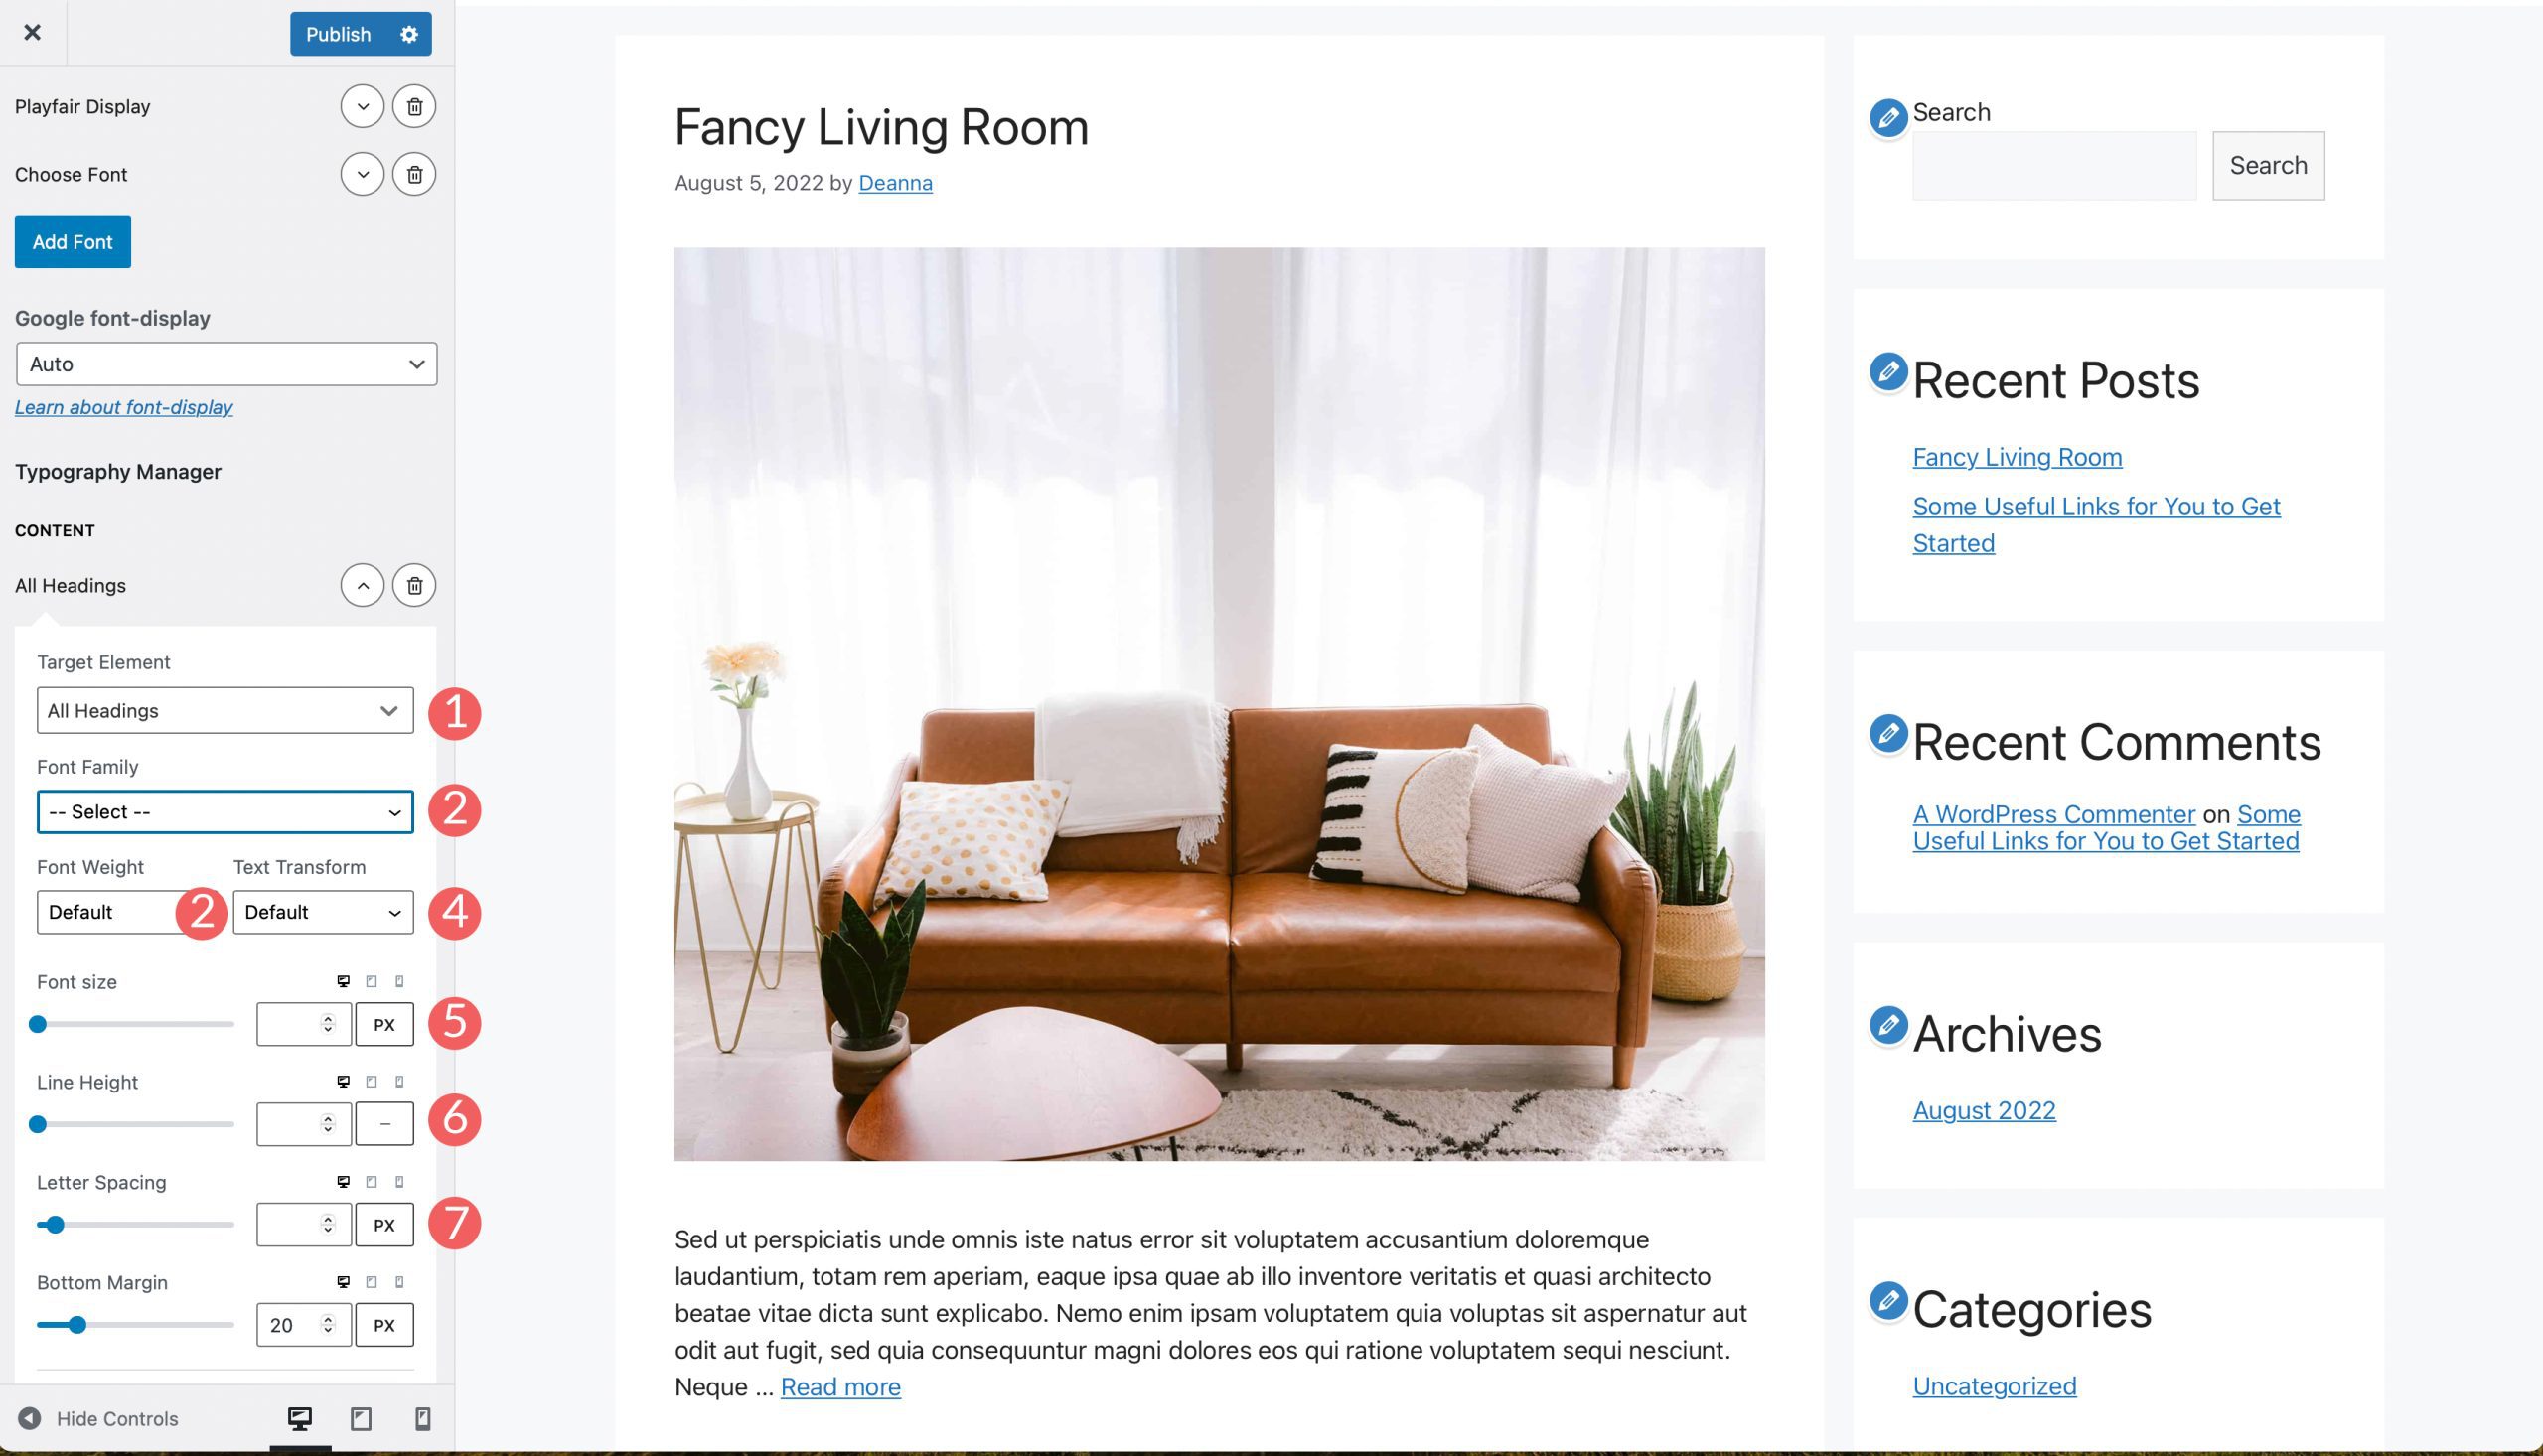
The second option, Typography Manager allows you to assign fonts that have been added to your site to different areas. In our example, you can add them to the body, site title, site description, menu items, headings, and more.
This is where you can change fonts as well. First, select the target element you wish to change the font for. Next, select the font family. Choose the font weight, and any text transformation you wish to apply. Then, choose the font size, weight, line height, and letter spacing. Repeat the process for other elements as you see fit.
2. Changing Fonts Using WordPress Full Site Editing
Most full site editor themes come preloaded with a few fonts to choose from. Themes such as Blockbase, Emulsion, Aino, and Twenty Twenty-Two give you the ability to change fonts in the theme’s editor. For example, we’ll use the Blockbase theme. To change fonts, navigate to Theme > Editor.
Next, click the style icon on the top right side of your screen.
![]()
Next, click the typography section to change the font for your theme.

In our example, you can change the text for your site as well as link text.
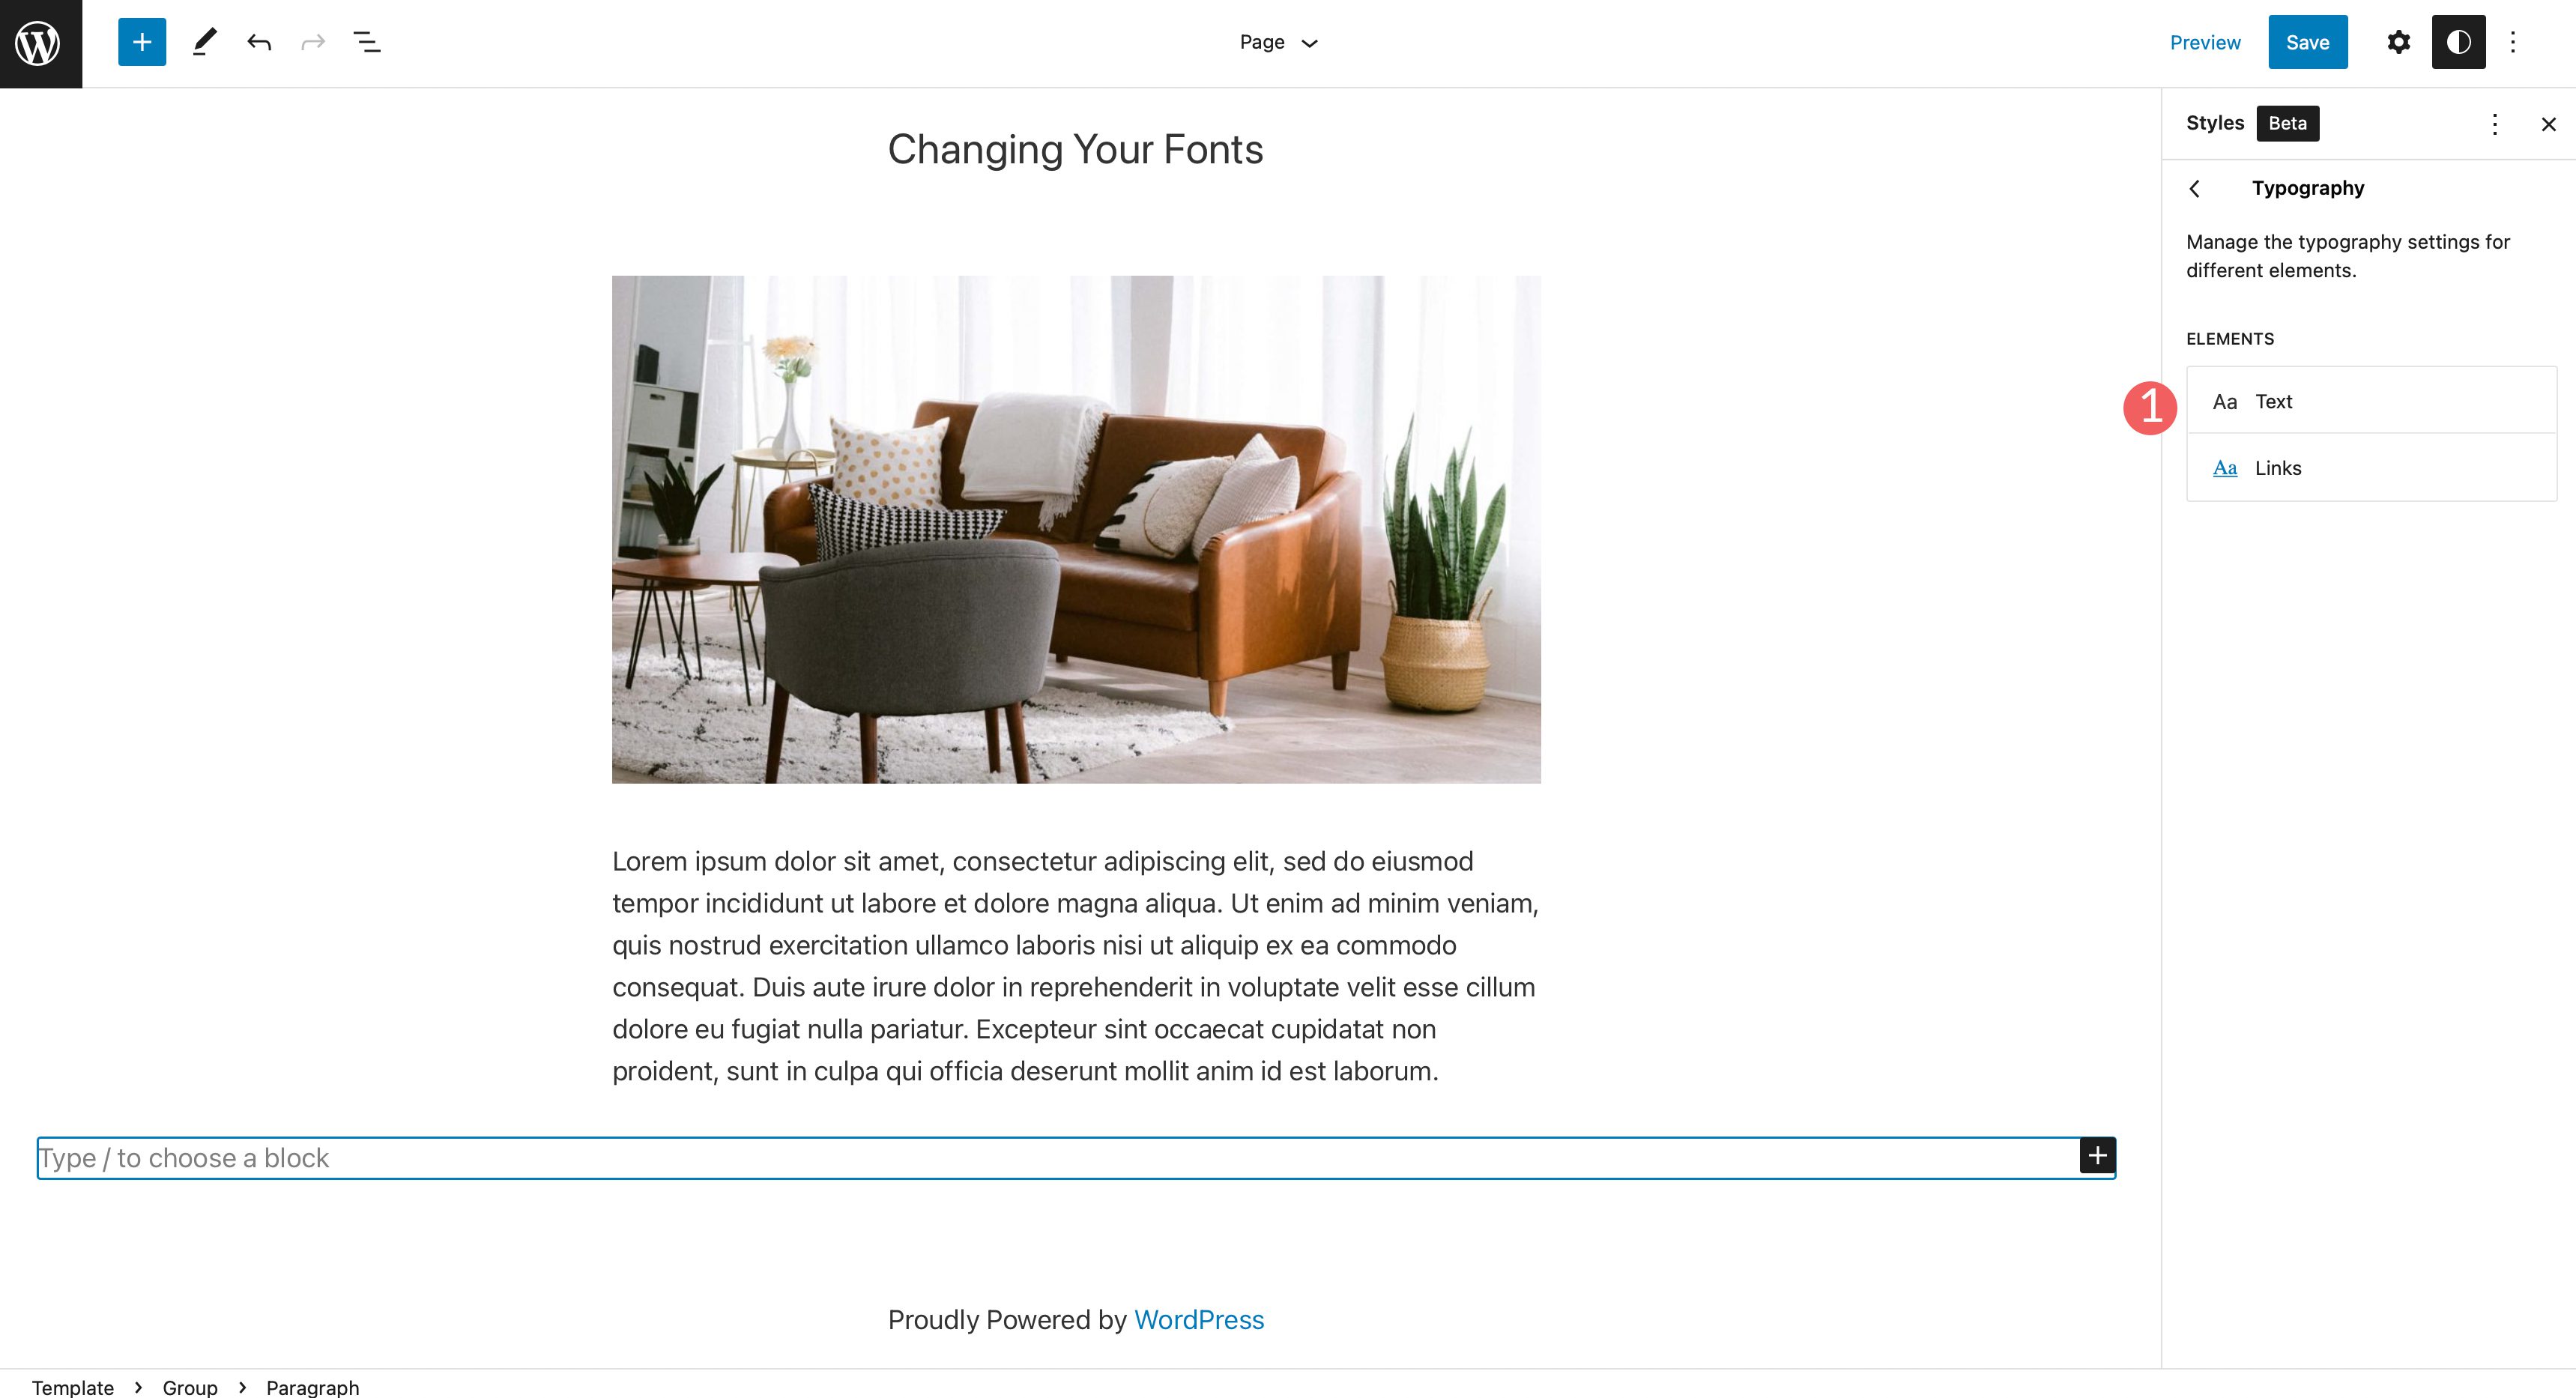
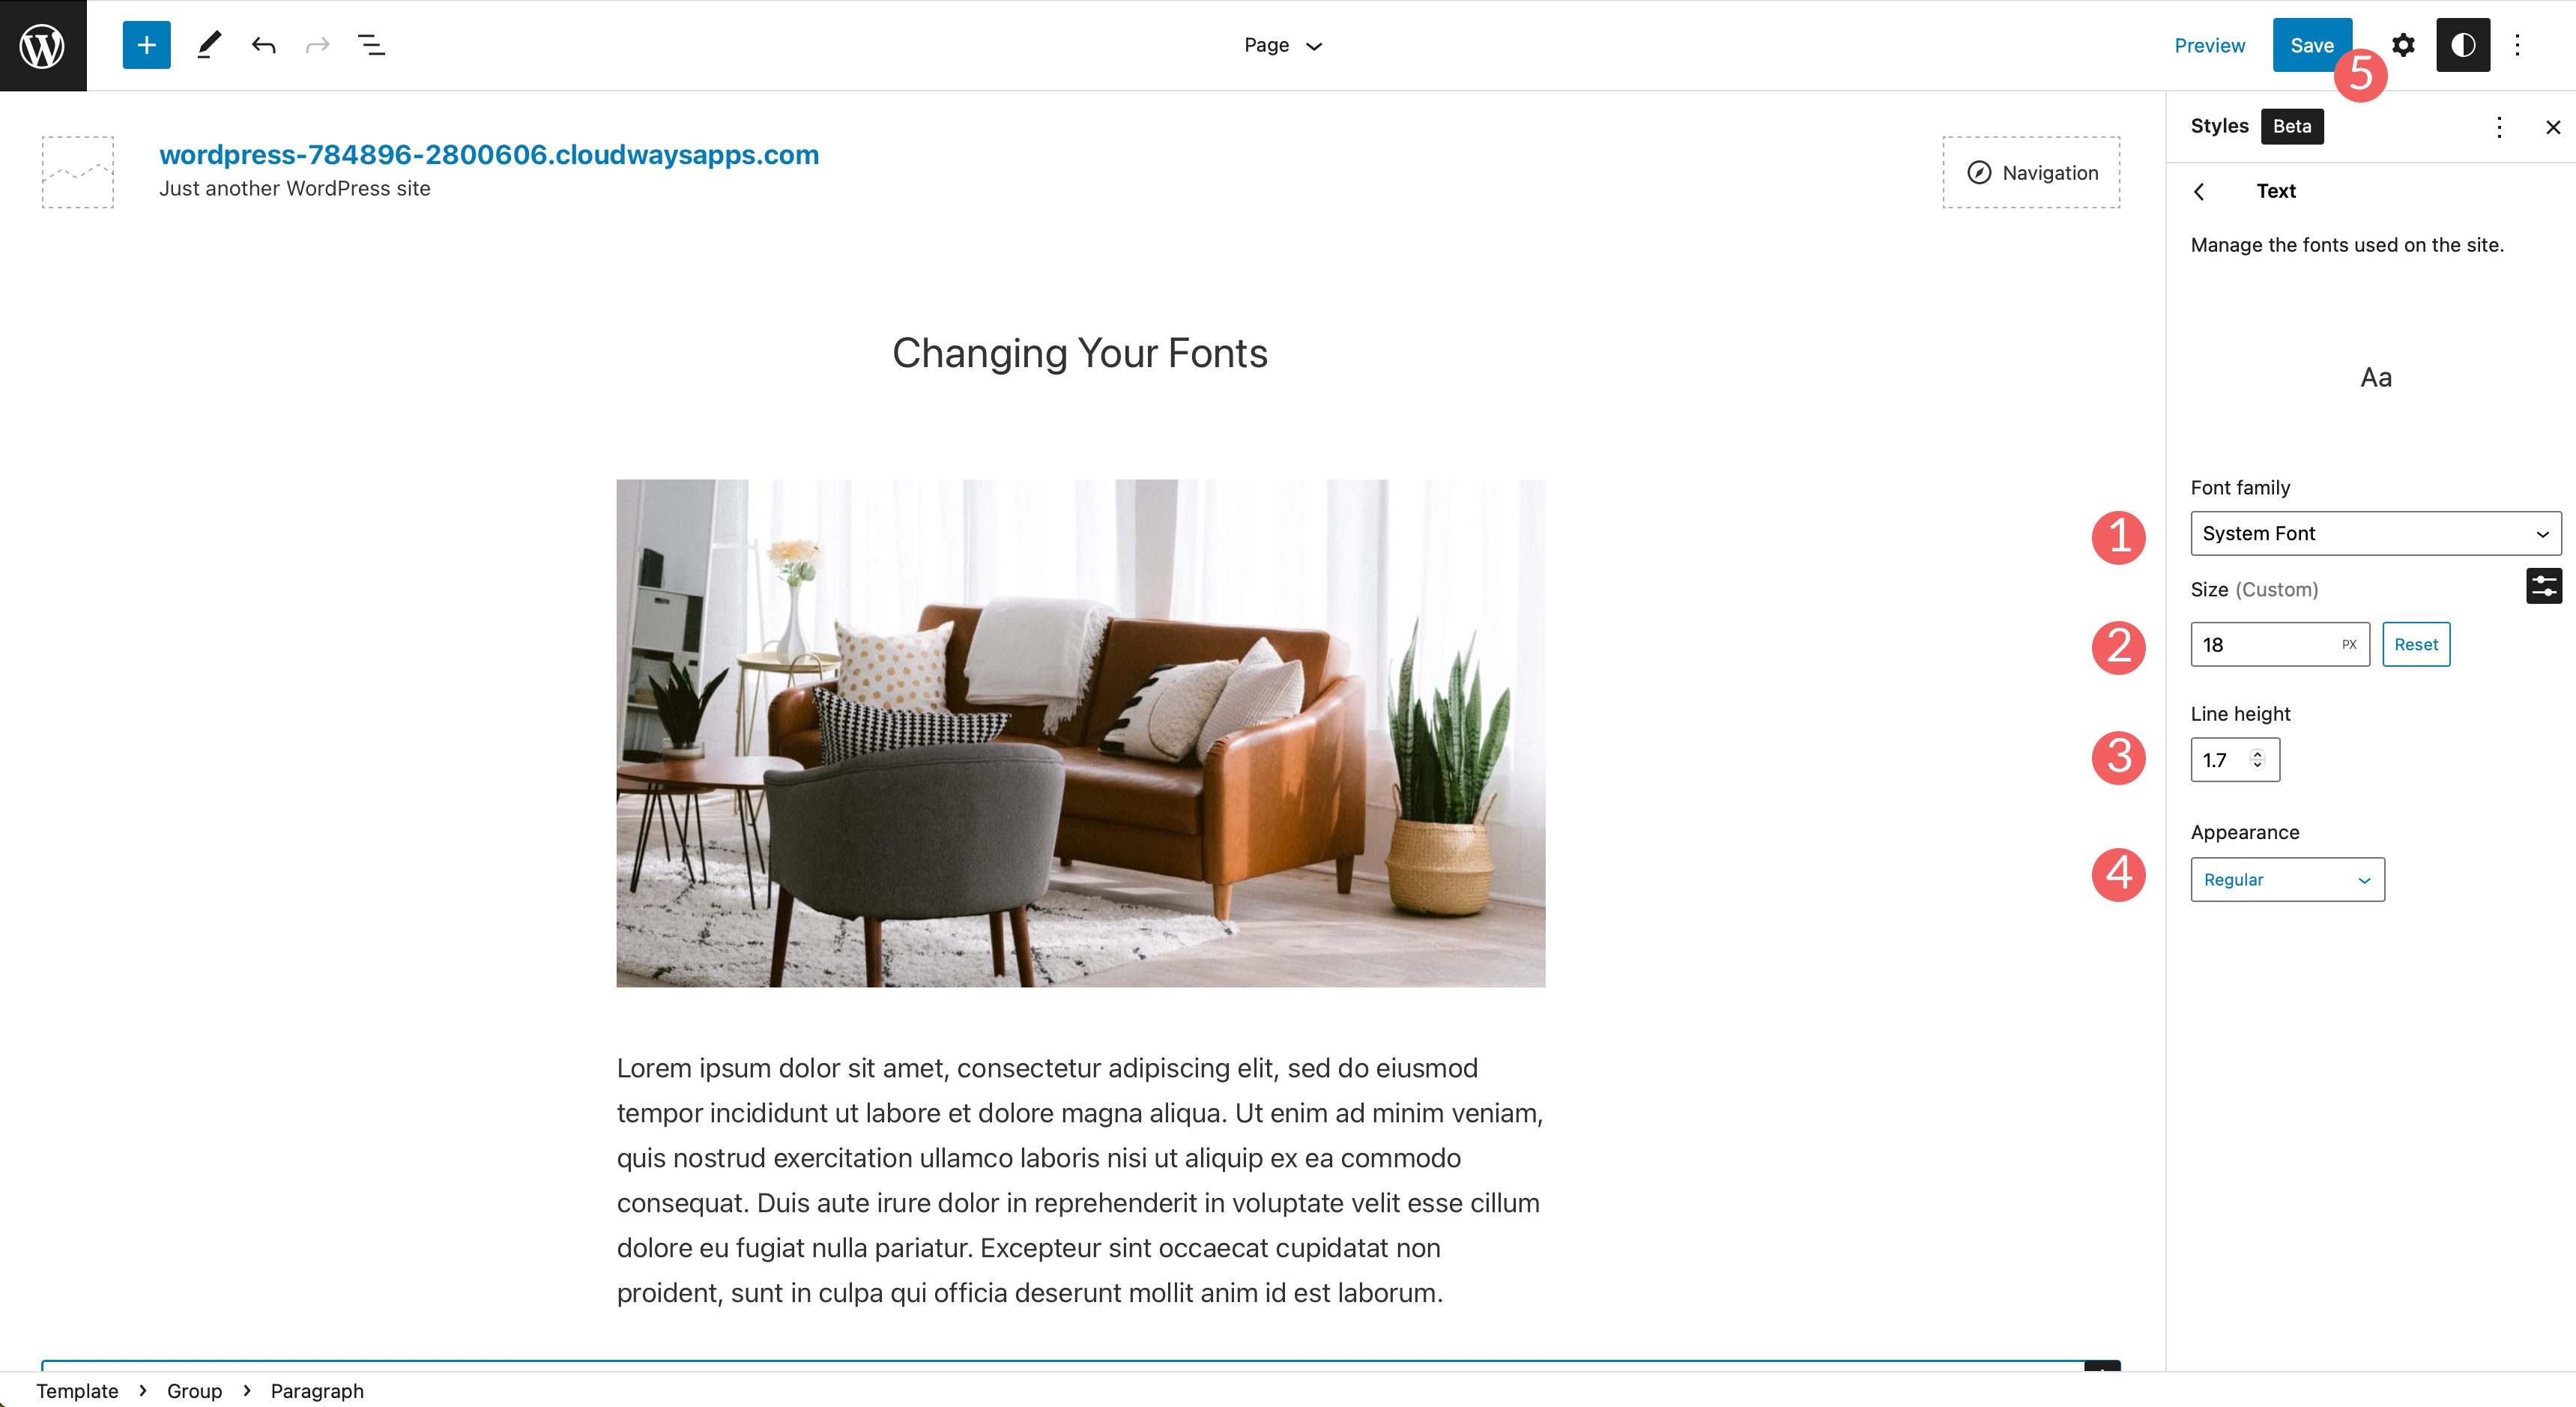
Under font family, click the drop down menu to reveal your font choices. Select the font you wish to apply. You can also choose to set the font size, line height, and appearance. After making a selection, click the save button at the top right of the page to apply your changes.
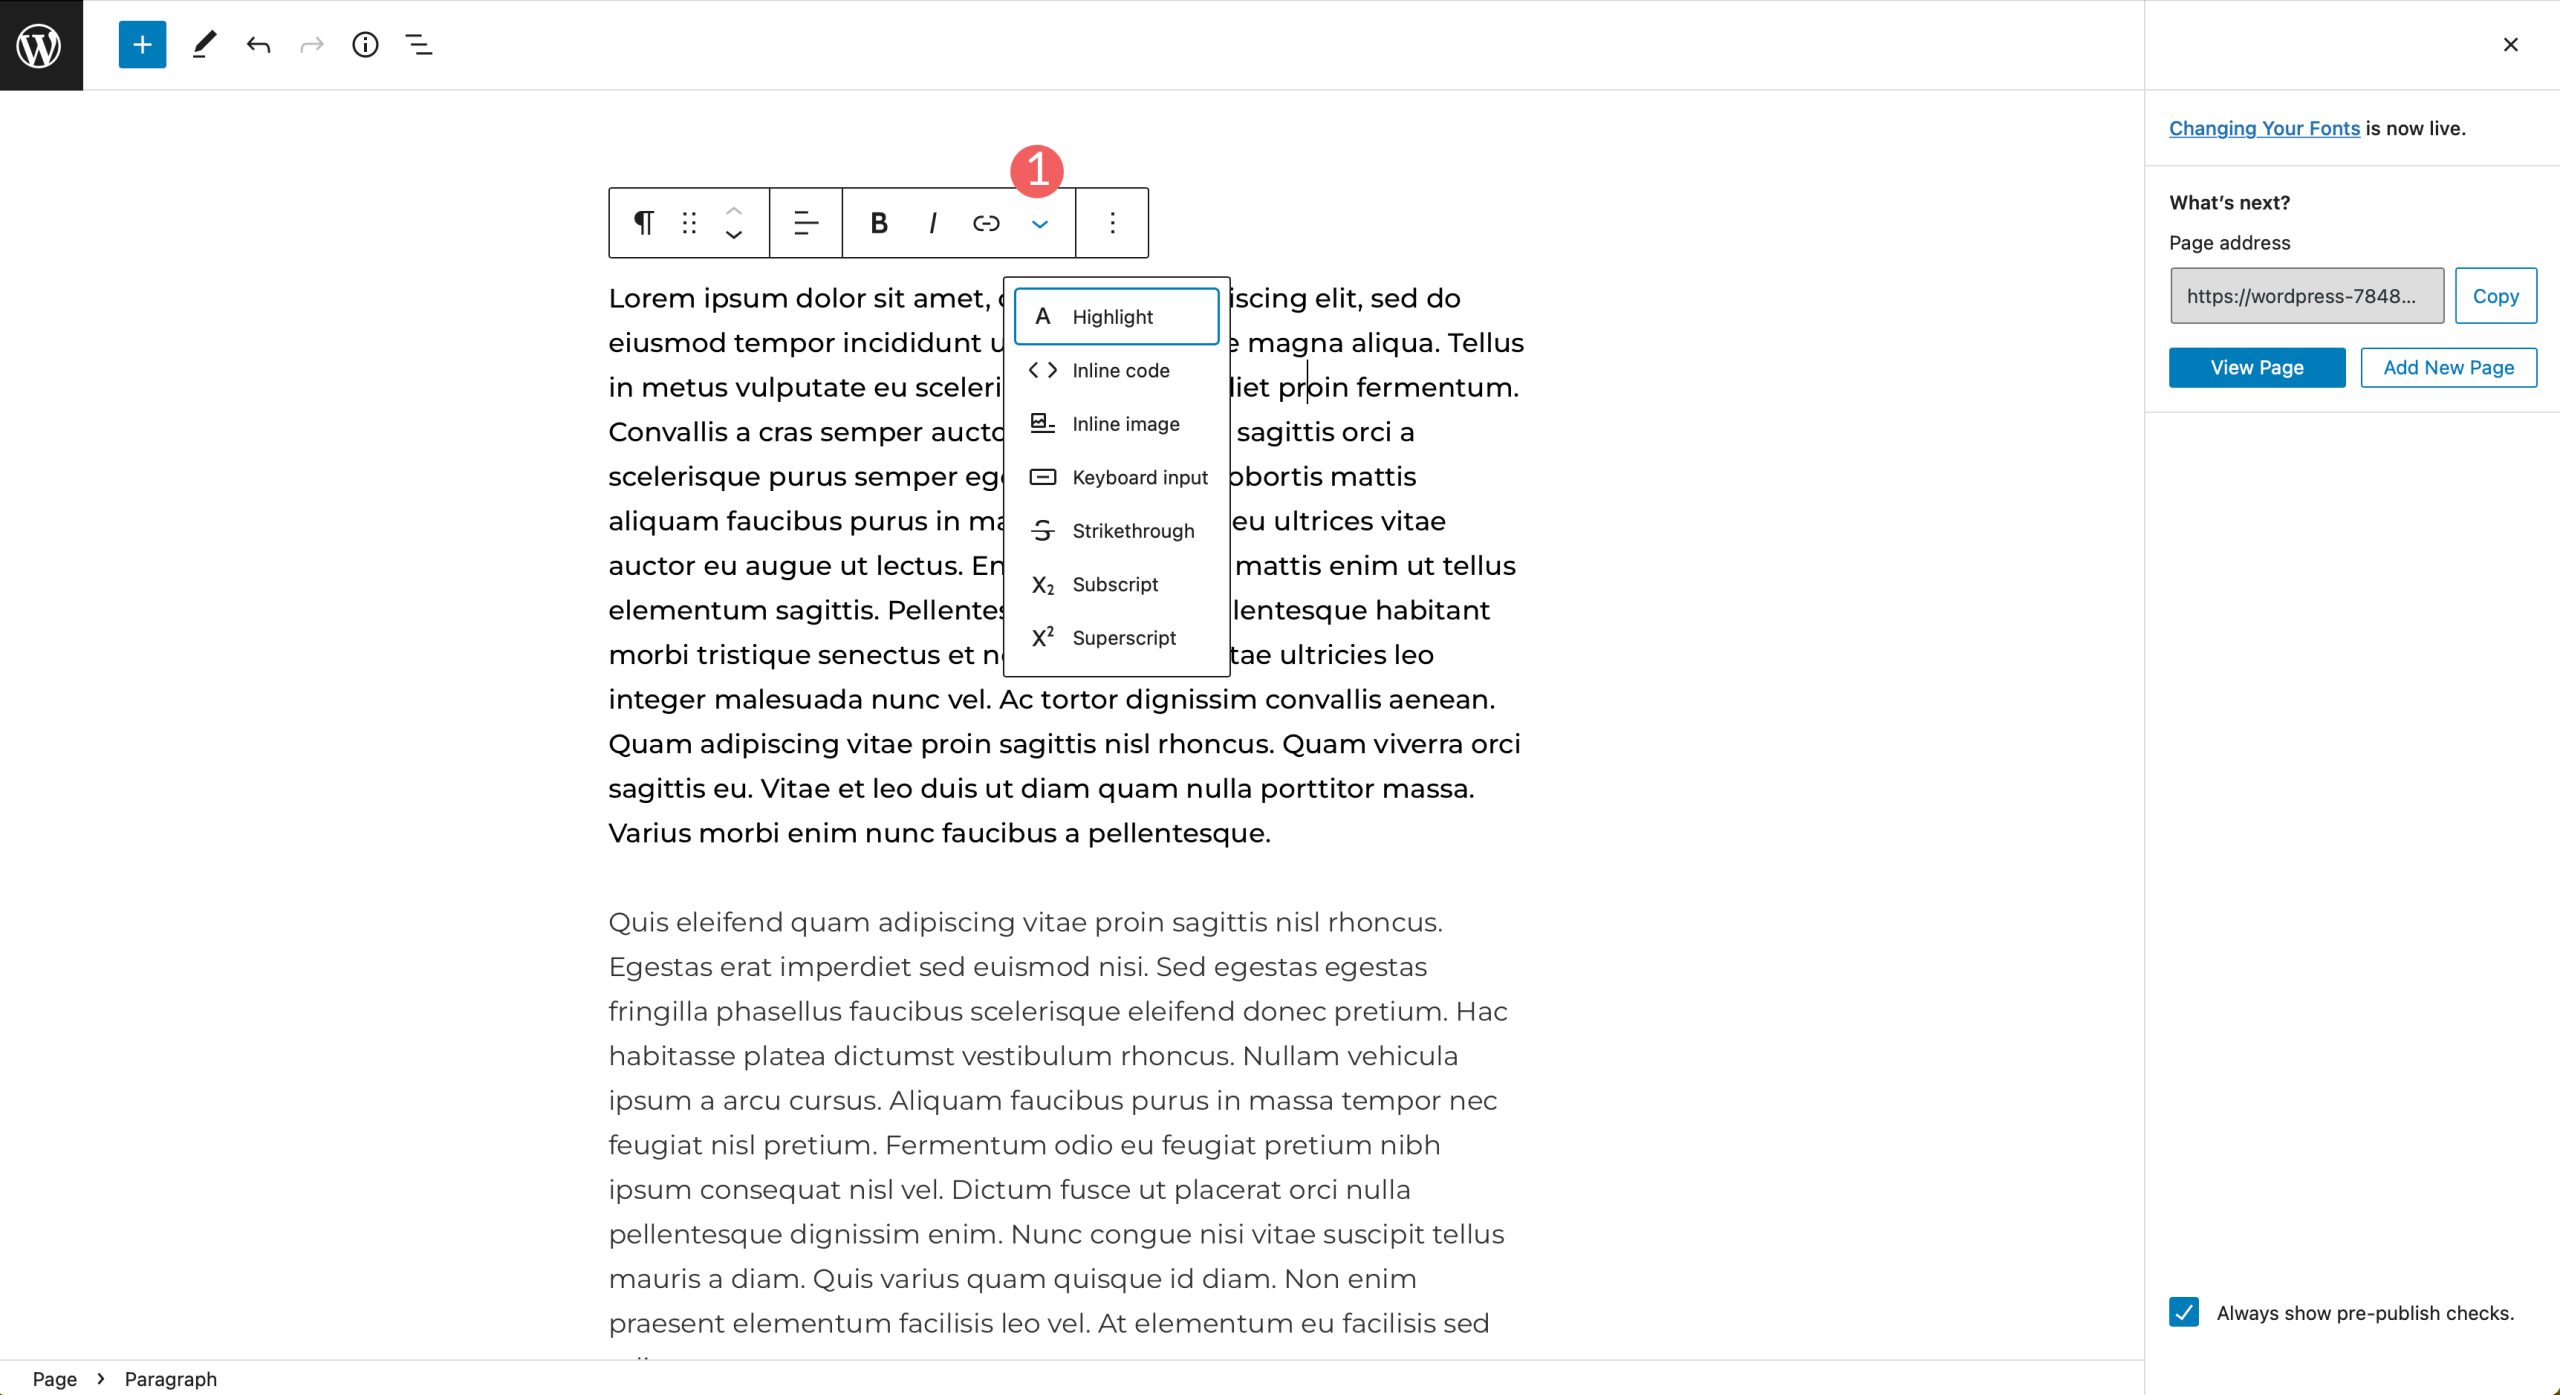
3. Changing WordPress Fonts with the Block Editor
Using the block editor, you can change the appearance of your fonts. You can change text and text background color, as well as set size and appearance. The appearance option generally includes font-weight, which is dependent on the font chosen in your theme’s settings.
There are additional options in blocks with text. Text can be bolded, or italicized, and you can set the alignment of your text.
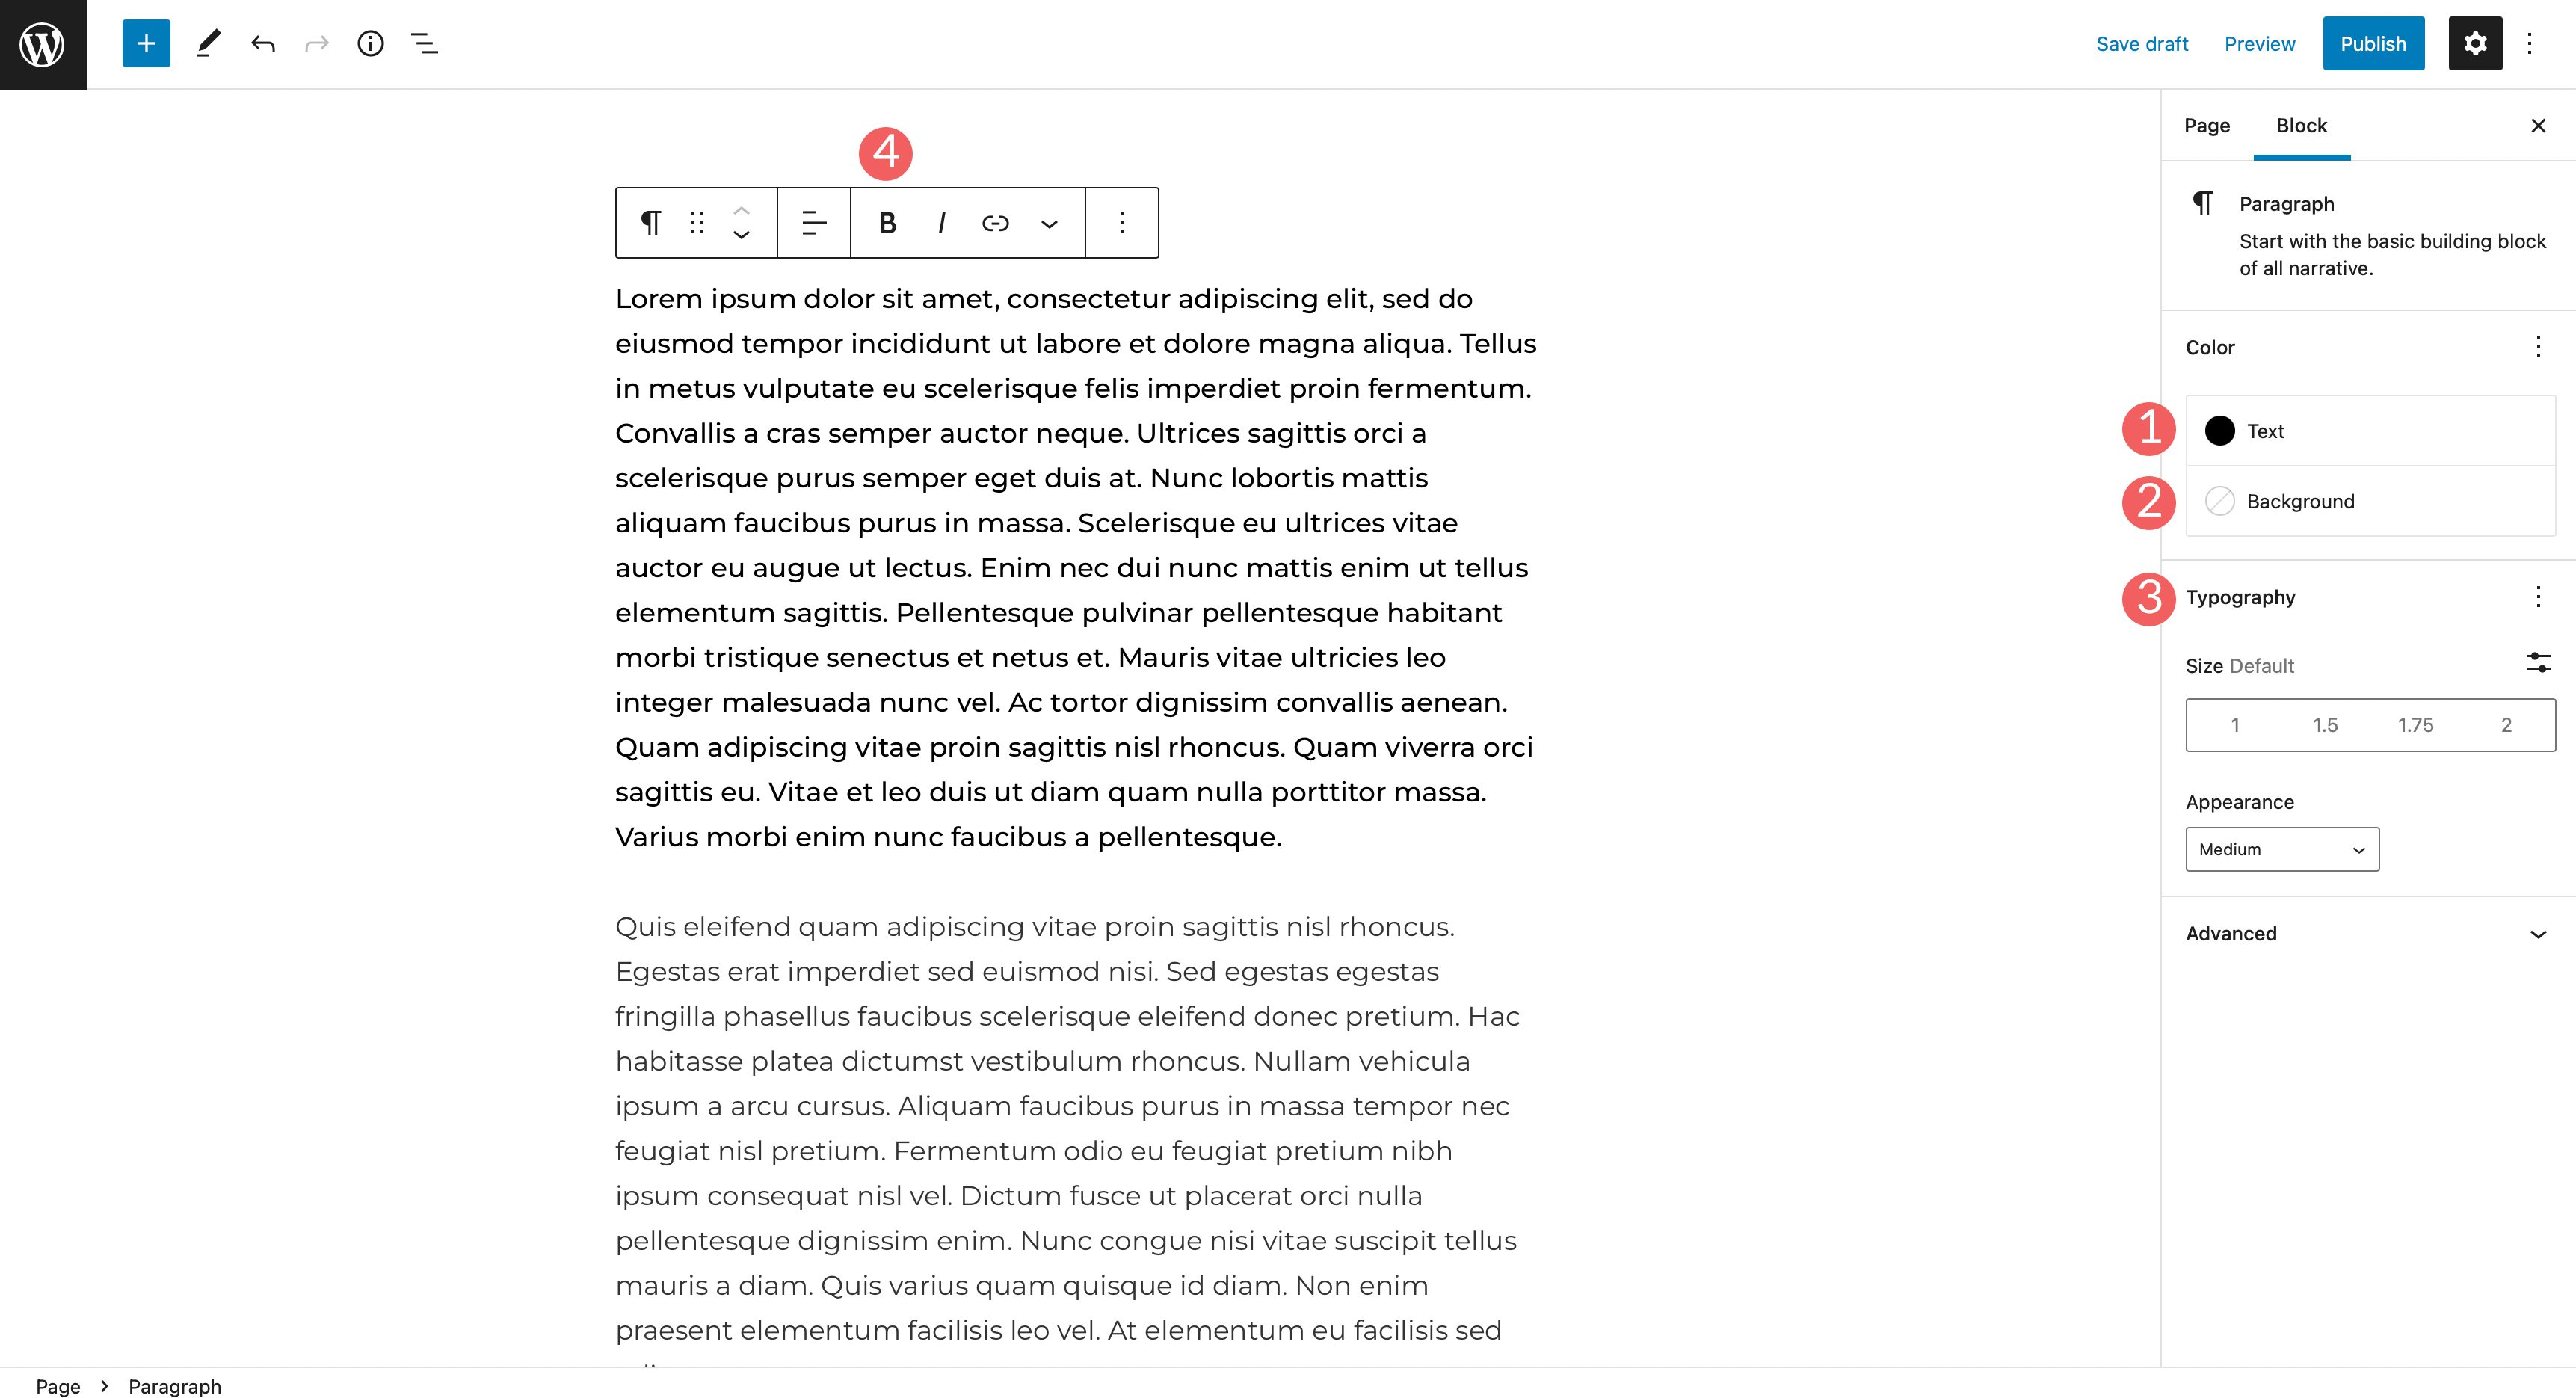
There are additional options to highlight your text, as well as add inline code and images, or strikethrough it. Lastly, you can add subscript characters, as well as superscript ones.
4. Using a Plugin to Change Fonts in WordPress
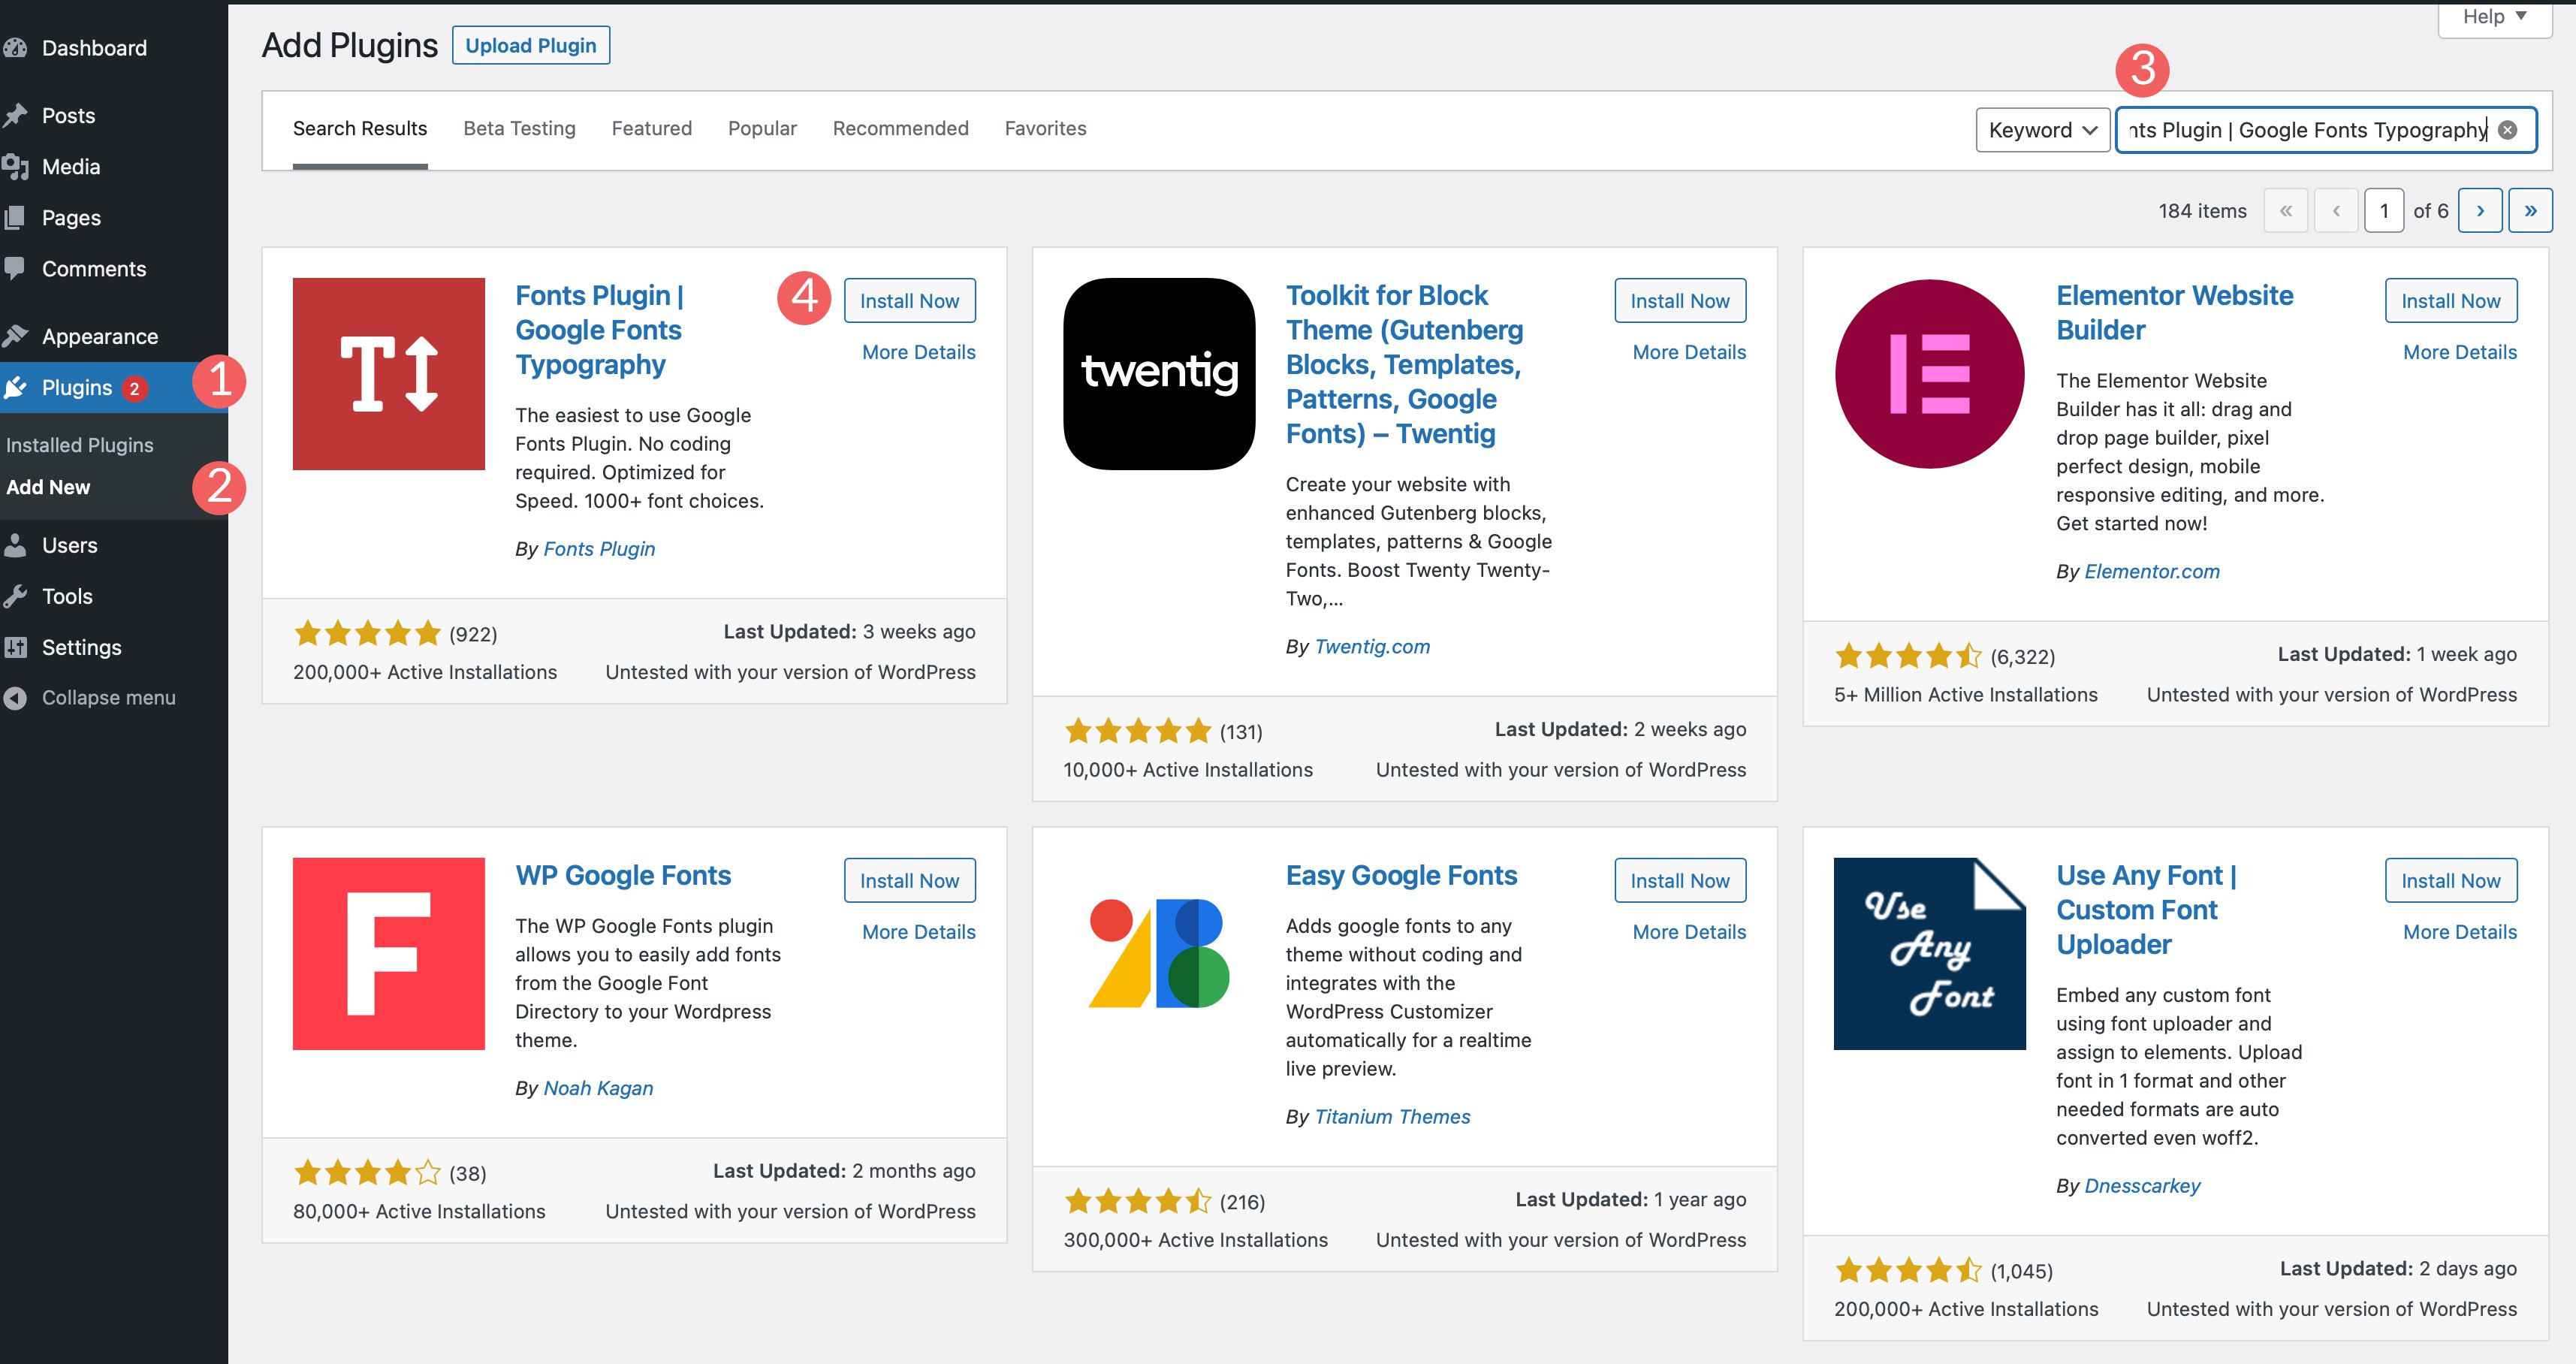
As previously mentioned, generic WordPress themes will need the help of a plugin such as Fonts Plugin | Google Fonts Typography in order to change fonts in WordPress. We’ll walk through the steps to install the plugin, configure it, and show you how to change fonts on your site while using it.
Navigate to Plugins > Add New. Search for Fonts Plugin | Google Fonts Typography in the search bar. Click Install Now to add the plugin to your website.
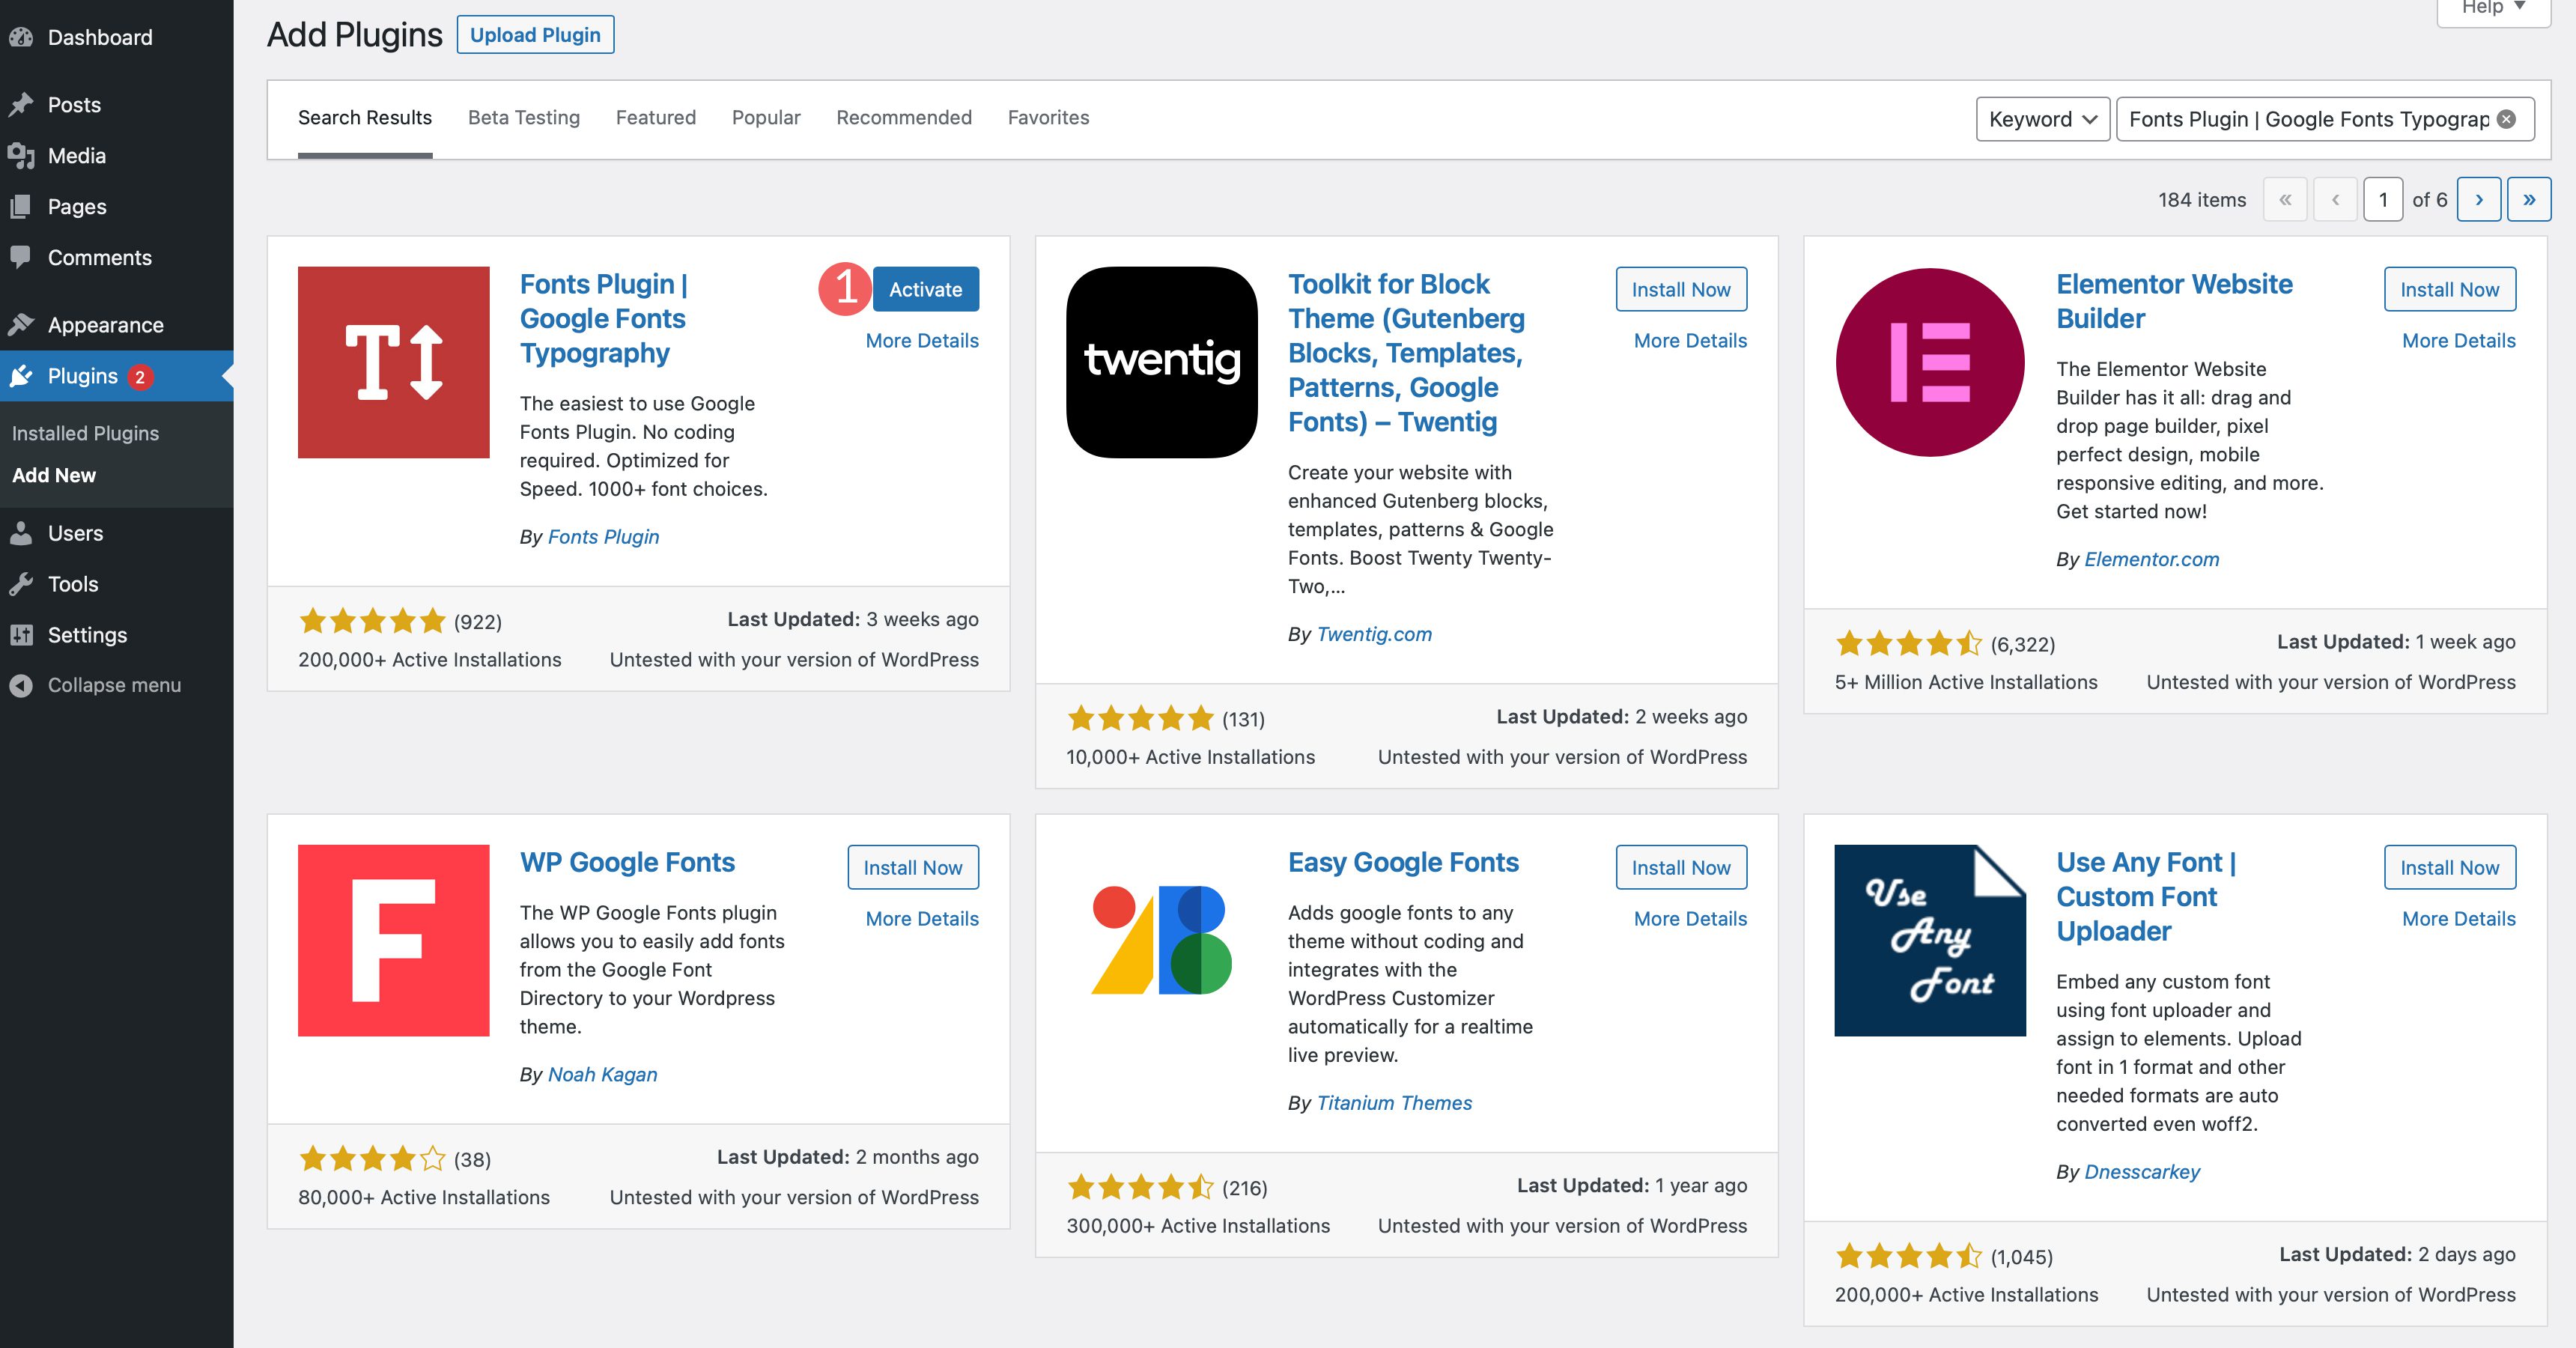
Next, activate the plugin.
To access the plugin, navigate to Appearance > Customize. When the page reloads, there will be a new section added to your customizer called Fonts Plugin.
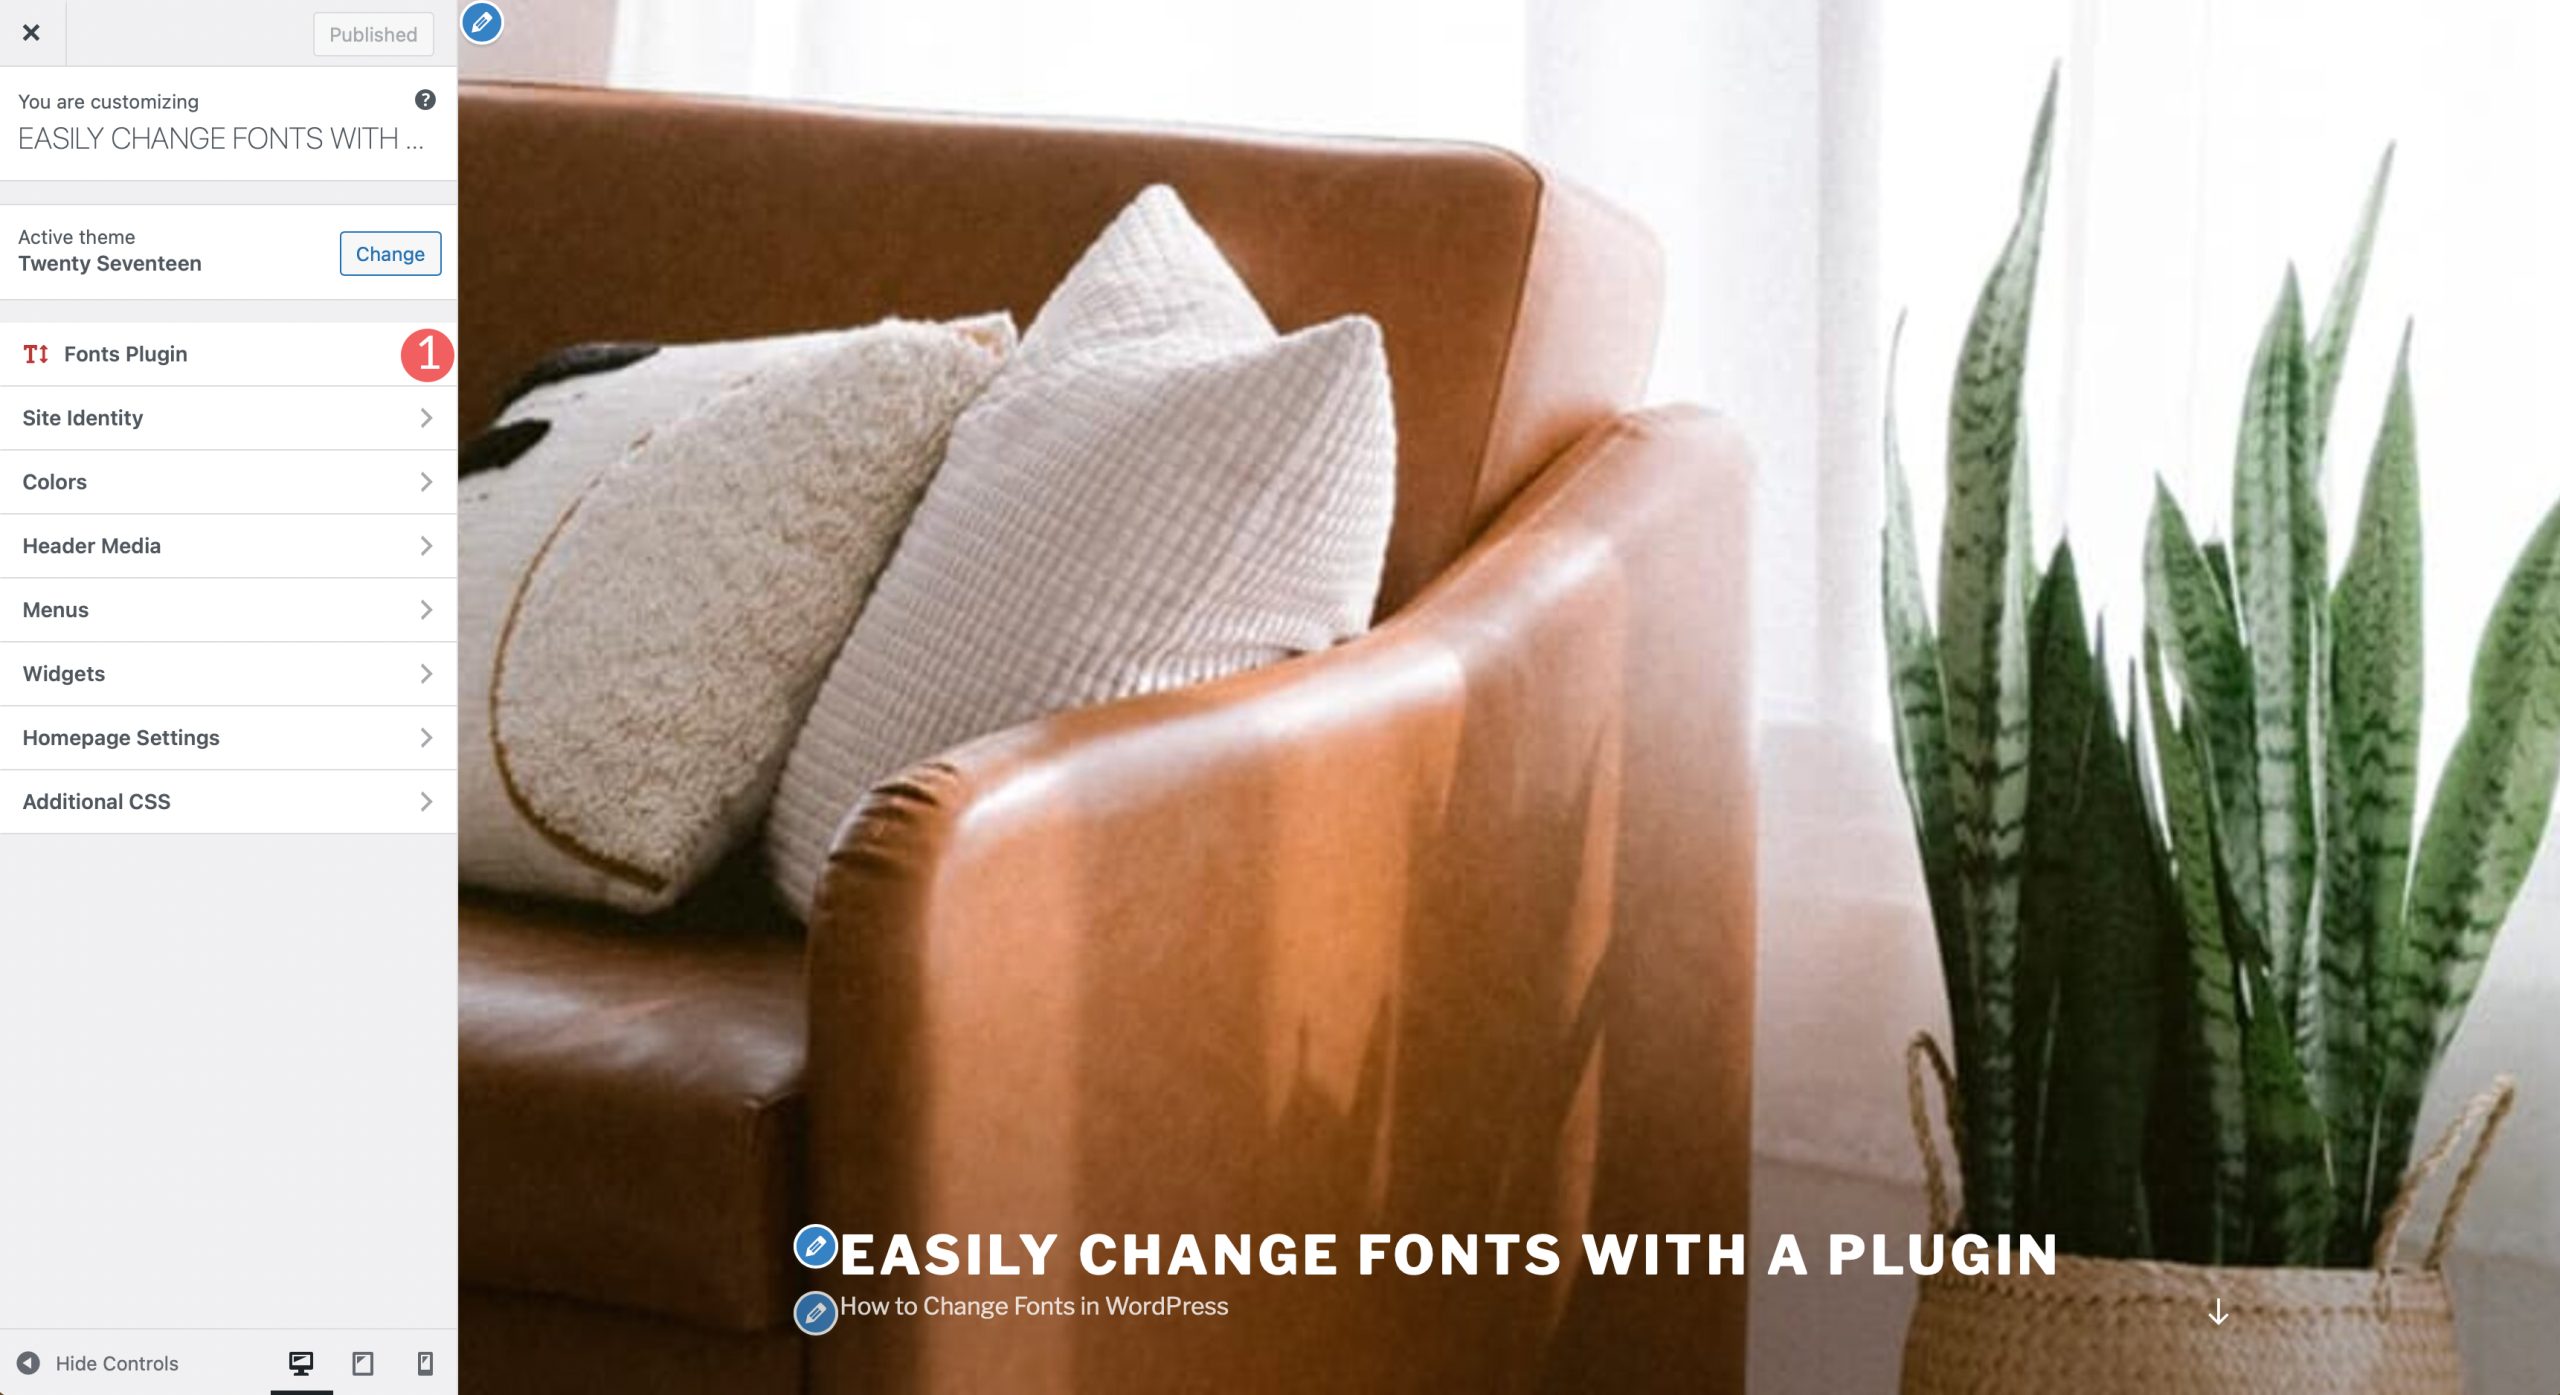
Plugin Settings
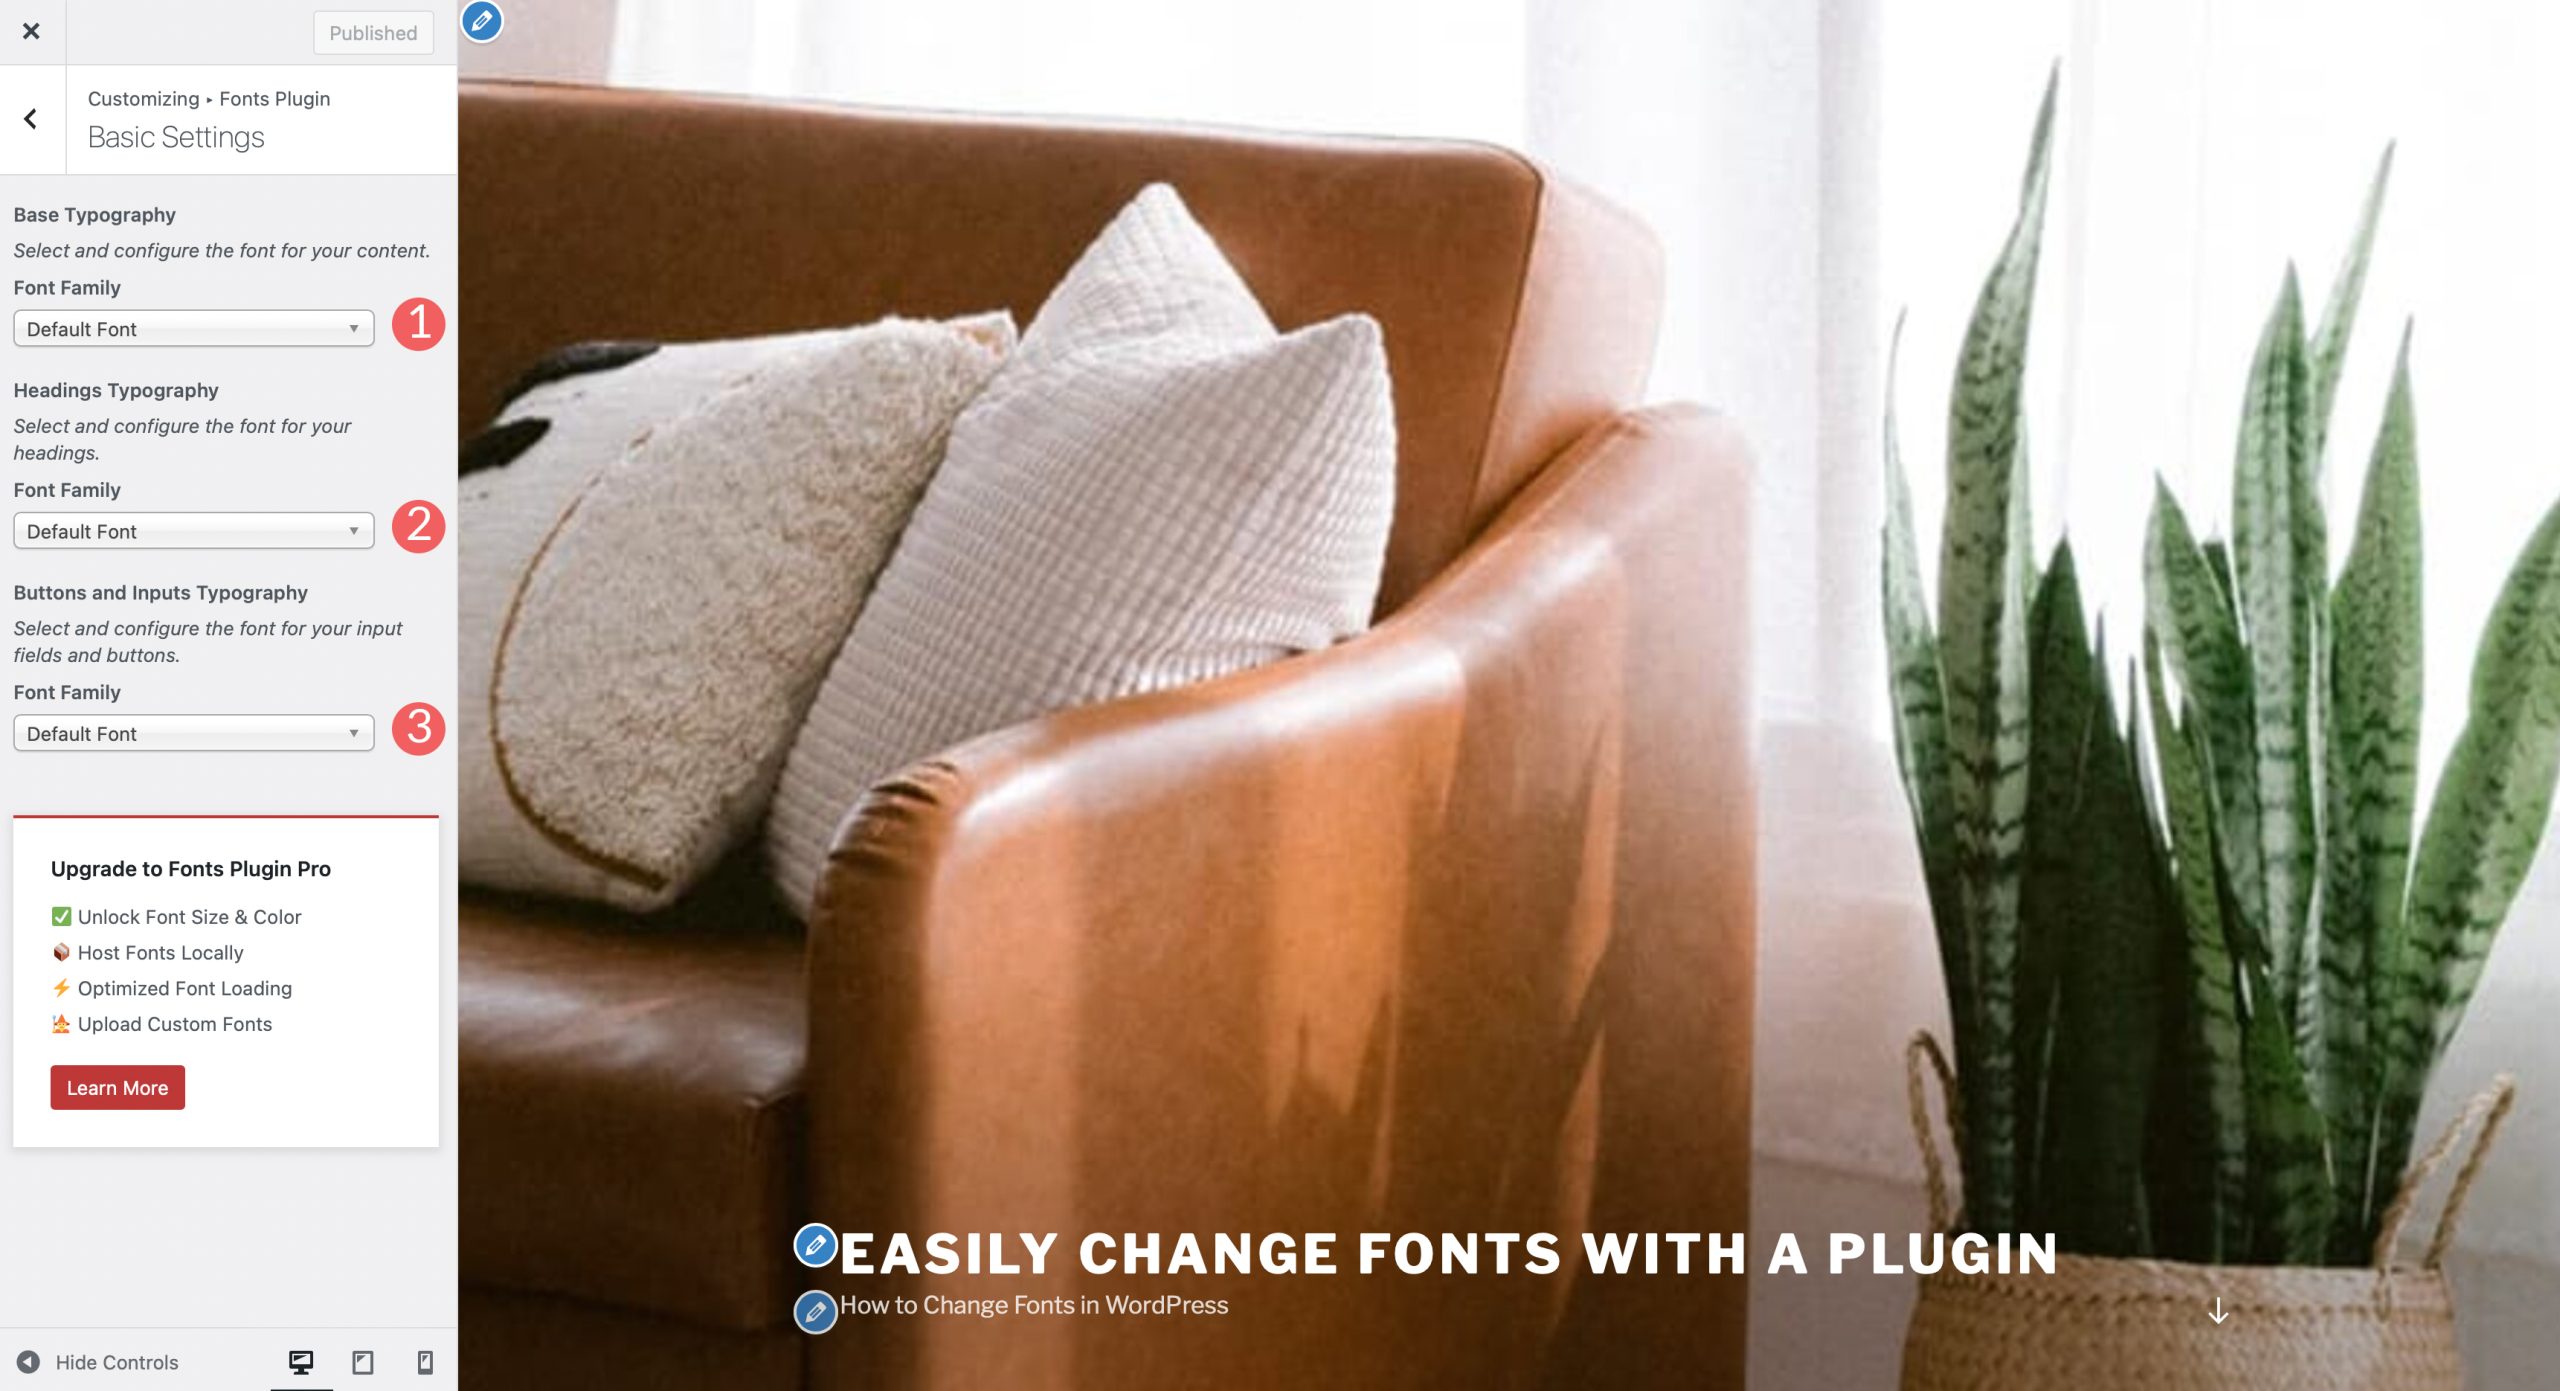
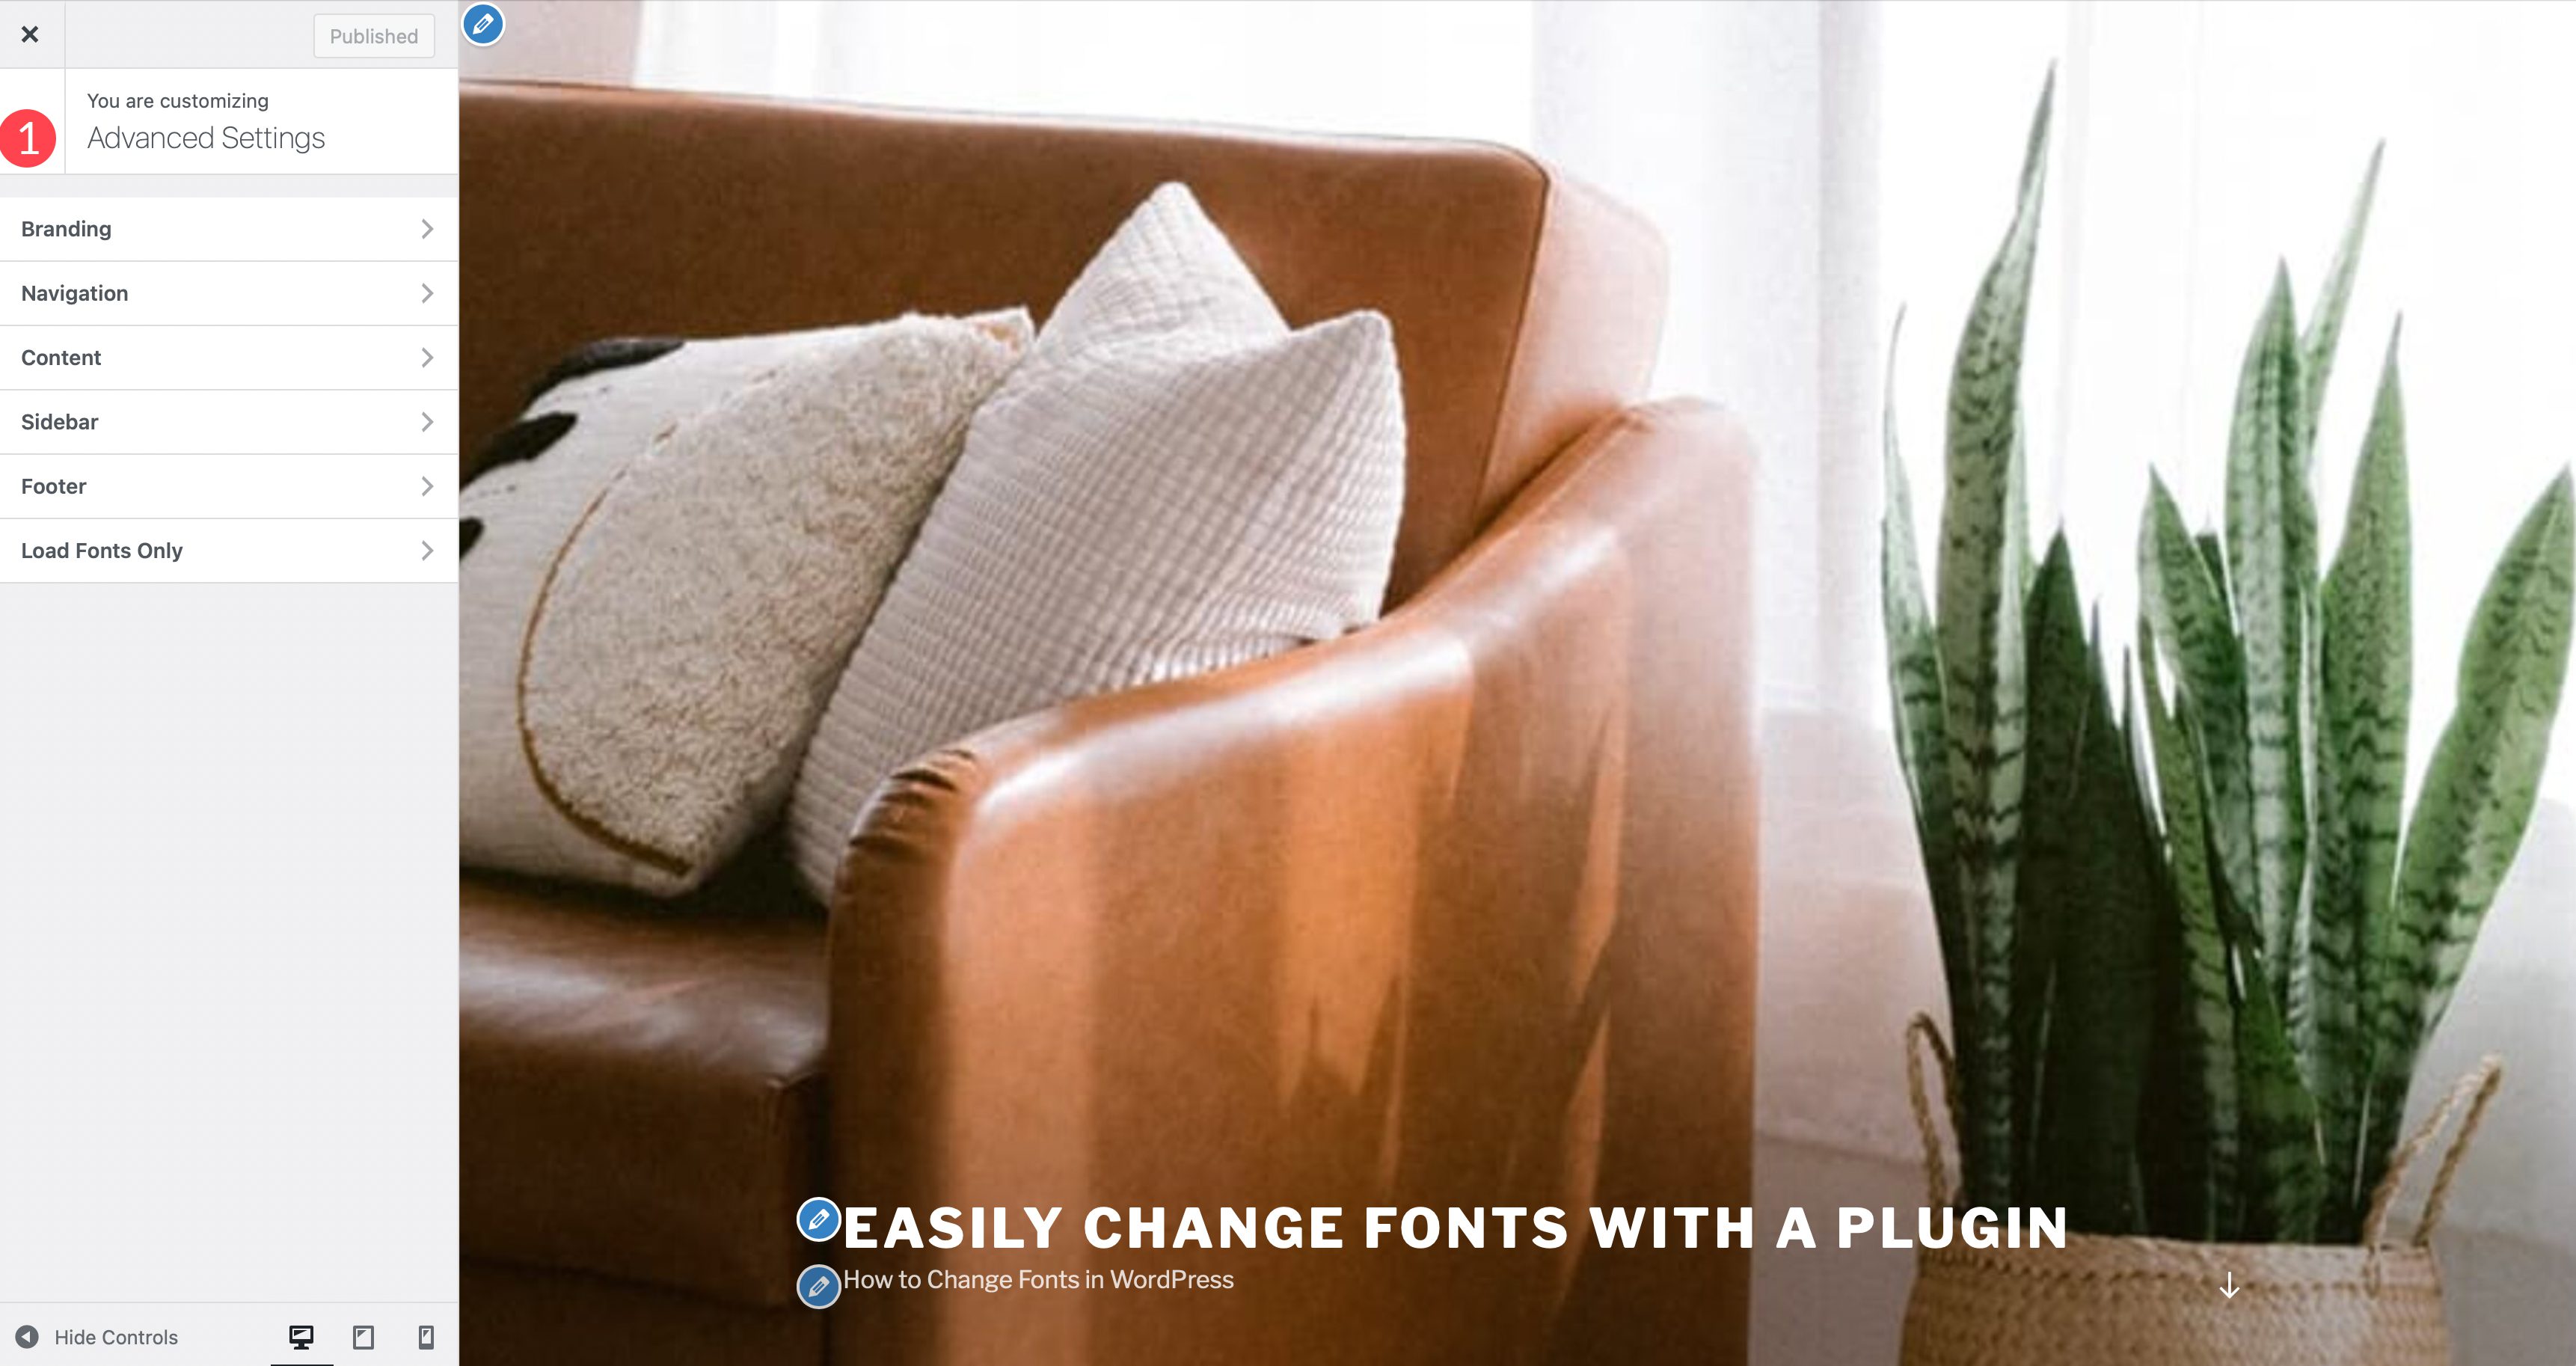
Once you click the tab, there are four menu options including basic settings, advanced settings, font loading, and debugging. Basic settings enable you to choose a default font family from over 1400 Google font options. You can also set a font for headings, as well as buttons and inputs.
Advanced Settings allow you to change the fonts for branding, which includes your site title and tagline. Under navigation settings, you can change the font for your site’s navigation menus.
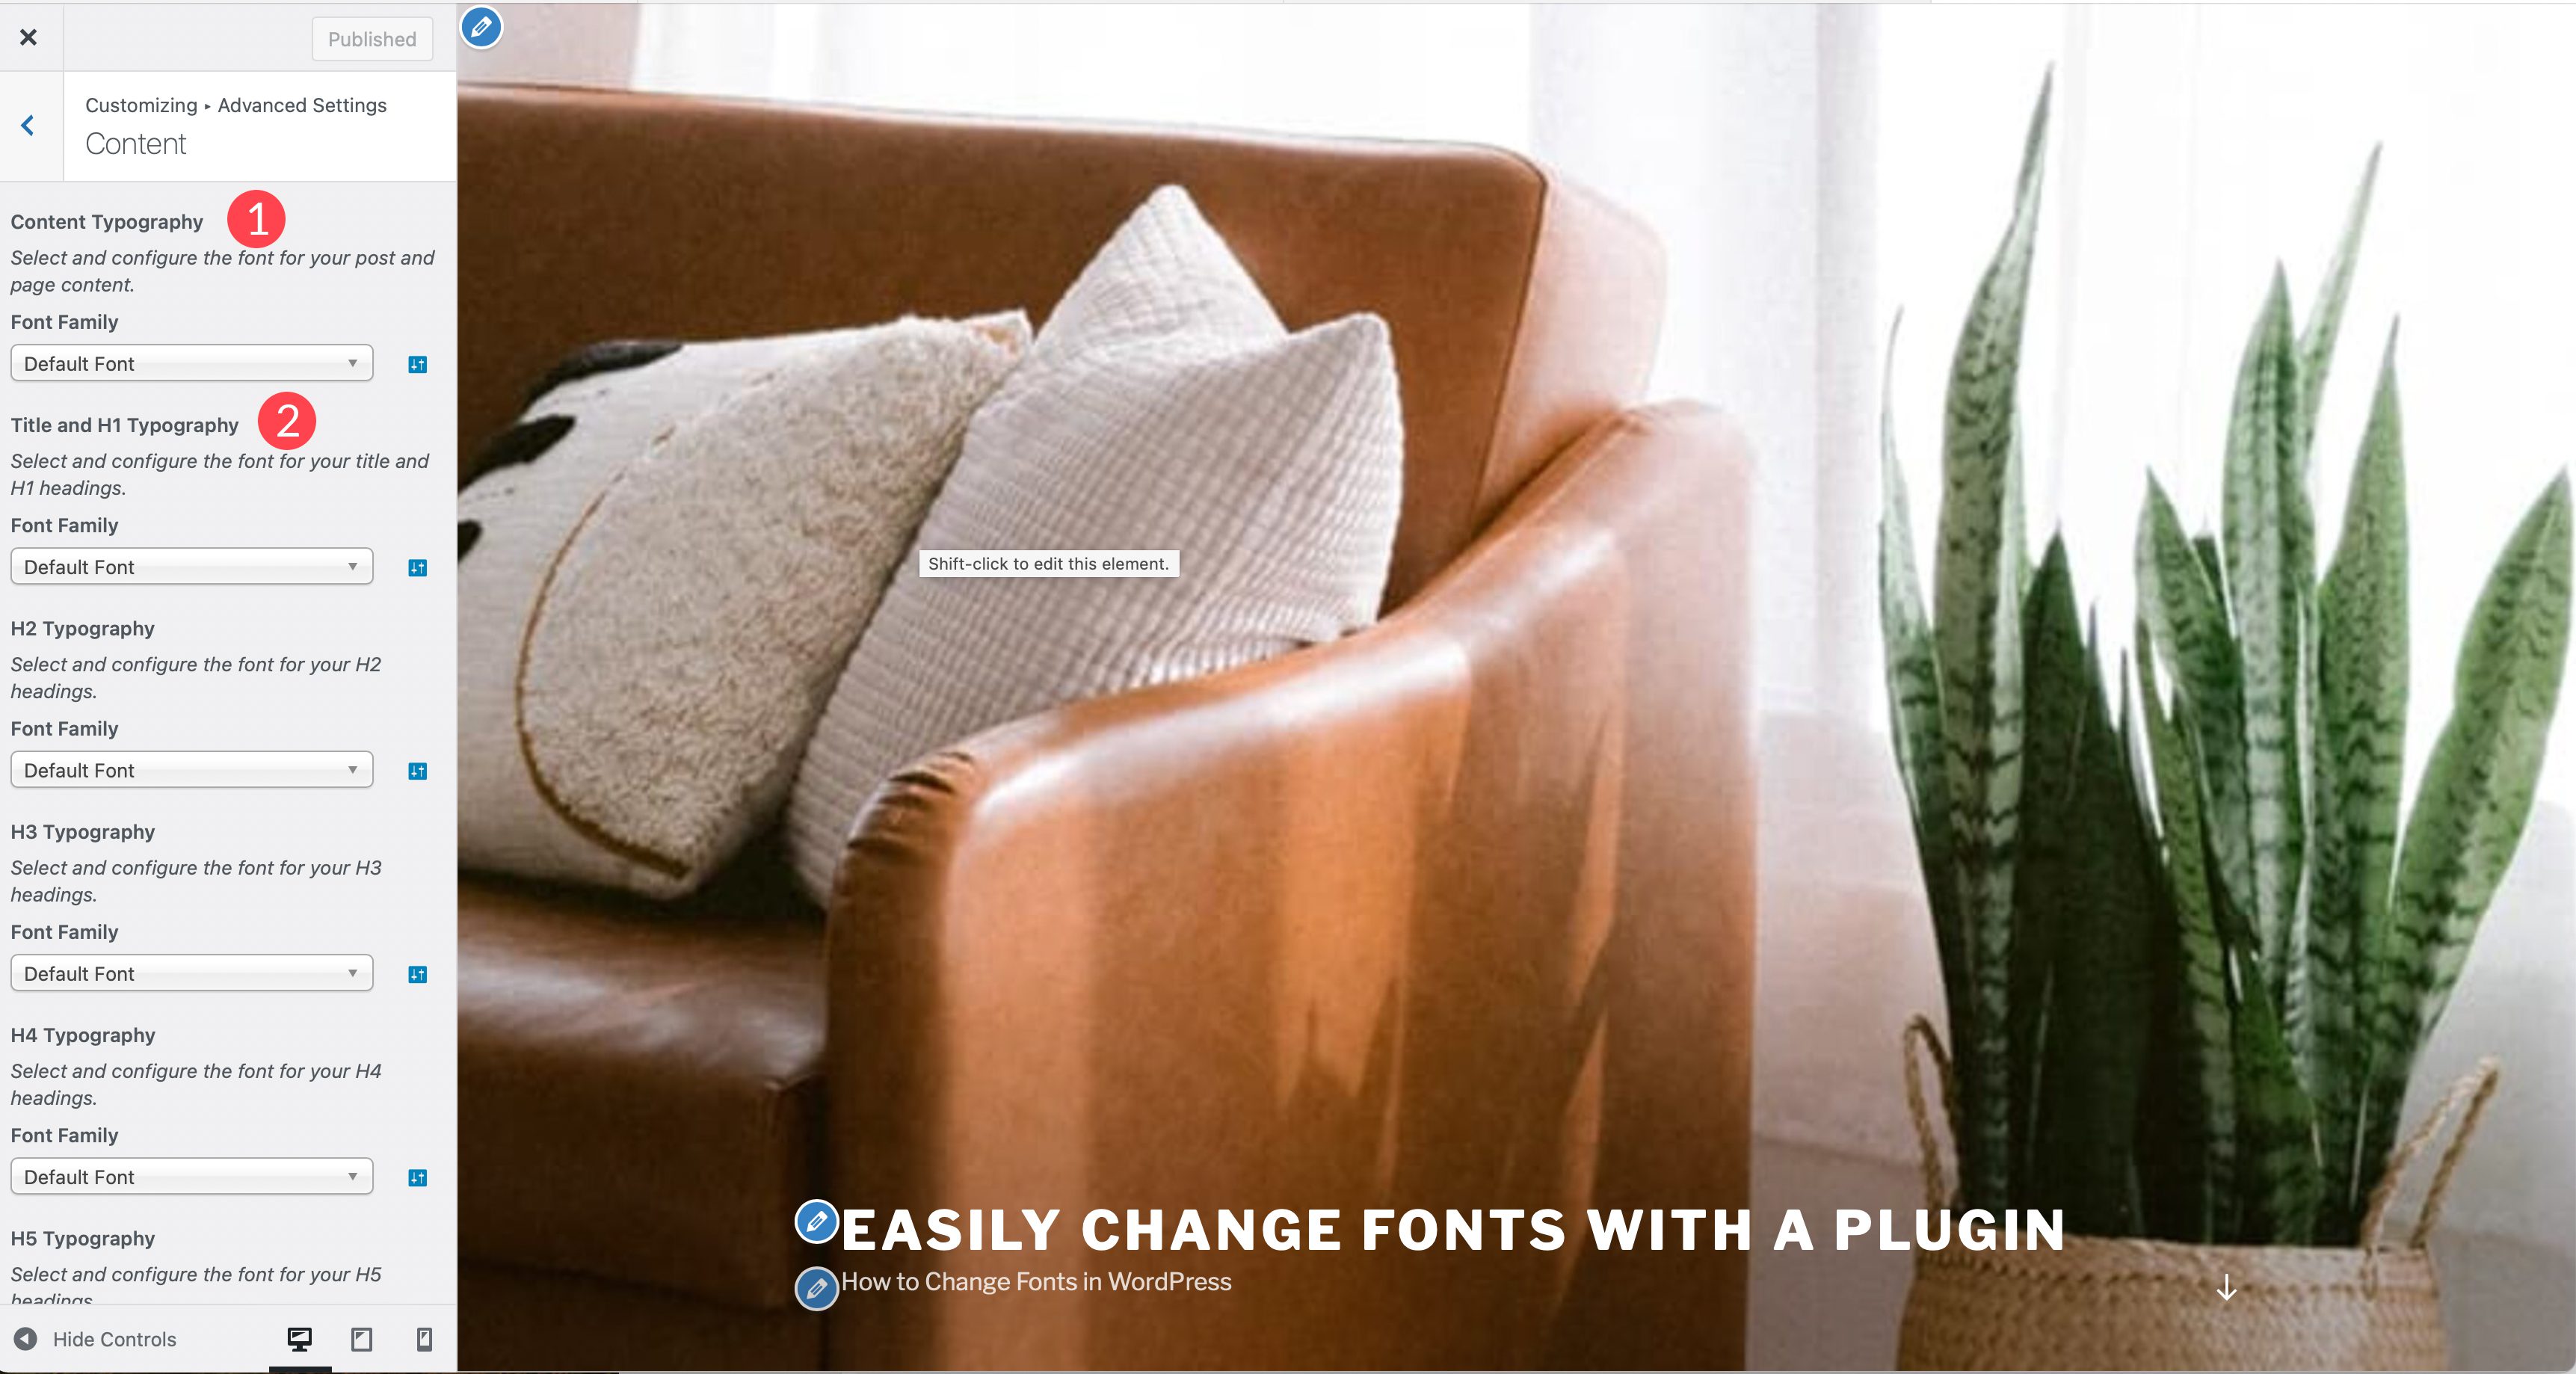
Under the Content Typography section, you can change body text, as well as the font for all headings tags individually.
The Sidebar and Footer tabs allow yout to change the fonts for those sections of your site, which include both heading and content typography. The last tab, Load Fonts Only, allows you to load certain fonts, but doesn’t automatically add them to an element. This is useful when you want to use fonts only on certain blocks. The Font Loading tab is exclusive to the pro version of the plugin.
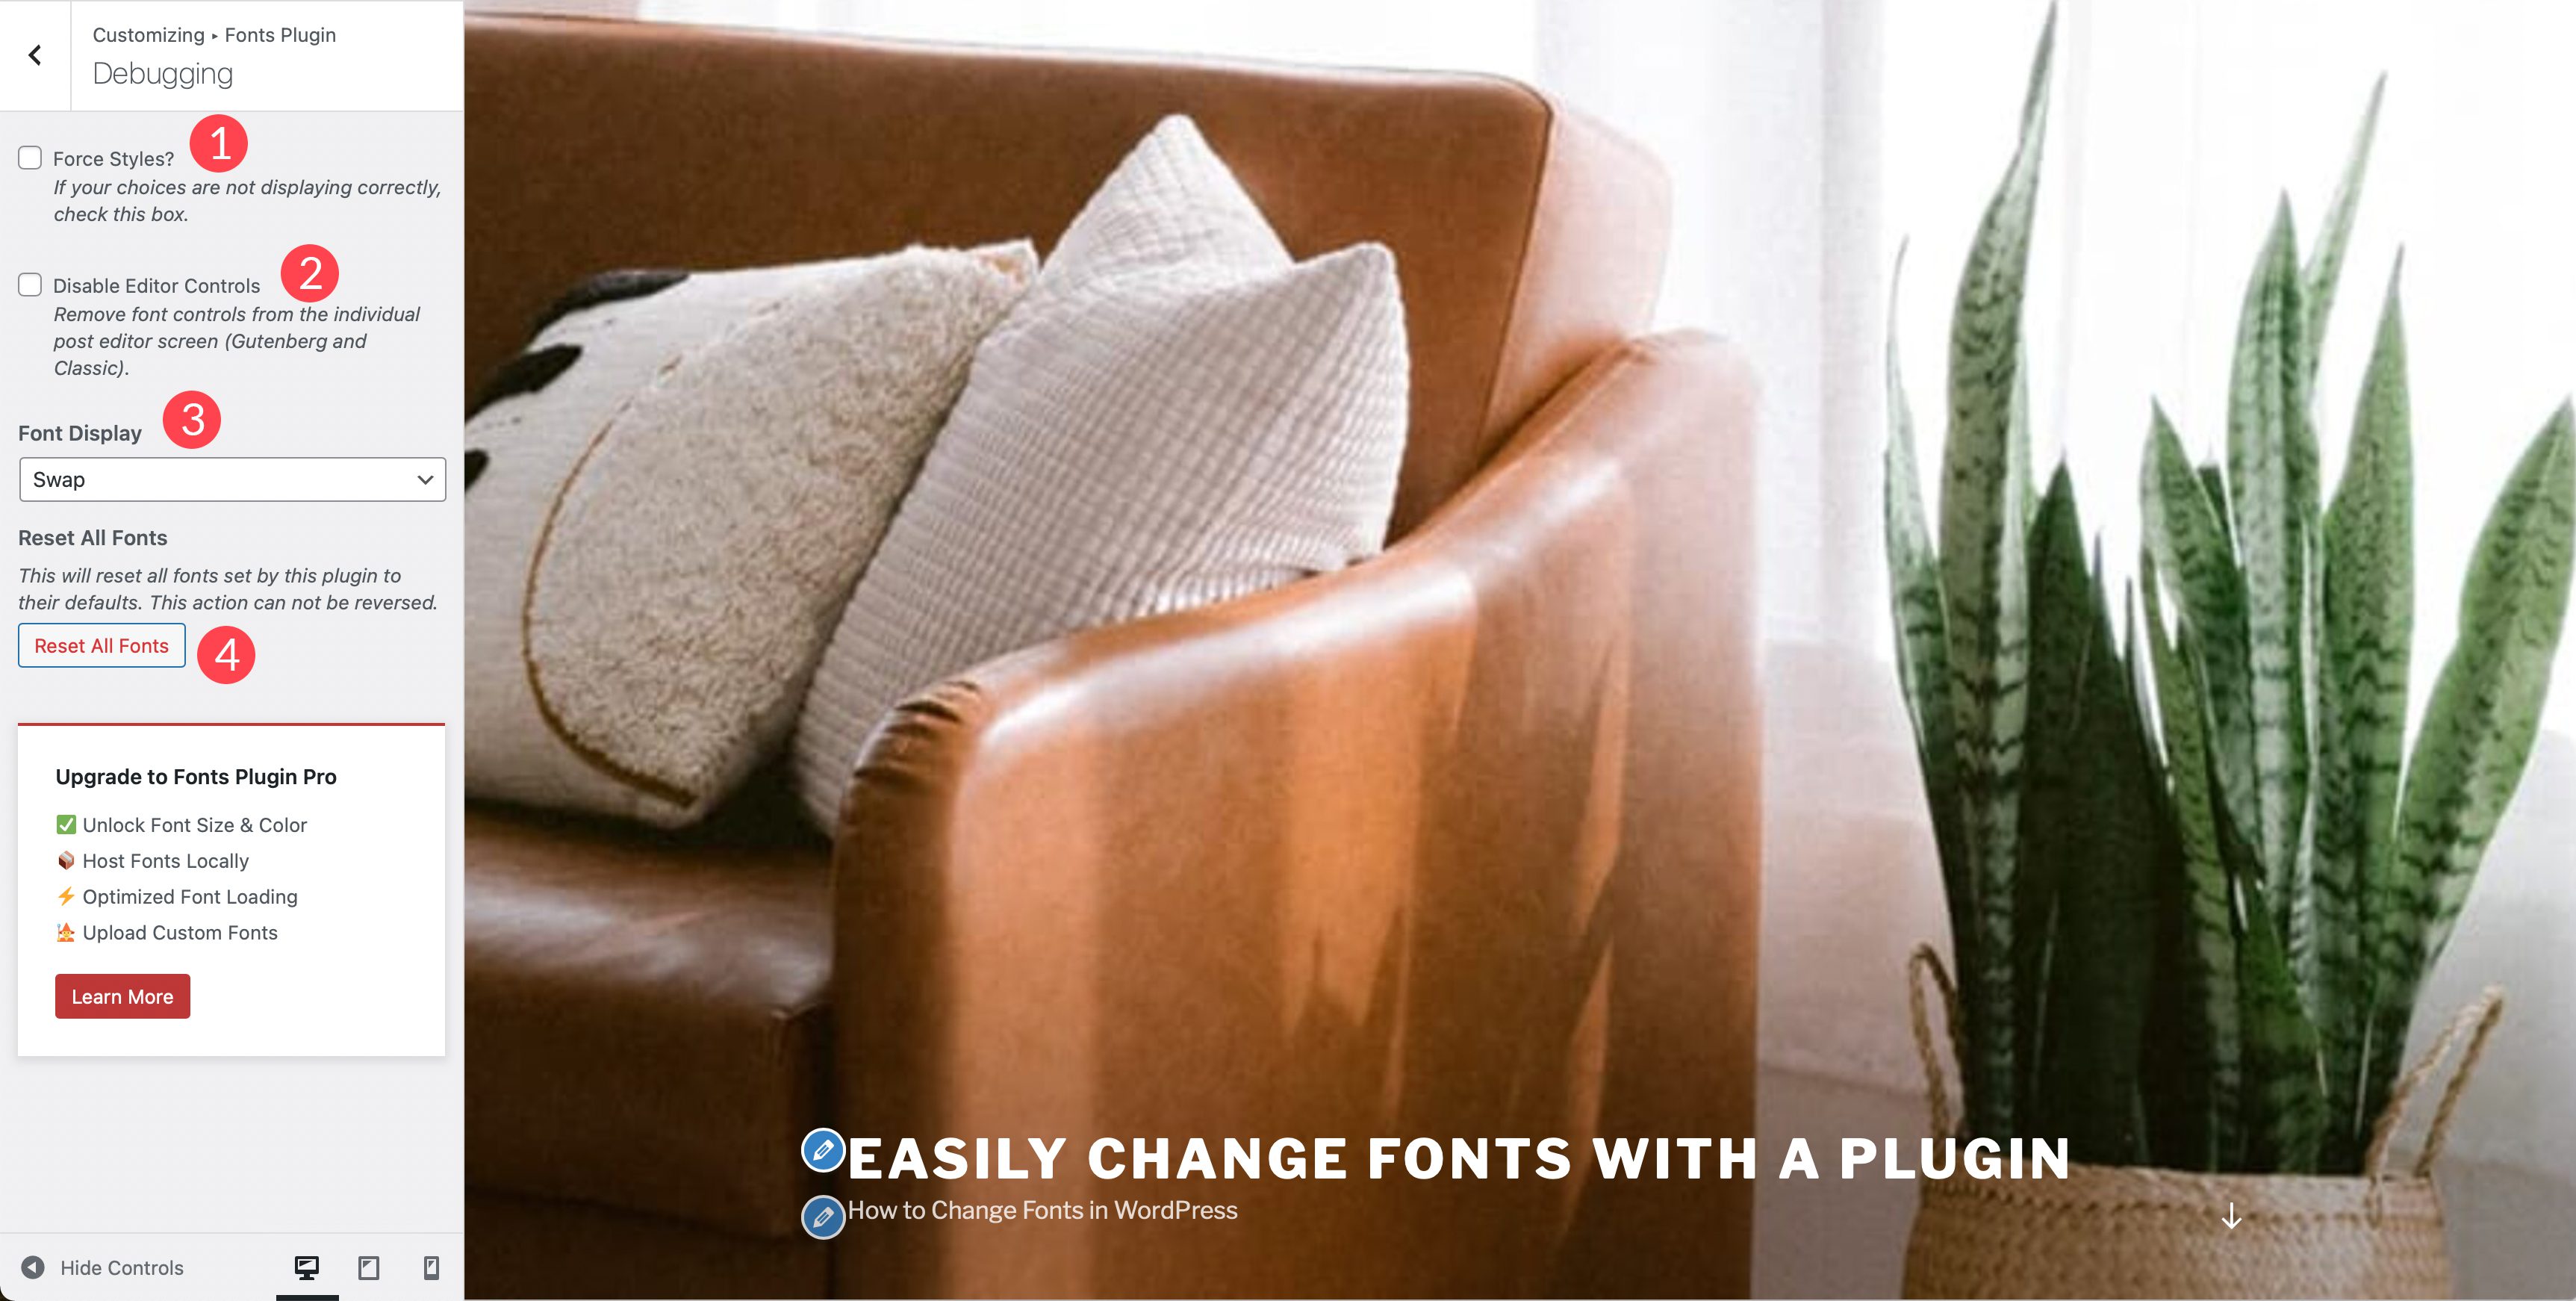
Under Debugging, you can enable the force styles checkbox which will allow you to determine why your fonts aren’t loading. An additional checkbox, disable editor controls, remove the font controls from individual posts and pages. Font display gives you four options including swap, block, fallback, and optional. The Reset All Fonts button will allow you to reset all of the changes you’ve applied in the plugin.
5. Using the Divi Theme Builder to Change Fonts

Divi is one of the most powerful theme builders in the world. When it comes to changing fonts in WordPress, there are a ton of options with Divi. First, it comes standard with built-in Google fonts. Fonts can be used in any module with text options, as well as the theme builder. Divi makes it easy to style fonts and combined with the theme customizer, you can set fonts globally. Let’s take a look at how to work with fonts in Divi.
To set fonts as a default font, enable the theme customizer. Start by navigating to Theme > Customize from the WordPress admin panel. When the customizer loads, click General Settings > Typography. There are multiple options available to set body and heading size, as well as line height, letter spacing, font style, heading and body font, and colors for each. Divi has the entire Google font library built in, so choices for the font are nearly unlimited.
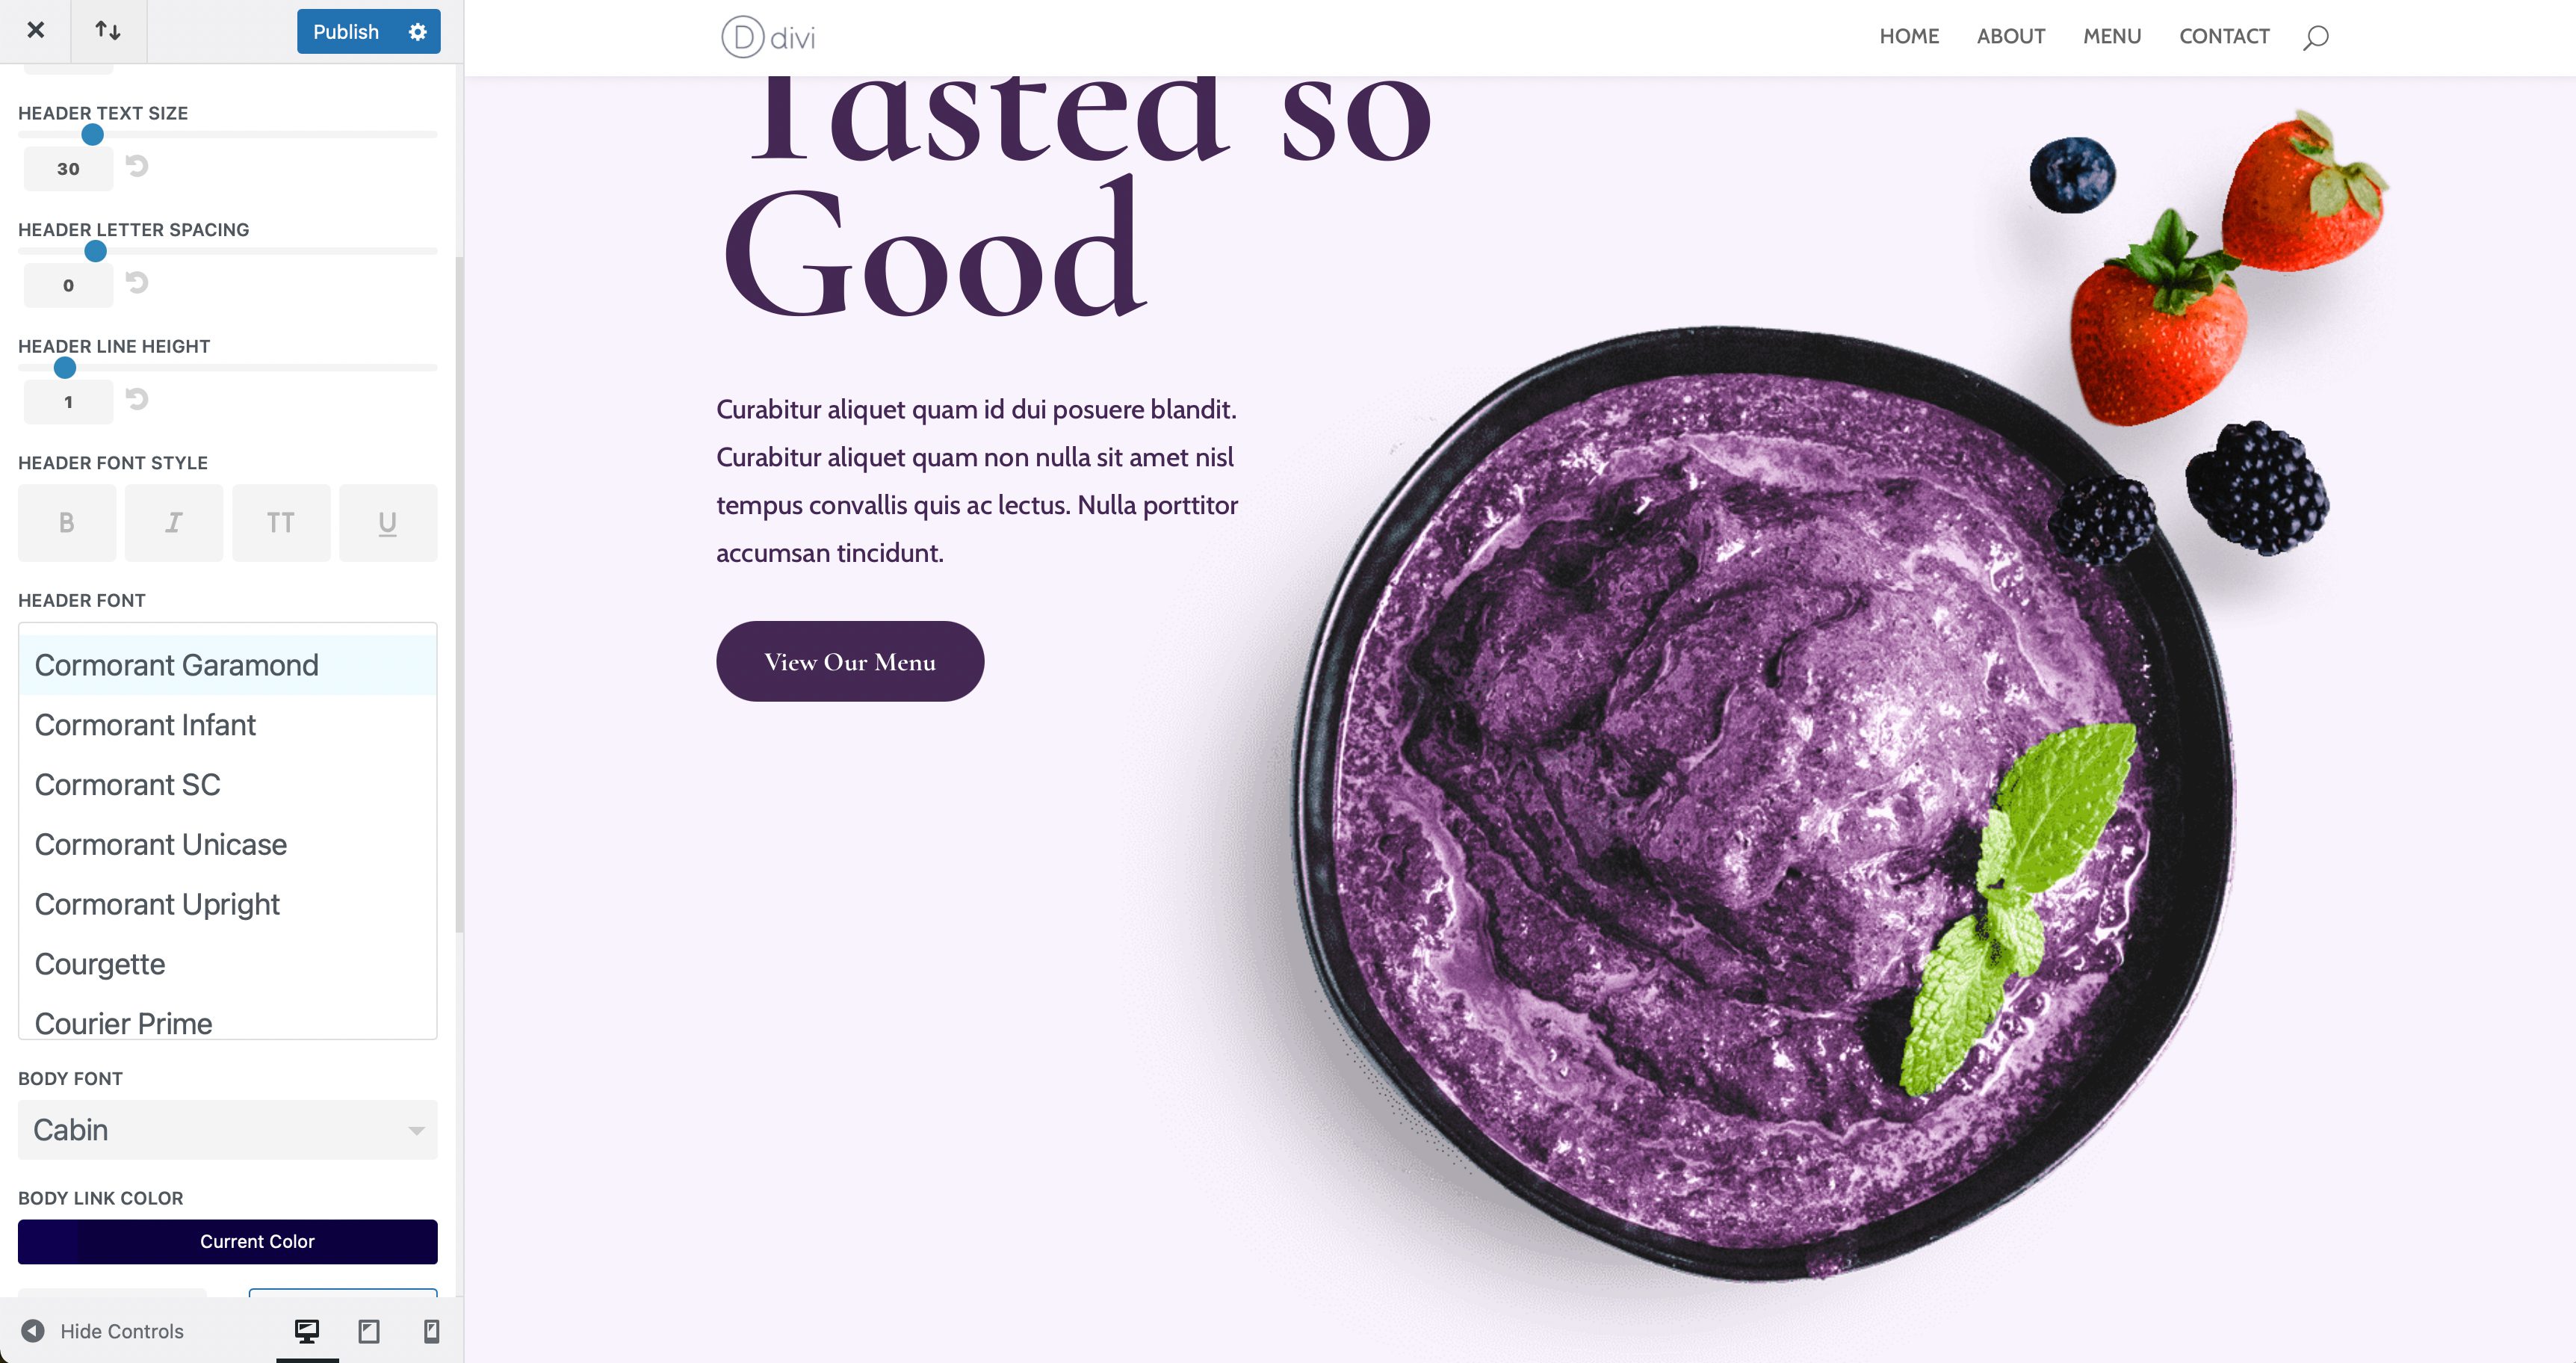
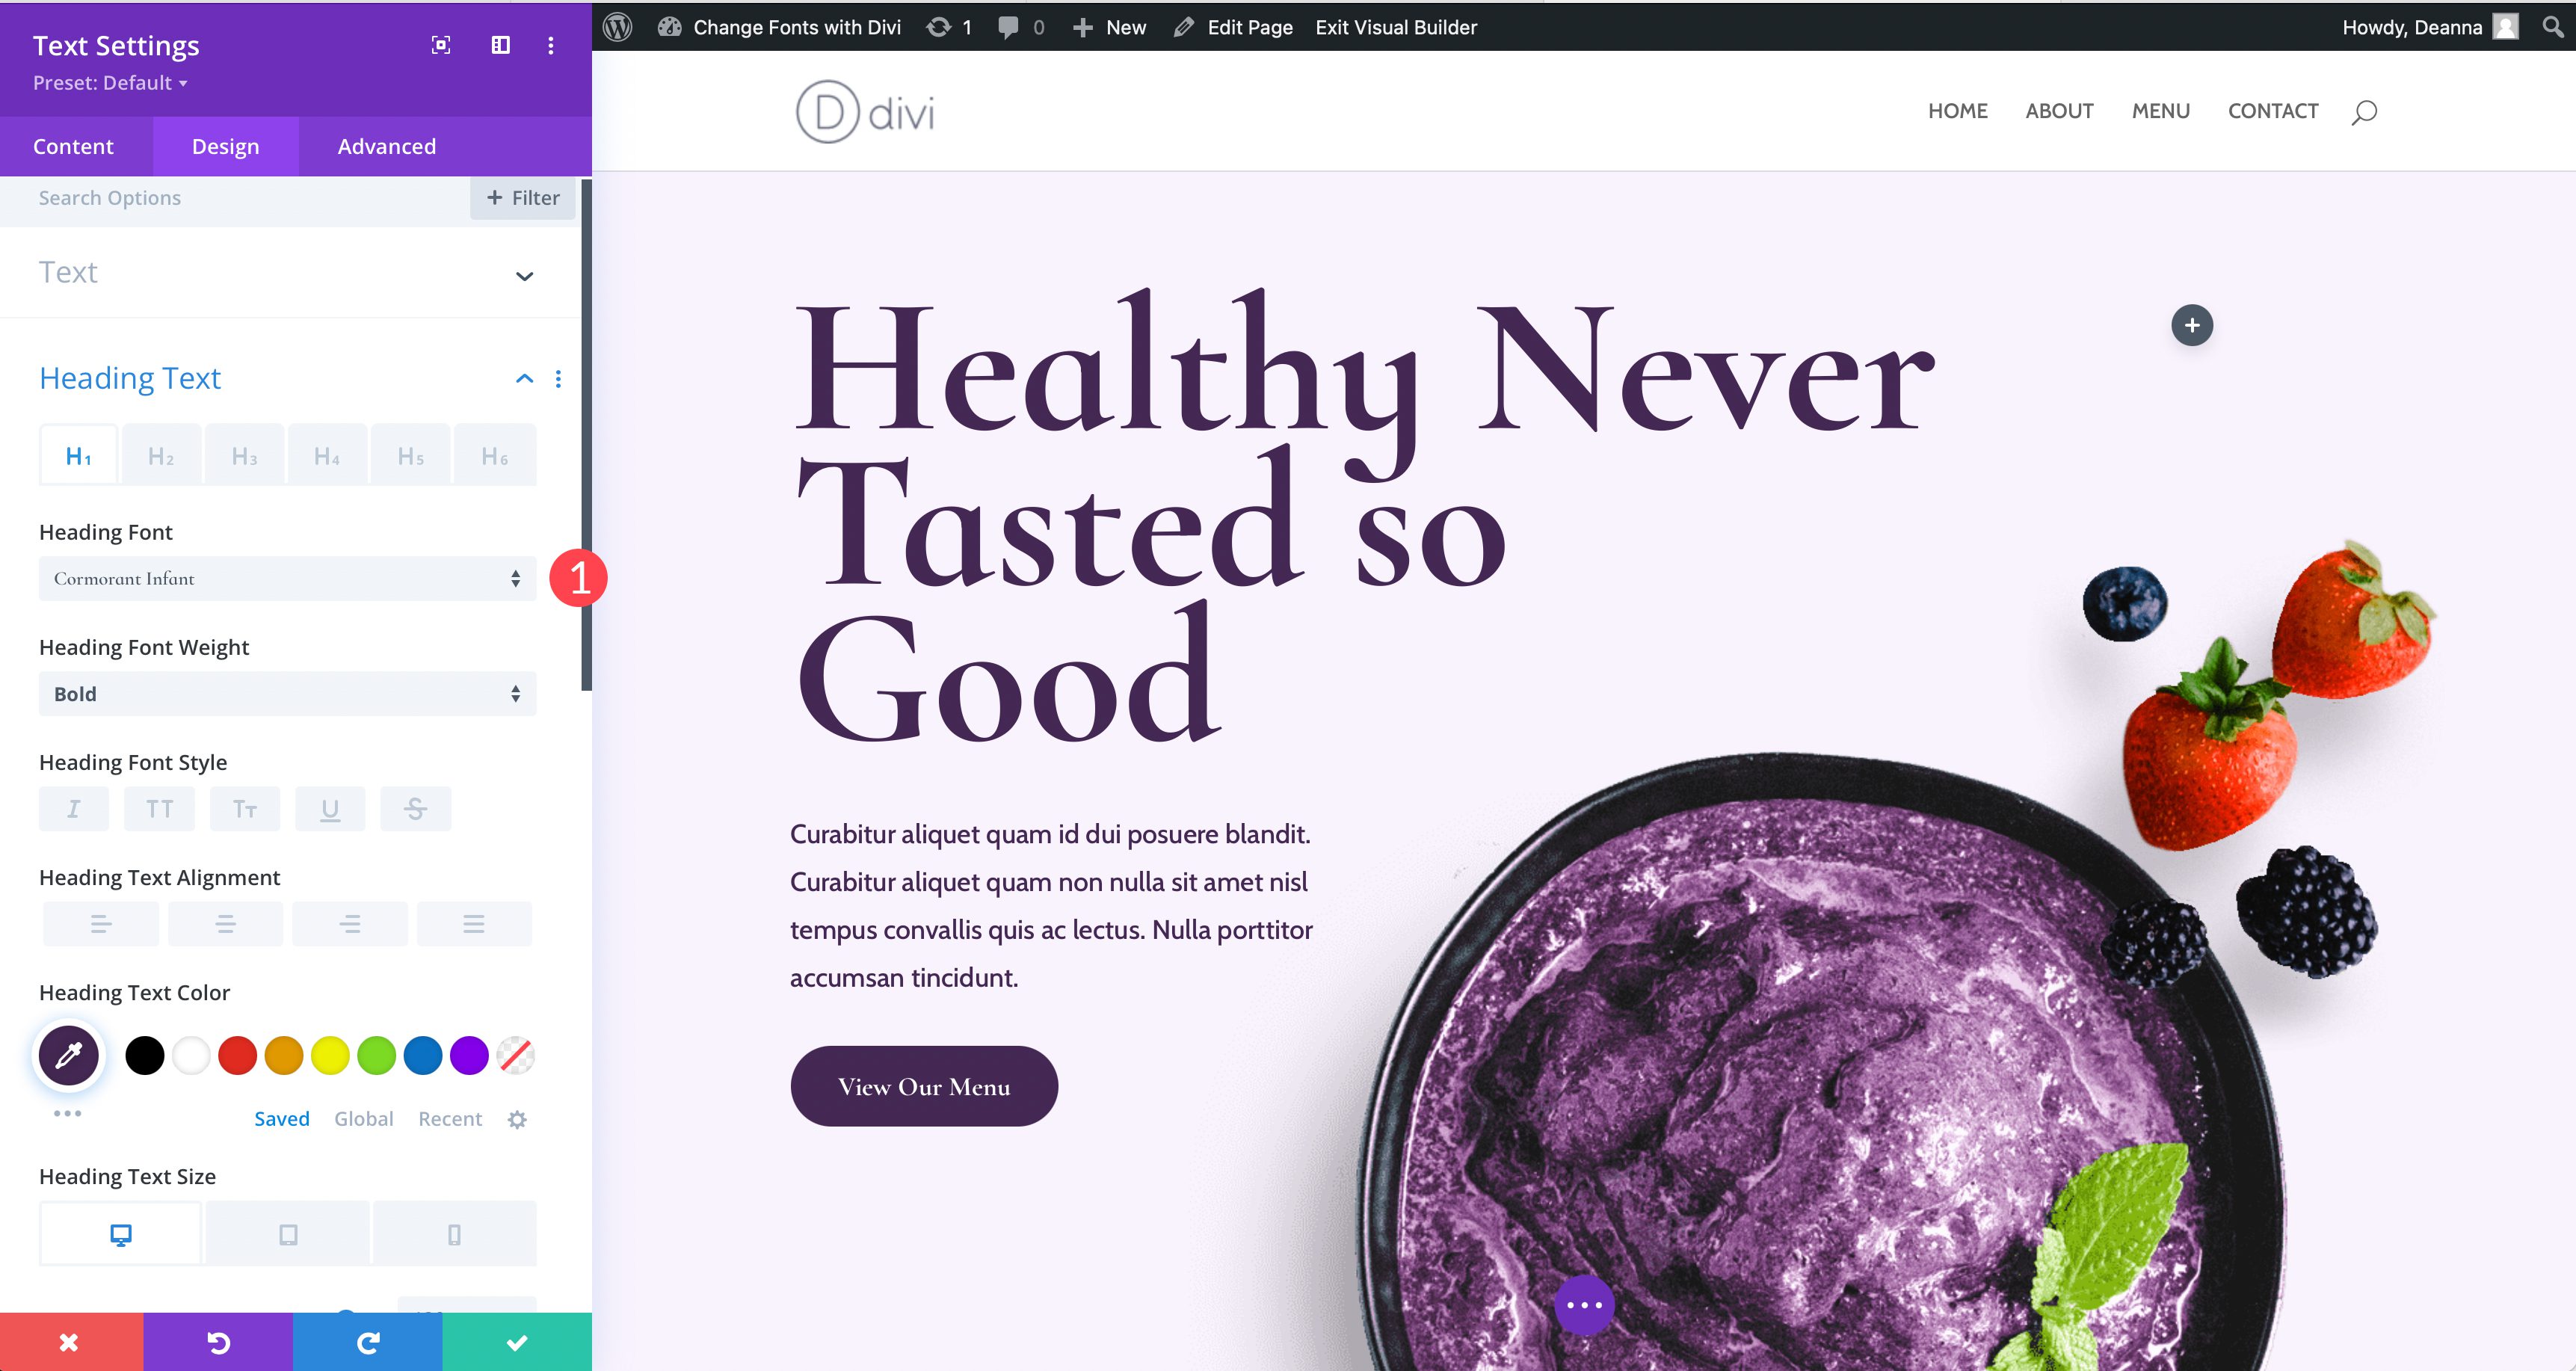
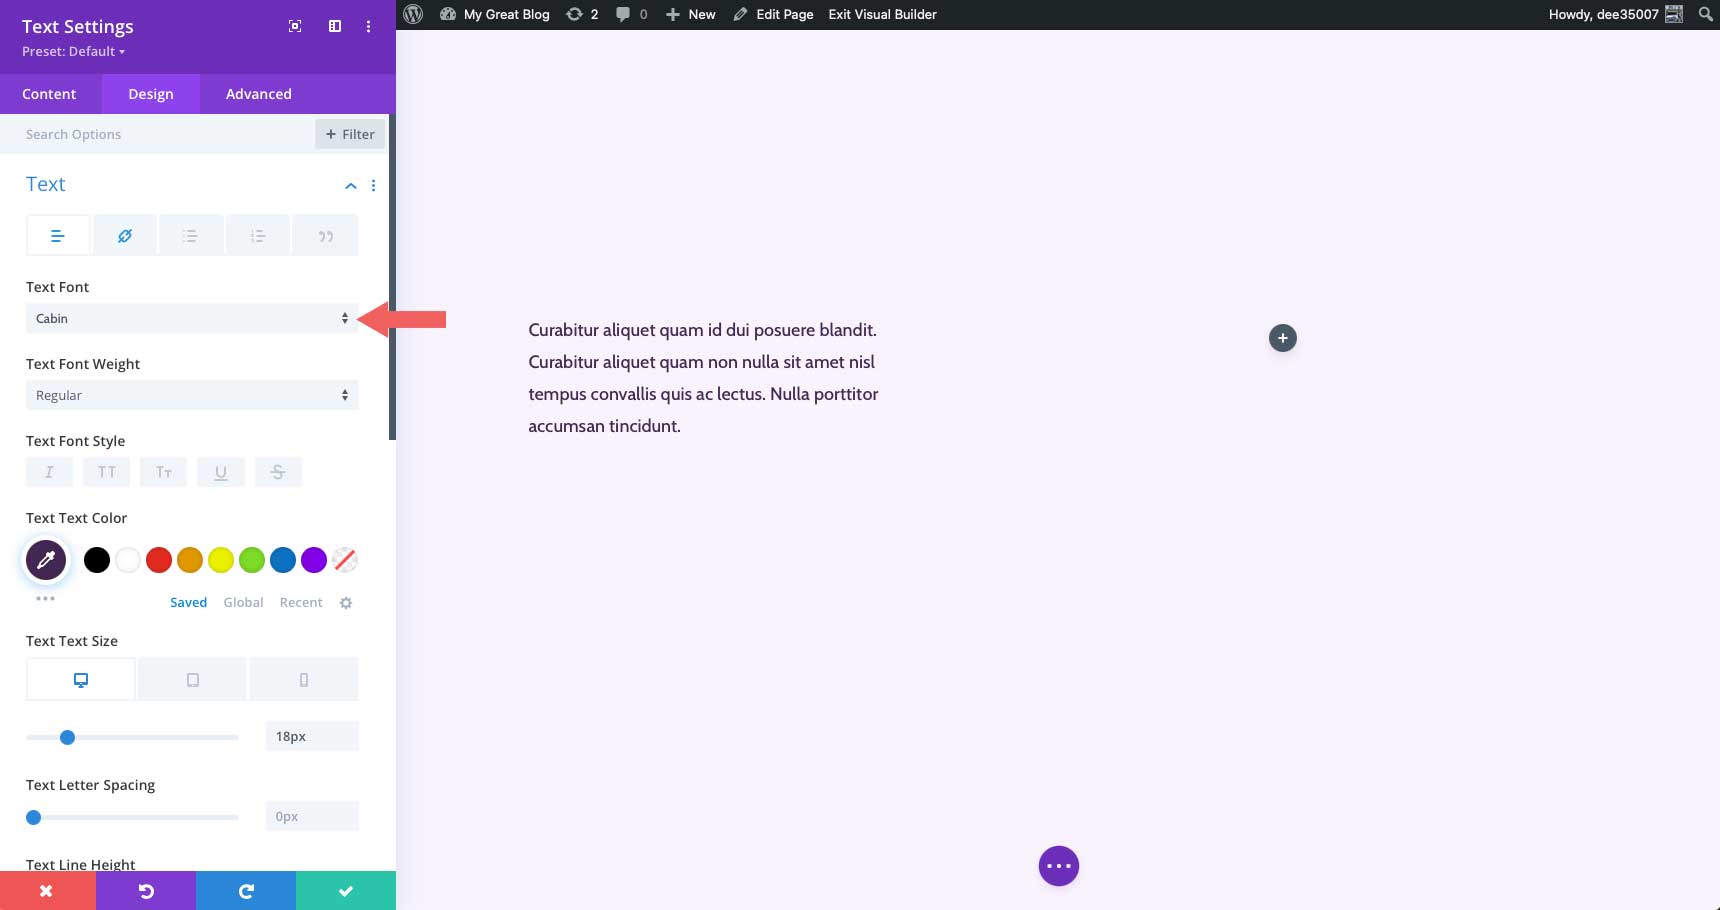
In addition to the theme customizer options, fonts can be changed at the module level where text is present. As an example, we’ll demonstrate how to change fonts in the text module. Under the design tab, you’ll find all of the text settings available to you. You can change body text, heading text, as well as color and styles for both. If you want to adjust the heading font, simply click on the dropdown menu to activate it. You can change your font, then a number of font styles including font weight, style, text alignment, color, size, and more.
6. How to Add a Custom Font in WordPress Manually
Thankfully, if you plan to manually load a custom font onto your site, it’s a fairly easy process. That being said, you will need to be comfortable editing theme files. We suggest using a child theme to perform this action since the slightest error can send your site into a tailspin. Keep in mind that adding a custom font to a generic WordPress theme won’t give you a ton of options, but it will keep your site free of speed-draining bloat. This is useful if you know you plan to only use a couple of fonts and don’t require a ton of options.
You’ll need to have a general understanding of how the WordPress file structure works, along with basic coding skills. We’ll be editing a couple of theme files and adding some CSS. Finally, you’re going to need your favorite code editor and an FTP program such as FileZilla.
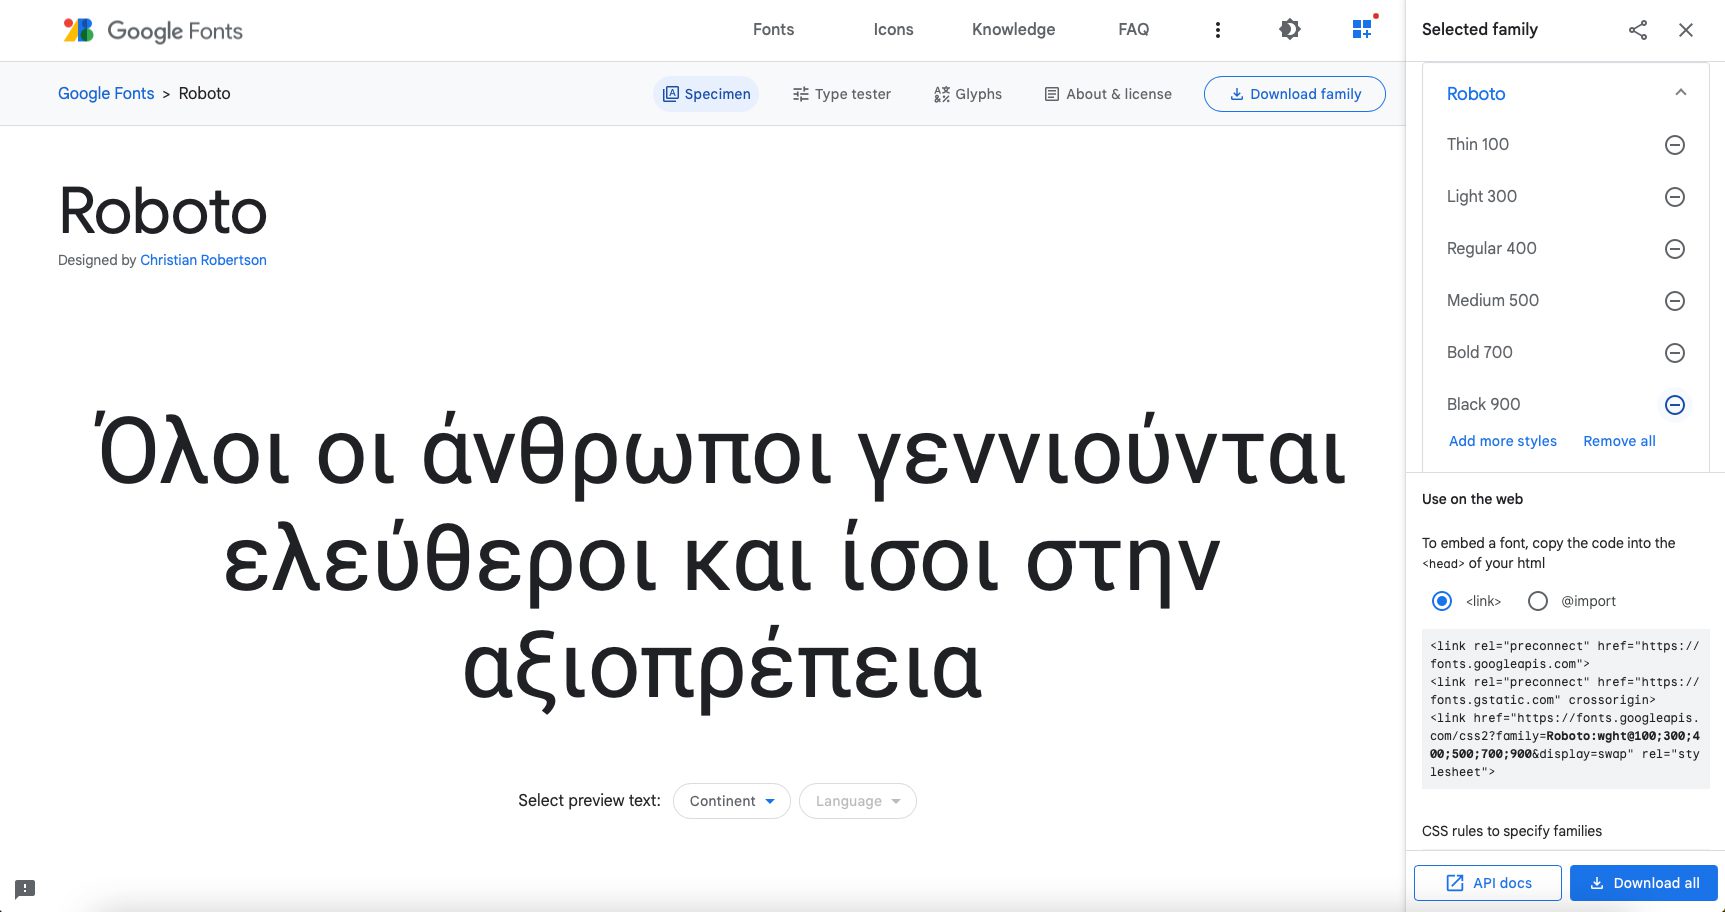
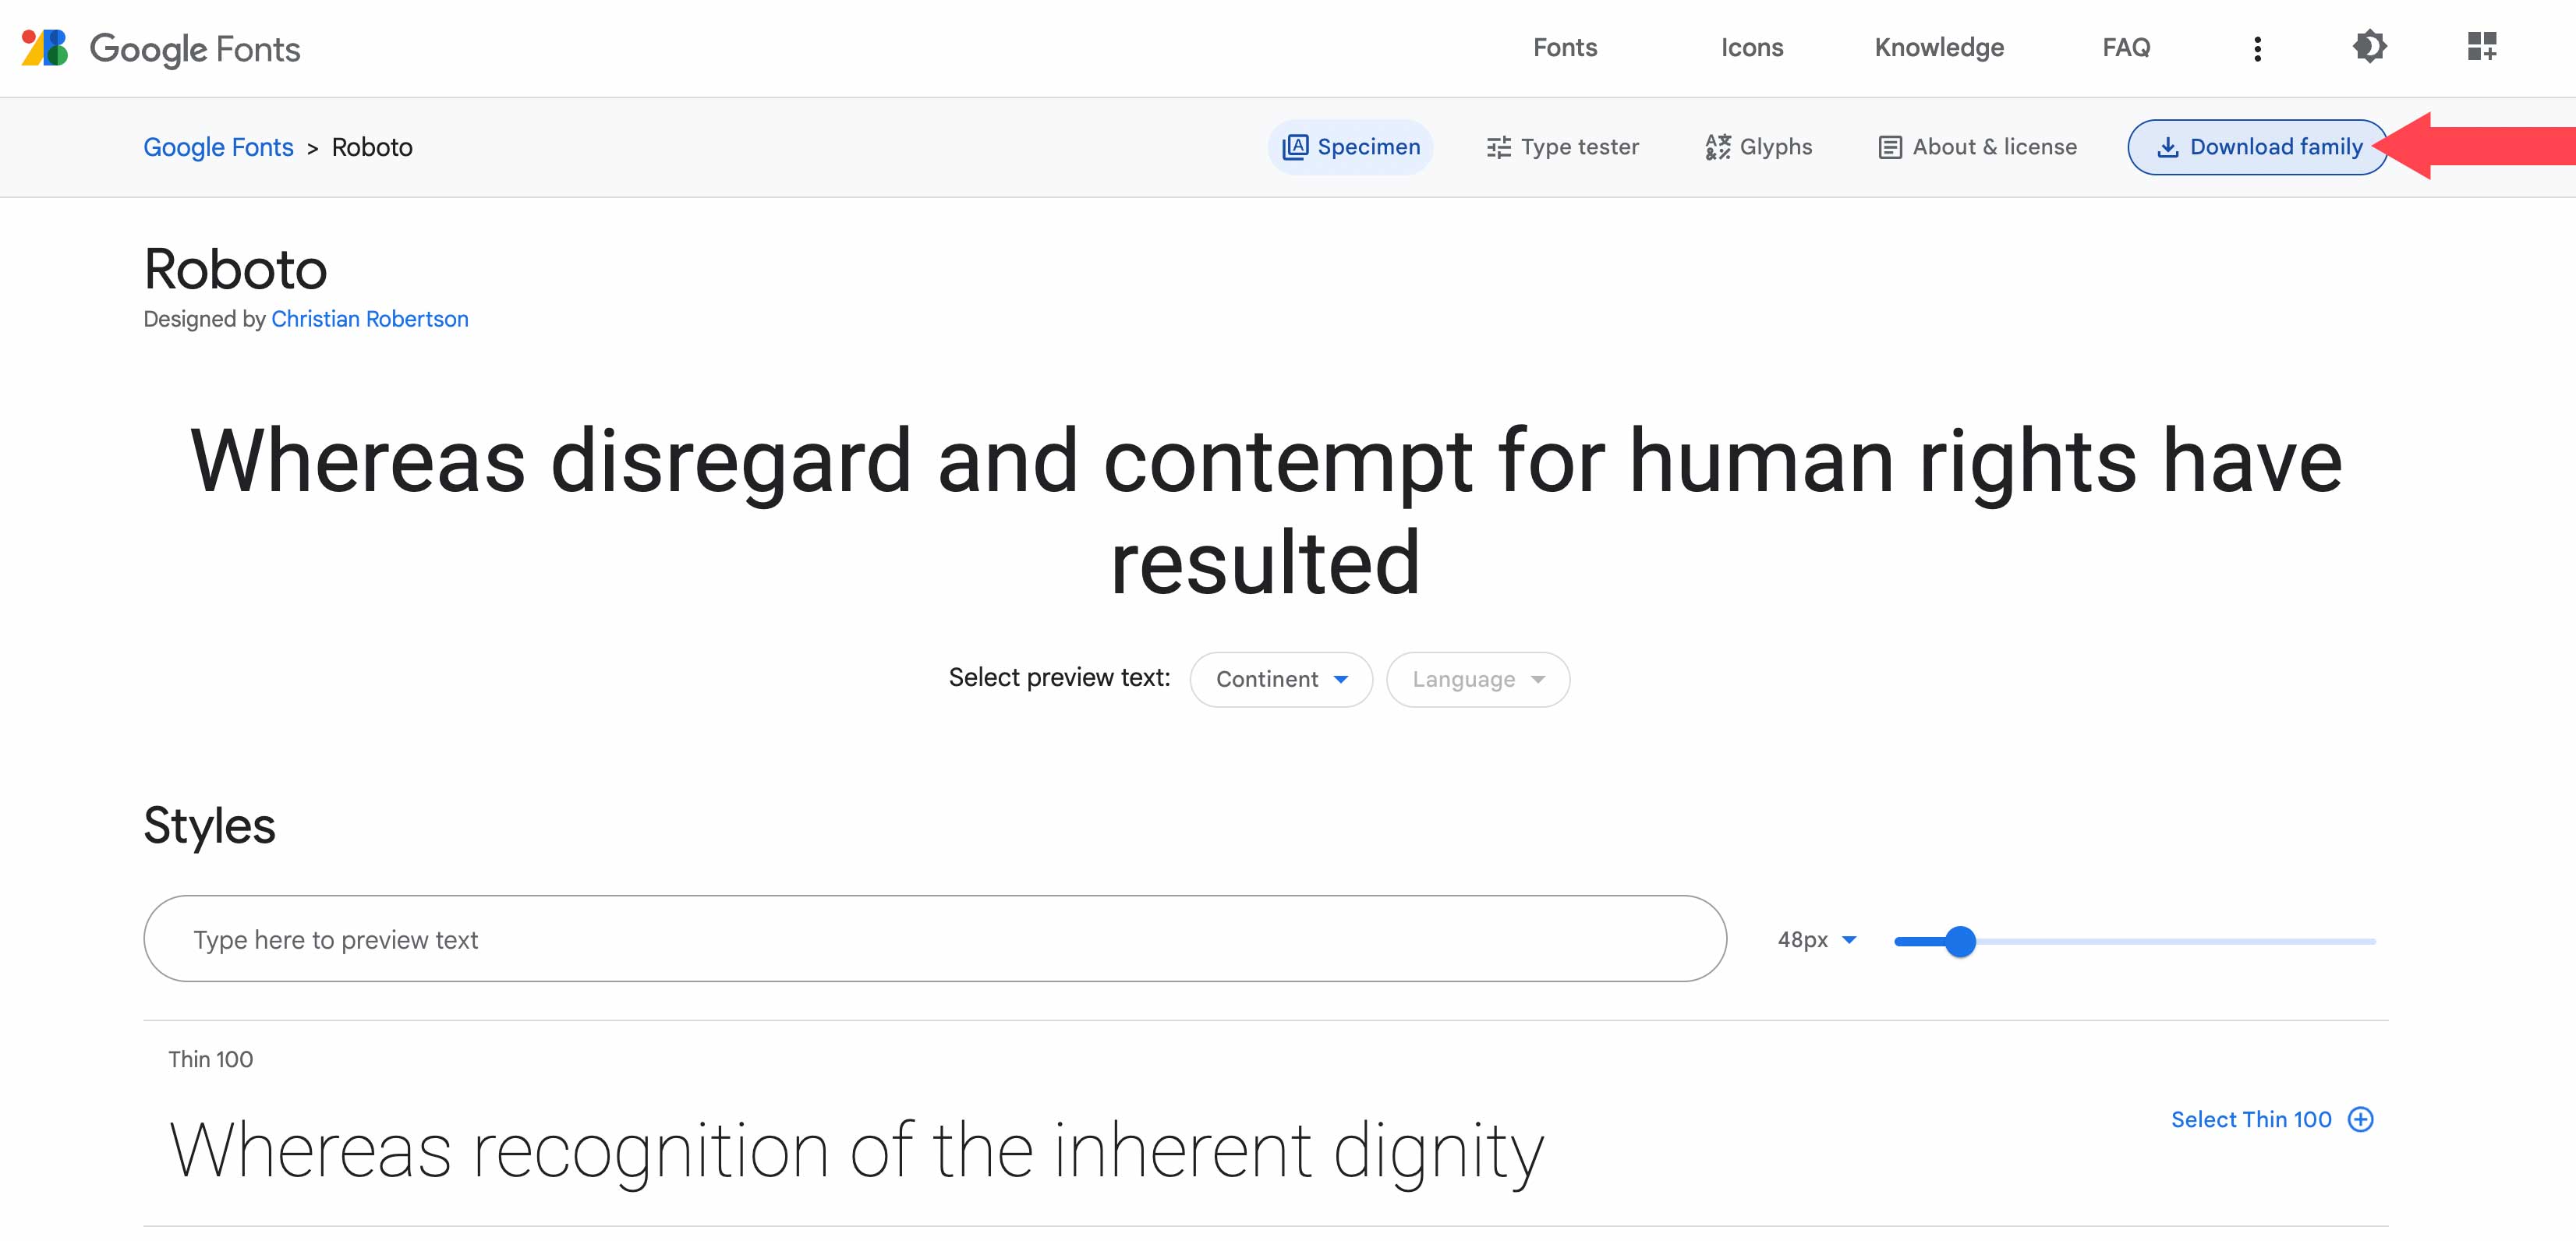
For our example, we’re going to add the Google font Roboto. The first step is to head to Google Fonts and find Roboto. Select the font styles you want to embed.
Adding the Code
There are a couple of ways to do this, but for our example, we’re going to do it the WordPress preferred way of enqueuing. First, copy the link to the Roboto font. This is included in the embed code from Google and will look like this example.
https://fonts.googleapis.com/css2?family=Roboto:wght@100;300;400;500;700;900&display=swap
Next, open FileZilla and connect to your website via FTP. Navigate to /public-html/wp-content/themes/yourthemechild/functions.php. It’s a good idea to use a child theme for this process since you will be editing a core theme file. Note: replace yourthemechild with your child theme’s name.
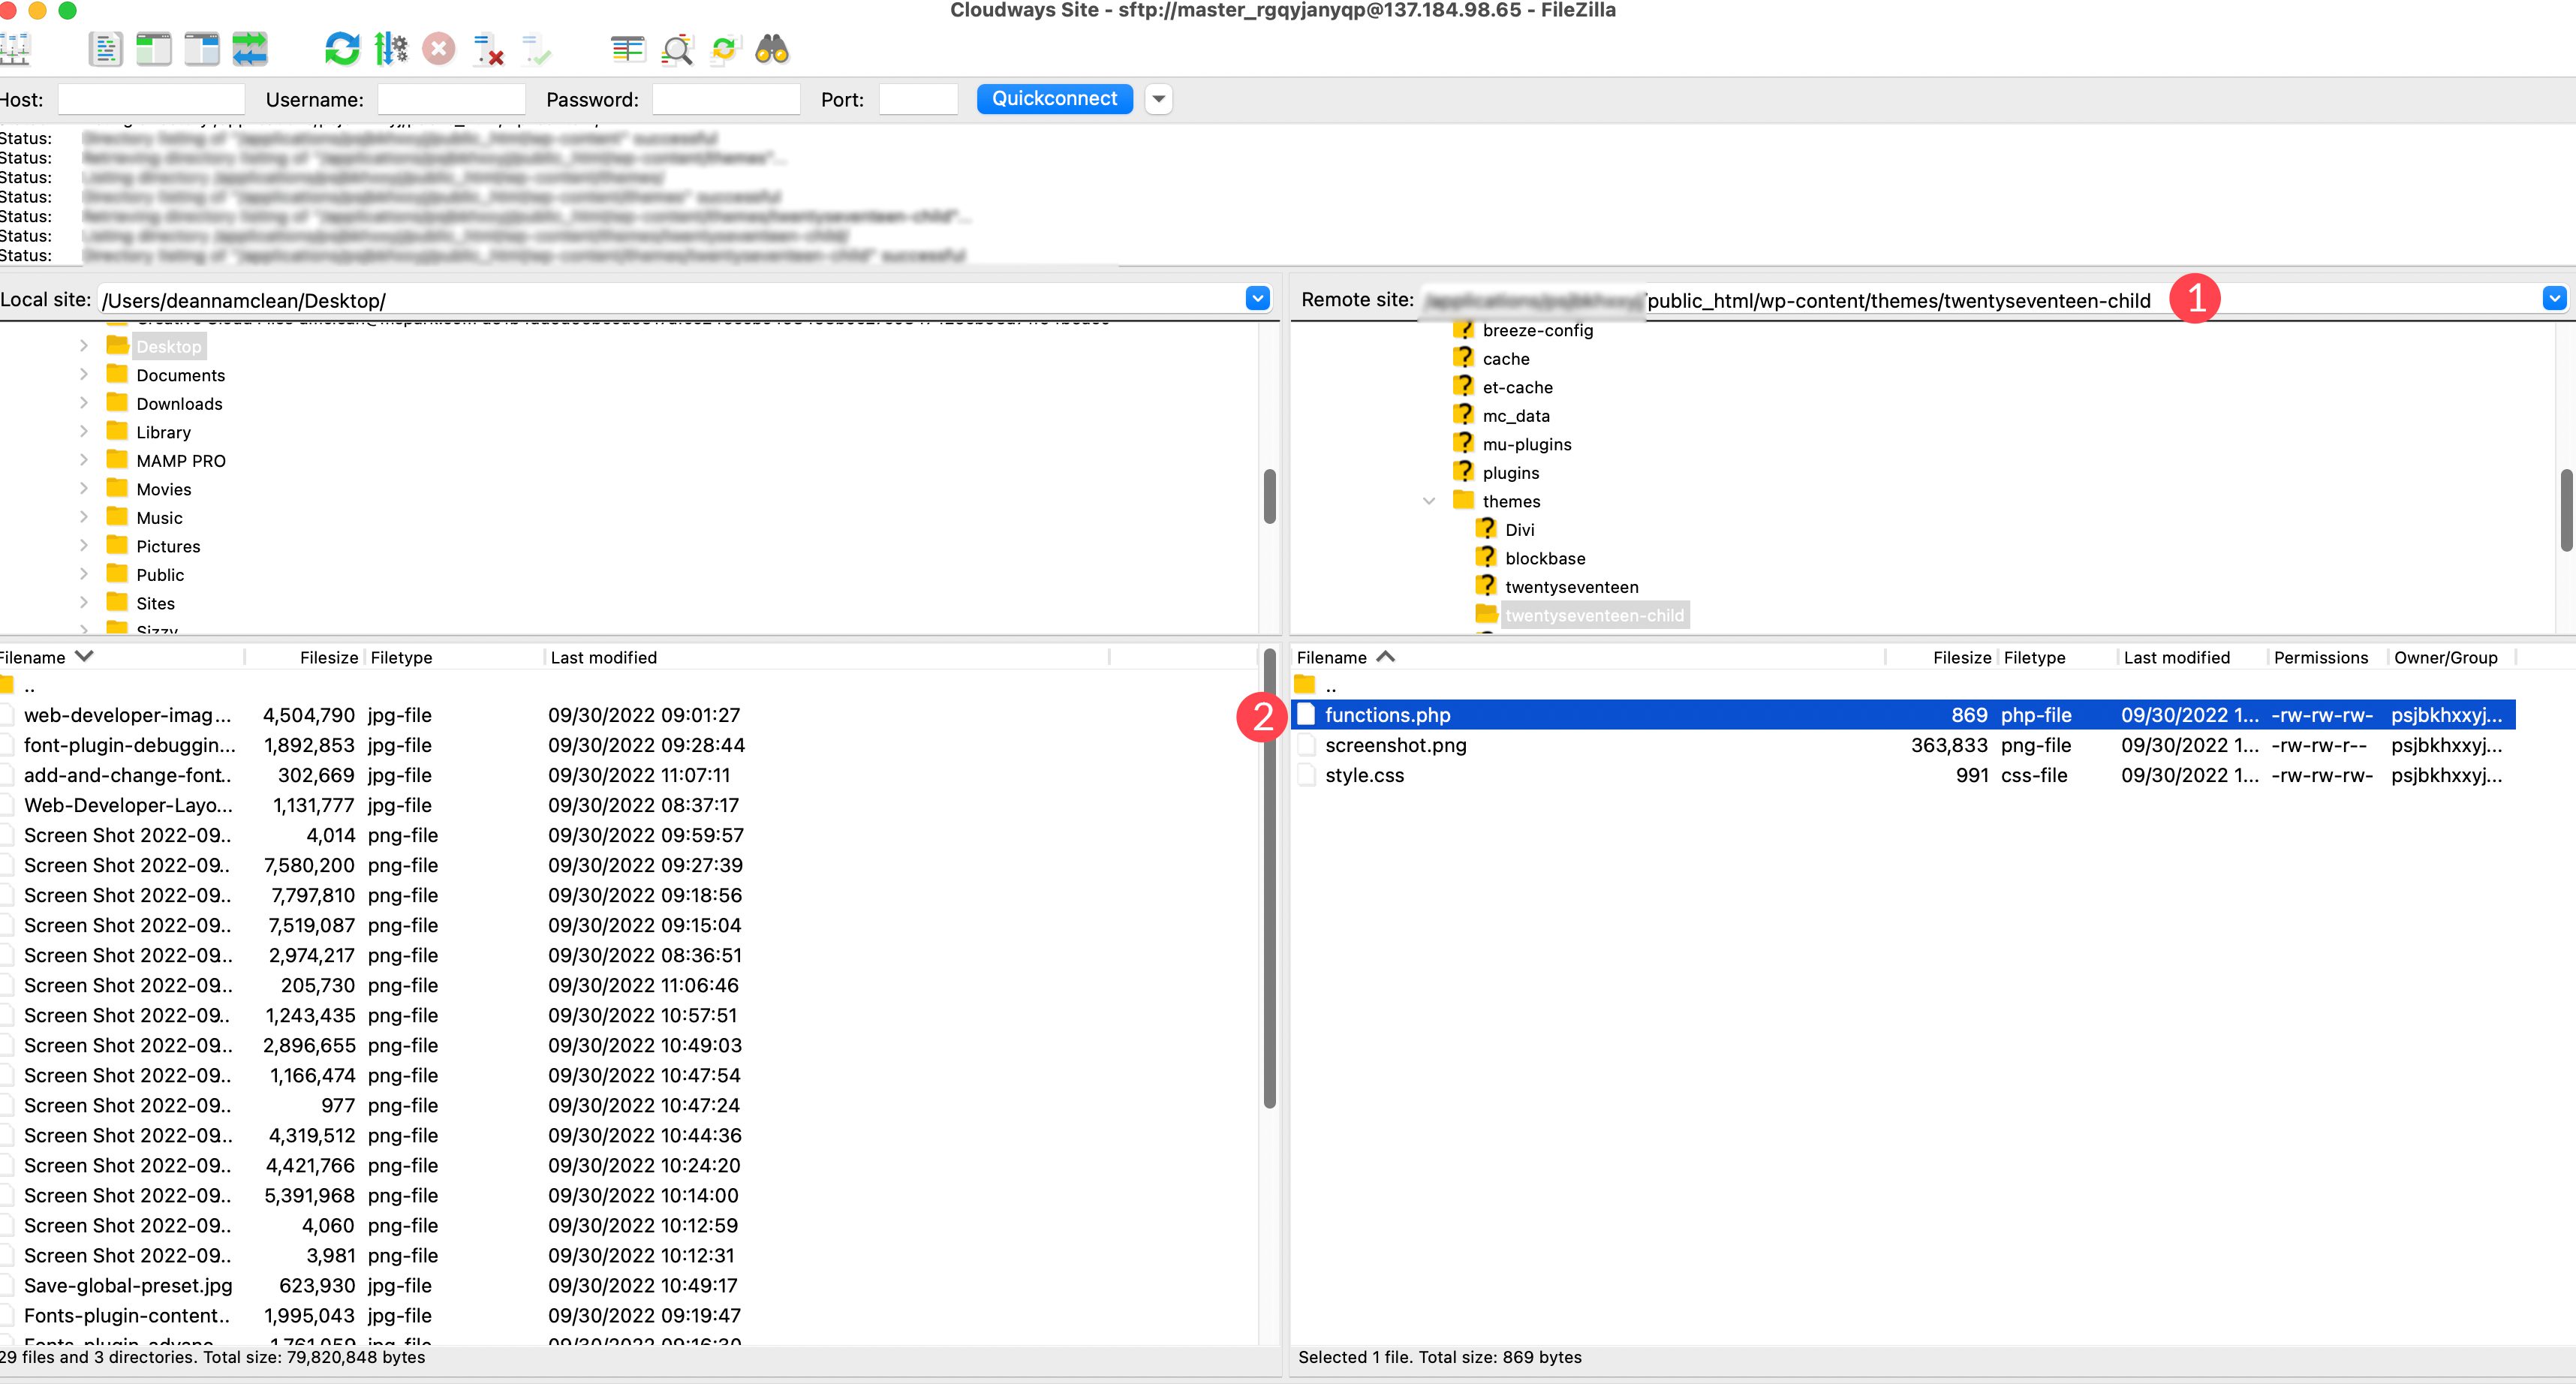
Right click on the file to open it. Add the following code at the end of the other code in the file.
function add_my_font() {
wp_enqueue_style( 'add_my_font', 'https://fonts.googleapis.com/css2?family=Roboto:wght@100;300;400;500;700;900&display=swap', false );
}
add_action( 'wp_enqueue_scripts', 'add_my_font' );
Next, you’ll need to tell WordPress where you want the font to be used. For this, we’ll add a bit of CSS to our child theme’s style.css file. Locate the file in the same folder we worked out of. Add the following code:
.body, .h1, .h2, .h3, .h4, .h5, .h6 {
font-family: 'Roboto', sans-serif;
 }
This code tells WordPress that you want to use the Roboto font on all body text, as well as all headings on the site. Keep in mind that every theme is different, so if our code doesn’t work for you, reach out to your theme’s developer or use your browser’s inspection tool to locate the specific CSS rule for your fonts.
7. Adding a New Custom Font in WordPress Full Site Editing Theme
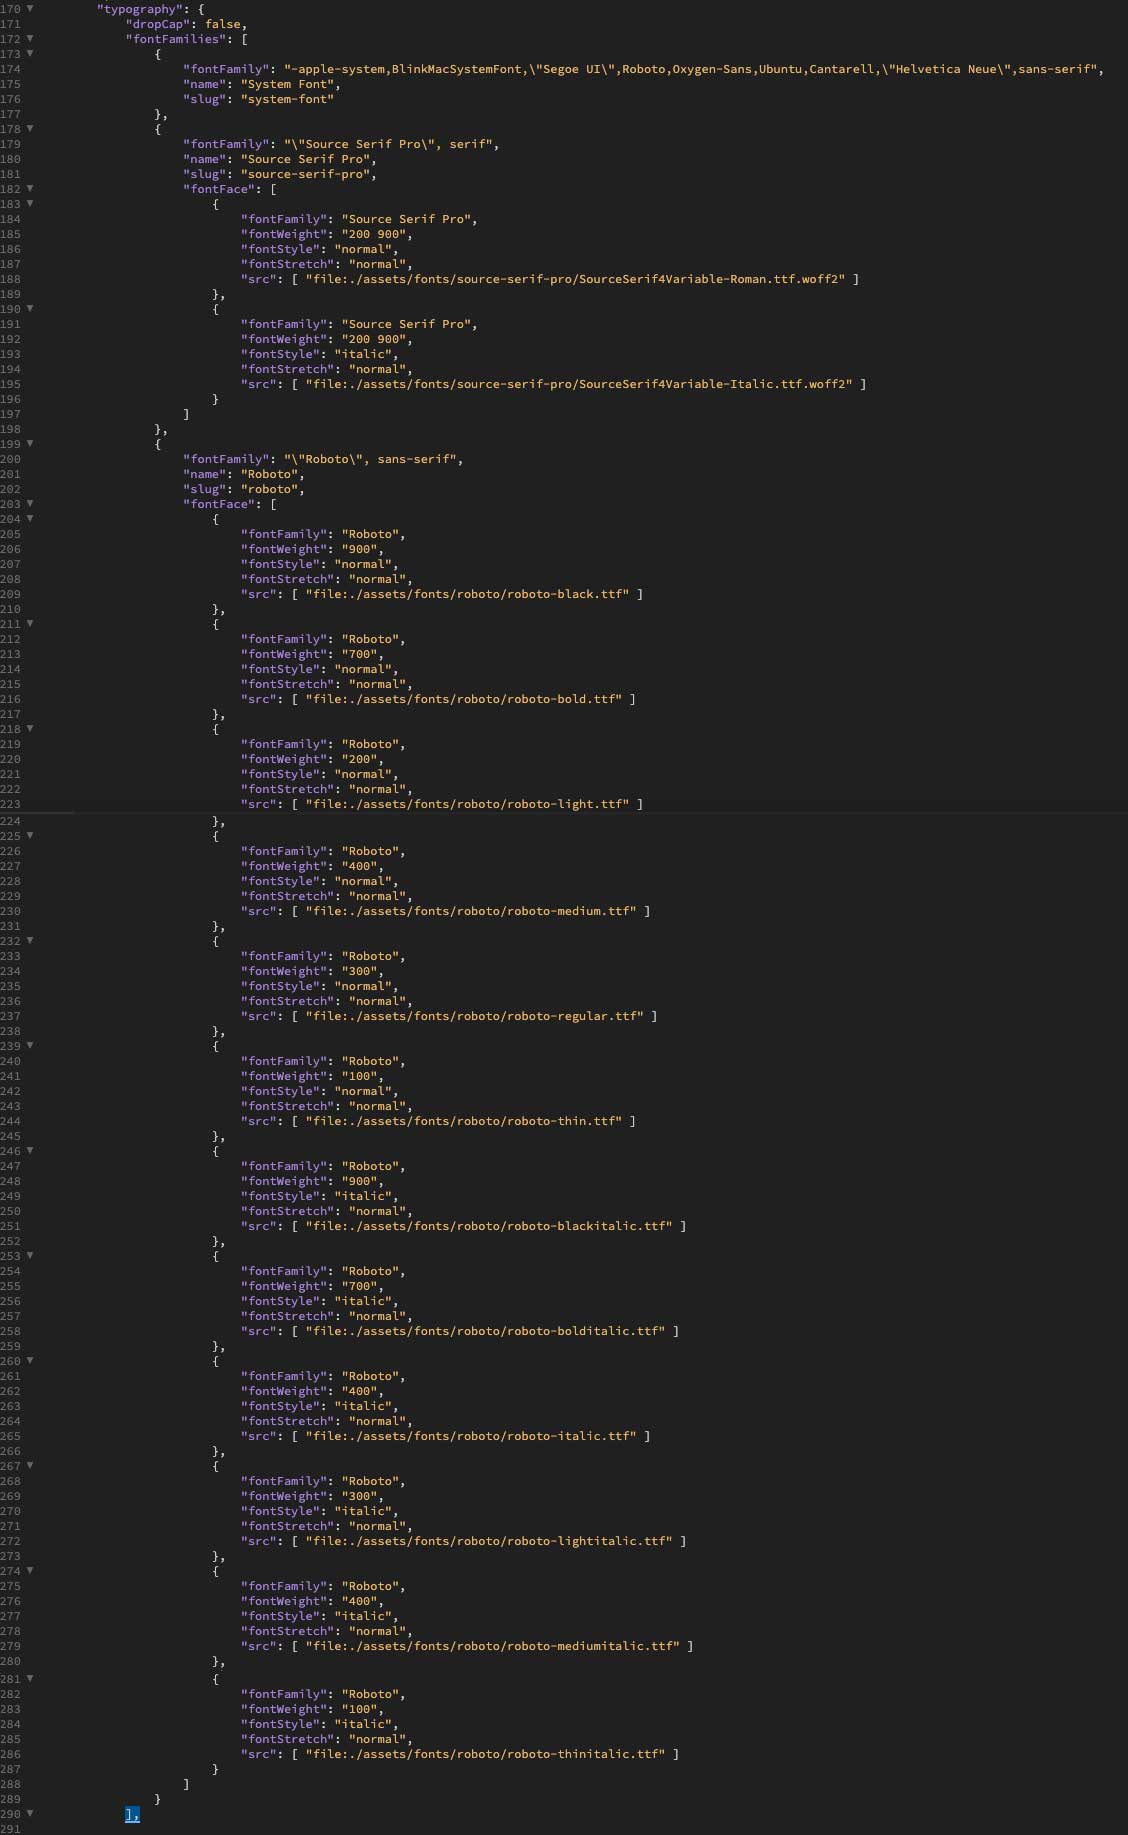
In full site editing (FSE) themes, it’s no longer necessary to use the @font-face CSS rule to add fonts. In FSE themes, you add the font to the asset/fonts/ folder, then call them in the theme.json file. Let’s go over the steps to add a custom font from Google Fonts to the Twenty Twenty-Two theme, then add the code to the theme.json file to use the font in your website.
For this example, we’ll use the Roboto font family from Google Fonts. The first step is to download the font from the Google Fonts library. Click the Download Family button at the top right corner of the screen.
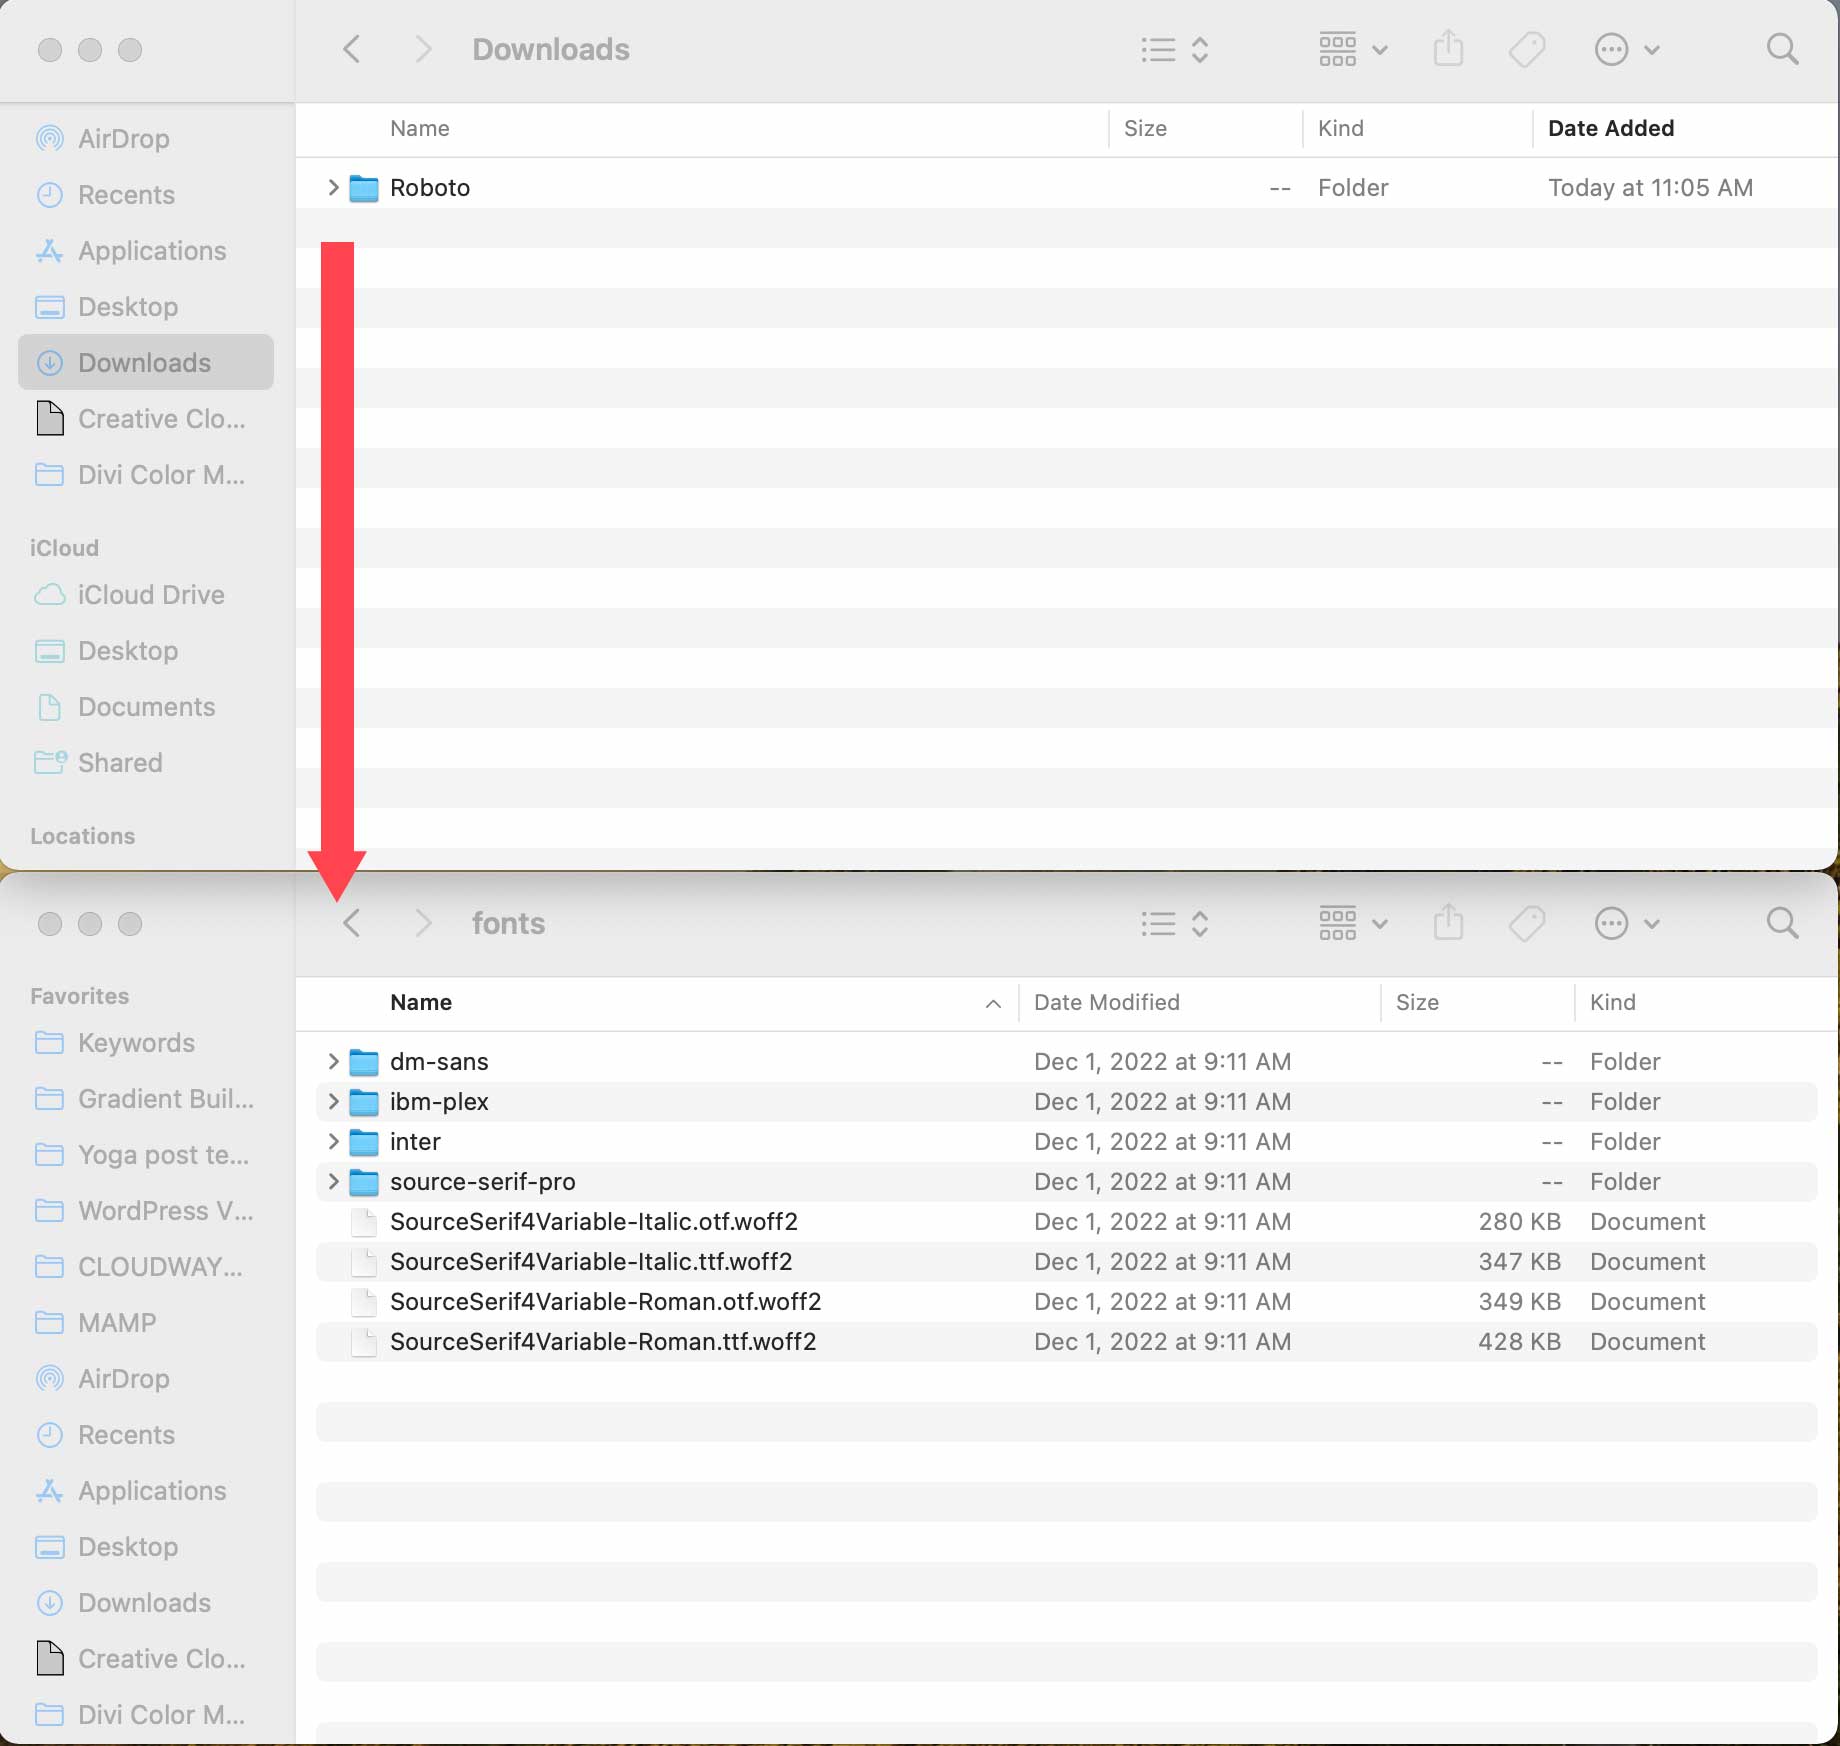
Next, navigate to your WordPress themes files either on a local machine or via FTP. For this example, we’ll use a WordPress install on our local machine. Please note the file location, as you will need to call it in the code we’ll add to the theme.json file later.
To locate your theme’s font folder, navigate to wp-content/themes/twentywentytwo/assets/fonts. Next, drag the downloaded font folder into the fonts folder of your WordPress install.
Next, locate the theme.json file by navigating to wp-content/themes/twentytwentytwo/theme.json.
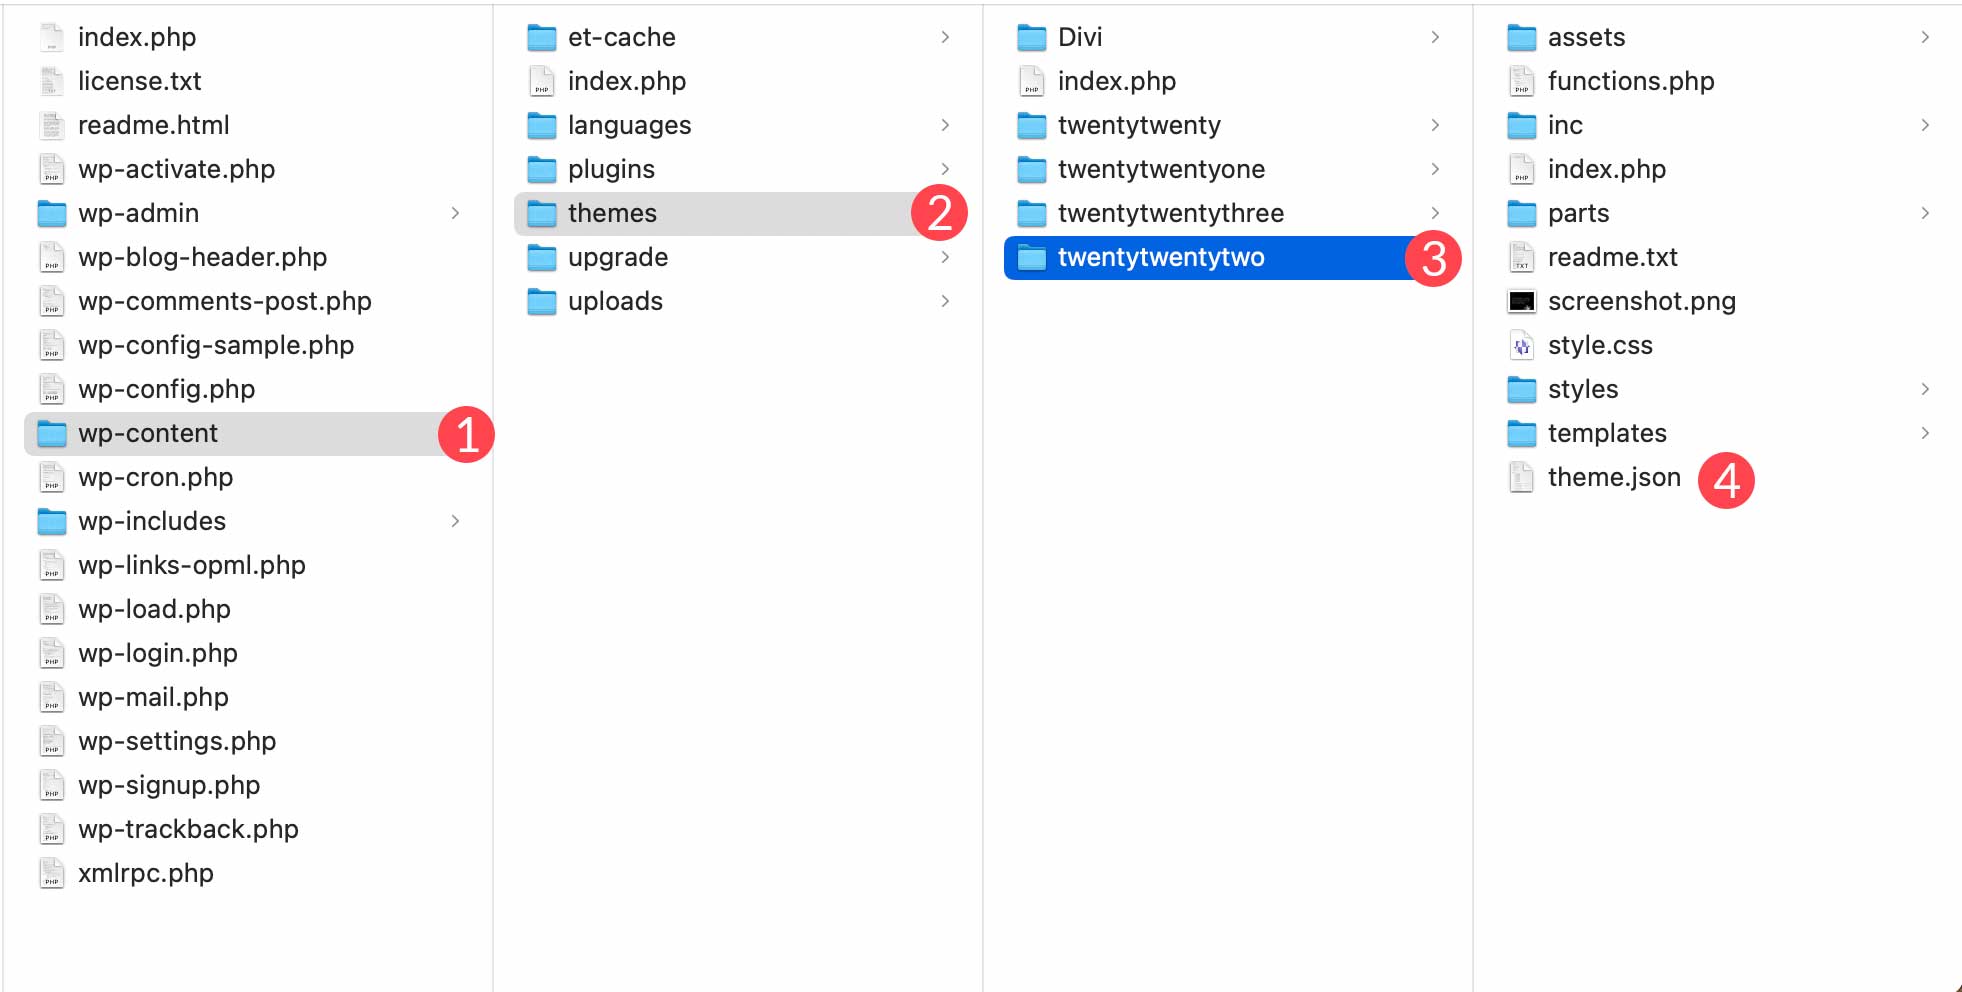
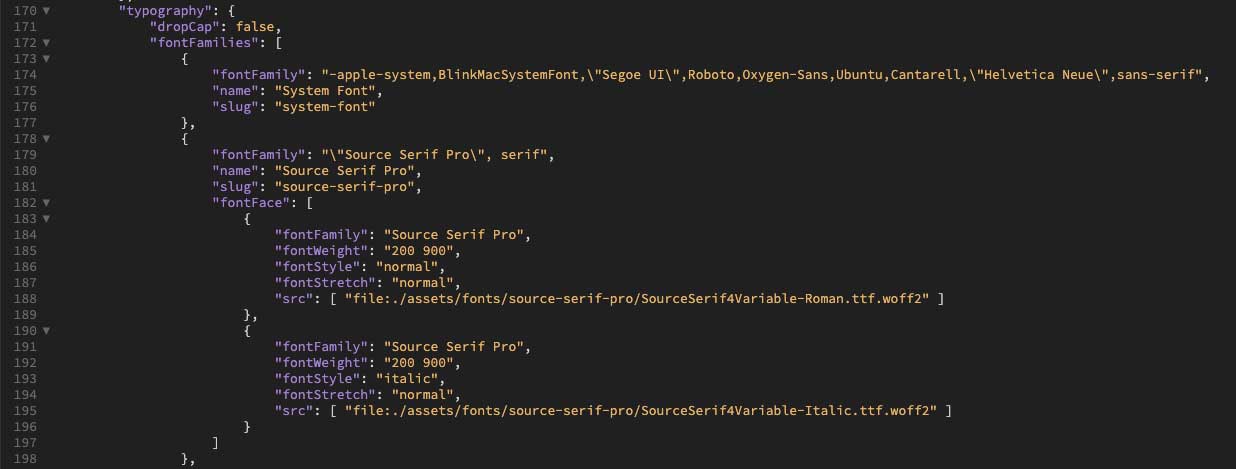
Right-click on the file to open it in your favorite code editor. Under the settings section of the theme.json file, scroll down to just past the source sans pro code in the typography settings.
Adding The Code to Theme.json File
Next, add the following code after the }, in the Source Serif Pro font section, and before the closing bracket ], of the typography section:
{
    "fontFamily": "\"Roboto\", sans-serif",
    "name": "Roboto",
    "slug": "roboto",
    "fontFace": [
        {
            "fontFamily": "Roboto",
            "fontWeight": "900",
            "fontStyle": "normal",
            "fontStretch": "normal",
            "src": [ "file:./assets/fonts/roboto/roboto-black.ttf" ]
        },
        {
            "fontFamily": "Roboto",
            "fontWeight": "700",
            "fontStyle": "normal",
            "fontStretch": "normal",
            "src": [ "file:./assets/fonts/roboto/roboto-bold.ttf" ]
        },
        {
            "fontFamily": "Roboto",
            "fontWeight": "200",
            "fontStyle": "normal",
            "fontStretch": "normal",
            "src": [ "file:./assets/fonts/roboto/roboto-light.ttf" ]
        },
        {
            "fontFamily": "Roboto",
            "fontWeight": "400",
            "fontStyle": "normal",
            "fontStretch": "normal",
            "src": [ "file:./assets/fonts/roboto/roboto-medium.ttf" ]
        },
        {
            "fontFamily": "Roboto",
            "fontWeight": "300",
            "fontStyle": "normal",
            "fontStretch": "normal",
            "src": [ "file:./assets/fonts/roboto/roboto-regular.ttf" ]
        },
        {
            "fontFamily": "Roboto",
            "fontWeight": "100",
            "fontStyle": "normal",
            "fontStretch": "normal",
            "src": [ "file:./assets/fonts/roboto/roboto-thin.ttf" ]
        },
        {
            "fontFamily": "Roboto",
            "fontWeight": "900",
            "fontStyle": "italic",
            "fontStretch": "normal",
            "src": [ "file:./assets/fonts/roboto/roboto-blackitalic.ttf" ]
        },
        {
            "fontFamily": "Roboto",
            "fontWeight": "700",
            "fontStyle": "italic",
            "fontStretch": "normal",
            "src": [ "file:./assets/fonts/roboto/roboto-bolditalic.ttf" ]
        },
        {
            "fontFamily": "Roboto",
            "fontWeight": "400",
            "fontStyle": "italic",
            "fontStretch": "normal",
            "src": [ "file:./assets/fonts/roboto/roboto-italic.ttf"]
        },
        {
            "fontFamily": "Roboto",
            "fontWeight": "300",
            "fontStyle": "italic",
            "fontStretch": "normal",
            "src": [ "file:./assets/fonts/roboto/roboto-lightitalic.ttf" ]
        },
        {
            "fontFamily": "Roboto",
            "fontWeight": "400",
            "fontStyle": "italic",
            "fontStretch": "normal",
            "src": [ "file:./assets/fonts/roboto/roboto-mediumitalic.ttf" ]
        },
        {
            "fontFamily": "Roboto",
            "fontWeight": "100",
            "fontStyle": "italic",
            "fontStretch": "normal",
            "src": [ "file:./assets/fonts/roboto/roboto-thinitalic.ttf" ]
        }
    ]
}
The file should now look like this:
Save the file and add it back to the fonts folder by overwriting the file on your local machine or uploading it via FTP.
Viewing the Font In Twenty Twenty-Two Theme
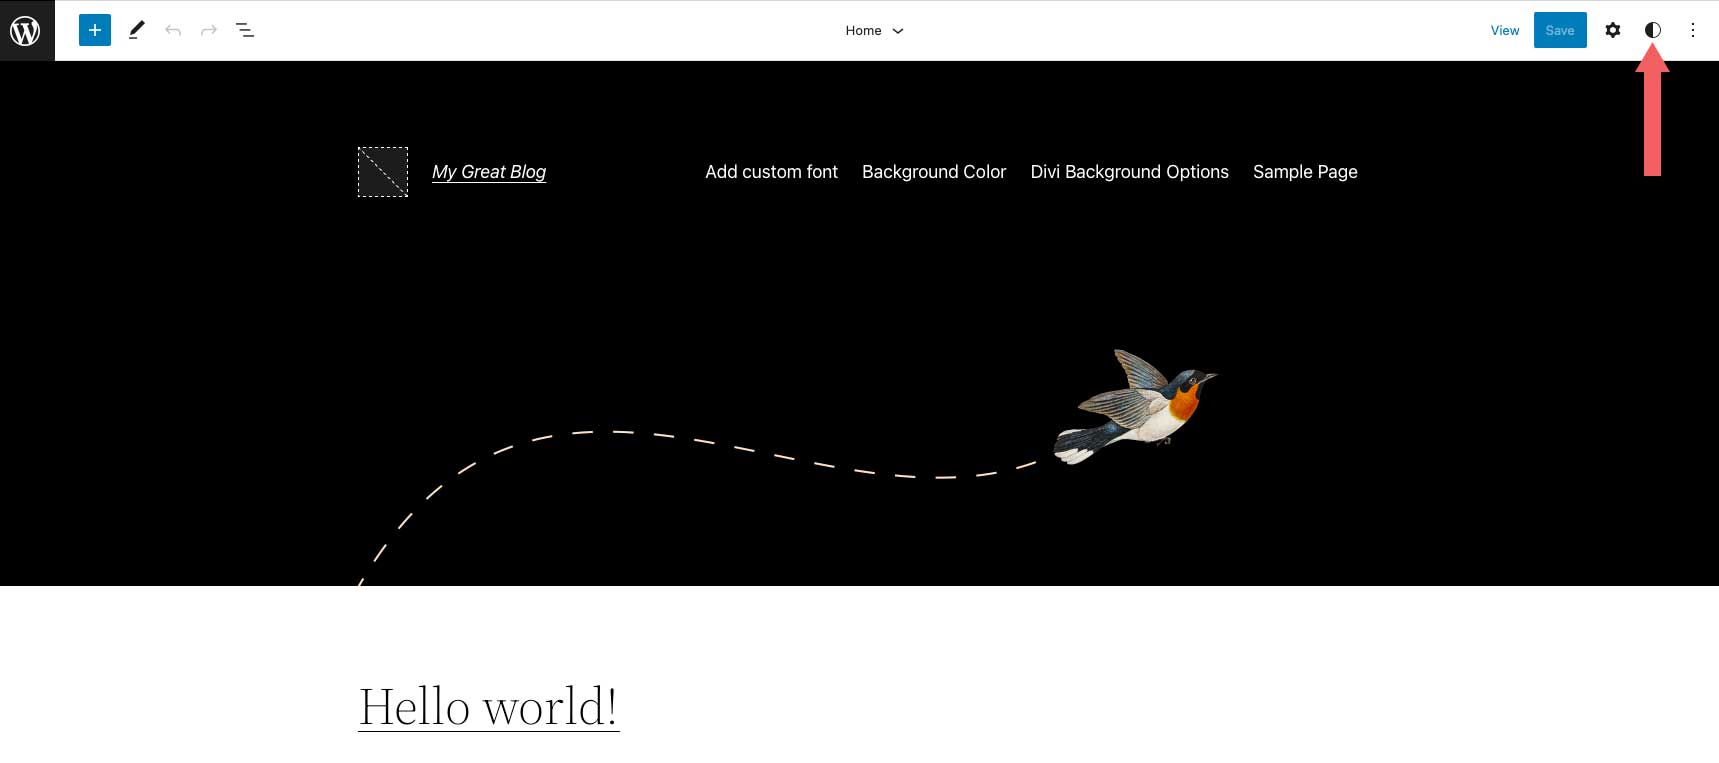
With the new font installed into your theme, you can view it by navigating to Appearance > Editor in Twenty Twenty-Two. When the screen refreshes, click the styles button.
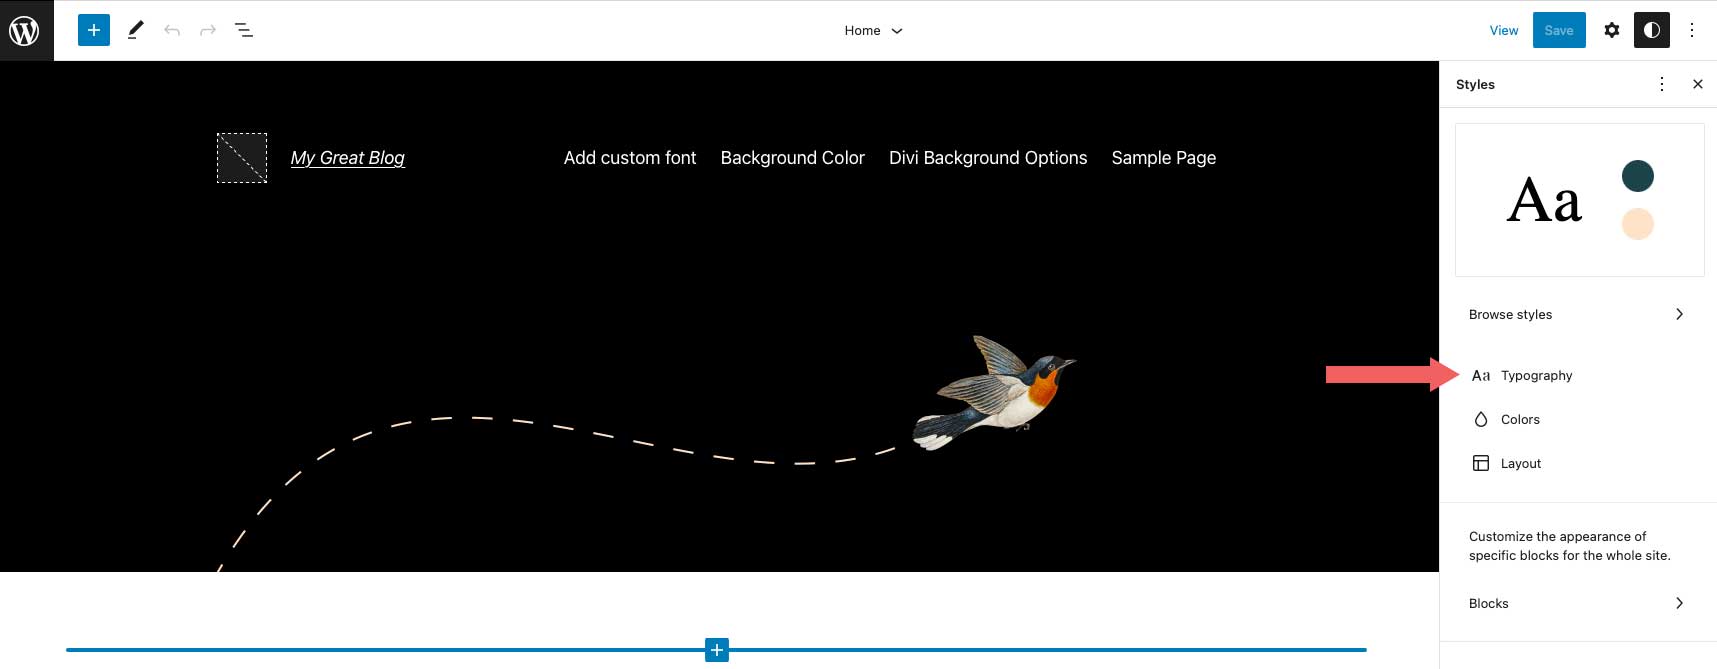
Next, click typography.
Now you’ll be able to select the new font from the dropdown menu, as well as adjust the font weight and other text styling options for your site.

8. Adding a New Custom Font in WordPress Using Divi
Divi makes it easy to upload custom fonts to your website through a text module. Divi accepts both ttf and otf file formats. If you try to upload any other format, you’ll receive an error message.
To get started, add or edit a page on your Divi website. Next, add or edit a text module in your page. Click on the settings icon in your text module to bring up the module settings.

Next, click on the design tab, then expand the text settings. Click on the drop-down menu located next to the font name.
You’ll see a list of all fonts available in Divi, as well as the current font, and an upload button. To add a new custom font, click upload.
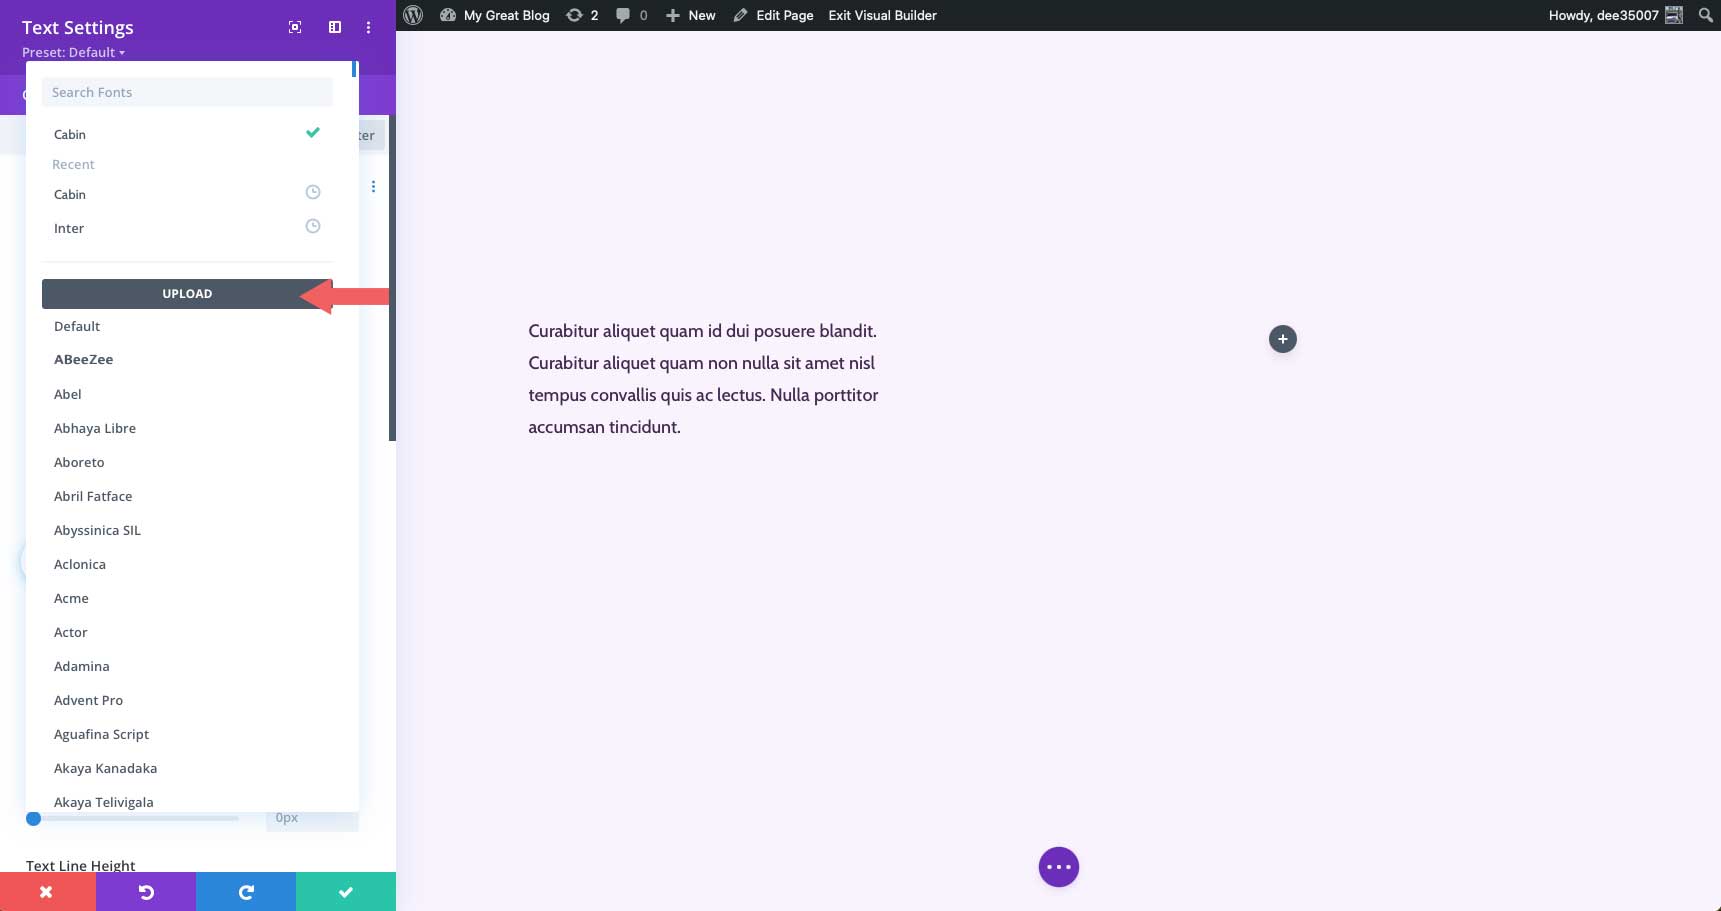
The upload font popup window will appear. Either click the choose font files button, or drag your ttf or otf font into the drag files here area.
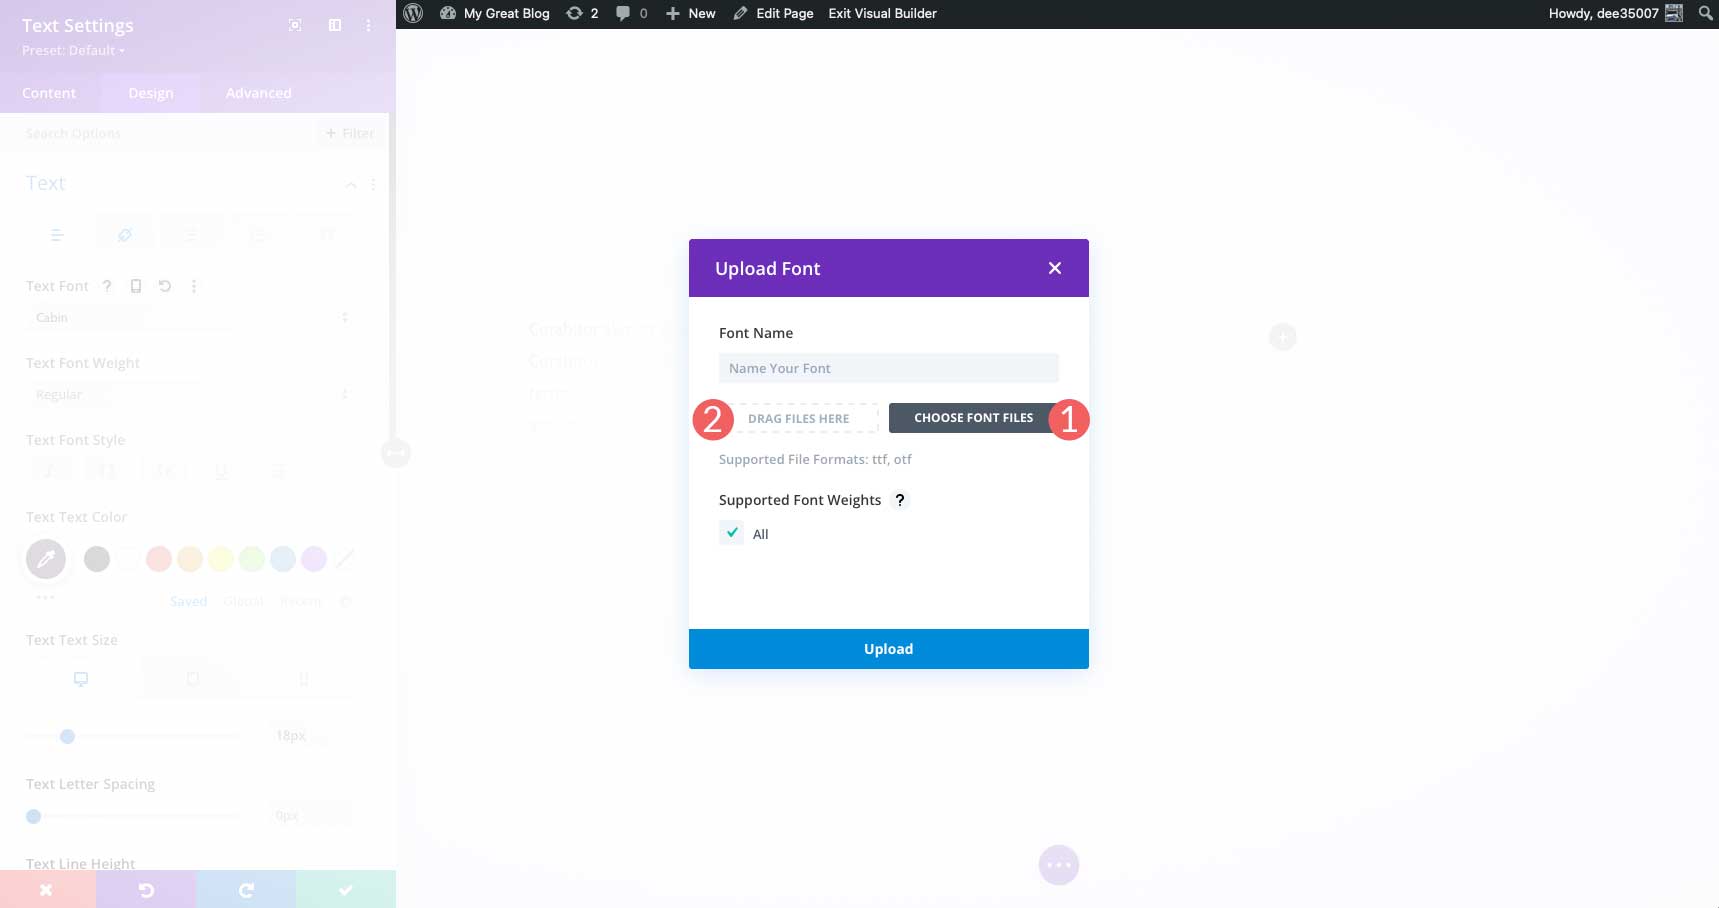
Next, you’ll want to give your font a name, and click the all checkbox to ensure that all font weights are supported for your font. Once you’ve set the options, click the upload button to add your font to Divi.
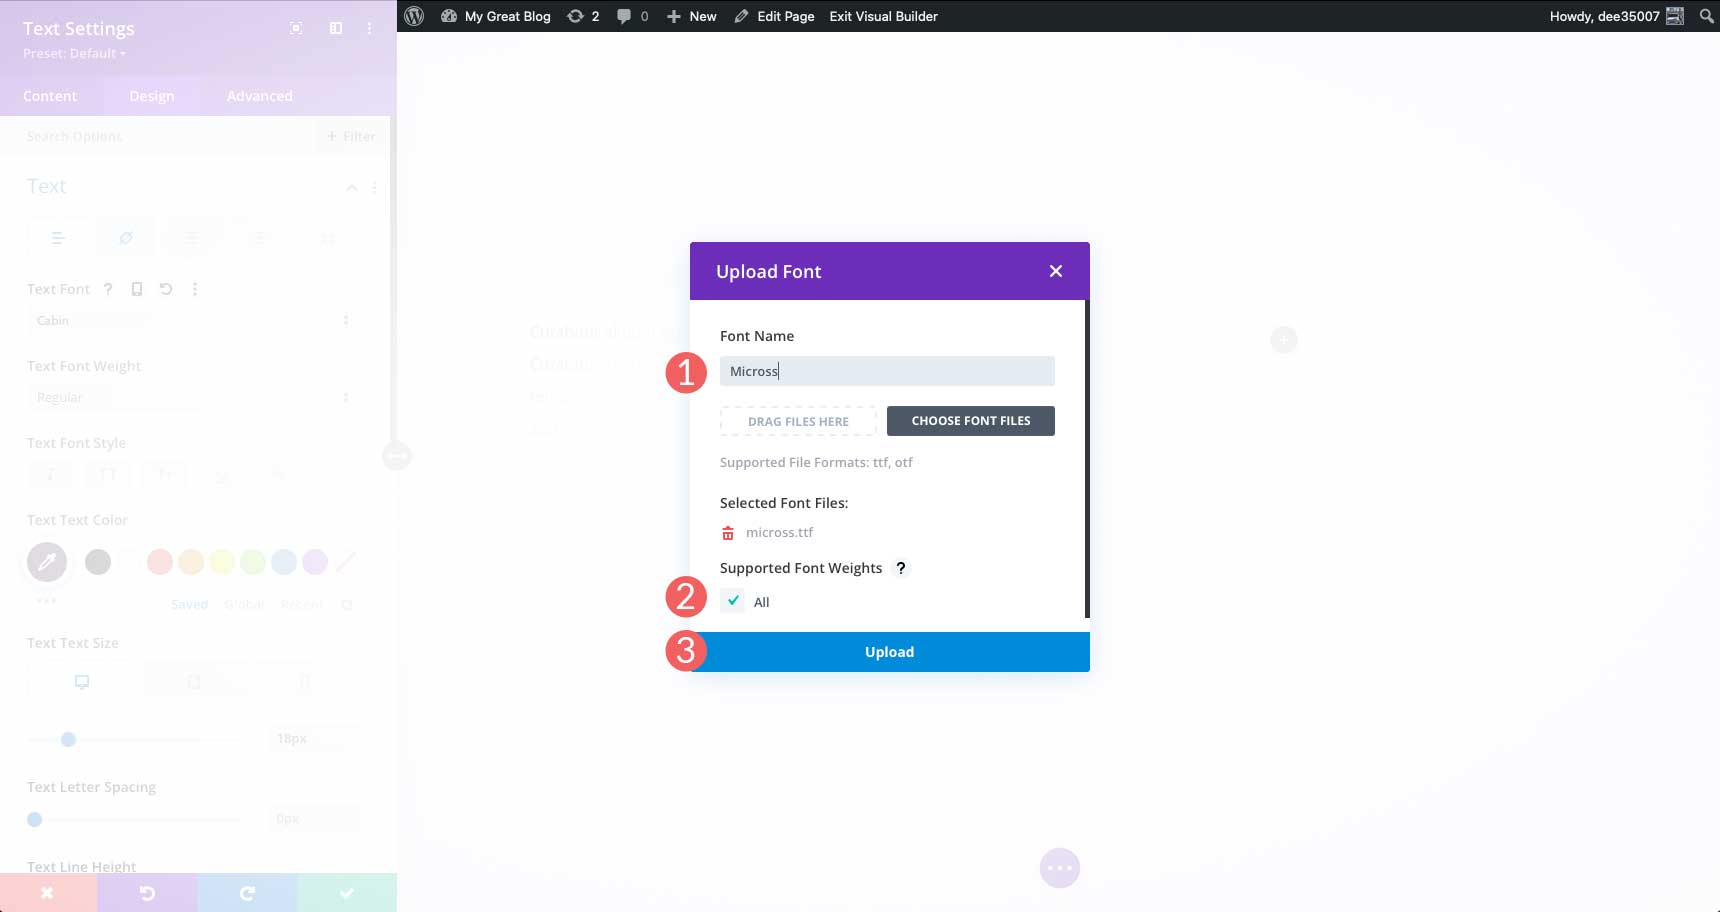
We should note that when you add a custom font to your Divi website, it will be made available throughout the site.
Tips and Best Practices When Changing Fonts in WordPress
Optimize Your Fonts
While using Google Fonts or any other web font provider, you should take steps to optimize your fonts. Not doing so can result in a slower website. Simple things like limiting the number of font families being used are a huge page load time reducer. Check out our post Using Google Fonts in WordPress (5 Tips for Optimizing Performance) for more information.
Choose Good Fonts
While using web fonts is a great choice, it only matters if you are using the right ones. Take the time to research the best web fonts for your site. Also, consider font pairing choices. It’s probably not a good idea to use two serif fonts together. After all, that can make things super busy and hard to read. To learn about some excellent choices offered by Google fonts, read The Best Free Web Fonts.
Consider Those With Accessibility Concerns
In addition to choosing the right font(s), you should be mindful of those who have trouble seeing smaller text. Always use at least 16px for body text, and use a legible font. The same can be said for the button text. Make sure that your button text is large and in charge. That is beneficial not only for those with visual impairments but is also a good call to action principle as well.
FAQs For Changing Web Fonts in WordPress
How many fonts should I use?
It’s a good idea to keep fonts to a minimum. Only use the fonts that you plan to use. If you want to have options, use a plugin or theme builder that pulls fonts from the cloud, such as Google Fonts CDN.
Can I use downloaded fonts in WordPress?
Yes, but it’s not a simple process. There are a lot of steps involved, and you’ll need some basic coding knowledge to do it. For more information on using downloaded fonts, check out How to Use Downloaded Fonts in WordPress without a Plugin on the Elegant Themes blog.
Can I change fonts in the Twenty Twenty-Two theme?
Yes, you can. That being said, there are only two options that come standard with it. Adding fonts to that specific theme isn’t the easiest path and requires editing theme.json and functions.php.
Are there good options to change fonts in WordPress with plugins aside from the one demonstrated in this post?
Yes! Check out our list of the 9 Best Typography Plugins for WordPress to see some of our recommendations.
Wrapping Things Up
There are a number of ways to change fonts in WordPress. If you’re using a generic theme, the easiest way to do it is to use a plugin such as Fonts Plugin | Google Fonts Typography. Full site editing themes generally give you more than one or two options, but some don’t make it incredibly easy to add more. Consider using a theme builder such as Divi because it gives you the most options. Finally, if you are a hands-on type of developer, or only need a couple of options, adding fonts manually may be right for you.
How do you change fonts in WordPress? Let us know by commenting below.


Hello.
How to add custom fonts in post classic editor?
My site is built with Divi.
Now I use Advanced Editor Tools (previously TinyMCE Advanced) plugin and here I have 17 fonts but I want to add a few more.
How to add to the editor a new font:
1) from Google Fonts?
2) custom font – I have TTF file
If you use a plugin like easy svg, you can upload a .tff-file. Just make sure to delete it again right after, because it makes it too easy to upload all kind of files to your website.
But it is a good idea to install a font on your server directly (by using ftp or uploading to Divi as mentioned above), since using google fonts is not compatible with the EU-privacy policy and laws, and website owners can be fined when using them.
I am a little scared about this Article, here in Germany I use DIVI with Google Fonts which give me a legal warning because of the DSGVO Law.
(They send the website visitors IP to Google which is not allowed in Germany)
I have to rework all my Sites to host the Fonts locally. It would be great if you could make this process easyer for German Website builders.
There are some Plugins now to host the Fonts locally (if you use the easy way, but they are not free).
It would be great advantage, if in DIVI there would be an option to select google Fonts and have a button to host the Fonts locally.
I love DIVI its the Best Theme I‘ve ever seen.
The forum is full of such requests. Try this one here:
https://github.com/degobbis/wp_plg_selfhost-google-fonts
Its a suggestion on the last answer here:
https://www.elegantthemes.com/forum/viewtopic.php?f=187&t=889148
Cheers from Germany,
Steve
Regarding 8. Adding a New Custom Font in WordPress Using Divi, this doesn’t work out of the box. Even uploading a standard .ttf font type results in the ‘Sorry, you are not allowed to upload this file type.’ error. The only way to make it work is to allow Unfiltered Uploads in the wp-config.php file. It’s kind of weird that Divi has this font upload feature, without making sure that it works around the WP filter.
Yep, this is a big problem and I have always used this plugin – Mime Types Plus – to deal with this. Add the respective mime type and then it works with the upload of the fonts. The plugin can be deactivated or deleted afterwards.
A solution on the part of Elegant-Themes would still be a great thing.