
In the current state of the web, pretty much every website needs to work with video in some way. Not only does Google prioritize articles and pages that have videos embedded (especially from YouTube), but users also clamor for video content wherever and whenever they can find it. One of the main issues, however, is that users aren’t always in the best situation to watch a video. Or they need a single snippet of information you discuss, not a deep-dive. Perhaps they’re hearing-impaired and need your site to be accessible enough to actually consume your content. That’s when you can add video transcripts to WordPress and give visitors your best content in the way that suits their needs.
How to Add Video Transcripts to WordPress
In terms of transcripts, you can get these in any number of ways. YouTube can automatically add captions to your videos, and this is one of the most common ways for creators to obtain transcripts for their videos.
The ease with which you can obtain these transcripts is by and large the reason you should check into this method first. The primary downside is that if you speak quickly or with an accent or use jargon/industry terminology, the automated transcription isn’t quite as accurate as most people would hope.
At any point in this process, though, you can adjust the text. So that makes the automated YouTube subtitles probably the simplest and easiest way to add video transcripts to WordPress posts.
1. YouTube Studio
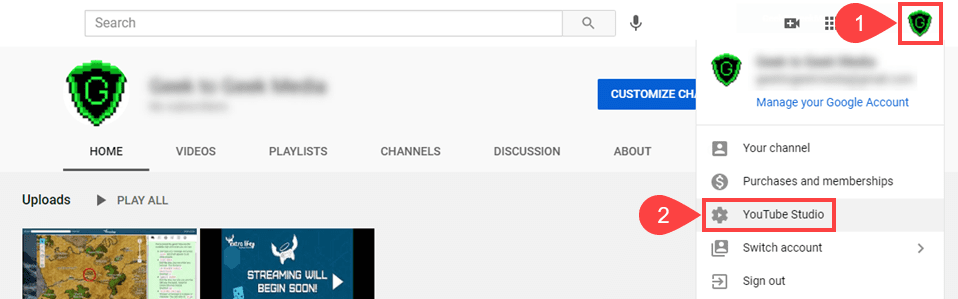
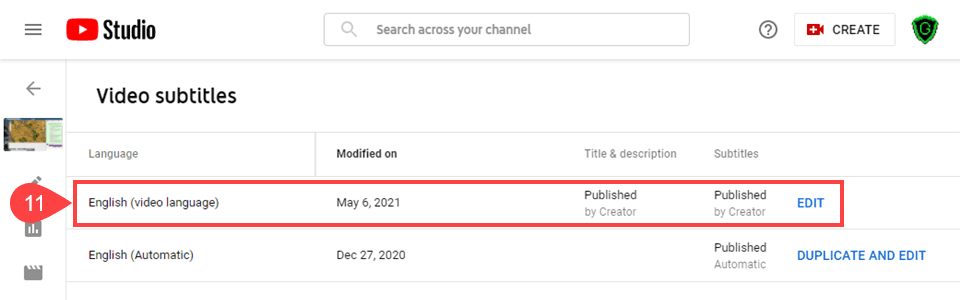
Navigate to YouTube and click on your profile icon in the upper right corner (1). From there, you will see an option labeled YouTube Studio (2). Clicking that will take you to your video dashboard.
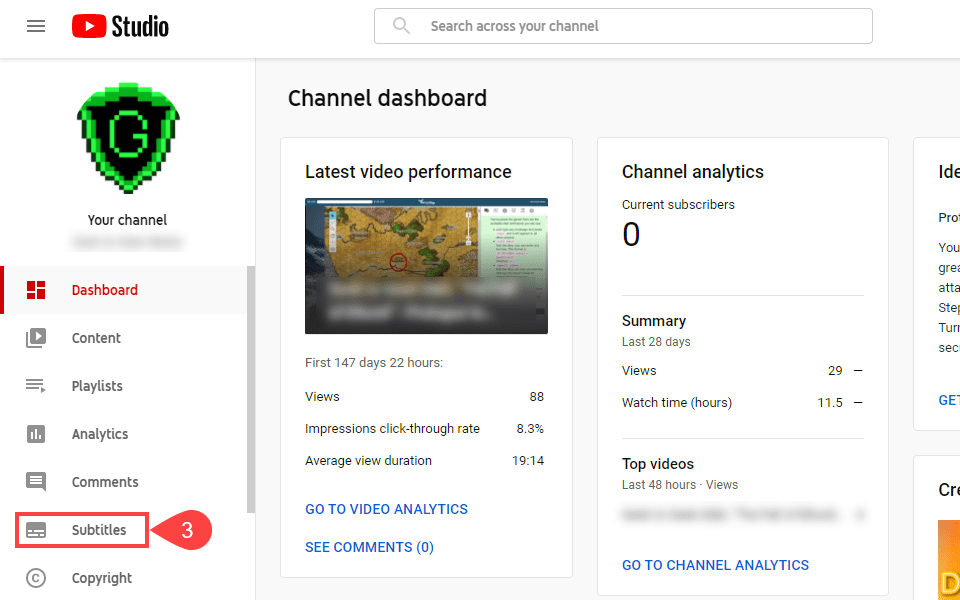
From there, check out the left-hand sidebar of the studio. Notice the Subtitles (3) entry. Click that. You can also find these options from within individual videos by clicking the Edit buttons. But starting from nowhere, this is by far the easiest place.
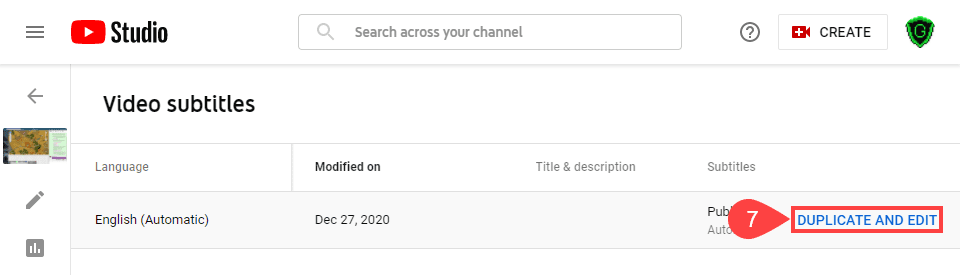
Depending on how many videos you have, you might need to filter and search for the one you’re looking for. When you find it, hover over it’s entry in the list. A series of icons will appear, and you want to click the pencil icon (4) to open the Video Subtitles page.
2. Video Subtitles
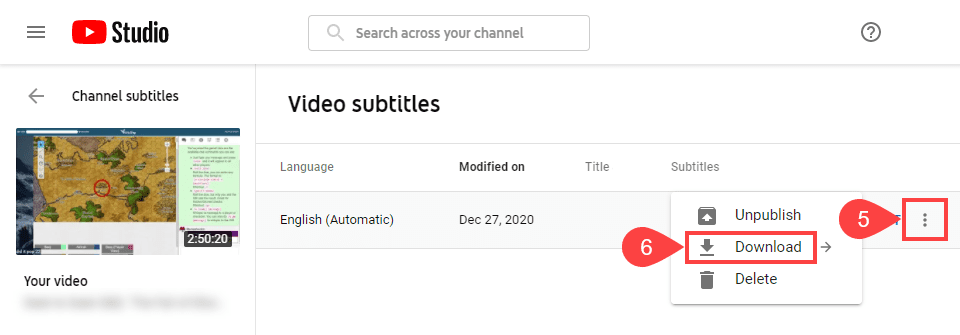
To the far right of the screen, you will find the three-dot icon (5). Click it to open a dropdown menu and select Download (6) from there.
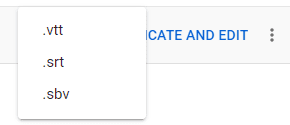
You can download the subtitles as they are in either .vtt, .srt, or .sbv formats. These are the standard formats for subtitles and subtitling software, you can open them in a plain-text editor (such as Sublime Text or VS Code). While you can edit these downloads to add the video transcript to your WordPress post, we don’t suggest it.
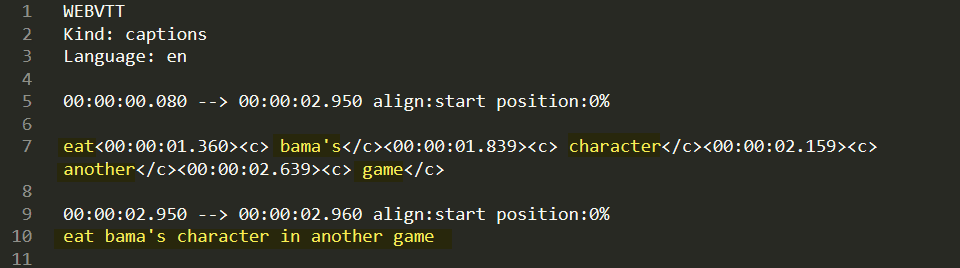
As you can see, the subtitles that you download are hardly human-readable. If you were to copy/paste this to your WordPress site, you’d have transcripts…but they’d be useless. You could certainly edit this down by hand, but there are 33,417 lines in this particular script. So unless you’re using a subtitle program, avoid these.
To get a readable(ish) video transcript for WordPress, you want to click on the Duplicate and Edit (7) button. (Don’t worry about the duplicate part just yet.)
YouTube opens a window that has a lot of things going on at once. The primary element you want to pay attention to is the actual transcript box (8) to the left of the modal. The text in this box is what you will use to add the video transcript to WordPress. But if you will notice…it’s a pretty huge wall of text.
The reason for the huge wall is because that text lines up with the video timeline (9) at the bottom of the screen. Rather than punctuation (which we couldn’t trust YouTube automation for, anyway), the text is broken up into timestamps for the video progression. Click into the transcription text (8) and copy it in its entirety.
3. Adding the Transcript to WordPress
Adding the video transcript to WordPress is a cinch. You will just need to create a new page or post (or edit an existing one). If you are using the default Gutenberg block editor, you may simply click into a block and paste the copied text.
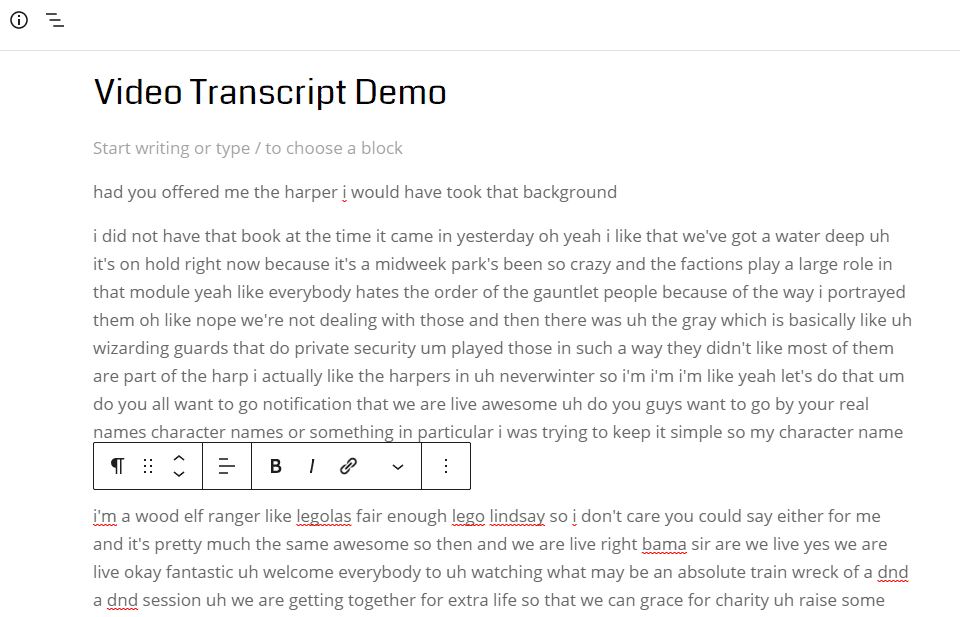
Notice here that the text is broken up into paragraphs. This is based on the YouTube timestamps, even though the huge wall of text in YouTube itself wasn’t displaying it.
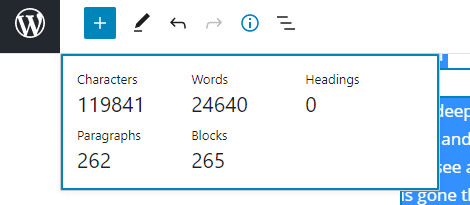
In this case, the video was long enough for 265 individual blocks. Which is much better to edit and parse than 1 block in a wall. Most videos that you transcribe won’t be close to 3 hours long (like the one in this example) and will be in a much more manageable number of blocks.
4. Edit the Video Transcript Text
The only thing left at this point is to edit the video transcript text itself. This can take a while to do, but in general, it doesn’t take very long to do (provided you don’t have 265 blocks to get through).
We find that using tools like Sublime Text or Chrome extensions like Search and Replace cut down on the time you spend immensely.
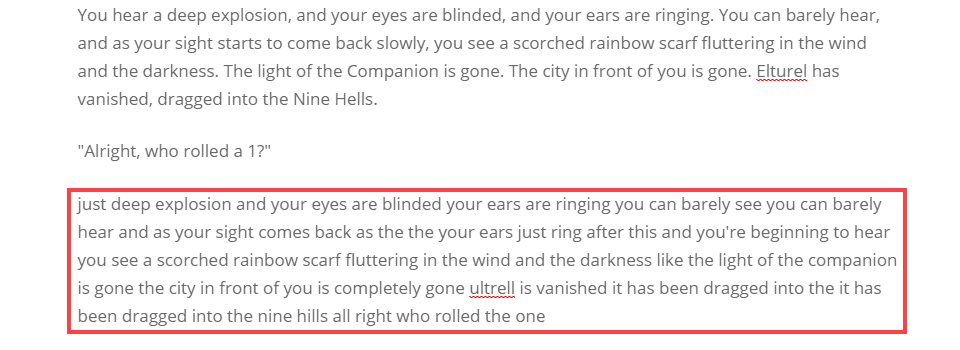
If you see a word consistently mistranscribed, a single Find and Replace All can make a huge difference. For example, in the text above, the speaker is talking about a roleplaying game and that takes place in a location called Elturel, but the software hears it as ultrell. A find/replace of things like that save massive amounts of time. As you work through the video transcript text, you will find a number of phrases and words like that.
And when that’s over, you can publish the post and add your video transcript to WordPress! With WP’s built-in YouTube embeds and blocks, that’s really the last step.
5. (Optional) Add the New Transcripts to YouTube
Since you’ve spent the time polishing the text to add the video transcript to WordPress, you might as well get the use out of those on YouTube as well. Simply go back into the Duplicate and Edit modal that we used earlier, paste the new transcript in the box to replace the other, then click Publish (10).

This is where the duplicate applies. When published, the newly polished subtitles will appear in the list.
You can now display these on your video instead of the automatically generated ones. Which will make the users’ experience on YouTube much better, too.
Conclusion
Using YouTube’s automatic subtitles feature is by far the easiest and simplest way to add video transcripts to WordPress. A few clicks and some copy/pasting, and you’re good to go. Excluding editing, of course. That said, if you want a more premium version of this tool, you can check out a fantastic tool called Descript. It does cost $15 per month, but you get 3 hours of transcription for free (one-time per account, not recurring). Either way you go, once you have transcripts for your videos on your websites, your content will become more accessible and more useful to just about everyone.
What are your favorite tools to use for adding video transcripts to WordPress posts and pages?
Article featured image by VectorKnight / shutterstock.com


Leave A Reply