
When you pull up your Twitter newsfeed, it’s easy for articles to get lost in the noise. Twitter cards are a feature that curtails this a bit, highlighting articles within a newsfeed with relevant metadata, such as titles and images. You’ve probably seen them in action from larger publishing sites like the New York Times, but they can be used by any website.

An example Twitter Card from the New York Times
Twitter cards can be used to really boost your presence on Twitter for just about any site out there, from content-driven blogs to e-commerce marketplaces.
What Are Twitter Cards?
Twitter cards act a bit like an expanded tweet, offering users more information about a posted link right in their feed. These are accessed when users click a view more link underneath a Tweet and on detail pages. For articles, a Twitter card might contain author attribution, a small description and a featured image. For product pages on e-commerce sites, this might mean a meaningful image and some details about a product.
However, Twitter does not add this information automatically. It is up to you, as a site owner, to provide Twitter with the kind of card you want to add, and the proper information to accompany it. As of right now, there are several different Twitter cards you can choose from.
- Summary Card: This is your most basic card, with a title, description, and small thumbnail image
- Summary Card with Large Image: Very similar to above, but with a larger featured image
- Photo Card: Just a single image. Good for image posts
- Gallery Card: Shows a gallery of images, with up to four photos
- App Card: Specifically for pages that highlight a mobile app with download link
- Player Card: For embedding video or audio right in a Twitter post
- Product Card: Built to display specific data about a product for purchase
You will not be using all of these at once, you simply have to pick the card which fits your site content the best. For blog sites, you will probably want to use a Summary card. Portfolio sites might want to use the Gallery card to show off a few samples at once. And marketplaces can use the Product card to highlight specific products.

An example Gallery card
Whichever you choose, Twitter Cards work by pulling metadata information straight from a posted link. After everything is set up on your site, all you have to do is post a link to your content in Twitter, just like you normally would, and a Twitter card will show up below it.
The tricky part is making sure to add the proper metadata to the HTML markup of your page. You definitely don’t want to do this manually, as the data changes from post to post. Fortunately, WordPress already stores the data you need to insert the right meta information for Twitter to use. You simply need to output it correctly.
How Twitter Cards Work
Twitter cards are created by scanning a webpage for the proper meta tags. These are placed in the head section of your HTML markup, where other meta information is also stored. In pure HTML, Twitter card mockup looks something like this:
<meta name="twitter:card" content="summary" />
<meta name="twitter:site" content="@tidyrepo" />
<meta name="twitter:title" content="How to Set Up Twitter Cards in WordPress" />
<meta name="twitter:description" content="Get set up with Twitter cards on any WordPress site" />
<meta name="twitter:image" content="https://mysite.com/uploads/2014/09/myimage.jpg" />
<meta name="twitter:url" content="https://www.yoursite.com/article" />
<meta name="twitter:creator" content="@jay_hoffmann" />
Basically we use various tags to fill out the required information for our card. We start by specifying what kind of card we want (summary in this case), then add our site’s Twitter handle, title of the article, short description, image, source URL, and the Twitter handle of the post author. There are other parameters you can enter, and each type of Twitter card requires different meta tags. For instance, a product card requires you to add product labels, and the player card requires you to enter the source of your video or audio file. For a full list of parameters, and the cards they match to, you can visit the full tags reference on the Twitter developer site.
This information needs to be added to the header of every page where we want to activate Twitter cards. Using a few WordPress variables and functions, we can populate the data dynamically so that the correct information shows up for every post.
Adding Twitter Cards Manually
In order to actually set up Twitter cards on our site, we’ll need to edit our theme and add the proper tags to our header. The best way to do this is to set up a child theme in its own folder, so that we can edit our theme without modifying the theme files directly.
Once you’ve created your child theme, open the “functions.php” file in your child theme’s folder. WordPress already contains a function which allows us to add something to the head section of our HTML. Let’s start by adding this.
add_action('wp_head', 'add_twitter_cards');

function add_twitter_cards() {
}
Right now, this function is blank. The trick here is that we are using the “wp_head” action. This adds whatever content is in our function to the head section of our HTML, which is exactly where we need our Twitter card metadata to be. The next step is to populate this function with the proper markup.
What I want to do is set up my Twitter cards to show a summary card on all single posts pages. First, I can retrieve all the information I need using a couple of WordPress variables, then output it in the proper format that Twitter needs. This will be added to the function we created above.
function add_twitter_cards() {
    if(is_single()) {
        $tc_url    = get_permalink();
	$tc_title  = get_the_title();
	$tc_description   = get_the_excerpt();
	$tc_image = wp_get_attachment_image_src( get_post_thumbnail_id($post->ID), full );
	$tc_image_thumb  = $tc_image[0];
  	$tc_author   = str_replace('@', '', get_the_author_meta('twitter'));
?>
	<meta name="twitter:card" value="summary" />
	<meta name="twitter:site" value="@elegantthemes" />
	<meta name="twitter:title" value="<?php echo $tc_title; ?>" />
	<meta name="twitter:description" value="<?php echo $tc_description; ?>" />
	<meta name="twitter:url" value="<?php echo $tc_url; ?>" />
        <?php if($tc_image) { ?>
	  <meta name="twitter:image" value="<?php echo $tc_image_thumb; ?>" />
        <?php } if($tc_author) { ?>
		<meta name="twitter:creator" value="@<?php echo $tc_author; ?>" />
<?
  	}
    }
}
The first thing we do in our function is use the is_single conditional tag so that Twitter cards are only enabled on posts pages. Next, I store the information I need in several variables using built in WordPress functions. For instance, getting the title and URL for our post is as simple as using the appropriate get_the_ function. For our image we will be pulling a featured image from the post, and we will pull our author’s Twitter handle straight from his user profile. All of these are built into the WordPress platform which allows us to easily pull this information for an individual post dynamically.
The final step is simply to output our meta information in the proper format, using our variables to populate it. That way, the information will change and correspond to each individual post, always in the correct format. As a final precaution, we also perform a conditional check for both the author and image, to make sure they exist, before outputting it.
It’s important to go through this and update it with the proper information. You’ll want to change “@elegantthemes” to the Twitter handle for your site, and change the type of Twitter card to match the format you want. Remember, the information that is needed for each kind of Twitter card is different, so make sure to change the outputted tags based on your desired format.
If you want to only use one kind of Twitter card throughout your site, or are comfortable setting up the PHP, then this is certainly the easiest way to go. But if you need some more advanced functionality, there are a couple of plugins out there that can help you add this information automatically.
WordPress SEO By Yoast
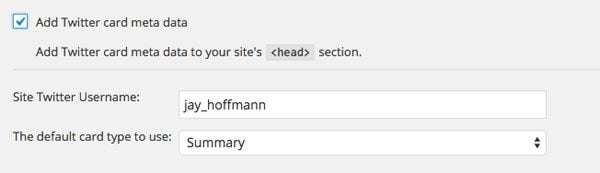
WordPress SEO by Yoast is one of the most popular SEO plugins out there. It provides a complete suite of tools for optimizing your site for search engines and social media. It allows you to add SEO optimized titles and descriptions, manages the titles of your posts and pages, and adds the proper metadata to your header to support social media.
One of the features in Yoast is the ability to switch on Twitter cards for your posts and pages. If you navigate to SEO -> Social and go to the Twitter tab, you can check a box which turns on Twitter cards. Simply enter in the Twitter handle for your site, and the kind of card you want to use (either Summary or Summary with Large Image). It’s important to note that SEO By Yoast uses a combination of Open Graph and proprietary Twitter metadata to activate Twitter cards on your site. Open Graph is an open metadata format that is used to specify information about a post, used by a few different social networks like Facebook and Twitter, and other third party services. Yoast supports Open Graph, and simply adds a few extra parameters specific to Twitter, like site handle and card type. The output is the same, it’s just a different way of implementing it.
Setting up Twitter Cards in WordPress SEO
Of course, SEO By Yoast’s implementation of Twitter cards is fairly simplistic, only supporting one kind of card without much customization. But if you’re already using it, it’s a very simple feature to switch on.
Jetpack
Like WordPress SEO, Jetpack is a popular plugin that provides everything from image carousels to notifications to social sharing features. It works by allowing you to enable or disable various modules which turn on or off features.
Jetpack supports Twitter cards as a part of its Sharing module. In order to get it set up, you will need to authorize your Twitter account in the WordPress admin, by clicking the “Configure” button in the Sharing section of Jetpack’s settings, and then clicking “Connect” next to Twitter. This will link up your Twitter account and WordPress site. Make sure that you configure Twitter correctly, and enter in your site’s Twitter handle in the options. After this, Twitter cards will be enabled. From your posts and pages, you will see an option to Publicize your post in the right sidebar. If you choose the Twitter option here, then Twitter cards will be added automatically and a link to your post will be posted on your Twitter account when it is published. If you are a developer and want a little more control over how the Twitter cards are output in Jetpack, there is also a function which allows you to filter its output, and add in custom metadata.
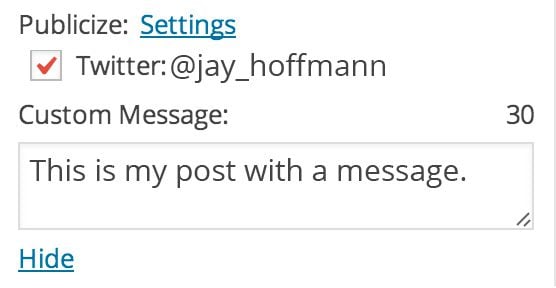
Using the Publicize feature in Jetpack
If you only want to use Twitter Cards, and are not interested in Jetpack’s other features, then the plugin is likely overkill. But again, if you already using the plugin, it is fairly easy to configure and get up and running.
JM Twitter Cards
If you’re looking for a more robust feature set, JM Twitter Cards is a good option. The plugin is dedicated to just Twitter Cards and has all sorts of customizations. Like WordPress SEO, you can choose a default card format, and enter in the handle of your site. However, JM Twitter Cards offers a few more features, like the ability to add an image fallback, which is used as an image when a featured image is not found. There is also multi-author support, and you can choose to turn on or off Open Graph.
JM Twitter Card also supports all Twitter card formats, not just a summary card. If you go into the “Deep Linking” settings page on the plugin, you will find the necessary meta-information for mobile apps, if you decide you want to use the App card.

Individual post settings in JM Twitter Cards
But the plugin’s best feature is that you can customize your Twitter card on each individual post. At the bottom of the post editor, you will see a new metabox, which allows you to choose what Twitter card format you want to use for that specific post, and whether or not you want to add a unique image, used in place of the featured image. And in this metabox, you will see a preview of what your Twitter Card will look like before you publish.
If you’re looking to get a lot more out of your posts, and add some advanced Twitter Cards features, JM Twitter Cards is a great plugin for setting them up, with relevant documentation to guide you along in the process.
Getting the Most Out of Twitter Cards
Twitter cards may seem like a bit of a hassle, but they can go a long way in getting interest from your followers and cutting through the noise. With just a small amount of set-up time, you can give your users more information about your post, and make them a lot more visually appealing. They are able to add a level of professionalism and polish to an otherwise crowded newsfeed, and increase click-through and engagement.
Article thumbnail image by Max Griboedov / shutterstock.com


Thank you very much for this awesome tutorial.
Awesome article! Thanks for writing. When you pull up your Twitter newsfeed, it’s easy for articles to get lost in the noise. Twitter cards are a feature that curtails.
Great post – i was struggling to set up twitter cards using a wordpress plug in without realising that Yoast had it in-built!
Thanks guys 🙂
Thanks for this.
I have tried to add Twitter cards but the checkbox is greyed out so I can’t tick it, any ideas why that might be?
I used the Twitter validation and Yoast SEO, received an email to say it was granted but nothing showed on my Twitter page also?
All very confusing.
Thanks
Gemma
I really enjoyed your post. I’m trying to integrate the the new Twitter card feature into my wife’s WP blog, but I’m having some issues. I have managed to get the code into the functions.php, but it will not pull the excerpt. I’m trying to validate the page on twitter but without a valid description it won’t let me complete the process. Was wondering if you had any insight?
You can use this code:
if ($post->post_excerpt) {
// excerpt set, return it
$twitter_desc = apply_filters(‘the_excerpt’, $the_post->post_excerpt);
} else {
setup_postdata( $post );
$excerpt = get_the_excerpt();
wp_reset_postdata();
$twitter_desc = $excerpt;
}
This is a new way to improve Twitter engagement on our blog. Thanks for your article!
Thanks for making this feature so easy to setup with your very clear instructions. I have the Yoast plugin and also JetPack on my site, so it should be easy to get one of them working
Again nice article Jay, I really like the way you present information in your articles. Thanks for sharing.
Holy hell I am confused.
I notice something also, why do you have this in your links?
Elegant+Themes&utm_campaign?
This was an excellent tutorial on a subject you don’t really hear to much about. Good article!
Awesome article! Thanks for writing.
This way we can improve Twitter engagement on our blog and get new followers too.
Just to add to this list, We can also embed Facebook posts in our post.
Dheeraj
Can someone post up a URL of this in action? Thanks.
Hi, here’s a url to twitter where my wife used a card. Sorry it’s in Dutch: https://twitter.com/angelinaswart/status/509417488938184704
Please, that would be great. I would love to see this in action.
Talked about timing, been thinking on how to do this in WP. Thanks for the tutorial, you save my time.
Jay,
Thanks for this awesome tutorial. I was just wondering about this the other day, and here you come with the answers!
Adam