
I have spoke many times about the benefits of having a test WordPress website in order to test plugins and try out changes to your WordPress theme.
My test WordPress website is installed in a subdirectory of a domain I own. This is the most practical solution for me as I use a 27″ iMac, and a 12.5″ Windows laptop, to work online. I switch between both of them frequently, therefore it is better for my test website to be hosted online.
An alternative to hosting your test environment online is to install WordPress locally on your computer. Doing this also allows you to modify your installation and learn more about WordPress; even if you are offline.
In this article, I would like to walk you through how you can install WordPress locally on a computer that runs on Microsoft Windows using an application called WAMP.
How to Install WAMP on Your Windows Computer
Wamp Server is a development environment that allows you to manage use PHP and MySQL databases on your Windows computer. The script is frequently referred by its abbreviated name WAMP, or Wamp.
WAMP can be downloaded from the official WAMP website. 32 bit and 64 bit versions are available. Be sure to download the correct version for your system.
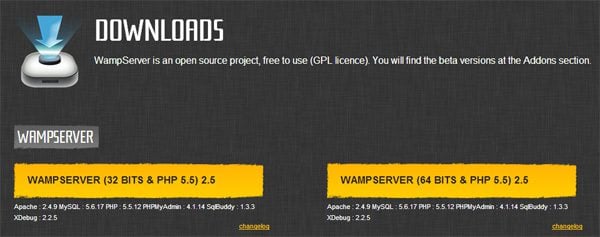
WAMP is available in 32 bit and 64 bit versions.
Once you have clicked on the WAMP exe file, the installation process will begin. The process is straightforward.
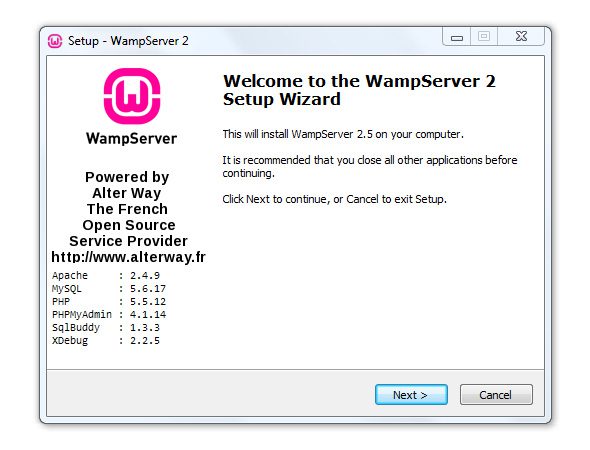
Installing WAMP only takes a minute.
Just like WordPress, WAMP is released under the GNU General Public License.
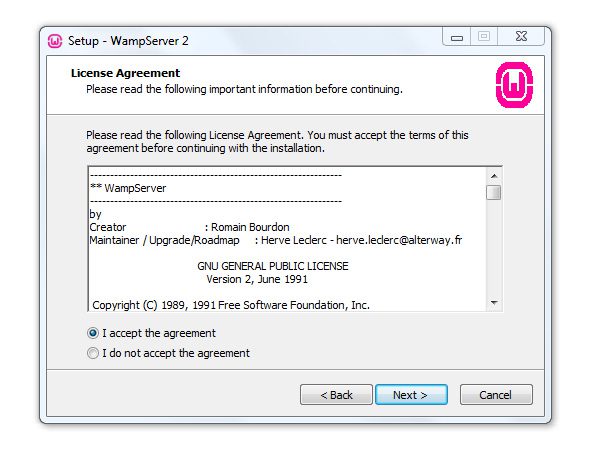
You need to agree to the terms of the GNU General Public License.
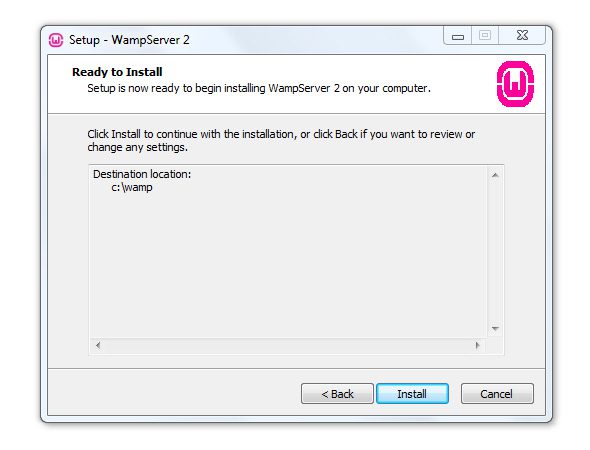
By default, WAMP will install to C:\wamp\. However, you can modify the directory name and location. Approximately, 450MB of storage is required to install WAMP.
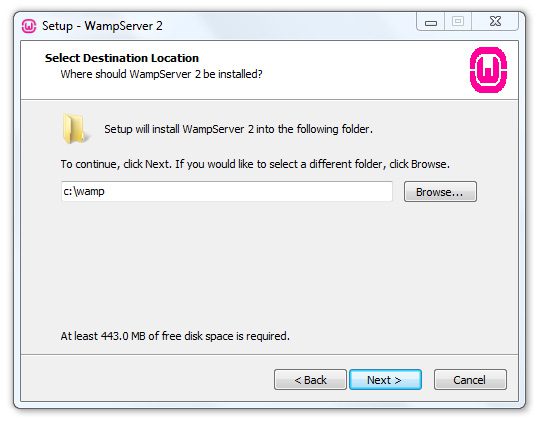
Choose the installation directory of WAMP.
Shortcuts to WAMP can be added to your desktop and to your quick launch menu.
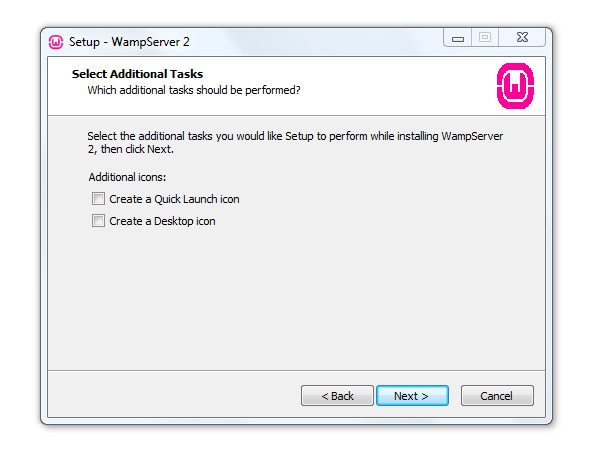
Add shortcuts to WAMP.
WAMP gives you a chance to backtrack and change settings before you click the “Install” button.
Click the install button to start extracting files to your computer.
The installation script will then start extracting files to the installation directory you specified previously.
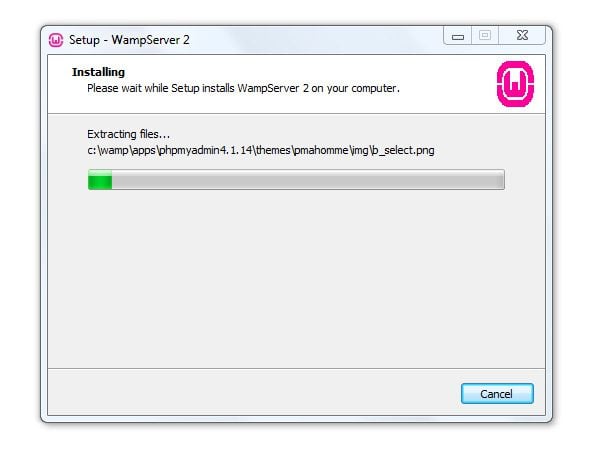
WAMP does not take long to extract all files to your computer.
In the next screen, WAMP asks you to choose your default browser. You need to navigate to the directory for the browser you use and then select the appropriate exe file.
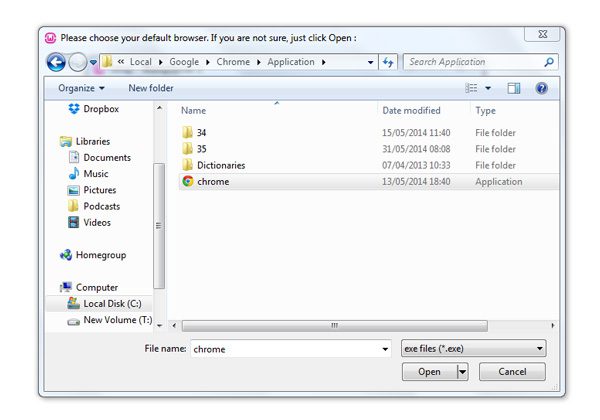
Select your default browser to ensure that WAMP opens up pages in the browser your normally use.
The mail parameters for PHP are defined in the next screen. I suggest leaving the default settings intact unless you need to send out mail through your local installation.
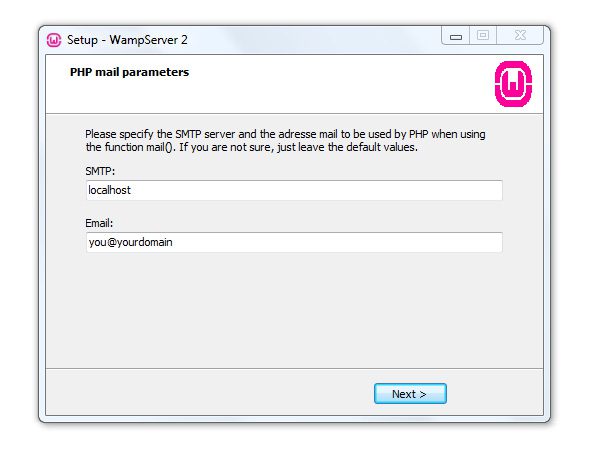
I recommend using the default PHP mail parameters.
That is all there is to it. WAMP will now be installed on your computer.
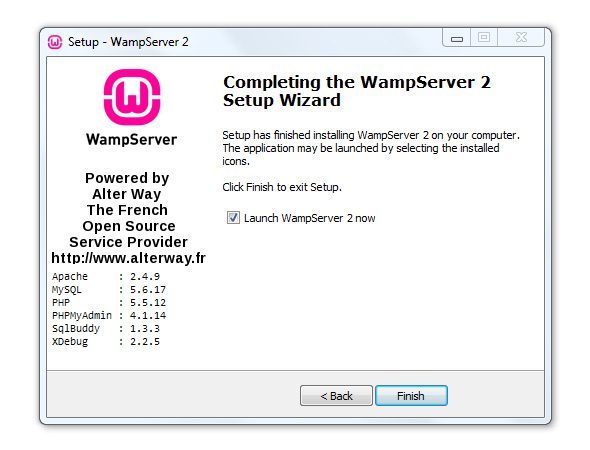
Congratulations – you just installed WAMP!
Starting WAMP
If you click on the “Launch WampServer” option at the end of the installation process, WAMP will be running. If not, you can open WAMP by clicking on the shortcut to WAMP via your Windows start menu.
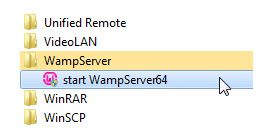
You can open WAMP via your start menu.
When WAMP is running, it will be displayed as an icon in your taskbar. A red W icon means that the WAMP server is not running. An orange W icon means that the server is running, but Apache is not configured correctly. A green W icon signifies that the server is online and you can access your server by entering 127.0.0.1, or localhost, into your browser.
Right clicking on the W icon will bring up an option to change to one of 24 languages that are available.
Right clicking the WAMP icon allows you to change the default language.
Left clicking on the W icon brings up the main menu of WAMP. From here, you can start, stop, and restart all services. You can also manage Apache, PHP, and MySQL. There are links to localhost, phpMyAdmin, and your www directory, too.
Left clicking the WAMP icon brings up the main menu of WAMP.
You will notice that the WAMP icon on my computer is orange in the above screenshots. It took me a while to figure out why the server was not working correctly on my computer. I found out that it was because the default port that WAMP uses was being used by something else.
You can verify whether this is occurring on your computer by left clicking on the WAMP icon. Then navigate to Apache, Service, and select “Test Port 80”.
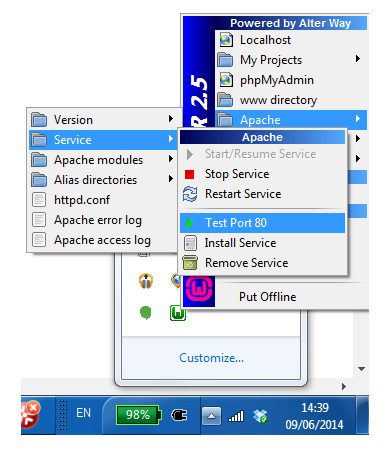
Select “Test Port 80” via Apache, Service.
This brings up a command prompt that states whether port 80 is being used by something else. In my case, it was being used by microsoft-IIS/7.5. This refers to Internet Information Services (IIS) for Windows Server.
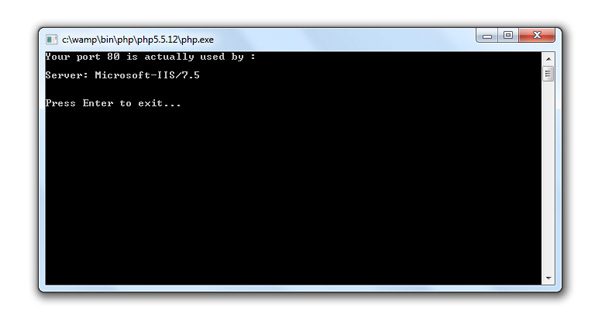
The command prompt states what is using port 80.
Apparently, you can resolve this issue by disabling or removing the application that is using port 80. A quicker solution, and from what seems to be a more practical solution, is to simply change the port that WAMP uses. To do this, you need to edit the httpd.conf file.
On my computer, I found this located in this directory -> C:\wamp\bin\apache\apache2.4.9\conf.
Open the httpd.conf file in a text editor and do a search for Listen 0.0.0.0:80. The two digits at the end refers to the port. The code will look like something like this:
#Listen 12.34.56.78:80
Listen 0.0.0.0:80
Listen [::0]:80
All you have to do is change the port number in the last two lines from 80. In my installation, I used 88; though you can use pretty much any number you wish.
The listen section in the WAMP httpd.conf file on my computer now looks like this:
#Listen 12.34.56.78:80
Listen 0.0.0.0:88
Listen [::0]:88
Once you have made the changes to httpd.conf, save the file and then select the “Restart All Services” option at the bottom of the WAMP menu. After restarting WAMP services, the WAMP icon should change from orange to green.
Your WAMP server should now be working correctly.
The only problem I faced installing WAMP was with port 80 being used. If you are struggling to resolve the same issue, or if you experience a different problem during installation, I recommend the WampServer forums. There are over 16,000 discussion threads in the forum, therefore you should find an answer to any issues you face.
The other problem that I saw mentioned frequently was that of Skype using port 80. Apparently, this issue can be resolved by opening Skype, selecting Tools and then options. Then go to the advanced section and click on Connection. You will find an option there to disable Skype from using port 80.
Note: I did not have to disable Skype from using port 80 as I changed the port that was being used.
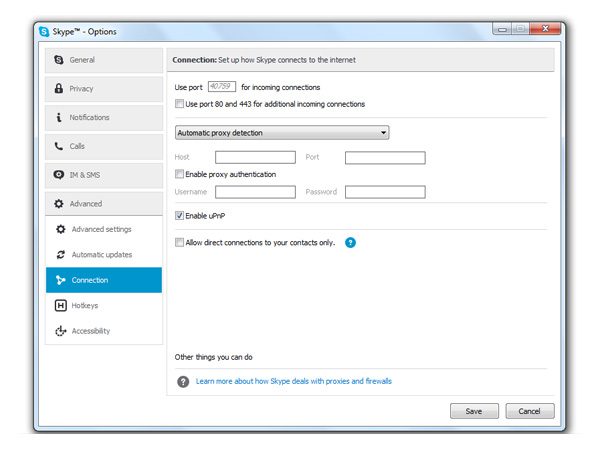
You can stop Skype from using port 80 via the Skype options area.
With WAMP now functioning correctly, you can now access the WAMP information page at http://localhost:XX/. XX refers to the port you defined in the httpd.conf file. Therefore, I can view the information page for my website by entering http://localhost:88/ into my browser.
If you are able to use WAMP with port 80, you should be able to view the WAMP information page directly using http://localhost.

The WAMP information page details information about your server configuration, tools, projects, and aliases.
You can also visit your information page by using the IP address 127.0.0.1 instead of localhost. For example, http://127.0.0.1 or http://127.0.0.1:88/.
How to Create a Database for Your Local WordPress Installation
In your WAMP information page, you will see a link to phpMyAdmin. Clicking on the link will open up phpMyAdmin and allow you to manage your databases. Alternatively, you can visit phpMyAdmin directly by entering http://localhost:XX/phpmyadmin/ into your browser.
Again, XX refers to the port your WAMP installation uses. For me, the direct link to phpMyAdmin was http://localhost:88/phpmyadmin/. If you are using port 80, the URL for phpMyAdmin should be http://localhost/phpmyadmin/.
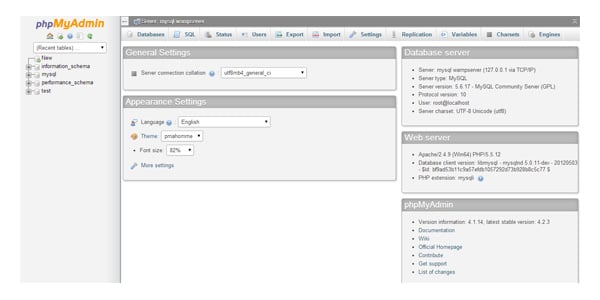
phpMyAdmin allows you to create and manage all of your MySQL databases.
At the top of phpMyAdmin, you will see a tab named “Databases”. If you click on that tab, you will see an option to create a new database. You can call your new database whatever you like.
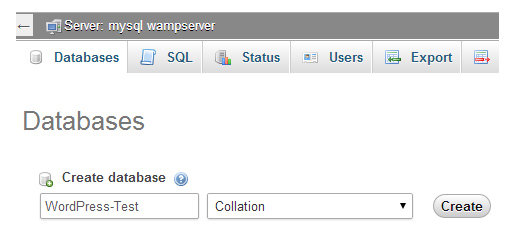
Creating a new database takes seconds.
You will receive confirmation that your database has been created. You will also see it listed in the database tree in the column at the left hand side of the page.
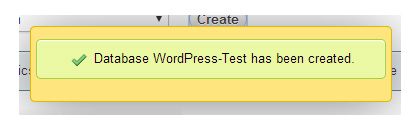
Confirmation of your new database being created.
You may have noticed that we have not created a database user and password. We don’t actually have to complete this step as we can use root for our database username and leave the password field blank.
It is also worth noting that your database name is not case sensitive. Therefore, in the example above, when I install WordPress, I could enter WordPress-Test, or wordpress-test, as the database name.
Extracting Your WordPress Files
Once you have created your database, you should download WordPress to your computer. Extract the WordPress folder to the www directory within your WAMP installation directory i.e. C:\wamp\www\.
You can rename the WordPress folder anything you like. For example, you could rename the folder test, blog, or my-website. It is really up to you. When I tested WAMP, I simply kept the folder name as WordPress. If you are installing many WordPress installations locally on your computer, I recommend naming each folder something self-explanatory so that you can easily reference them later.
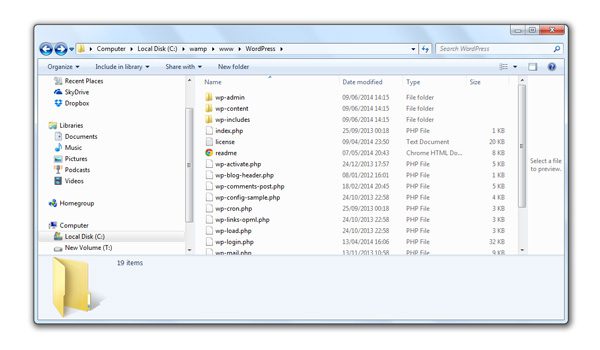
Place your WordPress folder in the www directory.
Installing WordPress Using WAMP
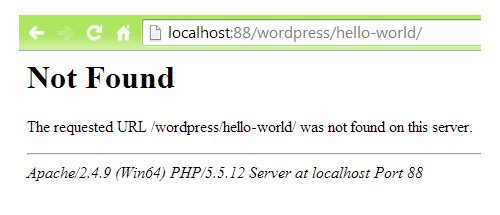
With WordPress copied to our www directory and a database created for our website using phpMyAdmin, we can now install WordPress. As the WordPress installation folder is named WordPress, the WordPress website will be located at http://localhost:XX/wordpress/. For my installation, the URL is http://localhost:88/wordpress/. If you were to use port 80, you could access it directly at http://localhost/wordpress/.
When you load up your website at the address noted above, you will see a message stating that there is not a wp-config.php file.
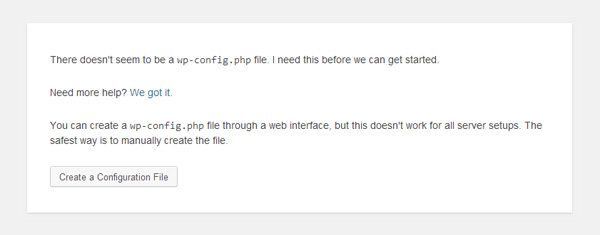
WordPress advises you to create a configuration file.
From here on in, the steps are exactly the same as any other WordPress installation. You may recall from my Complete Guide To Installing WordPress article that there are two ways of creating the wp-config.php configuration file. You can either rename wp-config-sample.php to wp-config.php and enter your database information (this is detailed in step 3a of my guide). Alternatively, you can create the wp-config.php through the WordPress installer (this is detailed in step 3b of my guide).
It does not matter which method you use, as they will both create a wp-config.php configuration file that will connect your WordPress core files to your WordPress database.
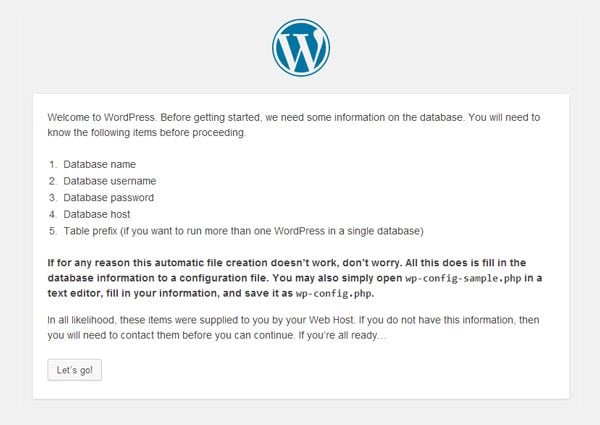
WordPress reminds you to have your database information ready for creating the wp-config.php file.
Creating the wp-config.php file through the installer is easy. The installer also verifies that your connection details are entered correctly.
There are five fields to complete. The database name is the name of the database you created through phpMyAdmin earlier. If you recall, I named my database WordPress-Test (I can also enter this in lowercase). You should enter root as your database username and leave the password field blank.
Leave the database host field as localhost. The last field is the prefix you want to add to your WordPress database tables. The default value is wp_. From a security point of view, it is normally better to change this value to make it more difficult for hackers to access your website. However, as your website will only be accessible locally on your computer, I do not believe there is a high risk of this occurring; therefore, I do not think there is any harm with keeping wp_ as the database table prefix.
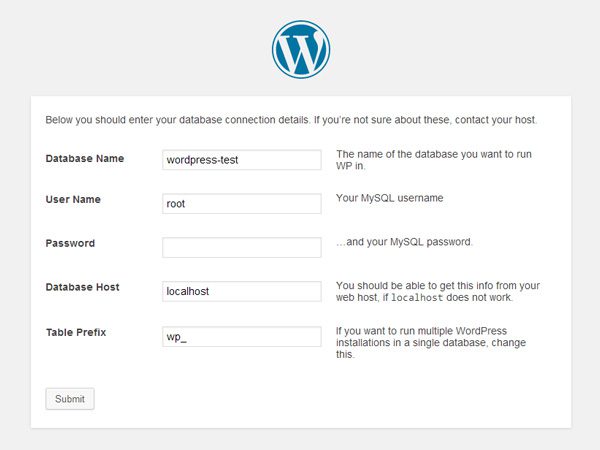
Enter your WordPress database connection details
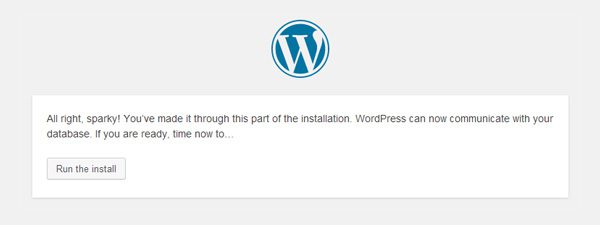
If your connection details were correct, you will then see a page advising you to run the WordPress installer. At this point, your WordPress installation directory will have a wp-config.php configuration file with the correct connection details.
You will see this page if your connection details were correct.
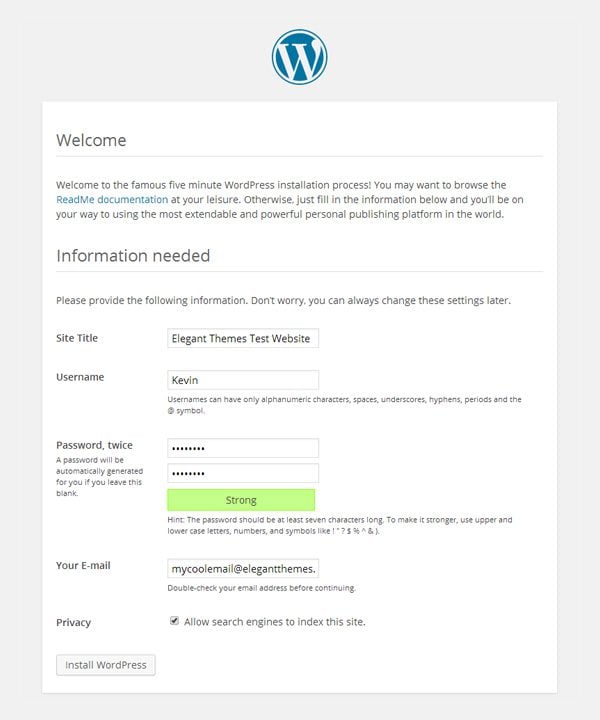
Once the wp-config.php configuration file has been created, you can install WordPress. You have to enter website details such as the site title, your administrator username and password, and your email address.
The installation process for WordPress is short and sweet.
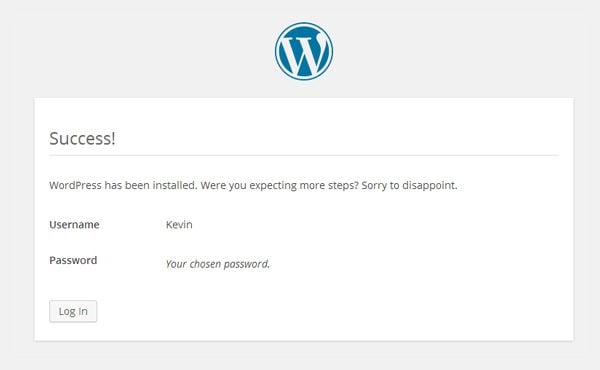
The next page confirms that WordPress has been installed and displays a button to log in to your newly created website.
WordPress has now been installed.
Next, log in to your new website using the username and password you just defined.
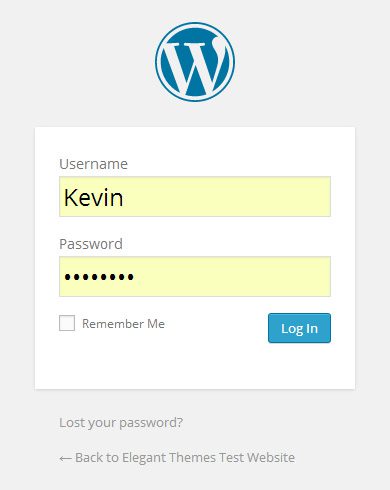
Login to WordPress using your username and password.
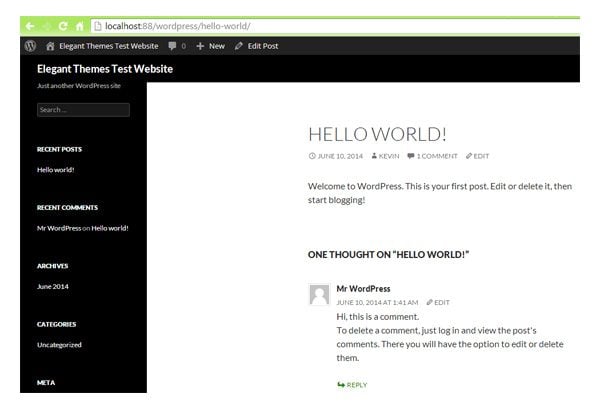
Your local WordPress website looks and works just like it would if it was hosted online.
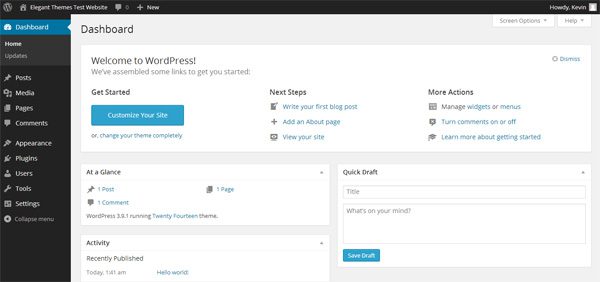
The WordPress dashboard is displayed when you log in.
If you ever move the your local WordPress website to a new directory, or if you rename the WordPress installation folder, you will need to change the website address via the general settings page.
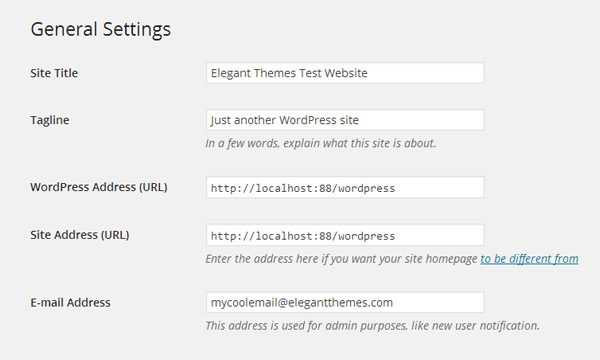
You can change the location of your website via the “General Settings” page.
Another thing you may want to change is your website permalink settings. As you know, this can be done via the permalink page in the settings area.
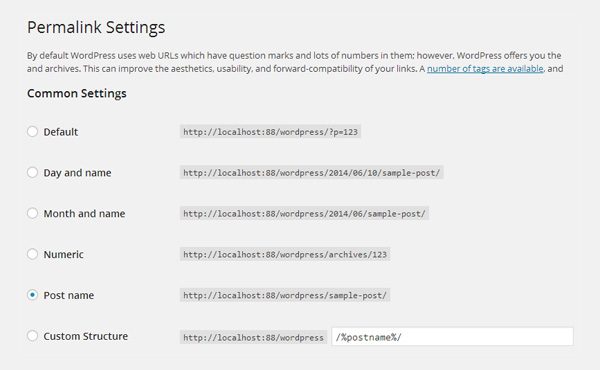
You can change your permalink structure in the settings area.
Your should see a message stating that your new permalink structure has been saved. Unfortunately, your permalinks will not work correctly after activating them.
Your permalink settings may not work correctly right away.
In order for a user friendly permalink structure to work correctly, you need to enable the Apache rewrite module. You can do this by clicking on the WAMP icon and bringing up the main WAMP menu. Then select Apache, Apache modules, and then enable rewrite_module.
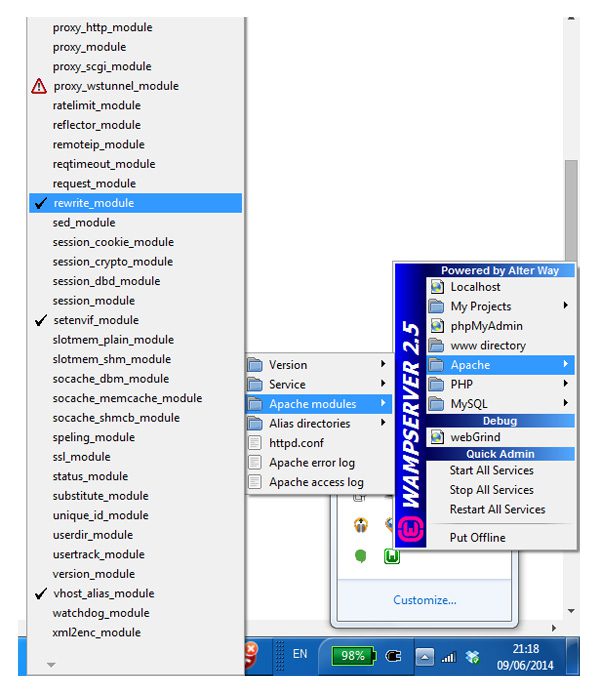
You need to enable the WAMP rewrite module in order for permalinks to work correctly.
Once you have enabled the WAMP rewrite module, your permalinks will work correctly.
Your permalinks will now work correctly.
That is all there is to it. You now have a fully functional WordPress website on your Windows computer 🙂
Alternatives to WAMP
WAMP is known as an AMP solution stack. W stands for Windows and AMP stands for Apache MySQL PHP. This is how WAMP gets its name.
WAMP is one of the better known AMP solutions, however there are alternative AMP packages out there for Windows such as Xampp, Ampps, and Bitnami.
If for any reason you cannot configure WAMP, you may want to give one of these alternatives a try. The process of installing a WordPress website locally on your computer is much the same. You simply need to activate a server on your Windows computer, create a MySQL database, and then install WordPress.
Final Thoughts
A local installation of WordPress on your computer is very useful for development and testing. I have always used a test WordPress website of mine that I host on a subdirectory of a domain I own. This is the best solution for me on most occasions as it allows me to access my test website on any computer and in any location.
However, I can see the benefits from having a WordPress website installed locally. It would be very useful when I do not have access to the internet. For example, when my internet connection goes down or when I have a long flight and I want to be productive and do some work.
During testing, I also noticed that my local WordPress website loaded quicker than my hosted WordPress websites. You would, of course, expect this; as the local installation of WordPress does not need to connect to the internet and download files from a server thousands of miles away. Security is less of a concern on a local WordPress installation too.
Transferring a local WordPress installation to a live website is also painless. All you have to do is upload your files and your database and ensure that the URL settings are correct (that, however, is not something I will cover in this article).
I encourage you to give WAMP a try for yourself and install WordPress on your Windows computer. It should take you ten to fifteen minutes to download the application and set everything up.
If you found this tutorial on installing WordPress locally useful, then I encourage you to subscribe to the Elegant Themes blog. This will ensure you are kept up to date with our latest articles.
Article thumbnail image by Jane Kelly / shutterstock.com


Completed my 1st step. configuration;
Feeling awesome, thanks a million to Kevin for very excellent step by explaination also found the port 80 conflict with skype and chnaged to 88 and added one another 808 too as shown, my local home over WAMP is operational… 🙂 😀
Thanks very useful information, I had been searching for how you can install blog in your system. After reading through i will attempt.
Thank You very helpful information, I was looking for how to install blog on your system. After reading this i will try.
Also kindly support me on how to download demo content
Hi Unable to upload DIV 2_3 on local host.
Kindly help.
Outstanding how to guide. Clear and concise.
Well done, keep up the good work.
Harry Burke
thanks a great deal.
KrojamSoft FilesSearch Tool is helpful in this case.
Thanks Kevin! That is a really useful and awesome tutorial!
Saved me a lot of time to test WordPress offline.
So I got WAMP and PHPMyAdmin to finally work using port:88. I go to the wordpress setup and on the database connection it seems to be stuck now on /wp-admin/setup-config.php?step=2 and it just hangs. Any ideas ? Thanks in advance.
Thank you so much for posting this!! Extremely helpful. 🙂
Hi, thank you for posting this. I have successfully installed WAMP but am stuck at this paragraph;
With WAMP now functioning correctly, you can now access the WAMP information page at http://localhost:XX/. XX refers to the port you defined in the httpd.conf file. Therefore, I can view the information page for my website by entering http://localhost:88/ into my browser. (I have port 80 so I use http://localhost/phpmyadmin/)
When I enter http://localhost/phpmyadmin/ in my webbrowser I get an error page saying “this webpage is not available”.
How can I solve this and get to the next step?
Many thanks
How can i do a search for Listen 0.0.0.0:80. will i do it in my computer or in the text editor.
This is the simplest tutorial I could have ever got for installing wordpress…. made me do the things in just minutes getting grasp of all of it 🙂 Thanks.
Your Tutorial was a welcome change. I spent 24 hours trying to implement using xampp. I was about to give up on WordPress until I found your tutorial. I followed the steps you laid out and voila! – I’m ready to proceed with WordPress.
Thank you so much for this article ! I am new at this and your explanations were clear and precise. Exactly what I needed.
Thanks a lot. This guide is exactly that I need.
Thanks for taking the time to explain this, very easy for new people to follow.
I am learning ABCD of web hosting ,Before a week I heard WAMP and WordPress and I have installed WP locally on my Home PC , Any one can Imagine “How explanatory the Article is? ” I would not have been possible to learn and Install and understand the terminology for novice fellow like me if you have not described all detail . Thank You Very Much Sir !
Thank You very much Kevin you solved my problem.
WoW, amazing article. But make small changes in the above article.
“Then select Apache, Apache modules, and then enable rewrite_module.”
Just after this line add as “restart all services” to apply the changes of rewrite_module.
what a wonderful article, a big thank you from a newbie 🙂
This tutorials help me to install wordpress locally in less than 7 minutes to Edit my WordPress site template on Dreamweaver.
https://www.youtube.com/watch?v=EiPl9kXIDy8
i have create wordpress website locally in wamp in one computer and i have use this web site locally in another computer wamp what i can do for this?
Excellent tutorial! To the point and no fluff! Why can’t all tutorials be like this? For people like me, who have A.D.D, this tutorial rocks!
After trying several times I can run both xampp and wamp same time with WordPress. Here is the article helped me. http://www.prioarena.com/2014/12/how-to-use-multiple-xampp-and-wamp.html?m=1
Hello admin,
First thanks for full step by step guide. Your site is extremely helpful for me and others blogger who are work on wordpress.
Thanks.
This is very clear and it helped me in solving the problem with permalinks change.
Very good article!
Thank you very much for this post Kevin. Everytime i read something you wrote, it help me a lot. And thanks to Elegant Themes for your help too, with all these posts on this blog : I read almost of them. Have a nice day, everybody and i wish you’ll be there for long time, i’m a fan of your themes and blog. Dan
Hi Kevin,
Great article.
I changed both URL in General Settings from localhost to 192.168.x.x so that the other computers on the same LAN can access to the testing website.
Regrettably, forgot DHCP assign new IP every time reboot the system.
Now, I can not access to the Dashboard or the website….
How can I regress the changes and get the website back?
Can I edit wp-config.php and hard code the current IP (from ipconfig) so that I can access to Dashboard and change the General Settigns URLs back to “localhost”?
Thanks in advance.
Robert
I’d like to congratulate you on a well written set of instructions that work 100%. Very specific and detailed, yet easily understanding by someone (me) that has no clue how PHP/MySQL/Apache works.
Excellent tutorial. Thank you very much!
do you also have a tutorial on how to populate a newly locally installed WordPress with the content of a live WordPress site?
I have customised and messed about with my live installation, so I’m very worried about upgrading the themes. I know that I will have broken something. So it would be really great to be able to transfer the live site to my local machine, update the theme there, and then test it thoroughly before uploading it.
Hi Kevin
Desktop Server does this, far more efficiently and easy. Yes it costs a few bucks but works like a dream, along with ET it is my default must have for WordPress site development.
Learning how to use it is far less complicated as well 🙂
Kevin your moonlight job must be a mind reader. 🙂 You simply have an uncanny knack of writing timely articles that help solve issues your readers are having. Just love reading your articles, and thanks for all the valuable info you share with us! 🙂
I have PortableApps installed on a USB flash drive, which then allows you to install XAMPP Sever plus many other portable apps. Such as FireFox, Chrome, NotePad++ and others.
I simply use it as an easy way to work on design and layout, and to be able test on different browsers. I have not used it for testing emails. I love being able to plug it in anywhere, and instantly have a server running WordPress, Firefox, Chrome or any of the many apps available. Plus it’s all Free!
Thanks again Kevin, keep on hitting it out of the park! 🙂
Hi Kevin, many thanks for this comprehensive tutorial. I managed to get it up and running today. There’s another error people can experience: the mod_rewrite module is not enabled by default, which can cause a lot of 404 not found pages. Here’s the fix for it: http://www.anmsaiful.net/blog/php/enable-apache-rewrite-module.html
Now it’s going beautifully!
To move the site to a live environment, I will use the Duplicator WordPress plugin, that has always worked fine for me to move sites from one server to another.
http://wordpress.org/plugins/duplicator/
I ran into a mess of trouble when I enabled the rewrite_module the Apache service would not start. Come to find out, I also needed to enable the authz_core_module, but since the service would not start it had to be done in the httpd.conf file.
Ohh, i pre-posted, very sorry!
VirtualHostX – and I really emplore you to read all the features listed on the page. I works with MAMP/MAMP Pro and XAMPP or OSX’s built-in Web-sharing (yes, I did say that, and yes it works great 🙂
Then there’s MAMP and MAMP Pro that I used for years on their own, and they are awesome too – but with VirtualHostX the create a full dev-environment.
And XAMPP on it’s own will sureæy do the job, it’s just not as polished – ny far not – as the others.
Hope I Helped some of the Mac Dev out there 🙂
Kevin, when I read your newsletter this morning I couldn’t believe I was receiving it just at this moment. It seemed to be a present from the hights, or whatever. Since two weeks ago when I subscribed for your themes I am fighting with Wamp. Although I read books, notes, forums, articles, etc. I could never reach the point to see the WordPress page asking for user and password. You were very clear and the images with the complete paths helped me a lot. I was making a mess with the folders, the configs, etc.
Perhaps this is useful for other people: One thing that complicated me in one of the failed installs was the upgrade for phpMyAdmin, because it is not true that wamp comes with the last versions of the programs. I didn’t know what to do with the vs. 4.2.2. I tried replacing it, but didn’t do it. Then, I found a post somewhere with the sollution: Content of the folder with the previous 4.1.14 must be deleted, excluding the config.inc.php, and the content of the new must be copied in there, minus, of course, the config.inc.php. I assume that perhaps it would be simpler to rename the new folder and replace the config, but as it functioned in the other way, I left it. I was suspicious about wamp recognizing the new vs. kept in a folder with another number, but it did.
I hope I’ll find help for the future Apache’s and PHP upgrades too.
I am sorry if my writing is a little (or a lot) confusing. English is not my mother language.
Thank you! You saved me!
Ana
AppServ is another good option. No port errors and so easy instalación!
Greate post Kev….
Sweet, just what I needed. Worked like a charm!
Kevin– I cannot imagine the work that went into this one post. Until you have tried to do a detailed explanation WITH pictures like the one above, you have NO idea how much time it takes & how much attention to detail it requires.
I’ve read about this installation before. This is outstanding!
And for the monkeys, like myself, http://www.uniformserver.com
It’s by far the easiest of all the local hosted server setup I’ve tried. Small, portable and resource friendly 🙂
Anything and everything Windows is just plain awful, absolutely terrible!
This is great but much more involved than accomplishing the same thing with InstantWP! I cannot imagine anything simpler that InstantWP.
One download. Quick installation. Completely portable. Install on any hard drive or flash drive. Quick access to theme folder, plugin folder – or actually any folder. Direct access to the mySQL database with phpMyAdmin which installs automatically. Nothing to configure. Installs the server, phpMyAdmin, WordPress, and default themes in one click.
Anyone who has ever installed any Windows program should be able to install and use it.
It’s great for learning, developing, and testing.
I don’t know of any advantages that the other “AMPS” offer over InstantWP. Are there any?
I second (third,fourth) the request for a tutorial on moving a site from WAMP to live server. Each time I migrate a new site I have to go back and update the theme options. Not a HUGE deal but it would be nice to just move the site and be done. I also have to move the site at a time when no one will see me redoing the theme options.
XAMPP stands for Cross-Platform (X), Apache (A), MySQL (M), PHP (P) and Perl (P). It is a simple, lightweight Apache distribution that makes it extremely easy for developers to create a local web server for testing purposes. If you ask anyone they will tell you that it is really not easy to install Apache web server and it’s really difficult to add MySQL, PHP and perl. XAMPP is really very easy to install and to use just download, extract, and start.
Thanks
nice article, but i use both WAMP and XAMP and i find XAMP more reliadeble, and much much faster on same configurated PC
You should “tutorialize” how to develop a test site in cpanel or plesk and then move it to production when the restyling has done. ;D
Nice and very deep information article regarding install WordPress in localhost. Thanks for share Kevin :). Very useful article for WordPress beginner.
Xammp is also cool, I’m using it since many years. It comes with an installer and it is relatively easy to start with.
I recommend Xampp replace WampServer – Xampp is stable, light and easy to use! You will love it when you use it!
Thanks for Kevin!
I use VMware Workstation install CentOS6.5 to work in local PC. And modify hosts file(selfdomain.com 192.168.1.105). In router, virtual NIC binding 192.168.1.105.
Final, enter selfdomain.com to chrome. This is because, some of my wordpress application can only be run under Linux.
PS: Login Module of Divi theme, I found that it was unable to work in Chrome, but use IE Opera is OK.
I find the reason, because already login in Chrome. Determine whether the user is logged in, very good design!
I would also like to see a related article to this one on how to upload and make your site live.
I have tried this in the past, and being a newbie, have found it very difficult. Maybe those in the know can give us newbs an easy guide or plugin that does the heavy lifting. Thanks.
I use EasyPHP.
I highly recommend instantwp (which can be found at instantwp.com). It’s free, and it’s basically a one-click install for a local WordPress site.
The server is built-in. No need to bother with it or even know it’s there.
It’s probably the easiest thing for a WordPress newbie, but it’s also more convenient, in some ways, for more experienced folk, since you can put it wherever you want. (You’re not restricted to putting your files in www, like with WAMP, for example.)
Note: You can have multiple installs in different places but you have to log out of one before you can log into another.
You’re right Laura, instantwp is a great option as well.
Superb, I’ve tried to install WAMP all this while but couldn’t get it done. I used xampp and I love it simplicity and flexibility. However, due to support, I seldom flesh out my site in a local server even when I screenshot where I needed help, instead I use a test server to do the full-fledged fleshing and it has always be working. Thank you Kevin for your intuitive posts
Desktop server by serverpress is excellent. It is based off of xampp and has been extremely stable for me as I work on sites and teach clients.
I was a fan of WAMP, and used it for years, until I found InstantWP (http://www.instantwp.com/).
InstantWP is a free, 1-click, complete remote and PORTABLE solution for locally installed WP sites. I say PORTABLE, because you can even install it on a flash drive. Hard to get more portable than that.
This guide is a great guide to WAMP, since WAMP can be pretty confusing to install at times…but there is nothing like a 1-click setup that still allows configuration once installed.
Hi, I need a tutorial for mac.
thanks
Just an amazing and superb post, Kevin!
So useful and so well explained!
THANKS!!!
Wow! Great article kevin. Explained in complete detail.
I used Microsoft webmatrix to install wordpress on my local computer.
You should really take a look at Ampps.
Much more user friendly, with auto install for WordPress and other apps. I’ve never tried using WordPress locally, but ampps helped me there.
http://www.ampps.com/downloads
Great article!
I was wondering if there is a way to create a local wordpress installation using the desired domain name instead of localhost. This way you can avoid many problems when going live (or vice versa). I used to do that with MAMP PRO. I have now switched on Windows and I have no idea how to do that. Any suggestions where to look for? Thank you!
Hi
I would love to see a Mac equivalent – this is something that would suit me down to the ground – are you thinking pf producing one?
Also you mention “Transferring a local WordPress installation to a live website is also painless. All you have to do is upload your files and your database and ensure that the URL settings are correct”.
Will you be covering this?
Nice to see you !
Sometimes I’m using this german solution:
http://www.web266.de/software/eigene-software/lokaler-webserver-lws/wordpress-version.html
Thanks Kevin, an interesting and informative post. I have tried Wamp but personally prefer and use XAMPP.
Local development using one of these packages is great for testing things out as you are safe in the knowledge that you will not trash or lock yourself out of a live site whilst trying out a new plugin or messing with code. You here of so many people doing this, particularly with new plugins and then they end up in panic mode and even lose money while their site (or their customers site) is down.
I was glad recently when trying out a new security plugin that I was working locally, as I ended up completely locking myself out of the WP dashboard and ended up having to delete and then re-install everything, which takes time but that’s all I lost. This is not the sort of thing you want to happen with a live site, trust me.
Once you have built a site locally and you are ready to publish, it is a fairly straightforward process to migrate the site to a live server.
For me it is really a no-brainer to build and test locally first.
Thanks again Kevin, keep up the quality posts 🙂
I would highly recommend DesktopServer, which works on Mac and Windows platforms. I’ve used it for three years now. This not only installs everything you need to develop locally, but allows for a very simple means of deploying a site live. I’ve done this with numerous sites, both small, 5 page sites, to a large 140 page site, and it worked seamlessly,
Thanks David, I’ll take a look. I see you’re using DIVI, great theme 🙂
I use XAMPP which I find great BUT testing a site locally isnt without its problems. For example I was having a problem with Divi and WooCommerce and posted a support item but the guys couldn’t help me because they couldn’t see the site. I had to move everything lock, stock and two smoking barrels to a testing environment online. Something to think about before you go this route.
I prefer XAMPP and Bitnami.
Simply the easiest I have ever used.
I recommend everyone to do a test with this application.
Serverpress is another good option.
I too use Desktop Server by Serverpress. I have used all the others mentioned here and more and find DS to be superior. Plus if you step up to the paid version you get access to a number of options that more closely match the way you WP installs actually work – including an almost one-click option to upload you completed test site to the internet when you’re ready to go live.
You are right, Brad.
DesktopServer by Serverpress is what I use, and it sure is a great shortcut.
Thanks Kevin. I too use a sub-domain for my test projects but I have always wanted to try this as well for speed and efficiency while prototyping. Thanks for posting this! It would be great to see an article on migrating the site from local to a hosted server online. Or better yet an article that gives us steps on migrating sites within domains, to other domain and from local like described above. It would be nice to have it all in one article for easy reference 😉
Would it be possible to use this method on a widows tablet in order to make a portfolio that would be internet independent?
Long and informative tutorial. Surely I’ll follow your tutorial to install WordPress on my computer. Thanks for the great share.
Great piece. We’re working on a Windows version of http://wpstarter.io. We hop you will check it out once it’s available.
Great post! Will you also post one on setting up this environment on a Mac? Also, will you cover migrating your site from the test environment to the live environment?
I really enjoy these tutorials that you are putting out! You guys never cease to amaze me!
For migrating your site from the test environment to the live environment, I have used on numerous occasions a great plugin called “Duplicator”
Hope it helps.
I second that….
Jared,
Just use MAMP, the Mac equivalent. Pretty much every step is the same. Download from mamp [dot] info. On install, ignore MAMP Pro, and just use the standard MAMP.
Hey Eric,
I am actually already using MAMP, but didnt know if there are any best practices to use with that as well. I guess I should have thrown that piece of info in my first reply. 🙂
Thanks for your reply though!
Thanks Kevin. I hope to see a Vagrant tutorial, for example about Varying Vagrant Vagrants 🙂