
Anyone who’s familiar with browsing the web has run across a 403 Forbidden error, or other HTTP status error, at some point. These errors are incredibly frustrating, especially when they appear on a WordPress website that you own and run. When you’ve gone to the trouble to set up your own hosting and you know the ins and outs of managing your own website, it’s perplexing to suddenly be locked out of a particular page (or the site itself).
Thankfully, a 403 Forbidden error is possible to fix. This article will explain what the 403 error is, and what to do if you see one on your WordPress website.
Let’s jump in!
What Is The 403 Forbidden Error?
The 403 Forbidden error occurs when a server essentially locks you out of a page or a website you’re trying to access. Normally, this error appears when there’s an issue regarding site access permissions. When the problem is coming from your website, that means you’ll need to check your permissions and fix any outstanding issues that might be causing the error.
Thankfully, a 403 error is not an indication of servers gone rogue. It displays when you don’t have the proper permissions to view the page you’re attempting to load. Generally speaking, this means you’ll need to correct a minor error in your WordPress installation. And, you’re more likely to spend the most time pinpointing what’s causing it. The fix is often quick and simple.
What Causes The 403 Forbidden Error To Occur?
There are several potential causes for a 403 error to show up on your website. Here are several of the most common:
- Permissions have been changed in the back end of your WordPress site
- Your .htaccess file has become corrupted
- A faulty plugin is installed on your website
- Your hotlink protection isn’t configured properly
- There’s a problem with your CDN
Before you jump into attempting to fix a 403 Forbidden error on your WordPress website, try to reload the page first. Sometimes, a temporary 403 error can occur on your site, which you can easily fix by reloading. Alternatively, make sure you’ve typed in the correct URL, since a misspelling can cause a 403 Forbidden error to display. If reloading the site or re-entering the URL does not help, move on to the next steps.
How To Fix The “403 Forbidden” Error (5 Ways)
Ready to learn how to fix the 403 Forbidden error that’s displayed on your WordPress site? There are several simple methods for fixing this issue.
Be sure to backup your site before you begin. If you haven’t backed up your site lately, now is the time. You don’t want to risk losing valuable time and data while you work on this fix. Luckily, fixing a 403 Forbidden error is fairly simple, and isn’t likely to cause a major headache. Still, it’s best to be prepared. If you need an assist backing up your WordPress site, there are a lot of great WordPress backup plugins available to help you do so easily.
Let’s take a look at your options.
1. Check Your File Permissions
Because a 403 Forbidden error means your site’s server is refusing you access, that means you may lack proper file permissions. For this reason, it’s wise to begin troubleshooting the issue by looking into your file permissions via FTP. To access your files, you’ll need an FTP file manager, your host’s cPanel file manager, or a WordPress file manager plugin. We’ll be using FileZilla in this guide.
Log into your FTP server, then navigate to your WordPress installation folder. You can get to this by double-clicking the appropriate folder (the one featured here is named public_html).
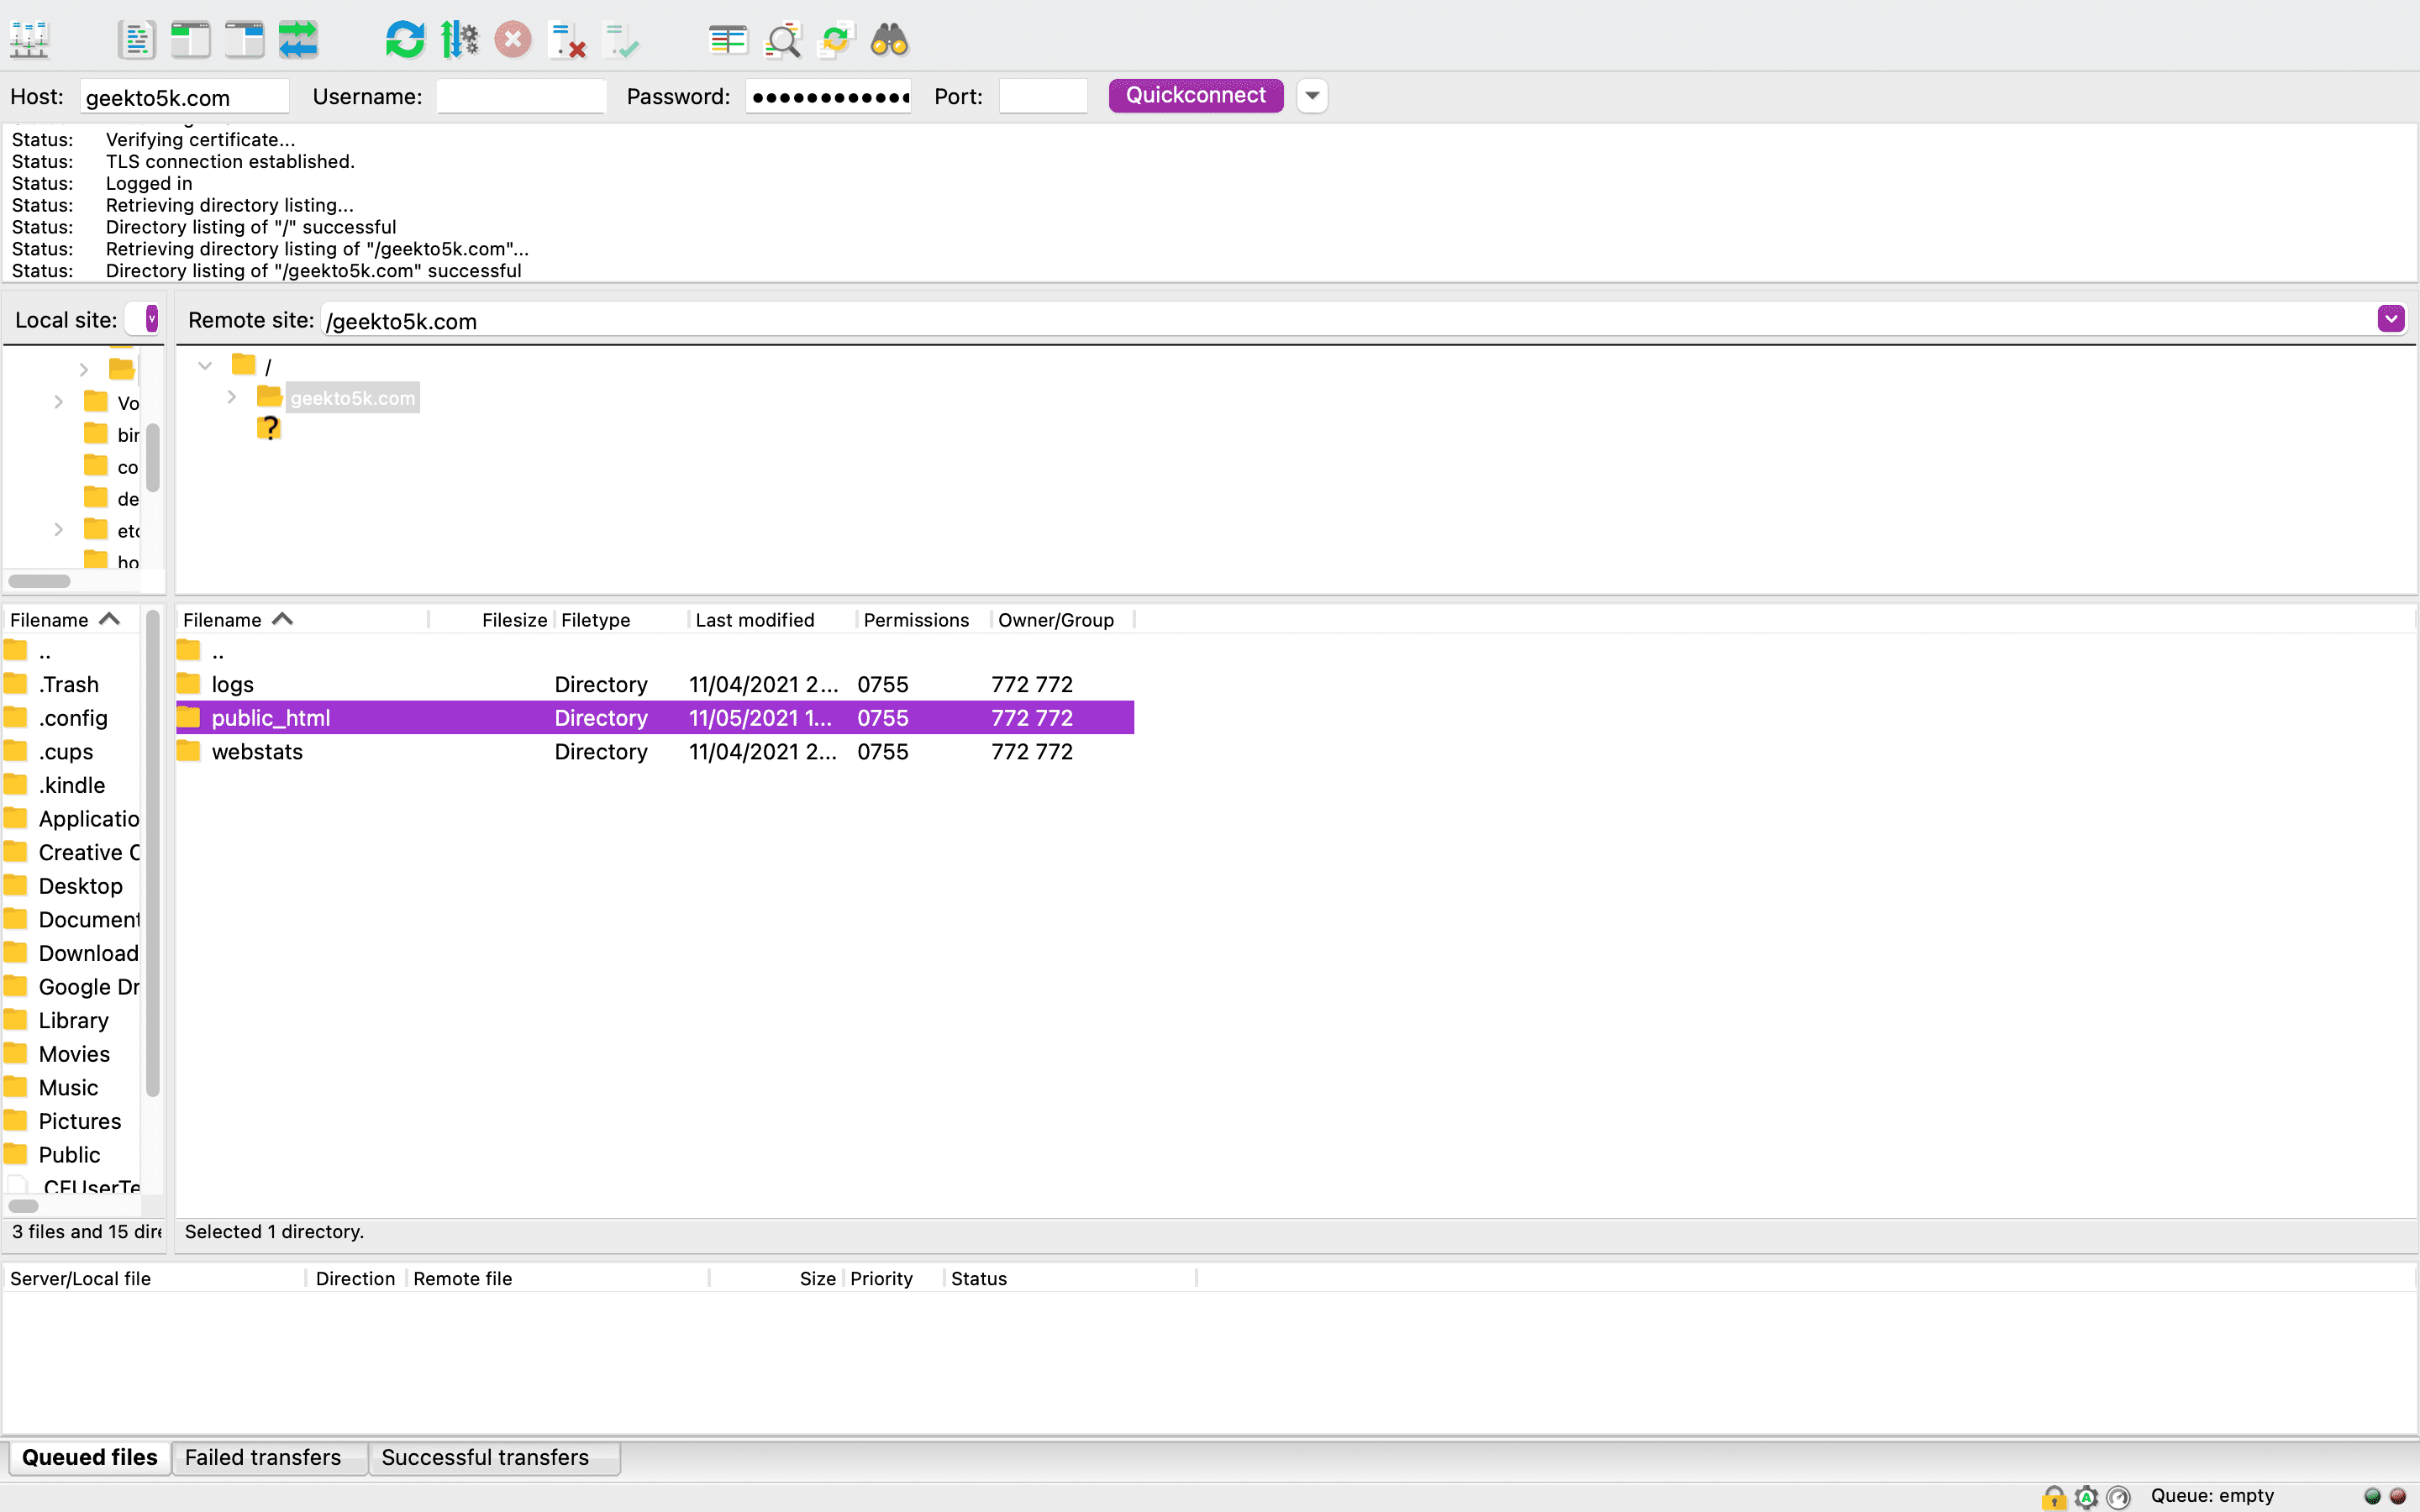
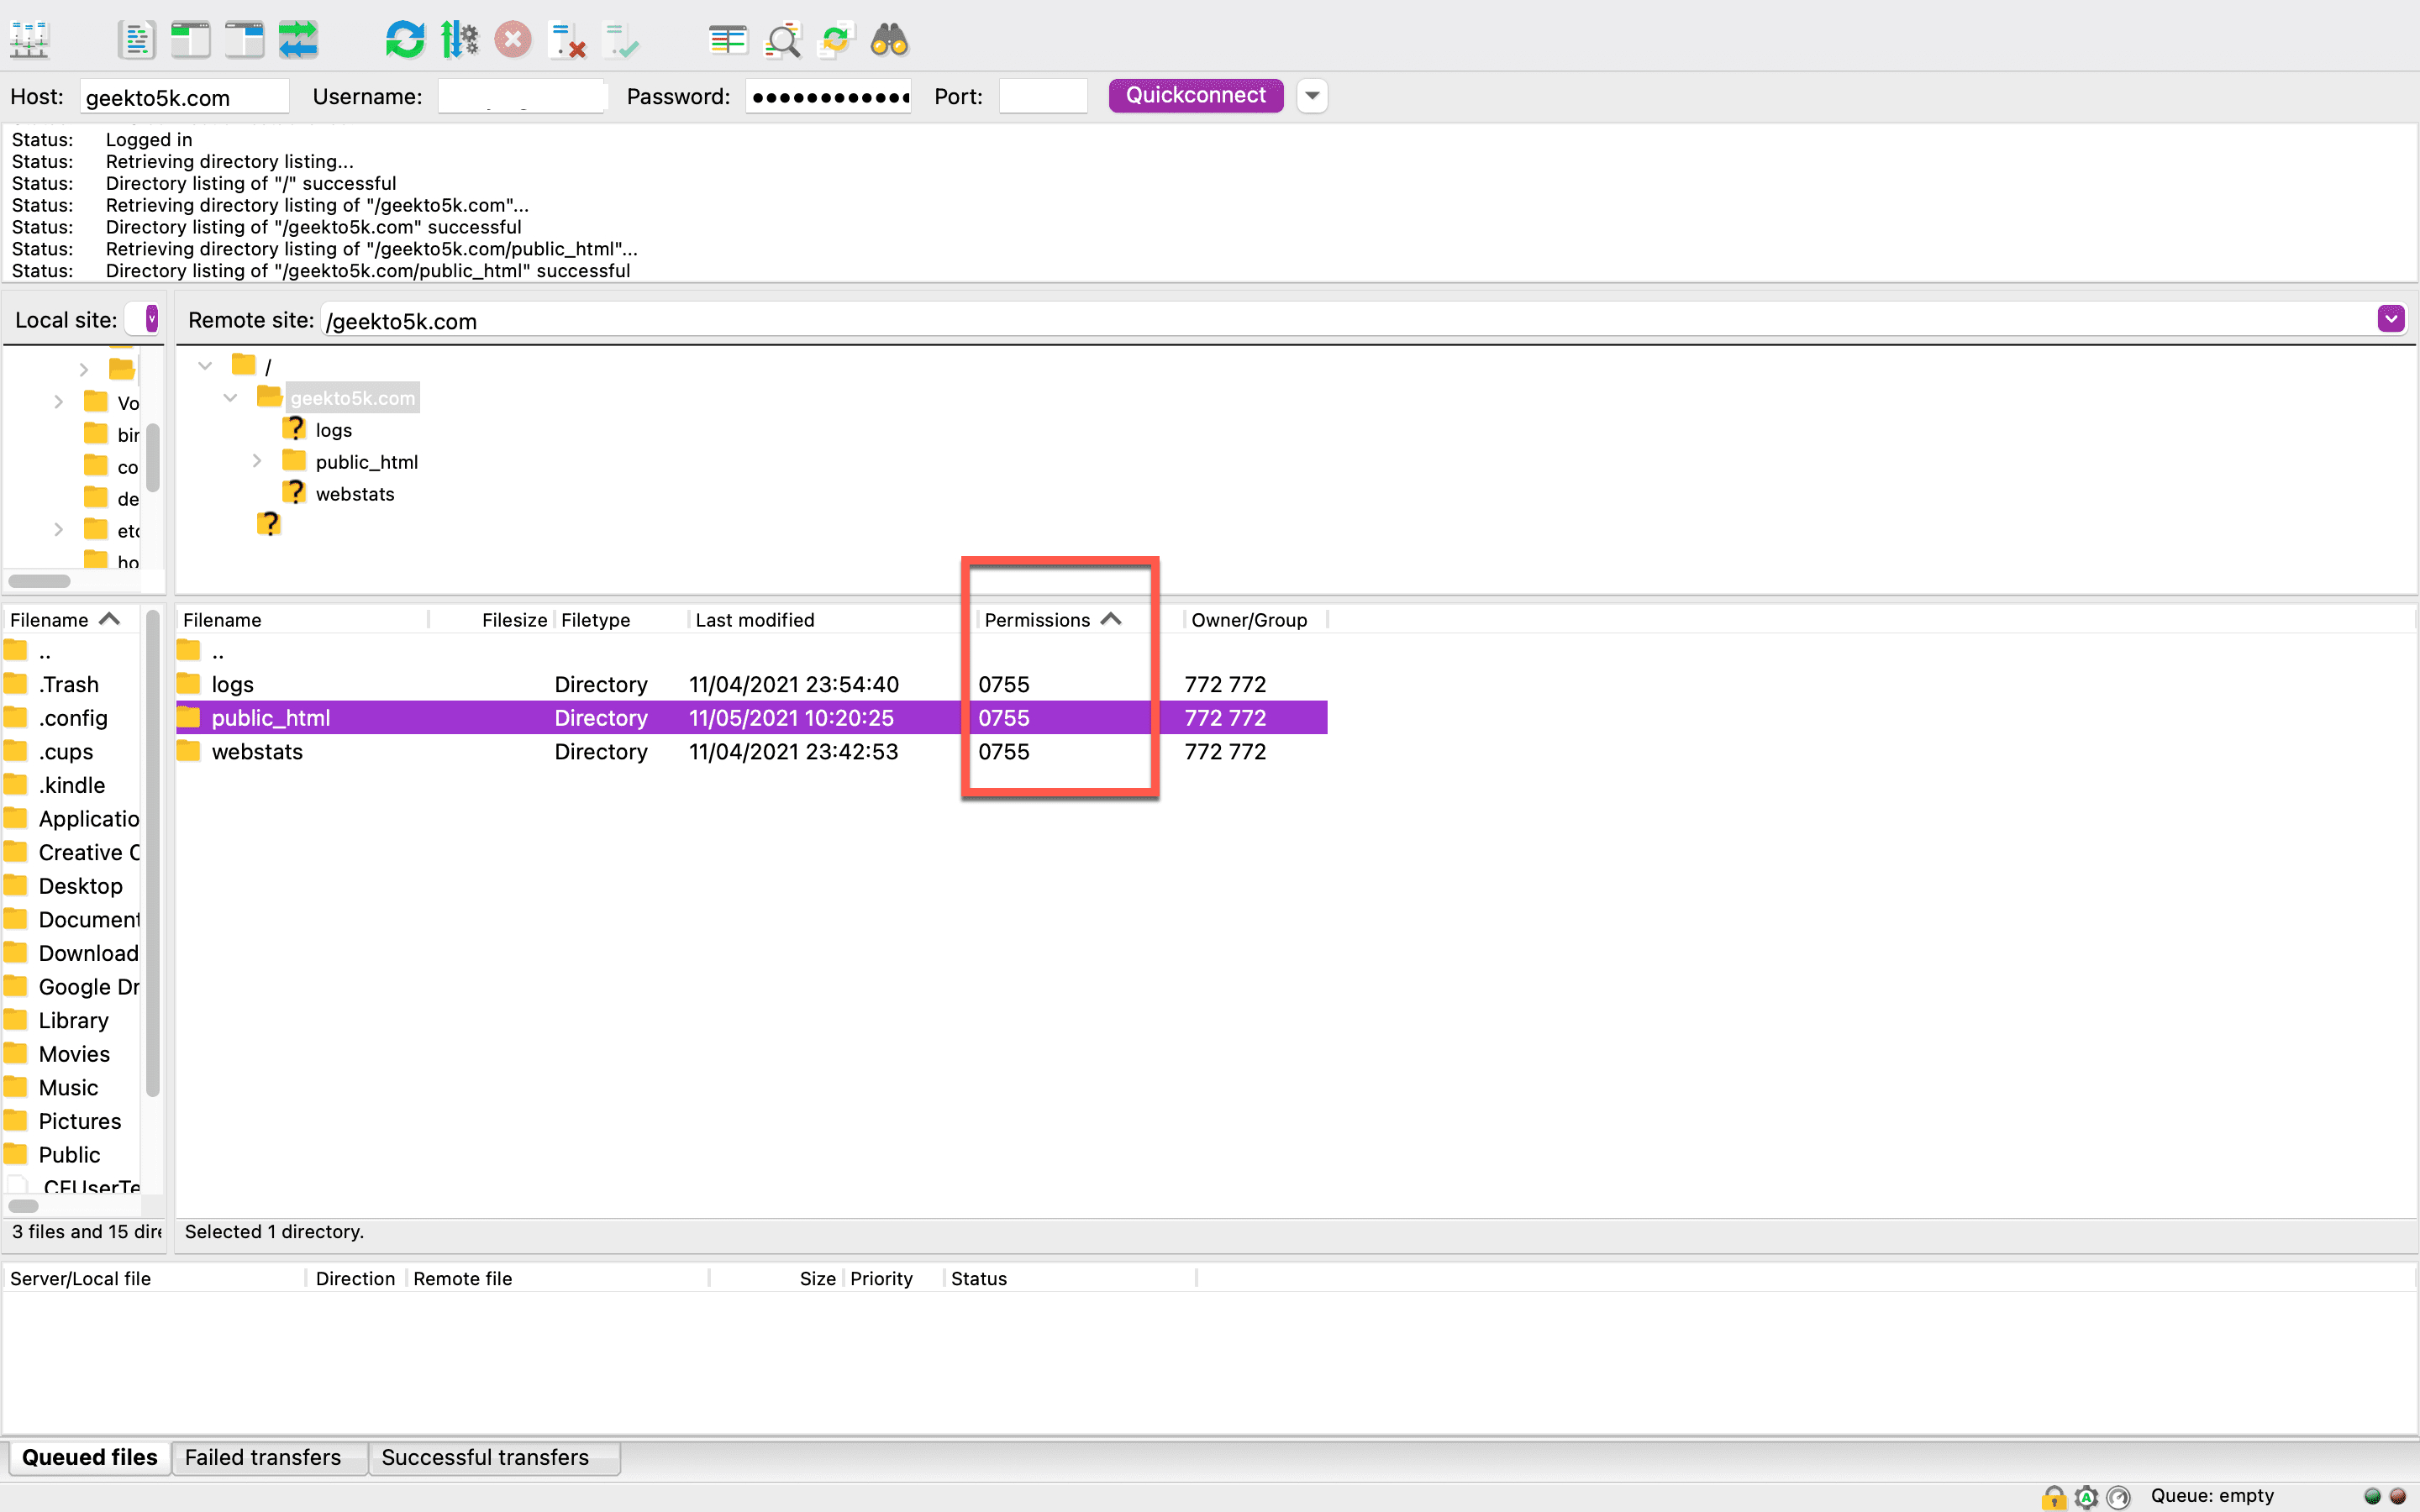
The public_html folder contains the files and folders that make up the backbone of your site. Each of these files has its own permission settings, with a specific numeric value that indicates who can interact with each file, and in what way. Every WordPress directory, for example, should have a default setting of 755 or 750. Your individual files’ permissions should be either 644 or 640, except for wp-config.php, which needs to be set to 440 or 400.
Keep in mind that changing permissions is a serious matter, and incorrectly adjusting them could potentially cripple your website. You’re trying to mitigate and avoid further 403 Forbidden errors, so proceed with extreme caution.
What Do The Numeric Values Mean?
The numeric value codes you assign to your WordPress website files and directories have specific meanings, and you might be wondering why 755 and 644 are your default values. Each code represents the specific permissions that users and groups have when it comes to accessing your website.
For example, 755 means every user can execute (access and open) and read the files on your site, but the owner is the only individual who can write to them. The 644 numeric value means that all users can read your files, but only owners can modify or write to them. Using an incorrect numeric value can potentially make your website vulnerable to malicious attack, since you might inadvertently open access to third parties. That’s why it’s so important to stick to the exact codes listed here.
How To Reset Permissions For Directories, Subdirectories, And Files
If you find that your file permissions have been changed from 755 (or 750) to another value, you will need to restore that original value manually. If this is the root of your 403 Forbidden error, then it should correct the problem.
Let’s fix your permissions so you can get back into your website. To reset your directories’ and subdirectories’ permissions, right-click on your website’s main directory folder and choose File Permissions.
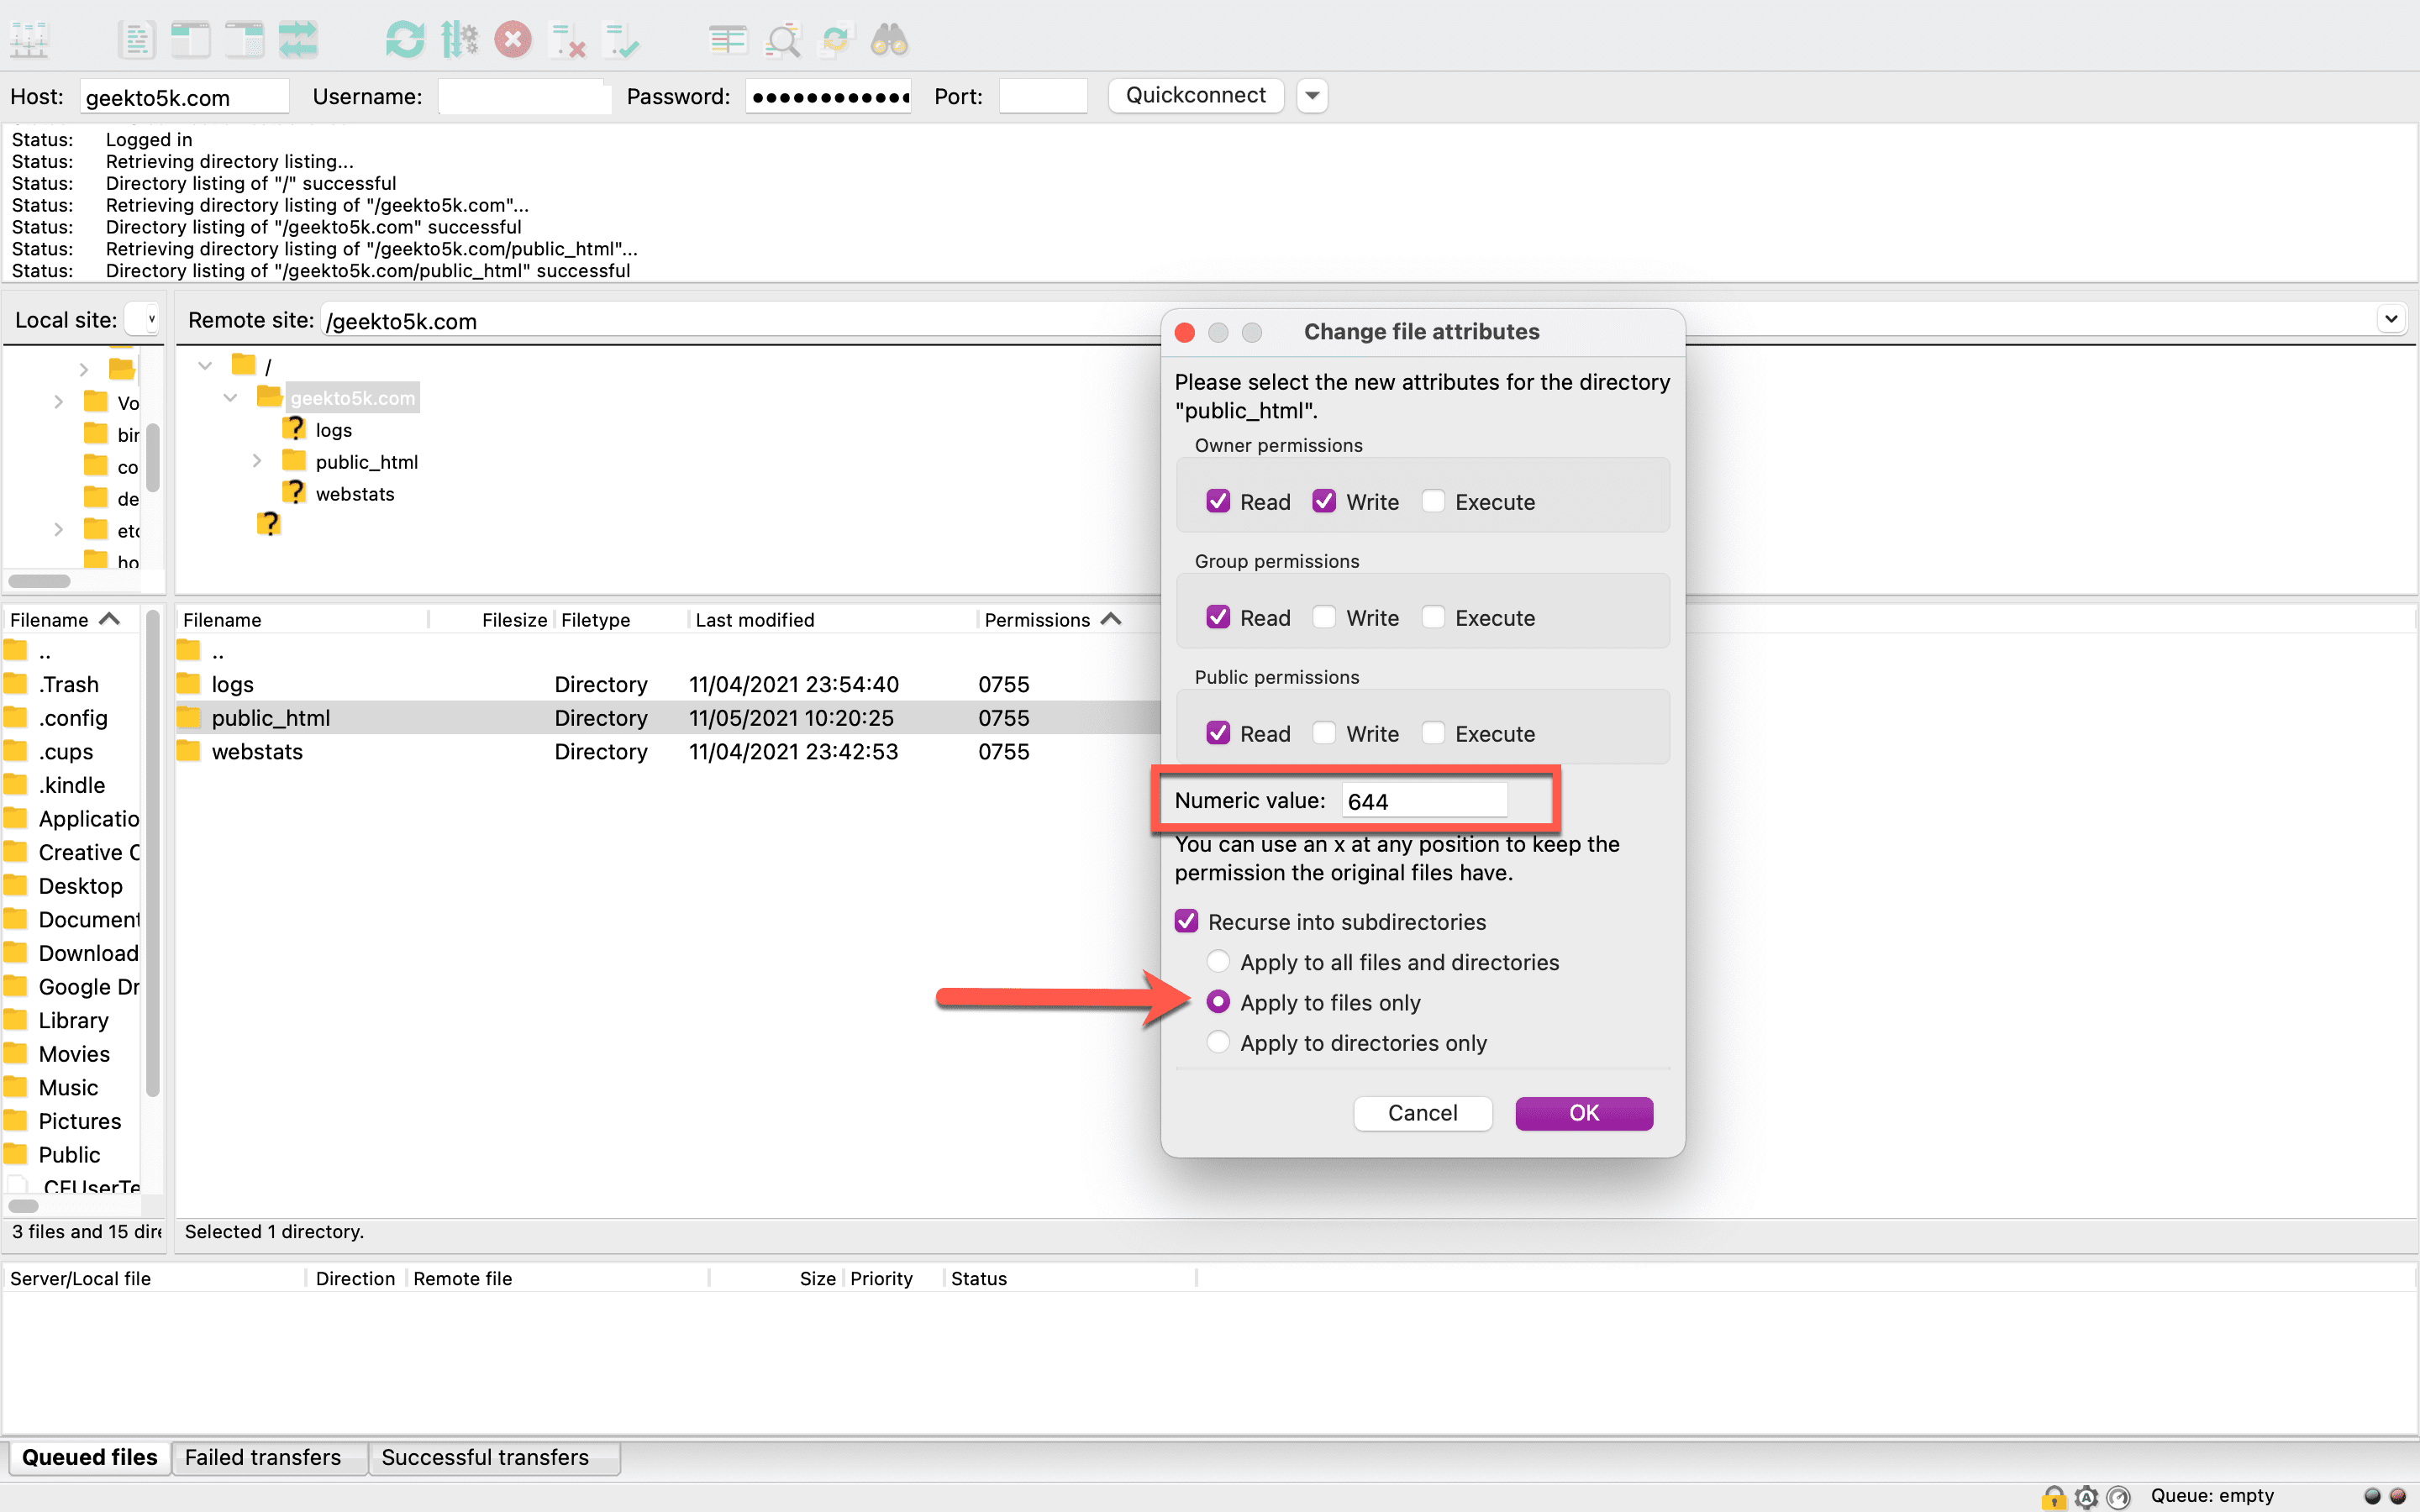
The following window will display on your screen:

From there, enter 755 into the box labeled Numeric Value. Checkmark the “Recurse into subdirectories” box, then select the option to “Apply to directories only.” Click OK to make the change.
Now that you’ve reset the permissions on directories and subdirectories, it’s time to do that for files. Right-click your folder again and select File Permissions. In the box labeled Numeric Value, enter 644 or 640. Select “Recurse into subdirectories” and “Apply to files only.” Then, click OK.
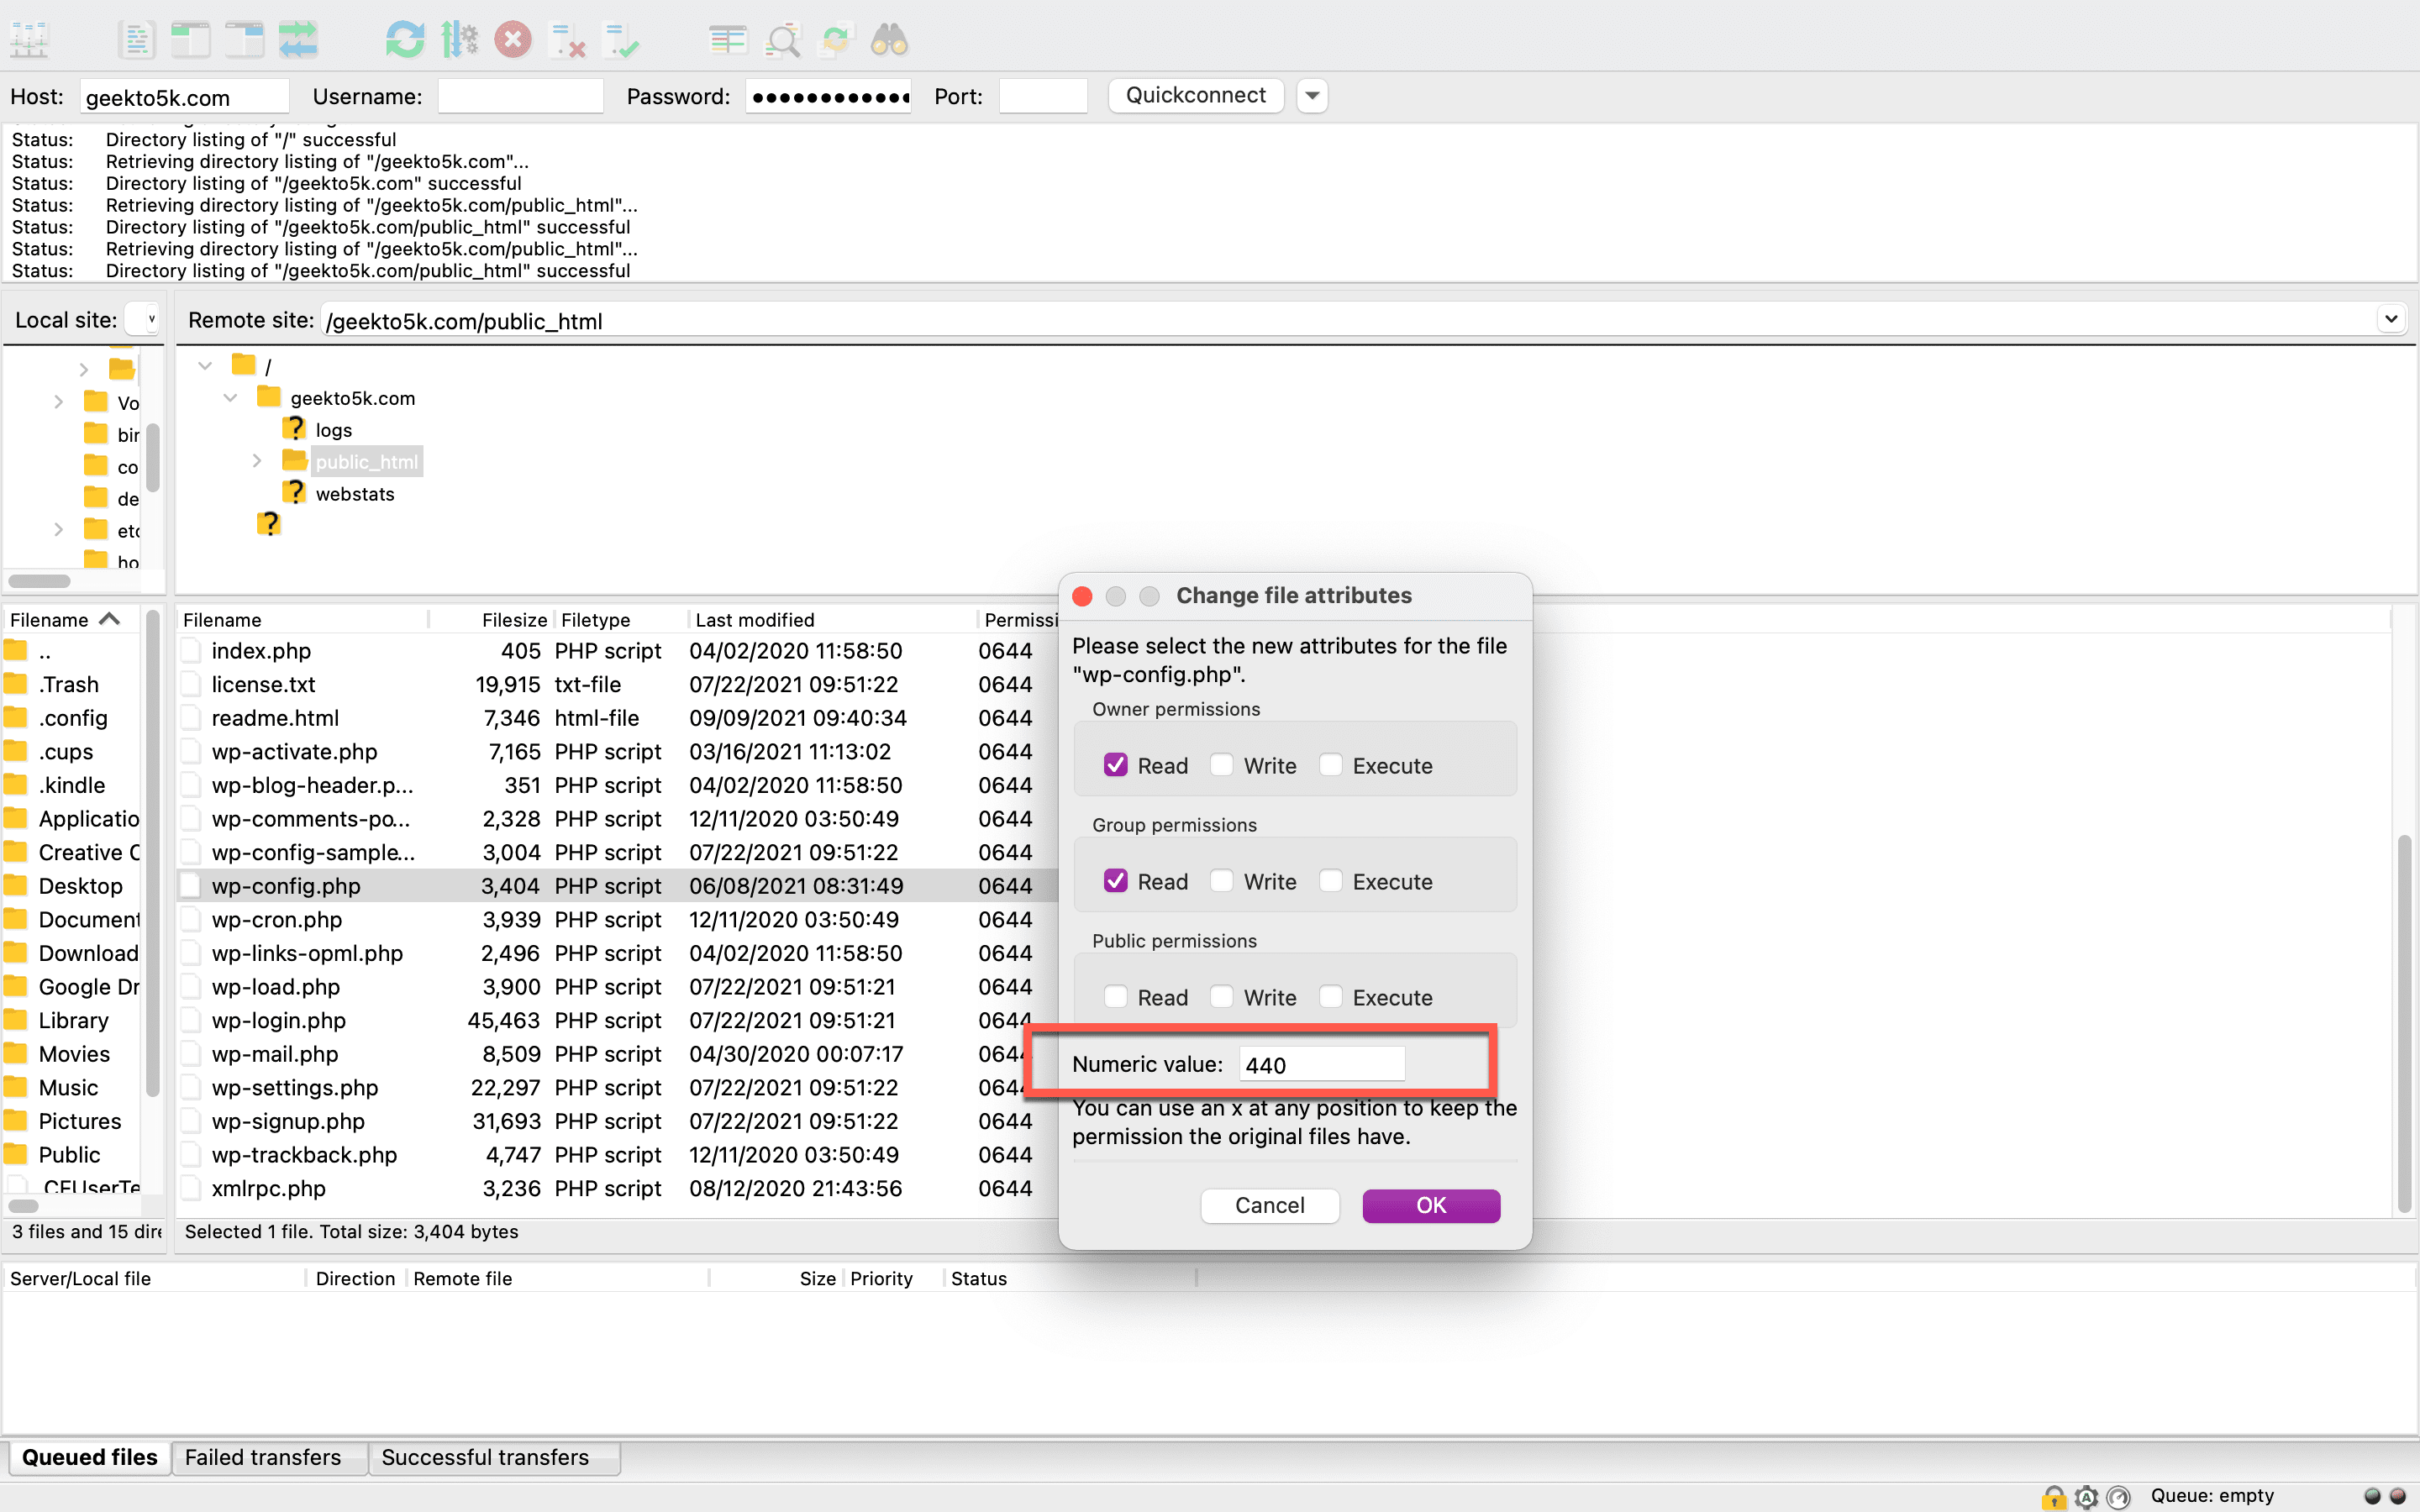
Finally, you’ll need to open your WordPress installation folder and locate your wp-config.php file. Right-click File Permissions, then enter 440 or 400 in the Numeric Value box. Click OK to continue. Do a quick spot-check inside your folders to make sure all the changes took hold.
Now it’s time to test your site’s functionality again. Attempt to visit the page that gave you the 403 Forbidden error. If your site loads correctly, you’ve fixed the problem! However, if you’re still getting the 403 error, there may be another underlying issue. Let’s move on to your next option.
2. Inspect Your .htaccess File
A corrupted .htaccess file can cause your site to display a 403 Forbidden error. If that’s the root of your problem, it’s a quick and easy fix.
Inside your FTP client, navigate back over to your WordPress root directory. That’s where the .htaccess file is stored, and it may be the first individual file you see in the list. Before you do anything, make a backup of your file. Right-click it, select Download, and your file will show up in your Local File directory.
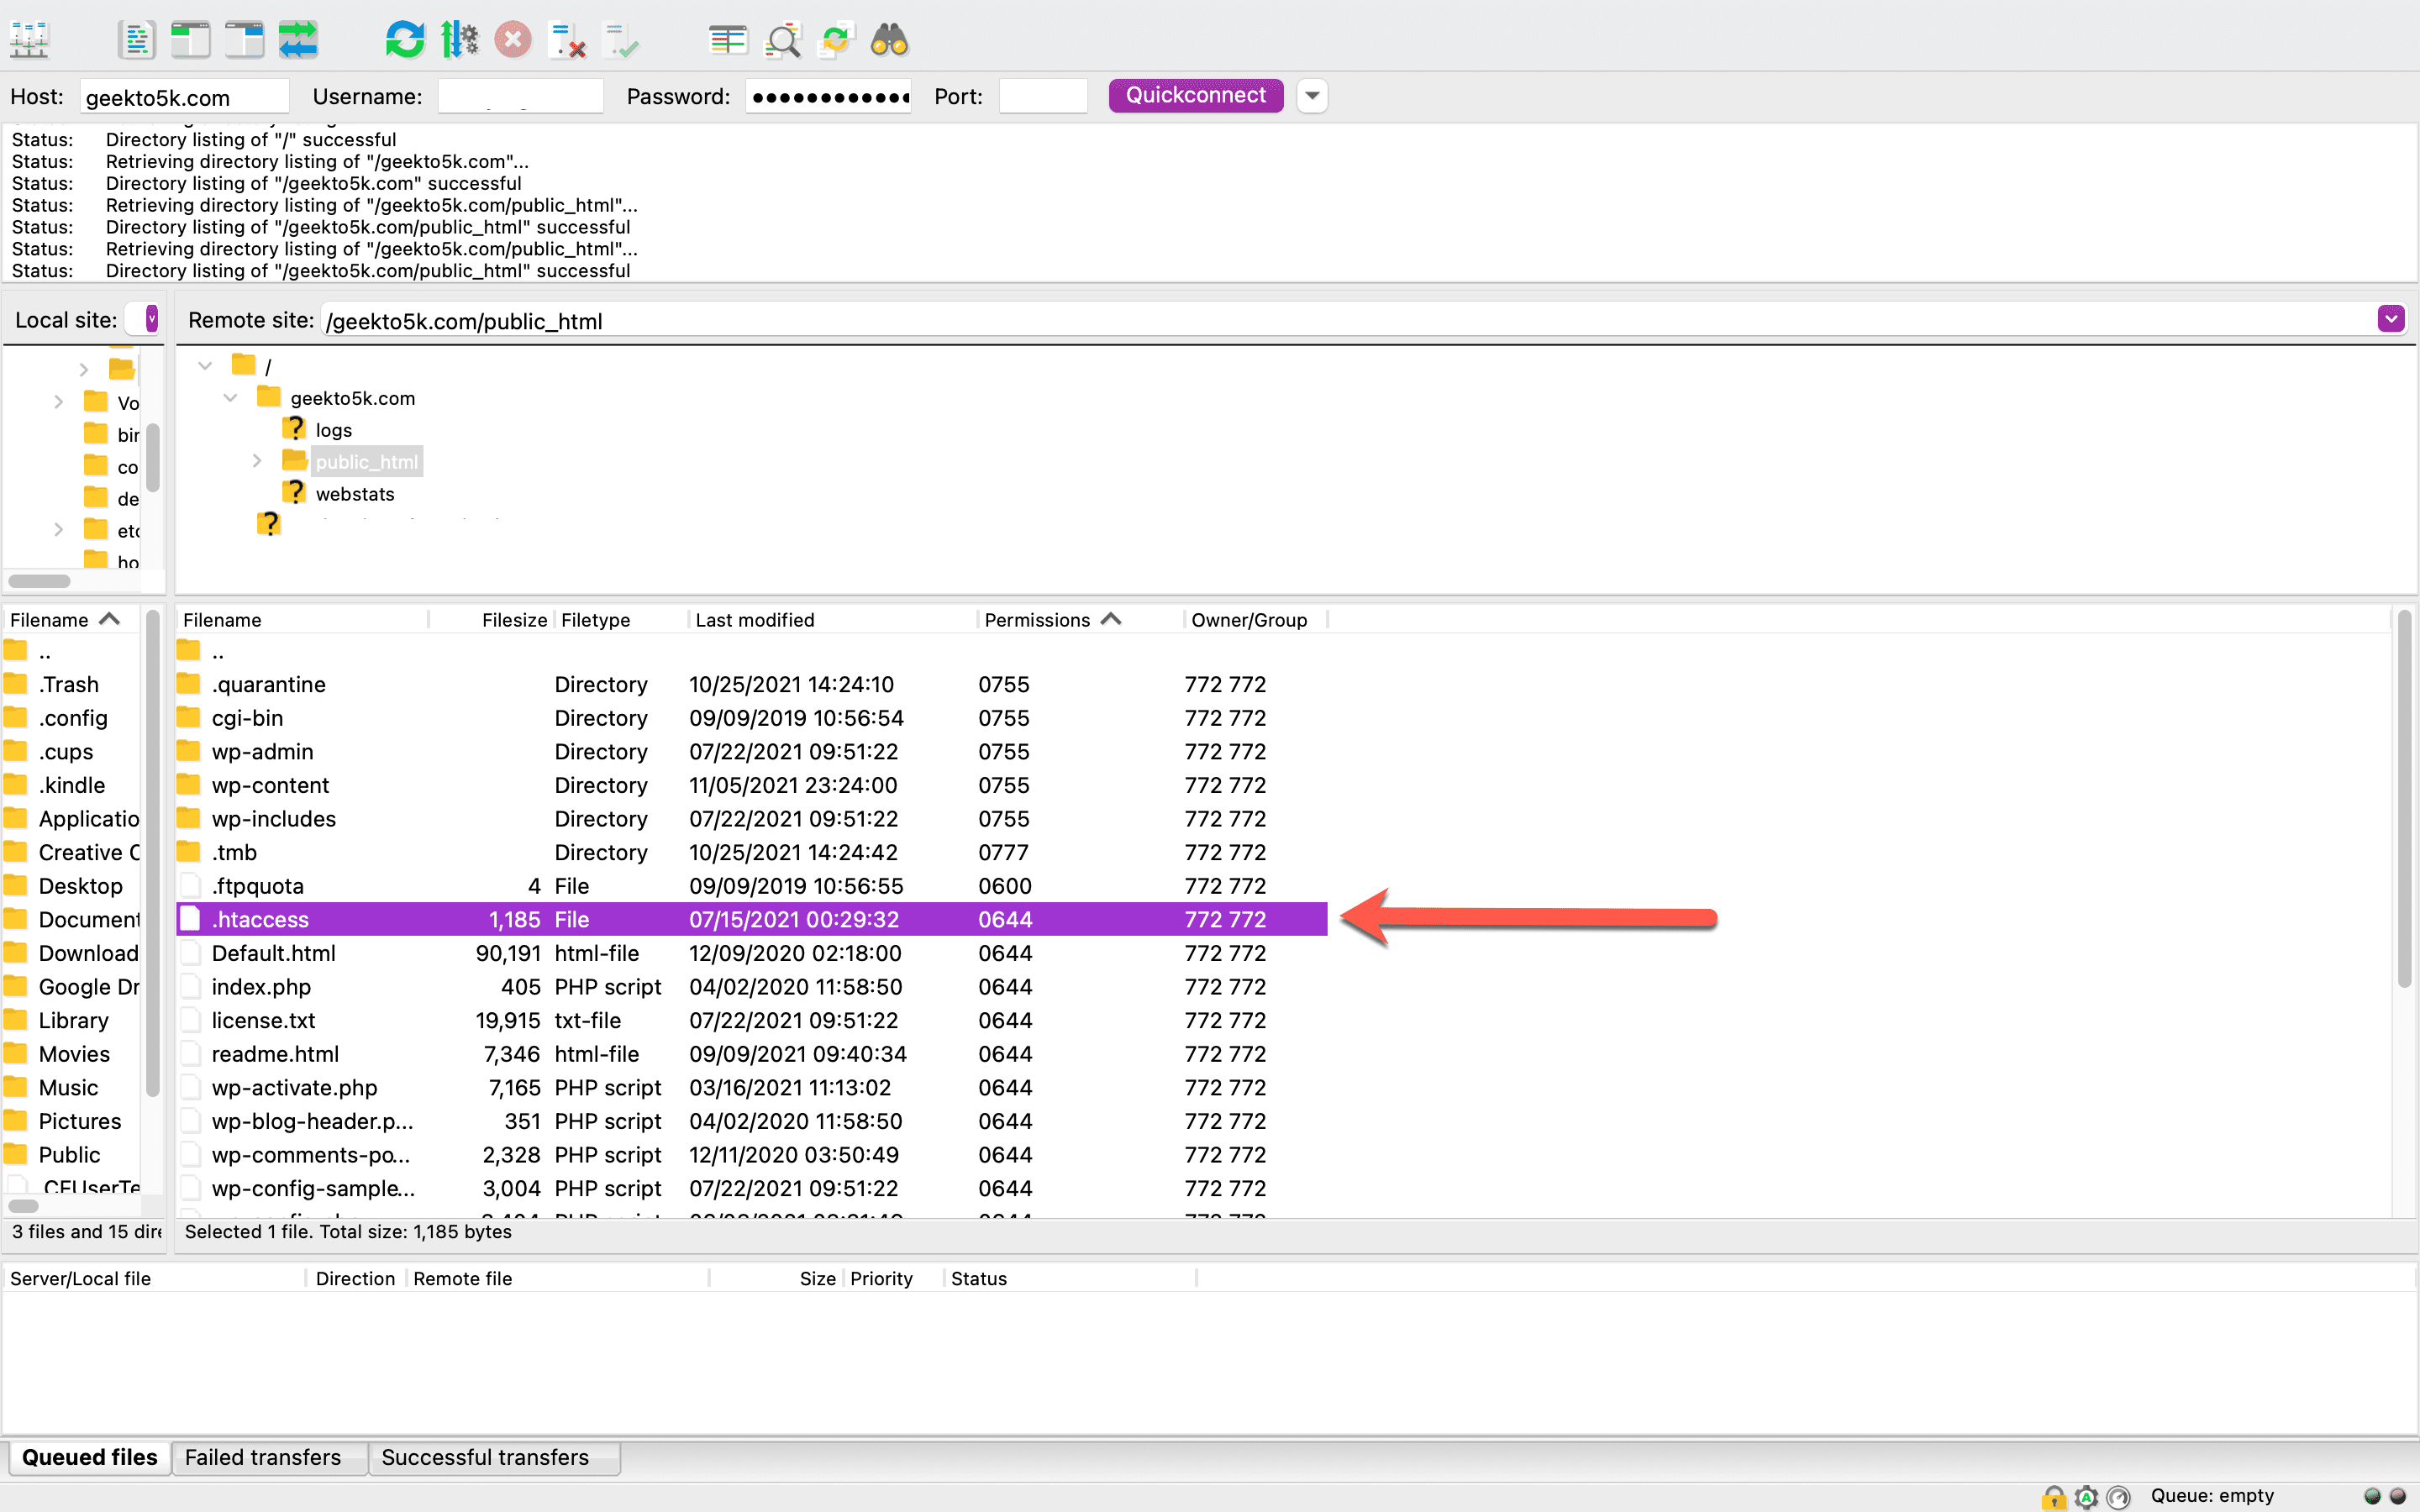
Verify that your copy of .htaccess is successfully stored on your computer. Once you’ve done that, you can head back over to the FTP client and delete the .htaccess there.
After you delete the file, attempt to access the page on your site where you saw the 403 Forbidden error. If the error persists, that means your .htaccess file was not the problem. If that’s the case, simply re-upload the backup you saved to your computer via FTP. Make sure you select the WordPress root directory so it lands in the right spot.
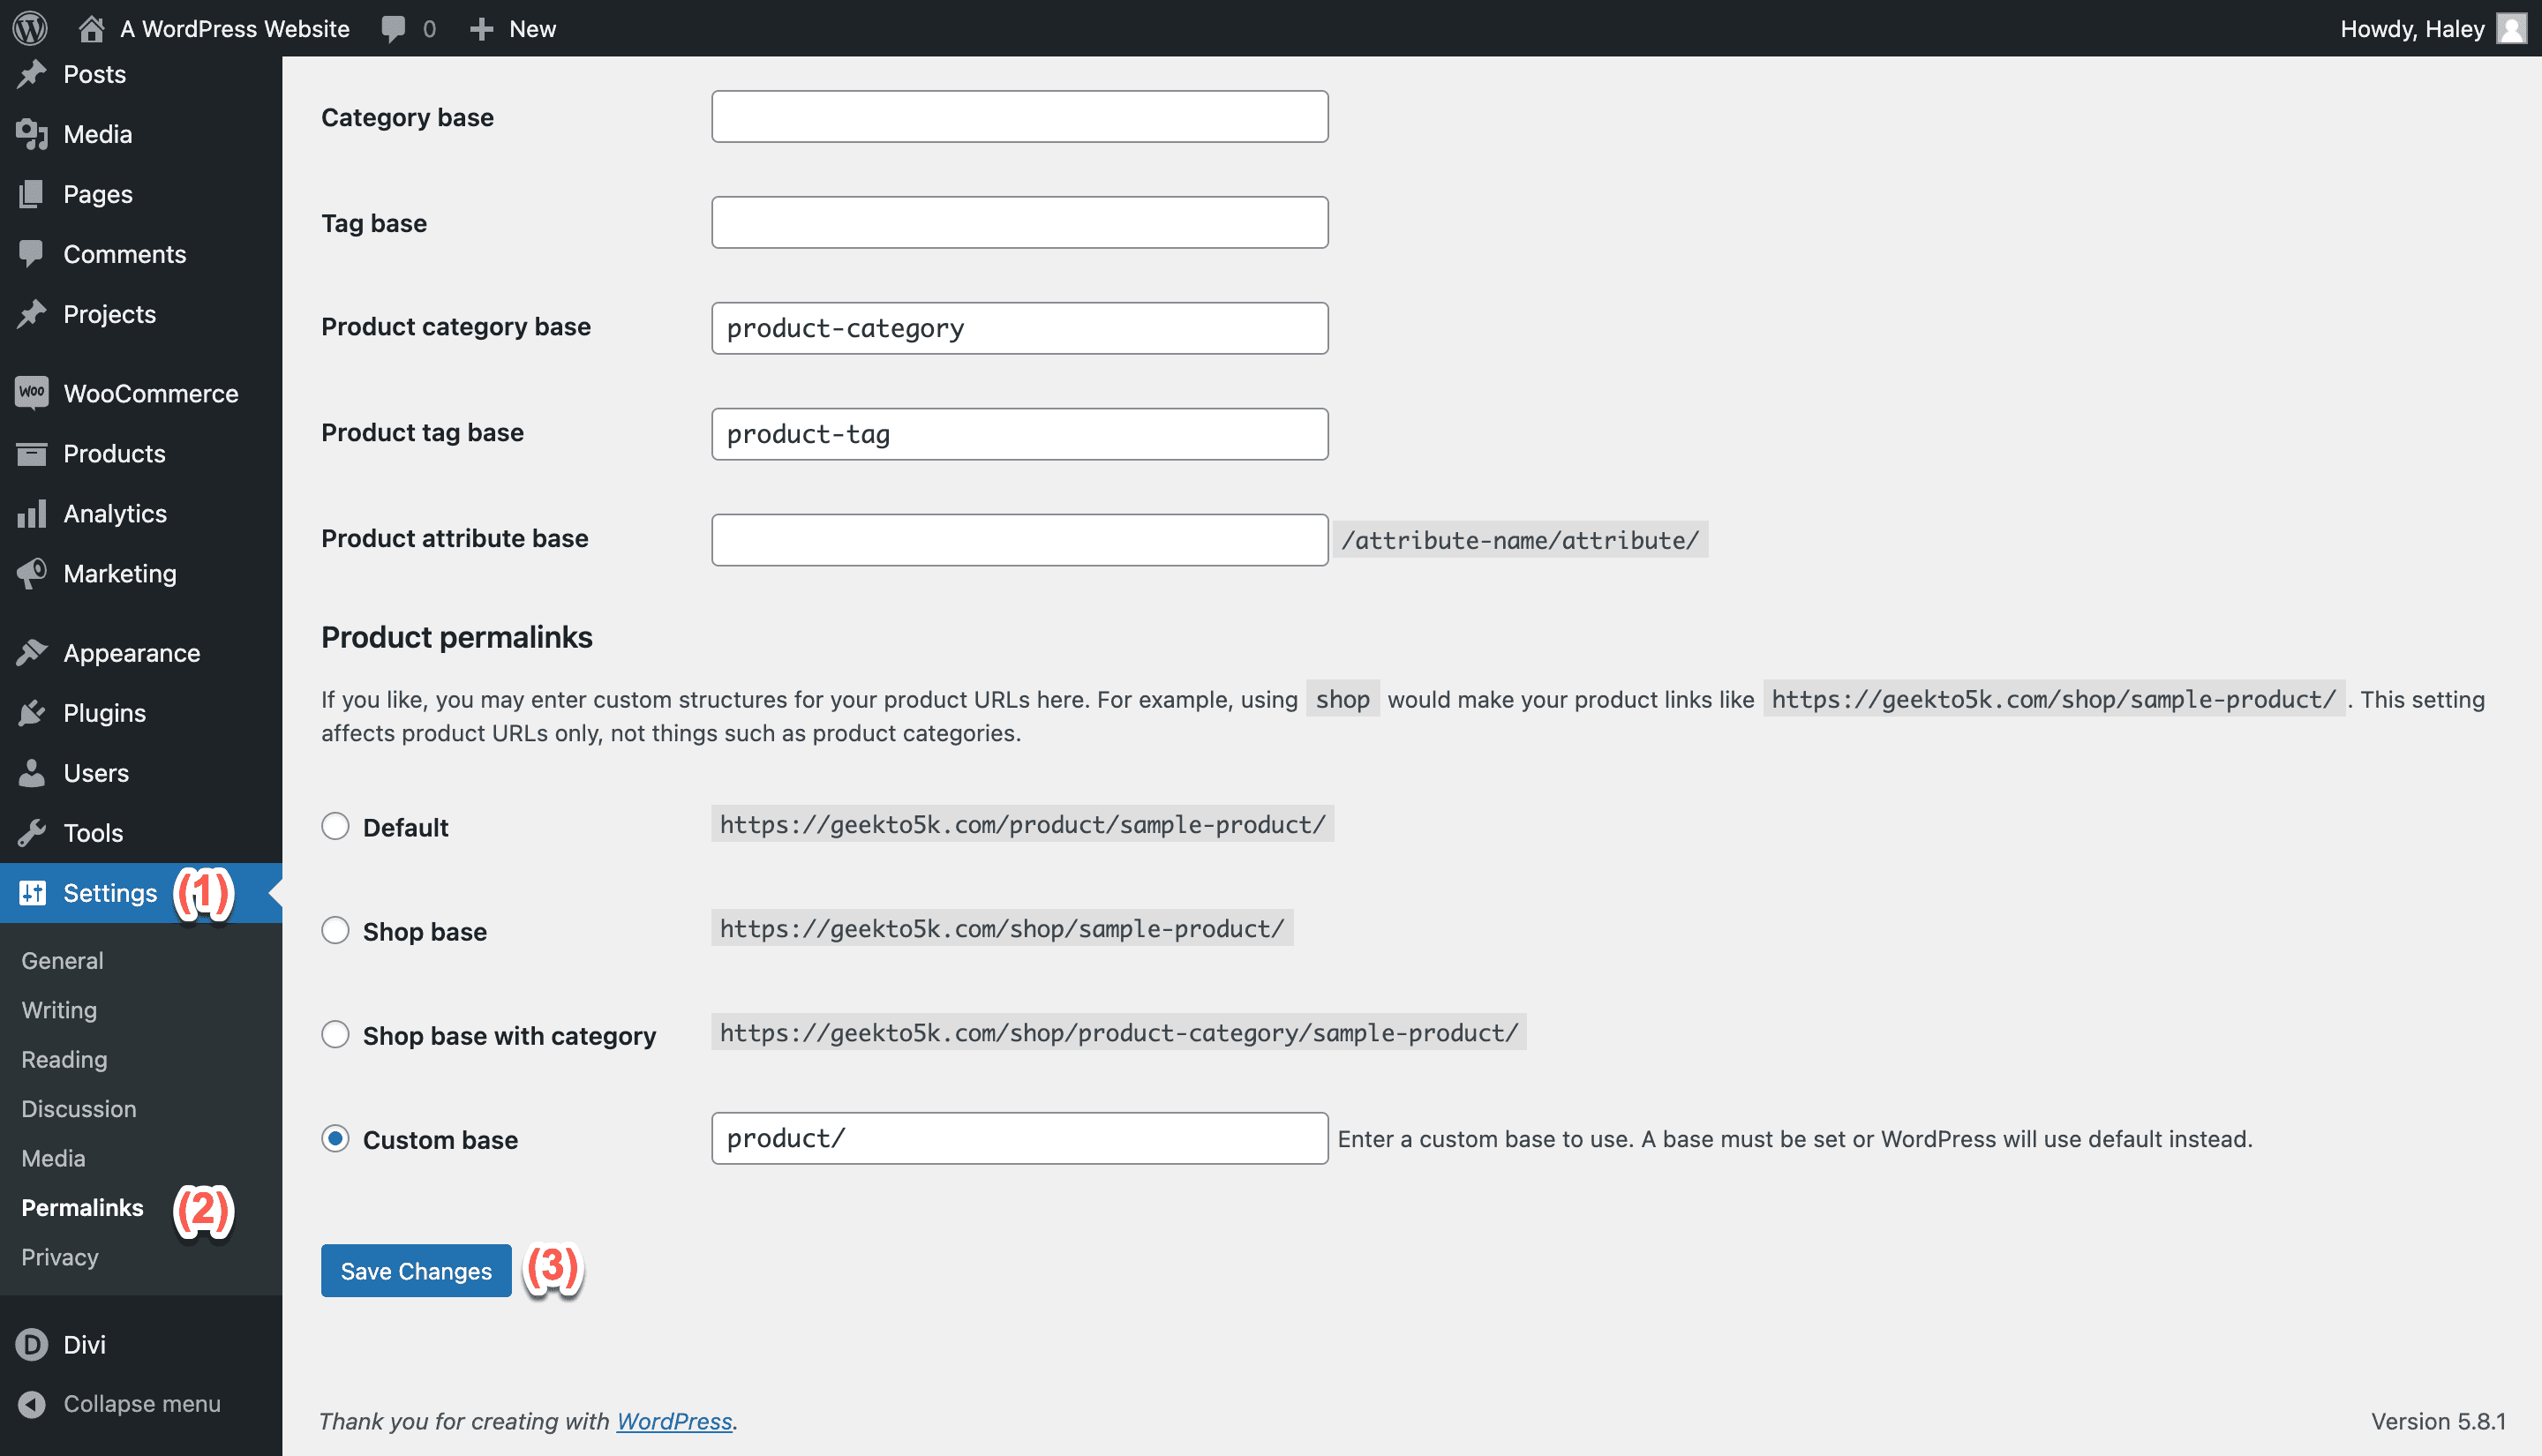
If you don’t see the 403 Forbidden error any longer, that means your .htaccess file was corrupted. In that case, you’ll want to generate a new one, and that’s easy to do. Just login to your WordPress dashboard, click Settings, and select Permalinks.
Note that a recent change to permalink settings may have caused your 403 error to begin with. That’s because clicking Save can write changes to your .htaccess file. When you’ve deleted .htaccess, as you did to test the 403 error, clicking Save generates a fresh .htaccess file for you automatically.
Did that method resolve the issue? Awesome! If not, let’s try another option.
3. Deactivate/Reactivate Your Plugins
No luck with checking file permissions or checking out your .htaccess file? That’s okay. You might be experiencing an issue with your plugins. If a plugin has a compatibility issue or has become corrupted, that can cause your site to throw a 403 Forbidden error.
It’s simple to identify whether you have an issue going on with your plugins, and thankfully, you don’t have to deactivate them one at a time. Instead, you can deactivate all of them at once. We recommend deactivating plugins via FTP rather than using the Plugins menu in WordPress, since the process is much quicker that way.
Head back over to your FTP client and find your plugins folder inside your main WordPress directory. To deactivate all your plugins at once, simply rename the folder. We recommend renaming it to something like plugins.old or plugins.deactivated.
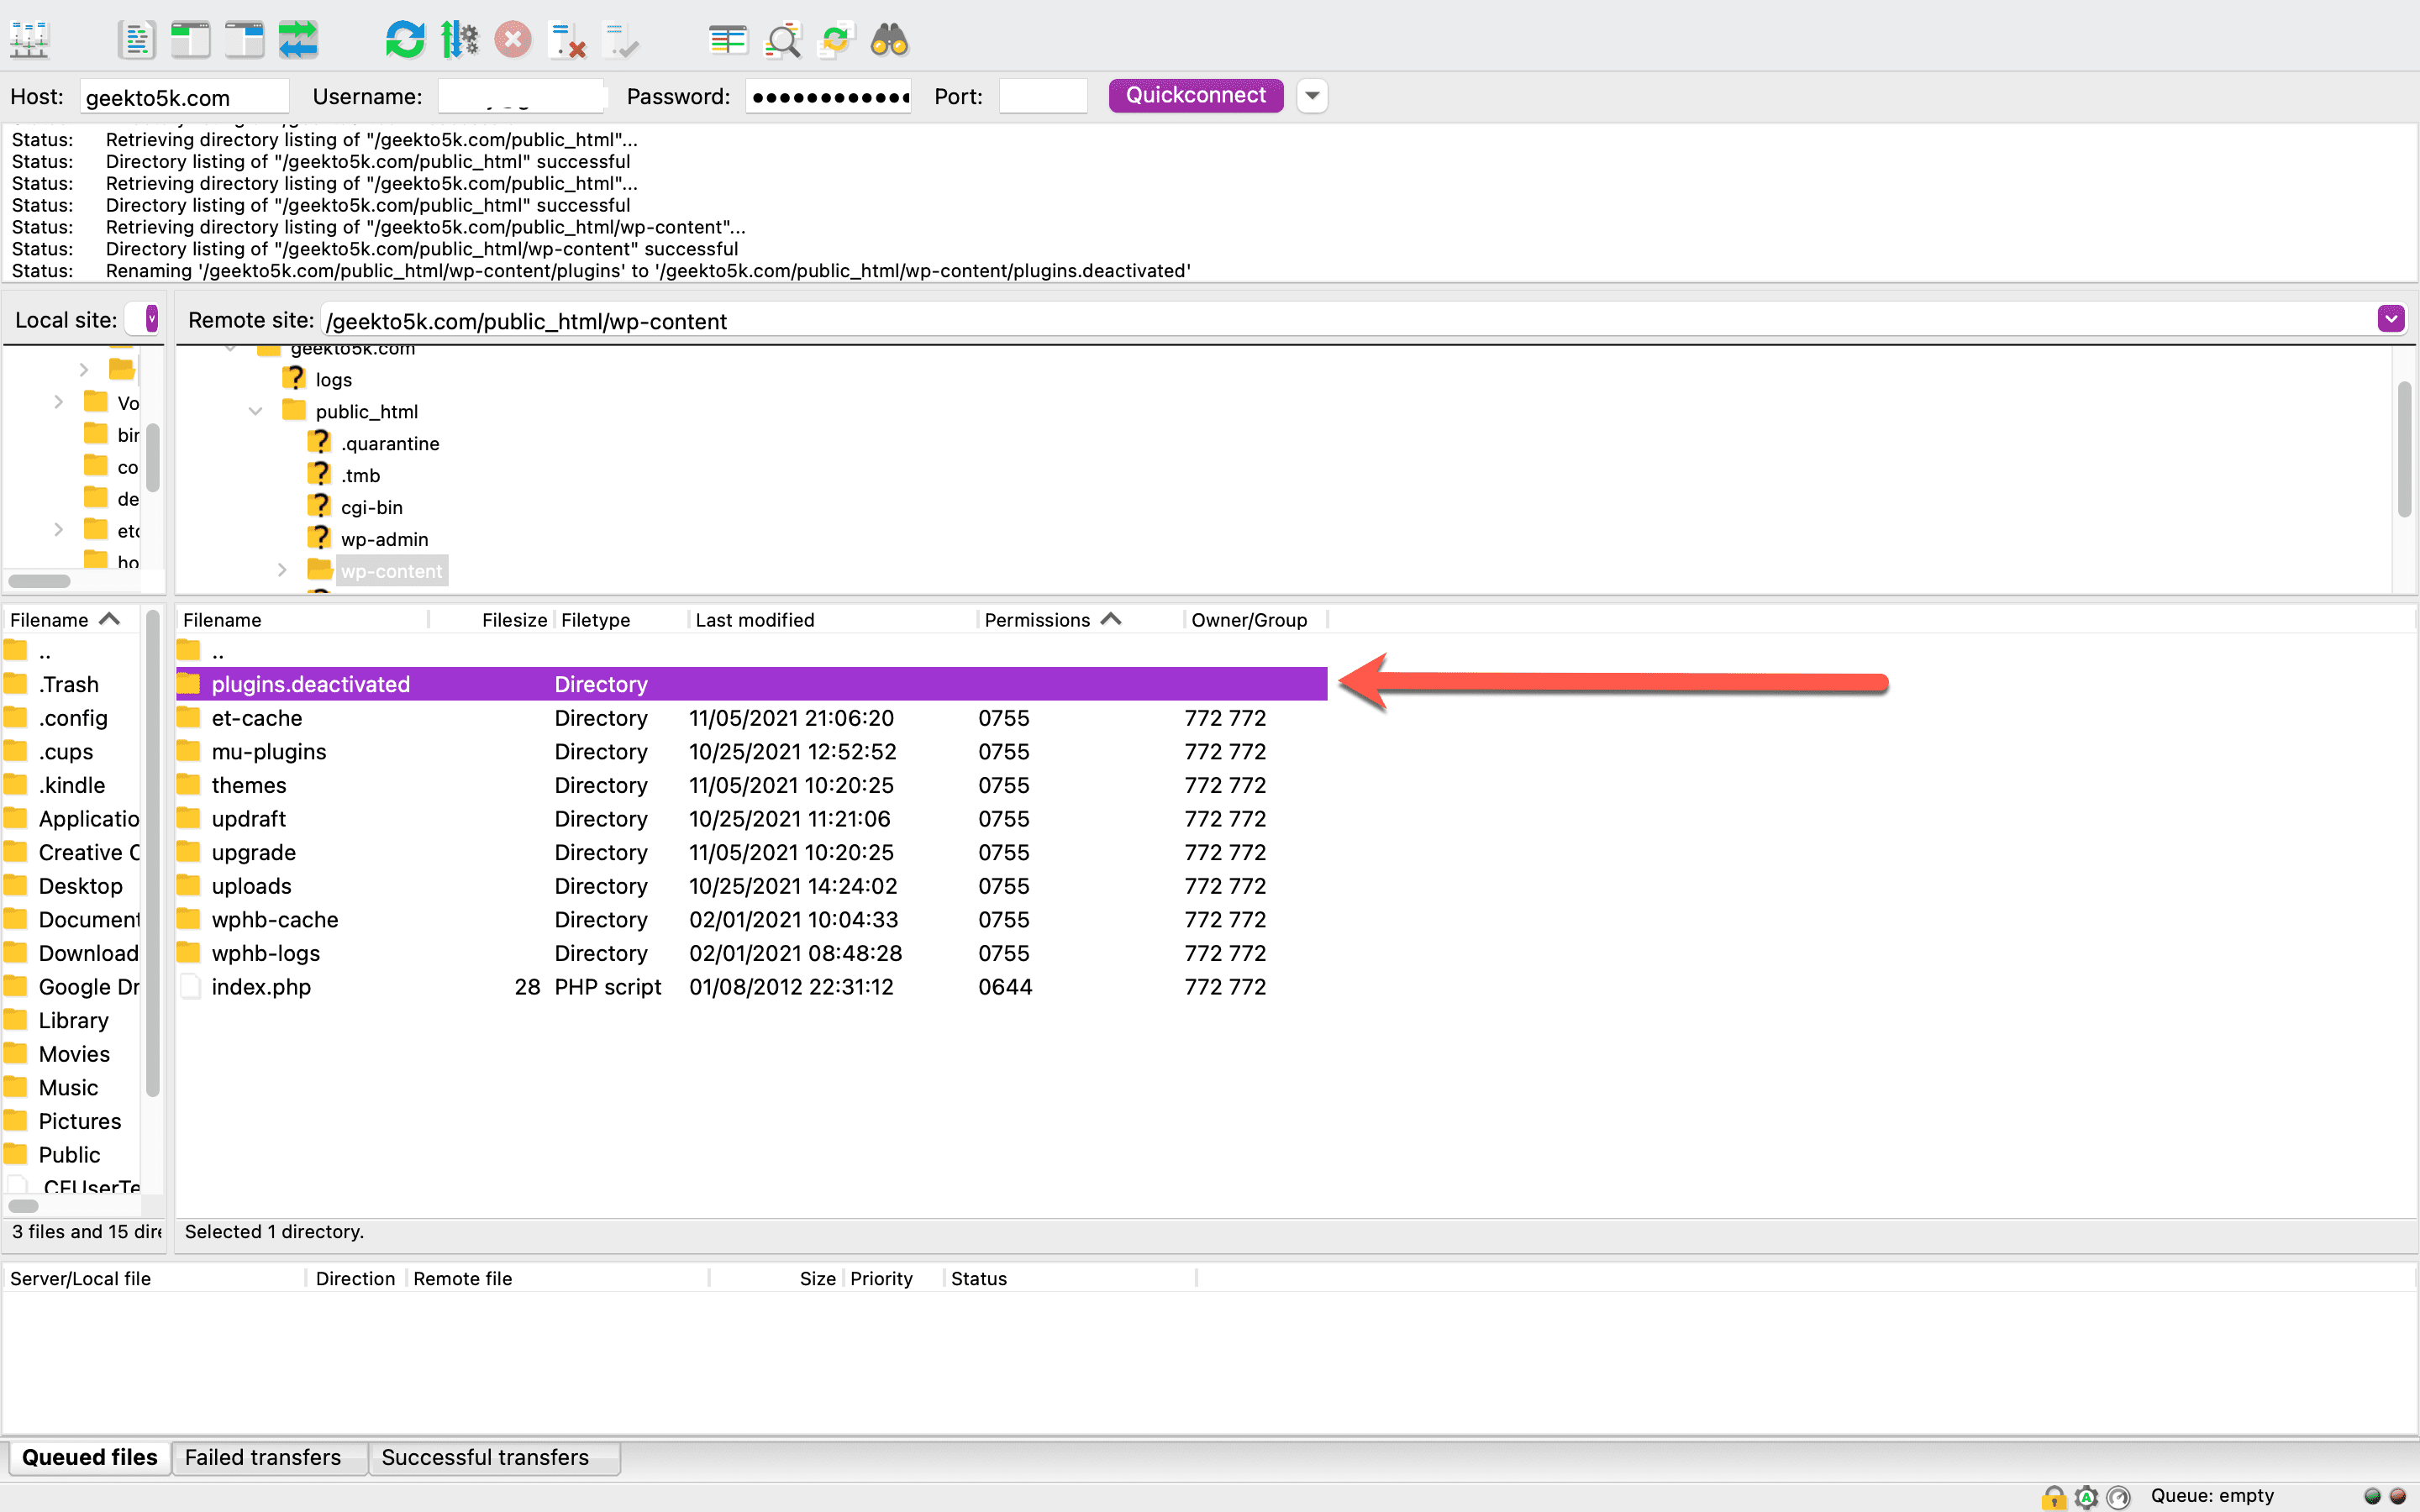
When you rename your plugins folder, WordPress won’t be able to find the plugins. Once you’ve renamed the folder, head back over to your website to check whether the error still appears. If it’s gone, that means you have a faulty plugin that’s wreaking havoc on your site. Then you can proceed to troubleshoot exactly which plugin caused the problem to begin with.
To troubleshoot your plugins, go inside your plugins directory and rename each folder, one at a time, just like you did for the main directory. Each time you change a folder name to deactivate an individual plugin, reload your site. Repeat the process until you find the offending plugin that caused the 403 error.
If deactivating your plugins didn’t help you solve the 403 error, let’s move on to another option.
4. Take A Look At Your Site’s Hotlink Protection Configuration
Does your content delivery network (CDN) provider or website host offer hotlink protection? This form of protection keeps others from hotlinking to your files. This means that they’re linking to your media files to display them on their website while pulling that media directly from your hosted space so they don’t have to use their own bandwidth.
If your hotlink correction is incorrectly configured, that can cause your site to display a 403 Forbidden error where one should not appear. Get in touch with your site host about this issue, as it’s a more technical fix.
5. Consider Deactivating The CDN For A Short Time
If you’ve tried all the above solutions and continue to see the 403 error on your website, it’s possible that there’s an issue with your CDN. These server networks are home to duplicates of your site, which can help it better perform for users all over the globe. It’s possible to disable the CDN for a short time to see if the 403 Forbidden error resolves, but like the fourth option above, it might be helpful to ask your web host for an assist. While it may be possible to disable the CDN yourself, that option isn’t available to every site owner.
Conclusion
While the 403 Forbidden error can be an intimidating issue to encounter at first, it’s generally something that’s simple to take care of. Most likely, if you face this problem on your own WordPress website, you will be able to reference these steps and resolve it yourself.
As a quick recap, here are the options you can look into to fix a 403 error:
- Inspect your file permissions (we recommend using an FTP client)
- Take a look at your .htaccess file
- Deactivate your plugins, then reactivate them
- Check up on your website’s hotlink protection configuration
- Consider deactivating your CDN for a short period of time
Have you ever been locked out of your WordPress site by a 403 Forbidden error? If you have, how did you resolve the issue? We’d love to hear from you, so be sure to leave us a comment and let us know.
Article thumbnail image by Oleg and Polly / shutterstock.com


Leave A Reply