
The WordPress login is one of the most used pages in the WordPress admin. Though simple and clean, it is heavily branded WordPress. However, most new users and clients do not need to know about the underlying software your site runs on.
If you are handing off the site to a client, or if you are running a member site where most users will be visiting the login screen, it is a good idea to add your own style to the page to make it more inviting and align it better with your site. You can do this by adding your own logo, changing the typography and color palette of the form and background, and appending useful links underneath the form. When customized properly, the login page can be a useful entry point for your users, welcoming them to your site and brand.
Fortunately, WordPress gives you the ability to customize a good amount of the login page with just a little code. In this article, we’ll walk through how to customize the login screen with a few WordPress hooks in your theme file, then go over a few plugins that can help with the task.
Customizing the WordPress Login In Your Theme
The easiest way to make changes to the WordPress login page is to add some code directly to your active theme. Most of this code will live in the functions.php file. This is a required file, so any code used here will work in any theme. I would recommend making these changes in a testing environment first before moving it to your live site.
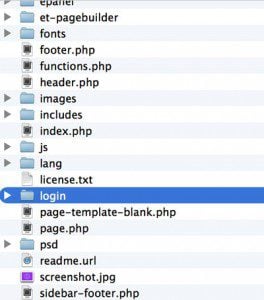
The first thing to do is open your theme’s directory and create a new folder in the root called login. We’ll use this folder to hold the images and CSS stylesheets we’ll be using throughout the article.
Next, open up the functions.php theme file in the editor of your choice. This file contains extra hooks, functions and filters necessary for your theme to work. It is where scripts and styles are added to a theme, customization options are defined, and extra back-end functionality is bundled in. We will be adding all of our code to the bottom of this file. Any edits made to this file will only take effect to the theme it belongs to. If you choose to activate another theme later on, you will have to migrate this code to the new theme’s functions.php file.
Changing the Login Logo
One of the simplest changes you can make to the login screen is to swap out the default WordPress logo at the top of the form for your own, so that it fits in with the overall look of your site.
The first thing to do is save your logo image in the login folder you created. The default size for this image is 80 pixels x 80 pixels. Your image doesn’t have to be exactly that size, but make sure it is square so that it fits the dimensions. This can be changed as well, but requires some additional code provided later in the article. I would also recommend saving a transparent PNG file, so the image works on any background.
Simply save your logo image as logo.png to the login directory you created. Then, at the bottom of your functions.php file, add this code.
function my_loginlogo() {
  echo '<style type="text/css">
    h1 a {
      background-image: url(' . get_template_directory_uri() . '/login/logo.png) !important;
    }
  </style>';
}
add_action('login_head', 'my_loginlogo');
We are using the login_head WordPress action here to append a small bit of CSS to the <head> section of the login screen’s HTML. From there, we are changing the background image of the h1 tag to our own custom logo. Make sure to include the “!important” flag in your CSS so that the default logo image is overwritten.
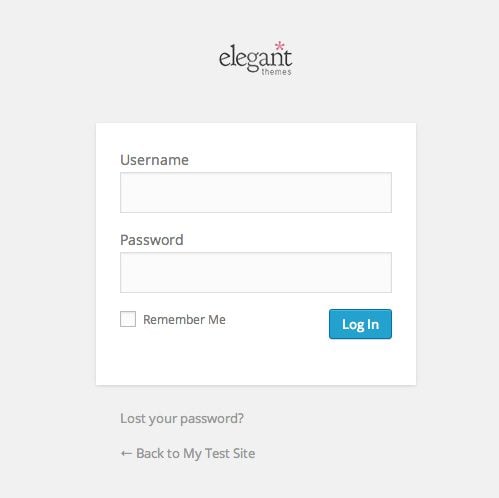
Switching out the default WordPress logo above the login form
After adding this code, you will see your own logo appear on the page, directly above the login form. So far so good.
Changing the Logo Image URL
By default, this logo image still links to “http://wordpress.org”. Chances are, you’ll want to direct this link elsewhere, either to some useful documentation or your own site’s homepage.
To change this link, you just need to add a few lines of code to the bottom of your functions.php file.
function my_loginURL() {
    return 'https://www.elegantthemes.com';
}
add_filter('login_headerurl', 'my_loginURL');
This time, we are using the login_headerurl filter in order to change the URL of the logo image. Make sure to replace “https://www.elegantthemes.com” with your preferred URL.
It’s also probably useful to change the title tag of this link, so that when a user hovers over it, they will see a proper name displayed. By default, this tooltip displays “WordPress.” To modify this tooltip, add this block of code.
function my_loginURLtext() {
    return 'Elegant Themes';
}
add_filter('login_headertitle', 'my_loginURLtext');
Again, change “Elegant Themes” to the name of your site.
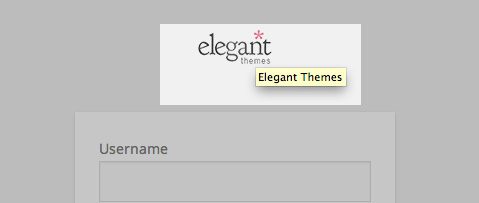
Adding a title tag changes the value on hover
Adding a Custom Stylesheet
The login screen is looking okay, but there are a few more style changes that still need to be added. For one thing, the logo is still fairly small. I’d also like to change the colors of the background and form elements to match the Elegant Themes brand a bit more. Finally, the typography of the form can also be tweaked a bit.
In order to accomplish this, we are going to add a new CSS stylesheet to house the CSS styles we want to apply to the page, then enqueue it to apply it to the login page. For this step, some basic knowledge of CSS will be required.
In the login folder you created add a new file called login_styles.css. Then, open this file up in the editor of your choice. You can add any kind of CSS to this file, but you’ll need to conform to the HTML markup produced by WordPress. For a full list of classes and IDs for you to hook into on the login page, visit the WordPress codex. In order to make the enhancements I want, I’ll add this chunk of code to my CSS file.
/* Change background color and font family */
body {
  background: #f8fafa;
  font-family: Arial,Verdana,sans-serif;
}

/* Change Width and Height of Logo Image + Add Custom Image File */
.login h1 a {
  background-image: url(logo.png);
  width: 213px;
  height: 97px;
  background-size: 213px 97px;
}

/* Add a few changes to the color and style of form itself */
.login label {
  color: #454545;
  display: block;
  margin-bottom: 1em;
  font-weight: bold;
}

.login form .input {
  font-weight: normal;
}

.login #backtoblog a, .login #nav a {
  color: #4da28f;
}

.wp-core-ui .button-primary {
  background: #4da28f;
}
Let’s step through these styles a bit. First, I added a background color and font family to the body tag, to change the general typography of the page, and the main background. Next, I added the code from our function in the first step straight into the stylesheet, but tacked on additional properties for the width, height and background size. This will change the aspect ratio of the logo image, and make it larger on the page. Lastly, I changed the colors and styles on the login form itself, to bold the “Username” and “Password” fields, and change the color of the footer links and buttons.
In order to actually have these changes take effect, you will need to enqueue this stylesheet using the login_enqueue_scripts action. Go back to your functions.php file and add this small block.
function my_logincustomCSSfile() {
	wp_enqueue_style('login-styles', get_template_directory_uri() . '/login/login_styles.css');
}
add_action('login_enqueue_scripts', 'my_logincustomCSSfile');
You can also remove the my_loginlogo function from the first step, as this code has now been incorporated into the stylesheet.
There is a lot more that can be done with custom CSS if you want to dig in, but already quite a bit has been customized to match the style of our site.
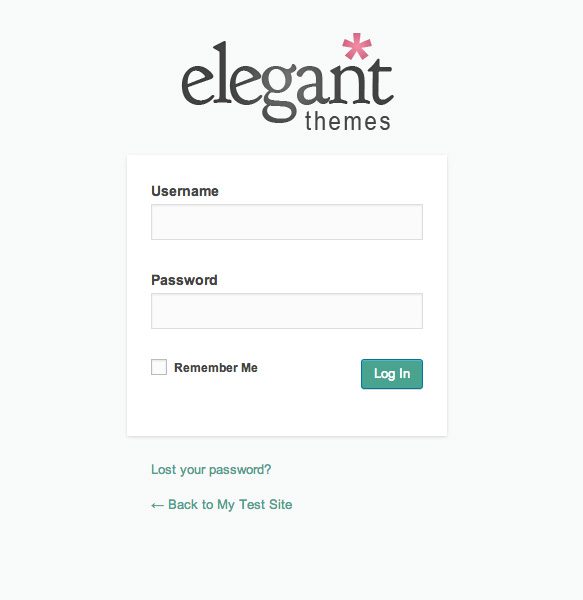
Looking a bit more complete now
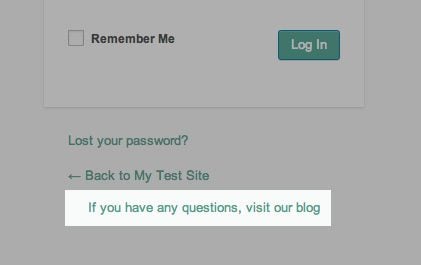
Adding a Custom Link Under Form
Below the login form, there are two links. The first is for users who lost their password, and the other is a link back to your main site. If you have open registration, there will also be a Register link here. These are useful enough, but I want to provide a bit more value to my users by adding a link to the Elegant Themes blog for quick access. If you are managing a site for clients, this might be a good place to put a link to documentation or a support form.
To append a link to the footer of the page, we use the login_footer action in our functions.php file.
function my_loginfooter() { ?>
	<p style="text-align: center; margin-top: 1em;">
	<a style="color: #4da28f; text-decoration: none;" href="https://www.elegantthemes.com/blog/">If you have any questions, visit our blog
        </a>
	</p>
<?php }
add_action('login_footer','my_loginfooter');
The link directs users to the Elegant Themes blog, but make sure to change the URL and corresponding text to something relevant for your users. I also added a few custom styles to match the rest of the page.
So, with a little bit of effort, your login page can incorporate your brand’s style and offer some useful information to users logging in. But there’s one final trick I’d like to share with you.
Redirecting Users after Login
By default, users are redirected to the WordPress admin after they login. But if you have a site with open registration, or a special area you want clients to be redirected to, this may not be the behavior you want. Using the login_redirect filter, you can redirect users anywhere on your site after they login.
function my_loginredrect( $redirect_to, $request, $user ) {
  if ( isset( $user->roles ) && is_array( $user->roles ) ) {
    if( in_array('administrator', $user->roles)) {
      return admin_url();
    } else {
      return site_url();
    }
  } else {
      return site_url();
  }
}

add_filter('login_redirect', 'my_loginredrect', 10, 3);
This might look a bit tricky, but that is simply because I’ve added in a few conditions for the redirect. First, the function checks the user’s role. If the user logging in is an administrator, they are redirected to the admin page (admin_url()) like normal, otherwise, they are directed to the site’s main homepage (site_url()). And as a final precaution, if all else fails, then users are directed to the homepage as well. These two URLs can be changed to direct to any page on your site, either by using WordPress directory shortcuts, or hard coding a link.
Helpful Plugins
All of the code outlined above is reusable on any theme you have installed. In turn, a few clever developers have created plugins that can do the heavy lifting for you, if you’d prefer to stay away from coding it yourself. The following plugins all tackle a different element of the login page, and they might be exactly what you need.
Custom Login
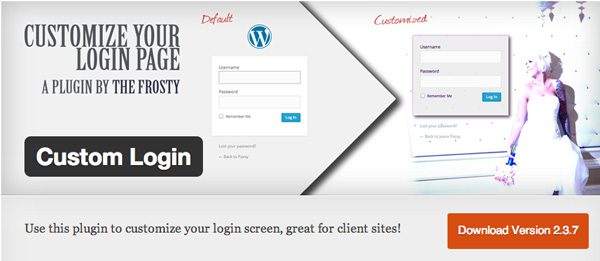
Custom Login lets you style every element on the login screen, one by one. You can upload custom background images for the body and login form, or a custom logo to replace the default WordPress logo. You can also customize the color of backgrounds, text and links. The plugin also allows you to inject custom CSS, HTML and Javascript into the page.
Uber Login Logo
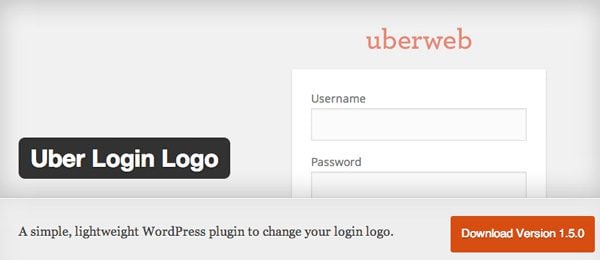
If you are simply looking to change the logo on the login screen, you can use Uber Login Logo. It allows you to upload any image through its settings page, which it swaps in for the default WordPress logo. Keep in mind that only the logo is replaced, and that you have to conform to the default dimensions.
Sky Login Redirect
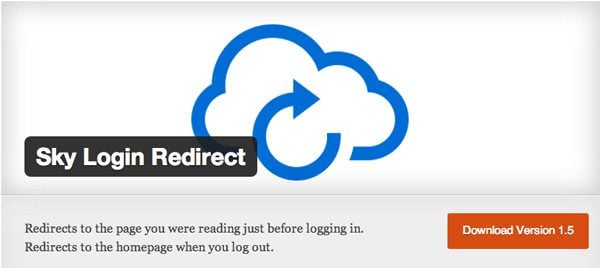
If you’re searching for a different way to redirect users after login, Sky Login Redirect takes an interesting approach. Instead of hardcoding a URL for users to be redirected to, they will simply be brought back to the page they were browsing before login. So if a user is reading a post of yours, then logs in, they will be brought immediately back to that article. In all extraneous cases, users are directed to the homepage. If you have a membership site, this is likely the most convenient flow for your users.
Go Forth and Customize
Modifying your login screen is a simple way to brand the WordPress admin and make it more approachable to your end users. Use it to provide helpful links to clients, enhance the login form, or just spruce the page up a bit to make users more comfortable with the login process.


Absolutely great! 😀 It’s working as expected.
Hi all,
I was wondering if it could be possible:
1) to add text between the logo and the login form
2) to remove the link “Batck to XXX”
Thank you in advance.
Really great article!
Gotta test it on my test site and if it works so great as it seems, it’ll sure to my live site.
Thank you so much for sharing the knowledge!
Thank you for sharing ways of manipulating WordPress without the need for plugins.
Thanks just added redirect. If you can add it to your functions don’t bother adding more plugins. Its the best practice.
I’m looking for a way to change the login URL adress to avoid hacking attemps, can not be found anywhere on this page, could someone help ?
When I do it from cpanel it displays a message saying a code line is missing line 1660 in some elegant theme file.
Hi, thanks for the tutorial, I change the login page for my company’s website according to your tutorial and it works fine, with some tweak from Foundation.
However my theme is using child theme, so the I changed your code from:
“wp_enqueue_style(‘login-styles’, get_template_directory_uri() . ‘/login/customelogin.css’);”
to:
wp_enqueue_style(‘login-styles’, get_template_directory_uri() . ‘-child/login/customelogin.css’);
Is there any way to improve the code?Thanks
It is okay, I found a solution from the comment above, change “get_template_directory_uri()” into “get_stylesheet_directory_uri()”
Thanks to Bonita =)
Great article- I prefer using plugins only when I really need too and with this, there’s one less plugin needed.
Thanks for the tips in this article. We only work with WordPress, its simple to use and really powerful. Also got to love the amazing plugins that just make your life so much easier!
There is a typo in the code under the “Adding a Custom Stylesheet” subheading. The file you create needs to be called login_style.css not login_styles.css. Change this or the reference to it in functions.php.
thanks for your article… i have used your tutorial for my clien website. 🙂
Hello, thank you for this article
For my part, I use a child theme Divi, I created the login folder in the theme of my child, I put the logo and I created a functions.php file to the root of the child theme Divi but there the logo will not appear. The function will look for the logo in the theme Divi and not in the back of the child theme.
Thank you for your help
See Bonita’s comment above if you are using a child theme.
Hi Jay.
Awesome job. I’ve been playing around with this problem for a couple of days now and just came across your tutorial today. Walked through it,made the tweaks to the files and,man, it’s a beautiful thing. I really like the branding for this customer site I’m developing.
And @Bonita, thanks for the tip on using this with a child theme.
Excellent article! I think I will attempt coding first. Programming the features is a bit more work, however, it seems to be a better option than having a plugin which could interfere with other aspects from the website. Thanks for this great tutorial!
I prefer WordPress plugin instead of custom code. Fast, easy and user friendly.
Great post for the php coding and sharing the plugins.
But a general remark for all the posts, why not explaining in a child’s theme environment ?
Modifying files like functions.php is not efficient, next upgrade of the theme and you have to do again…
Regards
Great post!!! Definitely going to use this. I used to hack the login.php file, but it was killed on every wp update. Would your code work with a renaming login plugin?
Definitely better to stay away from updating core files, so I’m glad this helped. This code should work just fine with a renaming login plugin. All a plugin like that is doing is changing rewrite rules to mask the URL of the existing login page.
This is great! I’ve just implemented this, and look forward to using it on all new sites that I set up.
Something to keep in mind though: If you are making use of a CHILD theme, you will need to create functions.php as a separate blank file. When adding the code into this file, you will need to use get_stylesheet_directory instead of get_template_directory.
Great article, thanks!
Just what I was looking for. Thank you Bonita 🙂
Very Nice Article! Helpful indeed!
Is there any way to modify the “favicon” also. Can anyone help?!
Ok! I found the Solution:
1) Add the Icon/Image for your favicon in login folder: login/favicon.png
2) Update the function.php as follow:
function add_login_favicon() {
$favicon_url = get_template_directory_uri() . ‘/login/favicon.png’;
echo ”;
}
// Now, just make sure that function runs when you’re on the login page and admin pages
add_action(‘login_head’, ‘add_login_favicon’); // Affect login page
add_action(‘admin_head’, ‘add_login_favicon’); // Affect Admin pages
I tried with Divi theme. It works fine and dose not affect the normal favicon for the theme.
Yup, just make sure you are echoing “” and you should be all good
Yes. I found the solution from (http://clarknikdelpowell.com/blog/how-to-use-favicons-on-the-wordpress-admin-login-pages/)
Thanks a lot,
Yup, just make sure you are echoing “” and you should be all good
Hi Jay,
Another great tutorial! But I have one issue with this whole solution:
“Any edits made to this file will only take effect to the theme it belongs to. If you choose to activate another theme later on, you will have to migrate this code to the new theme’s functions.php file.”
This is why we prefer to use plugins to handle functionality for websites, and themes for appearance. Using a plugin like White Label CMS (our choice at the moment, but I will check out your suggestions) means that you can update the theme, or change it completely, without breaking the site, or rewriting the new theme.
Terry
Terry, it’s quite simple to solve the portability issue by making a file custom-login.php and including that from the functions (or functionality) file. Then you only need to copy the file to the new theme directory, add the inclusion line and customise the code further to that specific theme.
I’m glad you enjoy using our plug-in Terry.
Hi Jay,
thanks for the article. I’m probably more interested in the plugins but really should stop procrastinating…. and get my head into the code.
Wondering if anyone has any interesting ways of linking to the WP-Admin screen? I’m just looking for creative – and slightly hidden – ways to link to the login page.
Cheers,
John.
Jay, thanks much for the plugin references at the end of your post. I use Uber Login Logo a lot, and it’s always great to see some other/different tools that are recommended by a reliable source.
Also, through your author bio, I checked out your site, Tidy Repo. What a fantastic resource! I dare say you have taken hours out of the ever-present search for worthwhile plugins by sharing your plugin reviews.
Thanks, that’s the idea for sure!
Thanks, that’s the idea for sure!
Thanx a lot Jay,
I spent a whole evening following your instructions and made three custumized login pages for my clients. Though I understand just a little, I see the beauty of WordPress in the code. You made my day man.
Jurrie
Greate post Jay!
Easy solutions. The code and plug….
Thanks.
Hi,
I wrote my own plugin for customizing for example the login for each installation. And I install it for each customer using mainWP.
But the logic is based on the article above. I just added a full page image as well.
Bart
I’ve been using custom login… Plugin works great for customizing the login page.
Nice article, keep up the great work.
Herre
You rock Hoffman! Thanks for this crisp solution though I used custom login plugin which gave me a full bg image option, I will try my hand from your tutorial. Cheers!
Since they started using svg images it beacome a bit difficult to normal user
This is one of my biggest issues with some WordPress based websites that I come across.
Developing a website for a client and not taking the time to properly brand all areas of the installation, no matter how subtle, is just absurd to me.
I’ve been using White Label CMS for my sites. It allows you to customize both the login screen and the admin area.
Thanks for the mention Kassim. Glad you enjoy our plug-in.
Hey Kassim & Richard
Which white label solution would you guys recommend?
I was getting excited about the plugin (never heard of it before) until I realized that the plugin is no longer supported, hasn’t been updated in nearly a year, and is only compatible with WP versions 3.8.3.
So the latest WP builds (3.9.x) will have issues w/ this plugin. Several people seem to be complaining about that in the plugin’s support forums.
I prefer to keep my WP builds up to date, which means this plugin is worthless for my projects unfortunately.
Hey Jeremy,
I can assure you the current version of the White Label CMS plug-in works with the latest version of WordPress. We are about to push out an update too.
Let me know if you have any questions.
White Label CMS is a great plugin, especially if you want to take branding the WP admin to the next level.
I’m with Kassim on that one; A+ for the “White Label CMS” plugin!
Thanks for your good instructive post Jay!
Hi,
Great article. I’ve used Uber Login Logo to change the login logo and works great.
Uber login is not bad indeed.
We just published this really simple and effective plugin : https://wordpress.org/plugins/login-customizer/ which let’s you customize the login screen using the power of customizer
Off topic I suppose, but your website is just what I need. Thanks a lot Irena.
You’re welcome! I suppose you want to make a WordPress website in multiple languages or maybe you like my WordPress theme.