
These days, no website can afford to ignore social media, and that goes for WordPress websites too. However, while posting to social media is the easy part, the process of actually publishing your content could become a huge timesink.
Fortunately, there are plenty of ways to automate this time-consuming task using WordPress. One of our favorite plugins for doing so is Blog2Social, which not only includes an auto-posting feature, but even enables you to optimize your delivery times. In this article, we’ll dig deeper into how auto-posting can help you, what Blog2Social offers, and how to set up the plugin in three steps.
Let’s get started!
If you follow any brands or business on social media, chances are you’ve already come across auto-posted content without even knowing it. After all, the greater the number of platforms you publish to, the more difficult it becomes to handle all that content manually.
However, there’s more to this feature than just saving you from performing a repetitive task. It can:
- Increase your efficiency. Posting your content to social media isn’t difficult, but it can be time-consuming. As your editorial calendar grows, so will the time you’ll need to spend manually publishing content to other platforms.
- Grow your audience. As long as your content is engaging, publishing on social media may enable you to tap into a wider audience.
- Increase visitor engagement. Social media is one of the best channels to engage with your users, and with the increase in published content comes more opportunities to establish conversations with your audience.
It goes without saying that you’ll also need to work hard and produce outstanding content if you want to enjoy the perks of auto-posting. However, that’s a topic for another article. In this case, we’re going to focus on how to use the Blog2Social plugin to auto-post your WordPress content to social media.
Blog2Social is one of the most comprehensive auto-posting solutions for WordPress. Not only does it enable you to share your content to most major social media platforms, it also lets you schedule posts for specific time windows.
In addition, you can add specific tags and comments for each network, which is always handy. The plugin also enables you to customize which images will appear alongside your shared content, and even lets you re-share older posts if you want to showcase a previous ‘hit’, or fill gaps in your calendar. What’s more, there are no compatibility issues with Divi, so you’ll be able to implement it on your own site without worry.
Finally, Blog2Social supports a number of platforms out of the box – there are perennial networks such as Facebook and Twitter, along with outliers such as XING, Torial, and Diigo, among many others.
Key Features:
- Auto-post your content to most major social media platforms.
- Customize your posts before sharing them on social media.
- Select which images will accompany your content.
- Schedule your auto-posts for specific windows of time.
- Re-share old content periodically.
Price: Free and premium versions available | More Information
With Blog2Social’s free plugin you can install, activate, and begin using it right away as you would any other plugin. However, if you purchase the premium version of the plugin, you’ll receive a license key via email that’s entered into the relevant field within the Blog2Social tab on your WordPress dashboard:

Once entered, click on Activate and you’re all set. The premium version offers a 30-day risk free trial, although we think the free version is more than enough for most users unless you need to set up multiple accounts for each platform.
Regardless of which version you pick, the rest of the process remains the same, so let’s get on to step number one.
By default, Blog2Social supports 14 social media platforms out of the box, but you’ll likely only use a few of them. The first thing you’ll want to do is connect your chosen networks to the plugin.
To do this, navigate to the Blog2Social tab on your WordPress dashboard and click on Networks. You’ll see a list of platforms you can connect to the plugin, along with individual buttons for each option:
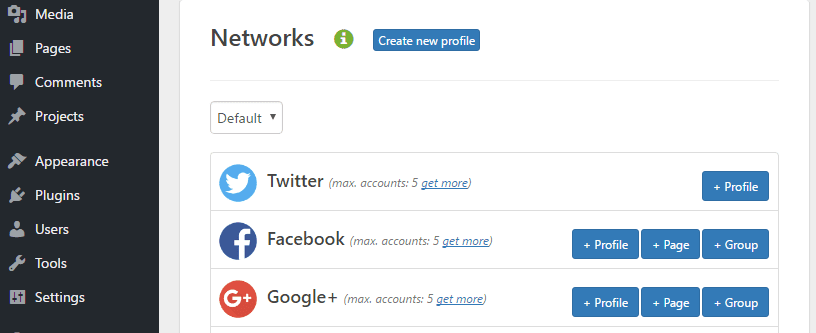
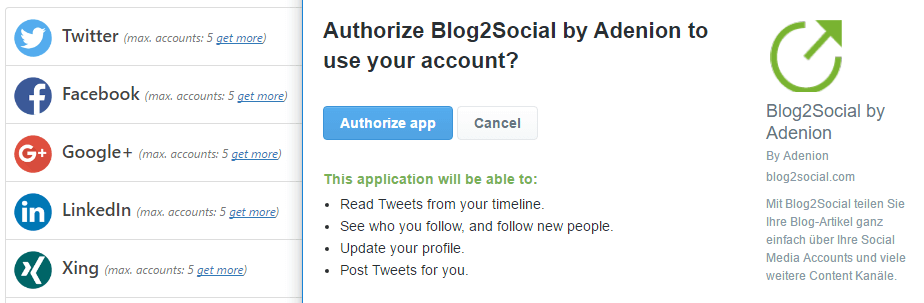
In most cases, all you need to do is click on the + Profile or + Page Button and authorize the application to access your account (as long as you’re already logged in):
Once you’ve added your social media accounts, the next step is to optimize your post’s delivery times.
Step #2: Specify Your Sharing Windows
Blog2Social enables you to configure sharing windows for each social media platform, and it even provides you with information on the best times to post content. It’s worth nothing that you can skip this step if you’d prefer to just auto-post your content to social media as soon as it’s published. On the other hand, if you’d like to retain a bit more control over your timing, keep reading!
To start, navigate to Blog2Social > Settings > Best Time Settings. You’ll find a list of platforms supported by the plugin, including those you haven’t linked to. Next to each one, you’ll find some information about the optimal window you should share your content in:
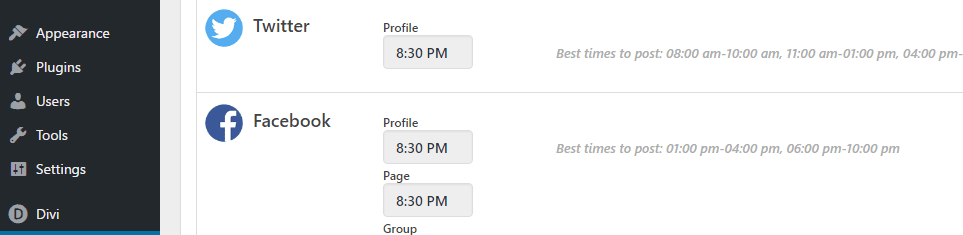
The plugin is configured to share your content on every platform at 8:30 pm by default, but you can change it if you wish:
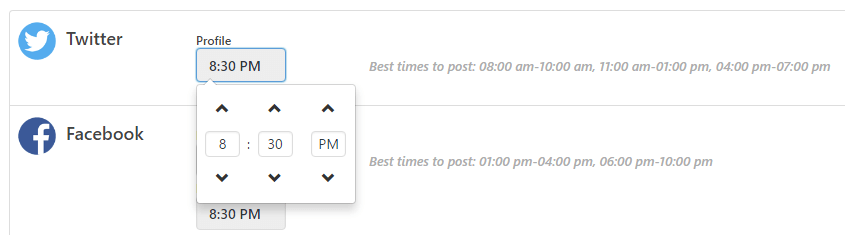
At this point, make your way through the list and tweak the times for each platform you intend on using. The final step is to learn how to enable auto-posting.
Step #3: Set Your Content to Auto-Post
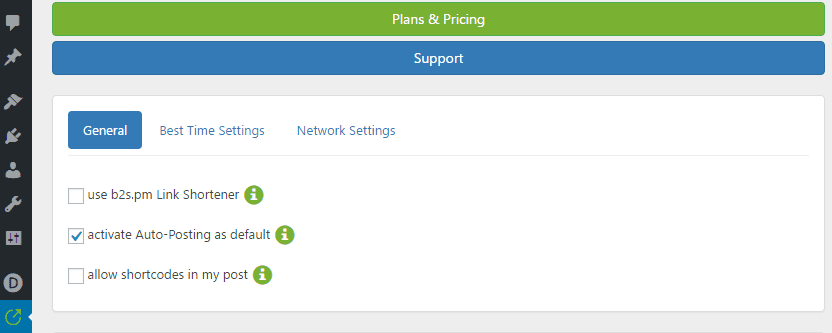
There are multiple ways to auto-posting your content. The first involves enabling auto-sharing globally, which means all of your posts will be sent to your linked social media accounts once they’re published. You can enable this by ticking the corresponding box under Blog2Social > Settings > General:
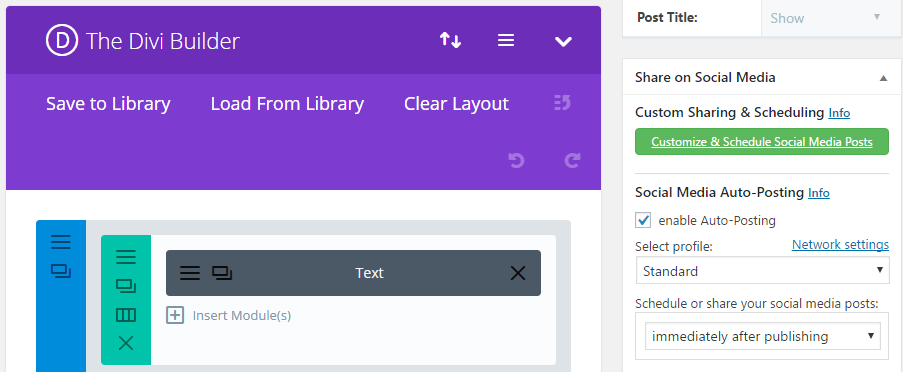
You can configure each posts’ sharing options while editing them too. After installing Blog2Social, a new Share on Social Media widget will appear next to the editor. From here you can enable immediate auto-posting for that particular piece, or set a scheduled time using the Schedule or share your social media posts option. This will default to the times you set during step number two, which should save you some time:
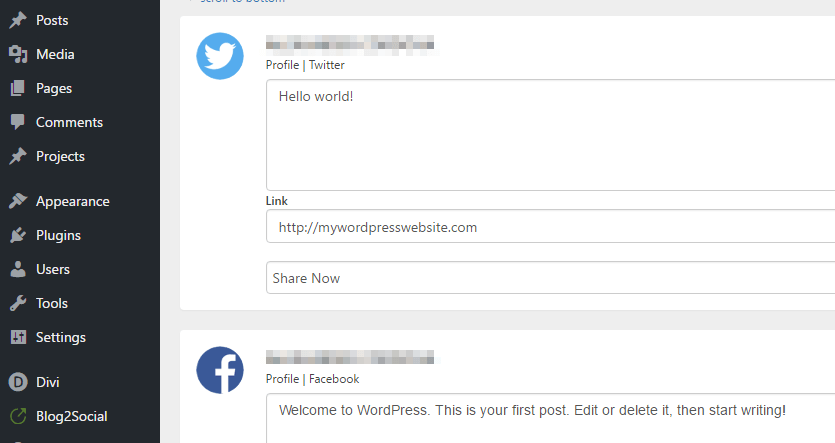
If you’d rather customize your content before sharing it, you can also click on the Customize & Schedule Social Media Posts button. This will bring up a new page where you can tweak how your content will appear on social media:
By default, Blog2Social will take excerpts from your posts and use those as descriptions within your social media accounts. The same goes for your images, unless you choose a different one, which you can do here. Simply scroll down to the bottom of the page, locate the Select Image option, then pick your favorite one:
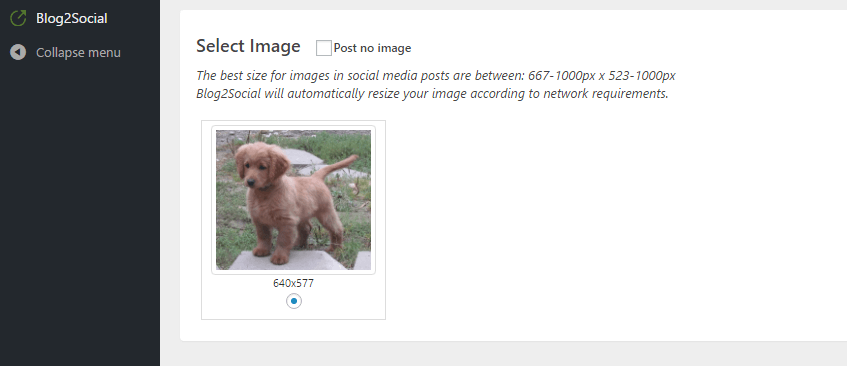
Naturally, not every image is going to display perfectly on each social media platform. With that in mind, Blog2Social includes recommendations for optimal dimensions, and takes care of any necessary resizing.
Once you’ve finished, save your changes, and you’ll be good to go! At this point, you can sit back and let Blog2Social do all of your heavy social media lifting.
Conclusion
Auto-posting your WordPress content to social media is a simple task that can have a lasting impact on your site. It’s time-consuming, but you’ll gain access to a wider user base for each platform you post in. You’ll also get to engage your users in more ways (which is always a plus!).
After installing and activating the plugin, here’s what you need to do to start auto-posting your WordPress content using Blog2Social:
- Configure which social networks to use.
- Specify your sharing window.
- Set your content to auto-post.
Do you think auto-posting your content to social media can bring in significant amounts of new traffic? Share your thoughts with us in the comments section below!
Article thumbnail image by howcolour / shutterstock.com


I tried this out, but it seems like it is missing a key feature. Or maybe I am missing it. How do I schedule a recurring post more than a week a part. Say I want to post something once a month. I do not see any way to do that. As a blog grows posting every piece of content weekly will flood your followers. Is there a way to do this with blog2social?
hi, John thanks for sharing this article. social signal is an important part of SEO. recently is using jetpack and I think Social Media Auto Post & Scheduler is better from jetpack plugin
You’re welcome, Arif! Thanks for your input. 🙂
I don’t know if this is supposed to happen but as soon as I signed up with this plugin and tried to configure my social media accounts, like 3 minutes later they started to freak out (especially Pinterest) that someone had logged in to my account remotely from an unknown location (somewhere in Europe). I then freaked out myself and changed my passwords because my accounts had been put into ‘safe’ mode. What’s going on, does this plugin use real people to log in and post stuff on your behalf or what? Haven’t they heard of API tokens etc.? Has anyone experienced something like this?
It’s hard to say why this is happening without seeing your exact setup (although we can assure you that the plugin is automatic and doesn’t require any real people for it to work). We’d suggest posting in the developers’ support forum to see if they have an answer: https://wordpress.org/support/plugin/blog2social.
Thanks alot John..its so usefull for my blog..
Hi Evan! You’re welcome. 🙂
I have use jetpack publize feature and it work very well and it is free
Hi, Marcus. Jetpack is another good option, although it lacks some of the features of Blog2Social (such as the ability to buffer posts).
You lose the ability to really gain traffic from social media posts when you do not edit the copy, images, and set up link tracking in order to test link click through rate. I’d suggest using tools outside of WordPress to schedule posts!
Do you have a recommendation, Alex?
That’s awesome john.. Very easy classification…
Thanks! 🙂
Thank you for this. I’ve been looking for a good alternative to the Jetpack Publicize feature for a while.
Hi Wade! We hope the plugin works out well for you.
Thanks for the review! I’m always looking for ways to improve my efficiency.
I currently use CoSchedule to schedule a campaign of posts, and Buffer to deliver them (WordPress –> CoSchedule –> Buffer –> social media). How would Blog2Social either compare with this, or fit into it?
You’re welcome, Bruce! Blog2Social lets you schedule and buffer posts, so it would essentially do the same thing as the system you’ve outlined (except you’d be using one tool rather than two).
Unfortunately, one cannot use the Auto-Post feature unless you pay for the Premium version.
LOL, what a fail. How about a post on using IFTTT? It takes some effort to set up but it can actually do a lot more.
I just started using IFTTT, thanks for the suggestion, Jamie!
Hey John, thanks a lot for this post. This looks like a really handy plugin. I’ve few doubts, though. Does it support OG tags like Yoast does for Facebook and Twitter? Also, do we need to disable the Publicize settings of Jetpack to use it? I mean they both would conflict with one another, won’t they? Looking forward to your response. Keep up the good work!
You’re welcome, Vishal! The plugin’s developers would be best able to answer these questions: https://wordpress.org/support/plugin/blog2social.
Can you use Blog2Social to schedule posts to multiple groups on FaceBook (vs multiple accounts). I belong to many professional groups and want to be able to automatically post links to my website material, repeatedly.
Thanks for this helpful explanation and introduction to this plugin.
Hi Kayce! I’d suggest posting in the plugin’s support forum to find out: https://wordpress.org/support/plugin/blog2social.