
When you’re launching a product or a new site, getting feedback directly from your users can be invaluable. A great way to do that is to add a form so visitors can let you know of problems they run into, or particular features they enjoy. The trick of a good feedback form is to keep things as simple as possible. Users will be going a bit out of their way to offer up feedback, and you want to make sure you use up as little of their time as possible. There are several different ways to add a feedback form to WordPress, but you can get it up and running in no time.
Why a Feedback Form?
Not every site on the web needs to solicit feedback from its users. Some sites are already established enough, and others might offer different avenues for getting in touch. Still others may host a site that is either too large or too structured to glean anything useful from user input. But there are several sites that could benefit greatly from a simple feedback form.
- A brand new site, that is still working out the bugs or adding new functionality
- A product sold or distributed through a website, where feedback can aid product development
- A publication looking to source errors or additions
- A simple blog wishing to connect more to their users
Obviously, this is an incomplete list, but it shows the range of scenarios where a feedback form might be useful. Beyond just the practicality of being able to solicit ideas from your users, they also help to make users feel comfortable with your site. Anyone visiting knows they have somewhere to turn if there is a problem. If you’re on the fence about it, it usually doesn’t hurt to add one and see if you get a response.
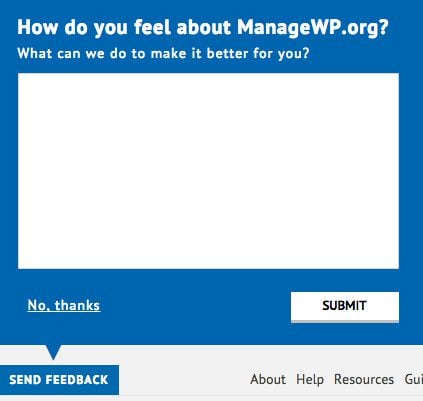
The feedback box on ManageWP
If you do decide to add a feedback form, you’ll want to keep a couple of things in mind. First, keep things as simple as possible. Ask for an email, name, a short message, and maybe a subject. In some cases, you may not even need the name, though this will help you follow up. Don’t bog down your feedback form with unnecessary drop-down menus or extraneous information. Also, place the link to your form on every page, and make it easy to find. This might just mean a link in your menu, or a pervasive button somewhere on your site.
There are several ways to add a feedback form in WordPress. It is something that can be done manually with some code, but managing form submissions, validations and post actions is fairly advanced. It’s best to rely on a couple of tested tools to get the job done for you unless you have this kind of experience.
Adding a Feedback Page with the Page Builder
If you are using a theme from Elegant Themes, then setting up your feedback page can be pretty quick. We will use the Divi Page Builder to add the form to a page in just a few steps.
To begin, go to Pages -> Add New in the WordPress admin. This will create a new page for you. Give the page a title, something like “Feedback”. Just below the title, you will see a button to “Use Page Builder”. Click on this to start inserting your page’s content. You will see a new layout in your post editor, which displays your page’s content visually, so you can construct the page using building blocks known as “Modules”.
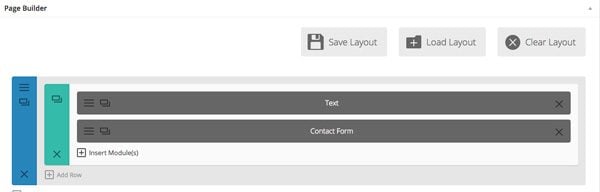
The Page Builder layout
The first thing we’ll want to add is a bit of text describing the page. Click the “Insert Column” button, and then select the first option for a full-width block. Then, inside the created column, click “Insert Module” and select Text. This will bring you to a simple text editor, where you can add a short message about the purpose of your page. I’ll add something very simple, but feel free to change to match your site.
“Please feel free to use the form below to make suggestions about the site or point us in the direction of problems!”
Below this, click the “Insert Module” button again. This time, scroll down until you find Contact Form. Again, you will be brought to a new screen with a few options for customizing your form. The first is “Display Captcha,” which will add a simple question to the end of your contact form to block spambots. I like to leave this off until I start receiving too much spam. In the “Email” text field enter in the email address where you want to send feedback messages. The rest of the settings are optional, and you can add a title or CSS class or ID.

Setting up your contact form
When you’re all done, just click “Save” to add the form, then “Publish” to push the page live. Fortunately, the default Elegant Themes contact form is very simple, and only asks for an Email address, name and message. This is perfect for a feedback form.
To ensure that users can actually get to your form, you’ll want to add your created page to the main menu of your site. This should be done for you automatically, but just to make sure you can visit your theme options in the Appearance section of the WordPress admin, and select the “Navigation” tab. In here, you will see a list of pages to exclude from the navigation. Ensure that there is a green check mark next to the “Feedback” page. If you see a red X, simply click on it to show, and save your options.
And just like that, you’ll have a simple form that users can easily access from the main menu and fill out if they have any problems with your site.
Feedback Plugins
Of course, adding a separate page isn’t the only way to add a feedback form to your site. If you are not using a theme from Elegant Themes, or if you’re looking for something a bit more complex, then there are several plugins out there that can set things up for you.
Usernoise
Usernoise is one of the simplest feedback plugins to set up and start using. The plugin works by adding a “Feedback” button to the side or bottom of your website. When users click on this, it opens up a small pop-up window with a short form, where users can choose what kind of problem they are having, and write a short message. This form then notifies the email address of your admin user whenever feedback is submitted.
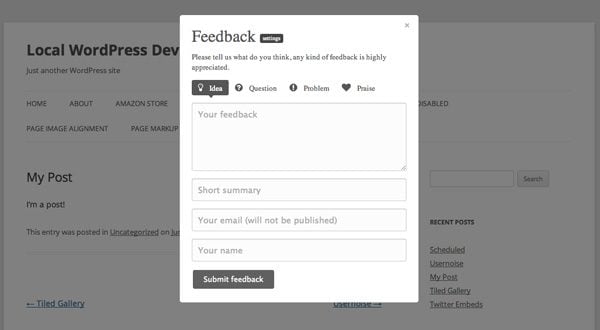
Every part of the form is customizable in the plugin’s settings. You can choose to add or remove categories, select which form fields to include, what text to display, and edit the color and style of both the form and the button that will be shown on every page. You can also turn on and off the form altogether with a simple checkbox.
Usernoise takes a “just works” approach. Once you flip it on and enable it, it will begin working on your site. You can change it a bit to match your theme’s style, but it doesn’t have any super complex features. Instead, it keeps things simple and consumer friendly. It also uses a responsive pop-up window, and inherits most styles straight from your theme. If you’re looking for a really simple way to add a Feedback button to every page on your site, you should use Usernoise.
Ninja Kick Contact Form
Ninja Kick Contact Form is a premium plugin very similar to Usernoise, but adds a couple of features and styles. The plugin adds a button to the side of your pages, which opens up a fairly simple feedback form. It uses basic animations to slide the form in from the side, and focus a user’s attention on feedback without having to leave the page.
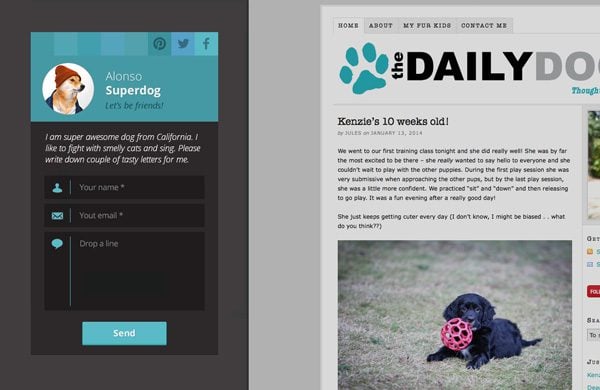
The slide-out form
The plugin also allows you to add your own branding to the form by customizing its color and adding your own logo the top. Below that, you can add a few social media links if you want to encourage users to contact you in a different way. You can then add in a short message. The form itself is kept very simple, and requires users only to enter in a name, email address and message. The message is sent to any email address you want, so you can easily organize feedback submissions.
Ninja Kick Contact Form is a paid plugin mostly because of its level of customization. You can choose from three different themes, and change the colors and style of every aspect of the form. It also features spam protection built-in, and is completely responsive and mobile-friendly. It works very well, keeps things fast, and uses a sleek animation to get the job done.
Usersnap
Usersnap takes a bit of a different approach to feedback. It is actually a third party service that allows users to take a screenshot of the page that they are currently on, and then annotate and add comments to the screenshot before submitting it to you. It is a paid, monthly service which has different price points for different integrations and multiple sites.
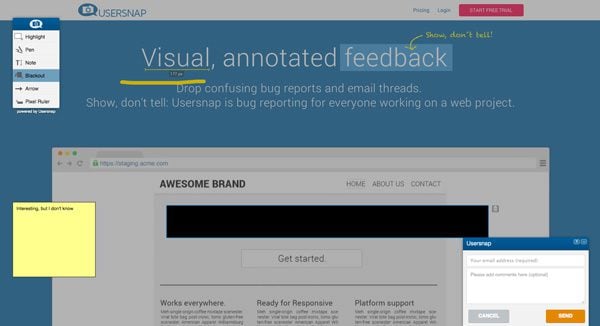
Usersnap’s annotated approach
Usersnap gets a mention here because the team actively maintains a WordPress plugin which integrates the two together fairly easily. Once it is set up, it adds a small feedback button to the bottom of each one of your pages. When a user clicks this button, a window will pop-up with a couple of tools. From there, visitors can highlight sections of the page, add annotated comments or draw various shapes to indicate problem areas. Included is a simple form so users can enter in their email address and a short message to go along with the screenshot.
Usersnap is not going to be necessary for every site. Its monthly price means that it will need to be a valuable tool for you. But if you are running a service or product from your website, it can help users to show you exactly what went wrong and where. It’s very easy to set up, and for the right kind of site, it can add a lot to your user’s experience.
Wrapping Things Up
The feedback form is often overlooked by site owners. If you open yourself up to some constructive criticism, I think you will be pleased with the results. I use a simple feedback form on my own site, and receive several suggestions every month. I’ve used these submissions to fix bugs on the site, and occasionally I’ve even gotten new ideas for features. Creating a positive loop between you and your users is never a bad thing. It can give dedicated visitors a place to connect to you, and I guarantee that connection will be worth it. So try it out, and see if it works for you.
Thumbnail Image by venimo / Shutterstock


hi there could we add comments in WordPress by WordPress itself without any plugin in my own theme >
There is a Comments Module default in Divi you can use: https://www.elegantthemes.com/documentation/divi/comments/
To enable Comments on a page, make sure to enable the comments and discussion option you can see at the screen options above: https://prnt.sc/Bwbtr6fvGkhC
If you want to further configure the comments and discussion, it can be done by going to Settings > Discussion: https://prnt.sc/ivGAarHUag_8
I tried it any times but I can’t able to fix this feedback form.
Hi, I have installed the handheld plugin at wordpress. My contact form works great at web. But it did not show in the mobile.
Any help?
I’ve been hoping for telephone number option for a long time. Without it I can rarely use the bundled form – it’s a shame.
I like the built in forms that come with your themes, but it would be great if you had a field in them for “telephone”.
My clients all want to get a customer’s telephone number, not just their name and email address.
Here’s hoping!
As an internet marketer, having such a form is critical in order to ensure the “customer experience” is the very best possible. Regardless of the market niche you operate in, competition is likely to be fierce, and by obtaining “social proof” through a feedback form you can establish your online brand by showing visitors that you truly CARE about them, and aren’t just out to get into their wallets.
It’s important to realize that feedback can take a number of forms, including testimonials, questions regarding the product or service being offered, as well as suggestions from visitors about what is missing from your site and/or would be a good addition to improve their ability to make intelligent purchasing decision.
In the age of social media it’s absolutely critical to have TWO-WAY communications with your site visitors, especially in a commercial environment. People DETEST sites that remain static with no means to contact the site owner/admin, and will waste no time in clicking on the “back” button or close the valuable (to YOU) tab your site occupies in their browser.
I can’t over-emphasize the importance of communicating with (including listening TO) your visitors, especially if your long-term plans include expanding your target audience. Thanks for posting such an insightful article!
Curious why a new page is necessary in the Page Builder – couldn’t you just make a new module within an existing page? Does it really need to be full width or can it be like 1/3 of a page width?
Nice headup Jay, I think for a new site launched, it sounds amazing to include user feedback to help the site owner to know his/her target audience preferences.
Nice post! I thought about doing this but needed some clarity on how to make it effective. Thanks for a well written article.