

Did you know that there are around 500 million Tweets sent every single day? That means that, no matter how well-written your Tweet is, there’s a very good chance your audience might simply miss it. And it’s the same with other social networks – it’s getting easier and easier for your posts to get lost in people’s busy news feeds. That’s why it pays to reshare old WordPress content multiple times over its lifespan.
In this post, I’m going to show you exactly how to do that automatically by using a handy plugin called Revive Old Post. It’s free and easy to use.
The first reason to reshare old content is to better reach your existing readers. There are two main reasons your current readers might not see your posts:
- It gets lost in their feed. Or, because many social networks are decreasing the organic reach of posts, it might just never show up in their feed in the first place.
- They’re located in a different timezone and aren’t online when your first post goes live.
Resharing your content can fix both of these problems. You can reshare in your main time zone to give those readers another chance to catch your post in their news feed, and you can also share in different time zones to make it easy for your global readers to see your posts.
Another reason you need to reshare content is to reach new potential readers. If your blog is growing, your social audience will grow as well. That means you might have followers today who never had a chance to see your old posts. Resharing content will allow you to reach these new social followers and get them into your back catalog of content.
These aren’t just pie-in-the-sky ideas either, Tomasz Tunguz found that reshared content on Twitter still got a significant number of retweets (though there was a dropoff from the first share).
Resharing Old Content Using Revive Old Post
Revive Old Post is a popular plugin that allows you to automatically share and reshare your content. In the free version of the plugin, you can:
- Share new posts that you publish as well as reshare old posts
- Choose the minimum time delay between social posts
- Choose how many posts to share
- Use specific hashtags in your shares
- Include links that go back to your site
- Exclude categories or specific posts from being shared
If you upgrade to the pro version, you’ll also get custom post types support, the ability to use multiple social accounts, LinkedIn support, custom scheduling, and more.
For the purposes of this post, though, I’ll be using the free version.
Installing and Configuring Revive Old Post
You can install Revive Old Post like any other plugin. Once you activate it, you’ll see a new tab in your dashboard:
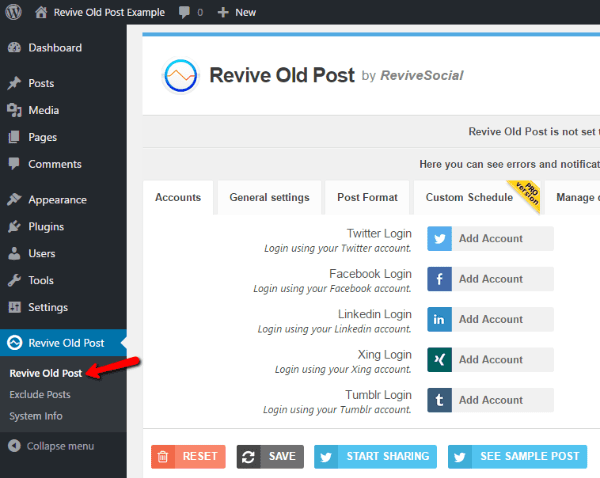
Here’s everything you can do from the Revive Old Post tab:
- Accounts – link the social accounts you want to automatically share to.
- General Settings – set details like the minimum time between shares, how old a post should be before resharing, and more.
- Post Format – choose the format and content to include in your social shares.
- Custom Schedule (Pro Only) – create a custom schedule for sharing your content.
And in the Exclude Posts tab, you can exclude individual posts from being automatically reshared:

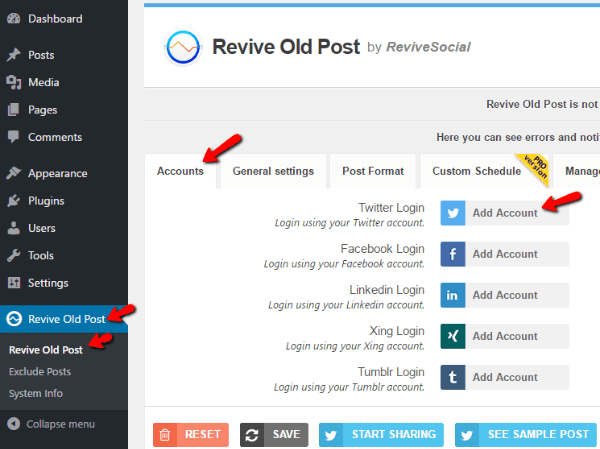
The first thing you’ll want to do after activating Revive Old Post is to link the social accounts you want to use.
First, go to the main settings page for the plugin. Then, all you need to do is click Add Account by the social network you want:
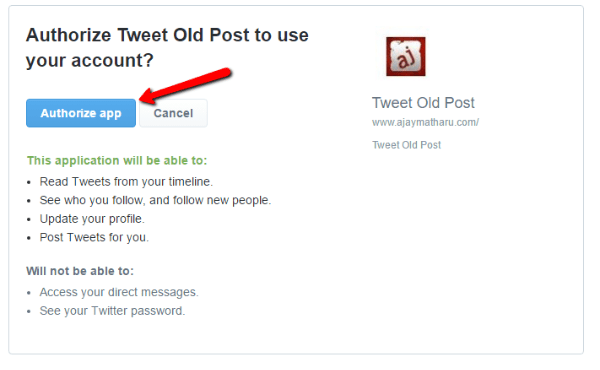
Then, Revive Old Post will ask you to grant posting permission for that network. For instance, if you add your Twitter account, you’ll need to authorize Revive Old Post like this:
Set Your Sharing Preferences
After you link your social accounts, you should set up the actual sharing schedule for your posts. To do this, go to the General Settings tab:
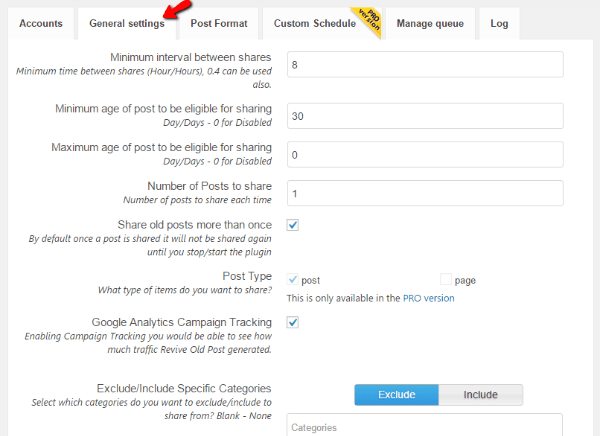
Here’s what you should definitely configure:
- Minimum interval between shares – specify the minimum amount of time between shares in hours. For example, if you don’t want the plugin to share more than once every four hours, you should enter “4”.
- Minimum age of post to be eligible for sharing – set the minimum number of days since publishing that must have passed. For example, if you don’t want to reshare a post until it’s two weeks old, enter “14”.
- Maximum age of post to be eligible for sharing – similarly, set the maximum eligible age of a post. If you don’t want to share posts that are older than 3 months, you should enter “90”.
- Number of posts to share – set how many posts to include in each share. Leaving this as the default of “1” is probably the best idea.
If you want to get more specific, you can also include/exclude categories, select image sizes, and set up analytics tracking.
After you tell the plugin when and what to post, you want to tell it how to post. You can do this by going to the Post Format tab:

Here’s what you’ll definitely want to configure:
- Post Content – choose whether to include content from the title, body, both, or a custom field. Usually, title is the best option here.
- Post Content Custom Field – this is somewhat advanced, but you can set up a custom field to pull content from. You would then manually enter the share text in each post’s custom field.
- Additional Text – you can input a specific bit of text that you place either at the beginning or end of your posts.
- URL Settings – configure if you want to include a link in your posts and whether or not you want to use a URL shortener.
- Hashtags – choose which, if any, hashtags you want to automatically include.
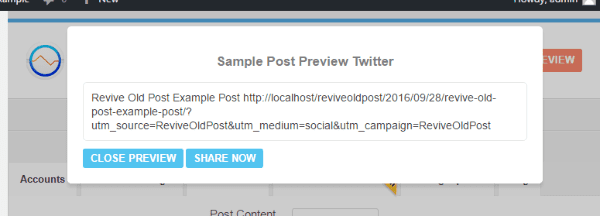
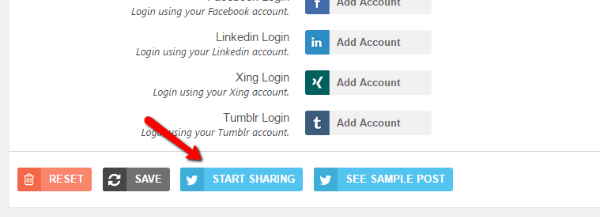
Now that you’ve set everything up, it’s a good time to click on SEE SAMPLE POST so you can get a live preview of what your share will look like:
Start Sharing Your Posts
When you’re happy with how your preview post looks, click on the START SHARING button:
Revive Old Post will give you a countdown and tell you exactly when your next piece of content will be shared:
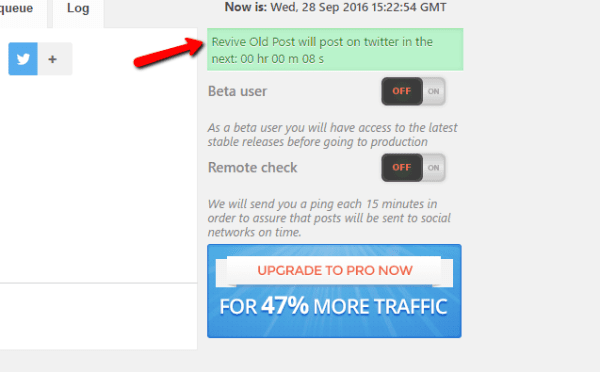
Remember, Revive Old Post will share your content according to the rules you set up under General Settings.
And if you ever need to exclude an individual post, you just need to navigate to the Exclude Posts option.
Wrapping Things Up
Setting up Revive Old Post should only take you ten or fifteen minutes. And once you’ve got it set up, it will work in the background and continue sharing all your old content. Essentially, unless you ever want to change anything, it’s set it and forget it.
With how easy it is to set up, there’s no reason not to start resharing your content. Just remember that reshared content should only be one part of your social strategy. You need to interact with followers and promote your new content, too.
Article thumbnail image by Bloomicon / shutterstock.com


I have installed the plugin but unable to link accounts, the screen just becomes disabled, any suggestions?
awesome post . i have one question , is there possible to add hash tag , something like when post sharing on twitter , automatically hash tag will be added one selected keyword : like #WordPress .
Thank you in advance
Yes it is. You can automatically add hashtags from Categories, Tags and Custom Fields.
So as long as you have ‘WordPress’ as a tag,category, or a custom field then it wil share using that hashtag.
Does this work better than NextScripts? I’ve used NextScripts for a while but it’s very buggie and sometimes I get a full list of post ALL at once.
That’s probably because of how WordPress Cron works, if you have no activity on your website the scheduled tasks won’t be posted.
We do have an option “Remote Check” where we will ping your website often to make sure everything gets shared and the Cron gets triggered.
It’s handy, but it depends on the type of content you publish – obviously anything time sensitive will need to be filtered out, or you risk publishing ‘breaking news’ from 12 months ago.
One solution is to create a category for ‘timeless content’ which can be re-shared without any issues…
And as said above, auto-posting can lead to issues…
Personally, I tend to look through the analytics of a third party social media tool like Buffer or Hootsuite and manually queue up anything that worked well and won’t look odd being re-shared… It also gives me a chance to rework the tweet/Facebook message and try different styles…
Hey Dan,
You can exclude/include whole categories or individual posts. So you only need to set it once, it will only share what you have specified.
Looks great, can’t wait to try it out. Thanks for sharing.
Does this work for pages as well? or only post?
Thanks for introducing to Revive Old Post, it make my sites more active and updated…
Sharing old content not just bring back traffic but also help to engage new followers
Thanks for the share Colin:)
In use this but am finding that while it’s good for twitter, when used for Facebook the shares are now getting no visibility at all. This seems to be since the last FB algorithm update. So, planning to only use on Twitter in future.
I will just give Revive Old Post Plugin a try.. Hope it will work proper on my site. Thank you so much Colin! 🙂
Re-sharing the old post will definitely work to get more traffic to your blog through social media. Thanks for compiling an article on how to use Revive Old Post.
The Premium version is the best one at there we have many tools to get more stability to share our old post at the social network.
thanks yo share..
Thanx to share this i am really need some thing like this. because am doing manually all this stuff.
Perfect timing. Thanks Colin. I will be looking into this for our blogs over the weekend. Cheers! 🙂
Nice article. I am always concerned about plugins slowing down pingdom scores. Any ideas if this plugin drags down page load? If it doesn’t I’ll give it a test drive. Thanks.
Thank you for the easy to follow directions. It took me less than 10 minutes to set this up on my site. 🙂
This is great! Is the plug in free and can you use it on the free version of wordpress?
Well, if you mean WordPress.com then unfortunately no. This blog covers topics related to WordPress.org which is the self-hosted version of WordPress.
We’re using Revive Old Post, and it works quite well. That said, we’re moving towards using Coschedule to manage our editorial calendar, and they have a pretty solid system that re-ups our content on our social channels. Something to consider if you need both features…
Indeed a wonderful post, thanks for spending time for creating this 🙂
Amazing! I was looking for something like this 😀
I caution the use of this plug-in on Twitter. The issue is that Twitter finds this type of tweeting to be to automated and has been “ghosting” people’s accounts who repeat the same tweets too much. If you modify the tweets with different titles and hashtags you will be ok, but regularly sending out the same tweet on an automated schedule is going to get you blacklisted on Twitter.
Thanks for the tip Sharon !!, It’s good to know using automated plugins can create these type of issues.
How about Bufferapp ? we use it and schedule the post !!
Good to know!
Revive old post and it premium version is one of the top products for that work, our there!
Nice sharing!