

A vague headline or a generic “Learn More” button can leave visitors unsure what you offer. With Divi AI Agents in Divi 5, you can revise headlines, service descriptions, and calls to action across a page from one conversation.
Choose a search topic that matches your offer, then use it to guide the edits. Each change should help visitors understand your service or take the next step.
We’ll use a fictional web design service page to show the process, with prompts and before-and-after examples you can adapt to your site.
- 1 How Website Copy And On-Page SEO Work Together
- 2 How Divi AI Agents Help Optimize Website Content
-
3
How To Improve Page-Wide Copy And SEO Using Divi AI Agents
- 3.1 1. Choose An Existing Page To Optimize
- 3.2 2. Identify Target Keywords And Search Intent
- 3.3 3. Configure Divi AI Agents For Content Optimization
- 3.4 4. Analyze And Improve The Existing Copy
- 3.5 5. Refine Headings, Keyword Usage, And Content Structure
- 3.6 6. Strengthen Calls To Action
- 3.7 7. Review The Changes And Validate The Page’s SEO
- 4 Before And After: Optimizing A Web Design Service Page
- 5 Tips For Editing Service Pages With Divi AI Agents
- 6 Improve Your Website Content With Divi AI Agents
How Website Copy And On-Page SEO Work Together
Clear writing helps visitors assess your service; on-page SEO helps search engines identify the page’s subject. A headline that names your offer and headings that organize the details support both goals.
Use relevant search phrases where they help explain the service. Repeating them in every heading adds little for the reader. Google’s people-first content guidance emphasizes useful information written for readers.
How Divi AI Agents Help Optimize Website Content
Once you’ve clarified the offer, the rest of the page needs to support it. Service descriptions should explain what visitors receive, and the closing invitation should help them act on that information. Divi AI Agents let you coordinate those changes inside the Visual Builder, with the conversation and edited page side by side.
Begin in Ask mode to share your business details and discuss improvements before anything changes. Once the suggestions fit your offer, switch to Build mode to apply them. If you’re editing a particular heading or button, add it as Context so the agent has a precise target.
For recurring work, saved Rules can carry your writing preferences into relevant tasks while you supply each page’s facts. You can then review the result against your brief and check its metadata in an SEO plugin, keeping the page text and search description connected.
How To Improve Page-Wide Copy And SEO Using Divi AI Agents
Work through these steps on one existing page. You’ll need Divi 5 and an active subscription that includes Divi AI Agents access.
Sign in with your Elegant Themes account when prompted, and check your AI Wallet balance before beginning. To follow the metadata example, you also need Rank Math installed and activated, or equivalent fields in your existing SEO plugin.
1. Choose An Existing Page To Optimize
Choose a page with a defined service and a clear next action. With one offer to focus on, you can judge each edit by whether it helps visitors understand the service and decide to contact you.
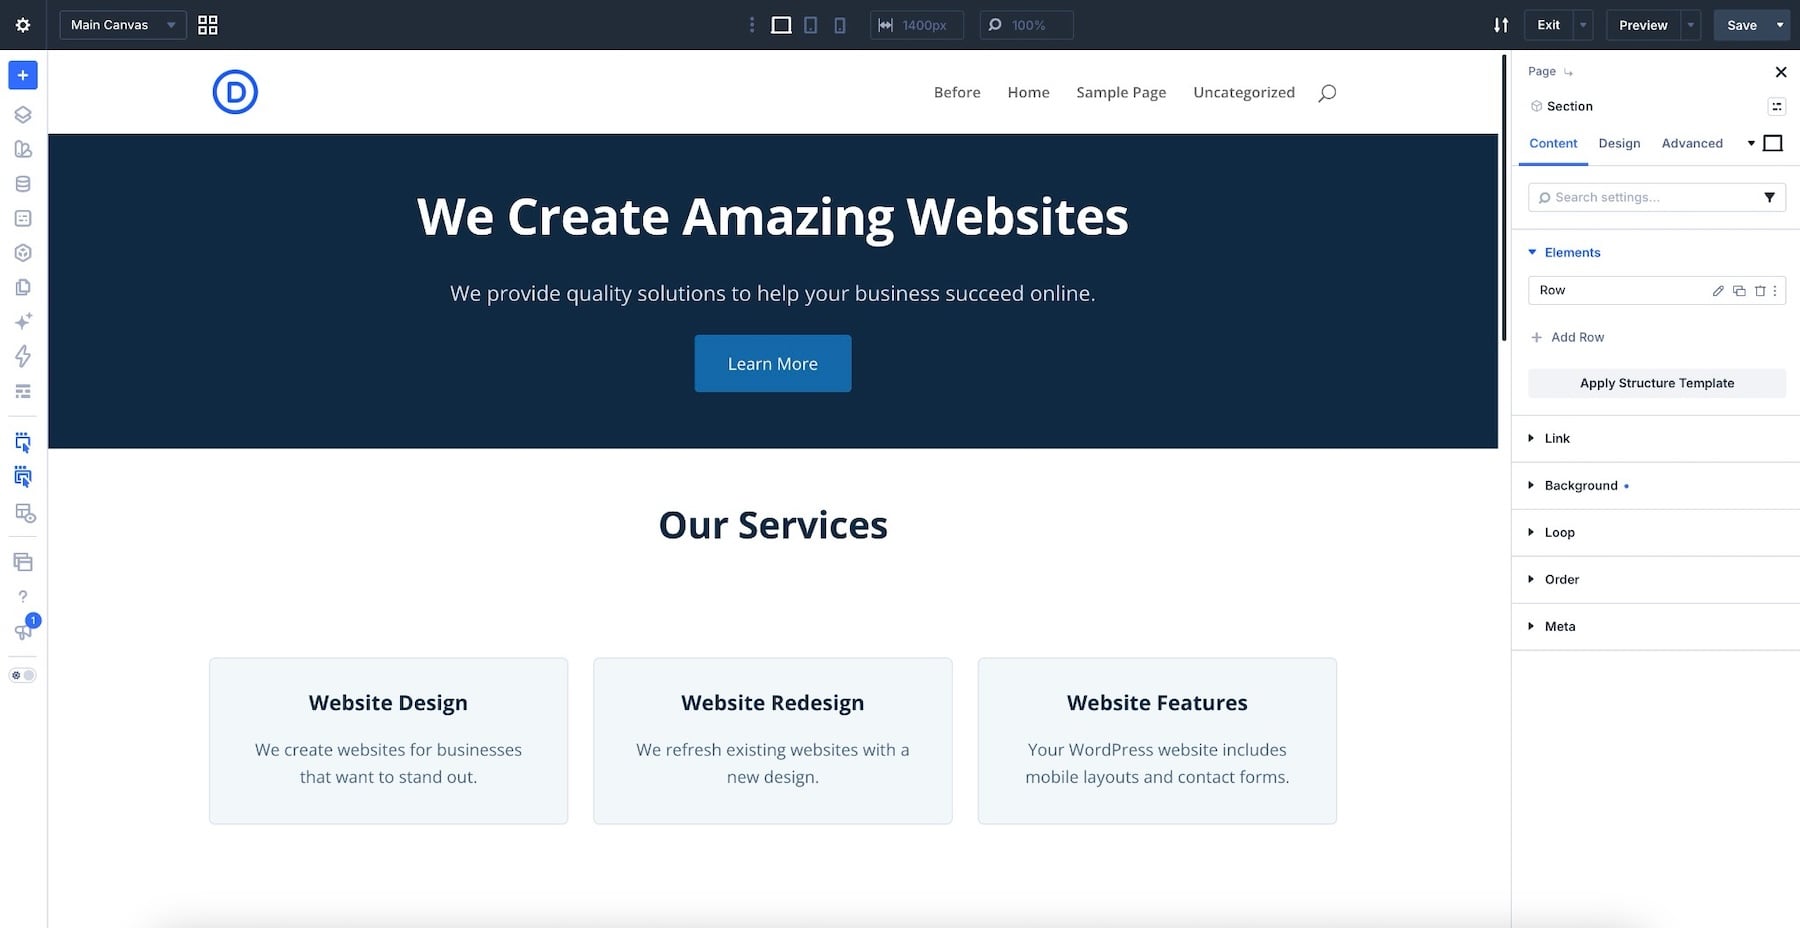
Our example offers WordPress websites to small businesses, but “We Create Amazing Websites” leaves those details out. Naming the platform and audience will help visitors recognize whether the service fits their needs, while the descriptions explain what is included.
We’ll start with the hero and service cards shown below, then follow the message through to the inquiry form. Work on a draft or staging page, keeping a backup and before-and-after captures so you can review what changed.
2. Identify Target Keywords And Search Intent
A keyword is a word or phrase someone enters into a search engine. Start with your service and audience to choose a relevant target. “Web design” covers a broad topic, while “small business web design services” gives our example a more specific focus. We’ll use that phrase as a working target and check it against research data.
Next, consider what that searcher wants to do. Someone hiring a designer needs service details and a way to inquire, while someone learning to build a website needs instructions. This intent guides the information you include, giving the rewrite a purpose beyond using the keyword.
Search your candidate phrase and look at the types of pages that appear. Service pages can suggest a different expectation from instructional articles, although results alone do not measure demand. If you already use Google Search Console, its query data can also show which phrases bring visitors to your site. Use that evidence or your keyword research data to refine the target.
Now turn the topic into a short business brief the agent can work from:
- Audience: Small-business owners looking for a WordPress website or redesign.
- Offer: Website design with mobile layouts and contact forms.
- Process: Discovery, design review, and launch preparation.
- Primary action: Submit a project inquiry through the existing contact form.
The brief gives the agent facts to work with. Use related wording such as WordPress website design naturally, and include locations, prices, or timelines only when they match your business.
3. Configure Divi AI Agents For Content Optimization
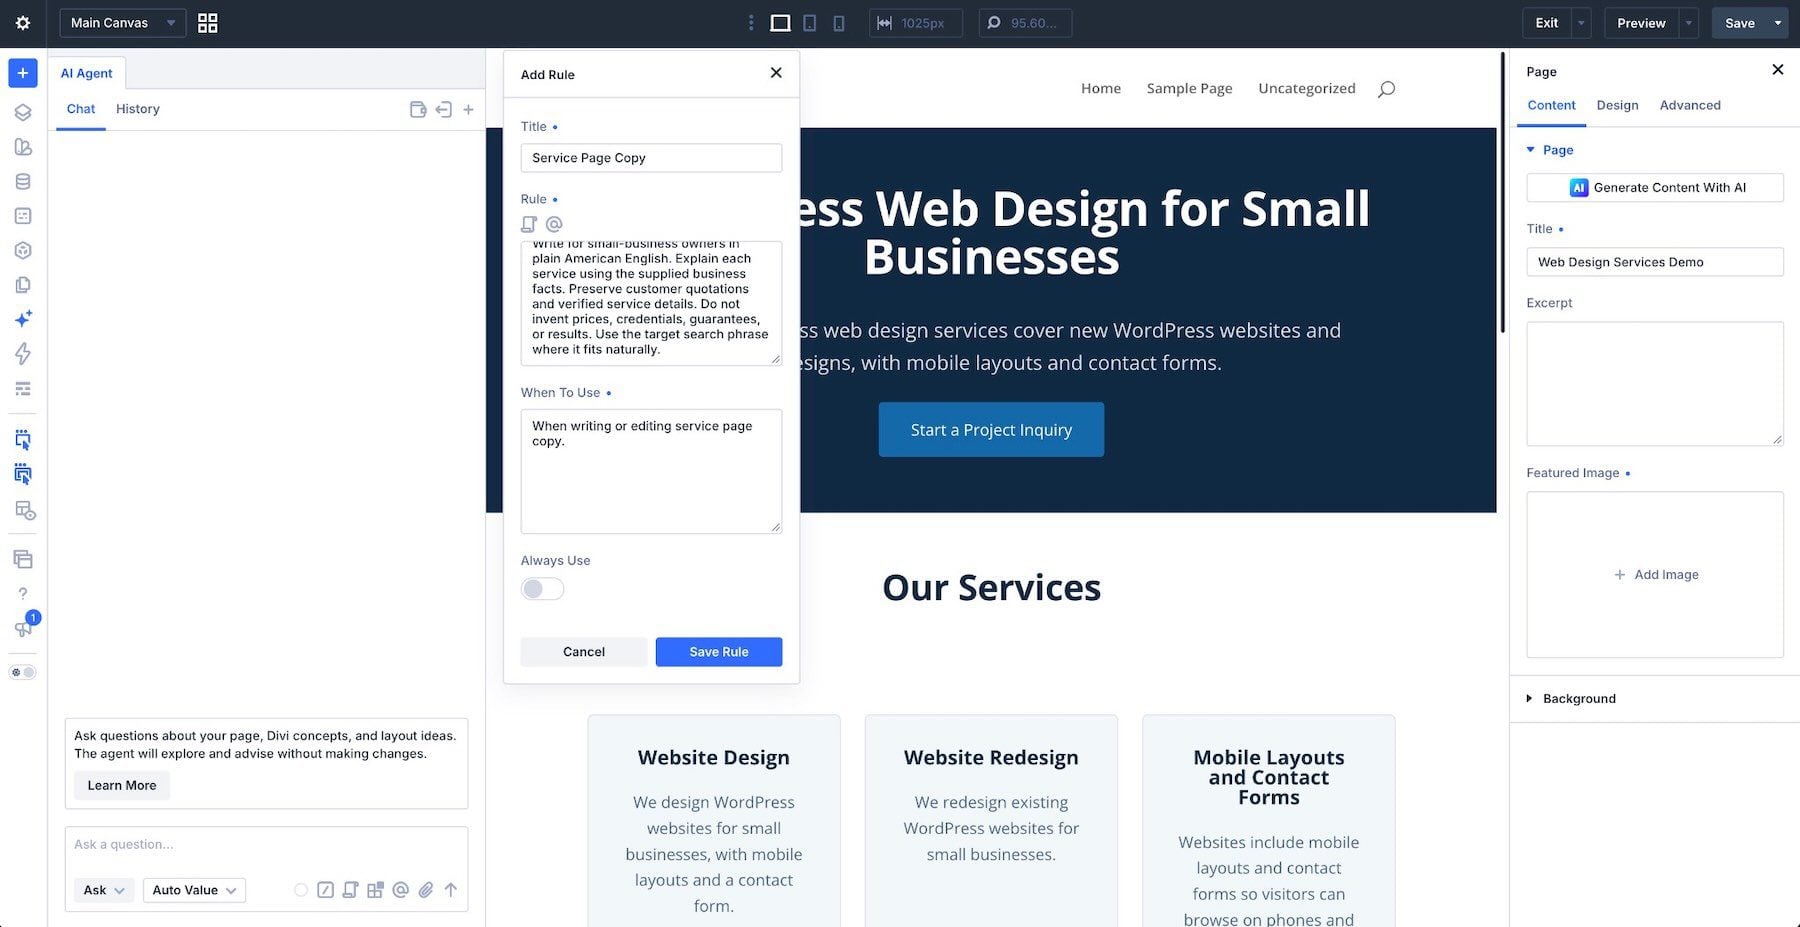
Open the page in the Divi 5 Visual Builder and click the Divi AI Agent icon in the sidebar. Select Ask mode for the initial review.
Provide your business brief in the conversation and identify the current page as the editing target. If an element Scope chip is present above the prompt field, click its clear icon before requesting a review of the whole page.
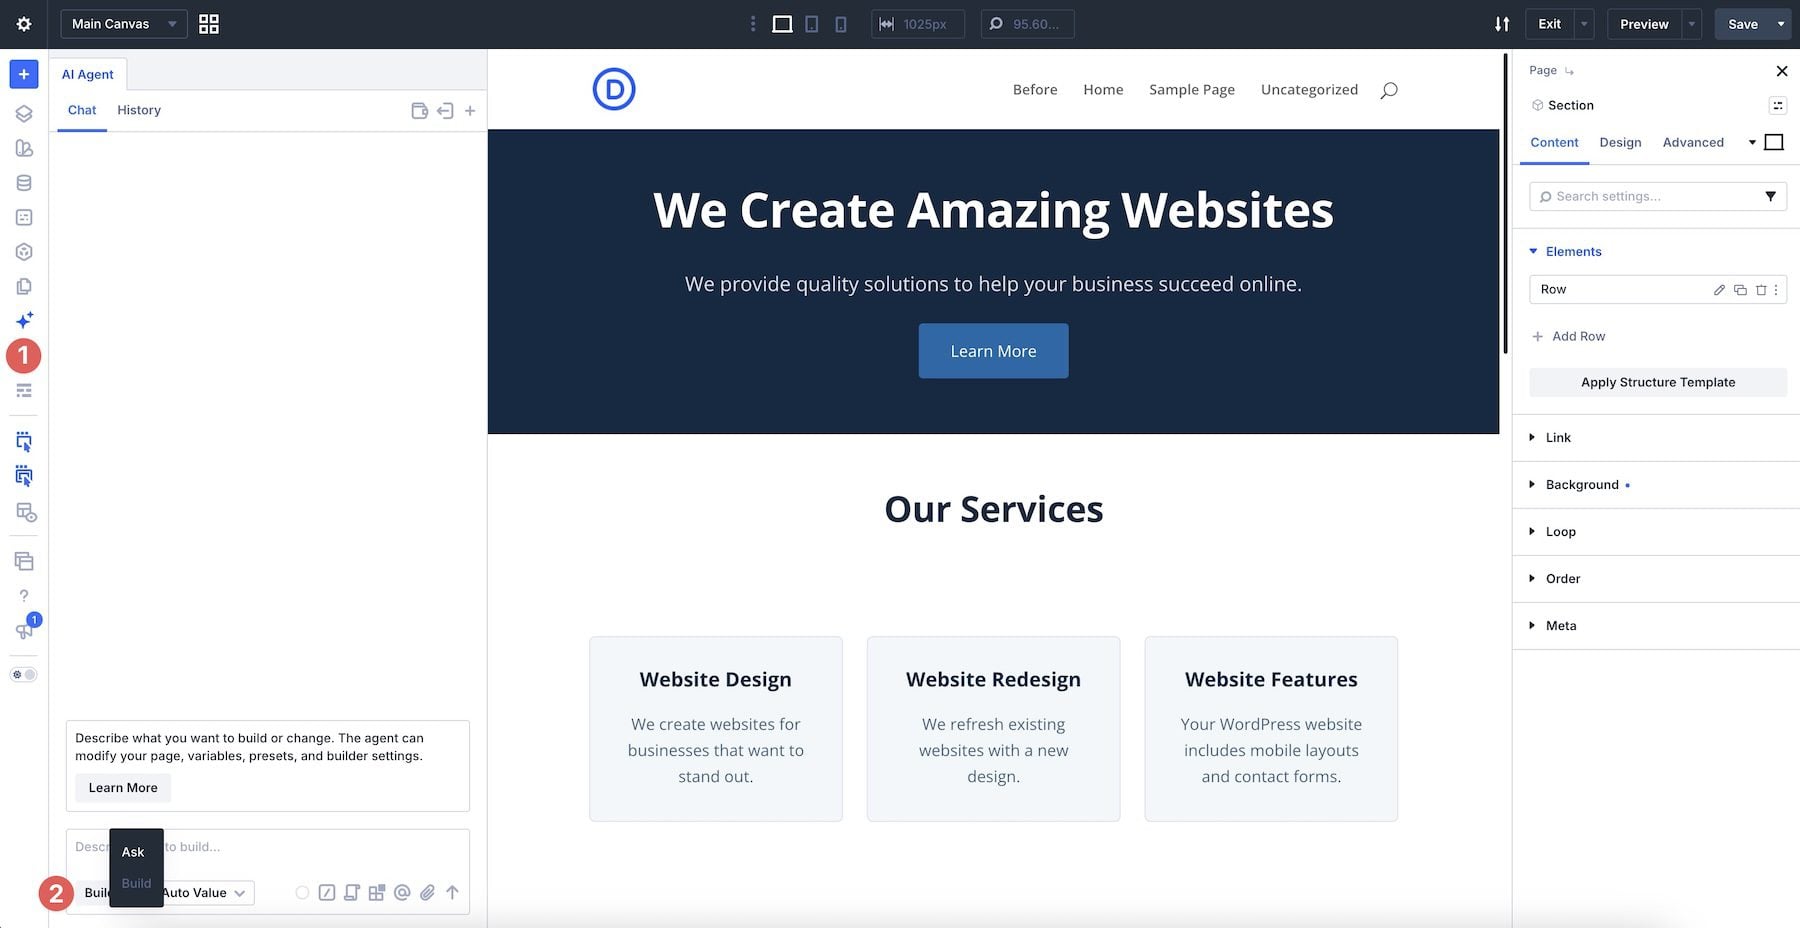
A saved Rule helps you reuse the same writing preferences as you move between sections or pages. Add that guidance through Rules > Add New Rule. In Title, enter “Service Page Copy.” Use this proposed instruction in the Rule field:
Set When To Use to “When writing or editing service page copy.” Leave Always Use off for this task-specific Rule, then click Save Rule. With Always Use off, the agent uses When To Use to decide whether the Rule applies to each request.
For more examples of reusable guidance, see our guide to Divi AI Agents Rules.
The Rule editor below shows these fields with the revised page in the background. Set up the Rule before starting your edits.
4. Analyze And Improve The Existing Copy
Before revising the wording, use Ask mode to see how the agent understands your page. This lets you catch suggestions aimed at the wrong audience or based on facts you never supplied. Share your business brief, then ask for a review:
Read the suggestions alongside the page so you can see what each change would improve. In our review, a closing “Learn More” button linked back to the section it already occupied, giving visitors no useful next step. Check the heading hierarchy separately from the wording; a clearer label does not necessarily need a different heading level. If the agent identifies the wrong heading, add the intended element as Context before continuing.
Click the Context icon beside the prompt field and choose the relevant element. The screenshot below shows a Section reference; select the specific module when the edit concerns one heading or button.
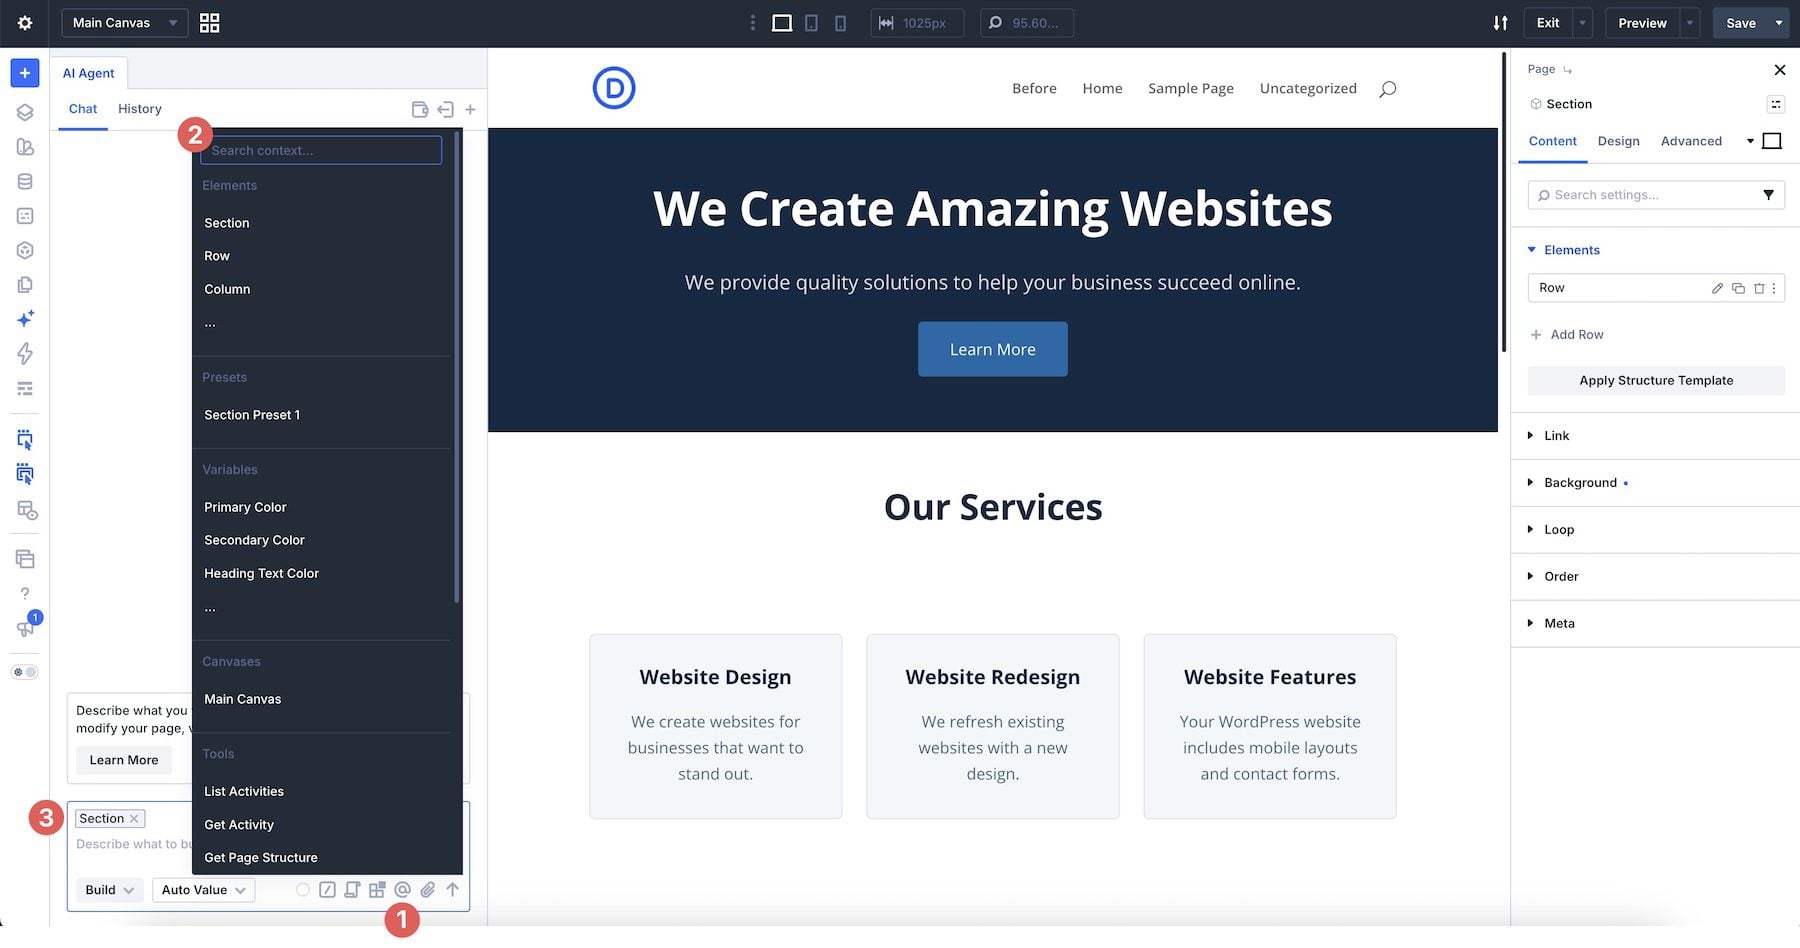
Once the plan matches your intent, switch to Build mode and start with the hero and service descriptions:
Review the text in its modules before expanding the edit to the remaining sections. The prompt requests content changes; check whether the result stays within that scope. Read the agent’s completion summary for skipped edits or uncertain targets. If two modules have the same label, select the intended module on the canvas and retry only that edit.
The video below replays the headline and service-description edits using the saved Service Page Copy Rule.
5. Refine Headings, Keyword Usage, And Content Structure
Headings help visitors scan the page and find answers without reading every paragraph. Review the outline before changing the wording so the service details and next steps have a clear place. The main headings in our example follow this outline:
- H1: WordPress Web Design for Small Businesses
- H2: Our Services
- H2: Our Process
- H2: Our Work
- H2: Get In Touch
Use the main heading for the page’s subject and section headings for the supporting answers. Check the actual heading levels, including any title supplied by your template; large text is not necessarily an H1.
Clear any element Scope before returning to a page-wide check. Ask the agent to inspect the existing structure in Ask mode before making changes:
Review the outline, then use Build mode to request the approved heading and text edits. Keep typography unchanged unless you’re also planning a design adjustment. Explain an omitted service detail using verified information rather than adding paragraphs to reach a word count.
The video below changes the service-card heading from “Website Features” to “Mobile Layouts and Contact Forms,” retaining H3. It demonstrates a wording change within the existing hierarchy.
6. Strengthen Calls To Action
Make the next step clear wherever a visitor is ready to contact you. In the hero, “Start a Project Inquiry” tells visitors what they can do next and leads them to the inquiry section. That is more useful than a generic “Learn More” label.
To target the hero button precisely, double-click its Button module on the canvas to open its settings. Confirm the prompt area shows Scope: Button, then request this edit in Build mode:
The revised hero below shows the new label alongside a description of the offer. Check that the button still takes visitors to the inquiry section after the edit.
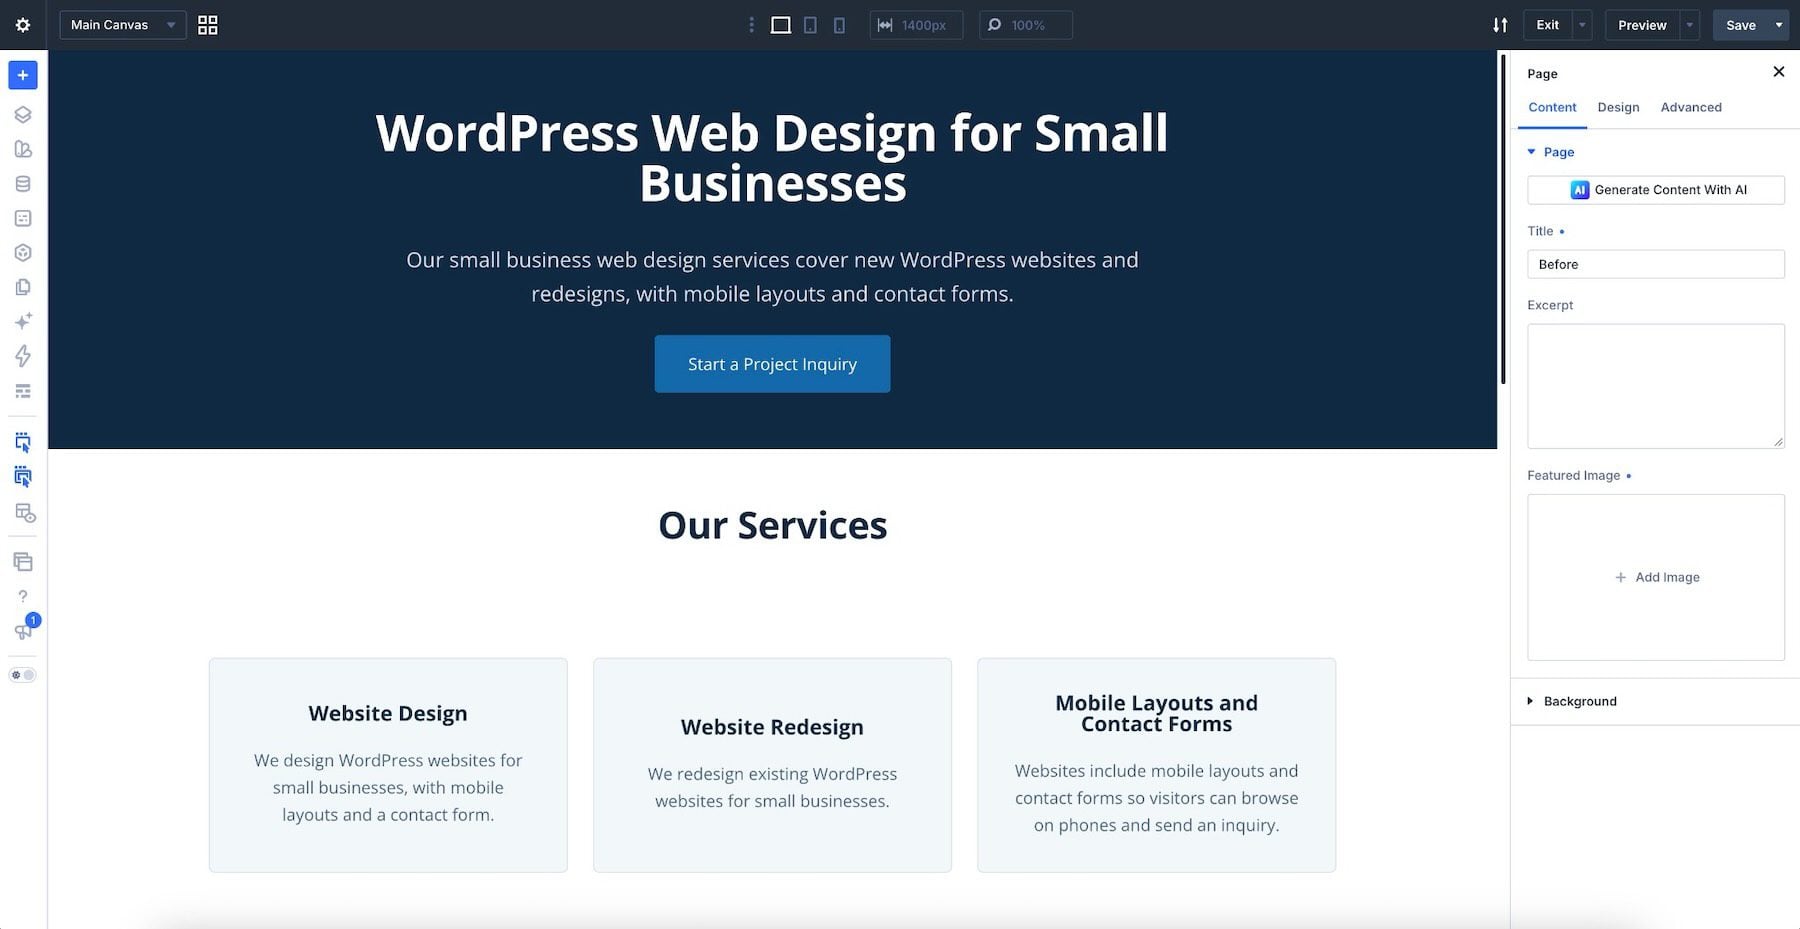
Clear the Button Scope before moving to the inquiry section. Select that section as Context or Scope so the next request can include both its introductory Text module and Contact Form.
Carry that wording through to the form. Use “Send Project Inquiry” for its submit button and introduce it with “Tell us about your website project using the form below.” Ask the agent to preserve the form settings while changing those text fields, then test the submission separately.
The recording leaves the separate closing “Learn More” button in place to isolate the form edits. If it only links back to the section containing the form, remove that redundant Button module or give it a distinct purpose and destination.
7. Review The Changes And Validate The Page’s SEO
Read the full page from top to bottom. Compare each service statement with your business brief and remove unsupported additions.
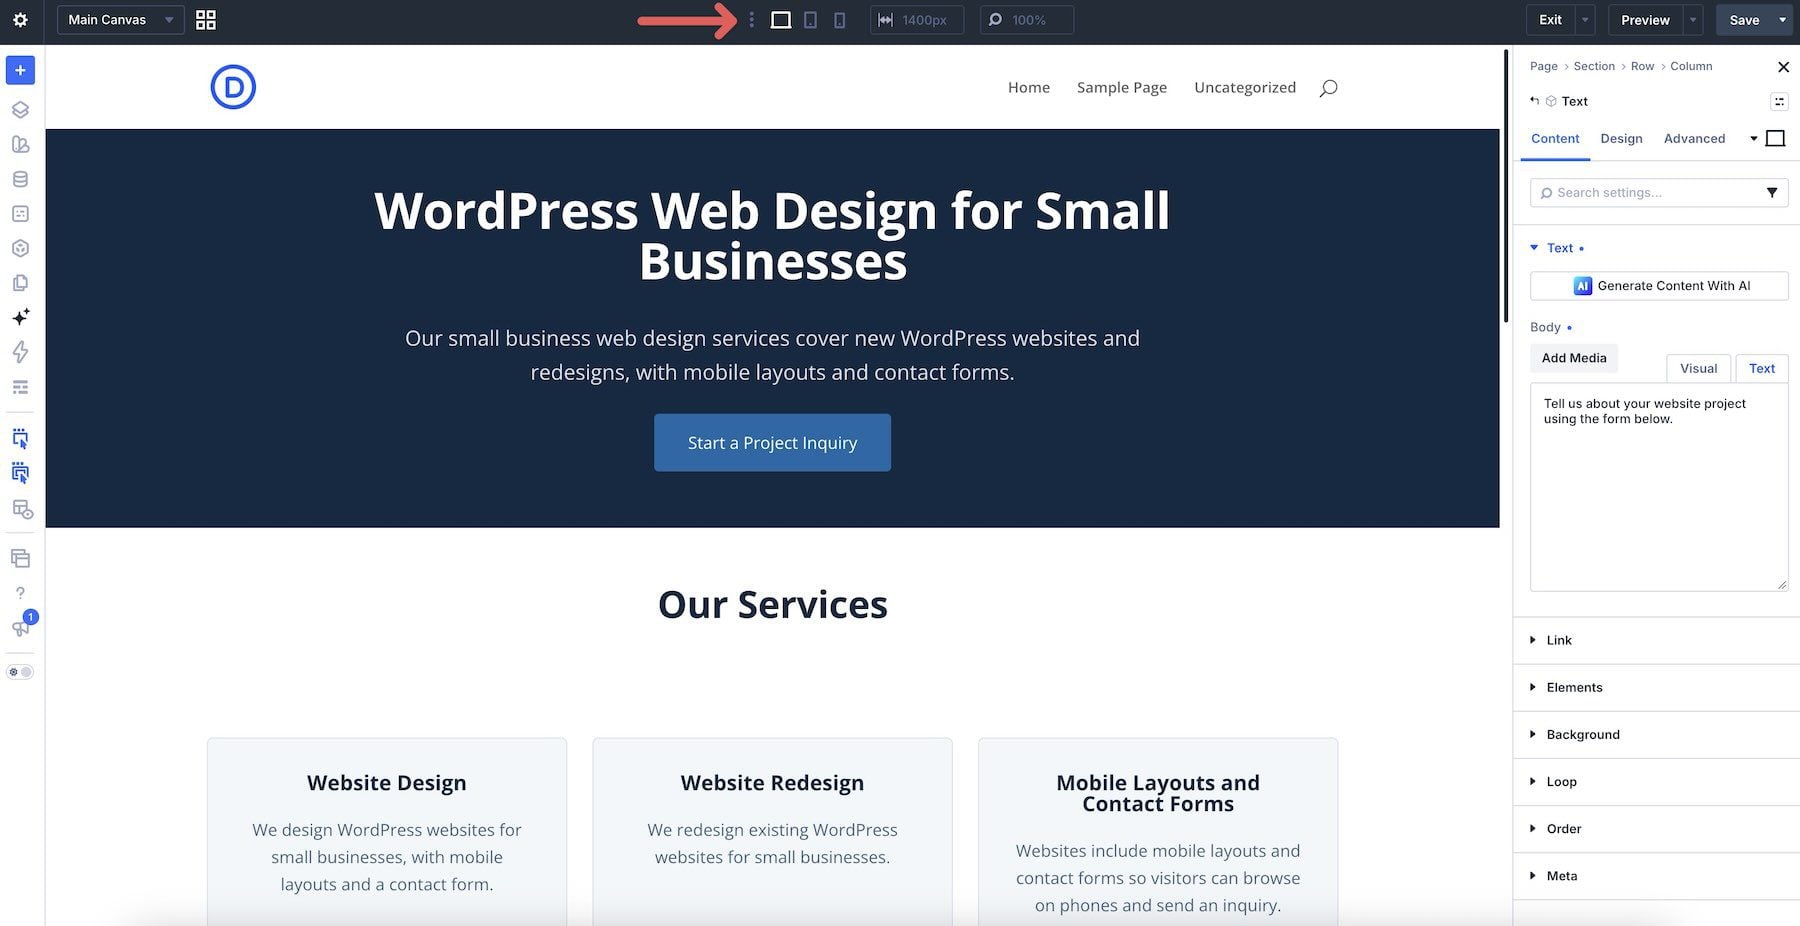
Use the Desktop, Tablet, and Phone controls in the top Builder bar to preview the layout, especially where longer text wraps inside buttons or cards. Enter a narrow width, such as 320px, in the preview width field and inspect the hero, service cards, and form. The screenshot below locates the preview controls; repeat the check at each relevant width on your page.
Review the page’s title tag and meta description in Rank Math or your preferred WordPress SEO plugin. The title tag identifies the page for search, while the meta description summarizes what it offers. They are separate from the visible hero headline and help describe the page before someone visits it.
You can ask the agent to suggest wording in Ask mode, then enter the approved text in the plugin:
For the demonstration page, Ask mode suggested this title tag: “Small Business WordPress Web Design & Redesign.” Its proposed meta description was: “WordPress website design and redesign for small businesses, including mobile layouts and contact forms. Send a project inquiry through our form.” These suggestions describe the supplied offer without adding business claims.
To enter the approved wording in Rank Math, save your Builder changes and open the page in the WordPress page editor.
- Click the Rank Math icon to open its panel.
- In General, click Edit Snippet to open the Preview Snippet Editor.
- Enter the approved text in Title and Description.
- Save the draft or update the page, then reopen those fields to confirm that the values persist.
The captured Title and Description fields below match the example wording. Inspect the saved frontend’s title and meta description to confirm that the published output matches those fields.
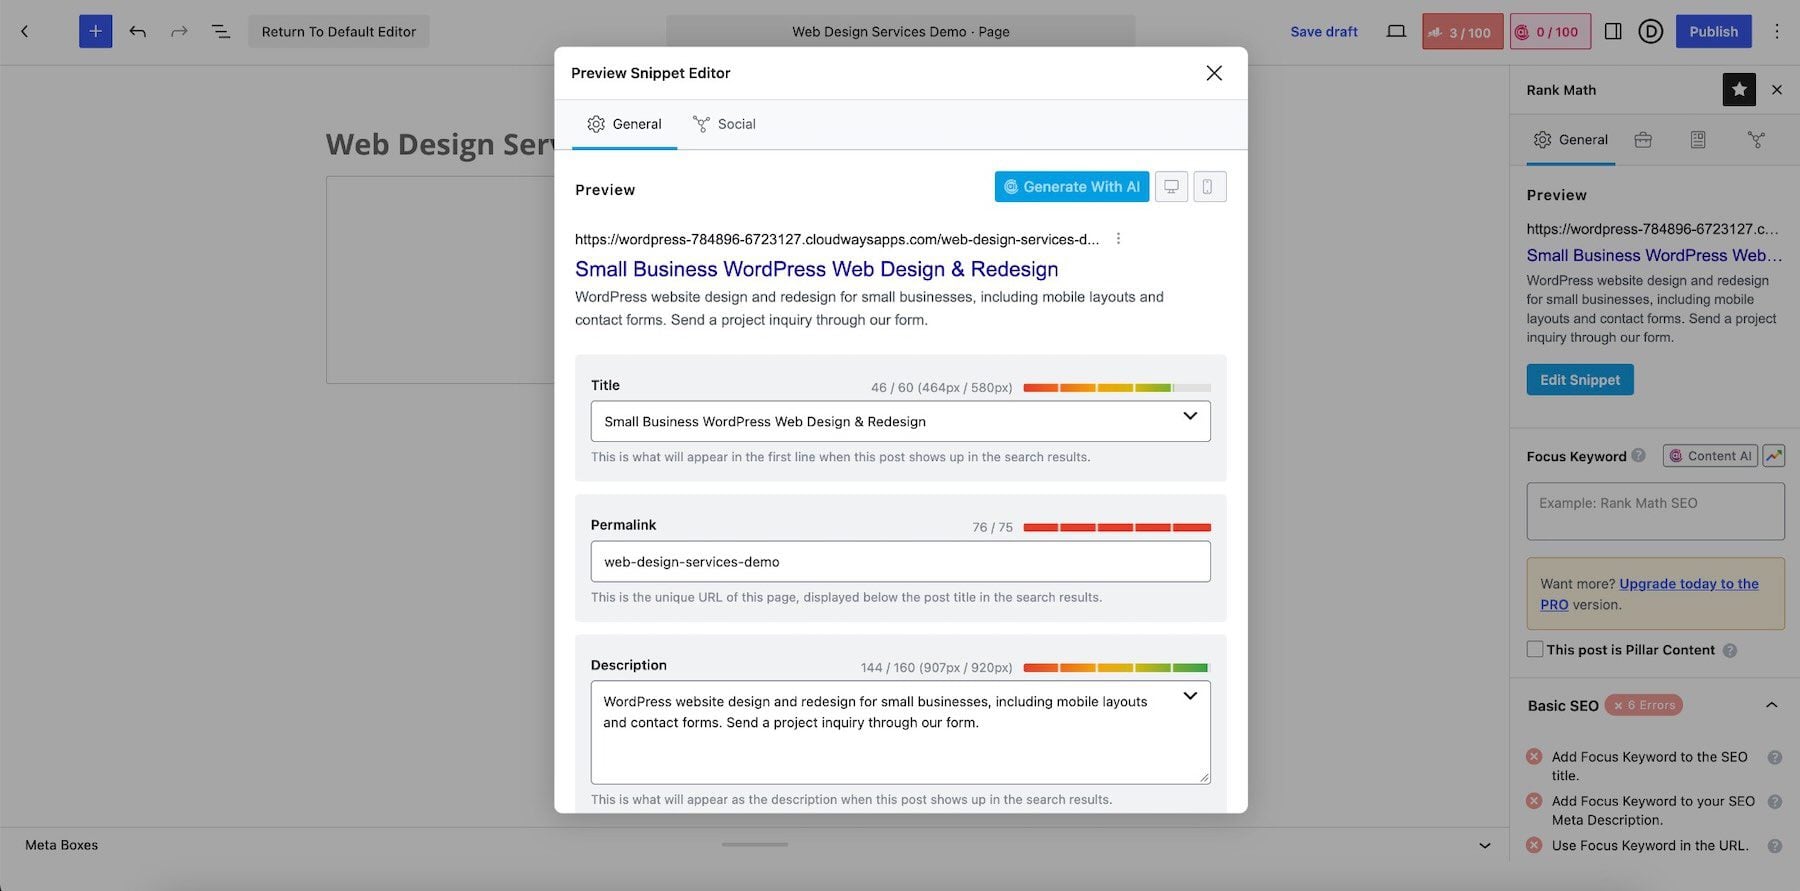
Google can draw title links and snippets from several sources, so the saved fields may differ from the search result. Use your plugin’s checks to flag issues, then review each suggestion against the page. A higher plugin score does not establish better rankings.
Before publishing, check the rendered headings and test the inquiry form. Confirm the recipient settings, send a test inquiry with dummy details, and verify both the success message and delivery to the intended inbox. Our on-page SEO checklist covers internal links, image descriptions, and indexing checks for a broader review. After publication, use Search Console to monitor the page’s search performance.
Before And After: Optimizing A Web Design Service Page
The revised page explains the service and audience more clearly, then gives visitors a specific next step. Compare the original and revised wording to see how those changes work together.
Hero Headline
Before: “We Create Amazing Websites.”
After: “WordPress Web Design for Small Businesses.”
Visitors can now recognize the platform and intended audience immediately. The opening paragraph builds on that message with the working target phrase and the services included.
Hero Description
Before: “We provide quality solutions to help your business succeed online.”
After: “Our small business web design services cover new WordPress websites and redesigns, with mobile layouts and contact forms.”
Naming mobile layouts and contact forms gives potential customers something specific to evaluate. Make sure those inclusions match your service before using similar wording on your own page.
Before, hero button label: “Learn More.”
After: “Start a Project Inquiry.”
The revised label tells visitors what to expect when they click, and the existing link still leads to the inquiry section. The form’s “Send Project Inquiry” label completes that flow when visitors are ready to submit their details.
Look for that consistency between the opening offer and the action you ask visitors to take.
Before: Original Hero And Services
After: Revised Hero And Services
Tips For Editing Service Pages With Divi AI Agents
As you apply this workflow to other pages, keep each request small enough to review and tie it to a visitor’s question.
Limit Each Edit
Start with one section or group of modules. Name what should change and what should stay, such as the layout or button links. Review the result before moving to the next section; this makes an unwanted change easier to spot.
Separate Brand Rules From Business Facts
Use a saved Rule for tone and writing preferences. Supply the offer, audience, and service details in the current chat so those facts match the page you’re editing. Check any added price or performance claim against its source before keeping it.
Answer Customer Questions
Read each section as a prospective customer. Does it explain what’s included, who the service suits, or how to inquire? Add a missing answer using verified details, and remove repeated phrases that make the explanation harder to follow. Google’s guidance on generative AI content emphasizes accuracy and relevance.
Track Search And Inquiry Results
Record the publication date and the sections you changed. Compare later Search Console data and form inquiries with your baseline, noting other changes to the site or offer. Use those observations to plan your next edit; the rewrite alone doesn’t prove a performance gain.
Improve Your Website Content With Divi AI Agents
Start with one service page and a business brief you can trust. With Divi AI Agents in Divi 5, you can review the page in Ask mode, apply your chosen changes in Build mode, and check how the message reads across the page.
For your next pass, use Context to reference the sections or modules that need attention. Bring your verified service details into the conversation and review the result before publishing, so visitors understand your offer and know how to get in touch.





Leave A Reply