
Divi and its sticky options continue to open doors for new design and functionality. In this tutorial, we are going to design a creative way to lead users through the content of a webpage using sticky headings as anchor links. The sticky headings stick to the top and bottom of the browser window as a helpful identifier of the content in view as well as the content that resides above or below. By adding anchor links to these sticky headers, we can allow users to click those sticky headers in order to jump to the corresponding section. This is a great way to boost the user experience on pages that display a process (like steps for a recipe).
To build the sticky heading anchor link navigation, we are going to use only Divi’s built-in options. The functionality on desktop and mobile are both unique. And the results may surprise you!
Let’s get started!
- 1 Sneak Peek
- 2 Download the Sticky Headings Anchor Link Navigation Layout for FREE
- 3 Download For Free
- 4 What You Need to Get Started
- 5 Part 2: Modifying the Layout
-
6
Part 3: Creating Sticky Headings for Each Row
- 6.1 Creating the Sticky Heading for the First Row (step one)
- 6.2 Update Mock Content
- 6.3 Duplicate Row 1
- 6.4 Create Sticky Heading for Second Row (Step Two)
- 6.5 Duplicate Row 2
- 6.6 Create Sticky Heading for Third Row (Step Three)
- 6.7 Duplicate Row 3
- 6.8 Create Sticky Heading for Fourth Row (Step Four)
- 6.9 Update Column Z Index for Each Sticky Heading
- 7 Part 3: Creating Sticky Heading Anchor Links
- 8 Final Results
- 9 Final Thoughts
Sneak Peek
Here is a look at the sticky headings with the anchor link navigation we’ll build in this tutorial.
To lay your hands on the designs from this tutorial, you will first need to download it using the button below. To gain access to the download you will need to subscribe to our newsletter by using the form below. As a new subscriber, you will receive even more Divi goodness and a free Divi Layout pack every Monday! If you’re already on the list, simply enter your email address below and click download. You will not be “resubscribed” or receive extra emails.

Subscribe To Our Youtube Channel
To import the section layout to your Divi Library, navigate to the Divi Library.
Click the Import button.
In the portability popup, select the import tab and choose the download file from your computer.
Then click the import button.

Once done, the section layout will be available in the Divi Builder.
Let’s get to the tutorial, shall we?
What You Need to Get Started
To get started, you will need to do the following:
- If you haven’t yet, install and activate the Divi Theme.
- Create a new page in WordPress and use the Divi Builder to edit the page on the front end (visual builder).
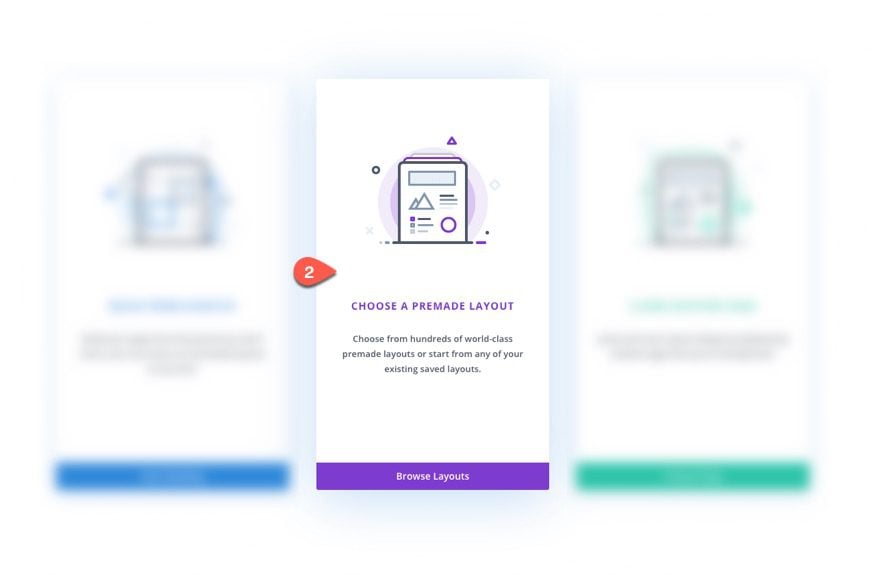
- Select the option “Choose a Premade Layout”.
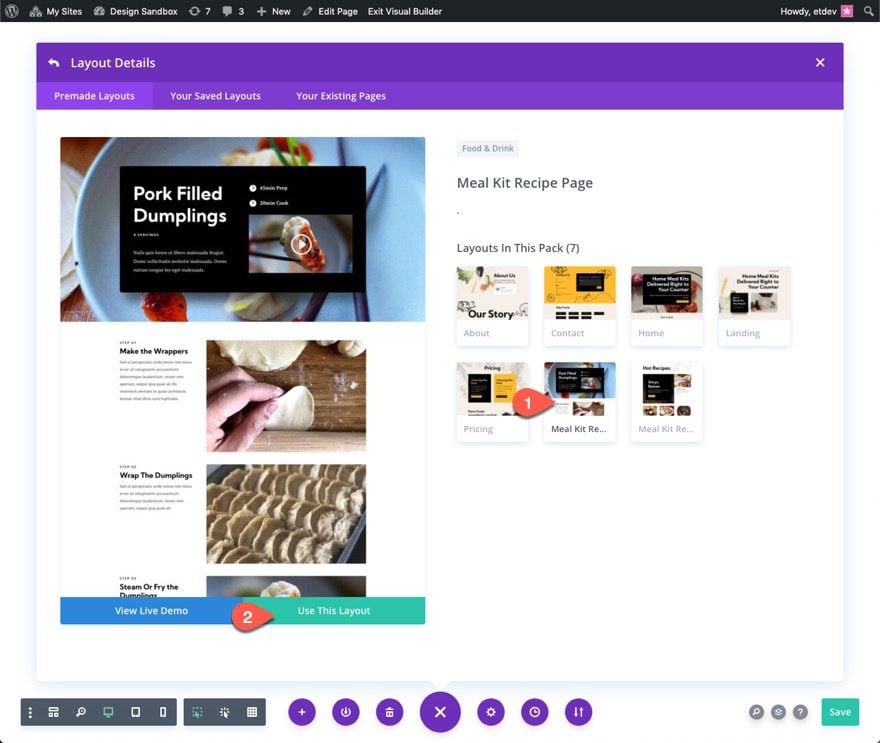
- From the Load from Library popup, find and upload the Meal Kit Recipe Page layout from the Meal Kit Layout Pack.
Part 2: Modifying the Layout
Deleting Rows
Once the layout has been loaded, delete the bottom two rows under the second section labeled Instructions.
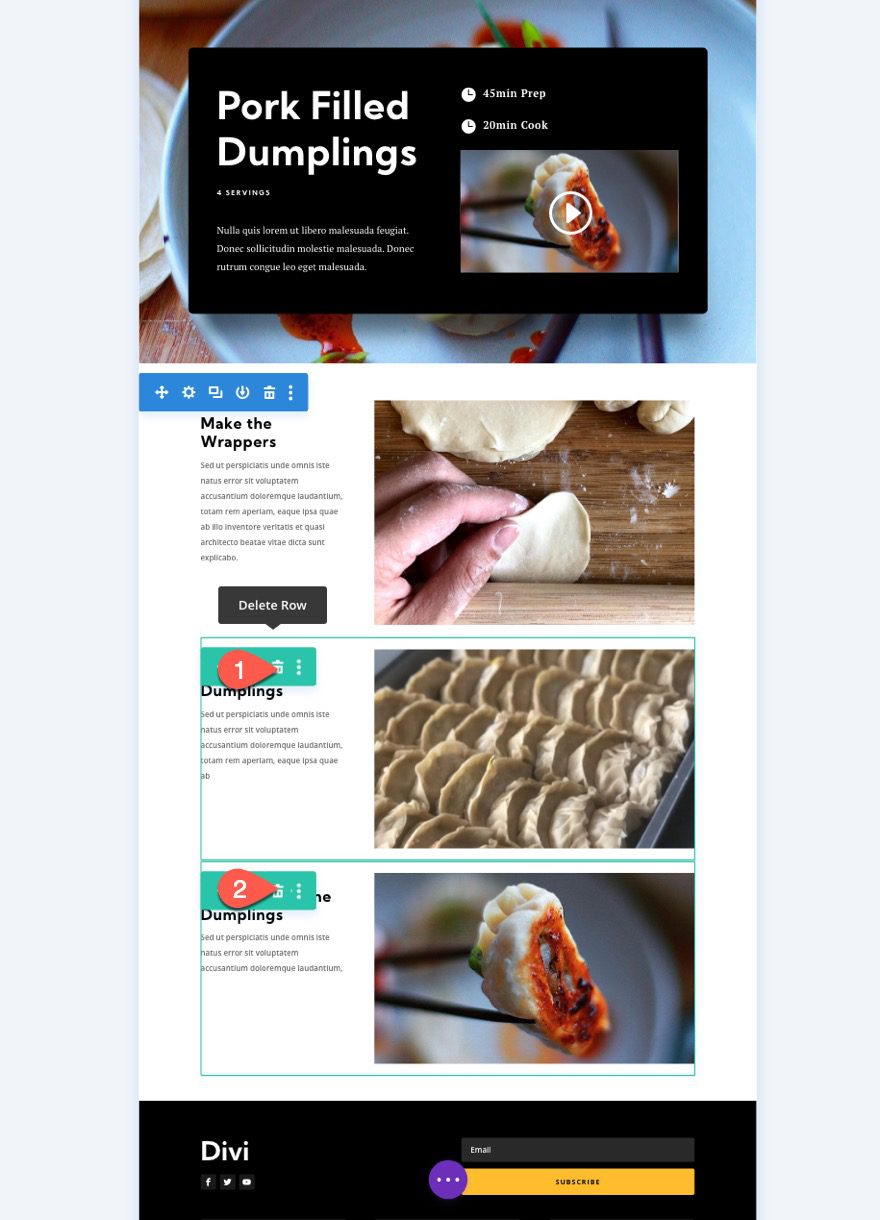
Now you should have one row with the content for “step-01” of the recipe.
Creating a New Row and Filling it with Content
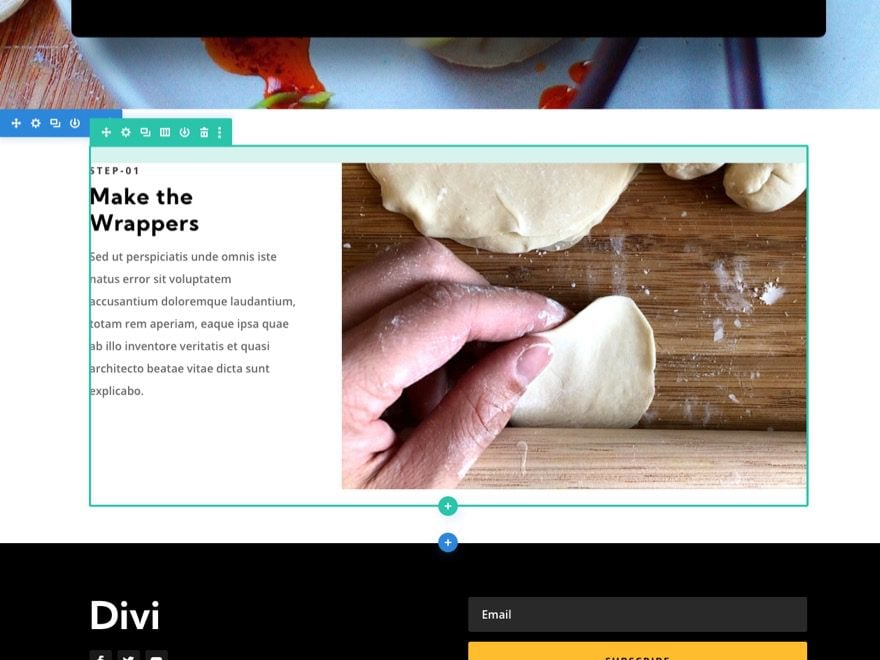
The sticky headings are going to reside in the left column of a two-column row. To create this setup, add a new 0ne-fourths three-fourths column row under the current row.
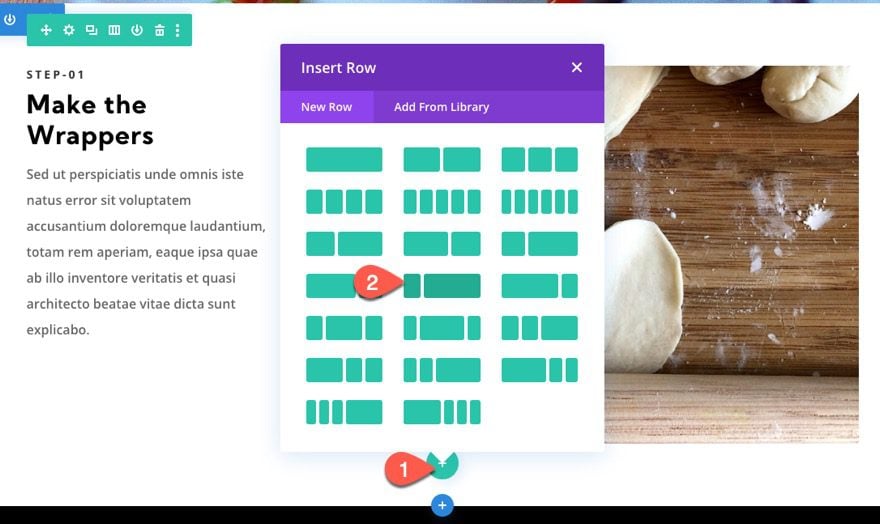
Using mulitselect (hold cmd/ctrl and click), select the three modules that contain the content for step one of the recipe in the premade layout row above.
Then drag those modules in the right column of the new row you just created.
Delete the empty row above when done.
Part 3: Creating Sticky Headings for Each Row
This layout will include four rows, each containing a sticky header in the left column. After creating the first sticky heading for the first row, we will duplicate the rows to create each additional row of content.
Creating the Sticky Heading for the First Row (step one)
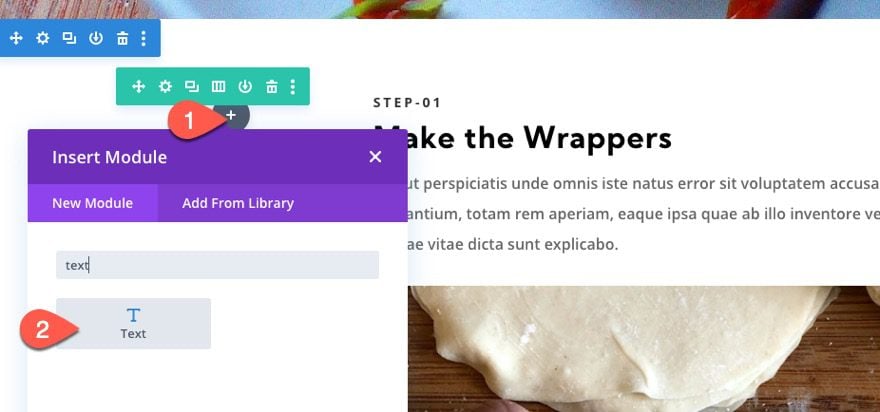
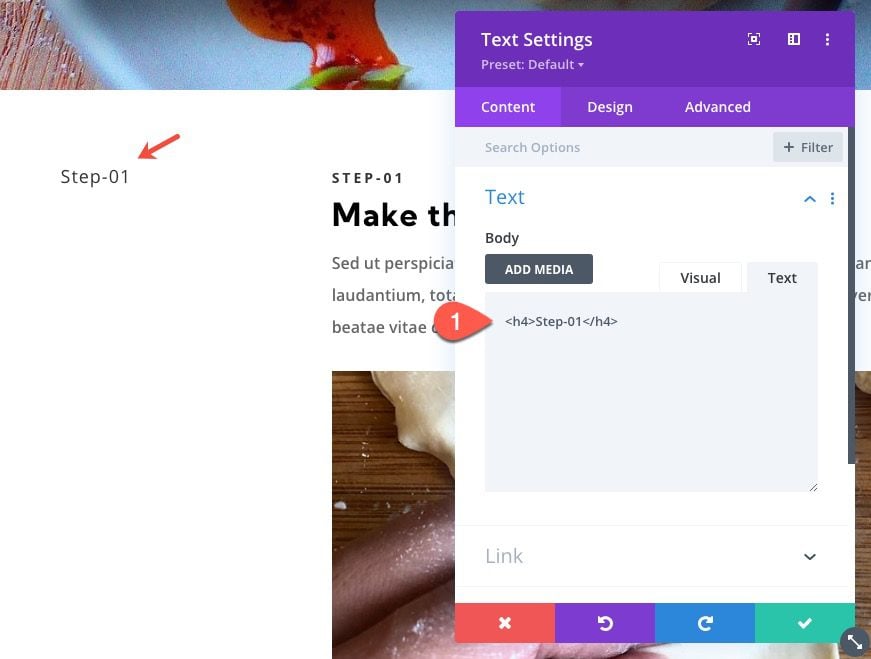
To create the first sticky heading for step one, add a new text module to the left column of the row.
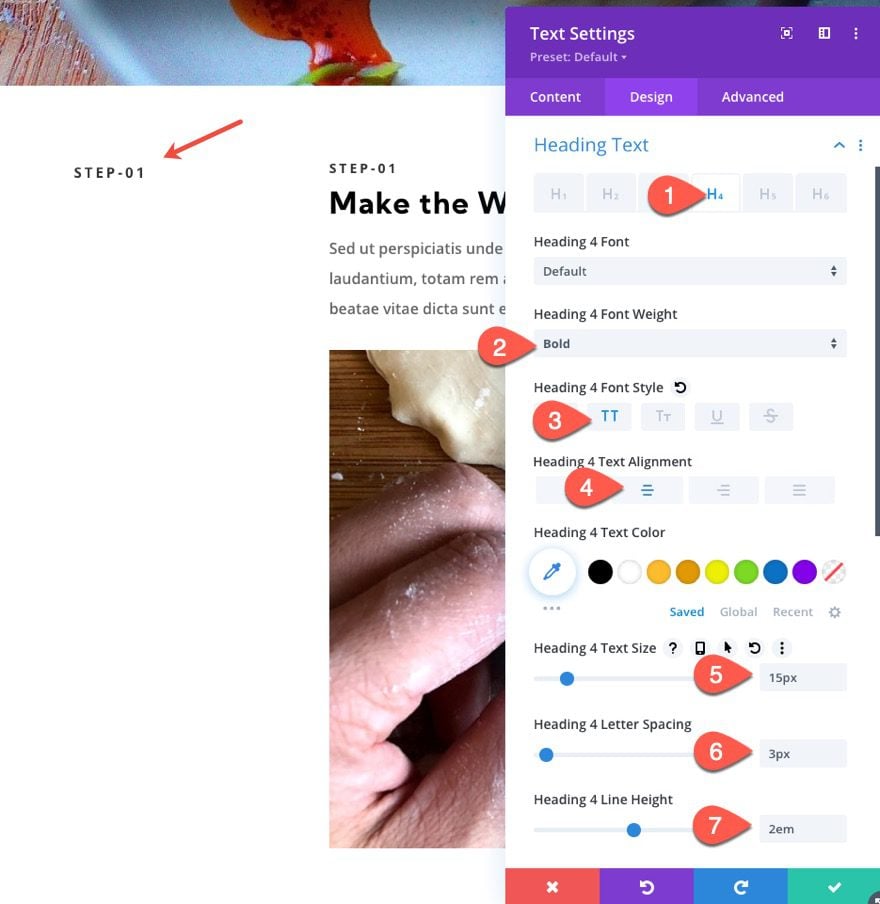
Then update the design settings for the H4 heading text as follows:
- Heading 4 Font Weight: Bold
- Heading 4 Font Style: TT
- Heading 4 Text Alignment: Center
- Heading 4 Text Size: 15px
- Heading 4 Letter Spacing: 3px
- Heading 4 Line Height: 2em
Then update the spacing and rounded corners as follows:
- Margin: 0px
- Padding: 10px
- Rounded Corners: 3px
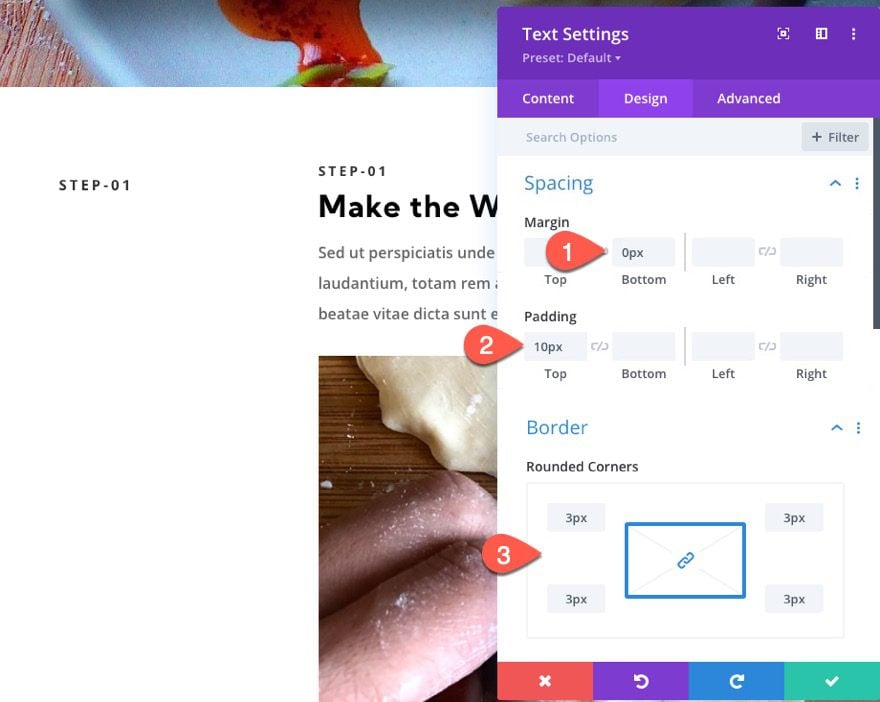
NOTE: Because of the text size (15px), line height (2em which equals 30px), the padding (10px), and the default H4 bottom margin (10px), the resulting height of the text module is 50px (30px + 10px + 10px). This is important to note so that we know to how much to offset each stick top and bottom position going forward.
Under the advanced tab, update the following sticky options:
- Sticky Bottom Offset: 150px (desktop), 0px (tablet)
- Top Sticky Limit: Section (desktop), None (tablet)
- Bottom Sticky Limit: Section (desktop), Row (tablet)
- Offset From Surrounding Sticky Elements: NO
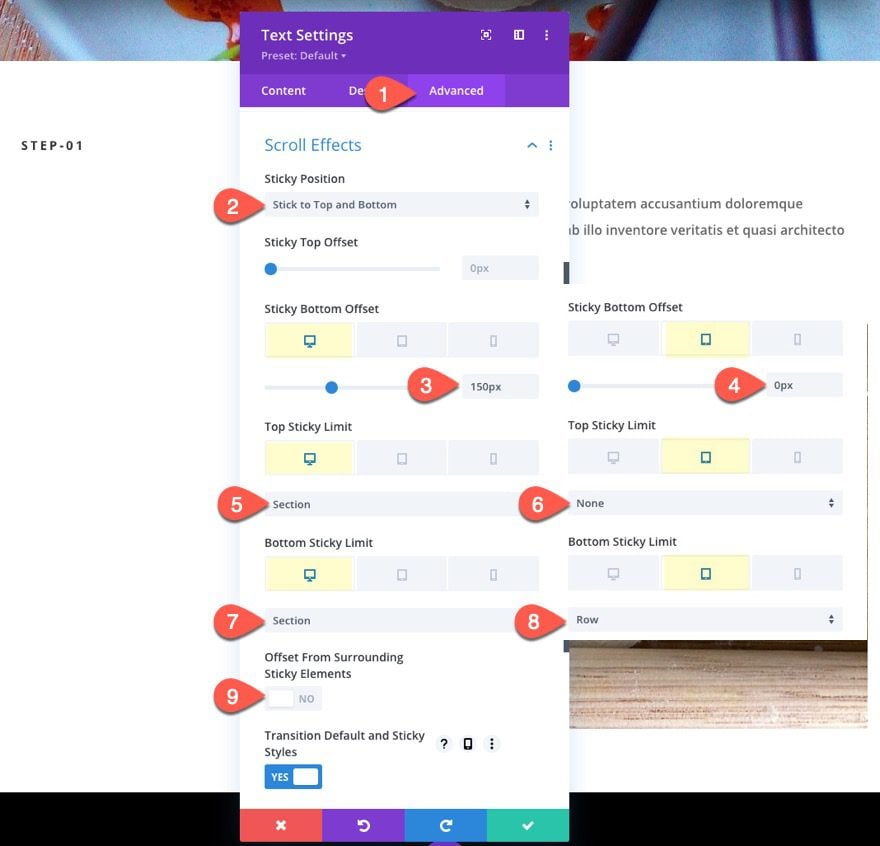
This technique will make sure our anchor links pull the row to the top of the browser window when clicking the sticky heading.
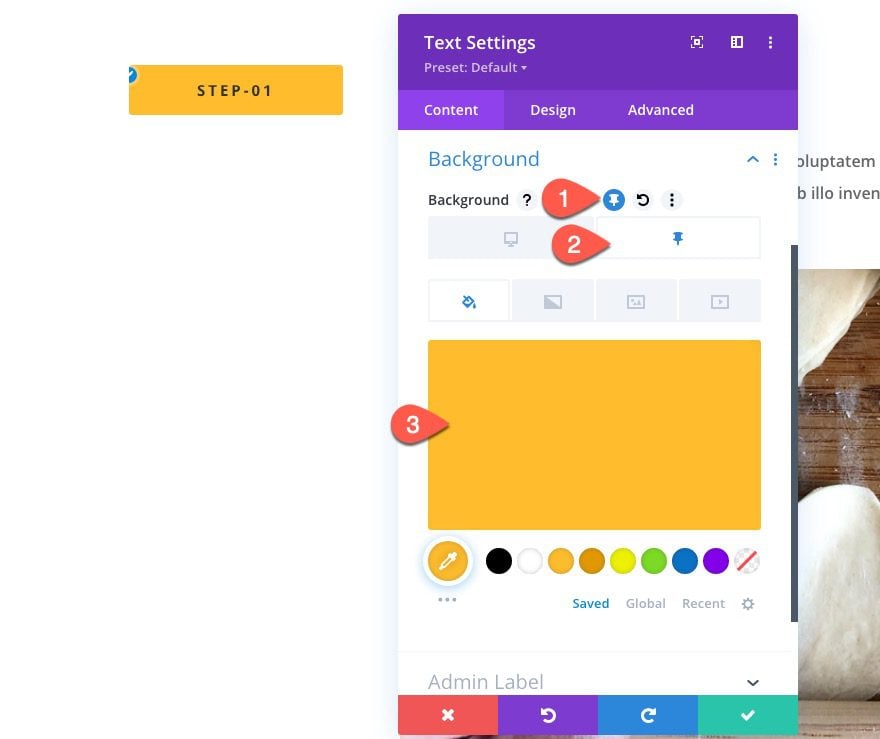
Next, update the background color in the sticky state:
- Sticky Background Color: #febd2d
Then update the Z Index on the sticky state:
- Z Index (sticky): 10003
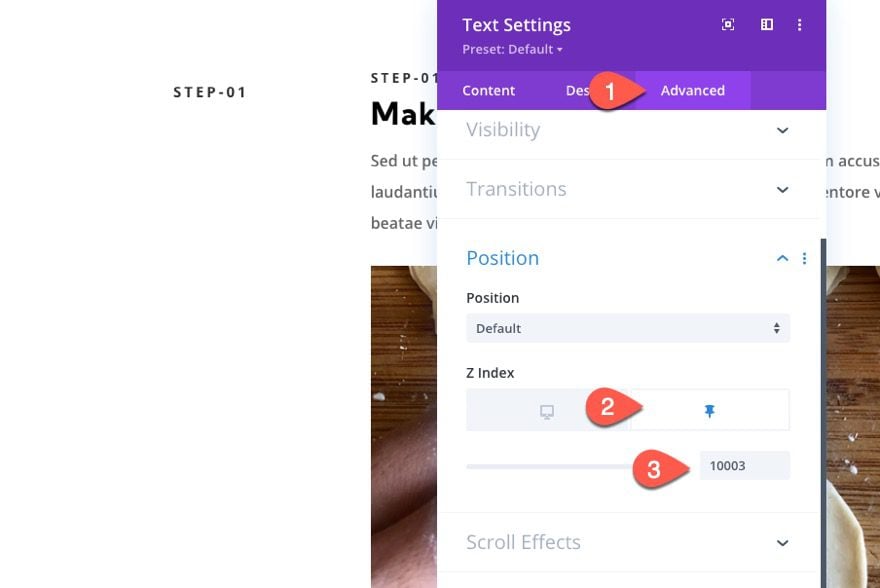
This will make sure the heading will stay above other sticky headings whenever they stack on mobile.
Update Mock Content
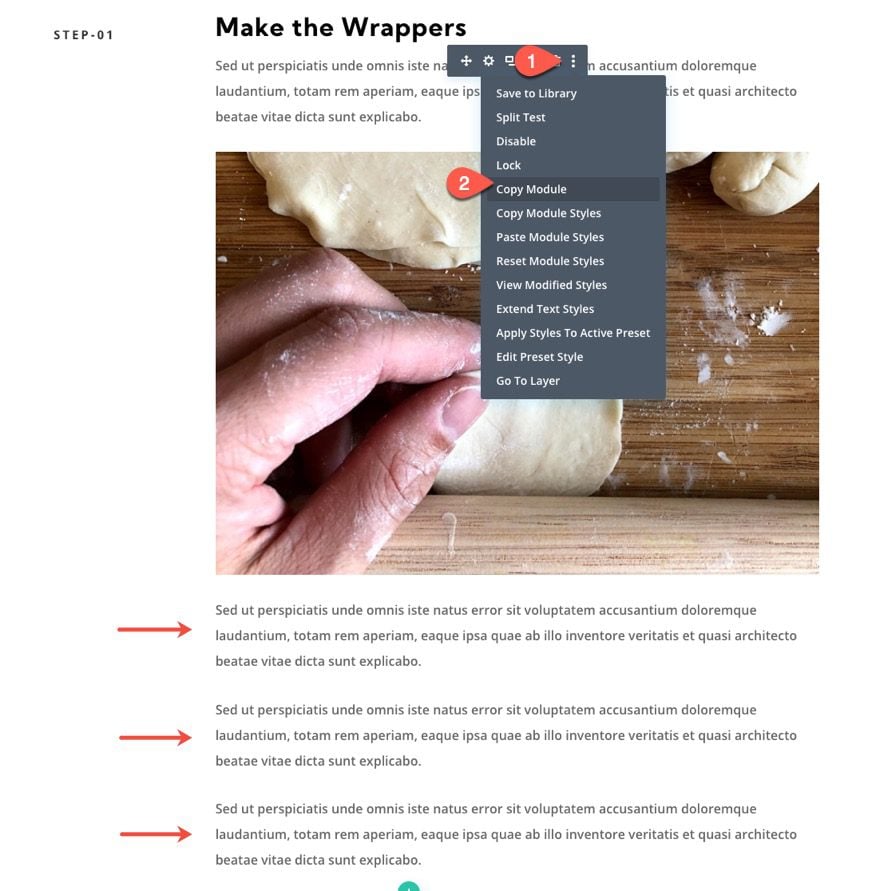
Before we duplicate our row for more steps, take out the H4 heading in the top text module in column 2. Then copy the second text module (with the paragraph text) in column 2 and paste it three times below the image module. This will give us more content to scroll through.
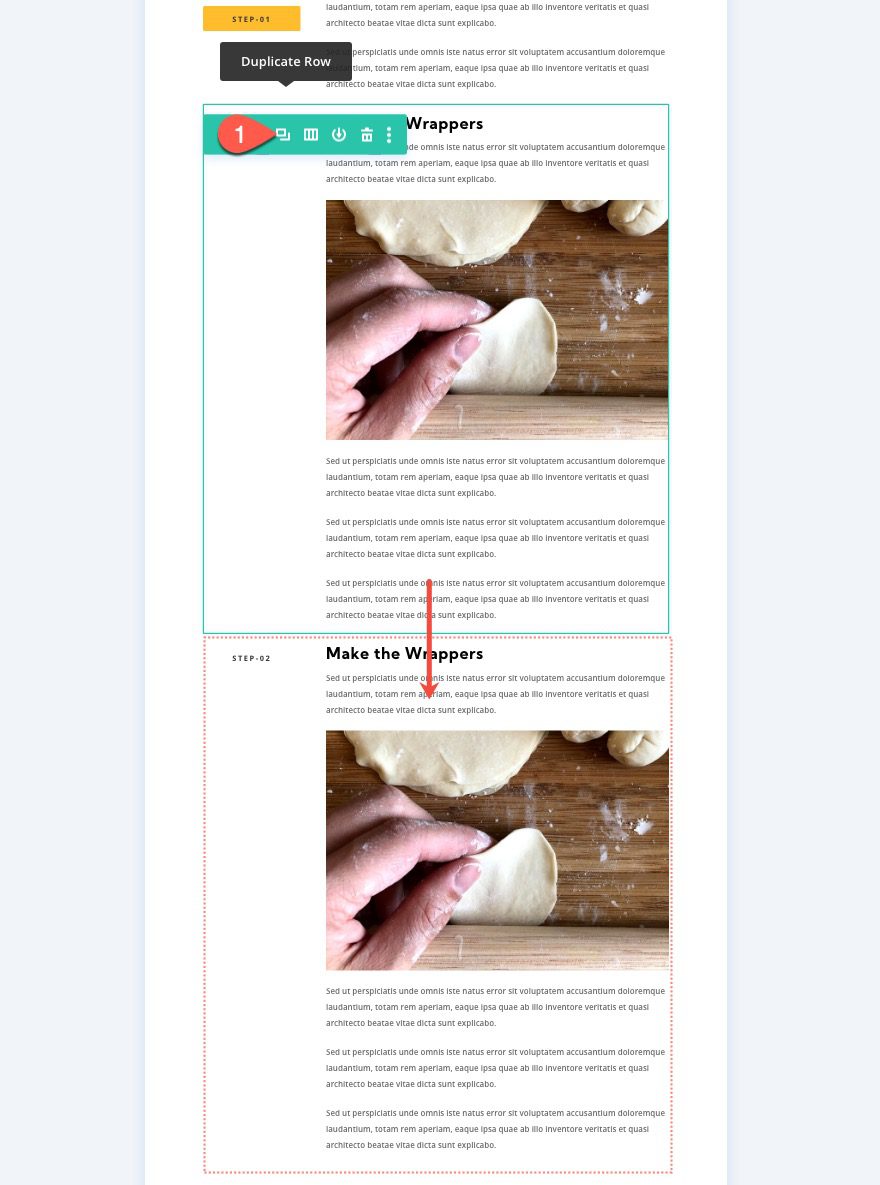
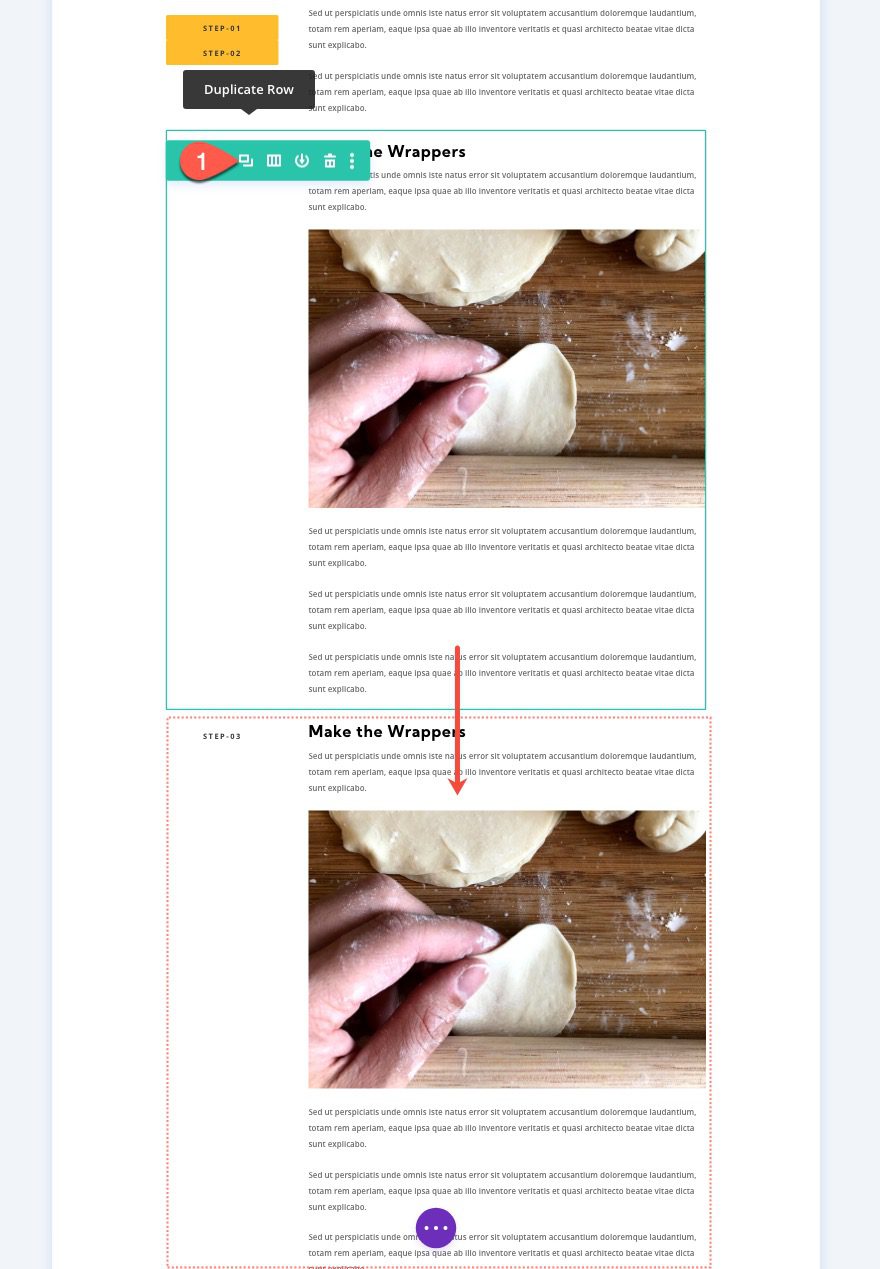
Duplicate Row 1
To create the second row for step two, duplicate row 1.
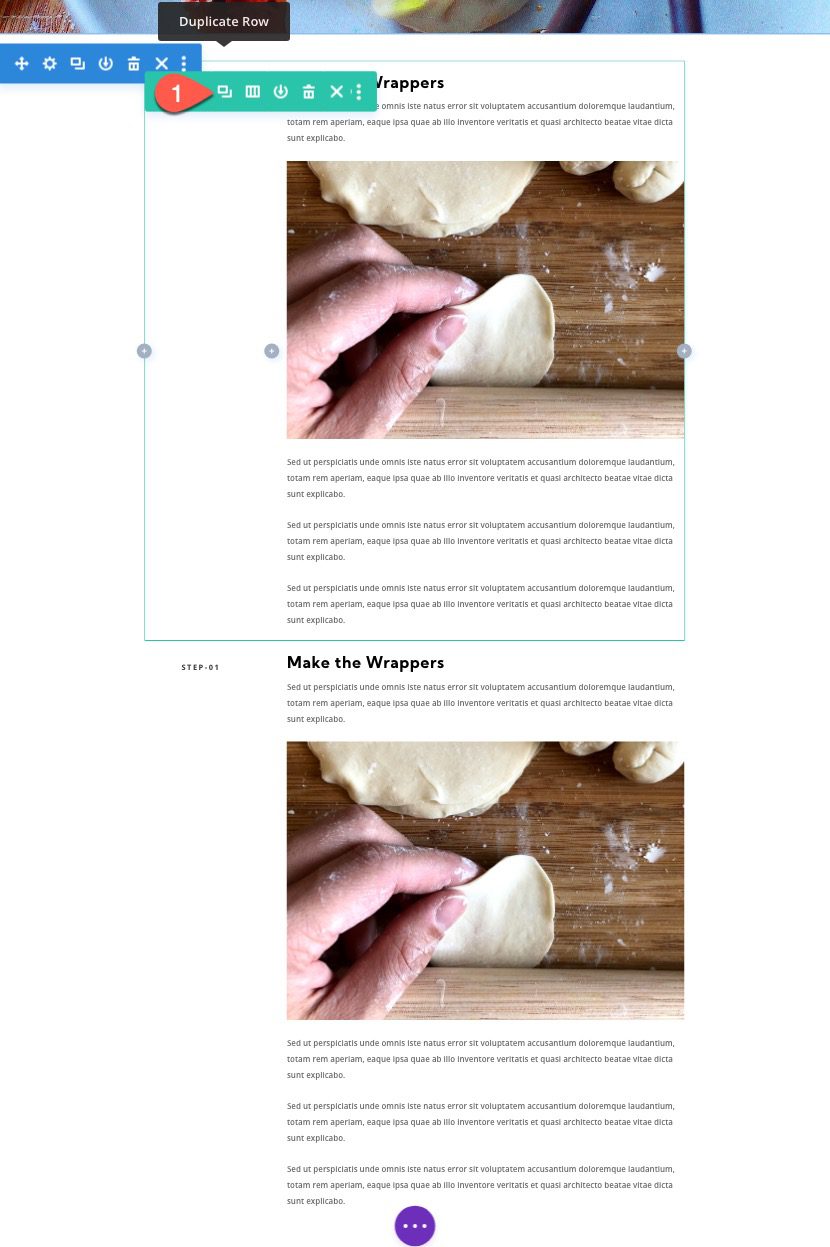
Create Sticky Heading for Second Row (Step Two)
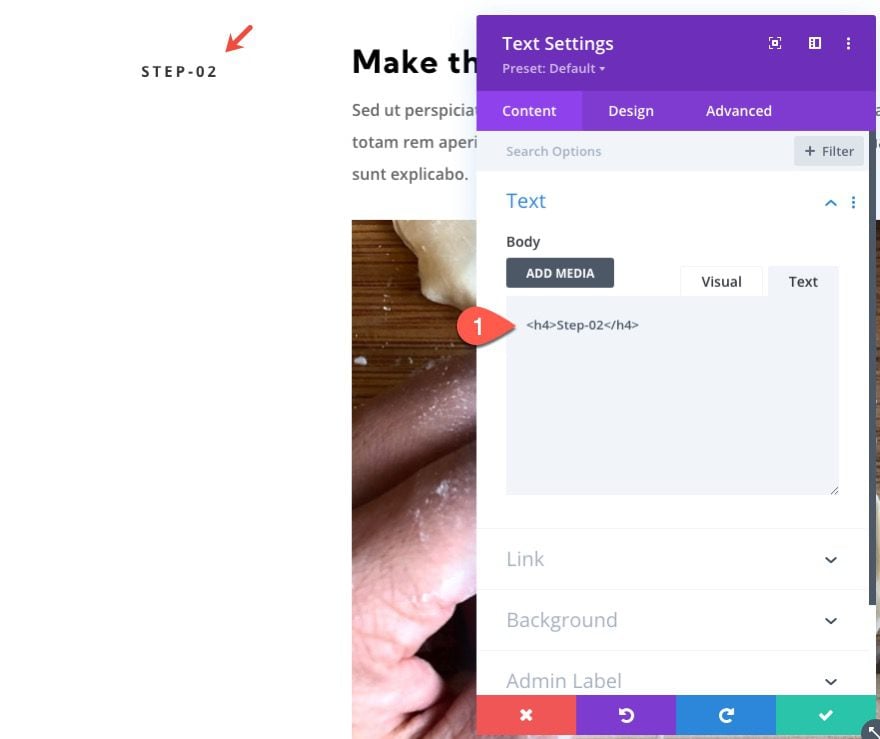
Open the text settings for the heading in column 1 of the duplicate (second) row, and change the H4 text to “Step-02”.
Then update the sticky options for the text as follows:
- Sticky Top Offset: 50px (desktop), 0px (tablet)
- Sticky Bottom Offset: 100px (desktop)
- Top Sticky Limit: Section (tablet)
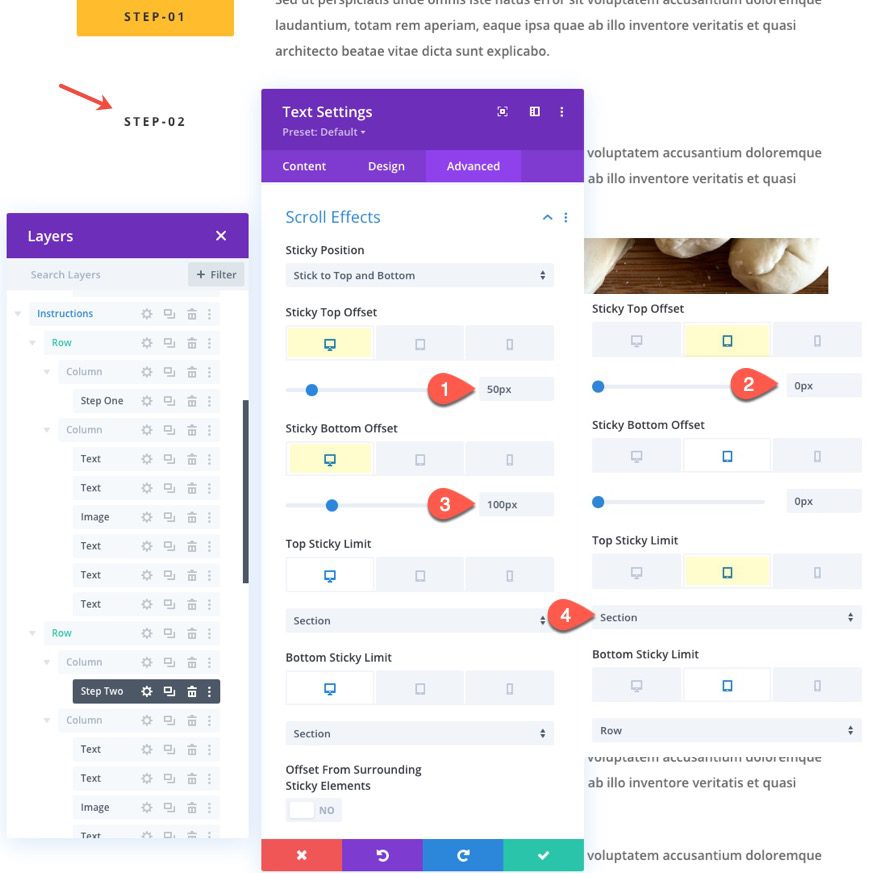
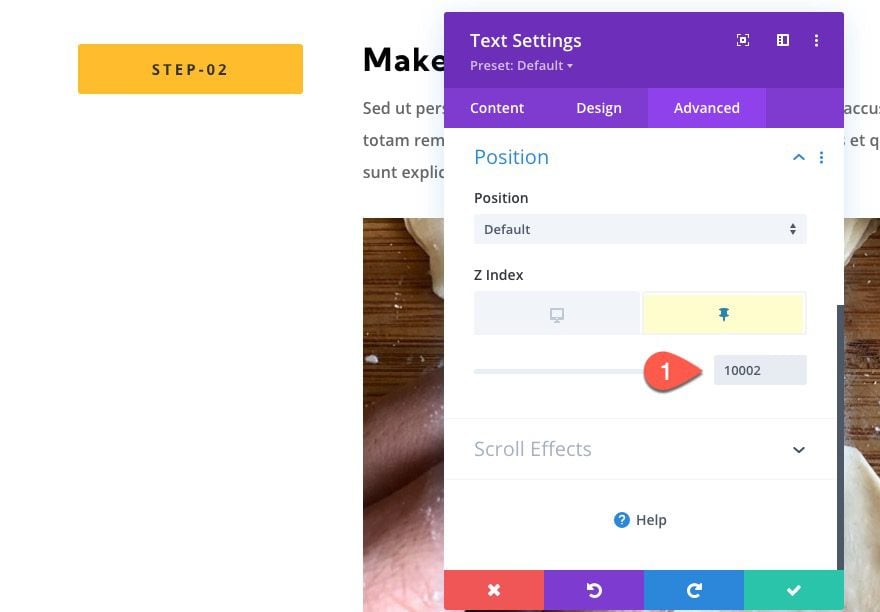
Then update the Z Index for the sticky state:
- Z Index (sticky): 10002
Duplicate Row 2
To create the third row for step three, duplicate row 2.
Create Sticky Heading for Third Row (Step Three)
Open the text settings for the heading in column 1 of the duplicate (third) row, and change the H4 text to “Step-03”.
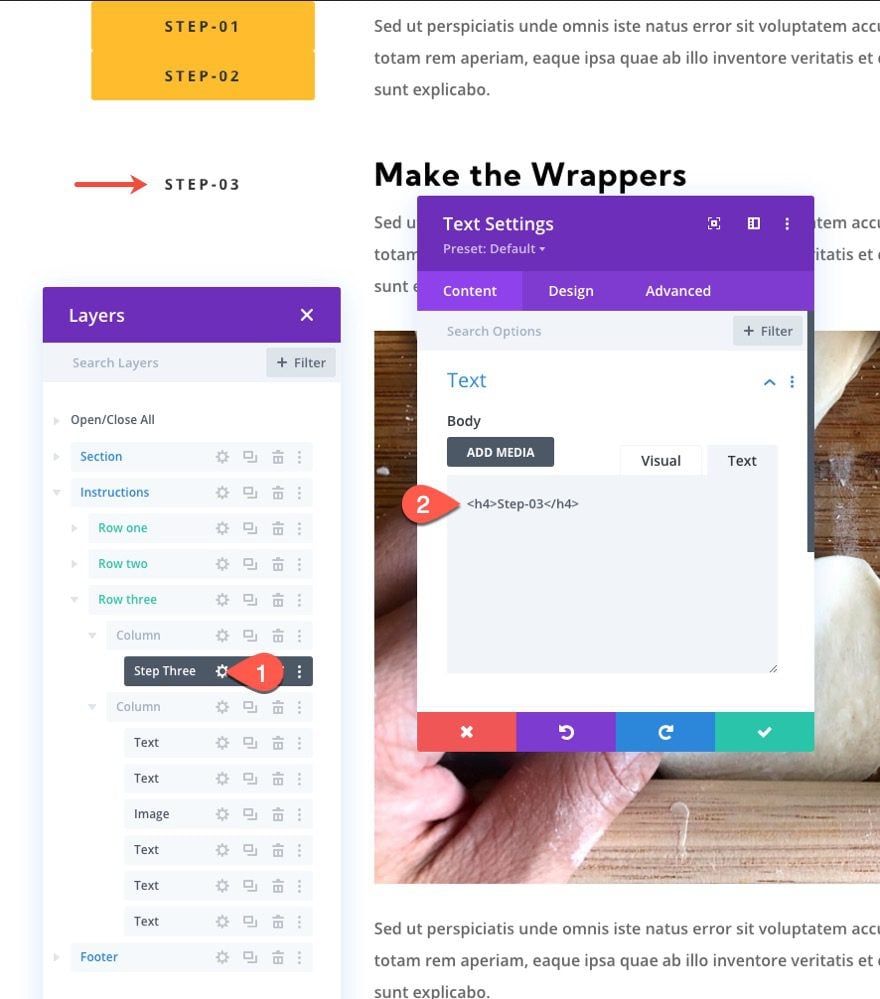
Then update the sticky options for the text as follows:
- Sticky Top Offset: 100px (desktop)
- Sticky Bottom Offset: 50px (desktop)
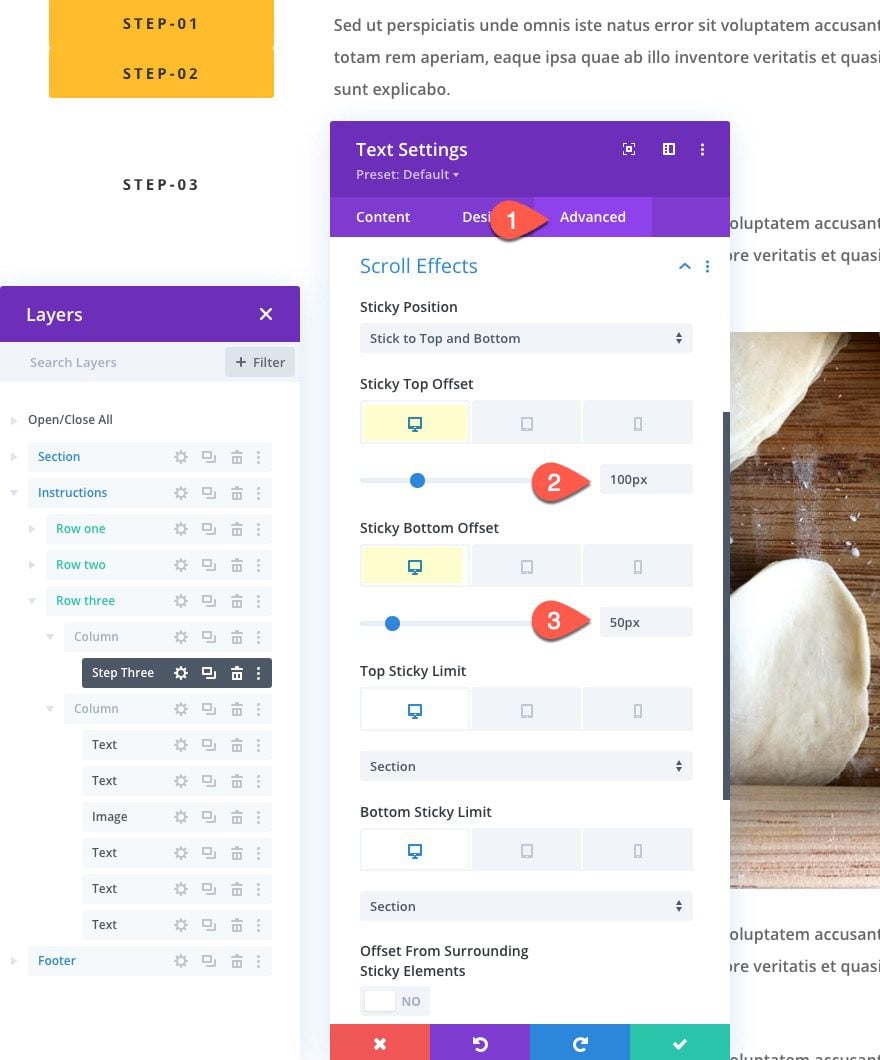
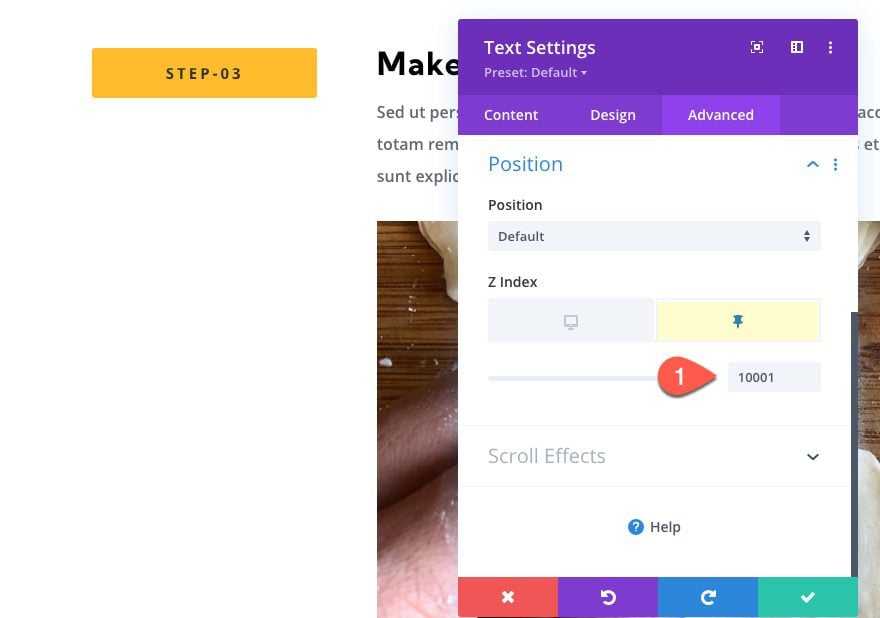
Then update the Z Index for the sticky state:
- Z Index (sticky): 10001
Duplicate Row 3
To create the fourth row for step four, duplicate row 3.
Create Sticky Heading for Fourth Row (Step Four)
Open the text settings for the heading in column 1 of the duplicate (third) row, and change the H4 text to “Step-04”.
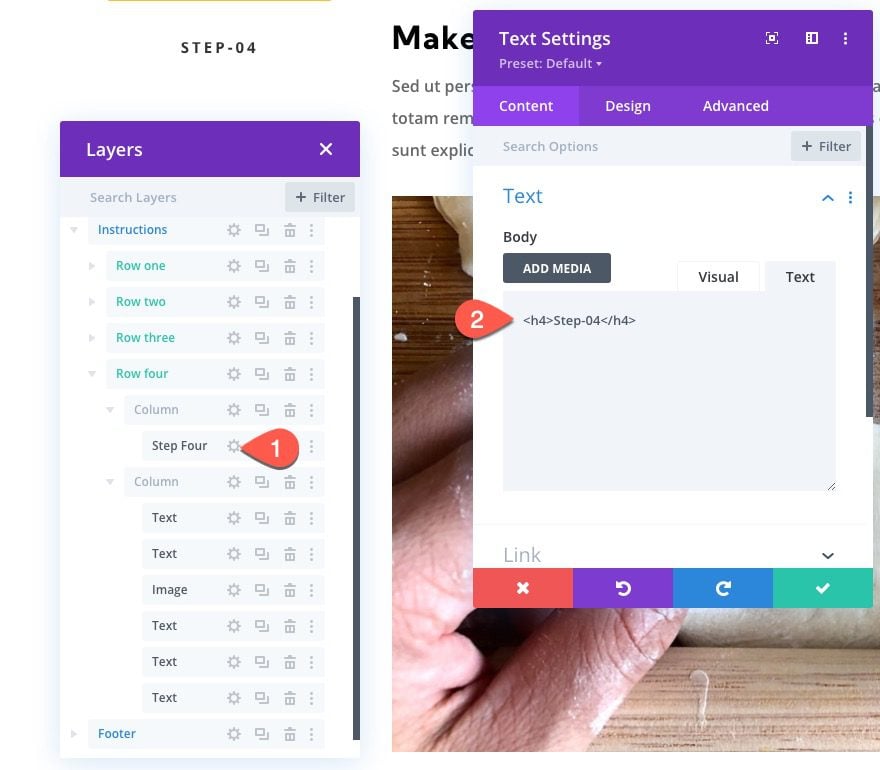
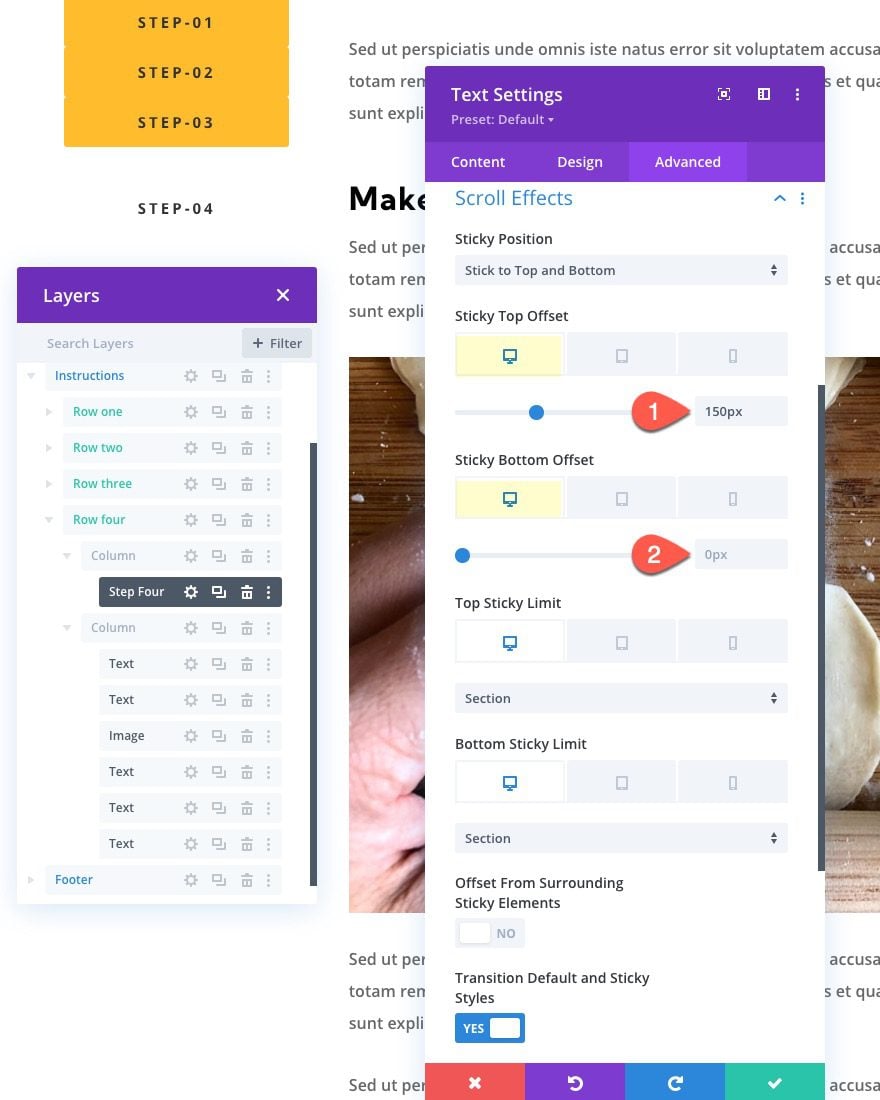
Then update the sticky options for the text as follows:
- Sticky Top Offset: 150px (desktop)
- Sticky Bottom Offset: 0px (desktop)
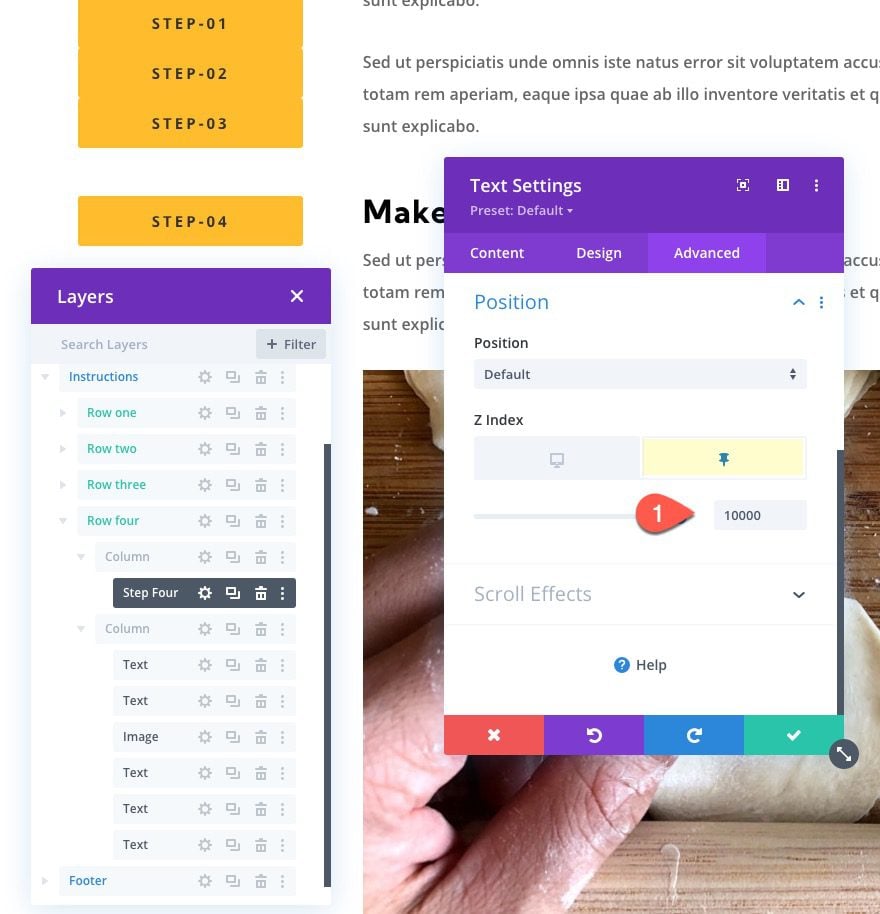
Then update the Z Index for the sticky state:
- Z Index (sticky): 10000
Update Column Z Index for Each Sticky Heading
Even though we update the z index for each stick heading, we also need to update the z index for the parent column of each heading to make sure the stacking order on mobile works.
To do this, open the settings for each parent column of each sticky heading (step 1-4), and update the column z-index for each as follows:
Row 1, Column 1
- Z Index: 20
Row 2, Column 1
- Z Index: 19
Row 3, Column 1
- Z Index: 18
Row 4, Column 1
- Z Index: 17

Part 3: Creating Sticky Heading Anchor Links
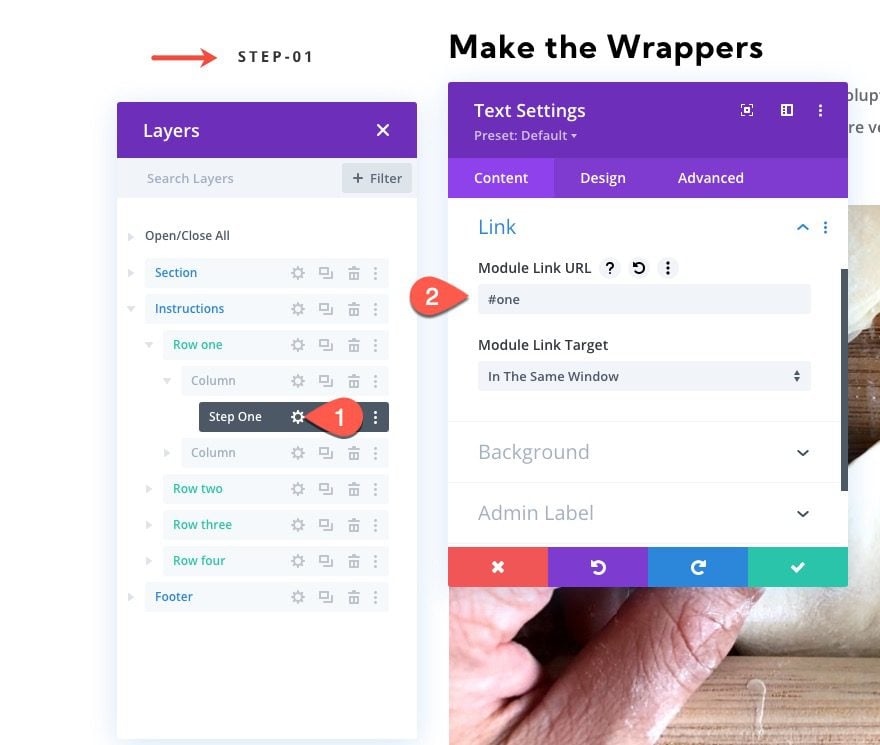
To create the anchor links for each heading, we need to assign a CSS ID to the Row that corresponds to the module URL for the heading.
Step One Anchor Link
To create the anchor link for the first sticky heading in row 1, open the settings for row 1 and add the following CSS ID:
- CSS ID: one
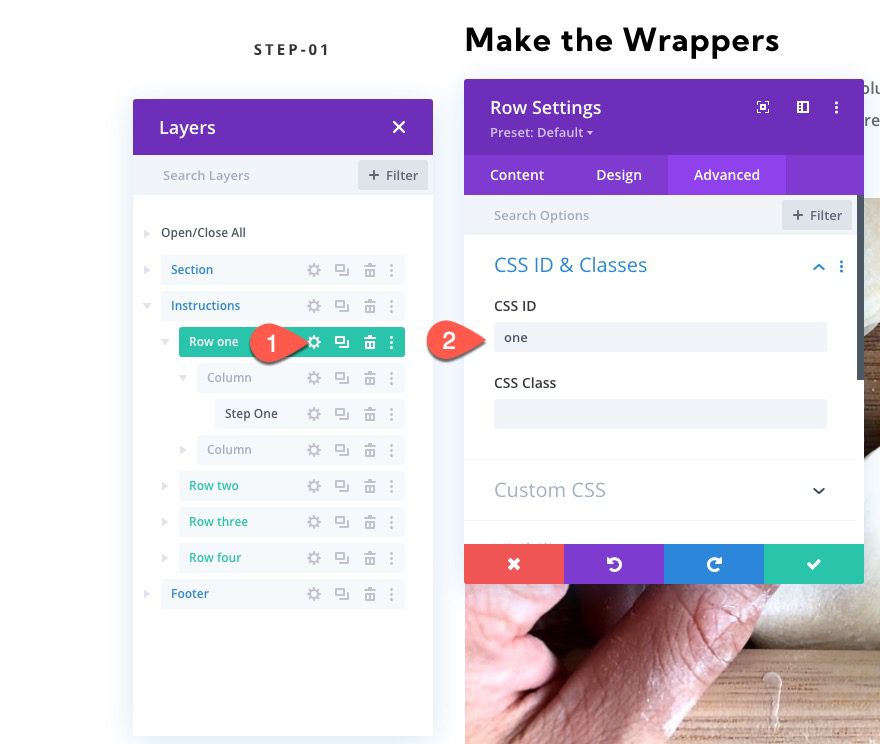
Then open the text module settings for the “step-01” heading and add the following module link URL:
- Module Link URL: #one
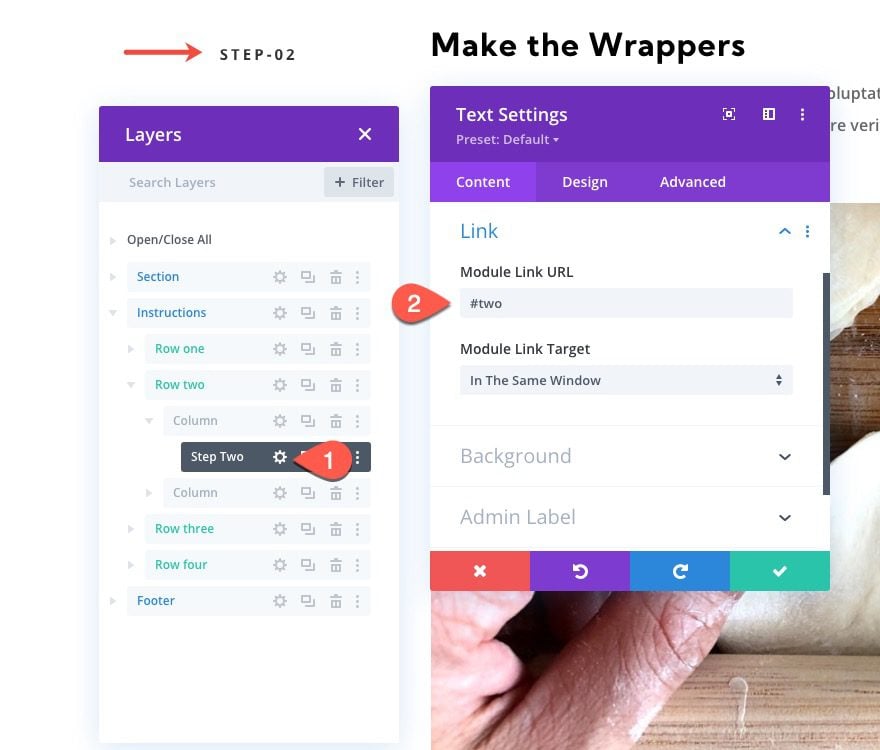
Step Two Anchor Link
To create the anchor link for the second sticky heading in row 2, open the settings for row 2 and add the following CSS ID:
- CSS ID: two
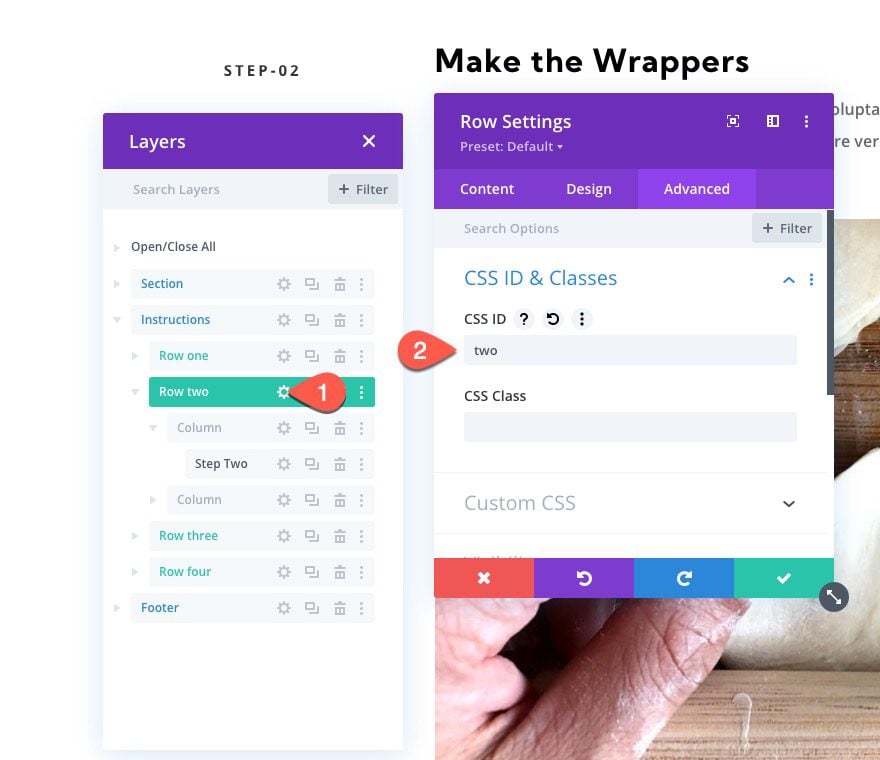
Then open the text module settings for the “step-02” heading and add the following module link URL:
- Module Link URL: #two
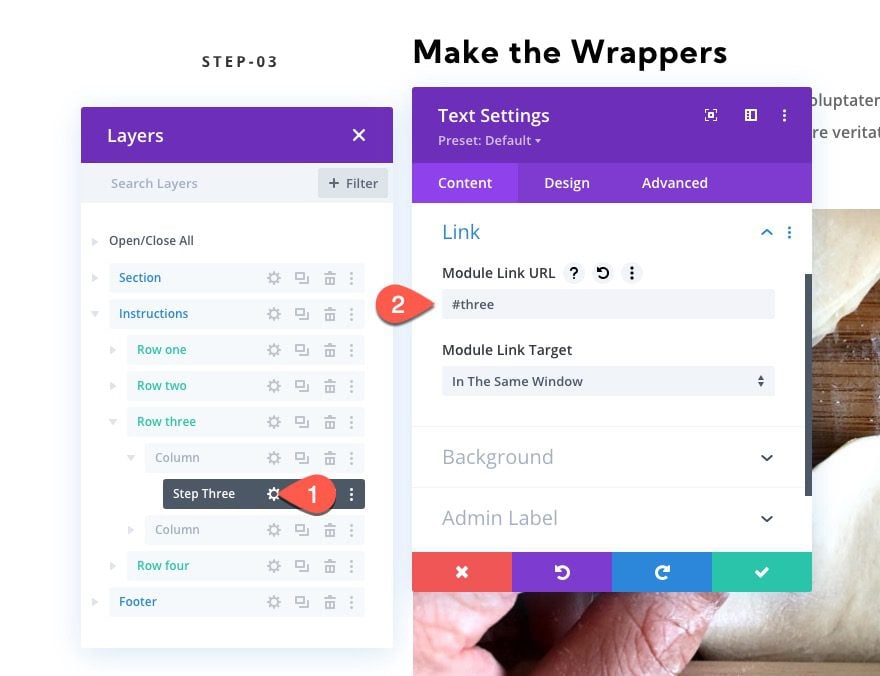
Step Three Anchor Link
To create the anchor link for the third sticky heading in row 3, open the settings for row 3 and add the following CSS ID:
- CSS ID: three
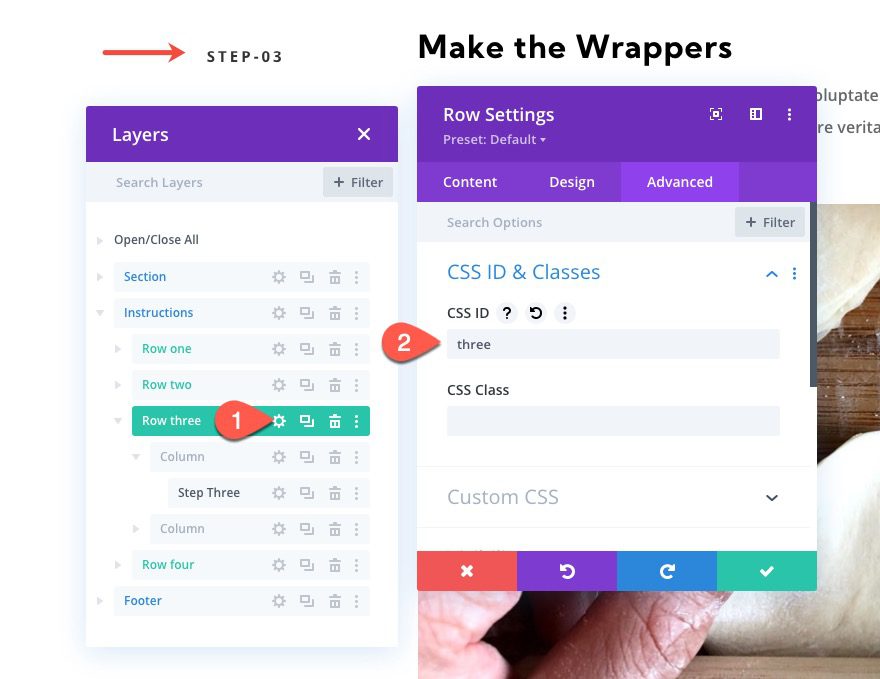
Then open the text module settings for the “step-03” heading and add the following module link URL:
- Module Link URL: #three
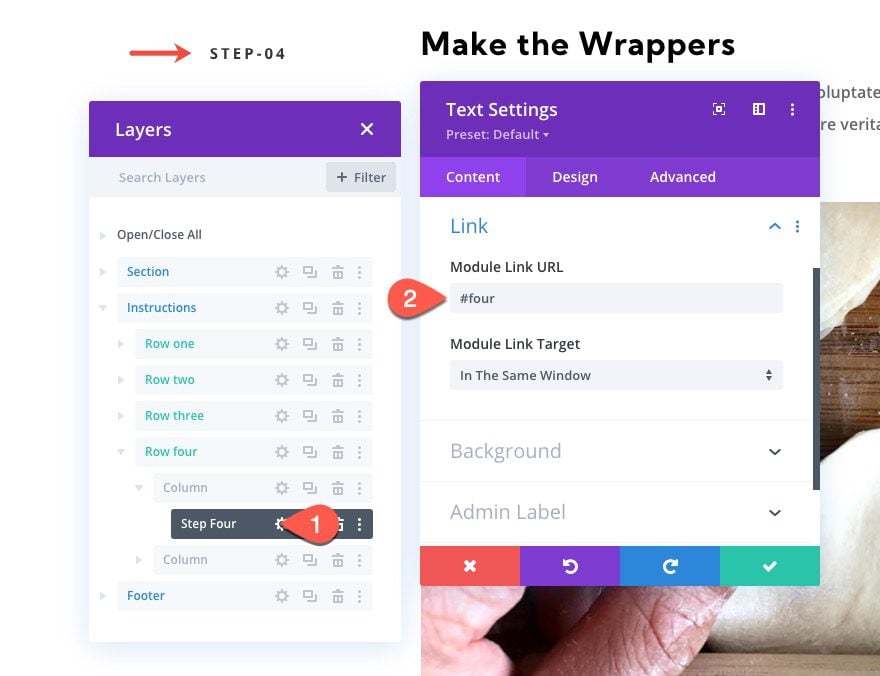
Step Four Anchor Link
To create the anchor link for the fourth sticky heading in row 4, open the settings for row 4 and add the following CSS ID:
- CSS ID: four
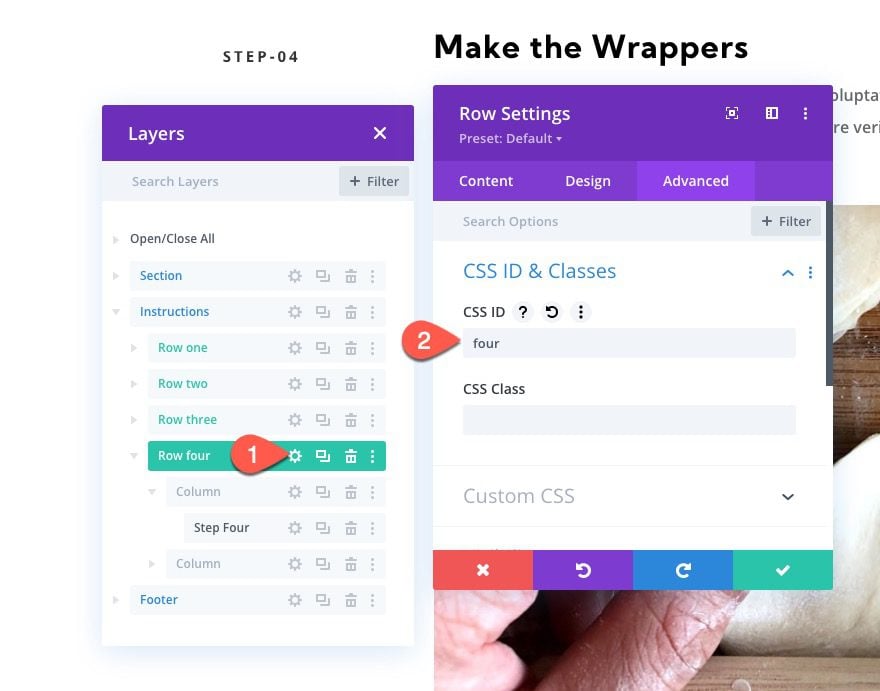
Then open the text module settings for the “step-04” heading and add the following module link URL:
- Module Link URL: #four
Final Results
Final Thoughts
Sticky headings alone are helpful for keeping users aware of the content in view. And, creating sticky headings as anchor link navigation is a uniquely effective way to boost user experience in a way that engages users to navigate through steps quickly. Hopefully, this will become a helpful design for any page that walks users through a process.
I look forward to hearing from you in the comments.
Cheers!


Thanks for sharing the article, nice tutorial
Thanks!
Hi Jason,
Thanks, great idea.
Can you create few tutorials how to reveal sections, row, columns, modules?
It’s quite complicated now.
Sincerely,
Igor
Igor,
Interesting. Can you elaborate. Not sure what you mean by that. Thanks
Cool! very nice tutorial!
Thank you. Glad you liked it!
Love it! \o/
Awesome!
Thanks a lot for this tutorial, Jason!
But…why you’re not using this technique at this post? 😉
That’s what I’m missing…to go back and further without scrolling…and a back-to-top-button 😀
You are very welcome, Bianca.