
Kids’ product websites have a unique style. They tend to be fun, colorful and inspire a smile. Your WooCommerce store for kids’ products is now easier to create with the Divi theme builder and customizable woo modules. Why not make it a little more special with a unique and fun design? In this post, we’ll show you how to create a kids’ product page template in the theme builder that will apply to all your products. It will work best with product images that have a transparent background. You’ll be able to download the JSON file for free as well!
Let’s get started.
- 1 Preview
- 2 Download The Fun Kids’ Product Template for FREE
- 3 Download For Free
- 4 1. Design Prep For The Kids’ Product Template
- 5 2. Create/Add New Woocommerce Product
- 6 3. Create New Template in Theme Builder
-
7
4. Recreate The Kids’ Product Design
- 7.1 Add New Section
- 7.2 Add New Row
- 7.3 Column 1 Settings
- 7.4 Column 2 Settings
- 7.5 Add Woo Image Module to Column 1
- 7.6 Add Woo Title Module to Column 2
- 7.7 Add Woo Description Module to Column 2
- 7.8 Add Woo Additional Info Module to Column 2
- 7.9 Add Woo Price Module to Column 2
- 7.10 Add Woo Add to Cart Module to Column 2
- 8 Preview
- 9 It’s a Wrap on The Kids’ Product Page!
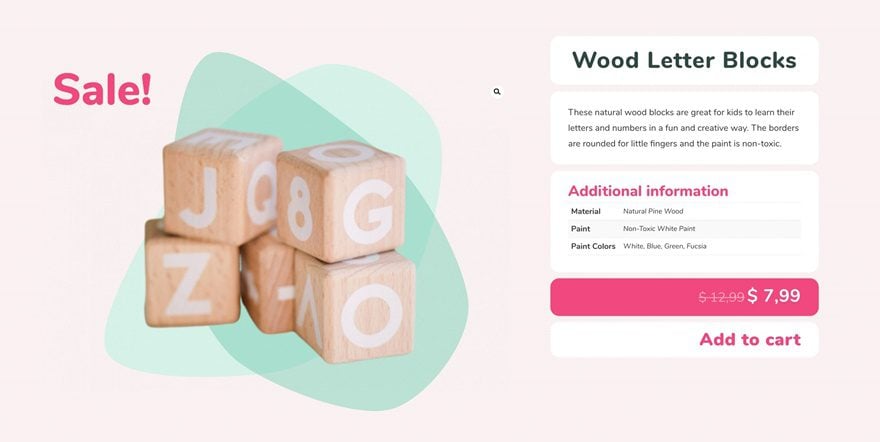
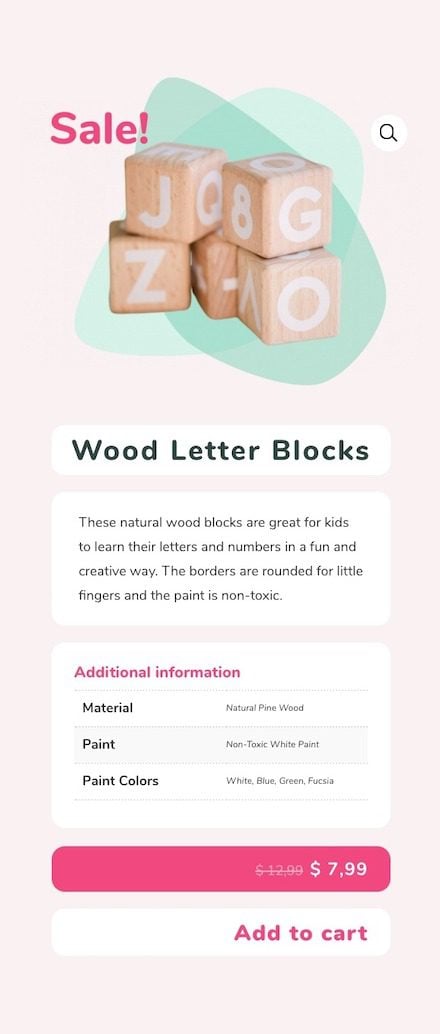
Preview
Before we start recreating the design, let’s take a look at the outcome across different screen sizes.
Desktop
Mobile
Download The Fun Kids’ Product Template for FREE
To lay your hands on the free fun kids’ product template, you will first need to download it using the button below. To gain access to the download you will need to subscribe to our newsletter by using the form below. As a new subscriber, you will receive even more Divi goodness and a free Divi Layout pack every Monday! If you’re already on the list, simply enter your email address below and click download. You will not be “resubscribed” or receive extra emails.

1. Design Prep For The Kids’ Product Template
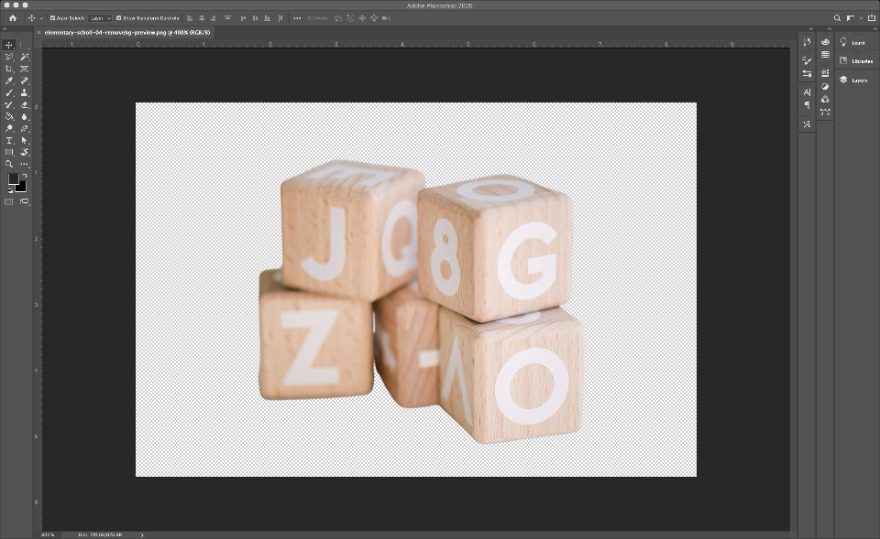
Remove Background From Product Photo
The first thing we’ll do before starting with the kids’ product design is preparing the images. Remove the background from the product images. You can achieve this with Adobe Photoshop, Adobe Illustrator, or remove.bg. Leave some space around the product so it sits well in the design. The best size for the final image is 600X400 pixels.
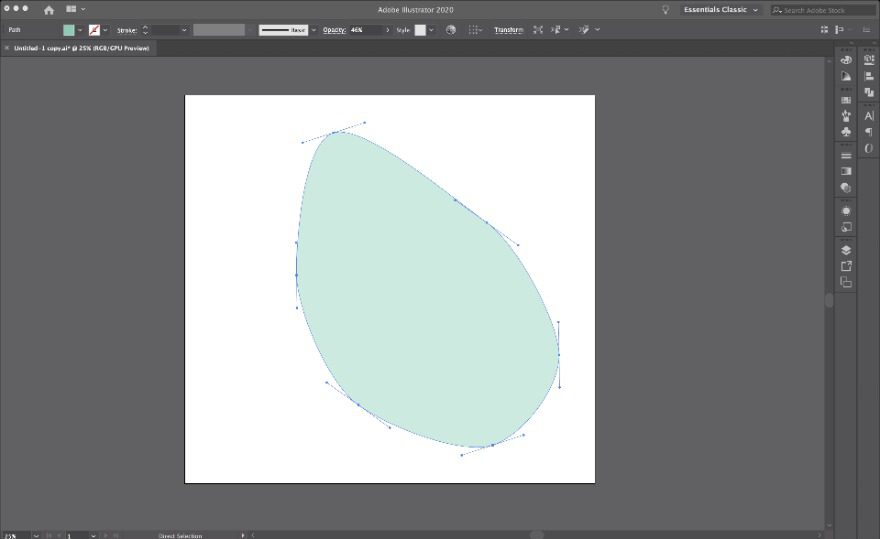
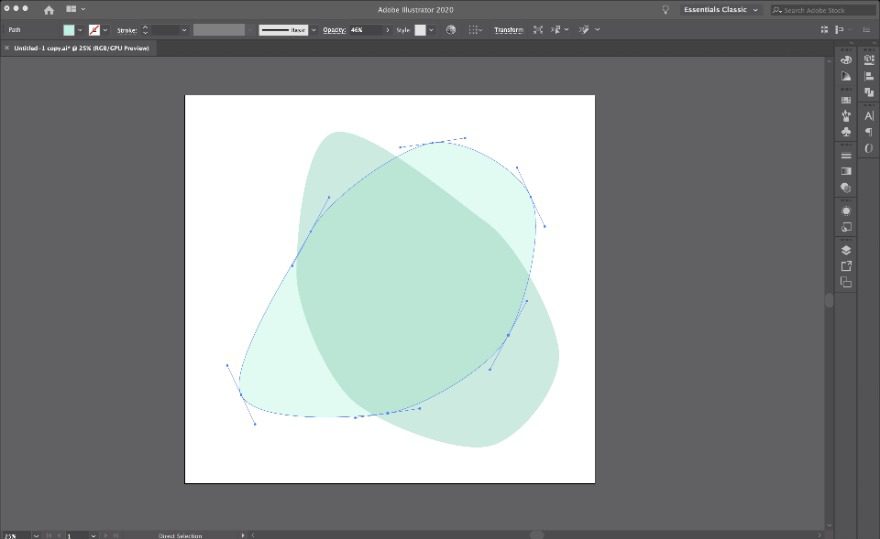
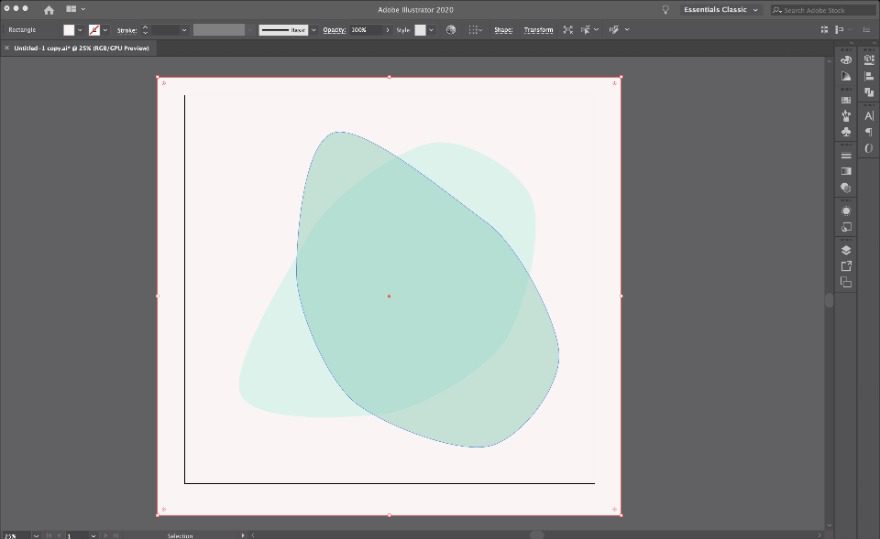
Create Background Design
The second step is creating a background design to place behind the image. This design with overlapping shapes is easily created inside Adobe Illustrator. Alternatively, you can find this background image in the downloadable folder above. Here are the steps to follow if you want to create the background:
- Create (or source) a shape.
- Give the shape the color you want.
- Duplicate the shape.
- Color it in a similar tone as the original.
- Rotate the second shape to create a nice composition.
- Add some transparency to both shapes.
- Add a background in the same color as the background in the final design.
- Save as a JPG at around 1750X1650 px.
2. Create/Add New Woocommerce Product
Product Data
Once we have the product image and the background designs ready, it’s time to create a kids’ product. To create a design exactly like ours, insert the following information.
- Title: Wood Letter Blocks
- Long Description: These natural wood blocks are great for kids to learn their letters and numbers in a fun and creative way. The borders are rounded for little fingers and the paint is non-toxic.
- Old Sale Price: 12,99
- New Sale Price: 7,99
- Featured Image: Cut out wooden blocks image. Preferred size: 600 x 400 px
- Attributes: See Below
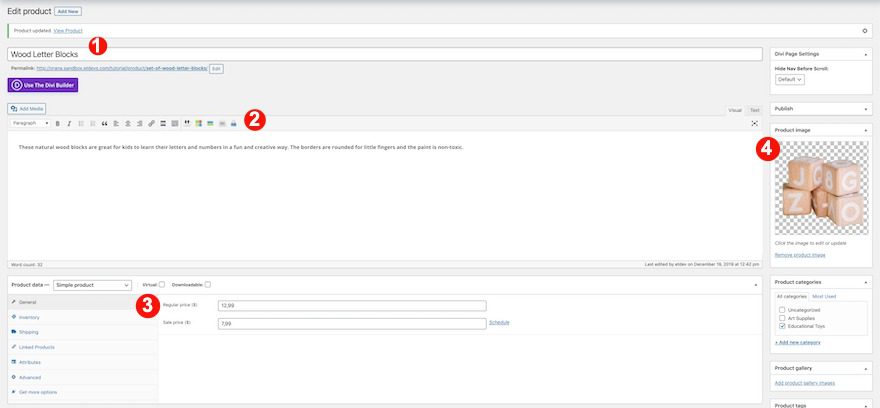
In the attributes tab, enter the values for the additional information module.
- Material: Natural Pine Wood
- Paint: Non-Toxic White Paint
- Paint Colors: White, Blue, Green, Fucsia

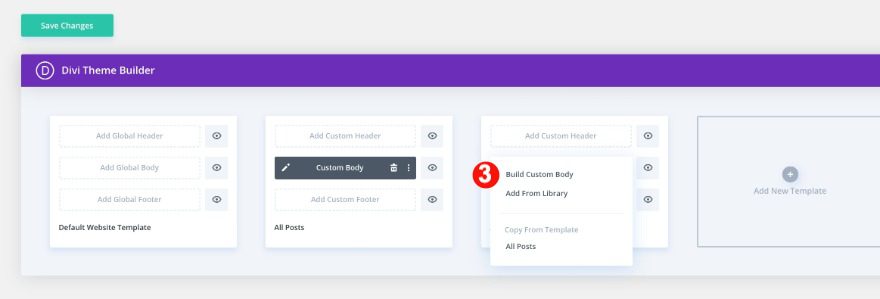
3. Create New Template in Theme Builder
Open Divi Theme Builder and Add New Template
Now it’s time to head on over to the Divi theme builder. We’ll build the design in there. Add a new template.
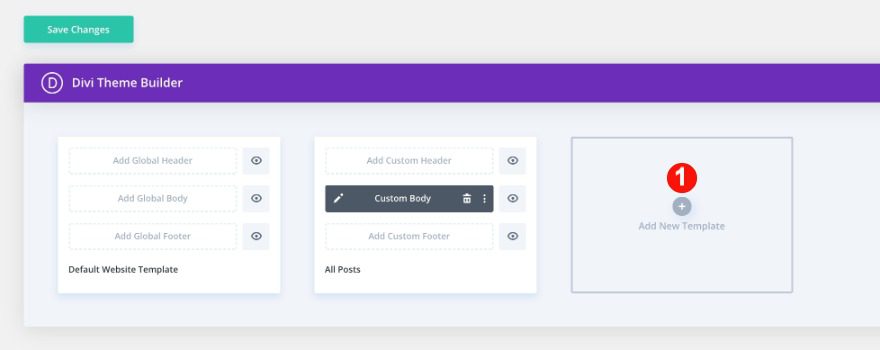
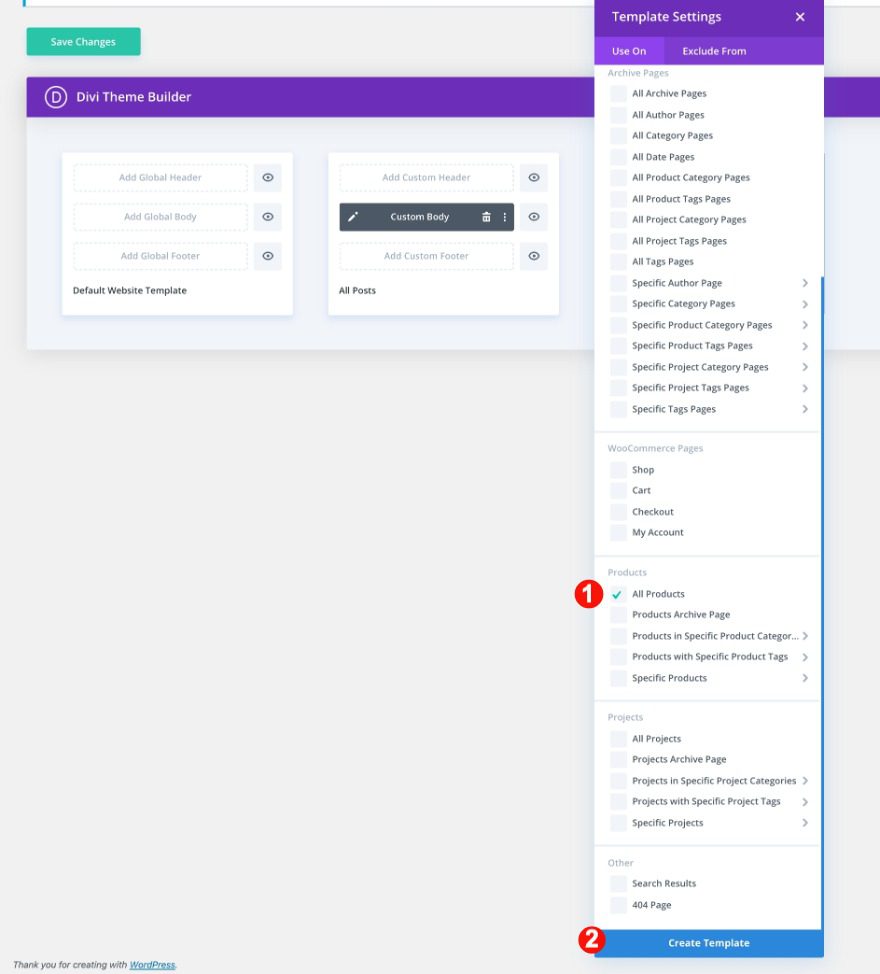
Start Building Custom Body For All Products
Use this template on all products and start building the body.
Theme Builder Pro Tip:
When creating a product design inside the theme builder, always keep a product page open in another window to check on the changes.
4. Recreate The Kids’ Product Design
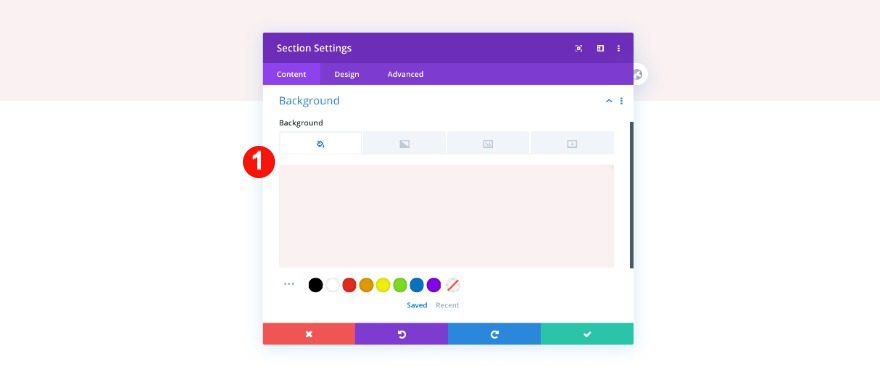
Add New Section
Background
Inside the body template builder, you’ll notice a section. Open that section and change the background color.
- Background Color: Palest Pink #f9f2f2
Add New Row
Column Structure
Now, add a new row with 2 columns.
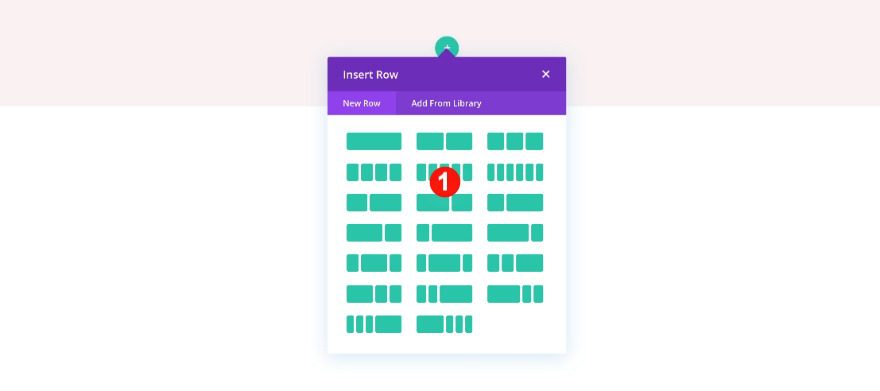
Sizing
Then, adjust the sizing of the row.
- Custom Gutter Width: 2
- Width: 90%
- Max Width: 90%

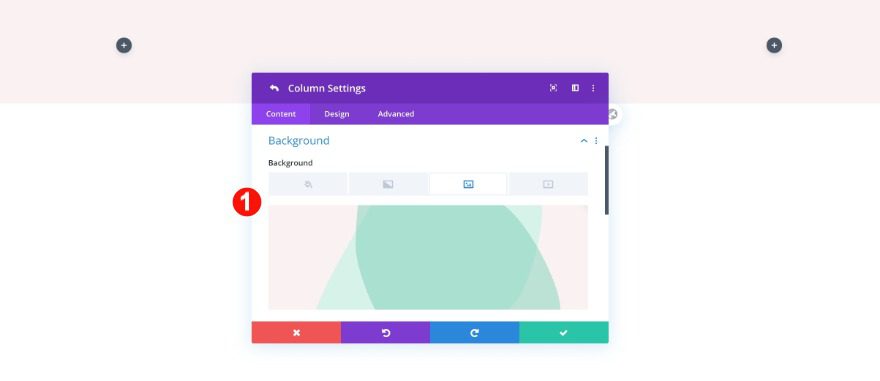
Column 1 Settings
Background
In the setting for column 1, add the background image design you created with the overlapping shapes.
- Background: Image
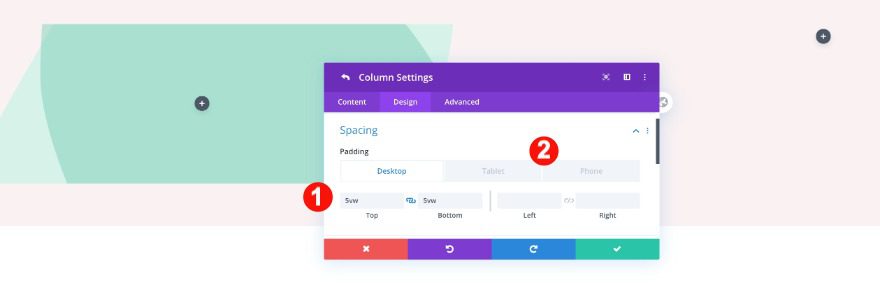
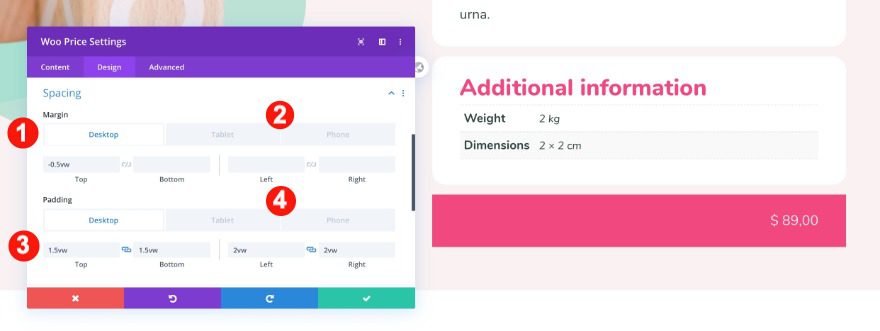
Spacing
Then, adjust the spacing accordingly.
- Top and Bottom Padding: 5vw
- Left and Right Padding
- Tablet: 2vw
- Phone: 0vw
Column 2 Settings
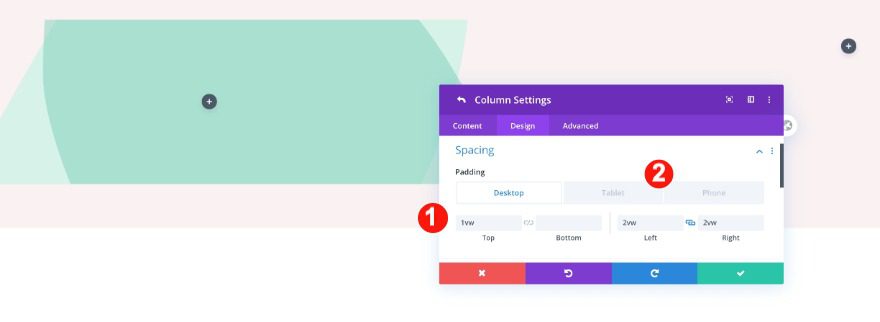
Spacing
Move on over to column 2 and adjust the spacing values as follows.
- Top Padding: 1vw
- Bottom Padding:
- Tablet + Phone: 1vw
- Left and Right Padding:
- Desktop: 2vw
- Tablet and Phone: 7vw
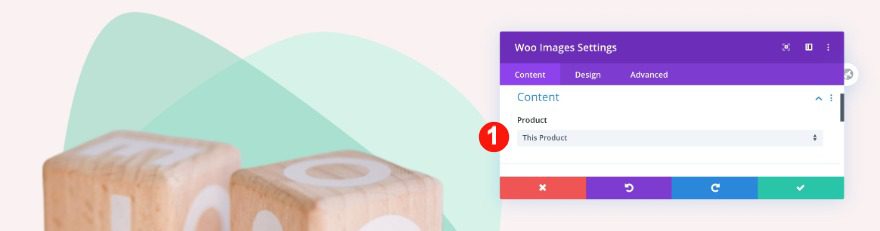
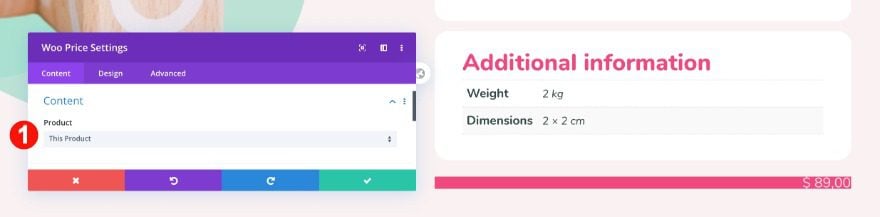
Add Woo Image Module to Column 1
Content
Now it’s time to add the modules. First, in column 1, add a woo image module and select this product under content.
- Product: This Product
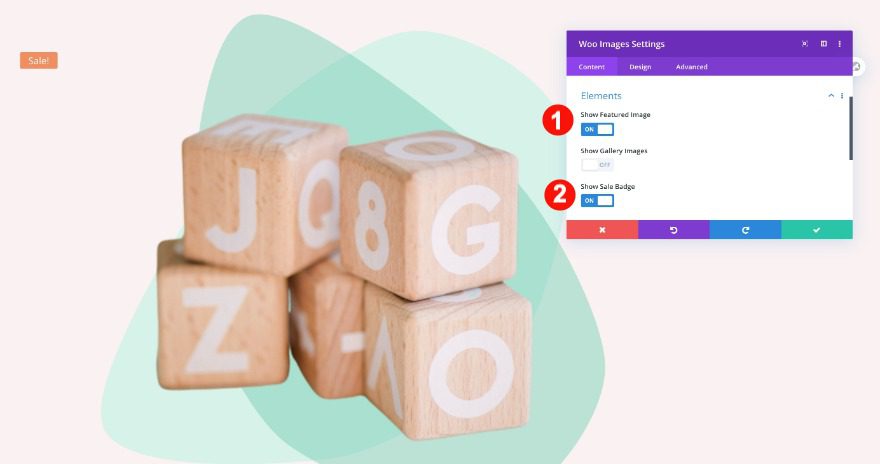
Elements
Then, select the elements that will be shown on the design.
- Featured Image: Yes
- Gallery: No
- Sales Badge: Yes
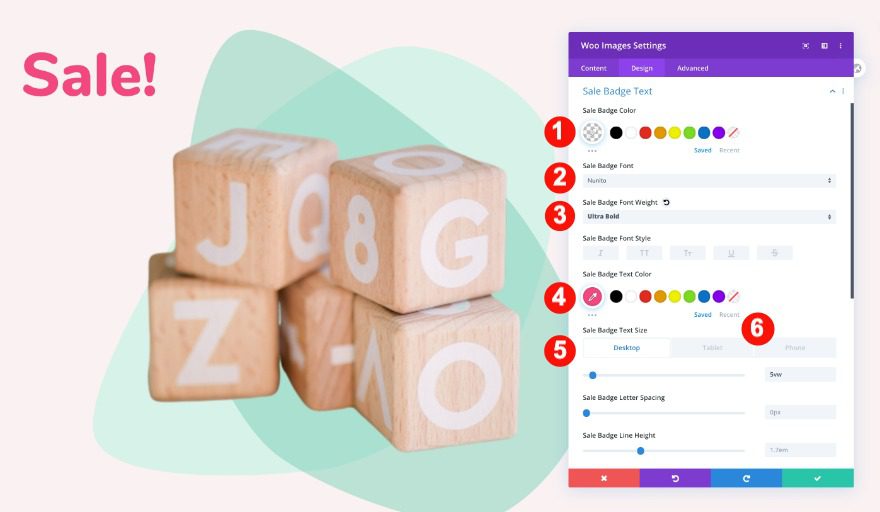
Sale Badge Text
In the design tab, adjust the values for the sale badge as follows.
- Badge Color: Transparent
- Font: Nunito
- Font Weight: Bold
- Text Color: Pink #f24881
- Text Size:
- Desktop: 5vw
- Tablet: 12vw
- Phone: 10vw
Sizing
Then, adjust the spacing to make things fit better.
- Top Padding:
- Desktop and Tablet: 1vw
- Phone: 2vw
- Bottom Padding: 0vw
- Left and Right Padding: 0vw

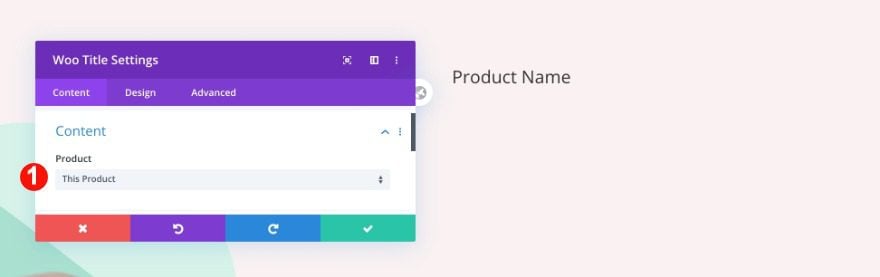
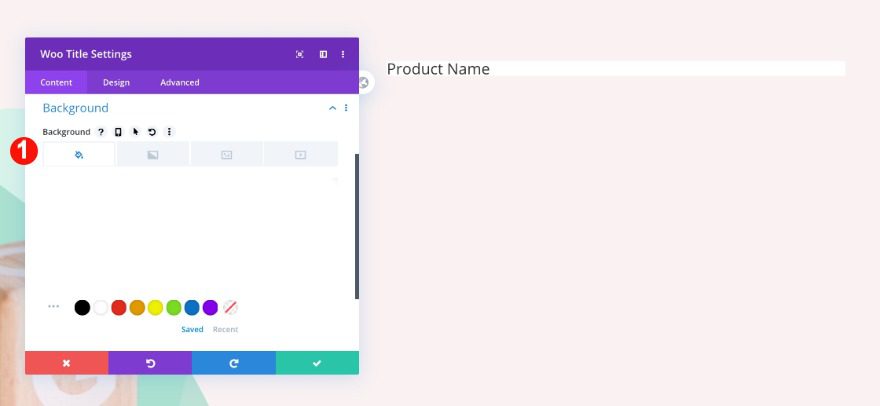
Add Woo Title Module to Column 2
Content
In the second column, add a woo title module and select this product in the content tab.
- Product: This Product
Background
Give the module a white background.
- Background Color: White #ffffff
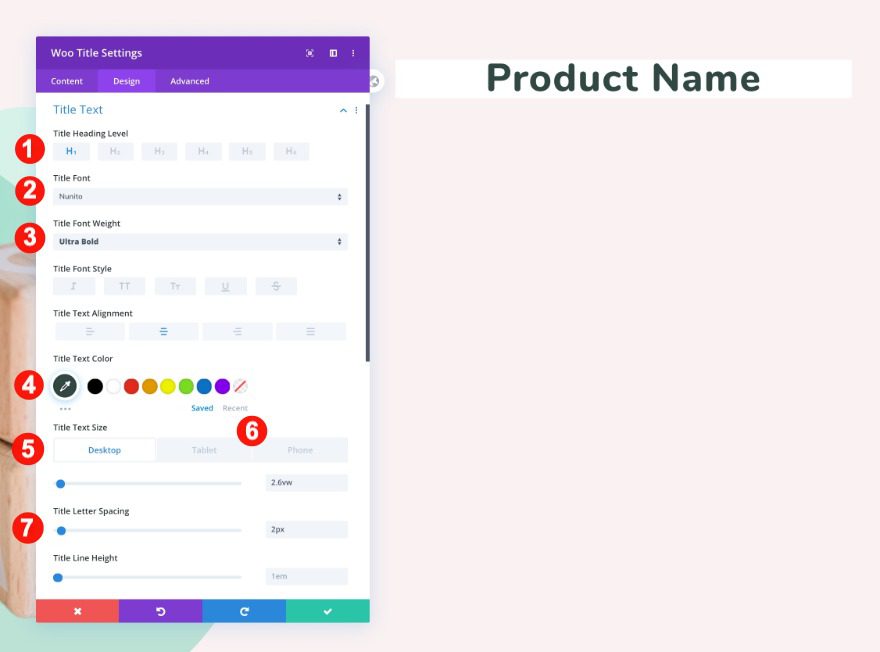
Title Text
Then, style the title text at an H1 level.
- Heading Level: H1
- Font: Nunito
- Font Weight: Ultra Bold
- Text Alignment: Center
- Text Color: Greenish Dark Grey #314942
- Text Size:
- Desktop: 2.6vw
- Tablet and Phone: 6.4vw
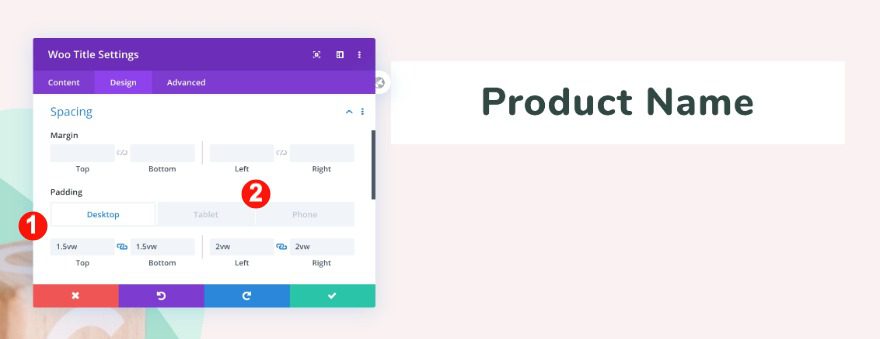
Spacing
Continue by adjusting the spacing in the module.
- Top and Bottom Padding:
- Desktop: 1.5vw
- Tablet and Phone: 2.5vw
- Left and Right Padding: 2vw
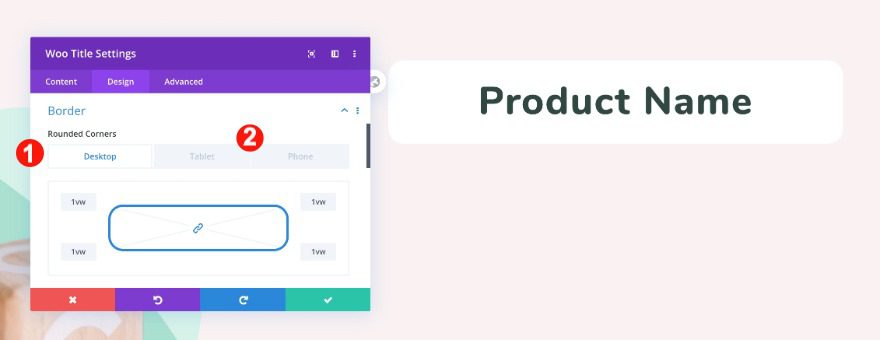
Border
Finally, adjust the border for both desktop and responsive sizes.
- Rounded Corners:
- Desktop: 1vw all four corners
- Tablet and Phone: 3vw all four corners
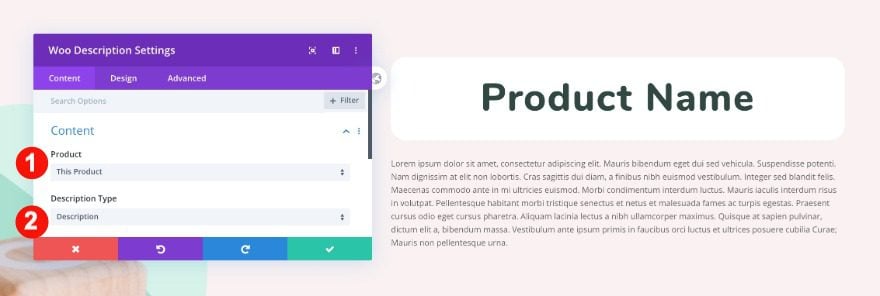
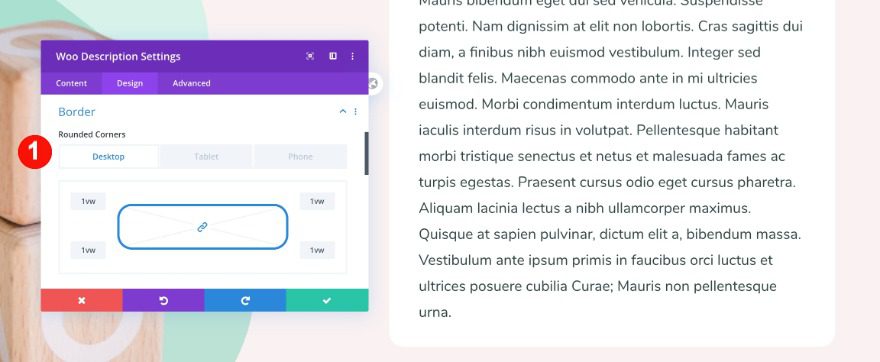
Add Woo Description Module to Column 2
Content
Below the product title, add a woo description module. Choose the description type and this product in the content tab.
- Product: This Product
- Description Type: Description
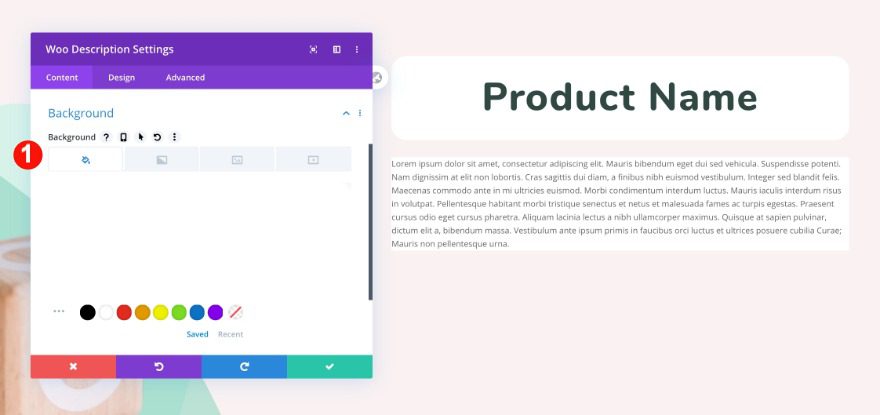
Background
Then, give the module a background color.
- Background Color: White #ffffff
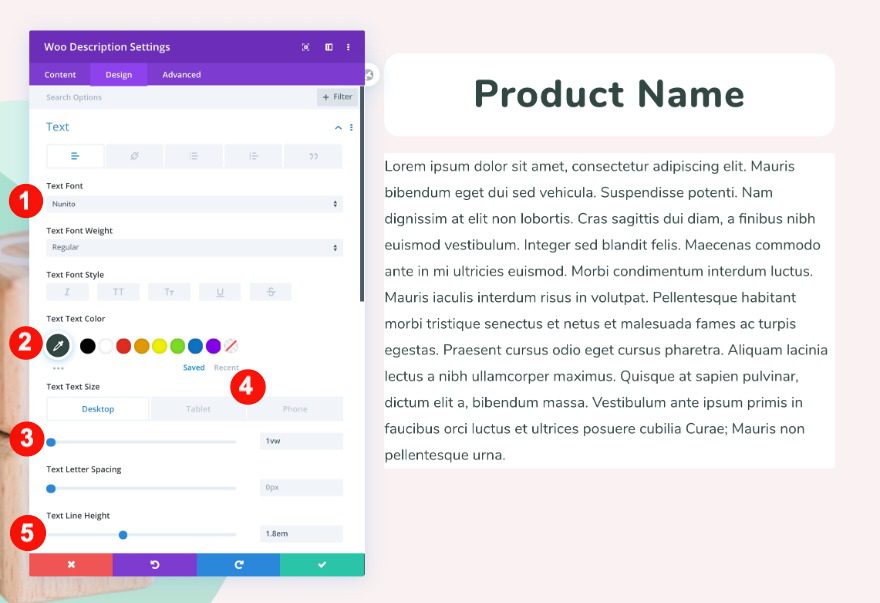
Text
Move on to the design tab and style the text.
- Font: Nunito
- Color: Greenish Dark Grey #314942
- Size:
- Desktop: 1vw
- Tablet: 2.5vw
- Phone: 3vw
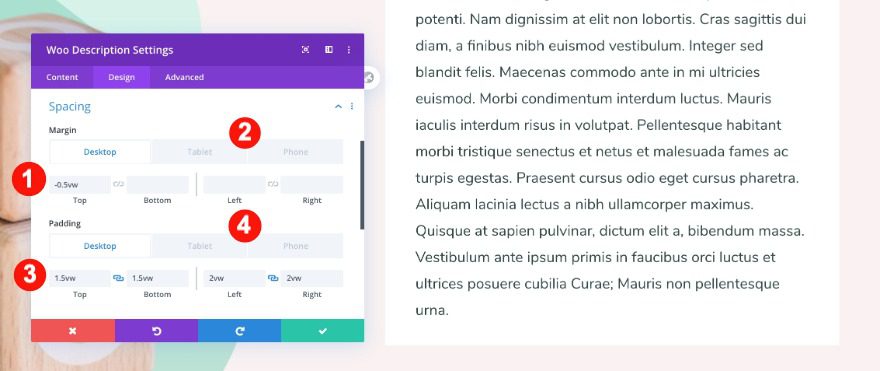
Spacing
Then, adjust the spacing for the module.
- Top Margin:
- Desktop and Tablet: -0.5vw
- Phone: -3vw
- Top and Bottom Padding:
- Desktop: 1.5vw
- Tablet and Phone: 4vw
- Left and Right Padding:
- Desktop: 2vw
- Tablet and Phone: 6vw
Border
Finally, add the rounded corners.
- Rounded Corners:
- Desktop: 1vw all four corners
- Tablet and Phone: 3vw all four corners
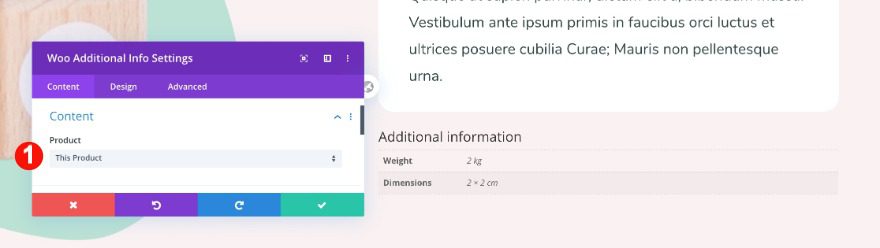
Add Woo Additional Info Module to Column 2
Content
Below the description module, add the woo additional info module. Choose this product in the content tab.
- Product: This Product
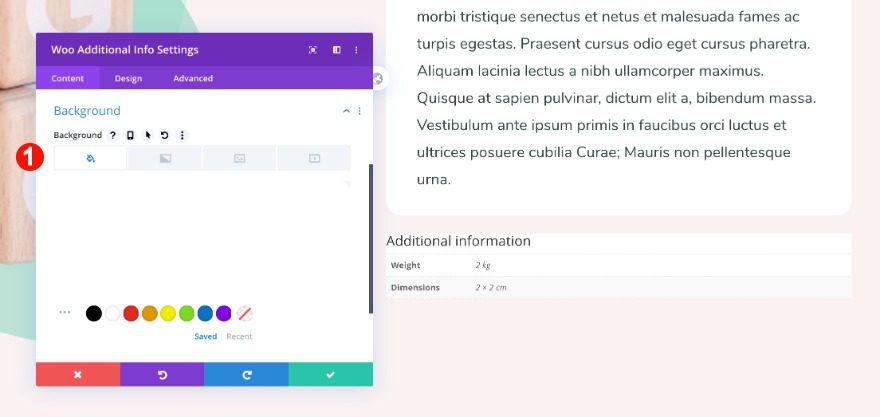
Background
Then, add a white background.
- Background Color: White #ffffff
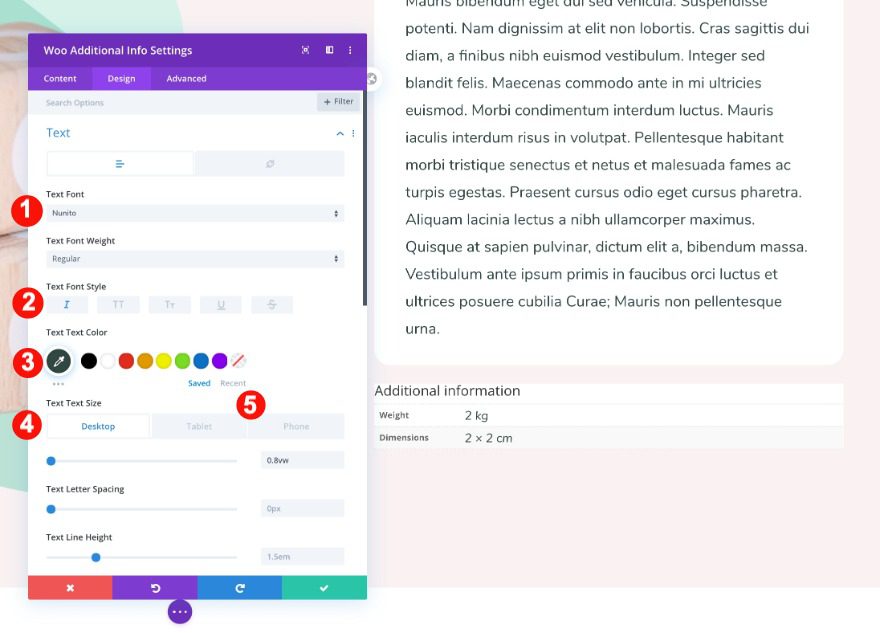
Text
In the design tab, start styling the different text types. First, the text that applies to the values of the attributes.
- Font: Nunito
- Style: Italic
- Color: Greenish Dark Grey #314942
- Size:
- Desktop: 0.8vw
- Tablet: 1.5vw
- Phone: 2vw
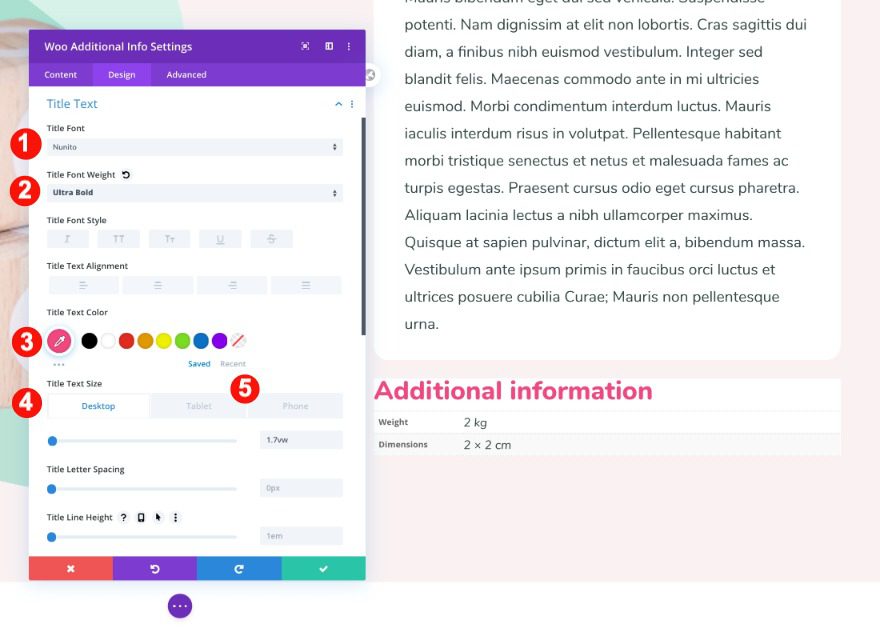
Title Text
Second, style the title text.
- Font: Nunito
- Weight: Ultra Bold
- Color: Pink #f24881
- Size:
- Desktop: 1.7vw
- Tablet: 3vw
- Phone: 3.5vw
- Line Height: 1em
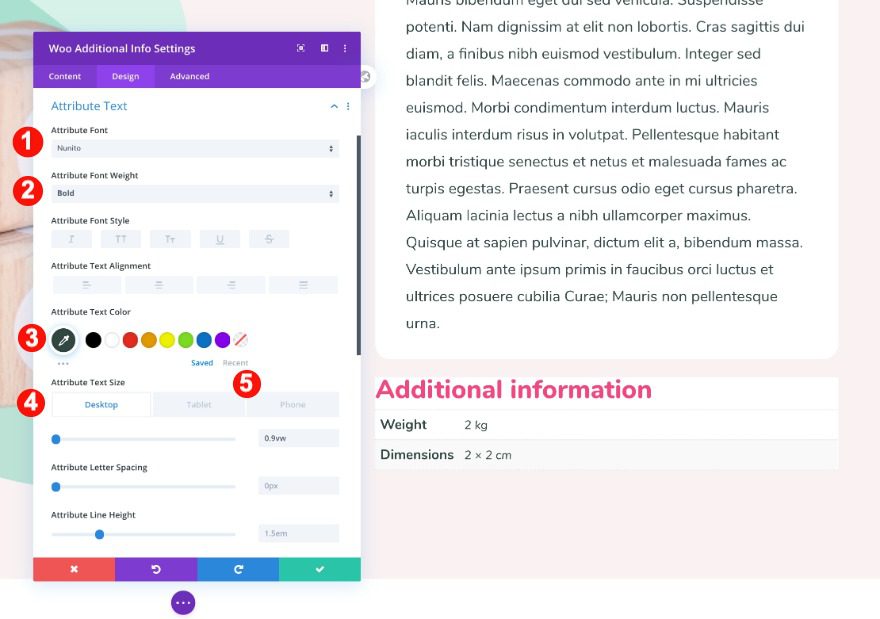
Attribute Text
Third, style the attribute text.
- Font: Nunito
- Weight: Bold
- Color: Greenish Dark Grey #314942
- Size:
- Desktop: 0.9vw
- Tablet: 2vw
- Phone: 3vw
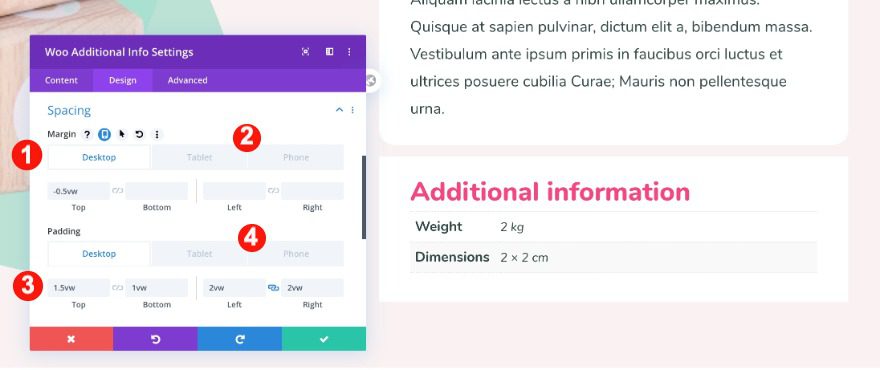
Spacing
Then, adjust the spacing as follows.
- Top Margin:
- Desktop and Tablet: -0.5vw
- Phone: -3vw
- Top Padding:
- Desktop: 1.5vw
- Tablet: 3vw
- Phone: 5vw
- Left Padding: 1vw
- Right Padding:
- Desktop: 2vw
- Tablet and Phone: 5vw
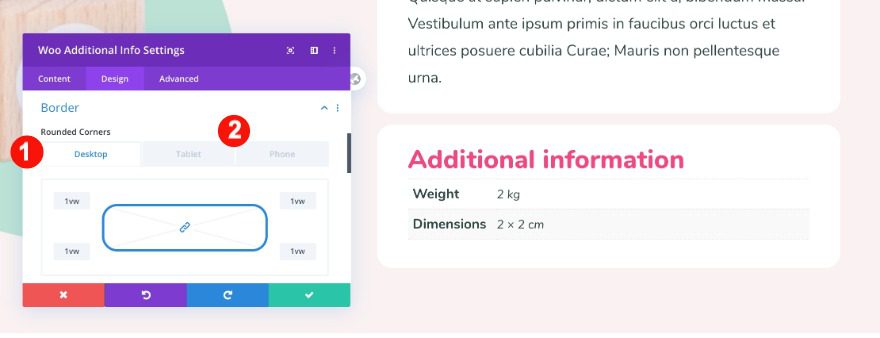
Border
Finally, add the rounded corners.
- Rounded Corners:
- Desktop: 1vw all four corners
- Tablet and Phone: 3vw all four corners
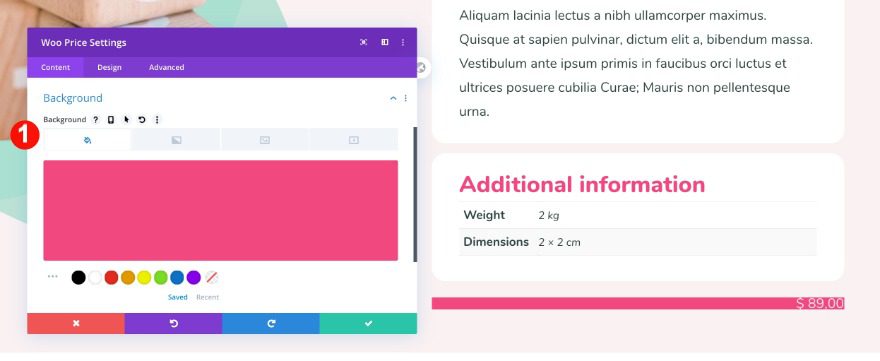
Add Woo Price Module to Column 2
Content
Add a woo price module and choose this product in the content tab.
- Product: This Product
Background
Also, add a pink background to the module to make it stand out.
- Background Color: Pink #f24881
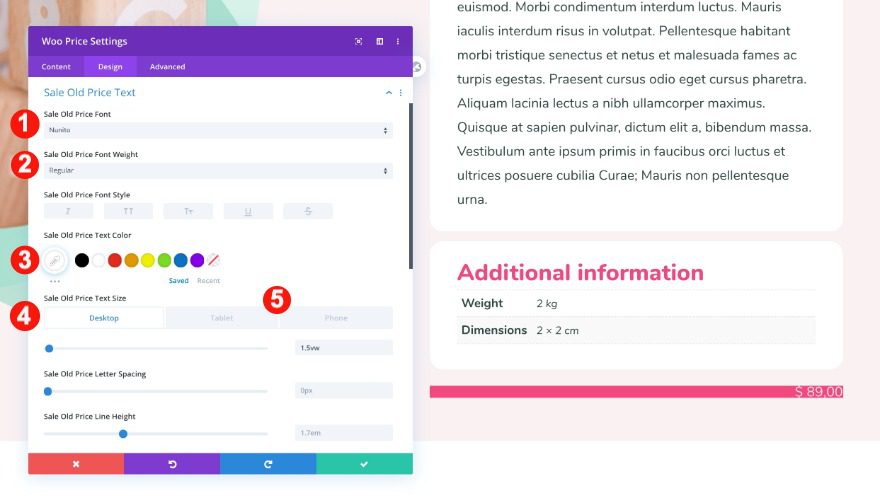
Sale Old Price Text
Move on to the design tab and style the sale old price.
* When you add a new and old sale price to a product, the woo price module will not show both of them in the theme builder. Check on the actual product page to see how the final design looks.
- Font: Nunito
- Color: White #ffffff
- Size:
- Desktop: 1.5vw
- Tablet: 2.5vw
- Phone: 3vvw
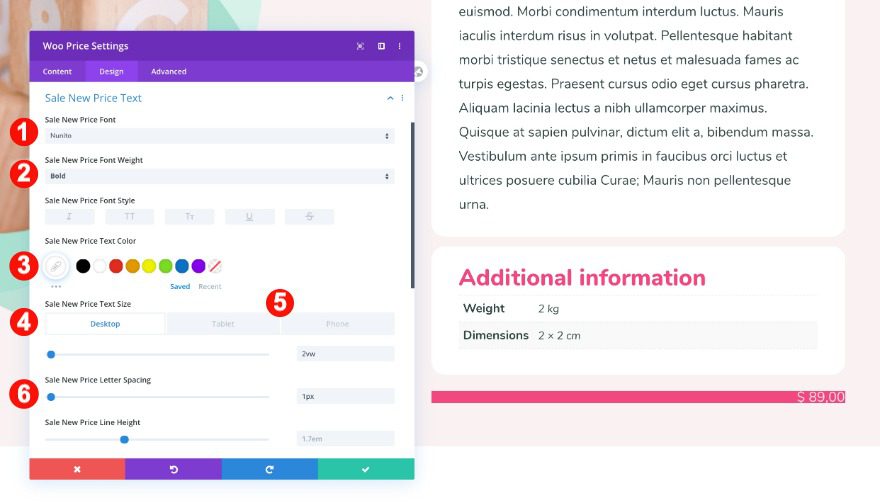
Sale New Price Text
Continue by styling the new price.
- Font: Nunito
- Weight: Bold
- Color: White #ffffff
- Size:
- Desktop: 2vw
- Tablet: 2vw
- Phone: 4vw
- Letter Spacing: 1px
Spacing
Then, adjust the spacing of the module.
- Top Margin:
- Desktop and Tablet: -0.5vw
- Phone: -3vw
- Top and Bottom Padding:
- Desktop: 1.5vw
- Tablet and Phone:
- Left and Right Padding:
- Desktop: 2vw
- Tablet and Phone: 5vw
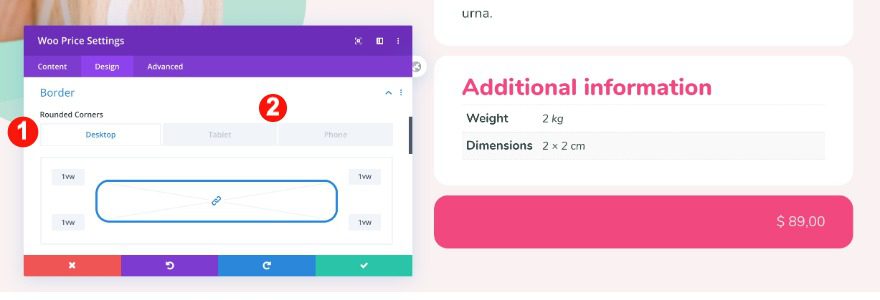
Border
Finally, add the rounded corners.
- Rounded Corners:
- Desktop: 1vw all four corners
- Tablet and Phone: 3vw all four corners
Final Design
This is what the design looks like on the actual product vs what it looks like in the theme builder.

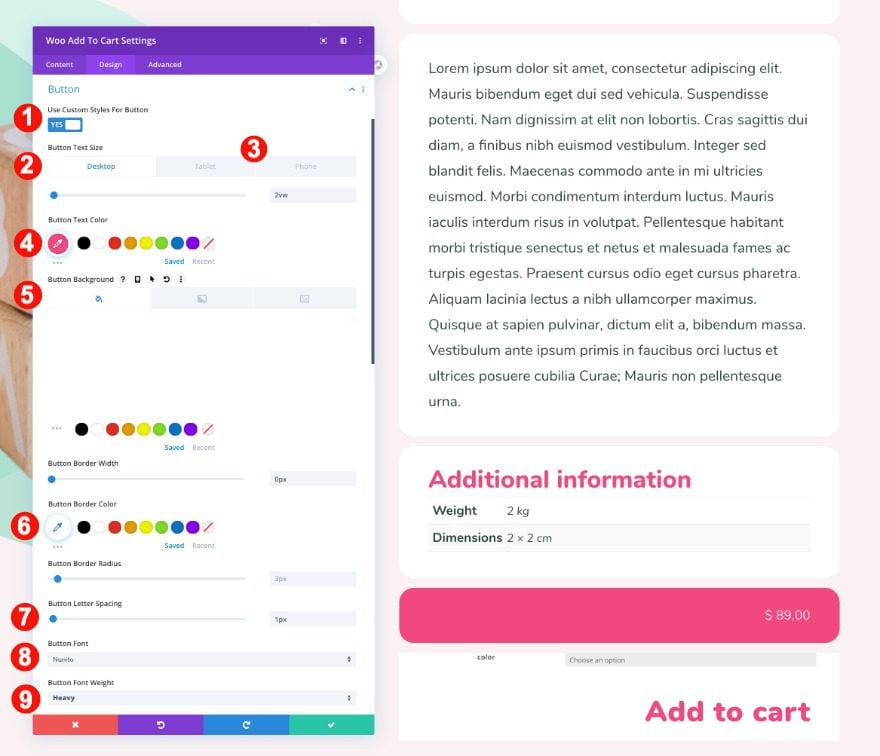
Add Woo Add to Cart Module to Column 2
Content
Below the price module, place a woo add to cart module. Select this product in the content tab.
* When you add a woo add to cart module, you’ll notice that on the top it has a dropdown menu for a color option. If you didn’t specify this on your product page, it will not show up in your final design. You can make sure by checking the live product as you’re building inside the theme builder.
- Product: This Product
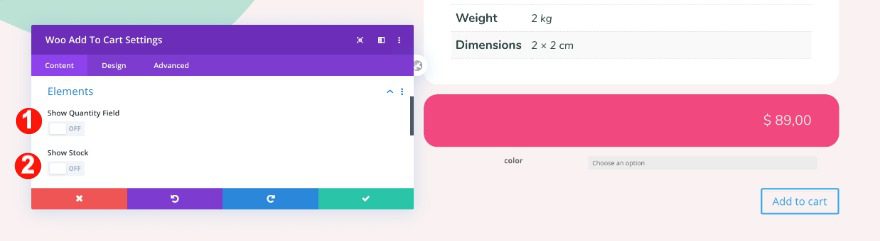
Elements
Moving on, select the elements that will show in the module.
- Quantity Field: Off
- Stock: Off
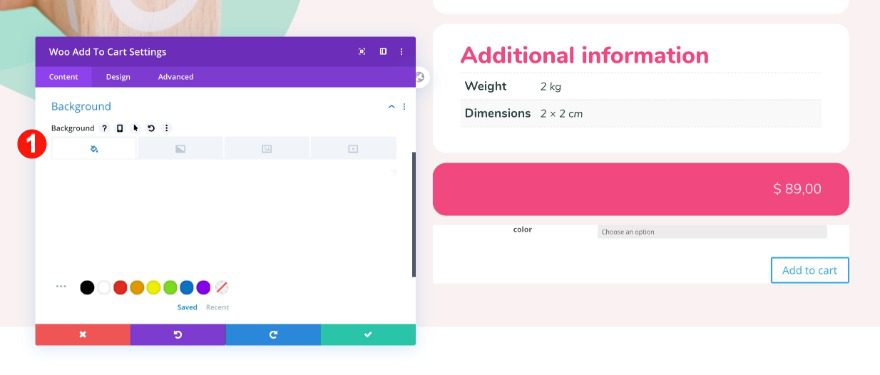
Background
Then, add a white background color.
- Background Color: White #ffffff
Button
Now it’s time to style button. Add the values as follows.
- Text Size:
- Desktop: 2vw
- Tablet: 3vw
- Phone: 5vw
- Text Color: Pink #f24881
- Background Color: White #ffffff
- Letter Spacing: 1px
- Font: Nunito
- Weight: Heavy
- Top and Bottom Margin: -0.3vw
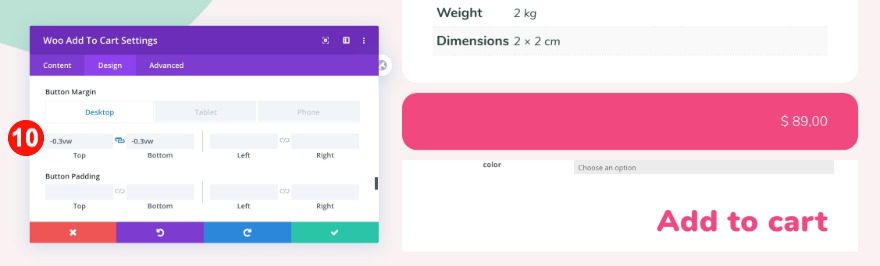
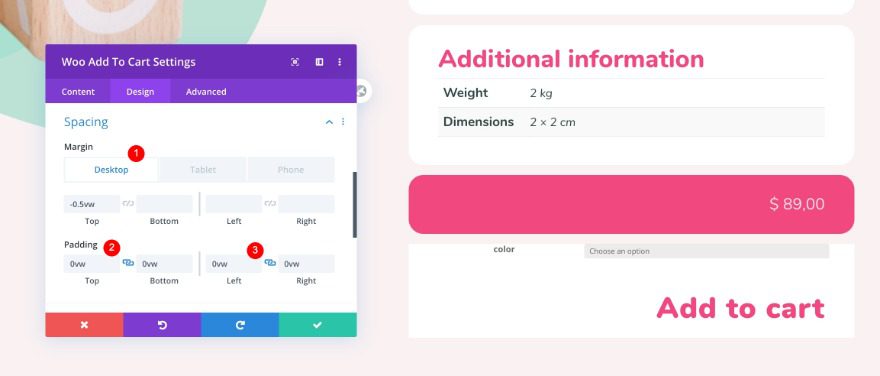
Spacing
Then, adjust the spacing of the module.
- Top Margin:
- Desktop and Tablet: -0.5vw
- Tablet: -3vw
- Top and Bottom Padding: 0vw
- Left and Right Margin: 0vw
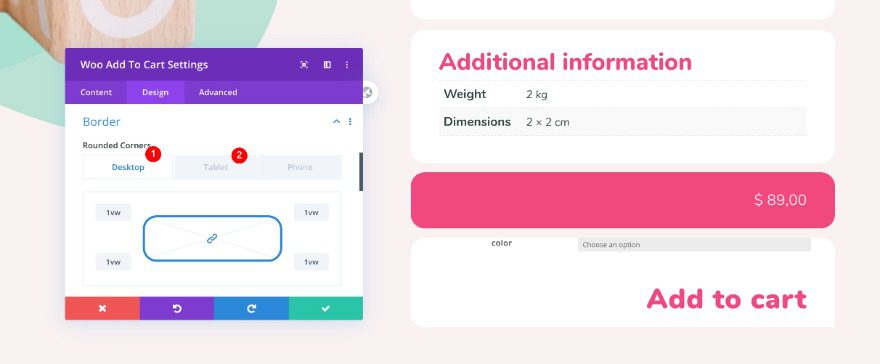
Border
Finally, add a rounded border.
- Rounded Corners:
- Desktop: 1vw all four corners
- Tablet and Phone: 3vw all four corners
Preview
Let’s take a final look at the finished design across different screen sizes. The kids’ product design template will now apply to all the products in your store. Make sure you go back to check on image sizes to make sure they all fit nicely.
Desktop
Mobile
It’s a Wrap on The Kids’ Product Page!
In this post, we showed you how to recreate a design for a kids’ product page. This design with soft edges, a fun background design, and happy colors will make all your products look inviting and ready to buy. We hope you like this design and will use it to inspire your own Divi creations. Leave us your thoughts in the comments!


The JSON download file doesn’t appear to be working…
Robin, the old sale text is this one, just like it says above
Size:
Desktop: 1.5vw
Tablet: 2.5vw
Phone: 3vvw
And you are correct, it is right-aligned.
I think it’s important when creating these tutorials that the given values are the right ones. For example, this is not right for the Old Sales Text:
Size:
Desktop: 5vw
Tablet: 12vw
Phone: 10vw
Also, the Sales Text is right aligned.
When foloowing tutorials by the instructions the outcome is not as in the previews. This has been an ongoing issue with most of the tutorials on this blog, so a little quality control would be much appreciated.