
Creating valuable blog posts takes time and effort. Besides finding the best topics to write about in your niche, it’s also important to keep readers engaged and allow them to find the information they’re looking for quickly. Now, a good way to approach this kind of user experience is by sharing a visual summary box at the end of your blog post, right before the final thoughts. With Divi and its new layout blocks, you can now effortlessly create a summary box with Divi’s built-in options. In this tutorial, we’ll guide you through the process and you’ll be able to download the layout’s JSON file for free as well!
Let’s get to it.
- 1 Preview
- 2 Download The Summary Box Divi Layout Block for FREE
- 3 Download For Free
-
4
Let’s Start Recreating!
- 4.1 Use Sixth Theme Builder Pack Post Template
- 4.2 Open Existing Gutenberg Post or Create New One
- 4.3 Add Summary H2 Title
- 4.4 Add New Inline Divi Block
- 4.5 Build New Layout Inside Divi Block
- 4.6 Section Settings
- 4.7 Add New Row
- 4.8 Column 1 Settings
- 4.9 Add Text Module #1 to Column
- 4.10 Add Text Module #2 to Column
- 4.11 Add Divider Module to Column
- 4.12 Add Text Module #3 to Column
- 4.13 Clone Column
- 4.14 Clone Entire Section Twice
- 4.15 Save Layout to Divi Library for Reuse
- 5 Preview
- 6 Final Thoughts
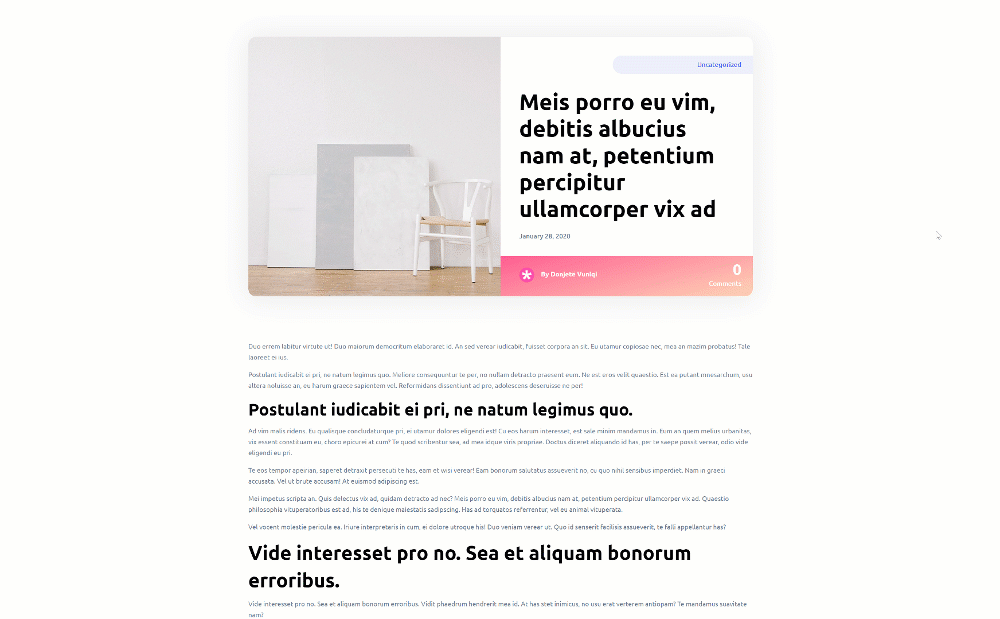
Preview
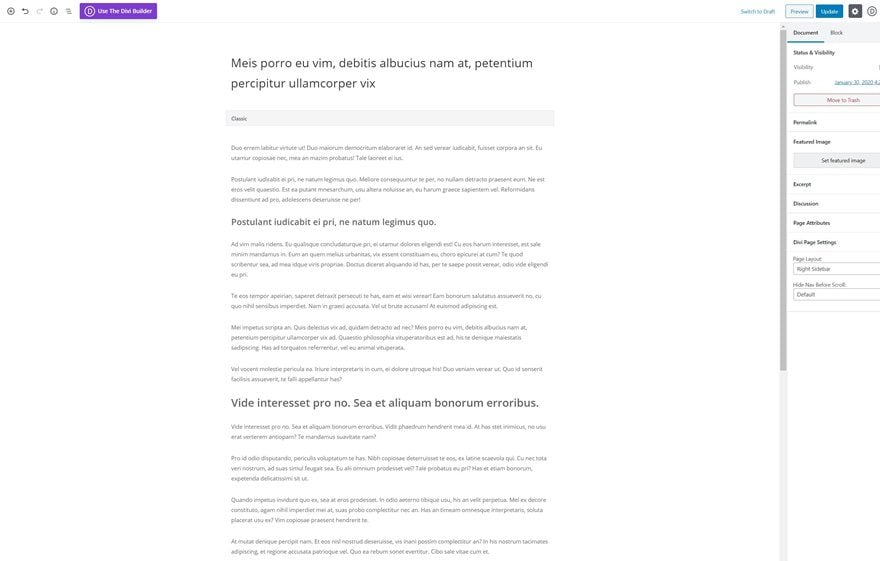
Before we dive into the tutorial, let’s take a quick look at the outcome across different screen sizes.
Desktop
Mobile

Download The Summary Box Divi Layout Block for FREE
To lay your hands on the free hero summary box Divi layout block, you will first need to download it using the button below. To gain access to the download you will need to subscribe to our newsletter by using the form below. As a new subscriber, you will receive even more Divi goodness and a free Divi Layout pack every Monday! If you’re already on the list, simply enter your email address below and click download. You will not be “resubscribed” or receive extra emails.

Importing The Layout Block JSON
Upload Layout to Divi Library
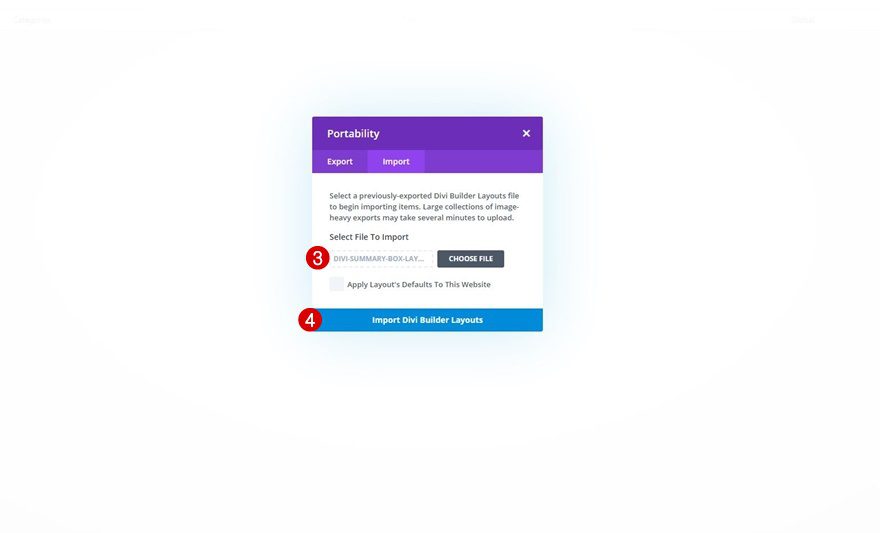
To import the JSON file you were able to download above, go to your Divi Library in the backend of your WordPress dashboard and click on ‘Import & Export’.

Then, select the JSON file inside your download folder and click on ‘Import Divi Builder Layouts’.
Add New Divi Block Block Inside Gutenberg Post
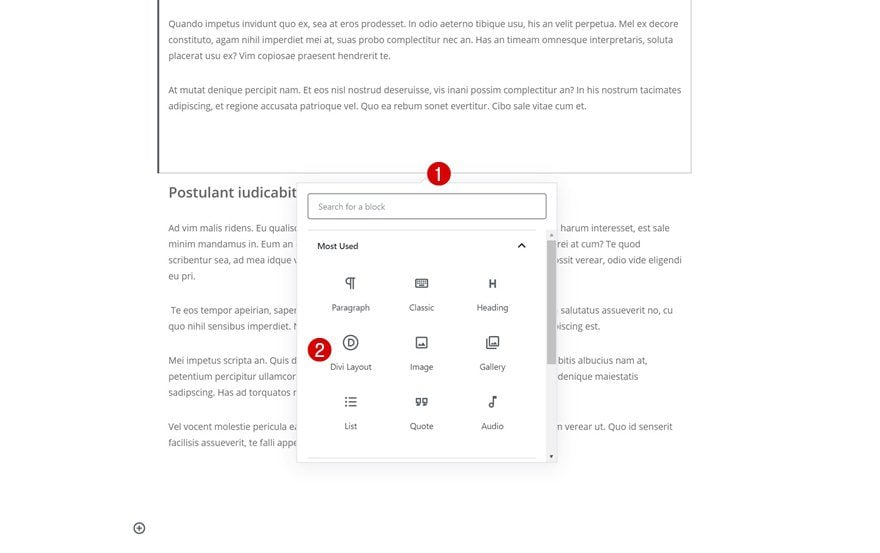
Once your layout has been imported, you can go to your Gutenberg post and add a new Divi layout block.
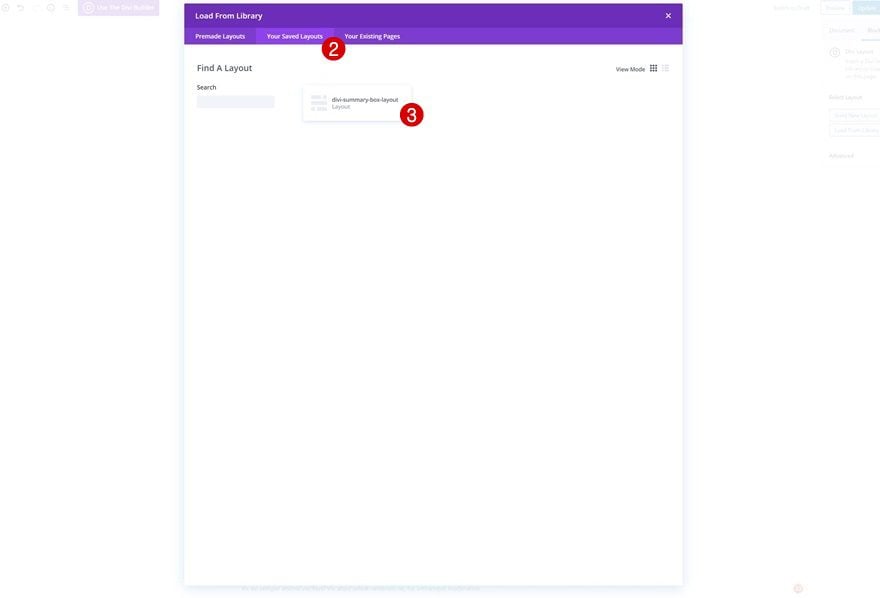
Import JSON File From Saved Layouts
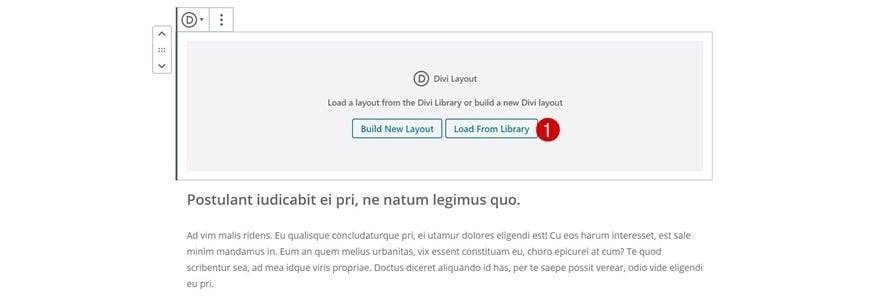
Then, click on ‘Load From Library’, navigate to ‘Your Saved Layouts’ and select the layout to import the summary box to your blog post. That’s it!
Let’s Start Recreating!
Use Sixth Theme Builder Pack Post Template
Download Sixth Theme Builder Pack
The summary box we’ll recreate throughout this tutorial matches the sixth free theme builder pack’s post template perfectly. Go to the blog post and download the entire pack.
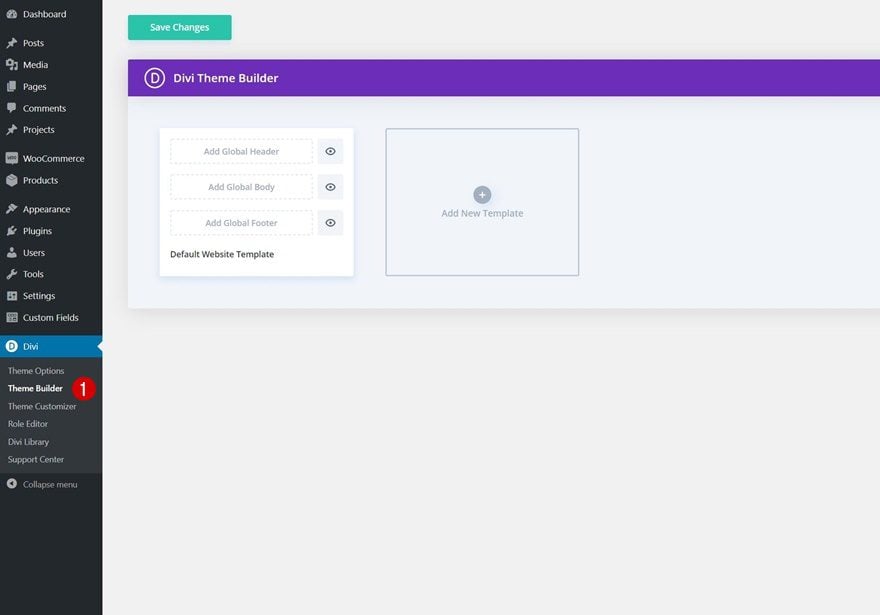
Go to Divi Theme Builder
Then, go to the Divi Theme Builder.
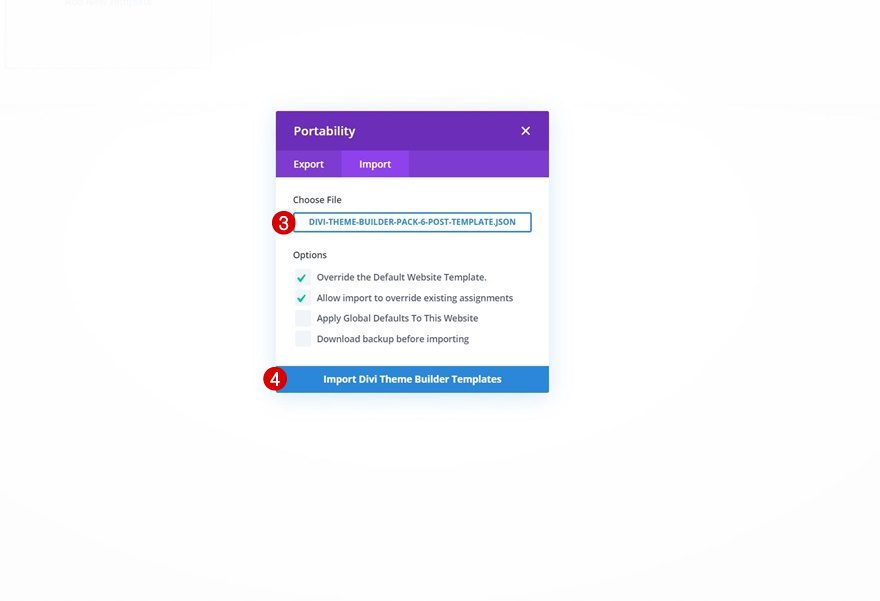
Upload Post Template
Click on the icon in the top right corner and upload the theme builder pack’s post template. Make sure you change all theme builder changes afterward.
Open Existing Gutenberg Post or Create New One
Now, once you’ve added the matching post template, it’s time to create the summary box. Open or create a new post using Gutenberg.
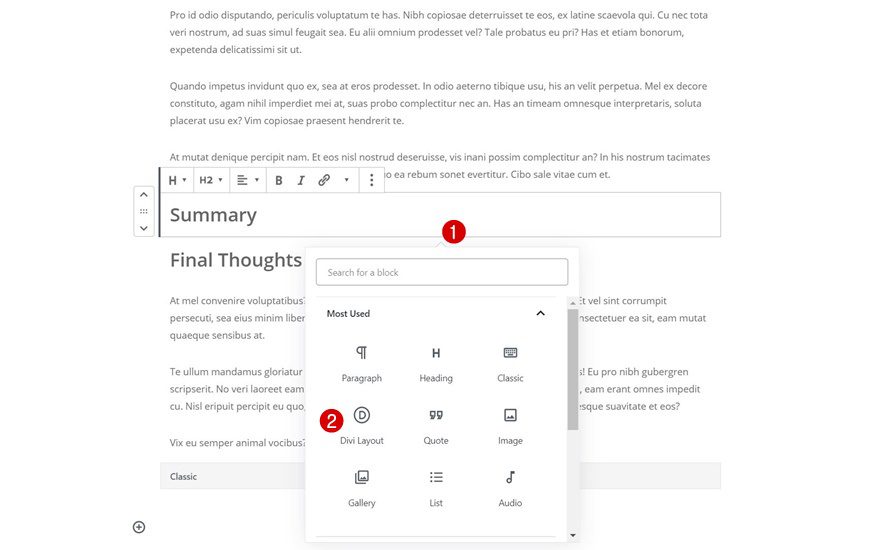
Add Summary H2 Title
Near the ending of the blog post, we’ll add a new H2 title.

Add New Inline Divi Block
Then, we’ll add a new Divi layout block.
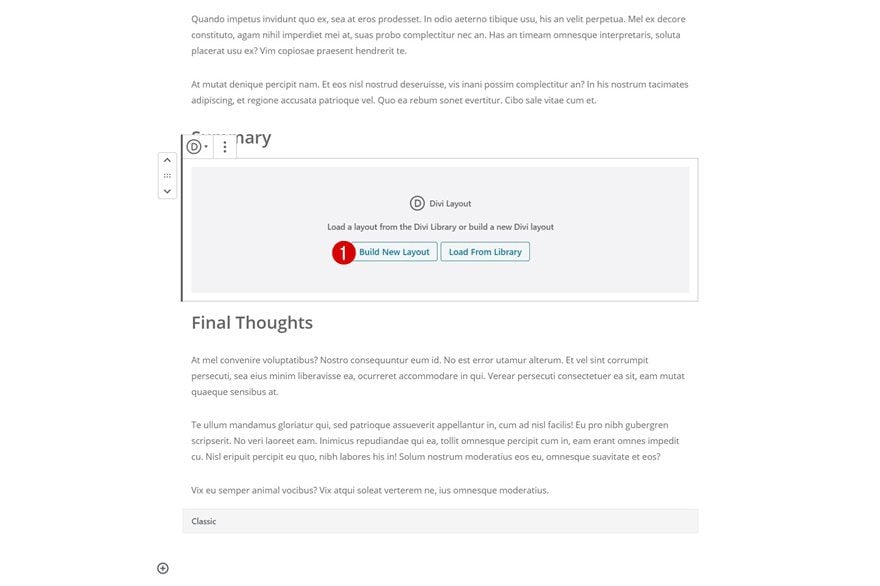
Build New Layout Inside Divi Block
Once you’ve added the block, you’ll get two options. Choose to build a new layout.
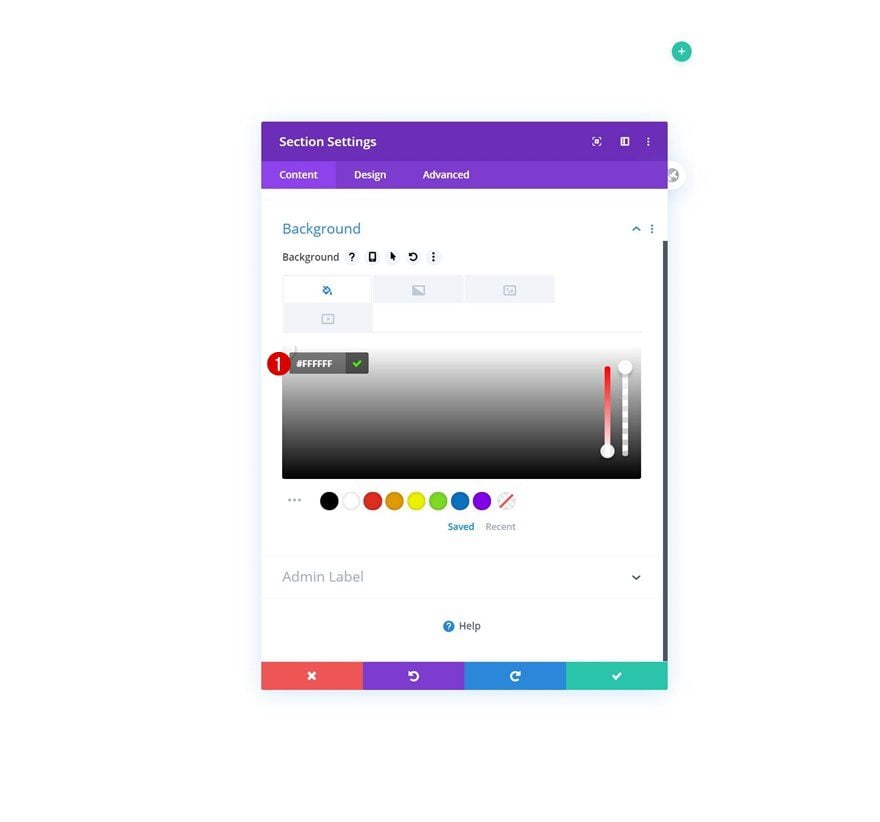
Section Settings
Background Color
Inside the Divi layout block editor, you’ll notice a section. Open that section and use a white background for it.
- Background Color: #FFFFFF
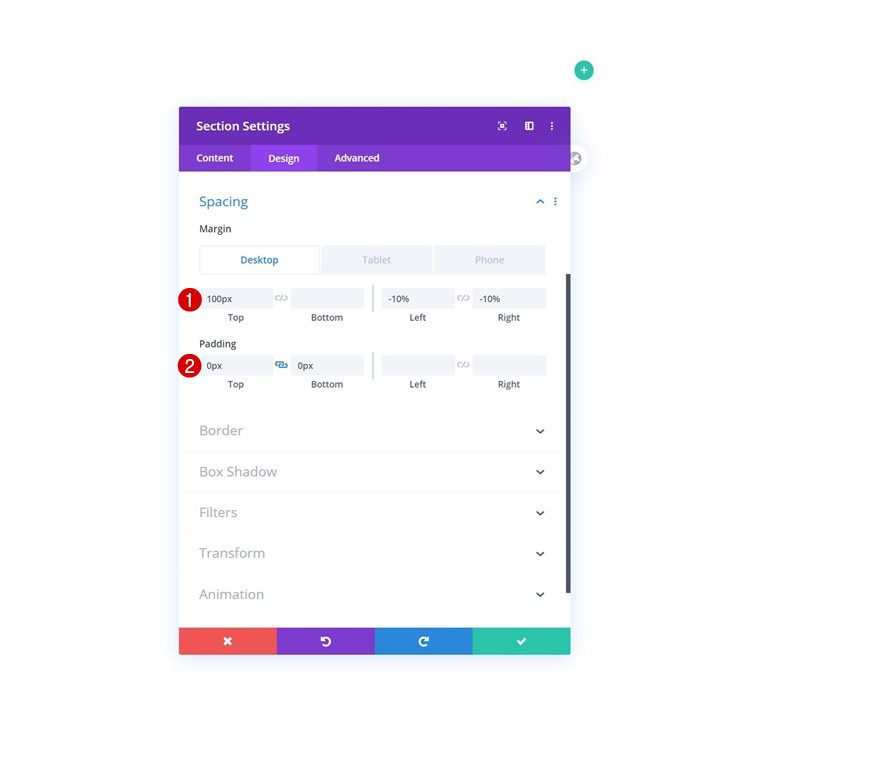
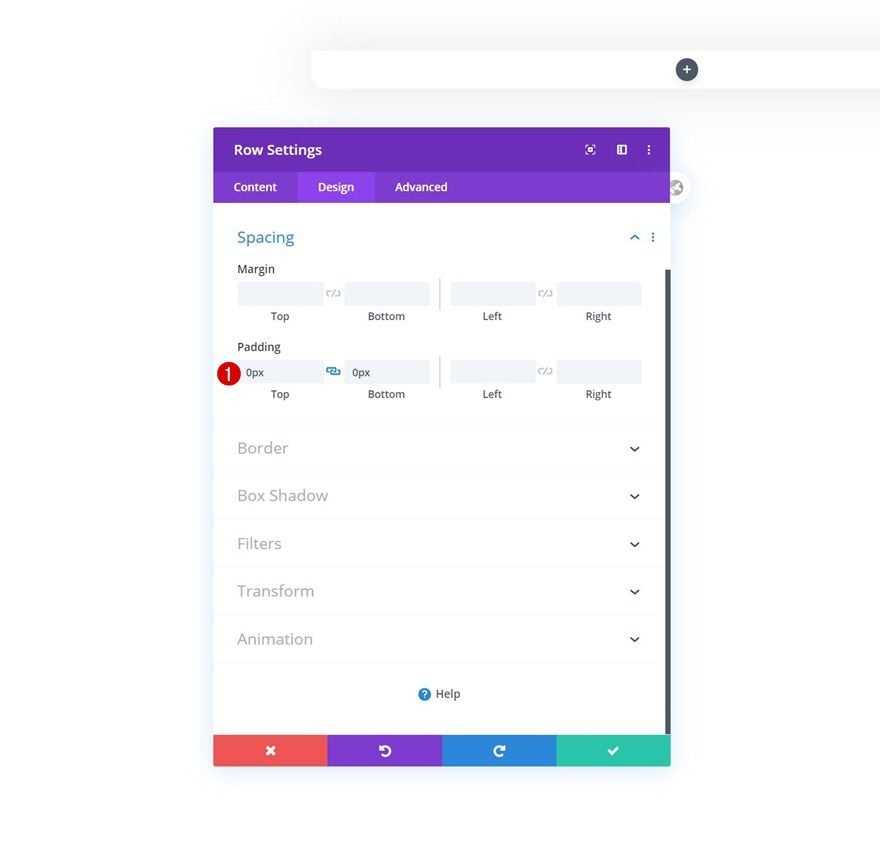
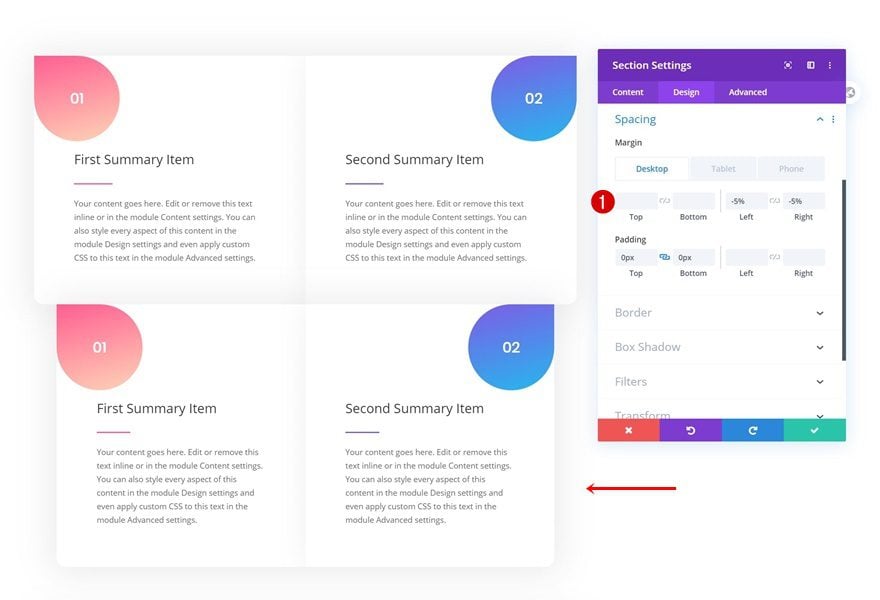
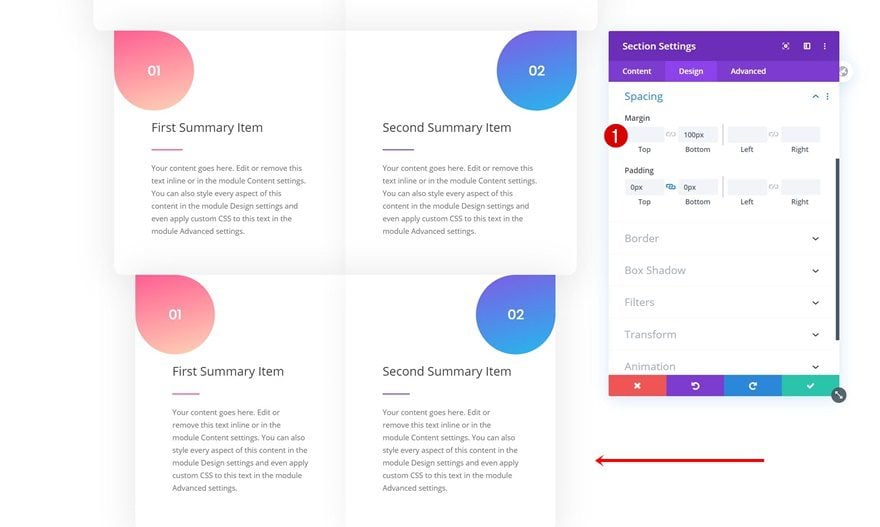
Spacing
Move on to the section’s design tab and add some custom margin and padding values.
- Top Margin: 100px
- Left Margin: -10% (Desktop), 0% (Tablet & Phone)
- Right Margin: -10% (Desktop), 0% (Tablet & Phone)
- Top Padding: 0px
- Bottom Padding: 0px
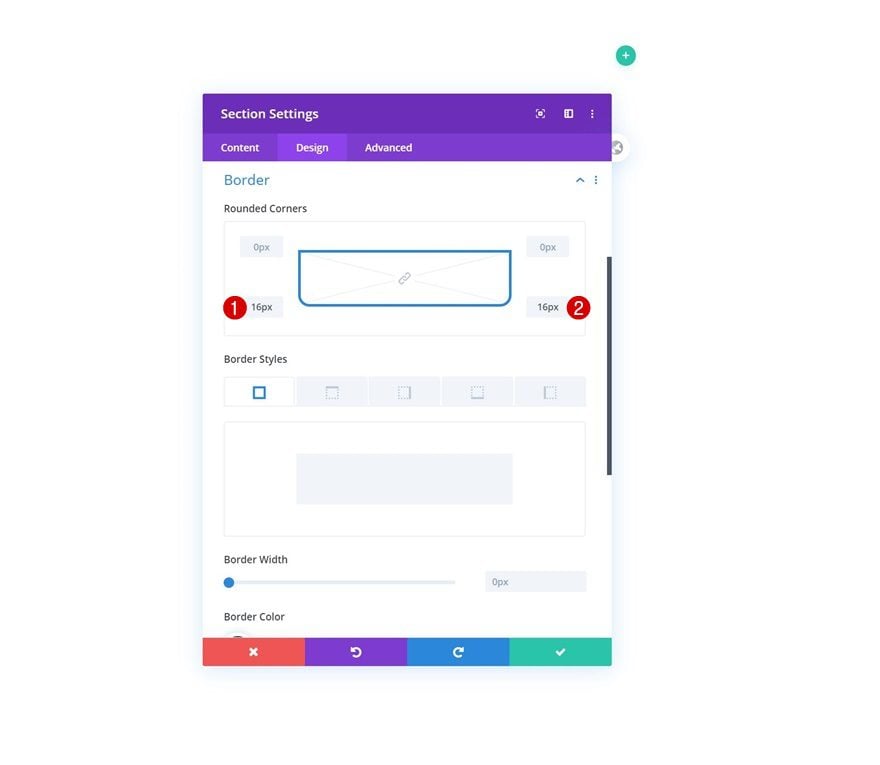
Border
Add some border radius too.
- Bottom Left: 16px
- Bottom Right: 16px
Box Shadow
Along with a subtle box shadow.
- Box Shadow Blur Strength: 60px
- Box Shadow Spread Strength: 10px
- Shadow Color: rgba(0,0,0,0.08)

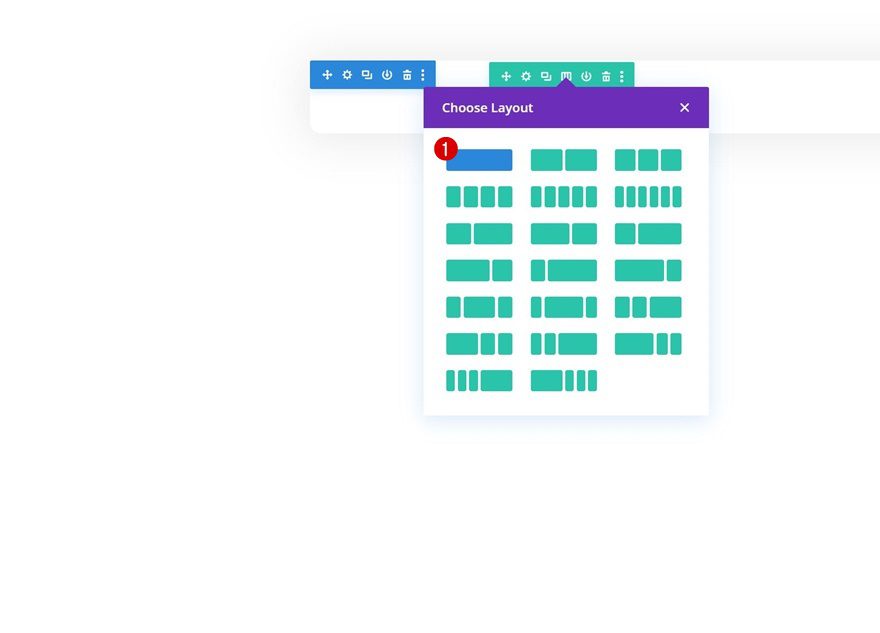
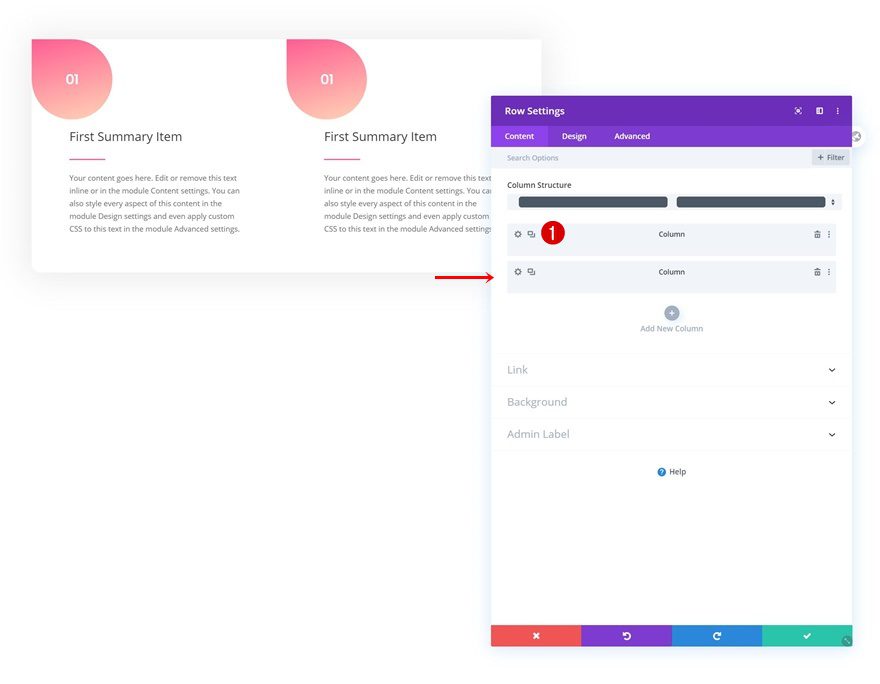
Add New Row
Column Structure
Continue by adding a new row to the section using the following column structure:
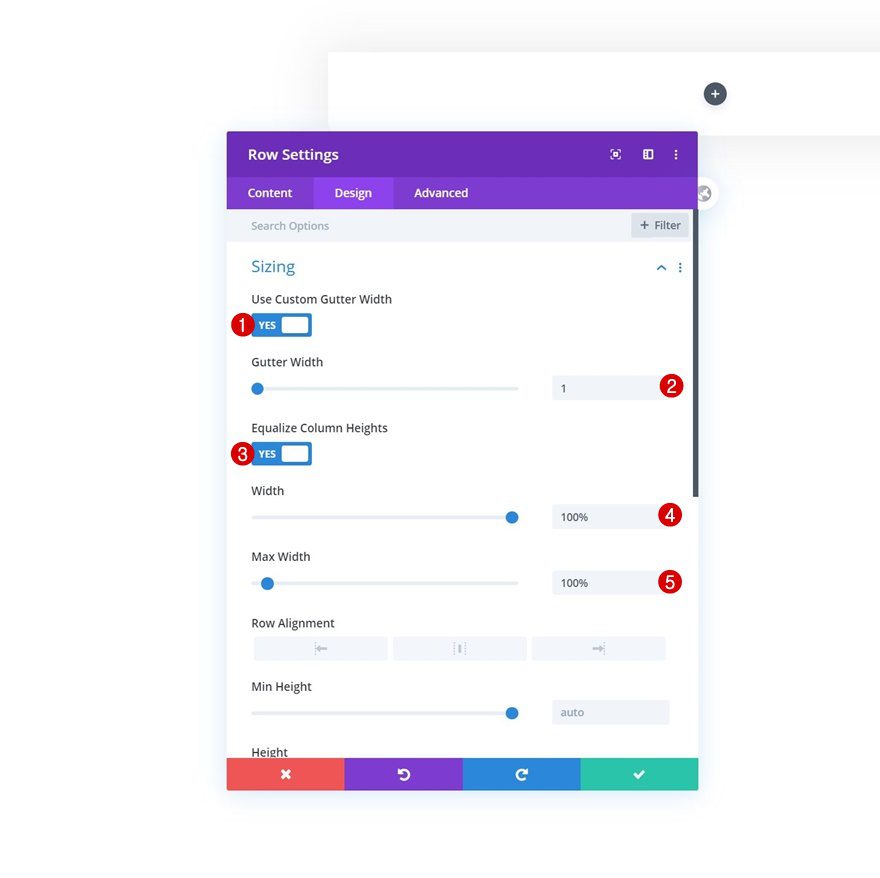
Sizing
Without adding any modules yet, open the row settings and allow the row to take up the entire section container’s width.
- Use Custom Gutter Width: Yes
- Gutter Width: 1
- Equalize Column Heights: Yes
- Width: 100%
- Max Width: 100%
Spacing
Remove the row’s default top and bottom padding next.
- Top Padding: 0px
- Bottom Padding: 0px
Column 1 Settings
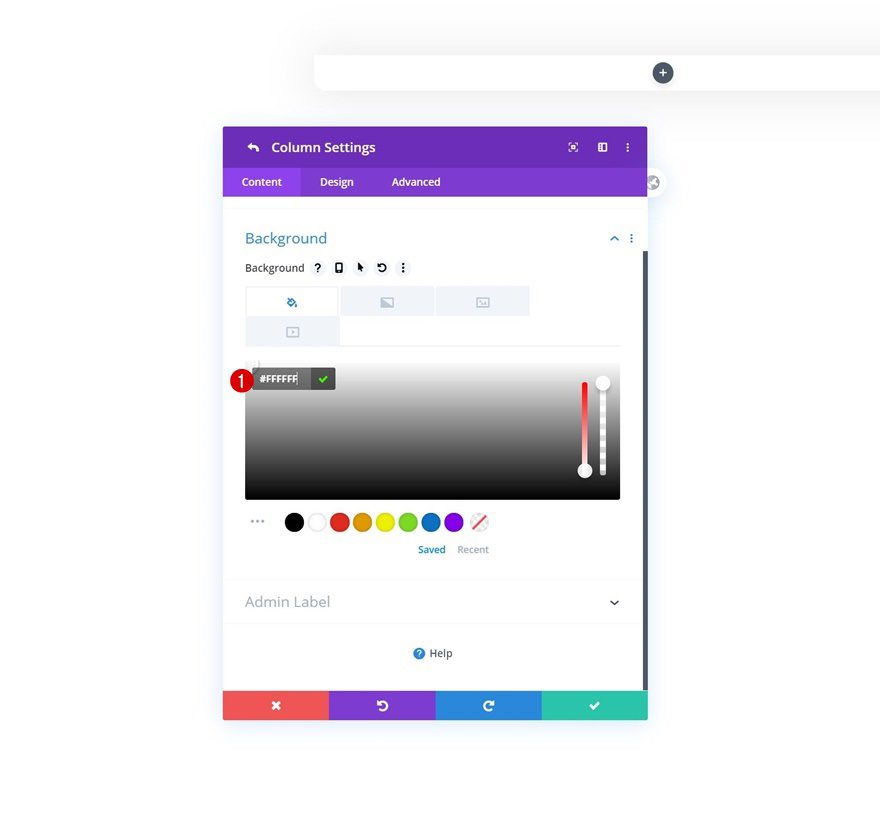
Background Color
Next, open the column 1 settings and use a white background color for it.
- Background Color: #FFFFFF
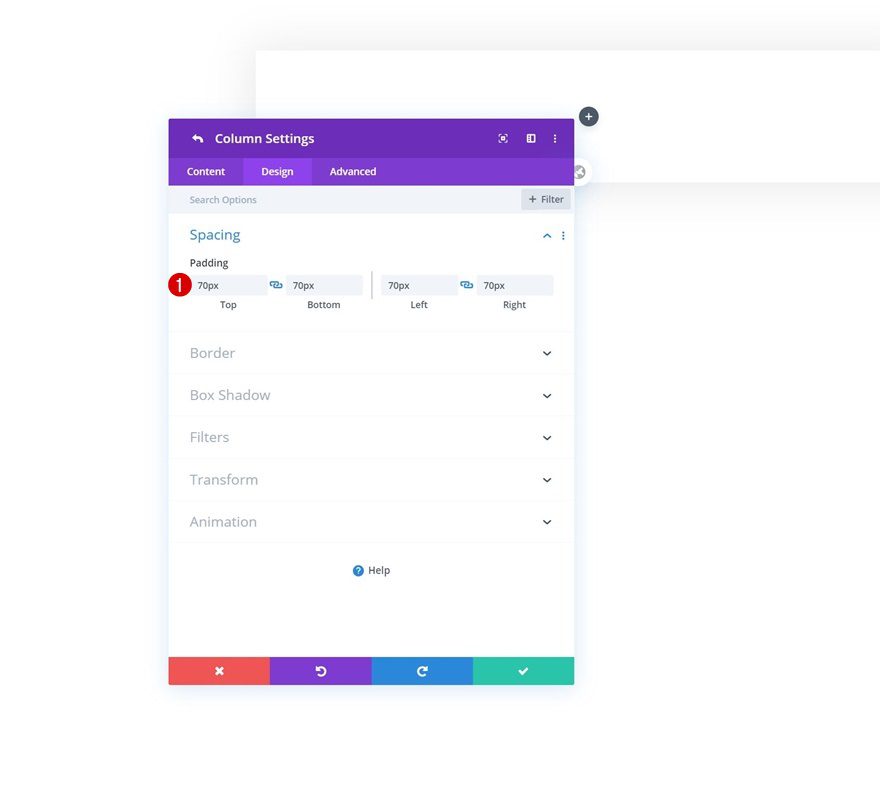
Spacing
Add some custom padding values too.
- Top Padding: 70px
- Bottom Padding: 70px
- Left Padding: 70px
- Right Padding: 70px
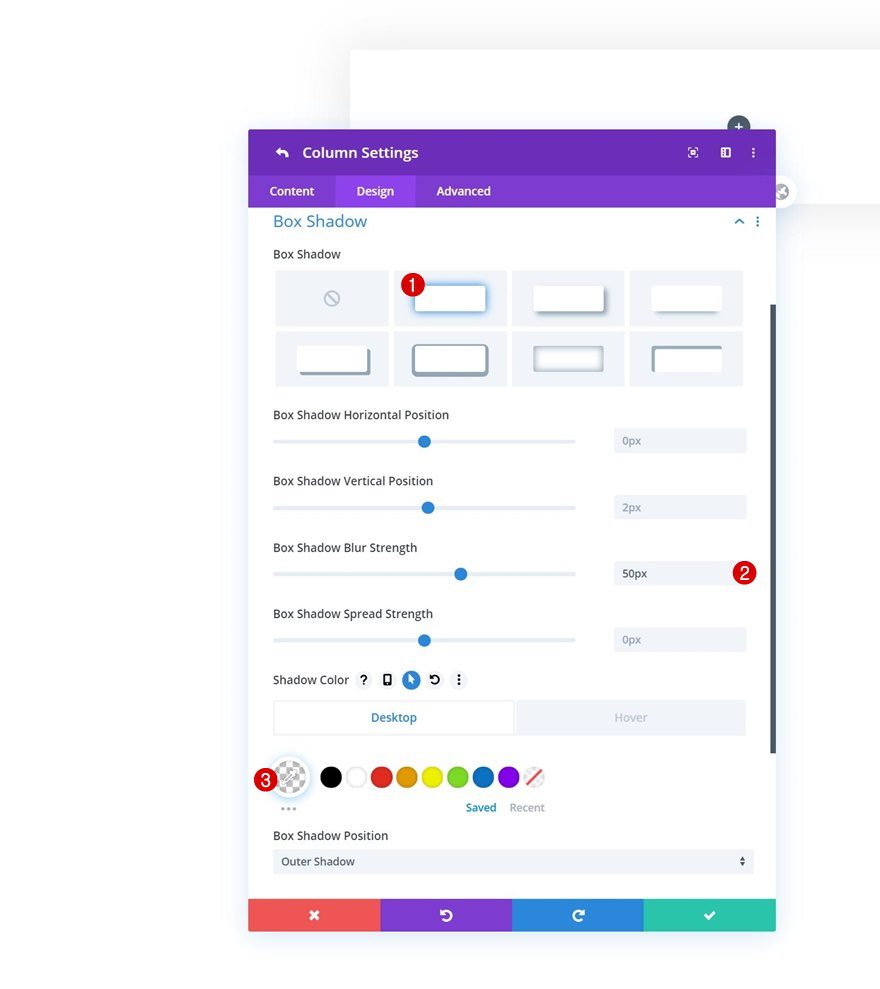
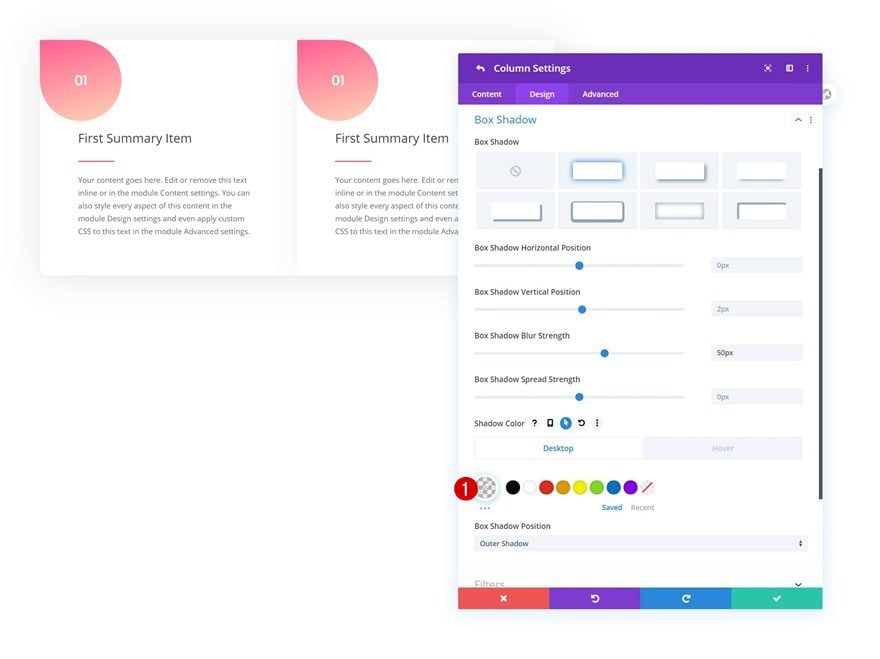
Box Shadow
Continue by adding a subtle box shadow with a different default and hover shadow color.
- Box Shadow Blur Strength: 50px
- Default Shadow Color: rgba(0,0,0,0)
- Hover Shadow Color: rgba(0,0,0,0.15)
Hover Transform Scale
On hover, we slightly want to scale the column as well.
- Right: 105%
- Bottom: 105%
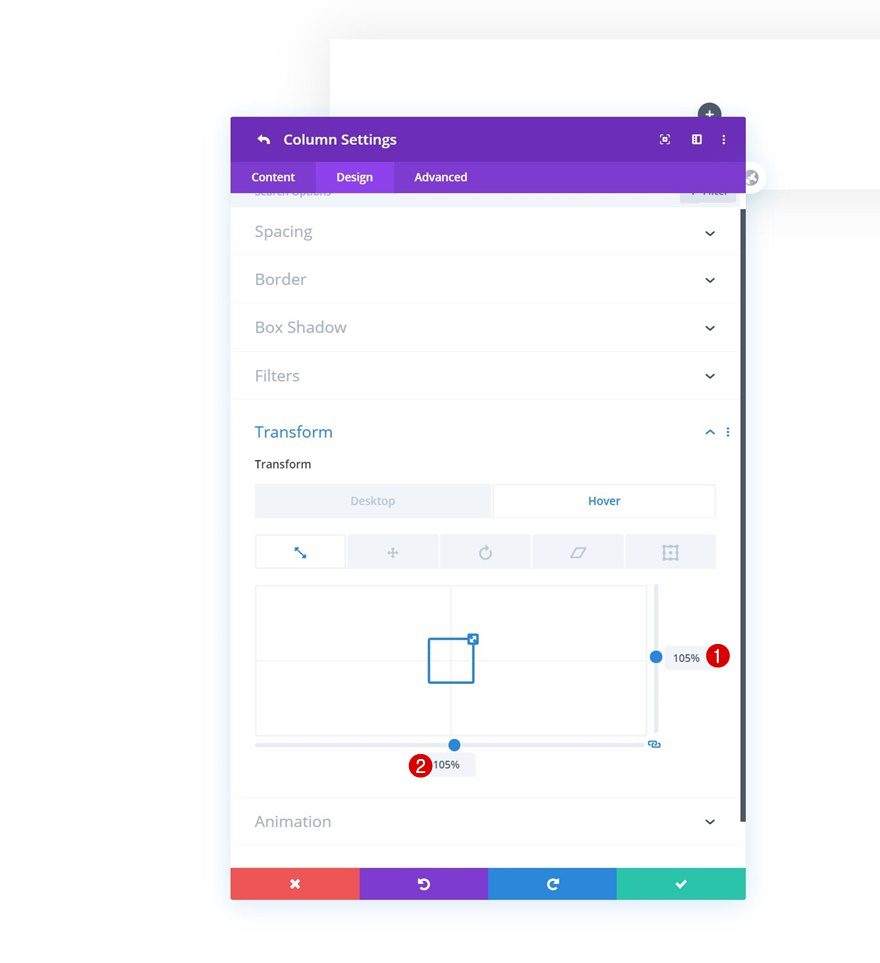
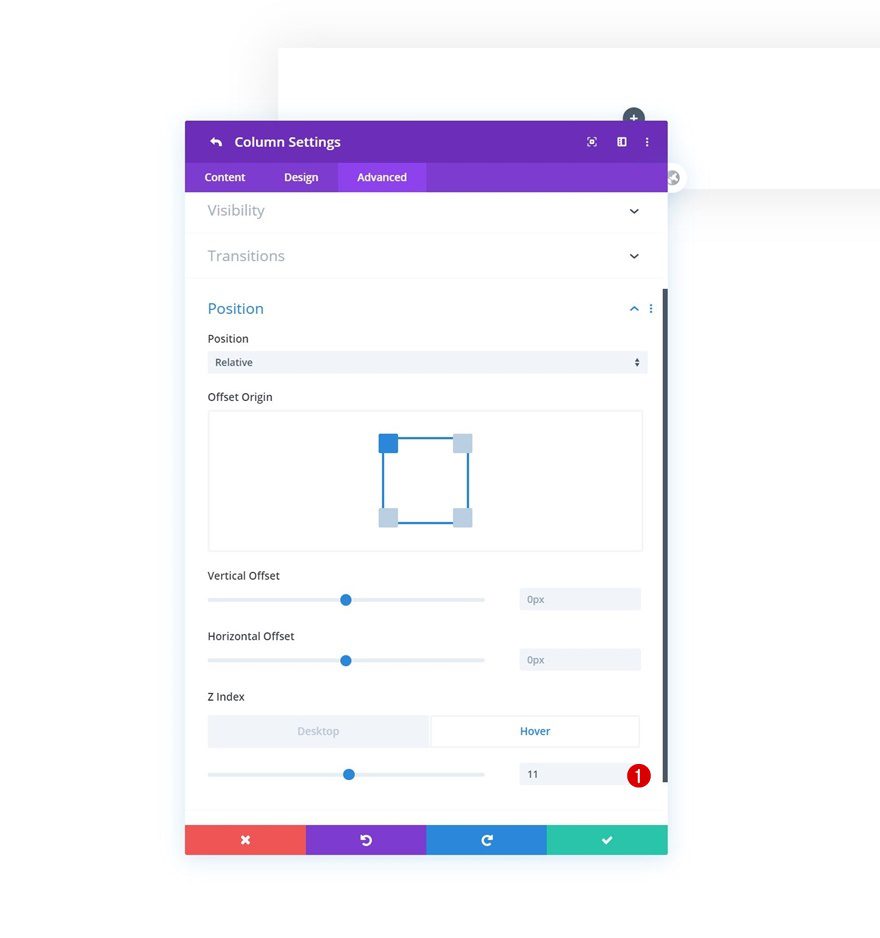
Hover Z Index
Complete the column settings by adding a hover z index.
- Hover Z Index: 11
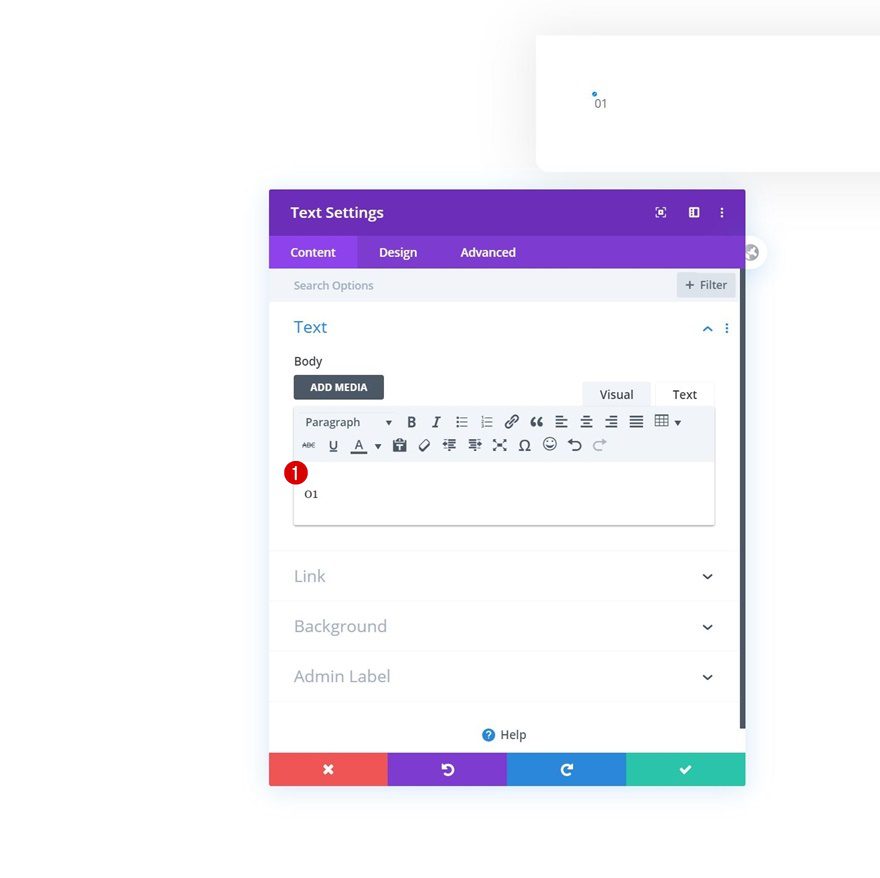
Add Text Module #1 to Column
Add Number to Content Box
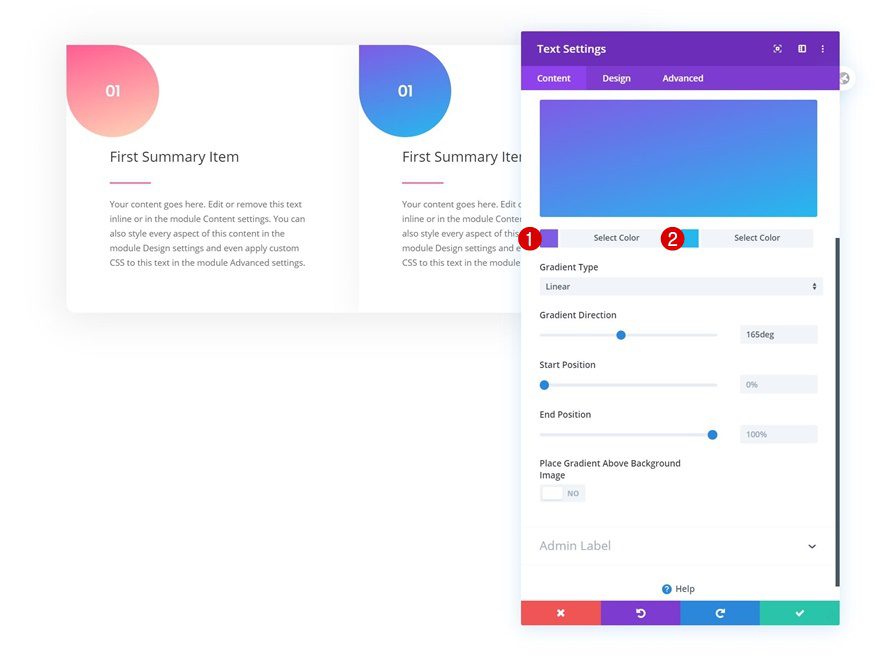
Time to add modules, starting with a first Text Module. Add a number to the content box.
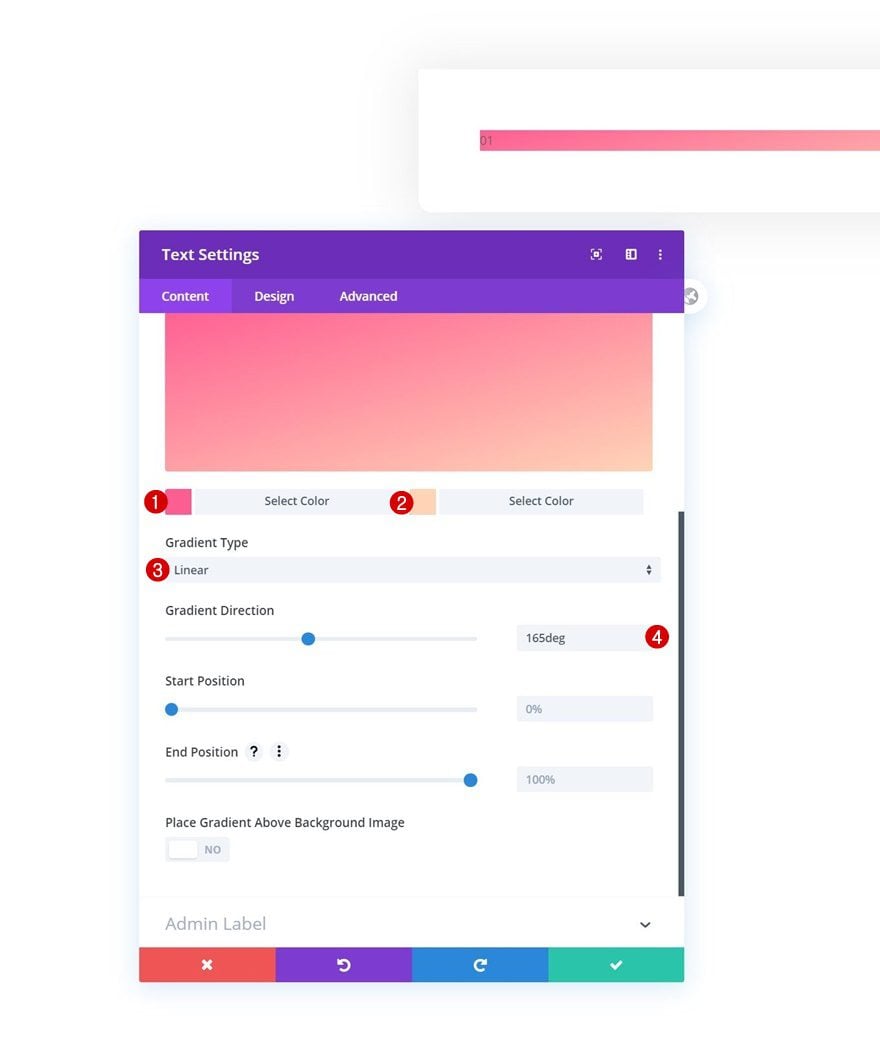
Gradient Background
Then, add a gradient background.
- Color 1: #ff5e92
- Color 2: #ffd4b6
- Gradient Direction: 165deg
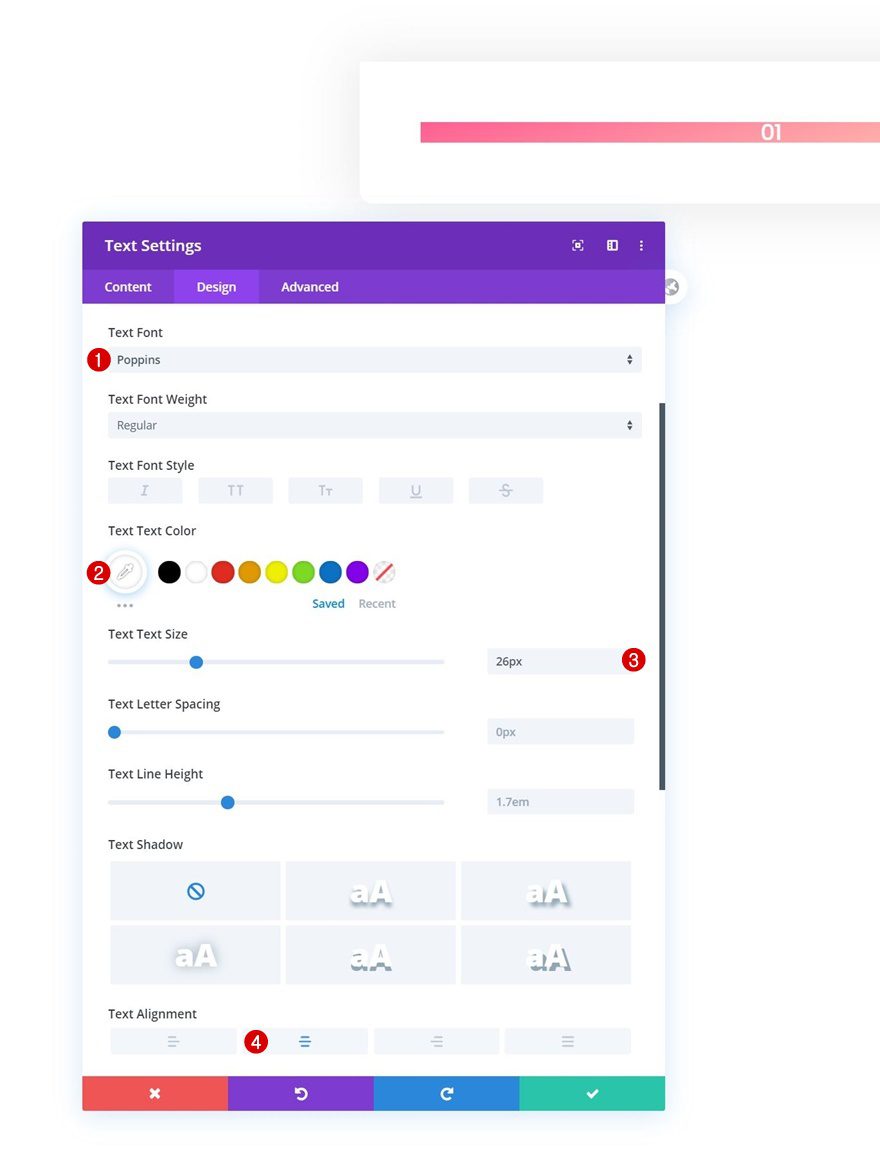
Text Settings
Move on to the module’s design tab and modify the text settings as follows:
- Text Font: Poppins
- Text Color: #ffffff
- Text Size: 26px
- Text Alignment: Center
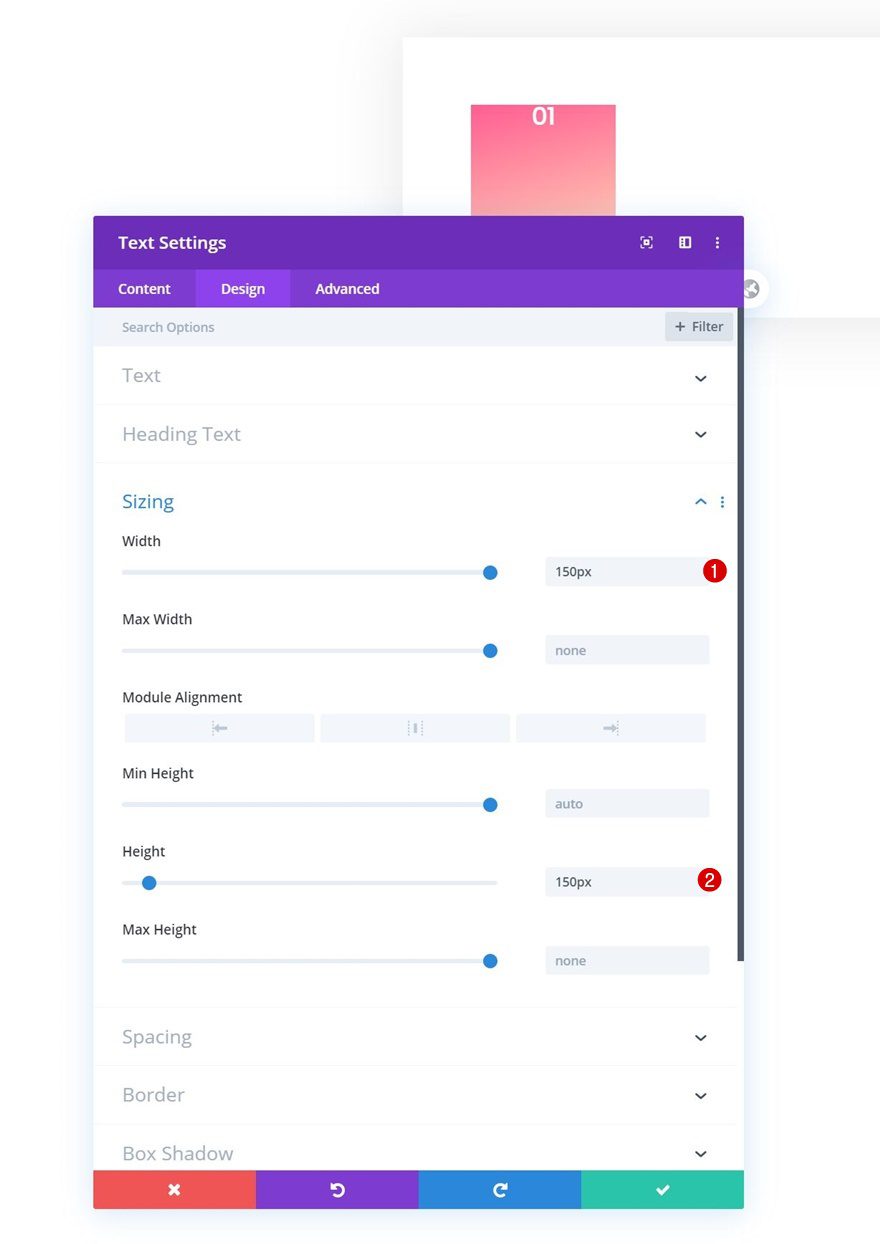
Sizing
Assign a width and height next.
- Width: 150px
- Height: 150px
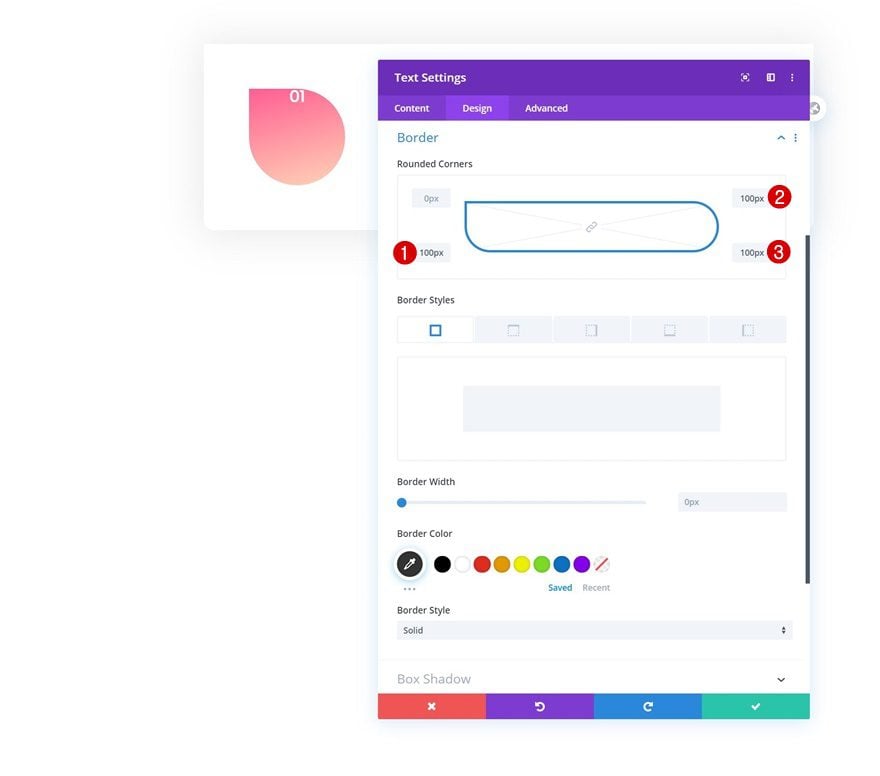
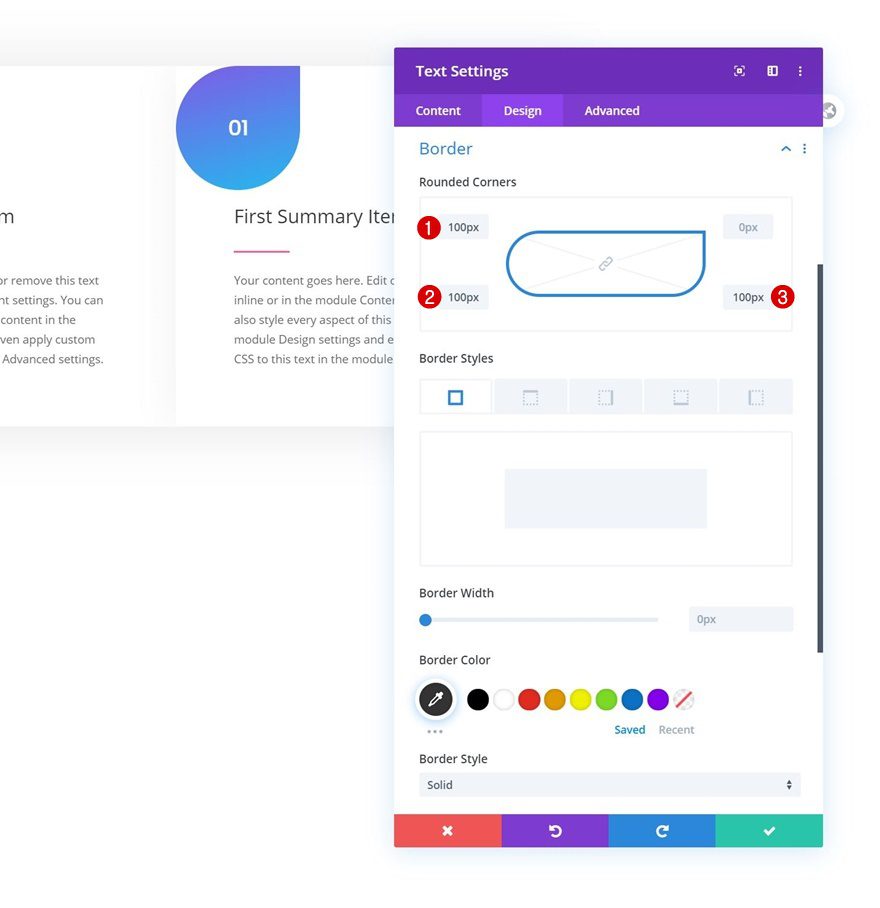
Border
Add some border radius too.
- Bottom Left, Top Right & Bottom Right: 100px
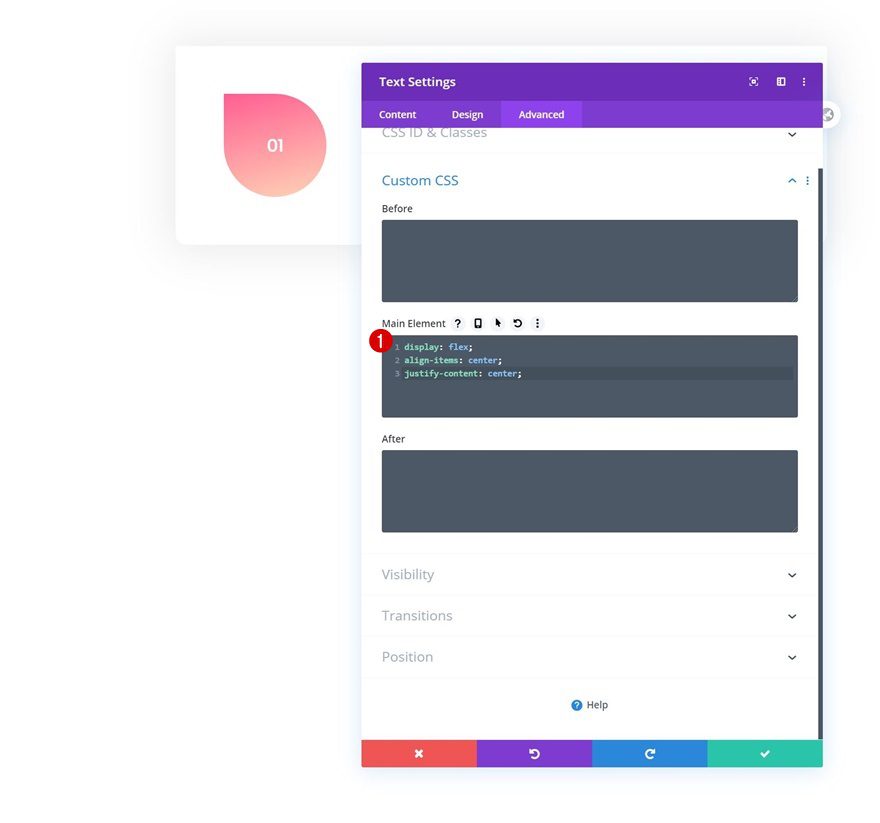
Main Element CSS
To center the text in our container, we’ll need to add a few lines of CSS code to the module’s main element in the advanced tab.
display: flex;
align-items: center;
justify-content: center;
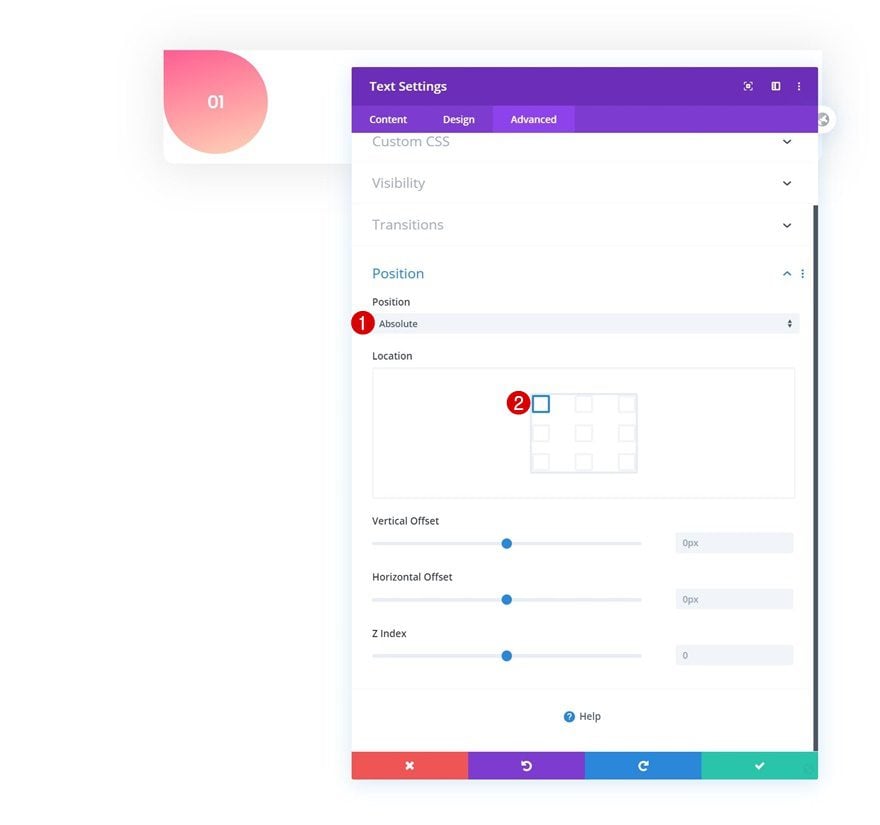
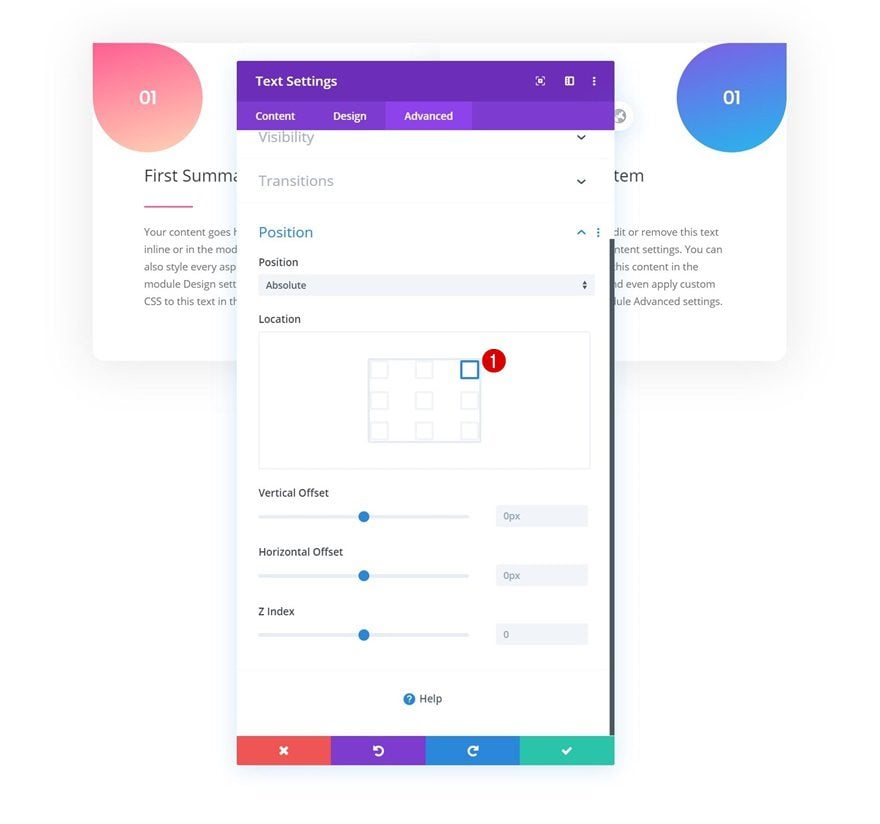
Position
And we’ll complete the module settings by repositioning the module.
- Position: Absolute
- Location: Top Left
Add Text Module #2 to Column
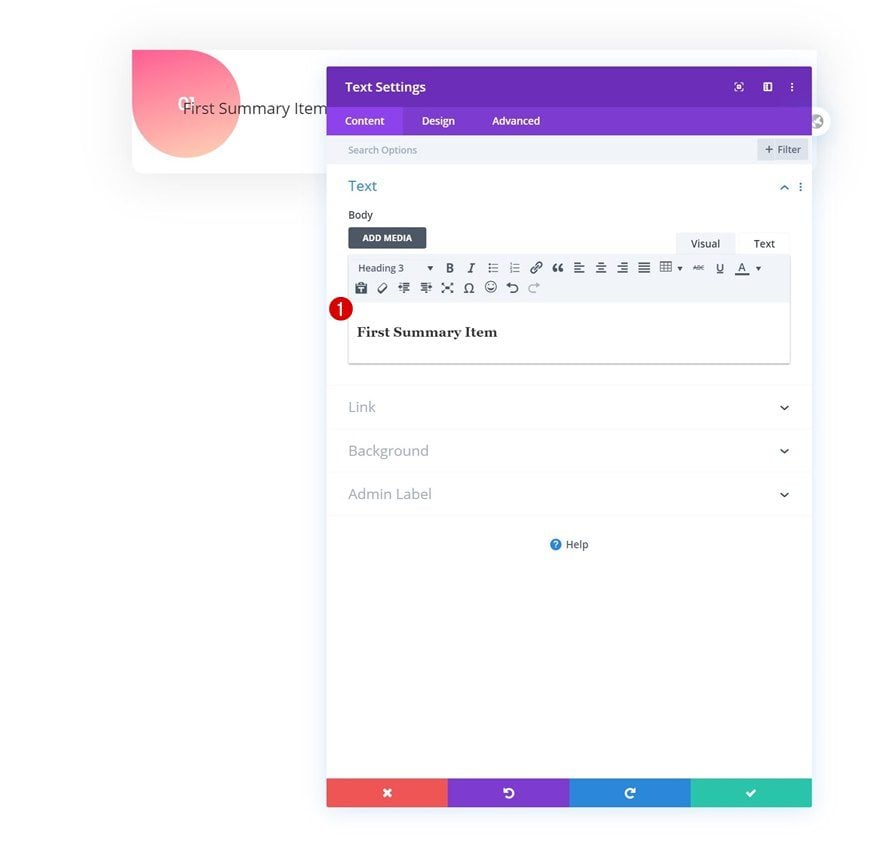
Add H3 Content
On to the next Text Module. Add some H3 content of your choice.
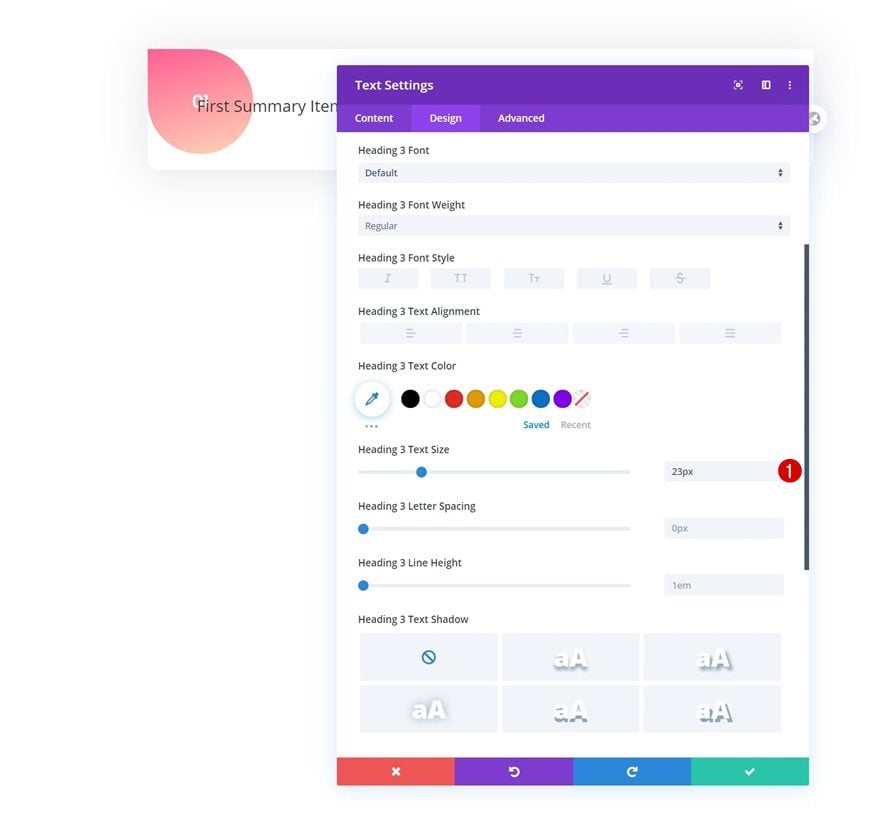
H3 Text Settings
Change the module’s H3 text size next.
- Heading 3 Text Size: 23px
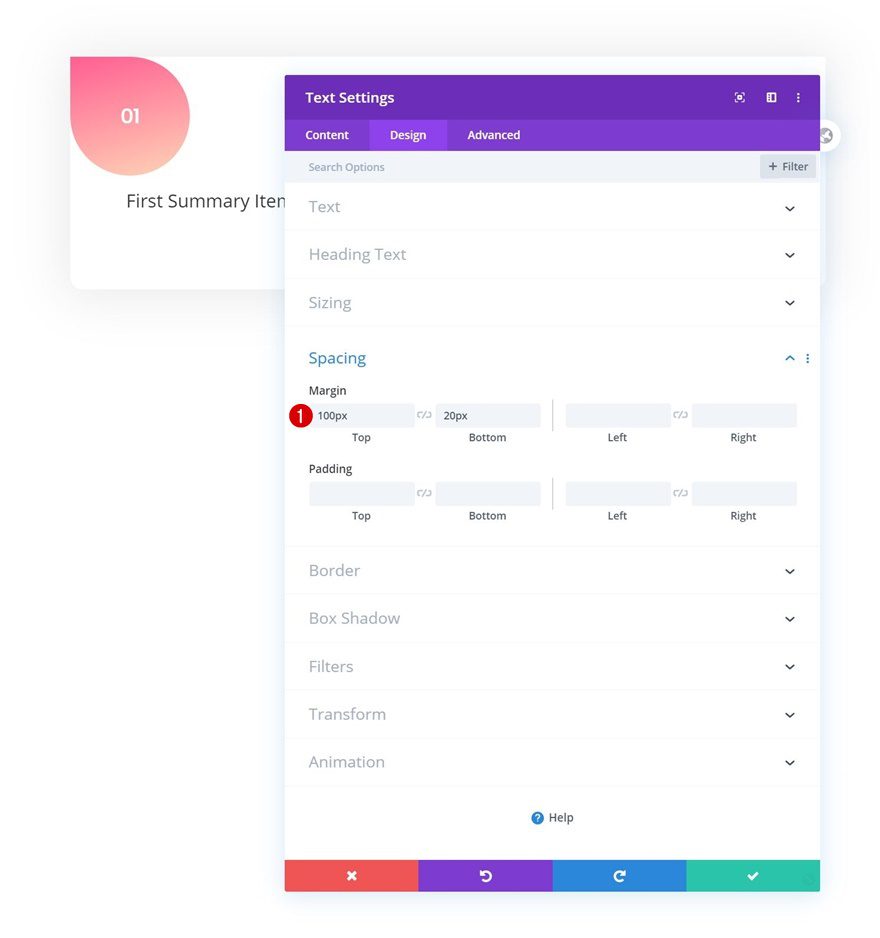
Spacing
Modify the spacing settings too.
- Top Margin: 100px
- Bottom Margin: 20px
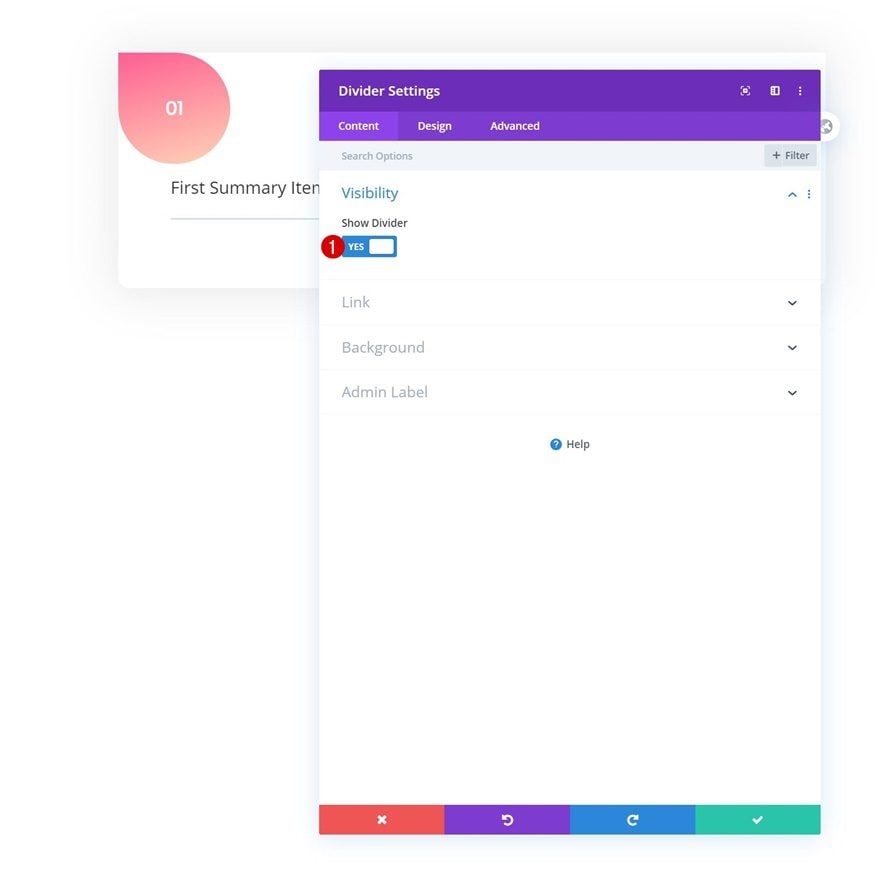
Add Divider Module to Column
Visibility
The next module we need is a Divider Module. Make sure the ‘Show Divider’ option is enabled.
- Show Divider: Yes
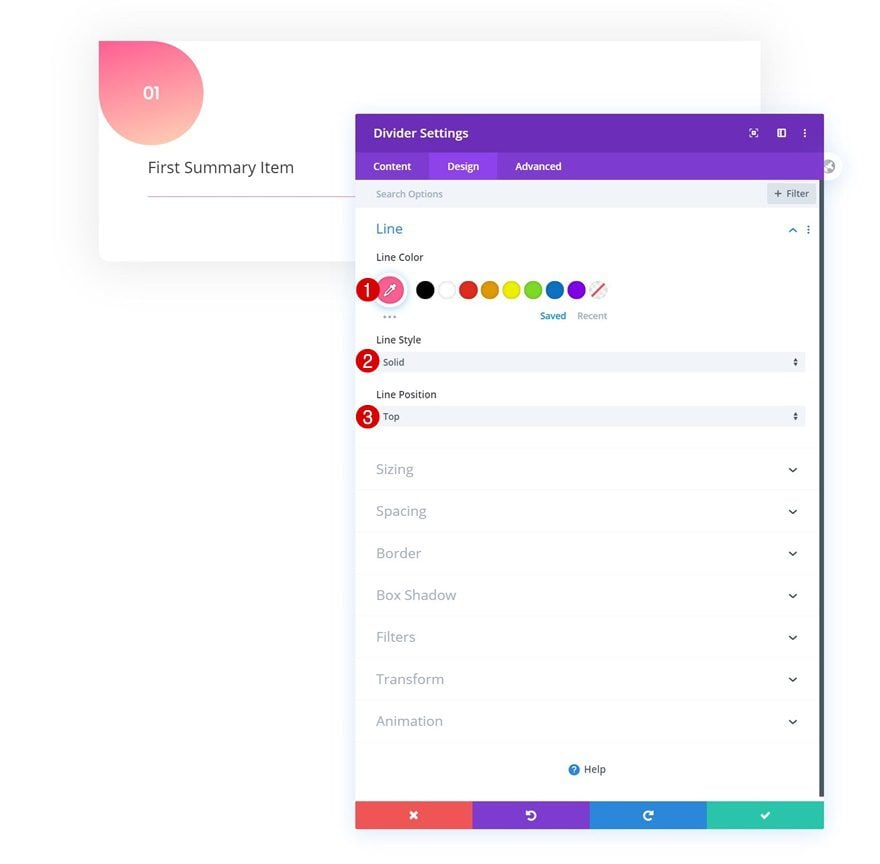
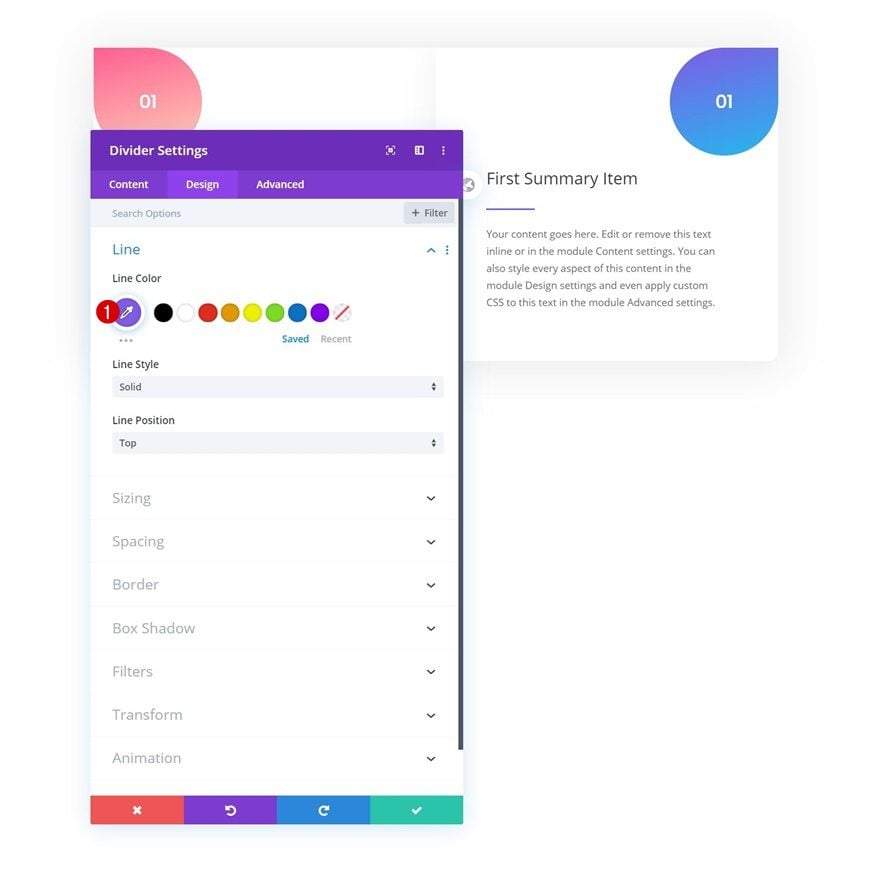
Line Settings
Move on to the module’s design tab and change the line settings as follows:
- Line Color: #ff5e92
- Line Style: Solid
- Line Position: Top
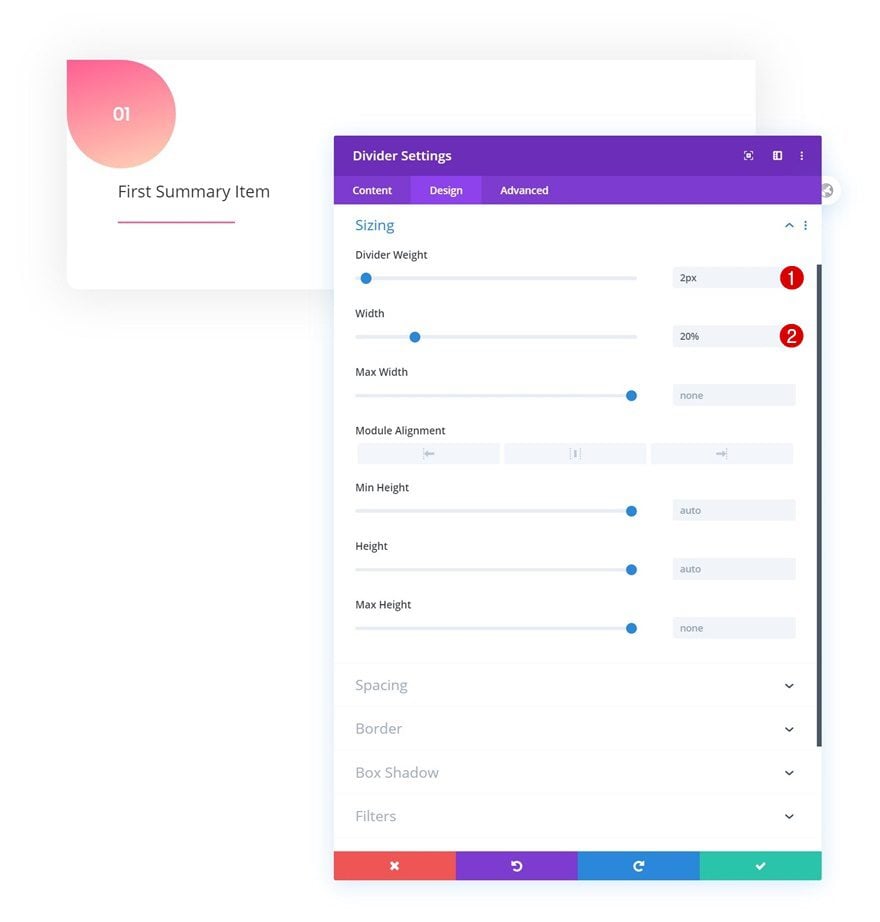
Sizing
Modify the module’s sizing too.
- Divider Weight: 2px
- Width: 20%
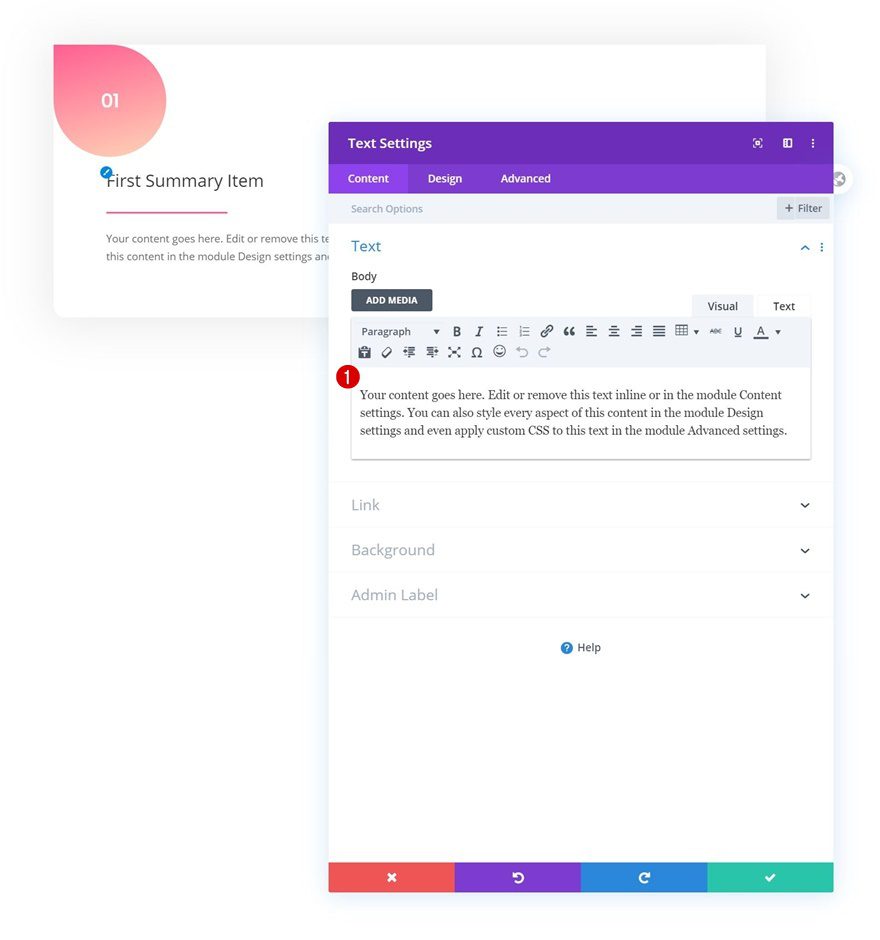
Add Text Module #3 to Column
Add Content
On to the next and last Text Module. Add some content of your choice.
Clone Column
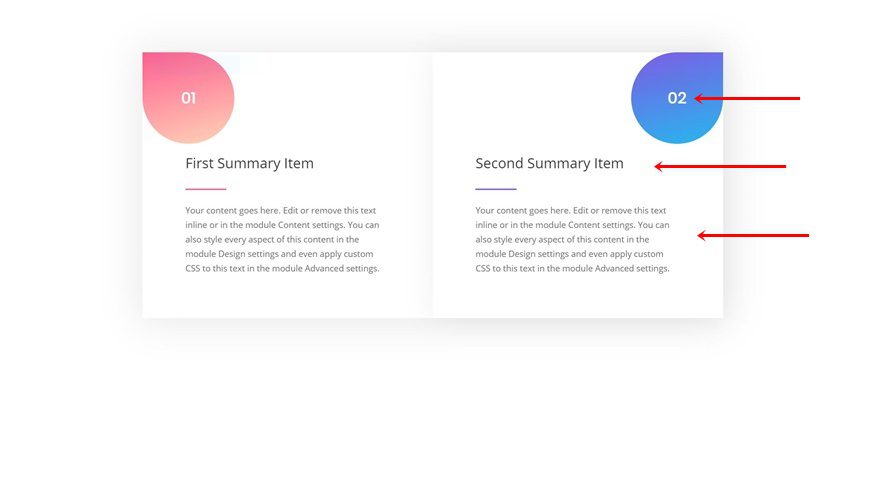
Once you’ve completed the column and all its modules, you can clone the entire column.
Change Default Box Shadow Color
Open the column 2 settings and change the default shadow color.
- Shadow Color: rgba(0,0,0,0.06)
Change Text Module #1 Gradient Background
Open the first Text Module in column 2 next and change the gradient background.
- Color 1: #7e5ce6
- Color 2: #25b8ee
Change Text Module #1 Border
Modify the module’s border settings too.
- Top Left, Bottom Left & Bottom Right: 100px
Change Text Module #1 Position
And reposition the module in the advanced tab.
- Loaction: Top Right
Change Divider Color
Continue by opening the Divider Module settings. Change the line color to match it with the new color palette.
- Line Color: #7e5ce6
Change All Content
Last but not least, change all module content in column 2.
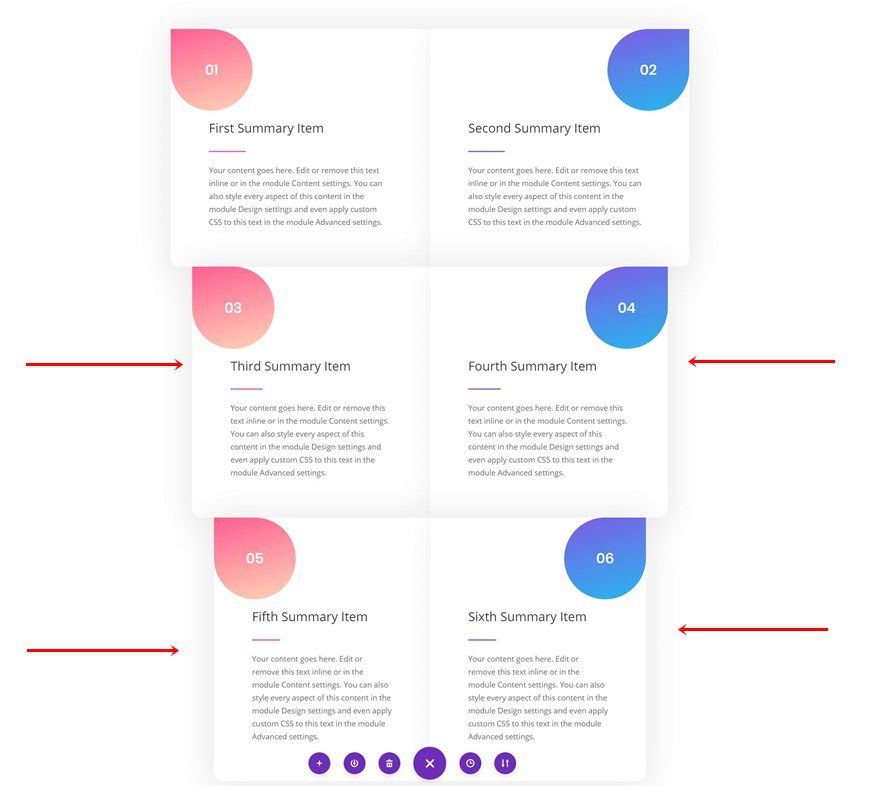
Clone Entire Section Twice
Once you’ve completed the entire first section, you can clone it twice.
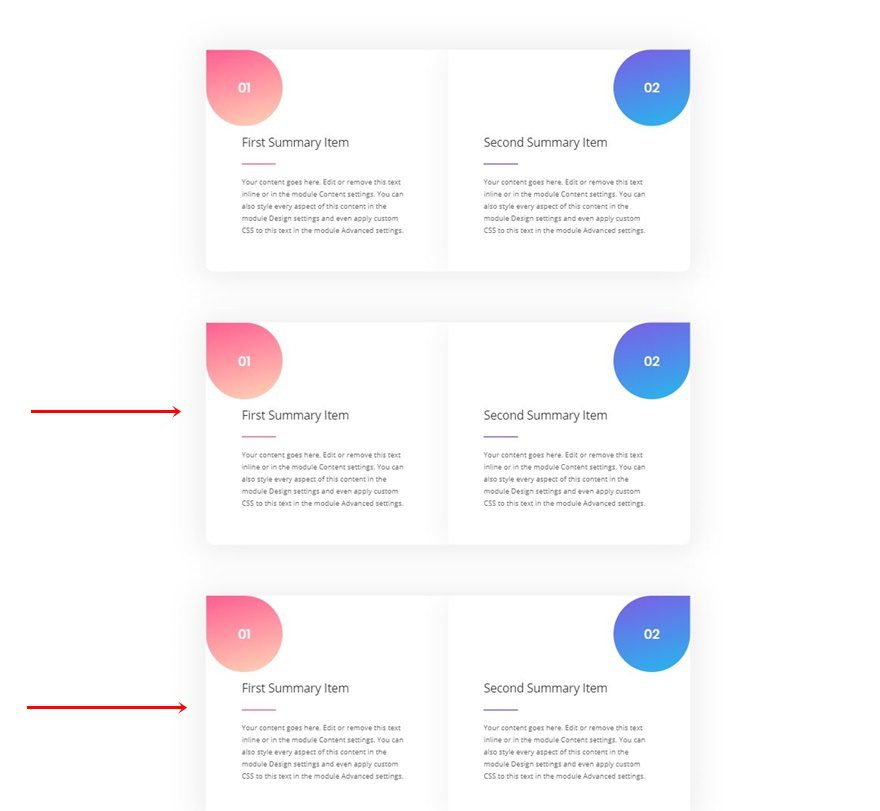
Change Spacing of First Duplicate Section
Open the first duplicate section’s settings and change the margin values accordingly:
- Left Margin: -5% (Desktop), 0% (Tablet & Phone)
- Right Margin: -5% (Desktop), 0% (Tablet & Phone)
Change Spacing of Second Duplicate Section
Open the second duplicate too, remove all margin values and add some bottom margin instead.
- Bottom Margin: 100px
Change All Content
Last but not least, change all module content.
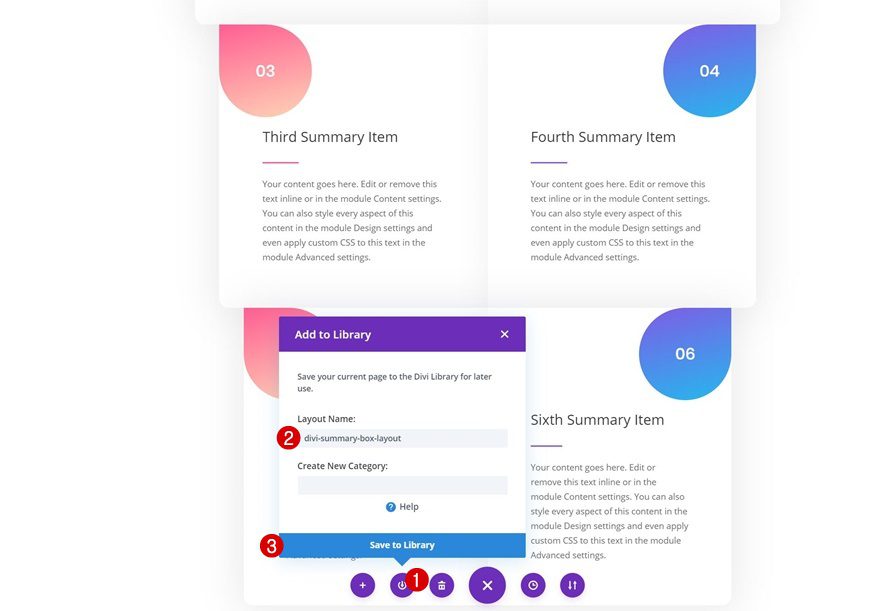
Save Layout to Divi Library for Reuse
If you’re planning to use this summary box inside other blog posts, make sure you save it to your Divi Library so you can easily access it! That’s it!
Preview
Now that we’ve gone through all the steps, let’s take a final look at the outcome across different screen sizes.
Desktop
Mobile
Final Thoughts
In this post, we’ve shown you how to add a summary box to your Gutenberg post with Divi’s new layout blocks. Summary boxes are a great and visual way to help your visitors find the information they are looking for. You were able to download the layout’s JSON file for free as well! If you have any questions, feel free to leave a comment in the comment section below.
If you’re eager to learn more about Divi and get more Divi freebies, make sure you subscribe to our email newsletter and YouTube channel so you’ll always be one of the first people to know and get benefits from this free content.


I wish I could try this out. Unfortunately, I’m not able to import the .JSON file in the Theme Builder using the instructions above. In my attempts, I receive a red X when it attempts to import.
Too bad.
Nice one up there Donjete, everything is well explained.
unfortunately this new divi layout block doesn;t play nice with Monarch.
I have monarch installed, and it inserts the social buttons into the layout block. The only way to stop it is to disable monarch or disable all buttons.