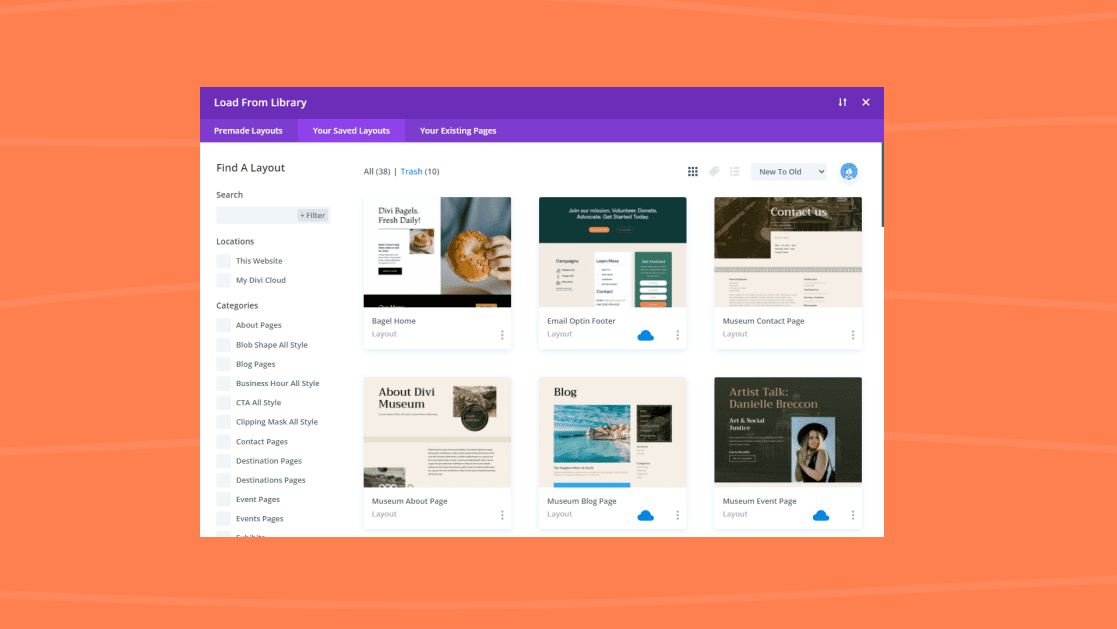
When you select your saved layouts from the Load From Library option in the Divi Builder, you’ll see layouts that you’ve added to both your Divi Library and Divi Cloud. What if you wanted to easily distinguish which items are in which locations? Fortunately, Divi makes it easy to know which layouts are local and which are in your Divi Cloud. In this post, we’ll see how to distinguish local from Cloud items in your Divi Library. We’ll also discuss the advantages of both storage options.
Let’s get started!
Divi Cloud vs Local Storage
There are lots of advantages to using the Divi Cloud, but it doesn’t replace the local Divi Library. Both are useful. Here are a few advantages of each storage option.
Advantages of Storing Layouts in the Divi Cloud
- It’s a convenient way to transfer layouts. Your layouts are just a few clicks away. You’ll never have to transfer them with USB drives, email, or some other type of transfer system or cloud storage. Importing them into Divi is as simple as importing the free Divi layouts.
- You’ll have access to your layouts regardless of which Divi installation you’re using. This means you won’t need to import the layouts via the portability option every time you want to use a layout. Simply log in and select it.
- Access to the layouts is restricted to those with your login. Backend users can have access to all layouts in the Divi Library without having access to certain layouts.
- Collaboration with team members is easier. Each team member can work on different websites and have access to the layouts at the same time. They can even create layouts for others on the team to view without team members needing to log in to the sites each member is working on.
- Layouts in the Divi Cloud are secure. You won’t have to worry about losing your layouts if your website is hacked, gets malware, or you lose access to the backend for any reason.
Advantages of Storing Layouts Locally
- You don’t need an internet connection. You can work on your website offline. Divi Cloud requires an internet connection to access your layouts. This usually isn’t an issue, but if you want to work on a local installation in a location that doesn’t have internet access, you’ll need to have your layouts in your local Divi Library.
- Loading layouts from the Divi Library is faster than importing them from the cloud. Importing does take time, so locally stored layouts will always be at least slightly faster.
- While it’s unlikely that Divi Cloud will go offline for any amount of time, you’ll still have access to your local layouts if it does go offline.
- You don’t have to search through your Divi Cloud items to find the layouts for the Divi website you’re working on.
- You can have only the layouts you want to use in your local library. This makes it easier to use layouts. This is especially helpful if you have multiple people working on the site.
When to Use Each Storage Option
Both storage options have advantages, but when should you use them? Here’s a look at when to use each option.
Use Divi Cloud When…
- You want access to the layouts across all websites.
- You want to transfer layouts from one Divi installation to another.
- Other backend users shouldn’t have access to specific layouts.
- You want to ensure your layouts are secure even if you’re website is hacked or damaged in any way that you lose access to the backend.
Use Local Storage When…
- You want to limit the number of layouts to choose from.
- You don’t have internet access.
- The layouts will not be used anywhere else.
- You need them to load faster than importing them allows.
How to Distinguish Local from Cloud Items in Your Divi Library
Now that we know the advantages of each storage type, let’s see how to tell the difference between locally stored layouts and those stored in the Divi Cloud.
How to Recognize Divi Cloud Items
Here’s a look at how to recognize a Divi Cloud item. For more information about how to add items to your Divi Cloud, see the post How to Transfer a Local Item to Your Divi Cloud. See how to remove them in the post How to Remove An Item From Your Divi Cloud.
- First, enable the Visual Builder by navigating to any page on the front end of your Divi website and clicking “Enable Visual Builder” in your toolbar at the top of the screen.
- Click the purple plus icon on the Divi toolbar at the bottom of the page to open the Divi Library.
- Click the tab at the top labeled “Your Saved Layouts”.
- Next, select the Grid View or the List View. You can also see them in Tag View, but you’ll need to select each tag individually.
- Finally, view your Divi Cloud items by browsing your layouts and looking for a blue cloud icon. In the Grid View, this icon will be visible at the bottom of the layout’s card. In the List View, you’ll see the blue icon under the Cloud label in the table. If the item is not in your Divi Cloud, the icon will not be visible until you hover over the layout in Grid View, and then it will be grayed out. It will automatically show as grayed out in List View.
- Click the Trash link to see both local and Divi Cloud items in the Trash folder in either Grid View or List View.
How to Filter for Divi Cloud Items
Next, let’s look at how to filter your Divi Library to easily find your Divi Cloud items. For more information on sorting and organizing your Divi Cloud items, see the post Cloud Storage For Divi Layouts And Content. Build Websites Faster With Divi Cloud.
- First, enable the Visual Builder by navigating to any page on the front end of your Divi website and clicking “Enable Visual Builder” in your toolbar at the top of the screen.
- Click the purple plus icon on the Divi toolbar at the bottom of the page to open the Divi Library.
- Click the tab at the top labeled “Your Saved Layouts”.
- Next, click the checkbox labeled “My Divi Cloud” under Locations in the left sidebar. Now, only the layouts within your Divi Cloud will display in either the Grid View, Tag View, or List View.
- Alternatively, you can click the dropdown box next to your account icon in the upper right corner of the Load From Library modal and choose “On Divi Cloud” from the list of options. This provides the same list of layouts as selecting “My Divi Cloud” under Locations.
- Unselect “My Divi Cloud” and click the checkbox labeled “This Website” under Locations in the left sidebar. Now, only the layouts in your website’s Divi Library will display in either the Grid View, Tag View, or List View.
Distinguish Local from Cloud Items Ending Thoughts
That’s our look at how to distinguish local from Cloud items in your Divi Library. Divi makes it easy to tell them apart, move them from one location to the other, and more. There are lots of advantages to both types of storage. With just a few clicks, anyone can easily know which layouts are in their local Divi Library and which are in their Divi Cloud.
We want to hear from you. Do you use both local and Divi Cloud storage for your Divi layouts? Let us know about it in the comments.


Very informative blog and thanks for sharing!
Great!