
Displaying time conditional content when a countdown timer expires can be a powerful marketing tool. We know those countdown timers are one of the best ways to incentivize users to take action on a website. They’re perfect for featuring limited-time deals for memberships, products, Black Friday promos, etc. But when the timer comes to end, you have a great opportunity to retarget visitors with time conditional content. Time conditional content is content that is displayed (or hidden) on a web page before or after a set date and time. So it makes sense to have new content ready to show visitors who missed out on a deal or ran out of time.
In this tutorial, we are going to show you how to display time conditional content when a countdown timer expires in Divi. To do this, we are going to use Divi’s new condition options to display certain content before and after a set date and time that coincides with a countdown timer. Before the timer runs out, visitors will be able to take advantage of a limited-time deal. After the timer runs out, visitors will be invited to subscribe to a newsletter to get deal notifications.
Let’s get started!
- 1 Sneak Peek
- 2 Download the Layout for FREE
- 3 Download For Free
- 4 What You Need to Get Started
-
5
How to Display Time Conditional Content when a Countdown Timer Expires in Divi
- 5.1 Step 1: Uploading the Pre-made Divi Layout
- 5.2 Step 2: Setting the Date & Time on the Countdown Timer
- 5.3 Part 3: Add Time Condition to Display Section Before the Set Date and Time
- 5.4 Step 5: Creating the Time Conditional Content for After Timer Expires
- 5.5 Step 6: Add/Update Time Conditional Content
- 6 Final Result
- 7 Final Thoughts
Sneak Peek
Here is a quick look at the time condition content and countdown timer we’ll build in this tutorial.
Here is the section before the countdown timer expires.

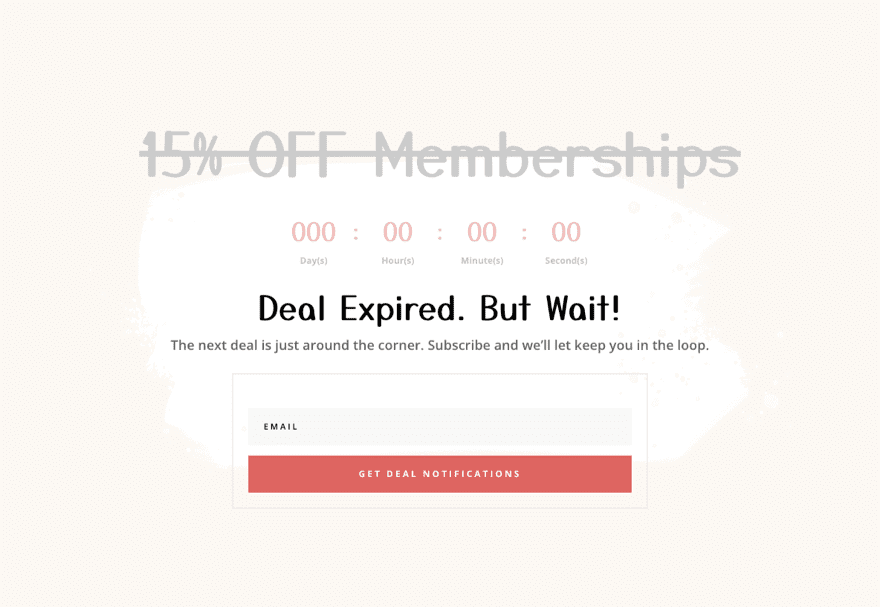
And here is the section after the countdown timer expires.
Download the Layout for FREE
To lay your hands on the designs from this tutorial, you will first need to download it using the button below. To gain access to the download you will need to subscribe to our newsletter by using the form below. As a new subscriber, you will receive even more Divi goodness and a free Divi Layout pack every Monday! If you’re already on the list, simply enter your email address below and click download. You will not be “resubscribed” or receive extra emails.

To import the section layout to your Divi Library, navigate to the Divi Library.
Click the Import button.
In the portability popup, select the import tab and choose the download file from your computer.
Then click the import button.

Once done, the section layout will be available in the Divi Builder.
Let’s get to the tutorial, shall we?
What You Need to Get Started

To get started, you will need to do the following:
- If you haven’t yet, install and activate the Divi Theme.
- Create a new page in WordPress and use the Divi Builder to edit the page on the front end (visual builder).
- Choose the option “Build From Scratch”.
After that, you will have a blank canvas to start designing in Divi.
How to Display Time Conditional Content when a Countdown Timer Expires in Divi
Step 1: Uploading the Pre-made Divi Layout
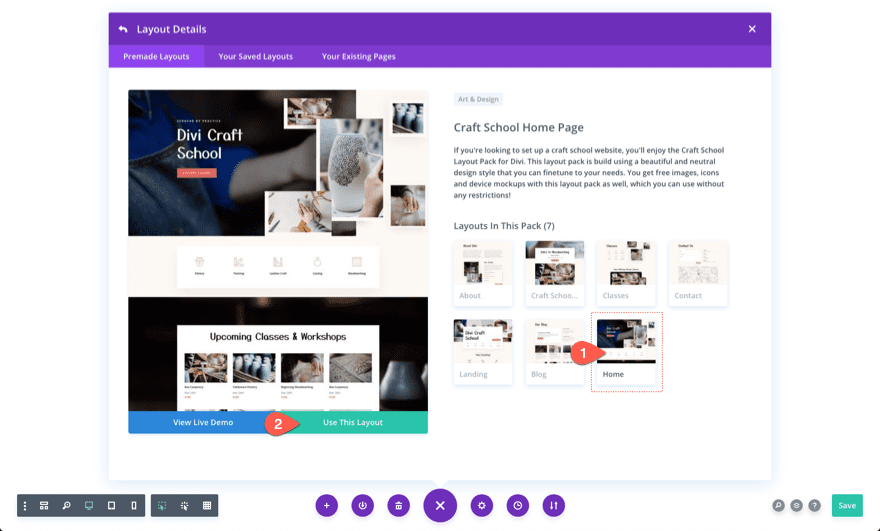
Open the page settings menu and then click the plus icon to bring up the Load From Library popup. Find the Craft School Layout Pack and then click to use the Craft School Home Page Layout.
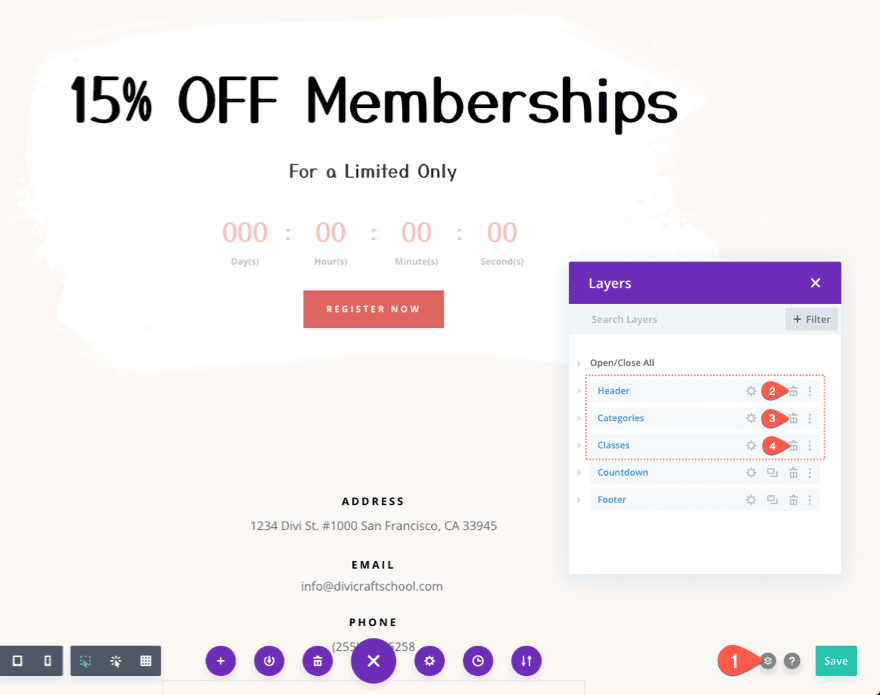
Once the layout has been added, delete the first 3 sections of the layout so that only the countdown section and footer section remain. We are going to use these sections to build our time conditional content and countdown timers.
Step 2: Setting the Date & Time on the Countdown Timer
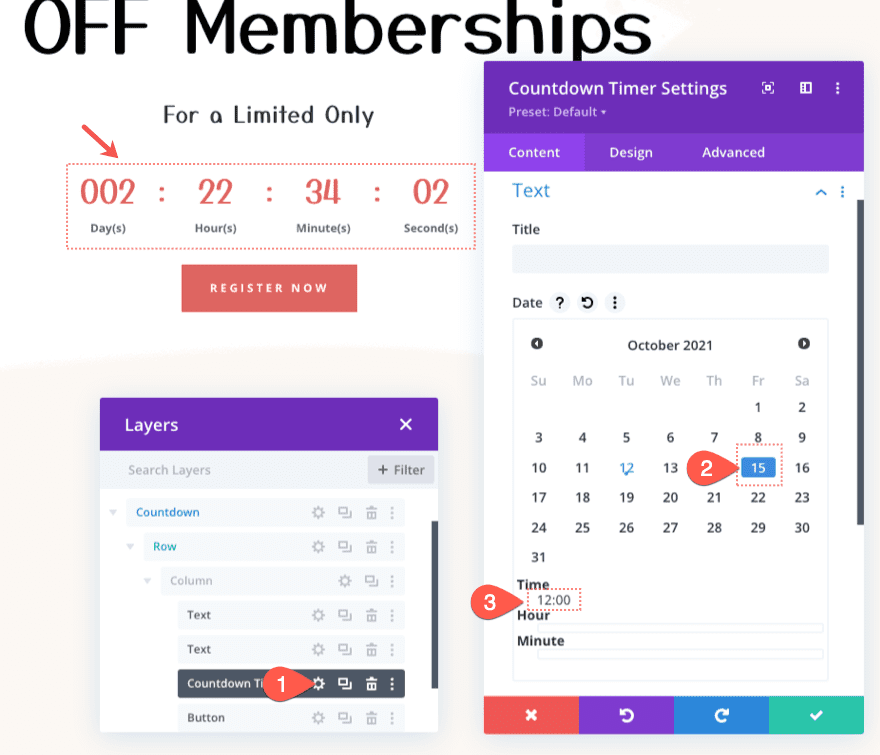
Next, find the countdown timer module and open the settings. Under the content tab, add the date and time you want the deal to expire. In this example, we are setting the date to October 15 and the time to 12:00.
NOTE: We will use this same date and time when we add the time conditional content later.
Part 3: Add Time Condition to Display Section Before the Set Date and Time
In order to change the content whenever the countdown timer expires, we need to add a time condition to display the entire section before the set date and time previously added to the countdown timer.
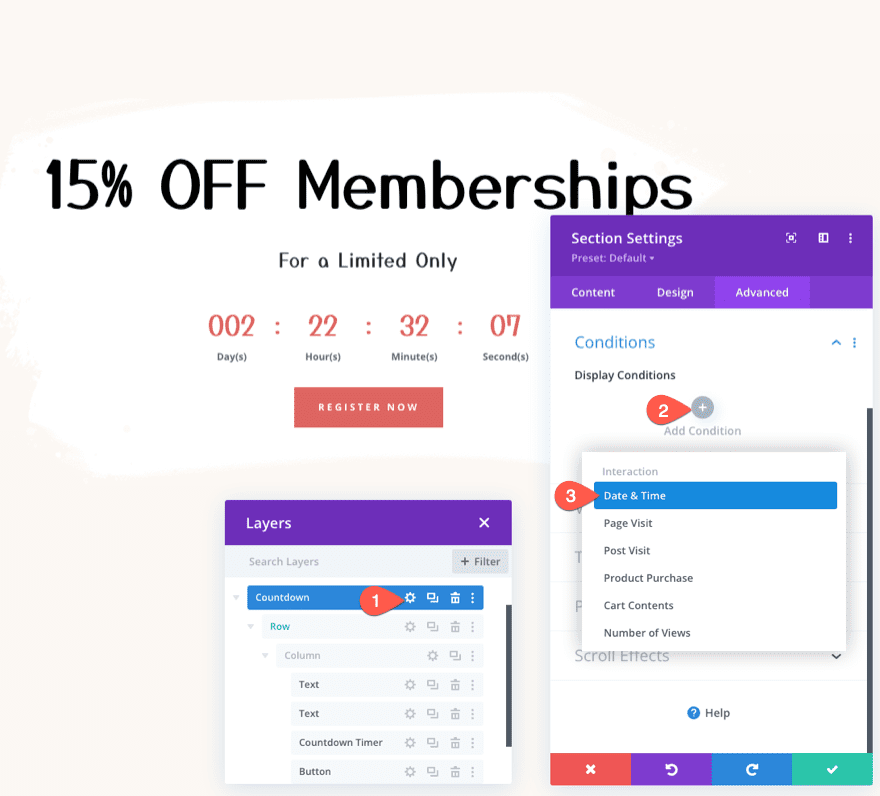
To do this, open the settings for the section containing the countdown timer.
Under the advanced tab, click to add a new display condition. From the dropdown, select the Date & Time condition.
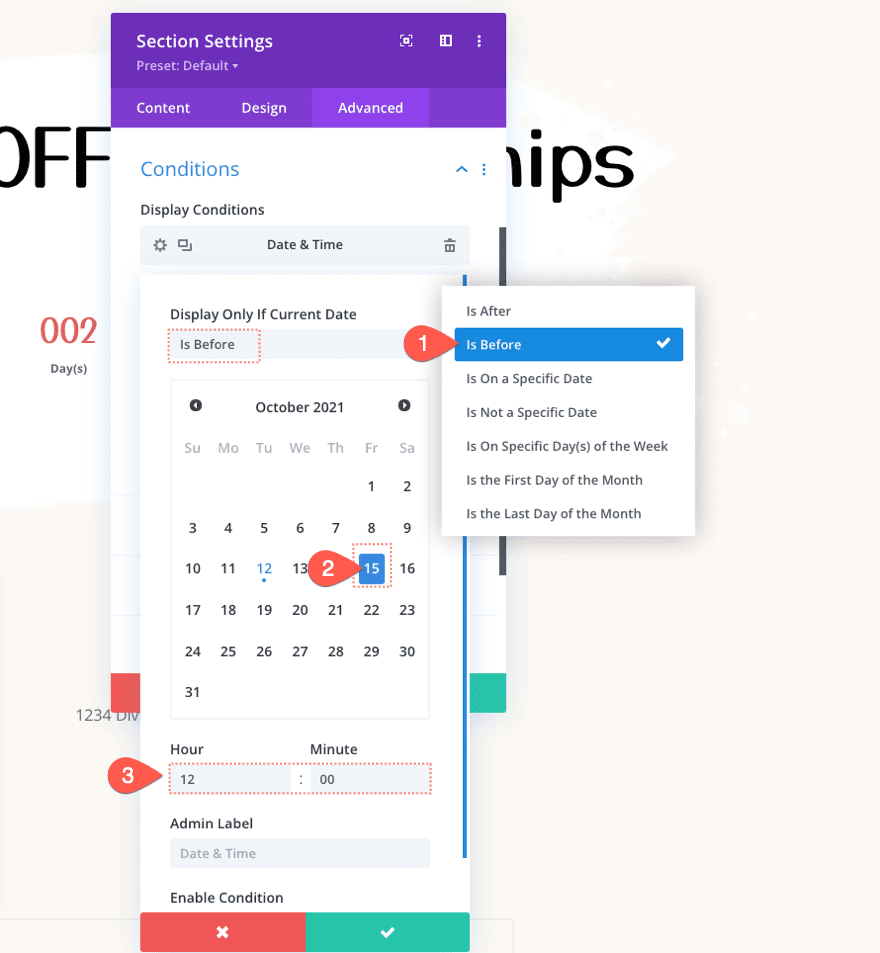
In the same box, update the settings of the Date and Time conditions as follows:
- Make sure the option Display Only If Current Date is set to Is Before.
- Choose the Date and Time that matches the date and time previously added to the countdown timer.
Step 5: Creating the Time Conditional Content for After Timer Expires
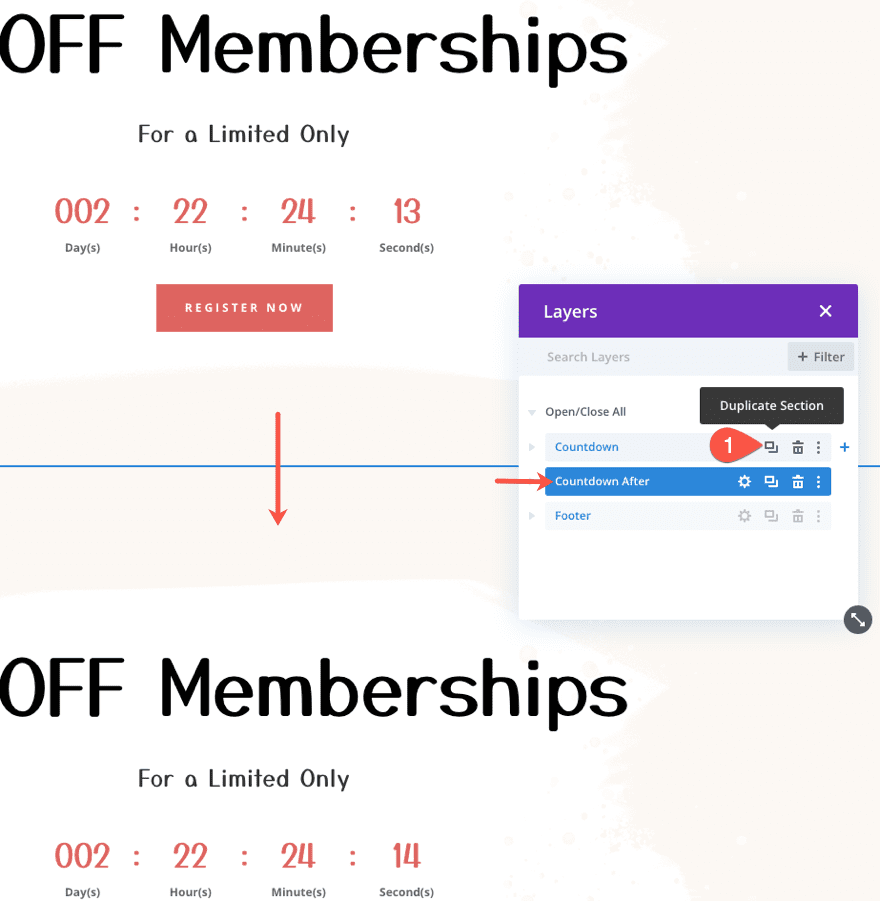
We already have a section of content that will show before the timer expires. Now we need to create a new section of content that will be displayed after the timer expires. To do this, duplicate the section with the time condition. On the new section, you can adjust the admin label to read “Countdown After” so you won’t confuse the two.
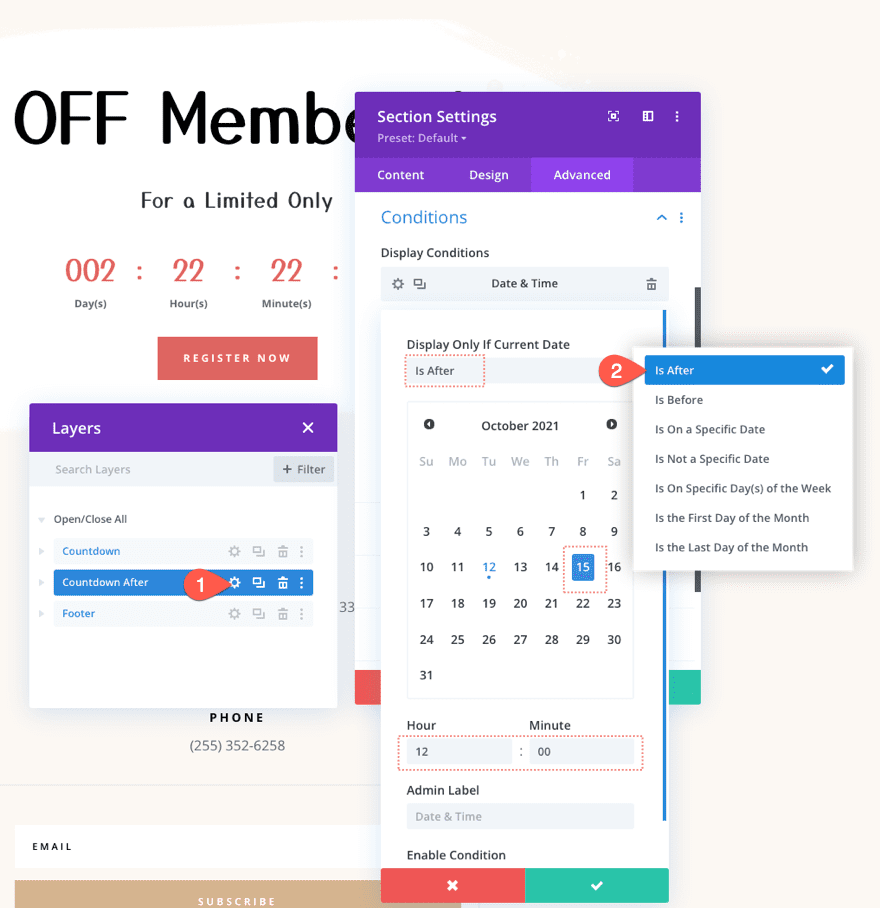
Open the settings for the duplicate section and update the Date & Time display condition option Display Only If Current Date to Is After. Make sure to keep the date and time exactly the same as the countdown timer. We want this section to be displayed after the countdown timer expires.
Step 6: Add/Update Time Conditional Content
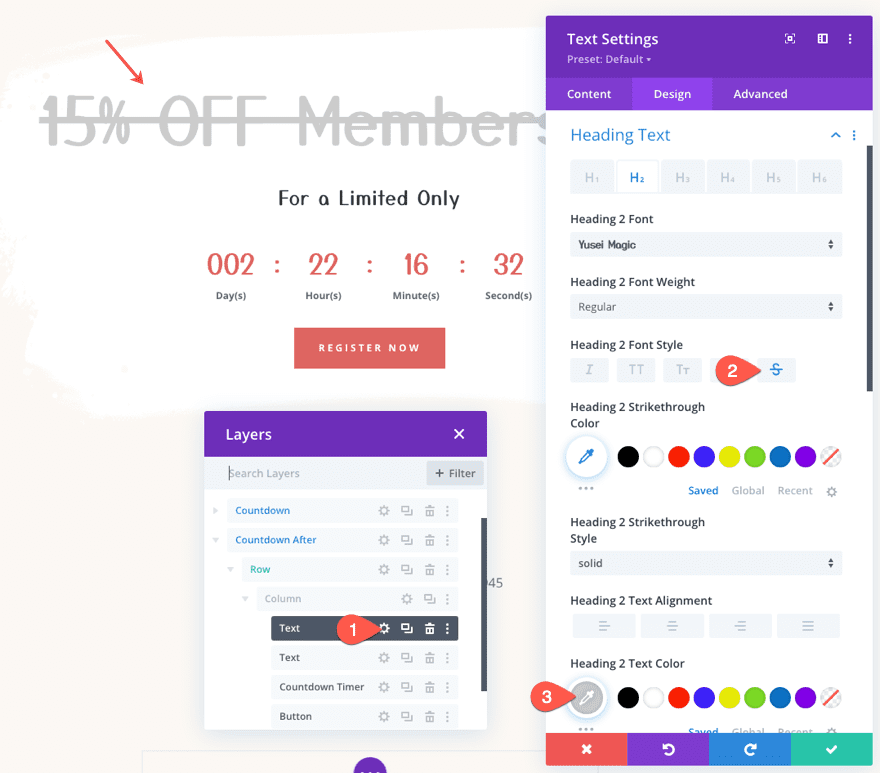
Once the deal has ended, we want to reflect that by adding a strike through the heading as well as give it a light gray color.
To do that, open the settings of the text module containing the main heading and update the following:
- Heading 2 Font Style: Strikethrough
- Heading 2 Text Color: #ddd
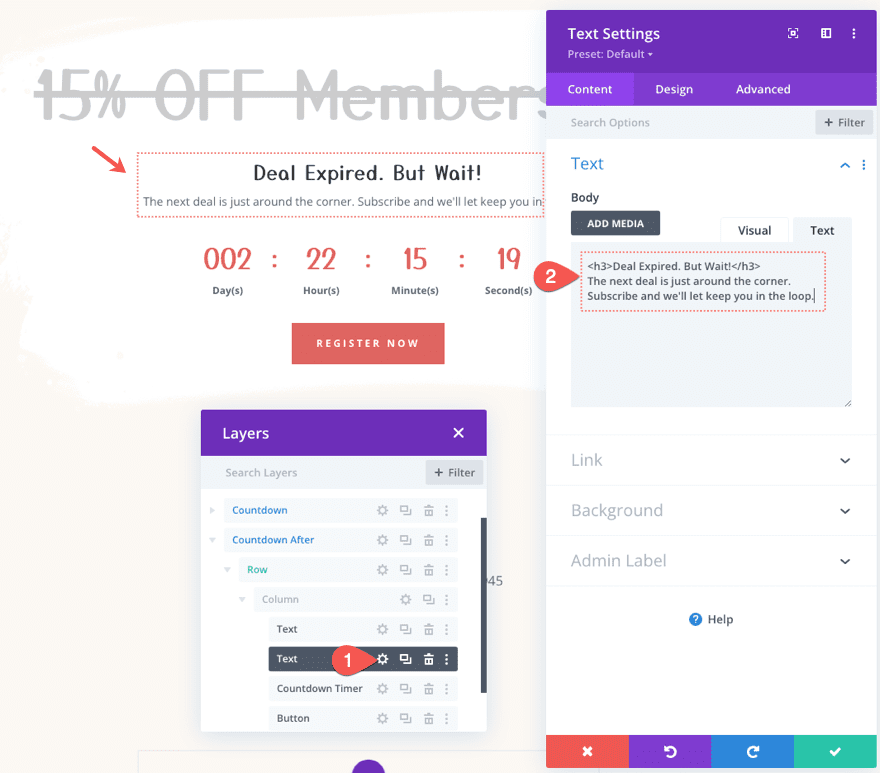
Next, open the settings for the second text module and change the content as follows:
html
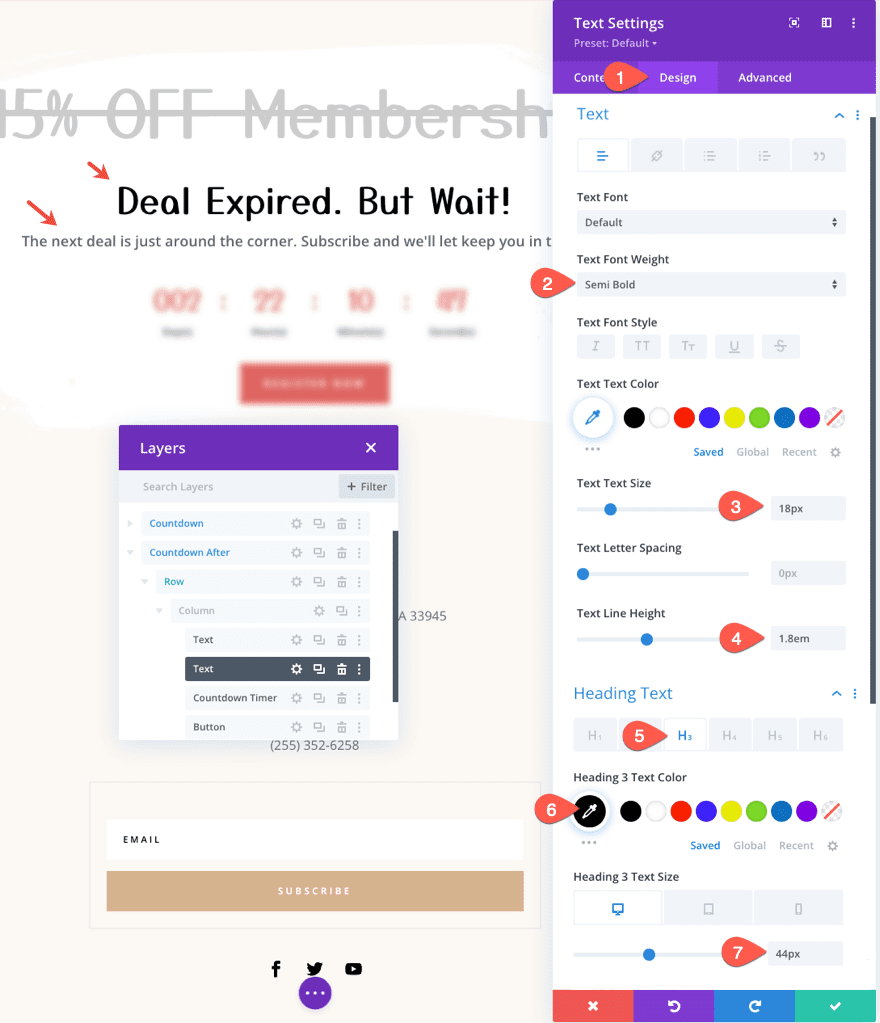
Under the design tab, update the text styling as follows:
- Text Font Weight: Semi Bold
- Text Text Size: 18px
- Text Line Height: 1.8emHeading 3 Text Color: #000
- Heading 3 Text Size: 44px (desktop), 38px (tablet and phone)
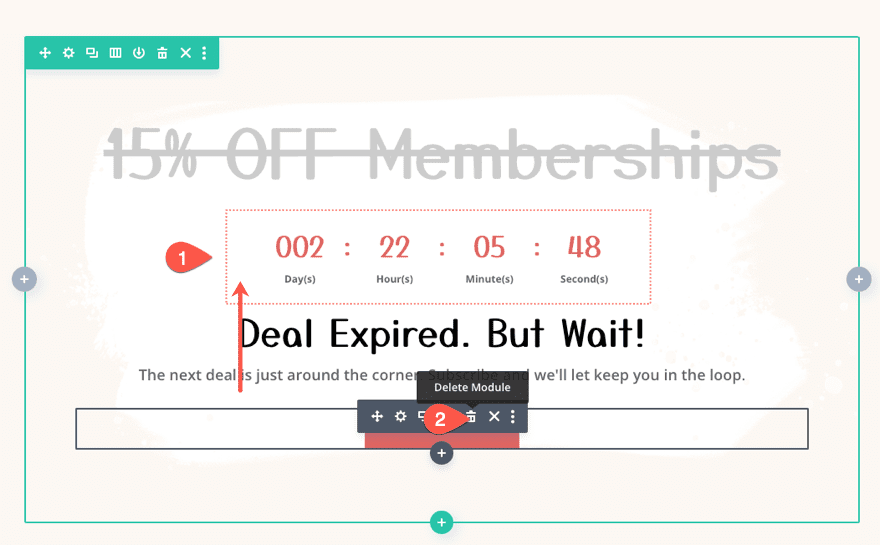
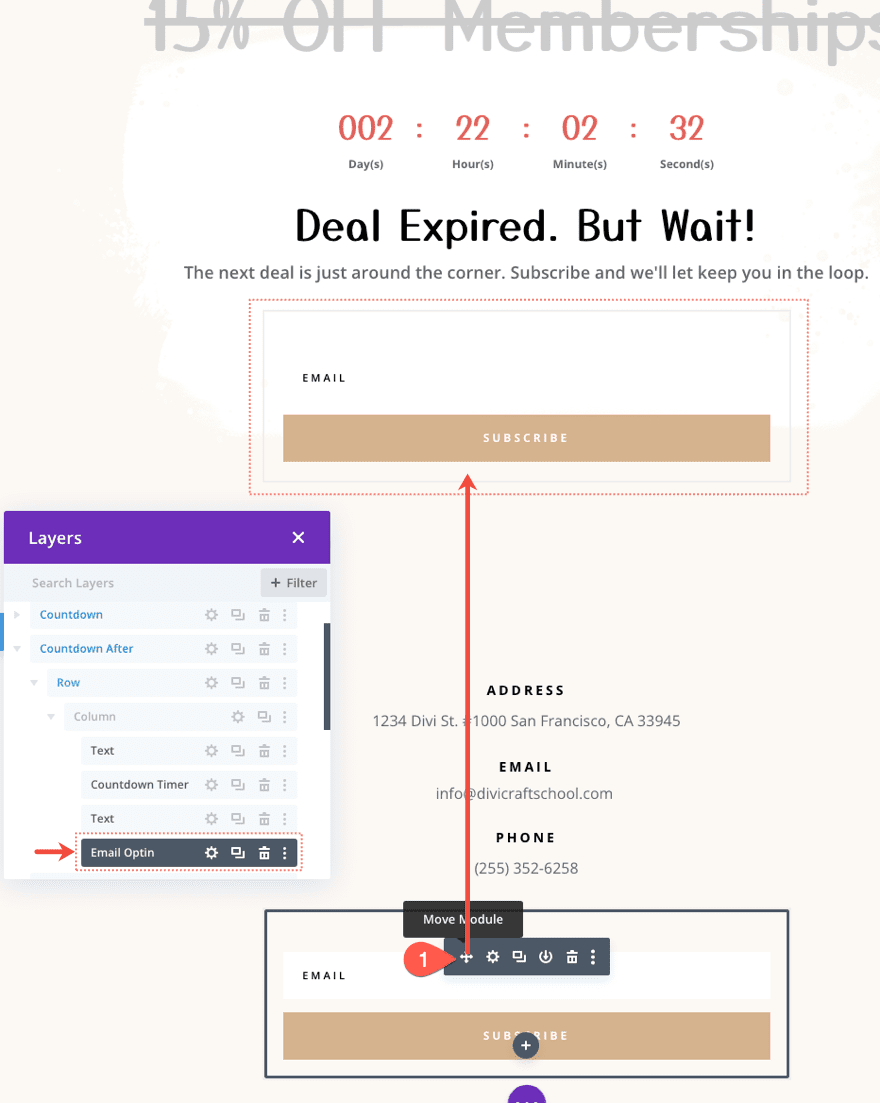
Next, move the countdown timer up one position, right below the top text module with the main heading. Then delete the button module at the bottom. We will replace this with an email option module.
To create the email optin, move (or copy and paste) the existing email optin module in the bottom footer section of the pre-made layout and place it in the section containing the after content under the bottom text module
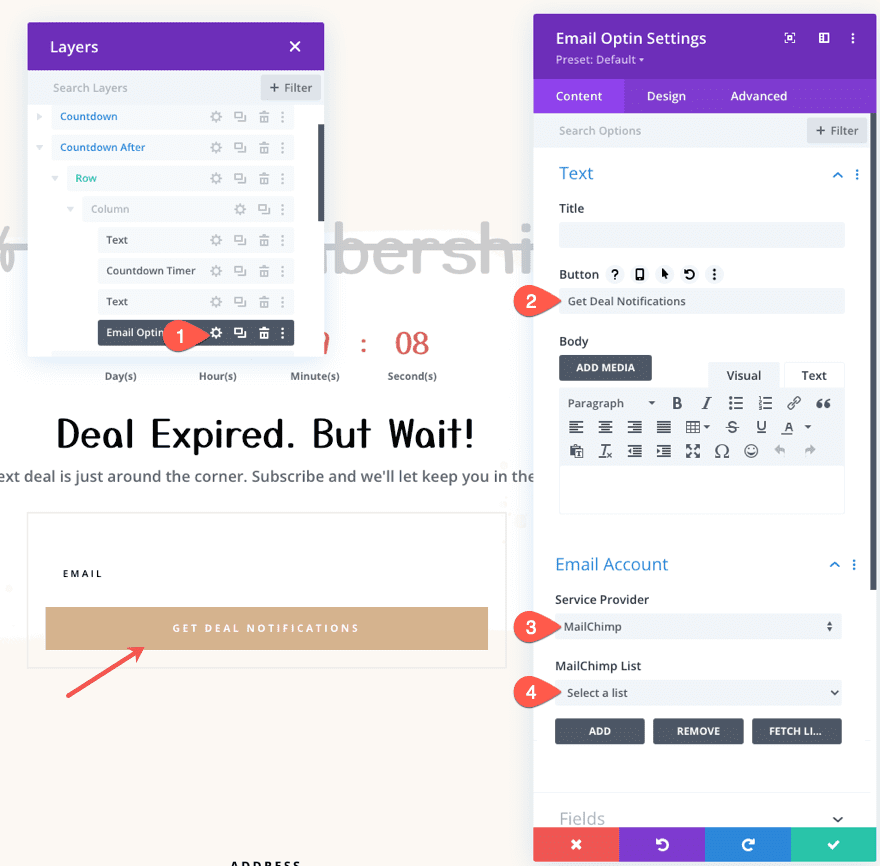
Open the email opt-in settings and update the button text and email account information as needed.
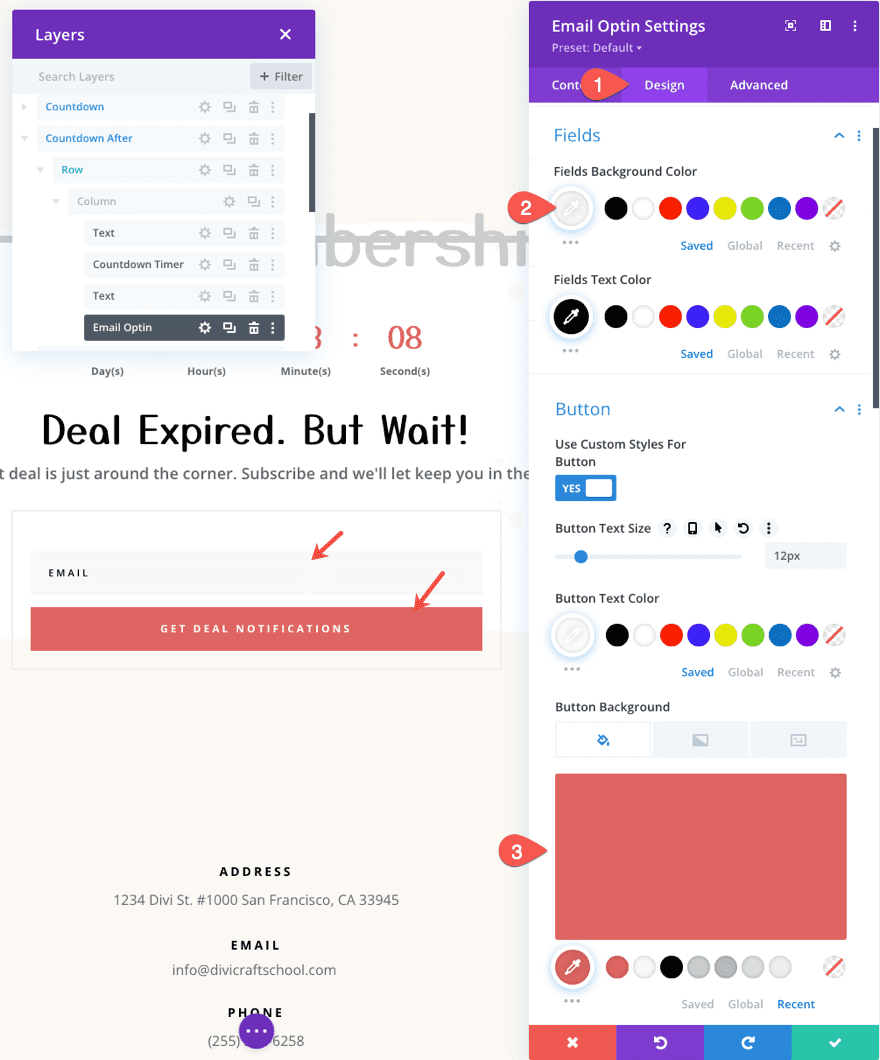
Under the design tab, update the field and button colors as follows:
- Fields Background Color: #f8f8f8
- Button Background Color: #de6561
Final Result
That’s it! Let’s review what we have done.
- We set the countdown timer to end on Oct. 15 at 12:00.
- We added a Date & Time display condition to the first section so that it would be displayed BEFORE Oct. 15 at 12:00.
- We created a new section of content with a Date & Time display condition that displays the section AFTER Oct. 15 at 12:00.
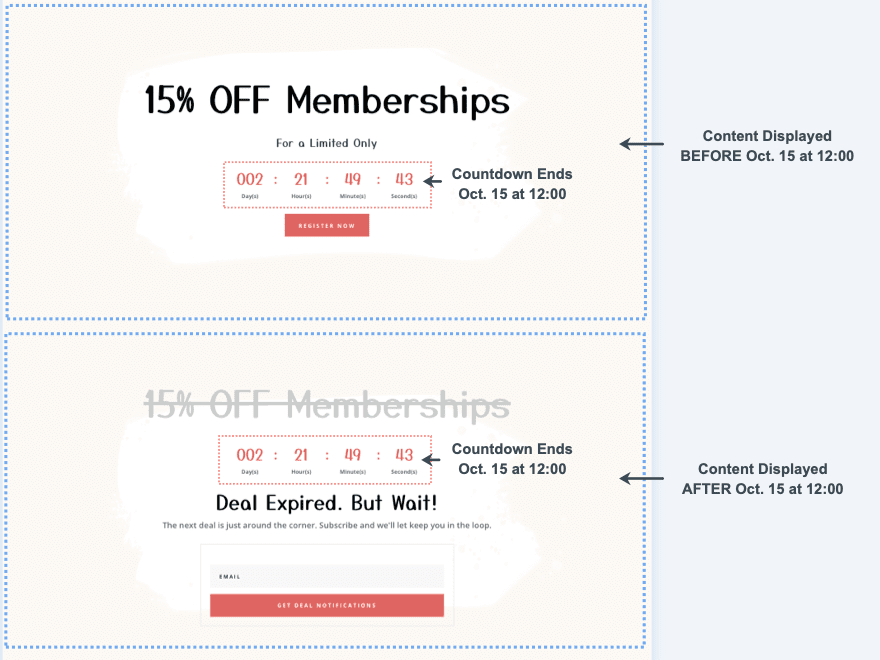
Here is the section before the countdown timer expires.
And here is the section after the countdown timer expires.
Final Thoughts
Time conditional content and countdown timers make a useful combo when promoting limited-time deals. And with Divi, you can easily take control of both. Once the countdown timer’s date and. time is set, all you need to do is choose what content you want to show before and/or after that same date and time. Hopefully, this will help give your visitors a better experience when seeing those expired deals.
One more thing before we wrap up. It’s also worth mentioning that, while this post focuses on building countdown timers with Divi, there are other solutions out there for non-Divi users. Be sure to take a look at our list of the best WordPress countdown plugins!
I look forward to hearing from you in the comments.
Cheers!


Hello,
thank you very much for this tutorial! very well explained, good job !
Awesome! Thanks Chowh1.
This is awesome! Thank you very much for the tutorial.