
Image galleries continue to be a popular feature for websites. And with Divi, adding a beautiful and responsive image gallery to your website almost too easy. This leaves some extra time to consider ways to make those images standout. One simple way to make your images pop is to start with a black-and-white version of each image that changes to the color version when hovering over the image. This effect has been around for a while but continues to be an effective and creative way to engage users with a surprising display of a beautiful image.
In this tutorial, I’m going to show you just how easy it is to create a gallery of images that changes from black-and-white to color with Divi’s Gallery Module. With Divi’s built-in filter effects and hover options, you can do this with a few clicks!
Let’s get started!
Today’s Before & After
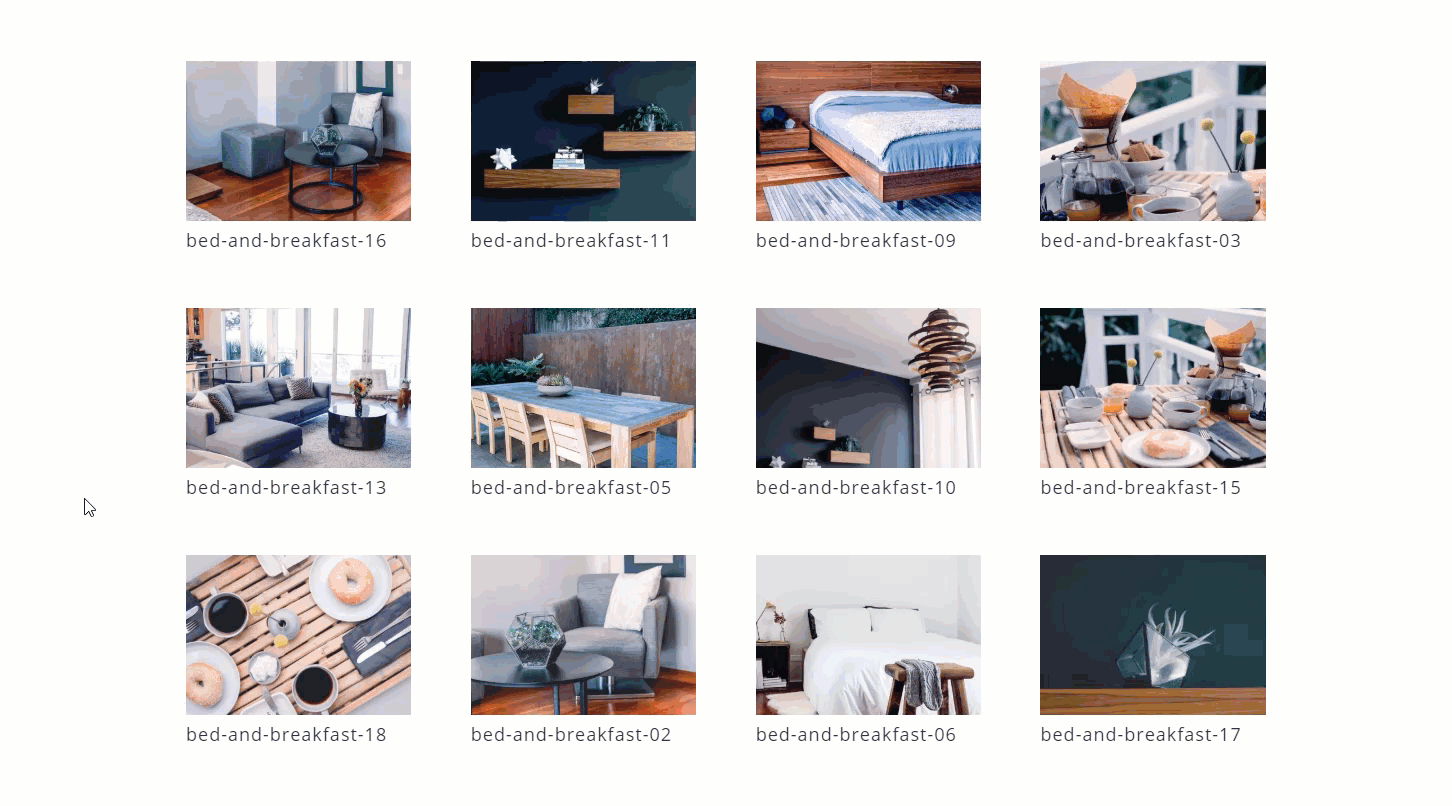
Here is what the image gallery looks like by default using the Divi Image Gallery:
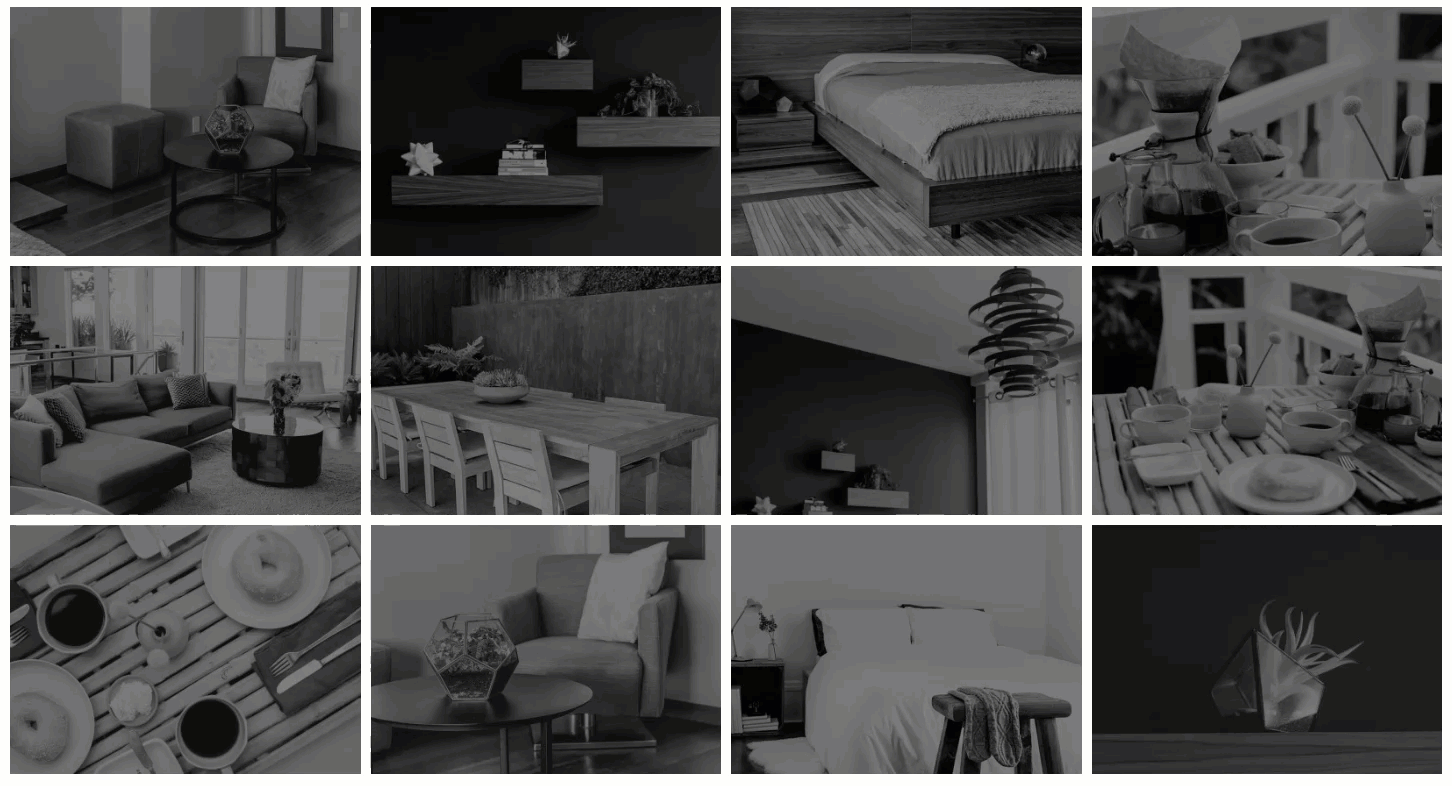
Here is the new image gallery that changes the black-and-white images to color when hovering over each image.
What You Need to Get Started
Subscribe To Our Youtube Channel
For this tutorial, all you will need is the Divi theme installed and active. After that, you will need to create a new page, add a title, and click to use the Divi Builder. Then select the option “Build from Scratch”. Publish your page and then click the button to build on the front end. Now you are ready to go.
Setting up the Image Gallery
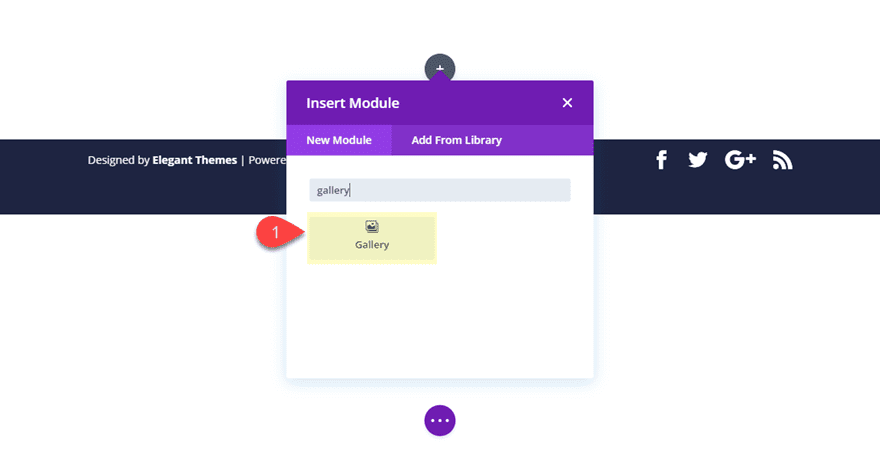
Using the Divi Builder on the front end, add a new regular section with a one-column row. Then add the Gallery Module to the row.
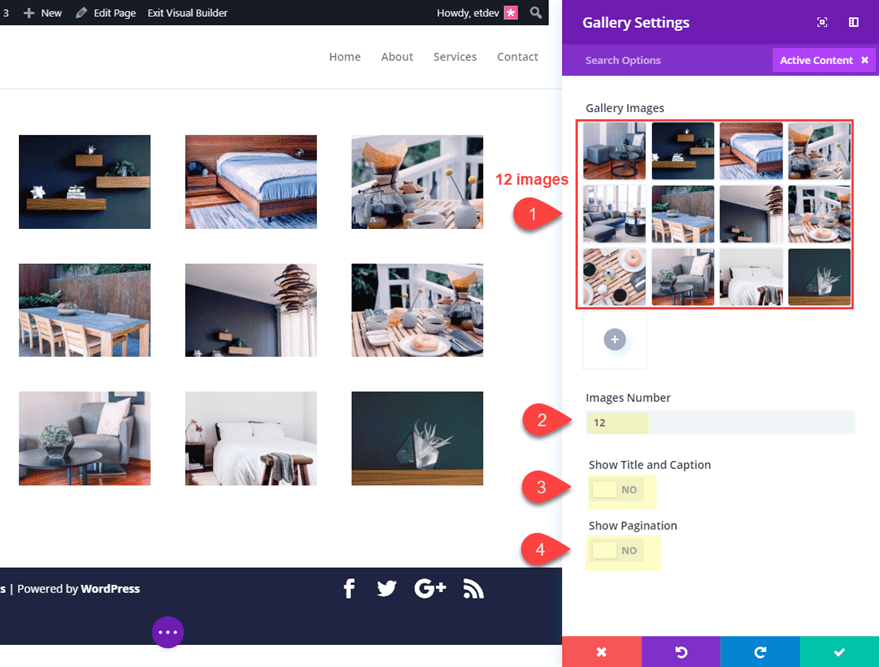
In the Gallery Settings, select the gray plus icon in the Gallery Images box to start adding the images from your media library.
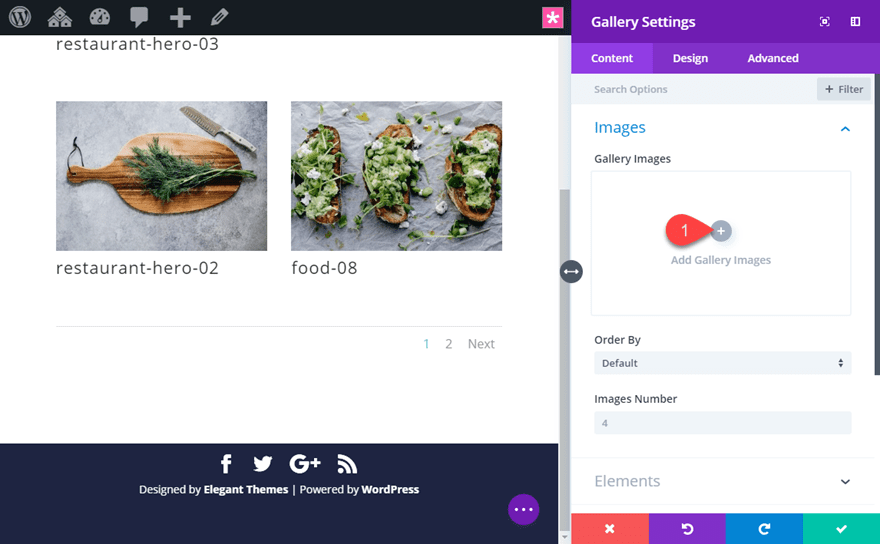
For this example, I’m adding a total of 12 images so that the images will display nicely with the default four-column grid layout on desktop.
Then update the following options:
Images Number: 12
Show Title and Caption: NO
Show Pagination: NO
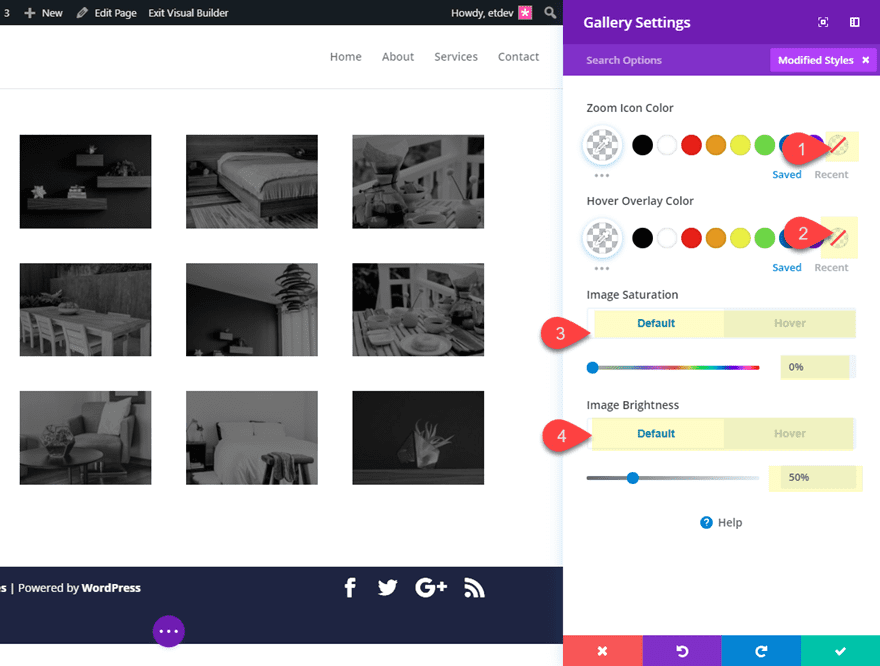
Now jump over to the design tab and update the following:
Zoom Icon Color: transparent
Hover Overlay Color: transparent
Image Saturation: 0% (default), 100% (hover)
Image Brightness: 50% (default), 100% (hover)
Setting the image saturation to 0% by default basically tones down the color of the image all the way down leaving only black and white. Then we simply set the saturation back to 100% to bring back the color. The image brightness set to 50% just makes the image a little darker by default. This is optional of course, but I like the contrast it creates when hovering over the image. It makes the color image pop out even more in my opinion.
At this point, the hover effect of each image is full functional and will change your images from a black-and-white version to a color version.
All we need to do is make our gallery fullwidth with a little spacing between each image.
Creating a Fullwidth Layout for the Image Gallery
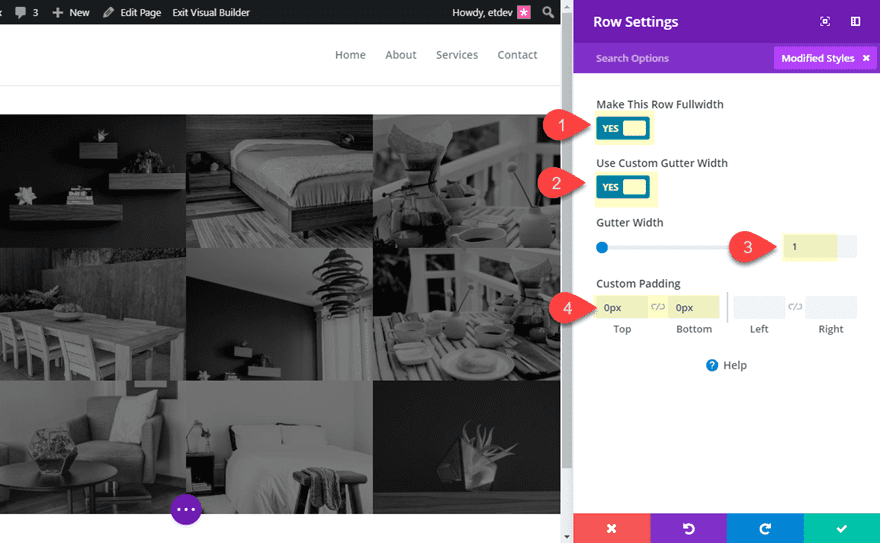
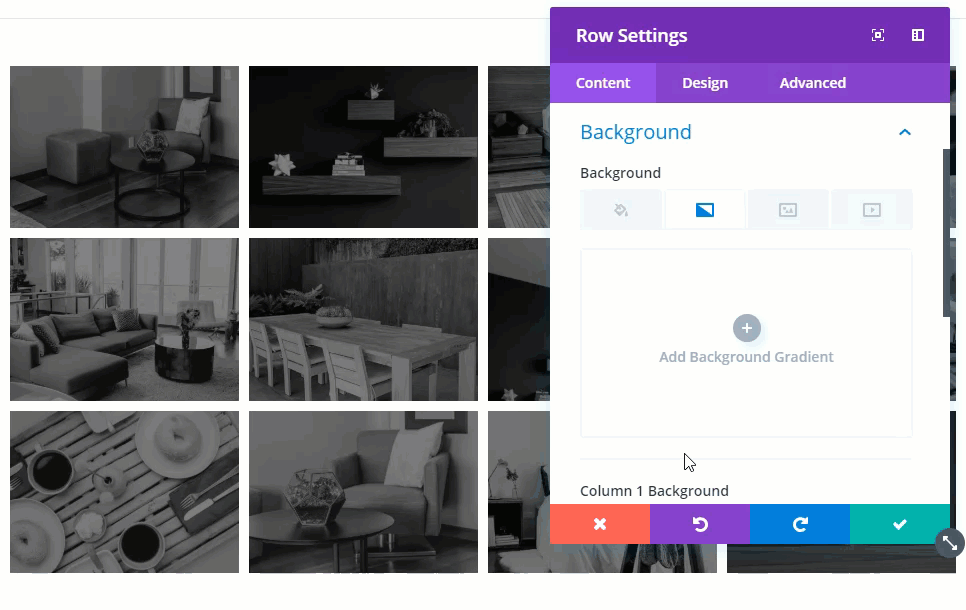
To create the fullwidth layout for the image gallery, let’s save our gallery settings for now and open the row settings. Under the design tab, update the following:
Make This Row Fullwidth: YES
Use Custom Gutter Width: YES
Gutter Width: 1
Custom Padding: 0px top, 0px bottom
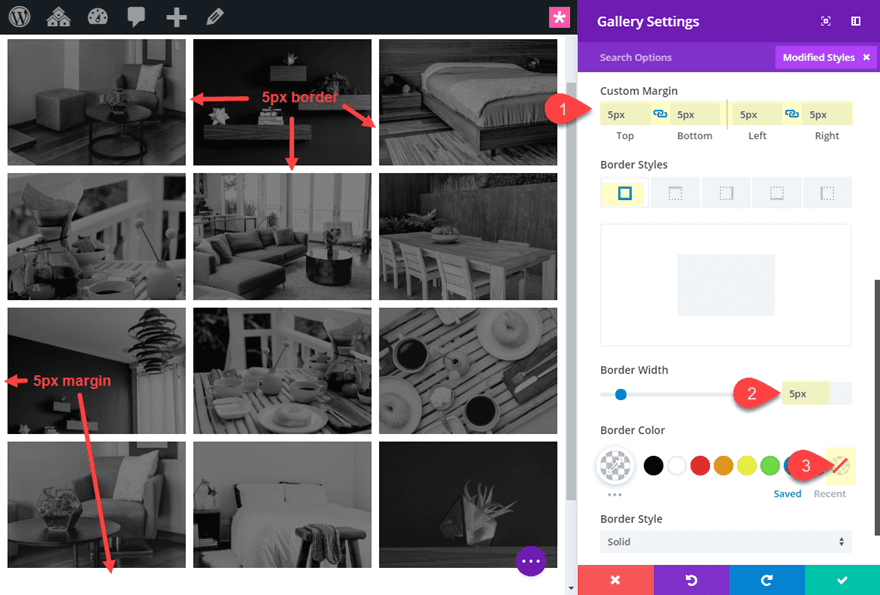
This will make the gallery span the full width of the page and take out any margin between the images. If you like this style you can keep it of course, but I’m going to show you how to add your own custom margin between those images.
To add a custom margin between the images in the gallery, open the gallery module and update the following:
Custom Margin: 5px top, 5px bottom, 5px left, 5px right
Border Width: 5px
Border Color: transparent
Final Result
Now let’s check out the final result of our design.
And, since our image borders are transparent, we can easily change the background of our row to different colors or gradients.
Final Thoughts
I hope this tutorial will give you a little inspiration for making your image galleries standout. For some reason, changing images from black-and-white to color seems to make those images look even more beautiful on hover. And don’t forget to explore the countless design variations possible with Divi’s built-in style options. Have fun!
I look forward to hearing from you in the comments.
Cheers!


Hello and thanks for this great tutorial. I have one Problem. My hole gallery changes from black-white to color, not each photo. I have now imitated this exactly 5 times after this tutorial, but always changes only the complete galery – so all pictures. What can be wrong here?
Hi Nice tips.
I tried implementing same but noticed that the new Divi updates don’t have hover and default view anymore
I really like this post. One problem do, strangely enough don’t have any hoover settings, the same as you have on the picture. Divi is updated till the latest version of today.. Any ideas?
Very nice work! It would even be better if the image and gallery modules had a zoom-on-hover setting… Any chance we might see this in the future?
Thanks, dear,
Thank you so much for sharing this image gallery creating technique.
Very nice! I thought we would need some custom CSS code to achieve this, but all this is possible with the Divi options.
Great Tutorial and a wonderful possibility to make galleries really interesting.
I just tested this on mobile, and discovered it hardly makes sense to display the images in black and white there. There is hardly any difference between the hover-like touch and a finger-click to display the image in lightbox. Is it possible to use the b&w-effect only on desktop?
Your tutorials are always amazing – so we are getting more and more ideas to tweak our websites built with Divi!
Hi Jason, I Have got to say that is the simplest and most stunning effect, so easy to do and makes for a standout page, absolutely love it
Cheers & Thanks
Adrian
great job beautiful effect
can have square images with this module by changing the css
thanks to the whole team
Precisely today I worked with a gallery when I received the notice of this post in my mailbox :), I saw it, I liked it and I implemented it, thank you very much, easily and visually very nice and current!
Greetings from Asturias!
Greetings! I love it when that happens. Happy to help.
Thank you Jason, great tutorial, very inspiring.
As a beginner:… what size do the images have to be? Will they auto-adjust or is there a preferred size for this effect? Thanks again, fantastic job!!!
Awesome!
How could you do the same thing with the portfolio module? The portfolio module does not have hover effects for images.
Hi Wolf…
Try adding below to the additional css:
.et_portfolio_image{
-webkit-filter: grayscale(100%);
filter: grayscale(100%);
-webkit-transition: all 2s ease;
transition: all 2s ease;
}
.et_portfolio_image:hover {
-webkit-filter: grayscale(0%);
filter: grayscale(0%);
-webkit-transition: all 2s ease;
transition: all 2s ease;
}
Cheers
Is this added to the page or the element?
Thanks Trent!
Love this!
Now, how could I do the same thing in the portfolio module as it does not provide on hover options for images?
This is really elegant and well done.
Love it.
Can we expect a “Mosaic” layout at anytime soon?
Nearly all my clients want and expect it and I don’t like using 3rd party plugins.
Keep up the great work.
(All the sites I do are in DIVI)
I think this is a great idea! Thanks for the suggestion.
This is really elegant and well done.
Love it.
Can we expect a “Mosaic” layout at anytime soon?
Nearly all my clients want and expect it and I don’t like using 3rd party plugins.
Keep up the great work.
(All the sites I do are in DIVI)