
A tilt effect on hover is one of those small details that makes a layout feel considered. The image shifts with the cursor, pulls back slightly, and suddenly the whole page feels alive.
Portfolio sites and product pages lean heavily on this effect, and for good reason: it keeps visitors engaged without demanding too much attention. Divi 5‘s Interactions system lets you build it directly in the Visual Builder. We’ll walk you through the entire process.
A Brief Introduction To Divi 5’s Interactions
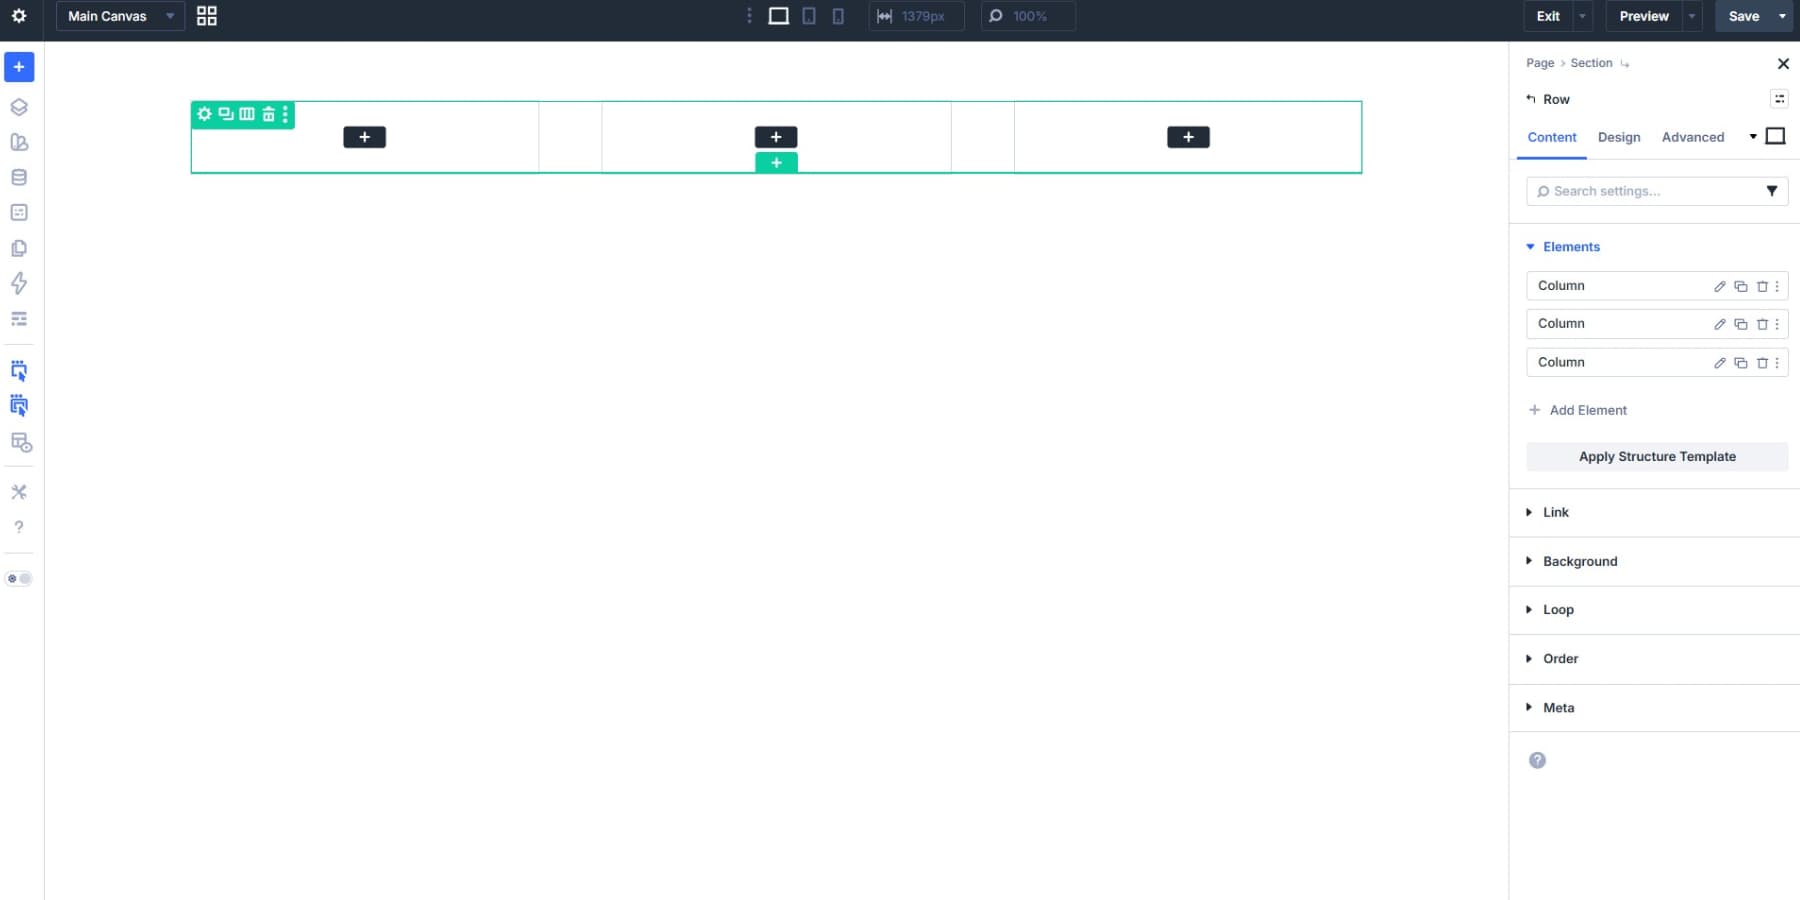
Divi 5 Interactions runs on three parts: a trigger, an effect, and a target. The trigger starts things off, like a hover or a click. The effect is what happens as a result, like a position change or a visibility toggle. The target is the element that receives it.
Subscribe To Our Youtube Channel
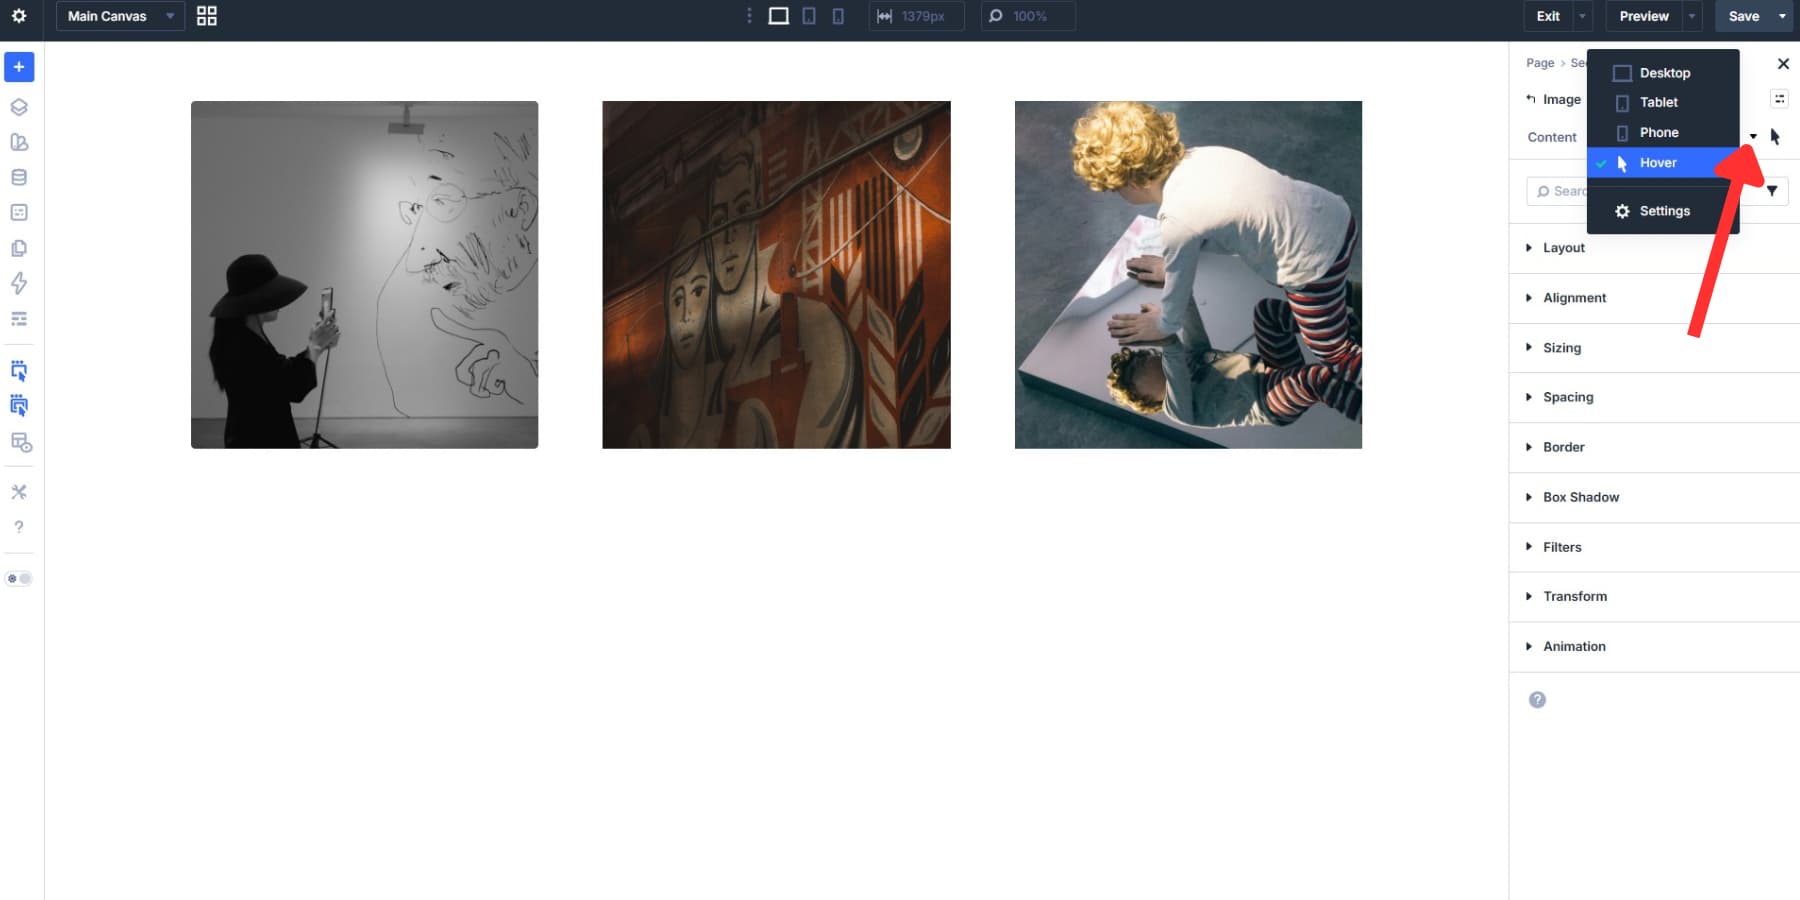
All of this lives under the Advanced tab of any module, column, row, or section inside the Visual Builder. The controls are fully visual, so coding knowledge isn’t needed.
The system covers a wide range of behaviors. A Hover trigger can fire a position shift. A Click trigger can toggle content on and off. A Viewport Enter trigger can start an animation as soon as an element scrolls into view. You can also stack multiple triggers on a single element when you need something more layered.
Each interaction supports a time delay, too, so you can stagger effects without touching a timeline editor. Pair that with Divi 5’s preset system, and you can define a reusable style, like a rotated state or a color shift, and apply it as an effect across multiple elements on the same page. That flexibility is what makes Interactions one of the more practical tools in the Visual Builder, letting you create pop-ups, animations, toggles, and more without coding.
A Preview Of What We Are Going To Build
Three images in a row. Hover over one and it lifts, the shadow beneath it deepens, and the column tilts in 3D space as the cursor moves across it. Pull away, and it settles back into place.
Portfolio sites and product pages get the most out of this. The effect adds a layer of depth that keeps visitors engaged without pulling focus from the content itself. It works just as well on a single hero image as it does across a full gallery row. Any layout where images carry visual weight benefits from that kind of physical responsiveness.
How To Natively Build A Tilt Image Effect On Hover In Divi 5
The build is shorter than the effect suggests. A few settings inside the Visual Builder, applied in the right order, and the whole thing comes together smoothly. Divi 5 gives you everything you need to pull this off natively, and the steps below will get you there:
Adding Images To Your Page
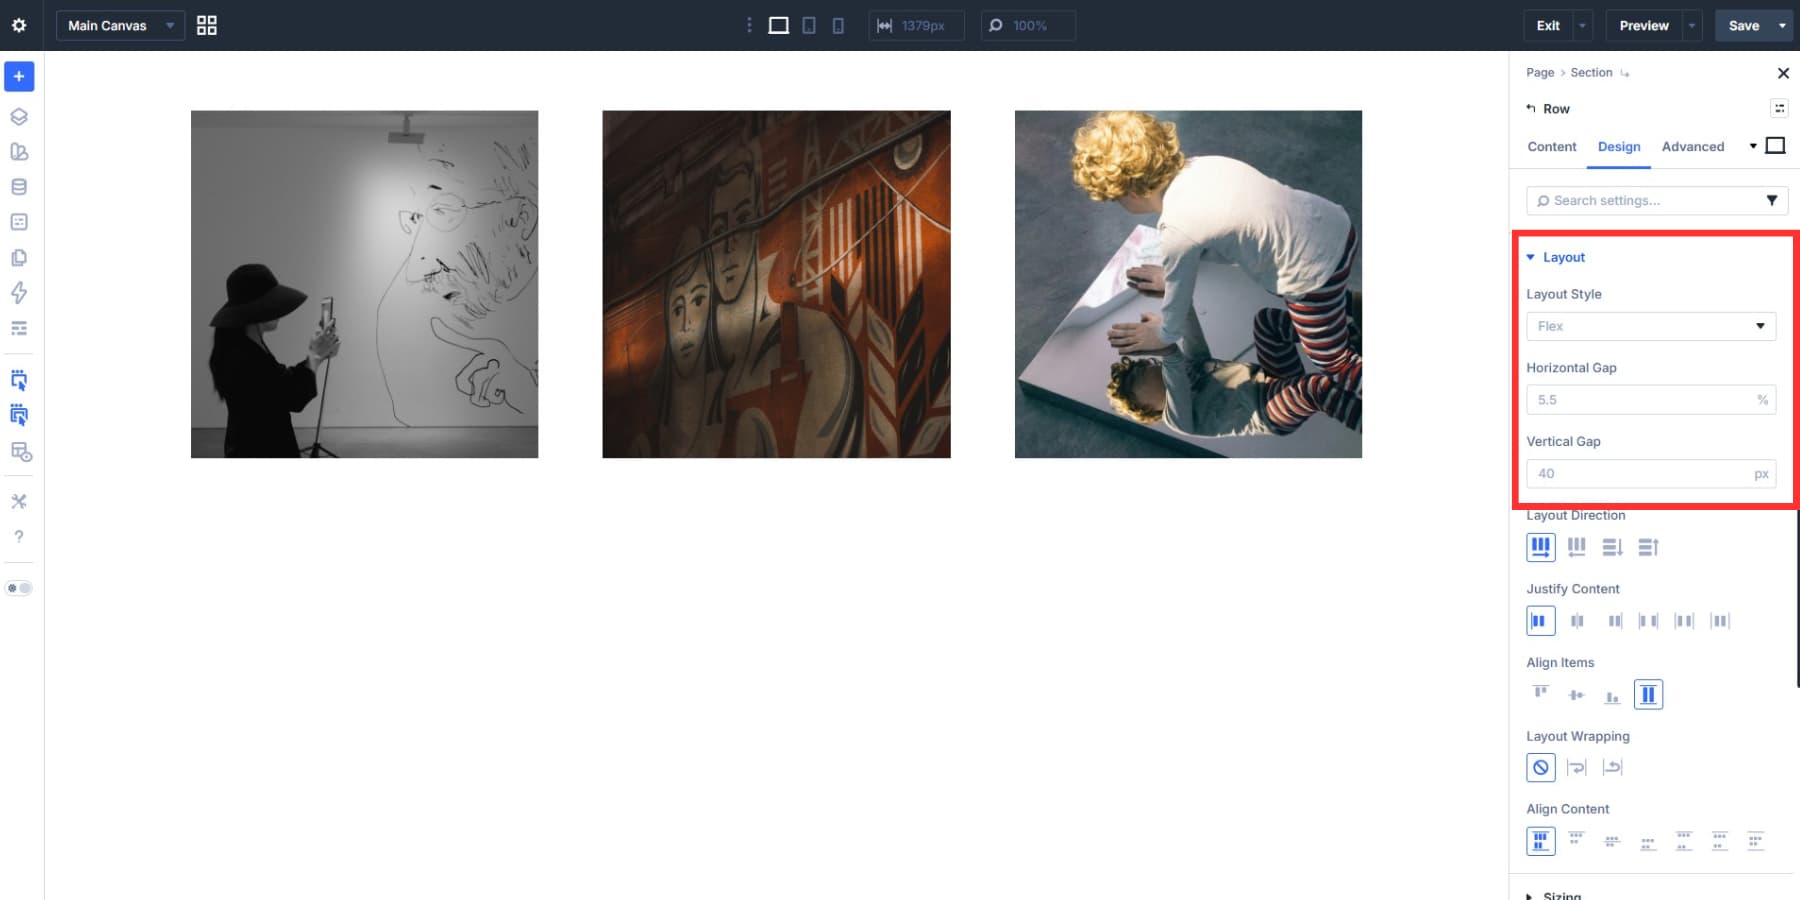
For this build, we used a three-column row with one Image module per column. That gives you a clean, side-by-side layout to work with, but any arrangement will do. A single hero image or a grid of six responds to the same technique just as well.
Drop your Image modules in and upload your photos. Square crops tend to hold up better than tall portraits in a side-by-side layout, though your content should guide that decision.
If you need even spacing between the images, adjust the column gap at the row level rather than adding padding to each module individually. That keeps your spacing values in one place and makes later adjustments much faster.
The Image module also has a link field under the Content tab. Portfolio pieces, product pages, and external URLs can all be wired up before you move on to styling.
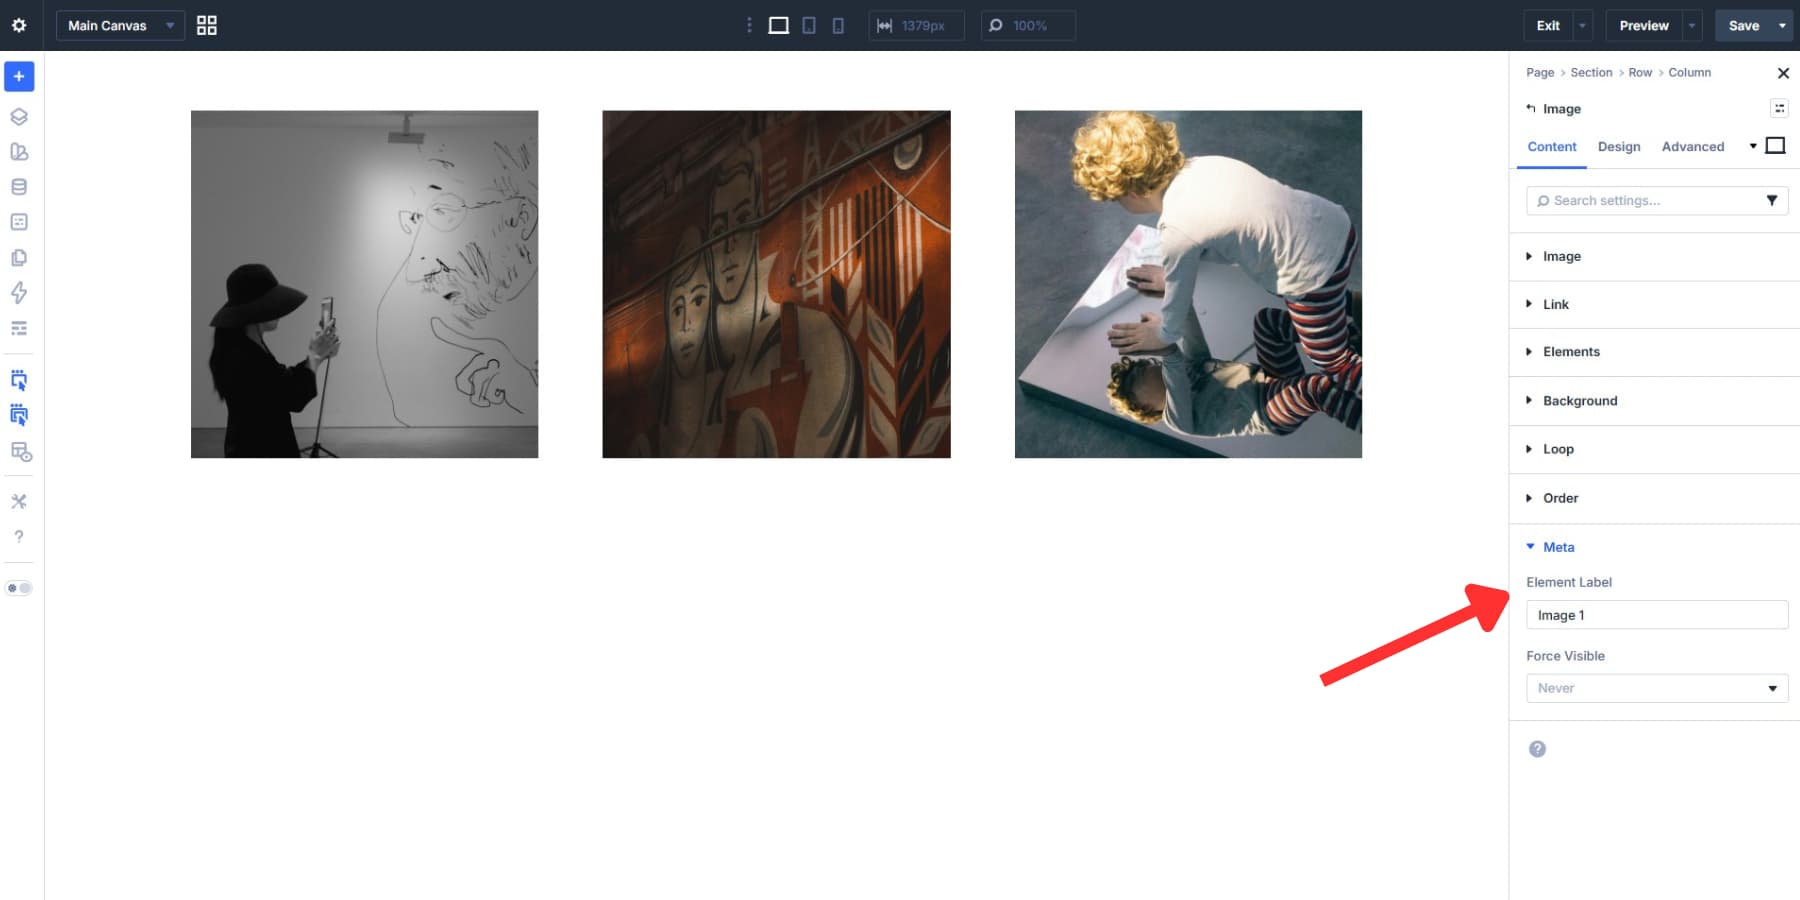
Before moving on, label each Image module and its parent column with a clear name. Something like “Image 1,” “Image 2,” and “Image 3” for the Image modules, and “Column 1,” “Column 2,” and “Column 3” for the columns works well. You can do this under the Element Label field in the Meta section of the Content tab. Those labels will come in handy in the steps ahead.
Styling The Default State
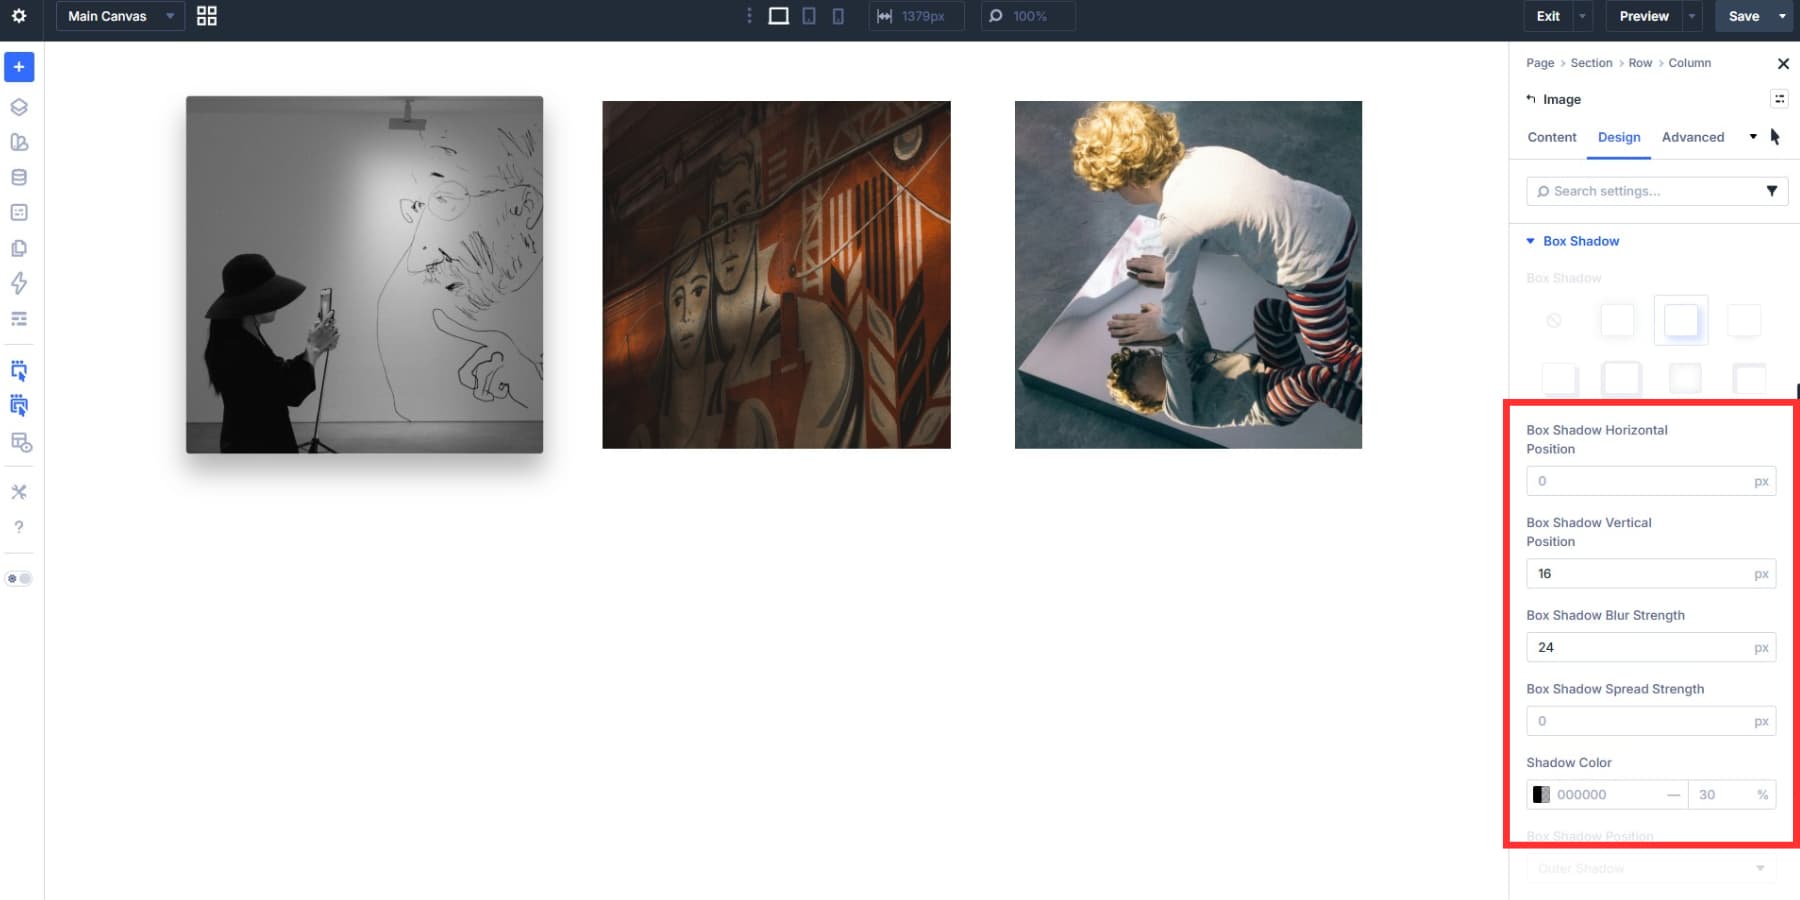
Open the Image module settings and go to the Design tab. There’s a full range of options available here: sizing, spacing, borders, box shadows, filters, and transforms. For this build, two of those will do the heavy lifting: Border and Box Shadow.
Border radius depends on your image content. Portrait photos and editorial shots tend to suit a soft corner well. Something around 8px to 16px reads naturally without softening the subject too much. Product shots on white backgrounds can go rounder, up to 24px, since the clean edges are already part of the look. Architectural or landscape photography generally works better with sharp corners or a very subtle 4px radius, since rounding competes with strong horizontal and vertical lines in the frame.
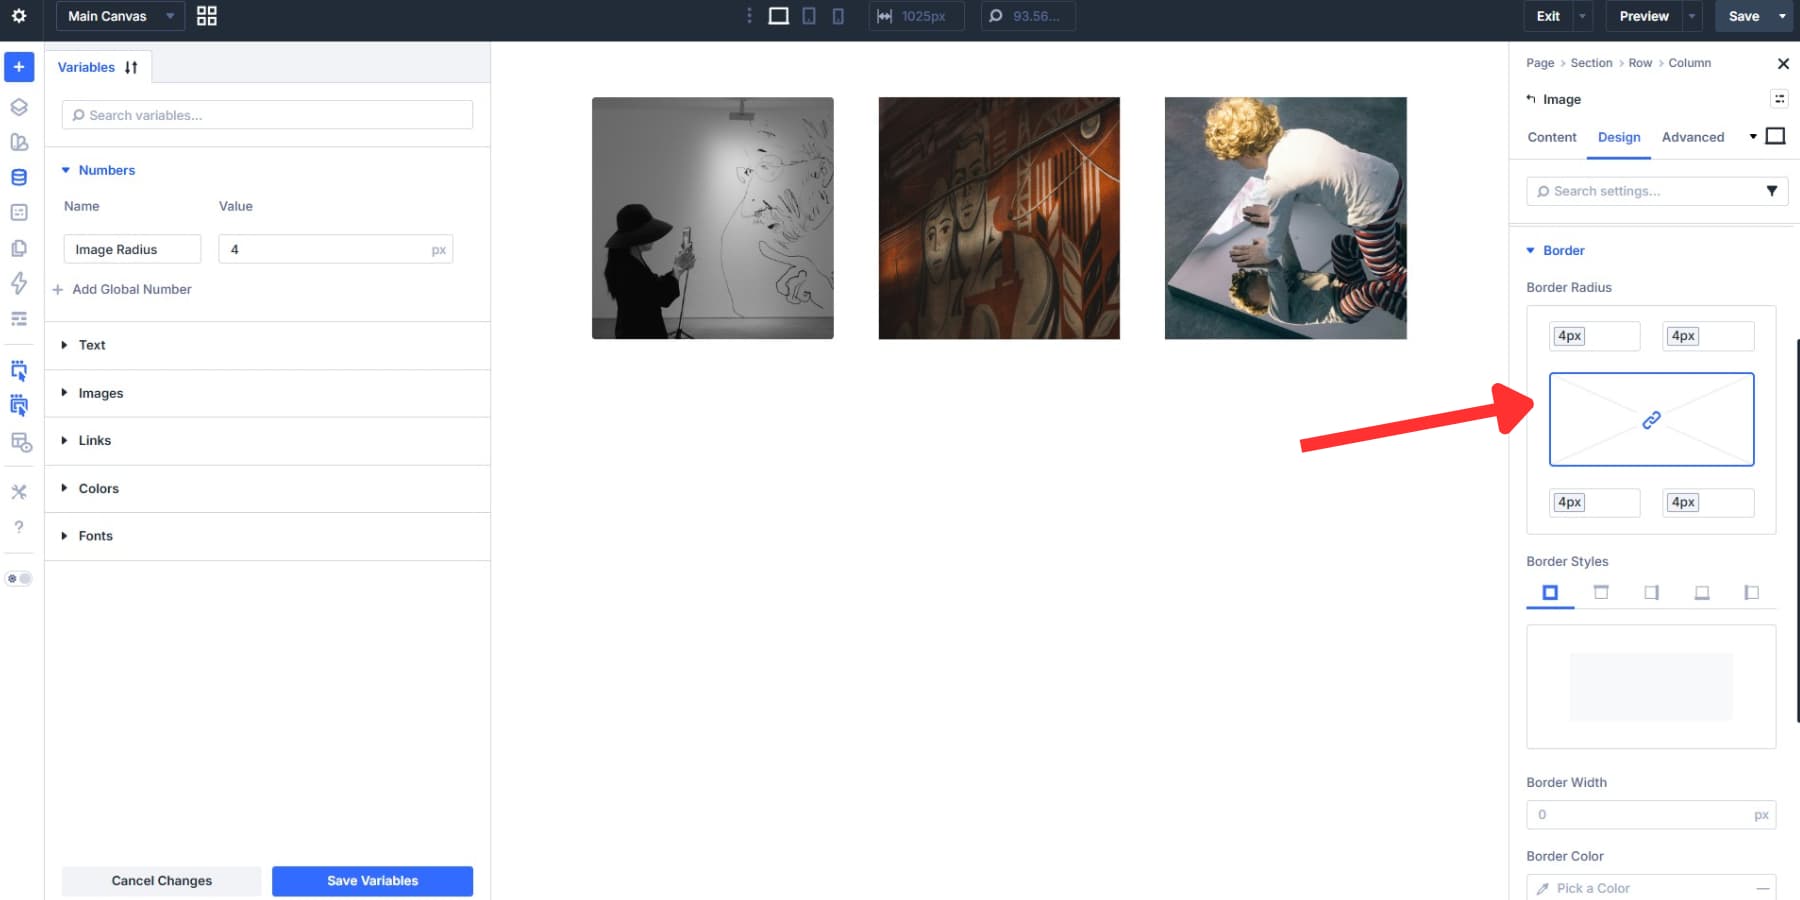
If you’re building across multiple pages and want the radius to stay consistent site-wide, setting up a Number variable through Divi 5’s Design Variables is worth considering.
Adjusting The Hover State Styling
Switch to the hover state by selecting the cursor icon from the state selector in the top-right corner of the settings panel. Any design change you make from that point applies only on hover, leaving the default state untouched.
We’re using the hover state panel here rather than Interactions because it gives you direct access to every design control without any extra setup. Interactions can produce the same result, but that route requires a preset with the desired styles already defined. If you already have something like that built out, that works just as well in the next step.
With the hover state active, go to Transform and set the scale to around 103%. That’s enough to make the image feel like it lifts slightly without growing distractingly large.

Then update the box shadow values: set Vertical Position to around 16px, Blur Strength to 24px, and leave Spread Strength at 0. The shadow deepens as the image scales up, which helps sell the sense of depth.
Beyond that, the hover state gives you control over almost every other design setting too: border color, filter adjustments like brightness or saturation, opacity, and more. Style whatever fits your layout. Switch back to the default desktop view once you’ve styled your hover state.
Adding Interactions To The Image
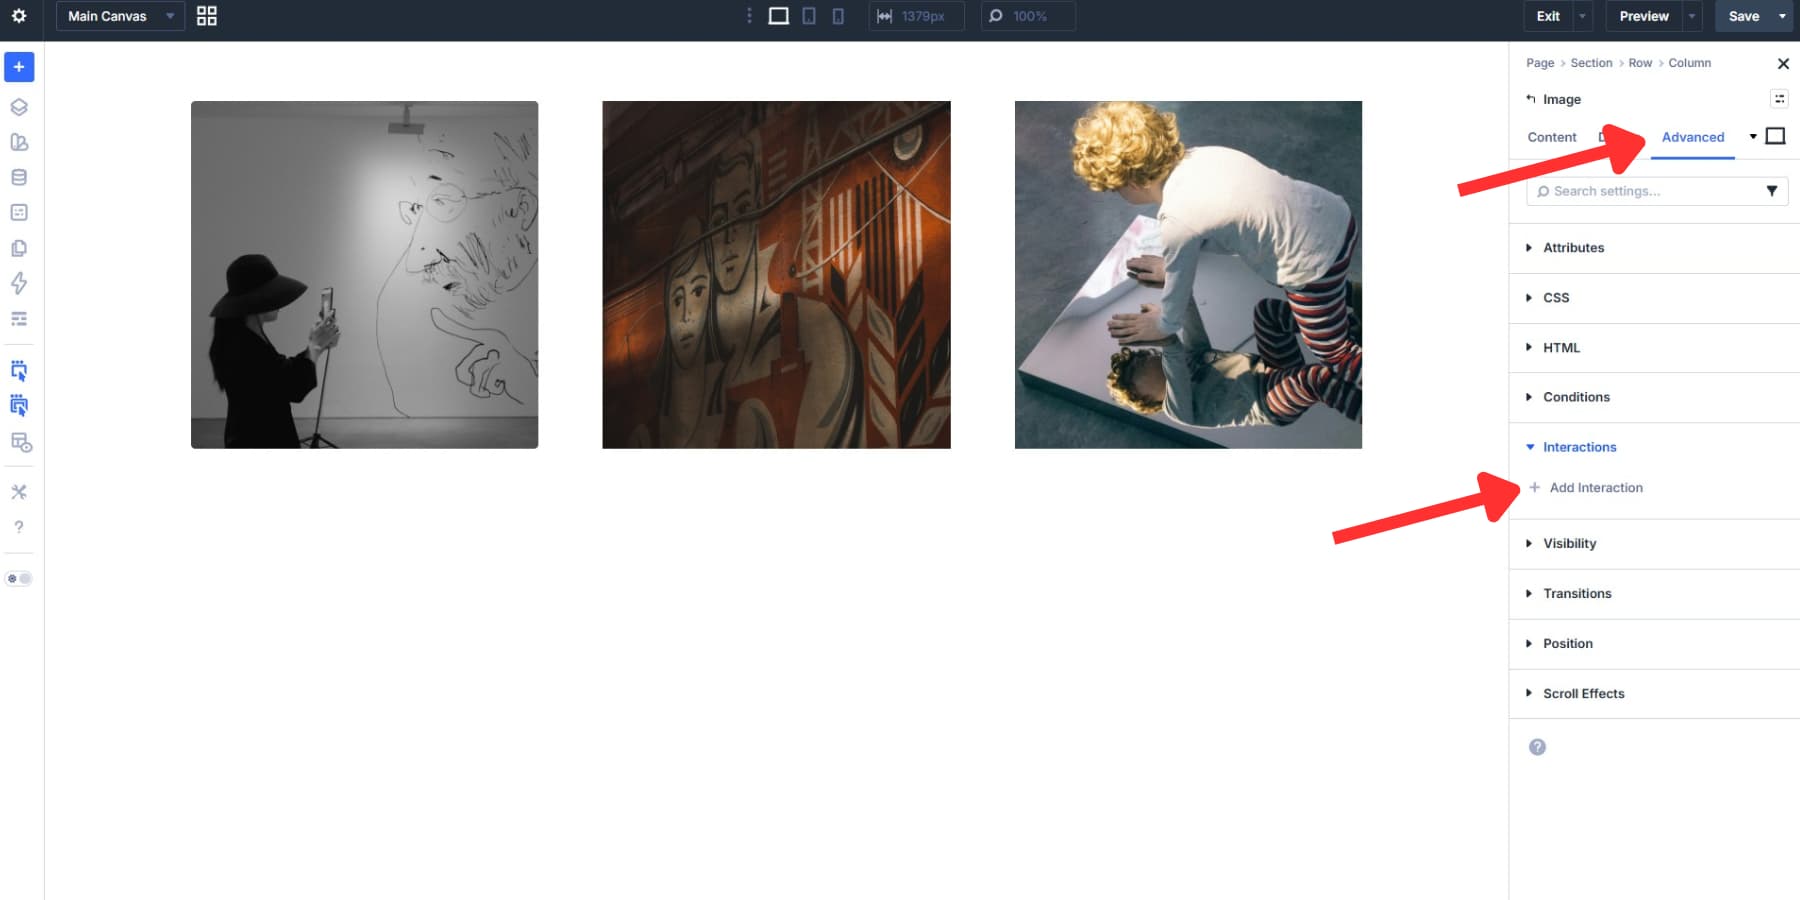
The tilt effect needs two interactions: one on the Image module and one on the column that contains it. Open Image 1’s settings, go to the Advanced tab, and click the Interactions dropdown. Hit + Add Interaction to get started.
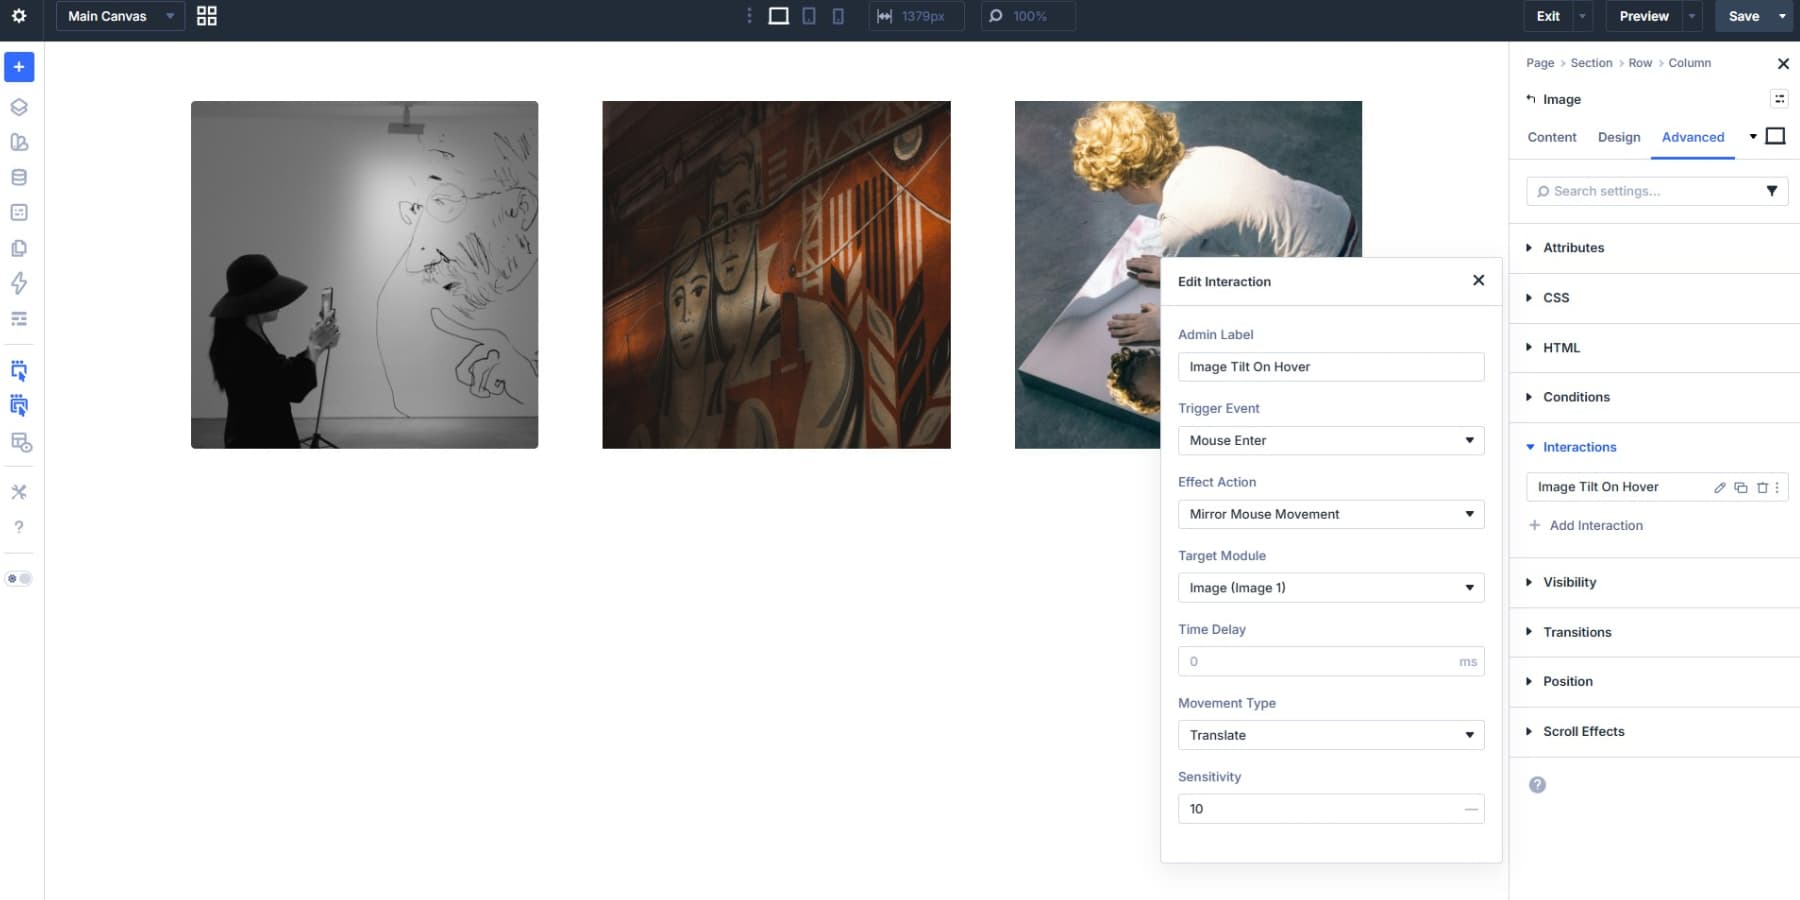
For the first interaction, set the Trigger Event to Mouse Enter, the Effect Action to Mirror Mouse Movement, and the Target Module to Image 1. Set Time Delay to 0, Movement Type to Translate, and Sensitivity to 10. Add a clear label for reference, save it, and then add a second interaction.
The second interaction should target Column 1. Set Trigger Event to Mouse Enter, Effect Action to Mirror Mouse Movement, and Target Module to Column 1. Keep Time Delay at 0, set Movement Type to Tilt, and bring Sensitivity up to 50.
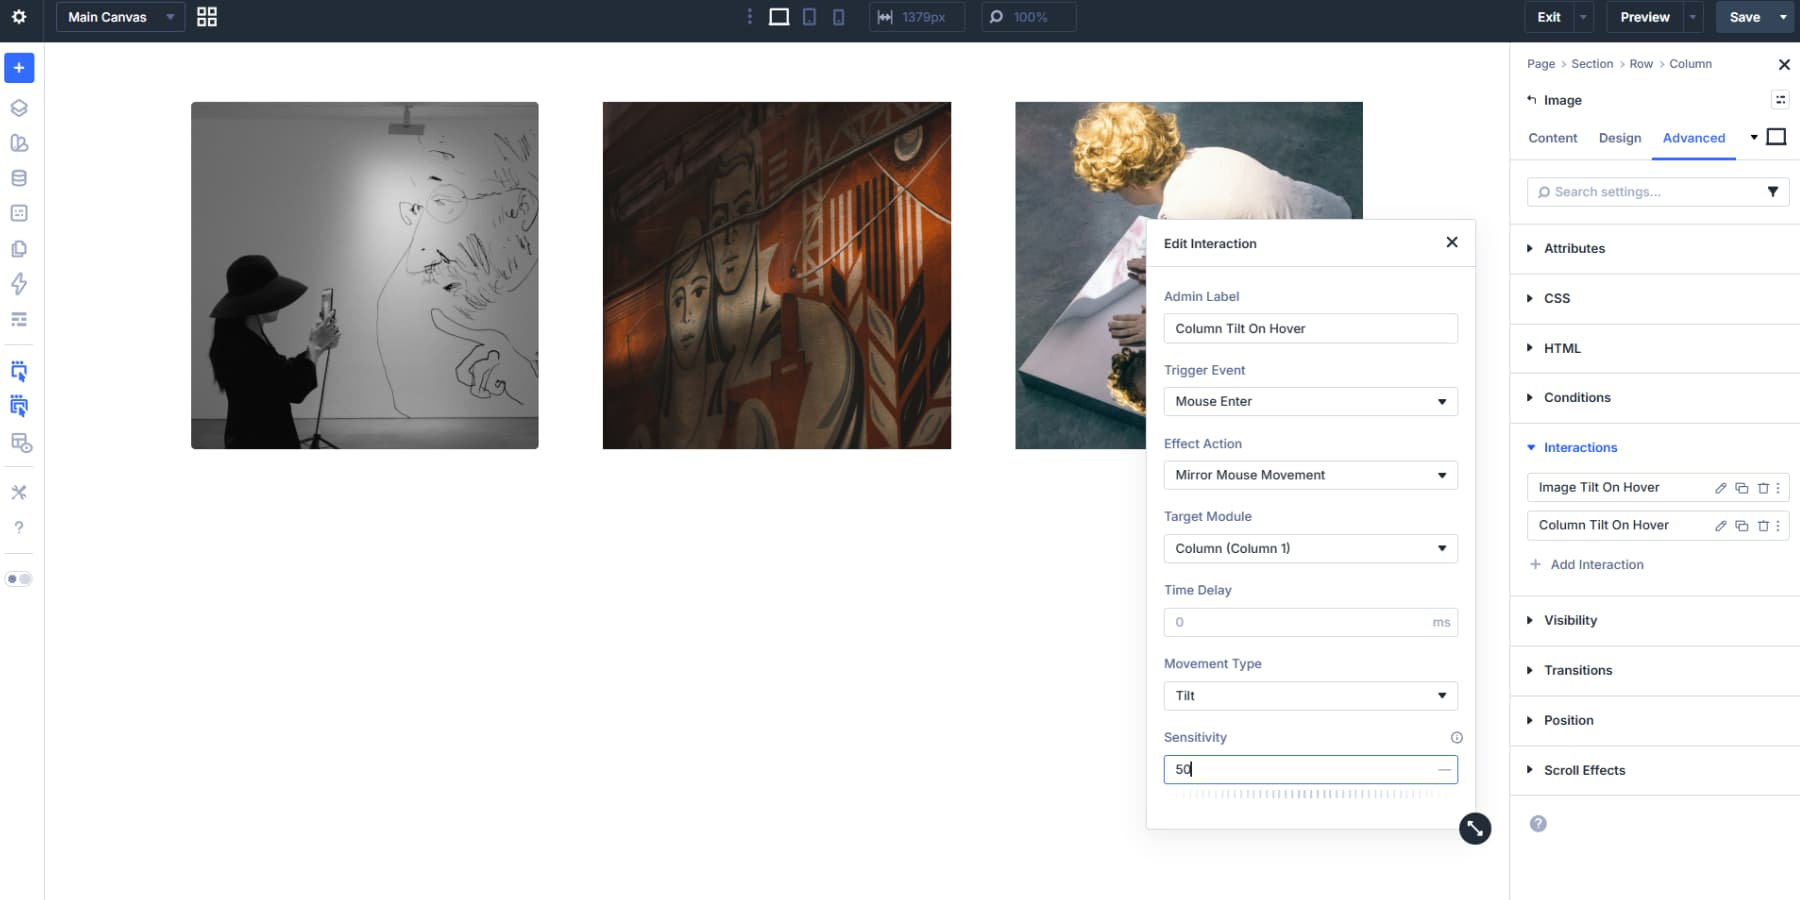
These two interactions do different things. The Translate setting on the image moves it along the X and Y axes as the cursor shifts. The Tilt setting on the column adds rotational depth, tilting the entire container in 3D space as the mouse moves across it. One without the other gives you either a slide or a rotation. The combination is what makes the image feel like it’s physically responding to the cursor.
If you prefer a more dramatic or more subtle hover effect, adjust the sensitivity values accordingly.
Applying The Hover Effect To Other Images
Before repeating the setup on other images, save both parts as presets. That way, any new image you add on this page or another can take on the effect in seconds.
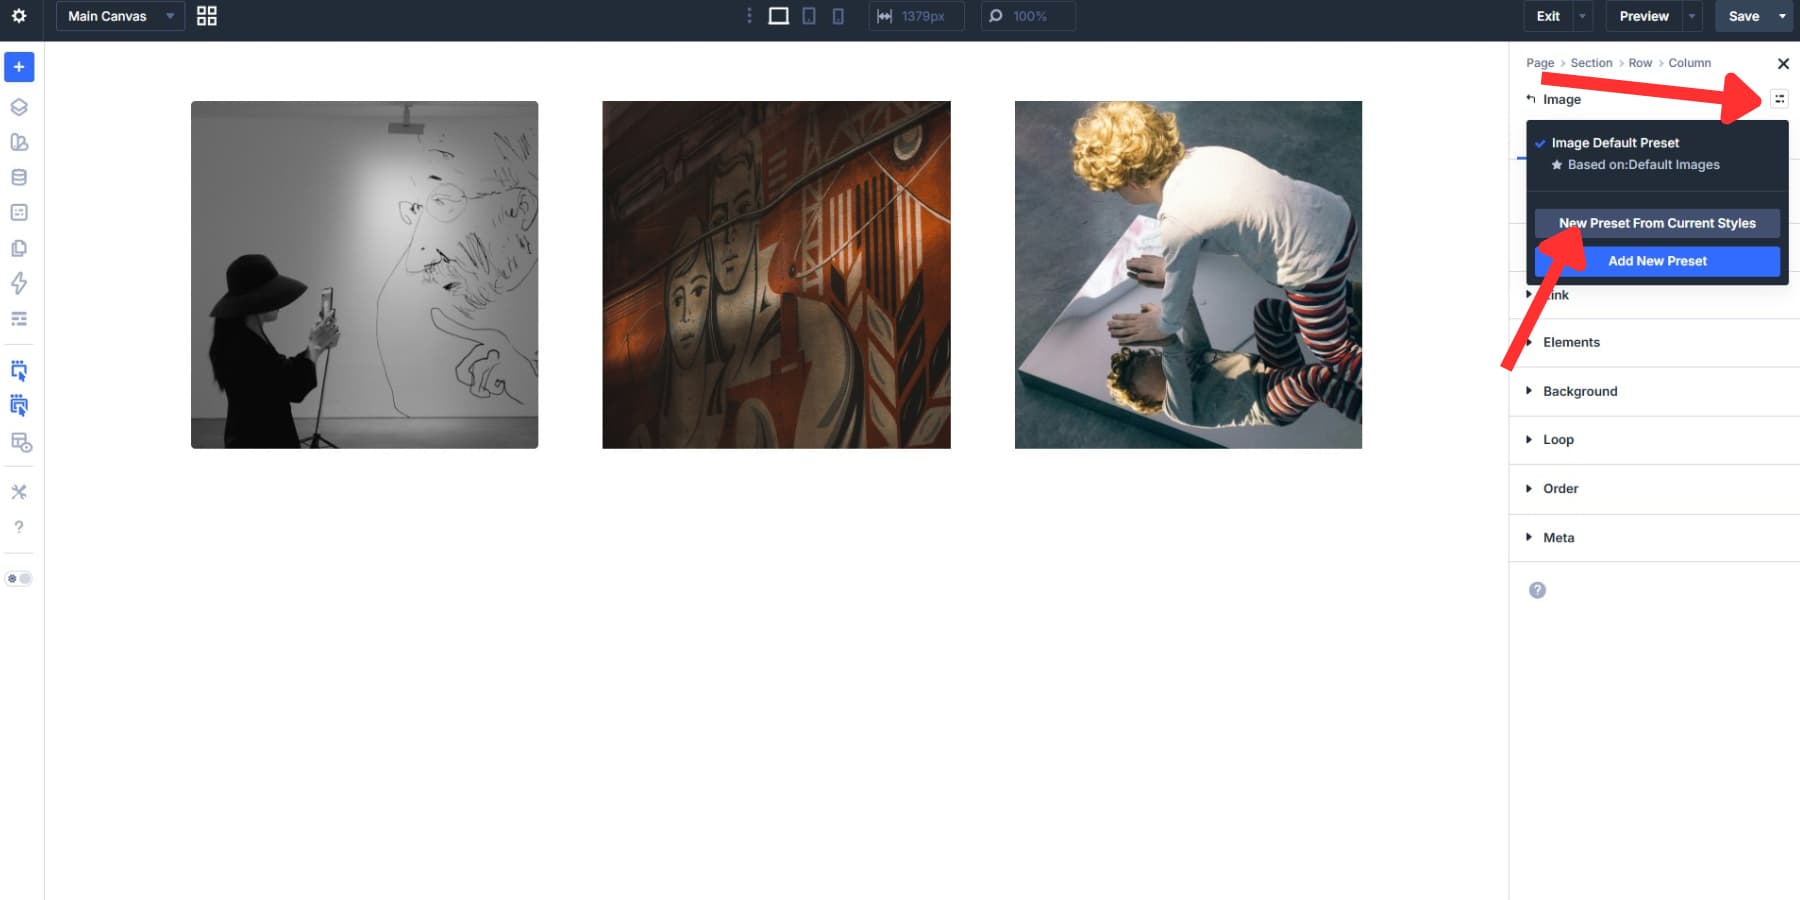
For the Image module, save an Element Preset. It captures all design settings, including the hover state, in one reusable package. Open Image 1’s settings, click the preset icon at the top of the panel, and then choose Create A New Preset From Current Styles. Name it something like “Tilt Image.”
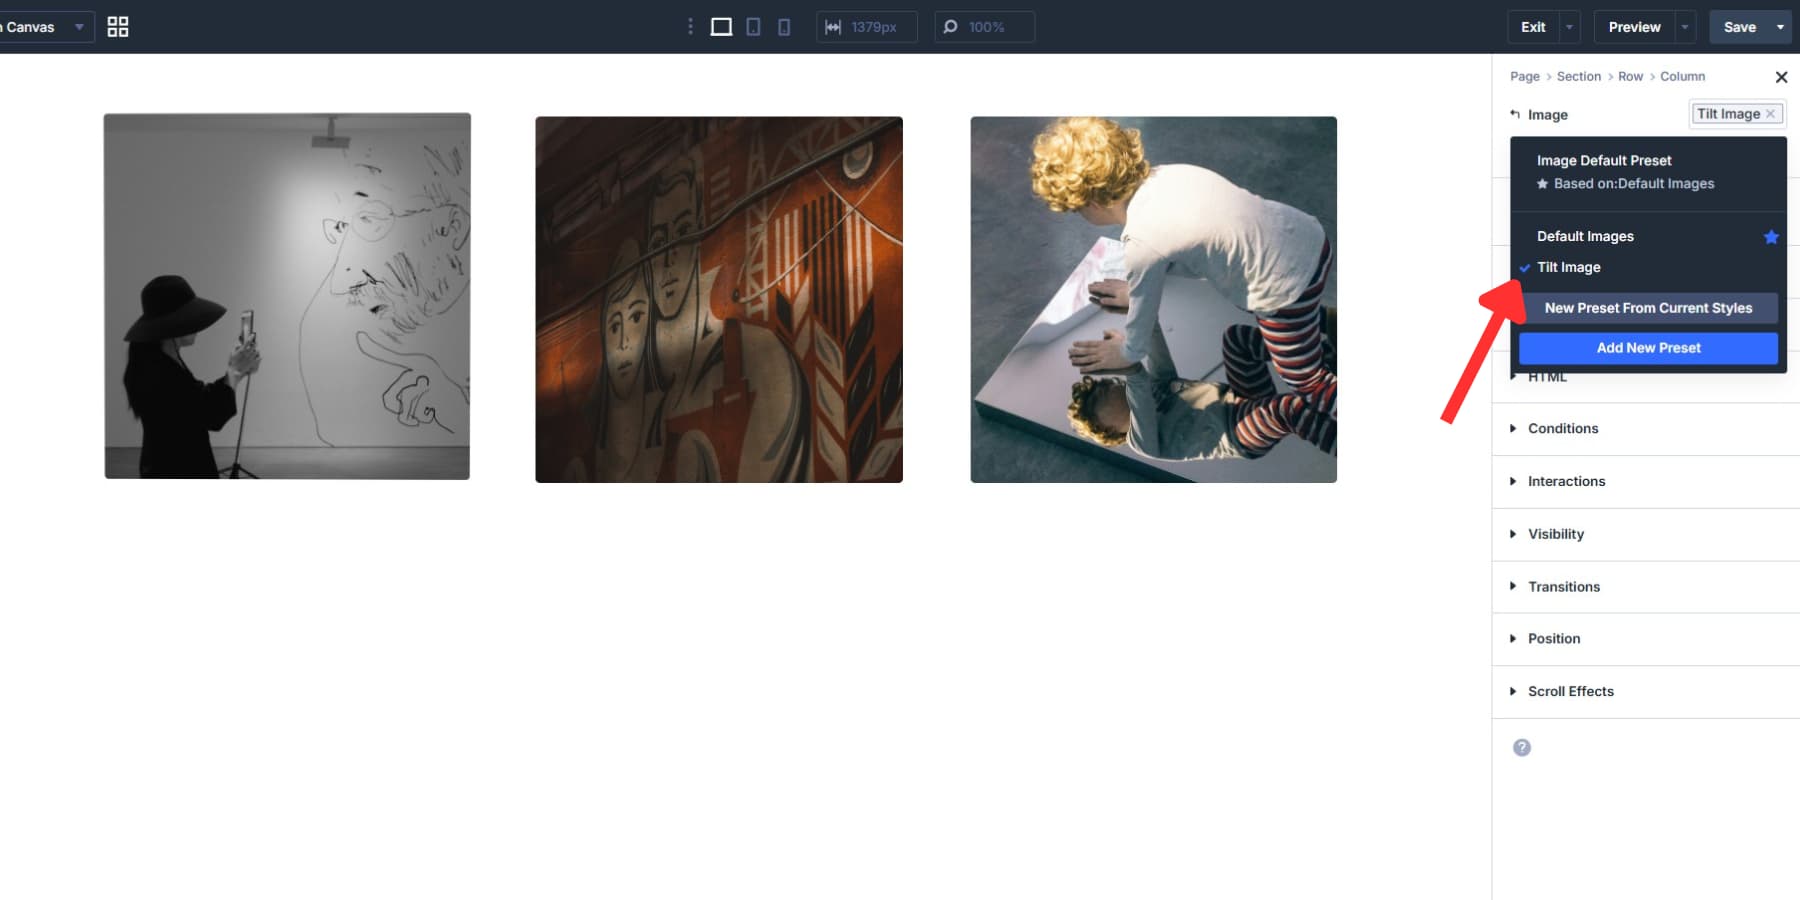
To apply it, open Image 2 and select the “Tilt Image” preset from the same icon. Repeat for each remaining image.
After applying the preset to each image, add the Interactions as shown above, or use an Option Group Preset for the interaction settings and then tweak values like Target Module to match the correct columns and images. Element-level values take precedence over preset values, so the rest of the preset remains unaffected.
That last point matters more than it seems. Say you later decide to soften the border radius or adjust the shadow across all your tilt images. Locate the preset inside any of your Image modules, hover over it, and click the gear icon.

Make the change once, and every image using that preset updates across the board. Any element-level tweaks you made to specific images stay exactly as you left them. The result is a consistent effect you can manage from one place, with room to break the pattern wherever you need to.
Download The Tutorial JSON File
If you want to see the results in action, download the JSON file below and import it into your Divi Library.

Interactive Websites Made Painless With Divi 5
Building interactive layouts in Divi 5 doesn’t require a developer or custom scripts. The Visual Builder gives you the controls, the Interactions system handles the behavior, and the preset system keeps everything organized as your site grows.
Small details like this one add up quickly, and the tilt effect is just a starting point for what you can build with Interactions. Get started with Divi 5 and put it to work on your next project.


I reported this bug months ago. when an element is sticky or has a scroll animation, features like interaction mouse mirror and similar functions don’t work.