")
Welcome to Day 3 of 3, the last day in our series on How to Add Custom Styles to Divi’s Blog Post Formats. By default Divi comes with six blog post formats: Standard, Video, Audio, Quote, Gallery, and Link. In this series we teach you how to customize them with php and css.
Today is the final day of our series on how to add custom templates and styles to Divi’s blog post formats. This last day of the series is dedicated to design. With our single.php customized and our child theme active, we are ready to add styling to the blog post formats.
I will walk you through all six post formats as we add some unique design touches to each one. By the end of this tutorial, you will have six great looking alternatives to the default blog post formats that Divi comes with.
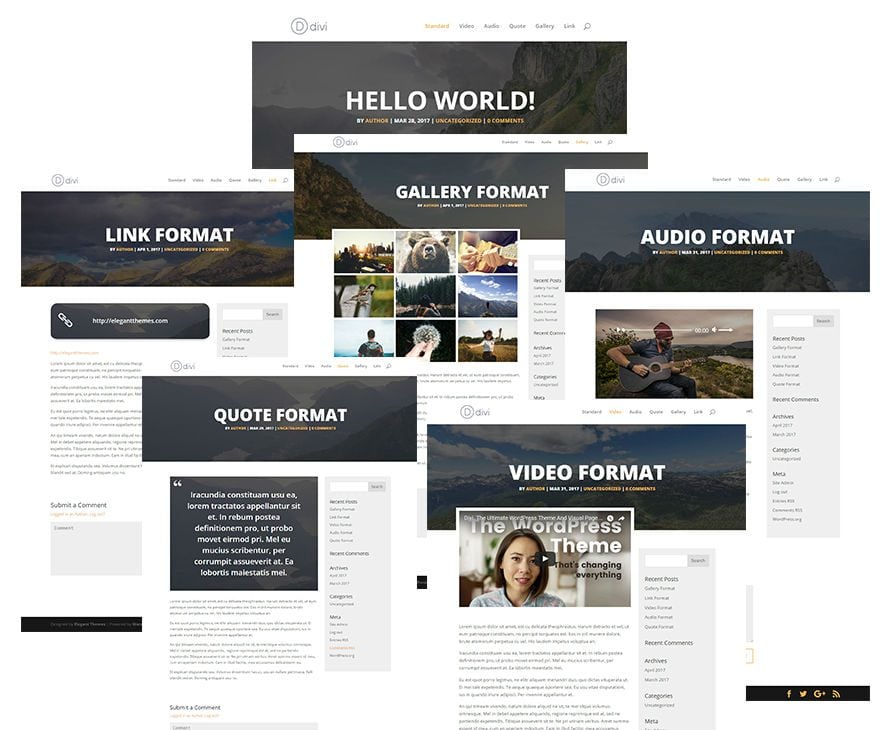
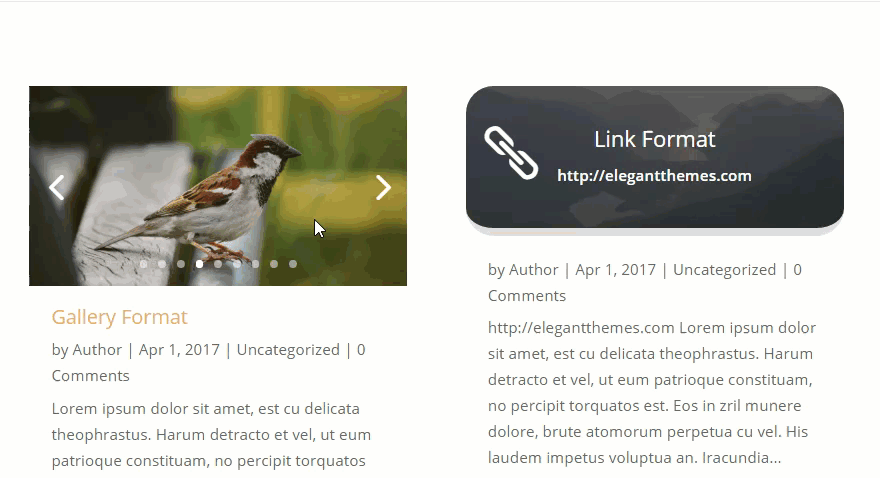
You will also have a pretty unique blog page that displays the different post format featured elements. For example, the link format will display a custom link box in place of the featured image thumbnail. The gallery format post will display an image slider of your gallery images in place of the featured image thumbnail. And, so on.
Here is a glimpse of what your blog page would look like after today’s tutorial (I’m using the Divi Blog Module with a grid layout in the gif below).
Let’s get started.
- 1 Setting Up General Design Settings in Theme Customizer
- 2 Styling the Hero Section for all Post Formats
- 3 Styling the Standard Post Format
- 4 Styling the Video Post Format
- 5 Styling the Audio Post Format
- 6 Styling the Quote Post Format
- 7 Styling the Gallery Post Format
- 8 Styling the Link Post Format
- 9 Responsive?
- 10 Final Thoughts
Setting Up General Design Settings in Theme Customizer
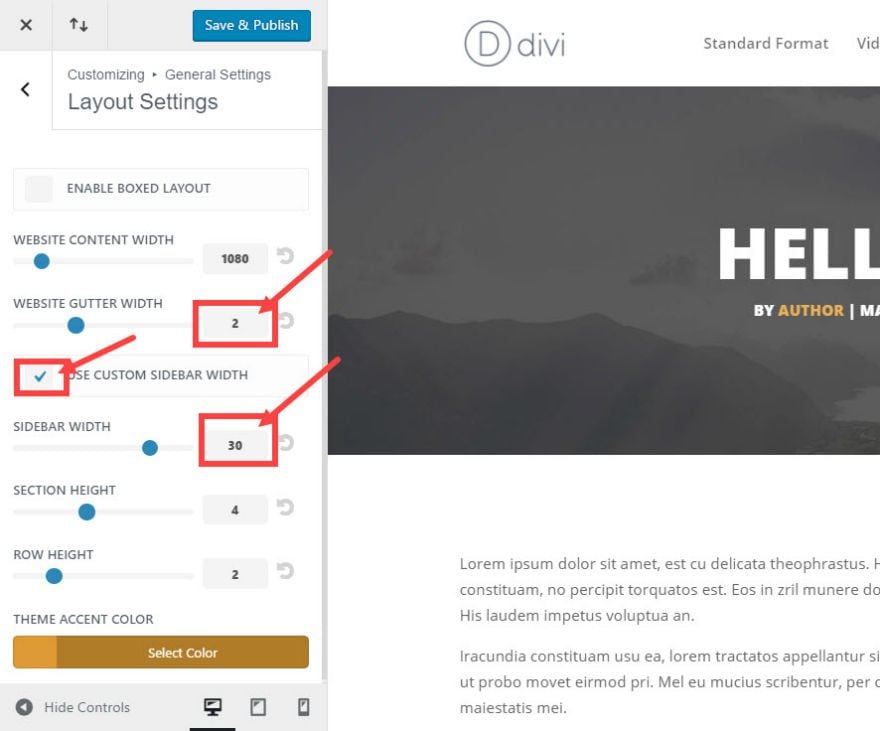
First we need to make a few general style changes using the theme customizer. From your WordPress Dashboard, go to Divi → Theme Customizer → General Settings → Layout Settings and change the following:
Website Gutter Width: 2
Check Use Custom Sidebar Width
Sidebar Width: 30
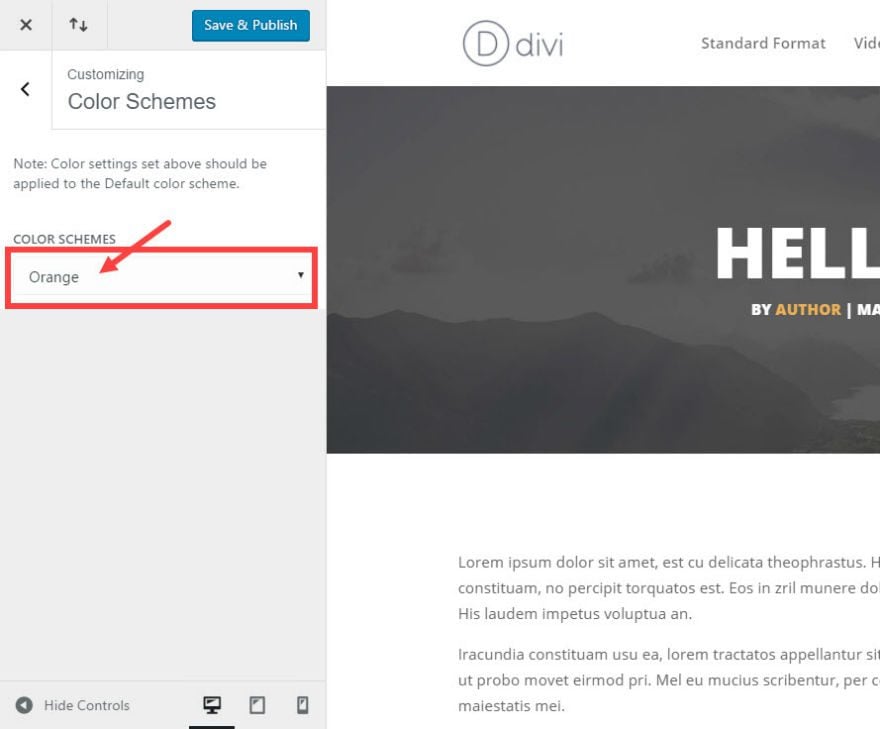
Also under Theme Customizer, go to Color Schemes and select Orange.
Now let’s take a look at what your standard post looks like so far:
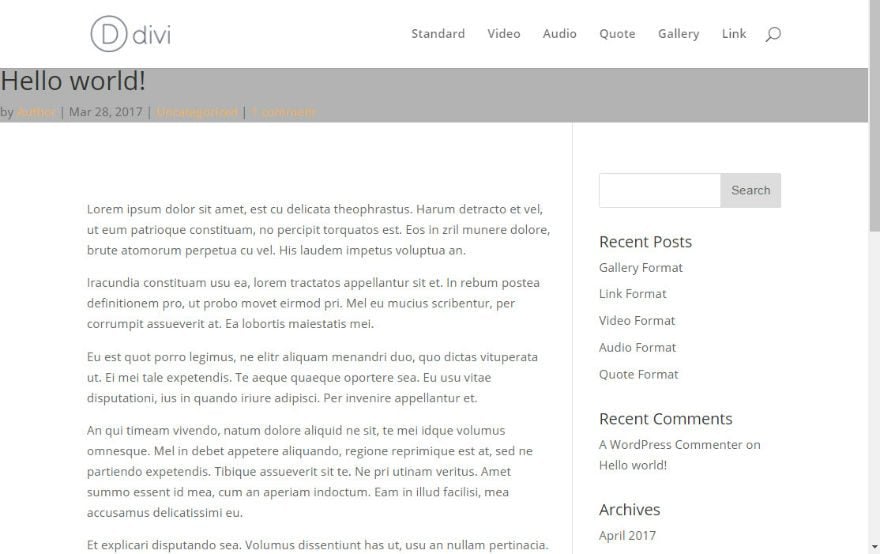
As you can tell, it still needs some styling but everything is in the right place. You have a hero section spanning the full width of the page. You don’t have a featured image yet so the background is only showing the gradient you added to your single.php file earlier. Also the post title and meta are inside the hero section. Now it is time to add the rest of the design elements.
Styling the Hero Section for all Post Formats
Since each of your post formats will share the same hero section and sidebar design, you can add this custom CSS first. Go to back to Theme Customizer, click Additional CSS at the bottom, and add the following custom CSS:
.hero-section {
	padding-top: 120px;
	padding-bottom: 120px;
	background-repeat: no-repeat;
	background-size: cover;
	position:relative;
	max-height: 450px;
	background-color: #333;
}

.single-post #main-content #left-area {padding-top: 0px;}

/* ---- Sidebar Settings ---- */
.single #sidebar {background: #efefef; padding-top: 20px; padding-right: 20px; padding-left: 20px; padding-bottom: 20px;}

/* ---- Standard Post Title & Post Meta ---- */
.single h1.entry-title,.attachment h1.entry-title, .single p.post-meta {
width: 100%;
text-align: center;
padding-left: 8px;
padding-right: 8px;
font-weight: 800;
text-transform: uppercase;
color: #fff;
}

 @media only screen and (min-width: 980px) {
/*** Set title font size for desktop ***/
.single h1.entry-title {
font-size: 65px !important;
}
 }
Now check out what a standard post looks like now.
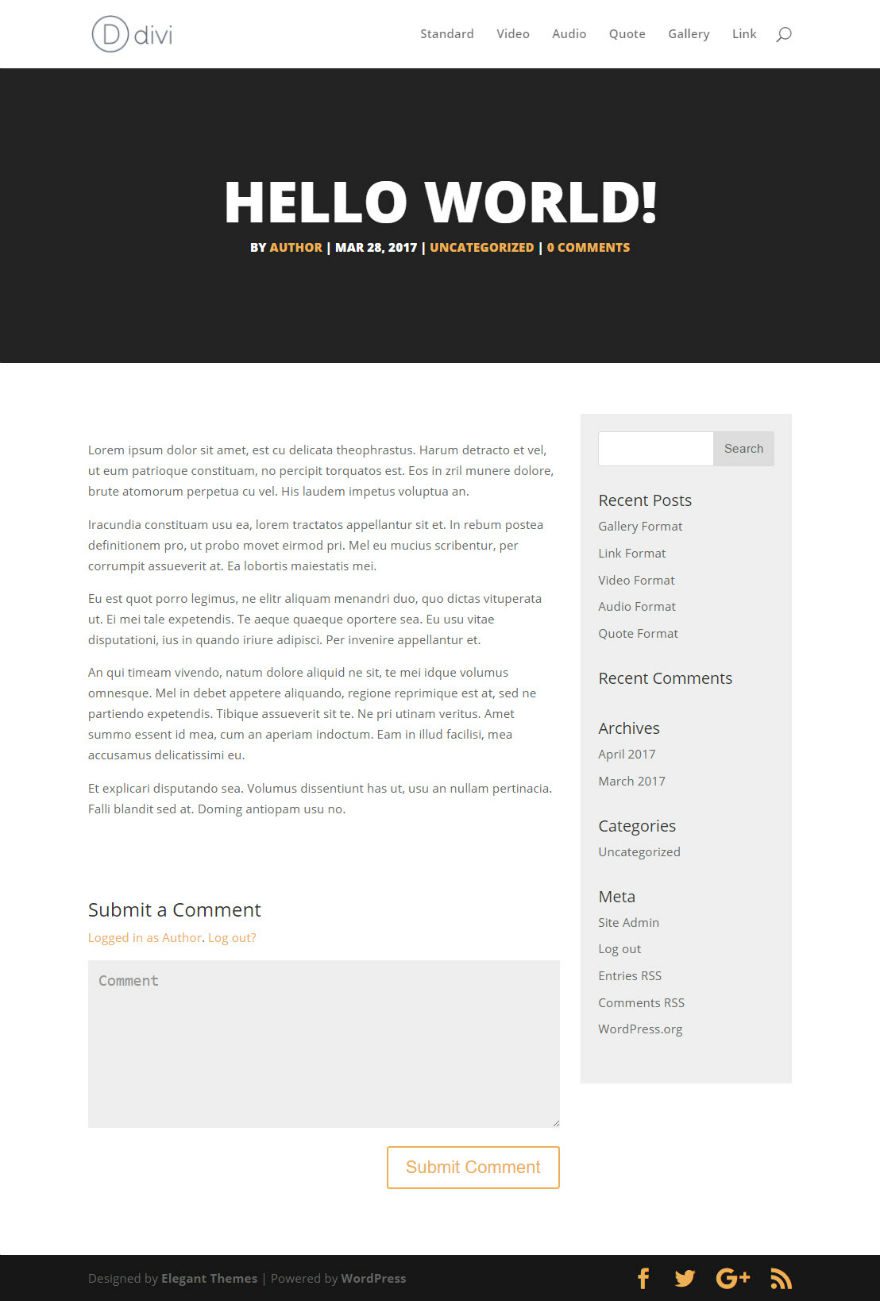
With the hero section and sidebar styling in place, you are ready to style the individual post formats.
Styling the Standard Post Format
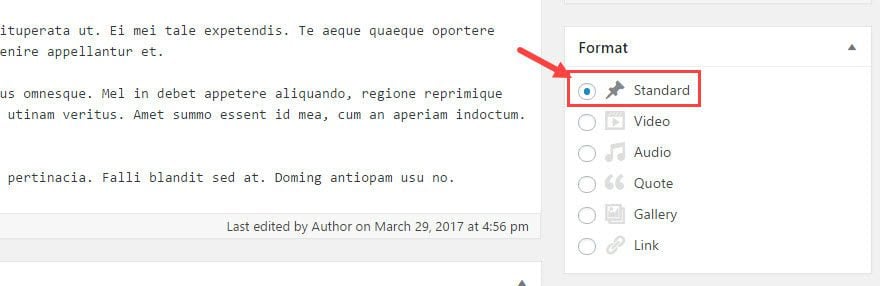
The standard post format is the default format for all of your blog posts. You can select the standard post format when editing your post.
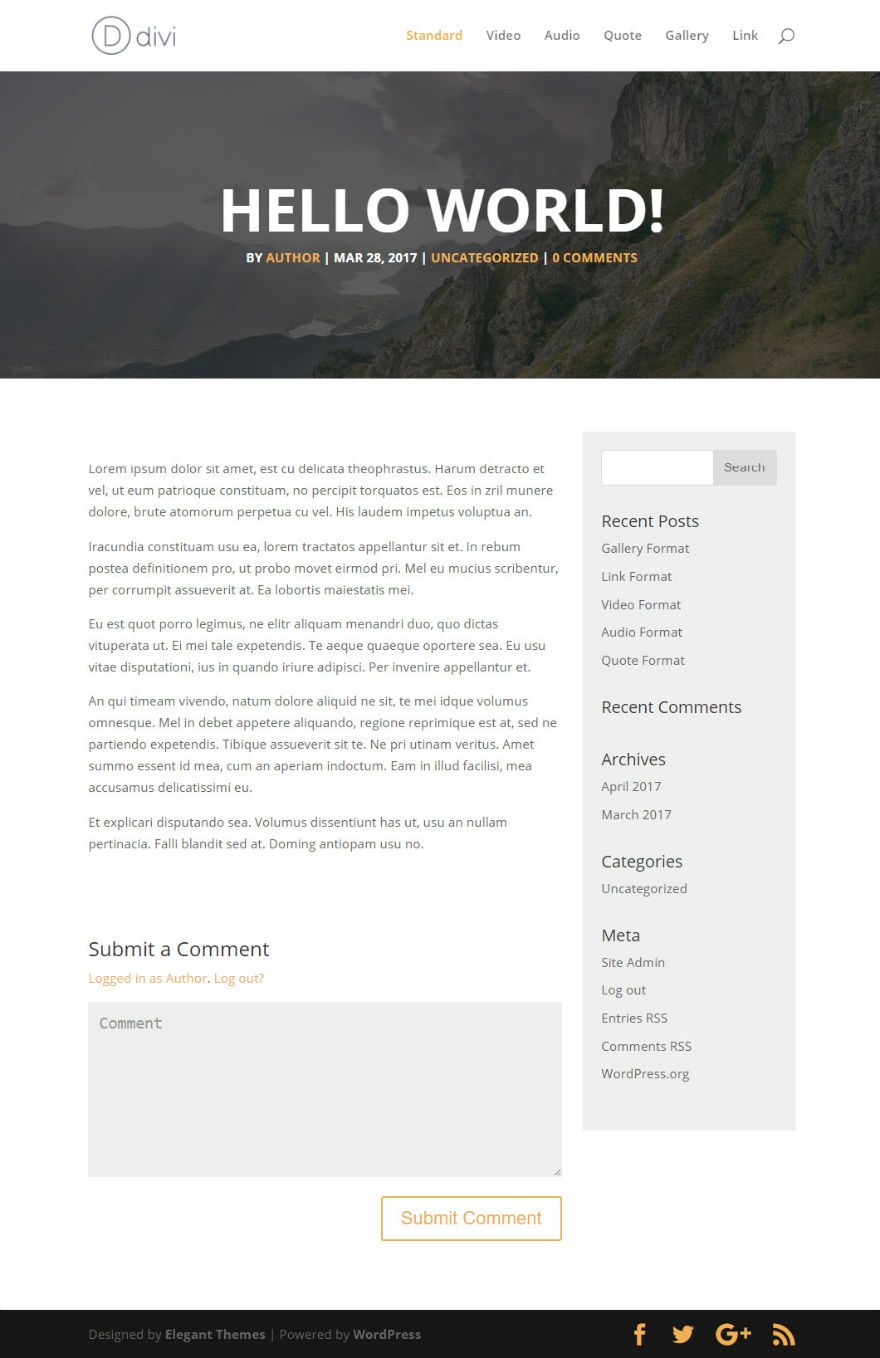
All we are going to do for this standard format is add the featured image. Because this featured image will stretch the entire width of the screen, I suggest using an image that is 2000 x 600. I’m using images from unsplash.com.
After you add your featured image, check out what the standard post looks like.
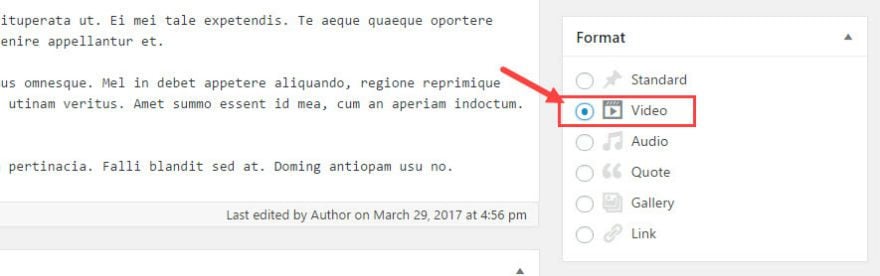
Styling the Video Post Format
To style the Video Post Format, make sure you have the Video format selected for your post.
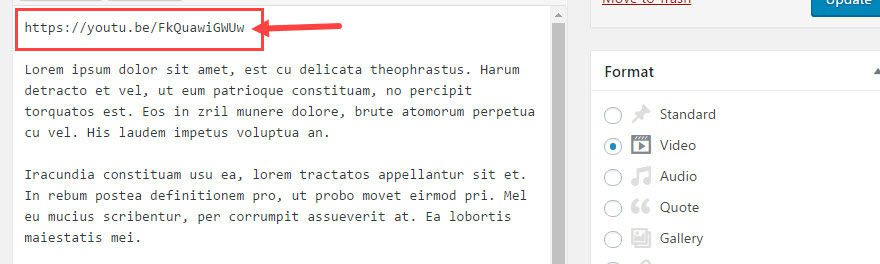
Next, add the url or embed of a video to your content. The video format will take the first video url, video tag, or embed and display it at the top of your post content. This video will also replace the featured image on your blog page.
For this example, I’m just using a youtube video url.
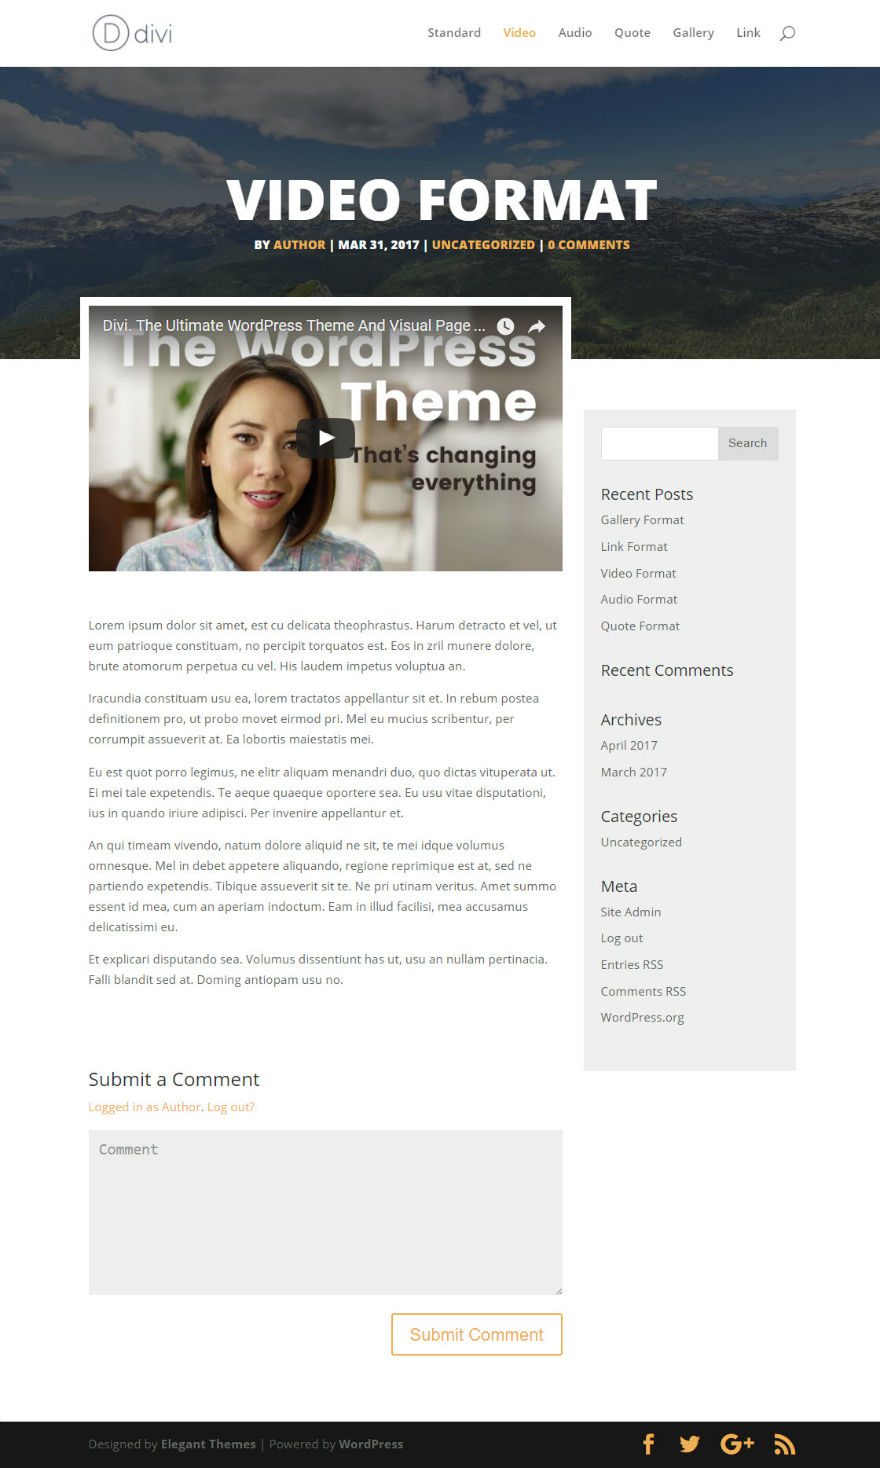
Add your 2000 x 600 featured image to the post.
Next, we are going to add additional styling to the featured video to give the video a white border and elevate it slightly so that it overlaps the hero section and stands out a bit.
Go to Theme Customizer → Additional CSS and add the following custom CSS:
/* ---- Format the Position of the Video Wrapper ---- */

@media only screen and (min-width: 980px) {
 /*** elevate the video to overlap the hero section ***/
.single-post.single-format-video .et_main_video_container {margin-top: -120px; background: #fff; outline: 10px solid #ffffff !important; z-index: 100; margin-bottom: -100px;}
}
Now check out your new Video Format post.
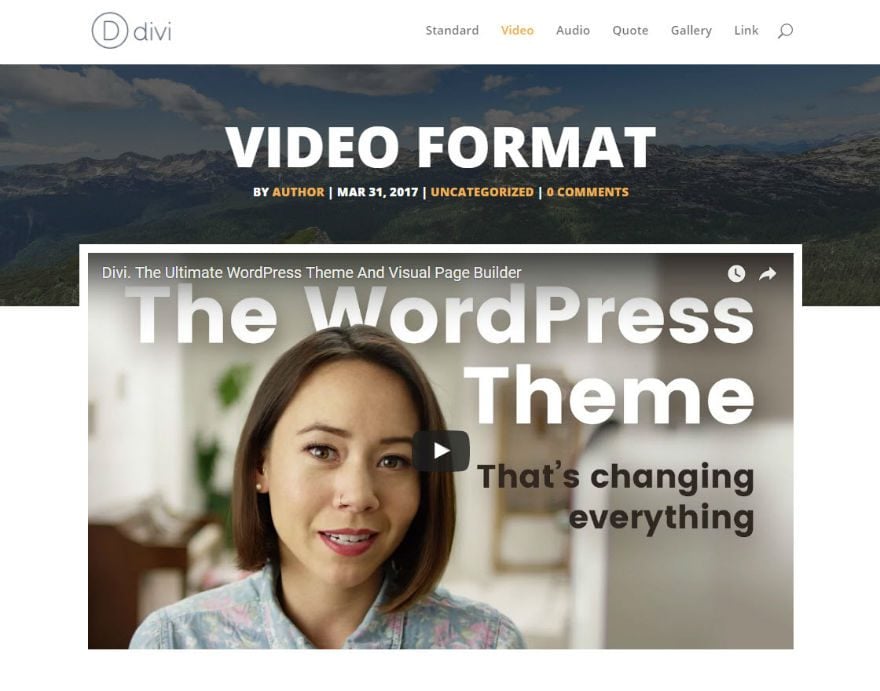
Alternatively, you could make this post fullwidth for another great design option. Simply go to edit your post and, in the Divi Post Settings on the top right of the page, select a fullwidth page layout.

Now check out the full width Video Format post:
Styling the Audio Post Format
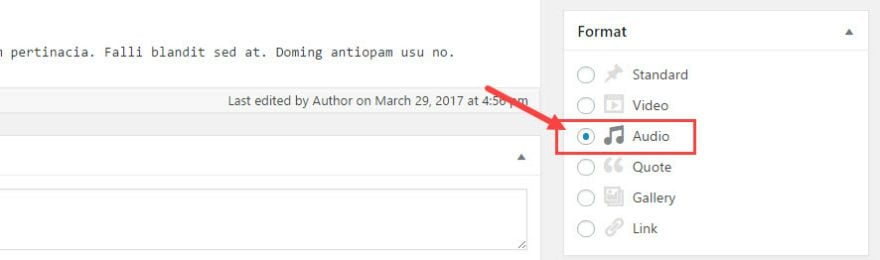
For the Audio Post Format, make sure you have Audio Format selected for your post.
Add your 2000 x 600 featured image.
Next, add your audio file to your post. This can be a .mp3, .m4a, .ogg, or .wav file. You can upload your audio file to your media library and insert to your post in three different ways (embed media player, link to media file, or link to attachment page).
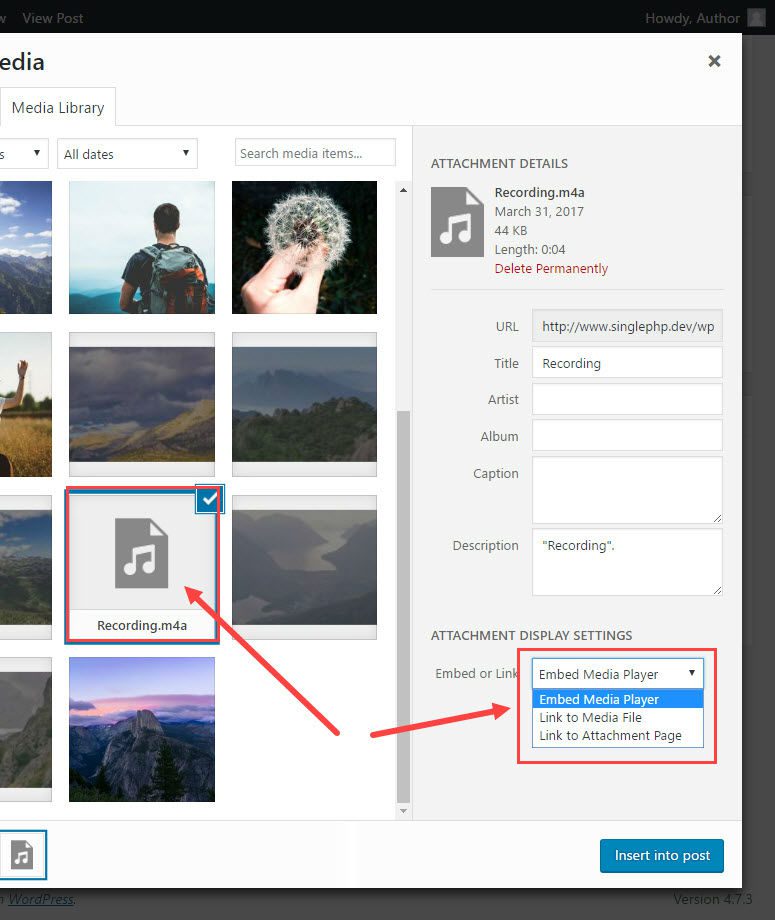
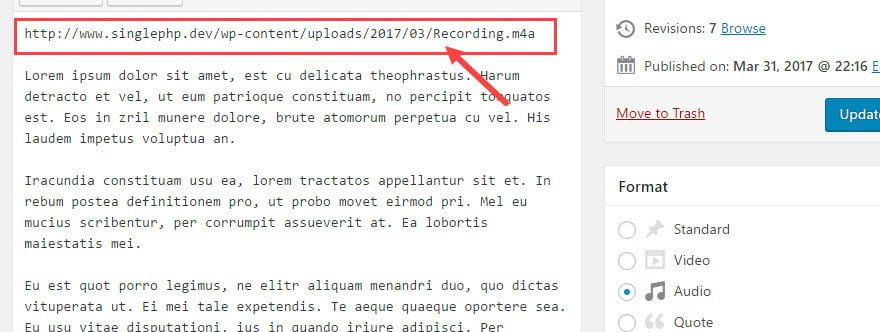
Any of these three options will work. But, for this example I’m just going to add a simple url to the audio file. WordPress will convert this audio url into a media player at the top of the post.
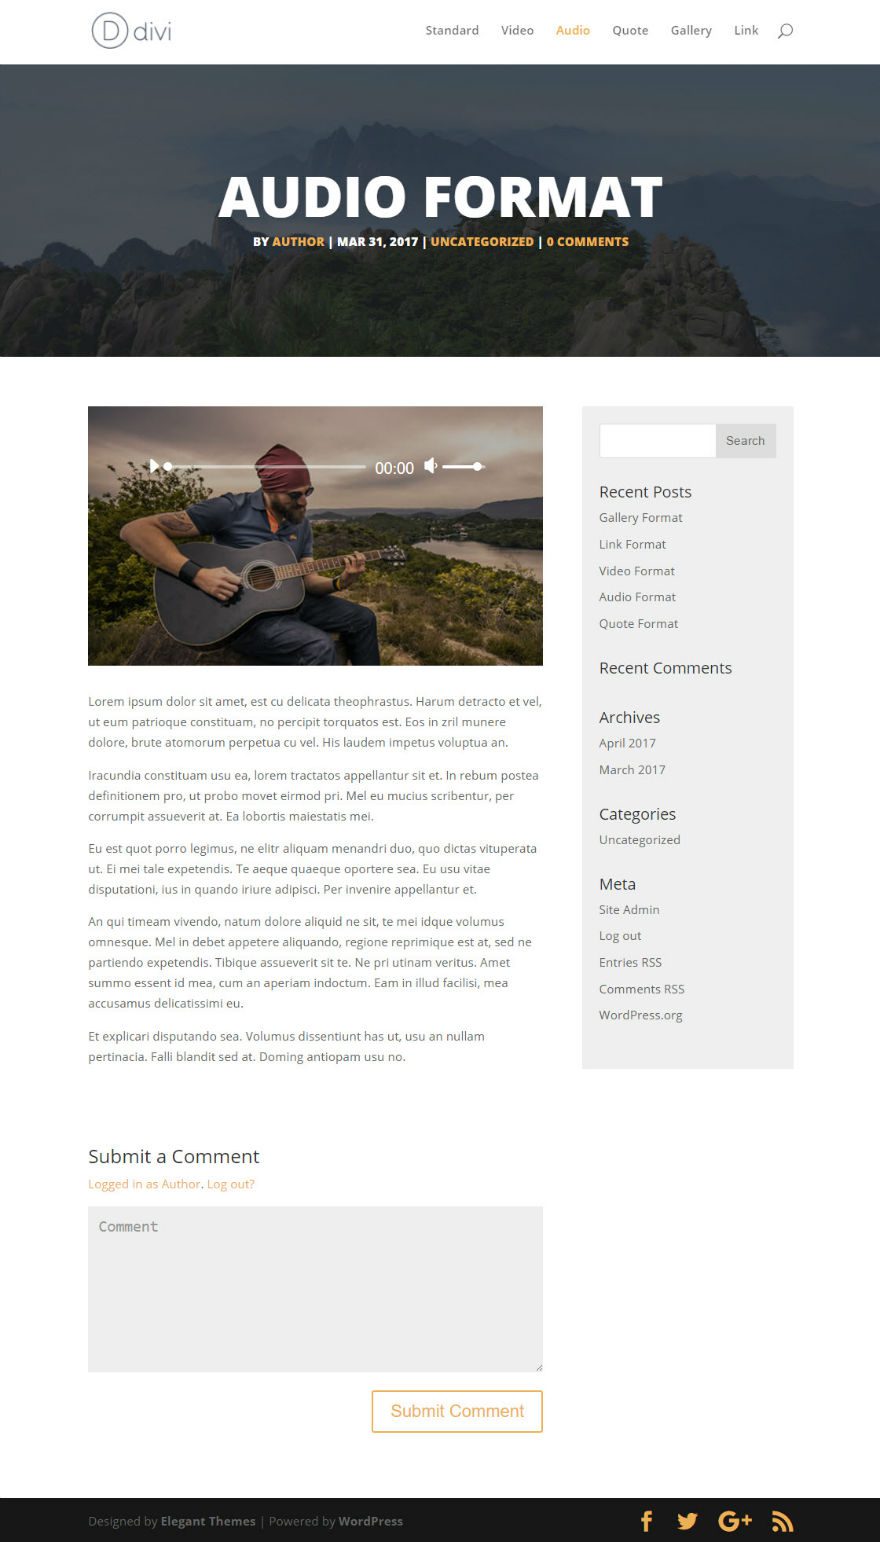
Now let’s take a look at the Audio Format post.

That’s not bad, but it could be better. Let’s hide the duplicate media player that shows beneath the orange media player and add a background image to our the orange media player.
Go to Theme Customizer → Additional CSS and add the following custom CSS:
/* ----- Add Background Image to the Audio Player & Change size of the player ----- */
body.single .et_audio_content, .blog .et_audio_content {
margin-bottom: 0px !important;
height: 300px !important;
background-image: linear-gradient(rgba(0,0,0,0.3),rgba(0,0,0,0.3)), url('ENTER IMAGE URL HERE');
background-repeat: no-repeat;
background-size: cover;
 }

/* ---- Hide the Duplicate Audio Player  ------ */
div#mep_1 {display: none;}
Then find and upload an image to your media gallery (should be around 700 x 300). Then copy the url and paste in the CSS above where it says “ENTER IMAGE URL HERE”.
background-image: linear-gradient(rgba(0,0,0,0.3),rgba(0,0,0,0.3)), url('ENTER IMAGE URL HERE');
Now go check out your new Audio Format post.
Styling the Quote Post Format
For the Quote Post Format, make sure you have the Quote Format selected for your post.
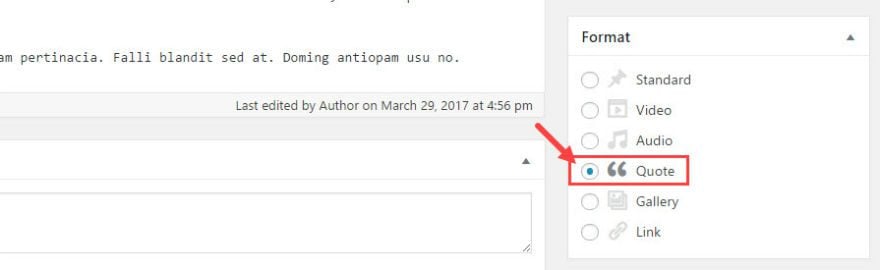
Then add a 2000 x 600 featured image to the post.
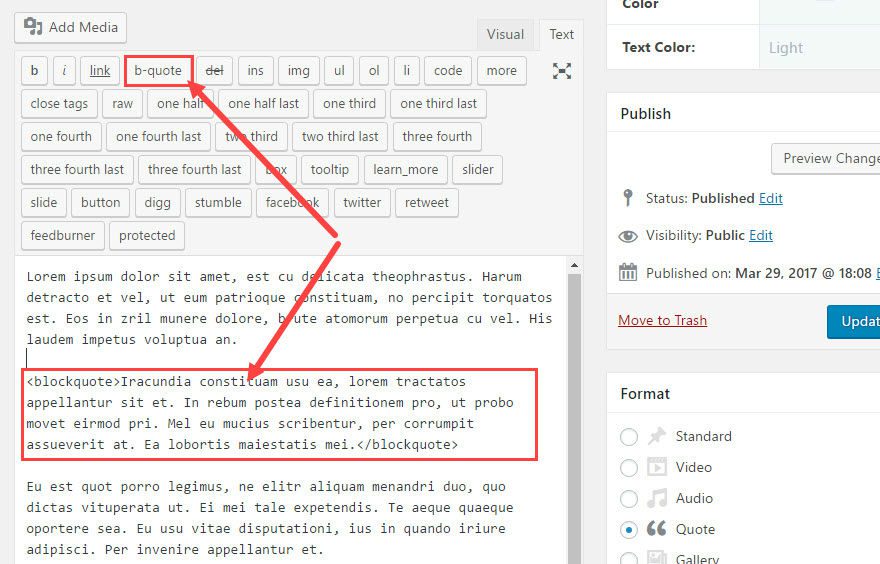
The quote format utilizes the blockquote shortcode to generate a custom quote display. So, add a blockquote to your content for the custom quote to be displayed.
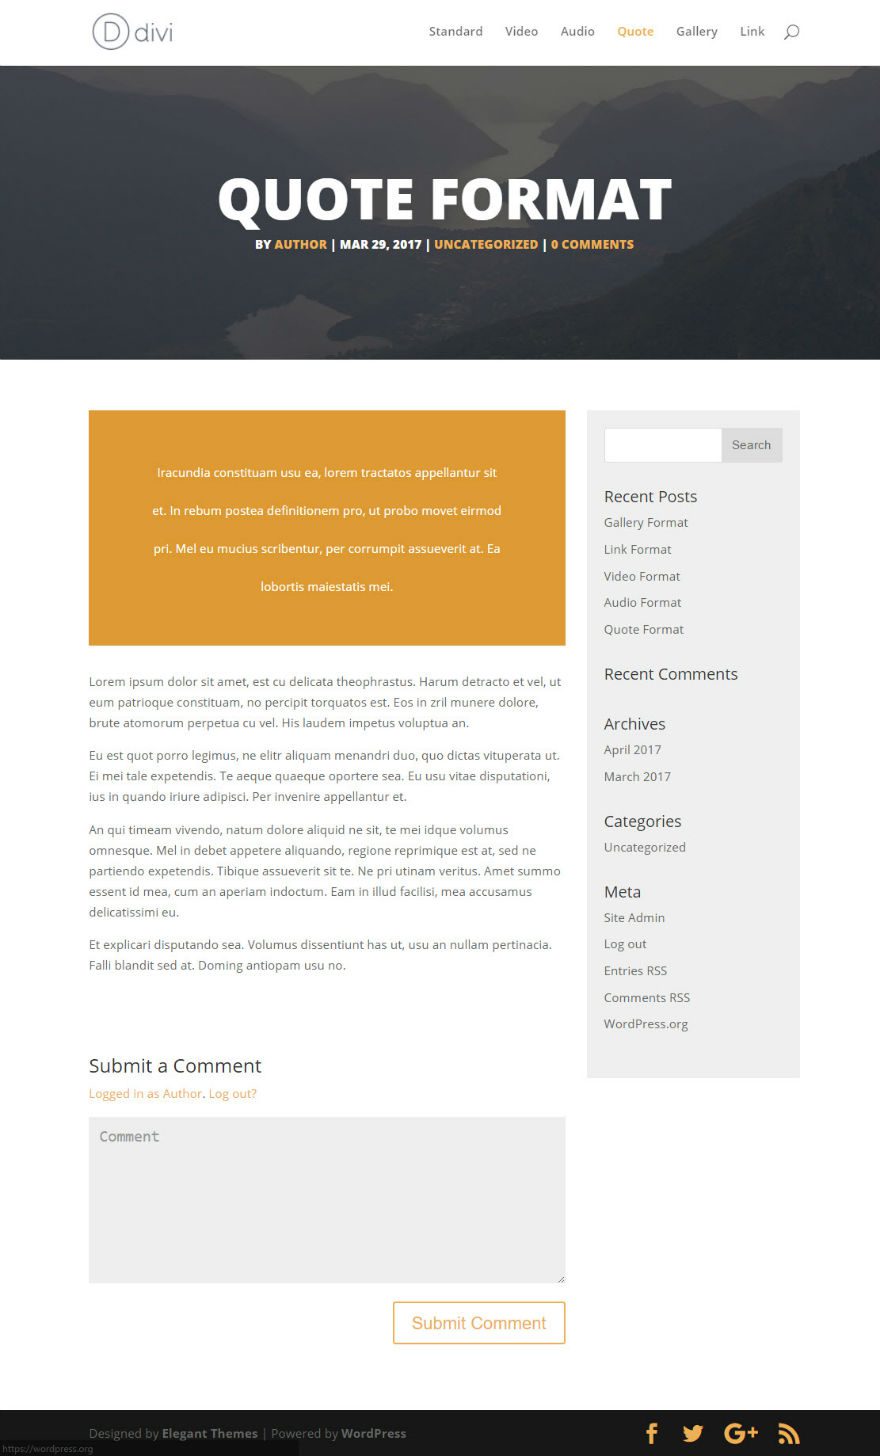
Now check out your post.
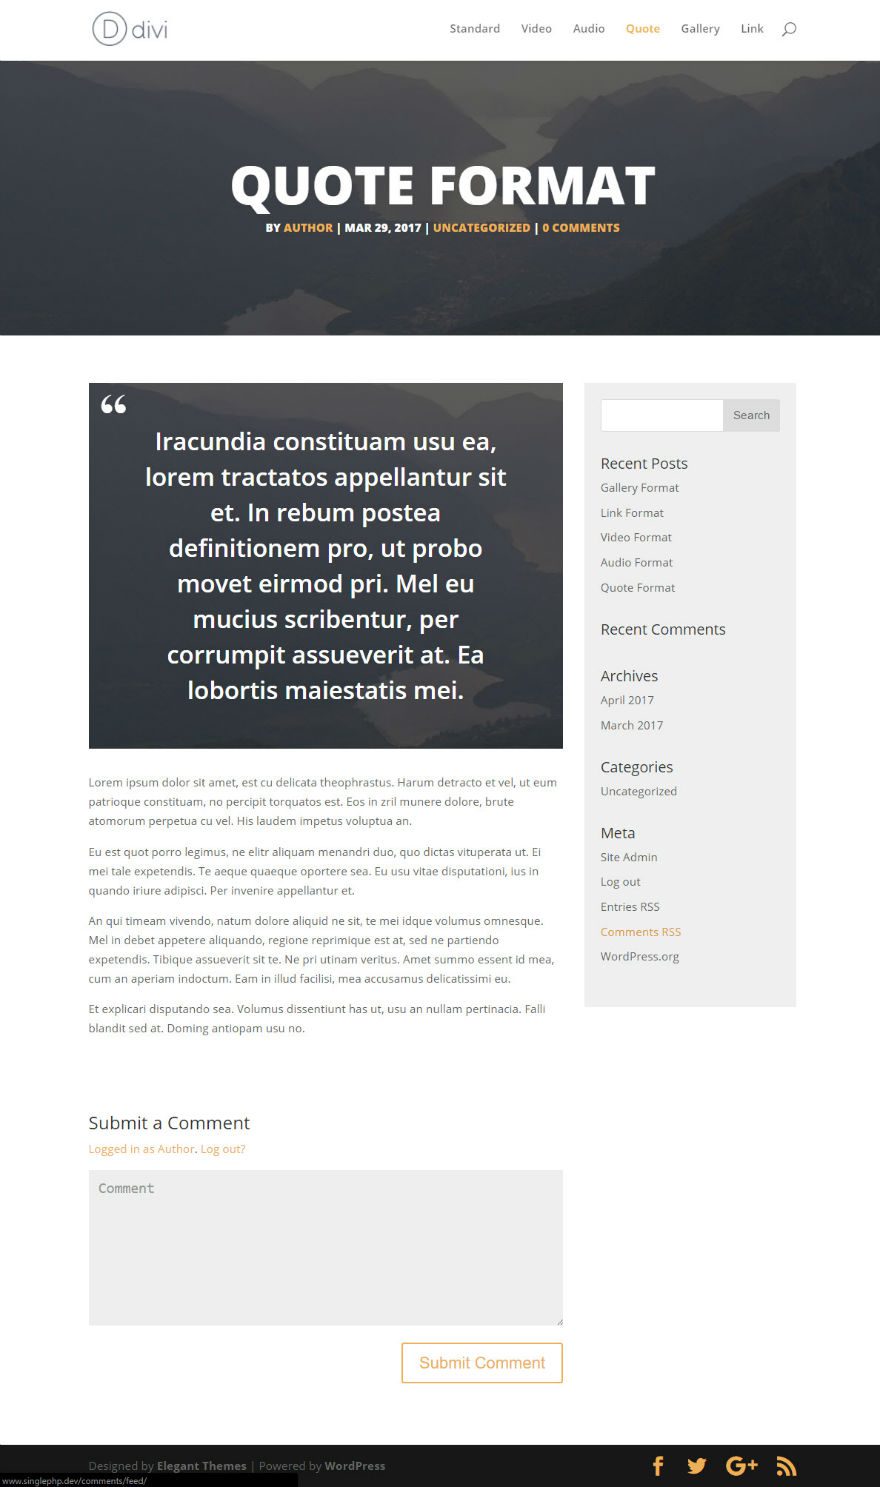
Let’s customize the featured quote box with a little CSS to give it a background image and large quotations on the top right.
Go to Theme Customizer → Additional CSS and add the following custom CSS:
/* ---- Add Background Image to the Quote Box ---- */

.et_quote_content {

background-image: linear-gradient(rgba(0,0,0,0.3),rgba(0,0,0,0.3)), url('ENTER IMAGE URL HERE')!important;
background-repeat: no-repeat;
background-size: cover;

}

/* ---- Add the Quotation Symbol to the Quote Box ---- */

.et_quote_content blockquote p::before {
font-family: Cardo;
position: absolute;
top: 16px;
left: 5%;
margin-left: -16px;
border-radius: 31px;
background: rgba(255, 255, 255, .0);
font-size: 70px;
font-color: #fff;
content: "\201C" !important;
}

/* ---- Text Format Inside of quote ---- */
@media only screen and (min-width: 980px) {
.single-post.single-format-quote blockquote p {
font-size: 30px !important;
font-weight: 600 !important;
}
}
Find and upload an image to your media gallery (should be around 700 x 300). Then copy the url and paste in the CSS above where it says “ENTER IMAGE URL HERE”.
background-image: linear-gradient(rgba(0,0,0,0.3),rgba(0,0,0,0.3)), url('ENTER IMAGE URL HERE');
Now check out your final result:
Styling the Gallery Post Format
For the Gallery Post Format, make sure you have the Gallery Format selected for your post.

Next, make sure to add your 2000 x 600 featured image.
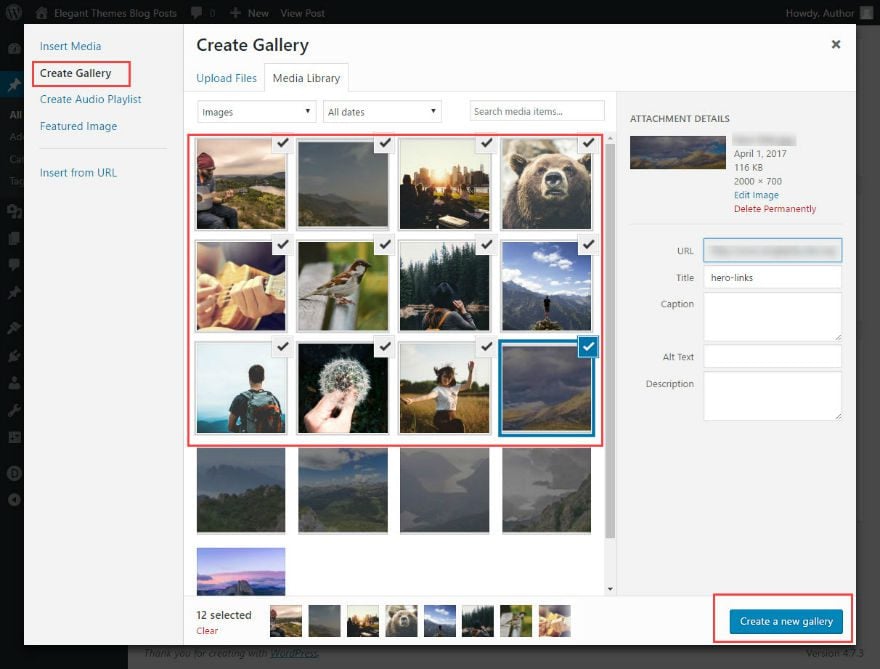
The Gallery Post Format allows you to create a gallery within your post content from the media gallery.
To create a gallery for your post, first upload at least 6 images into your media gallery. The size of the image can vary but since the gallery has a lightbox effect that blows up the images to full size, you can make the images about 1200 x 800.
Now select your images in the media gallery, select Create Gallery, and click the “Create a new gallery” button.
Now you should have a gallery shortcode in your content.
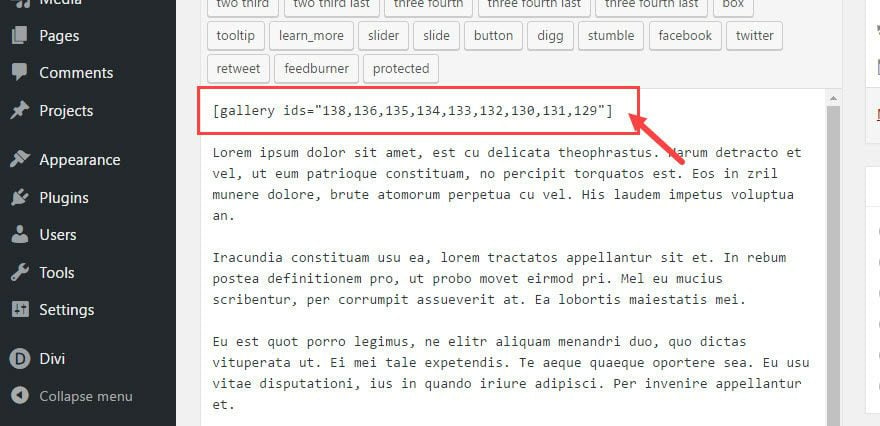
This gallery will be displayed on your post in a mosaic layout three columns wide. The gallery will also replace the featured image on your blog page with a slider of your gallery images.
Now go check out your post.

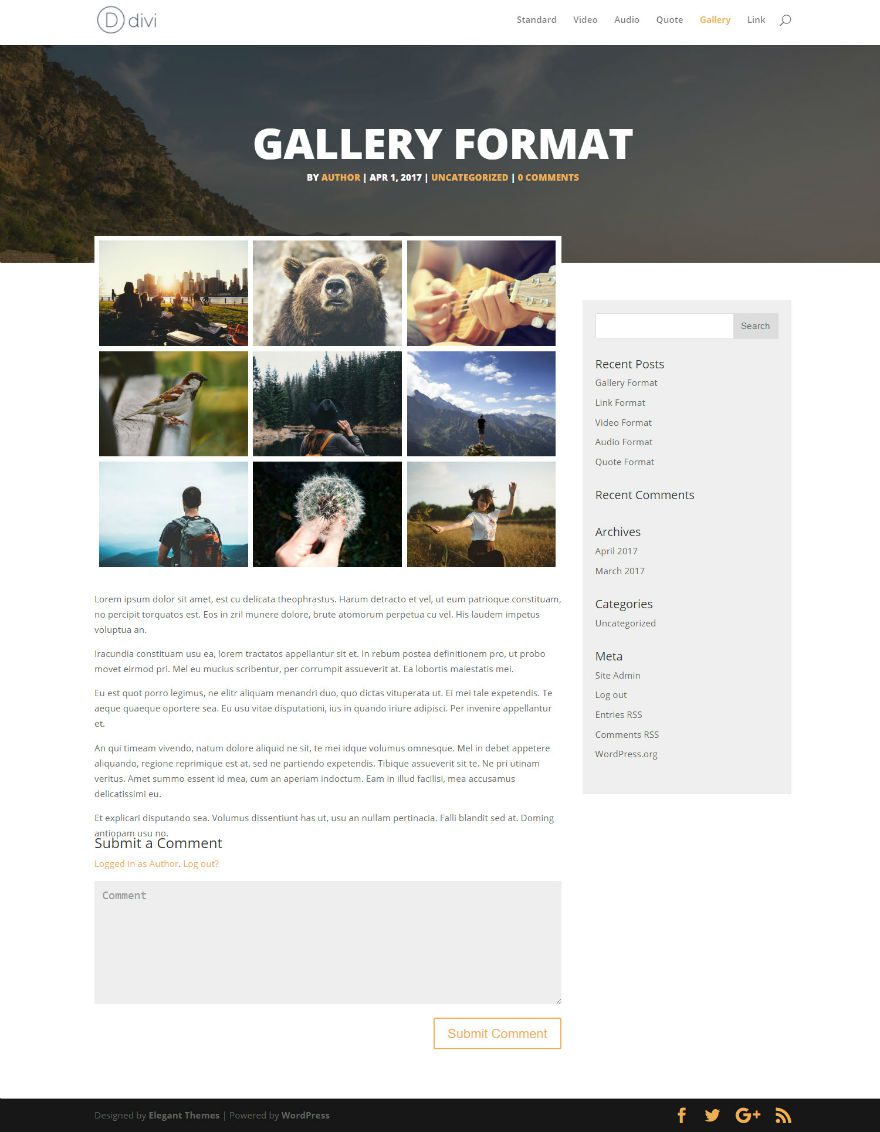
Let’s add some CSS to the gallery to elevate it a little to overlap the hero section and change the margins around each of the images.
Go to Theme Customizer → Additional CSS and add the following custom CSS:
/* ---- Position & Style the Gallery to Overlap the Featured Image ---- */

@media only screen and (min-width: 980px) {

.single-format-gallery .et_post_meta_wrapper { margin-top: -100px;}

.et_post_gallery {
z-index: 100;
position: relative;
border-top: 8px solid #fff !important;
border-left: 8px solid #fff !important;
background: #fff !important;
}

/* ---- Set Background Color, Margins & Padding for the Gallery Image ---- */

.et_gallery_item { margin: 0 0 0 0 !important;}

.et_gallery_item {
width: 33.3%;
margin: 0 0% 0% 0 !important;
padding-right: 8px !important;
background: #fff !important;
padding-bottom: 8px !important;
}
}
Now check out the final result.
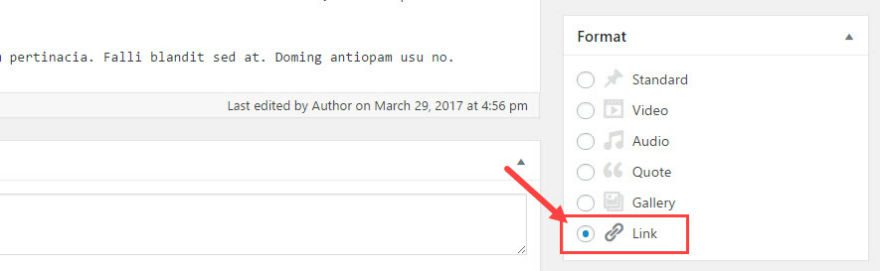
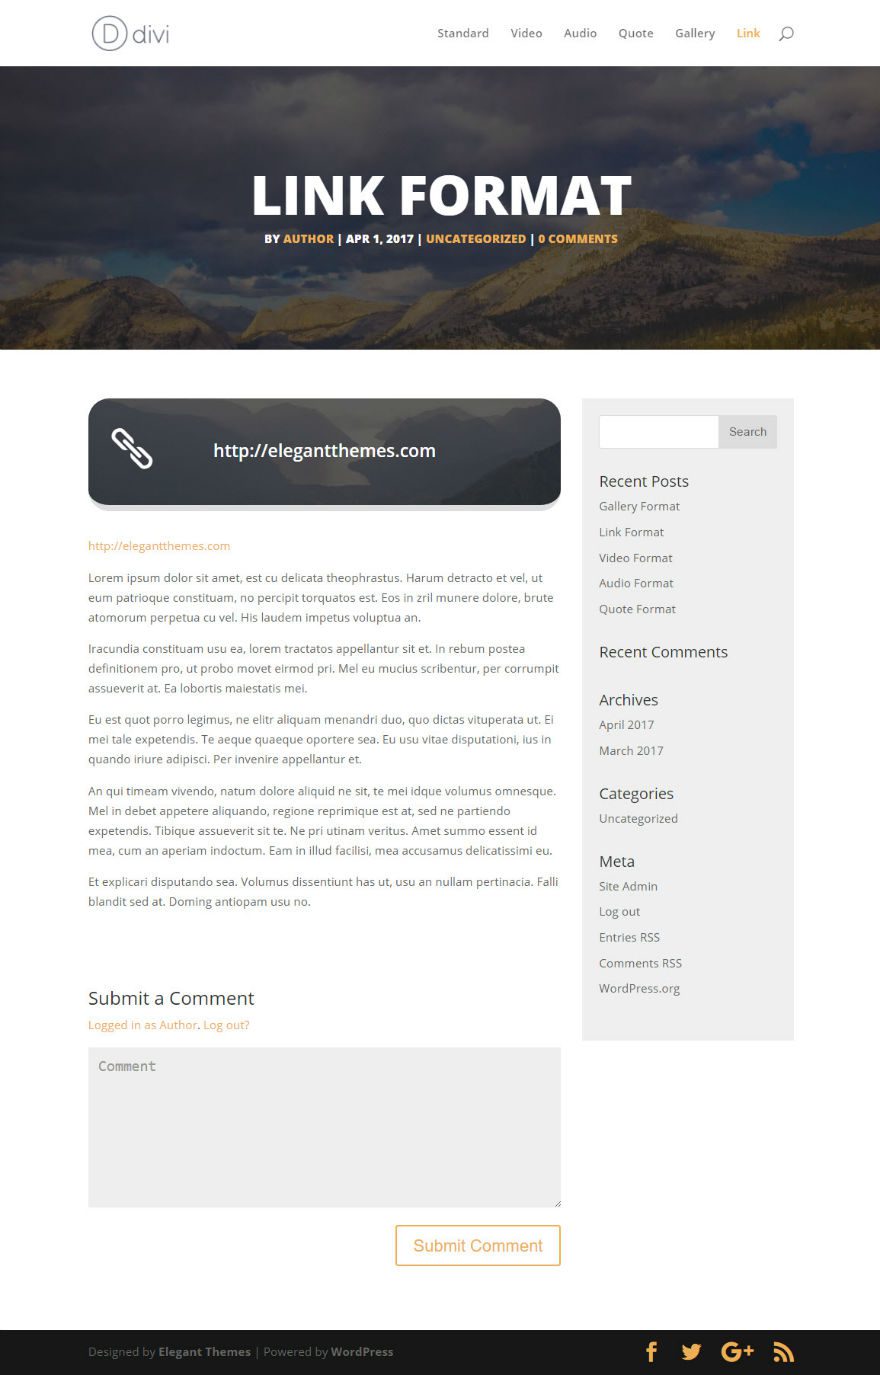
Styling the Link Post Format
For the Link Post Format, make sure you have the Link Format selected for your post.
Next, add your 2000 x 600 featured image to your post.
The Link Post Format take the first link in the post and displays it at the top of the content inside a box. This custom link display also replaces the featured image thumbnail for this post on your blog page.
Go ahead and add a link to your post and check out the post design.

Now let’s improve the design a bit by adding a background image to the custom link box, and an icon to the left of the link url.
Go to Theme Customizer → Additional CSS and add the following custom CSS:
/* ---- Add thick border to the left side and Lower the link box ---- */

.et_link_content {
border-bottom: 8px solid #ddd;
background-image: linear-gradient(rgba(0,0,0,0.3), rgba(0,0,0,0.3)), url(ENTER IMAGE URL HERE);
background-size: cover;
background-color:#edb059;
border-radius: 25px;
}

/* ---- Font Settings within the Link box ---- */

.et_link_content a.et_link_main_url { font-size: 21px; font-weight: 600; color: #fff !important;}

/* ---- Link Symbol on the right side ---- */

.et_link_content::before {
font-family: "ETmodules";
position: absolute;
top: 38%;
left: 5%;
margin-right: -26px;
border-radius: 31px;
background: rgba(255, 255, 255, .0);
font-size: 48px;
color: #fff;
content: "\e02c";
}

/* ---- Position & Style the Gallery to Overlap the Featured Image ---- */

@media only screen and (min-width: 980px) {

.single-format-gallery .et_post_meta_wrapper { margin-top: -100px;}
Then find and upload an image to your media gallery (should be around 700 x 300). Then copy the url and paste it in the CSS snippet you just entered where it says “ENTER IMAGE URL HERE”.
background-image: linear-gradient(rgba(0,0,0,0.3),rgba(0,0,0,0.3)), url('ENTER IMAGE URL HERE');
Now Check out what the post looks like.
That’s it!
Now that we have all of our post formats designed, it’s time to check out the cool layout it creates on the blog page. You can see how all the different post format featured items are displayed.
Note: you can display your blog using the default editor or the Divi Builder and the design will still work.
Responsive?
All of the post formats are completely responsive a work well on all devices. Here is an example of what the Gallery Format post looks like when I shrink change the screen size:
Final Thoughts
Congrats! You are all done. I hope you enjoyed this 3 part series on customizing blog post formats. If anything, I hope you learned something valuable to take with you on your next project. Now that you have completed the tutorial, feel free to experiment with your own design elements for your blog post formats.
Please submit your comments below. I look forward to hearing from you.


Hello, I followed the 3 tutorials and my featured image did not show up, I discovered that the WordPress jetpack plugin prevents the display from the featured image and I had to turn it off so that it works And it’s very embarrassing because the plugin Jetpack offers good functionality, would there be a way to be able to correct this ???
Great article how to add custom templates and designs ..
only one question:
is there a way to have the overlapping effect for one image in the blogpost just like the video url?
Thank you!
The feature image is not showing on the header. I followed all three tutorials and have a child theme.
Great series. Thank you. I have applied this to a site I am working on and it looks great.
Awesome series, I’ve been looking for how to make the header like that for days, thank you!! Unfortunately the post format won’t work with the Divi Builder, and I really need to use Divi Builder on my posts, would there be a workaround?
Also, when you use the Divi Builder after making those changes to the single.php file, the fixed navigation bar takes longer than normal to trigger.
Thanks for this tutorial
Posts look very nice now
I was just wondering where the CSS code we added is saved ? I checked the ‘style.css’ file of the child theme on the server, it has not changed, neither has ‘style.css’ of the parent theme ?
Lastly, is there a way to choose the background image *per post* for the player, quote, and player, respectively, rather than one single image across all posts of that type?
Love this tutorial and just implemented it at salonsonline.co.uk.
Question: How can I create your video post layout, but on a standard post? ie the featured image to appear in the hero section AND at the top of the content (overlapping the hero)?
I would love to know this as well, rather than tinker with the code with not much but hope.
The single posts are the last thing I need to do before making our new DIVI-built website live. This tutorial has been great, but I definitely think the standard posts look like they’re missing something without the featured image looking similar to the other post types.
Besides my comment/reply above, is there a way to change the background of the page and give the content and sidebar blocks a separate background color? Or a way to embed a DIVI section on the page? I replaced the footer with a global section on the rest of the site.
I realize these are likely a simple question, but I’m still learning php and css.
For some reason when applying all the code correctly from all 3 steps my blog post [ doesn’t ] seem to be grabbing the thumbnail and putting it the [ hero section ], any suggestions why that is?
Jason,
Did you darken the featured images before uploading them into DIVI or is there a way to do that within DIVI…ie, upload a normal picture into DIVI, but DIVI will darken the image so the post title text is more easily read?
Thanks in advance!
That’s where
<div class="hero-section" style="background-image: linear-gradient(rgba(0,0,0,0.3),rgba(0,0,0,0.3)), url('’);”>
comes in from part 2!
Ok so, I’m new to Divi and just trying to figure out how to set up a simple, elegant blog site. Found this post on editing the diff format types, but don’t see the other posts 1&2.
If I’m understanding this correctly from the comments, to do the work above:
1. I need to use a child theme?
2. Once I make these edits to a post you can’t save them as a template? Meaning every time you do a custom post you have to make these edits? Isn’t that what the library is for? I couldn’t take the time to do these edits EVERY time I submit a post, that is too time consuming for a small biz.
Clarifications and comments are appreciated!
1. You should else these changes will be lost every time you update Divi.
2. No, you’re updating the post templates here for standard post, video etc.
Hi
You have wonderful tips, but PLEASE add links to previous tips in SAME series!!!!!
Yes please – add links to the other posts in the series!
Really boys…
https://www.elegantthemes.com/blog/divi-resources/how-to-add-custom-templates-and-design-to-divis-blog-post-formats-part-1-of-3
https://www.elegantthemes.com/blog/divi-resources/how-to-add-custom-templates-and-design-to-divis-blog-post-formats-part-2-of-3
is there a way to have the css code target only the single post pages? some of the css code added is affecting other pages of the website.
ex:
[/* —- Position & Style the Gallery to Overlap the Featured Image —- */
@media only screen and (min-width: 980px) {
.single-format-gallery .et_post_meta_wrapper {
margin-top: -100px;
}
.et_post_gallery {
z-index: 100;
position: relative;
border-top: 8px solid #fff !important;
border-left: 8px solid #fff !important;
background: #fff !important;
}
/* —- Set Background Color, Margins & Padding for the Gallery Image —- */
.et_gallery_item {
margin: 0 0 0 0 !important;
}
.et_gallery_item {
width: 33.3%;
margin: 0 0% 0% 0 !important;
padding-right: 8px !important;
background: #fff !important;
padding-bottom: 8px !important;
}
}]
[.et_post_gallery] is a code used for other image galleries on other pages. so the padding-top and padding-left is affecting my existing photo galleries.
please advise, thanks!!
Just start the section with .single
ie single .et_post_gallery {…
love this!!
is there a way to hide the meta category?
and is there a way to make the featured image clickable so it can be opened? i generally have images that are much larger than 2000×600 and as a result, only a small portion is seen. having it open in a lightbox effect would be wonderful.
thanks!
To hide the meta category go to Divi theme options > Layout tab > Single post layout and hide categories.
Sall, thats perfect. i didnt even know that existed.
Thank you Tammy!
How could I elevate the video to overlap the hero section in standard post format?
Or how to make the video post format is the standard post format?
I post mainly videos in the blog? Is it possible?
It may seems ridiculous question, but I’m using lifterlms and inside the lessons posts there is no format option to select the video format.
I found it in wordpress Writing Settings (The default post format), But It doesn’t apply the video post format to lifterlms lessons, Hmmm.
I might be asking the same sort of question.
1. If I am already using a Child Theme, can I skip tutorial Parts 1 & 2 and just focus on inputting the coding that is listed here in this post (tutorial Part 3?)
The Layout is stunning!
Awesome work!
But I have some issues and a few questions.
1) All explained changes are made in active “divi-child” theme, right?
I did have problems with my child layout (after step 1,2 )..it´s not like the parent one..so I tried to use the css codes in the parent theme. Is it okay or prohibited?
2) Are you using the divibuilder and “text”modules or wordpress for the gallery function?
3) In /*LINK*/ was missing one “}”
4) Same issue here with title background..it´s white/empty!?
CYA tomorrow…zz.Zz.z
Thumbs up! so far
Kind Regards, Carol
Carol,
Maybe I can help.
1. you definitely want to use a child theme for this.
2. use wordpress to generate a gallery from within the media gallery.
Are you still having the issue of a white background. Did you add the featured image?
I might be asking the same sort of question.
1. If I am already using a Child Theme, can I skip tutorial Parts 1 & 2 and just focus on inputting the coding that is listed here in this post (tutorial Part 3?)
You definitely need to do part 2 even if you have a child theme.
Thanks Jason!
Thank you very much I was looking for this within the forum last week. You were quick in developing this series of tutorials. Very happy with you!
Just one more query, if I want to have Tema Divi son, but I want the style format of the secondary menu of the Extra theme, how can I add it to the theme divi son?
Tammy,
I love the end result of the tutorial. Everything was well explained and worked as expected. And I learned a lot of other useful bits for future Divi-ing.
Thanks.
I think, this post is very helpful for everyone, because everyone who uses devi needs this
Finally reveal Part-3. Thank you so much Tammy Grant for your hard work.
Does this work if we use divi builder in post.. Can you pl. suggest how we can make it work using divi builder in posts ..
I am unable to understand, why you peoples do not add these as option in the theme control panel instead of adding lots of CSS / JS. Working with DIVI is like working with garbage, where nothing is organised, for each and everything i need to add css / js. I have worked with several themes where everything is available under theme control panel itself.
Hi Imraan, thank you for the feedback. I think there is a misunderstanding if the impression you have is that you NEED css or js to use Divi. Part of that might be this post series.
This set of three tutorials is intended for people who WANT to do custom development with Divi. It’s sort of like an introduction into customizing templates. We chose the blog post formats because by changing one template file’s php we can style six separate theme elements differently. This is exactly the kind of stuff anyone interested in Divi Child Theme development would want to get started with.
If that’s not you and instead you’re interested in using Divi’s built in features (which are just as, if not more, robust than any other theme I’m aware of) then our documentation explains how to use each and every feature built into Divi.
All of that said, I think it’s probably high time we created more posts for the blog in which we used only the built-in Divi features because I can see how you and others would get the impression that you need css or js to use Divi since we tend to publish a lot of posts that use snippets to add this or that.
noooo… continue please the good work 🙂
Hi Tammy,
Loved your post series and it has come at the best time – right when I was getting my hands dirty modifying my blog post template.
I have followed your instructions but used a plain image as the hero header background. I was wondering how I would go about limiting the Post title text to the edges of my page content instead of being full width? You hopefully will see what I mean on this page – https://jenmulligandesign.com/6-legit-reasons-business-website-needs-blog/
I’m not very good with padding and margins so if you could let me know how I might achieve this it would be much appreciated.
Thanks again!
Cheers,
Jen
Find this section in your CSS:
/* ---- Standard Post Title & Post Meta ---- */
.single h1.entry-title,.attachment h1.entry-title, .single p.post-meta {

text-align: center;
padding-left: 25px;
padding-right: 25px;
margin: auto;
font-weight: 500;
text-transform: uppercase;
color: #424143;
}
And then add this line to it…
That should do it.
You rock! Thanks so much Jason, this worked perfectly! 🙂
All this customization is great but let’s talk about what could be better.
Divi should use it’s awesome builder to allow the creation of templates for every page and post type.
Posts, pages, post formats, products, categories, archives, tags etc.
Think about it. Part of Divi’s power is the builder. Yet, they have not in any way, implemented it in a way that you can build templates applied to specific post types.
We know it is absolutely possible because there are several plugins that serve this exact purpose. I use them.
But they are plugins, which require updates and maintenance. As a site owner you have to rely on other developers beyond Elegant Themes.
From a development standpoint this would likely be relatively simple to integrate and would make so much sense to push Divi over the top.
Absolutely agree Matt!
Hi Matt, do you have a recomendation for a plugin please? I came to read this post because I am trying to set a template made with the divi builder for custom post types, and I thought this tutorial would show how to do it. Unfortunately not.
Thanks!
Absolutely agree. I hope DIVI developers will take this advice to the heart because there is a quite big group of people waiting for theme with this feature. This will put Divi WAY ahead of other themes. There is no doubt about that.
I completely agree with you. +10000
How can I get these post types to have the same format as my other post which have post tiles and meta centered.
Thank you
I forgot my post tiles are above the featured image.
No worries, I figured it out.
Sorry, I was wrong. CSS to have post title and meta information above the featured image will work with these types of post if you use the Divi text module – if you use the WP format it will not.
Please advise. Thank you.
Thanks for pointing this out, Garnette.
I figured it out. If I use the Divi builder and include a “custom margin” (from the CSS all margins 8px) and use the “advanced design settings” (from the CSS Top margin -120px) everything works fine with my CSS to have blog title and meta information above the featured image.
By far my favorite post. Very easy to implement and the posts look great. However, the link post is specific to only one post if you wish to include the background image (unless I’m missing something here with this one). Also, the link and quote posts do not show the post’s tile on the archives page – please advise on this one.
Otherwise, this was an awesome post.
Thanks guys. Much appreciated.
I can’t seem to find the “format types” in the posts section. I use the Divi theme. I randomly had it show up one time but don’t know where it went. Any ideas?
It does disappear sometimes. Click on “screen options”, then uncheck “format” and do check “format” again.
Thanks Ruud!
Great series! Very useful. But imagine feature allowing user to build post and page templates using page builder and then just set them as default for normal posts, custom post types, all pages or selected single page whatever you need. Which theme can offer that?! I see how fast Divi is developing and becomes more and more customizable. But allowing user to create his own templates and setting them just with few clicks would be like “sh*t up and take my money!”. Combine that with custom taxonomy and sky is the limit. I believe it’s something that elegantthemes team could really consider. At least i hope so and that’s why im writing this comment which i very rarely do. Divi is great and i hope you guys will listen to the customers and market needs and make it epic!
Or maybe it’s already on to do list? Tell us please is it something that you could implement. But honestly without politically right answers like “we will/are think/ing about this”.
Thank you for such a great series and have a nice day!
I do not know what to do these post and do not directly improve DIVI.
+1 for this! Been trying to figure out how to use my custom Divi headers/pages “globally” without having to manually add to each page.
This would really enhance Divi’s functionality!
Looks awsome!
This Looks very nice, but now the Standard Divi Gallery has also a white Background… also the comments below are not in the right position
https://tobiashaas.info/2015/09/10/bandshooting-bei-hollisters-motorcycles/
do you have any solution for this?
Best Regards from Germany
Tobi
Replace this code:
/* ---- Position & Style the Gallery to Overlap the Featured Image ---- */
@media only screen and (min-width: 980px) {
.single-format-gallery .et_post_meta_wrapper { margin-top: -100px;}
}
With this code:
/* ---- Position & Style the Gallery to Overlap the Featured Image ---- */

@media only screen and (min-width: 980px) {

.single-format-gallery .et_post_meta_wrapper:first-child { margin-top: -100px;}

}
That should take care of the comment section.
Very cool, but now the Standard DIVI Gallery has also an White Background.
Comments also not in the right position…. 🙁
https://tobiashaas.info/2015/09/10/bandshooting-bei-hollisters-motorcycles/
https://tobiashaas.info/galerien/hochzeitsfotos/
Hope u can help 😉
Sorry for my bad english 😛
Hi Tobias,
Do you want to get the white border around each image out?
you can do that with a little css.
.et_gallery_item {
  background: #fff none repeat scroll 0 0;
  margin: 0 0 0 0;
  padding: 0 !important;
  width: 33.3%;
}
good luck.
Johann
This post is compatible with EXTRA theme?
I wanna do this too, on my website. Is it compatible?