")
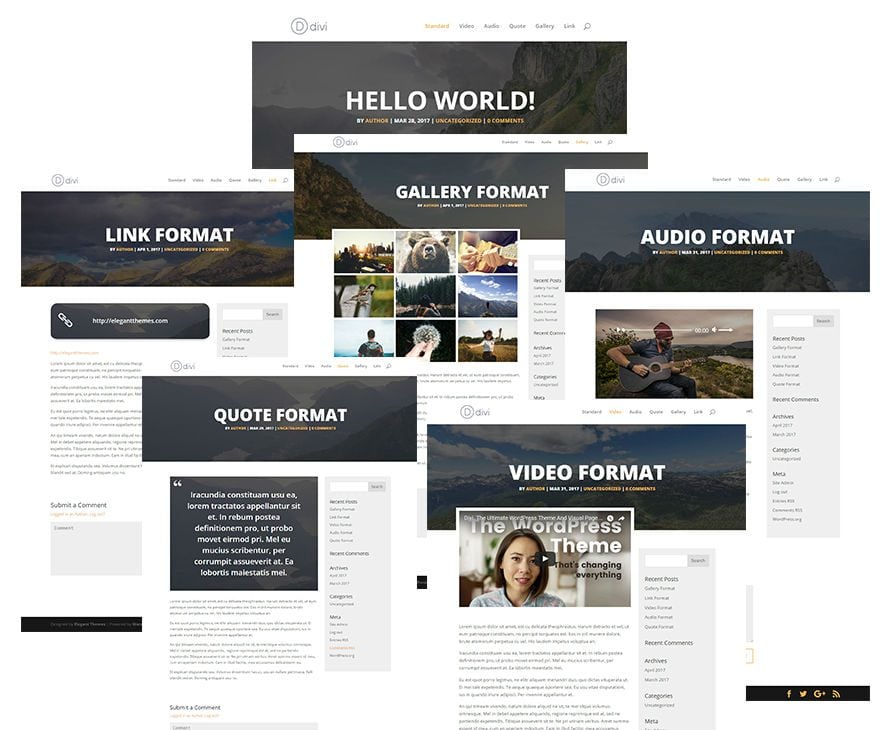
Welcome to Day 2 of 3 in our series on How to Add Custom Styles to Divi’s Blog Post Formats. By default Divi comes with six blog post formats: Standard, Video, Audio, Quote, Gallery, and Link. In this series we teach you how to customize them with php and css.
Yesterday, I walked you through how to use Desktopserver to create a local install of WordPress. I also showed you how to set up a child theme. Both of these are a great foundation for any project you are working on and it is perfect for what we are going to be doing today and tomorrow.
Today we are going to be editing some PHP code inside Divi’s single.php file in order to get a completely unique layout for your blog post formats. If you aren’t already familiar with PHP, no worries. It’s not a lot and it’s not hard to do. I will walk you through exactly what code you need and where to put it.
After we have our single.php file edited, we will finally be ready for our last part of our series. Tomorrow is all about styling and finding out just how cool blog post formats can look on your blog.
Let’s get started.
What You Need For This Tutorial
Here is what you will need to follow along with today’s tutorial:
- A code editor such as Atom, Sublime, Brackets or Notepad + + (whatever you prefer)
- A Local WordPress Installation (latest version) using DesktopServer (unless you already have one)
- A Divi Child Theme installed and active with three files added from yesterday’s post (style.css, functions.php, and single.php)
Customizing Divi’s Single.php Template
Adding a New Hero Section
Using your text editor, open your child theme’s single.php file. Make sure that you copied over all of the single.php code from the parent theme (Divi) with your file.
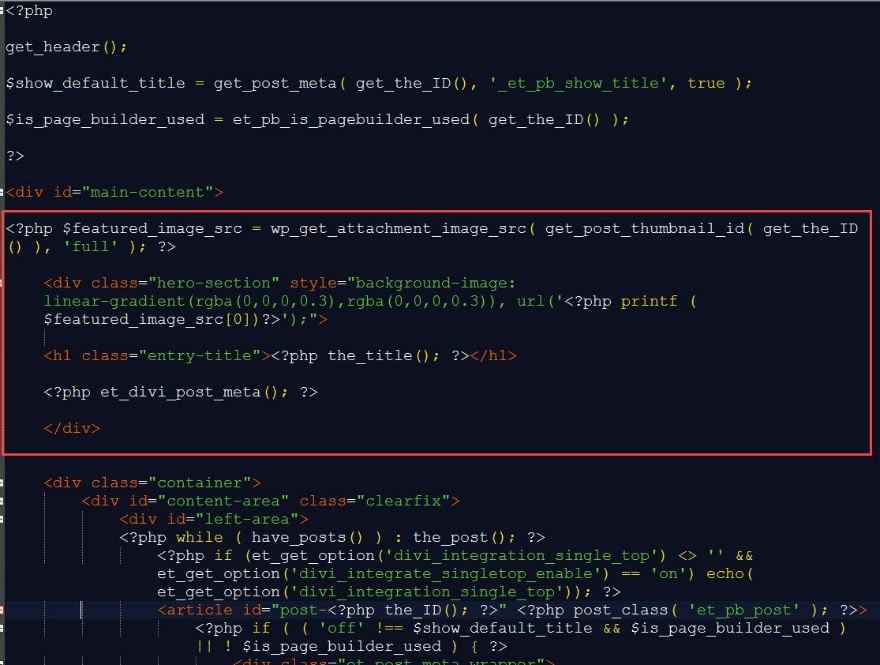
At the top of the file, locate the opening div with the id “main-content”.
<div id=”main-content”>
Then enter the following just below the “main-content” opening div:
<?php $featured_image_src = wp_get_attachment_image_src( get_post_thumbnail_id( get_the_ID() ), 'full' ); ?>

	<div class="hero-section" style="background-image: linear-gradient(rgba(0,0,0,0.3),rgba(0,0,0,0.3)), url('<?php printf ($featured_image_src[0])?>');">

	<h1 class="entry-title"><?php the_title(); ?></h1>

	<?php et_divi_post_meta(); ?>

	</div>
Here is what this code is doing to your single.php file.
First, a variable called “$featured_image_src” is assigned a value that “gets” the image source (which is the url to the image) for the featured image assigned to the post.
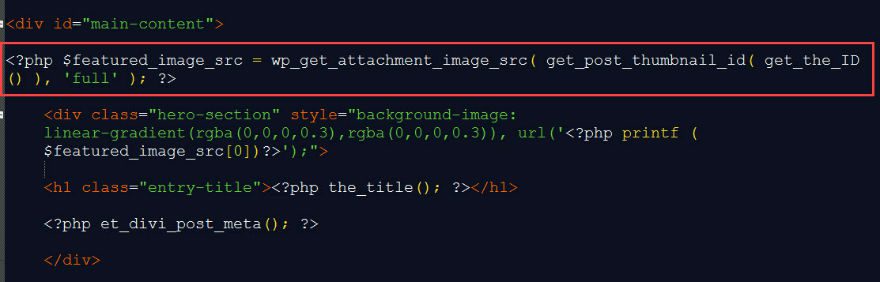
The next code is a combination of html and php that opens the new div with a custom class called “hero-section” and some inline styling to create two background images stacked on top of each other.
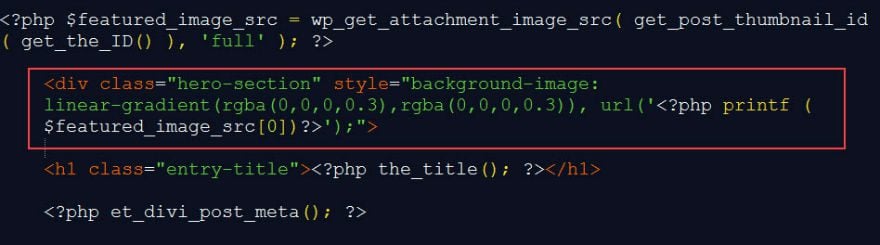
The first image is defined as a linear-gradient which serves as a dark overlay for the featured image.
Linear-gradient (rgba(0,0,0,0.3), rgba(,0,0,0,0.3))
And the second image (the featured image) is separated by a comma and, by default, stacks behind the first image.
url('<?php printf ($featured_image_src[0])?>')
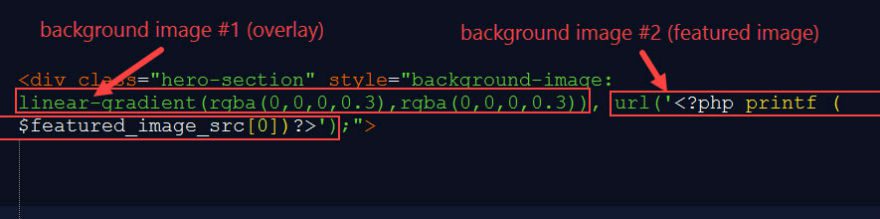
Notice variable defined earlier is used to set the featured image as the background of the “hero section”.
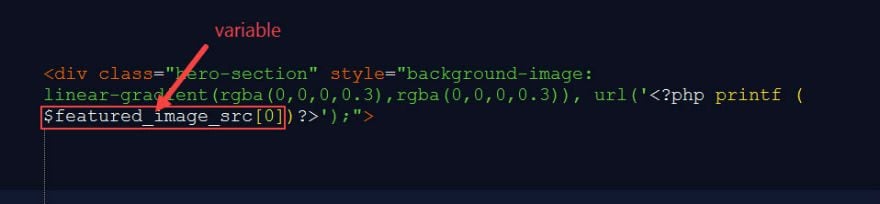
Because the second image listed automatically stacks behind the first image, this combination creates the dark overlay over the hero section image.
Now, whenever you add a featured image to your post, a dark overlay will be automatically applied.
The next snippet of code adds the headline for your post inside your new hero-section div.
<h1 class="entry-title"><?php the_title(); ?></h1>
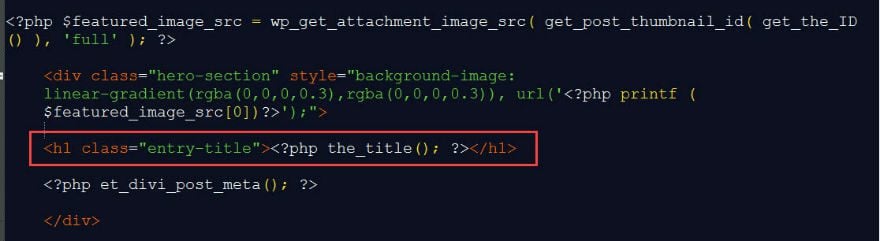
The final snippet of code adds the post meta content below the headline and within the hero-section div.
<?php et_divi_post_meta(); ?>

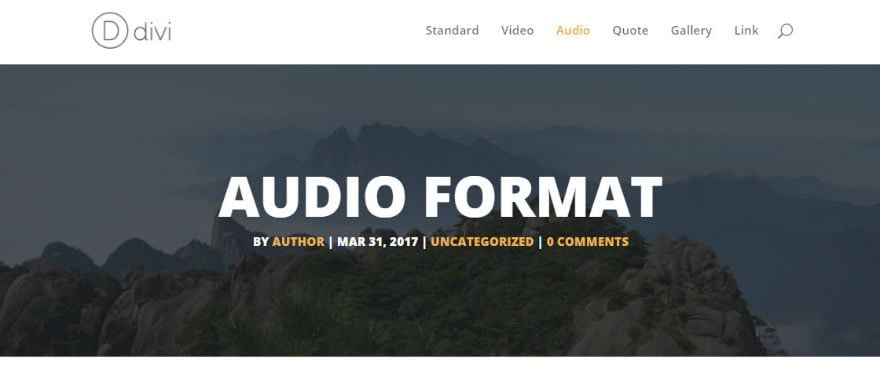
Here is what this new section and styling will allow us to accomplish in tomorrow’s post:
Taking Out What You Don’t Need
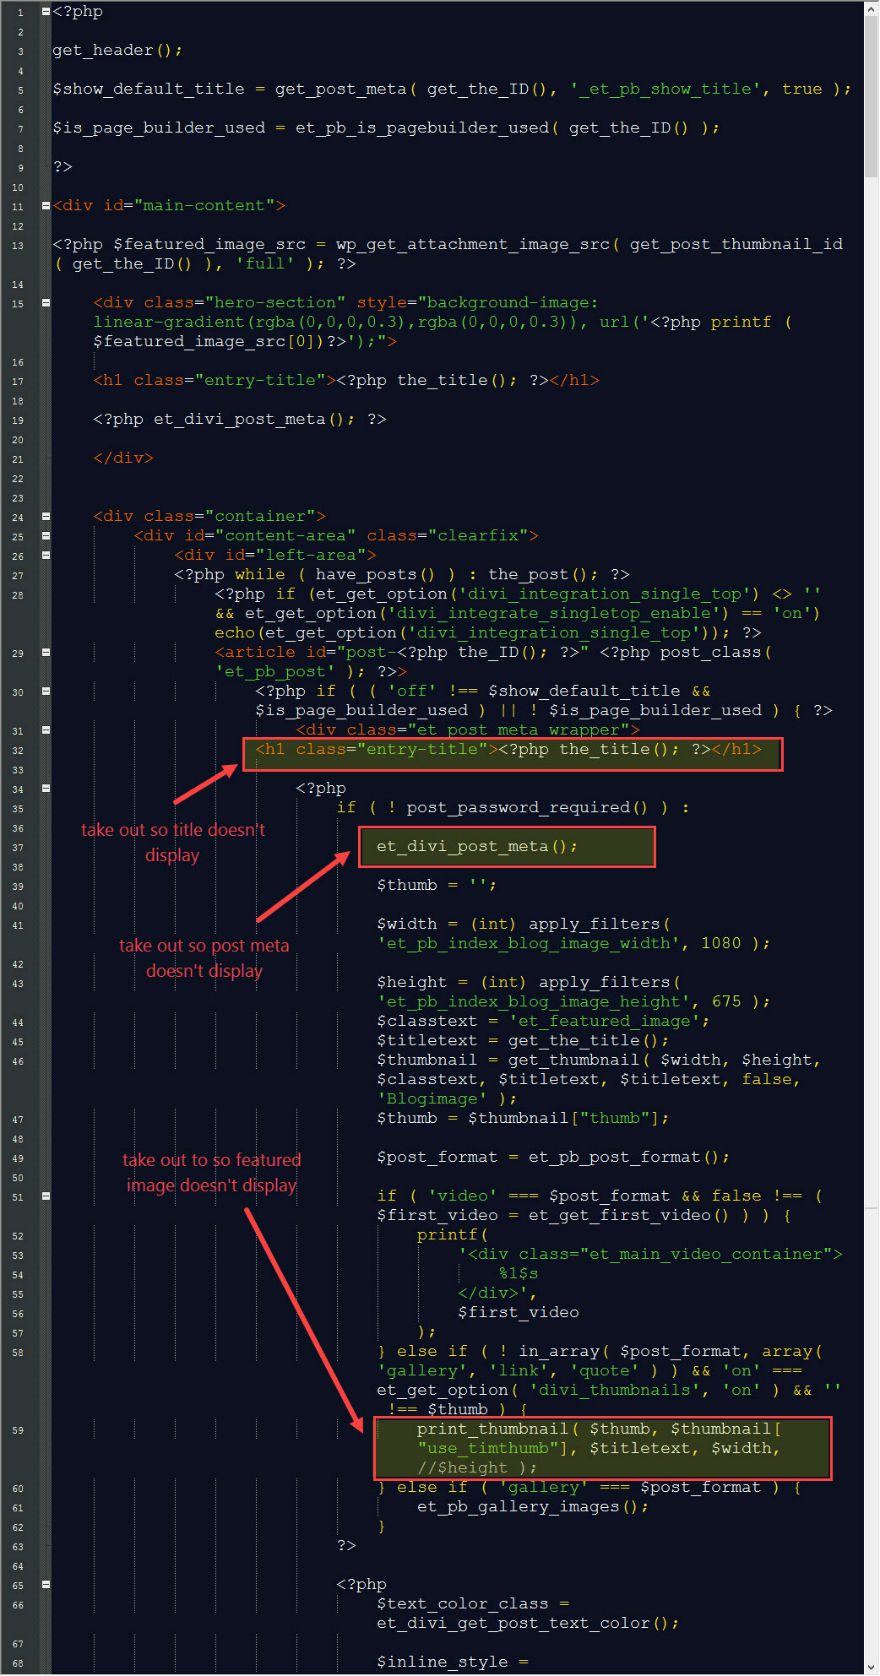
Since you have a new section for your featured image, post title, and post meta in place, you need to take out three sections of code that were being used to display your featured image, post title, and post meta by default.
You will need to take out the h1 tag that displays the post title:
<h1 class="entry-title"><?php the_title(); ?></h1>
You will need to take out the code that displays the post meta:
<?php et_divi_post_meta(); ?>
And you will need to take out the code and displays the featured image thumbnail:
print_thumbnail( $thumb, //$thumbnail["use_timthumb"], $titletext, //$width, $height );
Here is the entire code for the new single.php file. Feel free to copy and paste it if you get stuck.
Note: this is a scrolling box of code. You’ll need to select and drag to get it all.
<?php

get_header();

$show_default_title = get_post_meta( get_the_ID(), '_et_pb_show_title', true );

$is_page_builder_used = et_pb_is_pagebuilder_used( get_the_ID() );

?>

<div id="main-content">

<?php $featured_image_src = wp_get_attachment_image_src( get_post_thumbnail_id( get_the_ID() ), 'full' ); ?>

	<div class="hero-section" style="background-image: linear-gradient(rgba(0,0,0,0.3),rgba(0,0,0,0.3)), url('<?php printf ($featured_image_src[0])?>');">

	<h1 class="entry-title"><?php the_title(); ?></h1>

	<?php et_divi_post_meta(); ?>

	</div>


	<div class="container">
		<div id="content-area" class="clearfix">
			<div id="left-area">
			<?php while ( have_posts() ) : the_post(); ?>
				<?php if (et_get_option('divi_integration_single_top') <> '' && et_get_option('divi_integrate_singletop_enable') == 'on') echo(et_get_option('divi_integration_single_top')); ?>
				<article id="post-<?php the_ID(); ?>" <?php post_class( 'et_pb_post' ); ?>>
					<?php if ( ( 'off' !== $show_default_title && $is_page_builder_used ) || ! $is_page_builder_used ) { ?>
						<div class="et_post_meta_wrapper">
					<!-- h1 was here -->

						<?php
							if ( ! post_password_required() ) :

								//et_divi_post_meta();

								$thumb = '';

								$width = (int) apply_filters( 'et_pb_index_blog_image_width', 1080 );

								$height = (int) apply_filters( 'et_pb_index_blog_image_height', 675 );
								$classtext = 'et_featured_image';
								$titletext = get_the_title();
								$thumbnail = get_thumbnail( $width, $height, $classtext, $titletext, $titletext, false, 'Blogimage' );
								$thumb = $thumbnail["thumb"];

								$post_format = et_pb_post_format();

								if ( 'video' === $post_format && false !== ( $first_video = et_get_first_video() ) ) {
									printf(
										'<div class="et_main_video_container">
											%1$s
										</div>',
										$first_video
									);
								} else if ( ! in_array( $post_format, array( 'gallery', 'link', 'quote' ) ) && 'on' === et_get_option( 'divi_thumbnails', 'on' ) && '' !== $thumb ) {


								} else if ( 'gallery' === $post_format ) {
									et_pb_gallery_images();
								}
							?>

							<?php
								$text_color_class = et_divi_get_post_text_color();

								$inline_style = et_divi_get_post_bg_inline_style();

								switch ( $post_format ) {
									case 'audio' :
										printf(
											'<div class="et_audio_content%1$s"%2$s>
												%3$s
											</div>',
											esc_attr( $text_color_class ),
											$inline_style,
											et_pb_get_audio_player()
										);

										break;
									case 'quote' :
										printf(
											'<div class="et_quote_content%2$s"%3$s>
												%1$s
											</div> <!-- .et_quote_content -->',
											et_get_blockquote_in_content(),
											esc_attr( $text_color_class ),
											$inline_style
										);

										break;
									case 'link' :
										printf(
											'<div class="et_link_content%3$s"%4$s>
												<a href="%1$s" class="et_link_main_url">%2$s</a>
											</div> <!-- .et_link_content -->',
											esc_url( et_get_link_url() ),
											esc_html( et_get_link_url() ),
											esc_attr( $text_color_class ),
											$inline_style
										);

										break;
								}

							endif;
						?>
					</div> <!-- .et_post_meta_wrapper -->
				<?php  } ?>

					<div class="entry-content">
					<?php
						do_action( 'et_before_content' );

						the_content();

						wp_link_pages( array( 'before' => '<div class="page-links">' . esc_html__( 'Pages:', 'Divi' ), 'after' => '</div>' ) );
					?>
					</div> <!-- .entry-content -->
					<div class="et_post_meta_wrapper">
					<?php
					if ( et_get_option('divi_468_enable') == 'on' ){
						echo '<div class="et-single-post-ad">';
						if ( et_get_option('divi_468_adsense') <> '' ) echo( et_get_option('divi_468_adsense') );
						else { ?>
							<a href="<?php echo esc_url(et_get_option('divi_468_url')); ?>"><img src="<?php echo esc_attr(et_get_option('divi_468_image')); ?>" alt="468" class="foursixeight" /></a>
				<?php 	}
						echo '</div> <!-- .et-single-post-ad -->';
					}
				?>

					<?php if (et_get_option('divi_integration_single_bottom') <> '' && et_get_option('divi_integrate_singlebottom_enable') == 'on') echo(et_get_option('divi_integration_single_bottom')); ?>

					<?php
						if ( ( comments_open() || get_comments_number() ) && 'on' == et_get_option( 'divi_show_postcomments', 'on' ) ) {
							comments_template( '', true );
						}
					?>
					</div> <!-- .et_post_meta_wrapper -->
				</article> <!-- .et_pb_post -->

			<?php endwhile; ?>
			</div> <!-- #left-area -->

			<?php get_sidebar(); ?>
		</div> <!-- #content-area -->
	</div> <!-- .container -->
</div> <!-- #main-content -->

<?php get_footer(); ?>
That’s it for today!
Now the hardwork is all done and the framework is ready for us to add our styling to our post formats. Tomorrow I will be setting up and styling all 6 blog post formats using the single.php template we just created.
Please post your comments below and I will try my best to address any problems you may have. If possible, please make sure you have a fresh install of the latest version of WordPress and Divi to avoid any potential conflicts.
Until tomorrow!


Is there a difference between “commenting” out a line of code vs. deleting a line of code?
Is there any difference in performance if you comment out a section, rather than removing it? I prefer to be able to see the changes that were made.
Sorry, I posted the same question below because the blog told me my post wouldn’t post due to having “said it before.”
Would love to have this as a free Divi pack!
Is there no way to do this visually? Isn’t that the whole point of Divi?
I mean it lets me visually modify a specific post, but I want to modify the templates and don’t want to go through all this crap to do it. If I wanted to go through all of this I wouldn’t have bought a theme in the first place.
I am wondering when part three will post? Seems that it is confusing some of us as our websites are now not looking anything like divi. Please advise add to timing for next part.
I followed the instructions from Part 1 & 2 and even after copying the new single.php code in its entirety when I activate the child theme the website is virtually wiped out. I just get the logo a and few bands of plain text. I am new to this but even so, I thought, having followed the instructions it would work?
I had to deactivate the child theme and everything went back to normal, advice?
Hi, Great article – but – my single.php doesn’t have
It has
et_divi_post_meta();
Which is wrapped in all sorts of code including
if ( ! post_password_required() ) :
Has Divi changed since this article was written? And should I just delete
et_divi_post_meta();
Thanks,
Dave
Sorry that should have read “..doesn’t have the line “”.
ok so the comments containing php are being removed – even in quotes.
Ah I see now from your next screen shot that I should just be removing et_divi_post_meta(); without the php tags.
You should change the instruction as that’s very confusing 🙂
You can delete these comments too 😀
Thanks,
Dave
Great stuff Tammy. Just in time. I’ve built a private employee only corporate site and am in the midst of adding post capability. Styling is a big deal. Anyway your tutorial goes way beyond blog post styling and is much appreciated.
This post is compatible with EXTRA theme?
wow here is part – 2. Just completed part1 and 2. Waiting for part -3 . When it will come? I hope it will help me a lot in my website. I will implement this tutorial in my blog. Thanks again.
Thanks for the info Tammy! I’m Waiting for the 3rd part
Really good explanations! This topic is +Just in time+! I was so unhappy with the posts layout in divi…..looking forward for day 3.:*
Now I know that I was reading a blog with a post that is very commete. Thank you for sharing the information you post. I just subscribe to your blog. This is a great blog.
Hi,
I try to use this code but featured image doesn’t appear like demo
Same. Mine is showing as a tiny strip.
All the styling is the next tutorial 🙂
We use Divi and looking at ways to make the blog posts stand out. Really good advice and we will attempt as the instructions are easy – Good job Tammy
Hey Nettl, hope it makes a difference for you.
great Tammy, are amazing…
thanks for a tutorial
cheers 😉
Can’t wait to part 3!
Thanks,Tammy!
Awesome Sall! See you tomorrow 🙂
Thanks for well explained article. Can’t wait for the third part!
thanks! Was searching for something like this to change a bit my posts look. Looking forward to the 3rd part!
Glad it’s helpful Jannis.