
Confirmation and feedback are important elements to any eCommerce page. The user wants to know what happened after they clicked a button to purchase a product. They also want an easy way to see what’s in their cart. The Divi Woo Notice module provides these exact features for your WooCommerce Product pages. In this article, we’ll see how to style and add a Woo Notice module to your Divi Product page. We’ll also discuss why you need one and the best location to add it.
Let’s get started.
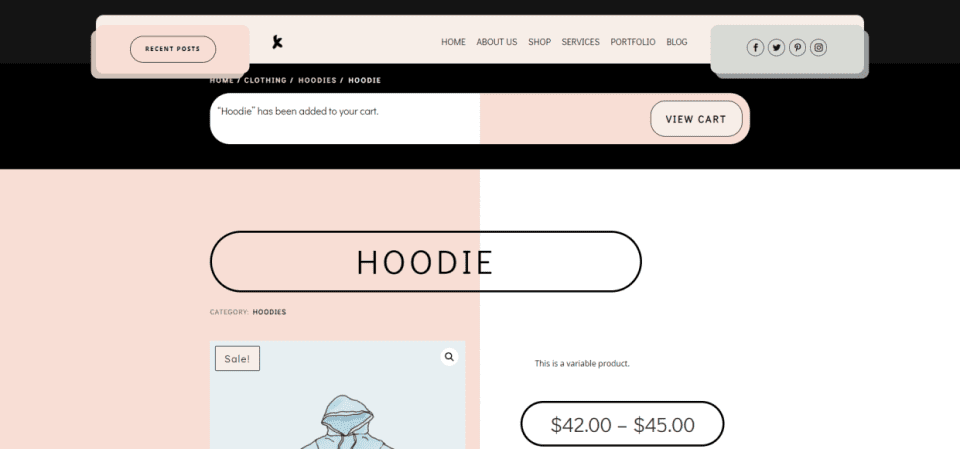
Preview
First, let’s look at what we’re going to build.
Woo Notice Module on Desktop
Woo Notice Module on Mobile

Download Your WooCommerce Product Page Template

First, let’s get a WooCommerce product page template for the Divi Theme Builder. You can build one from scratch or download one from the Elegant Themes blog. Search the blog for “product page template” and download the zipped file. I’m using the FREE Product Page Template for Divi’s Clothing Store Layout Pack.
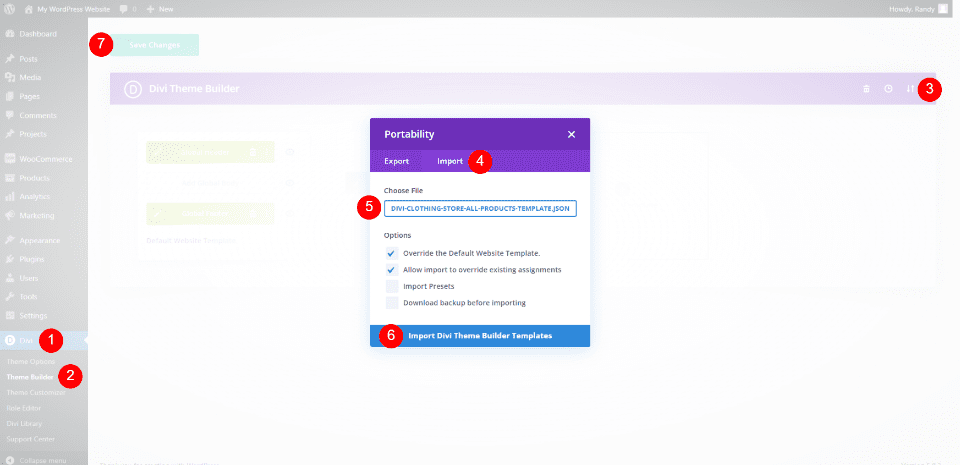
Next, unzip the file. To import it to the Divi Theme Builder, go to Divi > Theme Builder in the WordPress dashboard, select Portability, click the Import tab, navigate to and select your JSON file, and click Import Divi Theme Builder Templates. Save your settings. The file is automatically assigned to All Product Pages.
- Divi
- Theme Builder
- Portability
- Import
- Select your file
- Import Divi Theme Builder Templates
- Save
What the Woo Notice Module Does

The Woo Notice module does two important things:
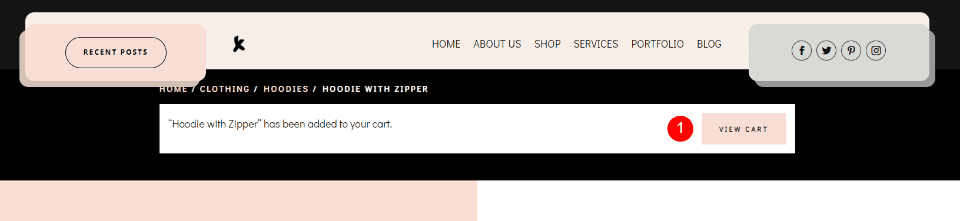
1 – it provides feedback to the user that they’ve successfully placed the item in their shopping cart.
2 – it provides a link to the shopping cart where they can view the items in their cart.
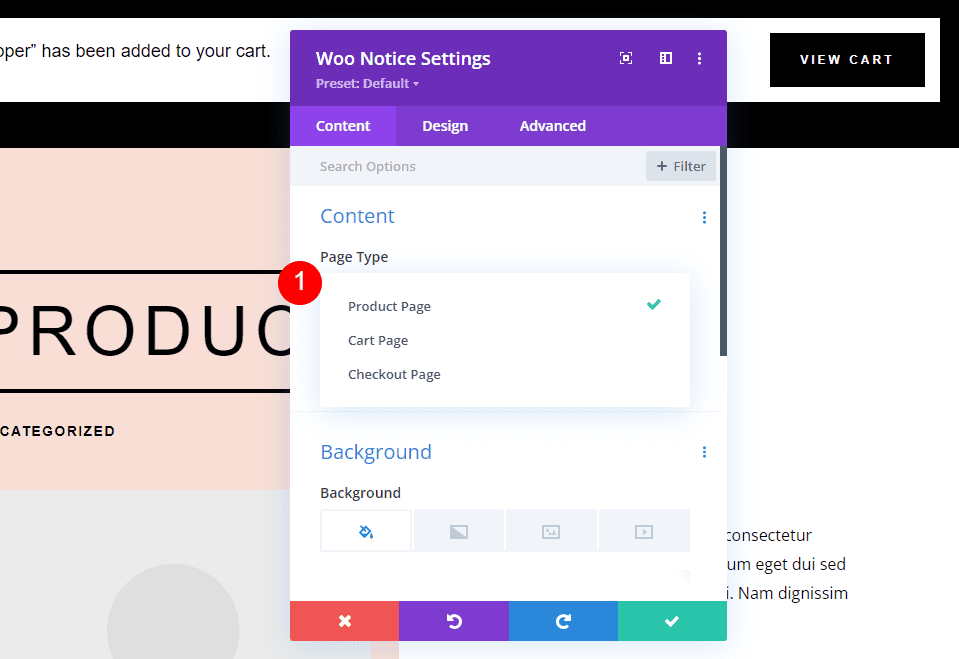
The Woo Notice module has options for the Woo Product pages, the Cart page, and the Checkout page. The second option shows the cart status and coupon information. The third shows a login field along with a coupon field. We’ll use the first option – Product Page.
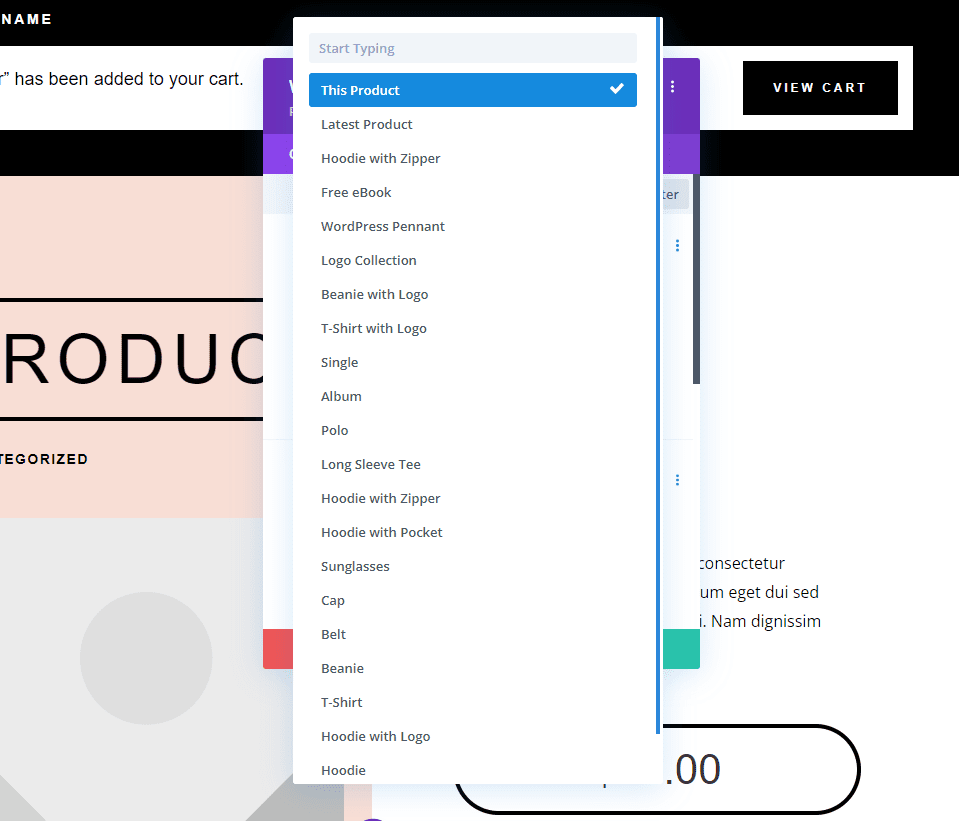
You can have it to display for the current product, the latest product, or any product you choose from the list.
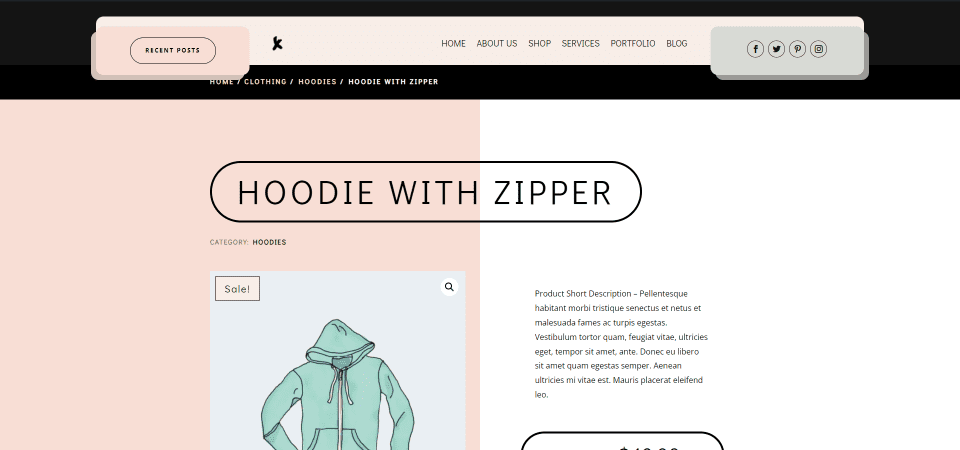
Unlike other Woo modules, the Woo Notice module only displays on the page under certain conditions. It’s only visible if the user adds the product to their cart. This example shows the product page when the product is not added to the cart.
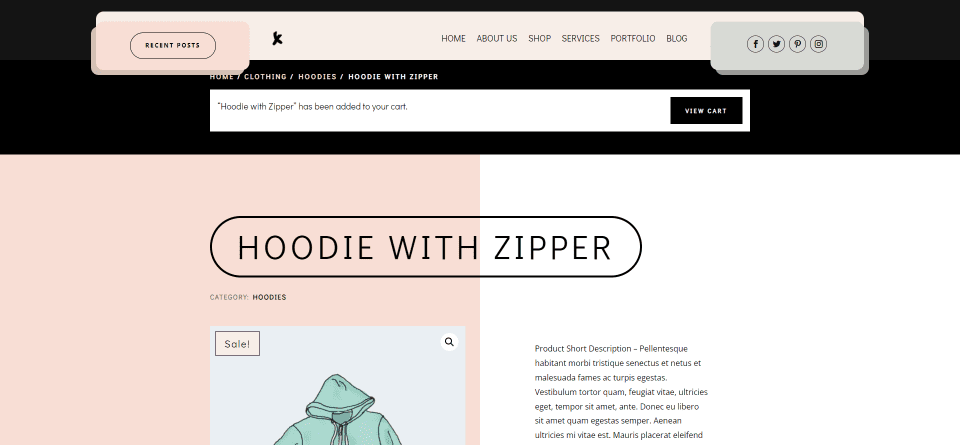
Once the product is added to the cart, the module appears.
Add the Woo Notice Module
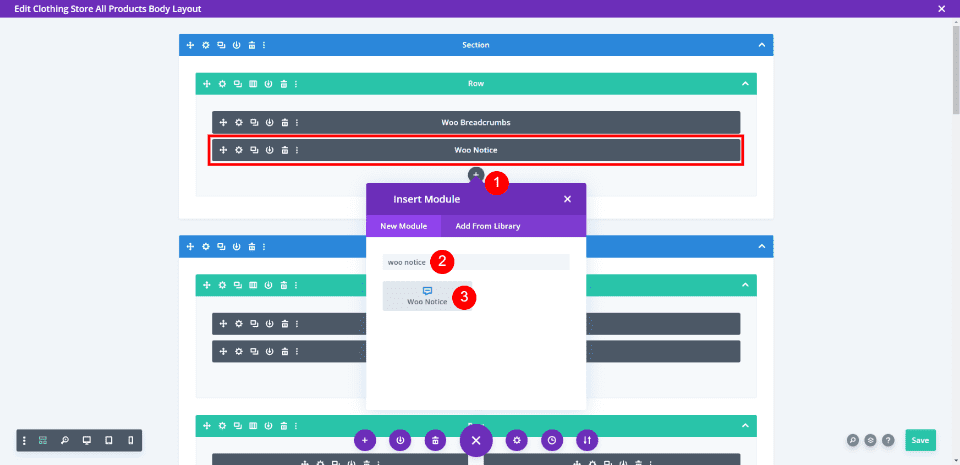
Like all Woo modules in the Divi Builder, the Woo Notice Module is only an option if you have WooCommerce installed. To add the module, click the gray plus icon, search for Woo Notice, and select the module. Many of the Divi product page templates include the Woo Notice module.
Where to Place the Woo Notice Module
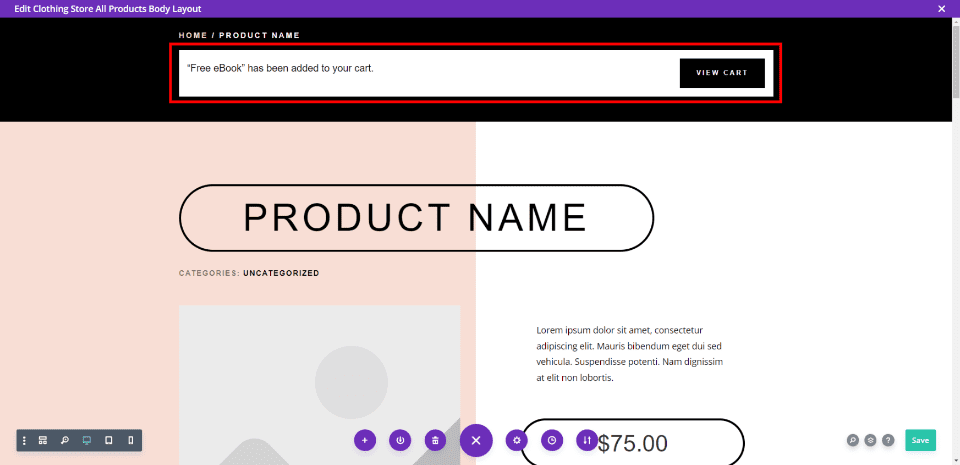
The best location for the Woo Notice module is at the top of the page, under the breadcrumbs. This will stand out to the user and it’s the location they would expect to see this type of information.
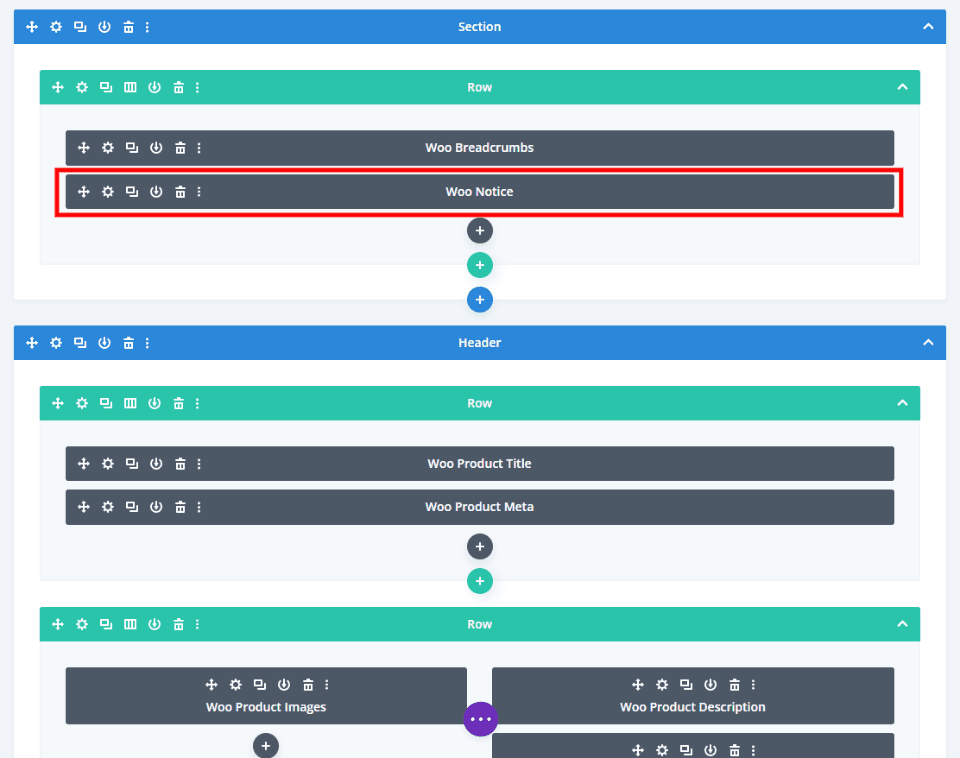
We can see in this wireframe view that the module is placed above the product’s information.
How to Style the Woo Notice Module
The template that I’m using already has the module styled. We’ll look at this styling in case you want to add your own, and then we’ll also style it a different way using design queues from the layout pack and header and footer templates for the Clothing Store Layout Pack. It includes a button that changes color on hover.
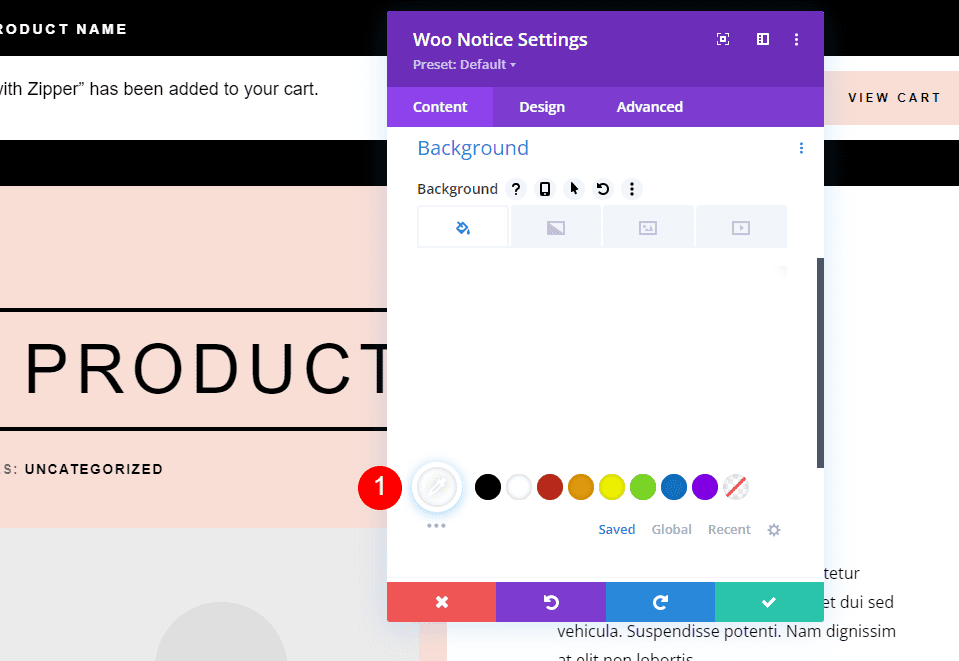
First, make the background white.
- Background: #ffffff
Design Tab
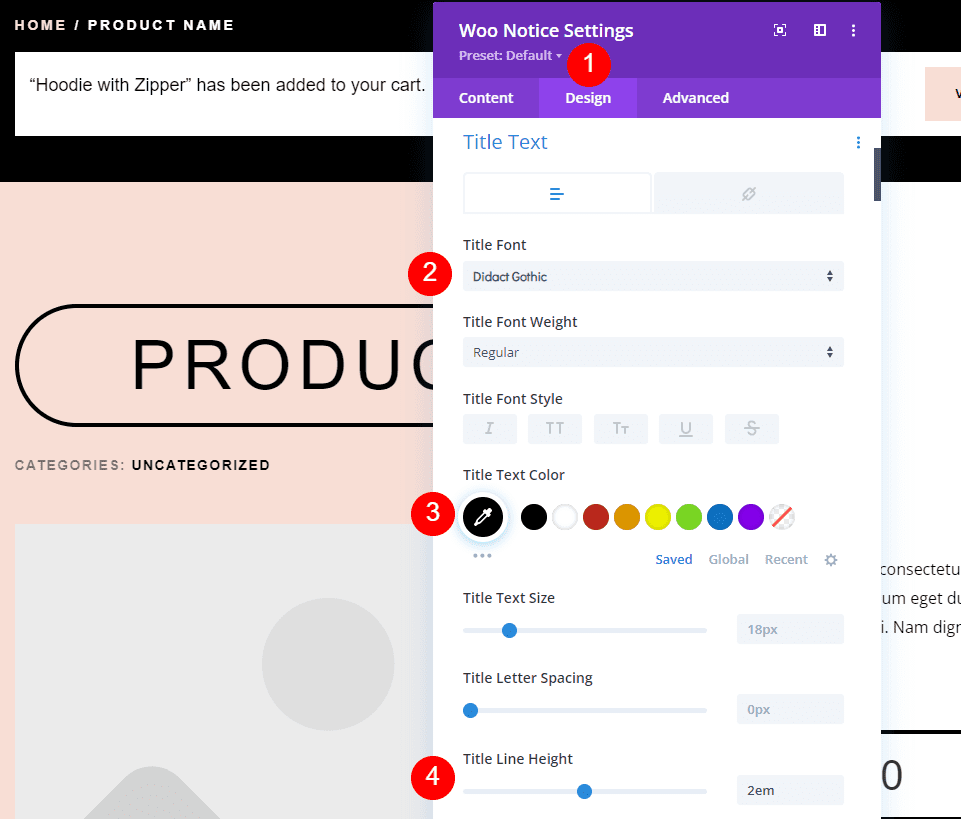
Choose the Design tab and select Didact Gothic for the Title Font. Make the font black and set the Line Height to 2em.
- Title Font: Didact Gothic
- Color: Black
- Line Height: 2em
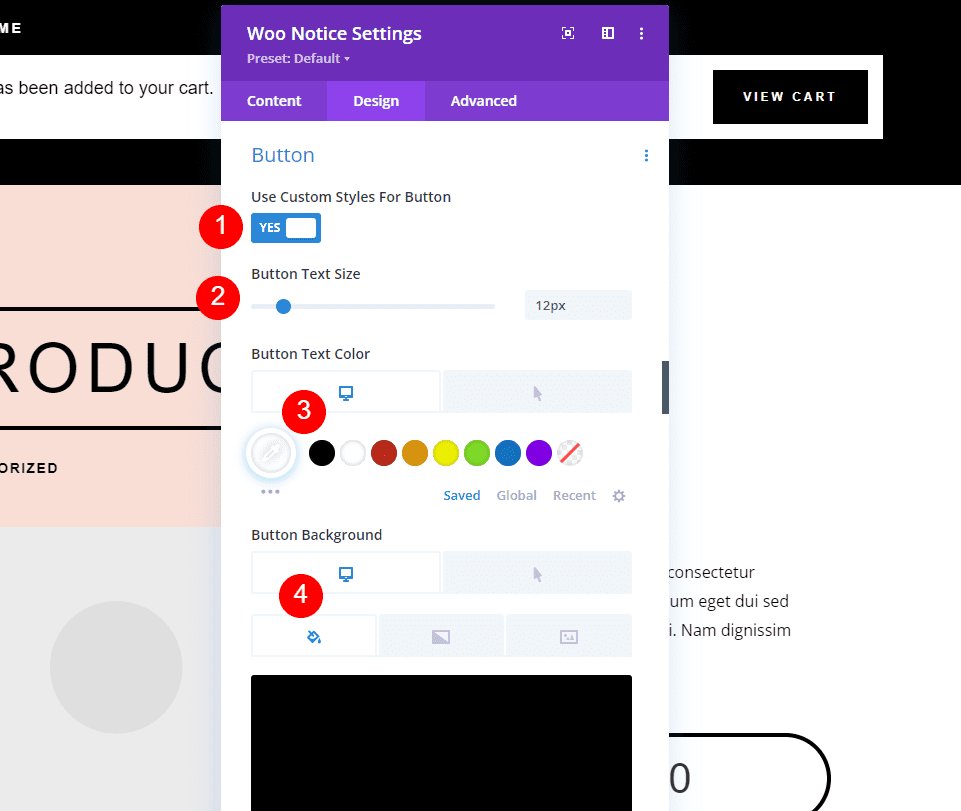
Scroll down to the button and enable Custom Styles. Set the text size to 12px. For the desktop options, set the text color to white and the background to black.
- Use Button: Yes
- Text Size: 12px
- Text Color: #ffffff
- Background Color: #000000

Choose the Hover Options and set the text color to black and the background color to #f8ded5.
- Hover Text Color: #000000
- Hover Background Color: #f8ded5
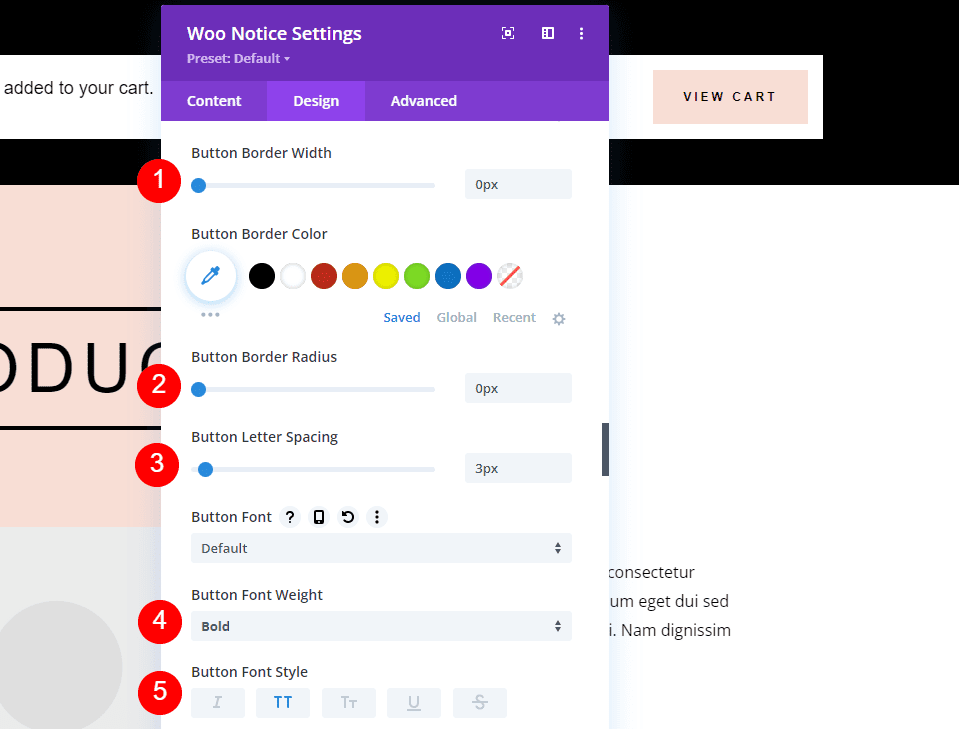
Set the Border Width and Radius to 0px, the Letter Spacing to 3px, the Font Weight to Bold, and the Font Style to TT.
- Border Width: 0px
- Border Radius: 0px
- Letter Spacing: 3px
- Font Weight: Bold
- Font Style: TT
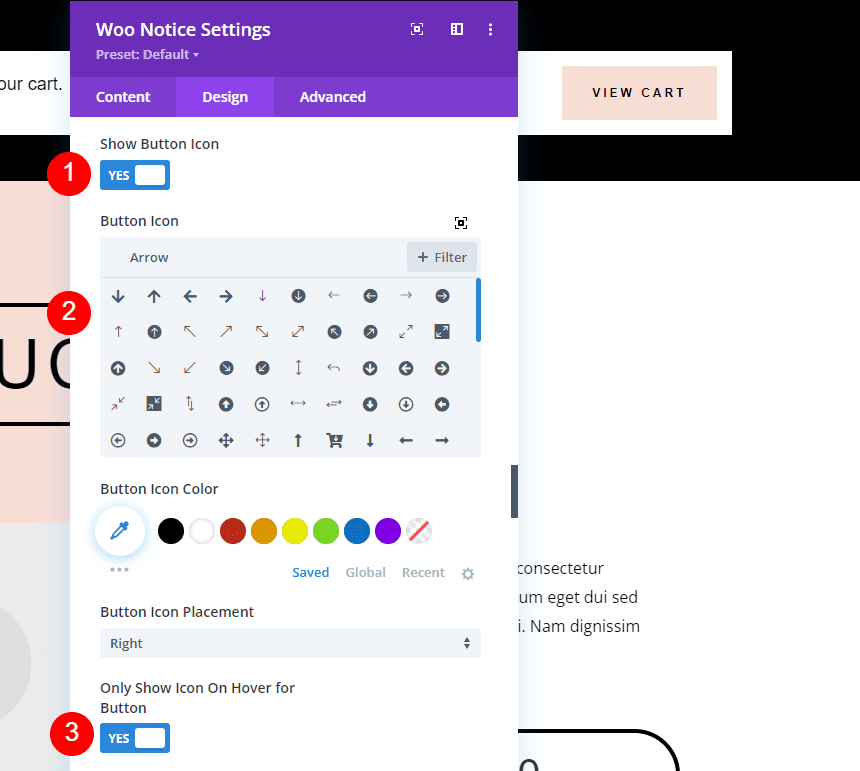
Select to show the Button Icon, choose a right arrow, and choose to only show the arrow on hover.
- Show Button Icon: Yes
- Icon: Small Right Arrow
- Only Show Icon on Hover for Button: Yes

Next, we’ll need to add some Button Padding to give it some space around the text. Add 15px to the Top and Bottom, and 30px to the Left and Right. Note, this is not the padding for the module. We’ll add that in a minute.
- Button Padding: 15px (Top, Bottom), 30px (Left, Right)
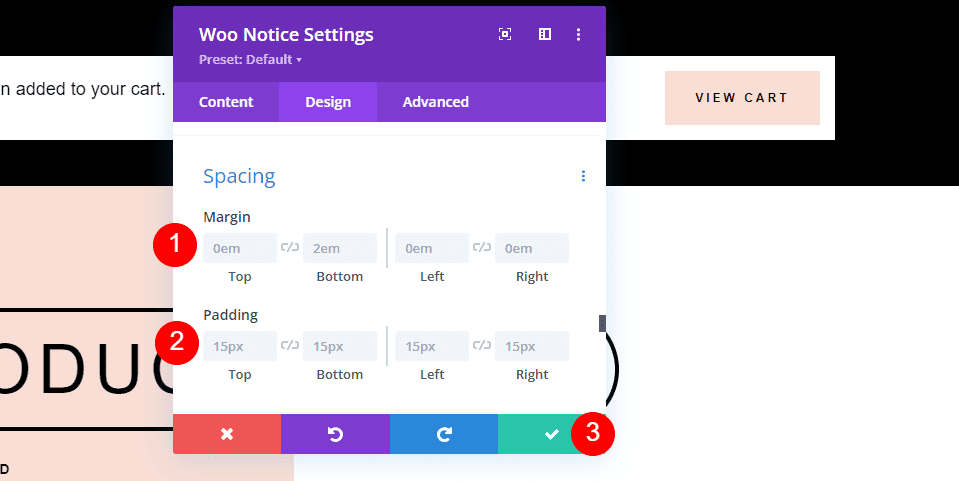
Scroll down to Spacing. Add 0em Margin on all sides and 15px Padding on all sides. These are the default settings. Close your settings.
- Margin: 0em (all sides)
- Padding: 15px (all sides)
Row Settings
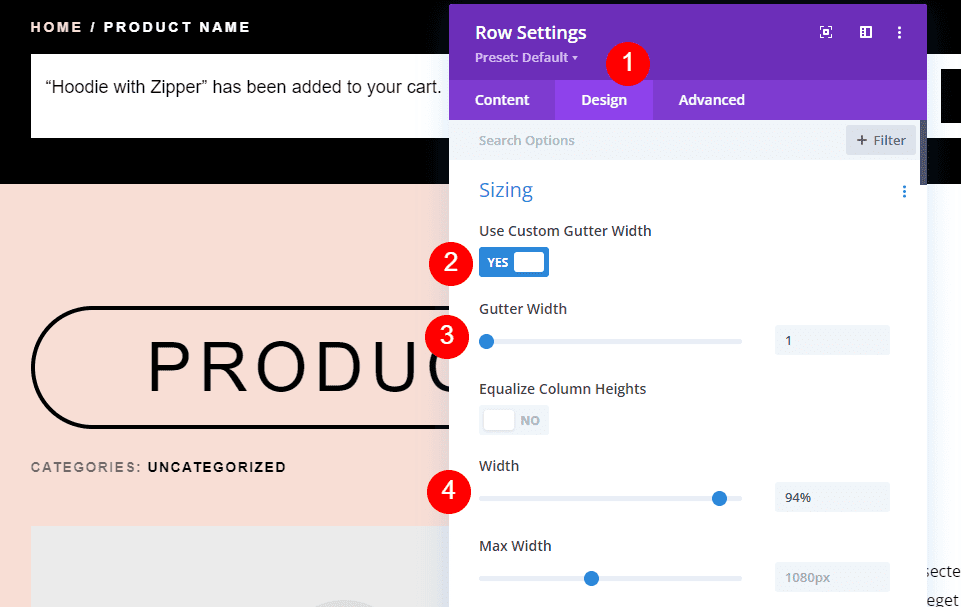
Next, we need to make some adjustments to the Row settings. Open the settings and select the Design tab. Choose to Use Custom Gutter Width. Set the Gutter Width to 1 and the Width to 94%.
- Use Custom Gutter Width: Yes
- Gutter Width: 1
- Width: 94%
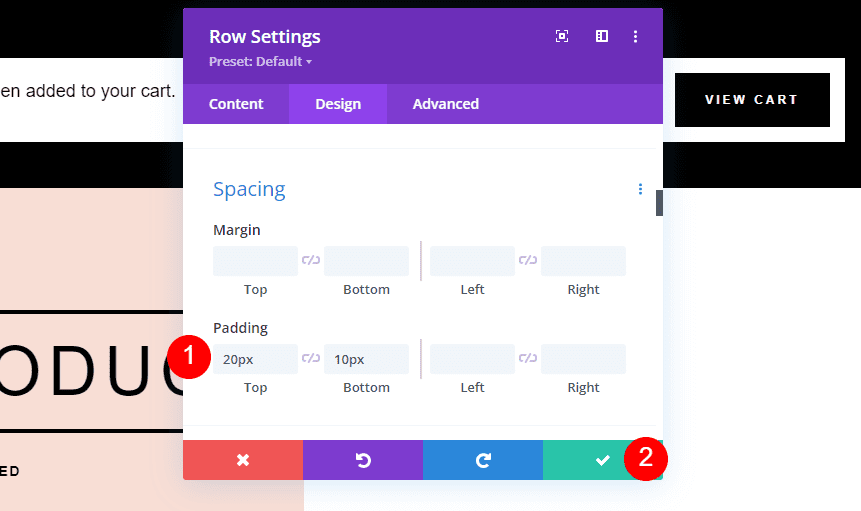
Finally, scroll down to Spacing and add 20px padding to the Top and 10px to the Bottom. Close the settings and save your work.
- Padding: 20px Top, 10px Bottom
Another Custom Style for the Woo Notice Module
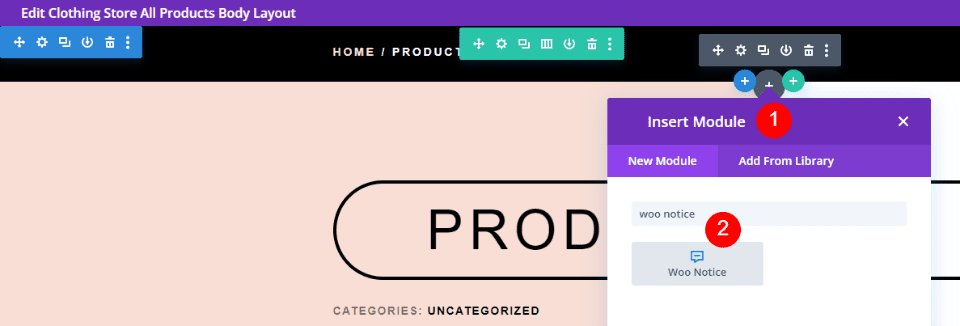
Next, let’s add and style a Woo Notice module from scratch. For this one, we’ll delete the original and add our own. Click the gray plus icon, search for Woo Notice, and add it to the top Row under the Woo Breadcrumbs module. To design this one, we’ll use ideas from the layout. We’ll use the same Row as the original, so its settings are the same as the previous example.
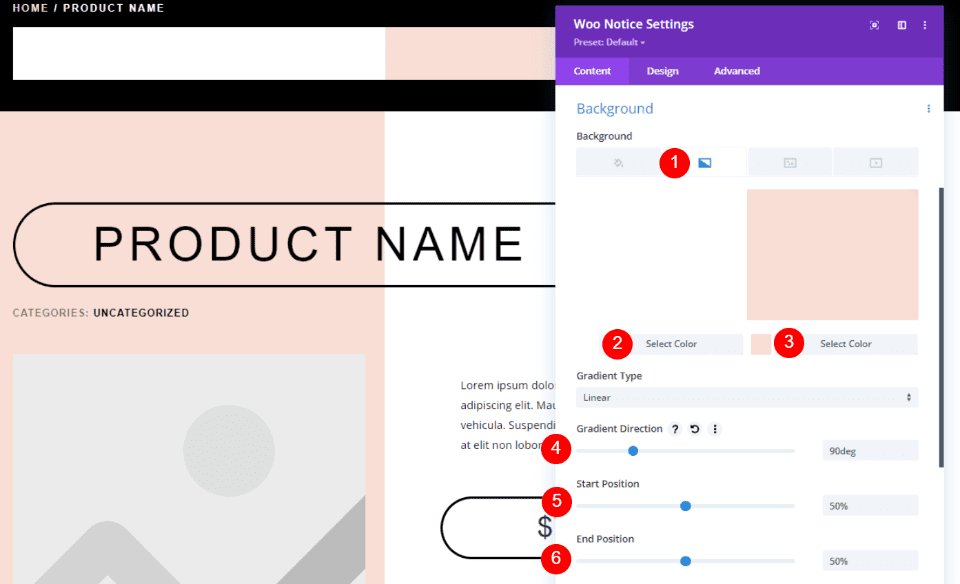
In the Woo Notice settings, scroll down to the Background settings and choose Gradient. Set the first color to white and the second color to #f8ded5. The Gradient Direction should be set to 90deg, and the Start and End positions set to 50%. This will give it a color design that’s the mirror of the Product section.
- First Gradient: #ffffff
- Second Gradient: #f8ded5
- Gradient Direction: 90deg
- Start Position: 50%
- End Position: 50%
Design Tab
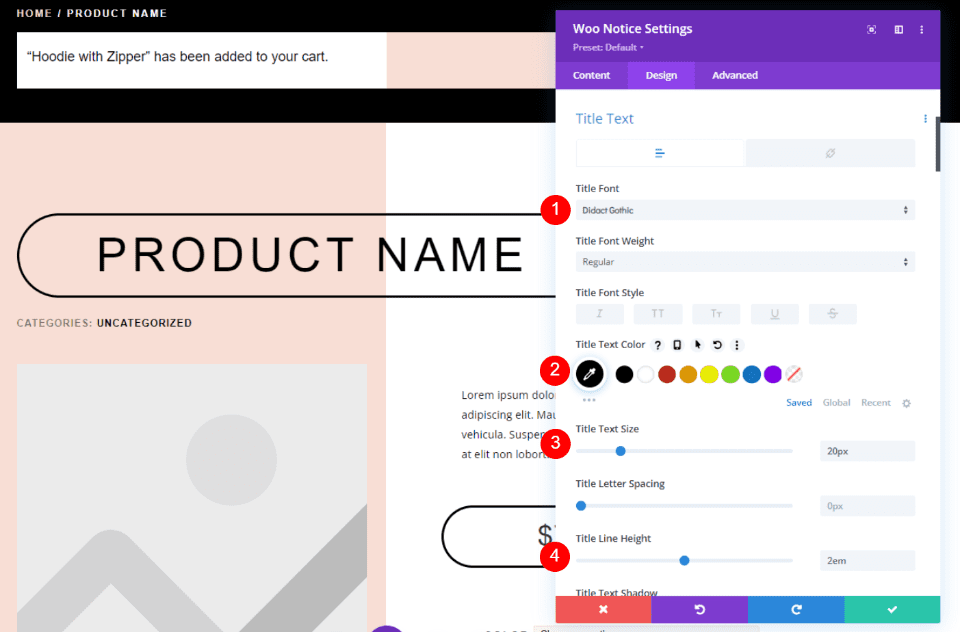
Next, select the Design tab and choose Didact Gothic for the Title Font. Make the font black, the desktop size 20px, the phone size 15px, and the Line Height 2em.
- Title Font: Didact Gothic
- Color: #000000
- Text Size: 20px (15px for Phone)
- Line Height: 2em
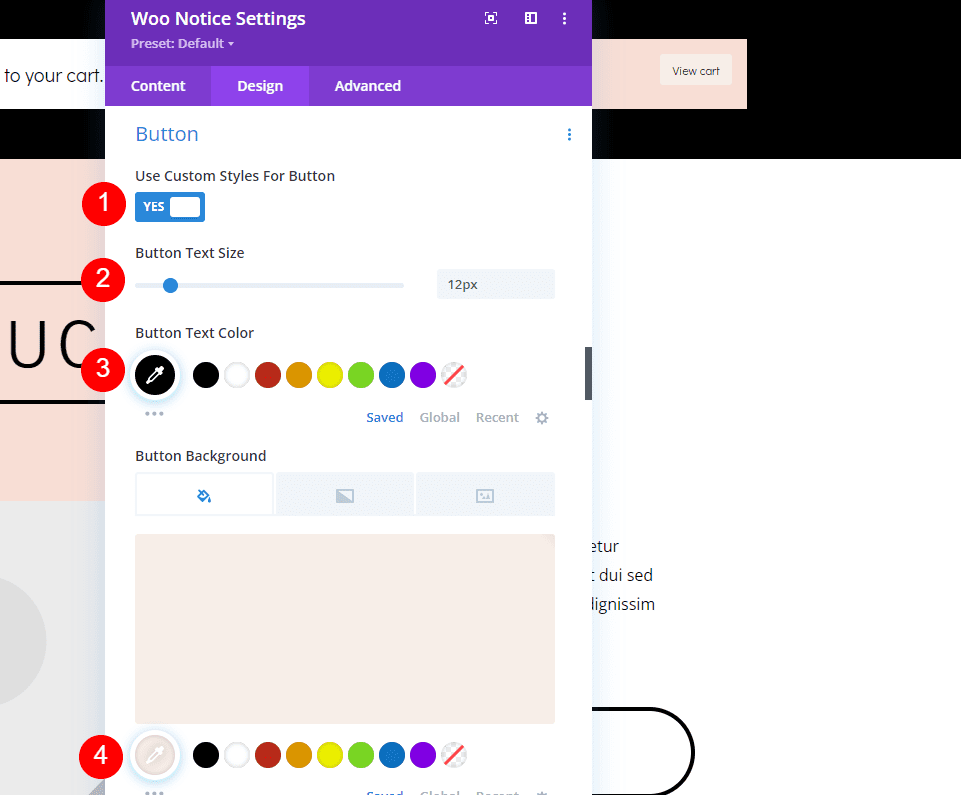
Scroll down to the button and select Use Custom Styles. Set the Text Size to 12px for desktop and the phone Text Size to 10px. For the desktop options, set the text color to black and the background to #f7eee8.
- Use Custom Styles for Button: Yes
- Text Size: 12px (10px for Phone)
- Text Color: #000000
- Background Color: #f7eee8
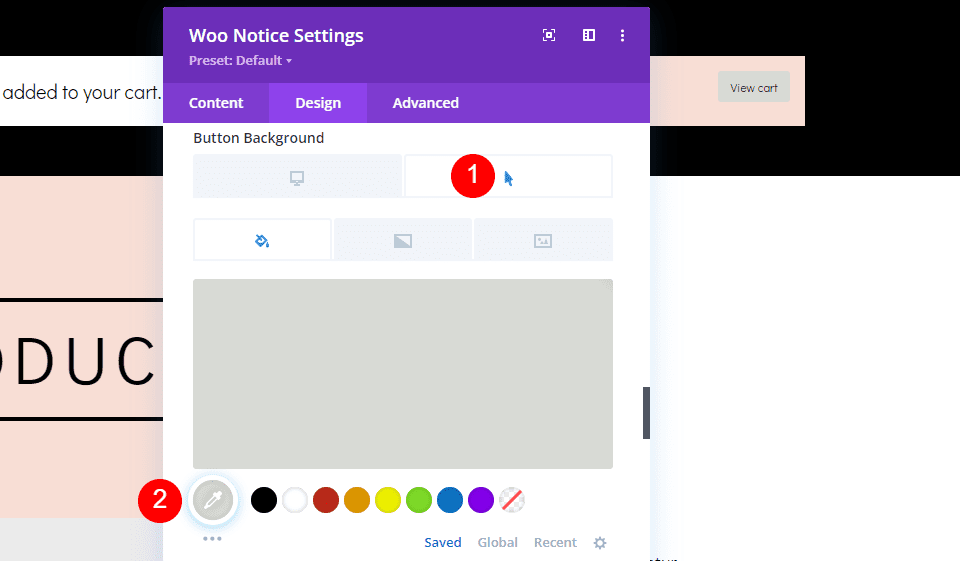
Choose the Hover Option for the Background color and set it to #d8dad5.
- Hover Background Color: #d8dad5
Border
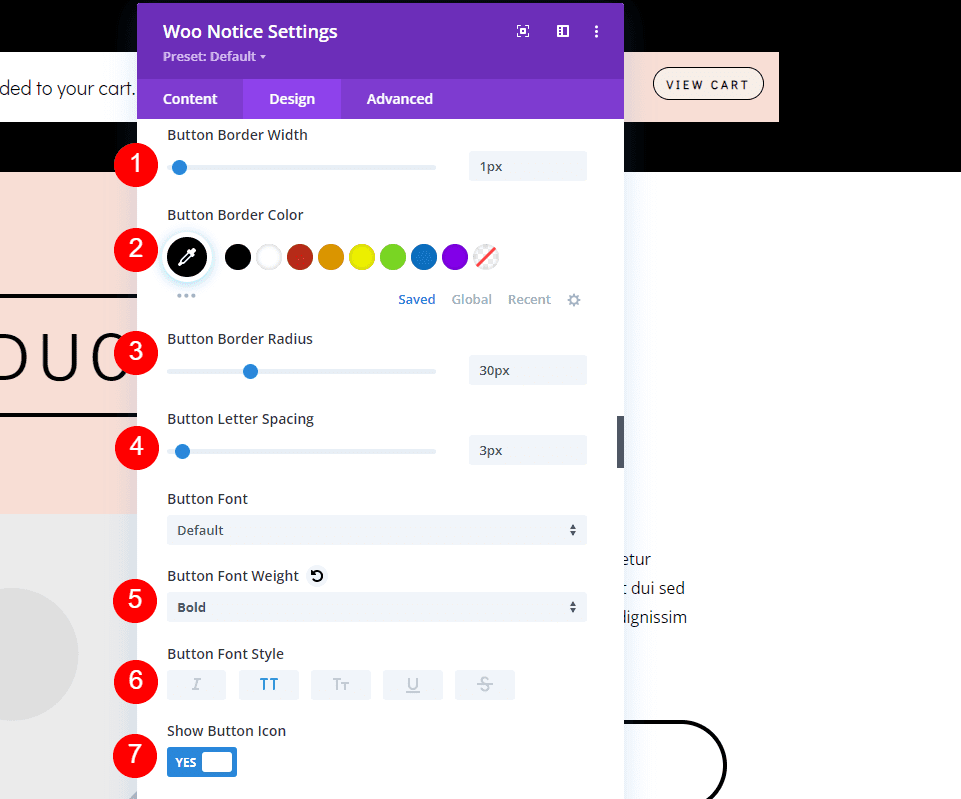
Set the Border Width to 1px, the Radius to 30px, the Letter Spacing to 3px, the Font Weight to Bold, and the Font Style to TT. Leave the Button Icon settings at default. This will show the icon on hover and include the default right arrow.
- Border Width: 1px
- Border Radius: 30px
- Letter Spacing: 3px
- Font Weight: Bold
- Font Style: TT
- Show Button Icon: Yes
- Icon: Small Right Arrow
- Only Show Icon on Hover for Button: Yes
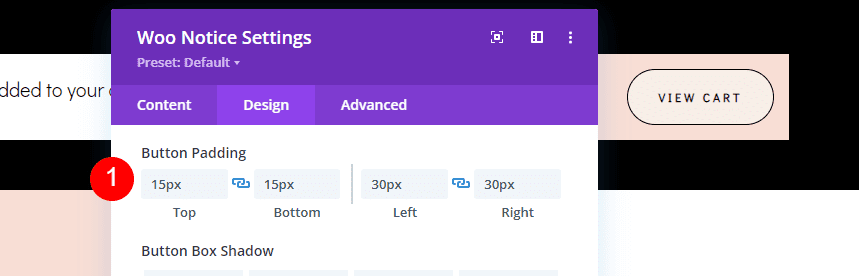
Next, we’ll need to add some Button Padding to increase the size of the button around the button’s text. Add 15px to the Top and Bottom, and 30px to the Left and Right.
- Button Padding: 15px (Top, Bottom), 30px (Left, Right)
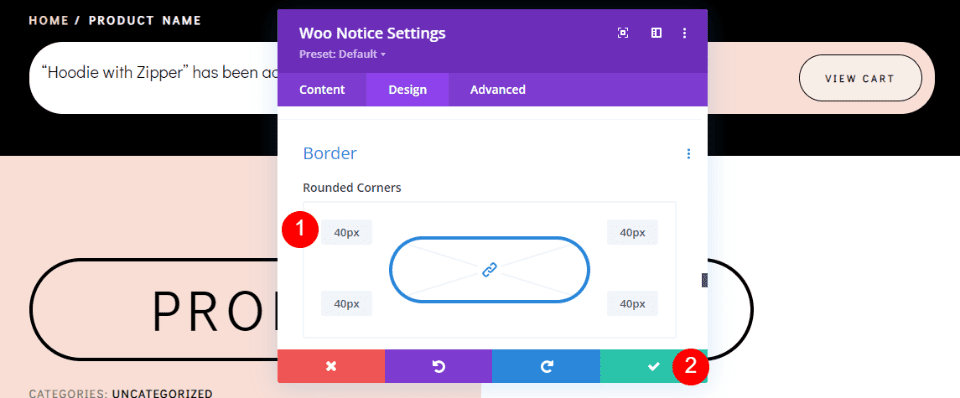
Finally, scroll down to Border. Add 40px to all sides. This gives us a rounded module that matches the design of the layout. Close your settings and save your work.
- Rounded Corner: 40px (all sides)
Results
Here’s how our Woo Notice module looks on both desktop and mobile.
Woo Notice Module on Desktop
Woo Notice Module on Mobile
Ending Thoughts
That’s our look at how to style and add a Woo notice module to your Divi Product page template. This module adds a lot of information for the user and the user will expect to see this information. This gives them the feedback they’re expecting. They’ll know instantly that a product was added to their cart, and they’ll have an easy way to see their cart. This module is easy to use and should be included at the top of every WooCommerce Divi Product page template.
We want to hear from you. Do you use the Woo Notice module in your Divi Product page templates? Let us know in the comments.


Leave A Reply