

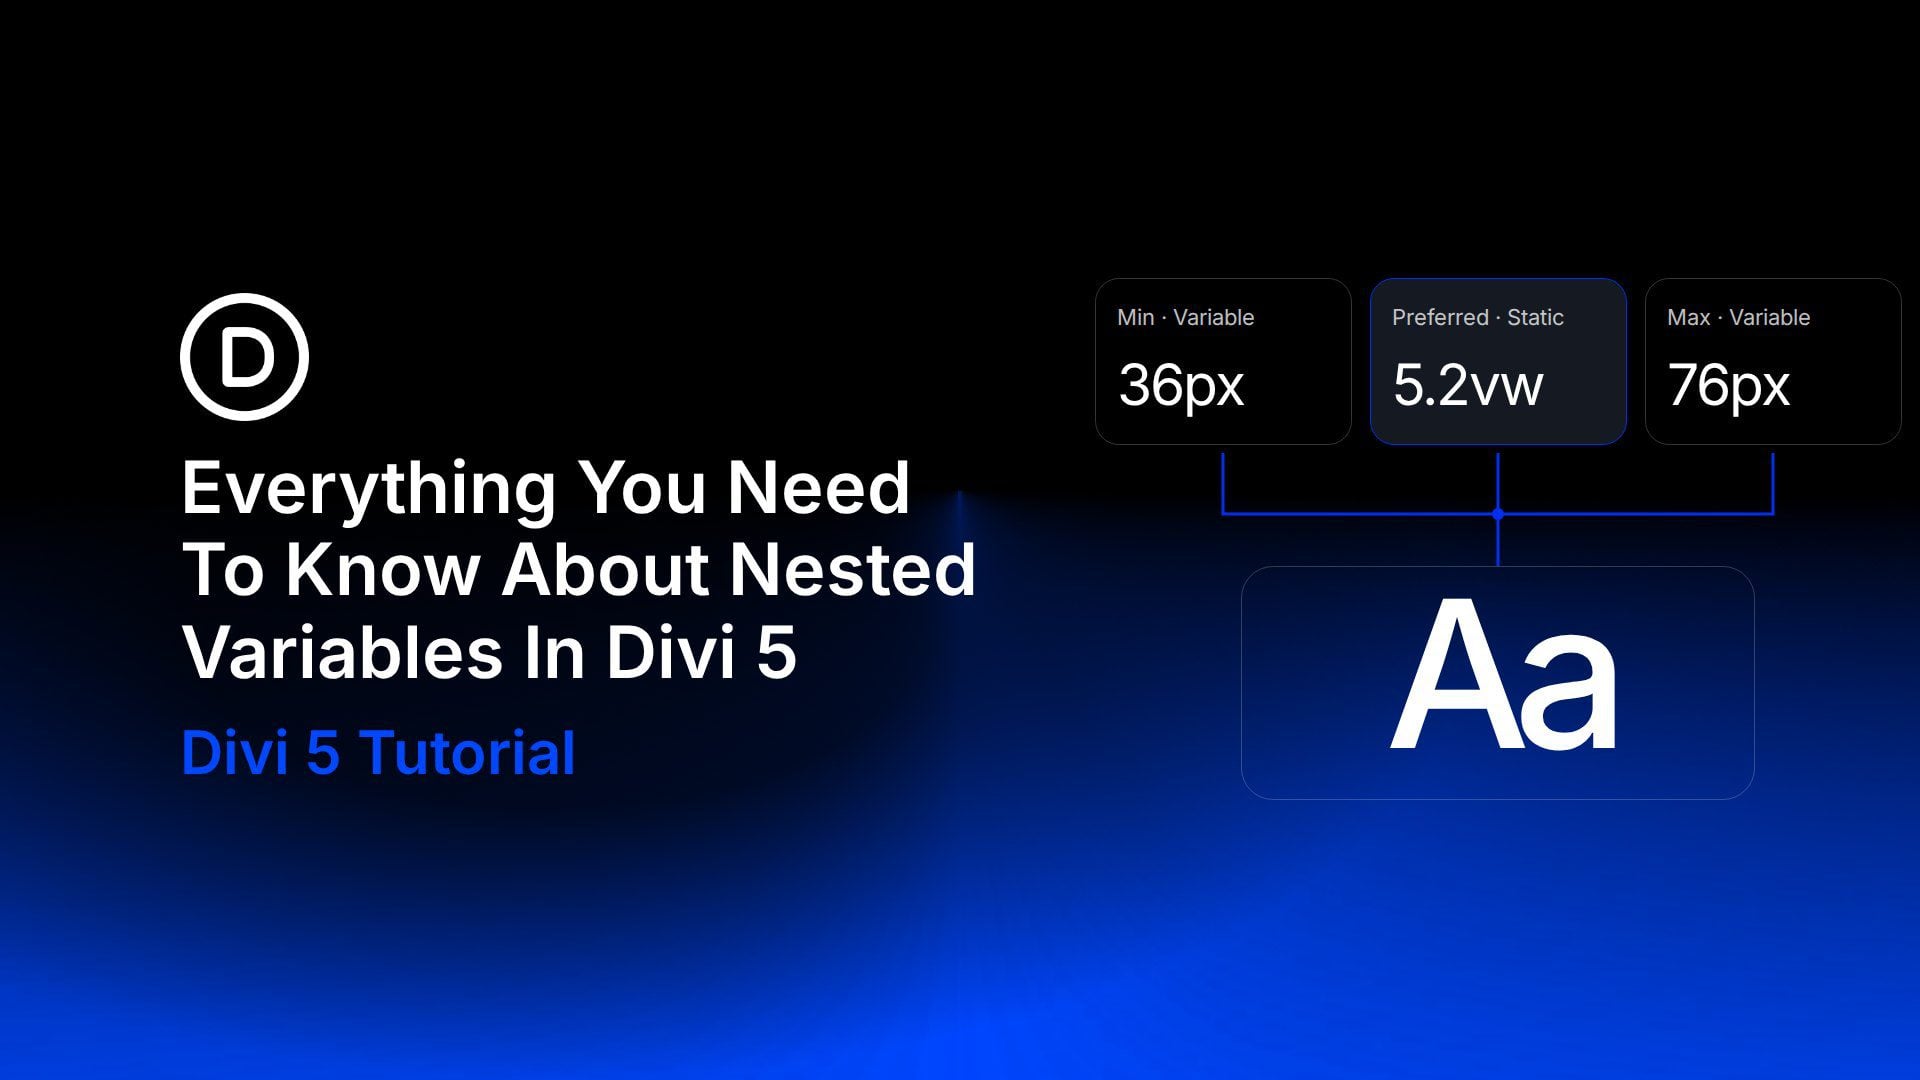
A spacing system becomes easier to maintain when its values have a clear relationship. A panel might need twice your standard padding, while the gaps between its contents need half that amount. Nested variables let you keep those relationships connected in Divi 5.
You can also build a fluid heading size from shared limits or assemble reusable text from smaller pieces. We’ll use a workshop layout to explore each approach and show what happens when a source value changes.
- 1 What Are Nested Variables In Divi 5?
- 2 Download The Example Layouts
- 3 Download For Free
- 4 Build Connected Spacing With Number Variables
- 5 Create Fluid Typography With Shared Limits
- 6 Assemble Reusable Text With Nested Variables
- 7 Insert And Manage Individual Variable Chips
- 8 Keep Your Variable Relationships Easy To Maintain
- 9 Build More Connected Designs With Divi 5
What Are Nested Variables In Divi 5?
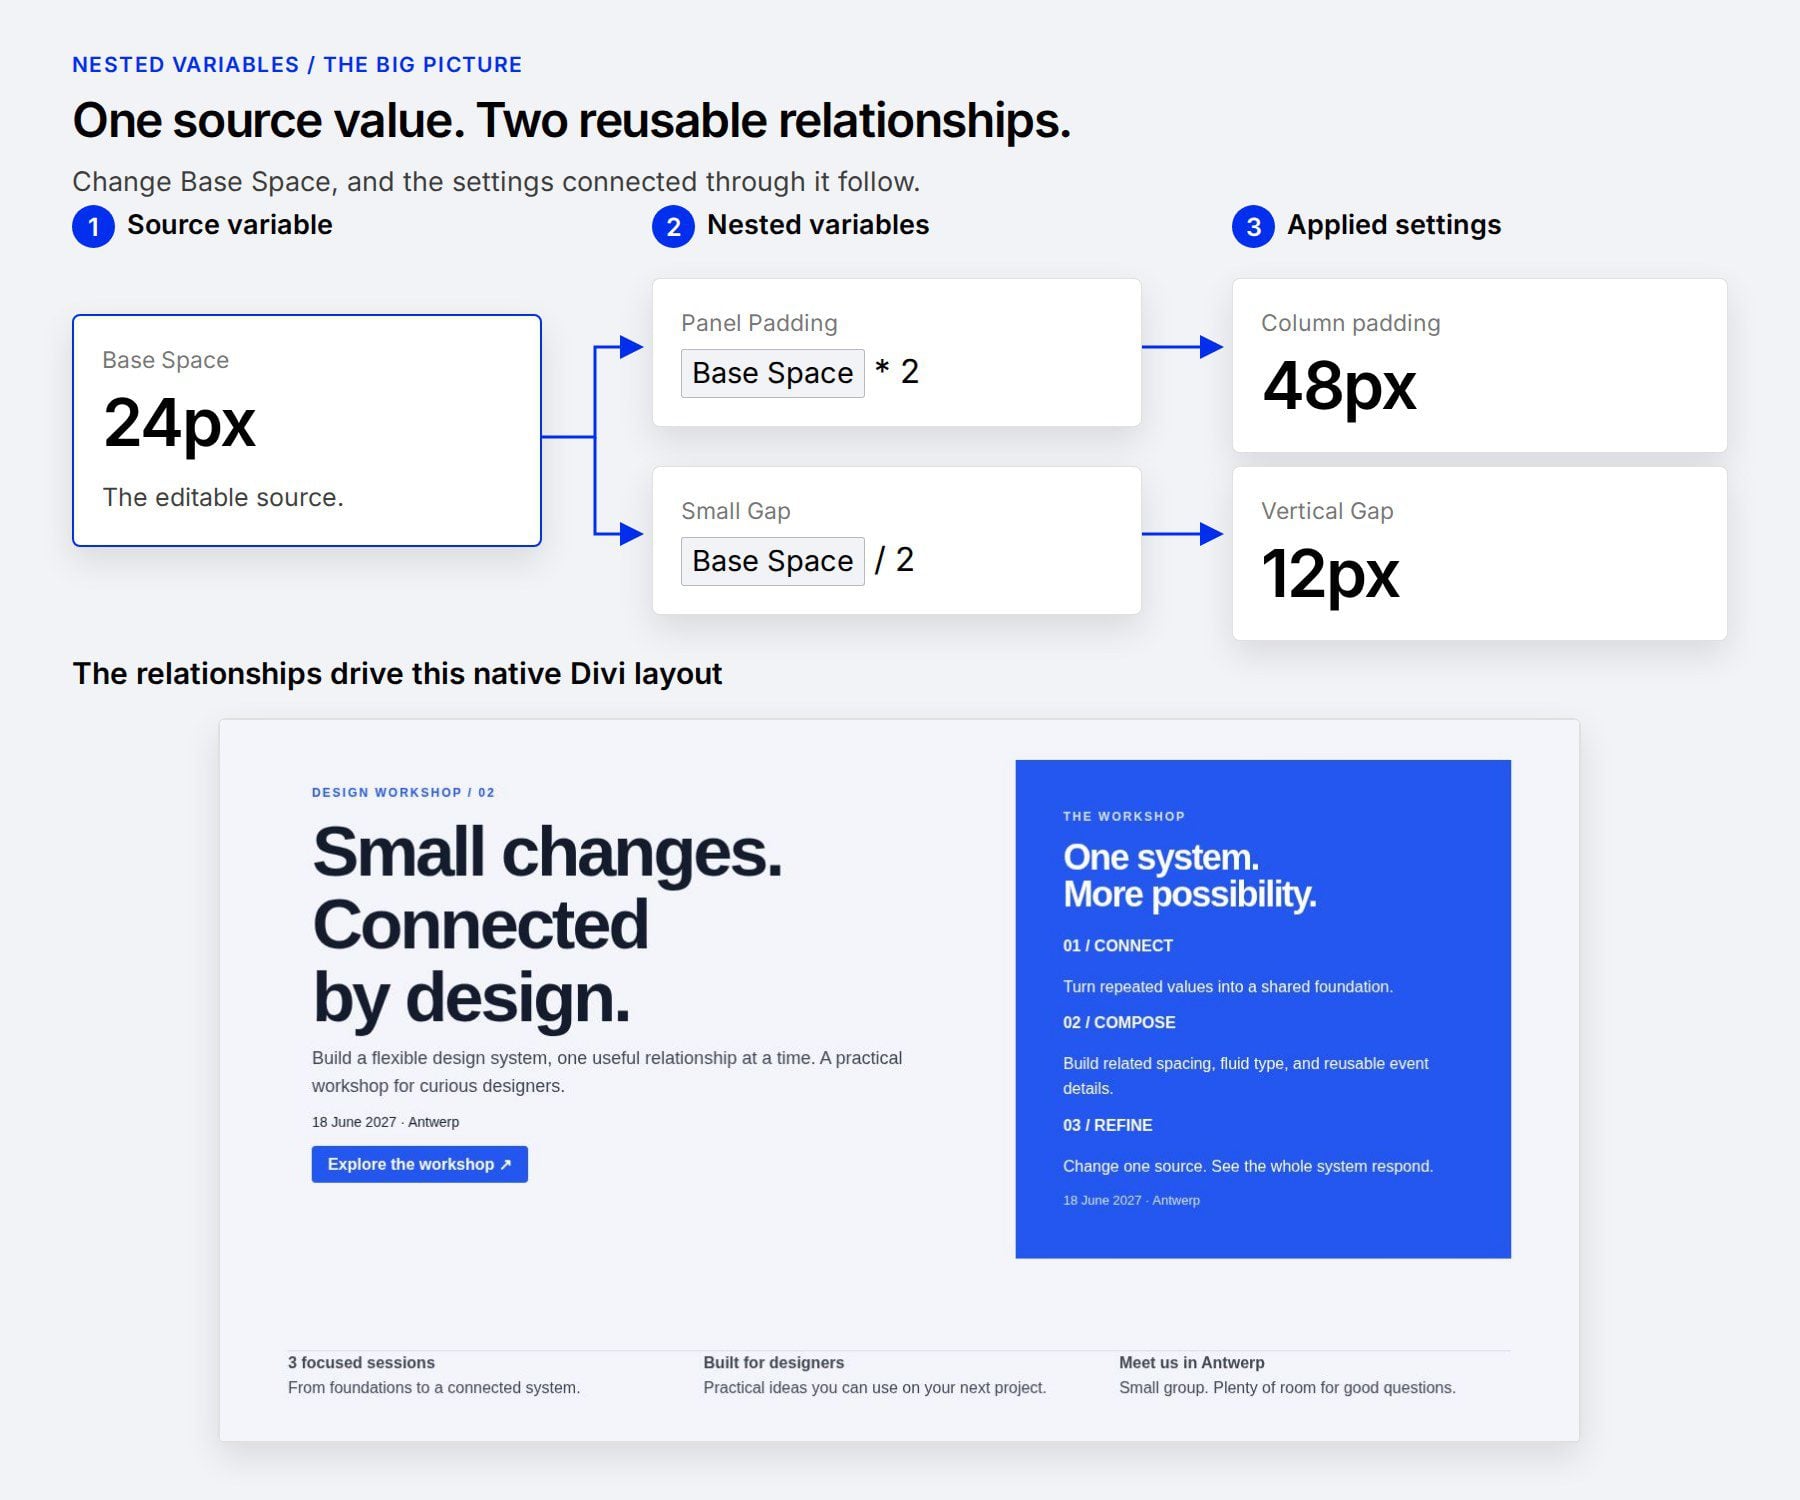
A nested variable contains a reference to another variable within its value. The source holds the original information; the variable that references it adds a relationship or combines it with other content.
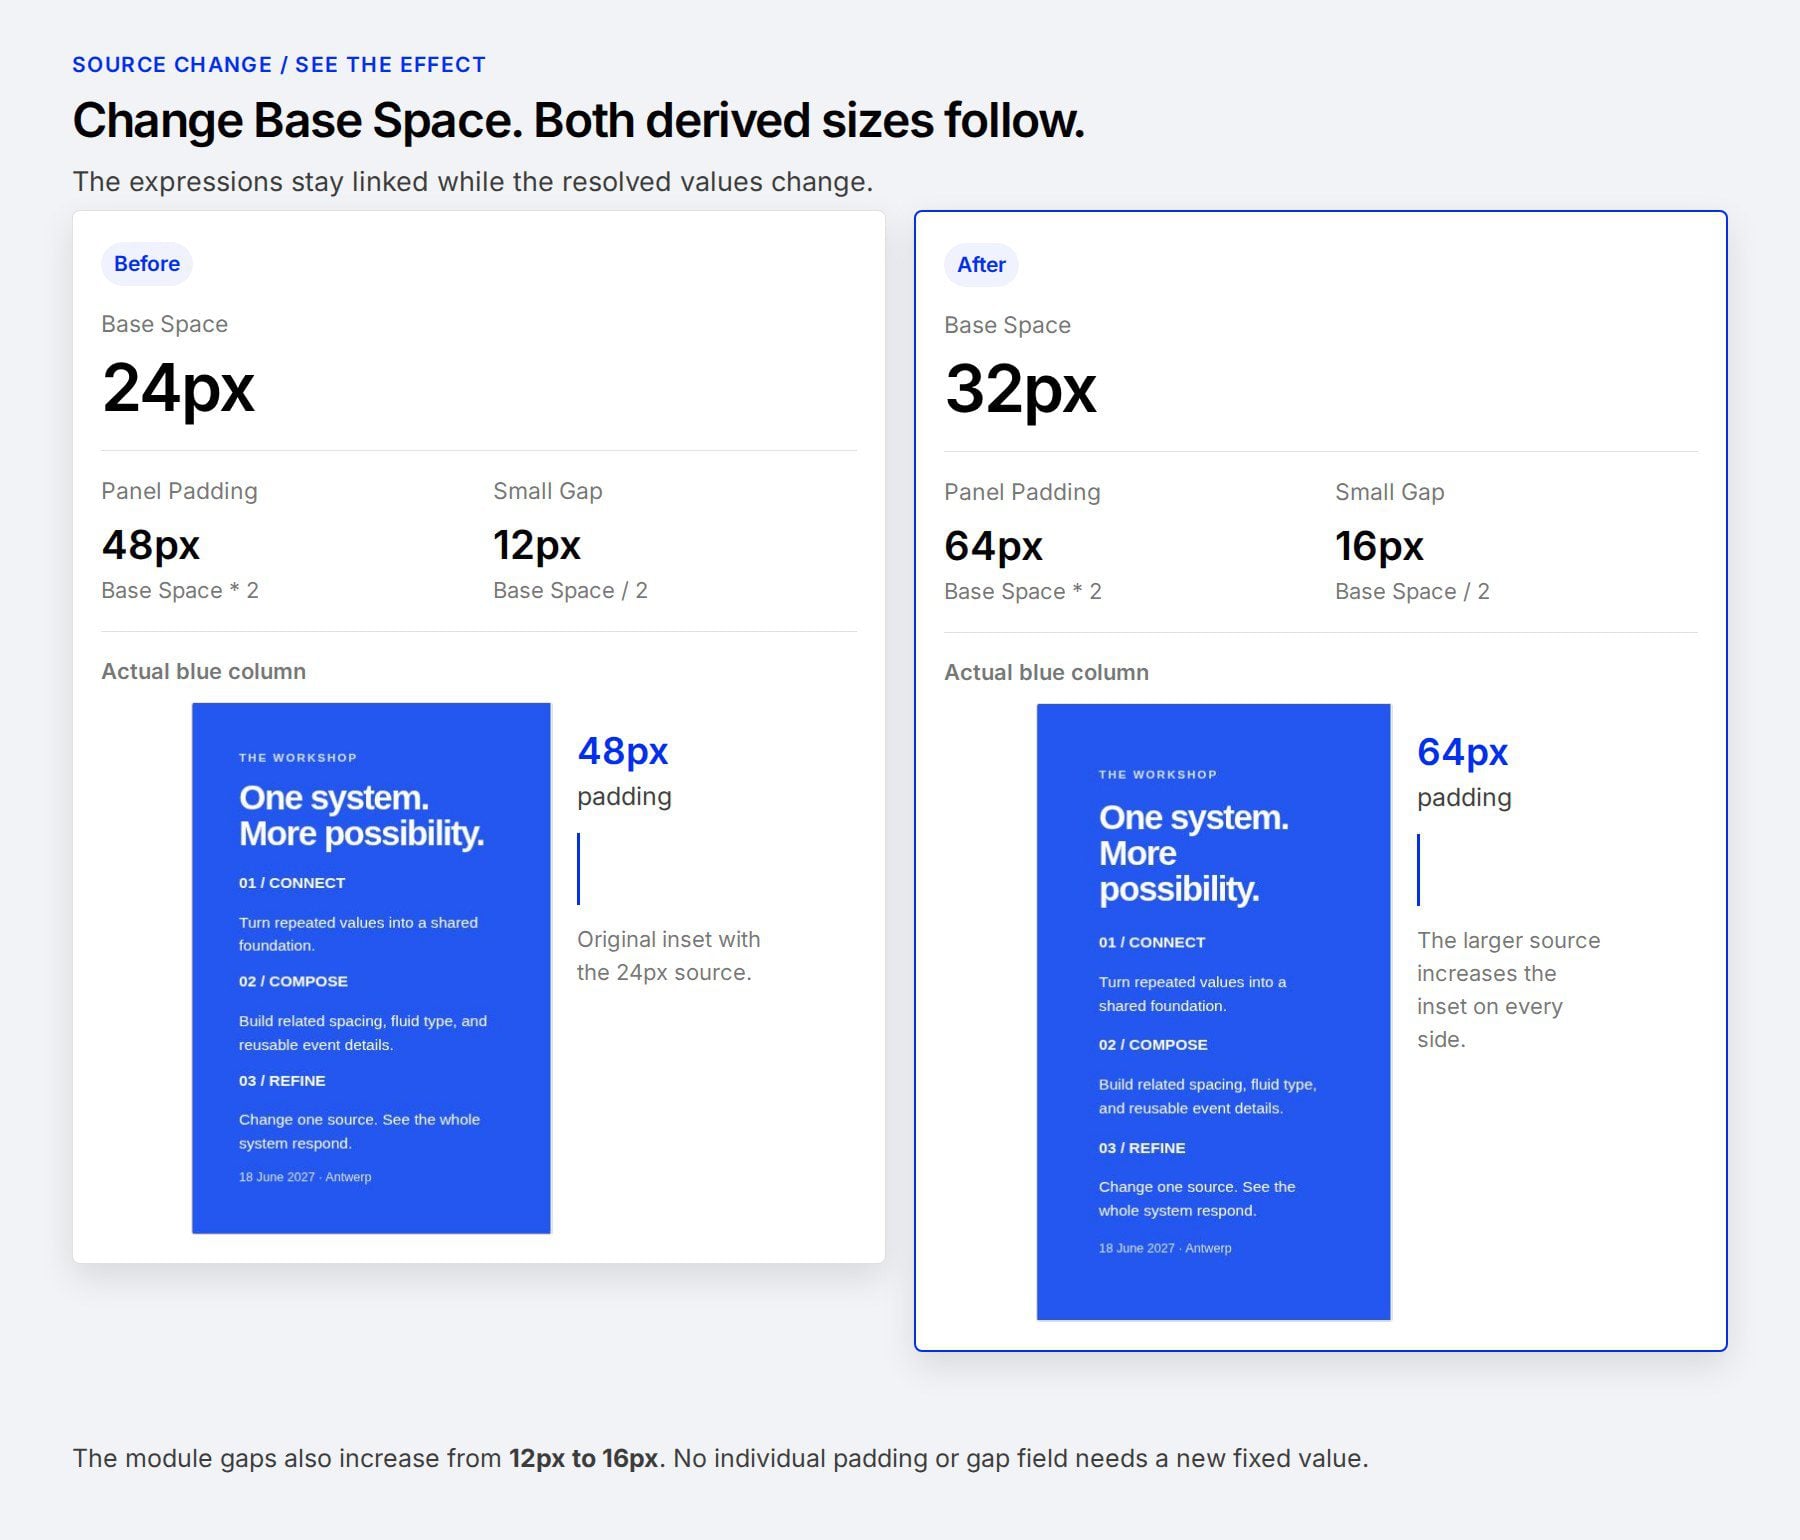
For example, a number variable named Base Space can hold 24px. A second variable, Panel Padding, can reference Base Space and multiply it by 2. Panel Padding then produces 48px wherever you apply it. Change Base Space to 32px, and that padding becomes 64px.
The distinction is where you store the relationship:
- Use a source variable directly when several settings should share the same value.
- Use variable math in a setting when a calculation belongs to that particular field.
- Create a nested variable when you want to name and reuse the calculated or combined value.
Our nested variables, variable math, and variable combinations update brings these workflows together. The examples below focus on number and text variables, using a single layout so their effects are easy to follow.
Download The Example Layouts
Choose between two page layouts in the download. With the starter, you can replace fixed values with variable relationships yourself. The finished layout includes the nested variables and their connections to the design.

To follow along with the starter layout:
- Create a new page in WordPress and choose the Blank Page template to keep the example free of a header and footer.
- Save the draft, then open it with the Divi Builder.
- Open the Page Menu at the top left of the builder and choose Import.
- Select the starter JSON from the extracted download. Leave Replace Existing Content selected on this new, empty page, then click Import Layout.
- Save the page and keep the Visual Builder open for the following examples.
These are page-level imports, so use the builder’s page menu rather than the Divi Library importer. The finished file also includes nine global variables; the starter does not require them.
Build Connected Spacing With Number Variables
Start with one source value and two related sizes. In the example, Base Space controls the introduction’s padding, Panel Padding gives the blue column more room, and Small Gap spaces the modules within each column.
Create The Source Variable
Open the Variable Manager from the builder’s left sidebar. If you’re new to the system, our Design Variables introduction explains how reusable values work across elements and presets.
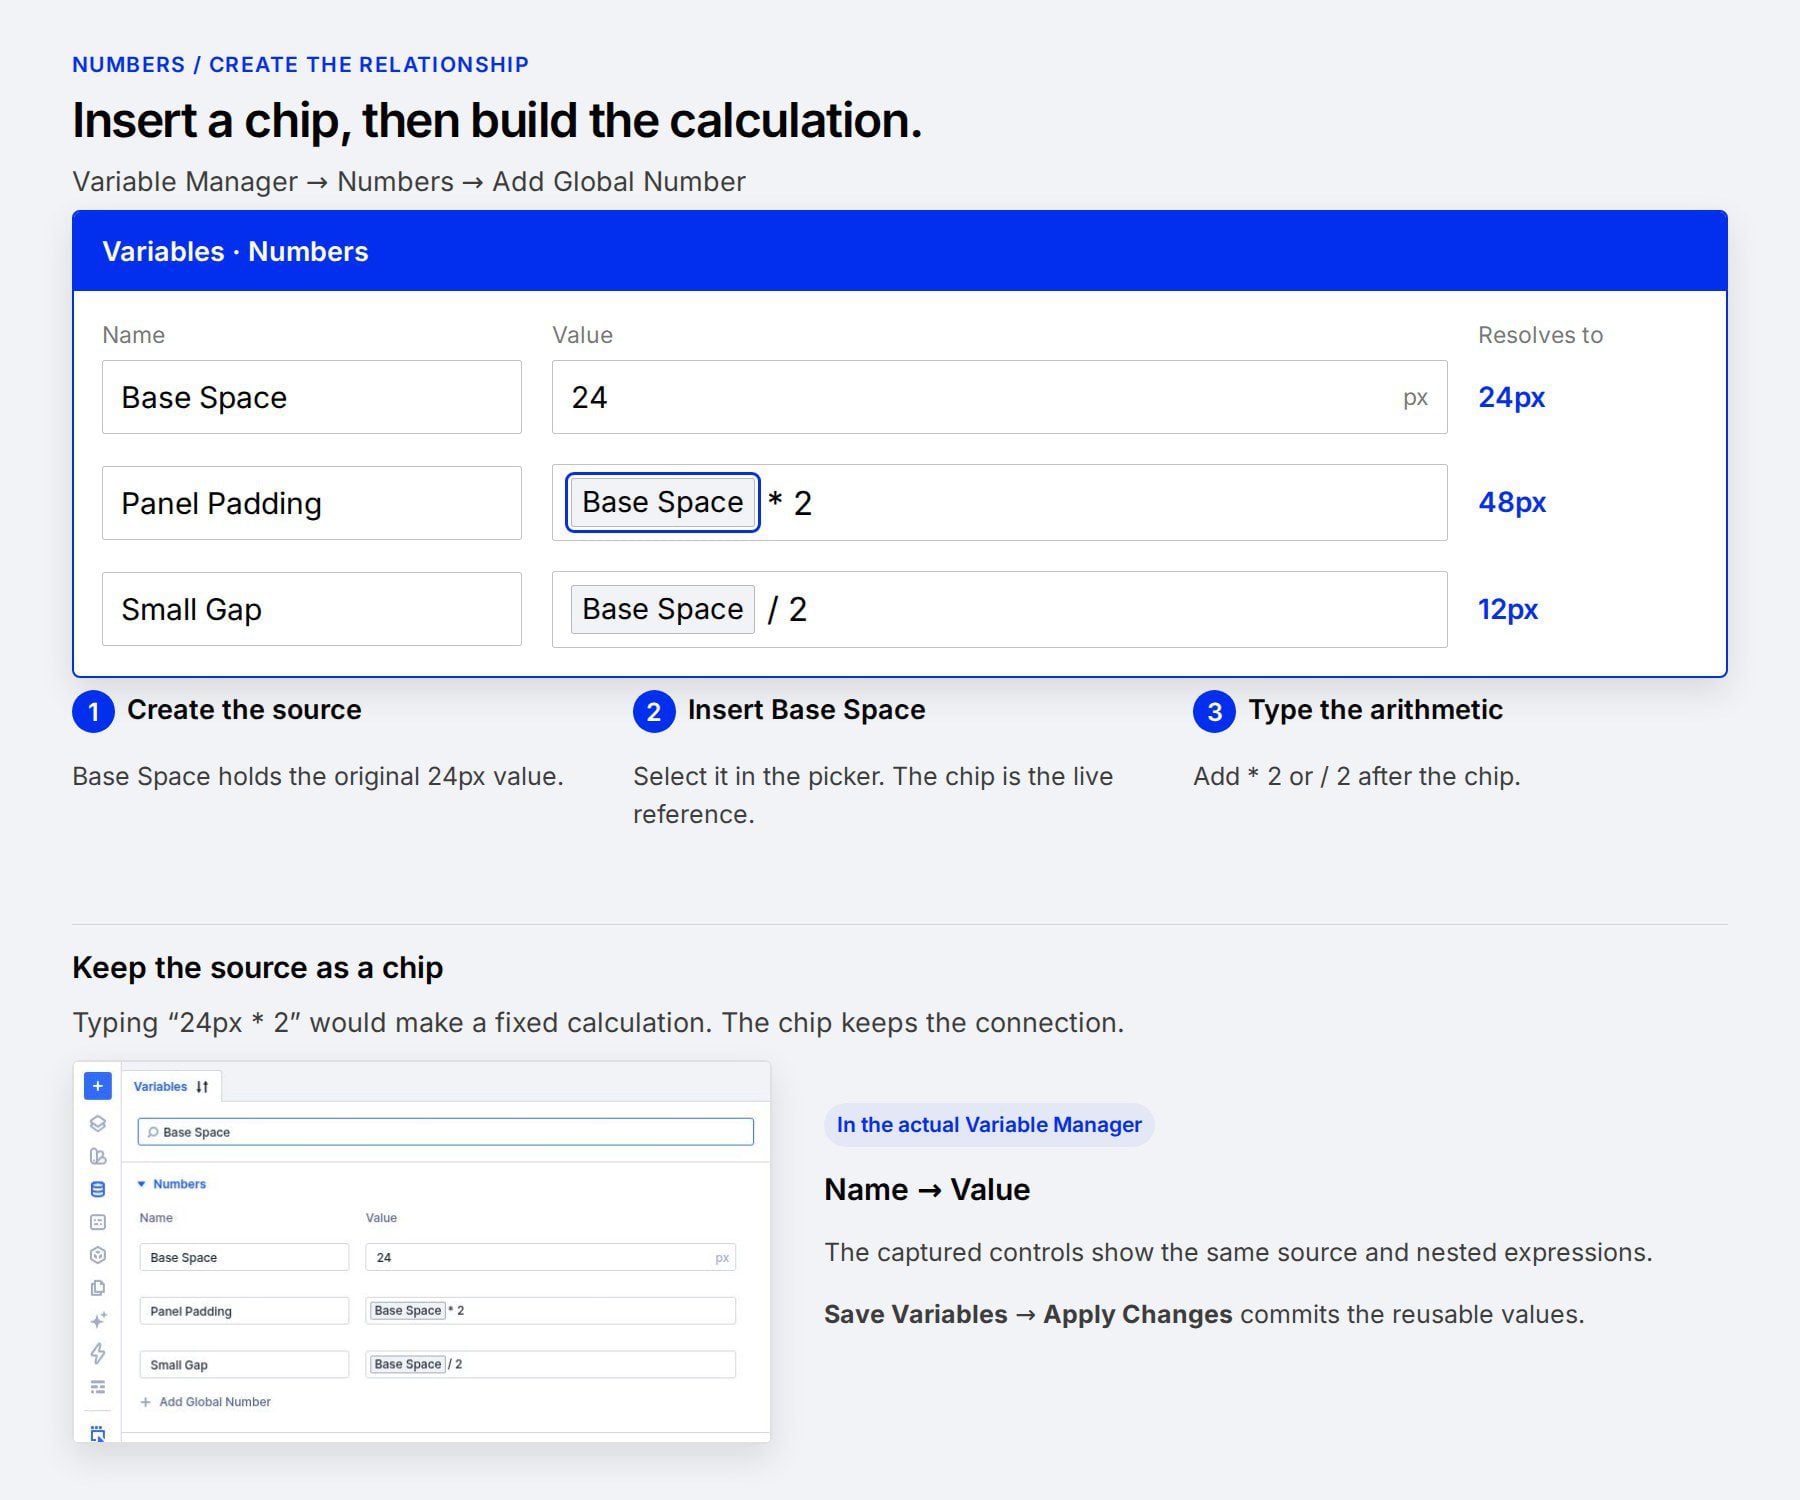
- Expand Numbers in the Variable Manager.
- Click Add Global Number.
- Give the variable the name Base Space.
- Set its value to 24 and its unit to px.
Use a distinct name if your site already has a variable for another spacing system. These variables belong to the website, so their names should make sense beyond the current page.
Create The Derived Spacing Variables
Add another global number and name it Panel Padding. Its value will contain a reference to Base Space followed by a multiplication.
- Clear the new variable’s initial value.
- Click its Dynamic Content insertion button and select Base Space from the number variables.
- Place the cursor after the inserted chip and type * 2.
- Add a third number variable named Small Gap.
- Insert Base Space in its value, then type / 2 after the chip.
Keep Base Space as a variable chip in both expressions. Typing its current value would produce a fixed calculation without a connection to the source.
Click Save Variables, then confirm Apply Changes when prompted. With Base Space at 24px, Panel Padding produces 48px and Small Gap produces 12px.
Apply The Variables To The Layout
Open Layers from the left sidebar and expand the section and its first row. Open the settings for the blue agenda column. Selecting the column in Layers helps avoid opening a Text Module inside it instead.
- Go to Design > Spacing in the column settings.
- In the first Padding field, use the dynamic content picker to select Panel Padding.
- Apply that variable to the top, bottom, left, and right padding fields. Use the linking controls for matching pairs where convenient.
Each side now references the same derived variable. The settings show its name, while the column uses the resulting 48px value.
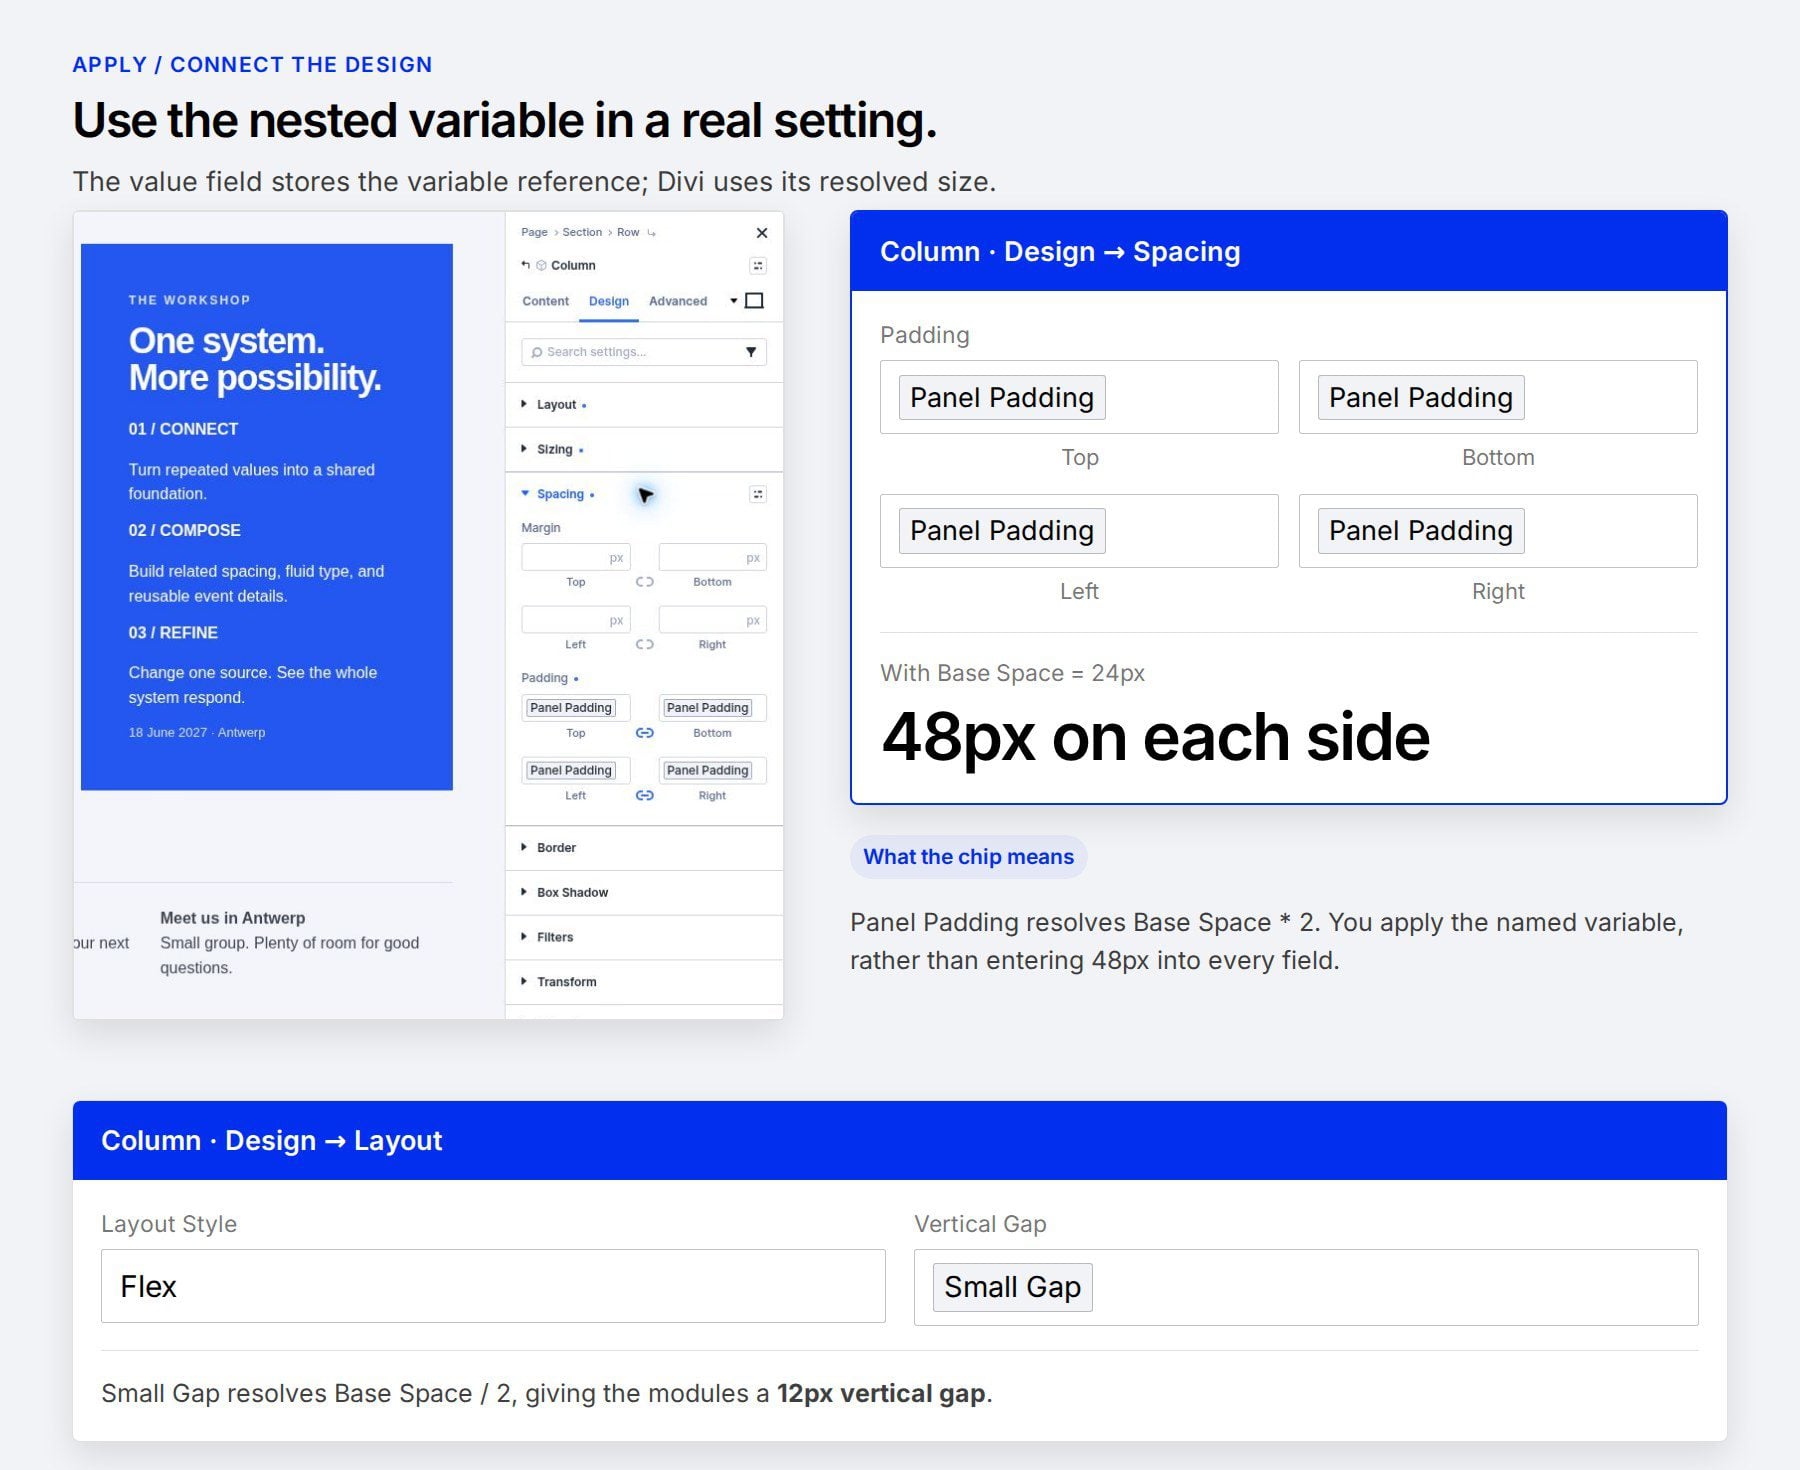
For the spacing between modules, open Design > Layout in that column and select Small Gap for Vertical Gap. The supplied columns use the Flex layout style. Apply Base Space directly to the introduction column’s padding if you’re reproducing all the example’s relationships.
Change The Source And Check The Result
Return to the Variable Manager and change Base Space from 24px to 32px. The introduction padding becomes 32px, the blue column’s padding becomes 64px, and the module gaps become 16px.
The derived expressions stay intact throughout that change. You can adjust the overall spacing without replacing the values in each connected setting. Restore Base Space to 24px if you want to continue with the supplied layout’s original proportions.
Nesting also works inside the CSS functions available through Divi’s Advanced Units. A useful example is a fluid heading with a shared minimum and maximum size.
We’ll use three number variables:
- Heading Minimum: 36px.
- Heading Maximum: 76px.
- Fluid Heading: a clamp() expression referencing both limits.
Create Heading Minimum and Heading Maximum in the Numbers group, as you did with Base Space. Then add the third number variable and name it Fluid Heading.
- Open Fluid Heading’s unit selector and choose clamp.
- In the function’s value field, insert the Heading Minimum variable as the first argument.
- After that chip, enter a comma, 5.2vw, and another comma.
- Insert Heading Maximum as the final argument.
- Save the variables and apply the changes.
The clamp selector supplies the function around those three arguments. In the value field, you’ll see the two variable chips with 5.2vw between them.
The first and final arguments establish the size limits. Between them, 5.2vw provides a preferred size that changes with viewport width: 5.2% of that width. The browser keeps the result within the two limits.
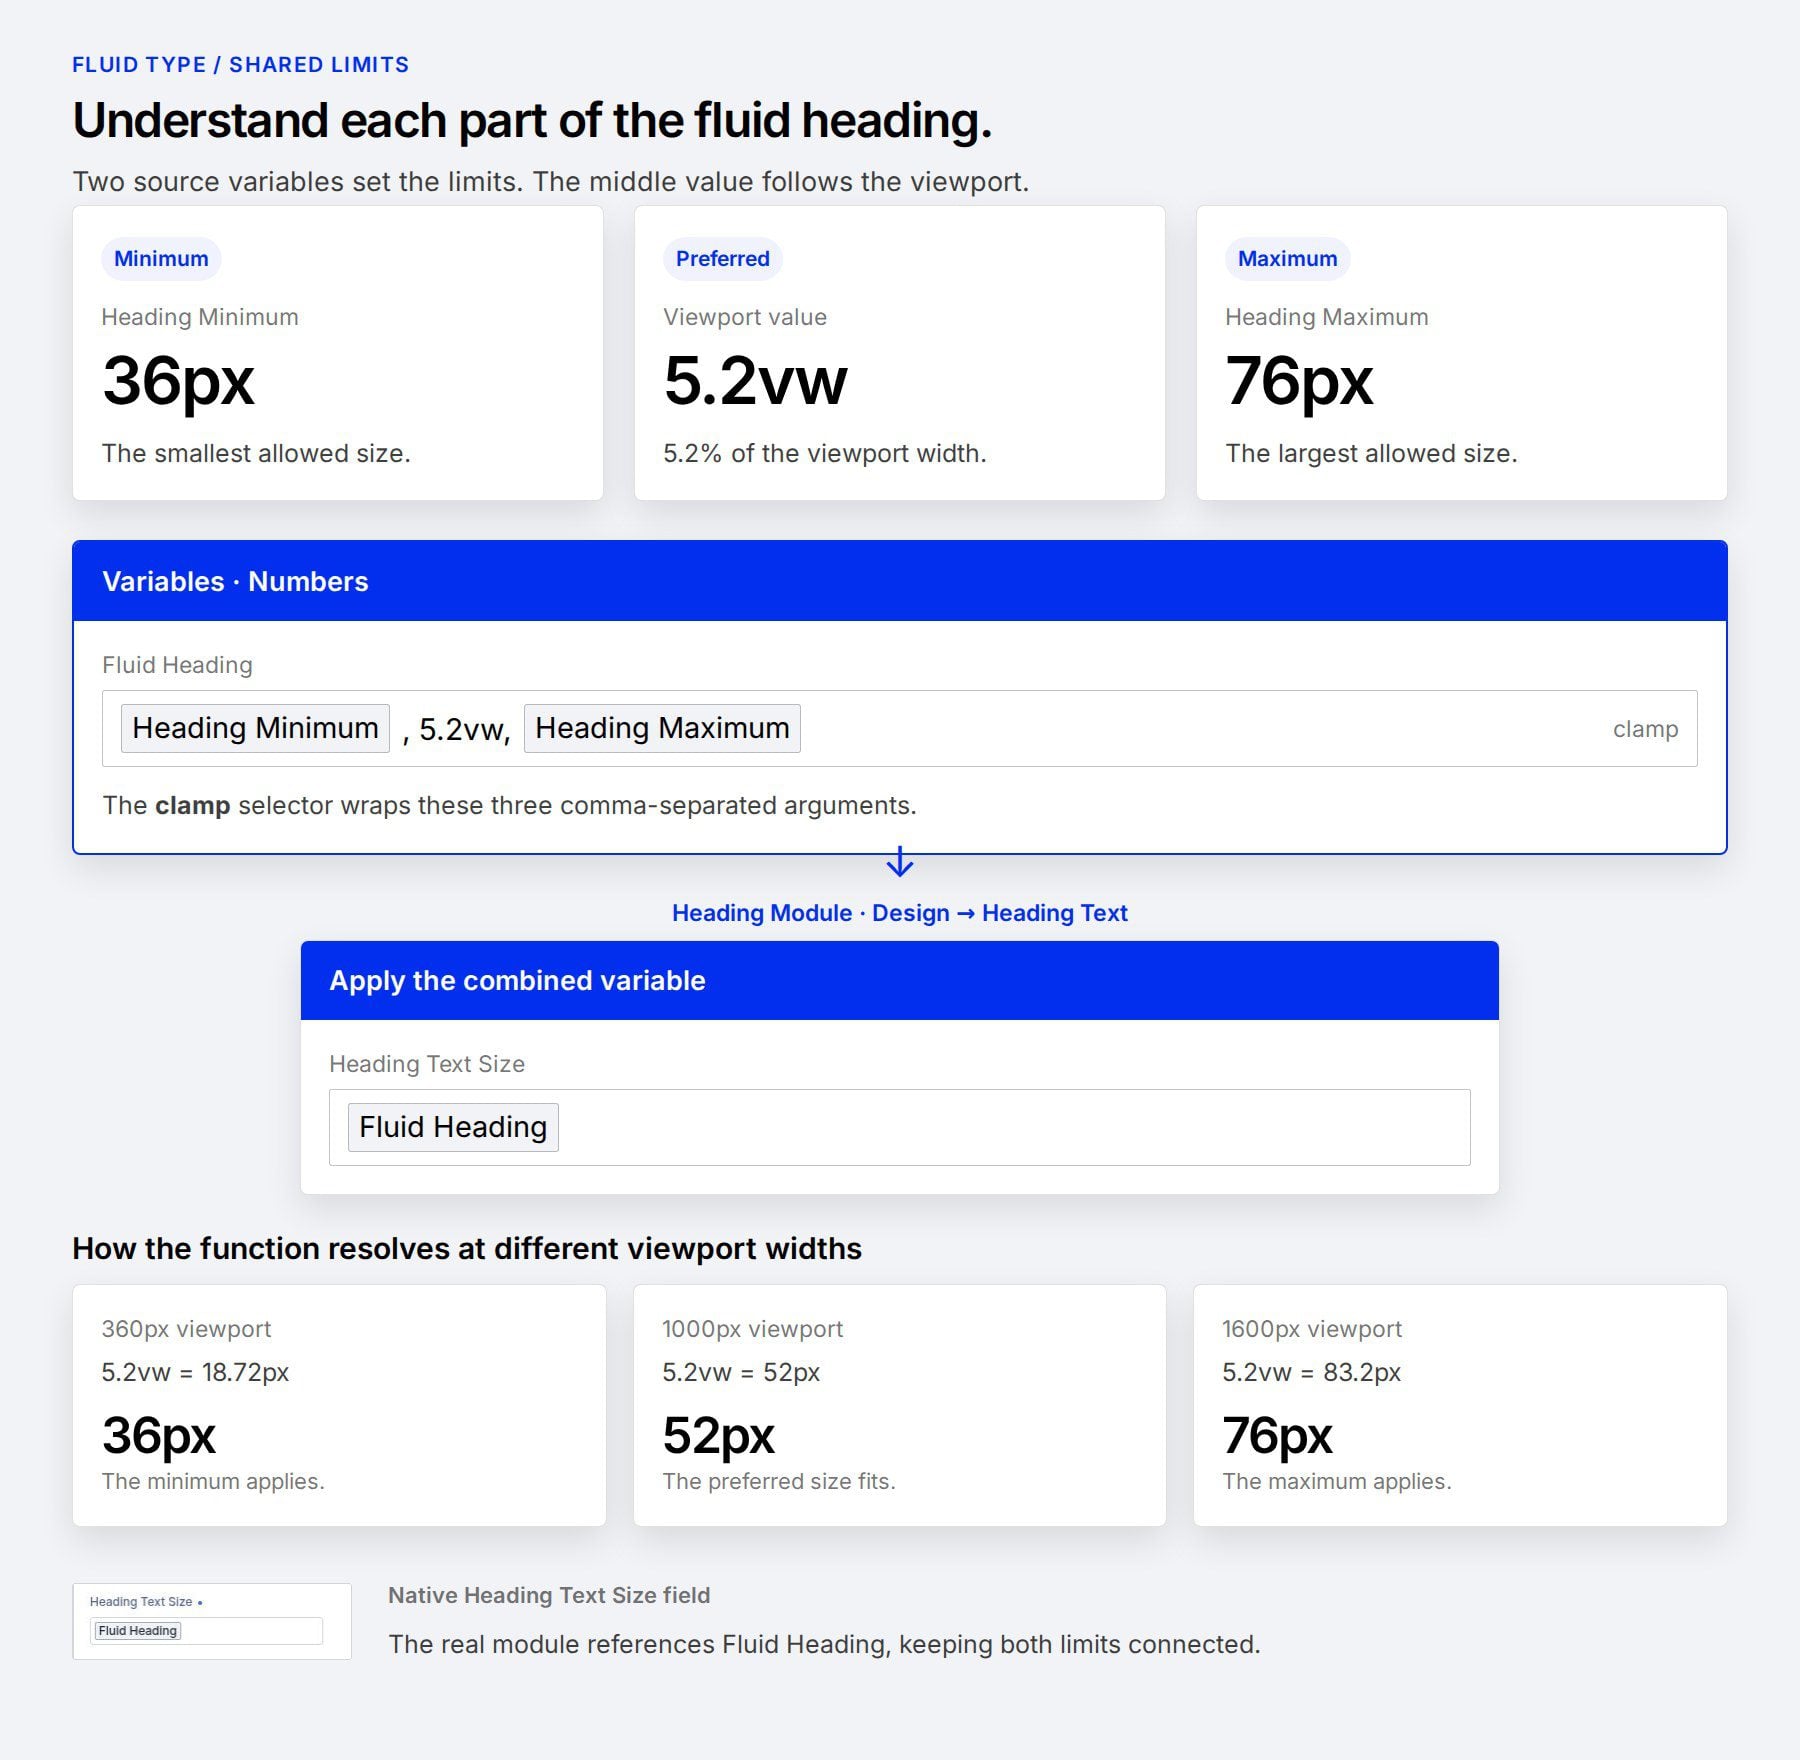
To use the result, open the main Heading Module and go to Design > Heading Text. In Heading Text Size, insert Fluid Heading through the dynamic content picker.
Check the title in desktop, tablet, and phone previews. At a wide viewport, the maximum may limit the size; on a narrow screen, the minimum may take over. Between those limits, the viewport value controls the heading’s size.
To verify the connection, temporarily lower Heading Maximum to 44px while viewing the desktop layout. The heading cannot grow beyond that limit. Restore 76px afterward. A change to the maximum will only alter the visible result when that limit affects the current viewport size.
Assemble Reusable Text With Nested Variables
Text variables can combine shared details into a larger reusable value. Our workshop uses a date and location together in both the introduction and the agenda panel.
Create The Individual Details
In the Variable Manager, expand Text and click Add Global Text. Create a variable named Event Date and enter the workshop date. Add another named Event Location and enter the city.
The example uses 18 June 2027 and Antwerp. Both are ordinary text values: the date stays as entered until you change its source.
Build The Combined Text Variable
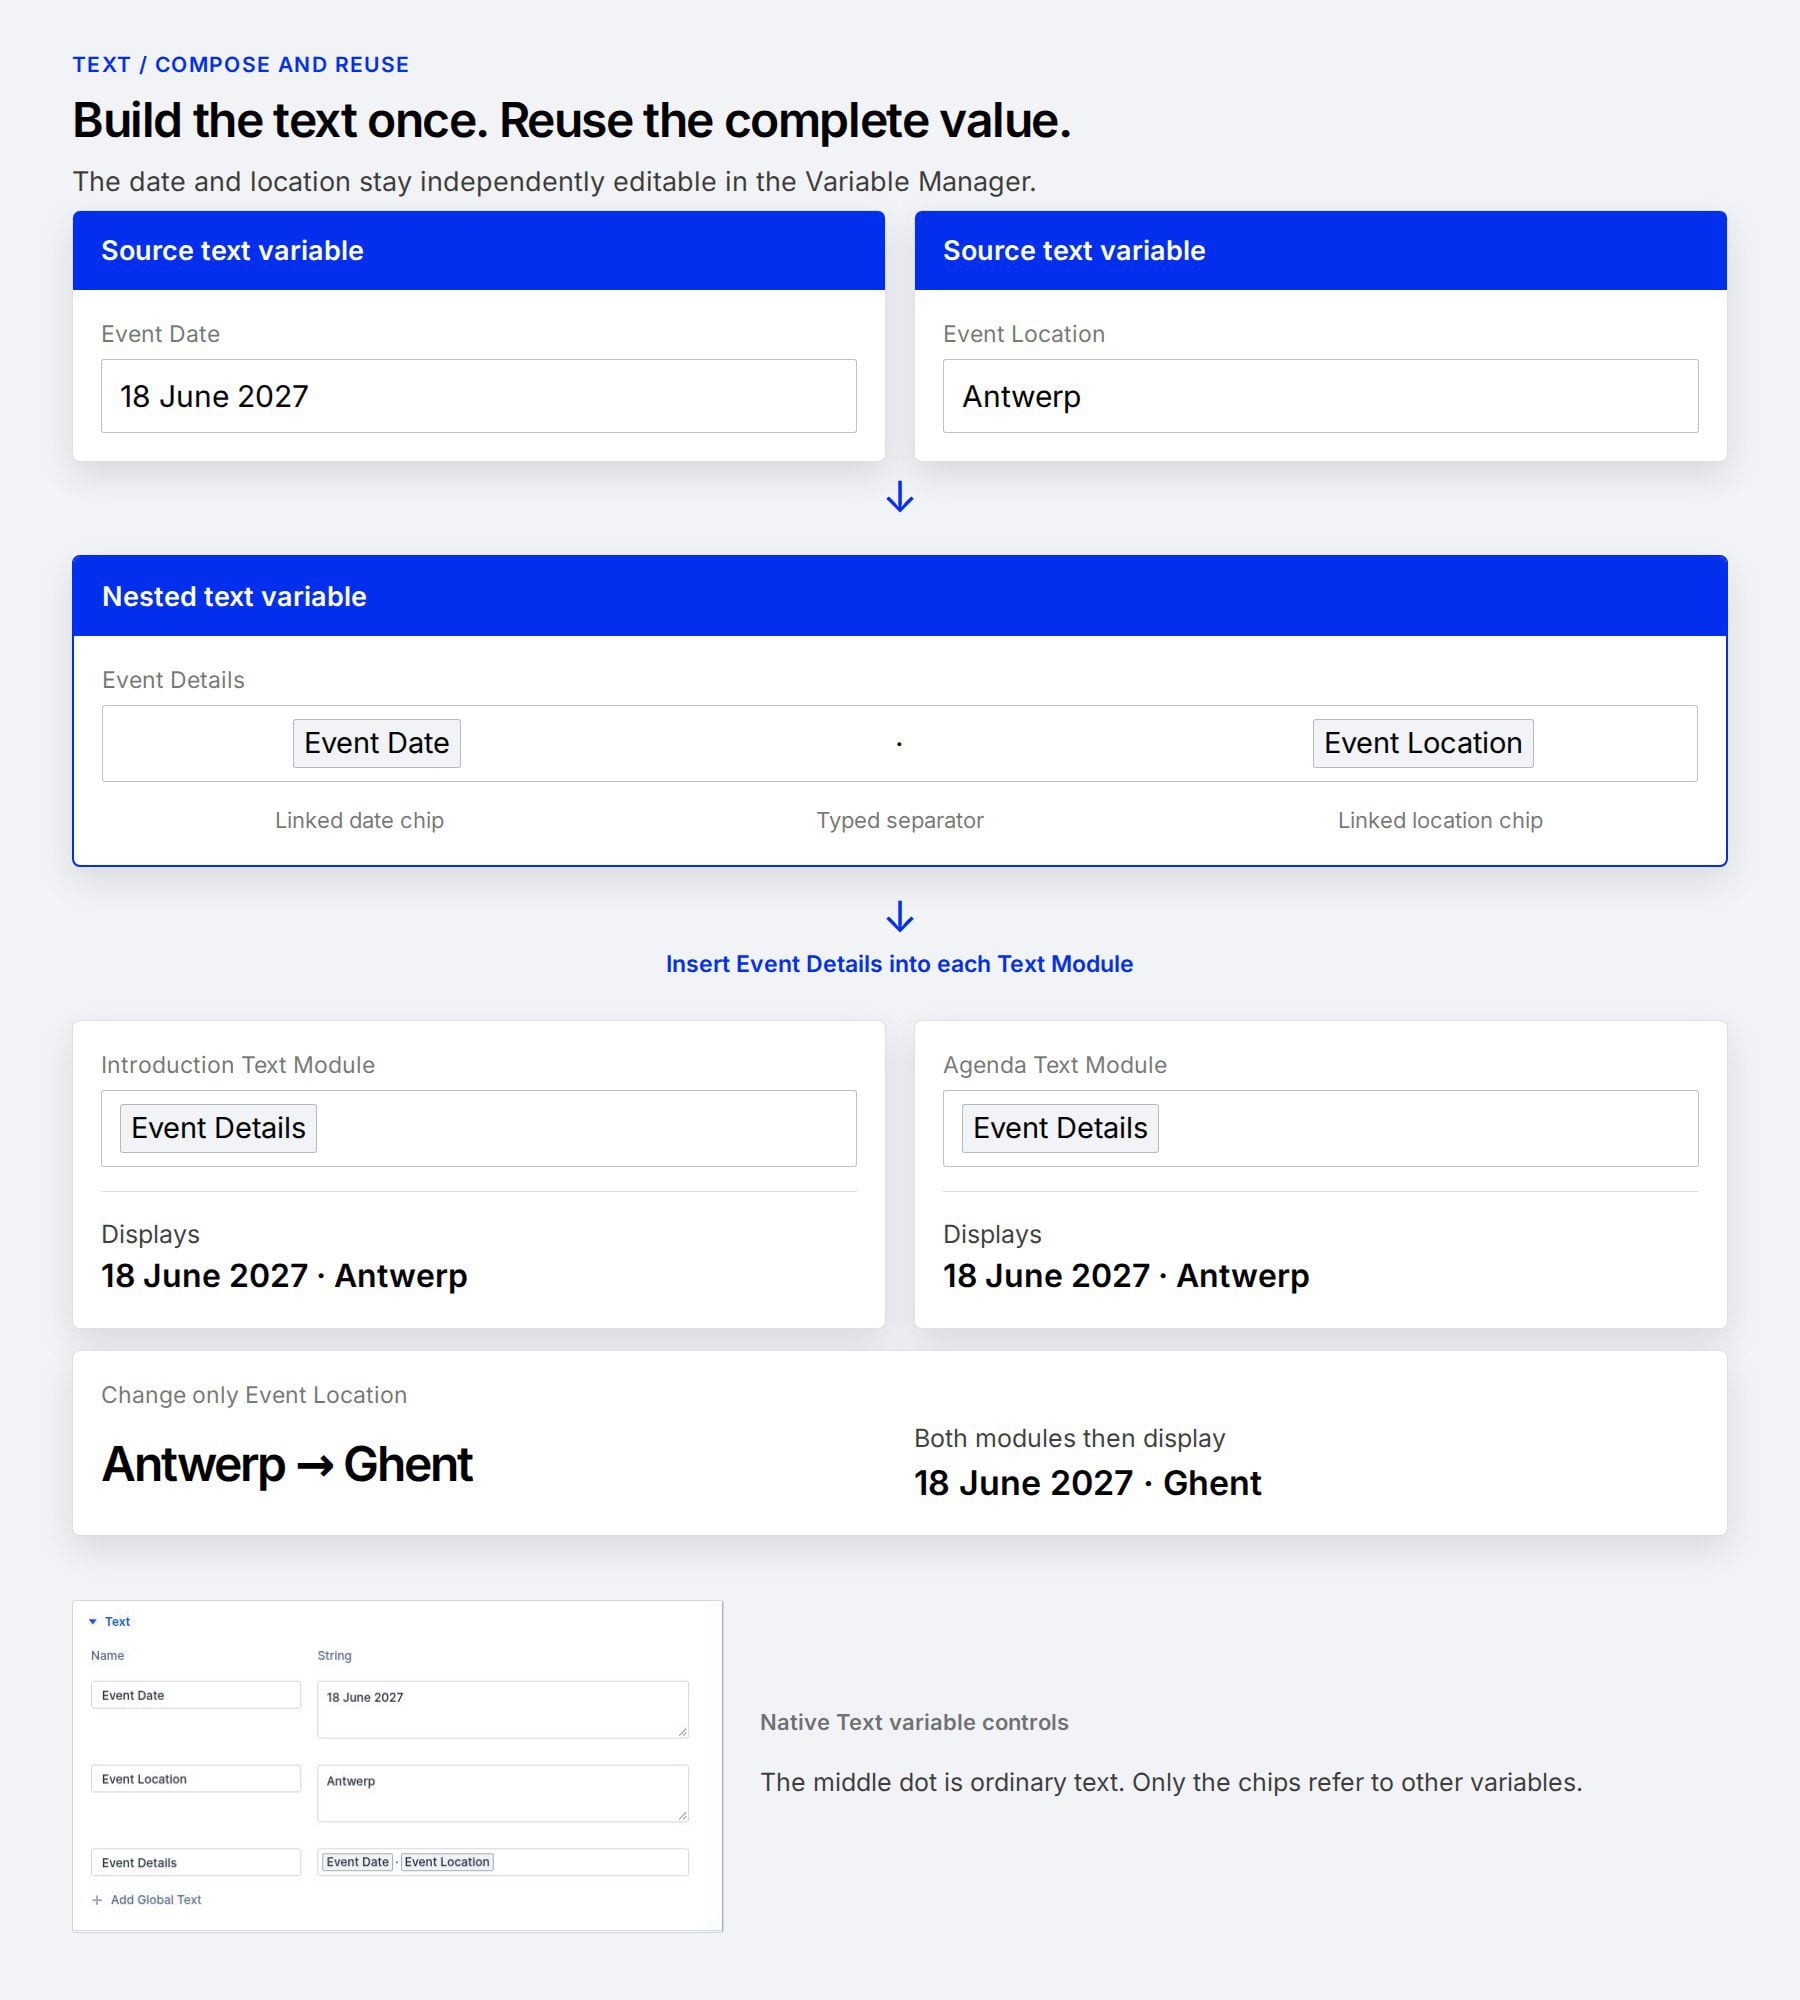
Add another text variable and name it Event Details. Build its value from the two existing sources:
- Place the cursor in the empty value field.
- Open the dynamic content picker and select Event Date.
- After the chip, type a space, a middle dot separator, and another space.
- Open the picker again and insert Event Location.
- Save the variables and apply the changes.
The date and location remain separate chips, with an ordinary text separator between them. Event Details combines those pieces into one value you can reuse elsewhere.
Reuse The Combined Value
Open the Text Module used for event details below the introduction. Under Content > Text, replace its fixed date-and-location line with the Event Details variable using the dynamic content control. Repeat this for the corresponding Text Module in the blue agenda column.
Now change Event Location in the Variable Manager. Changing it from Antwerp to Ghent updates both Event Details instances because they reference the same composed value. Restore the original location when you’ve finished checking the result.
You can also combine variables with words directly in a module’s text field. The distinction is reuse: create Event Details when that same combination belongs in several places. Keep surrounding words in the module when they belong to that particular piece of content.
Insert And Manage Individual Variable Chips
Each chip represents one source within the field. You can continue typing around it, add another source, or change that occurrence without replacing the whole value.
For keyboard insertion, place the cursor where a source belongs and type {{ in a supported field. Divi opens the variable picker at that position. Search for the source, select it, and continue editing around the inserted chip.
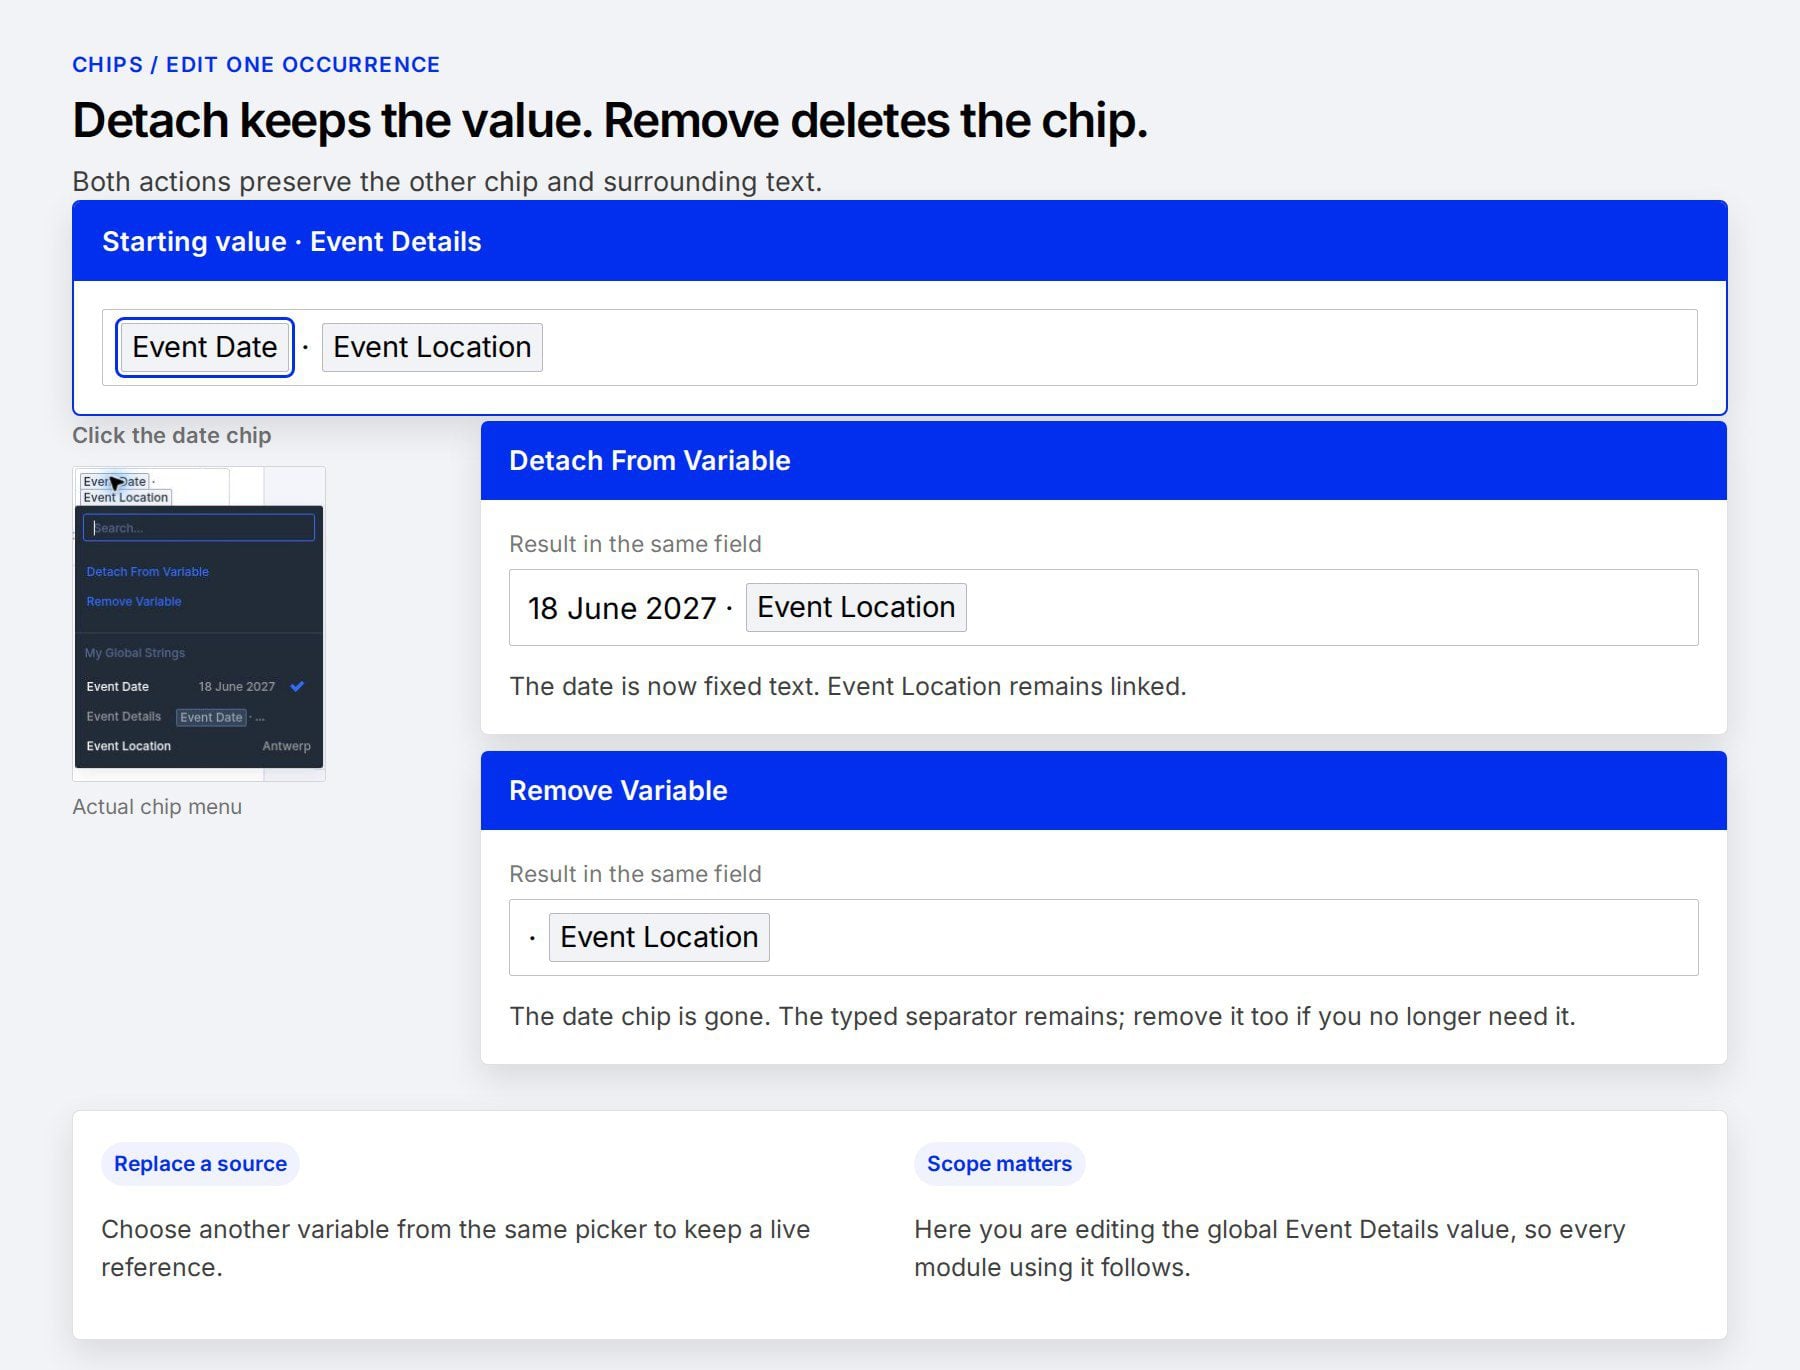
Click an existing chip to open its options. The menu lets you choose another source, Detach From Variable, or Remove Variable.
- Choose another source to replace that chip’s reference while keeping the surrounding content.
- Detach From Variable to keep the current value at that occurrence and break its live connection.
- Remove Variable to remove that occurrence from the field.
For Event Details, these controls belong to the individual date or location chip. Editing a chip inside that global text variable affects the composed value wherever it’s used. Editing a chip inside one module changes that module’s content instead.
Keep Your Variable Relationships Easy To Maintain
A useful nesting system should remain understandable when you return to it later. A few habits help keep the connections clear:
- Name variables by purpose. Base Space and Panel Padding describe their roles more clearly than numbered names.
- Keep arithmetic meaningful. Multiply or divide a spacing value by a plain number. When adding or subtracting lengths, use compatible CSS values and include the required units.
- Keep clamp limits sensible. The minimum should fit small screens, and the maximum should suit the design. Check the actual heading at several widths.
- Avoid circular references. A source should not depend on a variable that eventually points back to it.
- Check the connections before saving. Global variable changes can affect other pages. Inspect the dependent values, save the variables and page, then reload to confirm the result.
If a setting stops following a source, check whether it still contains a variable chip. A detached value, a fixed replacement, or a separate responsive override may explain why that setting behaves differently.
Build More Connected Designs With Divi 5
Nested variables let a few shared decisions guide the details of a design. Start with one spacing relationship or a reusable text combination, then expand the system where those connections save work. Explore Divi 5 and use variables to keep your next design easier to adjust.










Leave A Reply