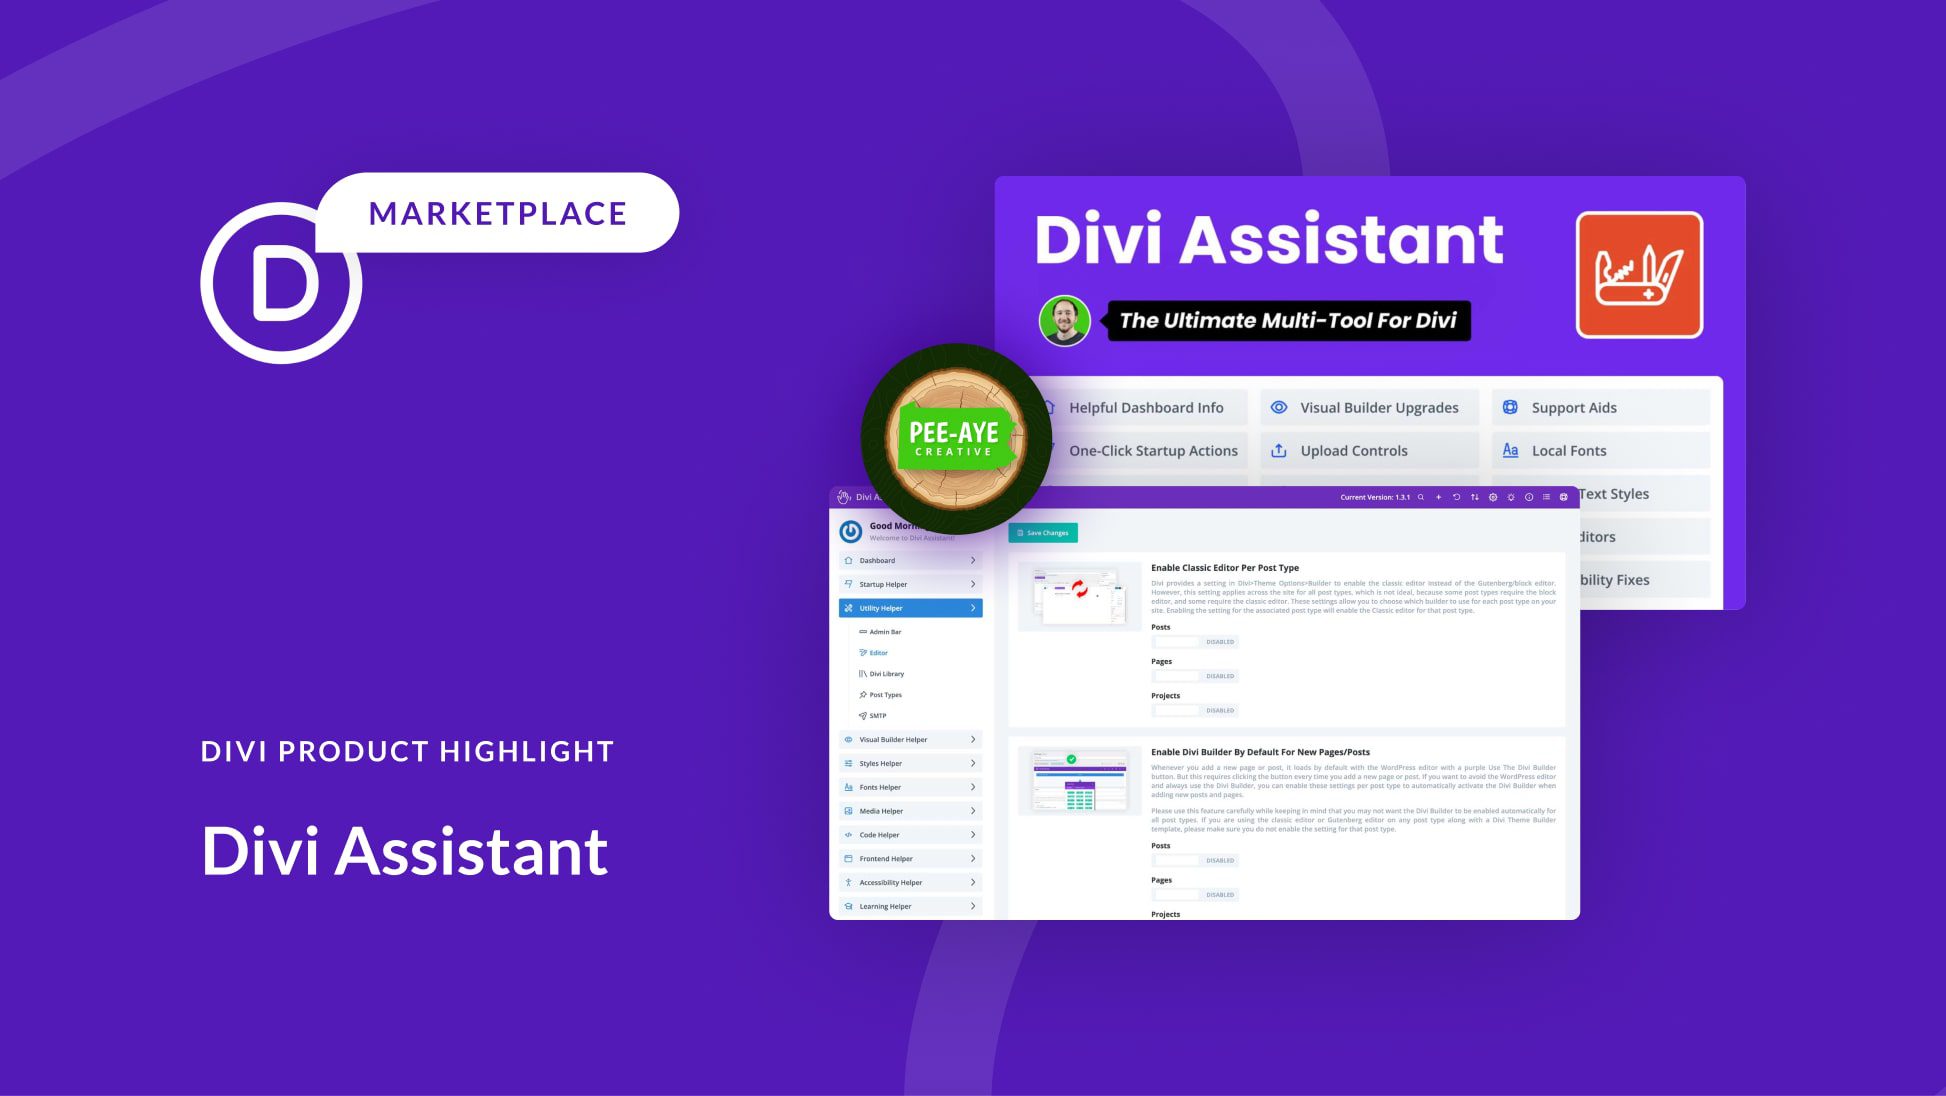
Do you want to spend hours keeping up with tedious tasks on your Divi website? Honestly, no one does. Thankfully, a product called Divi Assistant can be your time-saving digital superhero. This must-have plugin, available on the Divi Marketplace, simplifies tasks, boosts accessibility, and streamlines maintenance. Imagine being able to tweak Divi to better suit your preferences, alleviate image optimization headaches, or make your site more accessible to everyone.
Divi Assistant handles it all, saving you time and money. Are you ready to level up your Divi game? Let’s discover how it works!
What Is Divi Assistant?
Do you want to avoid juggling multiple plugins to enhance your Divi experience? Divi Assistant, a powerhouse from PeeAye Creative, integrates essential features into one streamlined plugin. From accessibility enhancements to maintenance tools, Divi Assistant empowers you to customize every aspect of the Divi Theme. Say goodbye to tedious manual adjustments and hello to a more efficient, enjoyable workflow. With Divi Assistant, your website’s potential is truly limitless.
Let’s take a close look at the plugin and what it offers.
Divi Assistant Features
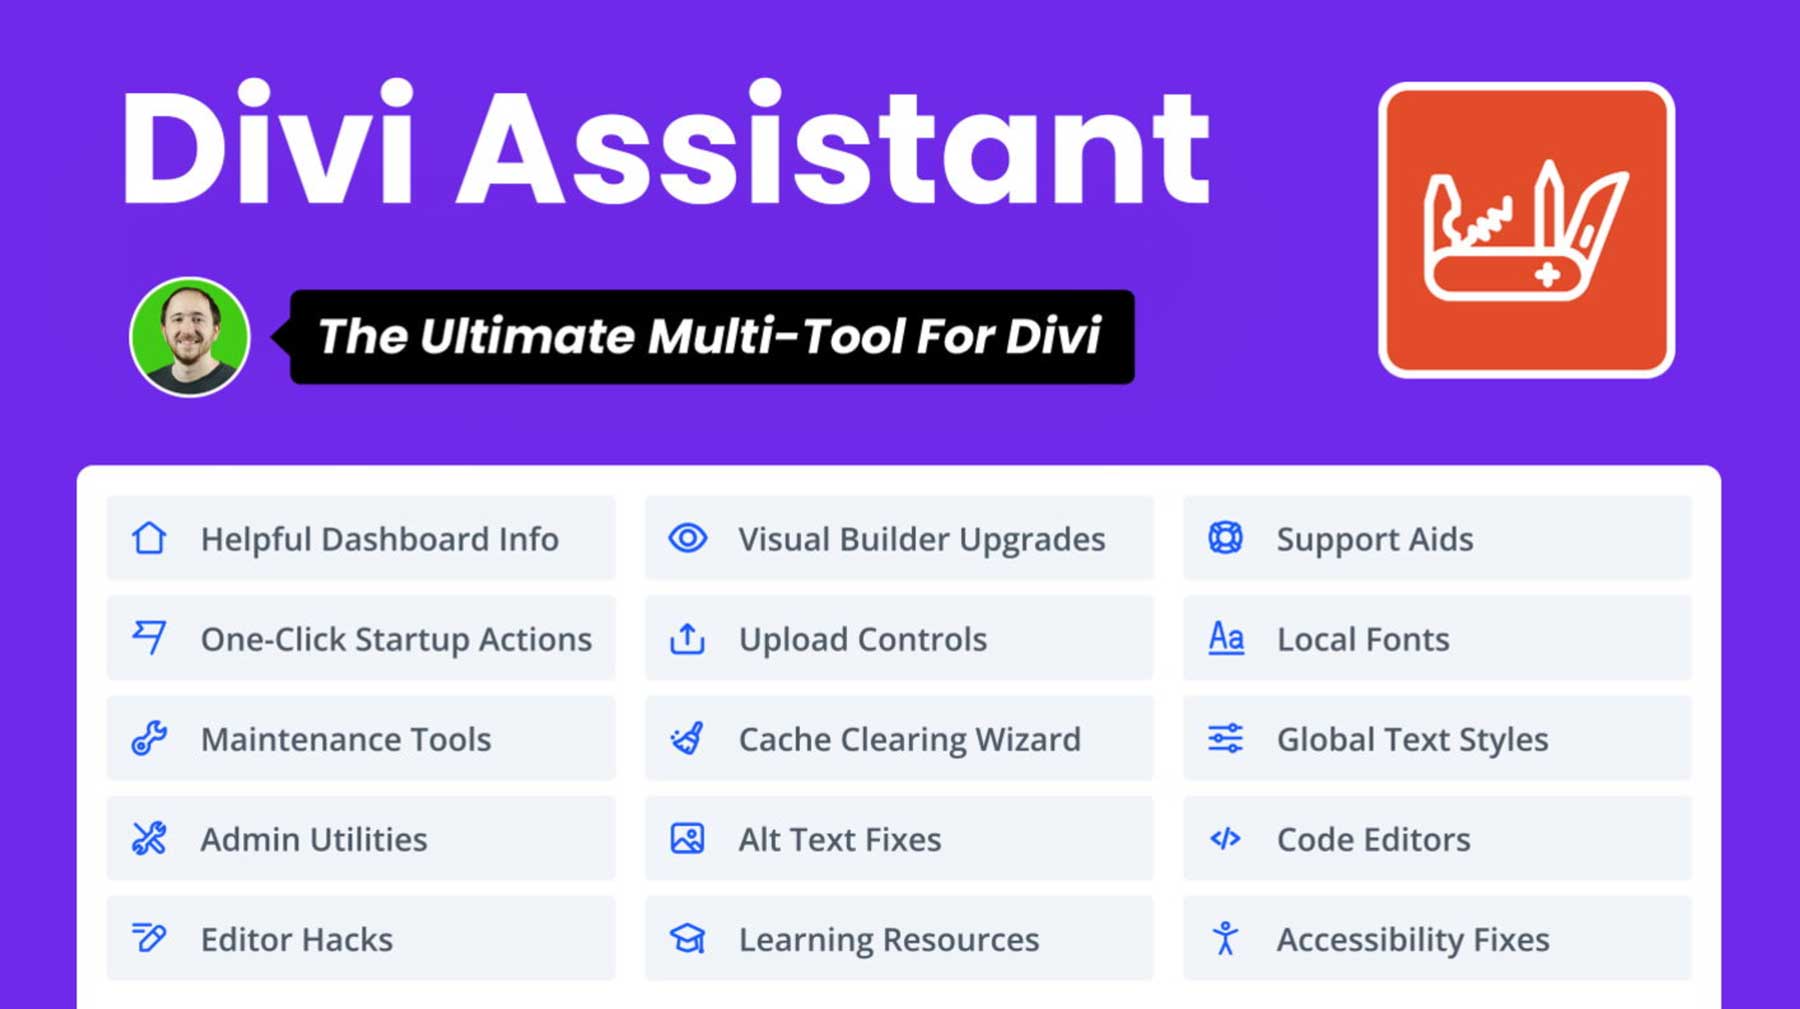
Divi Assistant is the most robust utility plugin for Divi available. It allows you to streamline your workflow by automating repetitive tasks that take hours to do manually. With a few clicks, you can accomplish tasks like setting site permalinks, viewing a comprehensive system report, fixing alt text errors, and more. Let’s look at everything Divi Assistant can do so you’ll see its tremendous value.
Starter Helper
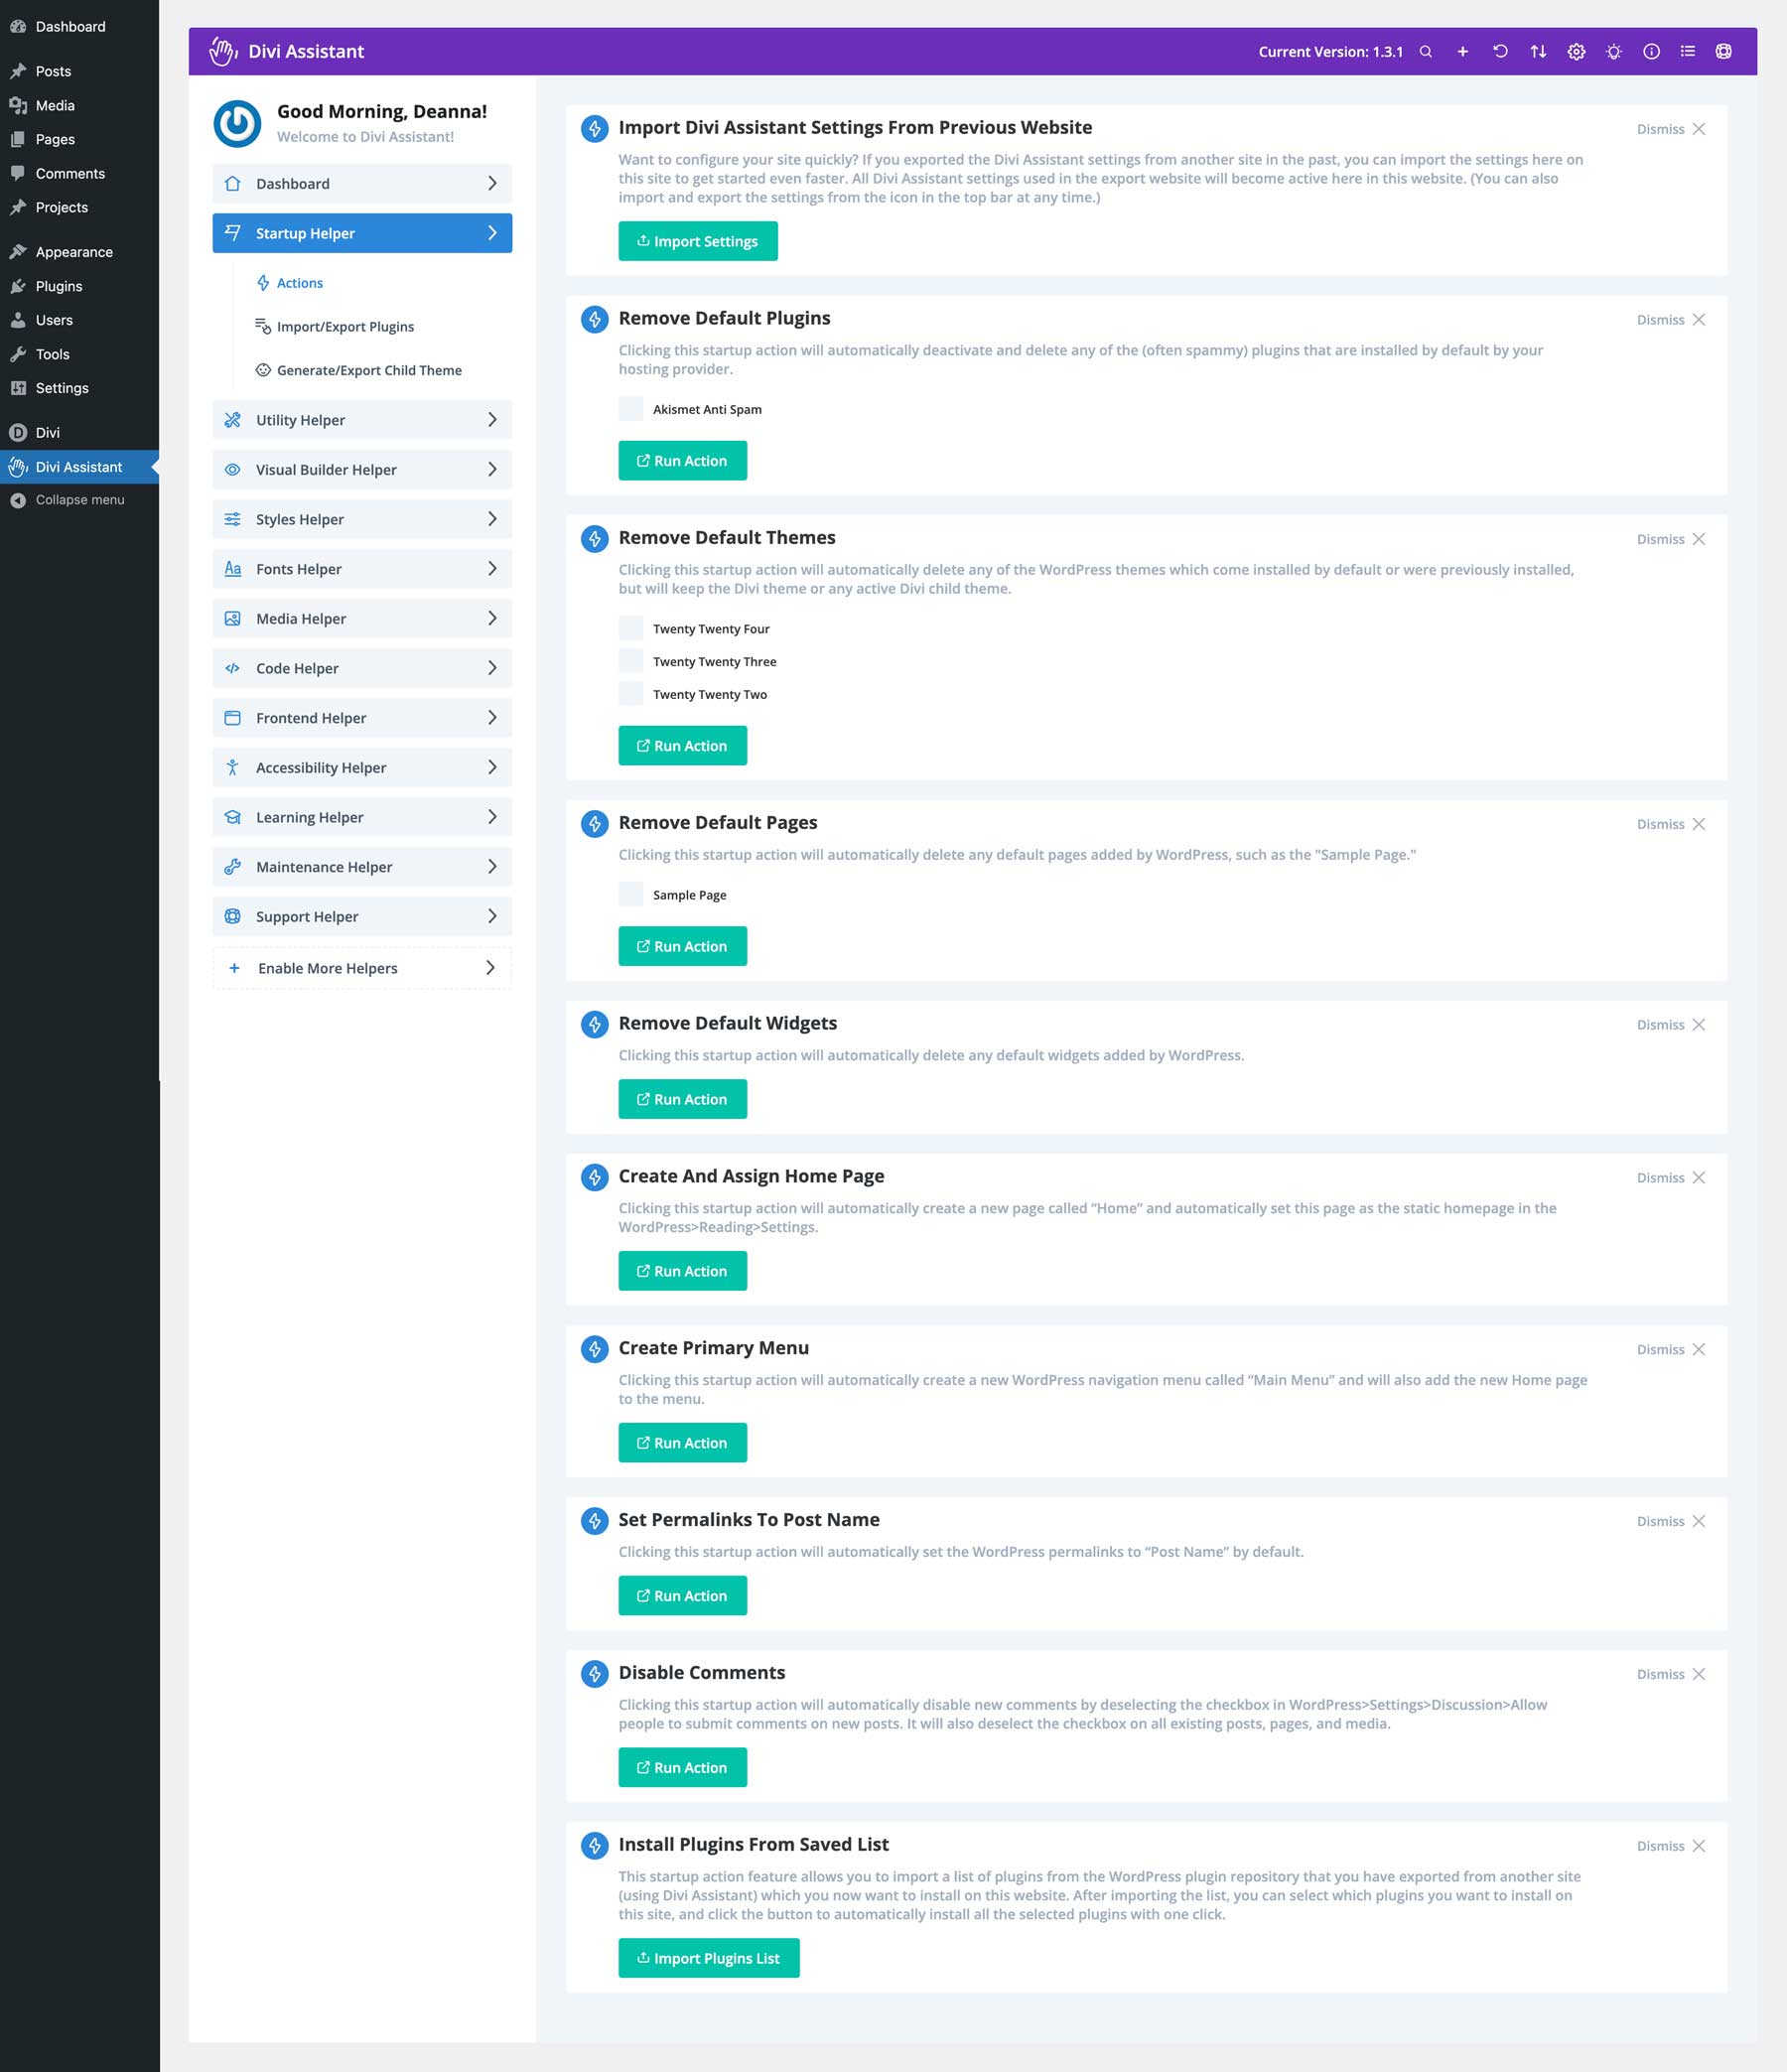
Divi Assistant’s Starter Helper saves time setting up a new Divi website from scratch by removing the hassles. With just a few clicks, you can automate repetitive tasks like removing default plugins and themes, removing WordPress starter pages and widgets, creating and assigning a home page, and creating a navigation menu from one convenient dashboard. You can also change your site’s permalink settings, disable comments, and import plugins from a saved list.
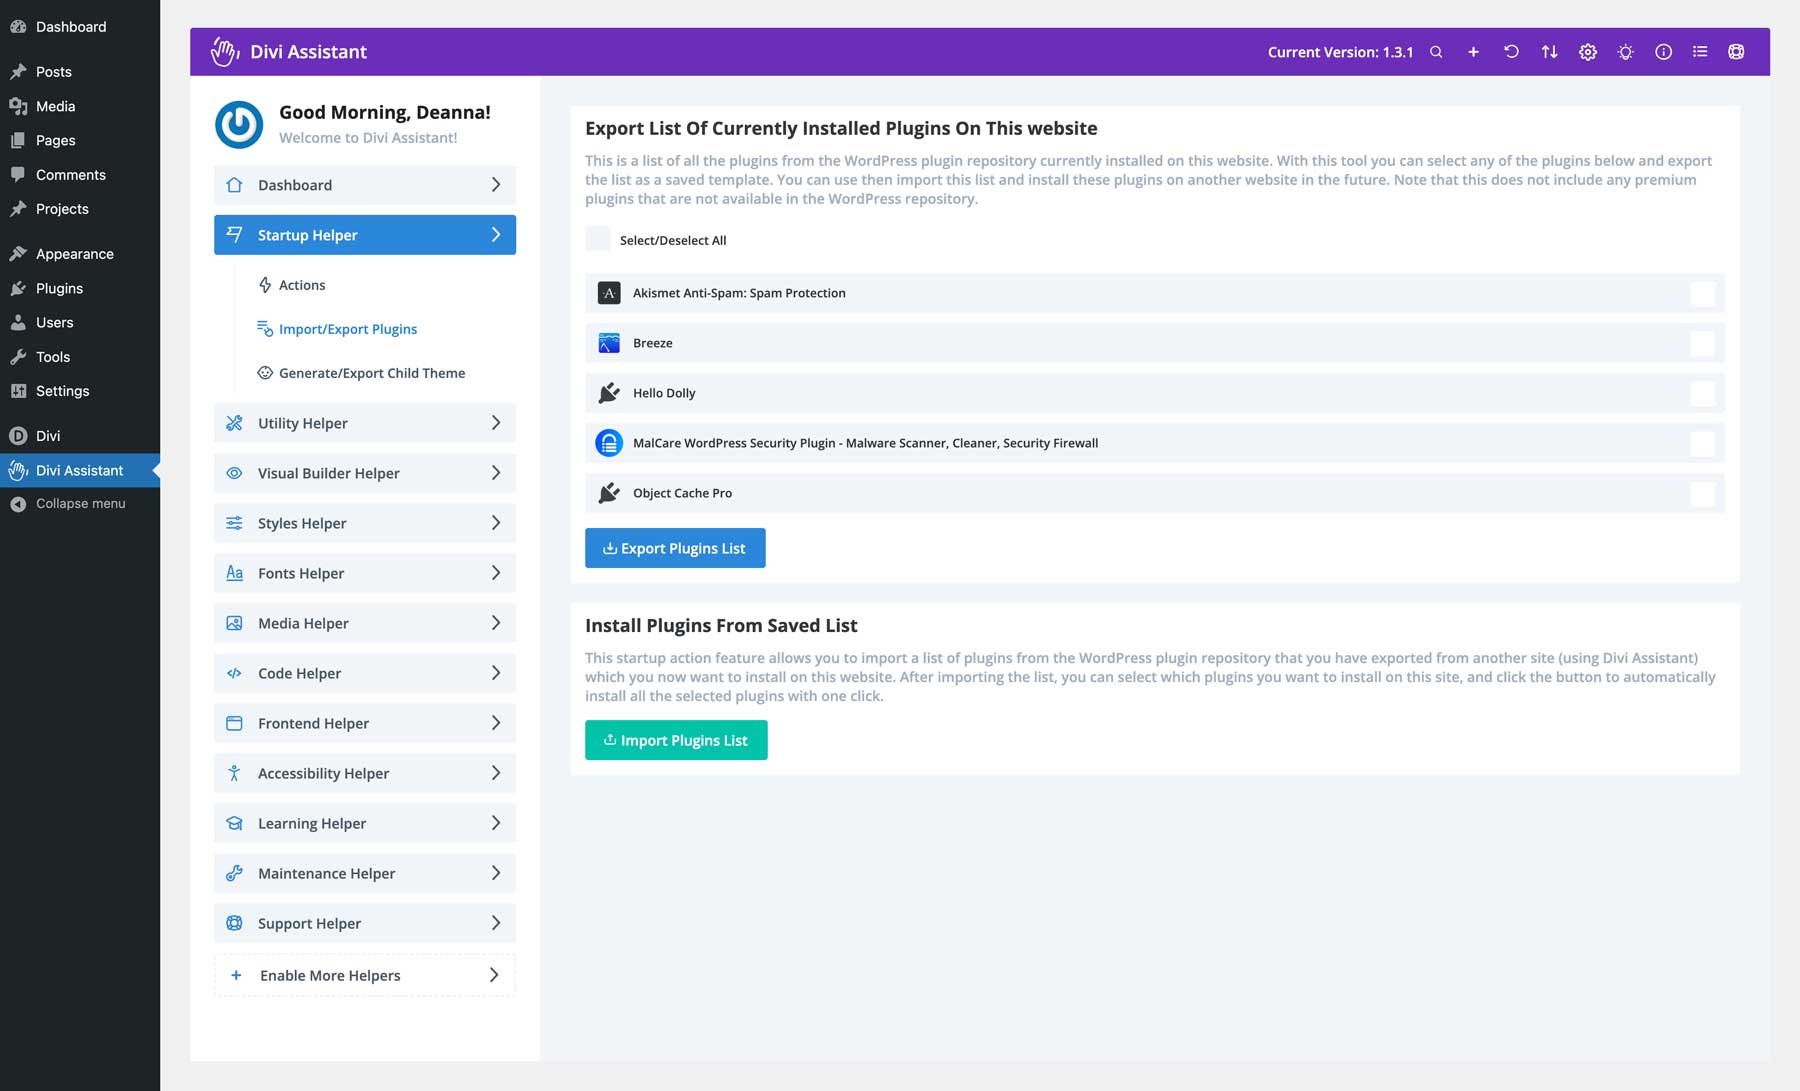
The Starter Helper is also perfect for setting up blueprints that can be used on other Divi sites where Divi Assistant is installed. You can easily export your favorite plugins in a zip file and upload them to other Divi websites for convenience.
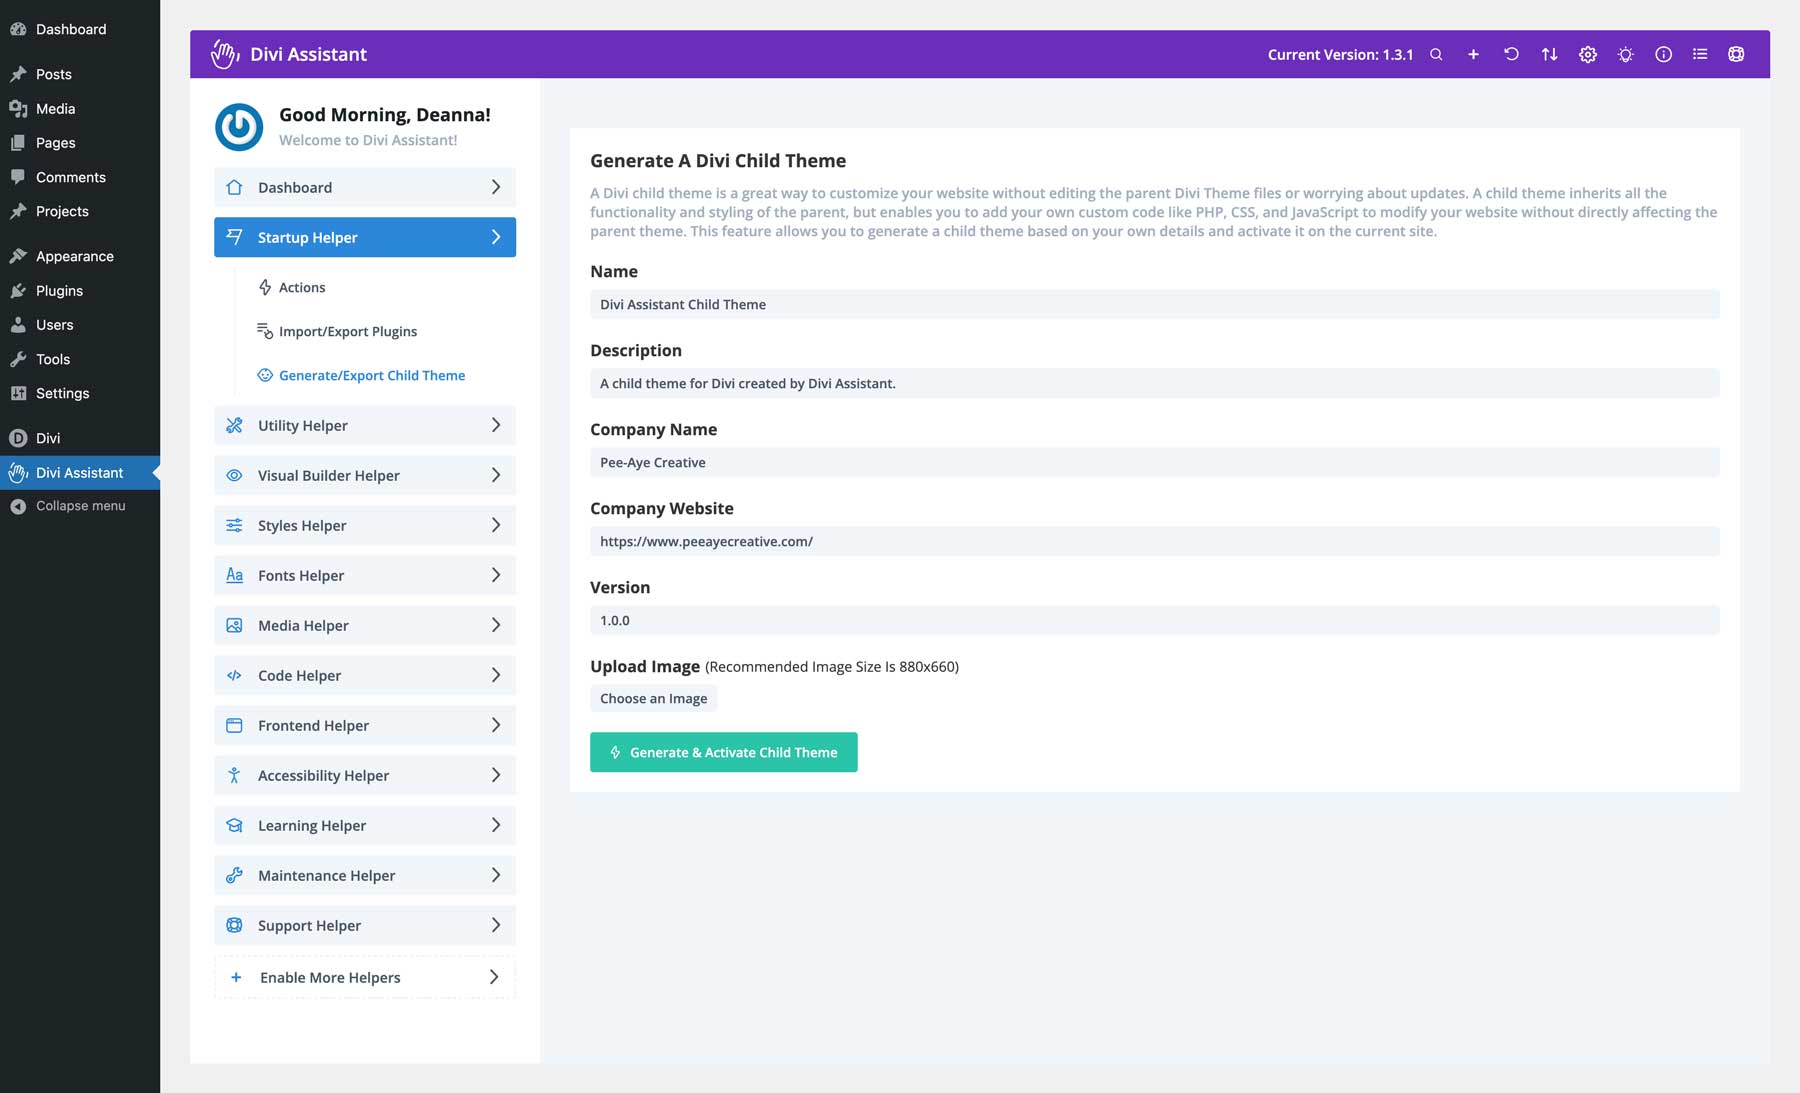
Another excellent feature of Divi Assistant is the ability to generate a Divi child theme with a few clicks. Simply add a name and description, upload a theme thumbnail image, and sit back while Divi Assistant takes care of the rest. Child themes can also be easily exported for use on other Divi websites.
Utility Helper
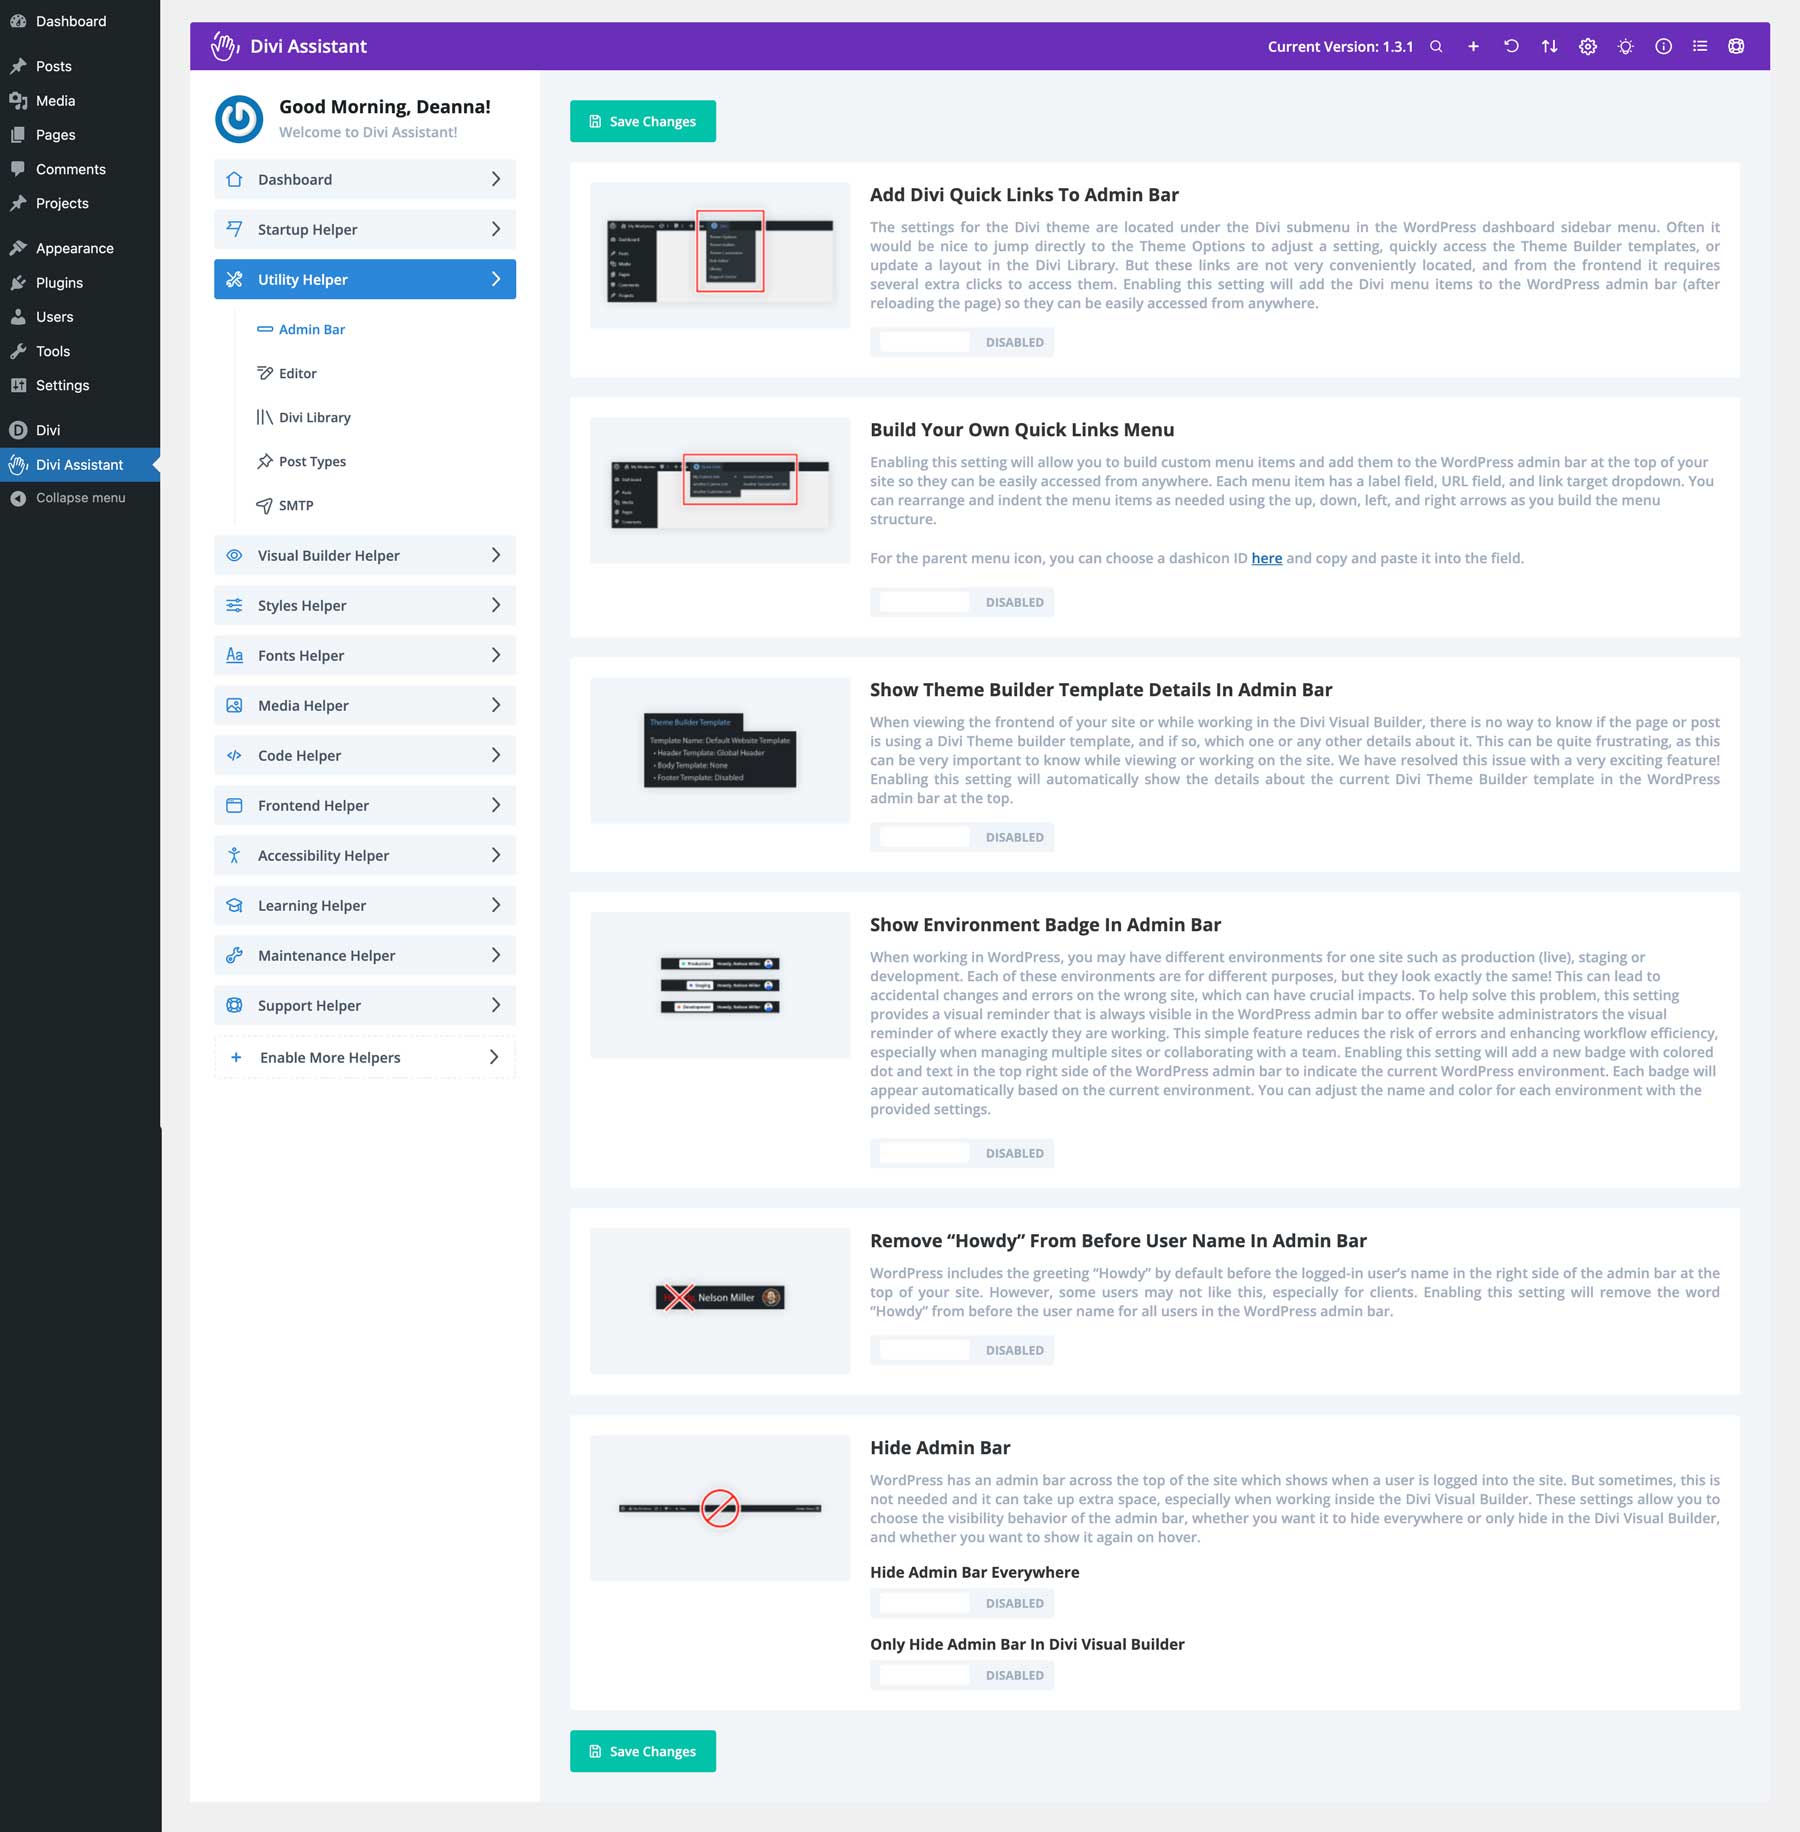
With the Divi Assistant Utility Helper, you can build a quick links menu to display in the WordPress admin bar, customize it, and add the tools you use the most. You can also customize the admin bar further by removing “howdy” before your WordPress username or hiding it altogether.
Customize WordPress Editor Settings
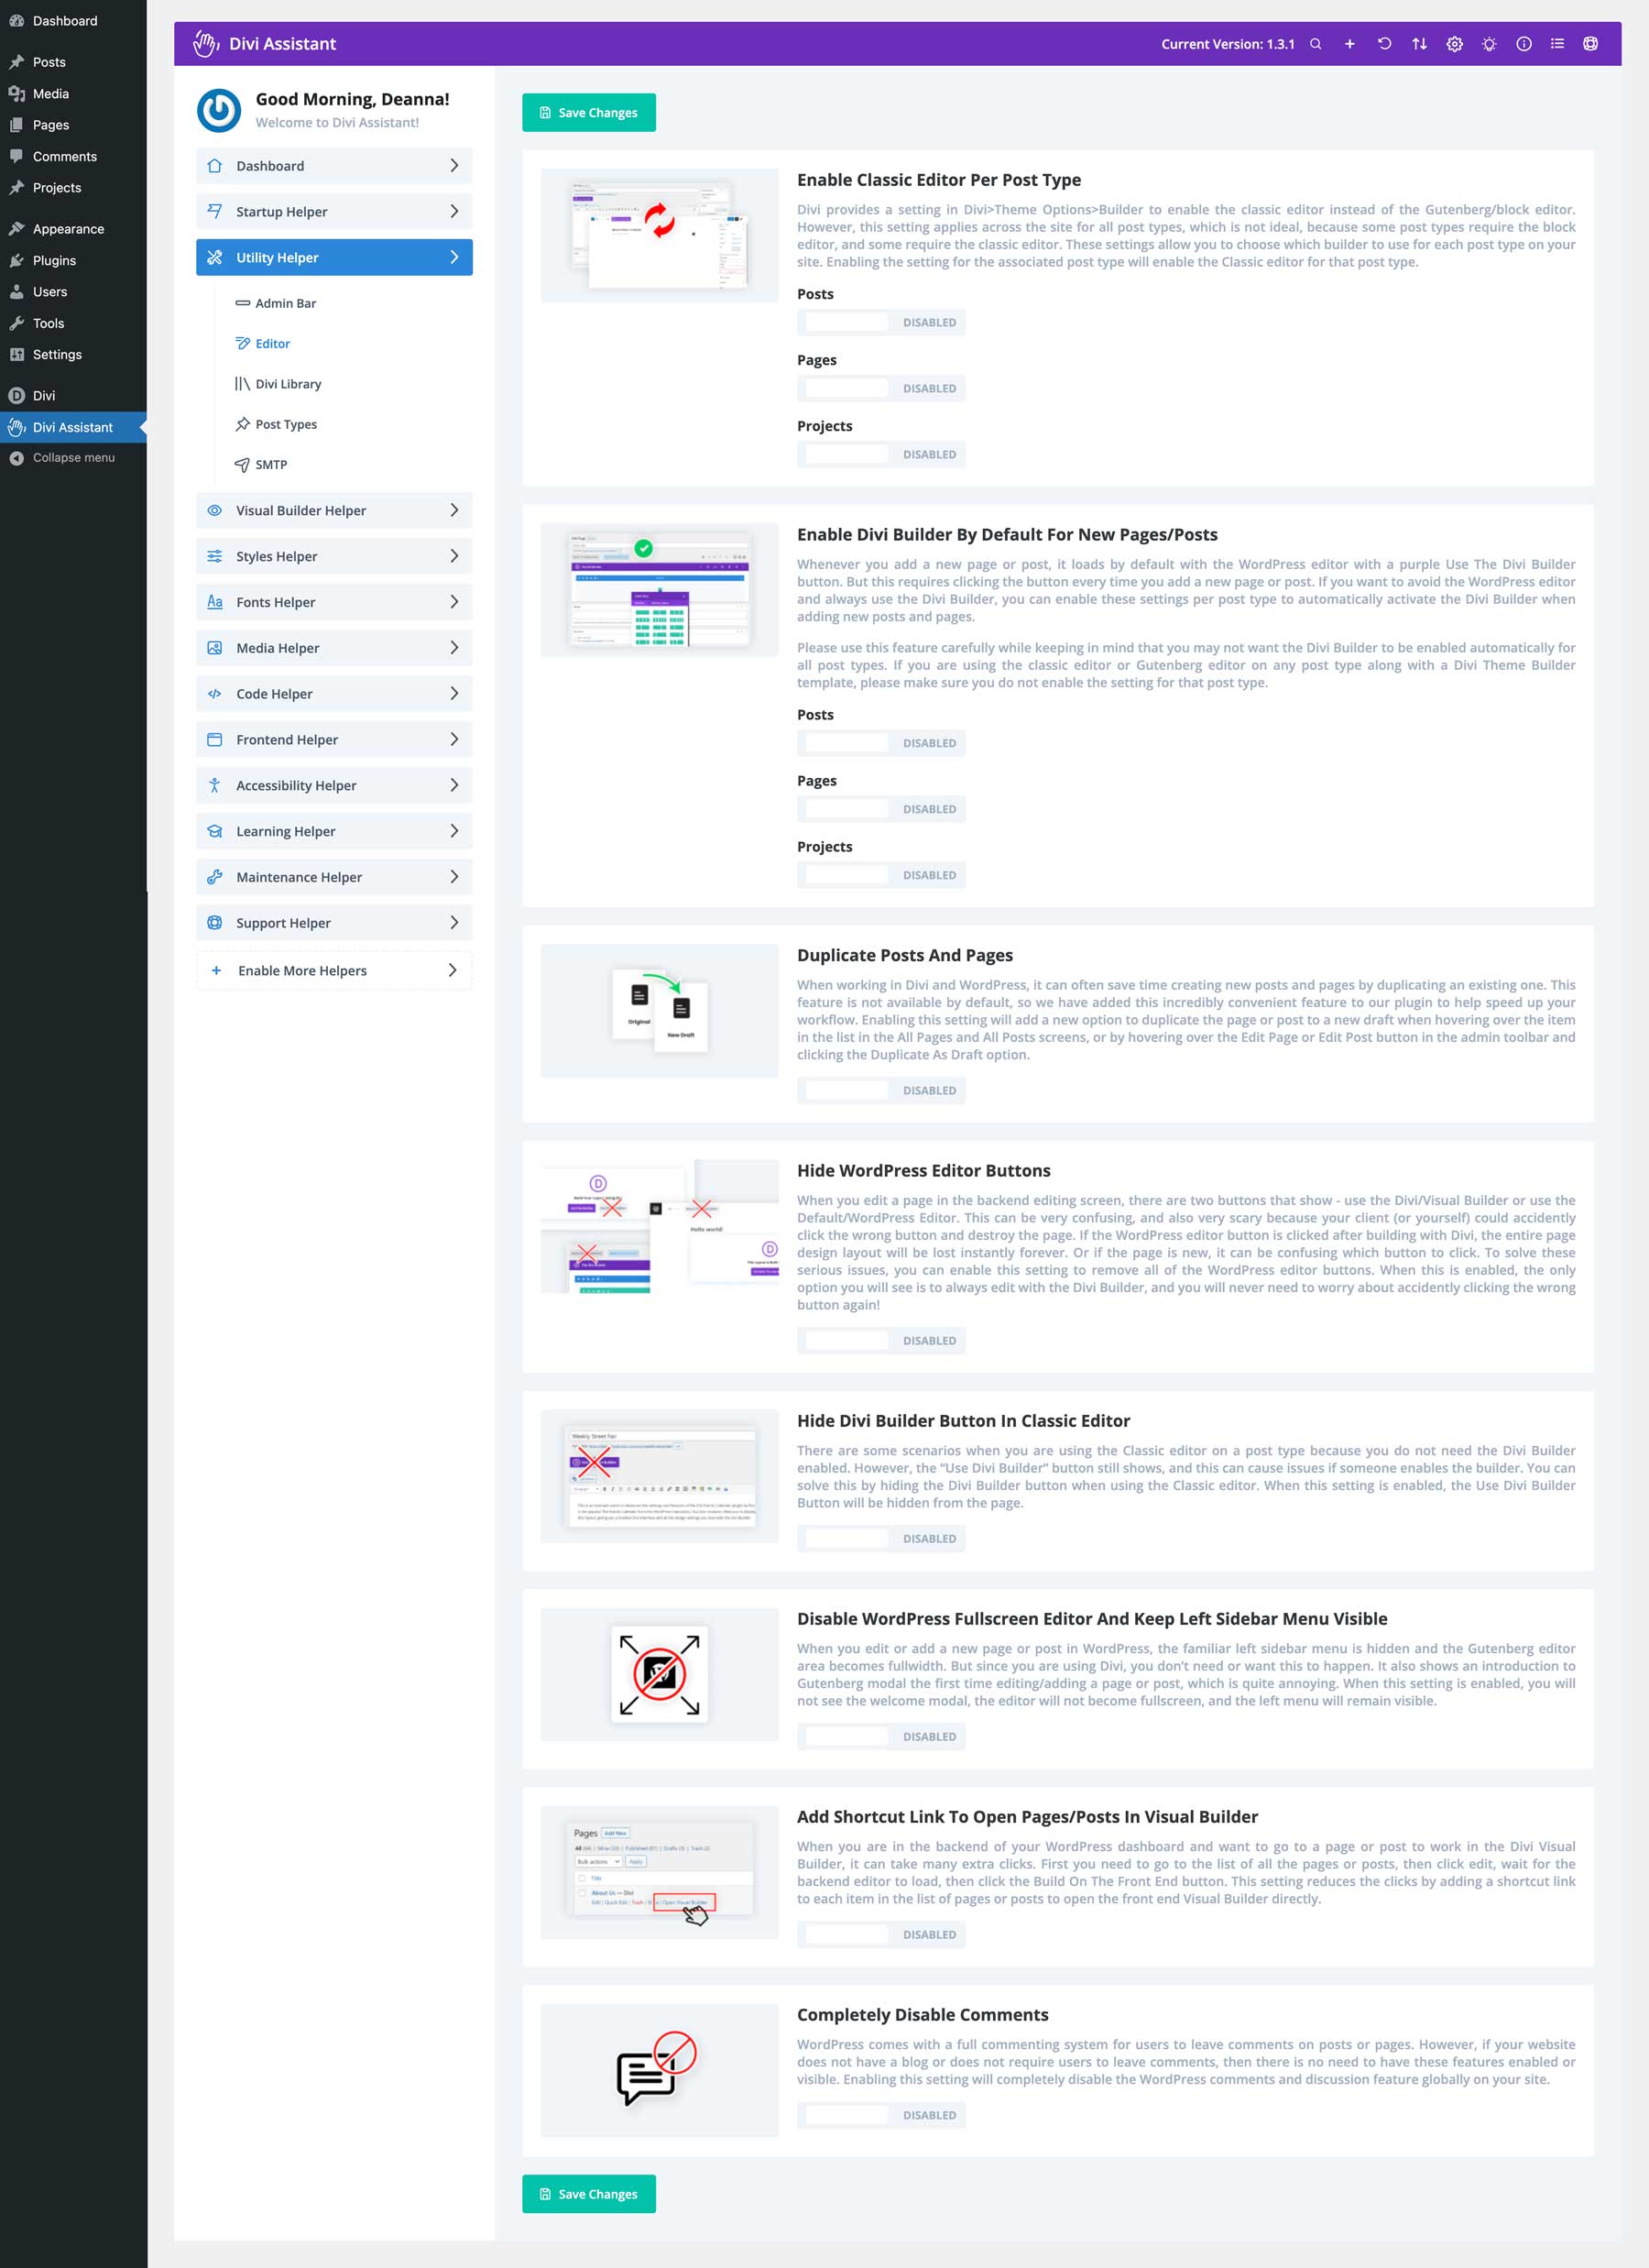
Divi Assistant’s Utility Helper is also perfect for controlling your site’s custom post types. You can easily enable the Classic Editor on all Divi’s post types, including posts, pages, and projects. Alternatively, you can ensure the Divi Builder is set up on all your custom post types, eliminating the need to do it manually. You can duplicate posts and pages, hide the WordPress editor or Divi Builder buttons, or easily disable comments.
Take Control of Your Divi Library Layouts
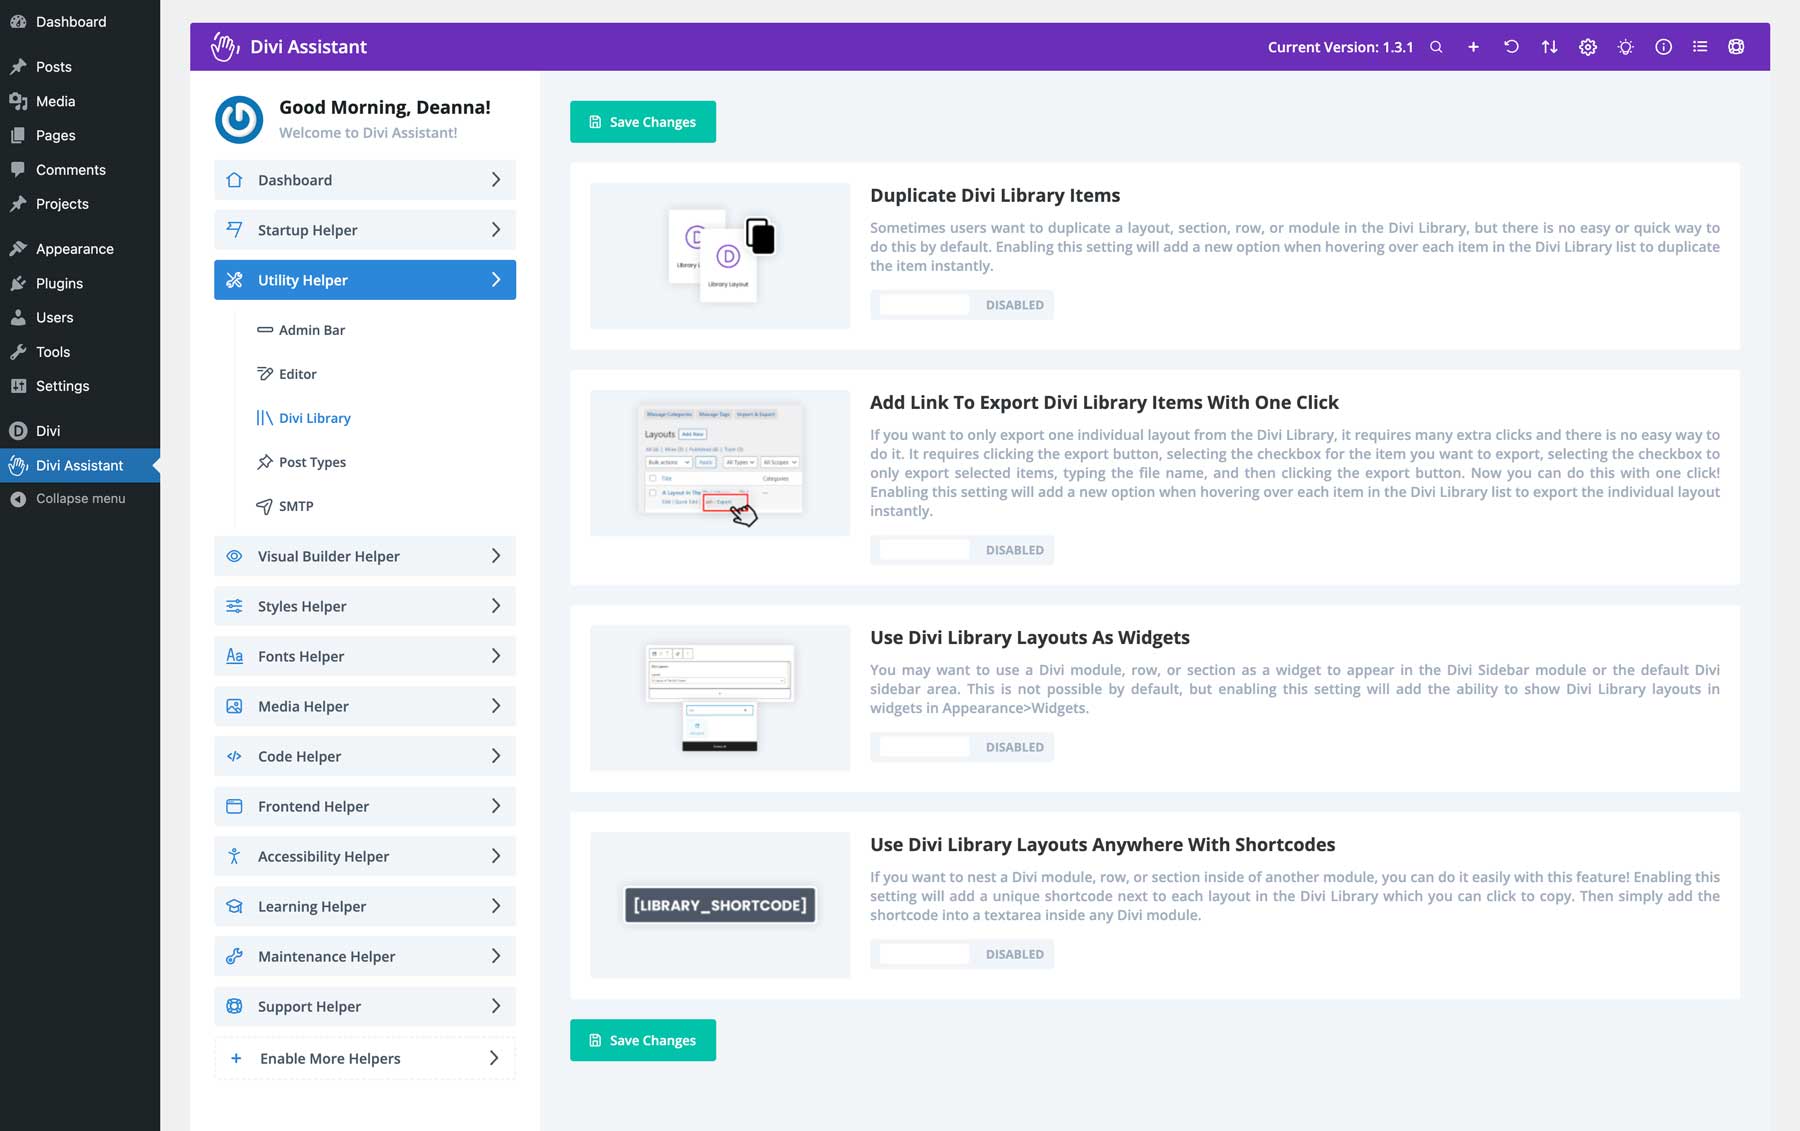
With Divi Assistant, you can easily control the layouts in the Divi Library. You can easily duplicate them and add an export link to export layouts. You can easily create custom sidebars for your Divi websites by incorporating Divi Library layouts as widgets. Another great feature is using a convenient shortcode to use your favorite Divi Layouts anywhere on your site.
Manage Post Types With Ease
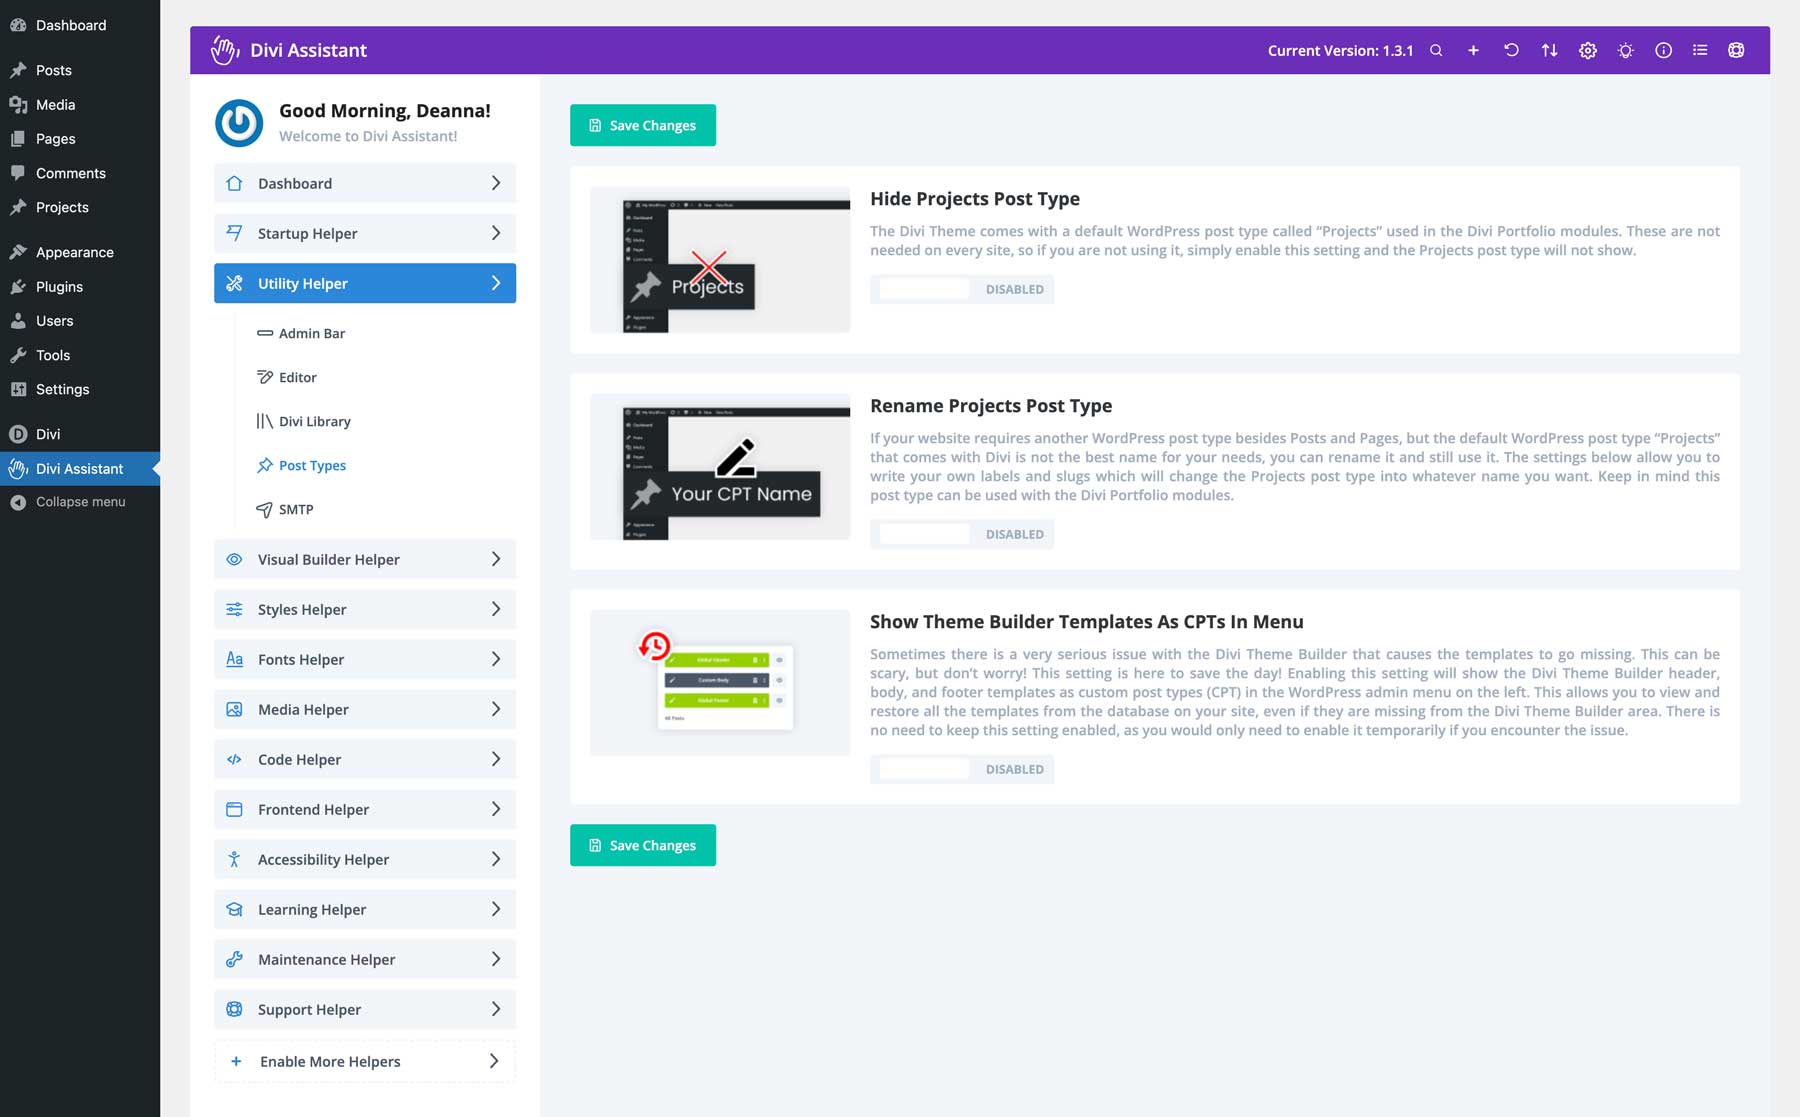
Another incredible feature of Divi Assistant is its ability to rename the project post type that comes standard with Divi. This is a great way to add a new custom post type without needing another plugin. Alternatively, you can easily hide the project post type to avoid unnecessary clutter in the WordPress toolbar. Want to access your Theme Builder templates faster? Divi Assistant can do that, too, by adding them directly into the toolbar for easy access.
Manage SMTP Settings
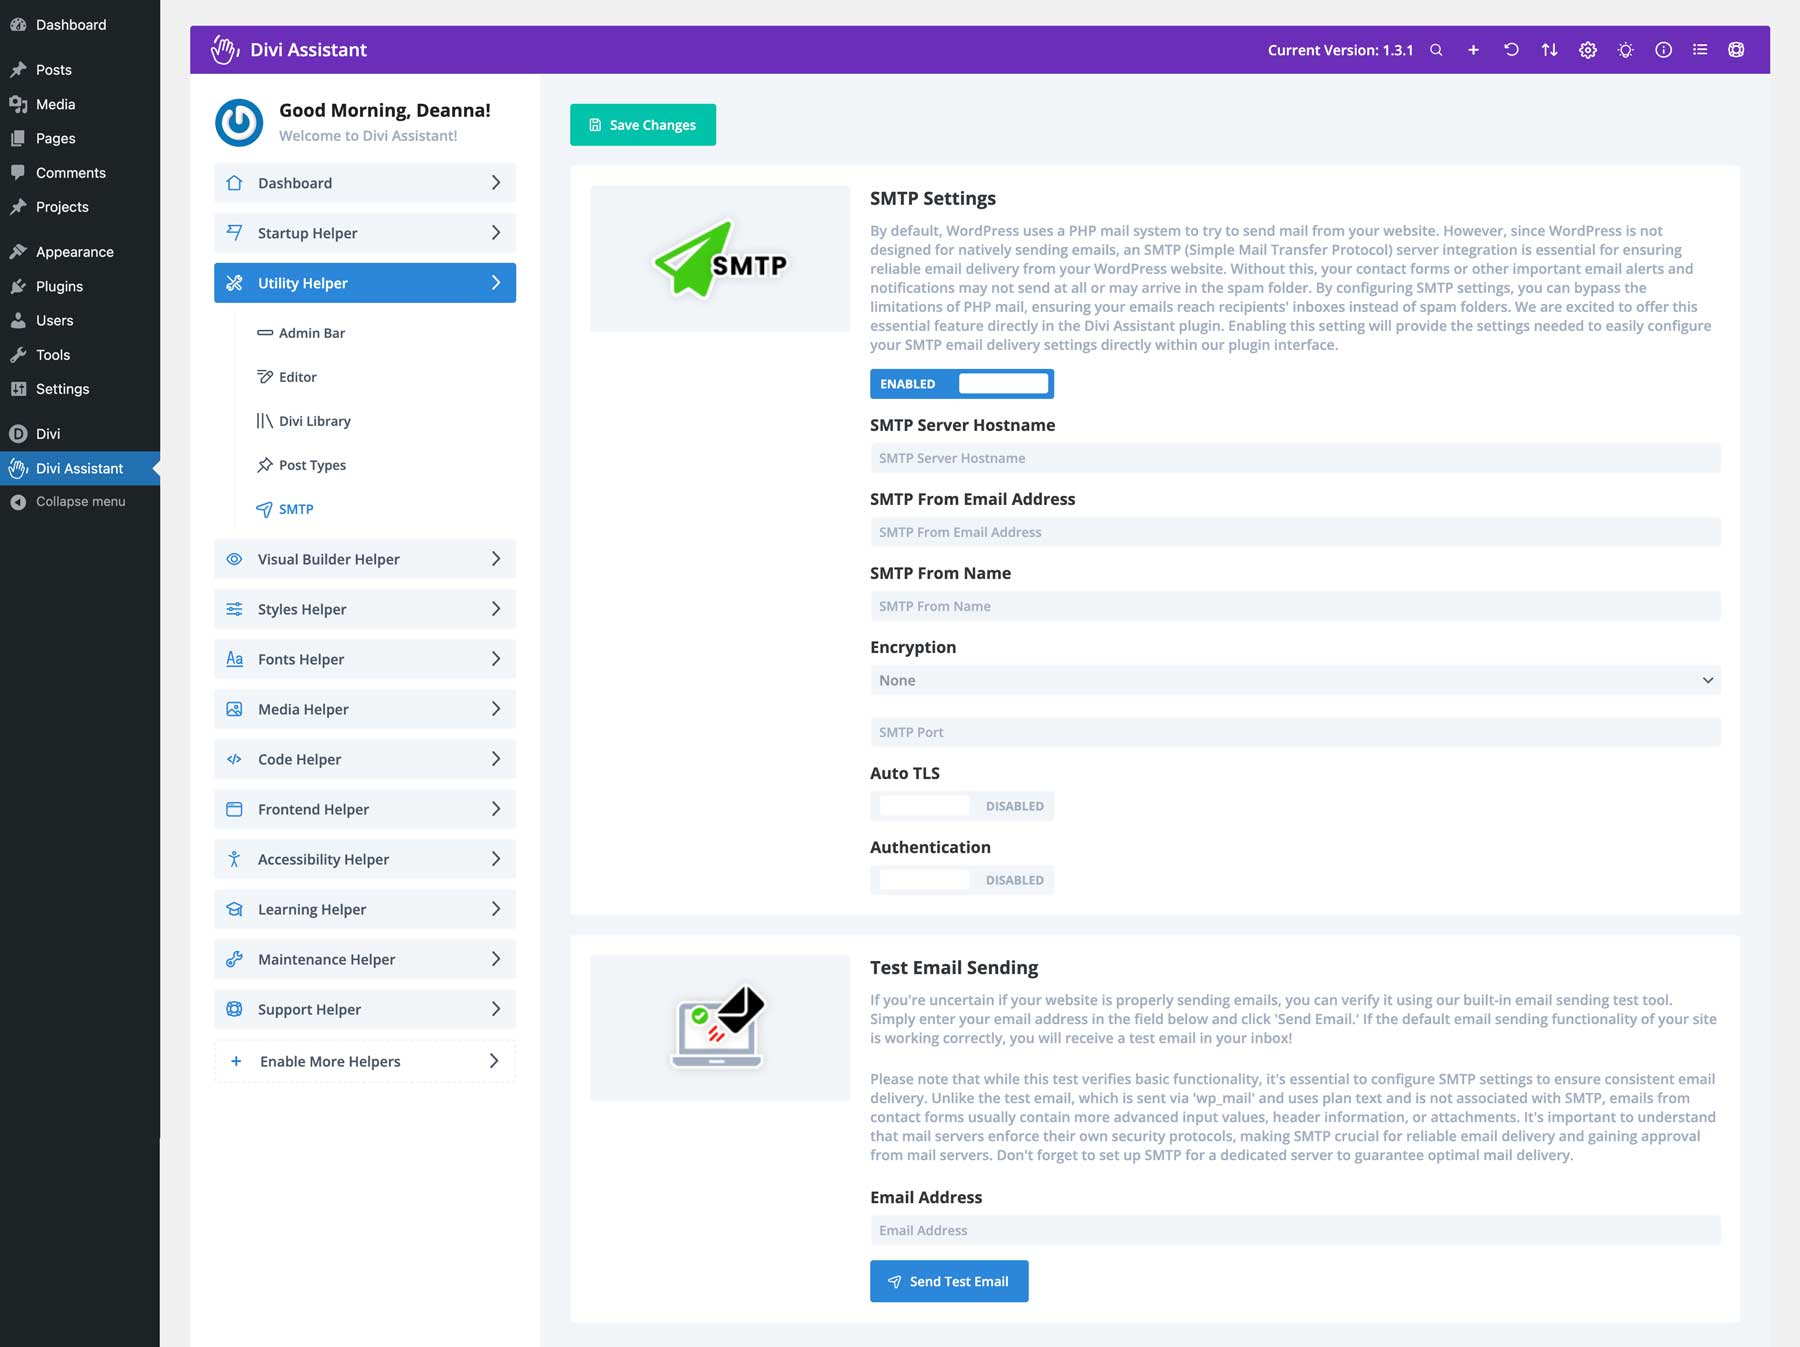
Kick PHP mail to the curb and ensure email deliverability with Divi Assistant’s built-in SMTP settings. Whether you use Google or another SMTP provider, you can add your settings, send a test email, and ensure your site will deliver email without a hitch.
Visual Builder Helper
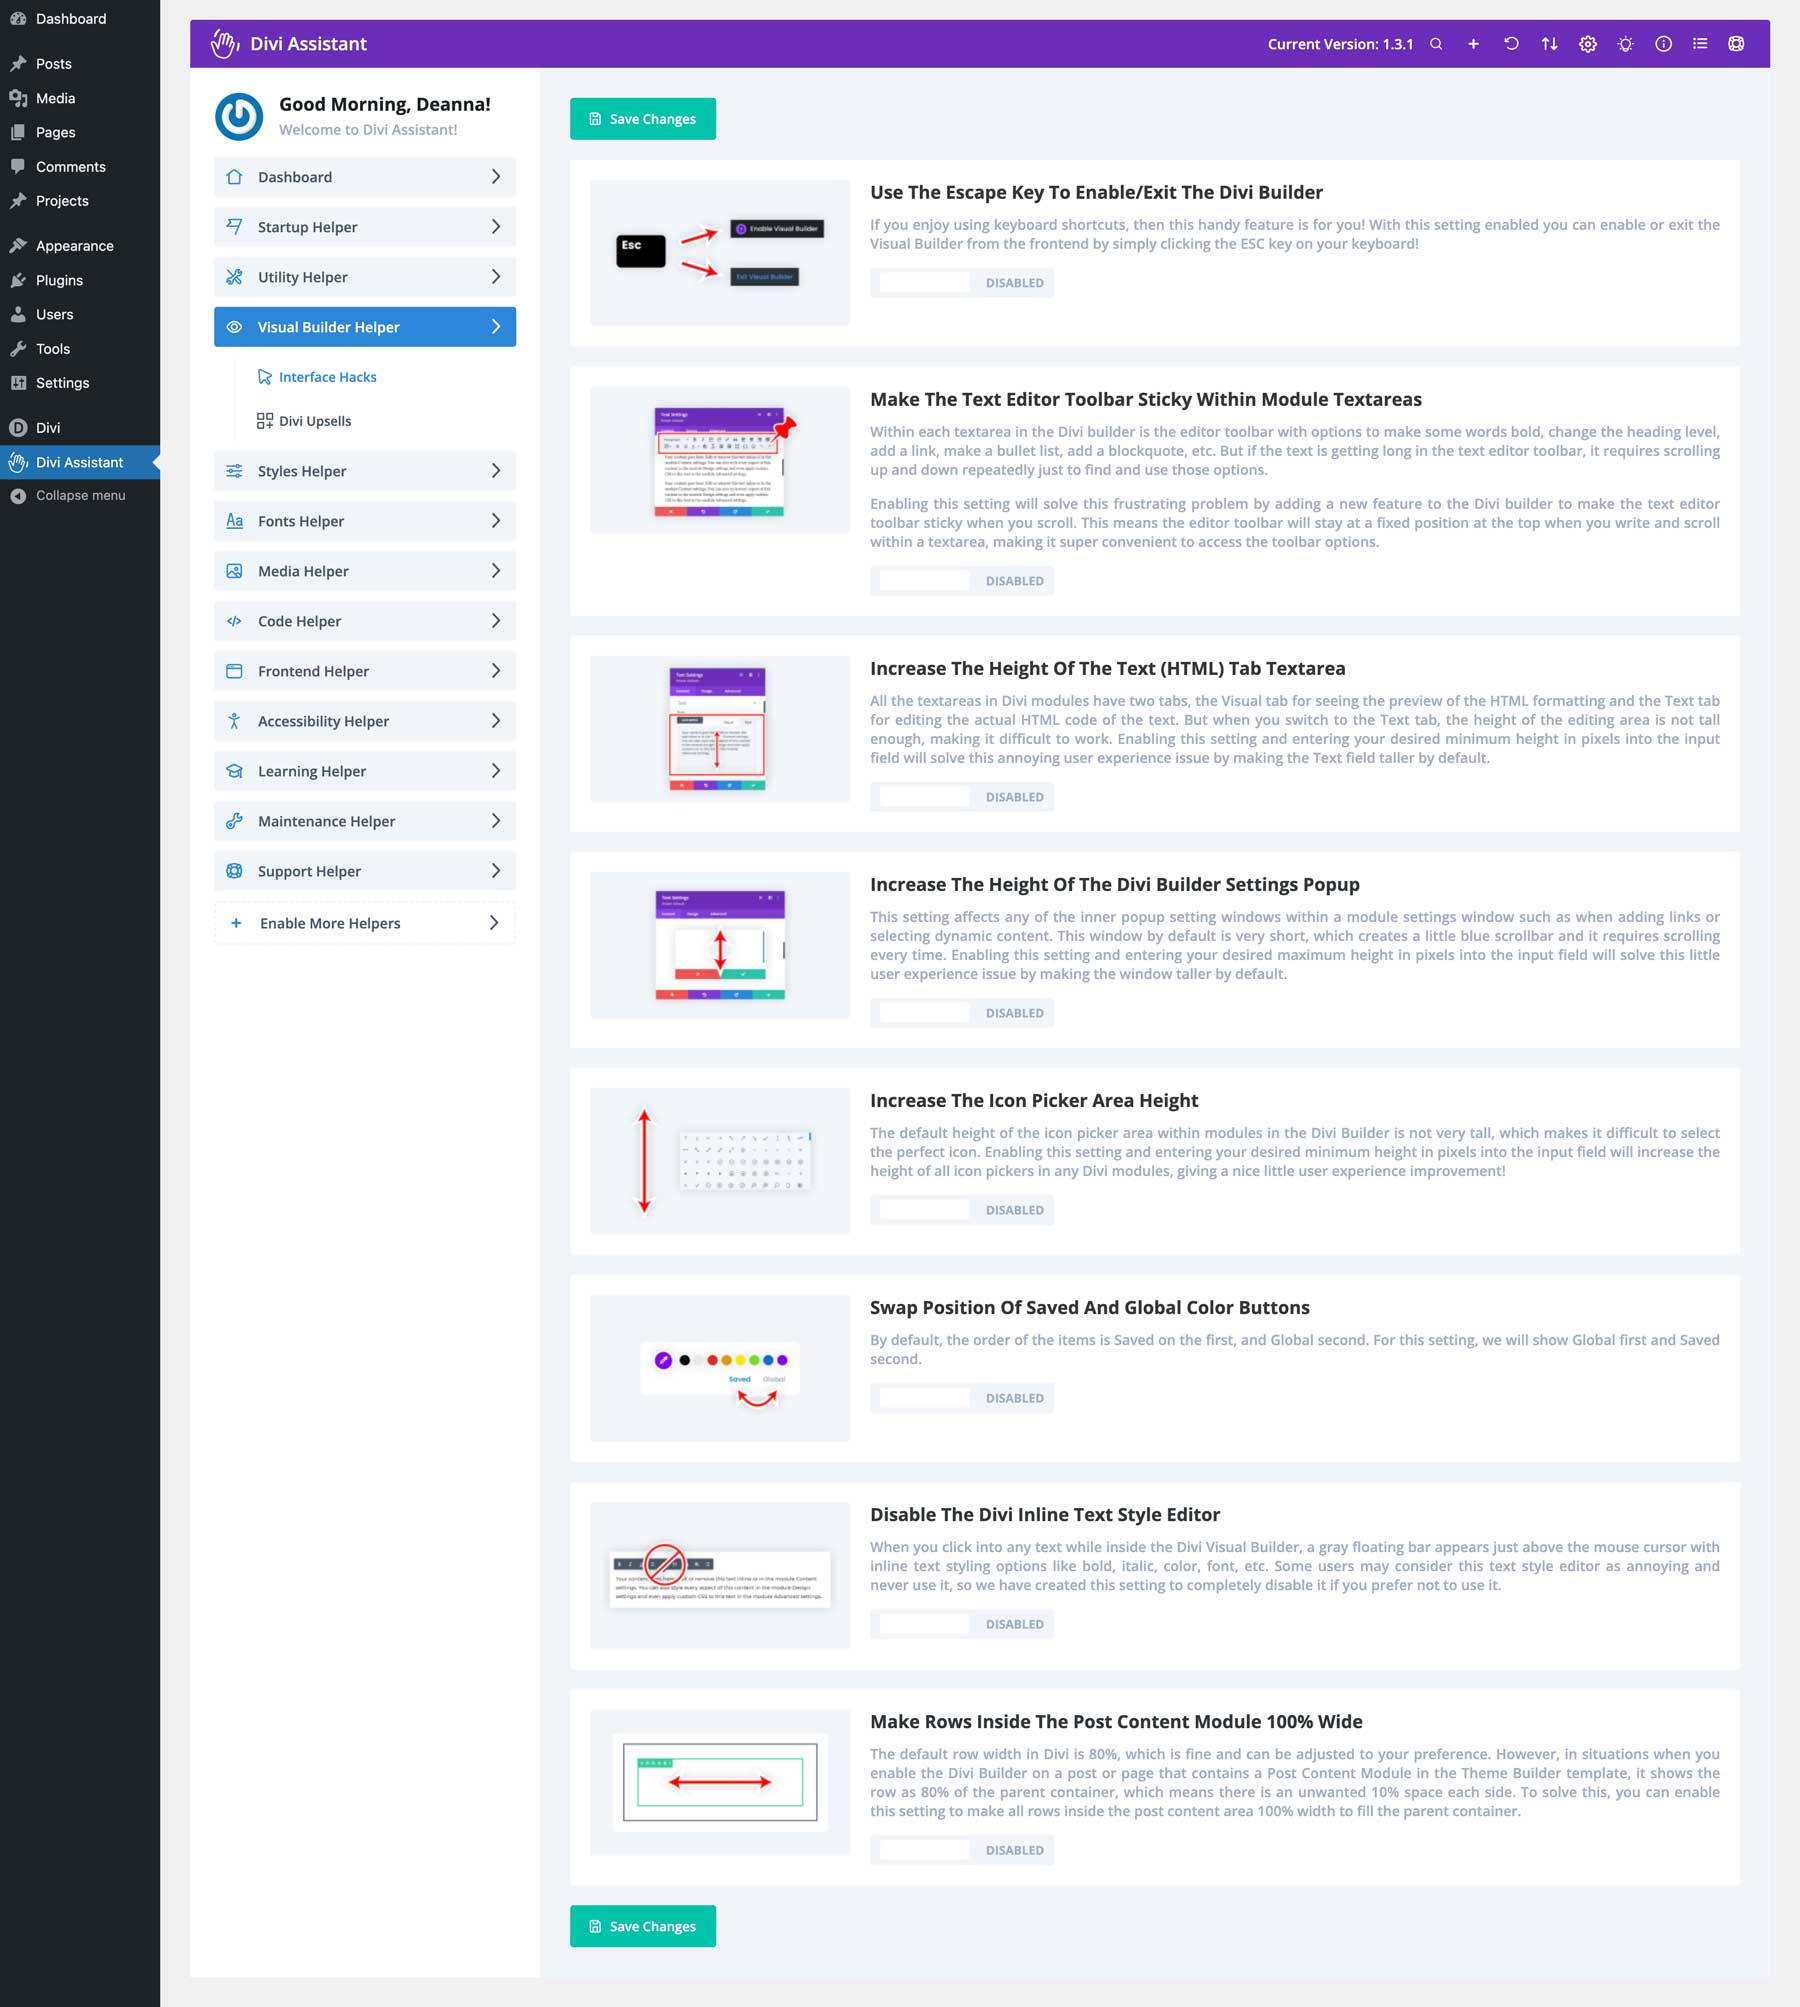
Divi Assistant includes some stellar features to help you be more productive within Divi’s drag-and-drop page builder. Some options include adding a keyboard shortcut to enable or disable the Visual Builder with the escape key and making the text editor’s toolbar sticky. For those who write blog posts or other long-form content, this is a great tool to keep you from having to scroll up to add links, insert images, and more. Divi Assistant also adds options for increasing the height of the Text Module’s text area, adjusting the height of the icon picker, and swapping the positions of saved and global colors.
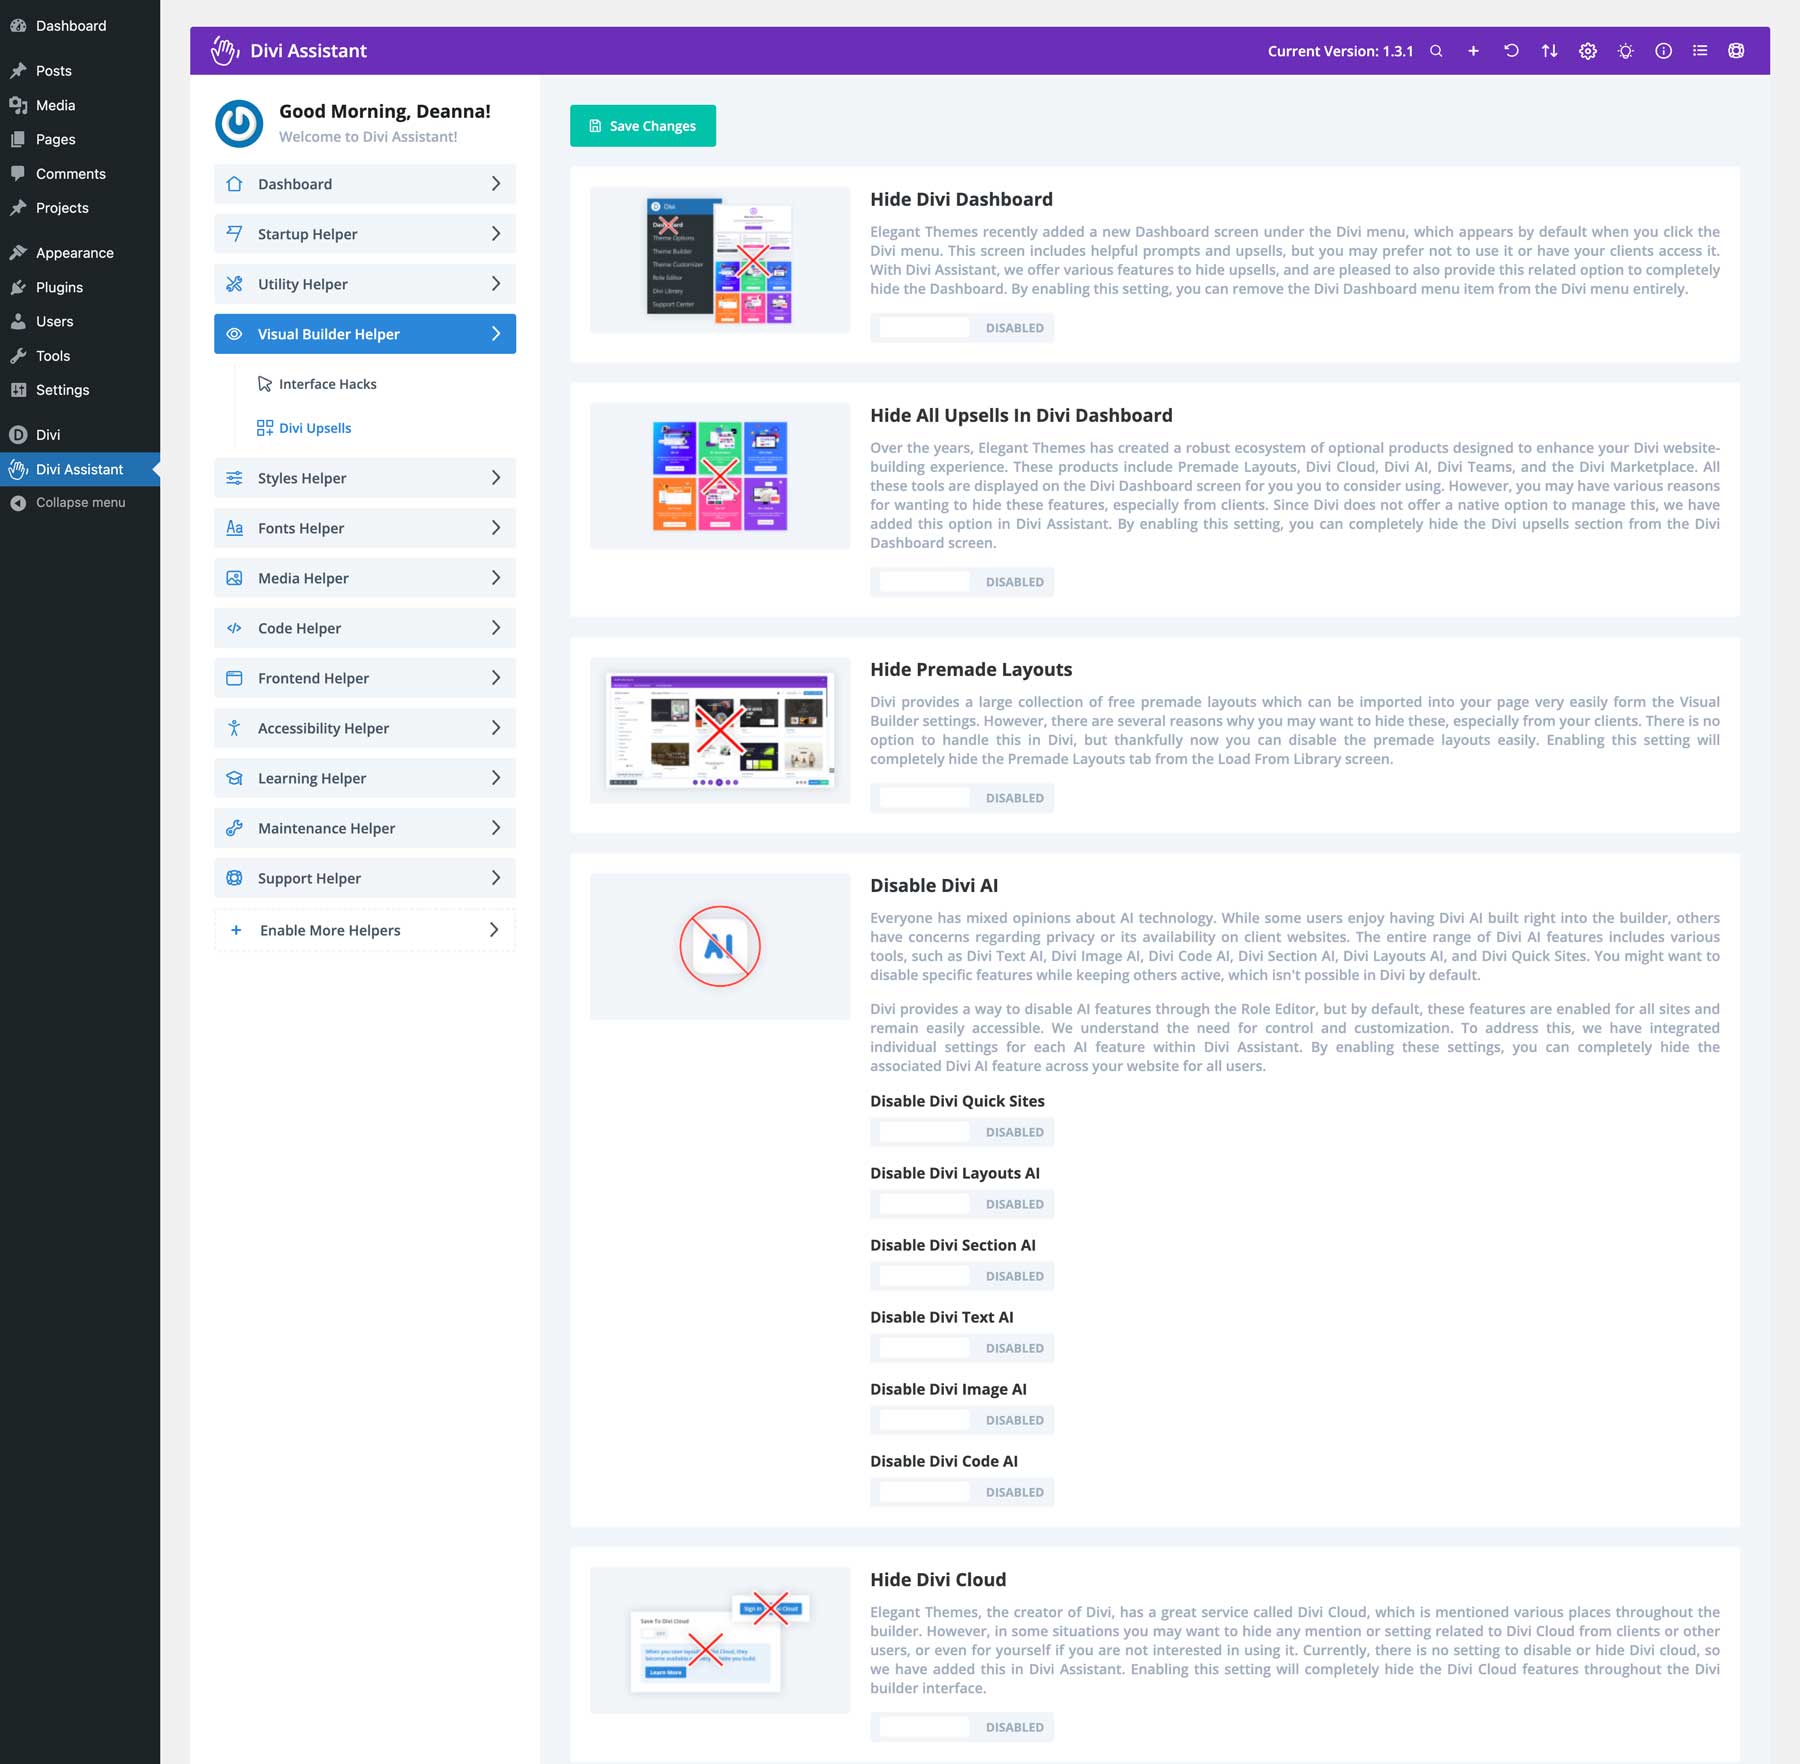
You can also make rows 100% by default, hide the Divi Dashboard and its upsells, disable premade layouts, and turn off Divi AI, Divi Cloud, or other products you aren’t subscribed to.
Styles Helper
With the Styler Helper, you can easily add and manage your global colors from the Divi Assistant dashboard. By adding that functionality, activating the Visual Builder to edit them within a post or page is unnecessary. You can also set custom styles for your headings, body text, links, bullet lists, and number lists in one convenient location. You can use this huge time-saver to set up all your Divi websites by exporting Divi Assistant settings. The best part? You can set all your styles for smaller screen sizes, ensuring a seamless browsing experience across all devices.
Fonts Helper
If you’ve wanted to use fonts within Divi other than ttf or otf, Divi Assistant has you covered. You can easily allow other font file types to be used within Divi through administrator access. A local fonts tab lets you upload custom fonts within the Divi Assistant dashboard. That way, you don’t have to leave the dashboard to activate the Visual Builder.
Media Helper
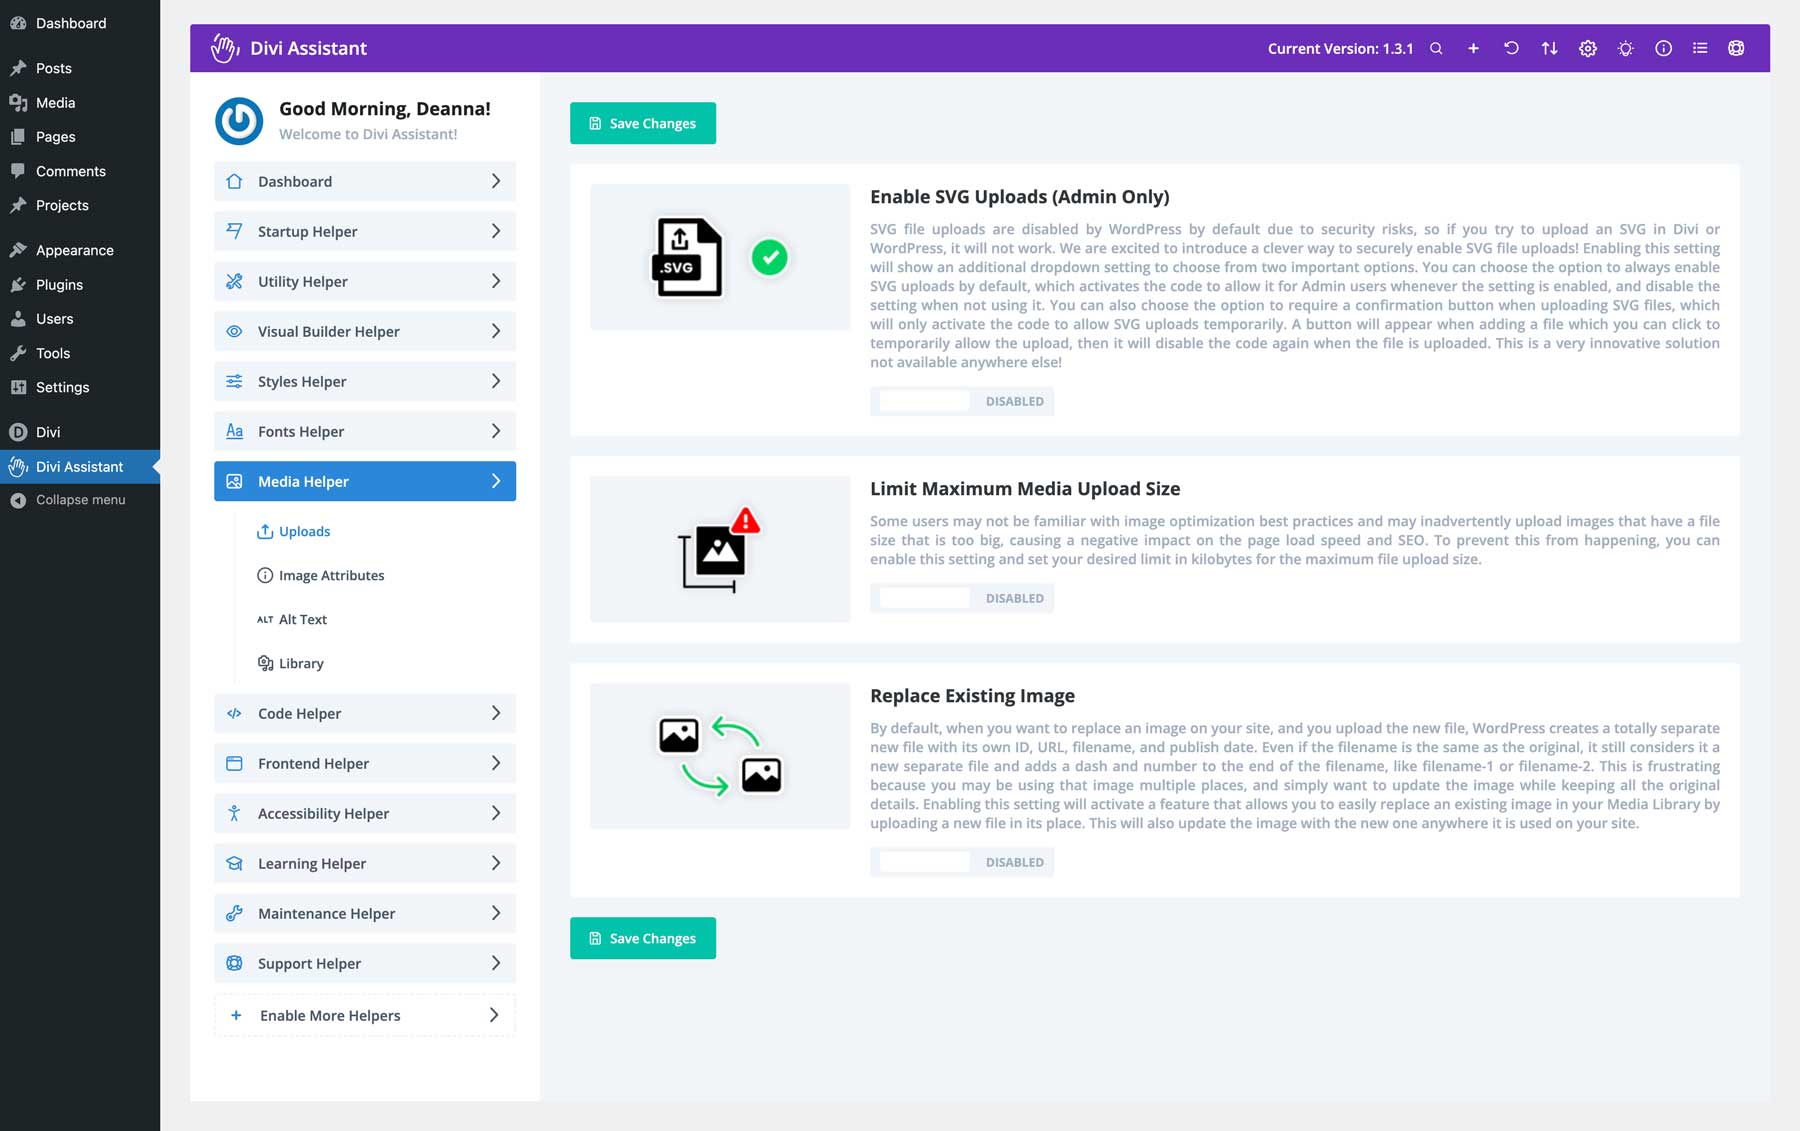
You can securely upload SVG files directly into Divi via the Media Library through the Divi Assistants’ Media Helper tab. You can choose between always allowing them and toggling them off when you don’t. Other tools include setting a maximum image upload size, which is great when multiple users are responsible for creating content on your site. After all, uploading large image files quickly kills your site’s speed and performance. You can also automatically replace images on your site. WordPress creates a new image file when you replace an existing one, even if the filenames match. Divi Assistant allows you to directly replace existing images, updating them wherever they are used on your site.
You can also hide tooltips on images, force Divi to automatically use alt text assigned to images in the media gallery, and use image titles as alt tags if one isn’t defined. Another useful feature of Divi Assistant is the ability to disable the load more button in the media gallery and replace it with an infinite scroll.
Code Helper
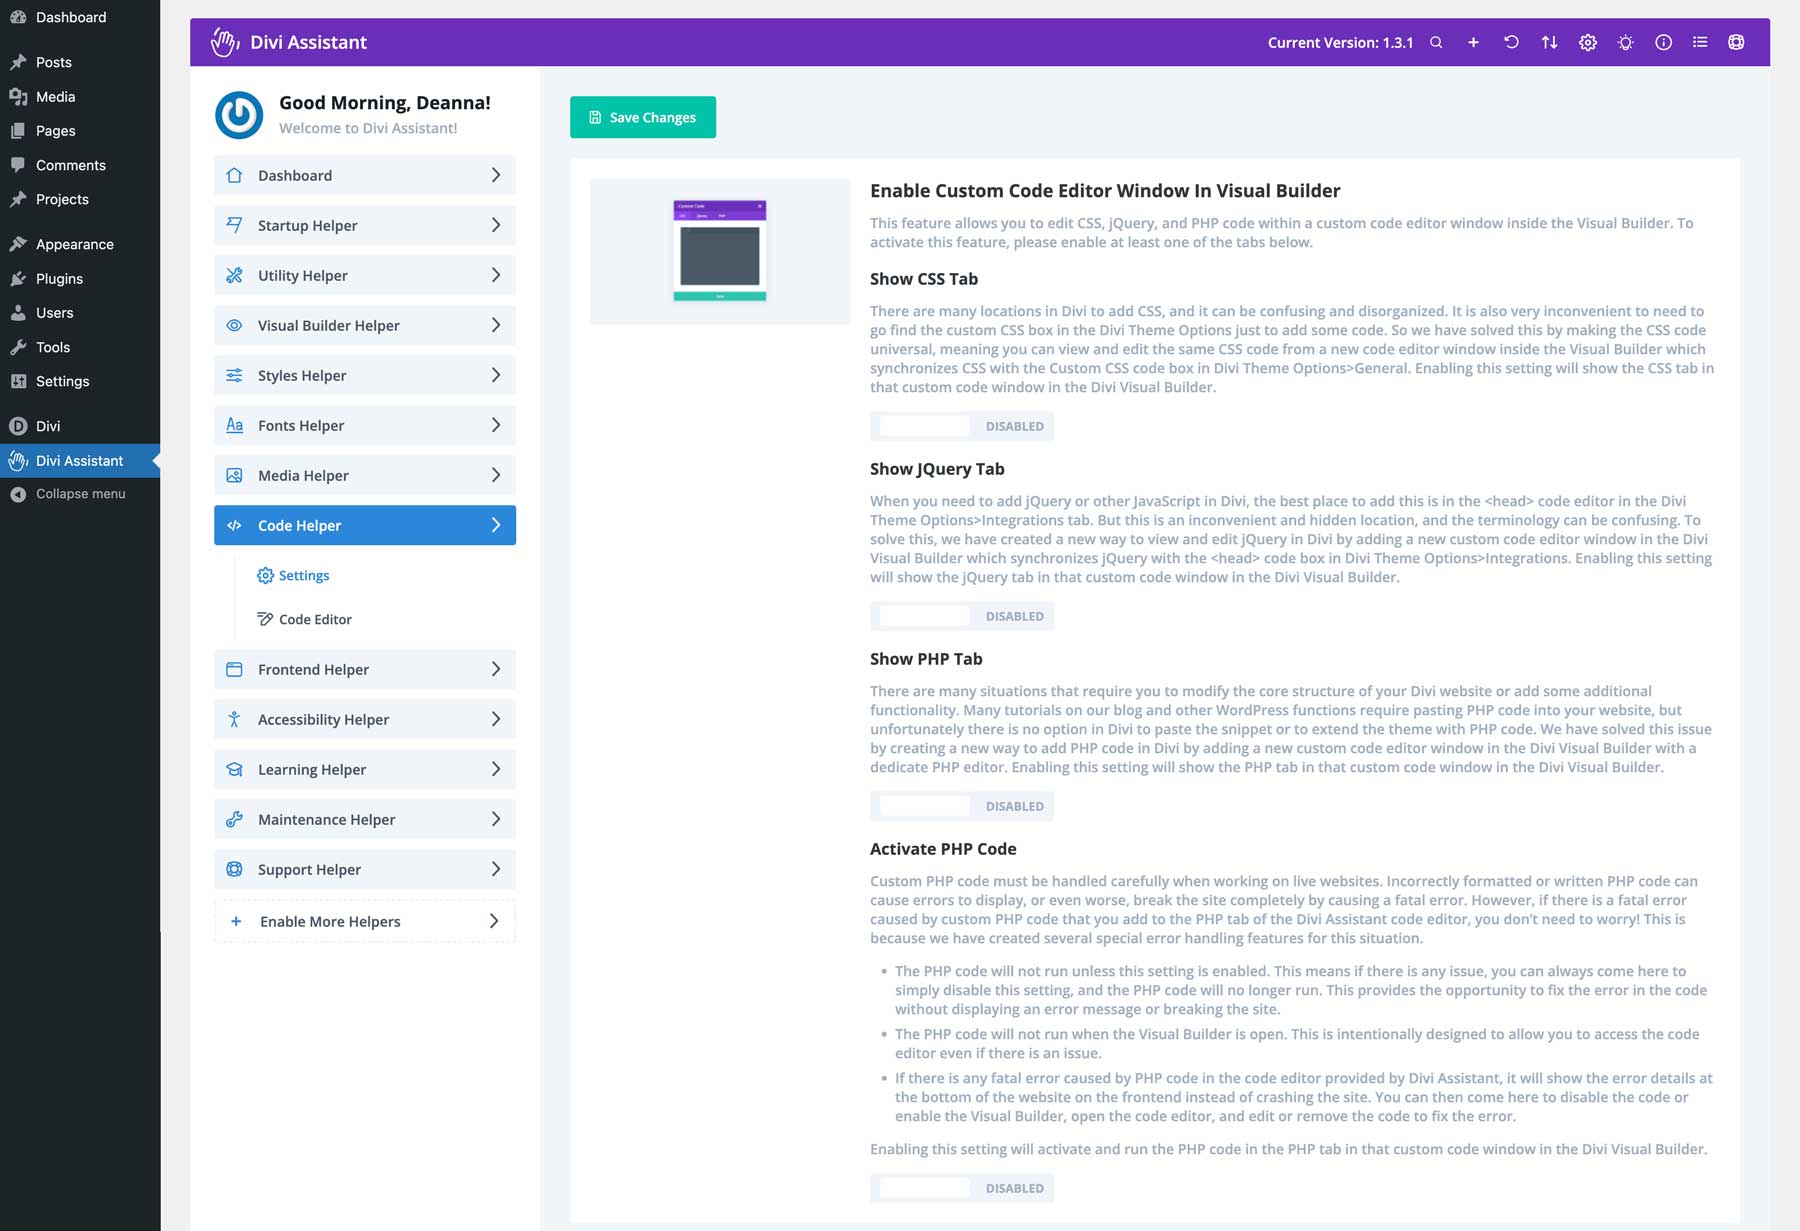
Divi Assistant introduces a new code editor window within the Visual Builder. This window allows for universal CSS, jQuery, and PHP code editing, eliminating the need to navigate to separate locations in the Divi Theme Options. The plugin also includes error-handling features to prevent fatal errors caused by custom PHP code, making it safer to experiment with code modifications.
Divi Assistant also provides a convenient way to view code as you write it. Divi’s Theme Options custom CSS code editor isn’t expandable by default. With settings in Code Helper, you can set a minimum height or drag the code areas to enlarge them, giving you more room to code.
Frontend Helper
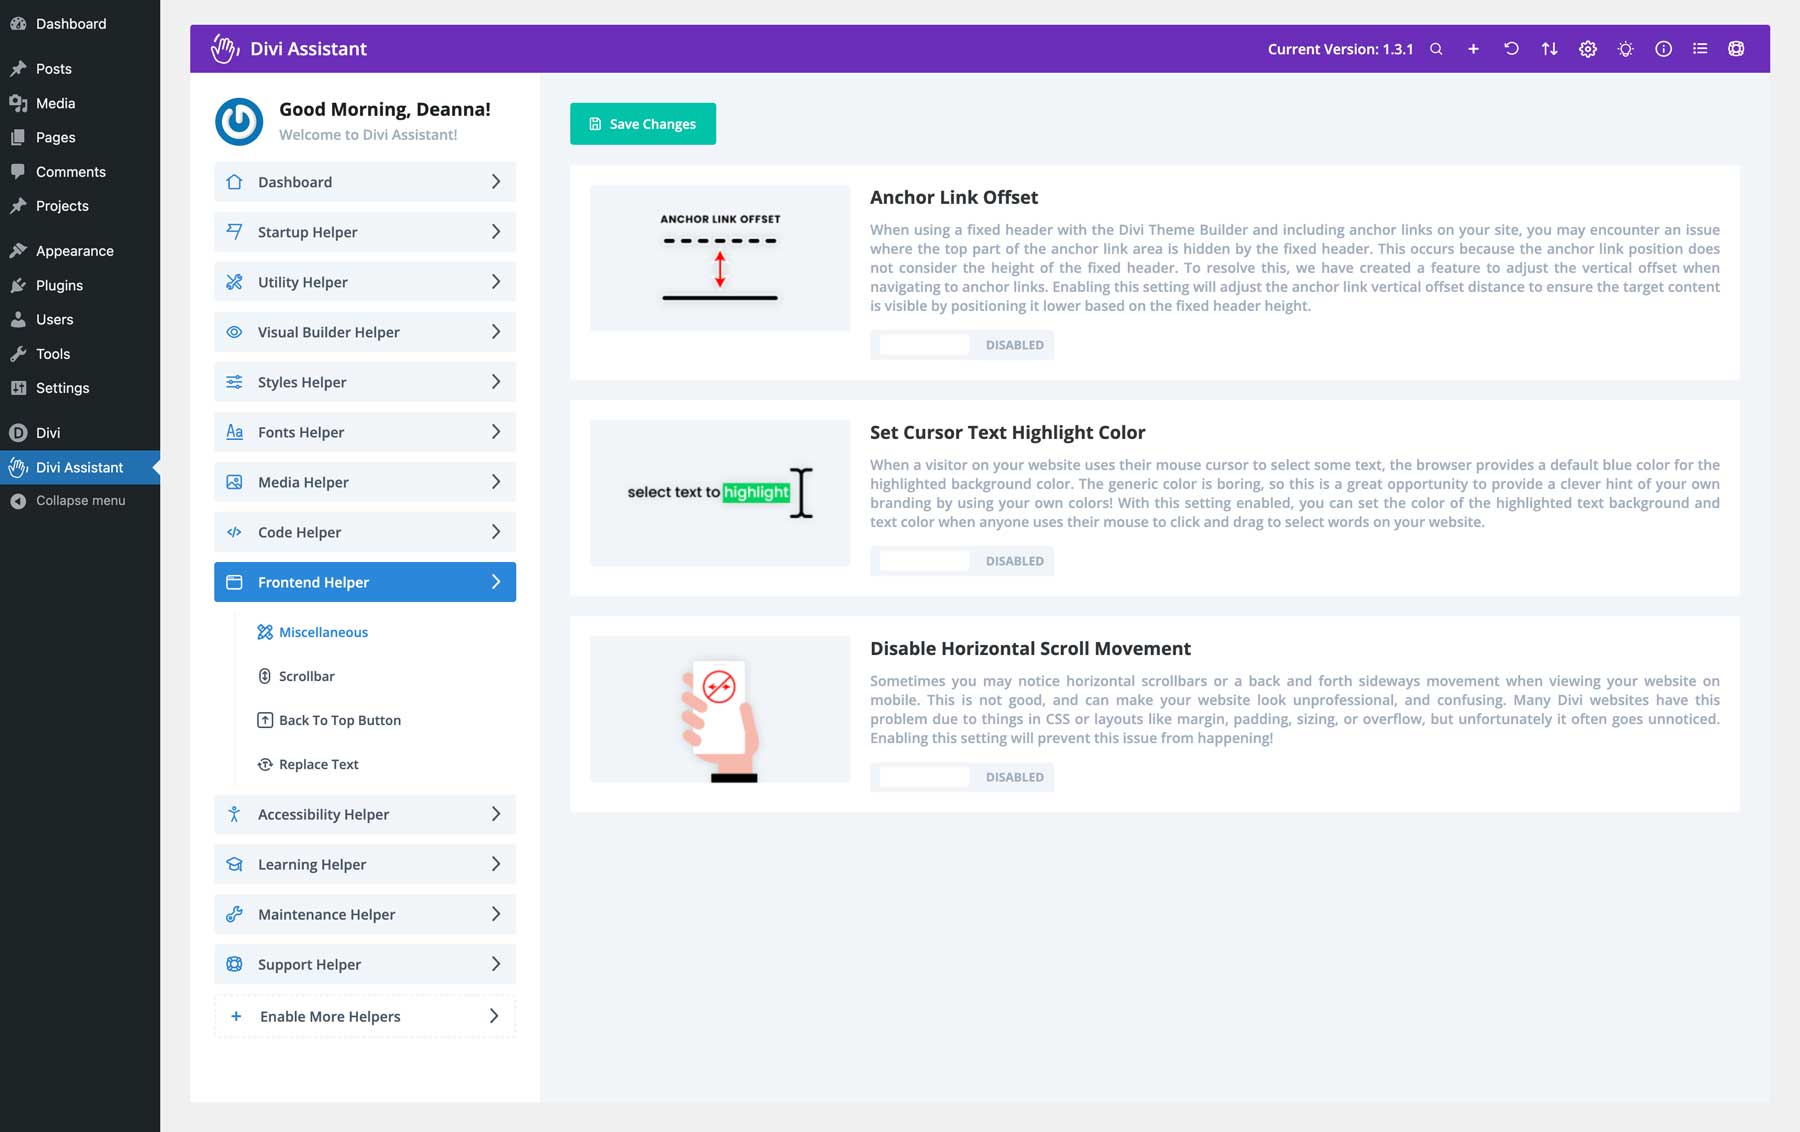
The Frontend Helper is great for customizing certain features of your website. For example, You can fix common errors like missing anchor links in fixed headers. You can also change the text highlight color to match your brand. There’s also a feature for fixing horizontal scroll issues on mobile devices.
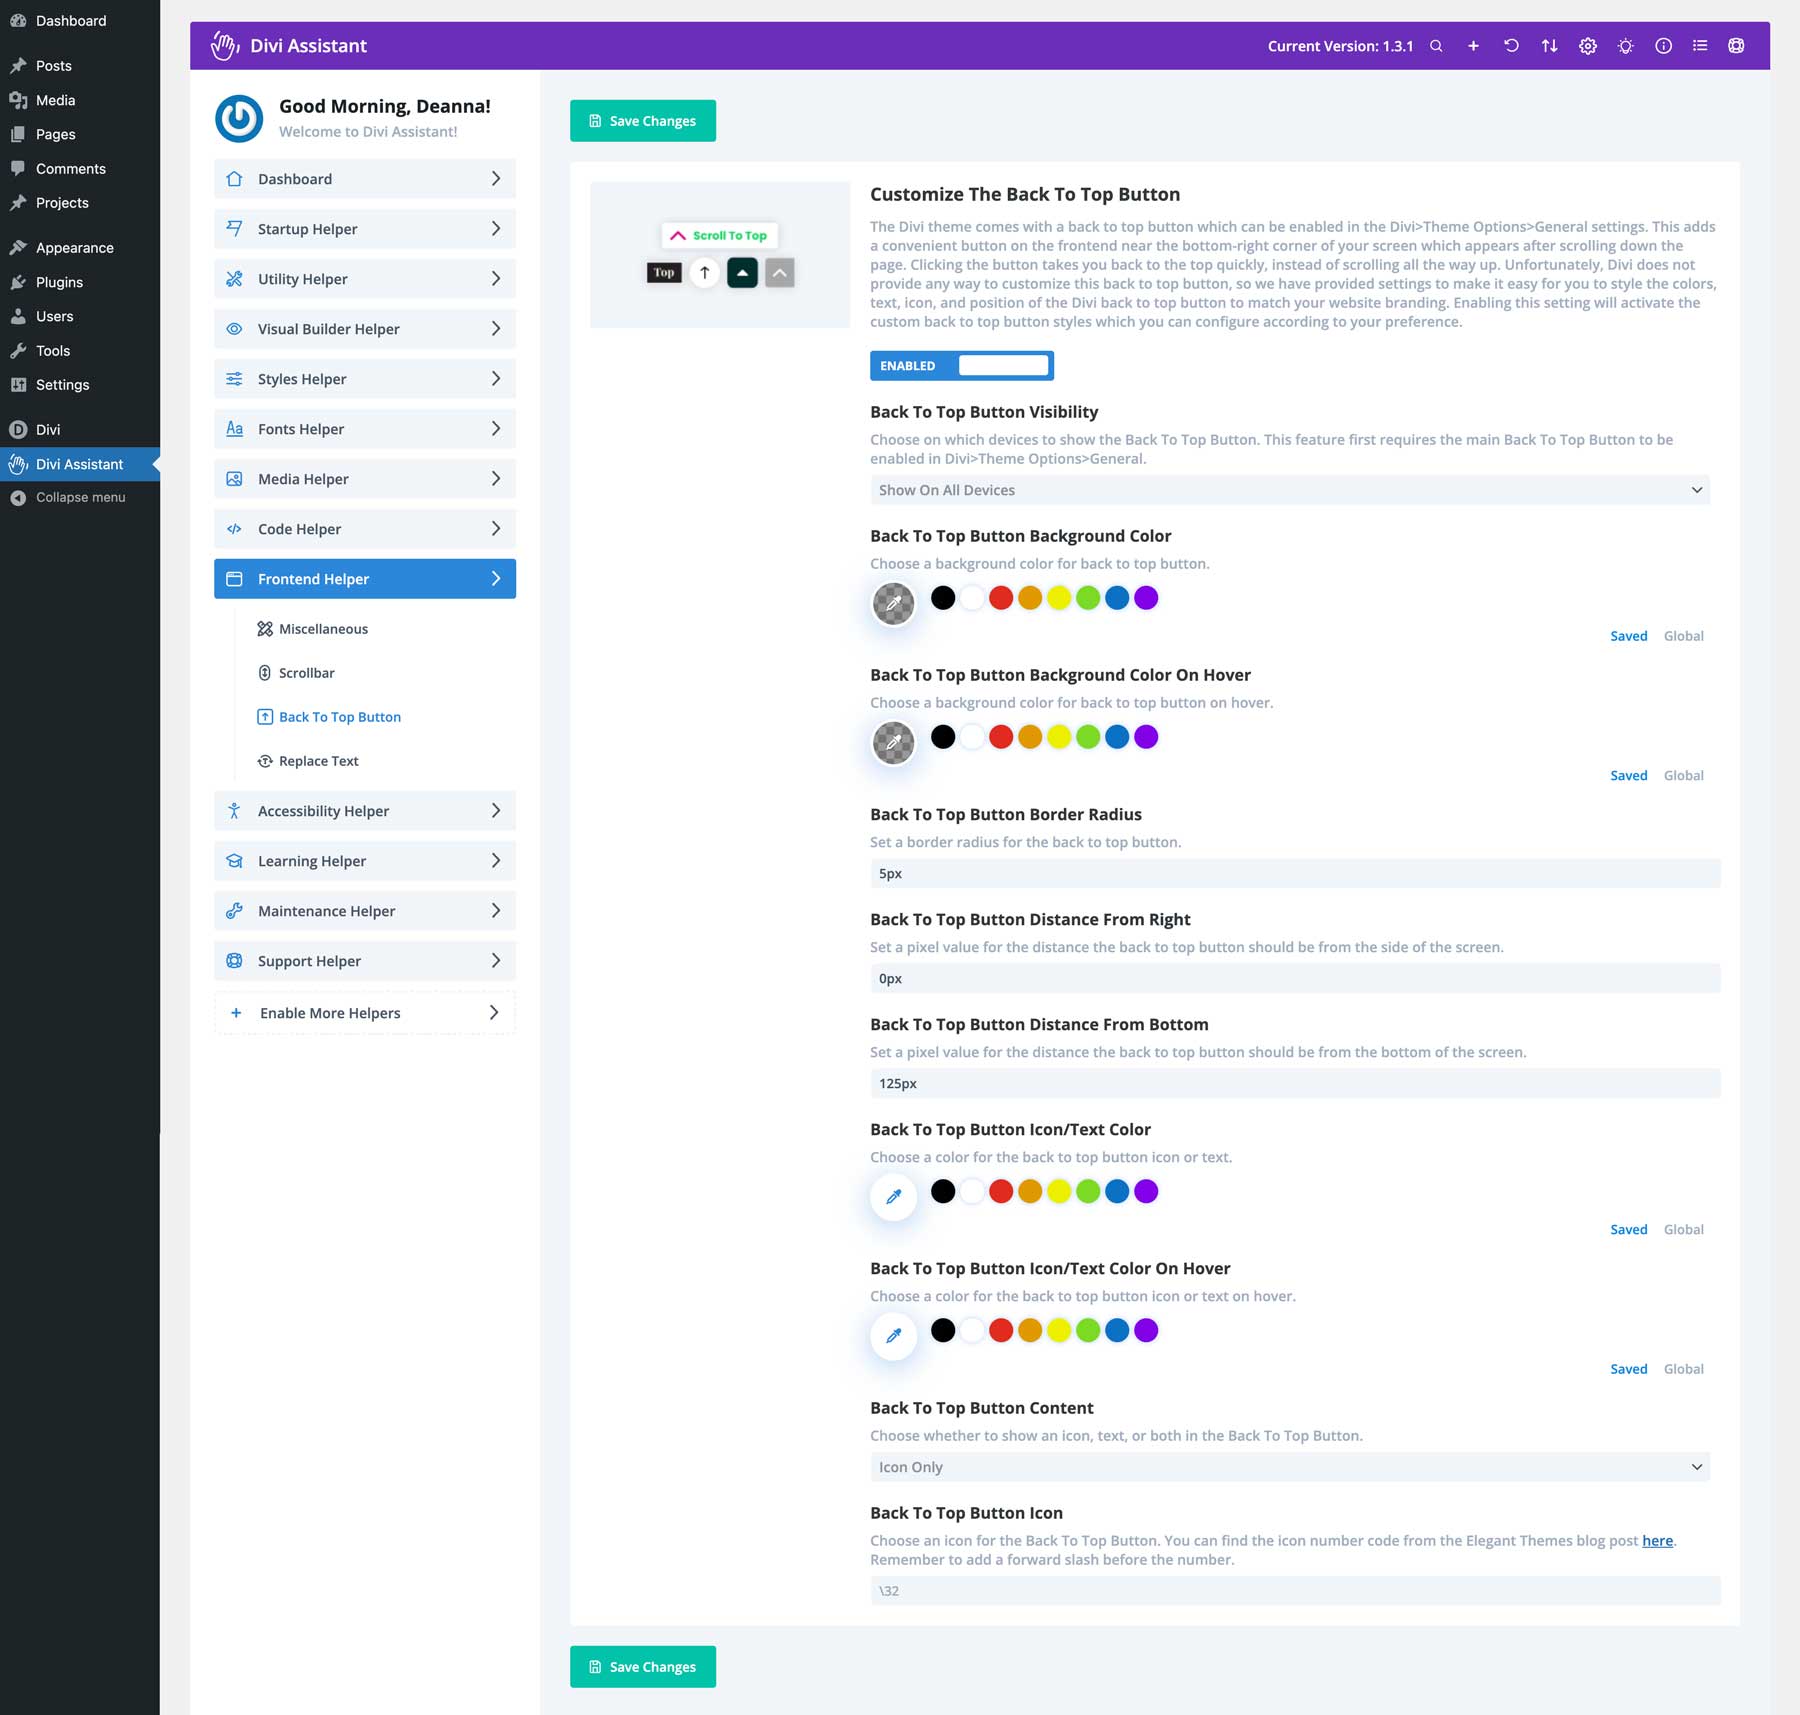
Other features within the Frontend Helper include the ability to customize the browser scroll bar. You can easily adjust the width, change the foreground and background colors, and adjust the border radius. Similarly, you can customize the built-in back-to-top button that comes standard with Divi. You can adjust responsive options, change the colors, add a border radius, and more.
Accessibility Helper
Having a website accessible to all users is crucial for inclusivity and how you appear in search engines like Google. Divi Assistant addresses this by adding accessibility features to your Divi website. Adding focusable support, keyboard navigation outlines, and ARIA attributes ensures your website is easy for everyone to use, including those with disabilities.
Divi Assistant optimizes Divi Modules for screen readers and other assistive technologies. By setting icons as ARIA hidden, adding a skip navigation link option, and fixing duplicate menu IDs, you can ensure your site’s navigation is intuitive. Furthermore, a browser pinch and zoom feature ensures your website is usable on all devices. Another great feature is the Tota11y button, which allows developers to identify accessibility issues quickly so they can be addressed.
Learning Helper
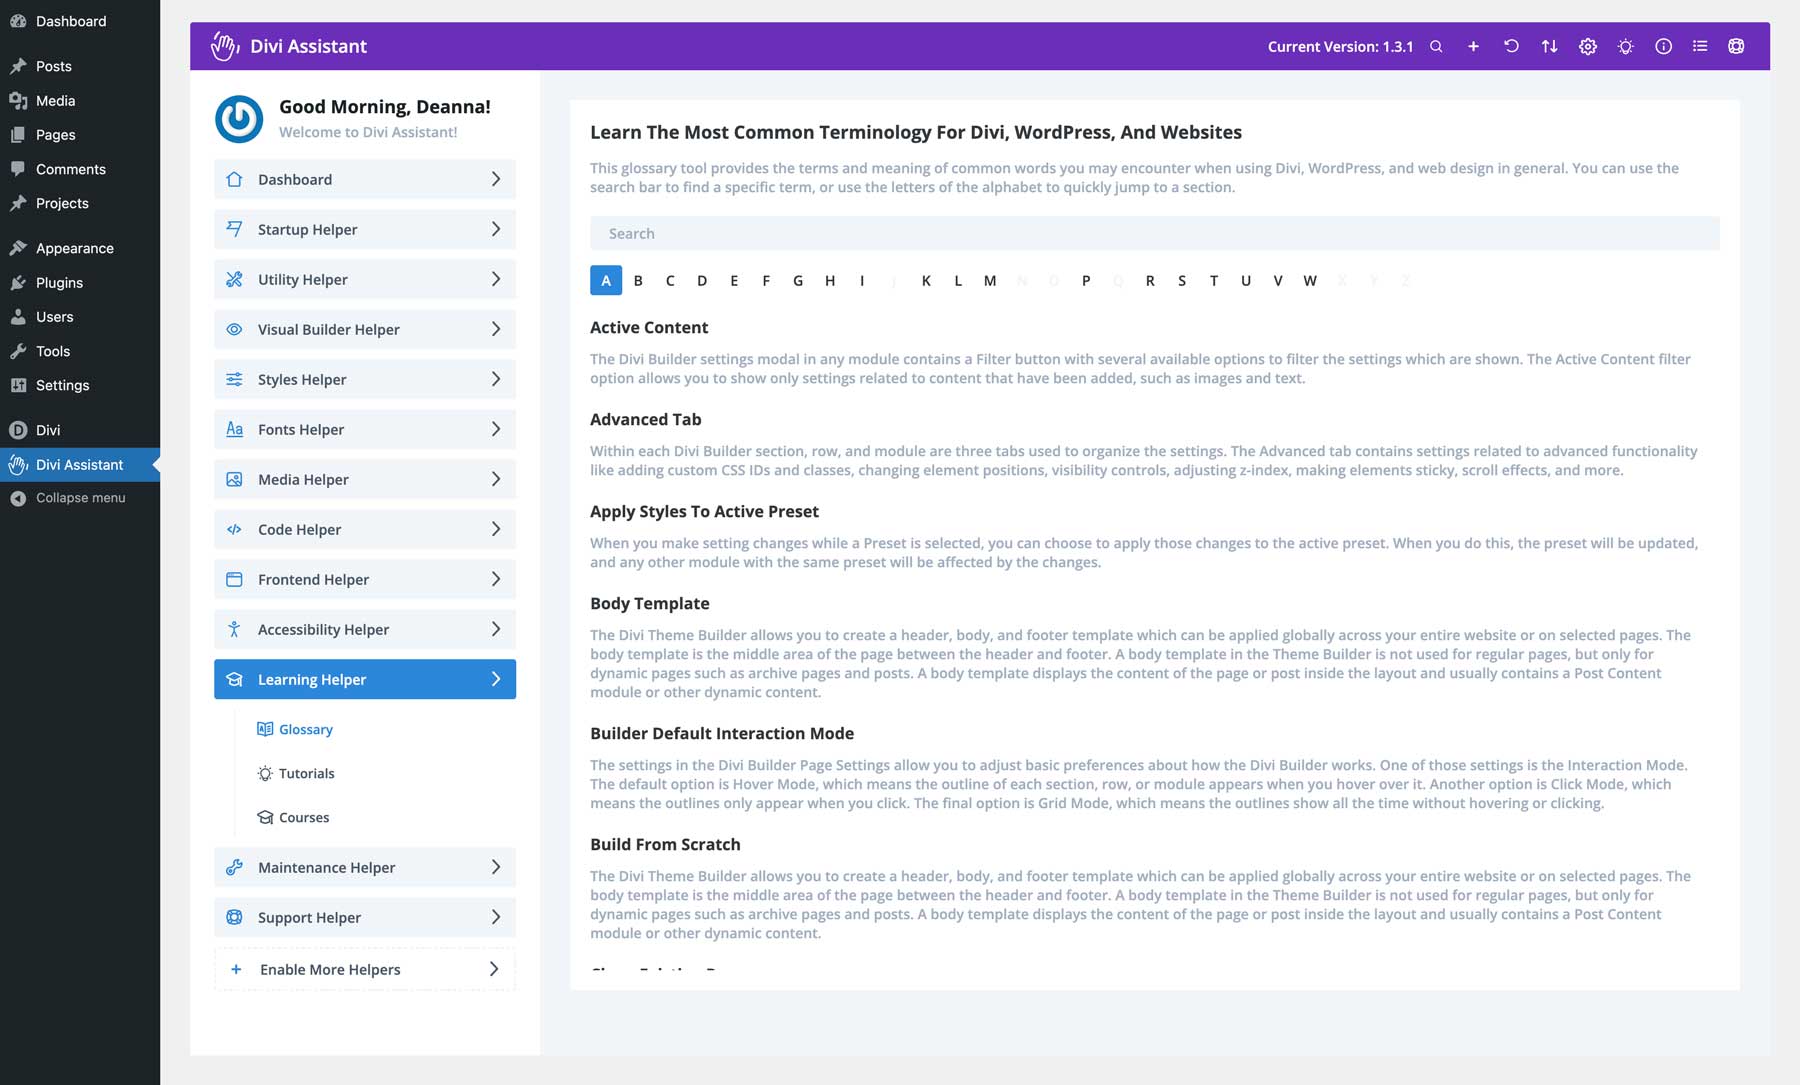
The Divi Assistant plugin also has an incredible Learning Helper designed to highlight the most common terms associated with Divi, WordPress, and websites in general. It has an extensive glossary with all the necessary definitions and a useful search bar to find exactly what you’re looking for.
Maintenance Helper
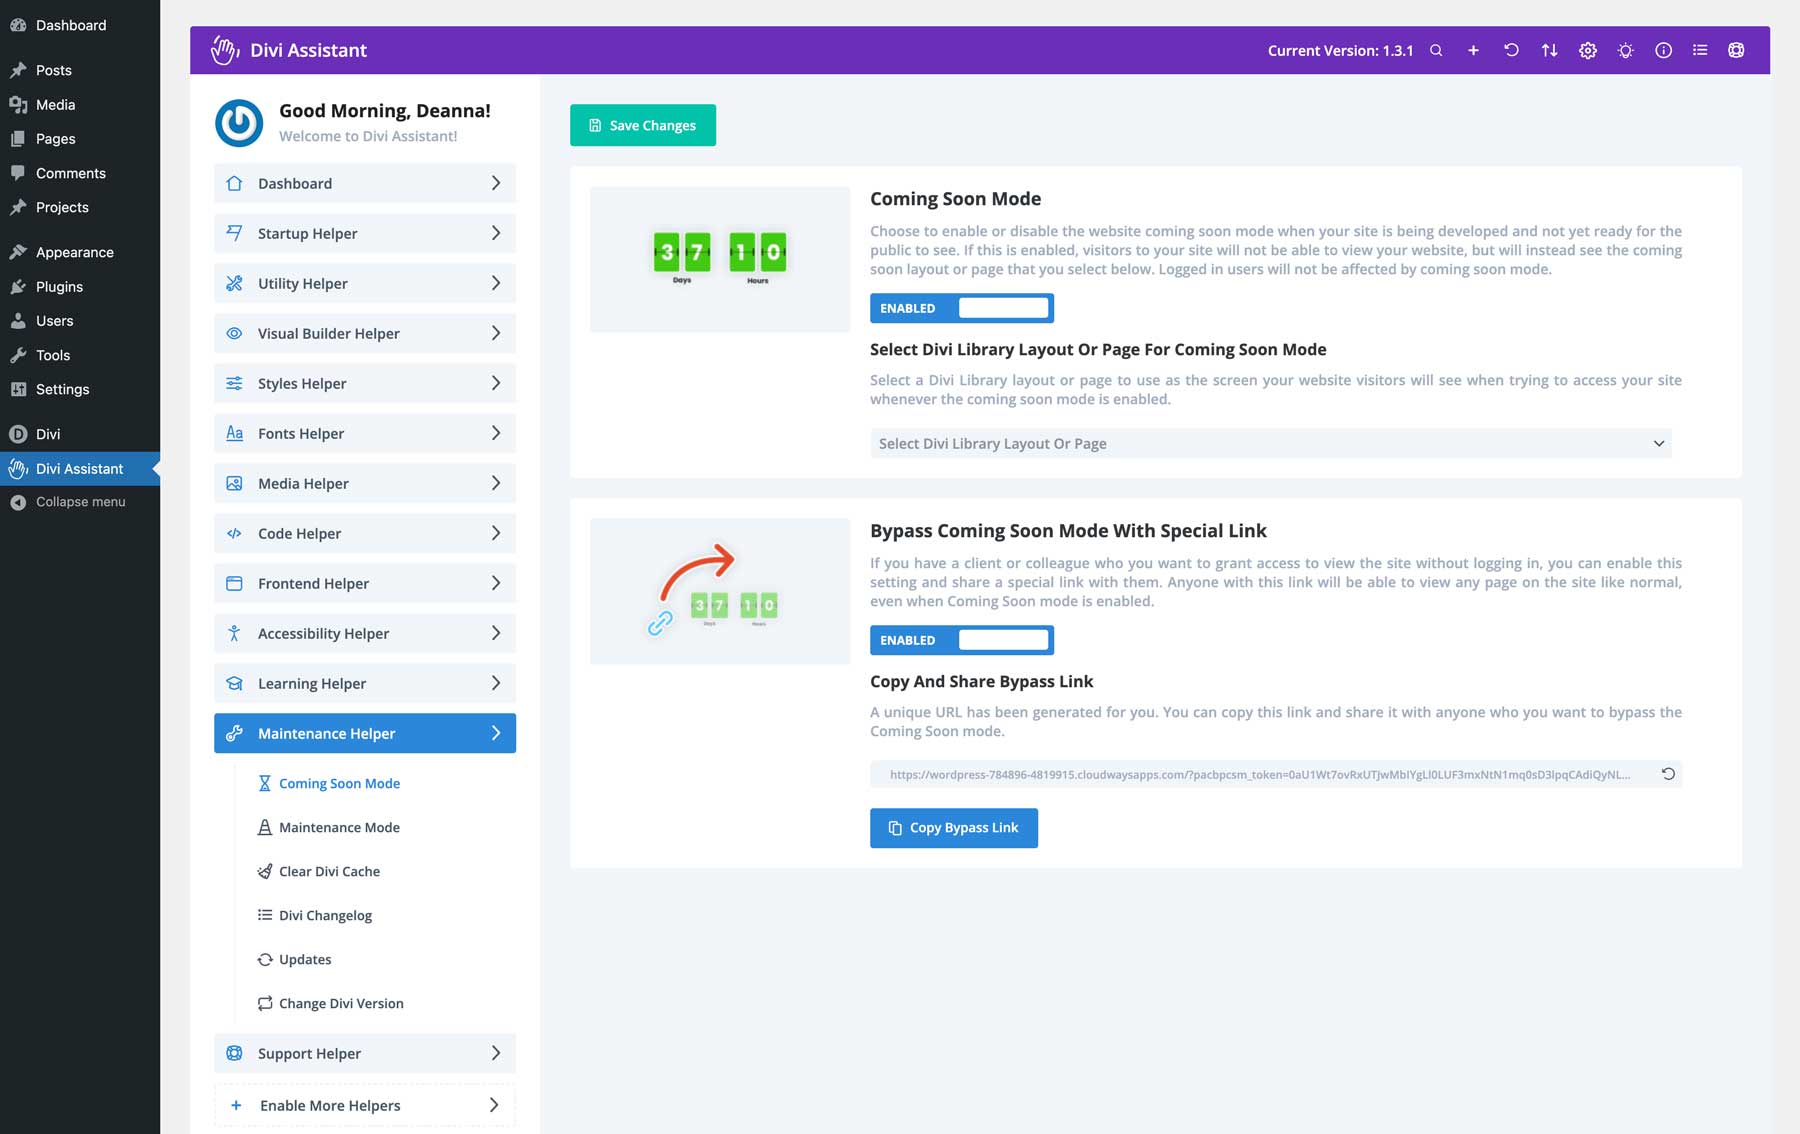
Want to keep your website under wraps until it is ready for primetime? With the Maintenance Helper, you can! The Coming Soon feature allows you to create a professional, branded Coming Soon or Maintenance page while your site is under construction. You can easily create the layout using the Visual Builder (or a premade layout) and link to it in Divi Assistant’s settings. A Coming Soon bypass link option lets you grant permission to certain users who may be working alongside you.
Divi Assistant has a built-in caching feature that clears the Divi static CSS cache on a schedule. Additional options include assigning rules for clearing the cache, whether it’s every time someone uses the Visual Builder or when a plugin or theme is updated. You can also add buttons for these actions directly to the WordPress admin bar, saving you the trouble of navigating the Divi Assistant’s settings to manage Divi’s cache.
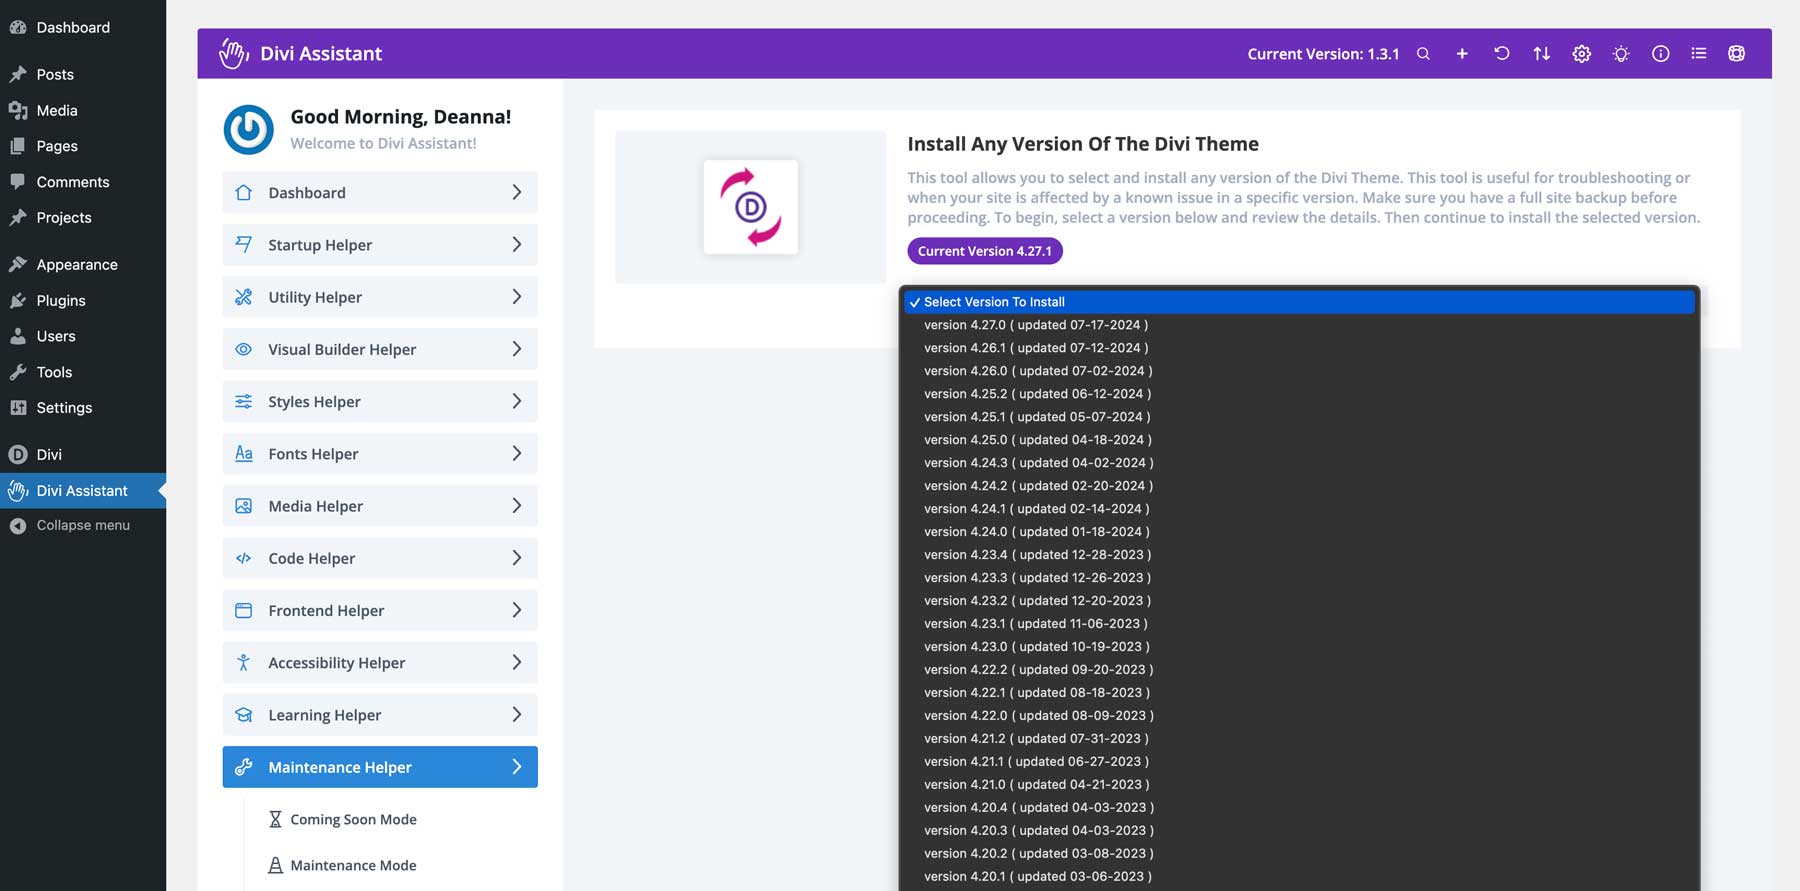
Maintenance Helper also includes an easy-to-read Divi changeling that provides information on the latest version of Divi and recent updates. Speaking of updates, you can easily disable and hide WordPress automatic theme and plugin updates, prevent future default WordPress themes from being installed, or roll Divi back to a previous version.
Support Helper
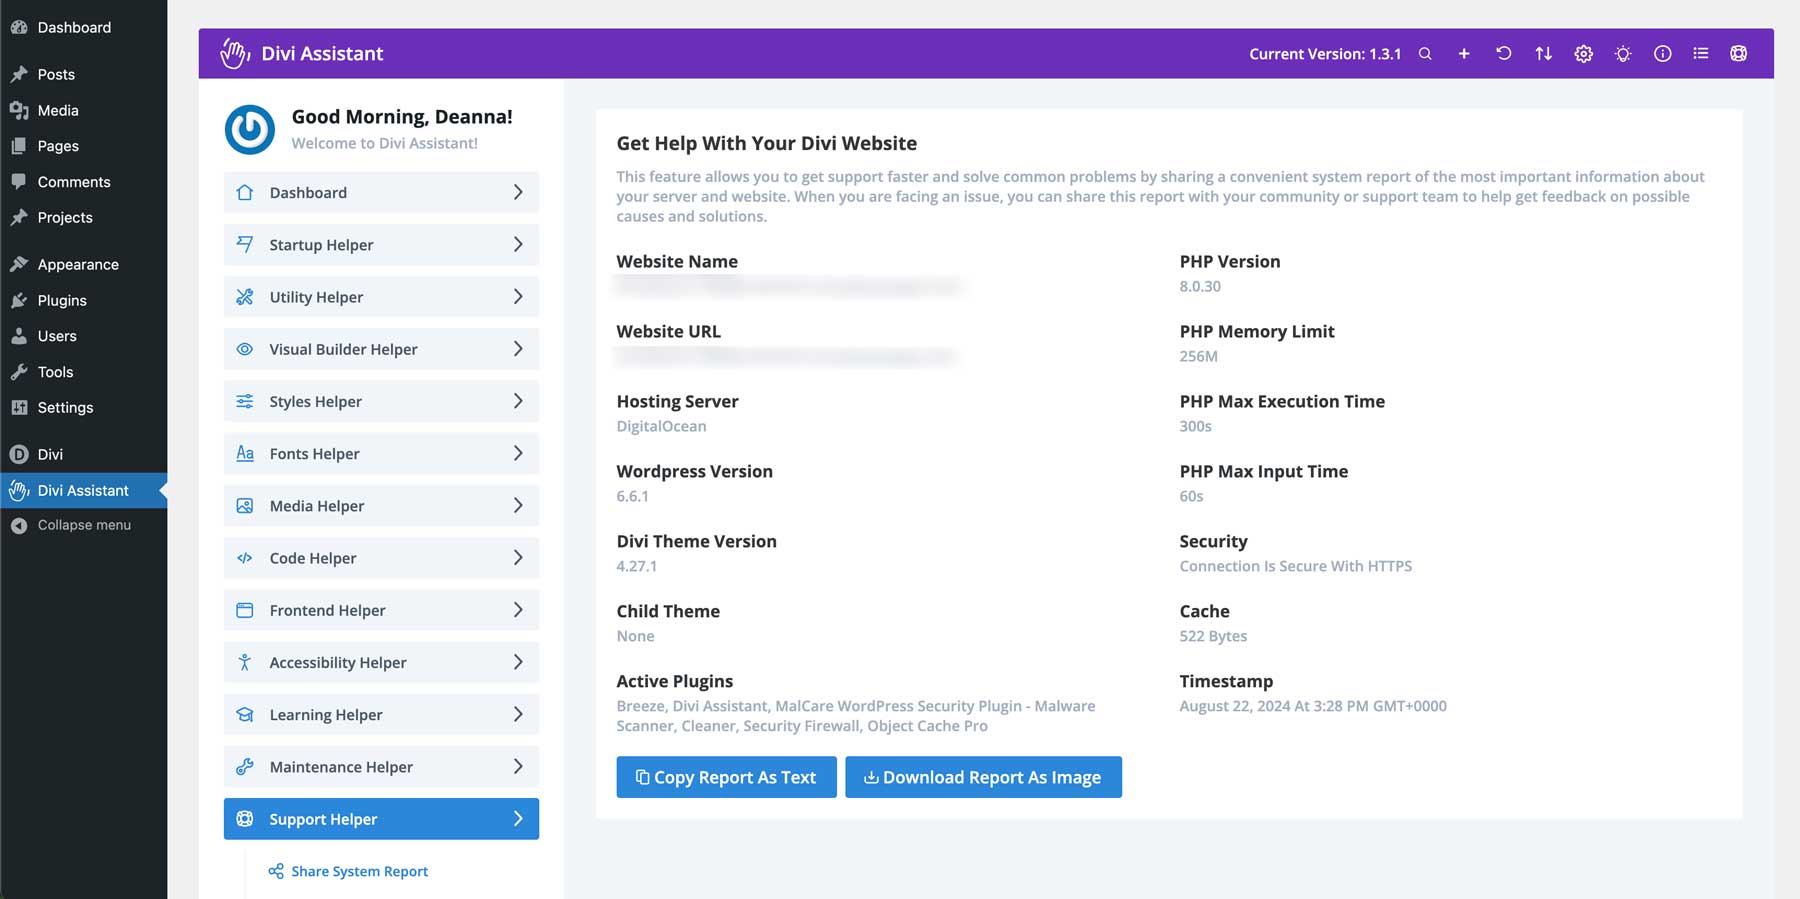
Lastly, the Support Helper section of Divi Assistant gives you an overview of your website and its status. It puts critical information at your fingertips, including PHP parameters for memory limit, max execution time, and max input time. You’ll also get an overview of the plugins installed on your site, the version of WordPress you’re using, and your hosting server. If you encounter a problem and require support from Elegant Themes or your hosting provider, you can easily download a system report or email it to a support team member for assistance.
How to Use Divi Assistant
Now that you know how amazing Divi Assistant is, let’s walk through installing and using the plugin.
Install Divi Assistant
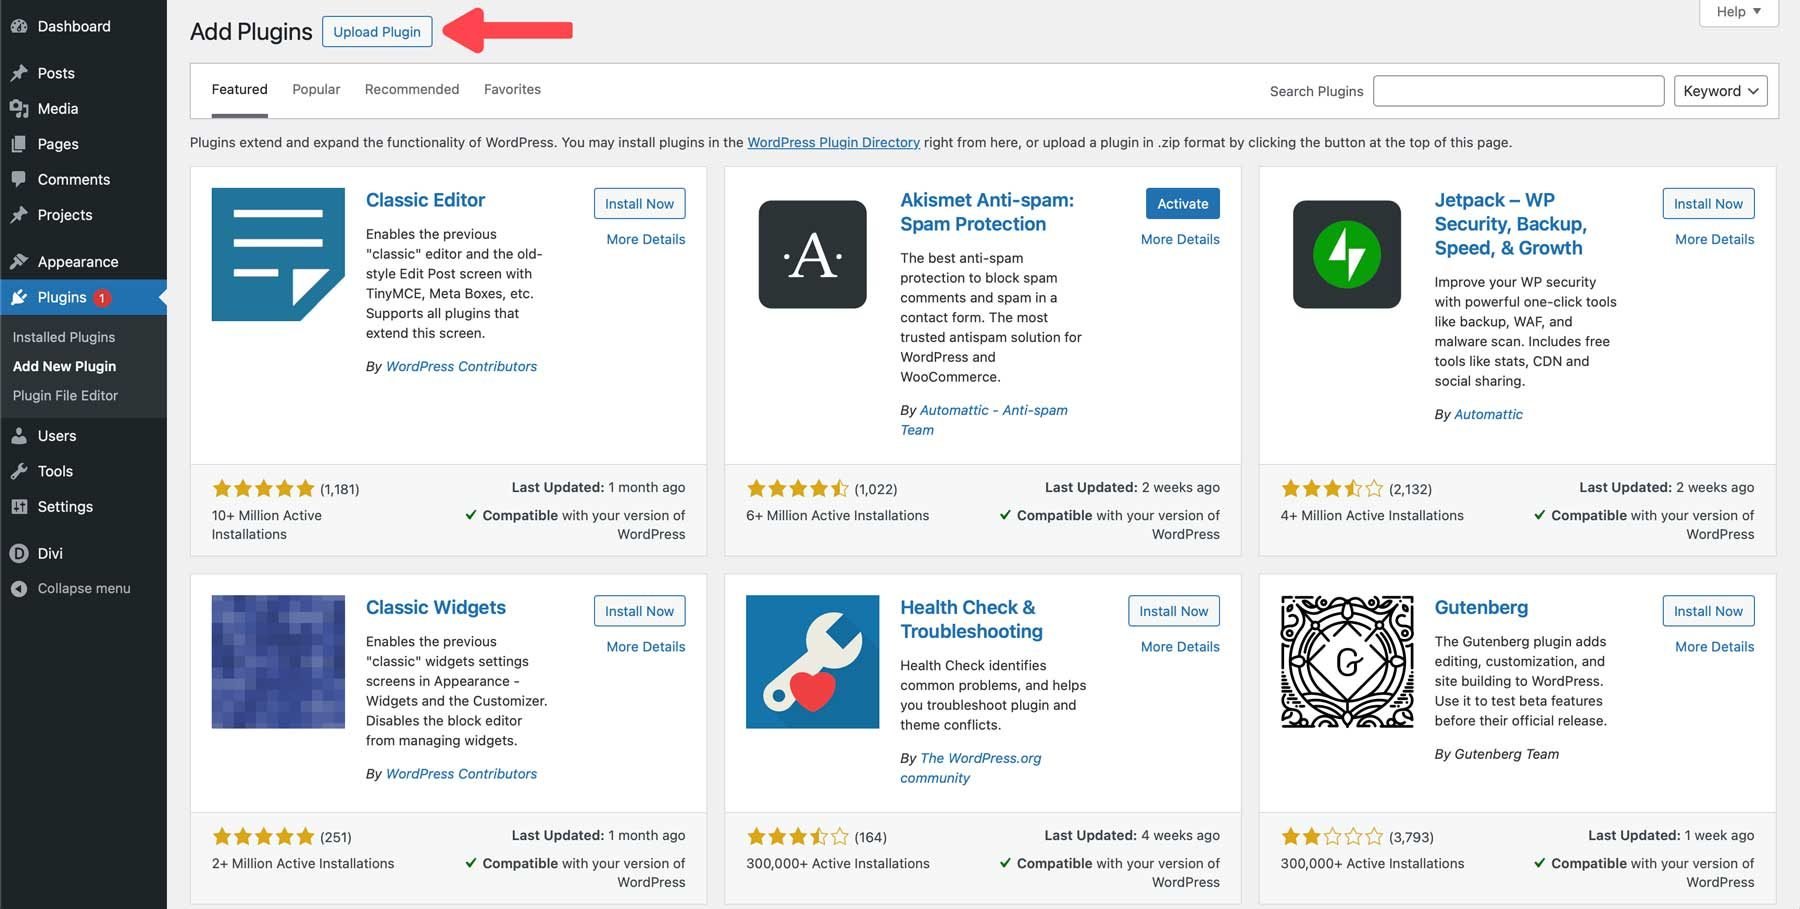
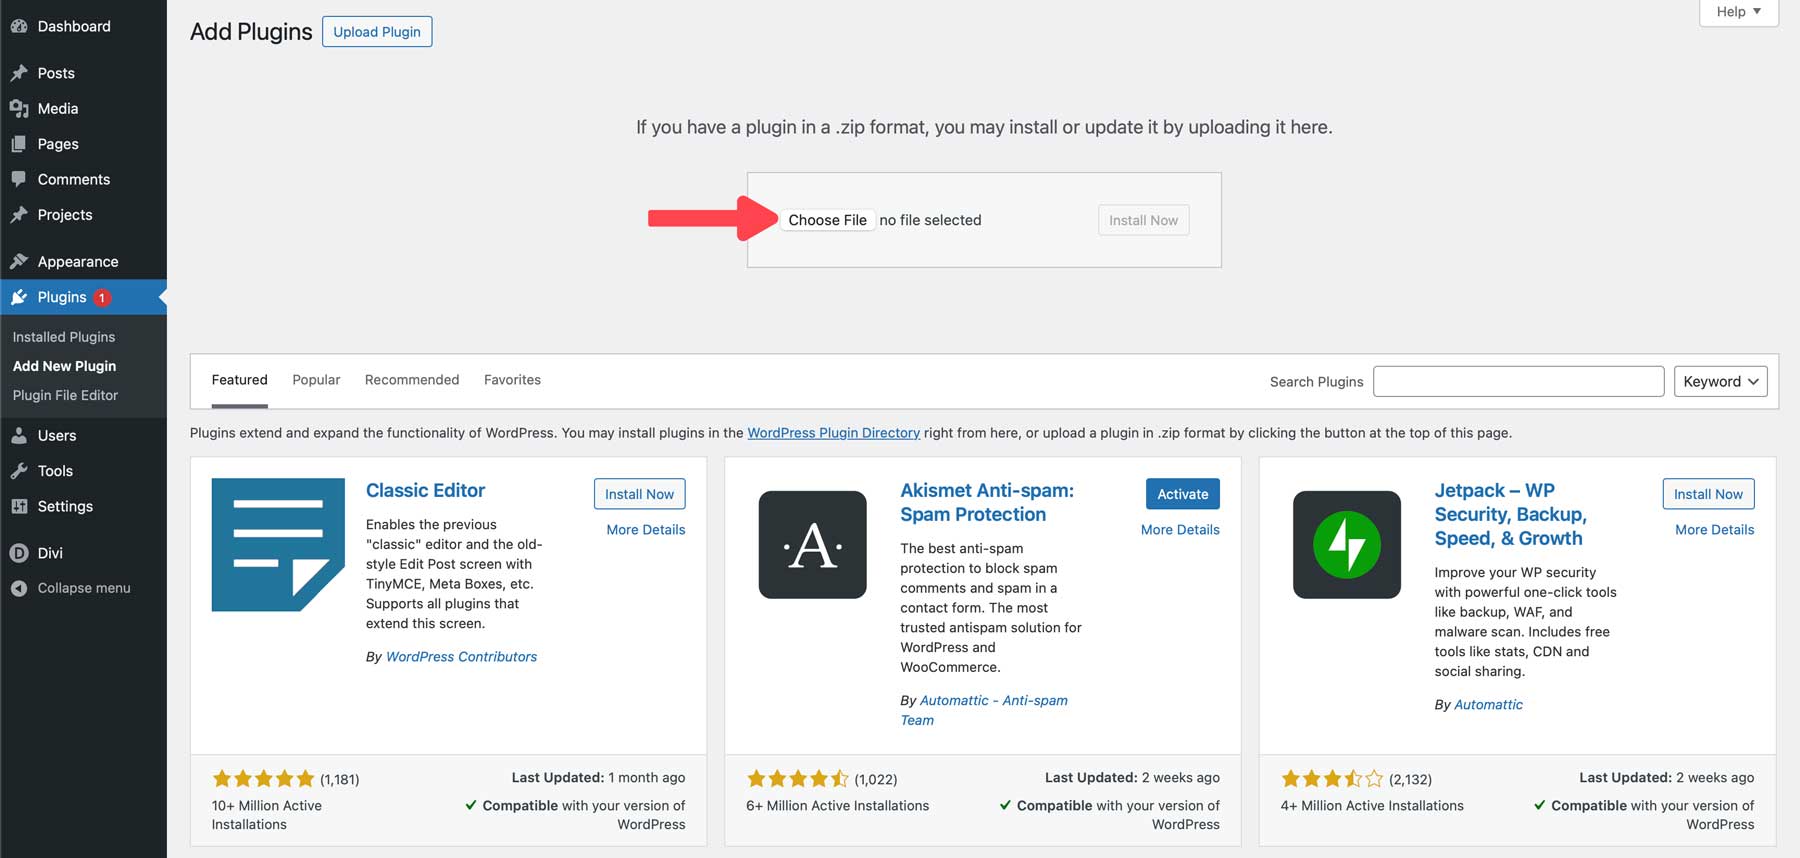
After purchasing and downloading Divi Assistant from the Divi Marketplace, log in to your WordPress website. Select Plugins > Add New Plugin.
Click the Upload Plugin button.
Select Choose file and locate the zipped plugin file on your computer.
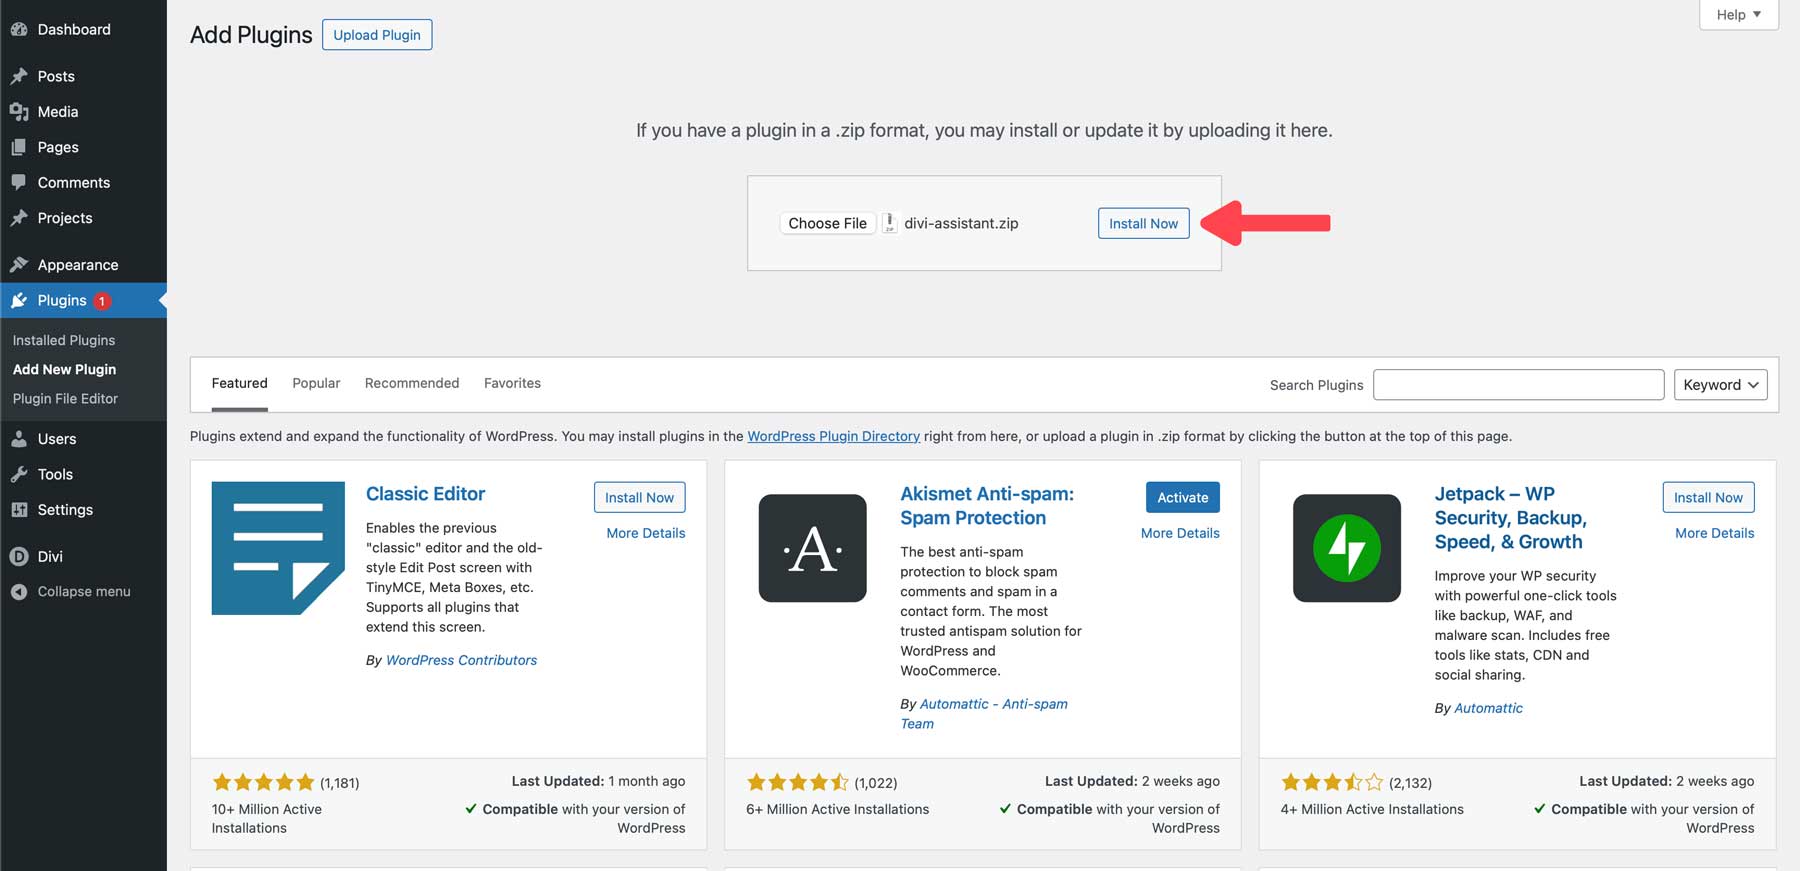
Click Install Now with the plugin file loaded.
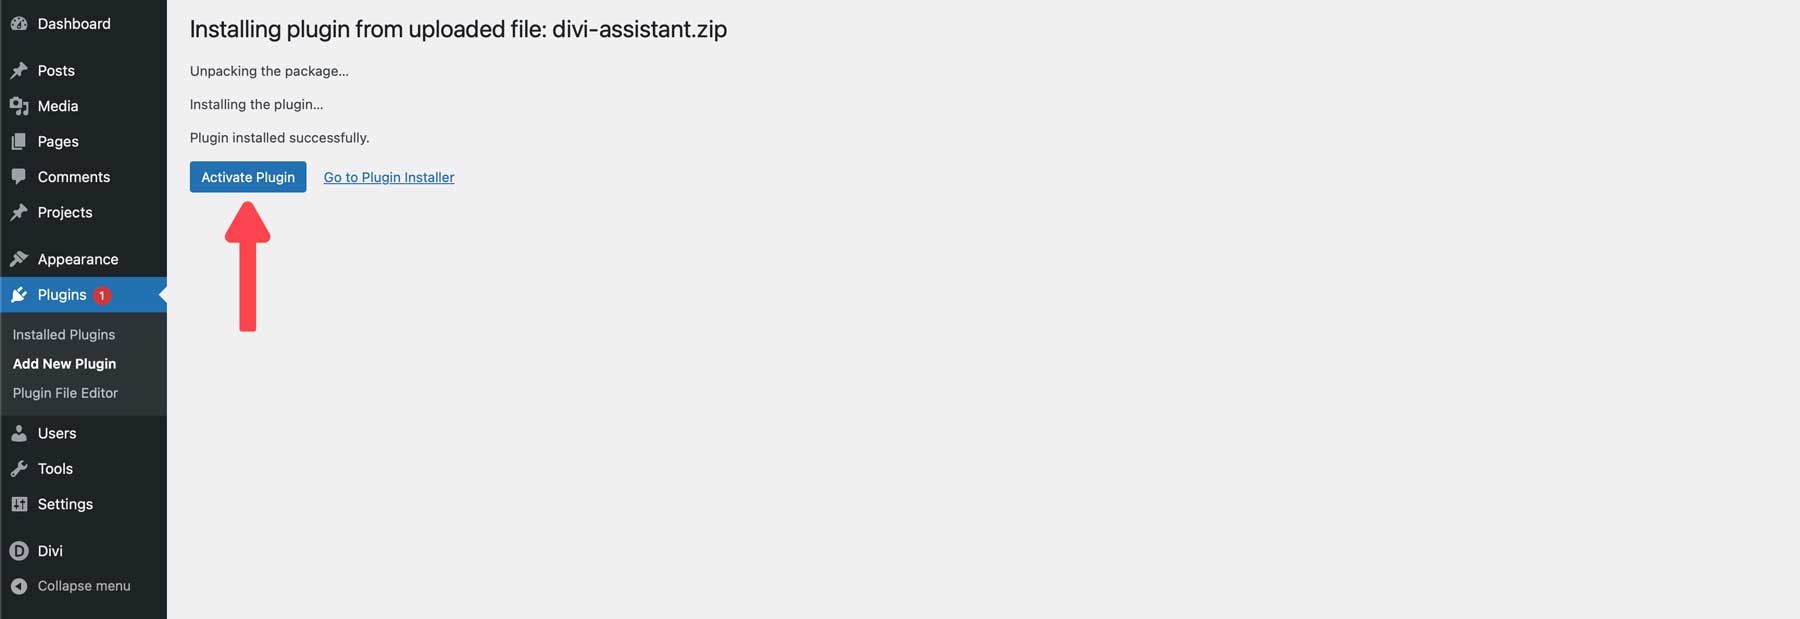
Once the plugin is installed, click Activate Plugin.
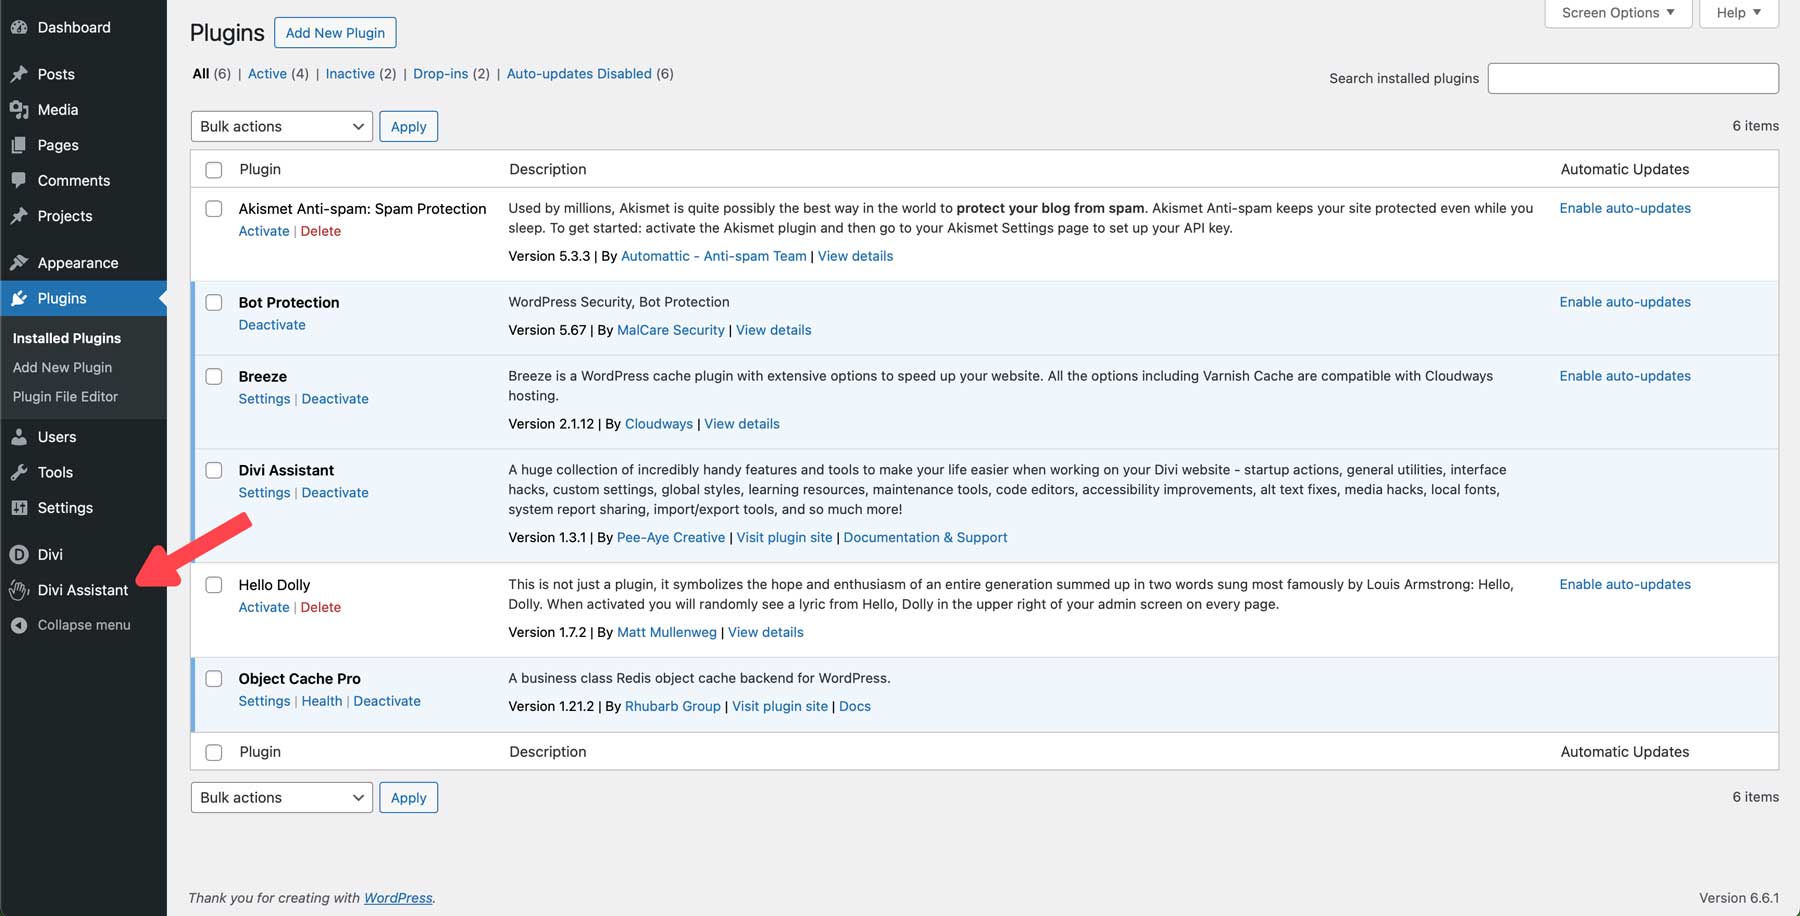
Once the plugin is installed, click the Divi Assistant menu tab to access its settings.
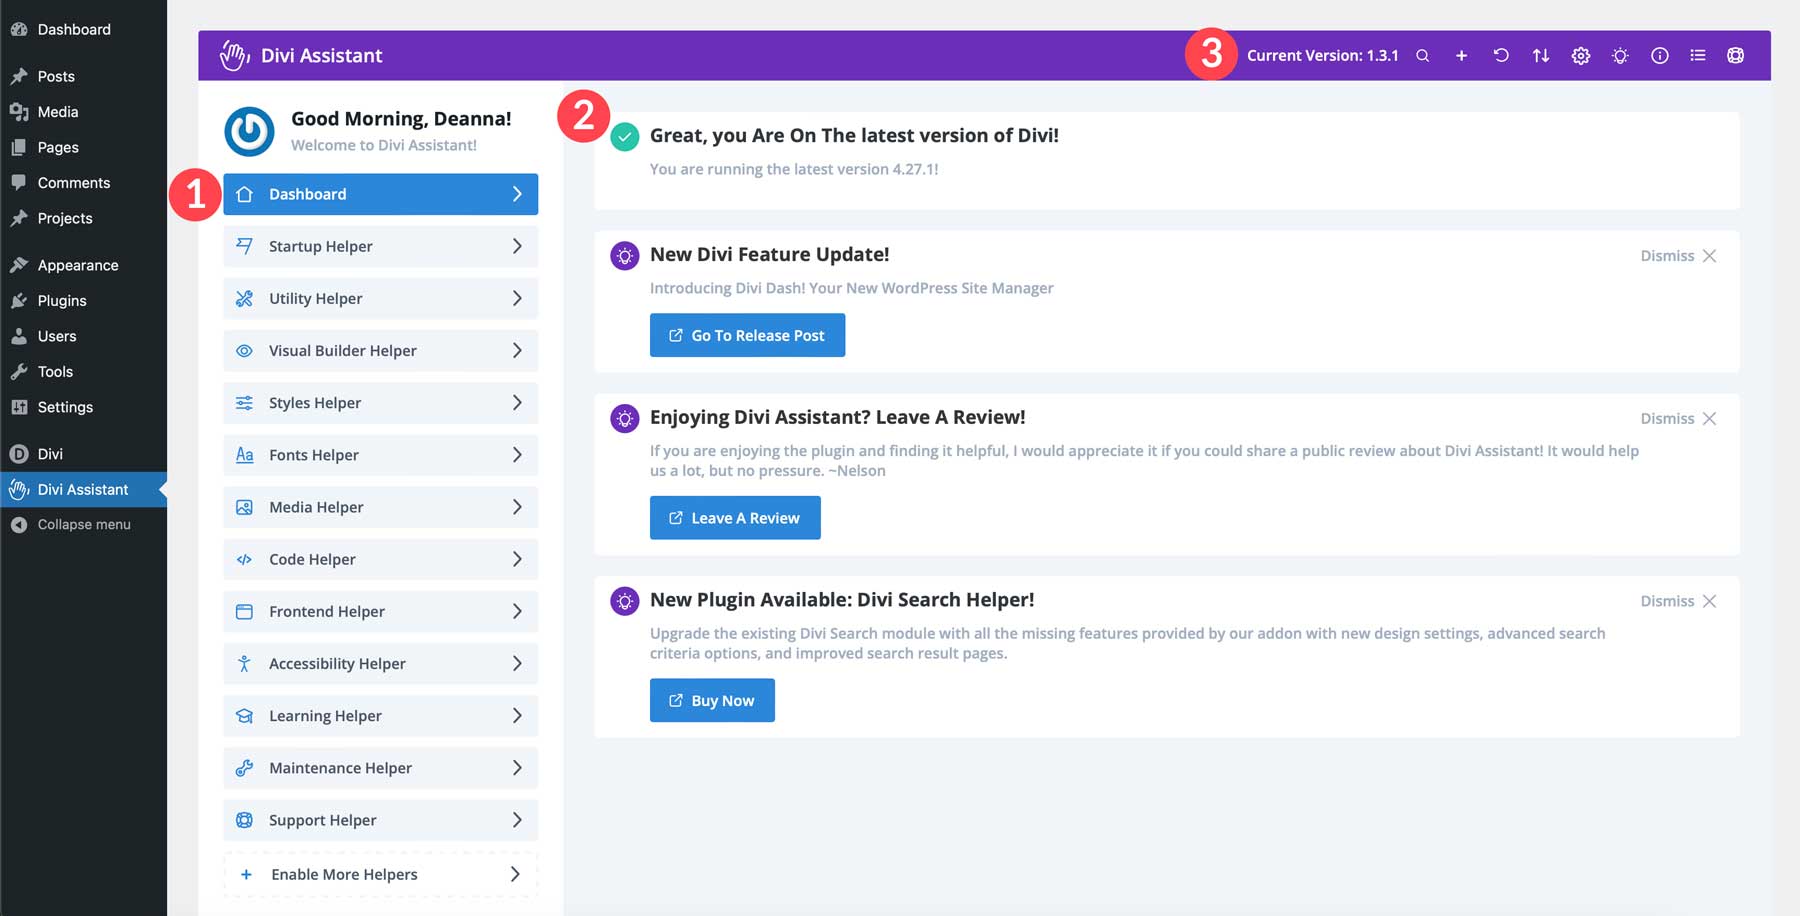
When you get your first look at the Divi Assistant Dashboard, it may be intimidating. No worries, though, because the folks at PeeAye Creative have made it easy to find what you need. You’ll notice a menu on the left, Divi-related alerts, and the taskbar on the main dashboard screen. Each menu item contains various tools and settings for improving your Divi experience.
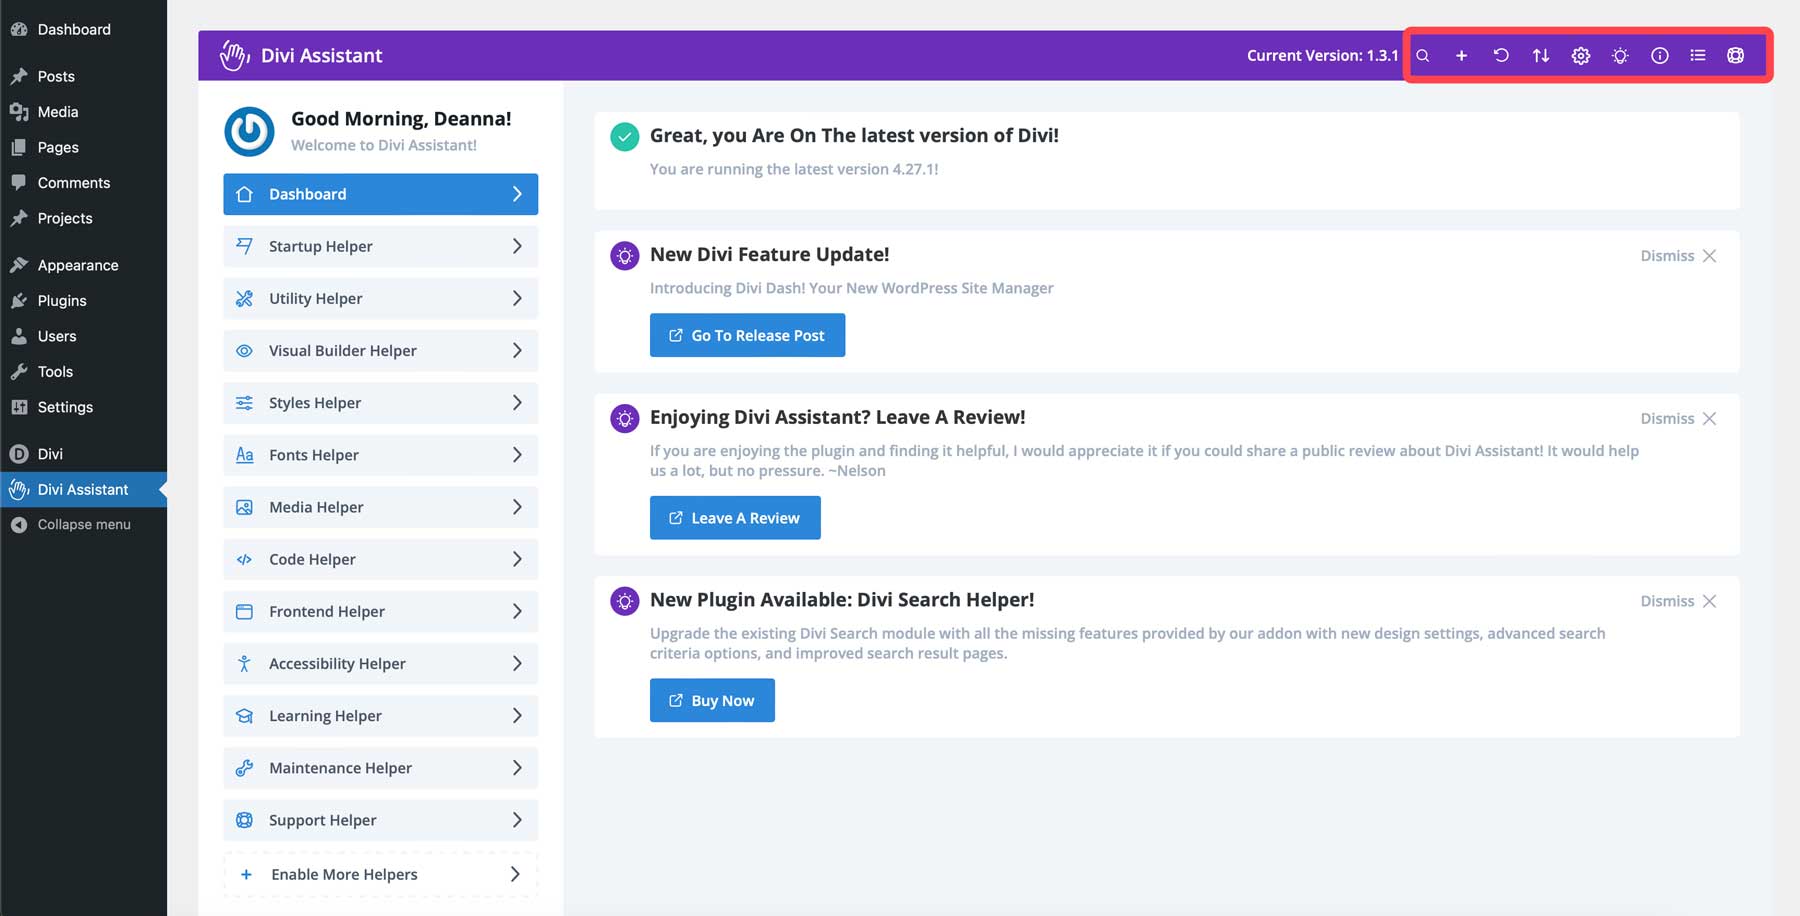
There are also a few options in the taskbar. You can search for settings, control which helpers are enabled, reset settings to default, import or export settings from another Divi website, access admin settings, suggest a new feature, and more.
Over the next several sections, we’ll show you how to do a few important things within Divi Assistant, with most things easily accomplished with a single click. From creating a child theme to putting your site into maintenance mode to adding global fonts, Divi Assistant makes it easy.
Create A Child Theme
Divi Assistant allows you to create a child theme within Divi without installing an additional plugin. A child theme is essential for customizing Divi without affecting its framework. Child themes allow you to make changes to your WordPress website by preserving the original files, ensuring easy updates, and protecting your websites from vulnerabilities.
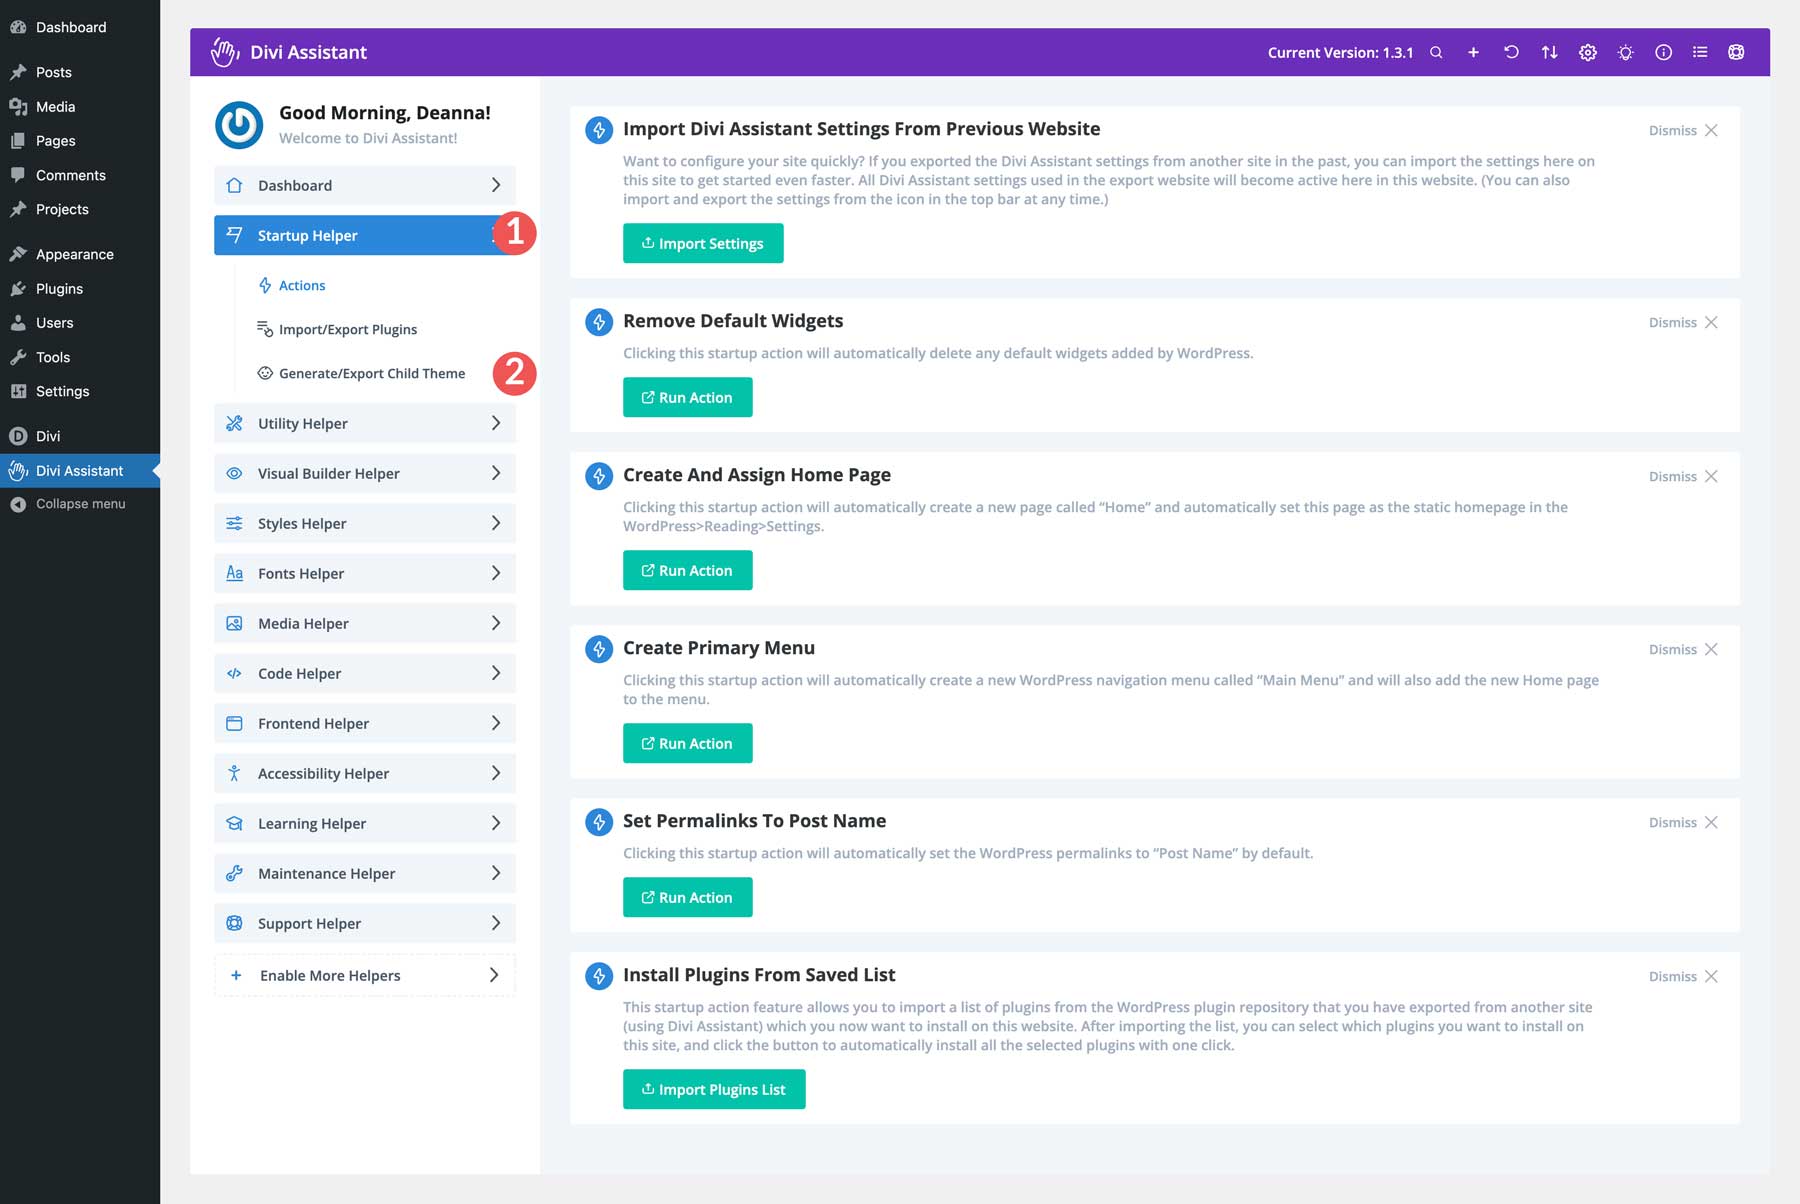
The entire process only takes a few seconds. From the main Divi Assistant Dashboard, click the expand the Starter Helper menu tab and select Generate/Export Child Theme.
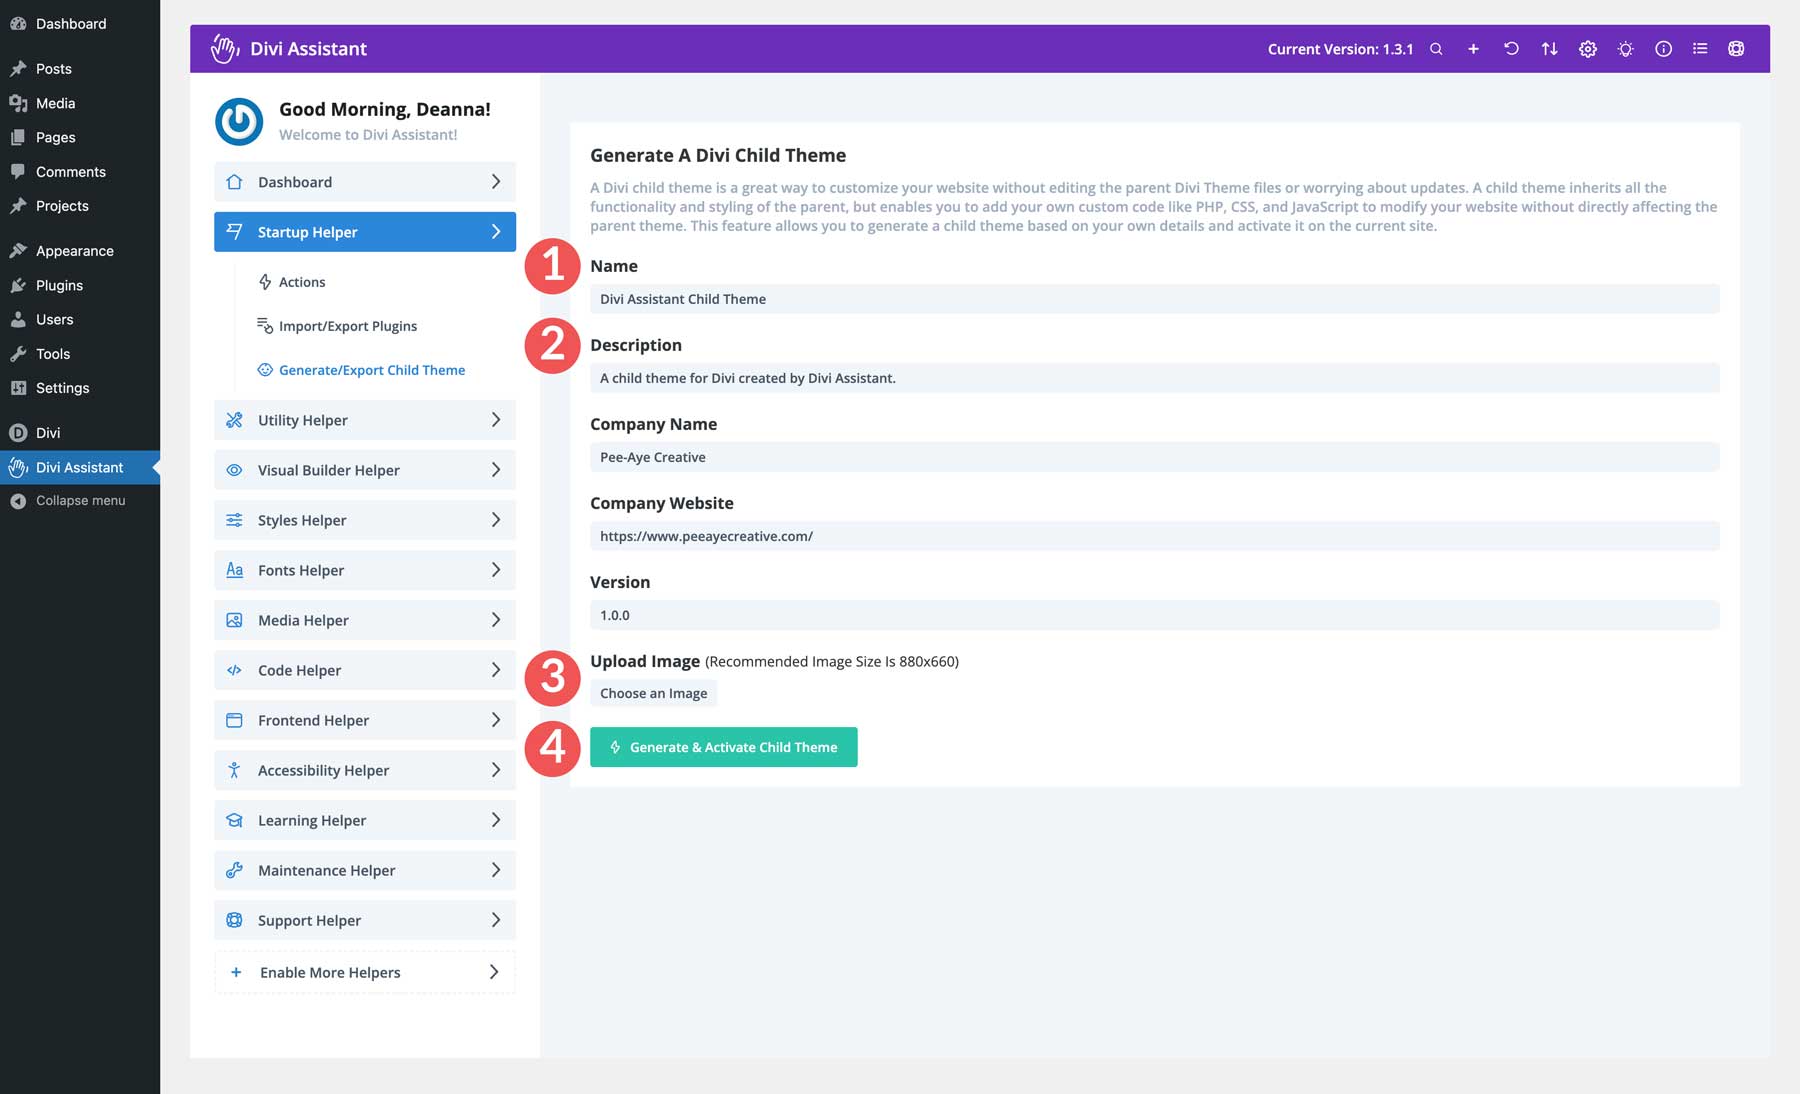
Give your child theme a name, description, and thumbnail image on the next screen. Finally, click Generate & Activate Child Theme.
Rename The Projects Post Type
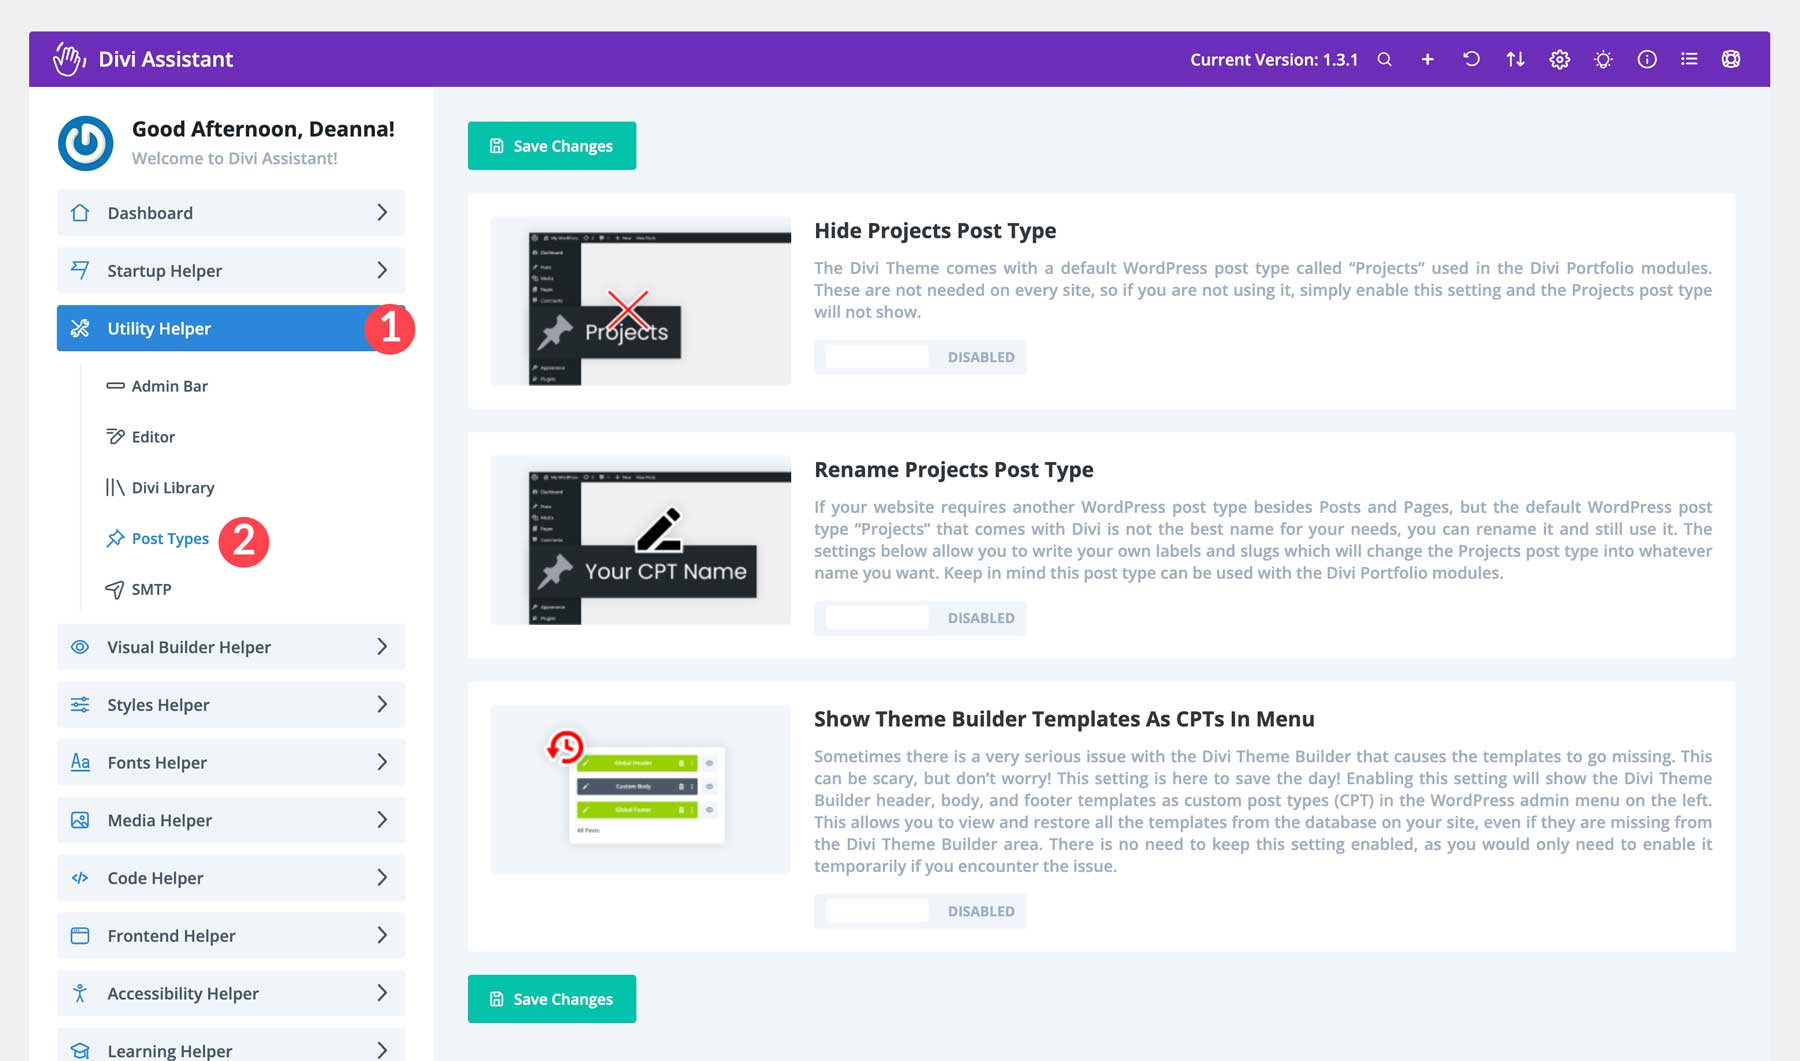
Depending on your site type, it might make sense to change the projects post type to something else. For example, a real estate website could benefit from having a property post type to showcase real estate properties. To change it, select the Utility Helper menu tab and click the post types link.
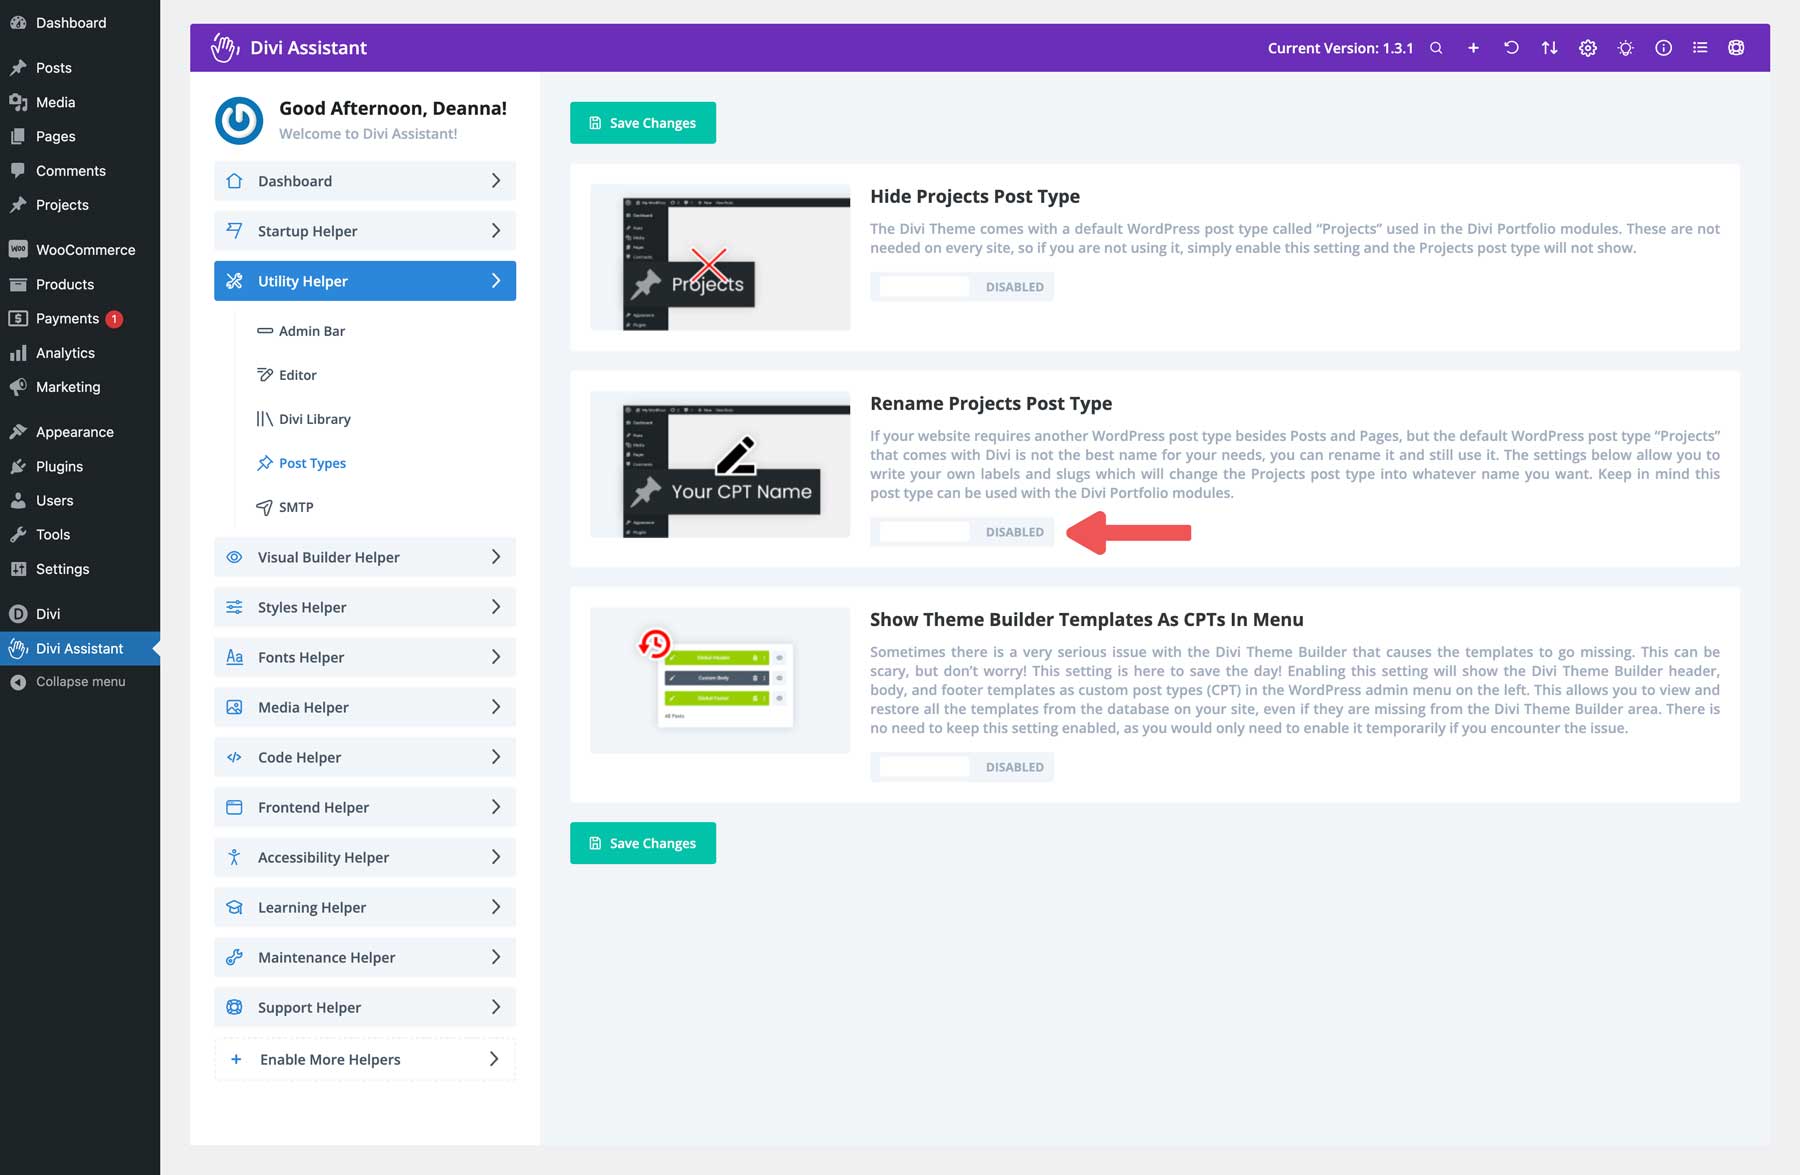
Next, enable the toggle under Rename Projects Post Type.
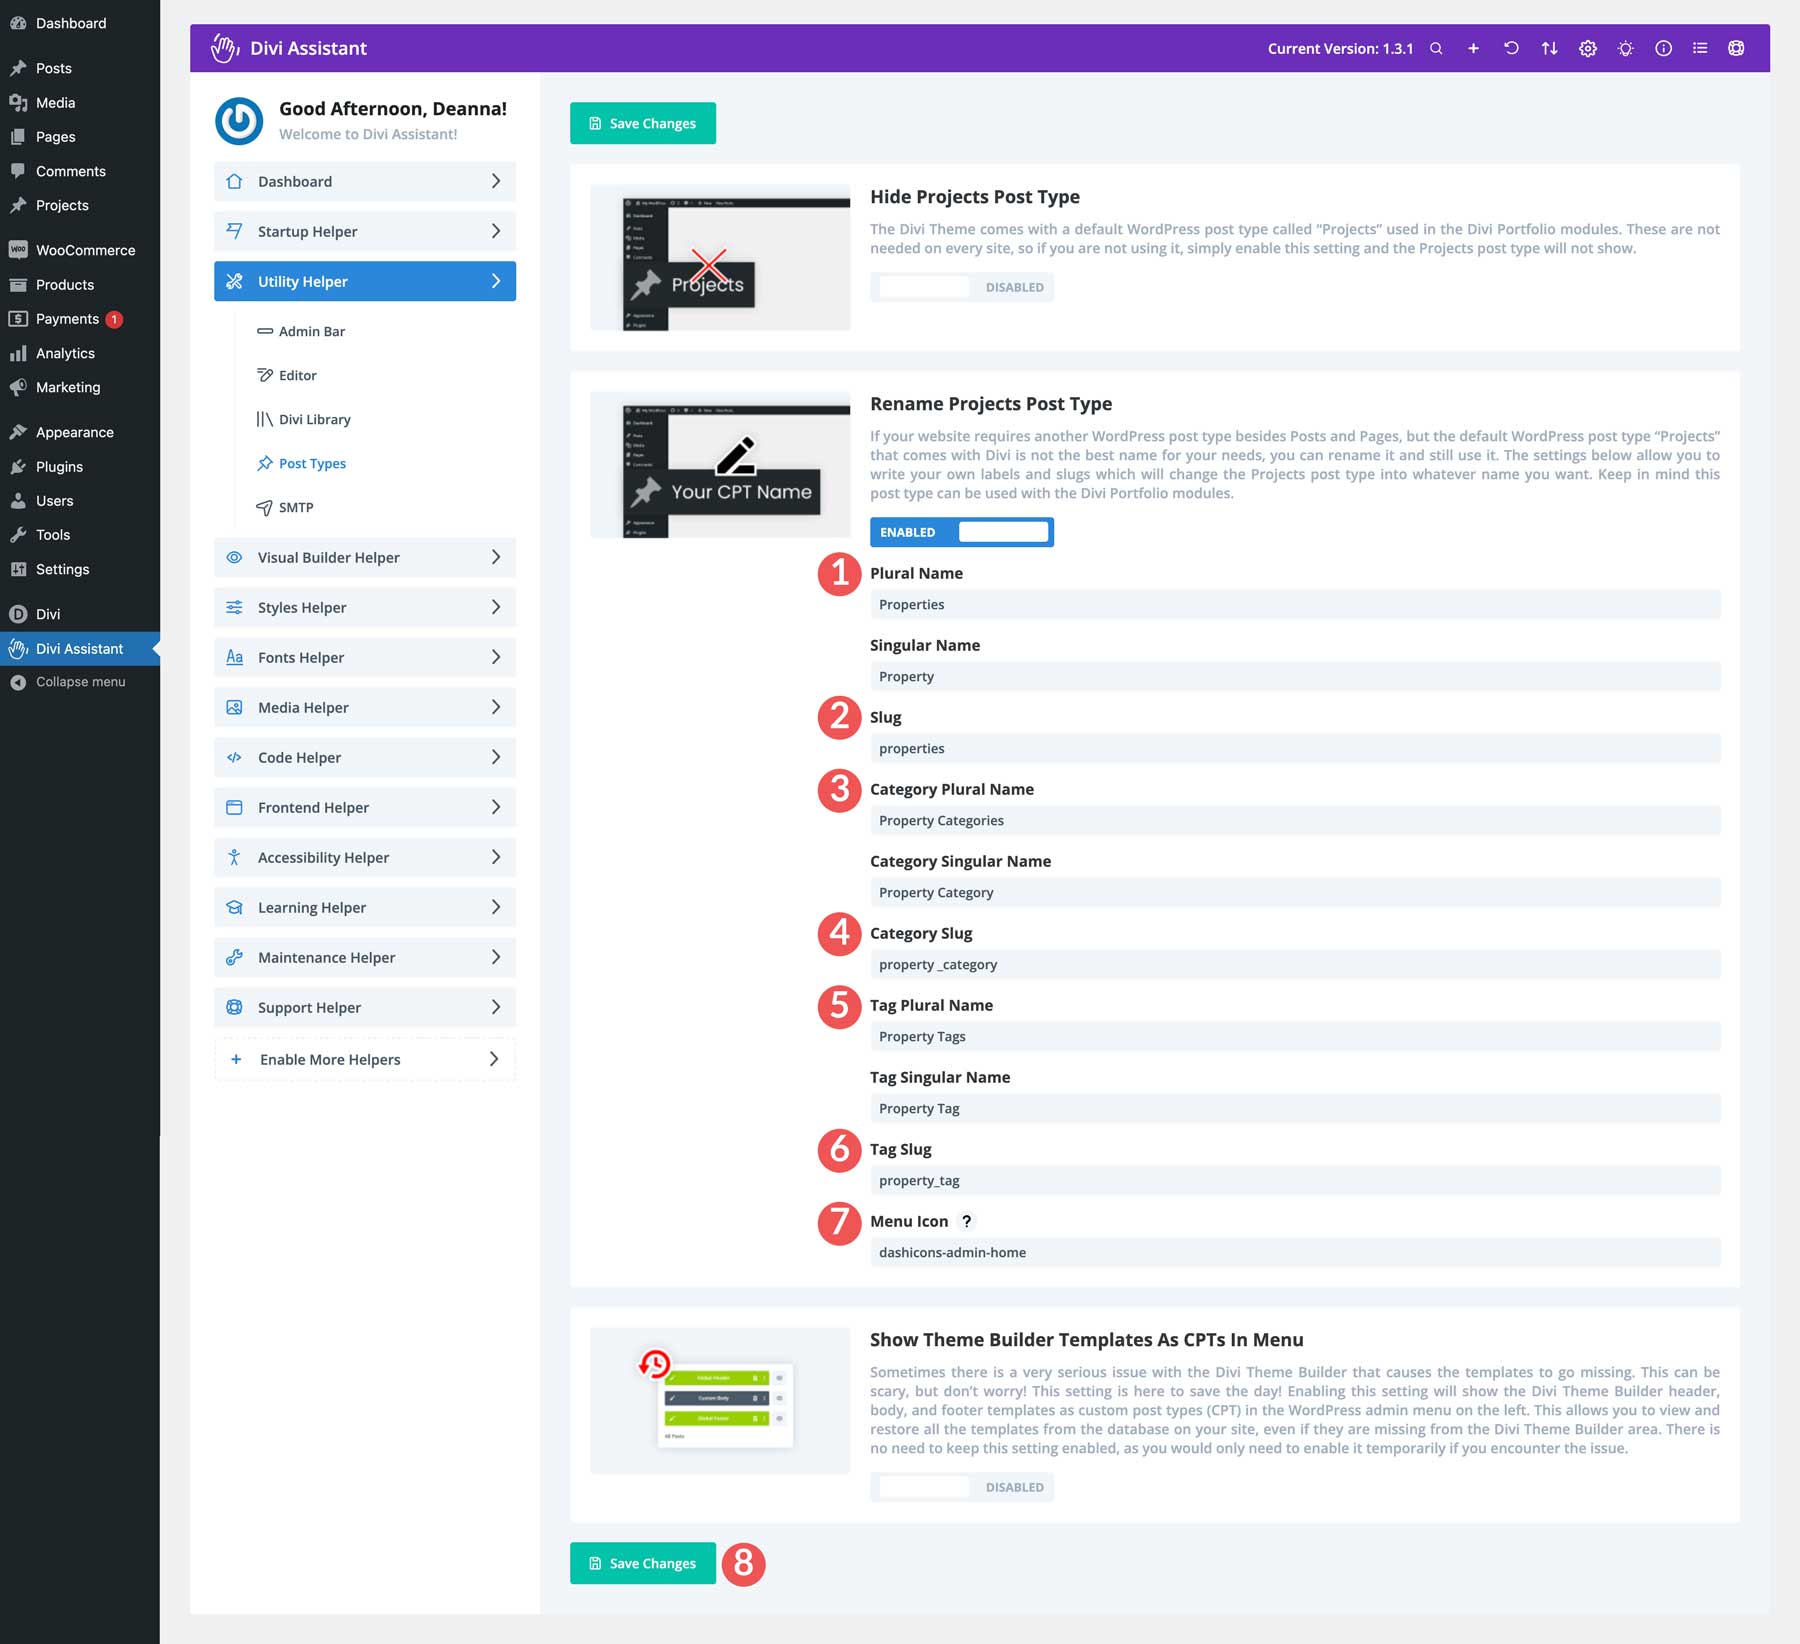
Finally, you’ll rename the project information (name, slug, category, etc) with property and click the Save Changes button to make the change.
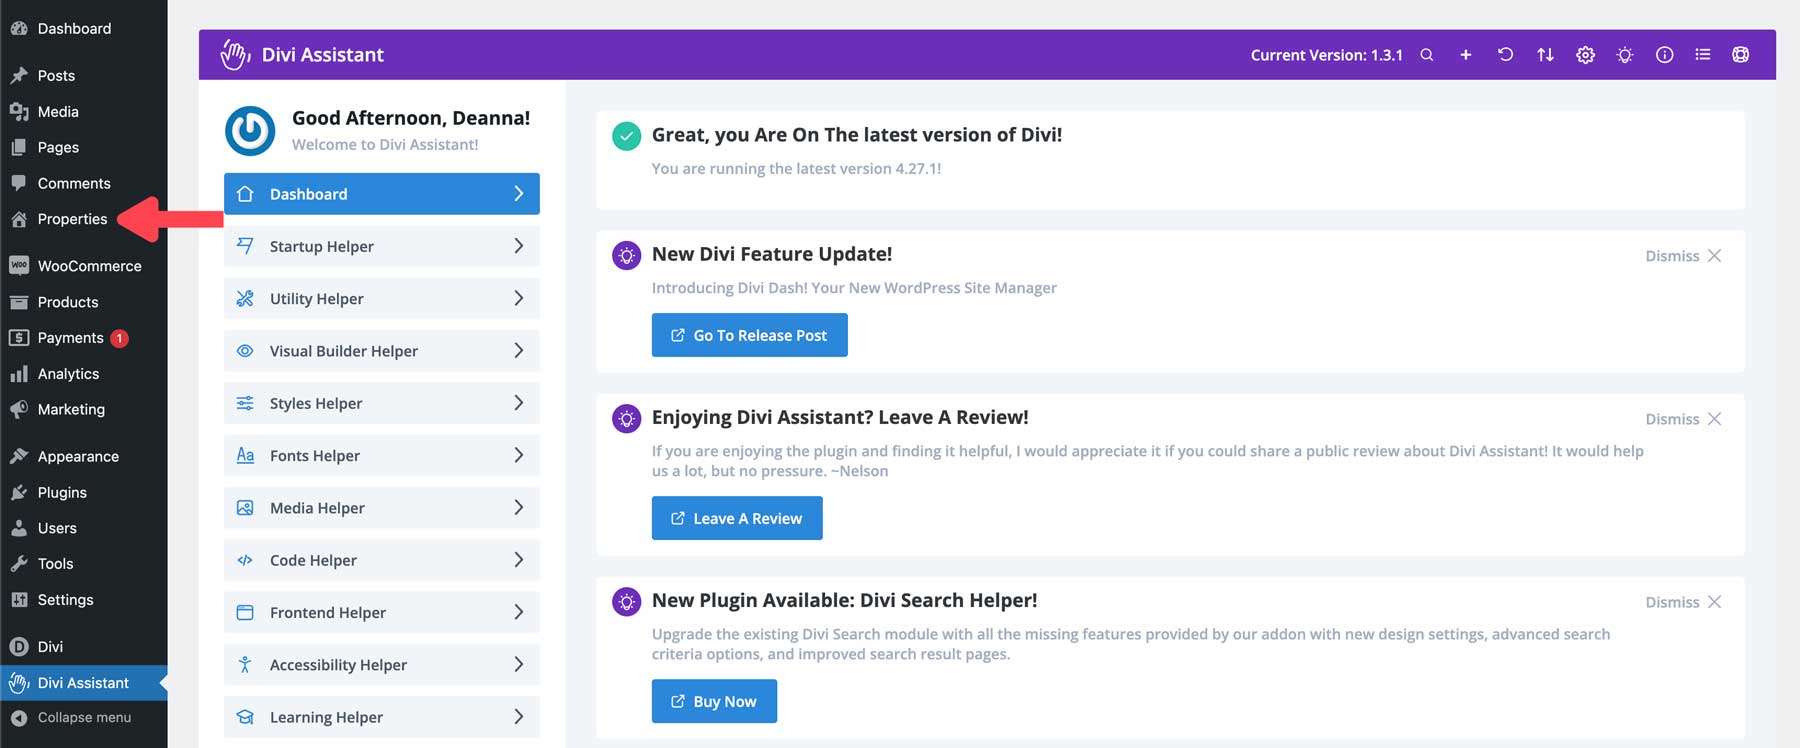
Once the change is made, you’ll notice that projects have been changed to properties in the WordPress toolbar.
Set Global Heading Styles
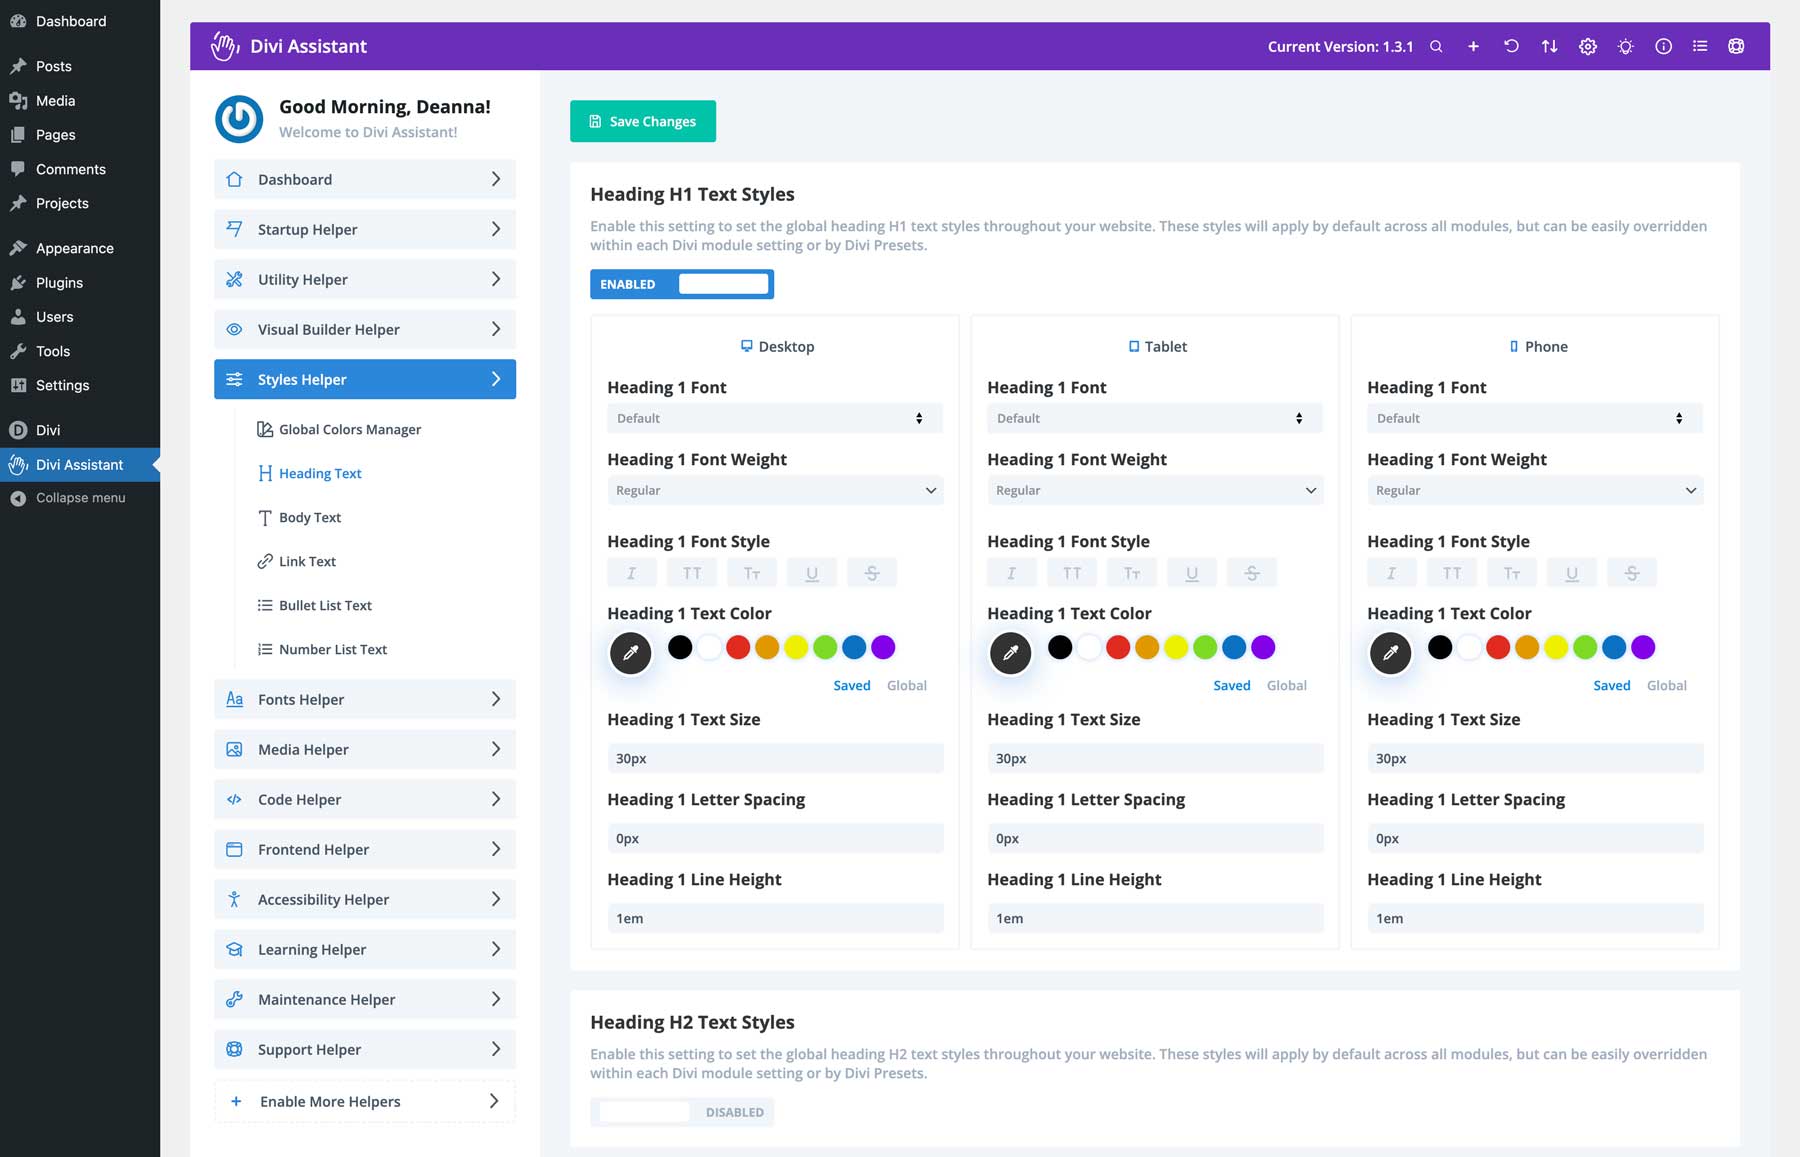
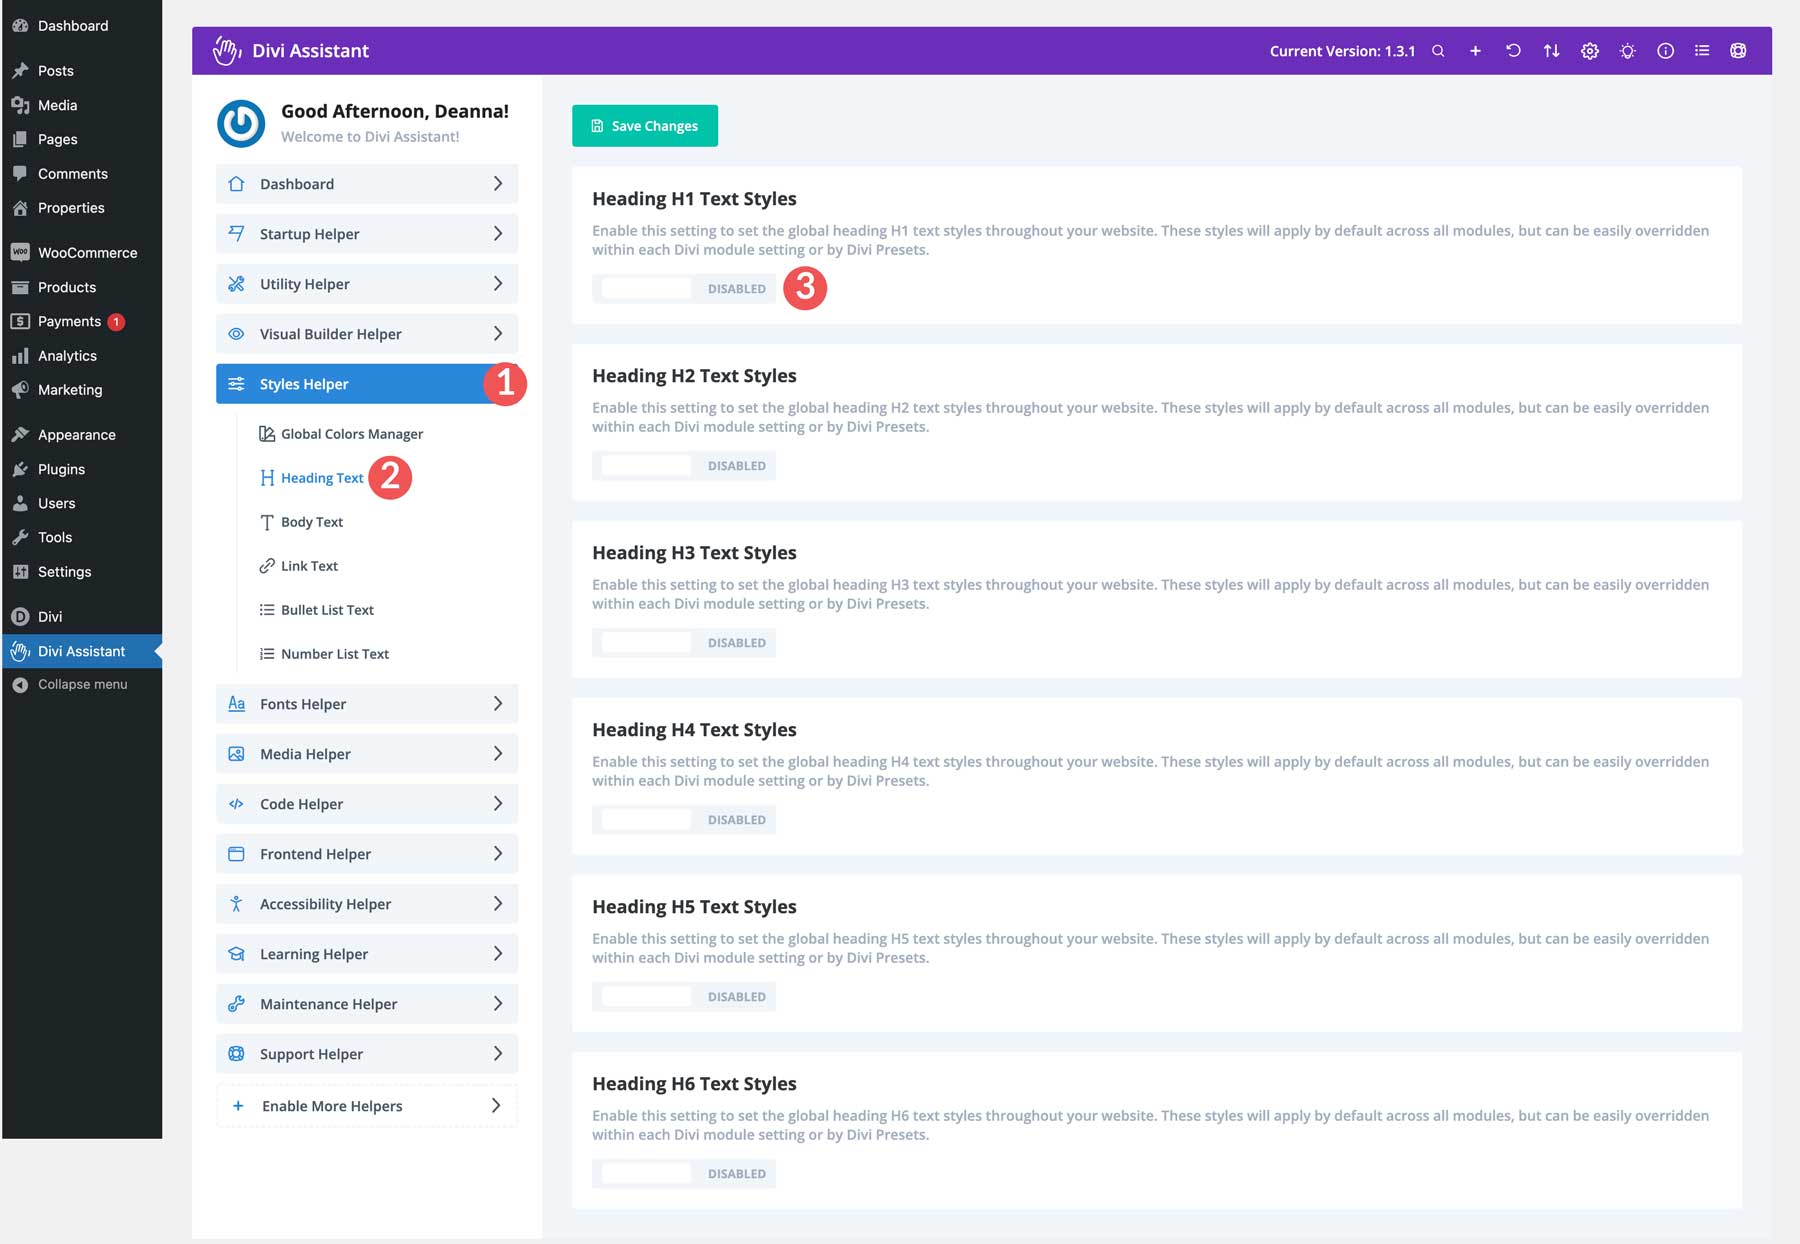
A cool feature of Divi Assistant is the ability to set global heading styles. This is a huge time-saver. Sure, Divi allows you to set global presets for headings, but it involves opening the Visual Builder and then a Heading Module. With Divi Assistant, you can set styles across your entire website with just a few settings.
Open the Styles Helper menu tab and select Heading Text from the options. Enable the toggle option under Heading H1 Text Styles.
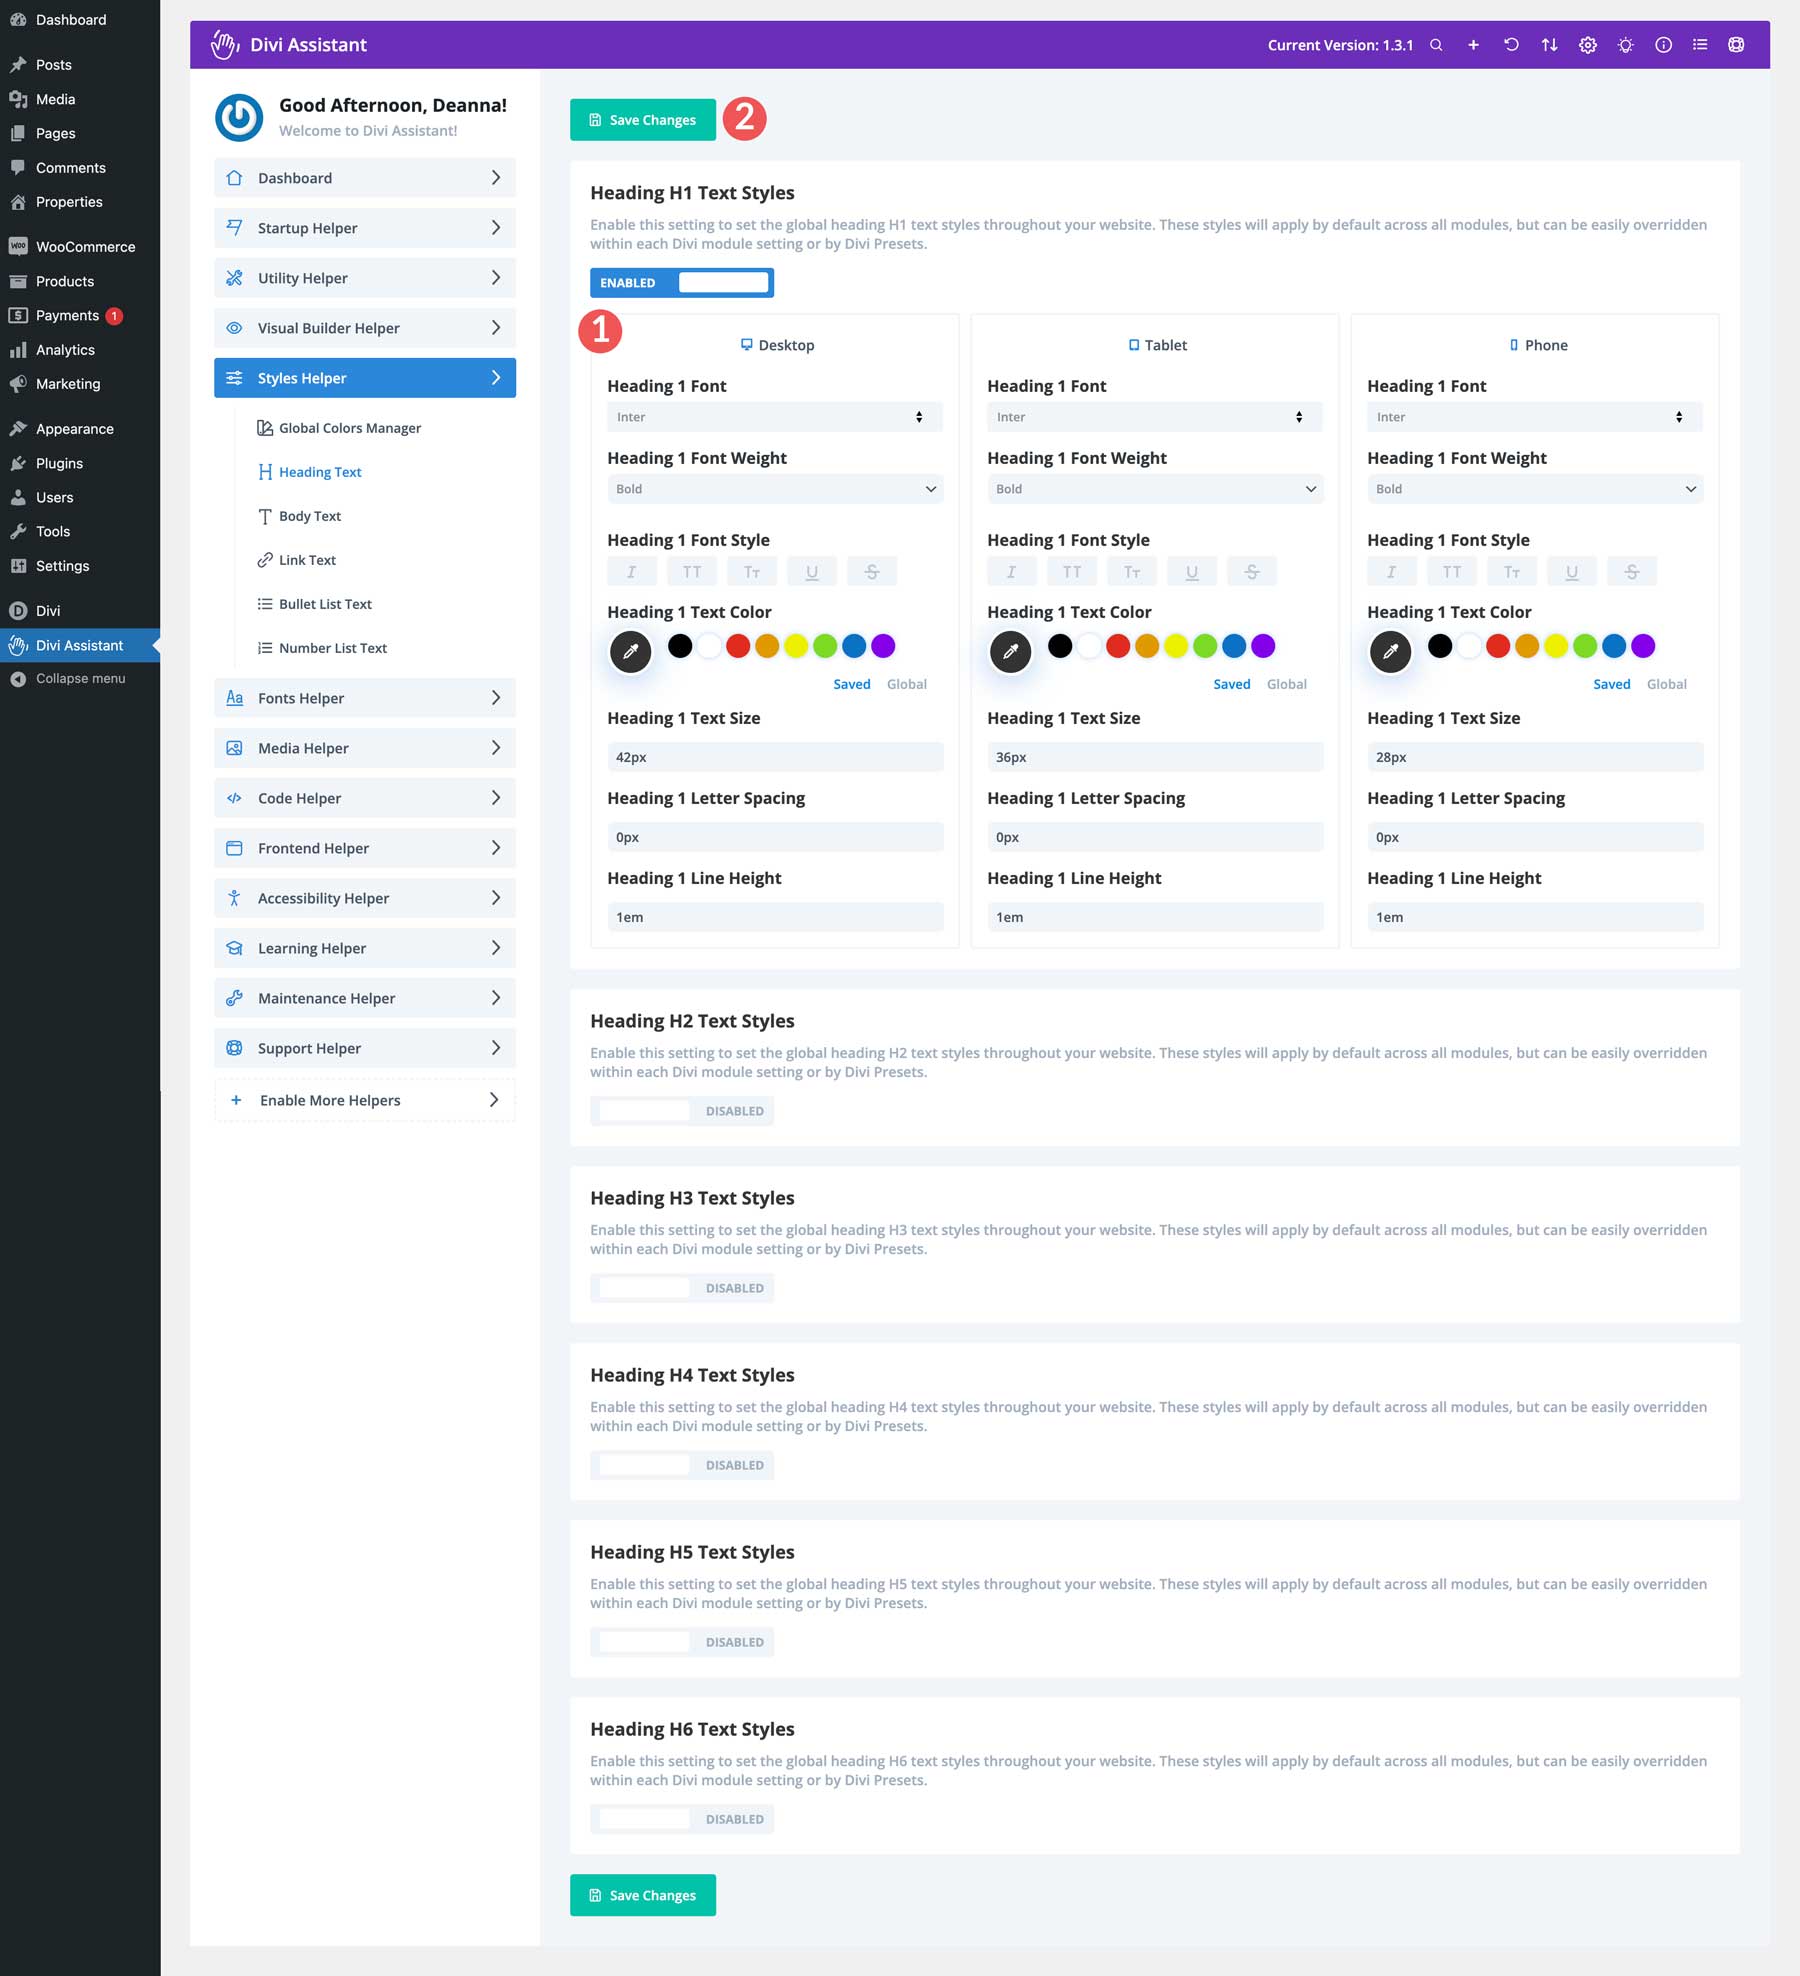
Divi Assistant allows you to choose the font, font weight, and font style responsively. That means that regardless of your visitors’ screen size, they’ll have a seamless viewing experience. Divi requires you to do this at the module level or create global style presents to change font sizes, colors, or line height. With Divi Assistant, you can change all heading styles, from H1 to H6, all in one place. Once you make the changes you want, click the Save Changes button to have them take effect.
Upload a Local Font
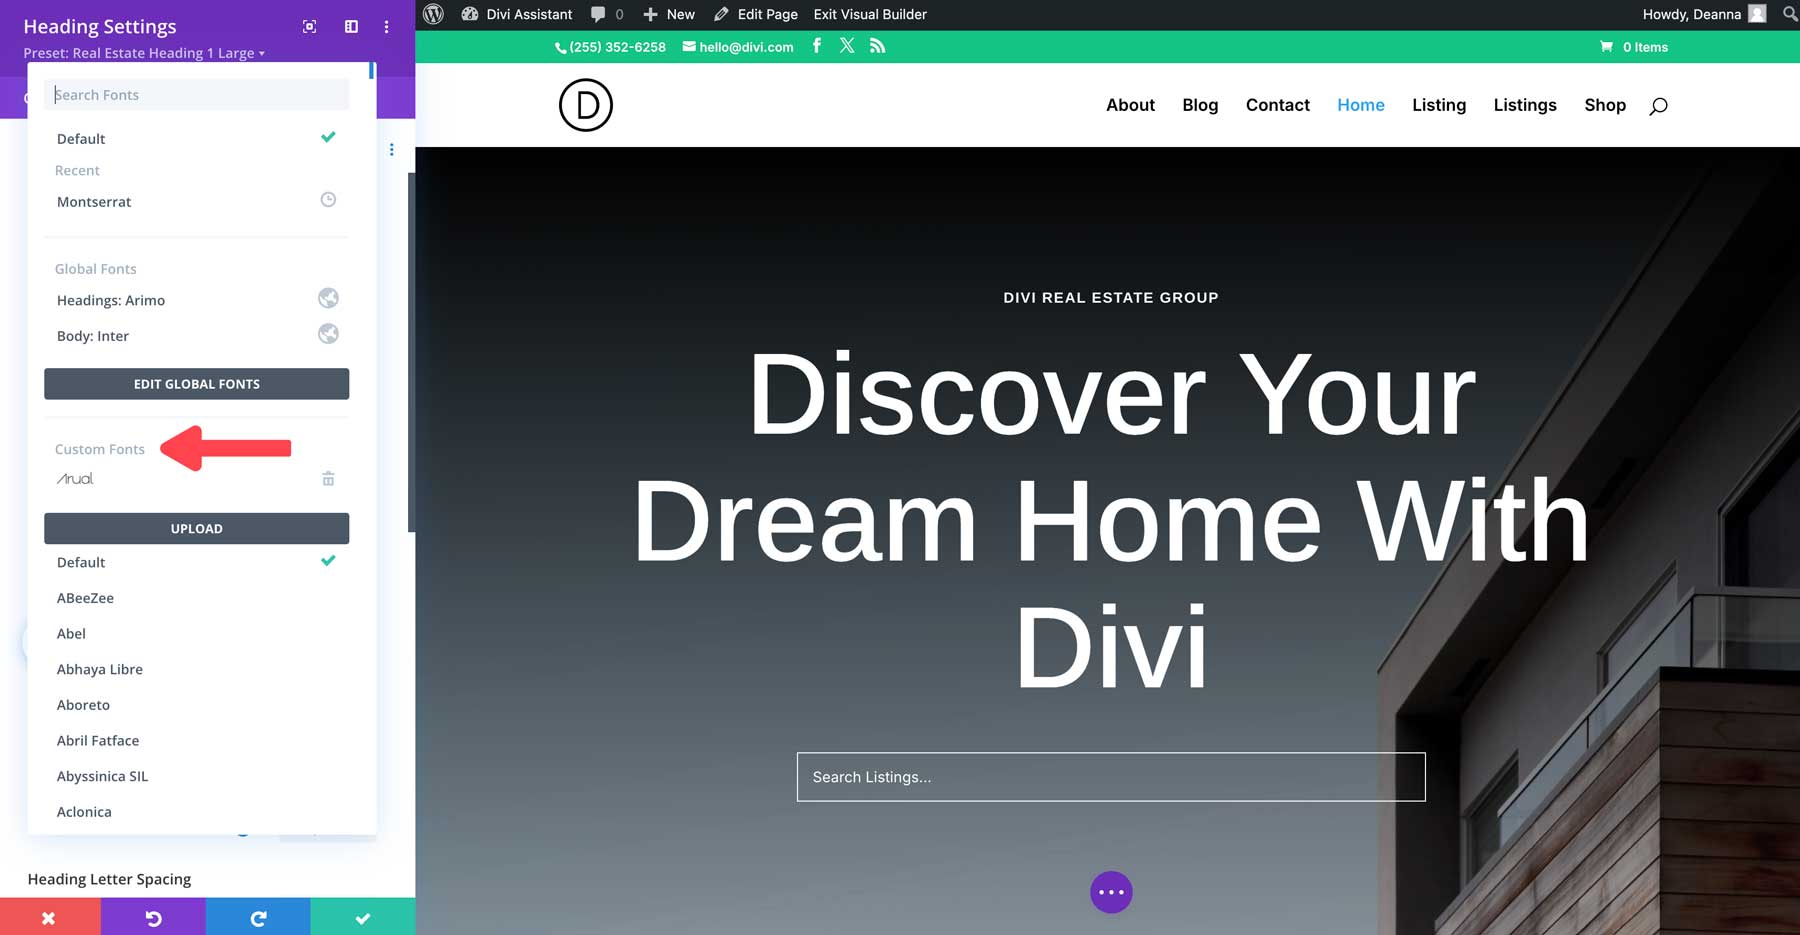
One of Divi’s best features is the ability to use your own fonts. To do that natively, you must open the Visual Builder and add them at the module level. You can do it with Divi Assistant within the dashboard.
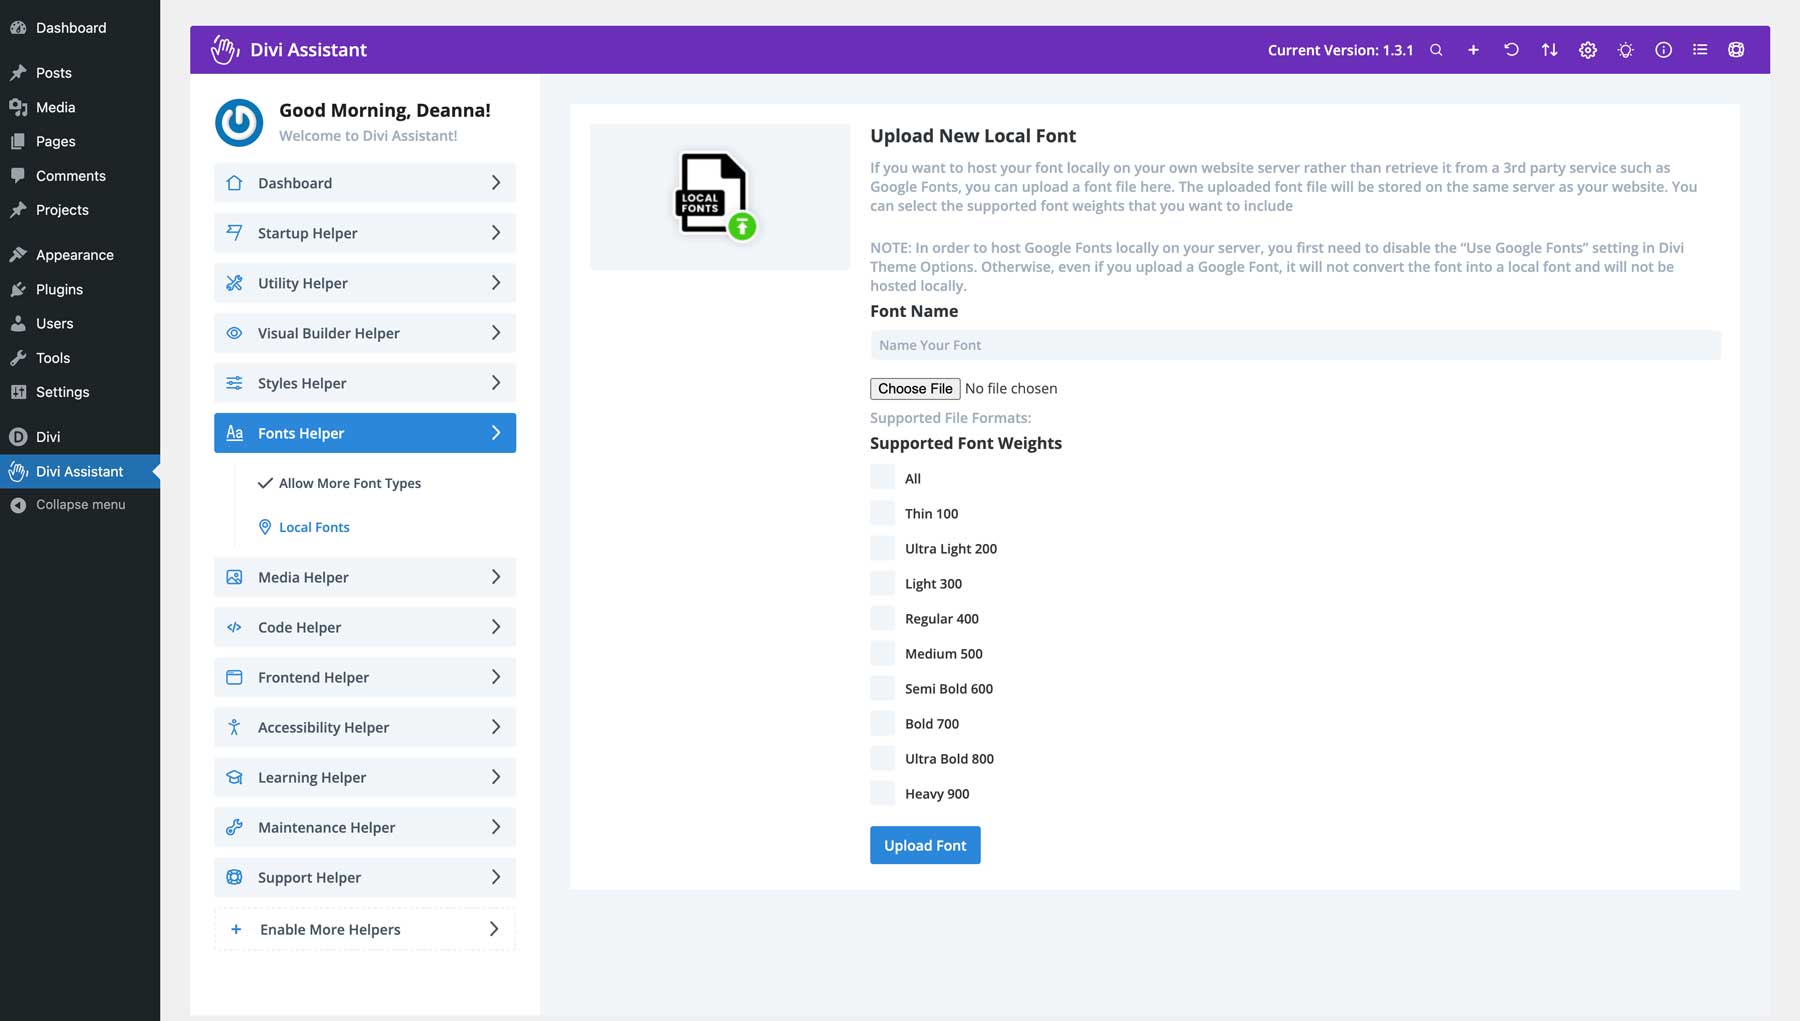
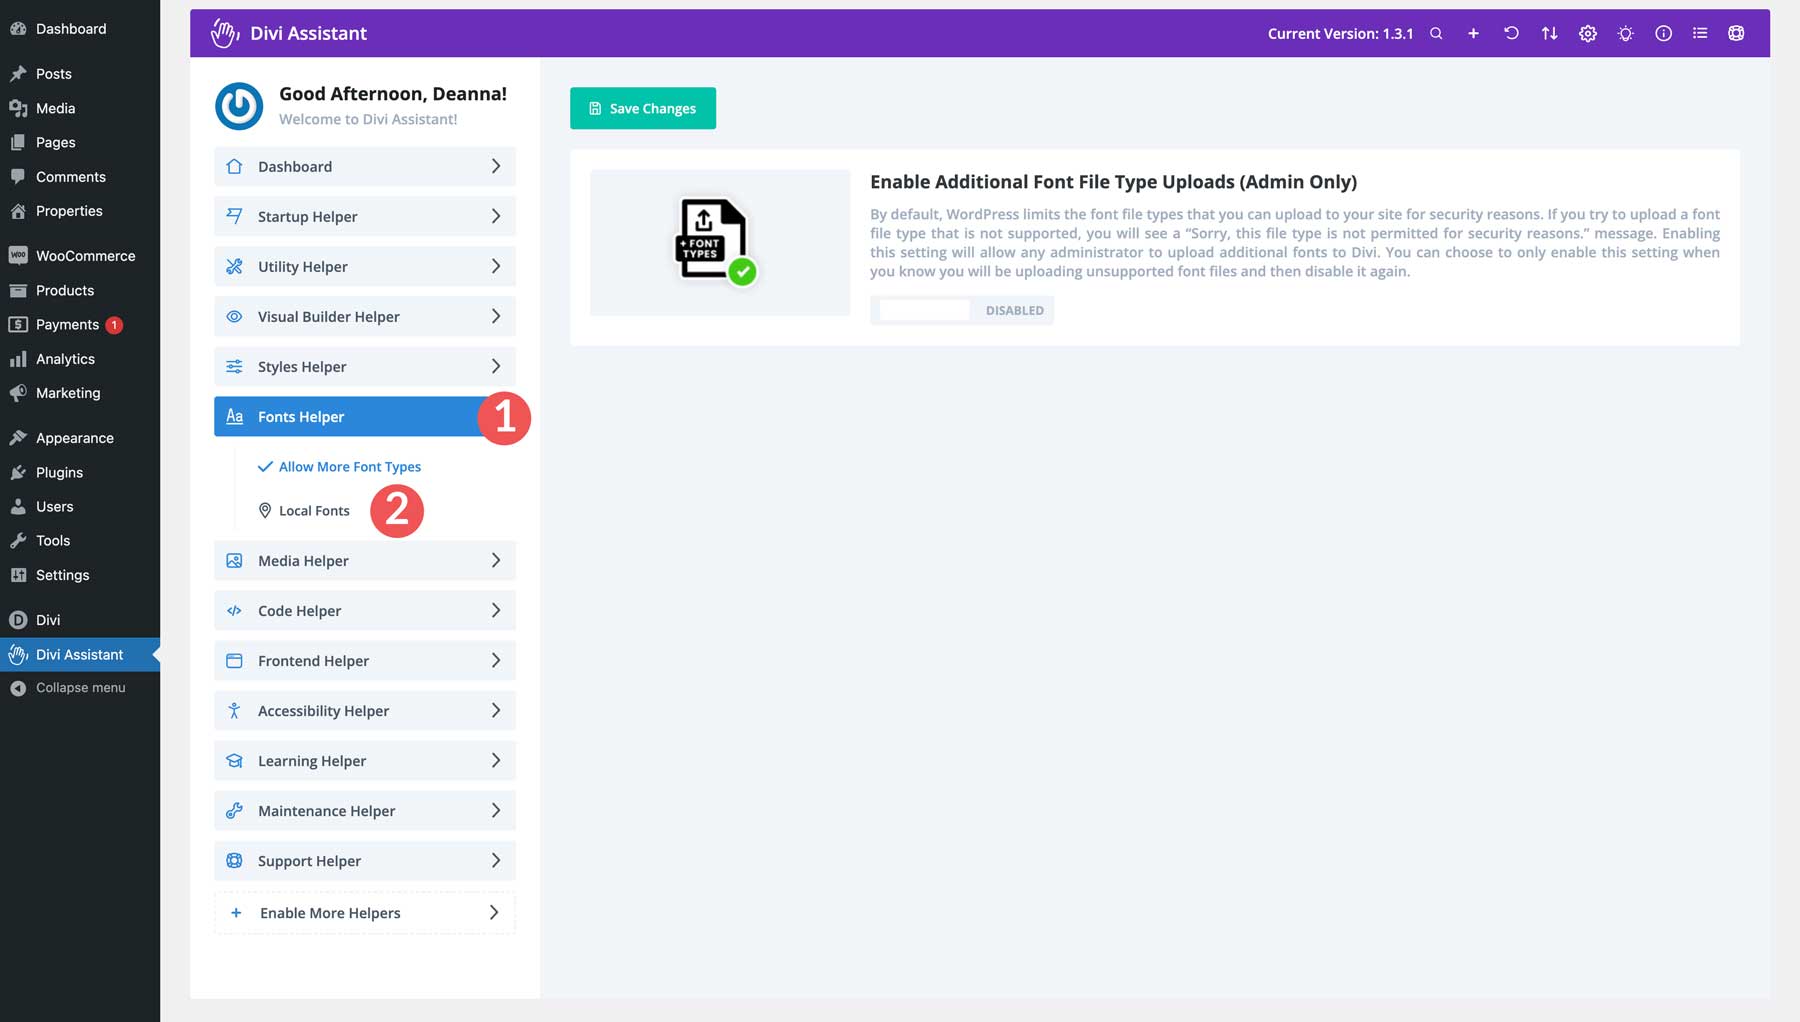
Select the Fonts Helper menu tab and click Local Fonts.
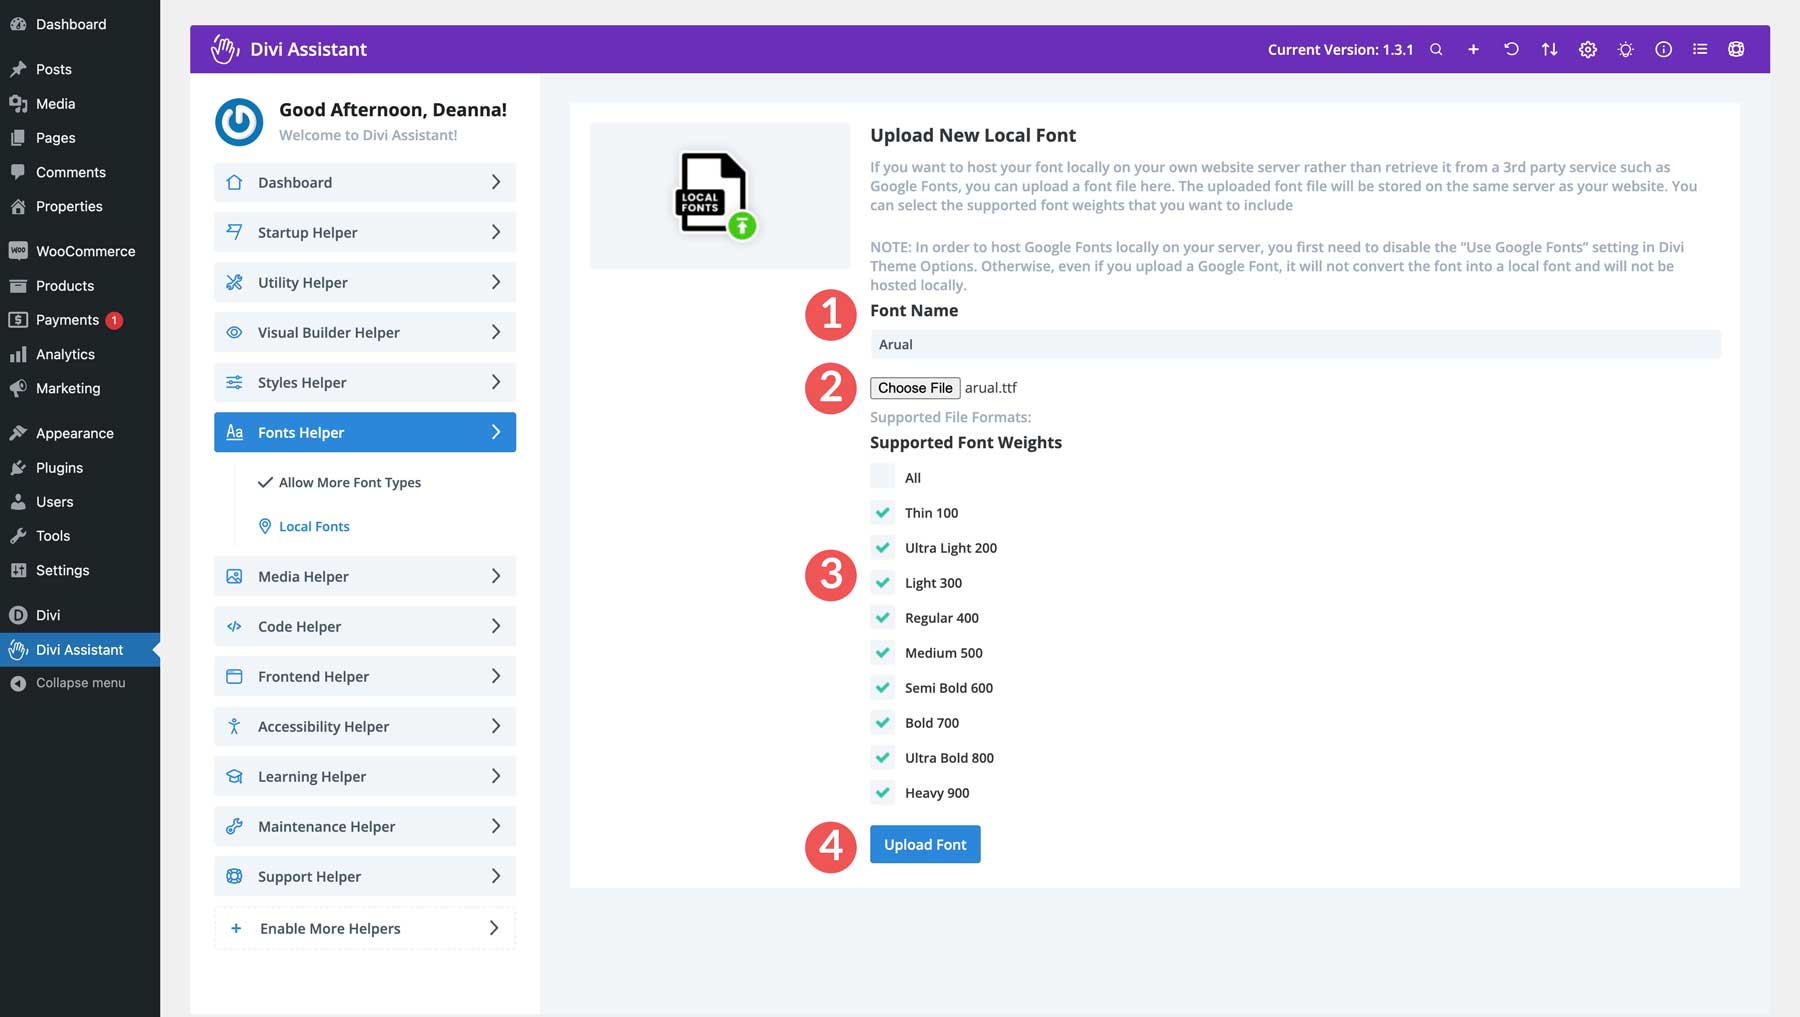
When the page opens, give your font a name, upload the font file from your computer, and assign the supported font weights. Finally, click the Upload Font button.
Open the Visual Builder, edit a Text or Heading Module, and your new custom font will appear in the design settings.
Ensure Image Optimization
WordPress can compress images when you upload them to your website. However, unless you adjust the PHP parameters for max upload size, your site’s users can upload large images that will weigh your website down. Not only that, search engines like Google consider page loading speed a factor in how your site appears in the search engine ranking pages (SERPs). That’s why optimizing images to keep their size down is important. Sure, image optimization plugins combat this, but loading your site with plugins weighs your site down, too.
Thankfully, Divi Assistant has a fix for that. It allows you to control the size of your image uploads, forcing your site’s users to upload optimized images. In addition, thanks to its image renaming feature, you can keep the number of images needed to a minimum.
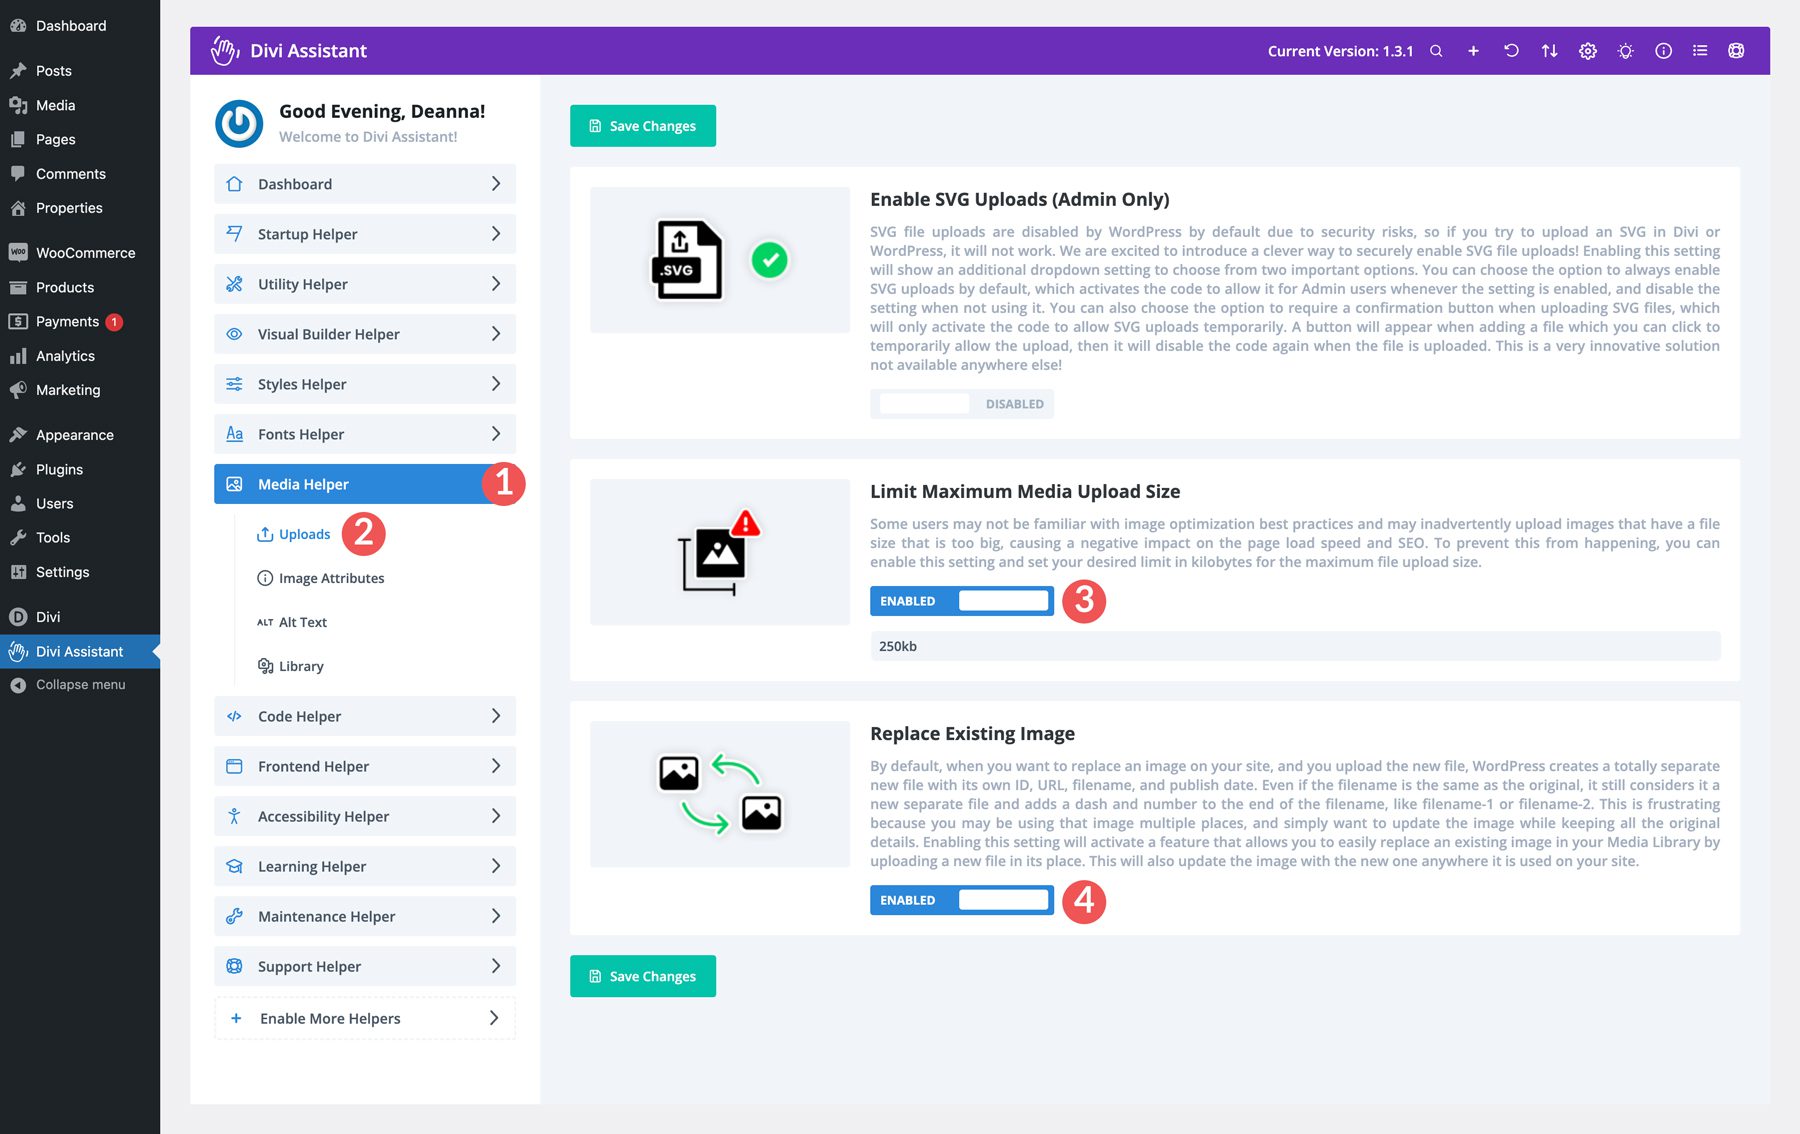
Under the Media Helper media tab, you can limit the maximum media upload size and replace existing images on your site while retaining the original file name. Select the uploads link and toggle those two features on enabled. That way, you’ll take a critical step in limiting bloat on your website.
Make Divi More Accessible
One of the most important things you can do when building a website is to ensure it’s accessible to everyone. Imagine if you couldn’t read a menu or use a website because it was too difficult. An accessible website means everyone can use it, regardless of their abilities. Accessible websites are often easier for everyone to use, leading to a better user experience and more visitors.
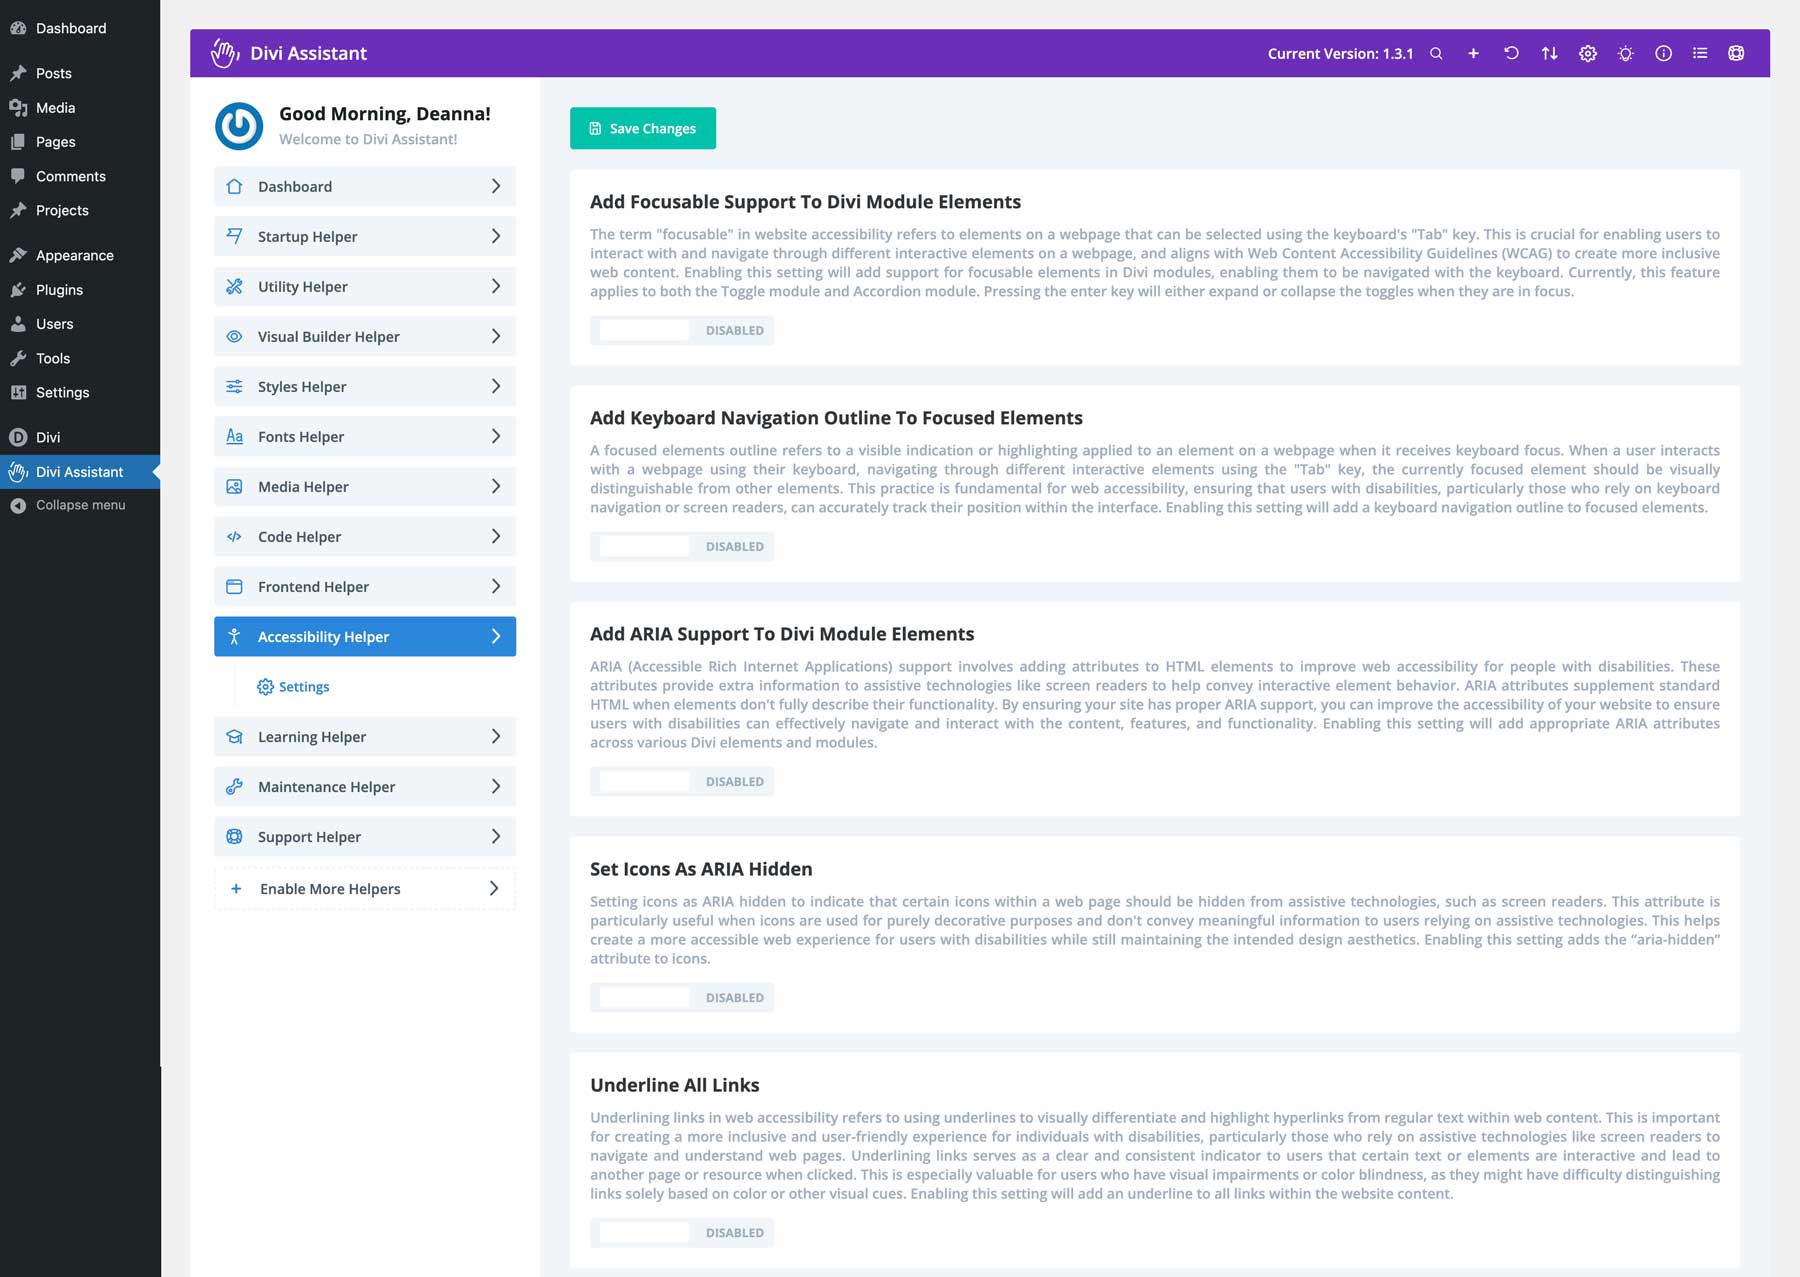
Divi Assistant understands this and includes a wealth of accessibility features for Divi. With support for accessible rich internet applications (ARIA), focusable support for Divi Modules, and keyboard navigation highlighting elements, you can ensure your website is accessible for anyone who lands on it.
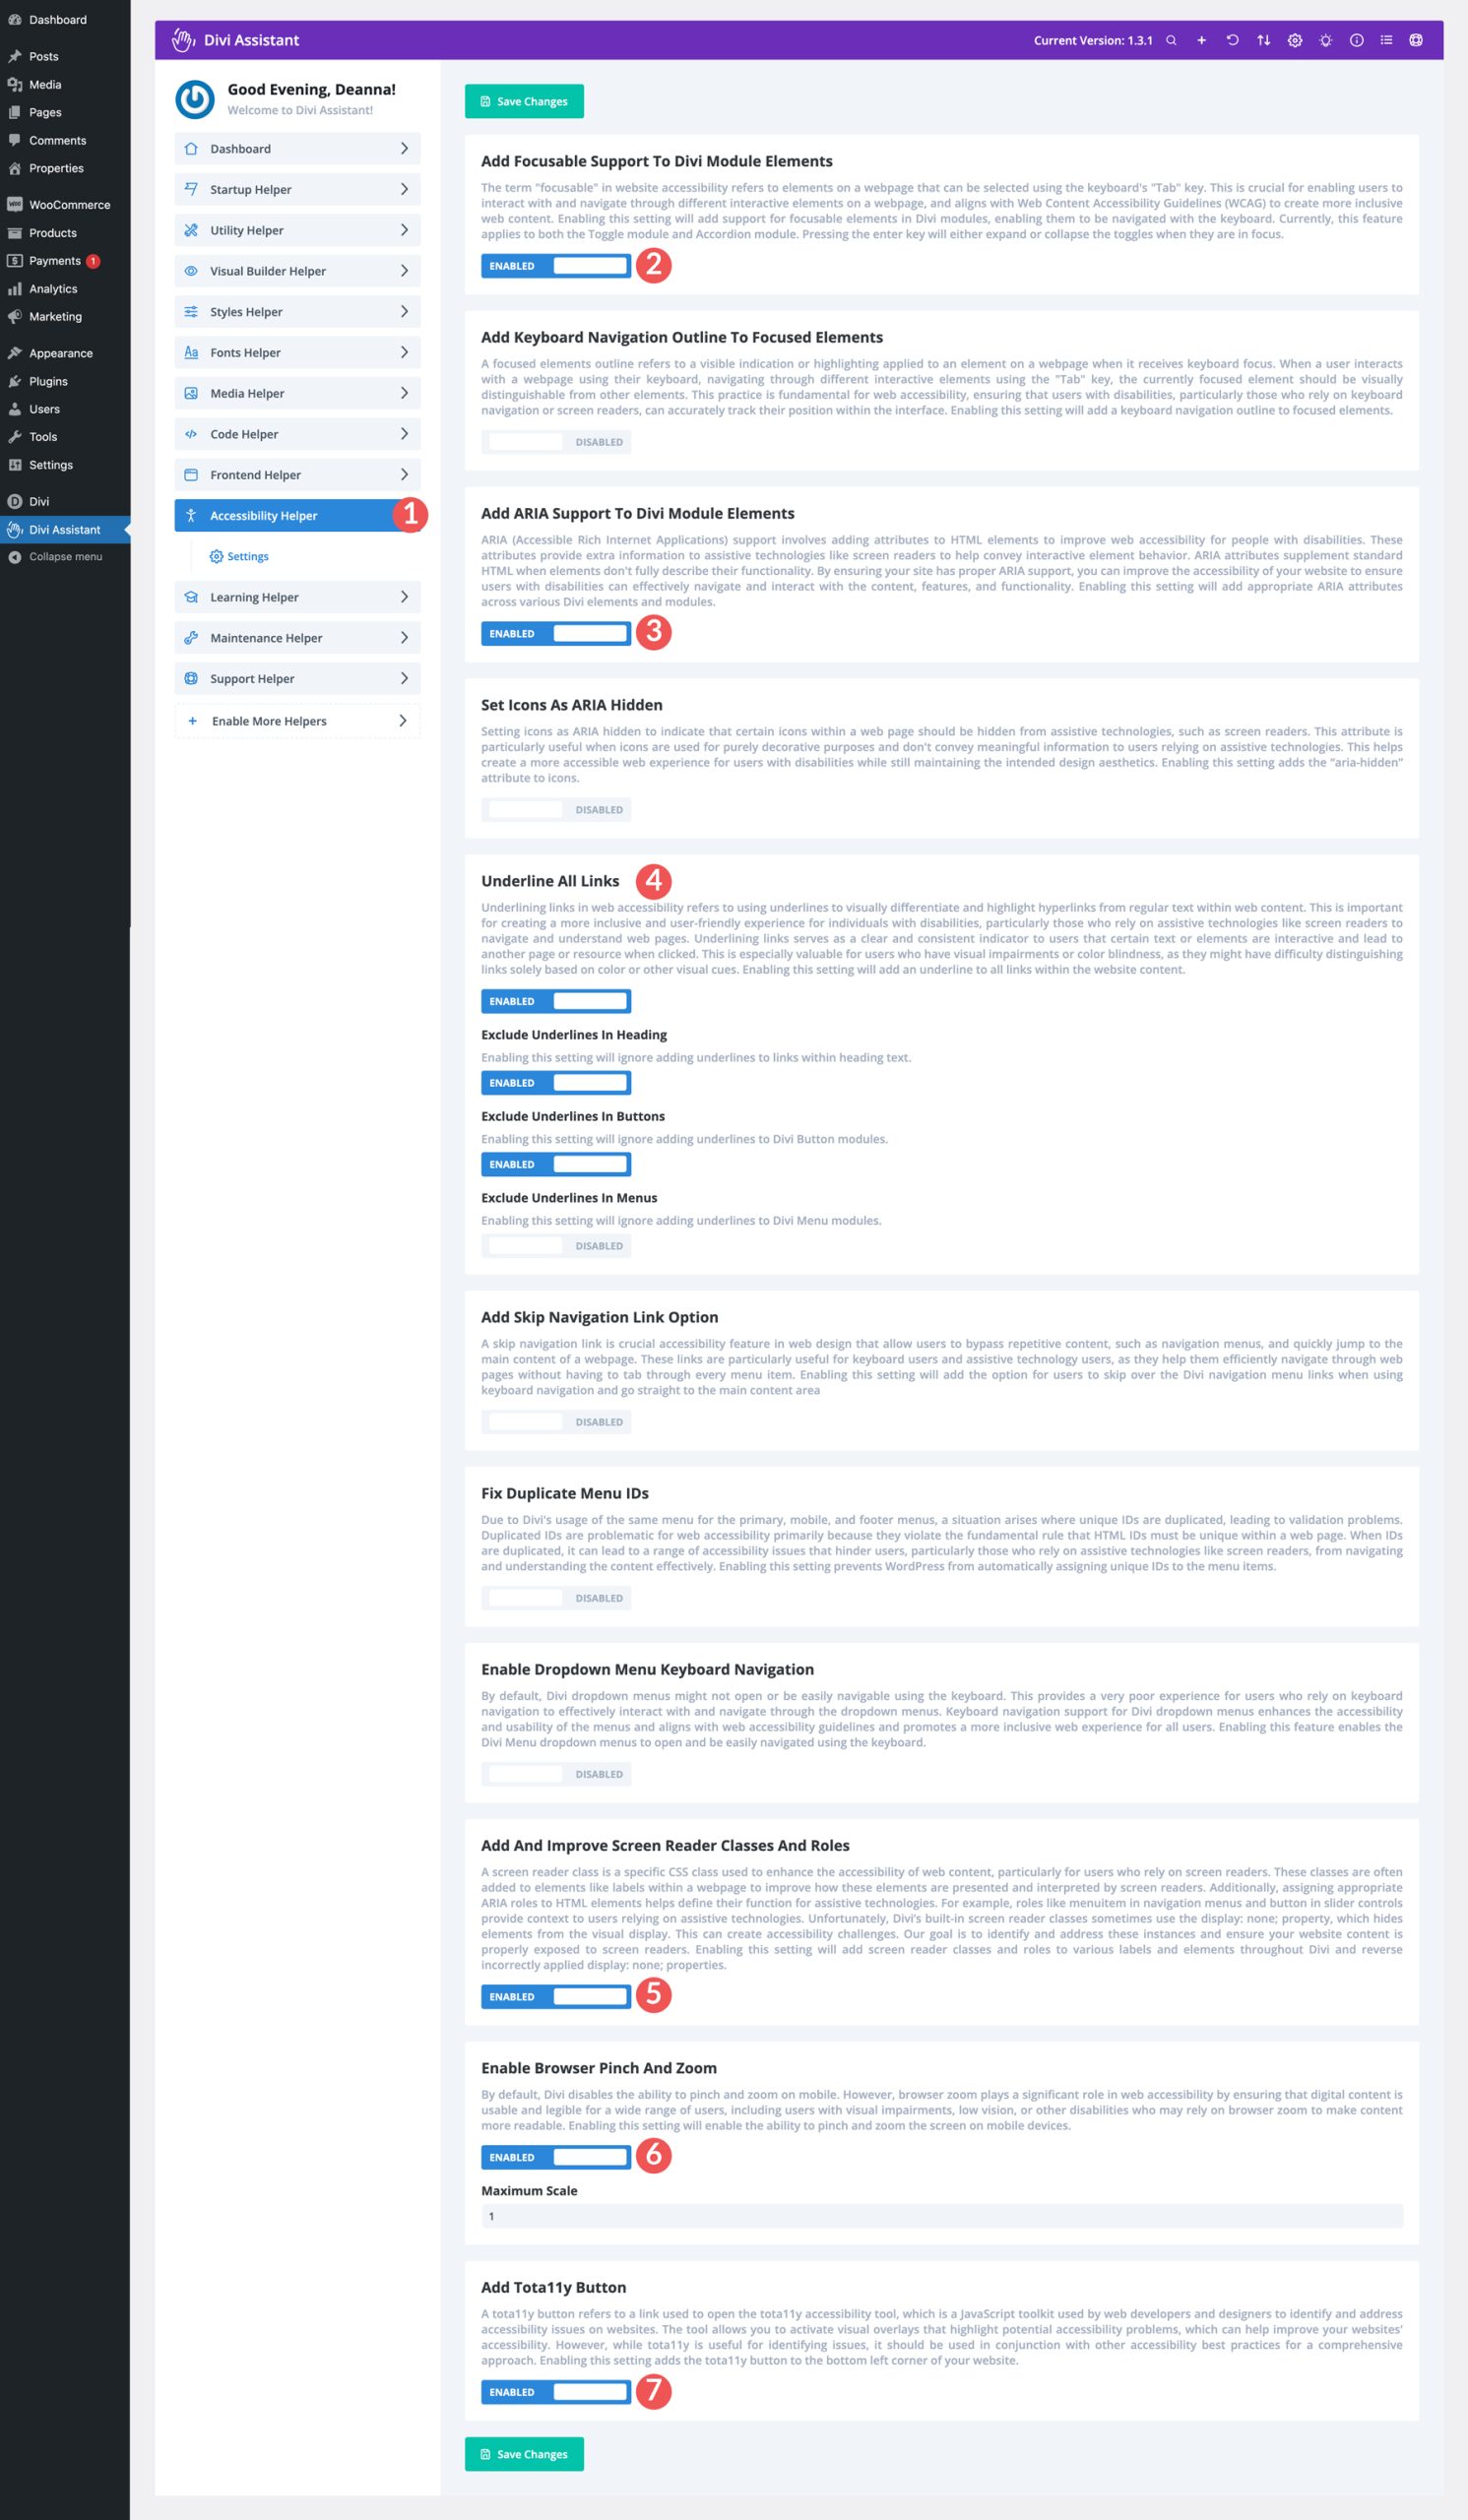
To enable accessibility features, navigate to the Accessibility menu tab in the Divi Assistant dashboard. A few settings that you should enable are highlighted in the screenshot below:
Enable Maintenance Mode
When working on your website without maintenance mode enabled, you risk losing visitors who land on your site. When updating plugins and themes, it’s good practice to provide your site’s visitors with a customized message rather than the default WordPress message. Divi Assistant enables you to use a page or Divi Library layout customized to your messaging. It’s a great way to provide information about your website while you perform critical updates or make content changes.
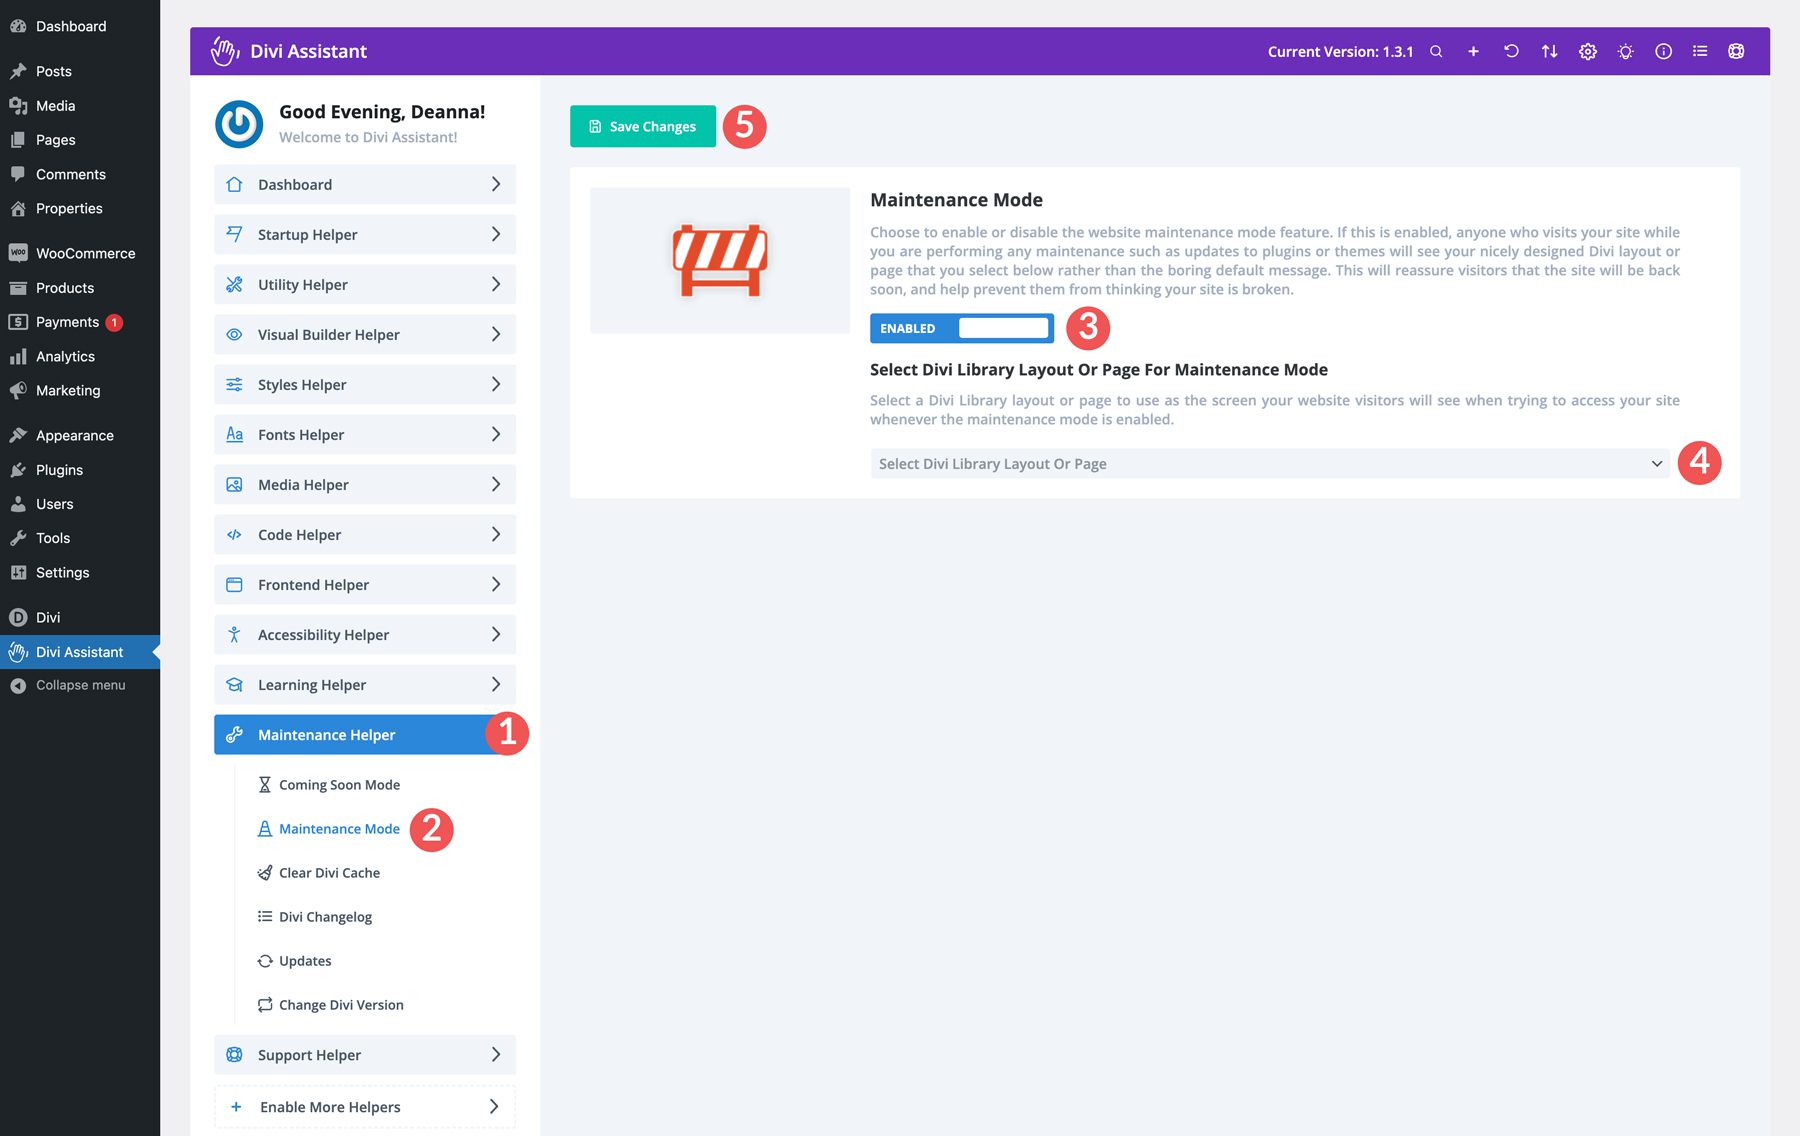
To enable maintenance mode, navigate to the Maintenance Helper menu tab. From there, select Maintenance Mode. Toggle the maintenance mode option to Enabled. Finally, select the page or Divi Library layout you wish to display and click the Save Changes button.
What Does Divi Assistant Cost?
Divi Assistant is available in the Divi Marketplace for $69. The price includes unlimited website usage, so you can use it on any Divi website you own! You can easily set up a blueprint for all your settings and export them to other sites. Divi Assistant also comes with one year of support and updates, ensuring you’ll have the latest version of the software and answers to all your questions when needed. If you aren’t completely satisfied with your purchase, you can request a full refund for a full 30 days after purchase.
Conclusion
Divi Assistant is a must-have plugin for anyone using the Divi Theme. It offers a comprehensive suite of tools that streamline your workflow, enhance accessibility, and improve overall site maintenance. Divi Assistant is the perfect solution for customizing your Divi experience and creating exceptional websites, from automating repetitive tasks to providing essential utility features.
With its user-friendly interface and extensive features, Divi Assistant is a valuable asset for Divi users of all levels. By incorporating Divi Assistant into your workflow, you can save time, reduce frustrations, and create websites that are both accessible and efficient. Try it out!




I’m so excited to see our flagship product highlighted on the Elegant Themes blog! Thanks for your work, Deanna, in sharing this! Even more features are coming to this plugin very soon!
Nelson,
It’s my pleasure! I thoroughly enjoyed researching this product and taking it for a spin. It’s a stellar addition to Divi. I look forward to seeing future updates!
Deanna
Divi assistant is for sure one of the best plugins for Divi, I‘m using it now on every website and had it from its beginning. It‘s features are extended regularely and the plugin gets better and better. I have already replaced 5 or 6 other plugins with it. I have to admit that I had to adjust my workflow a bit with it. If you know what your fonts should be (incl. locally hosted -> GDPR), the needed font-sizes on all devices, colors etc. – in other words a good understanding of how your website should look like – it‘s a great helper, because you can (should!) at the very beginning of your creative development enter all the settings you need in there. And Nelsons support is very quick and to the point. I even would recommend to go for an unlimited or even adventure license, like I did. Not because I need it all, but also to support a great developer. And no, I do not get paid for this comment ;o). I just wrote it because Divi Assistant deserves to be seen.
The folks at PeeAye Creative have really done a great job. It’s always worth checking out their website for help tips and tricks. In my opinion, this is the Divi plugin that fits in so well as if it had been integrated natively by elegant Themens. Really outstanding work.
Divi Assistant is one of the best plugins I have ever used. It has become a MUST for every Divi installation. It is part of my lifetime membership at peeayecreative.com
Nelson has done a really good job!