
Welcome to part 2 of 5 of our Divi mini series Creating Client Documentation to Empower your Clients and Save You Time. In this series, we’re branching out from a typical module or Divi design tutorial by showing you 5 ways you can create Client Documentation with the primary purposes of educating and empowering your clients and in the process, saving you time.
Investing in a website design can be a very intimidating and overwhelming process for a client. It’s our job as the web developer to prepare them on how the process works, what tools we use, etc. What better way to do that than with a getting started page?
I found myself repeating my process and tools to new clients over and over until finally creating a getting started page. Now when a project begins, I send my page to the client to review before we dive into design and development. I’ve found that this has alleviated most if not all initial questions my clients have before a project begins.
Alright, let’s dive in and give you some ideas on how you might create a getting started page for your clients!
- 1 Creating a Getting Started Page for Your New Clients
- 2 How This Can Benefit You
- 3 How This Can Benefit Your Client
- 4 Implementing a “Getting Started” Page on Your Website
- 5 1. A Basic Overview of What I Need to Get Started on a Project
- 6 2. Basecamp (or any particular project management software you might use)
- 7 3. Dropbox (or whatever image transfer program you may use)
- 8 4. The Development Process
- 9 5. Preparing for Launch
- 10 6. Final Link or Call-to-Action
- 11 Tomorrow: Creating a “Moving Forward” Page for Your Clients
Creating a Getting Started Page for Your New Clients
Here’s what my page looks like:
![]()
How This Can Benefit You
Having a link that you can send to a client that outlines your development process, tools and need-to-know items will save you time. You’ll avoid countless incoming emails and calls from clients who may be confused about the collaboration tools you use, your process and what to expect when a project gets underway. It’ll also help you better articulate and refine your process when you’re able to explain it visually in one web page. It reflects very well on you as a designer if you have a proven step by step process that’s easy to follow.
How This Can Benefit Your Client
With a getting started page, you can help make your client feel comfortable, informed and excited about the web design experience. Remember, you as a web designer are selling much more than a product or service; you’re selling a web design experience! You should want your client to feel excited and informed from the get go. Creating a Getting Started page is a great way for the client to see the process, know what to expect and know what’s expected of them as the project begins.
Implementing a “Getting Started” Page on Your Website
I’ll go over in detail what’s in my page and will hopefully encourage you think about what you may put in yours.
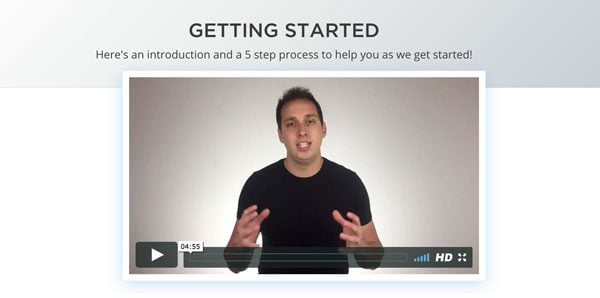
I created an intro video that briefly goes over my getting started process. Since I don’t often meet all my clients in person, I’ve found this a great way to make them feel more comfortable and get to know me a little better before the project starts.
1. A Basic Overview of What I Need to Get Started on a Project
This is all information that most all web designers should get before diving into a project. By listing this out (in bullets) it helps the client know what to get together and what’s expected of them before getting started on the new site.
There’s nothing worse than waiting on content from a client and though that’s a never ending struggle for designers, I’ve found this is a good place to start. This will also help you avoid any unpleasant situations where the clients gives you nothing then two weeks later is asking how the new site is coming. By sending this information to the client up front, they know you need this before you start designing.
Here’s what I ask for:
• Your Logo (PDF, EPS or high res JPEG if possible)
• Hosting Login (hosting account and/or Cpanel login)
• Current Website Login (if currently a WordPress site)
• Images or any new pictures you’d like to use for the new site
• Brand style guide, colors or any special graphics being used
2. Basecamp (or any particular project management software you might use)
I use Basecamp to help me manage all my projects. It’s a great tool for collaboration with clients and fellow team members. When I started using this however, I found that my clients were confused when they got emails from Basecamp. I realized very quickly that I needed to inform my clients up front that we’d be using this platform to track progress and share content. I also make sure to explain the benefits. In this case; to avoid loosing messages in email threads, to create organized discussions, to do lists, etc.
Here’s what I tell my client:
Basecamp is an awesome online platform for communication and project management. We’ll be using this to send messages, share files and track progress during the process. This will help alleviate content and images being lost in long email threads. Everyone loves email threads…right?! (Don’t worry you can still use your email. The messages will post directly to basecamp!) Once your project is underway, you’ll receive an email to set up your basecamp profile and we’ll be off and running!
3. Dropbox (or whatever image transfer program you may use)
I also use Dropbox for projects with several galleries and images. Though I tell my clients often use basecamp for image and content transfers, if there is a project with 50 to 100 images or more, I let them know about dropbox. This often helps me avoid getting multiple emails with 2-3 images per email when the client knows that we’ll be using this or basecamp to organize and collect images.
Here’s what I tell my client:
Dropbox is a great online image/file sharing platform. This isn’t necessary for every project, but if you have more than 15-20 images for your website or if they’re too big to send through email or post on basecamp, we can use dropbox. We can also use this to share important logins and credentials instead of sending through email. I will set up a folder for the project and will share the folder with you via email. You can upload all images and files there.
4. The Development Process
It’s very important for the client to know and understand your design/development process. This will not only help your client understand what’s going on day to day but is also a good way to set expectations. I simplified and explain my process in 3 steps:
Here’s what I tell my client:
THE DESIGN PROCESS
Designing a website, no matter how big or small, is an extensive process that can be overwhelming. I’ve outlined my process into 3 steps:
STEP 1 – LAYOUT AND DESIGN
A large and time consuming part of website design is in the layout, structure and design of the site. I’ll create the framework of the website and will send the homepage and a sub-page (or more upon request) for approval.
STEP 2 – DEVELOPMENT
Once the site layout and design is approved, I’ll move forward with the designing of all pages, functionality and responsive code, making sure your site looks great and functions nicely across all devices and web browsers.
STEP 3 – REVISIONS AND EDITS
Once the site is ready for final review, you’ll be able to review each page and we can make detailed edits until the site is revised completely.
I’ve found that when a client turns their project over to a developer, they want to know how the process works and what to expect. By laying out your process in simple terms, you can help your client feel at ease when the project begins. I accent this on my page by using the blurb module icons and putting a nice background image to help make this very important section “pop.”
![]()
5. Preparing for Launch
I’ve found that many clients are also initially interested in the “going live” process so I try to give them some basic information so they know what to expect before we go live with the new site. I give information to our website security and maintenance plan as well as letting them know that they’ll receive information and our recommendations on “moving forward” with their new site once it’s live.
Here’s what I tell my client:
Once the site is ready to go live, all unnecessary plugins, pages, images and backend files will be removed. The new site will be backed up and saved locally, should it ever need restored. Once live, please allow 24-48 hours for propagation to occur. Some computers will need to be refreshed in order to see the new site, though most computers will see the new site immediately depending on the wifi connection.
Your website logins and all credentials will be sent to you via basecamp or email insuring the security of your passwords. Though your logins and passwords will be saved locally, PLEASE SAVE ALL LOGINS FOR YOUR RECORDS AS WELL.
Upon completion, you’ll receive a link to my “moving forward” process where you’ll receive tips and tricks on marketing your new website and also information on our Maintenance/Security Plan which I highly recommend for all my clients.
6. Final Link or Call-to-Action
Finally, I have a link to my website questionnaire if a client didn’t happen to fill that out. More often than not, a client gets this after filling out the form but I’ve found it good to have a link there just incase.
Well I hope the idea of a “getting started” page inspires you to better prepare your clients before getting started on a project! I have found this very useful in helping me avoid repeating the same thing over and over to new clients and I’ve also found that clients are very appreciative and excited when they know what to expect before the web design experience begins!
Tomorrow: Creating a “Moving Forward” Page for Your Clients

Tomorrow we’ll talk about creating a “Moving Forward” page for your clients and I’ll give you the recommendations that I offer my clients to help them utilize and grow their new website; all of which you’re welcome to share with your clients as well 🙂
Be sure to subscribe to our email newsletter and YouTube channel so that you never miss a big announcement, useful tip, or Divi freebie!


Just catching up on posts. Working on a client’s site, I’m all, “Pssh, step 1, step 2, step 3, easy peasy,” etc. Putting my own stuff together, I’m all, “OMG WHERE DO I TURN FIRST?” Then there’s skwirls and… I lose all focus. So I’m loving this series. You’ve no idea how much this has helped!
That’s awesome to hear, Shannon! Thanks for the feedback and for letting us know how this has helped you!
What a wonderful idea! Amazing post! Josh 🙂
Thanks, Farhana! Hope this has helped you out!
I love you guys! your series earned me a lot of clients!
keep on making these killer posts!
Awesome to hear, Prince! Thanks for letting us know!
This is a process that I have not implemented and have experienced the pain of it. I’m loving this and will be implementing it IMMEDIATELY!
Thank you for sharing your success!!
That’s awesome to hear, Tony! Yea this saved me some serious time immediately with every project and has inspired many of my clients to do the same for their work in their industries.
Thanks for your feedback!
This is priceless! Thank you.
Thanks, Ivy!! Glad this was useful for you!
A very timely Great post! I’m working up on my first site and was wondering how to go about it. I started with a spreadsheet but your post gives a good direction. Thanks so much and looking forward to more in the series.
Thanks Seema! Awesome to hear that this post came to you at a good time. Appreciate your feedback!
Incredible post!!.
I will try to implement this on my site. Thank you
Great to hear! Thanks, Leonel.
Thank you for this information. I do something similar with info package. However, I am a talker so creating a video that explains everything is another way to do this. I also think that will go over better with a lot of my client as well thank you again for the idea.
Thanks for the feedback, LaToya! I’ve also found that creating a video forced me to be as precise and condensed as possible when sharing all this information to keep it to a 5min video.
Your clients must be a lot more savvy than mine.
One paragraph about Basecamp and they are good to go?
Same with Dropbox?
Plus you include technical terms like “propagation”, and why even mention the “removal of unnecessary plugins and backend files”?
I can see this page answering a few client questions but it would also raise quite a few as well.
Hey Paul,
There are certainly some clients that need more direction than others and some of this does raise questions but even with those situations, this has still saved me some serious time. There are more pros than cons to having a page like this to get clients started. And I’ll be improving, perhaps simplifying it more and more as time goes on!
Thanks for the feedback!
I send my clients a form, I ask them for everything they need: photos, videos, social data, addresses, phones, in short, the form of sending is very last, I use (Zopim)
Awesome idea! Thank you!
Thanks Lynne!
Is it weird that I’m so excited to read this? ? Well done! I can’t wait to implement this on my site. Thank you!
I’m excited that you’re excited to read and implement! Thanks, Ed.
Thank you so much for sharing! This is gold.
Thanks Tim! Appreciate your feedback.
Thanks Josh, great stuff! I’m curious where the questionnaire you discussed yesterday and this getting started page actually sit on your site.
Do you have a client login page for customers who already purchased your service, and then once they login, they can see these pages? Is this something you’d setup like a membership service?
I’m assuming these 2 pages are not just sitting free somewhere on your open website for anyone to look at, right?
What kinds of plugins would I need to make this actually work based on my question above?
Thanks again Josh 🙂
Hey Newbie, yep you got it – these are just standards pages on my site. They’re not private, they’re just not in the main menu. I send them to my clients when needed.
As far as the layout and design on this page, you can replicate the same look with Divi but I’m also working on making this a layout pack on Elegant Marketplace. Stay posted for that!
Thanks for your feedback and questions!
Hi,
Can you save this layout for me to import into my site?
Hey Timothy, I’m actually working on a generalized version of this that’ll be available on Elegant Marketplace soon.
Thats a awesome blogpost.
Thanks so mutch
Thanks for the feedback, Christophe!
I LOVE YOU JOSH!! Thank you so much for this article… Question, does the video go over the 5 points? I feel like clients just read the first line, scroll to the end and then end up asking the same questions that could be found mid-way up the page. Thanks again, I’m LOVING this series!!
Thanks, Christina! Yea my intro video just recaps the 5 points. Ideally, they could have the video running and it guides them through the sections below.
Great stuff Josh, super useful. Are you by any chance allowed to put this up as a downloadable divi layout pack for us to emulate? That would be amazing!
Thanks, Angus! I’m actually in the process of generalizing this and creating a layout that’ll be available on Elegant Marketplace soon!
Do you know when this might be available? Looking forward to it!
Great, great article! Just going to plan on getting mine set up which I’m hoping will save me a lot of time and hassle.
Thanks for the feedback! I wouldn’t hope on it saving you time and hassle…I’d plan on it 🙂
Thanks for such an informative post, Josh. I created a PDF checklist for clients, but I think it would be more helpful (and more accessible) for them to be led to a page like this that outlines the process. A video would make me more personable and possibly alleviate inhibitions about working with me online instead of in-person. Thanks again!
Absolutely, Annette! 100% agree to everything you said. It’s great to because with a getting started page, you drive traffic to your site and if they’re on your site, chances are they’ll look around at recent work, more services, etc 😉
Awesome post Josh. I imagine this will save a few hours per client.
Thanks Rick! Yea this has saved me countless hours since launching it a year ago. I’ve found it’s really a win win for the client and designer.
Wonderful post. Great tips!
Thanks for the feedback, Patrick!
Omgosh! This could change my life. Thank you for sharing Josh!
Awesome to hear Tammy! It sure changed mine 🙂
Same!!! This is amazing, what a great idea – thanks mate!