
An affinity diagram is an excellent creativity and productivity tool – so long as you know how to use one effectively. Teams use affinity diagrams as a way to see data come to life, and physically moving the data around helps immerse the team in it even more. It’s also a way for team members to share ideas and findings.
What is an Affinity Diagram?
An affinity diagram provides the framework for organizing everything that comes out of a brainstorming or research session – all of the scrambled, repetitive and related information that’s conjured. If you’re trying to think through a complex issue or solve a problem, or if you need to gather all of the information and ideas related to a process or product, an affinity diagram will help. An affinity diagram will also help if:
- It’s important to create relationships between or extract themes from a large number of ideas
- There’s verbal data to analyze, like the results of a survey
- You have to collect and organize large data sets
Furthermore, by looking at an affinity diagram and going over the different ideas and relationships represented, you may think up more ideas to add. Affinity diagrams are used in design thinking, but they’re also used in non-design brainstorming processes. Most affinity diagrams have 40 to 60 items, but it’s possible to have as few as 15 items or upwards of 100.
Affinity diagrams may be referred to as affinity charts, affinity mapping, clustering exercises, the KJ Method or Technique, Space Saturate and Group, or thematic analysis. All of these terms refer to organizing a vast amount of ideas by their natural relationships.
When Should an Affinity Diagram Be Used?
Affinity diagrams can help define a project. They can narrow the scope of the project when there’s so much information it feels out of control, and they can also broaden the scope if you’re having a hard time figuring out how all of the information connects. Here are other times when an affinity diagram will be helpful:
- If you have a lot of facts or ideas to consider, but there are so many and they’re so disorganized that it feels chaotic
- The issue you’re considering feels too complex, large or overwhelming to think through
- Your team is stuck in a loop of habitual thinking and/or you seem to loosely define the same categories every time you brainstorm
- Your group has to come to some sort of consensus, and they need the information presented in a logical way in order to do so
If you have fewer than 15 points, you may not need an affinity diagram. With 15 or more points, you should be able to create 3 or more groupings, which is when an affinity diagram will come in handy.
An affinity diagram isn’t necessarily a project you’ll complete in an afternoon. You may have to spread your brainstorming and/or diagraming process out over several days so that everyone can make clearheaded decisions without getting burnt out. Sometimes walking away from an issue you’re working on gives you the clarity to return and make decisions faster.
How to Create an Affinity Diagram
Let’s go through the steps of creating an affinity diagram, from setup and brainstorming to finalizing the diagram and taking action.
Appoint a leader
While everyone will be involved, the leader will keep the process moving and provide guidance when the team gets hung up on a problem they can’t seem to solve, like where a note should go or what the main category is for a grouping.
Gather your materials
You’ll need cards or sticky notes and tape; Sharpies or thick marker pens; and a large, unused work surface, like a chalkboard or whiteboard, floor, table or wall. The work surface should be accessible to the entire team – everyone will gather around it to look at the notes and diagram.
Define the issue
Hopefully, you already know why you’re having this brainstorming session. To get everyone on the same page, though, write a problem statement so that everyone knows the question they’re trying to answer or the issue they’re attempting to solve. Put the problem statement at the top of the workspace as a framing device.
Brainstorm
Your affinity diagram starts with brainstorming, and you’ll have to decide which type of brainstorming your team will do: traditional or silent. In traditional brainstorming, everyone writes down one idea at a time, then announces it, in order, to the group. This saves the trouble of team members writing down the same ideas, which can easily happen in silent brainstorming, and which can make the diagraming process less efficient.
One of the most important characteristics of a brainstorming session is that there’s no criticism. Team members have to know they can think creatively, throw out ideas that seem “bad” at first and go with their gut, all without being criticized.
Every time someone comes up with an idea during a brainstorming session, write it on its own card or sticky note. Limit the ideas to seven words, max. Take up space on the card so that ideas can be read even from a distance. Other things that can go onto a card include:
- Data
- Documented facts
- Drawings
- Observations
Every time you have a new note, place it on the work surface. Don’t start organizing or categorizing the notes yet, just get them all in one place. They should be facing the same direction and nothing should be overlapping.
Group similar ideas
Once you’ve added all the brainstorming notes, look for ideas that feel like they’re related to one another. Move the notes around so related notes are next to each other, and aim for 3-10 groupings.
Is this feeling chaotic? To make the process easier, take one note, any note, and move it to a blank space on the work surface. That’s the first note in your first group. Then pick up another note and ask yourself if it relates to the first note. If it doesn’t, start another group with it. Repeat. These tips will also help:
- Don’t worry about creating a hierarchy within the groupings yet.
- Be speedy. Quick reactions are best. Deliberation comes next, and nothing is set in stone.
- It’s possible that some ideas will be standalones because they don’t feel like they fit into any one group.
- If a note fits equally well into two groups, duplicate the note and place one in each group. This is useful when team members disagree on where a note should be placed.
Oh, and also: do this step silently. It will feel strange to be with a group of team members and not talk even as you’re all making decisions, but it’s important that this part of the process remains silent. It’s an unconventional way to think through an issue, which helps people break old patterns of thinking. Also, people won’t get into semantic arguments while grouping ideas. Lastly, one person won’t have more of a (literal) say than everyone else.
Talk to one another and make changes
Now it’s time to talk with one another. Right now, you have groupings – related notes that are grouped together. You haven’t defined the groupings yet, though. Get rid of ideas, add ideas, move notes around, etc. More things to talk about during this step include:
- How the notes should be ranked. Which groupings are more important than others?
- Groupings that have a lot more information than others.
- Patterns that you’ve noticed, especially ones that are unexpected.
- Reasons for moving a note that doesn’t seem to fit well in its category.
- Groupings or notes that will be stronger or more thorough when combined.
This is also the time to decide on categories, which will define the groupings. What is the common thread that connects all of the notes in a grouping? When you create a category, write a header card with the category name (and an optional summary) and place it at the top of the grouping. You may also feel that one of the notes in the grouping best represents the category, and you’ll use it as the header.
Review and finalize the affinity diagram
Your affinity diagram should be pretty neat by this point. There should be columns of ideas grouped under category headers, and the categories and their ideas should all be in order of importance (or whatever flow makes the most sense). Everyone should take a close look at the affinity diagram and open up discussion again. Fine-tune it until it’s right.
Take action
An affinity diagram doesn’t mark the end of the process. Instead, it’s more like the beginning of a solution. More analysis and work are required if you’re going to get to the root of an issue and then take steps to improve or solve it. At this point, the team should singularly or jointly come up with next steps to bring their ideas and plans into the real world.
A Real-Life Example of Brainstorming and Creating an Affinity Diagram
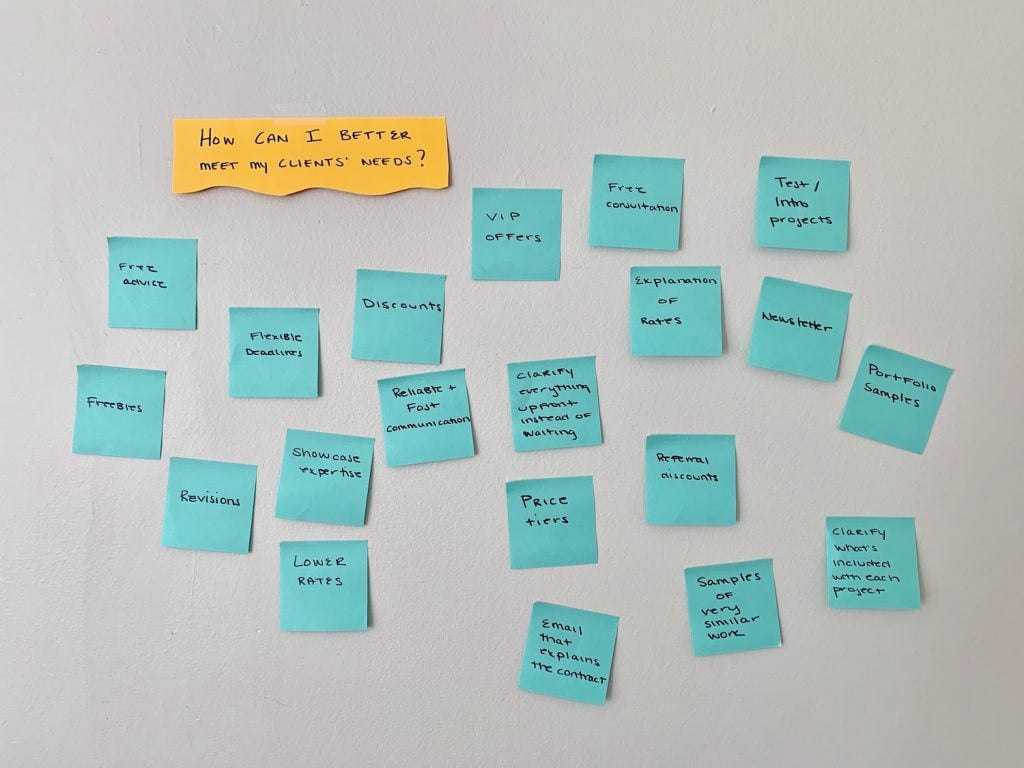
I walked through a brainstorming and affinity diagraming session on my own. I started with the question, “How can I better meet my clients’ needs?” Then, I sat down and wrote out ideas until I had at least 15 (I ended up with 20). I put them all up on the wall in random order, with the main question at the top.
Next, I organized them into groupings that felt most natural. I did this pretty quickly – I didn’t take too long to make my decisions. As you’ll see, these ended up changing quite a bit as my diagram took form, but it was a necessary and important first step to get them into some sort of organization. It’s also interesting that I went from 6 groupings to 4 and then back to 6 when the diagram was finished.
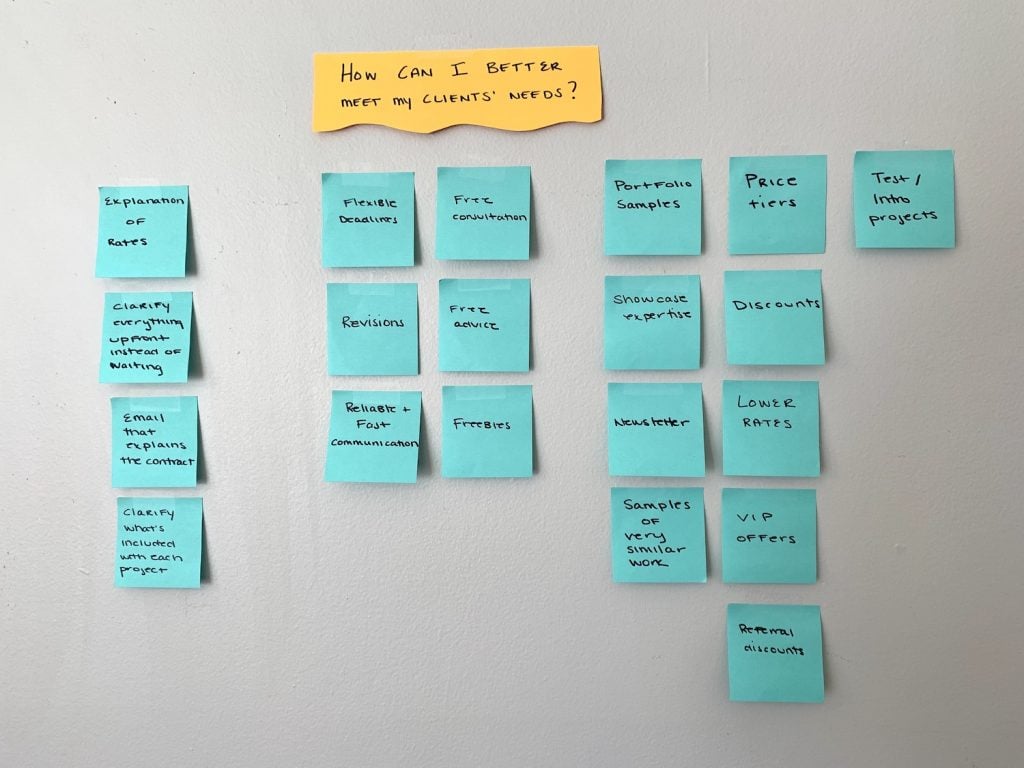
When I was organizing the notes into groupings, I started to see some natural categories take shape. These ended up changing and expanding, too. Affinity diagraming is very liquid – it’s going to change before your eyes, and that’s the point.
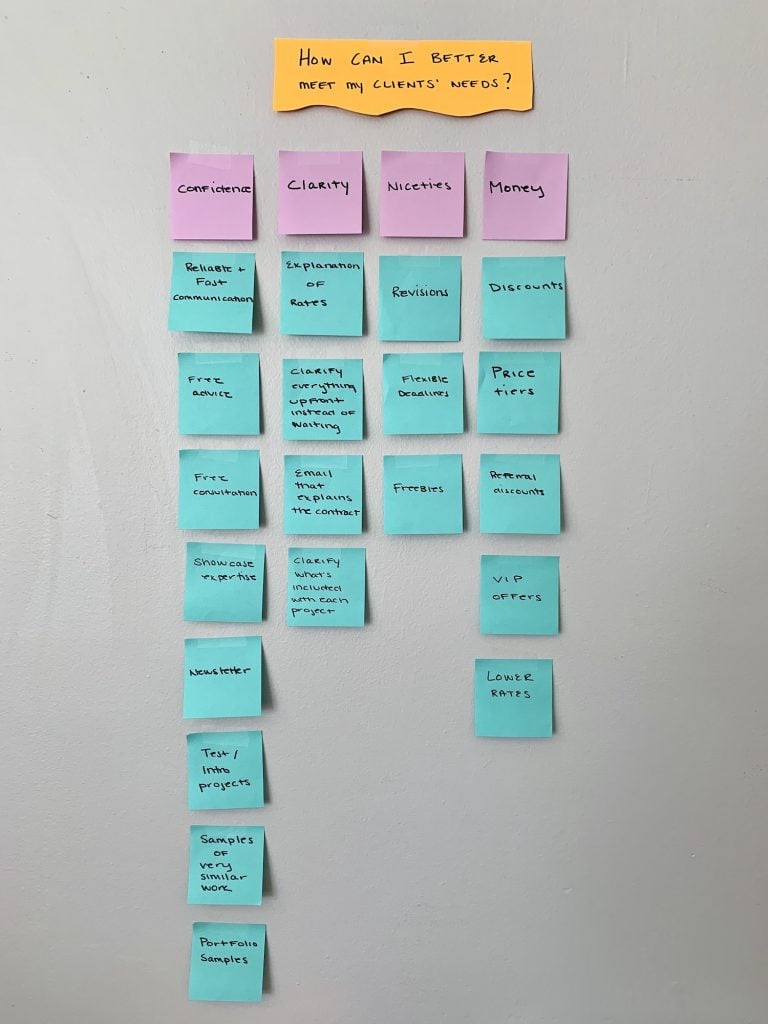
This is when the affinity diagram really started to take shape
I created four category headers, put them in the correct workflow from left to right, and placed the notes under them. Some notes left their original groupings and went into other groupings. Naming the categories made it easier to group the notes based on similarities – not only did they have to be similar to each other, but all of the notes in a group had to work toward a similar purpose.
I stepped back and took the diagram in, reading through everything carefully. If I had a team of people here, this is when the most conversation would have taken place. Here’s what the finished diagram looks like, followed by an explanation of what happened during this stage:
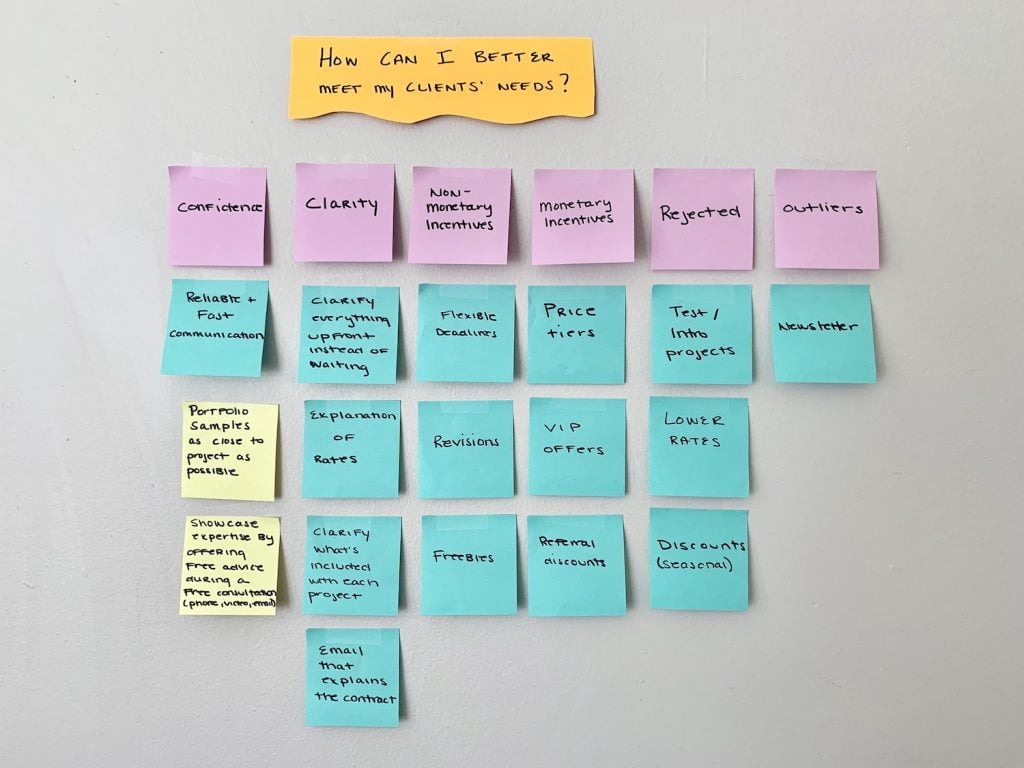
- Added two new categories: Rejected and Outliers
- Changed the name of two categories – “Niceties” became “Non-Monetary Incentives” and “Money” became “Monetary Incentives”
- Combined overlapping ideas into larger, more clear ideas (the yellow sticky notes)
- Created hierarchies within categories (top to bottom)
- Moved three ideas into the “Rejected” column based on past experience
- Realized that creating a newsletter feels like part of a different process, and it will likely become part of a client maintenance or marketing brainstorming session
It’s time to put ideas into action
I’m not finished. Right now, I just have multi-colored sticky notes on my wall. They have to become actionable in order to actually make a difference. From my final affinity diagram, here are just a few of the many actions I can take:
- Add my work hours to my email signature and website so clients know when they can (and cannot) get in touch with me. Turn on my iPhone’s Gmail notifications so I never miss an important client email.
- Write a clear, brief overview of my rates and services. Put it on my website and create a PDF to send to new clients.
- Create a list of freebies that I can offer clients to upgrade their projects (and that don’t eat up my time or energy). For example, articles or blog posts can be accompanied by three ideas for future articles. P.S. This is a good basis for a new brainstorming session and affinity diagram.
- Set up a referral program and email past and current clients with the information.
Wrapping Up
Affinity diagrams provide structure when brainstorming sessions are too unconfined to make sense of. You can create an affinity diagram online, but the physical act of holding and rearranging your notes – your ideas – is powerful, and simply getting away from a computer screen can jog creative thinking. While it’s helpful to have a team, you can brainstorm and create an affinity diagram on your own if you’re a freelancer or other type of solo worker. The most important part of the process is what you do next – ideas will remain on your sticky notes, unused and futile, unless you take when you’ve learned and decide how that translates into actual process changes.
Brainstorming and creating an affinity diagram may be a great exercise for your mastermind group. Here are another 9 Tips to Make Your Mastermind Group a Success.
Featured image via simonlidesign / shutterstock.com


A very inspiring blog that contains how to organized your affinity diagram project details points to point.
Is there a simple (not more difficult that inserting code snippets) way to have cards that can be moved on the frontend for individual or, preferably, team manipulation of the cards. Having this on the front end of a Divi site would be useful.
Come to think of it, an individual could do this using the frontend design builder in Divi as a workaround. I’d much rather have such a function that is fully in the frontend for individual, team, or pubic.
There are dedicated services for this. I have used Miro (formerly RealTime Board). I’d love to make my own website with movable cards on the frontend.
“Cards” might not be the correct term so substitute the Divi or third party module name of choice.
I’d love to hear back from anyone with knowledge of such.
Thank you,
Mike