")
Adobe Premiere Pro is the industry standard for video editing. With dozens of effects, text-based editing, and excellent color grading and mixing capabilities, it’s the go-to software for professional video editors. In this Adobe Premiere Pro review, we’ll provide an in-depth look at the interface, showcase its newest features, and provide some pros and cons so you can decide if it’s right for you.
Let’s get started.
What is Adobe Premiere Pro?
Adobe Premiere Pro is a video editing software encompassing many capabilities. From keyframing to editing text with artificial intelligence (AI), it provides all the necessary tools a video creator needs to make polished, professional-grade videos.
Features of Adobe Premiere Pro
Adobe Premiere Pro is a powerful program with dozens of features to help you create stunning, compelling videos. Standard features include tools for creating motion graphics, adjustment layers, editing, mixing audio, creating a multi-cam sequence, and more. With the latest release, Premiere Pro has included several AI-powered features, including text-based editing, speech enhancement, and audio tagging, to name a few.
Text-Based Editing
The text-based editing tool is an AI-powered feature that allows users to edit video like a text document. It automatically transcribes footage and creates a video transcript. Users can then select the text they want to use and insert it into the timeline using keyboard shortcuts or by clicking the insert button. The text edits are automatically applied in the timeline, allowing users to quickly and efficiently build a rough cut of their video.
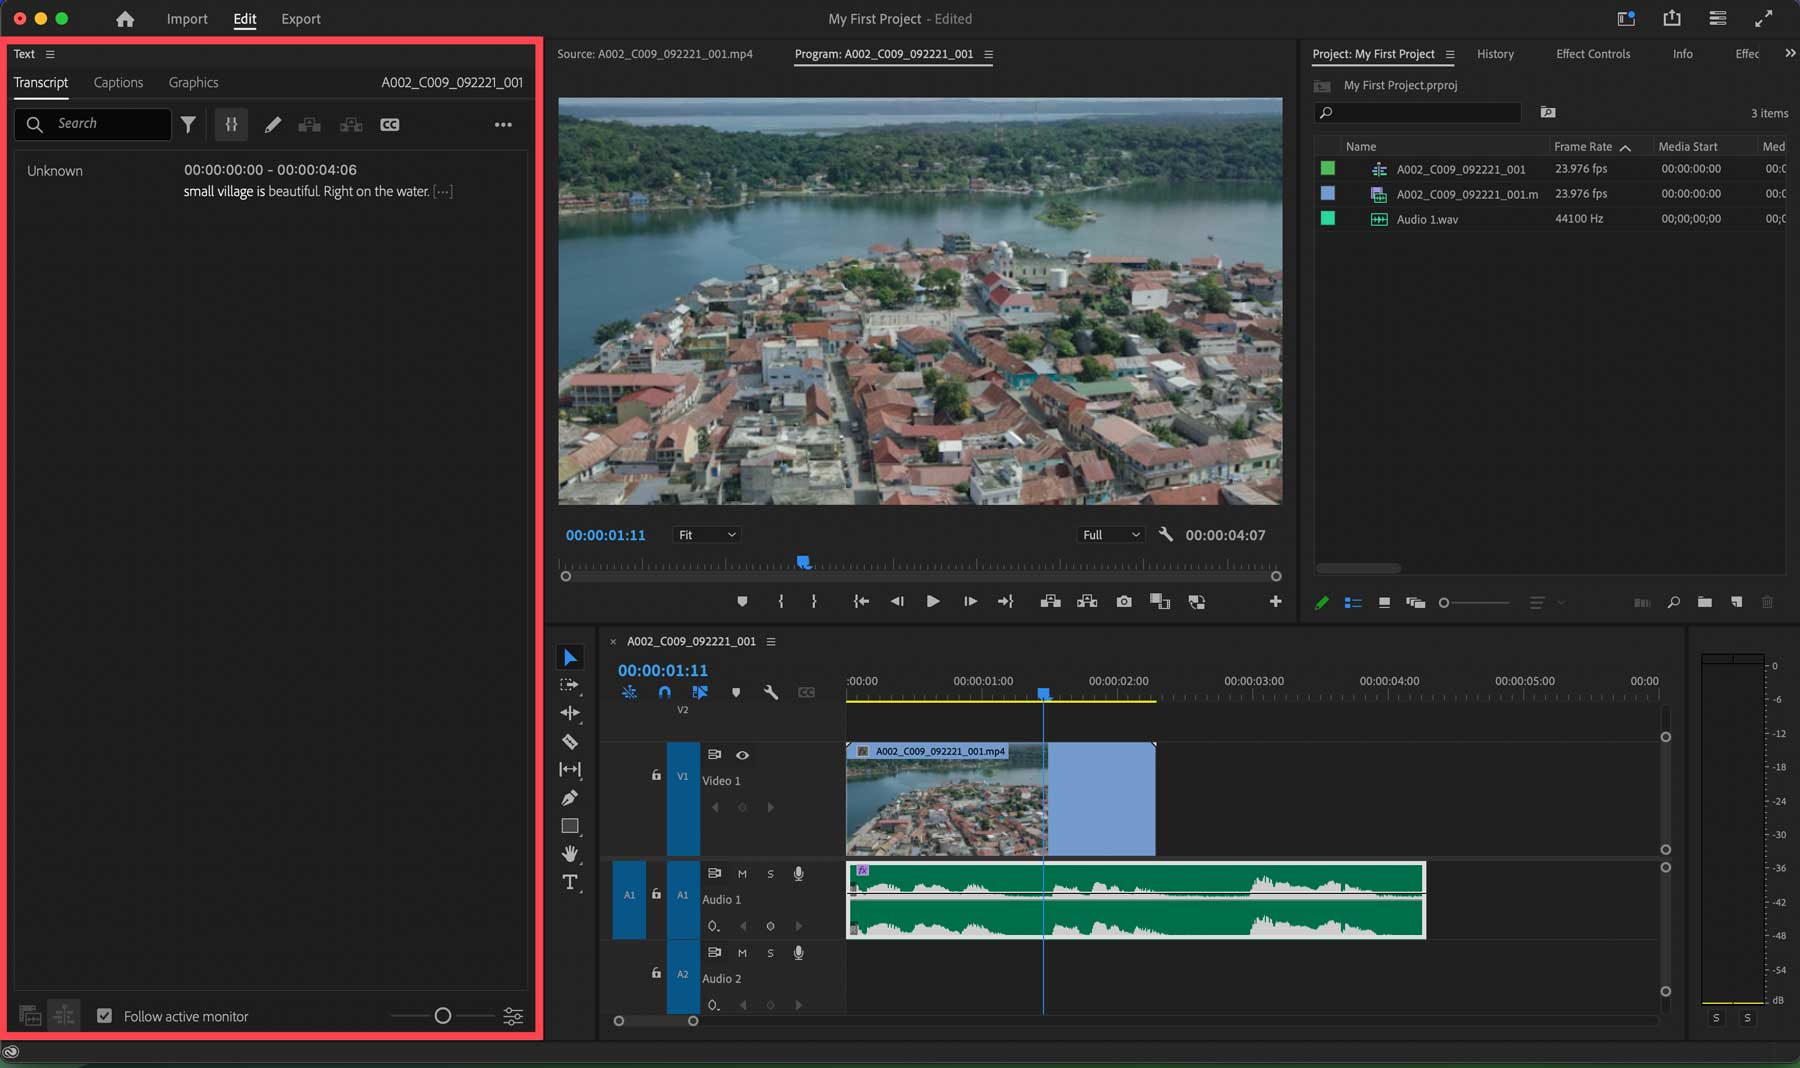
Users can also search for keywords to find what they need even faster. Once the rough cut is complete, users can switch to video editing tools for refining, color grading, trimming, or adding titles or graphics to their cuts.
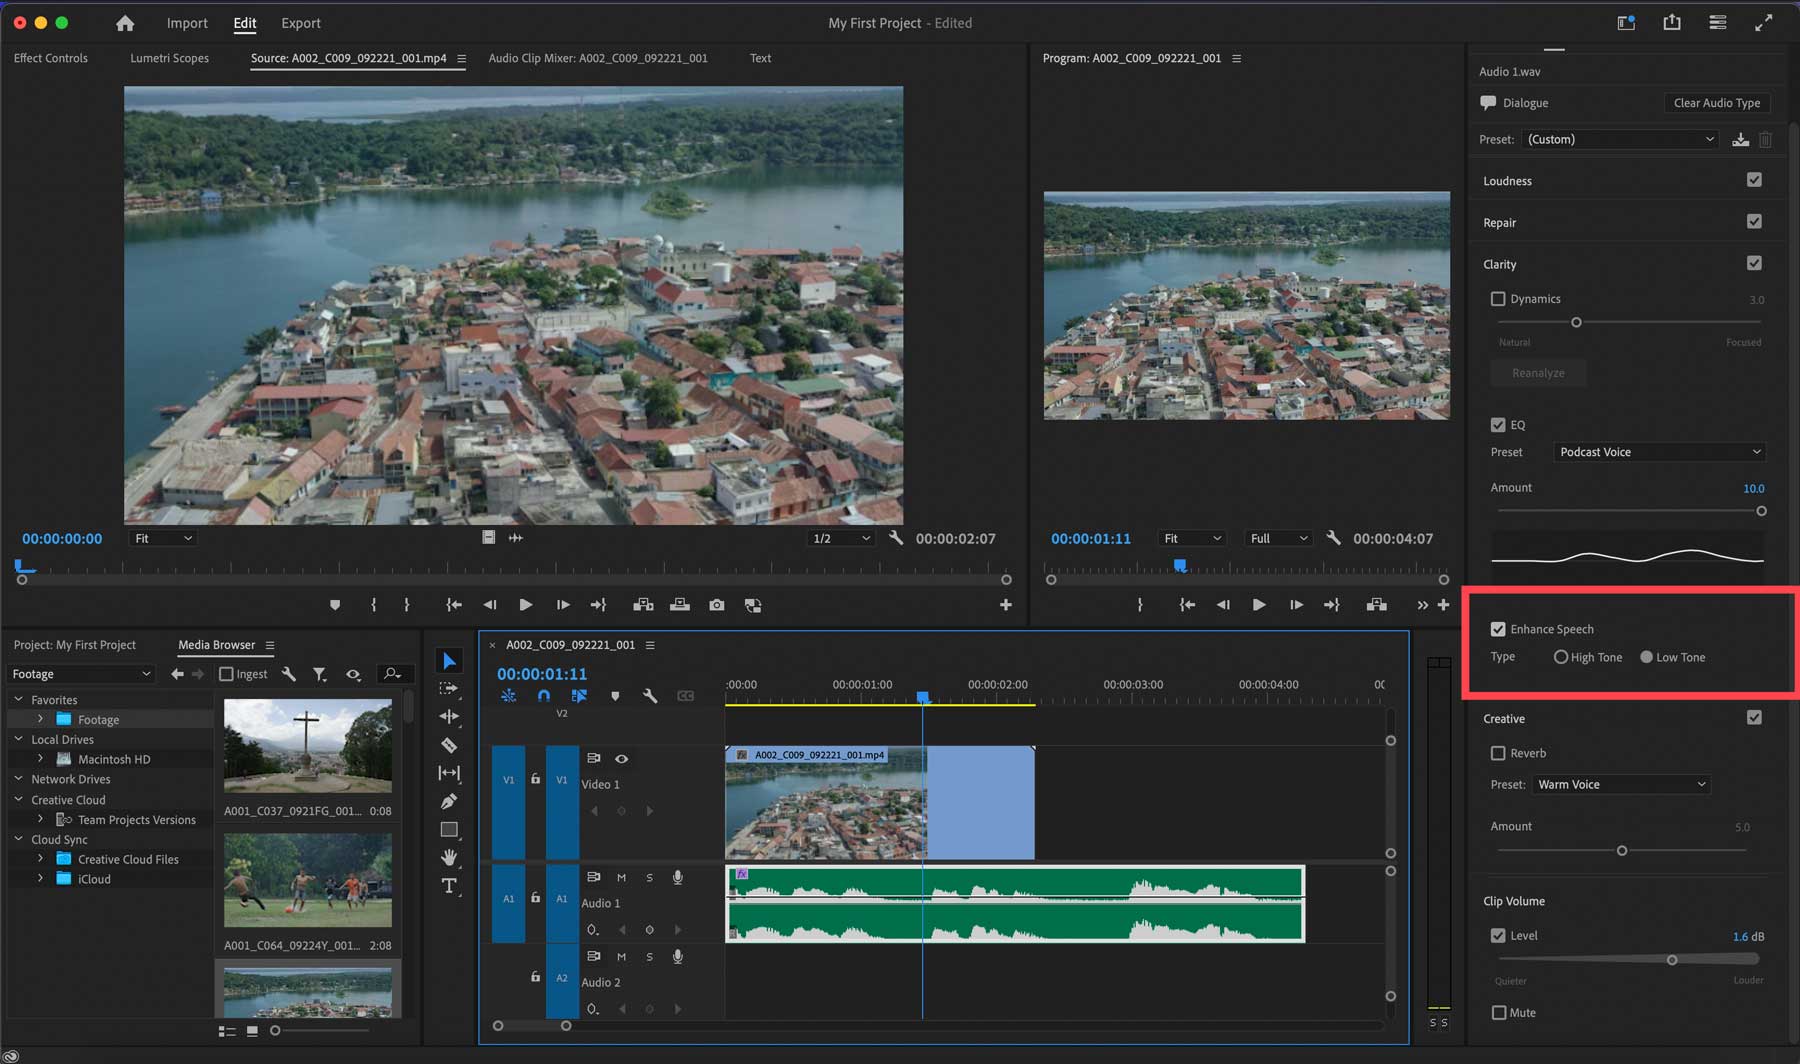
Enhance Speech
The Enhance Speech feature in Adobe Premiere Pro is a tool that uses AI to improve the clarity and quality of audio recordings containing dialogue. It can remove noise and give the audio a professional studio sound. The Mix Amount control allows you to adjust the enhancement level depending on the situation and specific clip. It is important to note that Enhance Speech is a clip-based effect and NOT a source-based effect, meaning it will only enhance the clip’s section inside the timeline.
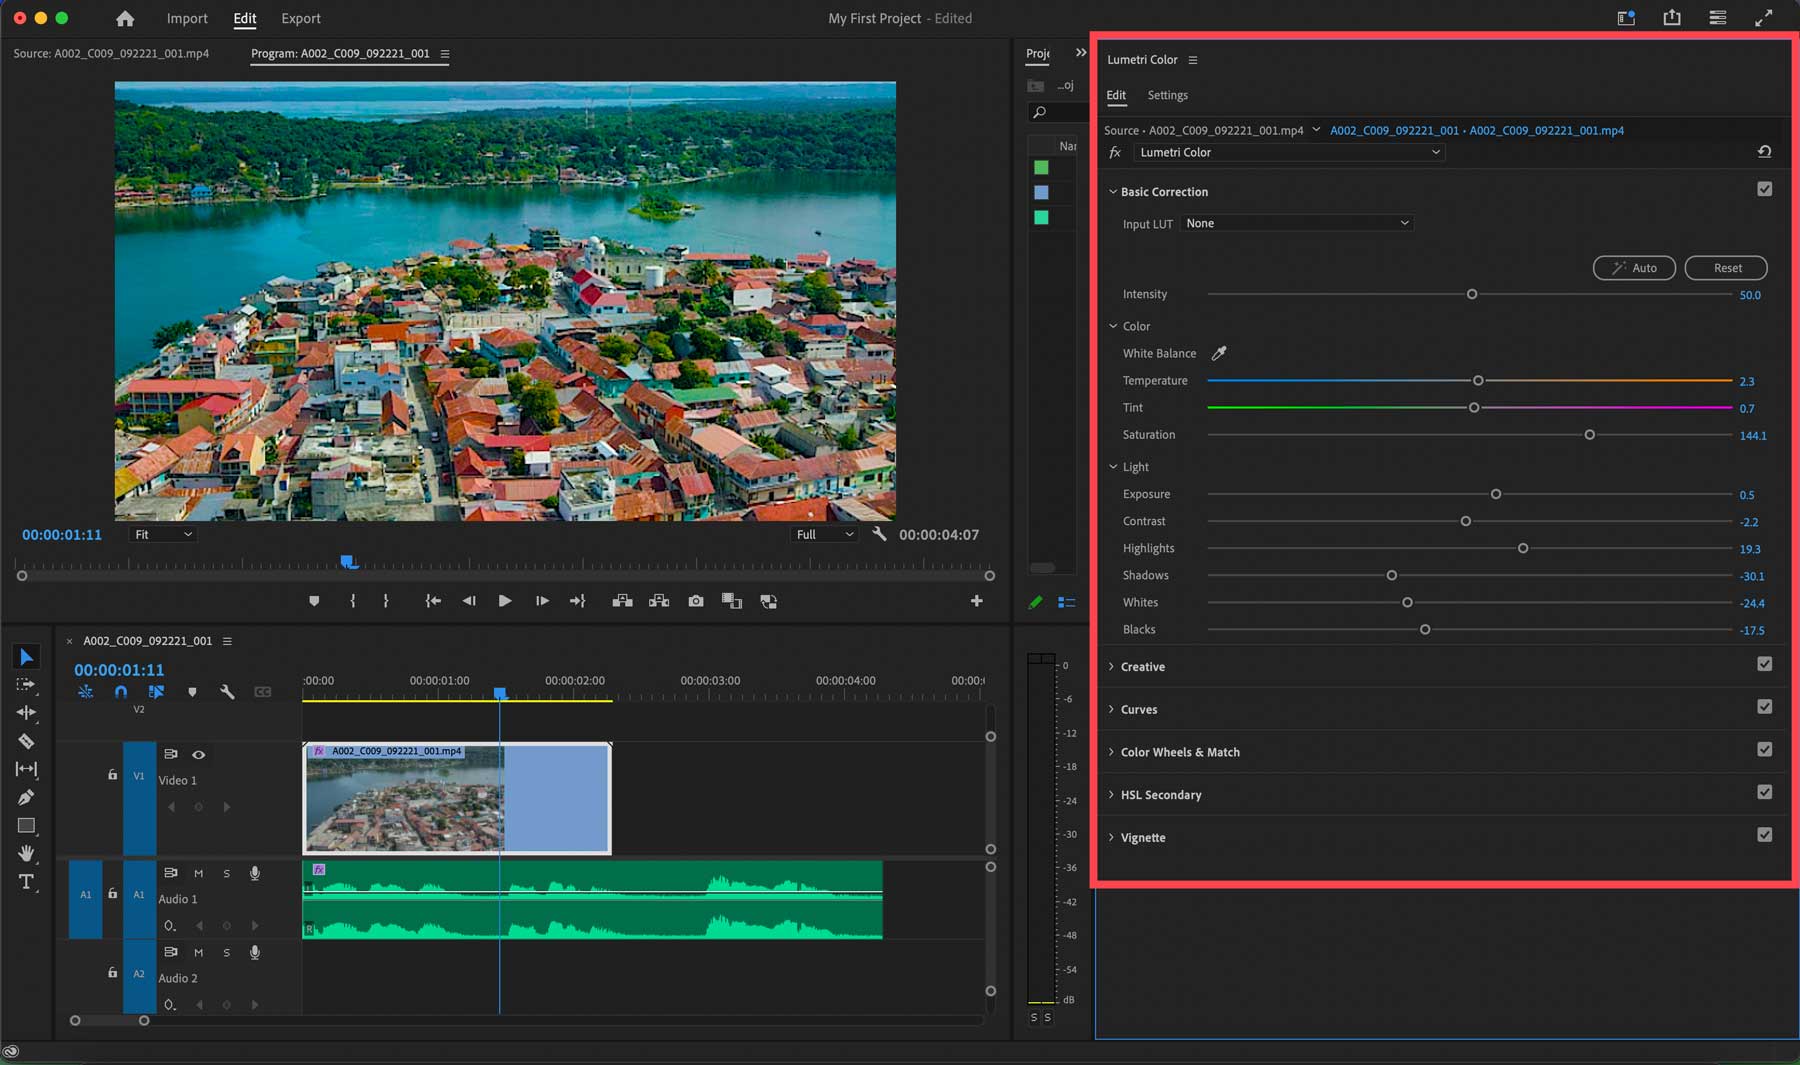
Color Grading
Premiere Pro provides the business’s most robust color grading and correction tools. These tools are courtesy of the Lumentri Color workspace. You can adjust lighting, color, curves, hue, and contrast. You can also set up a custom color grading workspace to reuse settings within your clips.
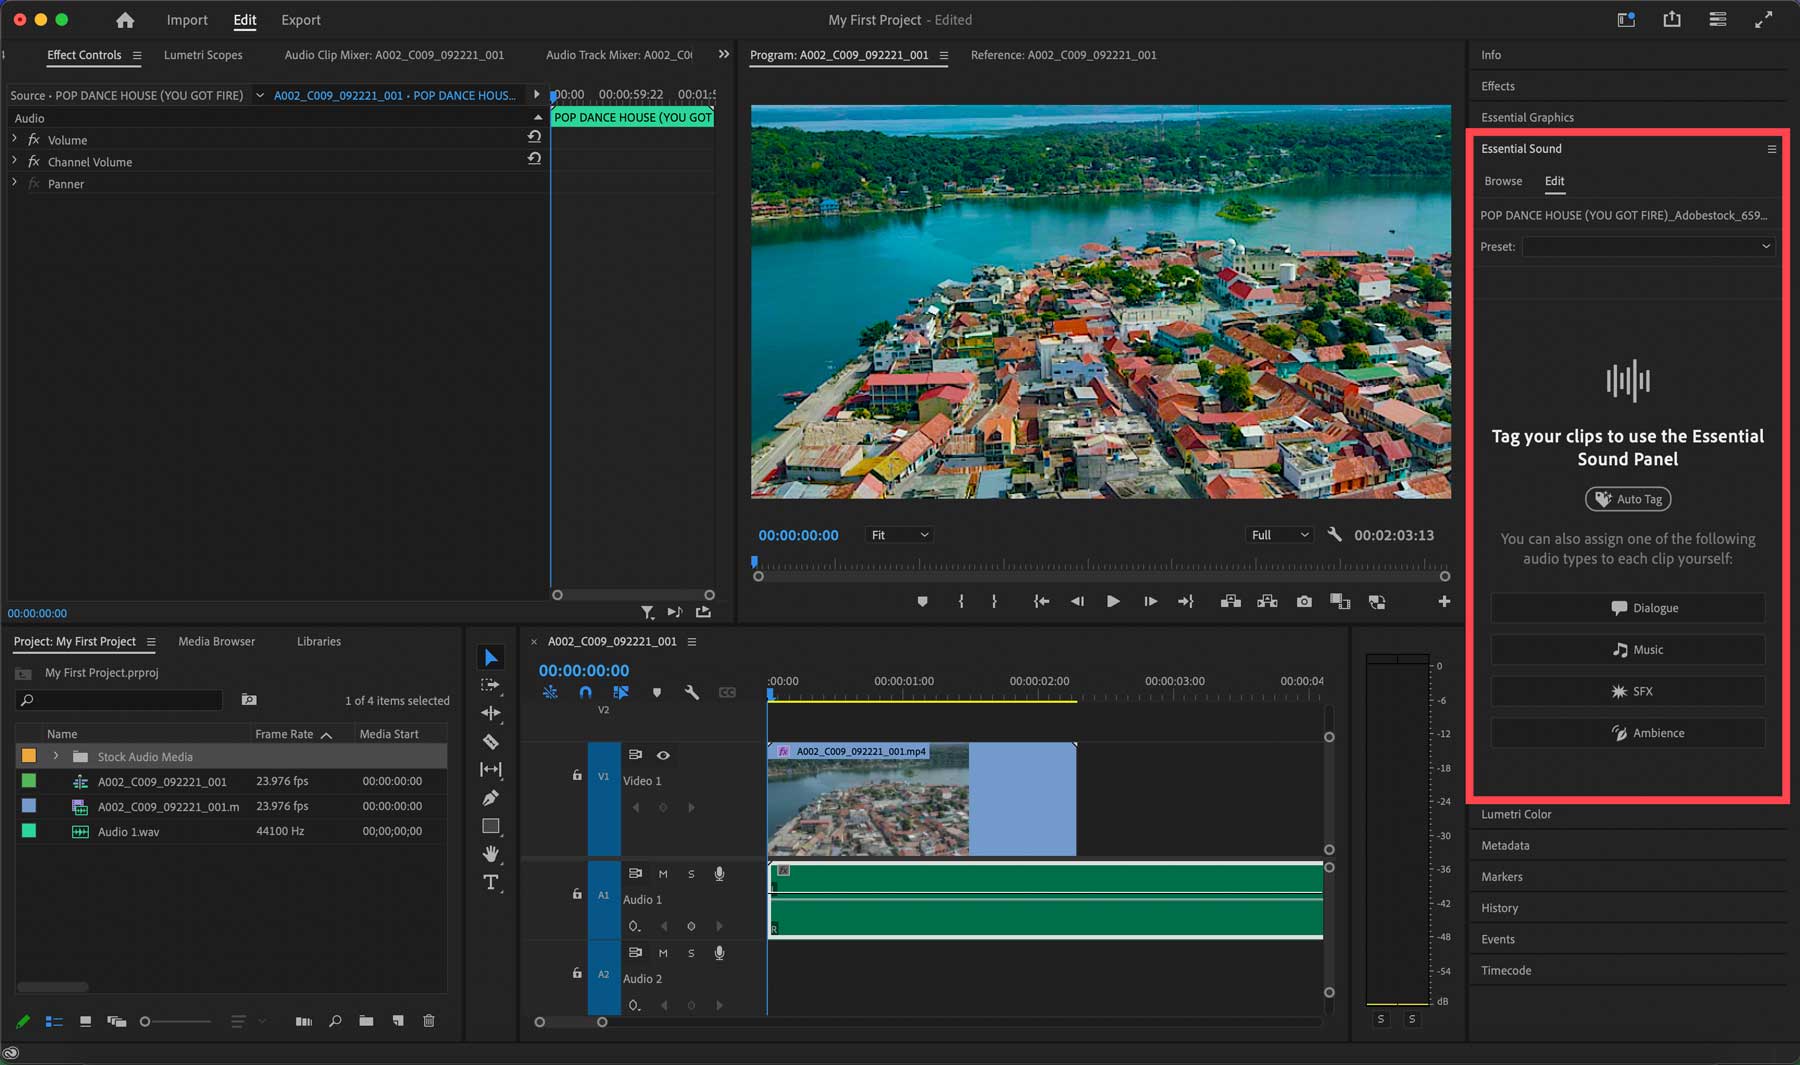
AI-Based Audio Tagging
AI-based Audio Tagging is a new feature in Adobe Premiere Pro. It uses artificial intelligence to automatically categorize audio files into dialogue, music, sound effects, or ambiance using the essential sound panel. Users can access it by selecting an audio file in the timeline and clicking Auto Tag in the panel.
Recovery Mode
Another excellent feature that’s been absent in previous versions of Adobe Premiere Pro is recovery mode. Now, there’s no danger of losing hours of progress due to a program crash. There’s also the revert feature, which allows you to revert to a previous version of a project. Users can customize the time between auto-saves, reducing the chances of losing time-consuming cuts, mixes, and more.
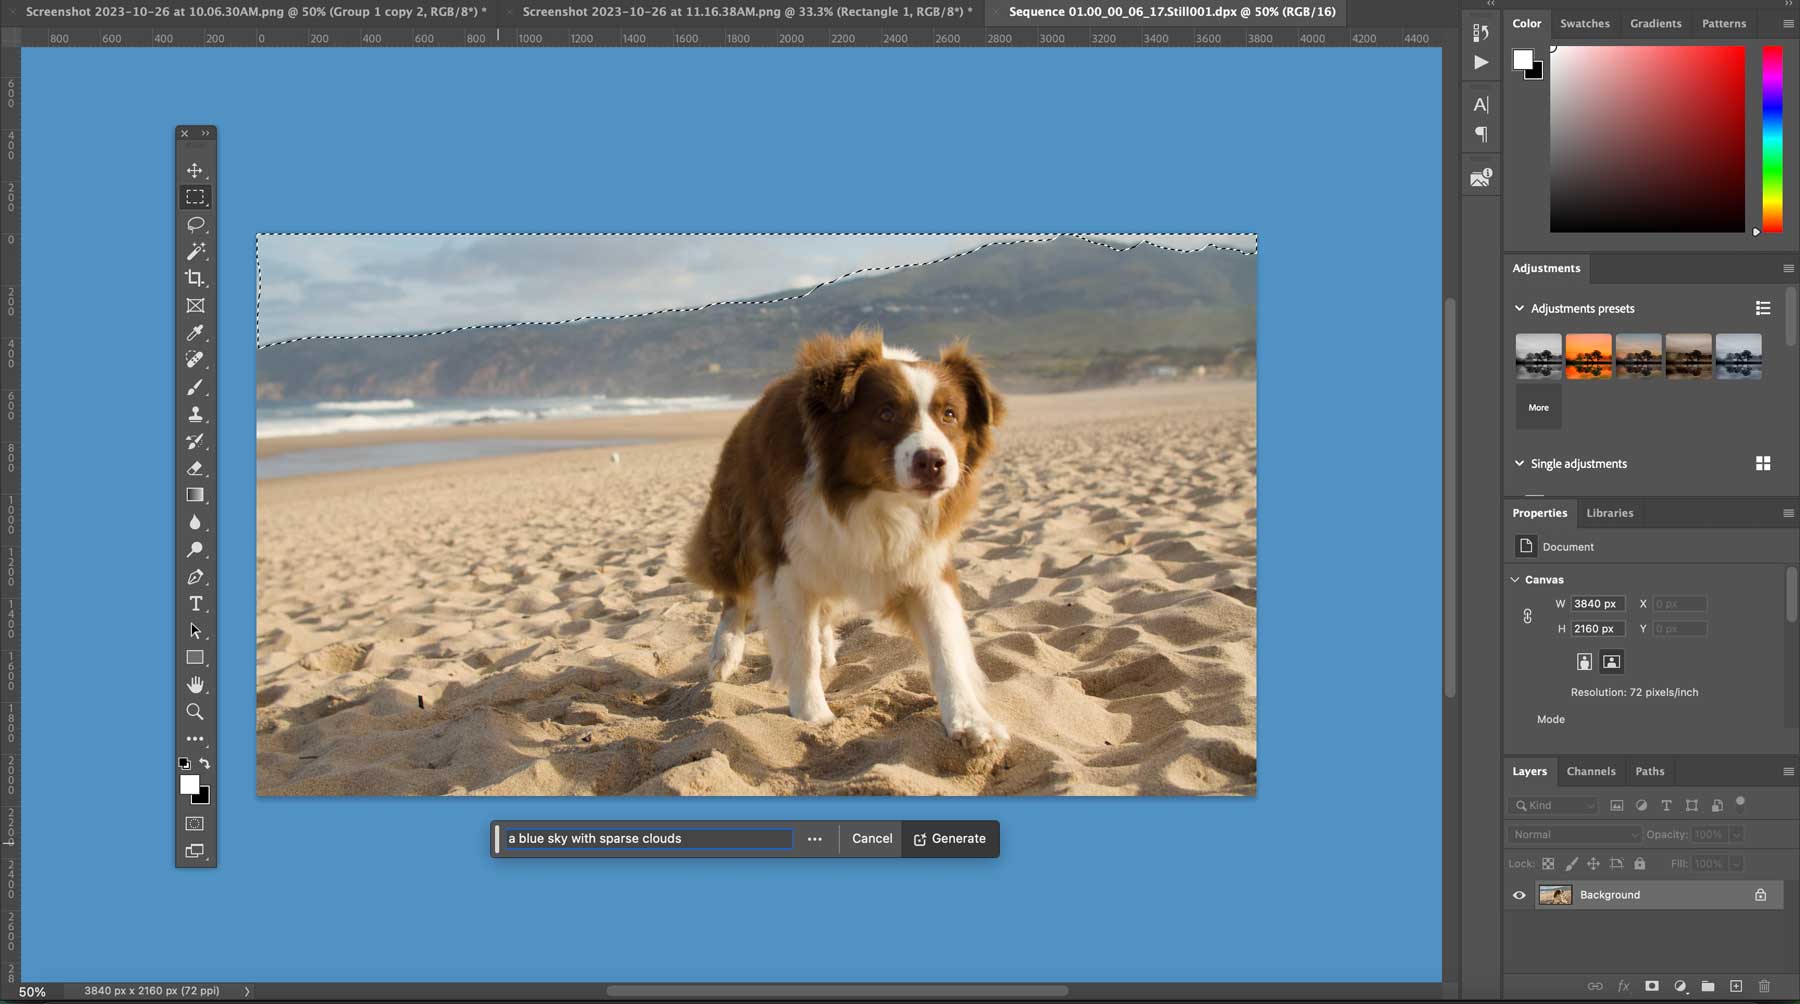
Generative Fill
One of the coolest new features of Adobe Premiere Pro is the ability to export a single frame and then import it as an MP4 that you can edit with Photoshop. Using generative fill, you can generate elements for your frame, erase unwanted aspects of it, and then import it back into Adobe Premiere Pro with one click.
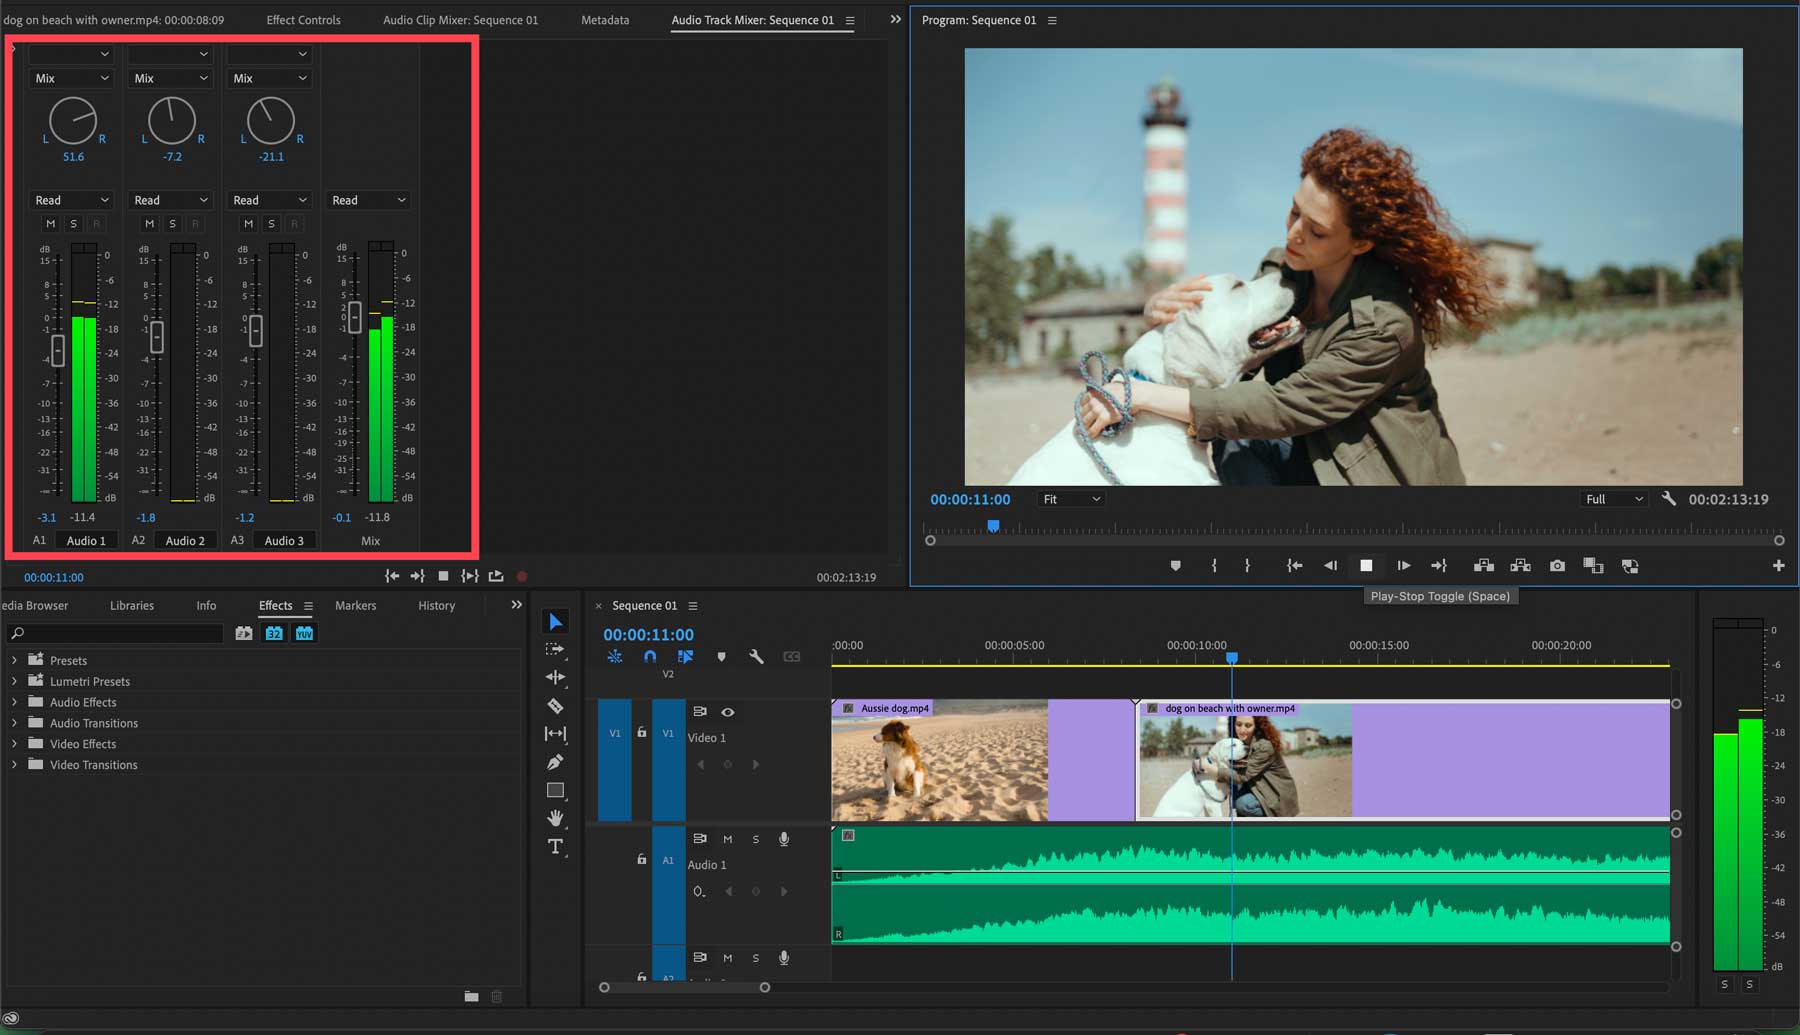
Audio Track Mixer
The Audio Track Mixer tool allows users to edit, mix, and add various effects to audio tracks. There are three presets: Panning, mixing, and effects enabling you to adjust a sound signal to a different part of the stereo field and blend and adjust audio tracks.
Automatic Tone Mapping
Adobe Premiere Pro’s automatic tone mapping feature is a powerful tool that can save users time and improve the overall consistency of their videos. It uses AI to analyze each video frame and adjust the colors and brightness levels accordingly, making it easier to work with different types of footage and other color spaces in the same sequence.
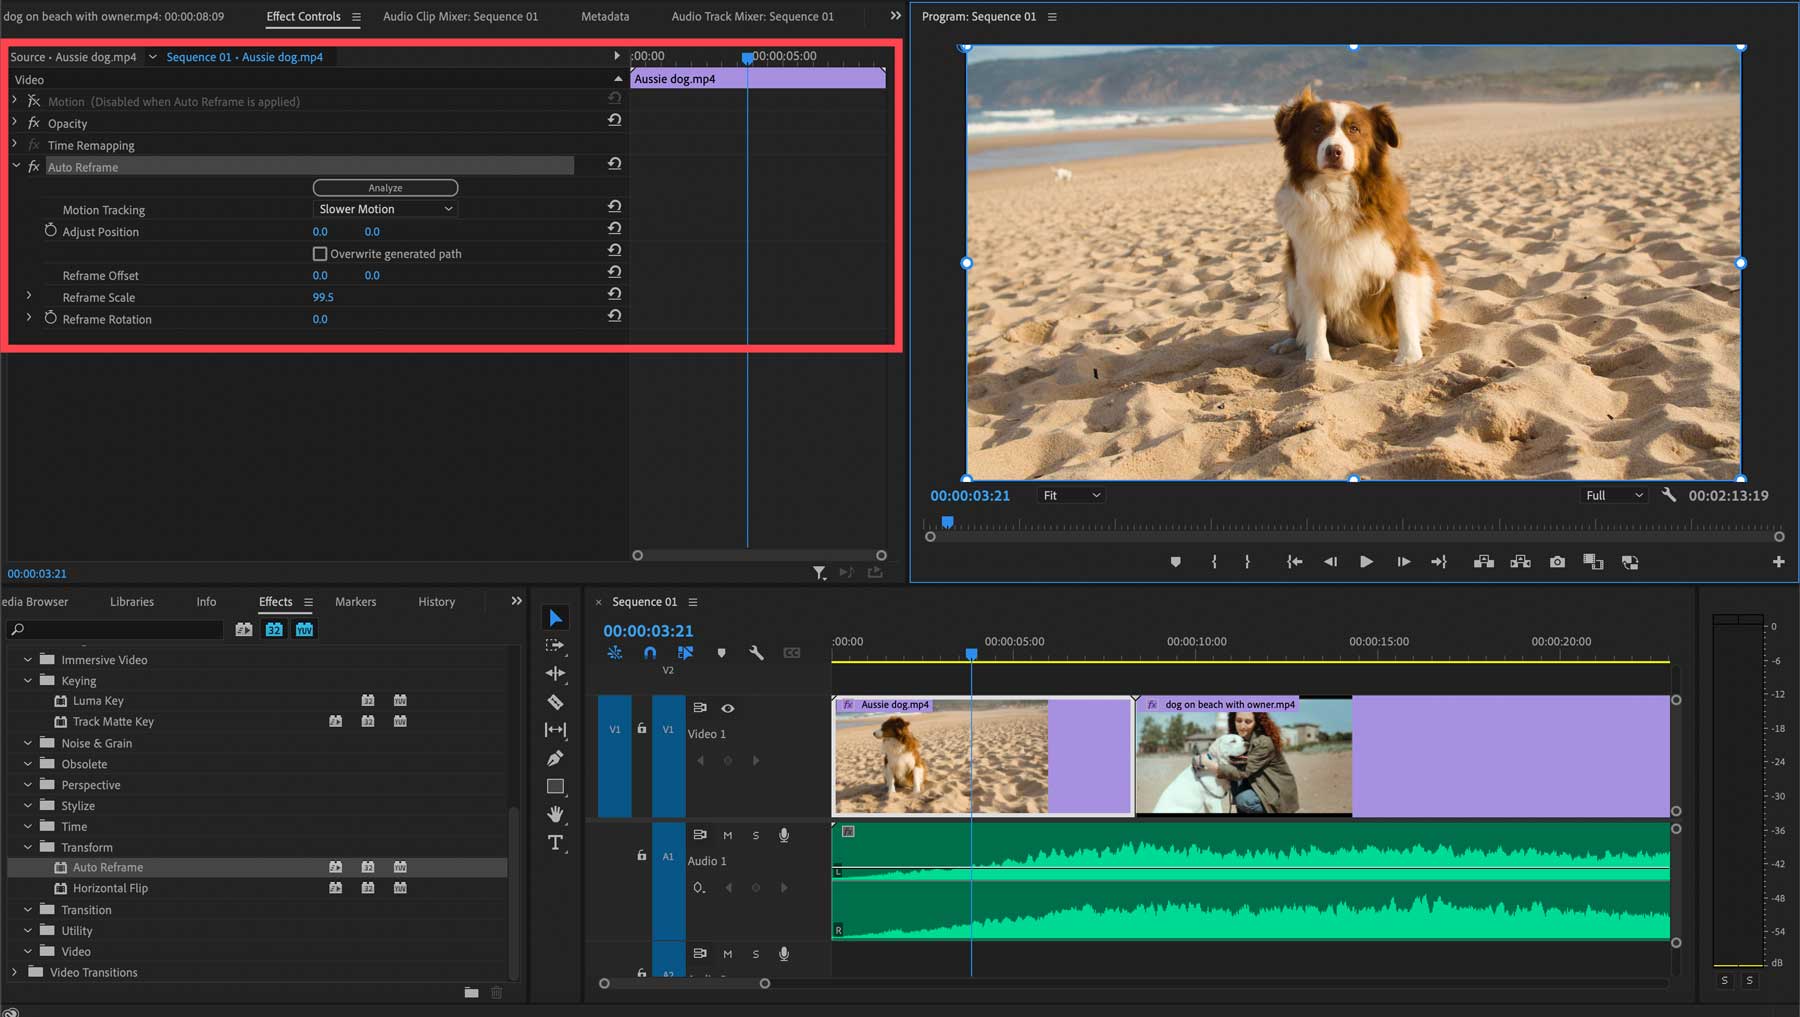
Auto-Reframe
The Auto Reframe tools allow users to change the aspect ratio of their videos automatically, making it easier to export videos for Facebook reels, Instagram, or YouTube shorts. It’s a massive time-saver for creators who regularly create videos for various platforms.
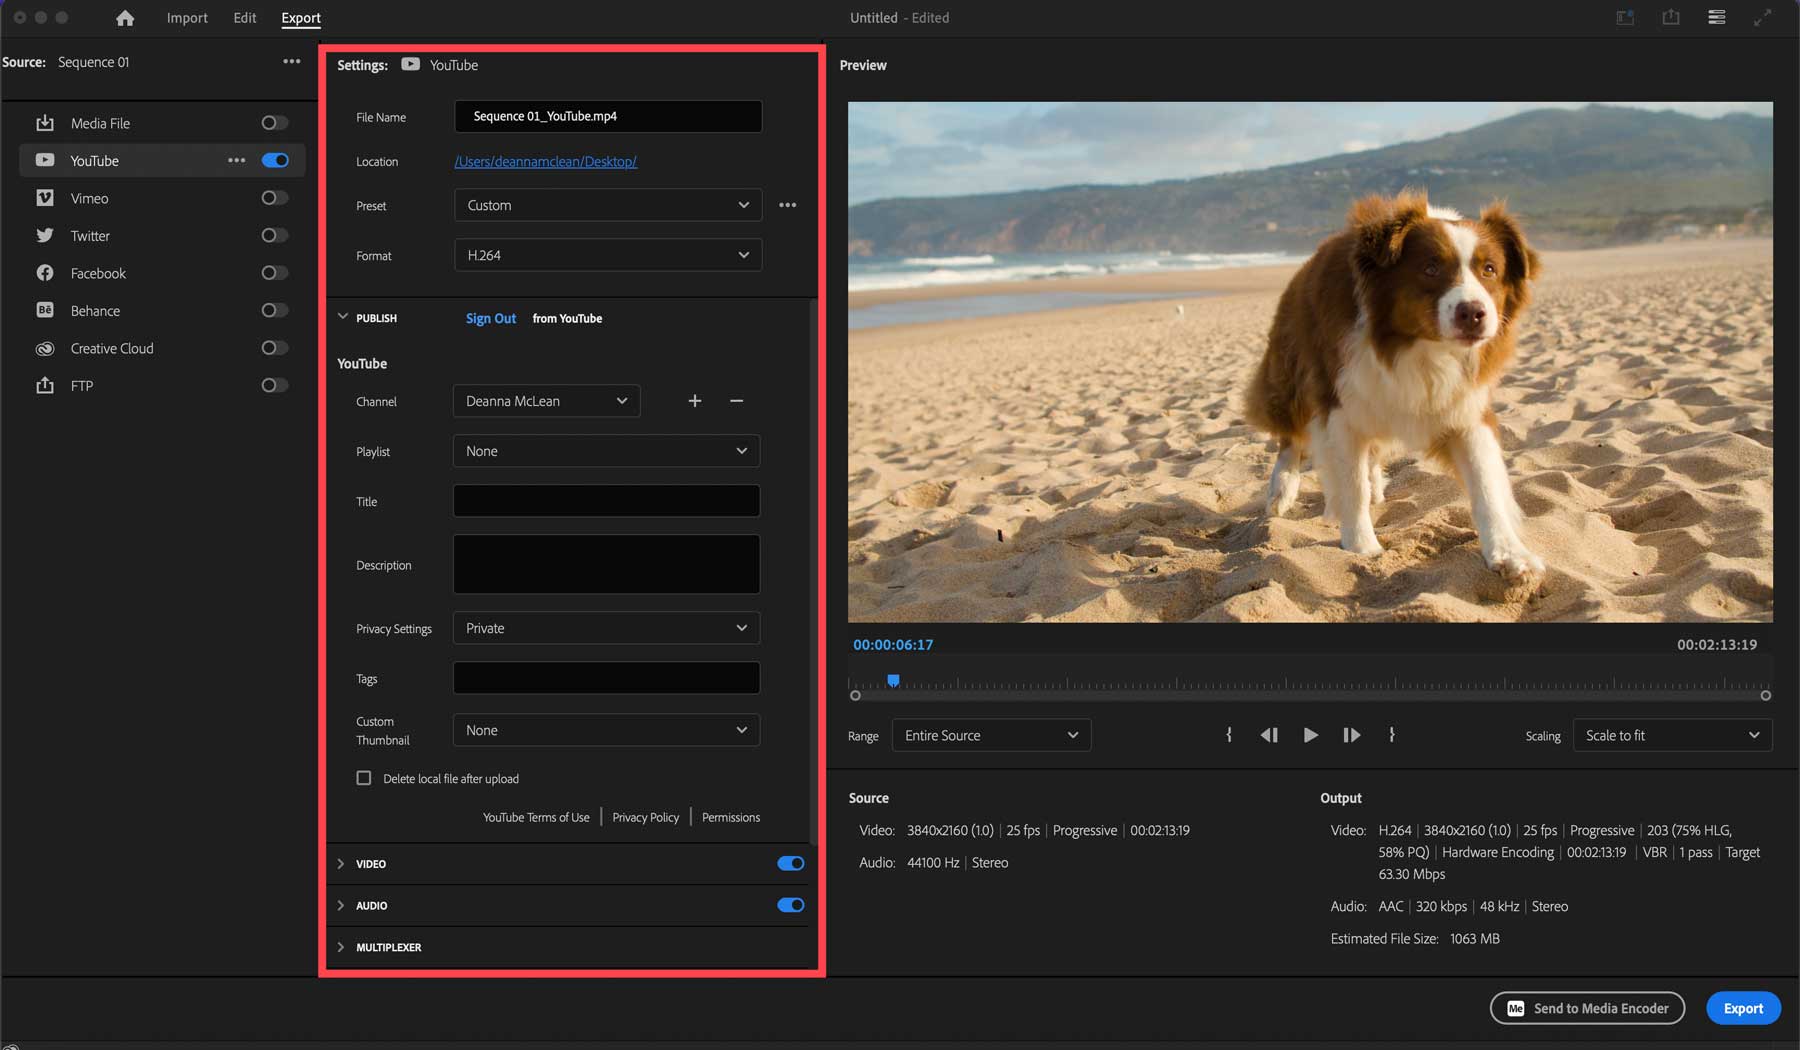
When exporting your project, Adobe Premiere Pro makes it easy to publish to multiple platforms. Aside from exporting to your local machine, you can log in to YouTube, X (formerly Twitter), Facebook, or Vimeo and export your project with each platform’s settings. For example, when exporting to YouTube, you can add a title and description, assign a category, add tags, and configure privacy settings.
Getting Started With Adobe Premiere Pro
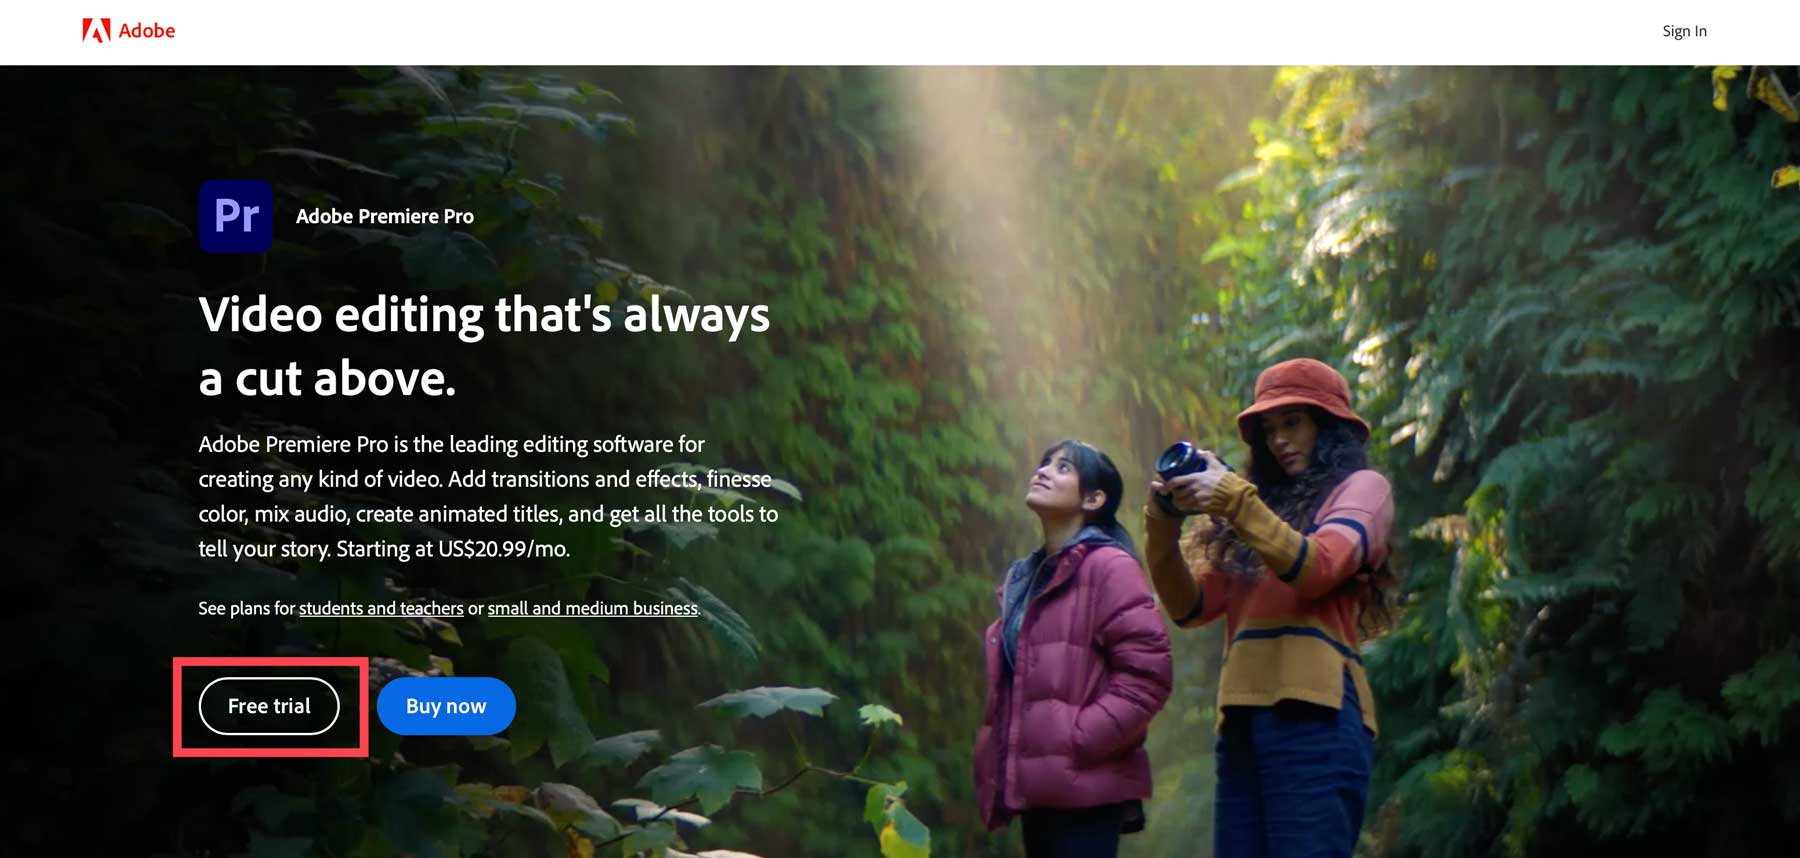
Adobe offers an easy path to start editing videos. On the Premiere Pro home page, you can either start with a free trial or purchase the software. If you’re new to video editing, we suggest starting with a free trial to determine whether the software fits you. Click the Free Trial button to begin.
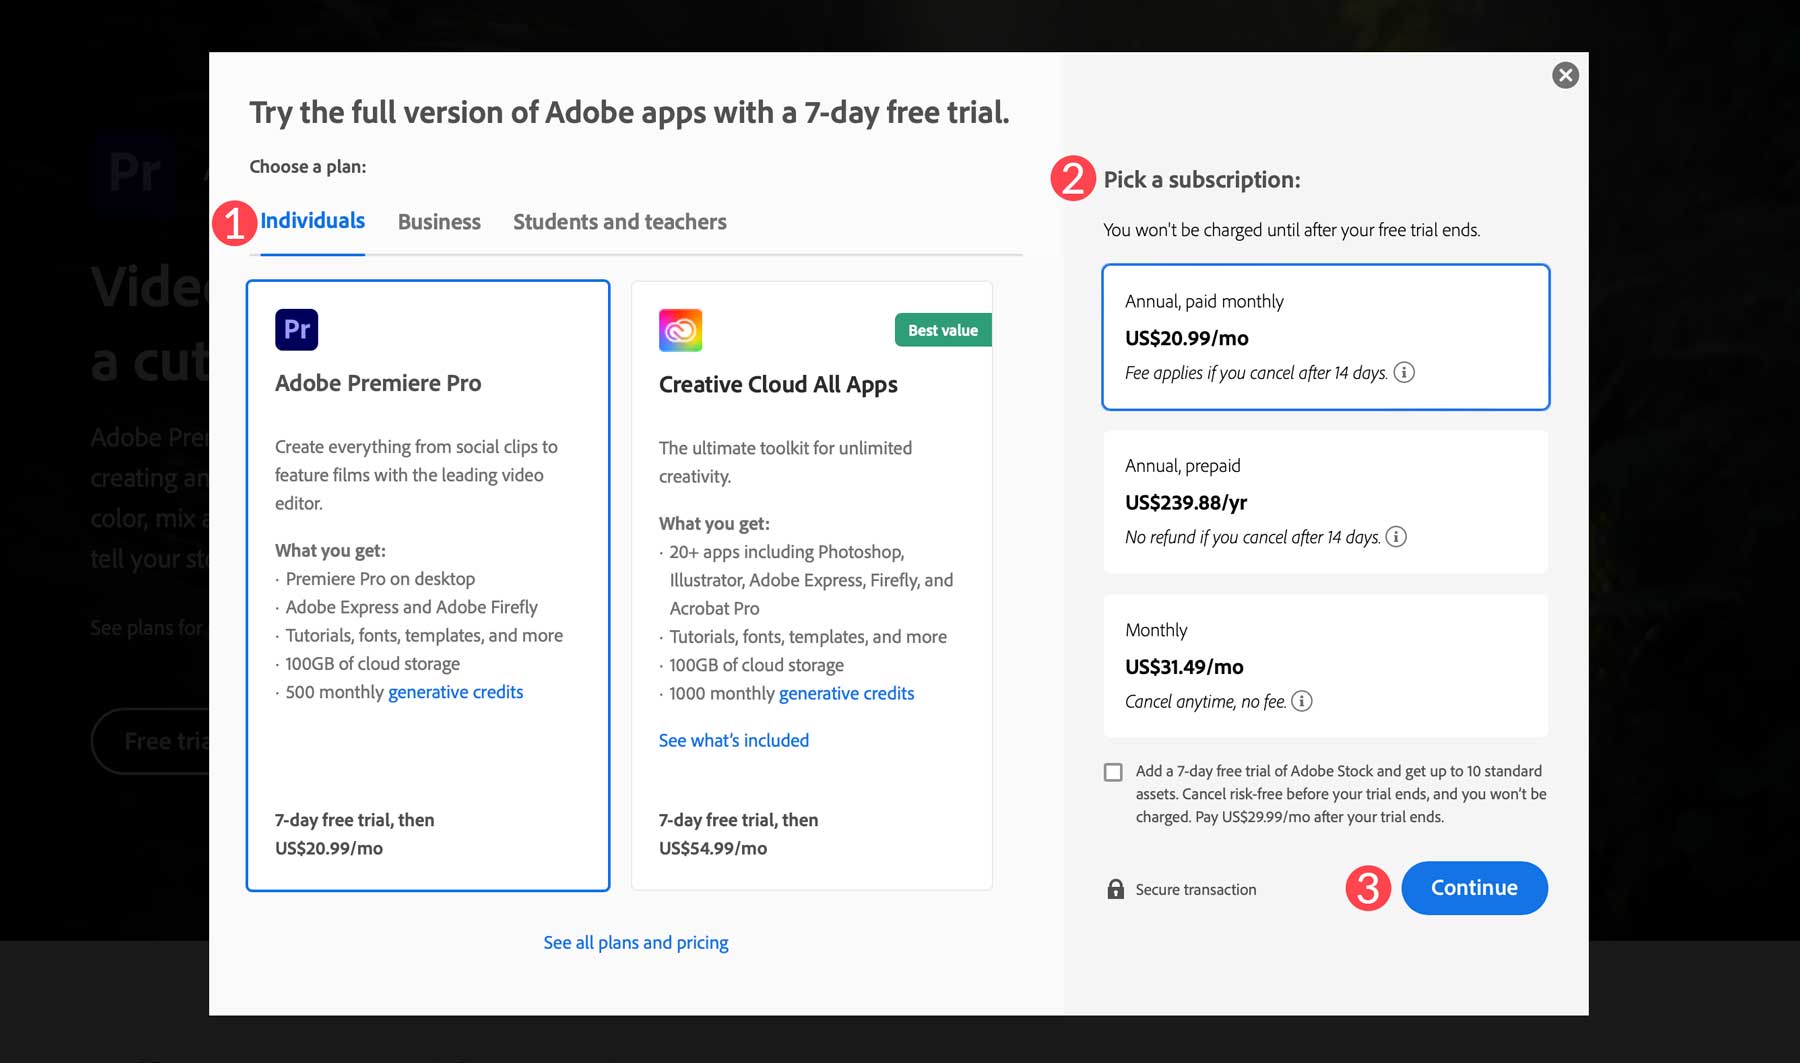
A dialog box will appear asking whether you’re an individual, business, or student. Select the tab that applies to you (1), then pick a subscription plan (2). You can choose an annual, monthly plan, annual, or monthly with the ability to cancel anytime. Click the continue button once you’ve selected a plan (3).
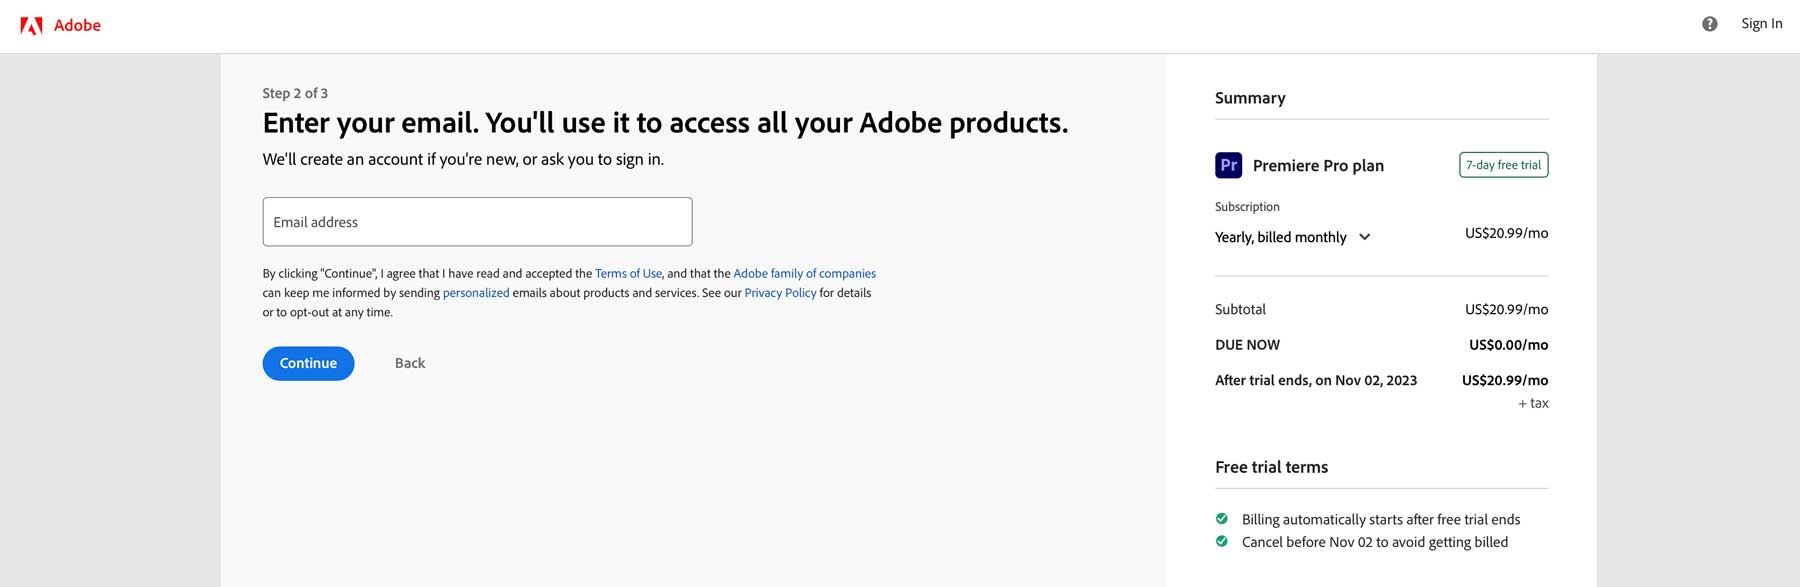
Next, add an email address you’d like to use for Adobe product access.
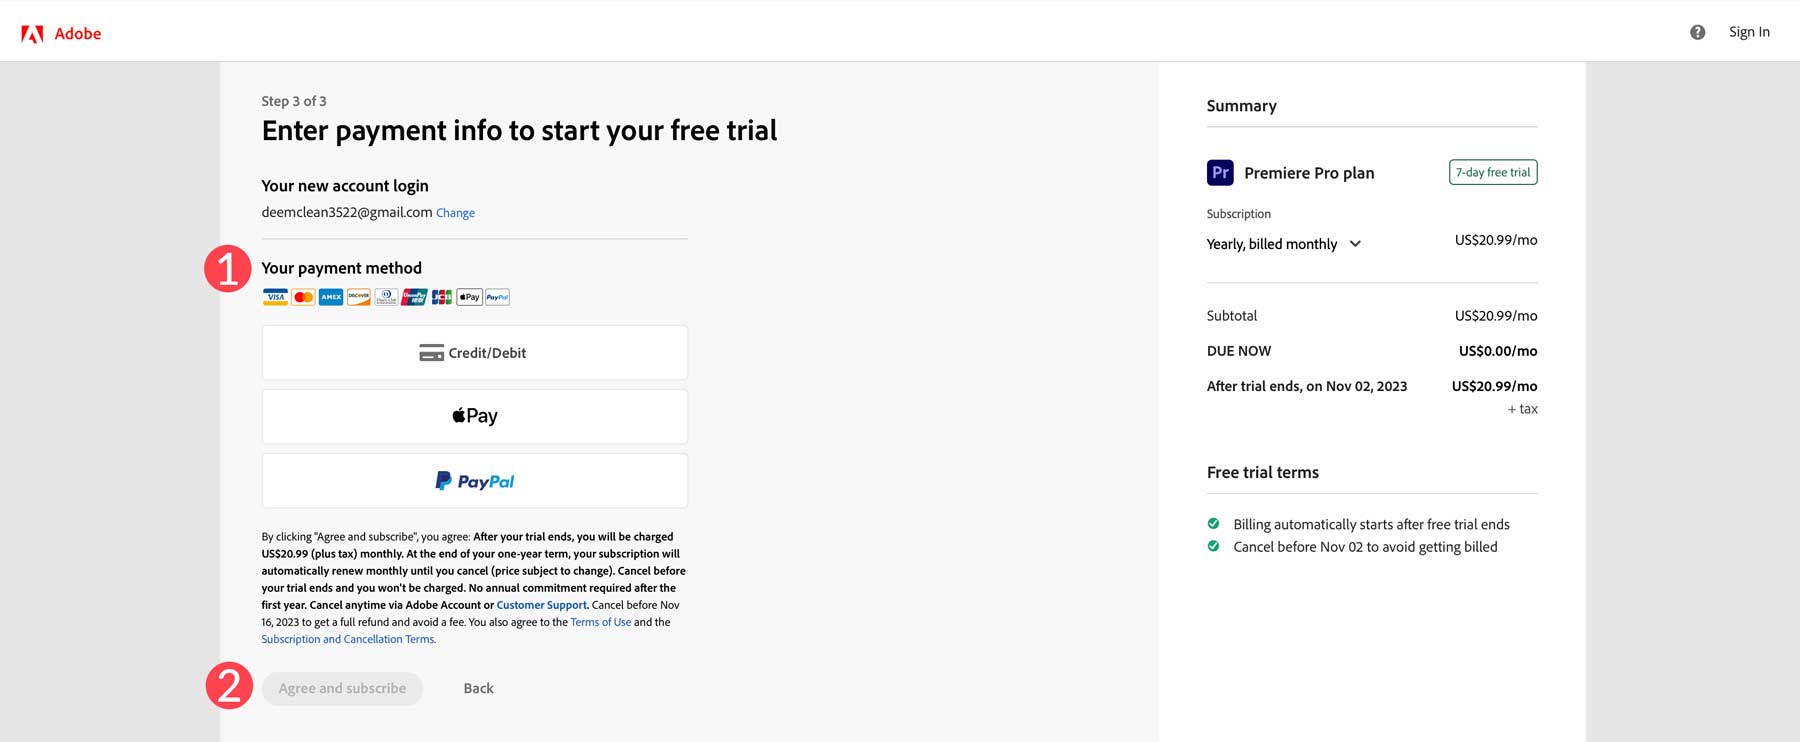
Finally, choose your payment method (1) and click the agree and subscribe (2) button to start your free trial.
Downloading the Software
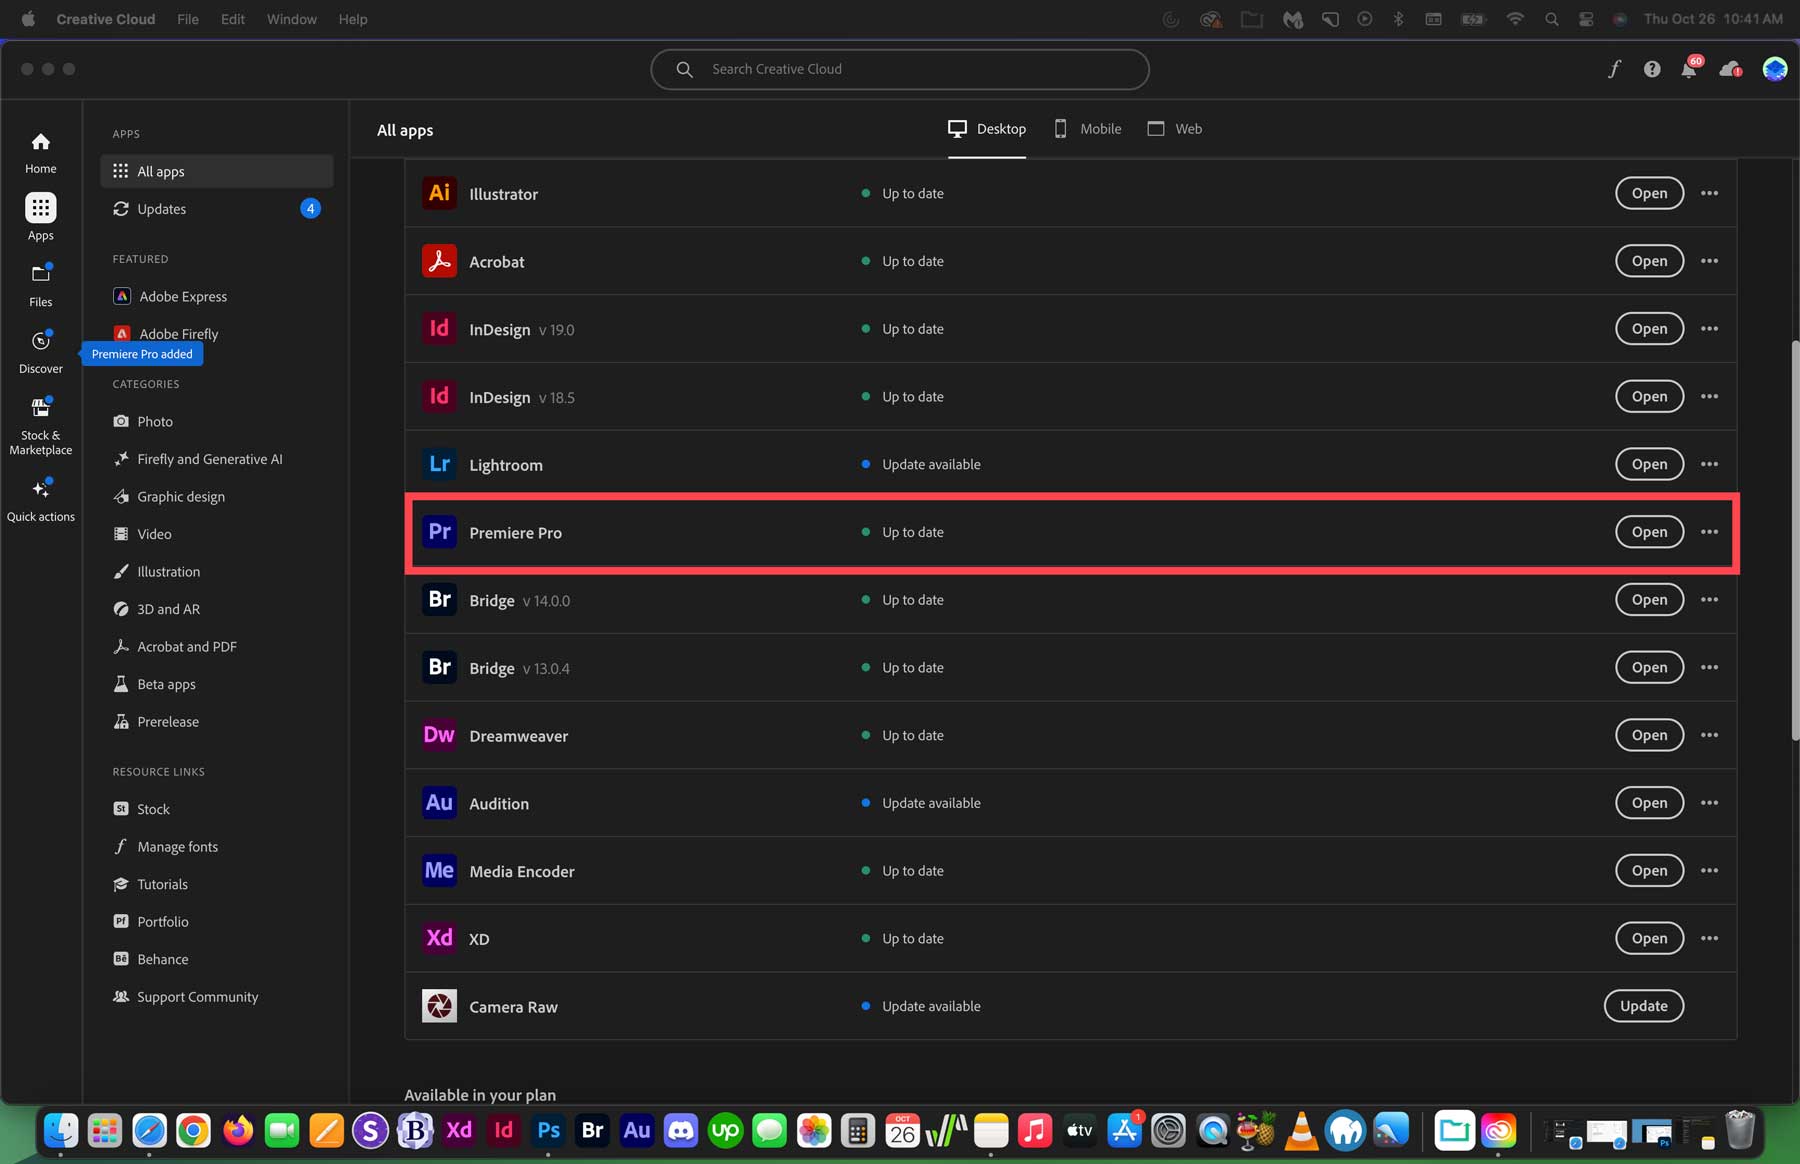
Once you’re signed up, Adobe will install the Creative Cloud Manager on your computer. Once launched, you can install the Adobe Premiere Pro software. Click on Apps (1), then navigate to the available in your plan (2) section. Locate Premiere Pro and click the install (3) button.

Creating a New Project
With Adobe Premiere Pro installed, you can create your first project. From the Creative Cloud Manager, click open next to the Premiere Pro app.
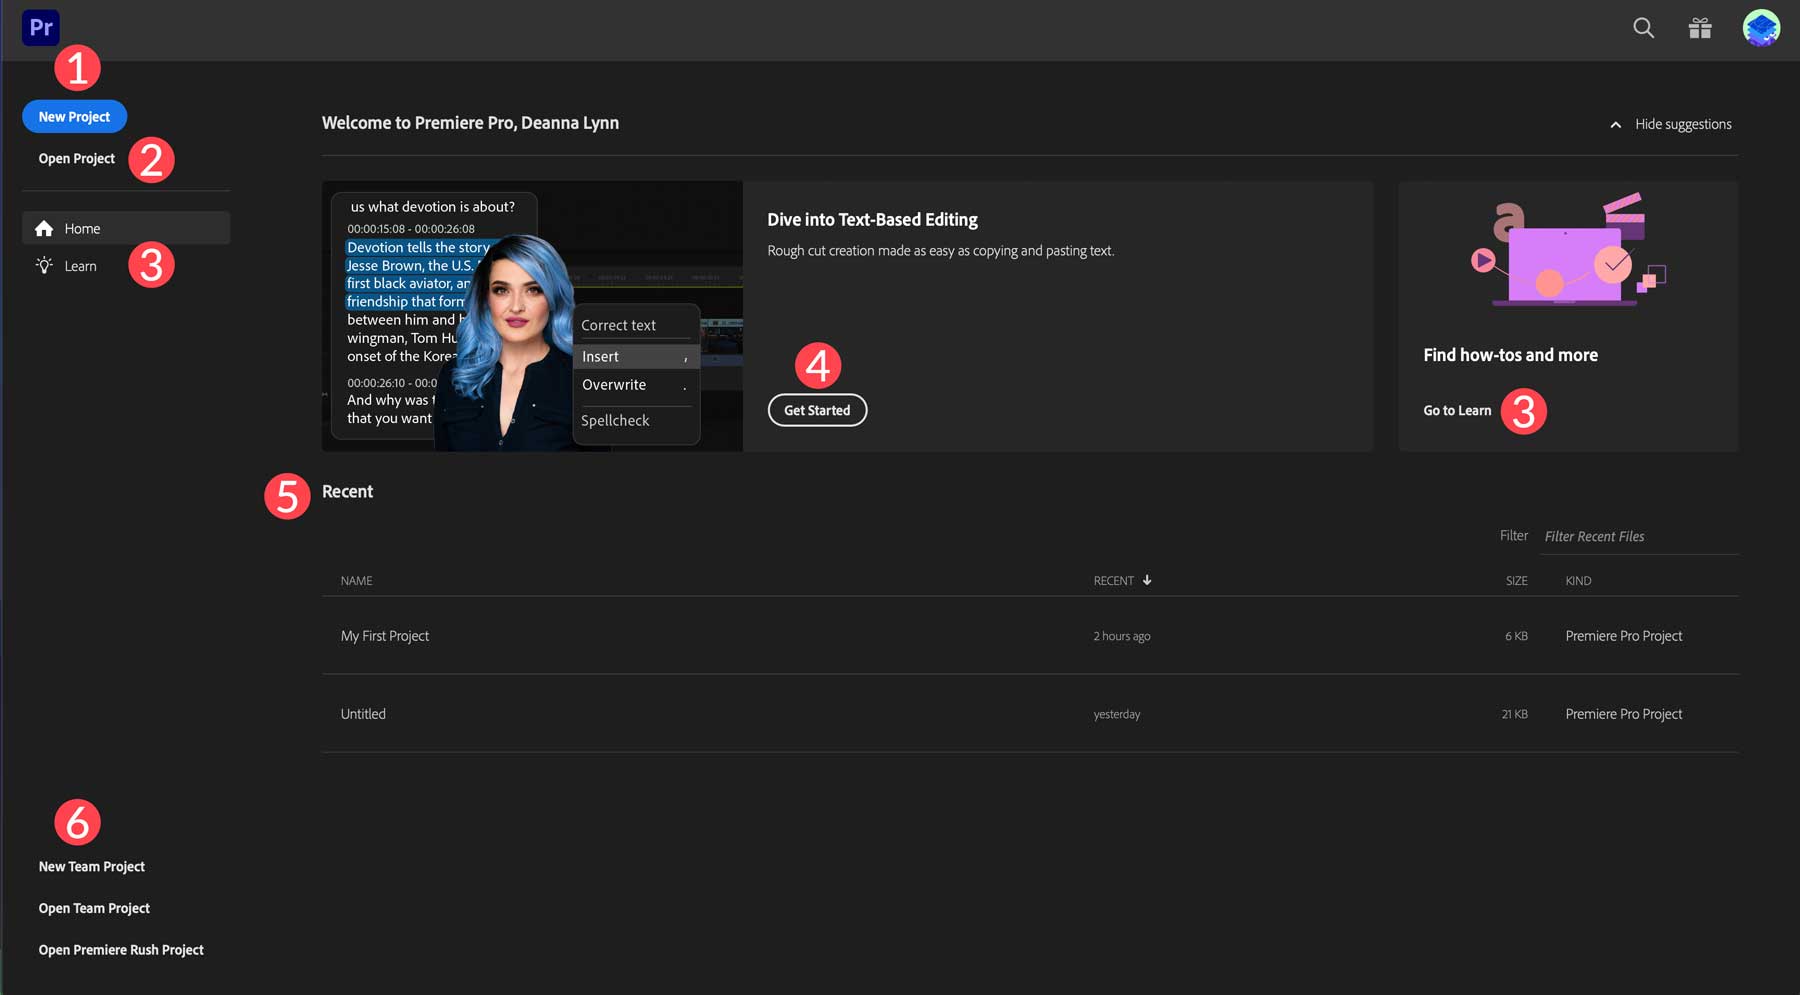
You’ll be met with a few options when the software dashboard opens. You can create a new project (1), open one (2), learn how to use Premiere Pro (3), watch an in-depth tutorial (4), review a list of recent projects (5), and create or open a team or Premiere Rush project (6).
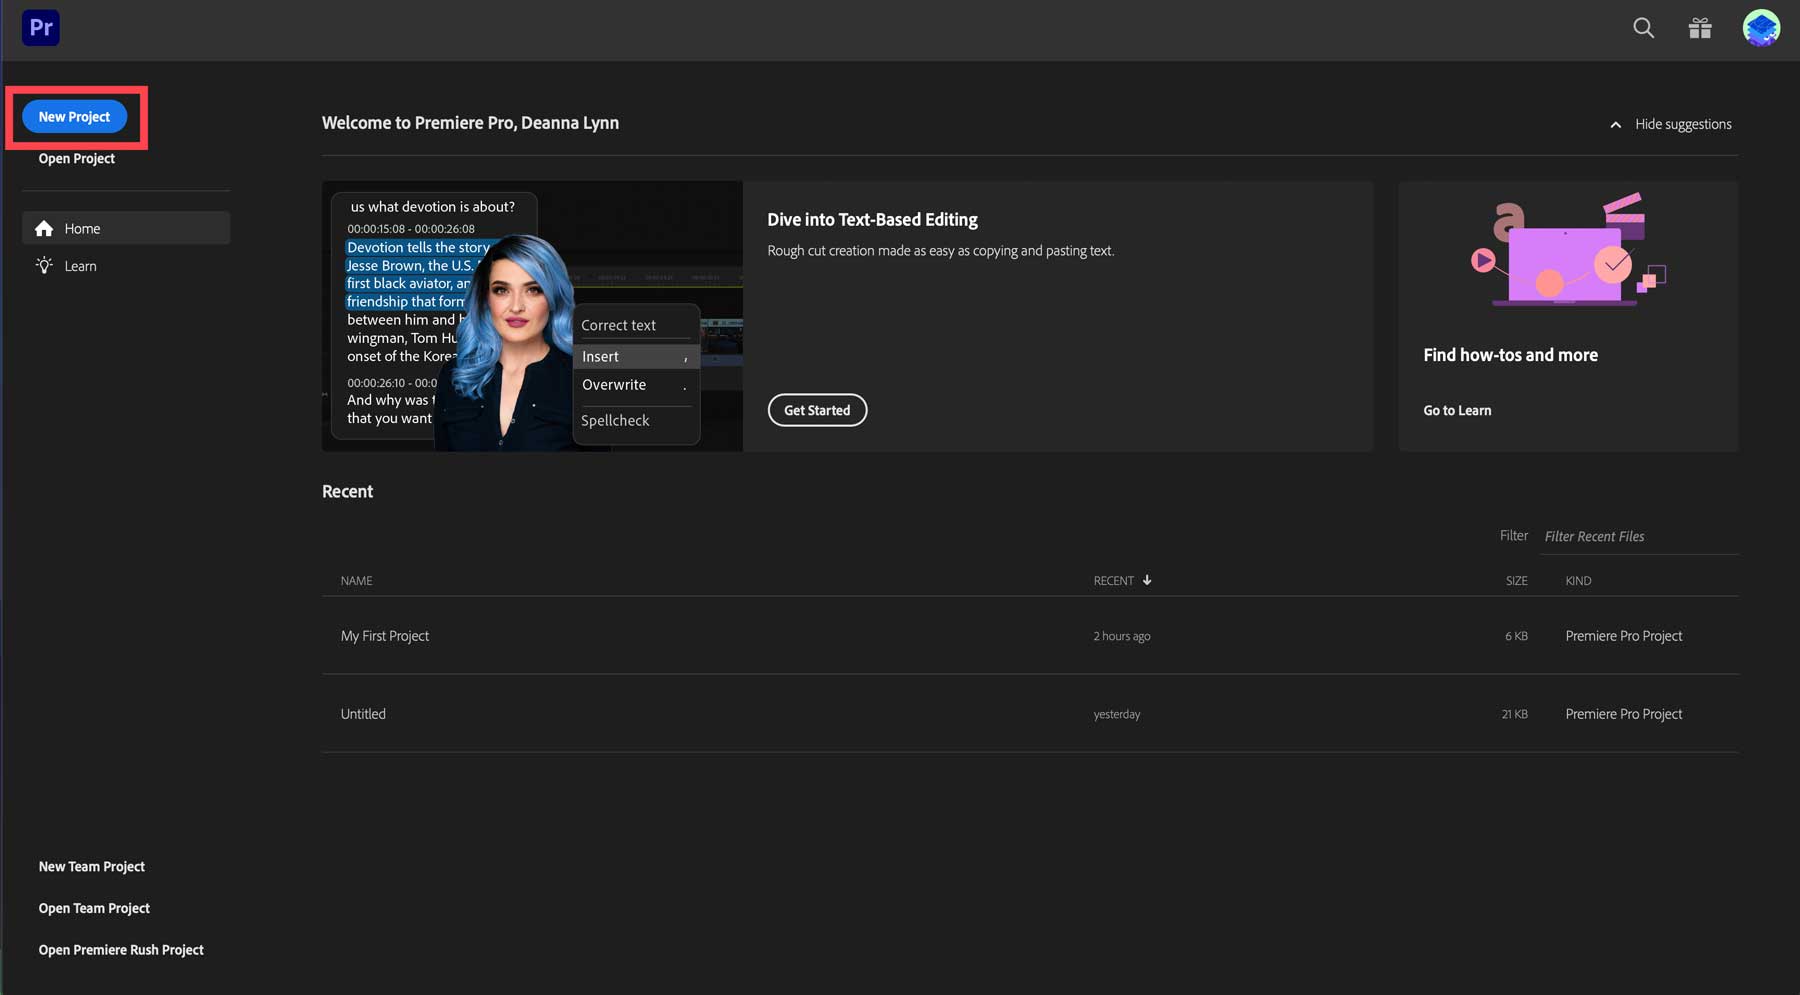
In this tutorial, we’ll show you how to navigate the Adobe Premiere Pro interface and demonstrate a few of the standard features of the software. So, start by clicking the New Project button to create a new project.
Exploring the Adobe Premiere Pro Interface
Adobe Premiere Pro is a massive program with many features, so it would be impossible to discuss them all here. Instead, we’ll cover basic things you need to know to start. Adobe Premiere Pro is a challenging program to learn. However, there are plenty of resources, such as Skillshare, that can help get you up to speed in no time.
Adobe Premiere Pro Project Window
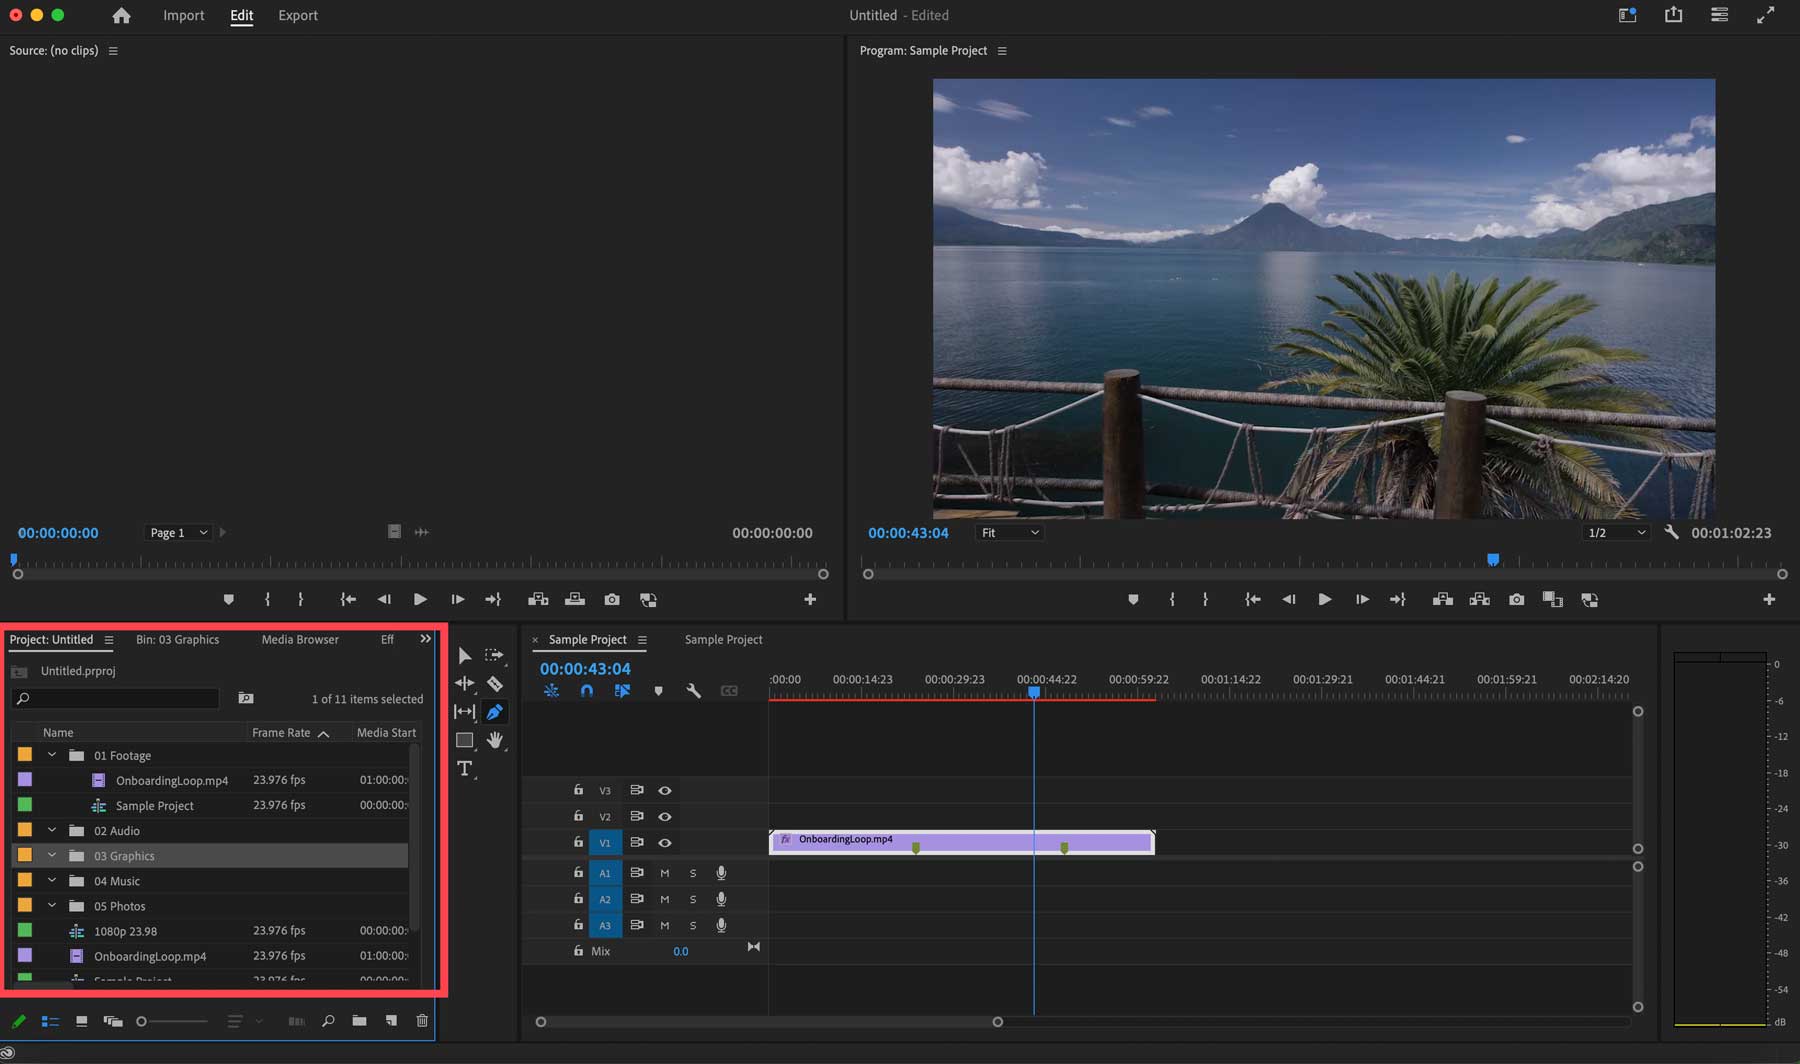
The project window is one of the most important sections of the Adobe Premiere Pro interface. You can import pictures, videos, audio clips, sound effects, and more there. You can easily add files to your project by double-clicking them or simply select the files you wish to import and drag them into the project window. To help keep things organized, you can create folders called bins, where you can drop your files for easy access.
Creating a new bin is simple. Within the project window, right-click and select New Bin.
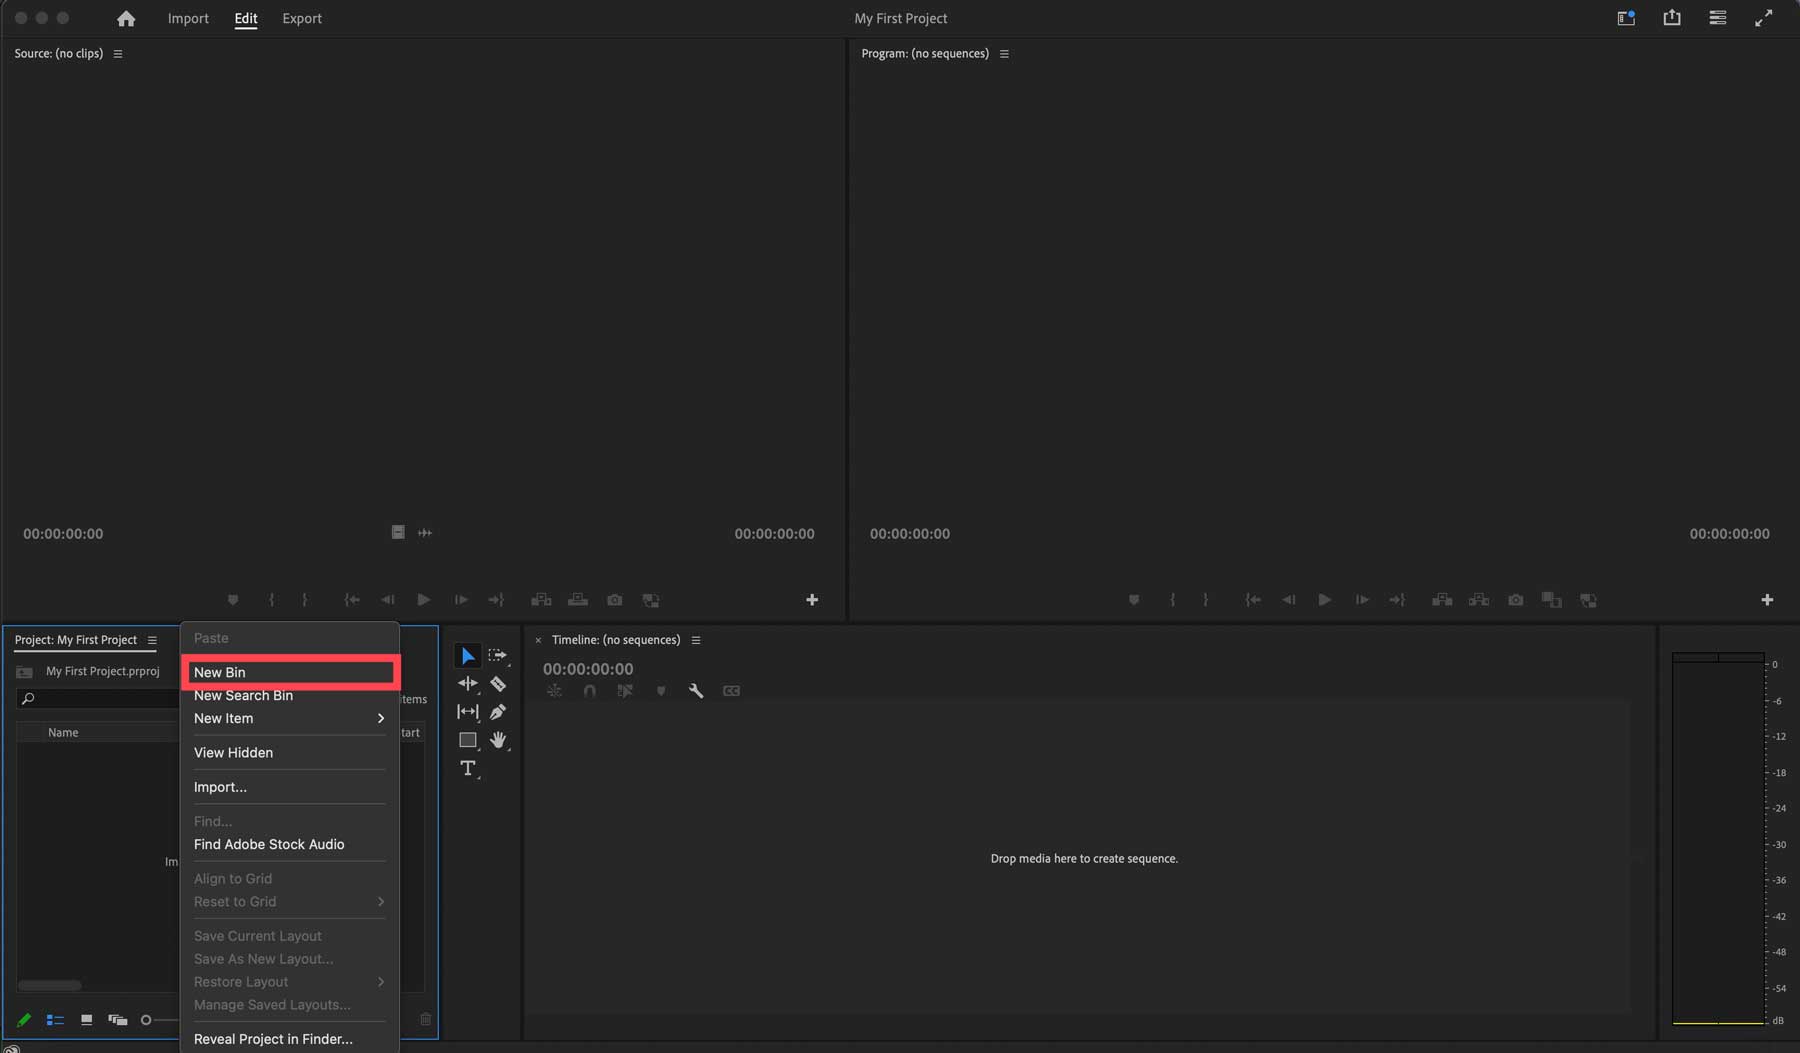
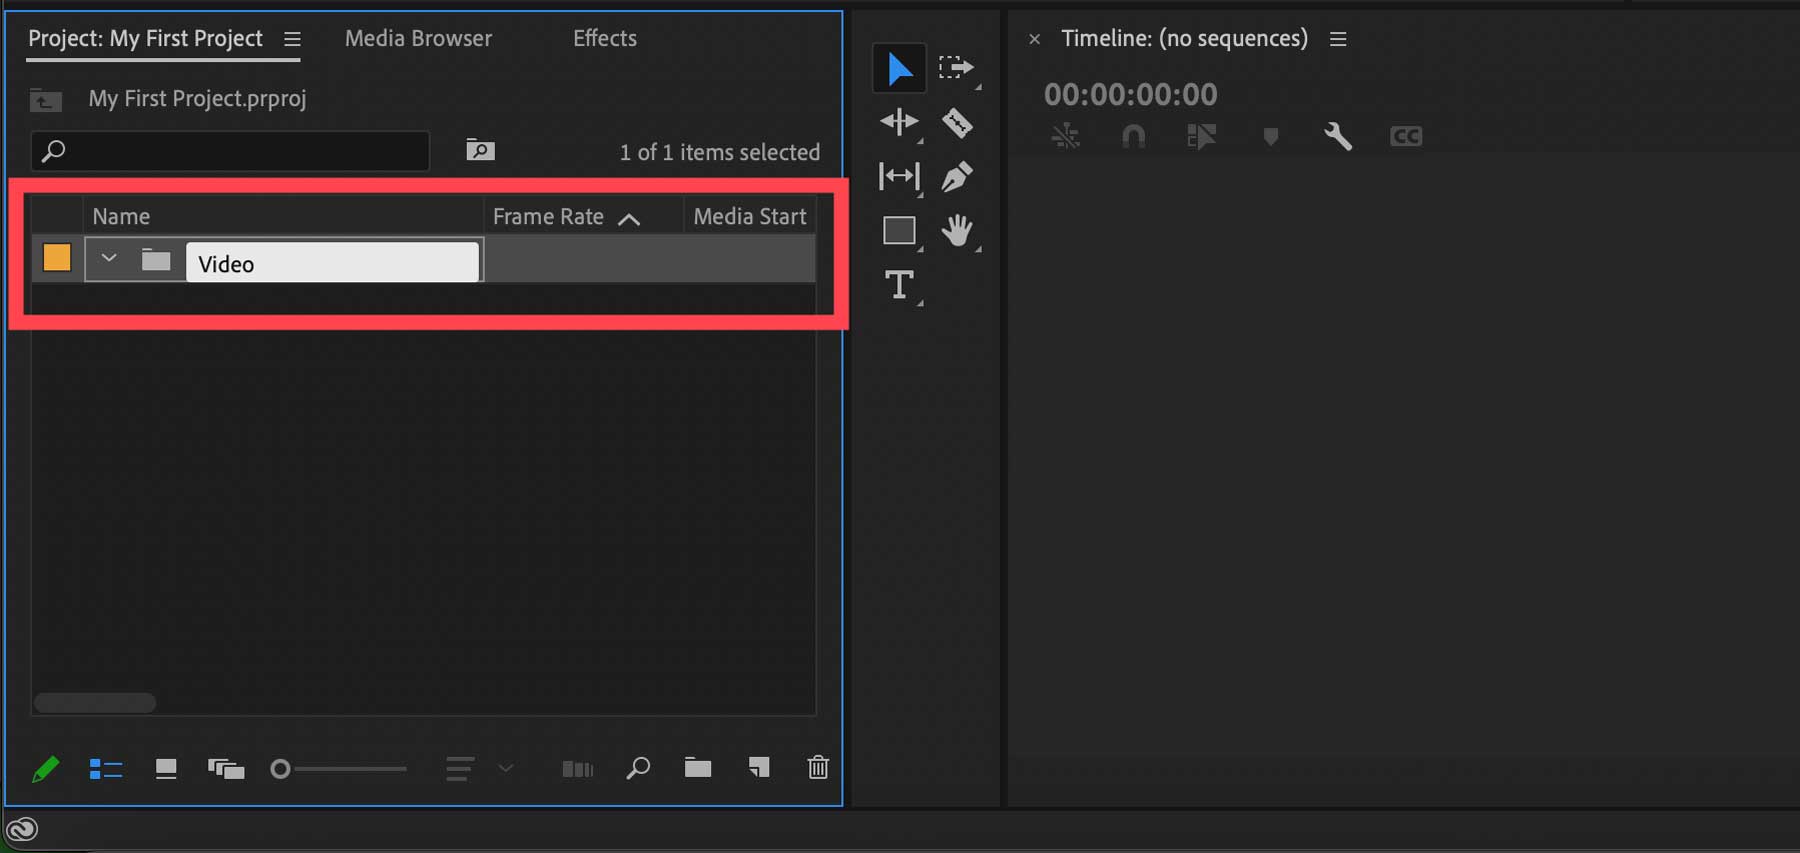
Give your new bin a name, such as video, then click enter to create it. Then, repeat the process to add bins for your photos, text, audio, and special effects.
Creating a New Sequence
Those familiar with video editing software have heard of a term called timeline. A timeline is comprised of a video clip along with its corresponding effects, text, and audio. In Adobe Premiere Pro, a timeline is referred to as a sequence. When creating a new project, one of the first things you’ll do is create a sequence.
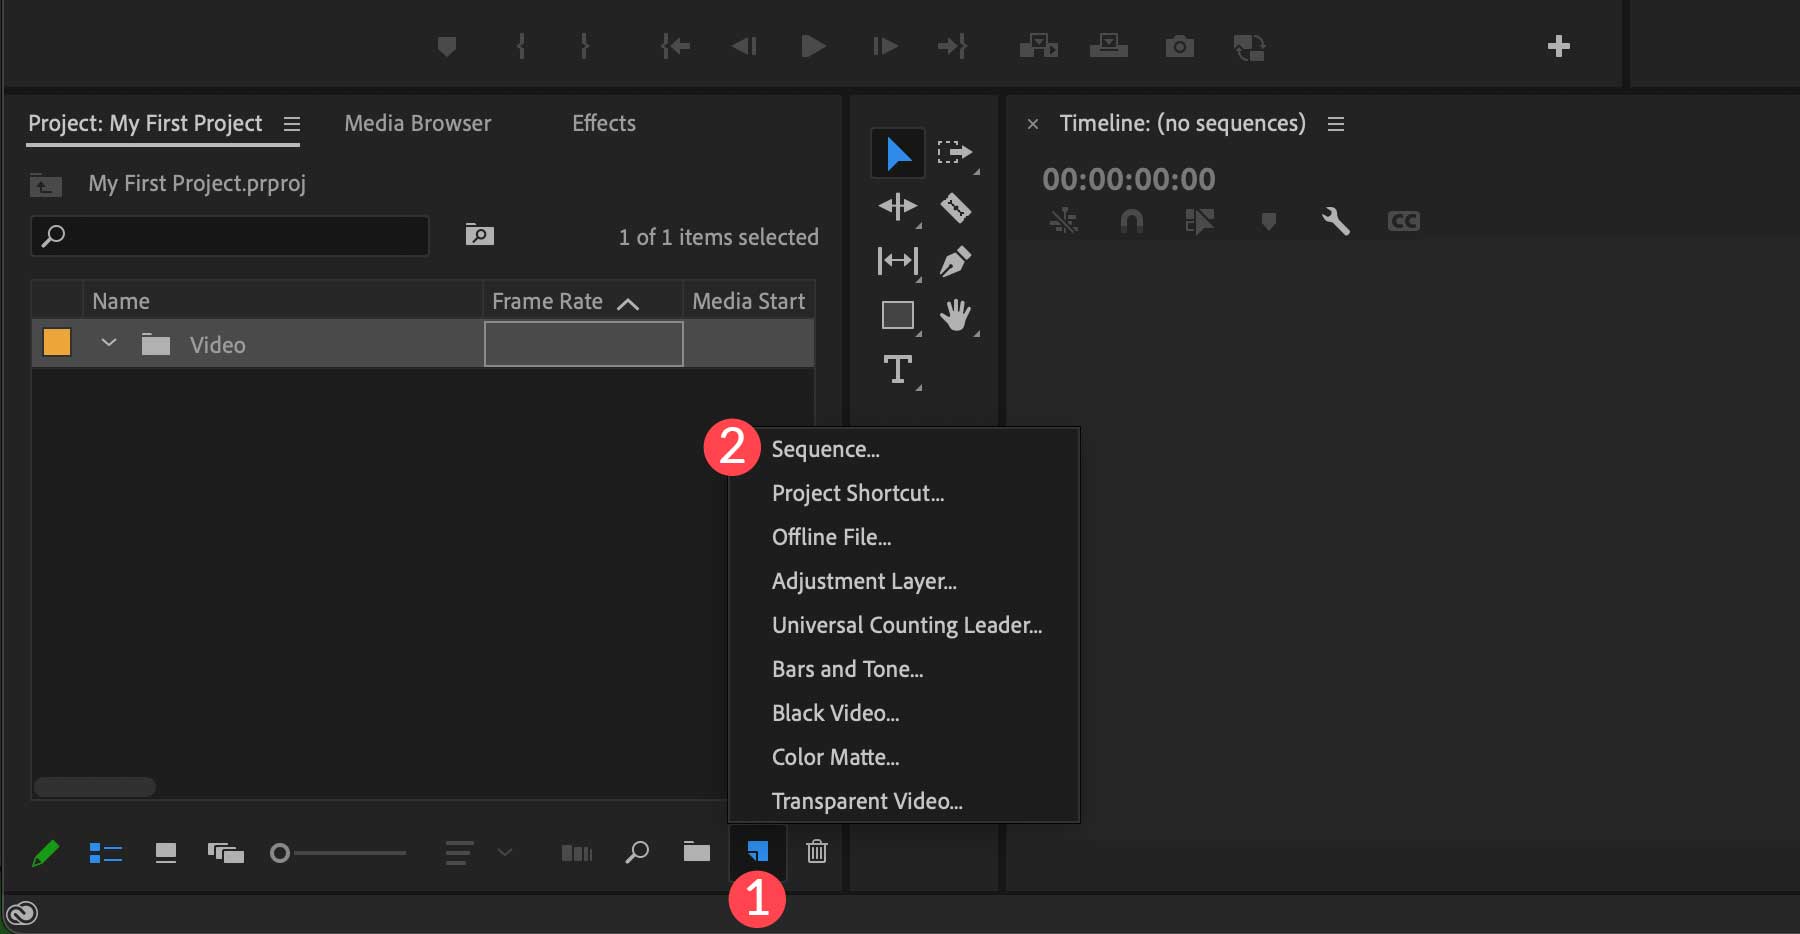
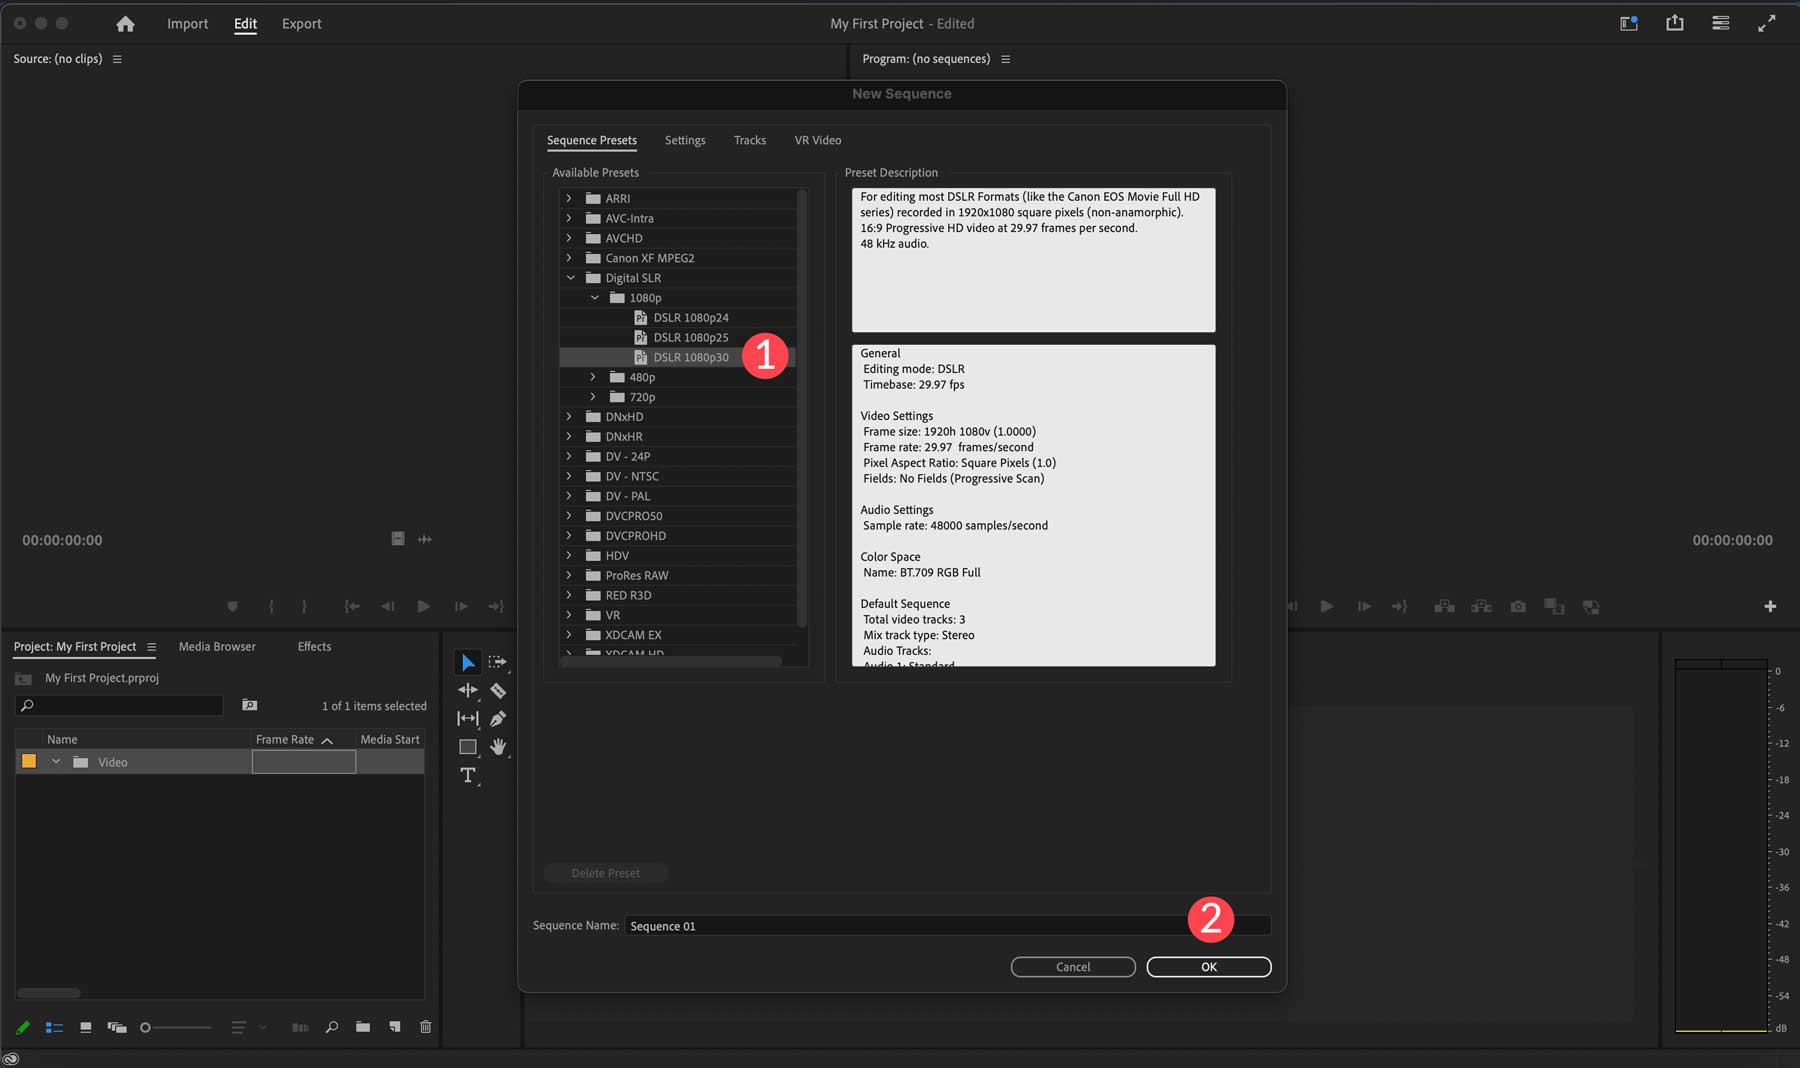
To create a new sequence, click the new item icon at the bottom right of the project window and select sequence.
When the dialog box appears, you’ll be greeted with presets you can use for your sequence. By default, DSLR 1080p30 is selected, which allows you to create a 1920×1080 resolution video in DSLR editing mode with 30 frame rates per second. Select your preferred preset, then click the OK button.
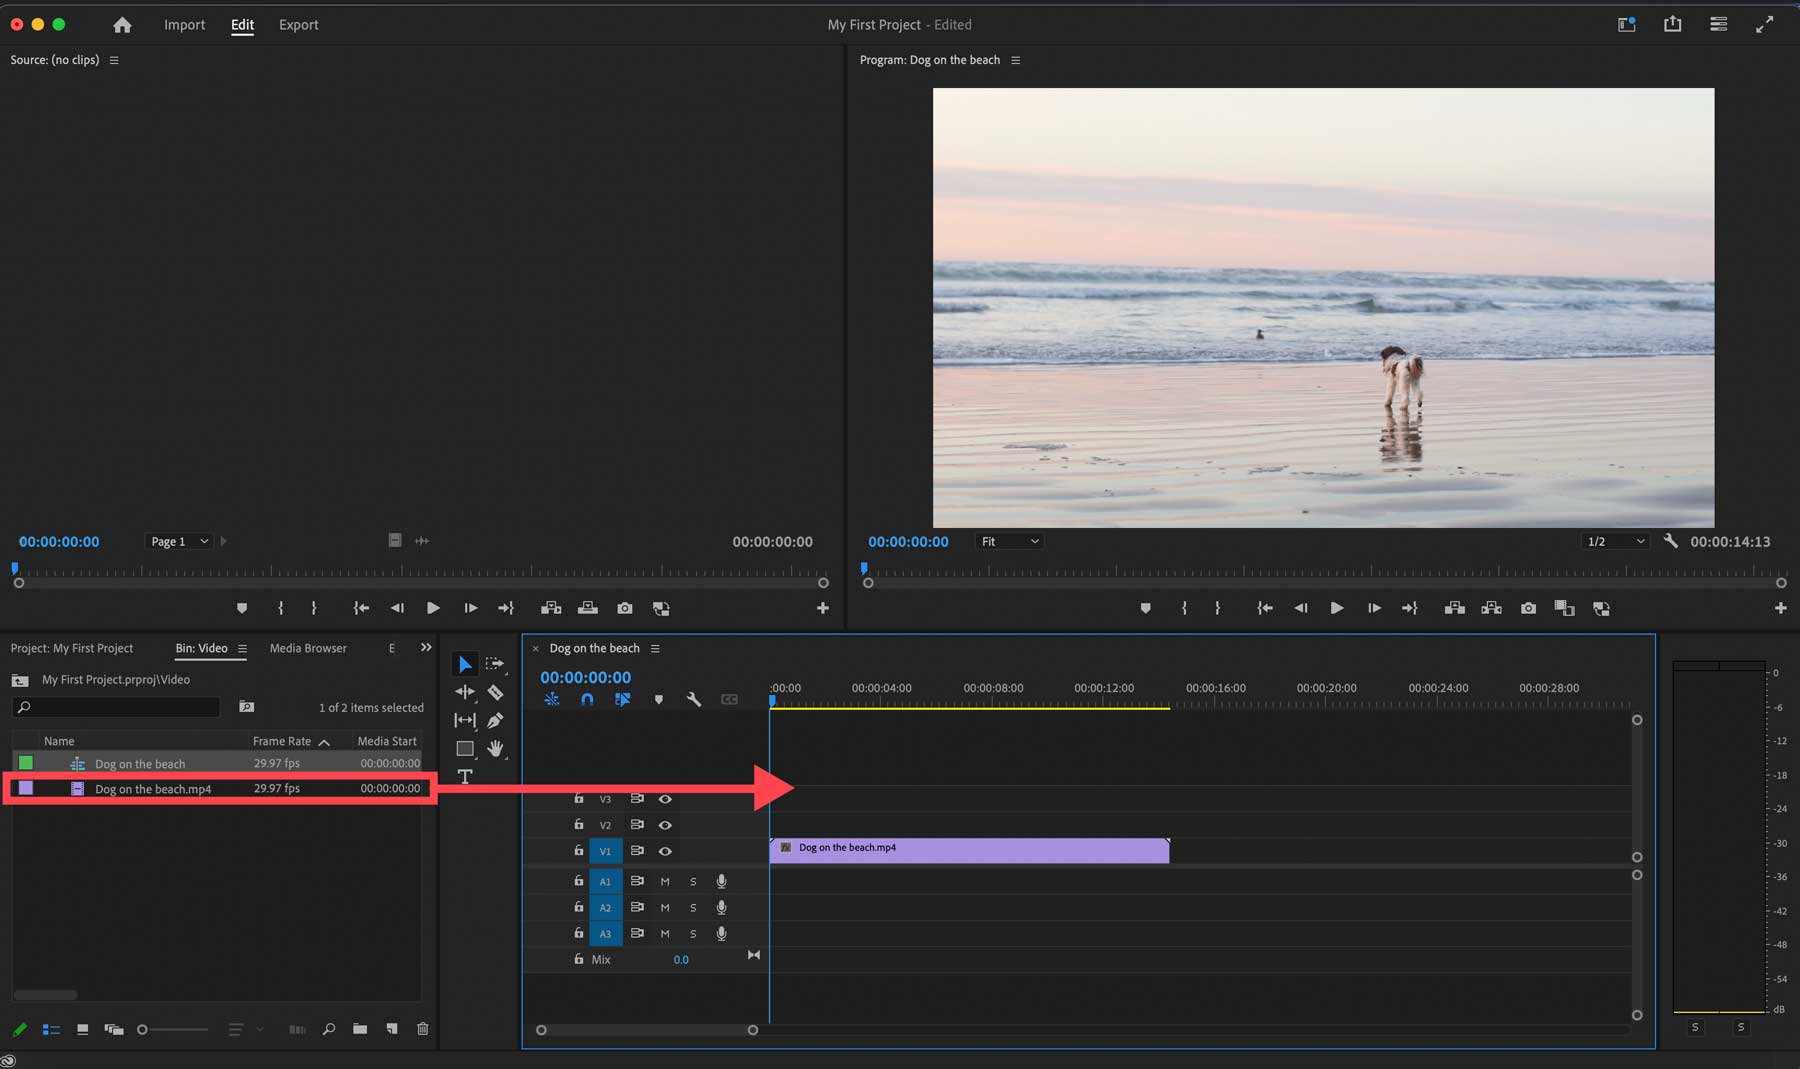
Alternatively, you can click into the video bin of your project window (1) and browse for video files on our computer (2), then click the import button (3) to load it into your project.

Once your video is imported into Adobe Premiere Pro, you can drag it directly into the timeline.
You can create multiple sequences for your video and then navigate between the two by clicking the tab above the timeline.
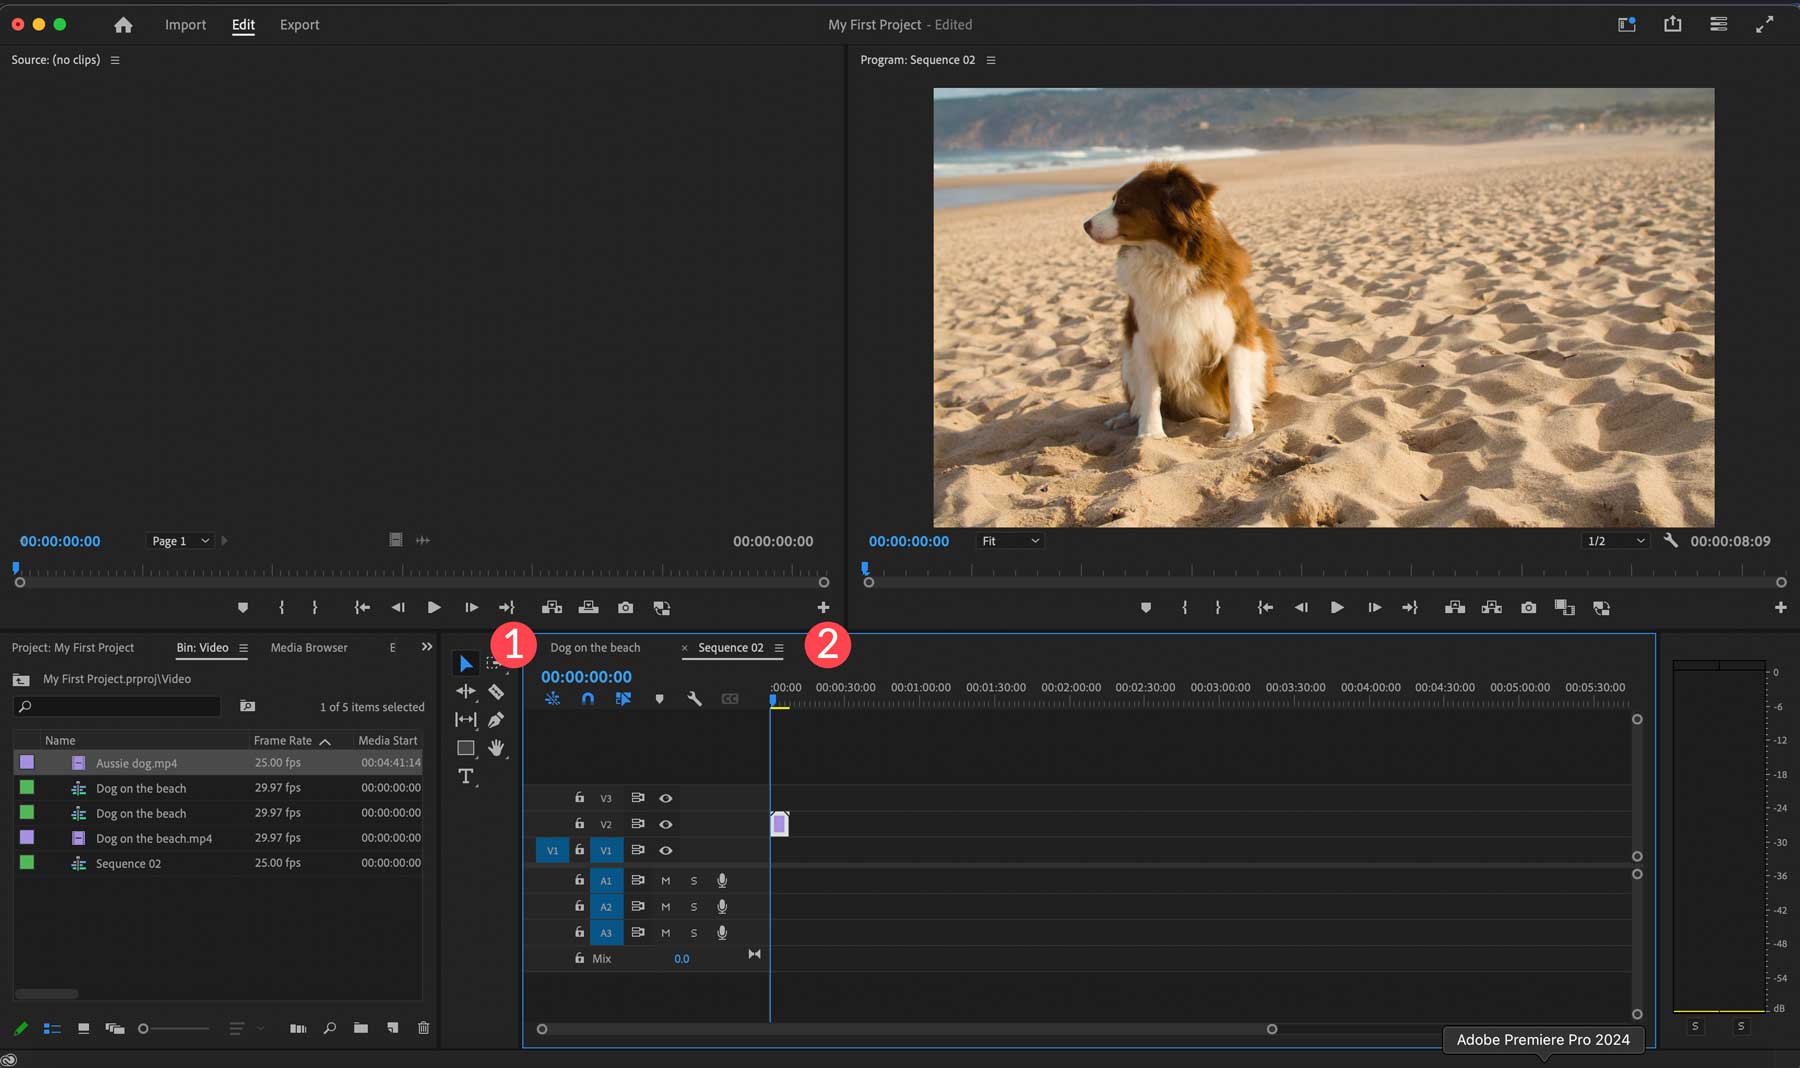
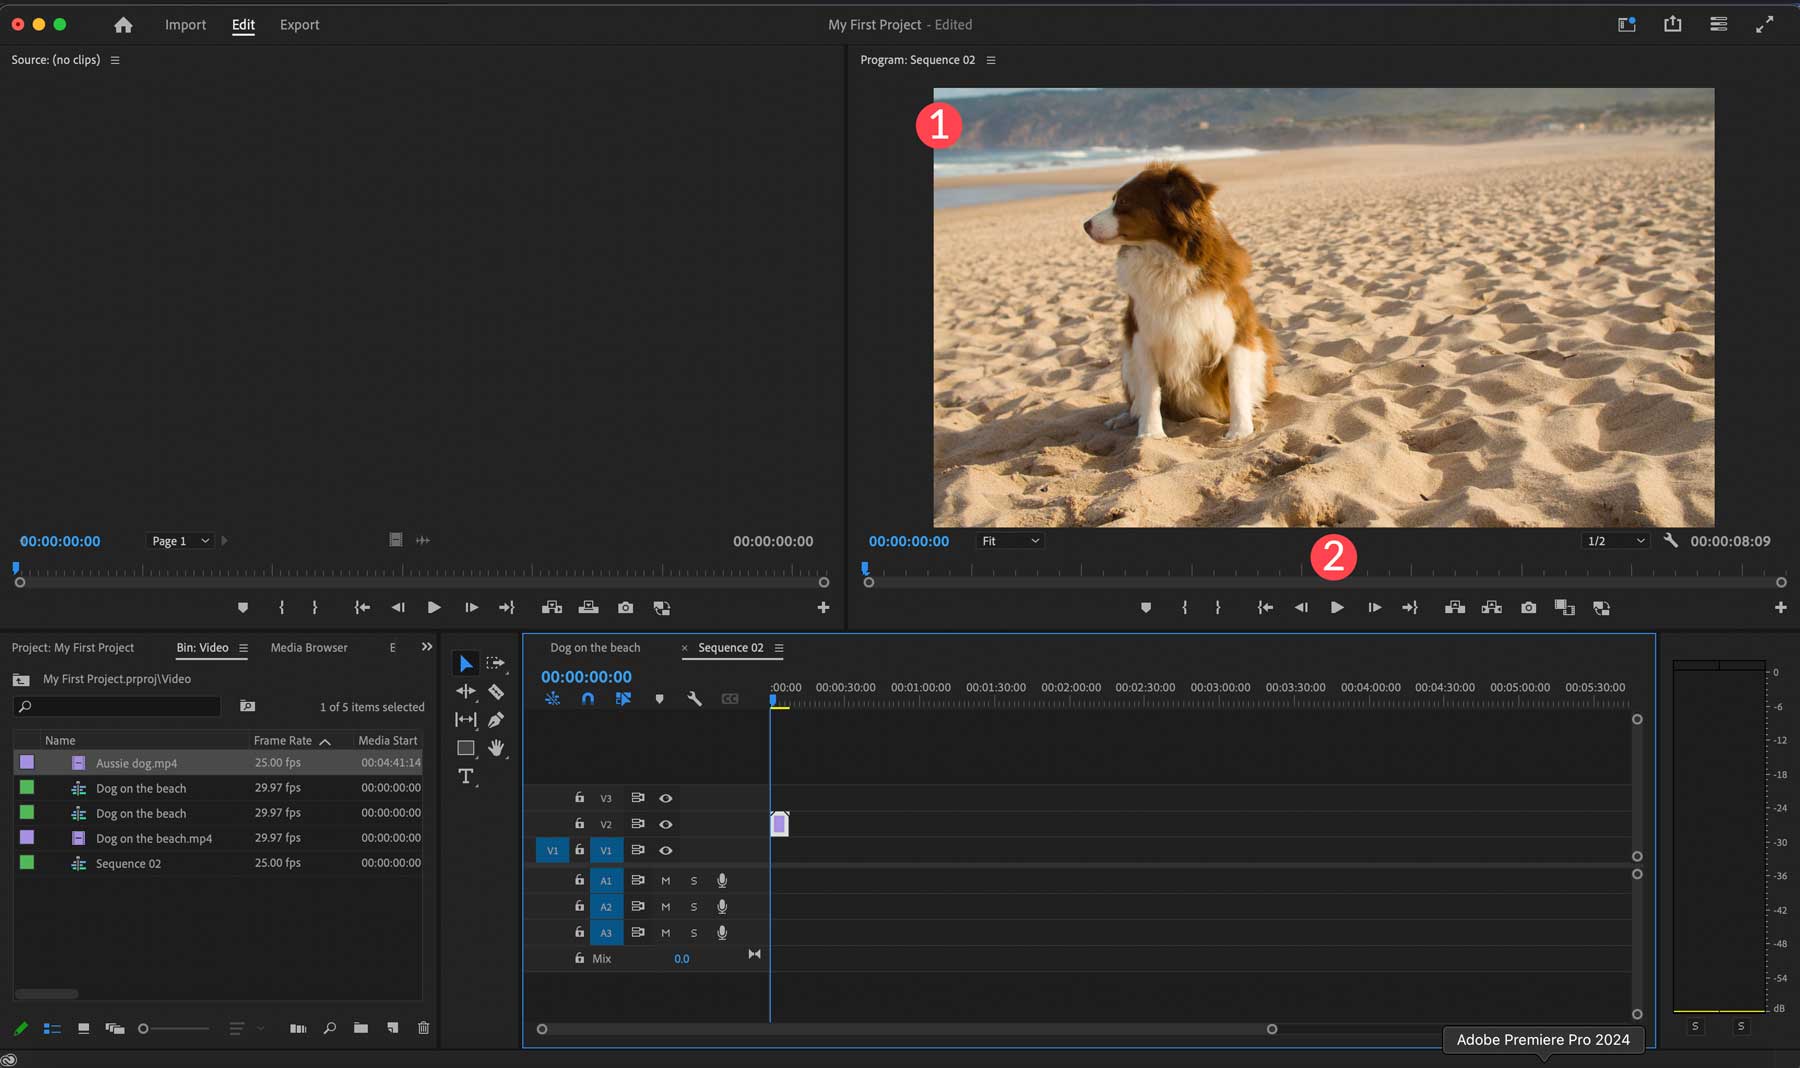
You can preview your sequences anytime in the program monitor (1) by using the playback controls (2).
Using the Source Monitor
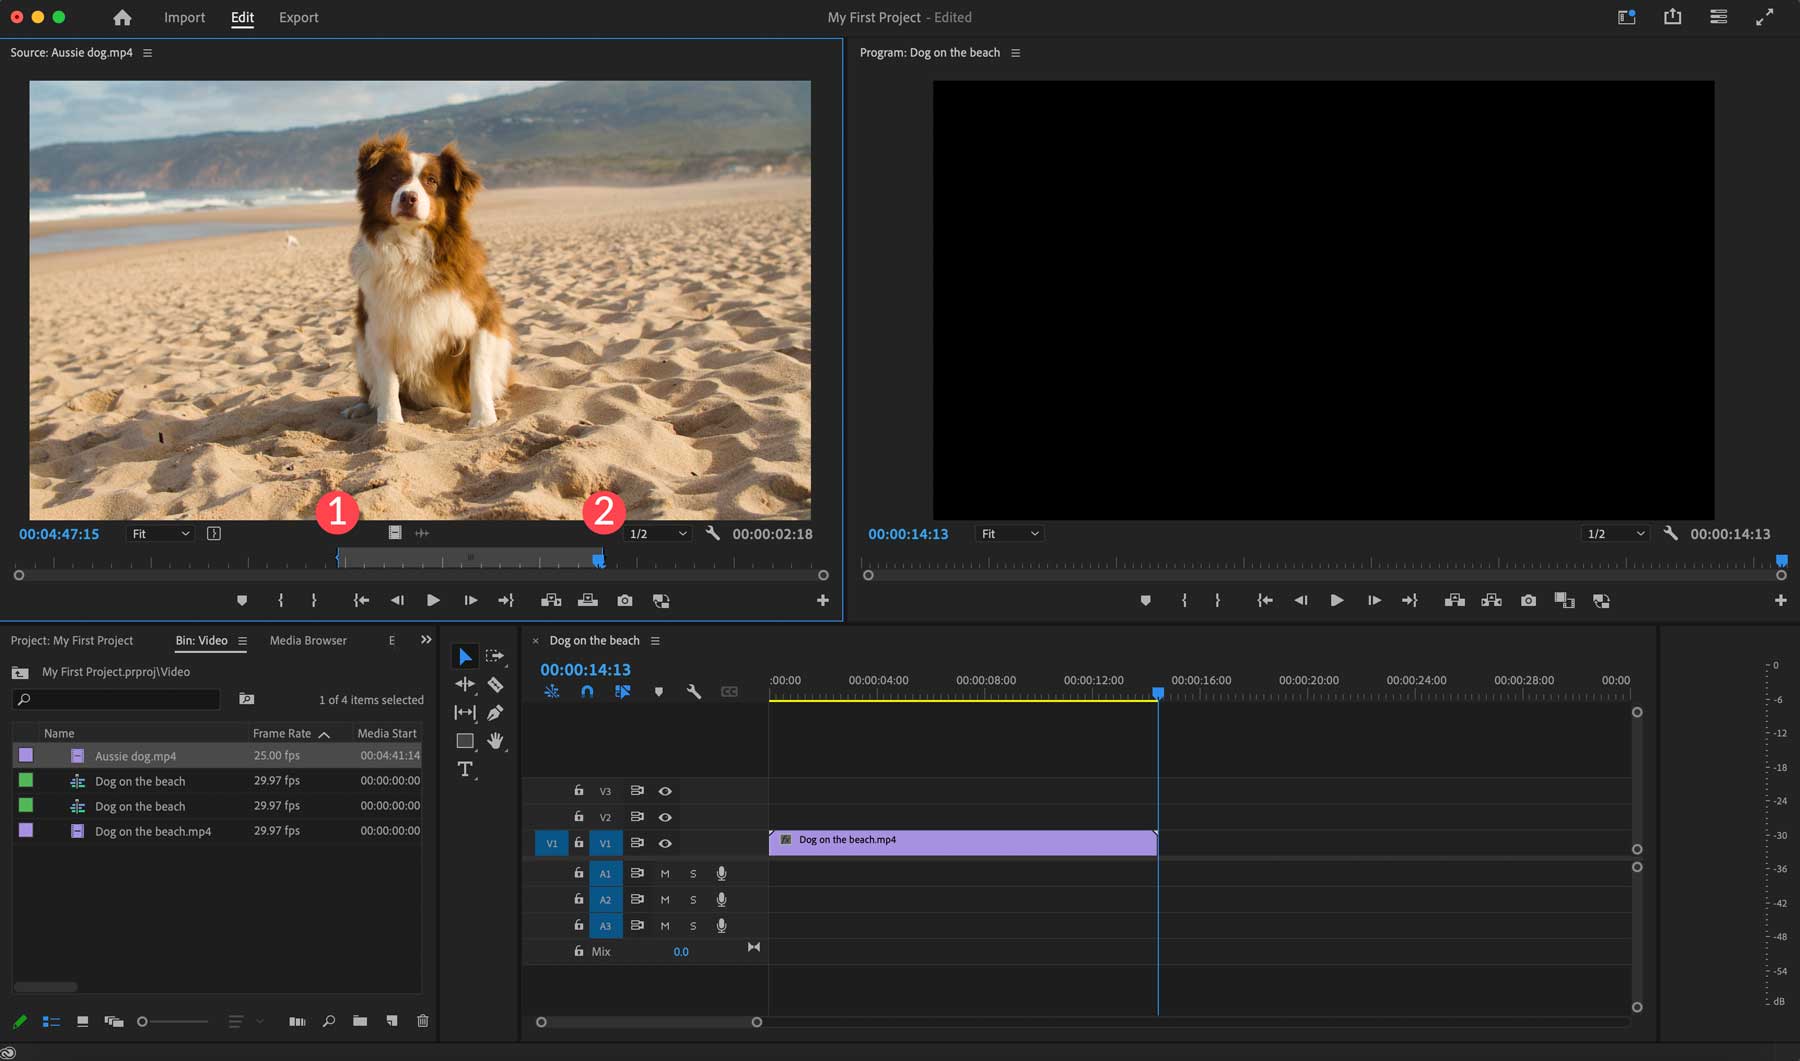
To preview a clip before importing it into your project, you can double-click it in the project window to preview it in the source monitor (1). You can play it using the playback controls (2) or the scrub bar (3) to manually advance the video.
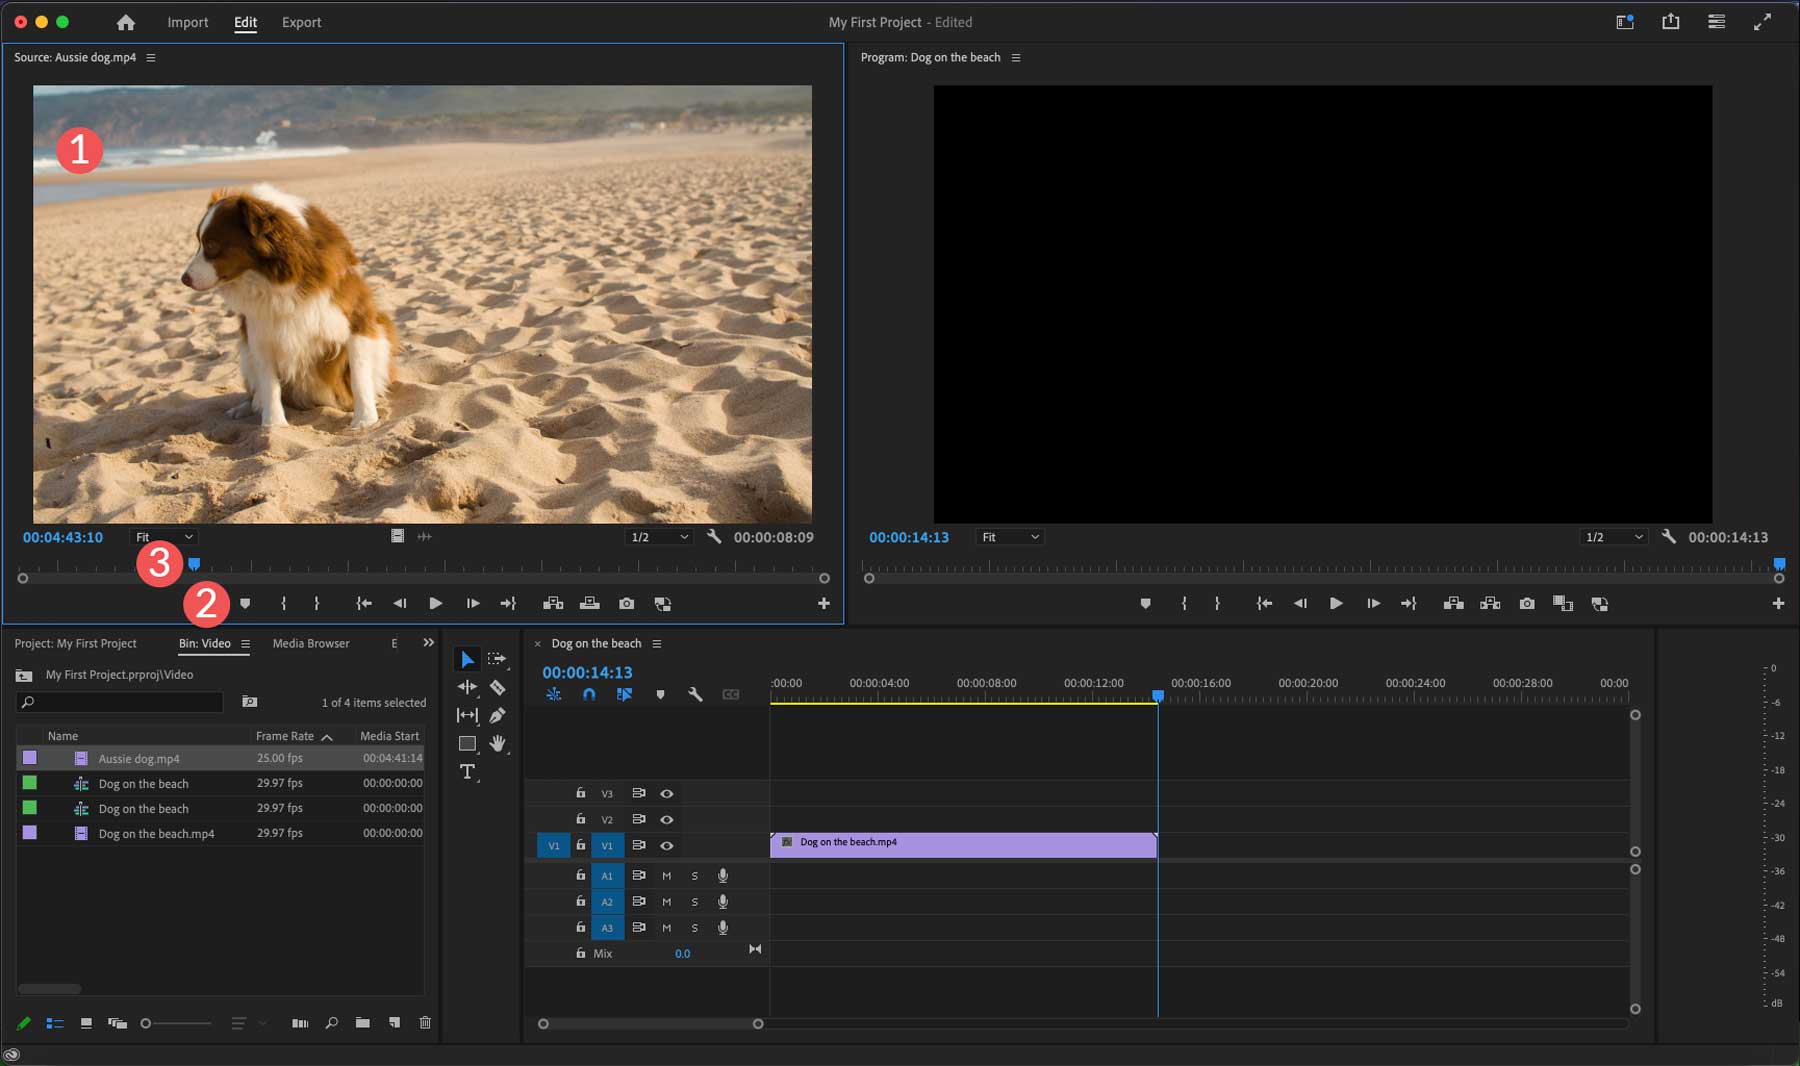
The source monitor is also helpful for scrubbing through a video to locate a specific part to use in your sequence. When you find the section you want to use, click the I key on your keyboard to set an in-point, then press the O key to select the endpoint for your clip.
To place the clip into the sequence timeline, simply drag the video into the timeline.
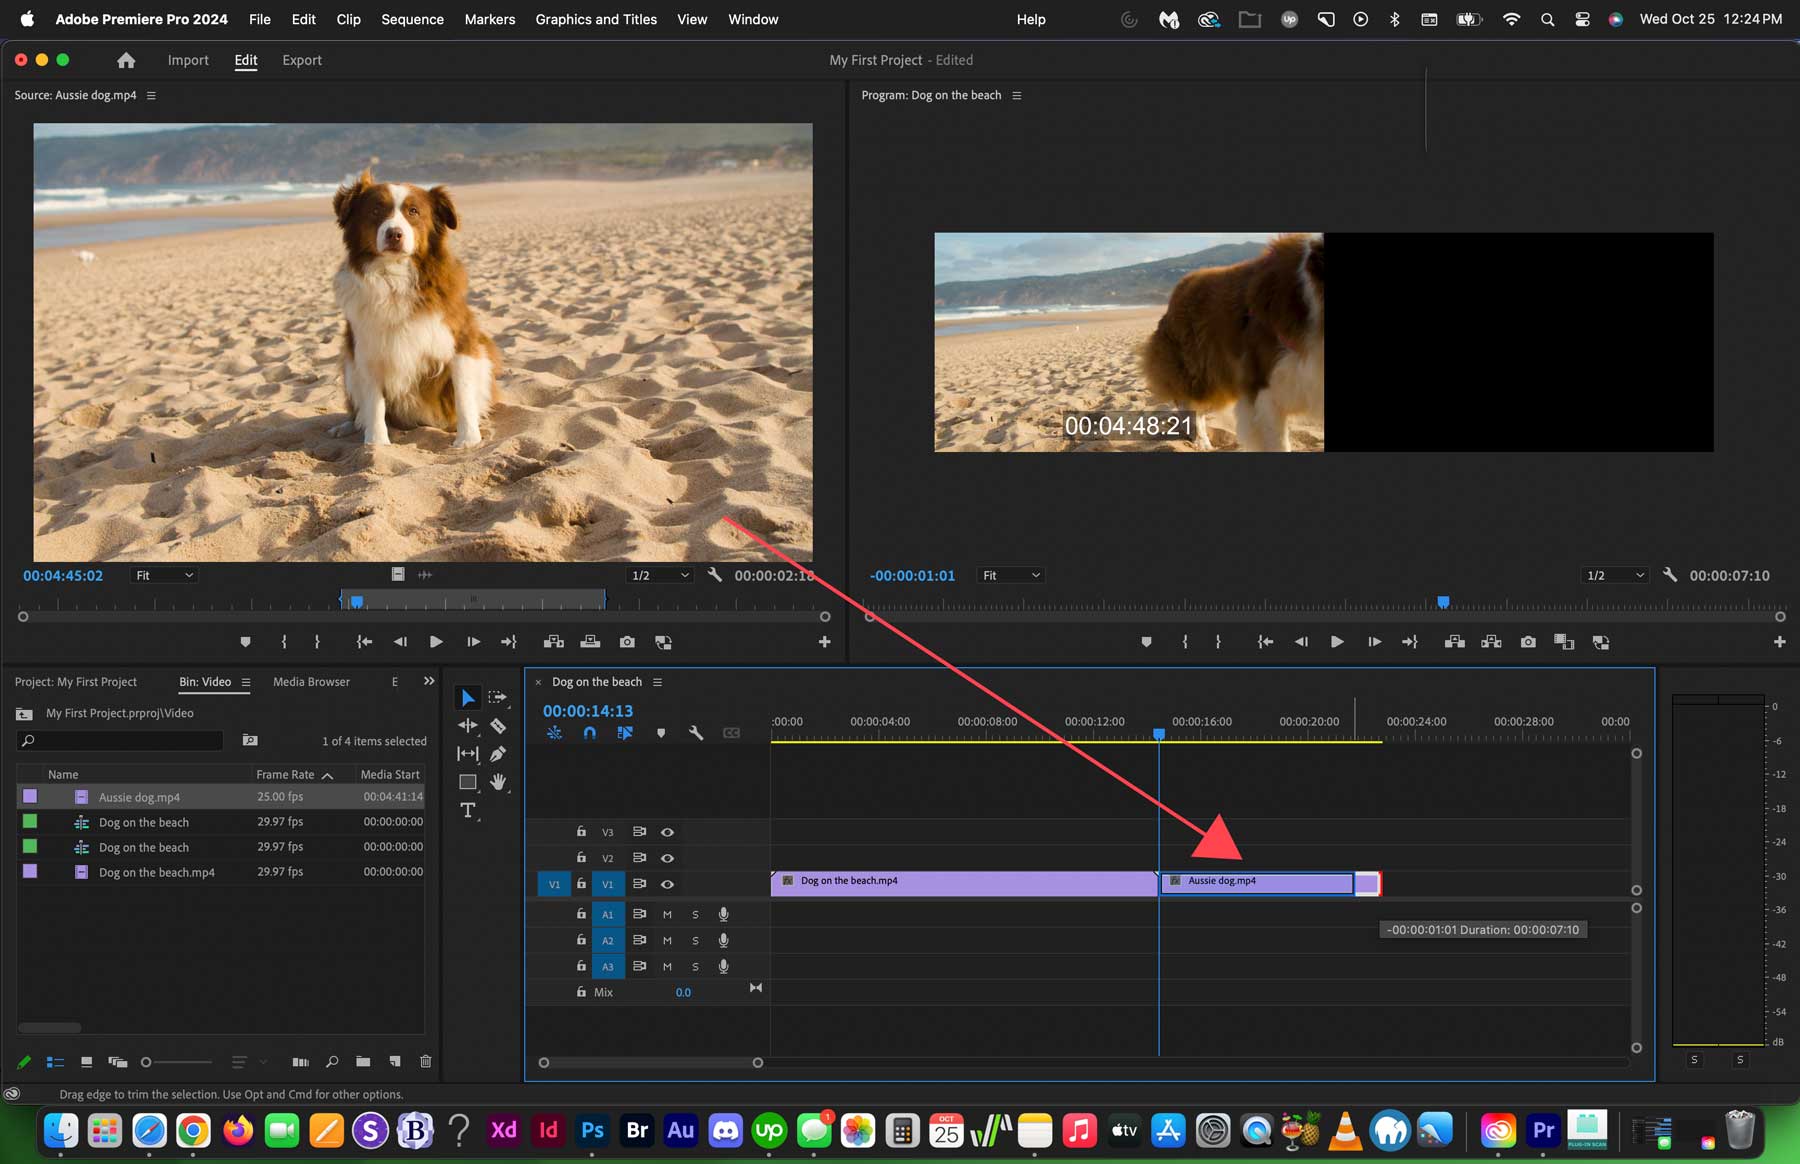
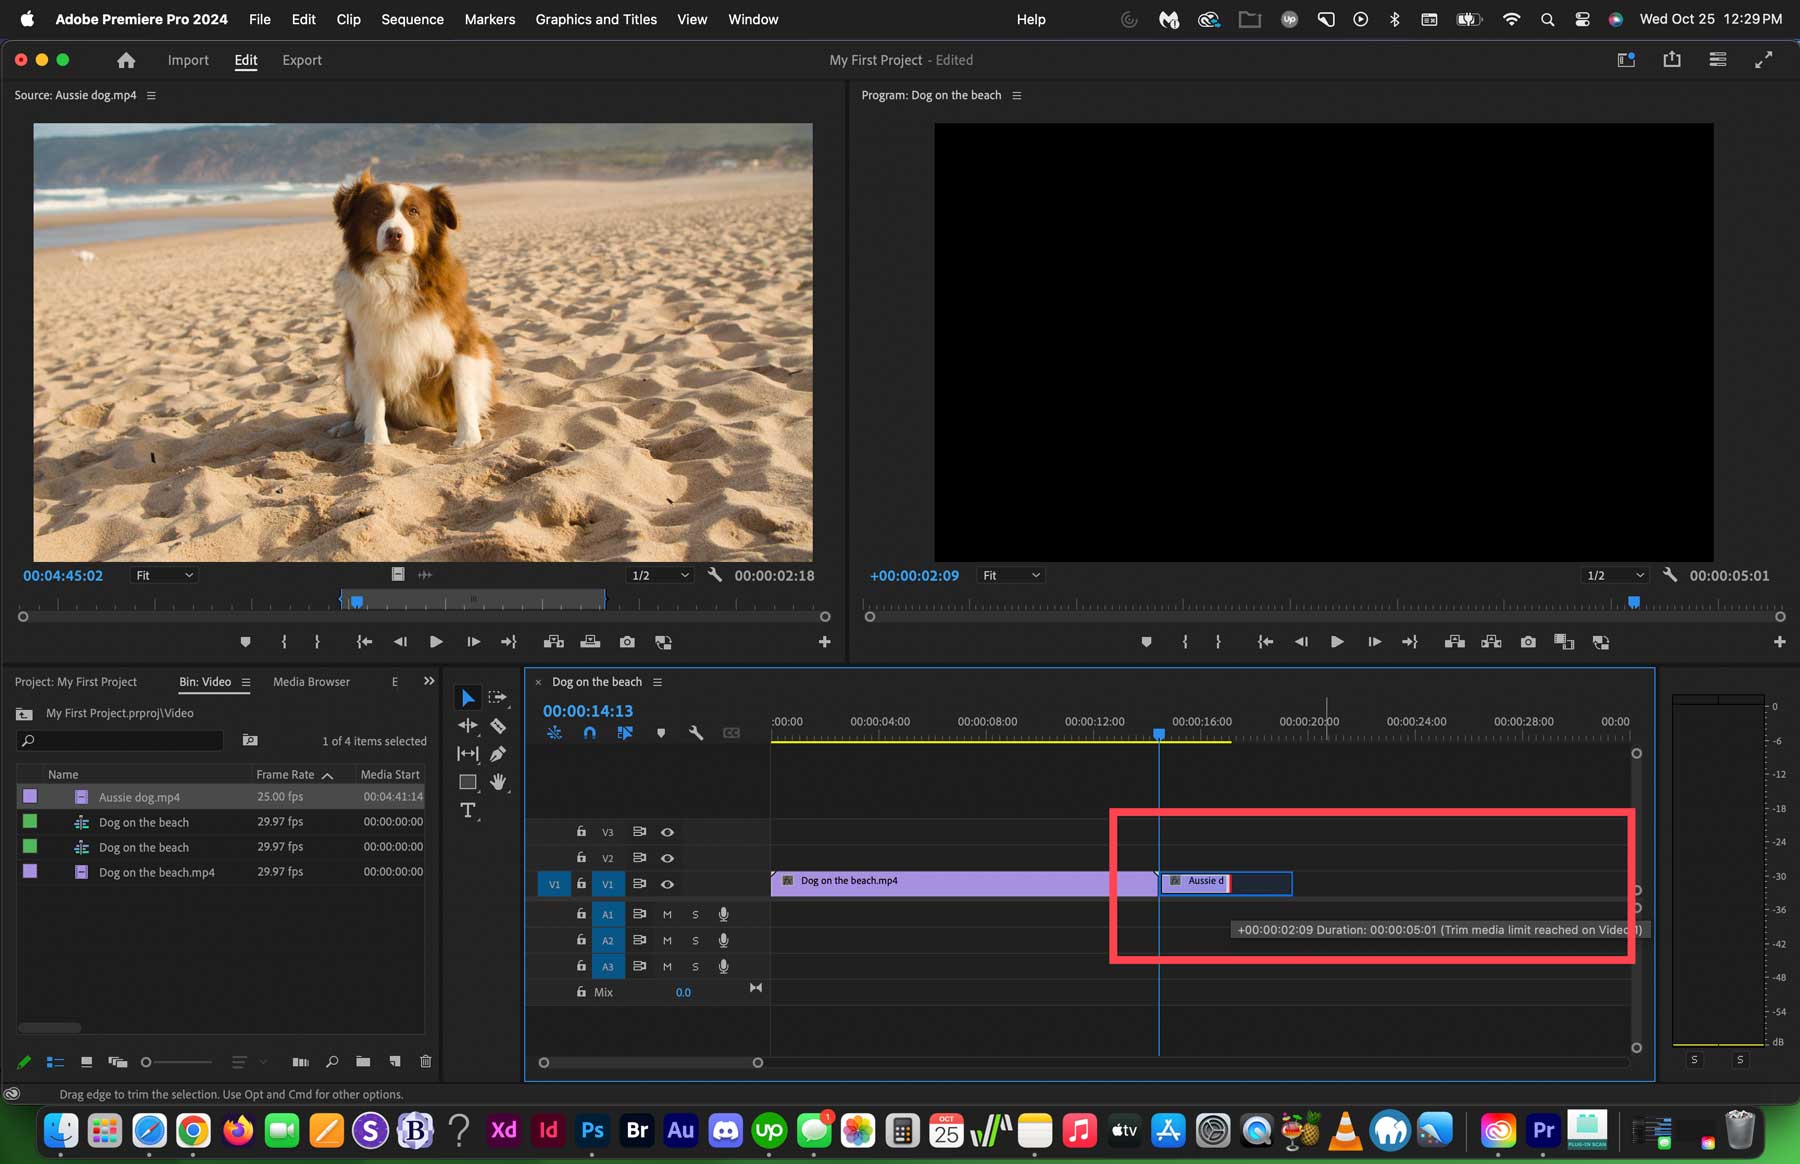
Adobe Premiere Pro will only include the clipped portion in the sequence, but you can still go back in and extend or shorten it as needed by dragging the right edge of the clip in your timeline.
You can also select multiple clips from a source video, an excellent feature for selecting important scenes from one video to use in your project.
Using the Timeline
Adobe Premiere Pro makes the timeline tiny by default. Thankfully, you can easily navigate through the timeline and zoom in by using the scroll bars underneath and to the right of the timeline. Alternatively, you can press the ALT + scroll wheel to zoom in and out.
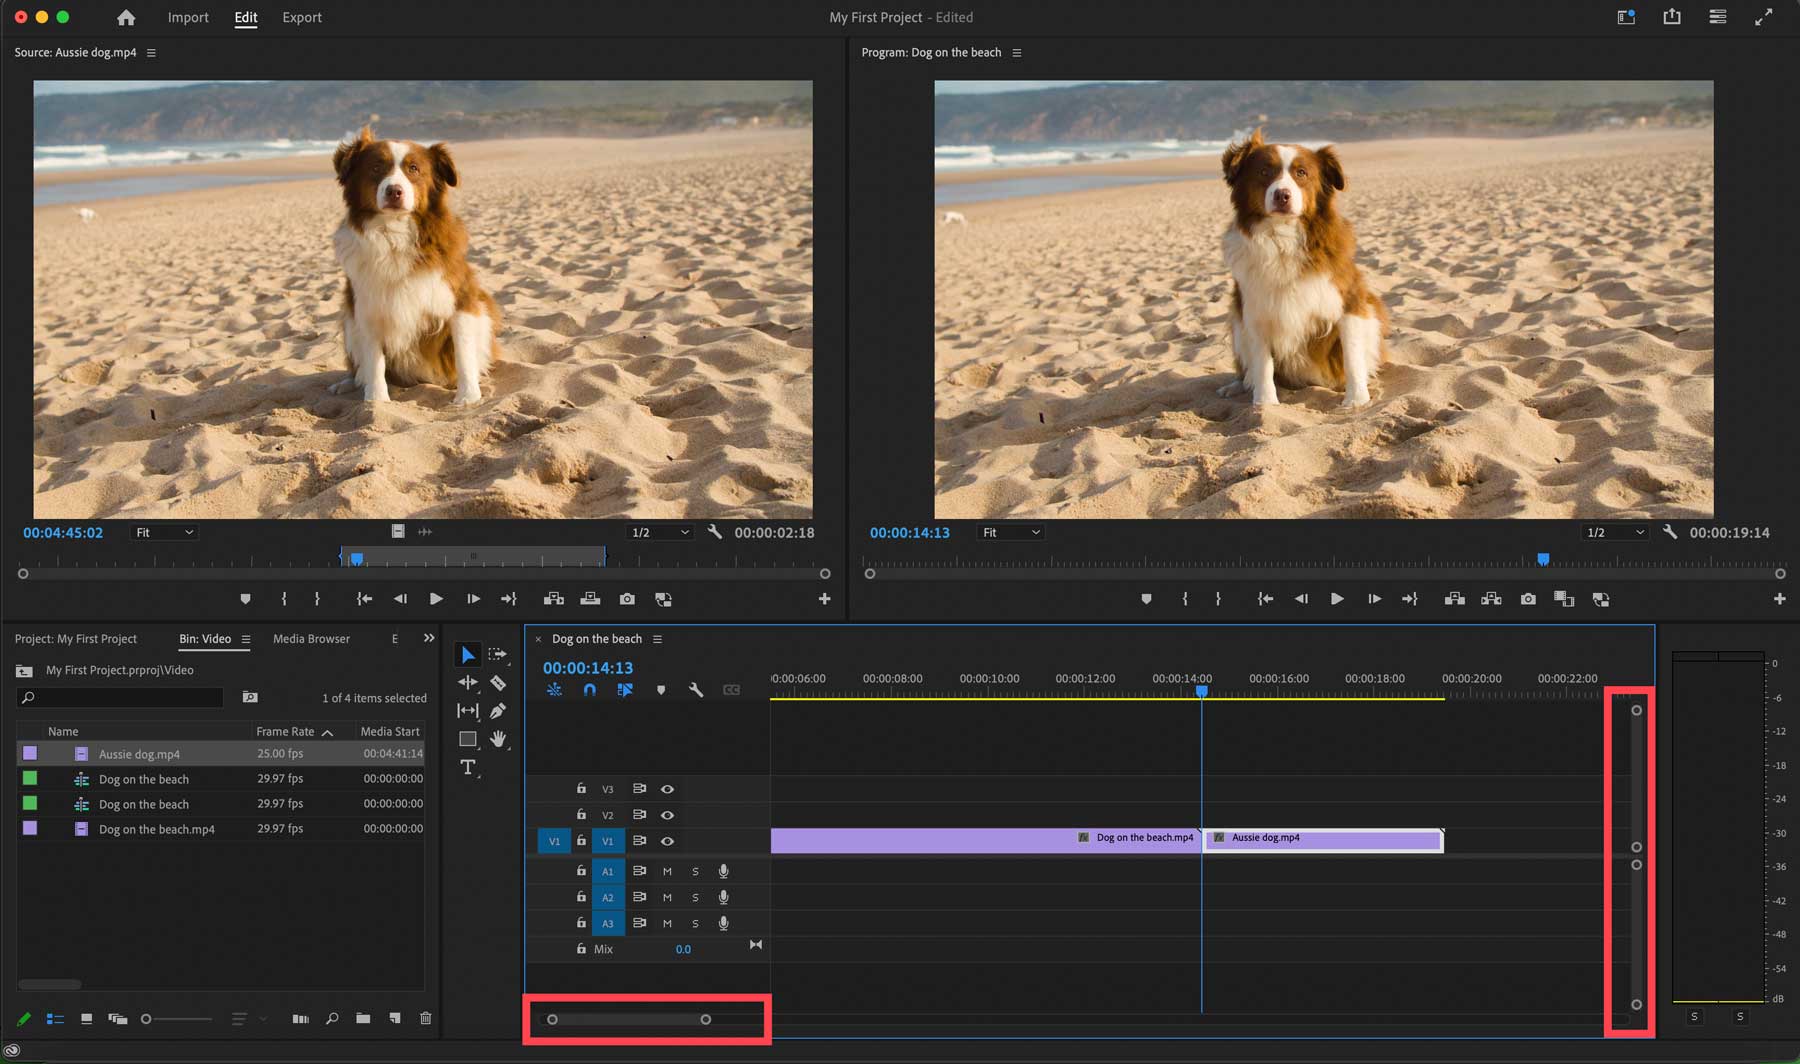
You can also click into a track’s column within the timeline to adjust the channel size by dragging it up and down. Making a track larger will reveal details about it, including thumbnails, making it easier to identify each one.
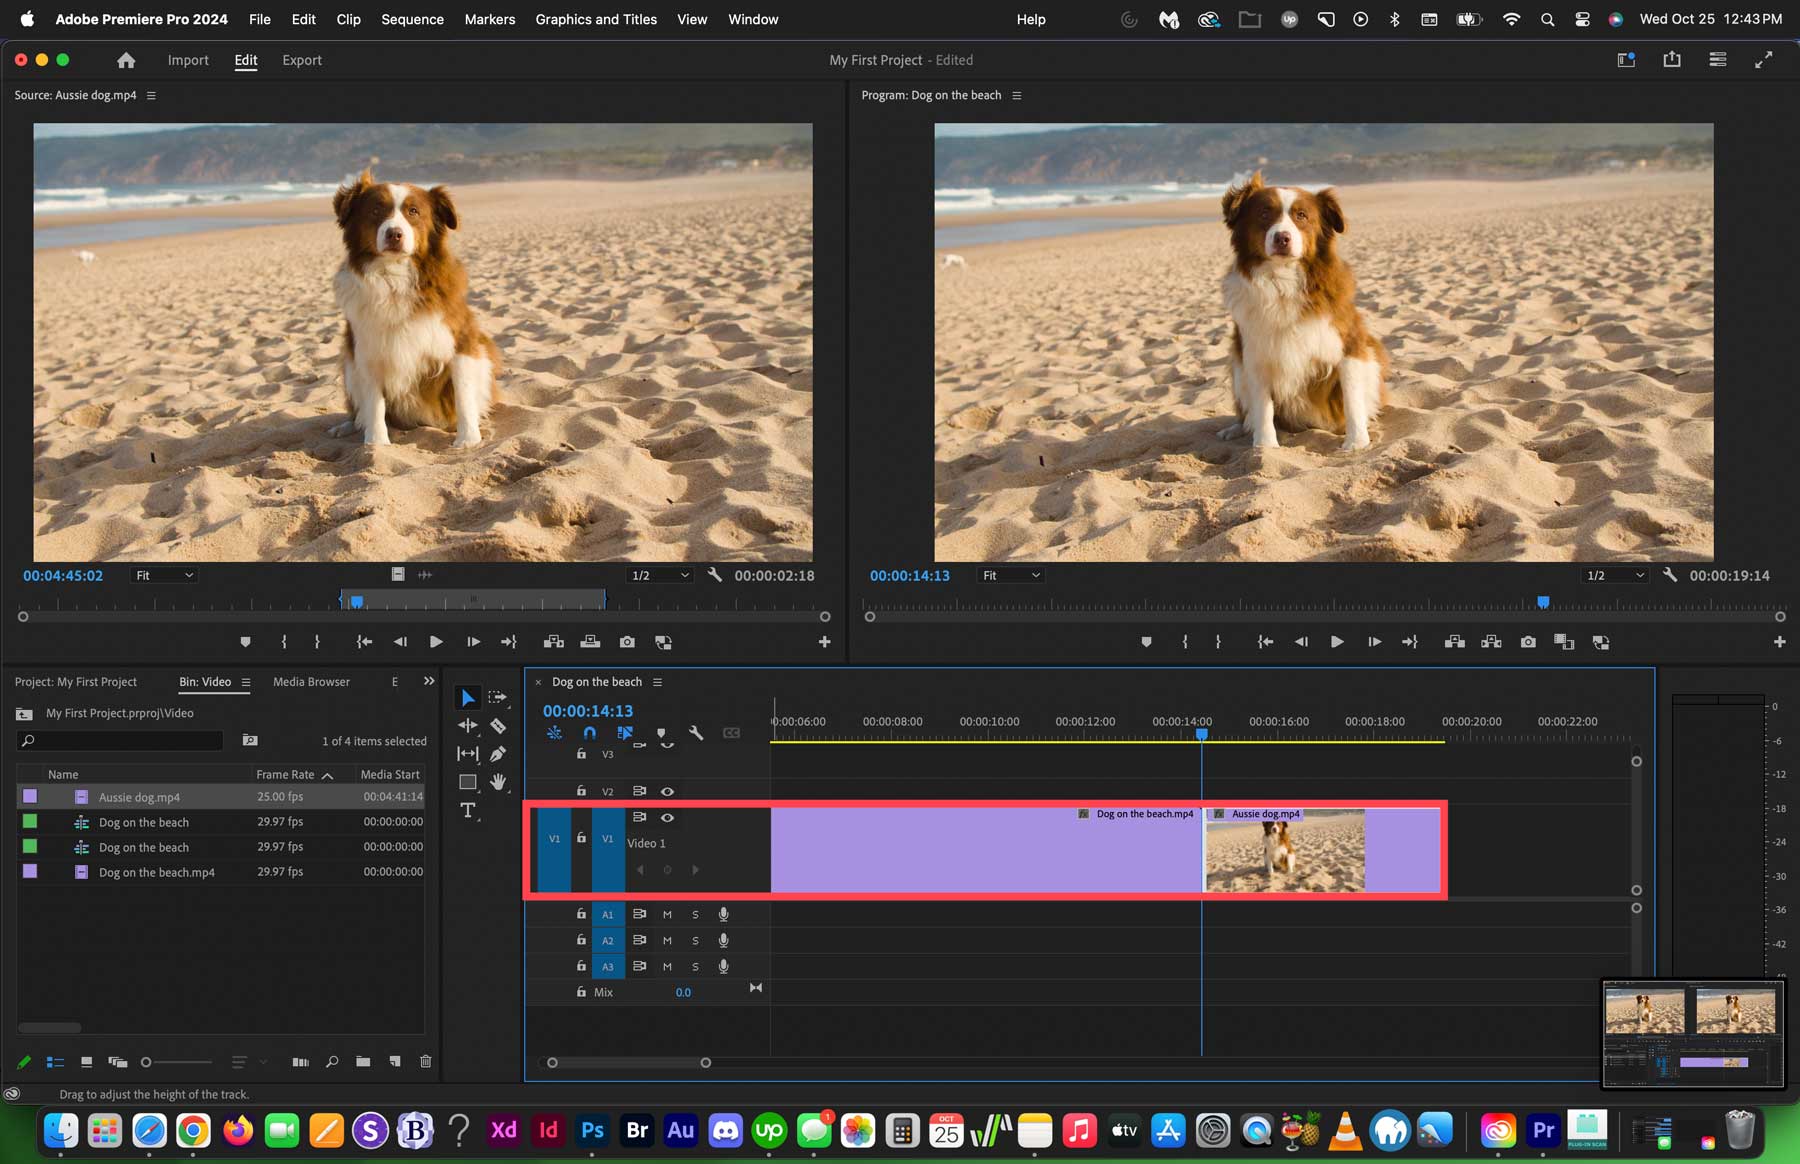
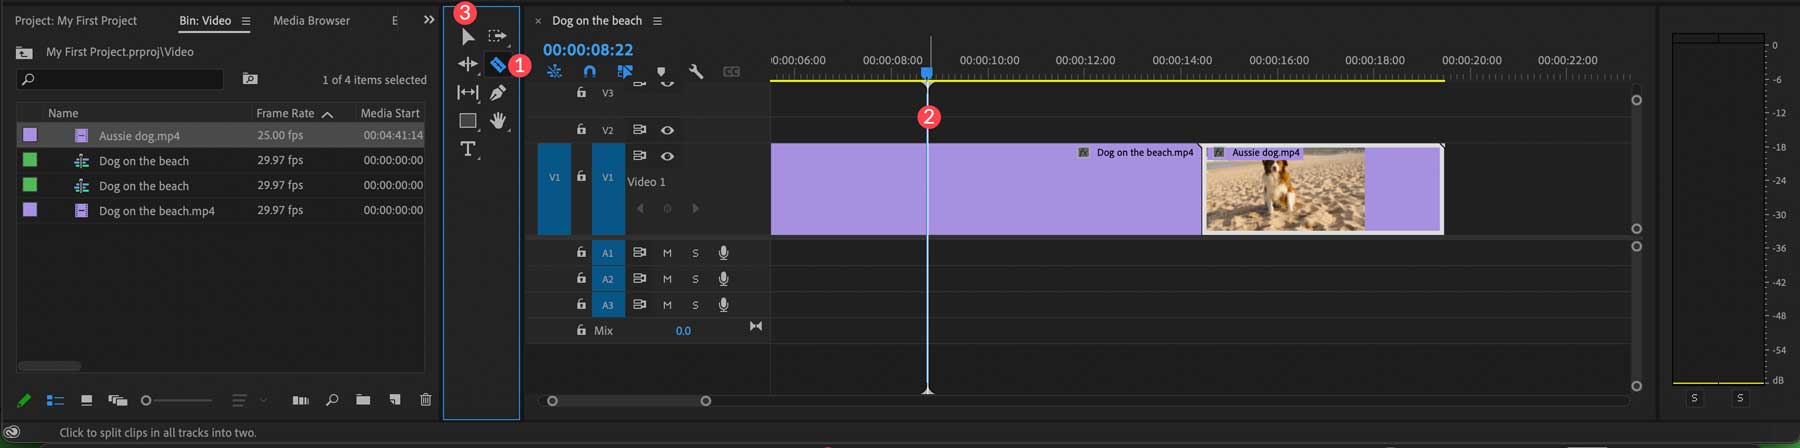
If you want to move clips around in your timeline, you can easily click and drag them into a new position on the timeline. Additionally, you can create a cut by tapping the razor tool (1) in the toolbar and then clicking on a clip (2) within the timeline to cut it. However, when done making cuts, you should always click back on the select tool (3) to avoid any unwanted cuts.
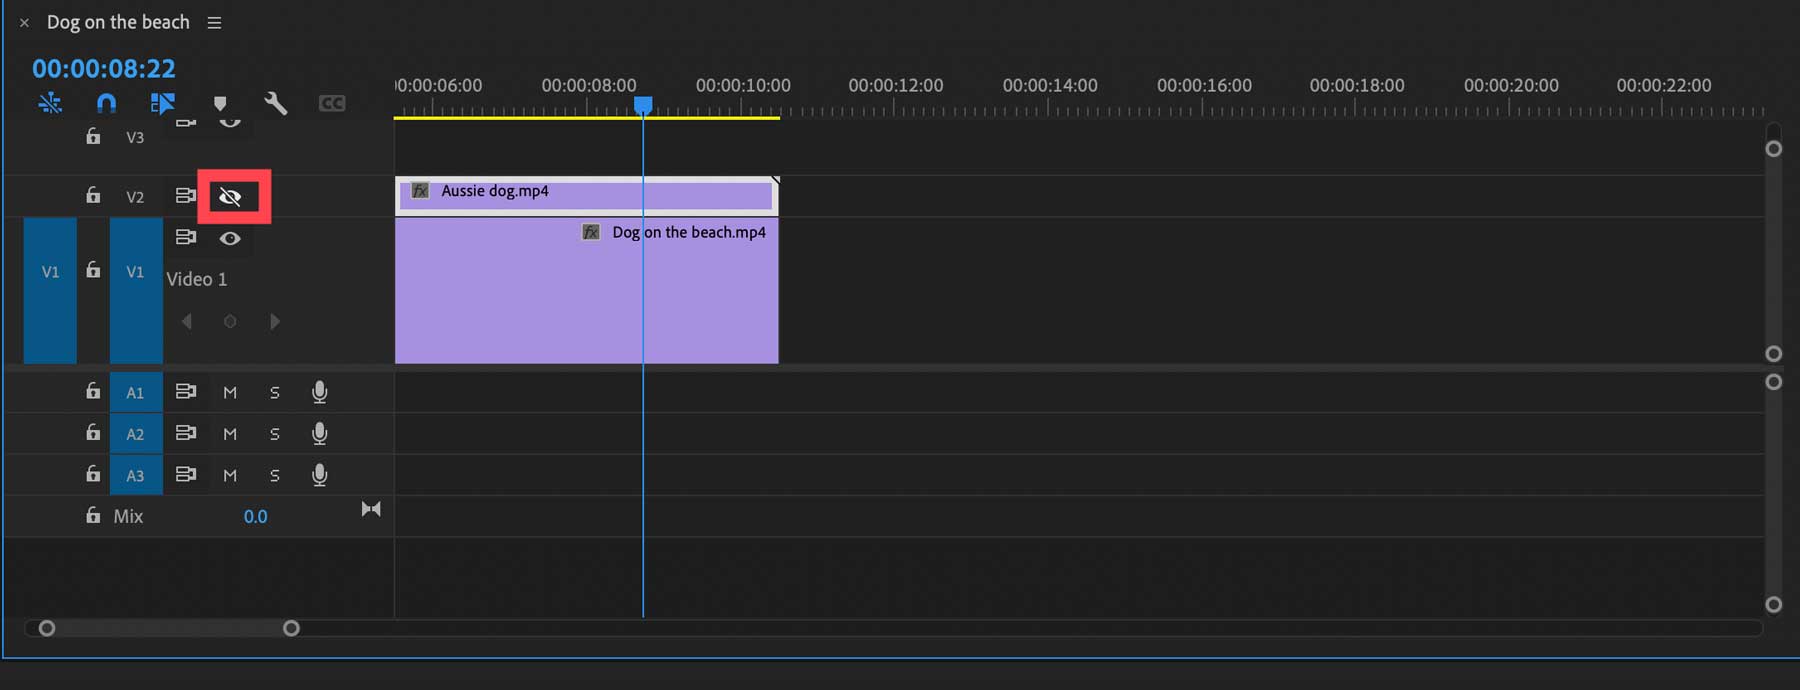
The timeline can house multiple video tracks on top of each other, but remember that Adobe Premiere Pro will only show you the video on the first channel. You may be wondering why you need to do this. For example, you may need to create a video containing a B roll to add sections easily. In that case, you can place the B roll under the main video track so that only the best footage is featured. Alternatively, you can hide channels in the timeline by clicking the visibility icon in the track’s column to hide it.
Adding Effects in Adobe Premiere Pro
Now that you understand how to use the basic tools of the interface, it’s time to showcase some fun stuff.
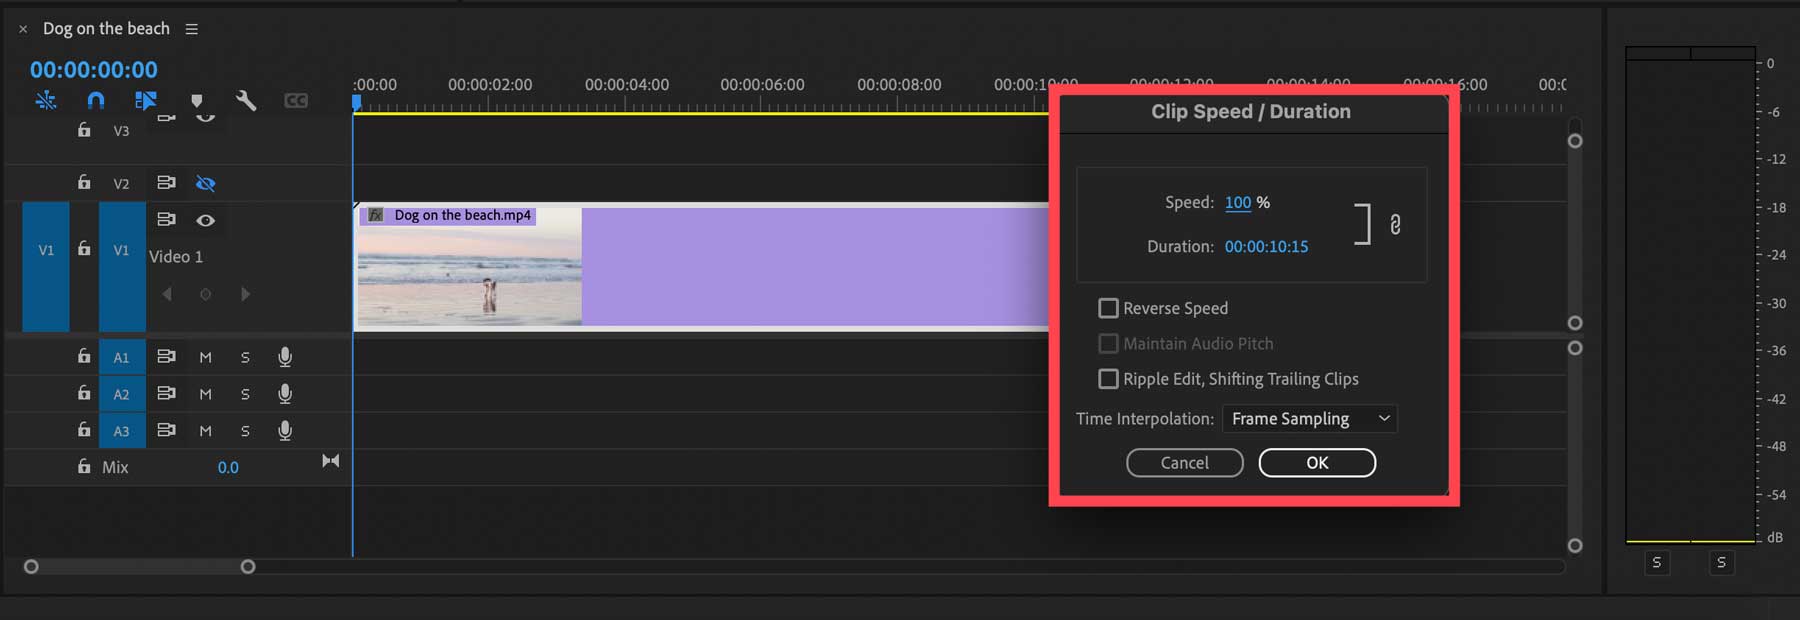
Speeding Up or Slowing Down a Clip
If you want to speed up or slow down a clip, right-click on it and select the speed/duration option from the menu. By default, the speed is set to 100%. To speed it up, increase the percentage. Alternatively, you can reduce it to slow the video down. It’s a simple way to create a slow-motion or high-speed clip in your project. You can also reverse the video by clicking the reverse speed checkbox.
Adding Text
Adding text to your video is very simple. Select the text tool (1) and click on the program monitor (2) to start typing. From there, you can click the select tool (3) to adjust the size.
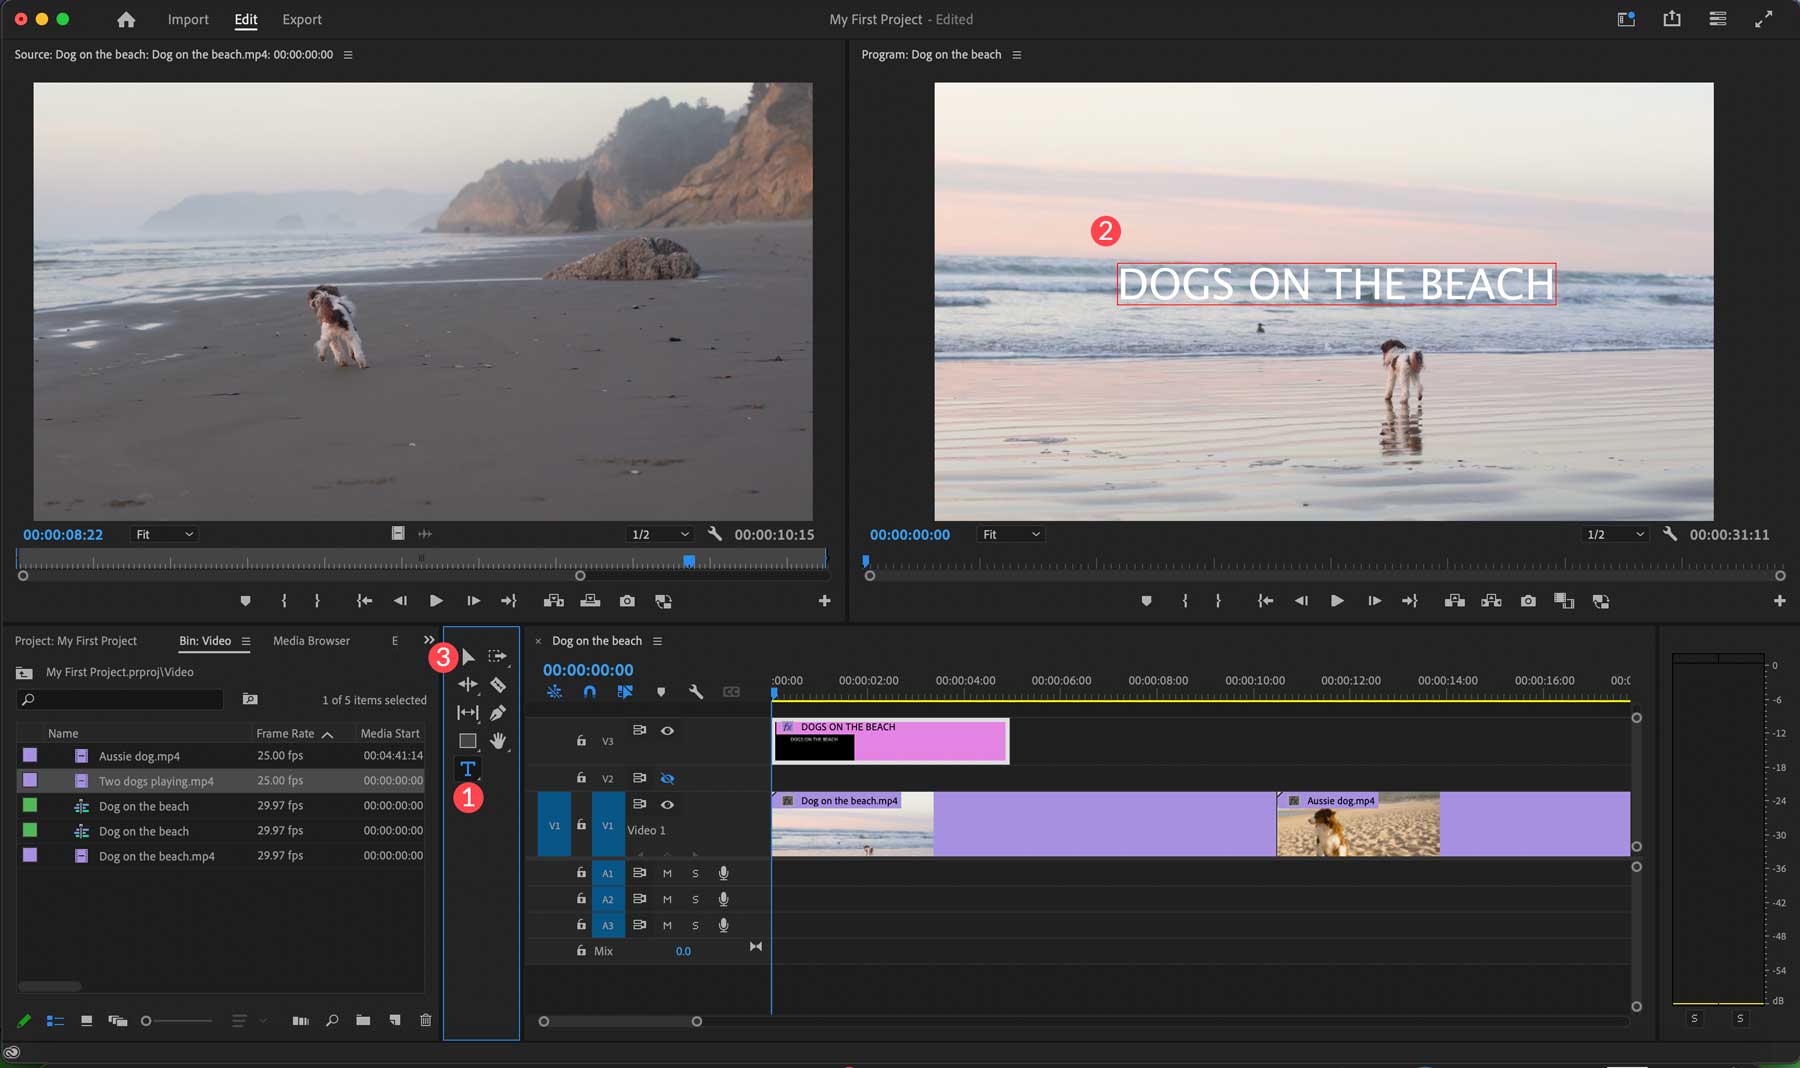
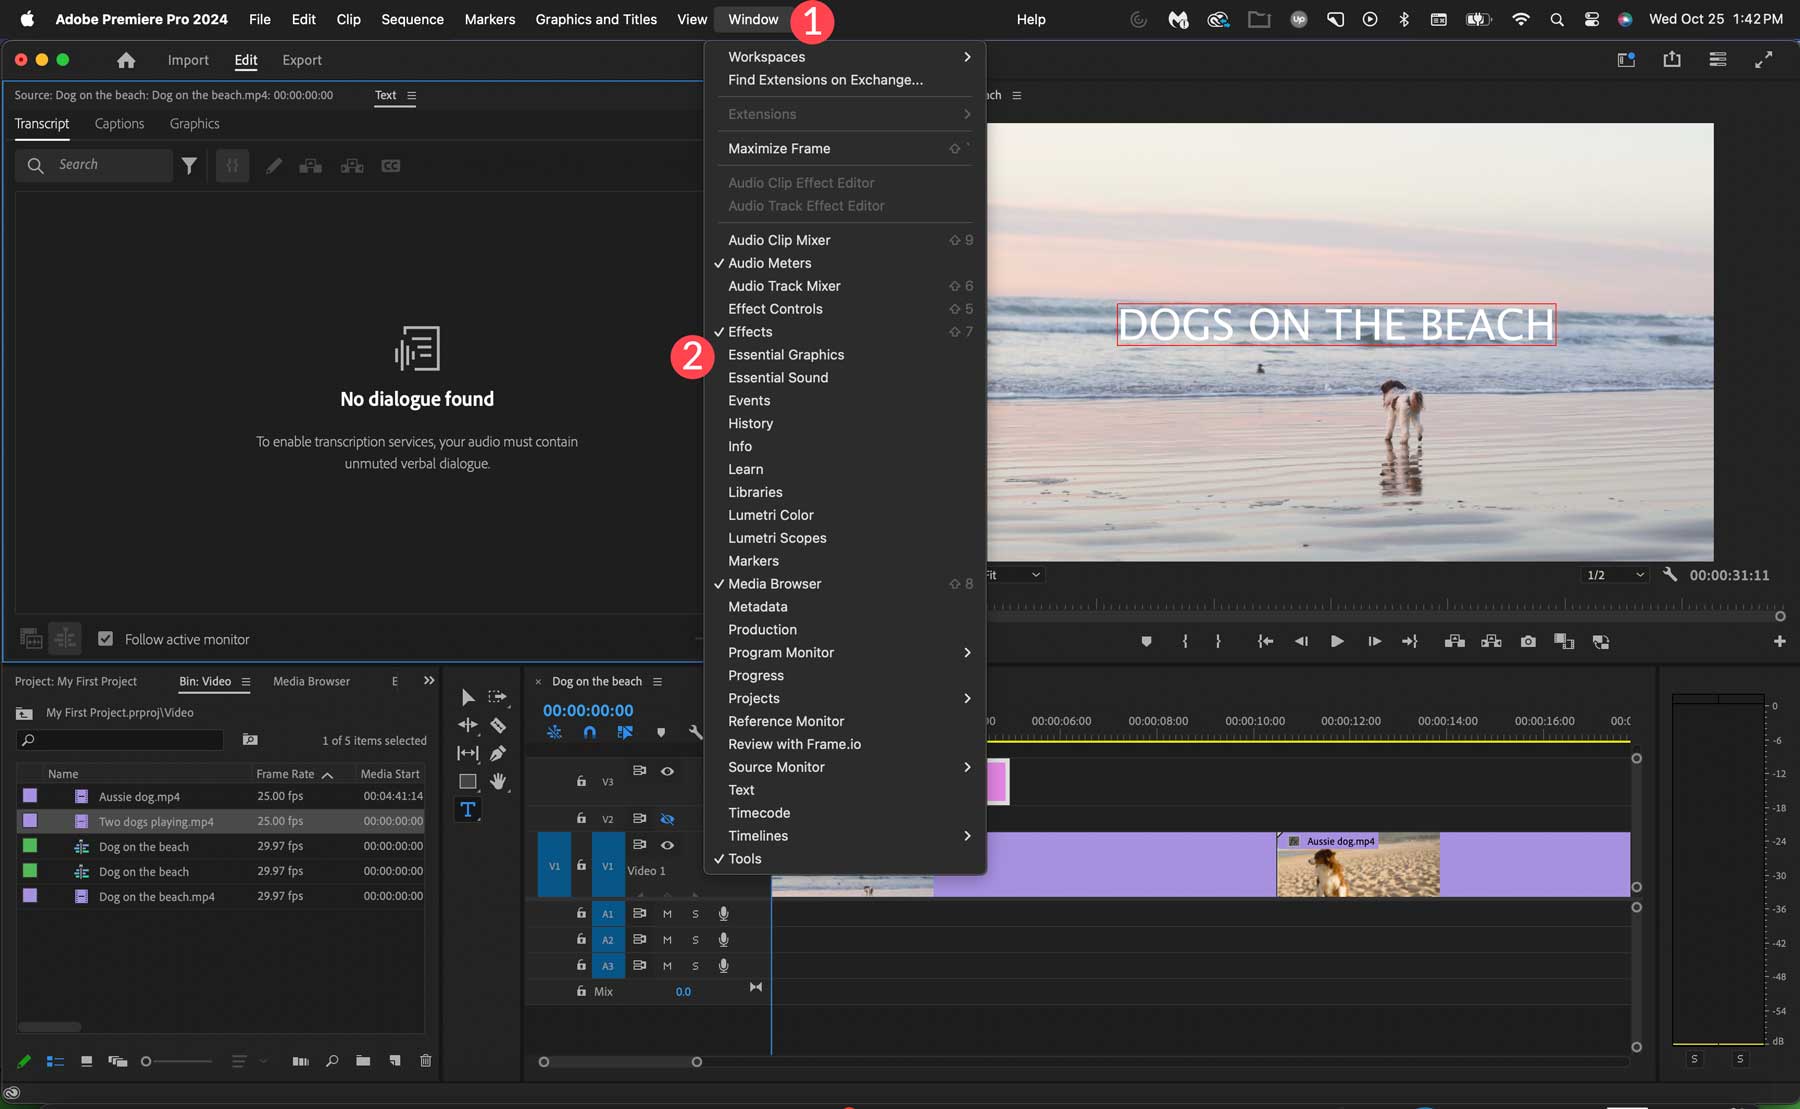
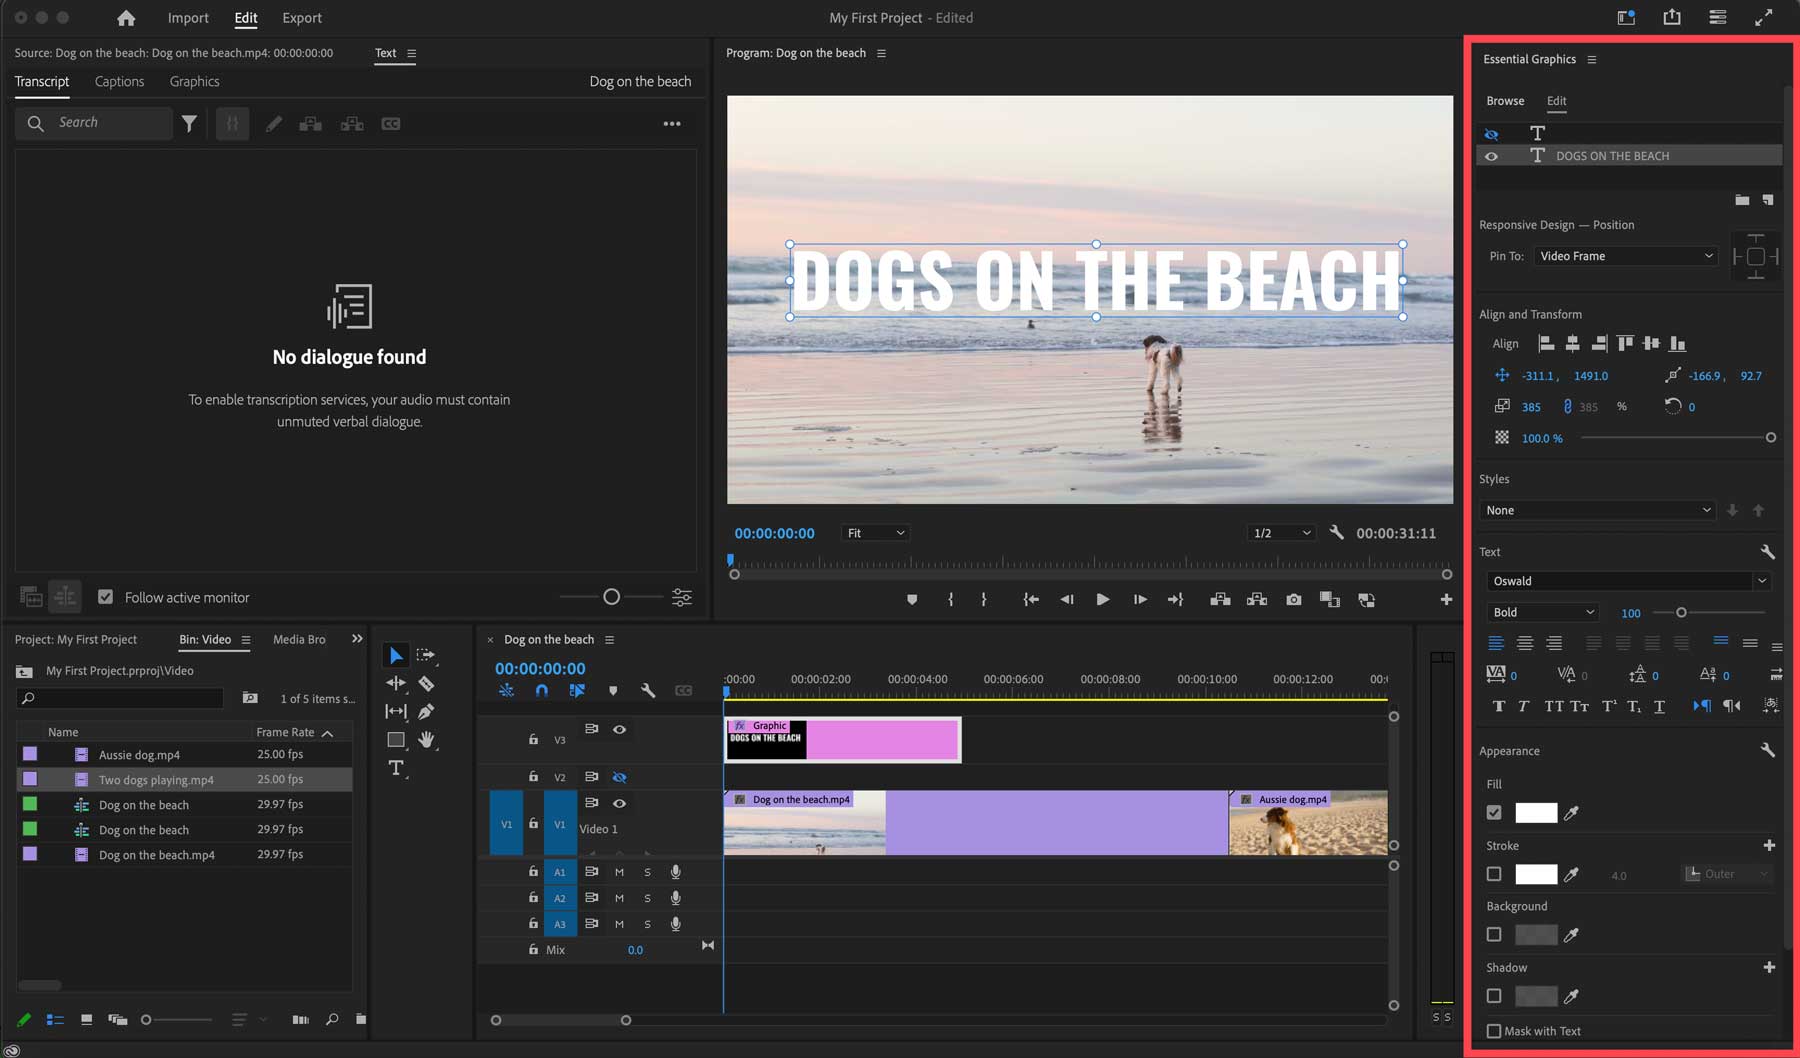
You’ll notice that you have a new graphics layer in the timeline. You can drag it over a particular part of the video clip or drag it into a blank space so it has a black background. To style it, click the window tab (1) in the navigation menu and select essential graphics (2).
Once it opens, you can change the font, position, size, color, and other aspects of the text to meet your preferences.
Animating Clips
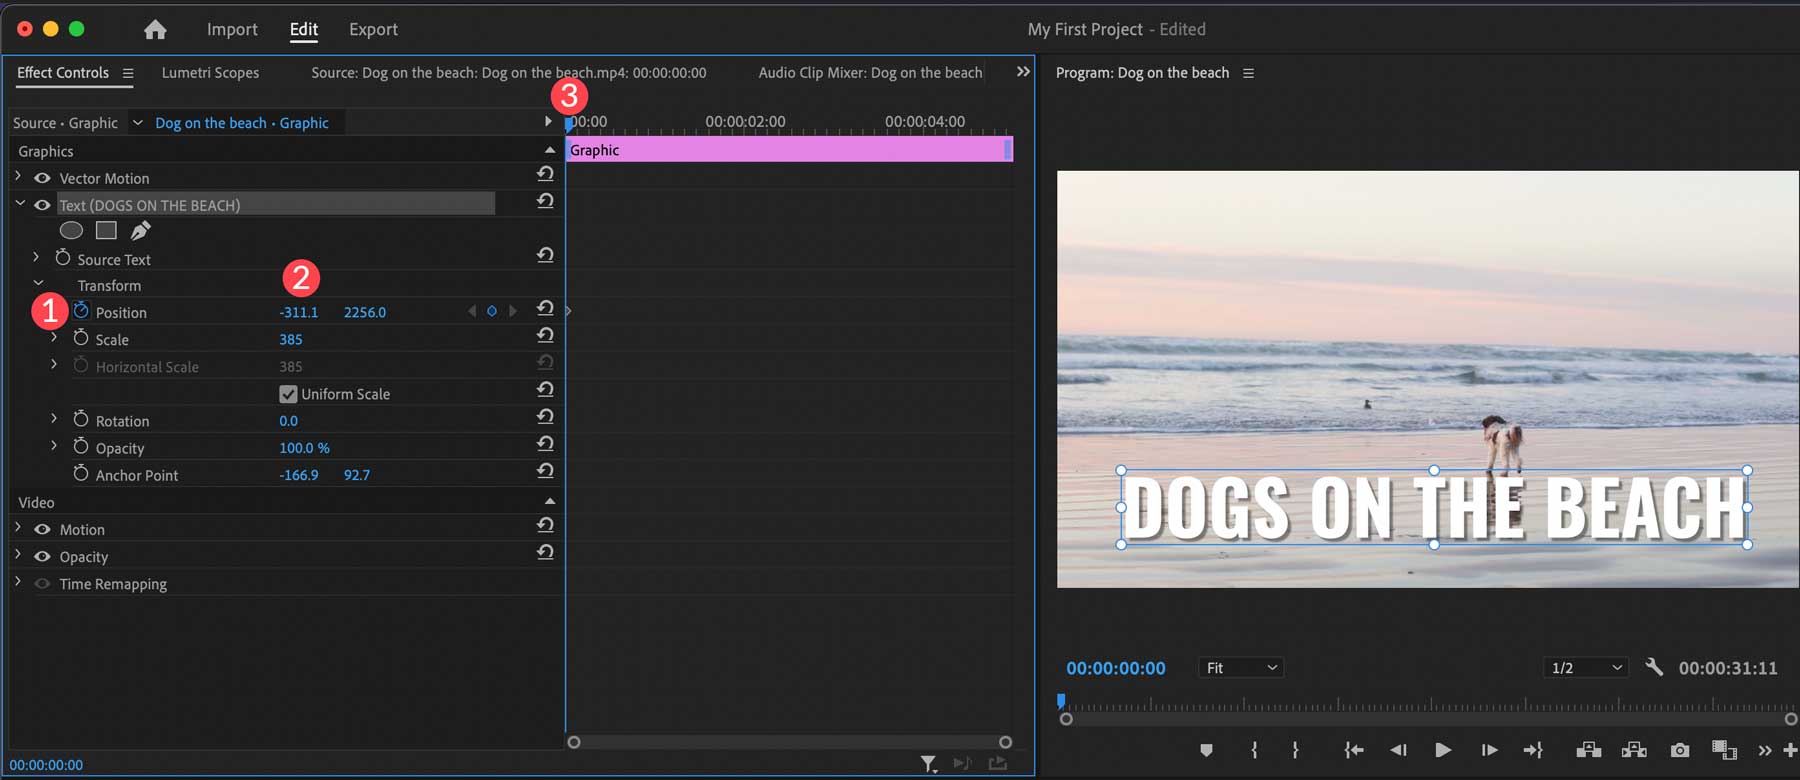
Every track has an effect controls panel that lets you easily adjust its properties. You can scale, rotate, reposition it, and add animations. Select the text track, then select effect controls (1) in the properties panel. You’ll notice little stopwatch (2) icons next to each property.
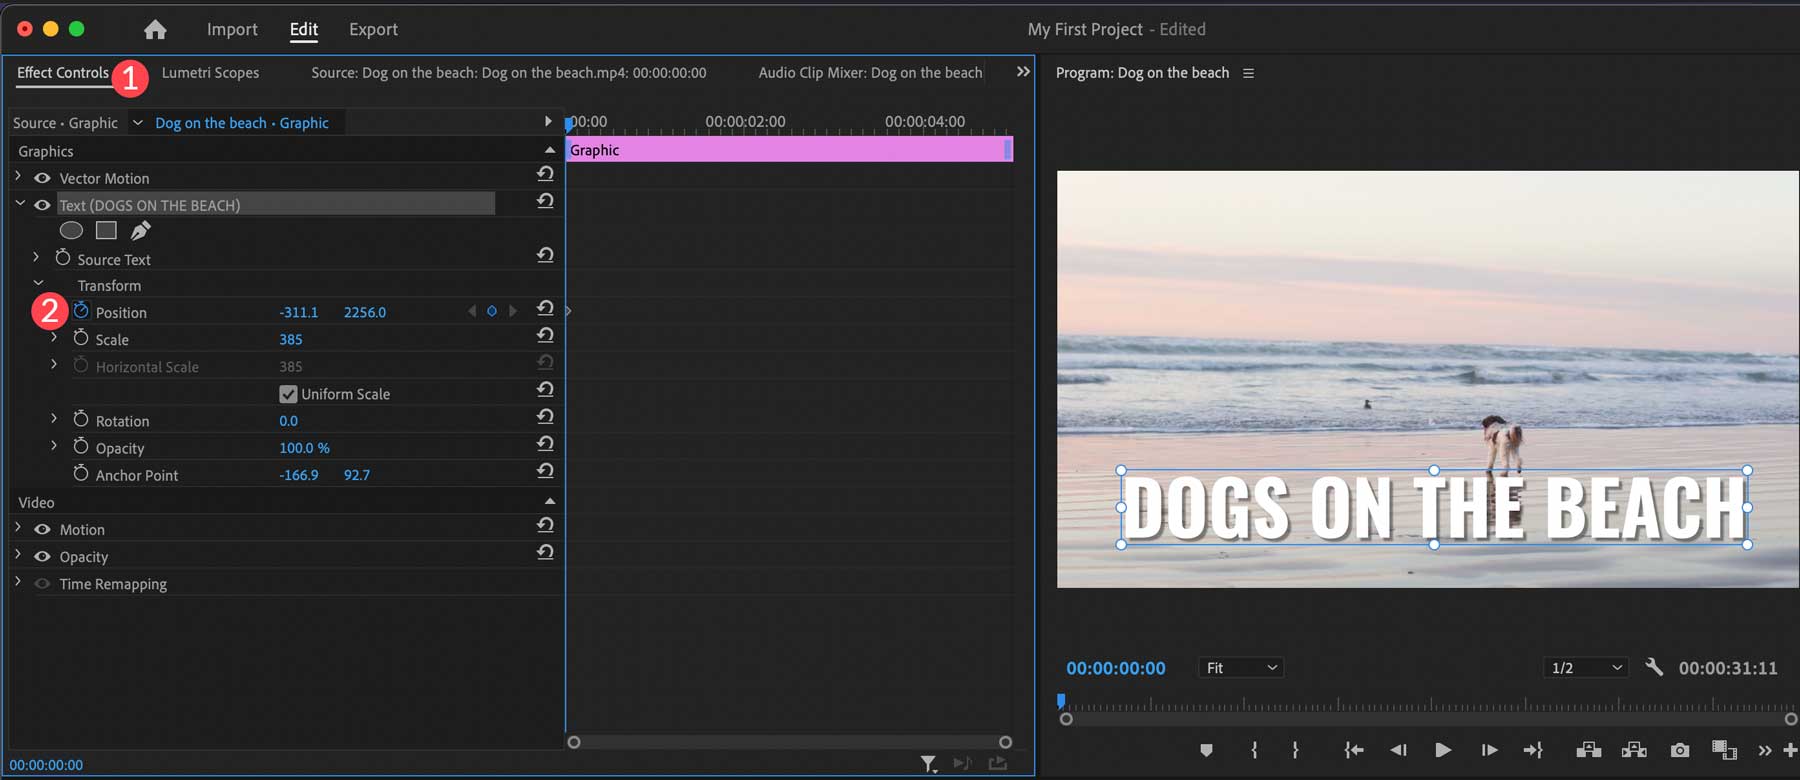
When the effect controls panel is active, you’ll see a mini timeline containing only the track selected in the main timeline. When you click a stopwatch icon, a keyframe is created, which can be used as a starting point. For example, by clicking on the stopwatch in the position property (1), you can adjust the starting point of the animation (2) and then slide the scrubber in the mini timeline to create a stopping point (3) for your animation.
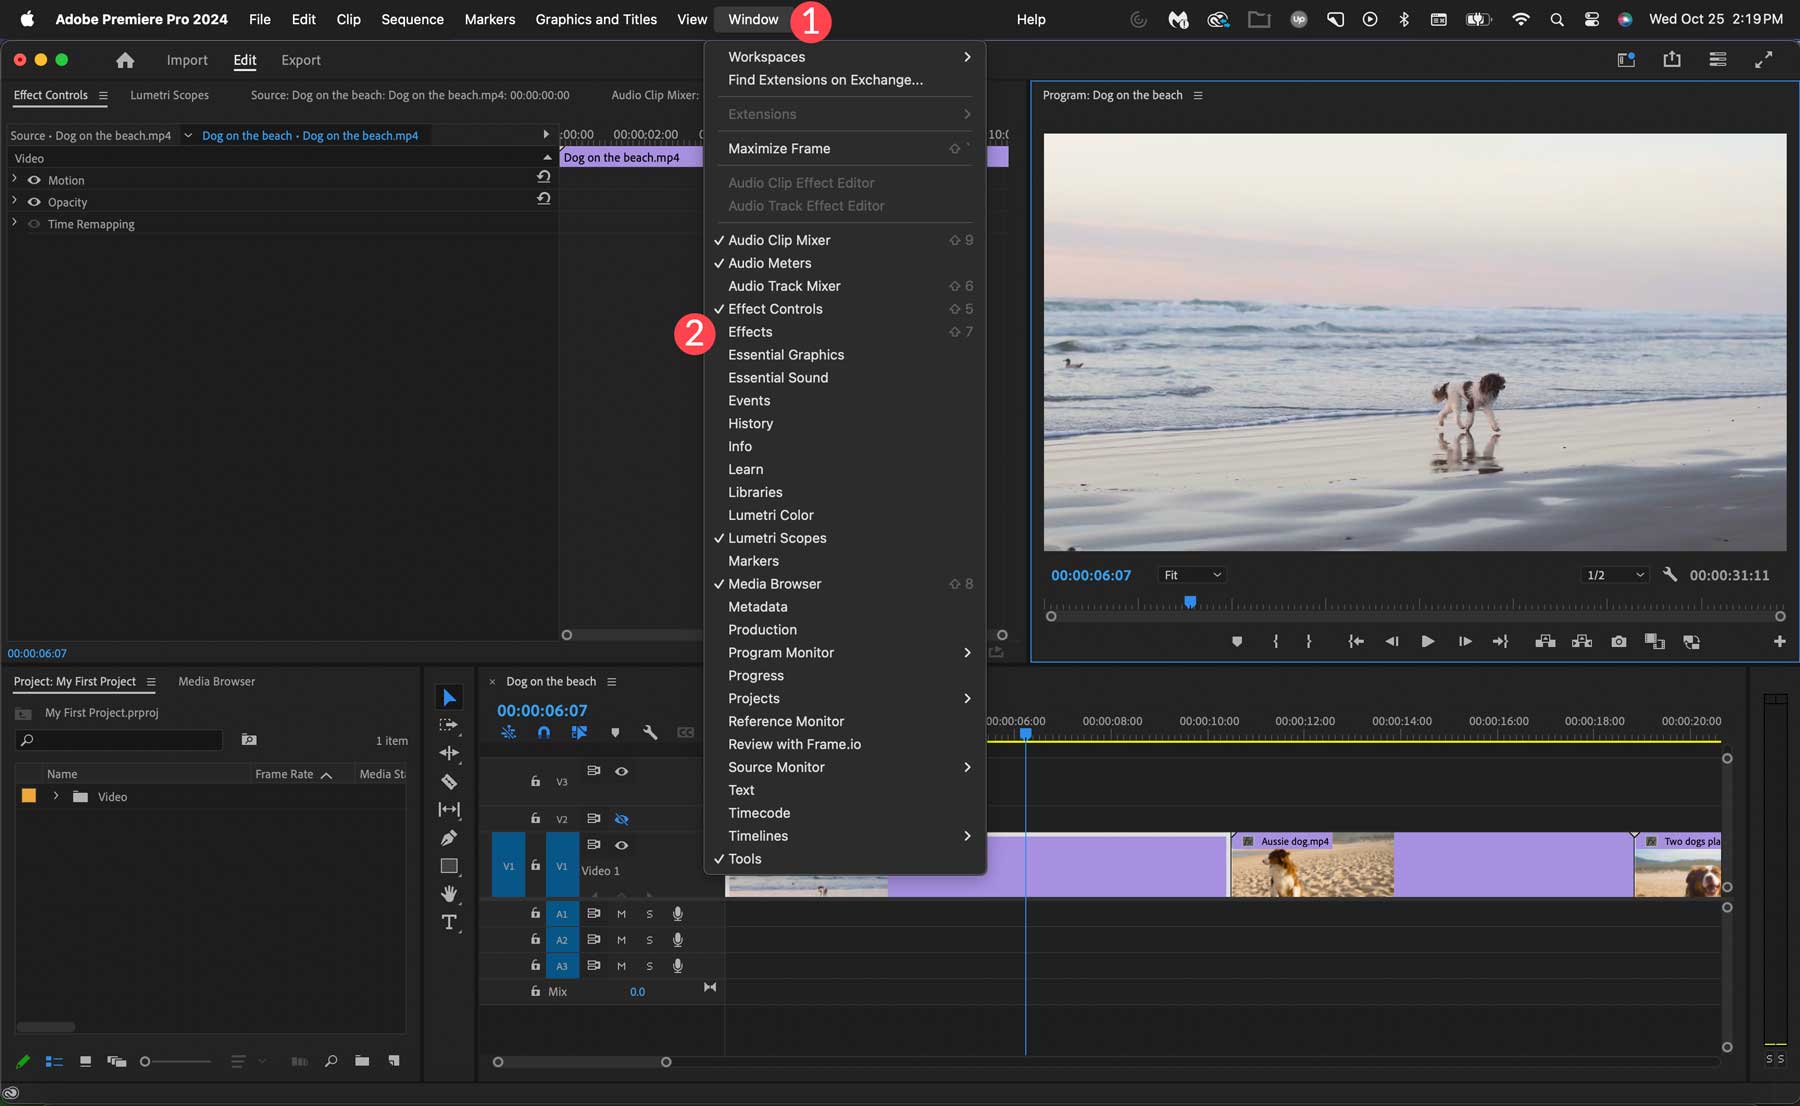
Accessing the Effects Library
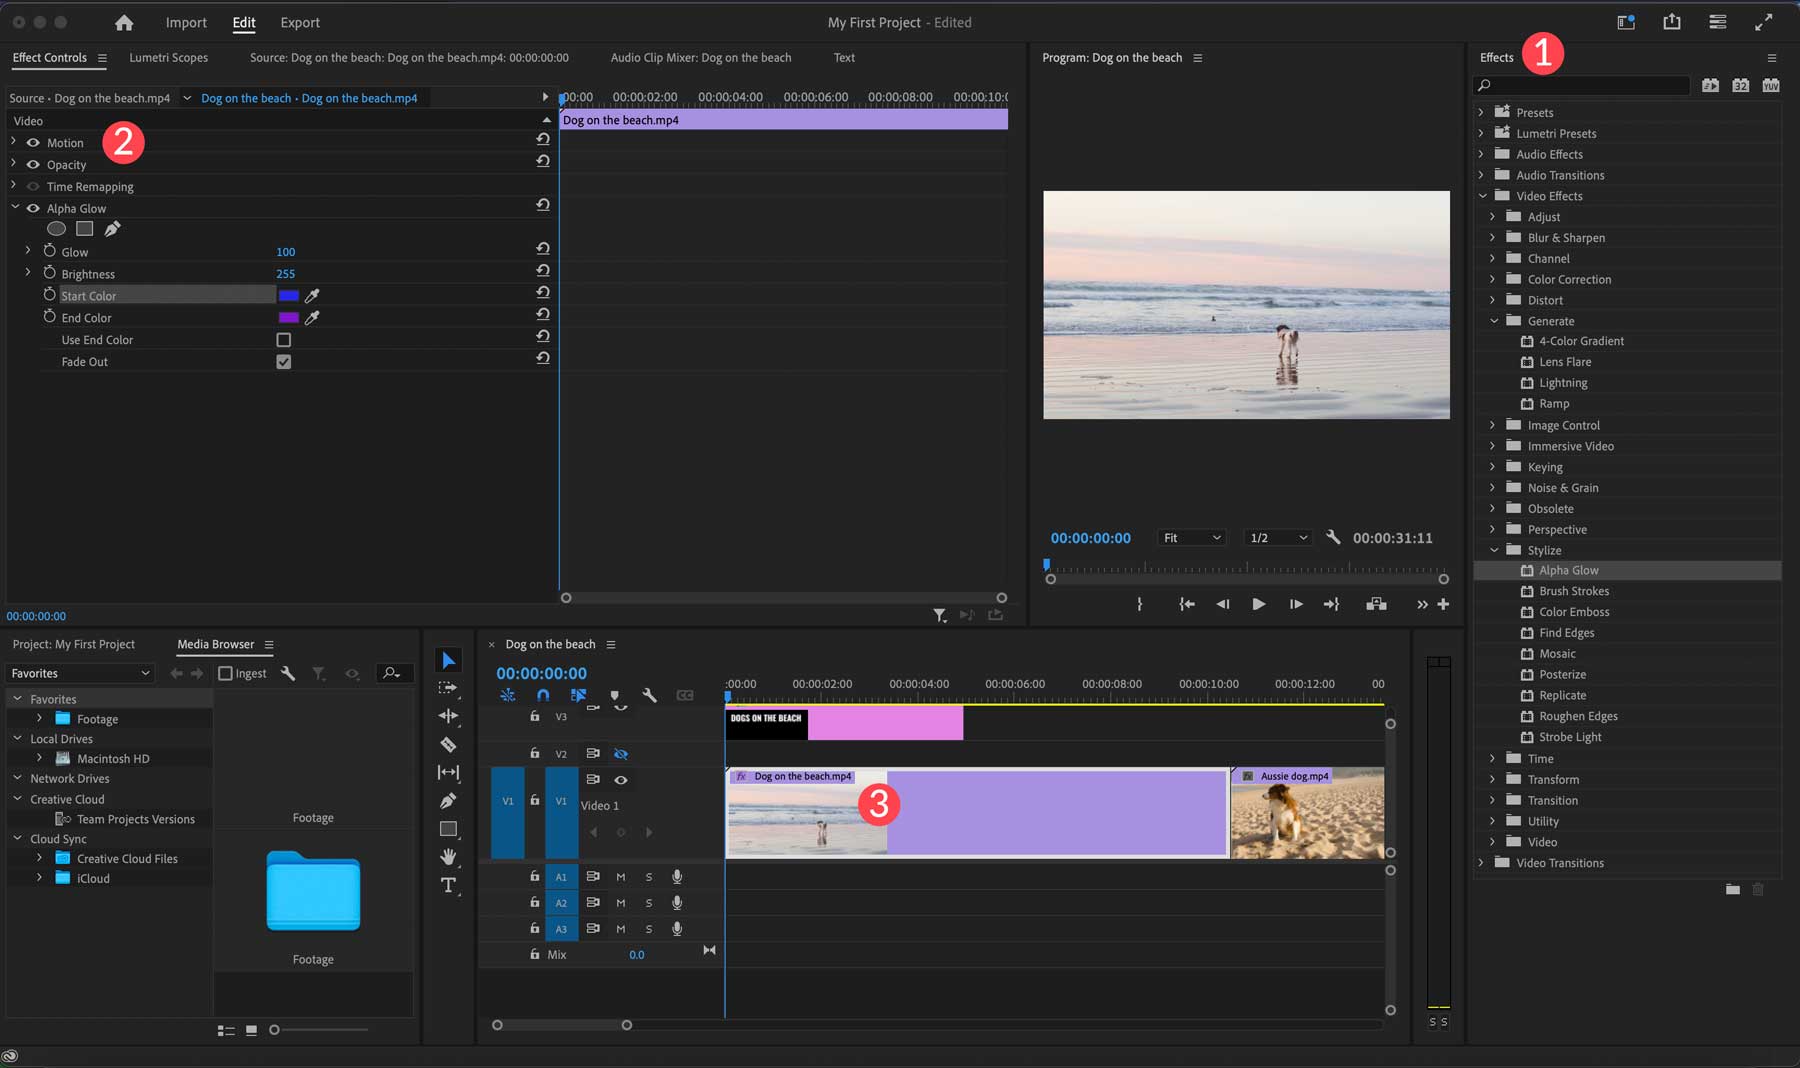
Adobe Premiere Pro has many effects you can add to your videos. Options include video and audio effects, transitions, blur, sharpen, color effects, and more. To access the effects library, click the window in the main navigation menu (1). Click on effects (2).
Like tracks, every effect (1) has properties in the effects control panel (2). You can use these to add varying effects to your video, text, and audio tracks. To apply an effect, simply drag it into the track you want to apply it to (3). From there, you can adjust the properties of your effect, add animations, and more.
Pros and Cons of Adobe Premiere Pro
We must consider the pros and cons to provide a transparent Adobe Premiere Pro review. Using such powerful software has plenty of benefits but some limitations. You should know a few things when considering Adobe Premiere Pro as your go-to video editing platform.
Pros of Adobe Premiere Pro
- Plenty of AI-powered tools to make video editing easier
- Automatic transcription
- Copy and paste effects in the timeline
- Learning mode for getting new users up to speed
- Auto-reframe for making videos in different aspect ratios
Cons of Adobe Premiere Pro
- There is no extensive free audio or sound effects library
- Generative fill doesn’t allow for creating movable objects and lacks lighting controls
- Intimidating interface for beginners
- Some techniques, like effects and generative fill, require additional programs or plugins
Adobe Premiere Pro Pricing
Adobe offers several price plans for Premiere Pro users. Individuals get access for as little as $20.99 per month when they sign up for an annual plan. If you prefer to pay month-to-month and avoid lengthy contracts, the cost increases to $31.49 monthly. Yearly plans are $239.88 with a 14-day money-back guarantee. However, if you choose the monthly option, you’ll benefit from a 7-day free trial to explore all it offers.
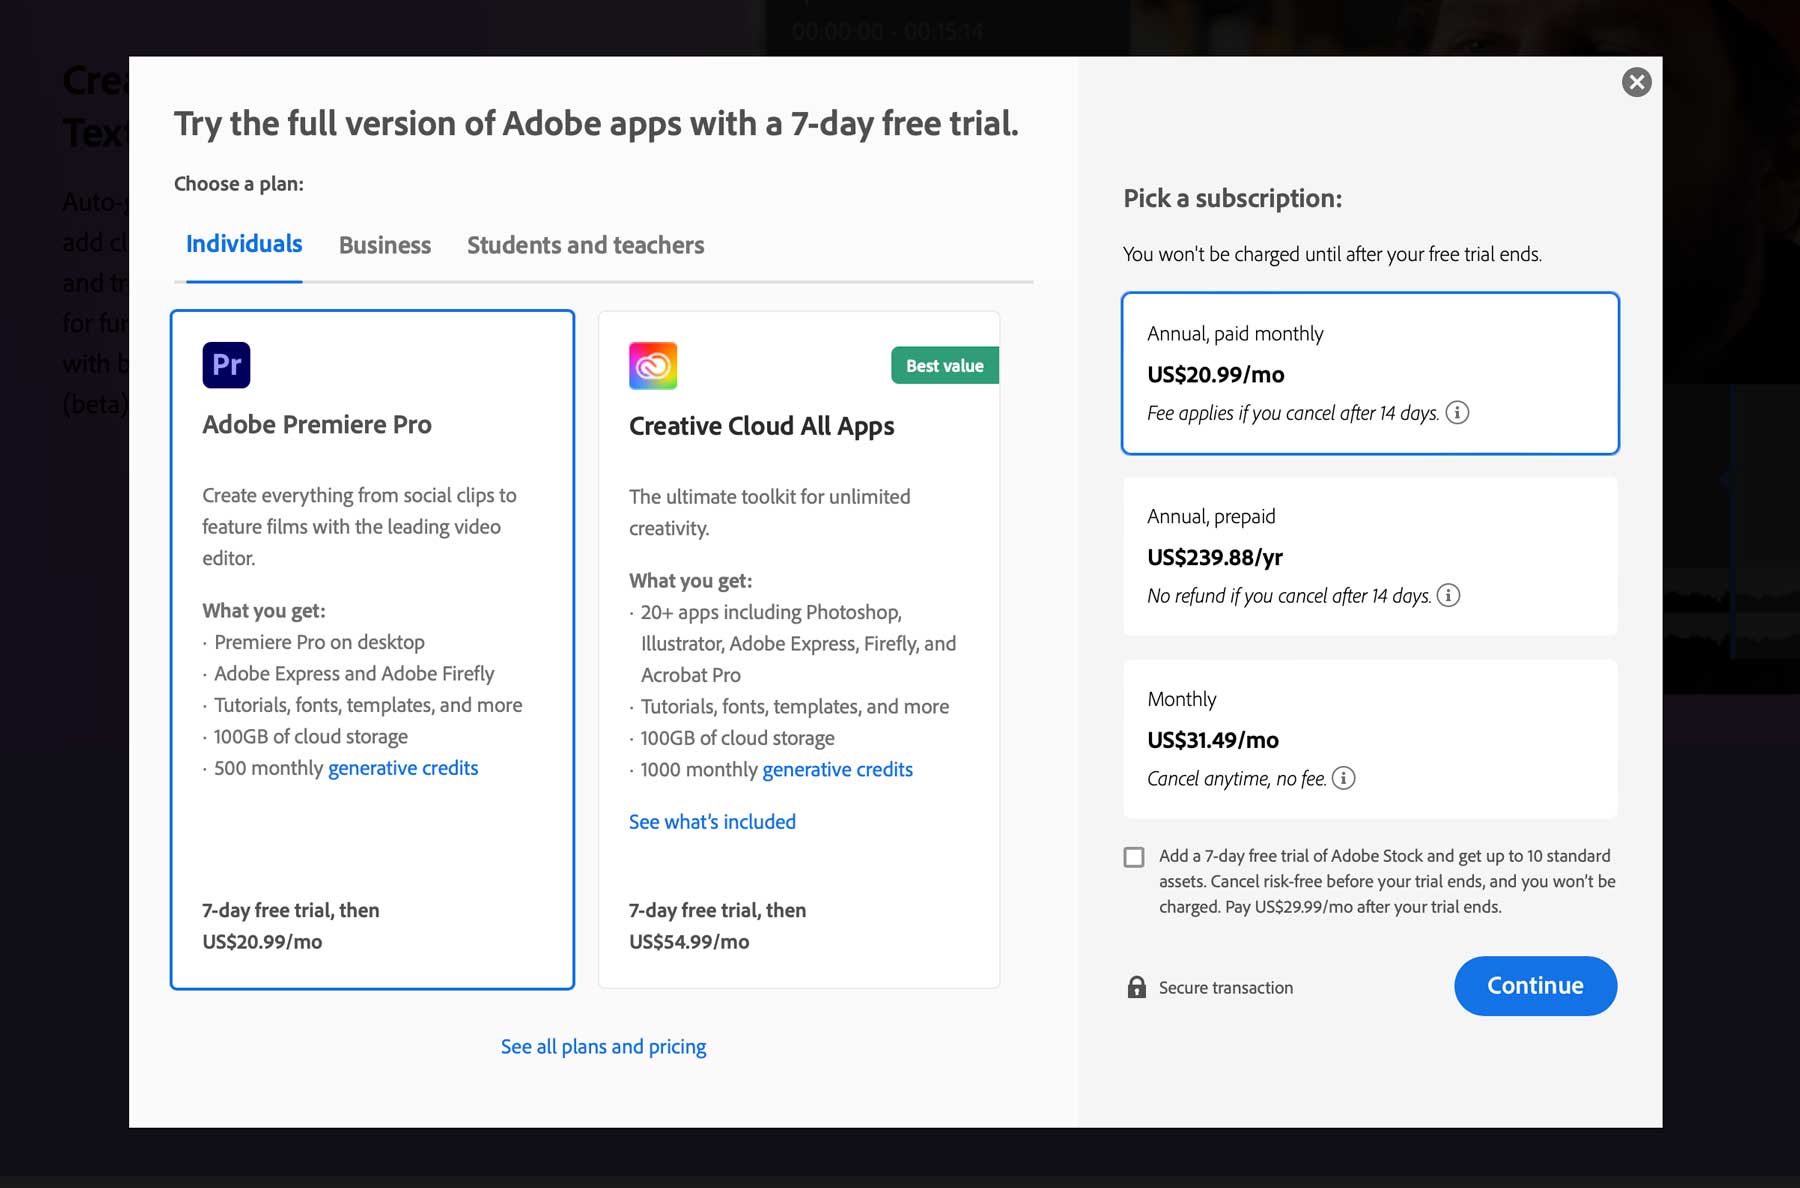
If you’d like to sign up for access to all of Adobe’s apps, you can select the Creative Cloud license. For individual users, it gives you access to Premiere Pro, Photoshop, Illustrator, and more for $54.99 per month.
Final Thoughts on Adobe Premiere Pro
Adobe Premiere Pro is a stellar video editing program. From its powerful interface to its AI-powered tools, Premiere Pro continues to push the boundaries of what’s possible in video editing. Tools such as text-based editing, audio tagging, and auto-framing provide users with quick ways to improve and categorize their videos quickly. The downside to Premiere Pro is the learning curve. Beginners will struggle at first, but Adobe’s extensive tutorial library and a plethora of third-party platforms like Skillshare allow newbies to get up to speed in no time. If you’re an aspiring or seasoned video editor, you won’t find a better option than Adobe Premiere Pro.
Looking for more tech reviews? Check out some of our more recent posts showcasing software and tools:


Leave A Reply