
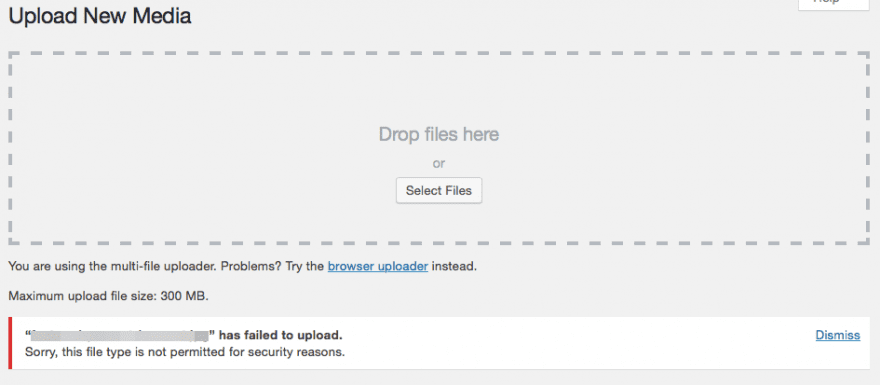
If you’ve tried to upload a file to your media library and received the “Sorry, this file type is not permitted for security reasons” error, you may feel stumped as to how to proceed. Fortunately, there are several ways to fix the error, and get things back to normal.
In this article, we’ll explain why the “Sorry, this file type is not permitted for security reasons” error exists in WordPress. Then, we’ll show you five ways to solve the error and upload any file to your WordPress site.
Let’s get started!
Subscribe To Our Youtube Channel
Understanding the “Sorry, This File Type Is Not Permitted for Security Reasons” Error in WordPress
The reason behind this WordPress error is much more straightforward than it might seem. You may not know it, but WordPress has restrictions on the types of files you can upload. The “Sorry, this file type is not permitted for security reasons” error appears when you try to upload a prohibited file type.
The reason behind these restrictions is to prevent security issues due to file uploading vulnerabilities. The accidental or purposeful upload of malicious exectuable files could do permanent damage to your site. Others can give hackers access to your site or your server.
However, while this error prevents you from uploading files to your site, it also does so for your users. Without any “roadblocks”, practically anything could be uploaded to your site, which of course poses a great risk.
In a nutshell, the “Sorry, this file type is not permitted for security reasons” error is in place to protect your site and certainly isn’t the worst WordPress error you could encounter. Even so, if you have to upload a prohibited file type, this well-meaning error still presents a problem.
How to Fix the “Sorry, This File Type Is Not Permitted for Security Reasons” Error in WordPress (4 Methods)
When it comes to this particular error, you have a variety of options for how to deal with it. Depending on your situation, one of the methods listed below should provide a simple solution.
However, some hosting providers limit the file types you can upload too. If yours is one of them, the methods we’ve listed below won’t solve the error. In these cases, contacting your hosting provider should be your first port of call. They should be able to help you solve the situation.
1. Add Permitted File Types by Changing WordPress Multisite Settings
WordPress Multisite enables you to create a network of websites with a single WordPress installation. For example, it’s handy if you want to enable users to create their own blogs, or if you’re an international company and want to use subdomains to create country-specific sites that can be updated simultaneously.
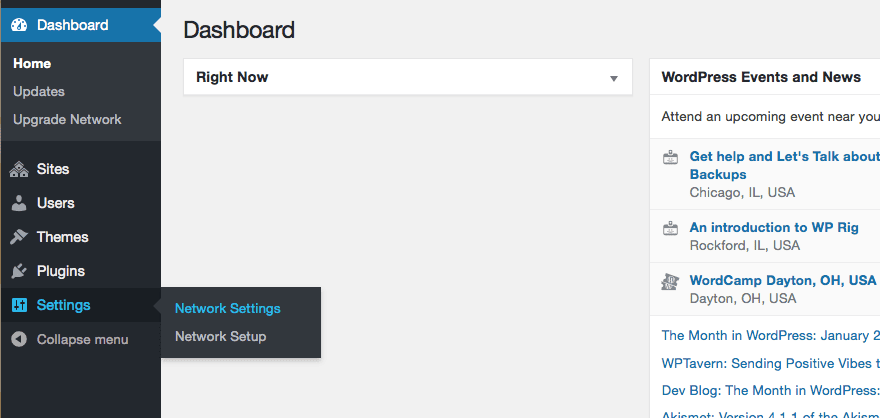
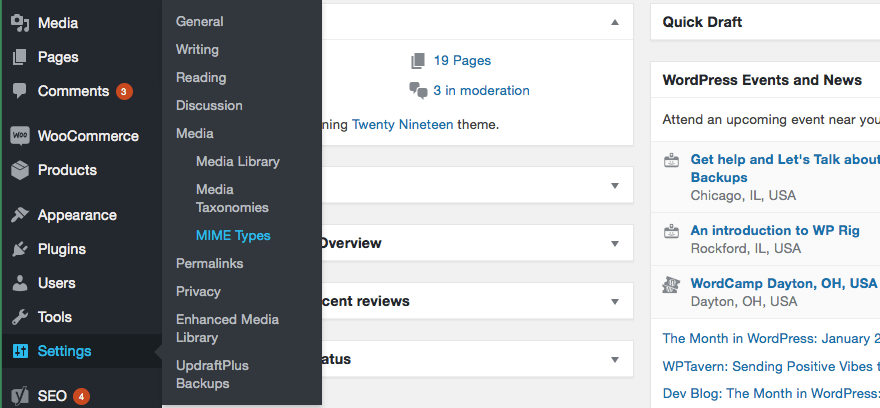
Unlike single-site WordPress installations, Multisite has a setting to enables you to easily allow for file uploads not normally permitted by WordPress. To access it, navigate to Network Settings under Settings in the Network Admin dashboard:
Beneath the Upload Settings heading, you’ll find the Upload file types setting where you can add the extensions for the file types you wish to permit.
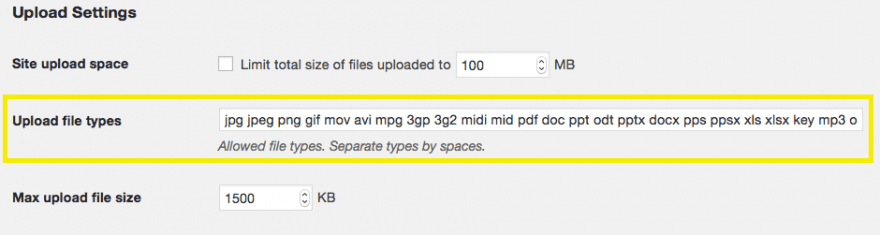
Once you save your changes, this will update the permitted file types for all the sites in your network, enabling you and your users to upload any file types included in this setting.
2. Modify Approved File Types Using a Plugin
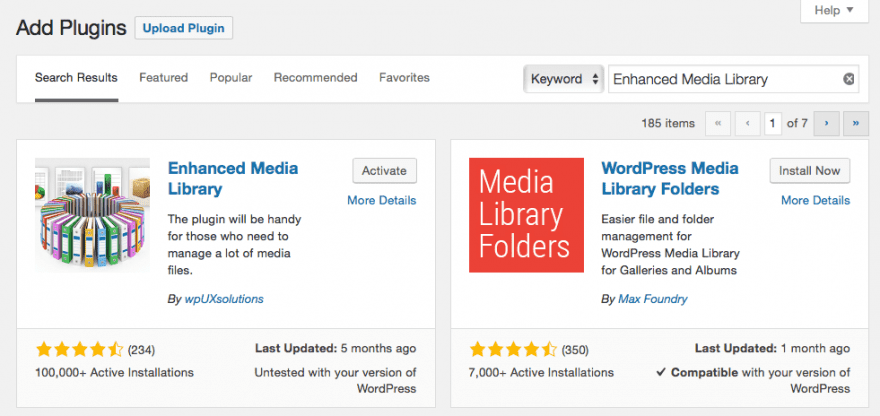
There are several plugins capable of enabling you to upload prohibited file types, such as File Manager and Enhanced Media Library. These plugins have settings to enable you to add permitted Multipurpose Internet Mail Extensions (MIME) types for upload to WordPress.
A MIME type describes the content a file contains, and tells your browser how to display it correctly. For example, the file extension .jpg corresponds with the MIME type image/jpeg, and displays as an image in web browsers.
We’ll use the Enhanced Media Library plugin to add new permitted MIME types for upload. You can quickly install and activate the plugin within the Plugins area of WordPress:
With the plugin activated, we’ll go to our settings and see that there’s a MIME Types > Media option:
There are two ways to permit uploads for a specific MIME type. The first is to simply select the box corresponding to the desired MIME type in the Allow Upload column. However, if your desired type is not listed, you’ll have to select Add New MIME Type at the top of the page.
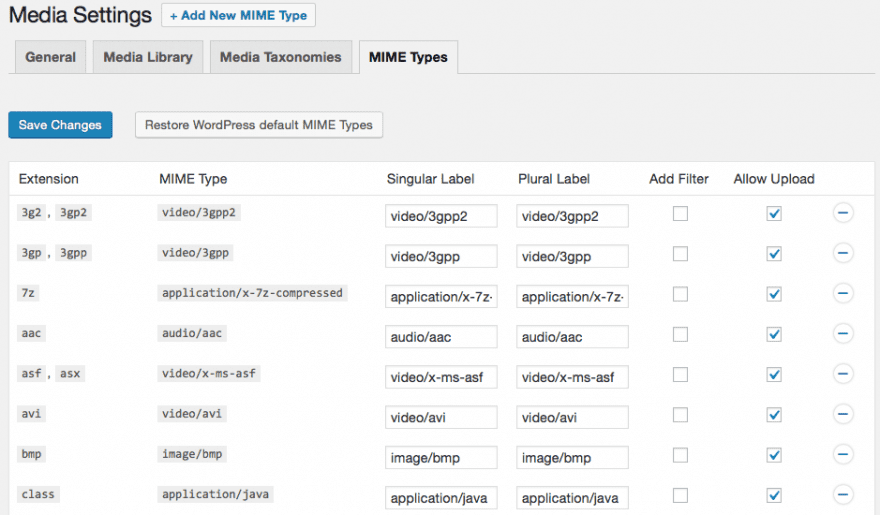
This will add a new row where you can enter the extension, MIME type, and labels. Next, select the Allow Upload box for the new MIME type. If you ever change your mind, you can remove entries by using the button at the end of each row, or select Restore WordPress default MIME Types for the original settings.
3. Use the Upload_Mimes Filter by Editing Your Theme’s functions.php File
You can instead change your site’s permitted MIME types manually. To do so, you’ll need to access your theme’s functions.php file and utilize a WordPress function known as a ‘filter’.
The functions.php file defines the behaviors, or functions, of your WordPress site. In WordPress, you can use filters to modify the platform’s default functions. By adding the upload_mimes filter to functions.php, you’ll be changing WordPress’s default behavior when you attempt to upload a prohibited file type.
To start, back up your site, which ensures that if something goes wrong while you’re editing important site files, you have a way to restore it. Then, you’ll need to access your functions.php file via FTP using an FTP client such as FileZilla.
Once you’ve connected to your site’s server, you can find your functions.php file inside your theme’s folder located in the wp-content directory. Right-click on the file and select View/Edit.
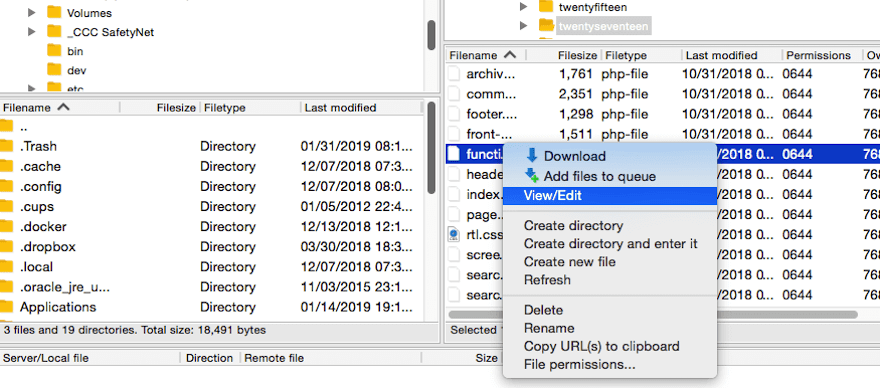
The file will open in your text editor, where you can add the following code:
function my_custom_mime_types( $mimes ) {

// New allowed mime types.
$mimes['svg'] = 'image/svg+xml';
$mimes['svgz'] = 'image/svg+xml';
$mimes['doc'] = 'application/msword';

// Optional. Remove a mime type.
unset( $mimes['exe'] );

return $mimes;
}
add_filter( 'upload_mimes', 'my_custom_mime_types' );
Add your desired MIME types and their corresponding extensions to the array. You can also add MIME types you wish to prohibit to the optional Remove a mime type section, or delete it if it’s not applicable.
This method enables you to specify which MIME types you want to allow, so you still have control over what’s uploaded to your site to help prevent file upload vulnerabilities. Make sure to save your changes when you’ve finished editing.
4. Allow Unfiltered Uploads in Your wp-config.php File
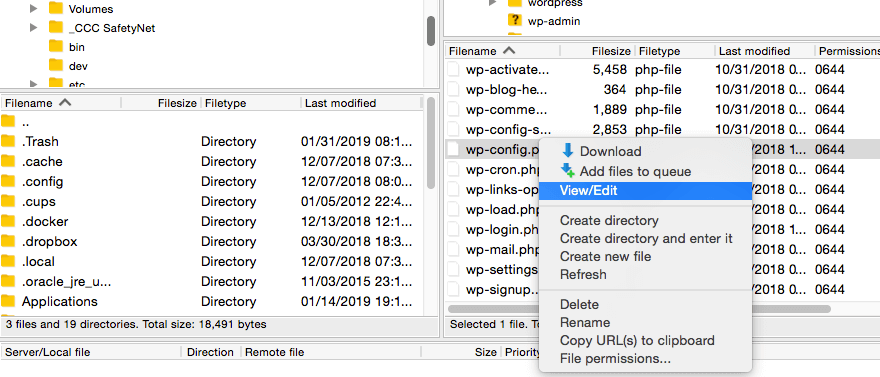
If you want to allow all file types for upload, you can do so by editing wp-config.php – the file that contains information pertaining to your site’s database. Once again, you’ll want to back up your site in case something goes wrong when you’re editing.
Then you’ll access wp-config.php using FTP as we described in the previous method. The file should be located in the root directory of your website. Select View/Edit to open the text editor.
You can add the following code to the file, anywhere above the line reading “/* That’s all, stop editing. Happy blogging. */”:
define('ALLOW_UNFILTERED_UPLOADS', true);
Save your changes when you’ve finished editing. Note that doing this means nothing will prevent you or users from accidentally (or purposefully) uploading malicious files to your site, so it may be wise to try other options before resorting to this one.
Conclusion
WordPress errors can cause setbacks when you’re making changes to your site. However, when it comes to the Sorry, this file type is not permitted for security reasons error, there are several solutions available to let you to upload files WordPress doesn’t allow by default.
In this article, we’ve discussed what causes this error in WordPress and why it exists. Then we provided four possible solutions for fixing the error:
- Add permitted file types by changing WordPress Multisite settings.
- Modify approved file types using a plugin.
- Use the upload_mimes filter by editing your theme’s functions.php file.
- Allow unfiltered uploads in your wp-config.php file.
Do you have questions about the Sorry, this file type is not permitted for security reasons error in WordPress? Let us know in the comments section below!
Article thumbnail image: 1000s_pixels / shutterstock.com


I was facing this problem.. Thank you for sharing
Hi guys,
i added this plugin in my wp site, in the settings check the box for upload .ttf and .otf files.
Now custom fonts upload in Divi – works.
https://wordpress.org/plugins/wp-extra-file-types/
Adding this code in the wp-config file worked for me!
This problem is really anoying. Nice to found this article.
Thank you
the plugin doesn’t work for otf fonts. Help me, please.
Hi,
I am trying to upload a .otf font file and getting this error. I was actually there and working fine until I did the latest divi update and not the font no longer works properly.
I have tried to upload it again but getting the error. I tried the multi site settings but I don’t seem to have the option on my wordpress – I can’t see it.
I also tried the media plugin in and that didn’t work either.
Please help, I am not hugely comfortable with code.
Thanks
Thanks for Sharing. Phew!!! one more issue resolved.
Good to hear, Dinesh!
Thanks for the article. Unfortunately it does not work for SVG files.
Since the latest WordPress release it has not been possible to upload SVG files to WordPress without first opening the svg file and adding to the top with a text editor.
This issue has also affected very popular plugins like SVG Support, which no longer work.
I’d be very grateful if the folks at Divi could shed some light on this issue.
Have you tried the Safe SVG plugin from Daryll Doyle?
It also sanitises the SVG on upload to close any security holes.
I’m sorry, but this is so unhelpful. All the work one has to go through in order to add a custom font. #1 – not applicable, because it’s one site, #2 – File Manager and Enhanced Media Library, either need to be the Pro version, or you need to have a deep understanding of both of those plugins to get the settings correct, #3 – changing the functions.php file is not a best-case scenario for most web builders, #4 – edit the wp-config.php file, what an extremely unsafe thing to do!
Why can’t Divi have a way to upload custom files?? In reality, those files are not very large, and it is a quite common need, to be able to upload fonts. You need to be much more transparent about the fact of WHY they cannot be uploaded. Is it the extension? Is it the size? Is it one of Divi’s shortcomings? Please write a blog that is much more useful and less dangerous than these ideas. I don’t know of one person who has yet been able to upload fonts. I think it is something Divi really is not able to do. At least certainly not from the text module, like you try to make it seem.
I’ll be honest – I have very very little experience building websites, and I have spent the last 3 hours trying to install ONE CUSTOM FONT – to no avail.
Just like this commenter says, #1 – I only have one site, #2 – This post does not make clear what I’m supposed to put under “Mime Type”, “Single label” and “plural label”, so it ended up not working for me. And #4 – I did exactly what the post says, saved it, and I still get the exact same error message when I try to upload a custom font under “Design”. Sooooooooo frustrating!!!!!
I guess this is the difference between a “web builder” as you call yourself and web developer. Developers don’t complain about having to get our hands dirty with code and there is nothing remotely unsafe about editing files in a child theme. If you’re editing files right inside of you WP installs through a system that doesn’t give you control of versioning/staging, and at least un-dos so that you can revert a file back quickly you deserve every ounce of struggle you get. If you want to build websites like that go play with Squarespace or Wix where you can use their training wheel systems. Otherwise learn how to do actual web design and programming and stop complaining.
First off, why you all up in my face about whether I”m a web builder or developer? Did I hurt your feelers? You’re obviously using WordPress, too, so don’t try to sound so up and mighty. Secondly, the wp-config file is not in the child theme and opening that up to uploads – as any web developer knows and even us lowly and complaining builders know – is unsafe. And who said anything about where or how I edit my files, staging or live? Assume much?
If ET is going to show videos of “how easy it is to upload fonts”, but the reality is it doesn’t work (check the forum queries), then ET needs to acknowledge it right off the bat, instead of making it look like “anyone can do it.”
A more helpful blog would be to talk about the differences in font formats, what works, what doesn’t. I have not found anything about that from them. And anyone trying to make it work ends up wasting time trying to get it right… only to find the answer is much more complicated than ET originally says.
thanks a lot for this, today i was actually having problems trying to upload a font using the divi font feature and i couldnt upload it and i found this blog post
Perfect! I’m glad this post was useful to you!
Thanks so much, I’ve this problem so many times, on diferente WordPress installations.
Good work!
Glad we could help you out, Carlos. 🙂
Very useful tip! Thank you very much…
ElegantThemes has been a little bit silent for a while; I’m wondering if you guys are preparing us a surprise!
very good post.. Thanks a lot for sharing
You’re welcome, Praveen!