
AWeber is one of the most popular email marketing services available, and it’s easy to see why. The tool packs in a plethora of powerful features, such as an intuitive drag-and-drop editor and a reliable autoresponder. It’s the latter we’ll focus on today, as it can be used to run your marketing campaigns without lifting a finger (aside from the initial setup process).
In this article, we’ll give you the lowdown on autoresponders, discuss why they’re important for your marketing, then guide you through how to set them up step-by-step using AWeber.
What an Autoresponder Is (And Why They’re Essential to Your Marketing Efforts)
Autoresponders (or a follow-up series) are email campaigns that trigger once a user subscribes to your list. You’ve likely subscribed to at least one mailing list in the past, and you’ll be aware that some of them send regular messages your way. In most cases, this is the work of an autoresponder.
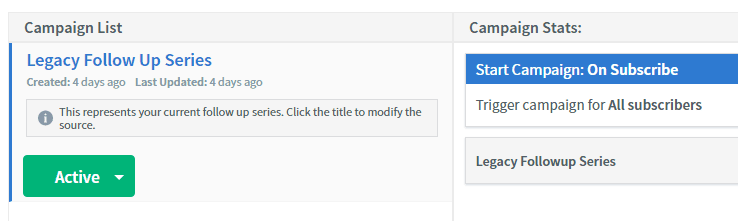
This is an example of a AWeber’s autoresponder functionality.
As you may have gathered, these emails are mostly hands-off affairs. You simply set up a series of messages, add them to your autoresponder series, and leave it to its own devices for the most part. Your users will continue receiving messages in succession until either your campaign is over, or they unsubscribe from your list.
Naturally, autoresponders are pretty handy for both established and burgeoning internet marketers. Let’s discuss why:
- They can save you time. Setting up a few solid follow up messages may take some time, but once they’re complete, you can let them work their magic for you without further input.
- Engagement could skyrocket. Autoresponders enable you to gently remind your subscribers that you’re still around every few days, which may prompt them to reconnect with your services.
- Your conversion rate could improve. Ideally, at least some of your messages will include calls to action that should lead users to convert. If you keep your visitors engaged, chances are some of them will convert sooner or later.
In short, autoresponders are all about engaging with your audience and keeping them interested over the long term. If that sounds like a winning proposition to you (and it should!), then keep reading, because we’re going to guide you through the process of setting up autoresponders using AWeber.
An Introduction to AWeber
AWeber is an email marketing tool that enables you to design and launch campaigns for your users. Using this platform, you’ll be able to customize every aspect of your email marketing experience from top to bottom. That means creating sign up forms, designing a campaign, managing your subscribers, and more.
On top of being a one-stop solution for email marketing, AWeber also shines due to its integrations. The platform also plays nicely with several Content Management Systems (CMS) including WordPress.
Key Features:
- Enables you to create responsive signup forms.
- Provides a drag-and-drop editor to design mailing lists
- Includes over 700 mobile-ready templates for campaigns.
- Lets you manage and segment your subscribers.
- Helps you track the performance of your campaigns.
- Integrates with dozens of third-party platforms.
Price: $19 per month | More Information
How to Set Up Autoresponders in AWeber (In 3 Steps)
Before getting your AWeber autoresponders set up, you’ll (of course) need to sign up for an account. Sadly, AWeber doesn’t offer a free tier, but it does come with a free trial in order to let you try before you buy.
Let’s take a look at what you should do once you’ve opened an account.
Step #1: Create an Email List and a Signup Form
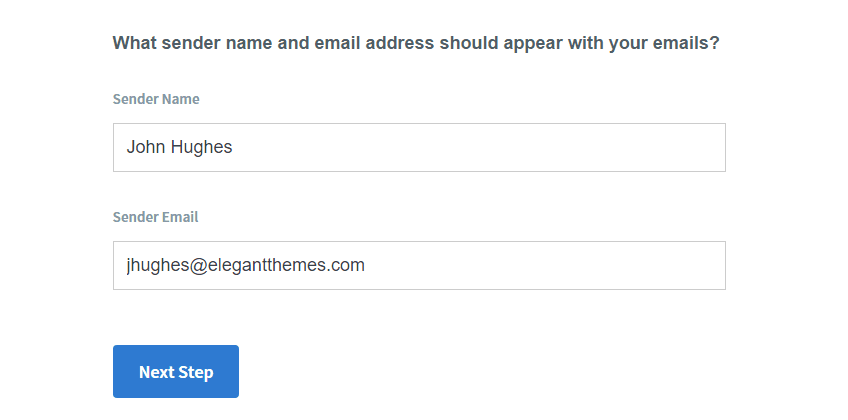
Once you sign up, you’ll get the opportunity to create your first mailing list. To do this, the platform will ask you to fill out a few simple fields, including the sender’s name and email:
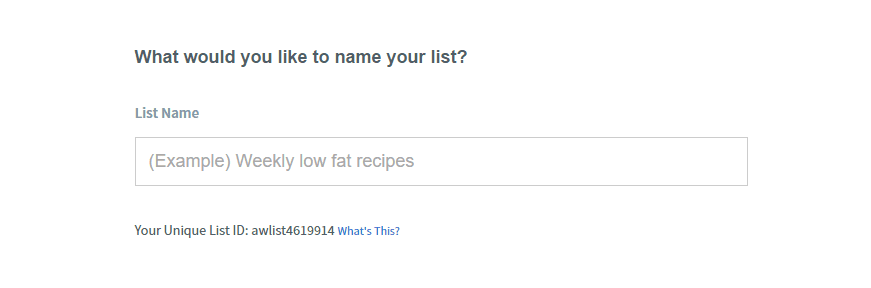
Once you’re done, click Next Step. You’ll now need to pick a unique name for your mailing list, which will enable you to identify it in a pinch:
You’ll also need to come up with a brief description of your mailing list and the topics it covers. This will display when a user attempts to unsubscribe from your list, and looks to jog their memory about why they subscribed in the first place. In short, make it sound compelling!

Again, click Next Step when you’re ready. You’ll now need to configure a confirmation email for subscriber verification. AWeber provides you with a handy list of pre-approved subject lines that have been shown to perform well. Our recommendation is to use the option that includes your subscriber’s first name, since personalization is always a nice touch:
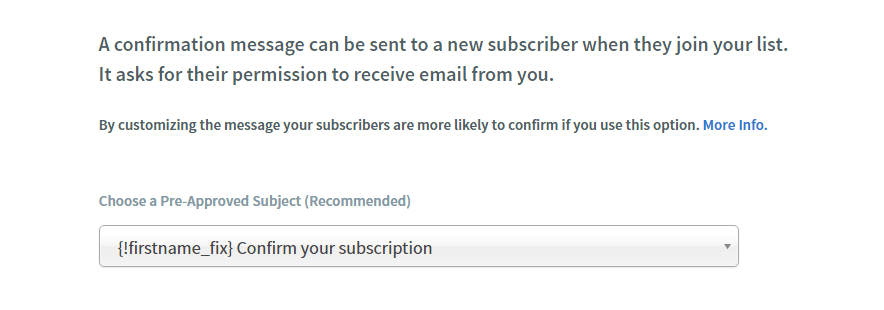
You can also edit the text of your confirmation message in case you want to make it sound more personal, although the default should work well enough. Finally, click on Approve Message & Create List and you’ll be prompted to create a signup form for your new mailing list:
What type of form to use is a decision that will depend on your personal taste and your site’s style, so we’ll leave this one up to you. AWeber provides you with plenty of templates and a tutorial to guide you through the process, so it shouldn’t take you long.
Step #2: Customize Follow Up Series’ Welcome Email
After setting up your email list and a signup form, you should be ready to start receiving your first subscribers. Once they confirm their subscription, the first message they receive should be a welcome email.
Of course, a subscriber is likely already interested in your content. However, a good welcome email – or a series of them – gives you the opportunity to seal the deal and make sure they pay attention to your future messages.
To do this, head to your AWeber dashboard and navigate to Messages > Legacy Follow Up Series. In this section, you can set up a series of autoresponders for your subscribers – the first of which is going to be a welcome message.
For every entry in your campaign, you have the option of using AWeber’s drag-and-drop builder, simple text, or HTML. We recommend using the first option, given its ease of use:

The drag-and-drop builder is simple enough, but AWeber have put together a comprehensive tutorial to help you utilize all of its features. When you’re ready, go ahead and put together an initial welcome message.
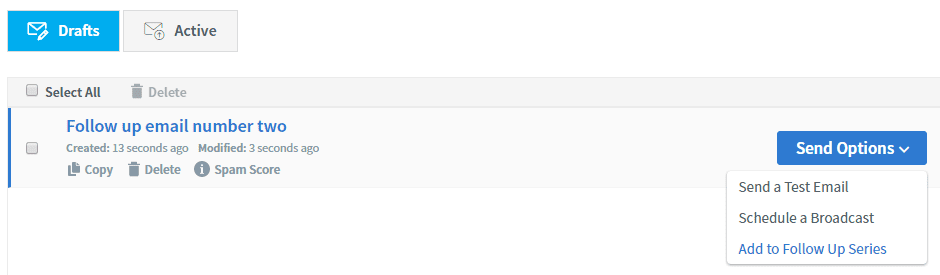
After your message is done, click on Save & Exit. Your email will now appear on a list of drafts, alongside any others you have created. Next to its name, you’ll see a button that reads Send Options – click this and select Add to Follow Up Series:
Since this is the first email on your autoresponder, AWeber will send it to any new users as soon as they confirm their subscription. Simple!
Step #3: Add More Entries to Your Follow Up Series
By now, you already have a working autoresponder set up using AWeber. The final step is add more entries to your follow up series. Return to Messages > Legacy Follow Up Series on your dashboard, and click the Create a Message button again. Now, repeat the process from step number two until your email is ready to go. When adding it to your existing series, you’ll get the option to schedule when it should be delivered:
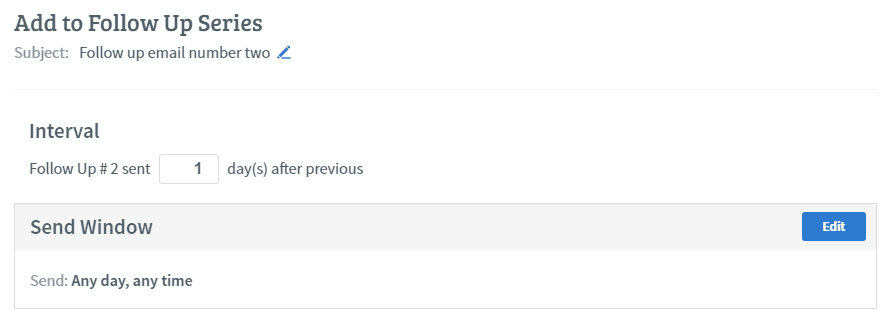
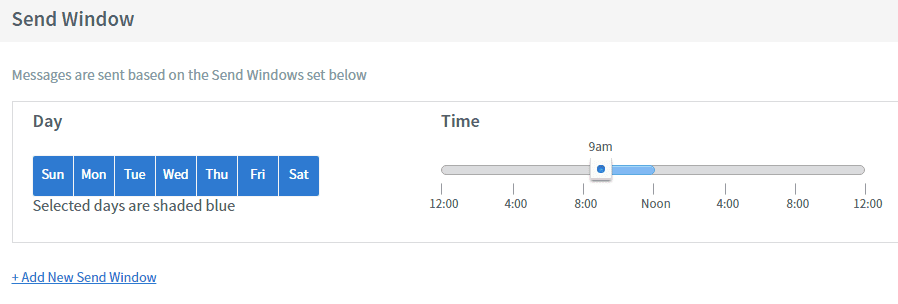
By default, each AWeber follow up email is configured to go out one day after the previous one. You can tweak these setting to something more reasonable, such as a weekly email blast. In addition, you can also configure a specific ‘send window’ for your messages by clicking the Edit button. Using these settings, you can disable specific days so they don’t count – Sundays, for example – and you can indicate a window of time for your messages to go out. Some windows of time are better than others to maximize your open rates, so do a bit of research and set yours accordingly:
Once you save your changes, your new message will appear below your welcome email:

At this stage, you can add as many emails as you want to your AWeber autoresponder. You can also re-arrange the order of your messages by dragging and dropping them on the Legacy Follow Up section.
Conclusion
AWeber is clearly a robust email marketing solution. However, with the addition of its autoresponder feature, it transforms into one of the most efficient tools available to manage your campaigns. After all, staying on top of an email list can be incredibly time consuming – particularly as it grows – unless you employ some automation.
To start reaping those benefits, follow these steps to get your AWeber autoresponders set up:
- Create an email list.
- Customize your follow up series’ welcome email.
- Add more entries to your autoresponders.
Do you have any questions about how to set up AWeber autoresponders? Ask away in the comments section below!
Article thumbnail image by Bakhtiar Zein / shutterstock.com


Thanks for the great info look forward to reading more
You’re welcome! 🙂
nice share John, if you make a video it will be very helpful. But your Step by Step procedure will help anyone.
Thanks! 🙂