
How often do you have the need to take a screenshot of something online or on your desktop? How often do you have to add some kind of note or scribble to make something in the screenshot more noticeable? In my case, it’s at least once a day. If you are a content creator and designer, then you’re probably taking screenshots and doing screen recordings more often than that. There are numerous programs that help with these tasks. Today, I’ll give you an overview look at Nimbus Capture, the browser extension that is complementary to Nimbus Note.
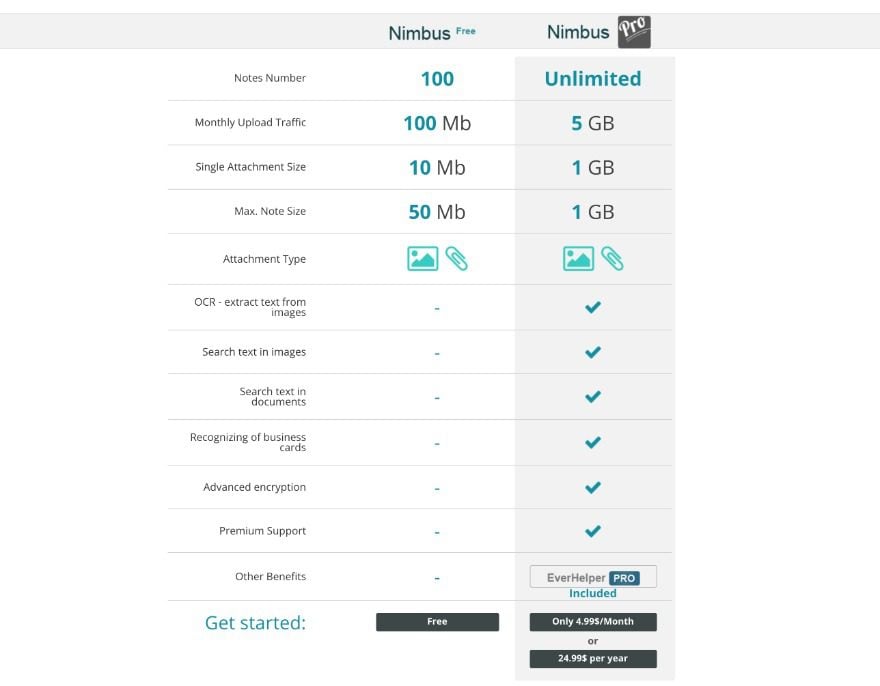
The features you’ll see below are available under a Nimbus Pro subscription, some of them are not available with a free version. I got a free trial of Nimbus Pro for this overview after using the free version for years. I’ll tell you at the end what my thoughts are on the difference between the two.
Nimbus Capture Fundamentals
Nimbus Capture is part of a suite of tools under the Nimbus name. The other two are Nimbus Note and Nimbus Clipper. They are all available for Chrome, Firefox, and Opera. Nimbus Capture is easy to download via your browser’s extension store. It’s free to download and use, but for advanced features, you will need a subscription. I use it on Chrome, where it’s most powerful.
You don’t need to have Nimbus Note to use Nimbus Capture. One definite plus of having Nimbus Note though is that you can save your screenshots there and not fill up your computer’s storage space.
Let’s take a look at what Nimbus Capture offers inside your browser.
Screenshots
Making a screenshot is achieved a number of different ways; through the browser icon in the bookmarks bar, with keyboard shortcuts (that you can customize), or via the right-click popup menu.
Below are the different ways you can grab a screenshot of your browser.
- Visible Part of Page: Capture what can be seen on the browser.
- Capture Fragment: Capture a specific section of the page.
- Selected Area: Manually select a section.
- Selected & Scroll: Select and scroll more of the page.
- Entire Page: The whole website even if it can’t be seen.
- Delayed Screen: Take a screenshot with a countdown. Perfect for when you have to open a menu in a screenshot.
- Browser Window: Capture any application window open on your computer, like Photoshop or System Preferences.
- Blank Screen: Open a blank screen and then insert any image or use the browser window feature.
After taking a screenshot, you have a number of options. You can choose to set any of these as a default in the browser popup.
- Edit
- Send to Nimbus / Google / Dropbox
- Open uploading/converting page
- Download

Annotations on Screenshots
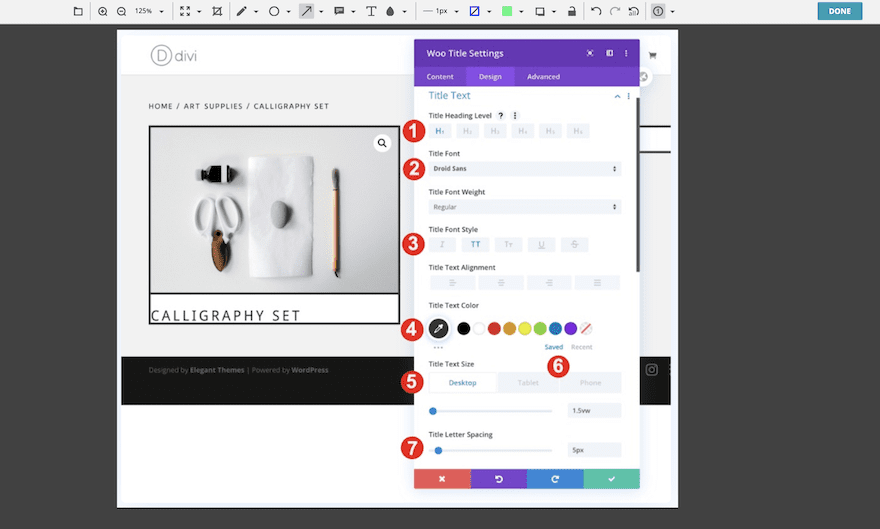
To make annotations on your screenshot, choose ‘edit.’ The Nimbus screenshot editor has lots of features. Here is a list of things you can achieve inside the editor.
- Add a new image
- Make a new screenshot
- Zoom
- Resize
- Crop
- Marker/Pen
- Shapes
- Arrows/Lines
- Text Arrow/Note Text
- Text
- Blur Area
- Font and Size
- Line and Text Color
- Color Fill
- Text Shadow Color and Blur
- Lock Figures
- Undo / Redo / Undo All
- Automatic Numerical Annotation
With all these tools, you are able to create professional-looking screenshots for your tutorial articles or client training demonstrations. Two of the most useful tools in the editor are the resizing button and the automatic numerical annotation.
After editing, you can save the screenshot to your computer, your Nimbus Note, Google or Dropbox.
Screen Recordings
The other option in the Nimbus extension is the screen recording feature. It’s the last choice of the list after all the screenshot options. When you click on Record Video the popup switches to another list with these toggle options:
- Record Mic Sound / Tab Sound / Webcam
- Show Drawing Tools
- Add Your Watermark
- Video Settings
- Tab / Desktop / Webcam Only
The drawing tools option gives you the option to annotate on the screen as the video recording is taking place. There is a setting to choose if the annotation disappears after a few seconds or if it stays on the screen.
For the webcam option to work, you need to make sure your privacy settings are allowing the browser to turn on your camera in the first place.
The video settings tab opens up another set of options about preferred video and audio quality settings.
Video Editing Capabilities
When the screen recording is finished, it will give you the option of downloading it in .webm file format, saving to Nimbus Note, to Google, to Dropbox or to upload directly to YouTube. In that window, you can also choose to edit the video or transform it to .mp4 or .gif.
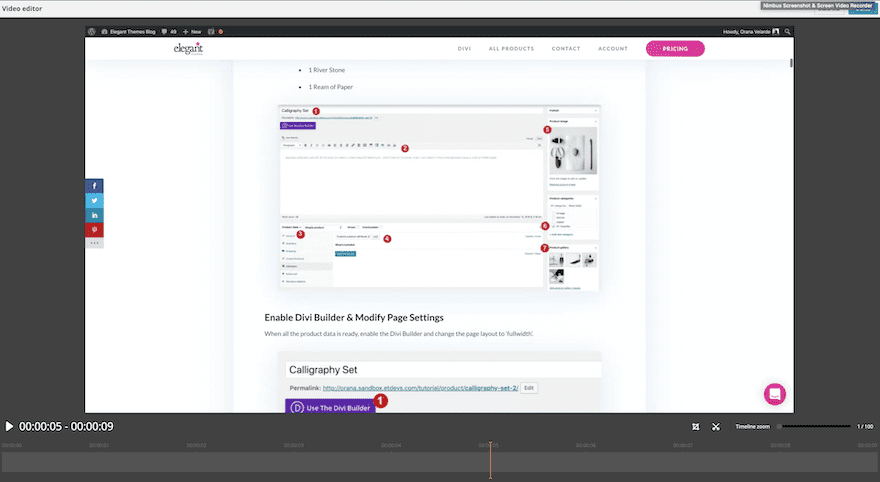
Inside the video editor, you can crop and trim.
Further Nimbus Settings
At the very bottom of the main popup, there is another set of options for your screenshots and screen recordings. Below is a general list of all these options
- Save the screenshot as .png or jpg
- Naming options
- Numerous options for the screenshot feature
- Hotkey settings
- Watermark settings for screenshots and screen recordings
- Video save settings
I have been using the free version of Nimbus for a while. All the Divi tutorials I create here on the Elegant Themes Blog have screenshots made with Nimbus Capture. The free version was ok because I didn’t know what I could do with a premium version.
First of all, the screen recording options on the free version are very limited. I was having to use a converter to be able to edit screen recordings on another program and then turn them into gifs. With Nimbus Pro, you can do a lot, plus create GIFs right inside the editor.
I hadn’t realized that you could take screenshots or take screen recordings outside of the browser. That was an amazing find.
All in all Nimbus Capture is a great browser extension for all screenshot and screen recording needs. I’m looking forward to discovering more on how to make my screenshot process easier and faster.
Disclaimer: This is not a paid advertisement from Nimbus nor is it a sponsored post, all views are my own. I honestly really like it.
What do you use for your screenshots and screen recordings? Have you tried Nimbus Capture? What are your thoughts?
Featured Image via Alesha23 / shutterstock.com


hi Orana, thanks for the honest review! i will definitely try on that. have a great day!
Thanks Orana, I didn’t know Nimbus Pro and I really like it because it seems like an all-in-one solution! I’m going to take a look!
I use Screencastify, but Hippo Video and Iorad are also very interesting … Let’s see what you think!
Looks nice. Can it capture a full webpage that has a fixed header and/or parallax section? I haven’t found any tool yet that can deal with that.
And when you record a video while scrolling down a page, do you get a smooth result, or is it a bit jolty/bumpy?
While Nimbus may be a fine product, I prefer Snagit from TechSmith. It has been the leading capture product for as long as I can remember and TechSmith continues to make improvements each year. Just my opinion.