

If you are in the marketing business, you know how important emails are. Improving sales, generating more traffic, and creating personalized content are just a few ways to use email marketing campaigns to grow your business. Some folks out there will try to tell you that email marketing is dead, and that you should focus on other tools to reach your customers. That’s hardly the case. In fact, 99% of people check their email daily. If you aren’t utilizing email marketing for your business, you’re missing the boat. In this post, we’re going to show you how to set up email marketing campaigns on Cloudways with Divi hosting — either using an email service or with the FluentCRM plugin.
- 1 What is Divi Hosting by Cloudways?
- 2 Create Your Website with Divi Hosting by Cloudways
- 3 What is SMTP?
- 4 How to Choose the Best Email Marketing Campaign Service on Cloudways
-
5
Setting Up SMTP for Email Marketing Campaigns in Cloudways
- 5.1 Configuring MailGun for Email Marketing Campaigns in Cloudways
- 5.2 Configuring SendGrid for Email Marketing Campaigns in Cloudways
- 5.3 Configuring Mandrill for Email Marketing Campaigns
- 5.4 Configuring Elastic Mail for Email Marketing Campaigns in Cloudways
- 5.5 Configuring the Cloudways SMTP Add-On
- 6 Connecting Your SMTP Server to FluentCRM
- 7 Cloudways Makes It Easy to Setup Email Marketing Campaigns
What is Divi Hosting by Cloudways?
Through our partnership with Cloudways, we provide a great choice for hosting your Divi website. Divi hosting by Cloudways is fast, and comes with some amazing features such as SSL certificate, bot protection, backups, great support, and the ability to install Divi in one click. In addition to those features, Cloudways has the ability to handle a huge amount of traffic, due to being a cloud hosting provider. Additionally, you have the ability to configure your server to be able to handle transactional and marketing emails by setting up your own SMTP through several provider options. If you’re looking to boost your business through email marketing campaigns, Cloudways has you covered.
Create Your Website with Divi Hosting by Cloudways
When you sign up for Divi Hosting with Cloudways, your server is optimized and ready for you to install your new Divi website. For this tutorial, we’ll assume that you’ve signed up for a Cloudways account and have created a server.
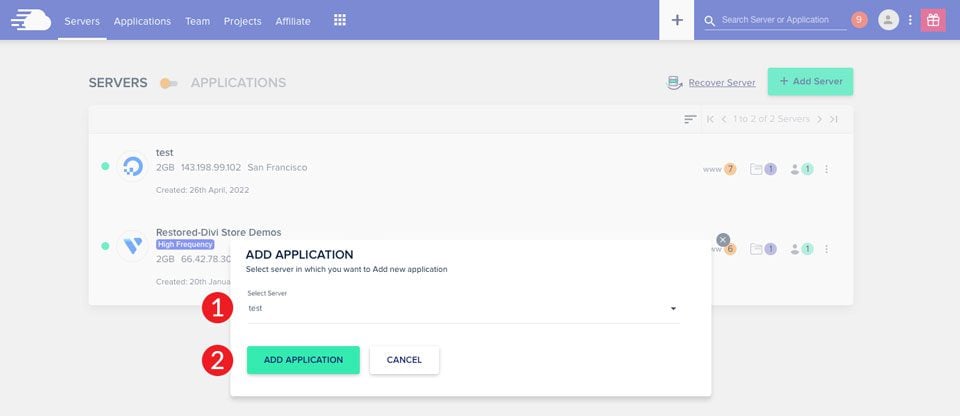
First, login to your Cloudways account. Next, click the + icon in the main menu. Next, click Add Application.

Choose your server from the dropdown menu, then click Add Application.
Finally, choose Divi Bundle from the dropdown menu, name your application, select your project, then click Add Application.
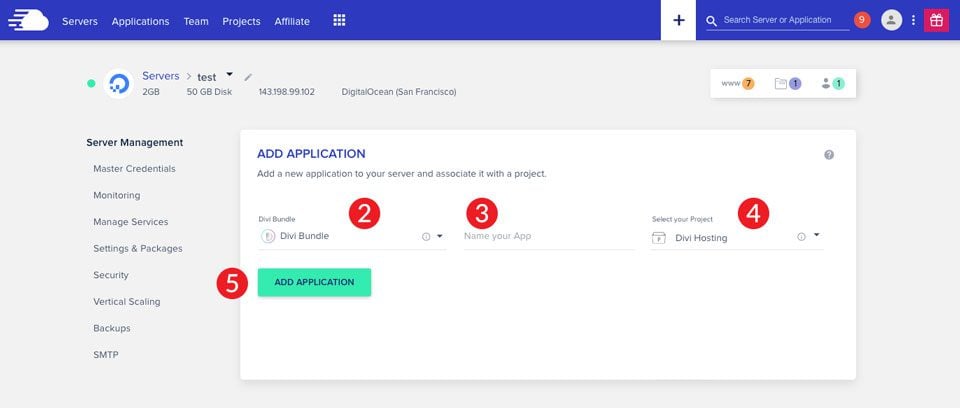
Generally, it will take 2-3 minutes to create your new application. Once the process is complete, you’ll have a fresh WordPress site with Divi pre-installed. Next, we’ll discuss SMTP and the choices you’ll have to set up your email marketing campaigns in Cloudways.
What is SMTP?
Simple Mail Transfer Protocol (SMTP) is widely considered the industry standard for sending email messages across the internet. SMTP uses authentication, which increases the changes of your email messages being delivered successfully. When email marketing is a priority for your business, it’s essential to choose a good SMTP server that has the ability to handle high volume user-triggered emails. Without SMTP, your transactional and marketing emails could be lost, costing you revenue. Thankfully, Cloudways offers integration with several of the top ranked SMTP email services — MailGun, Mandrill, Elastic Mail, and SendGrid. Additionally, we’ll show you how to use the SMTP mail add-on through Cloudways. All are great options for email marketing campaigns on your Cloudways server.
How to Choose the Best Email Marketing Campaign Service on Cloudways
It’s essential that you identify the needs for your business before choosing an email service. First, ask yourself what you want your email service to do for you. Do you require sending large amounts of emails? Also, if you have an ecommerce website, that should be weighed when considering a provider. Let’s take a look at the email services that easily integrate into Cloudways to assist you in making a decision.
MailGun
MailGun is an excellent choice for those looking to send a large amount of emails with high deliverability rates. It integrates seamlessly with WordPress with very little setup time, and is easy to configure in Cloudways. Additionally, MailGun is highly scalable, allowing you to adjust your plan as your business grows. That being said, MailGun isn’t the easiest to configure. It’s quite complicated, and requires some time to adjust to.
SendGrid
SendGrid is another option available to you through Cloudways. It is a highly popular choice for marketers, and one of the best on the market. You can create and send newsletters, shipping notifications, password resets, as well as promotional emails. SendGrid is easy to integrate into Cloudways, without the need for any SMTP plugins. If you aren’t sure whether to use MailGun or SendGrid, take a look at our comparison post to help you decide which one is right for you.

Mandrill
Mandrill is an SMTP add-on that is provided by Mailchimp. It aids in sending transactional emails, which are automated emails used to send ecommerce emails, as well as account activity related emails. Some of its robust features include white-labeling, split testing, and audience management. Like MailGun and SendGrid, integrating Mandrill into WordPress is an easy way to send email marketing campaigns through Cloudways.

Elastic Email
Elastic Email is a free SMTP service that you can incorporate into your Cloudways account effortlessly. It has the capability to send transactional emails, as well as email automation tasks. Additionally, there are key features included that will enable marketers and developers to build their campaigns easily. Setup is quick, and allows you to incorporate A/B testing, email verification, developer tools, and marketing automations. Elastic Email is an available add-on in Cloudways, with plans starting at .10¢ per 1000 emails.

Gmail via the Cloudways SMTP Add-On
Lastly, if you have a smaller business or freelance website, Gmail is a viable option. Gmail offers its own SMTP server, and is easy to set up in Cloudways. Some of its features include business email, online storage, calendars, and more. The only caveat to using Gmail is that you’ll need to incorporate a paid service such as Mailchimp to be able to send newsletters, or promotional emails.
Setting Up SMTP for Email Marketing Campaigns in Cloudways
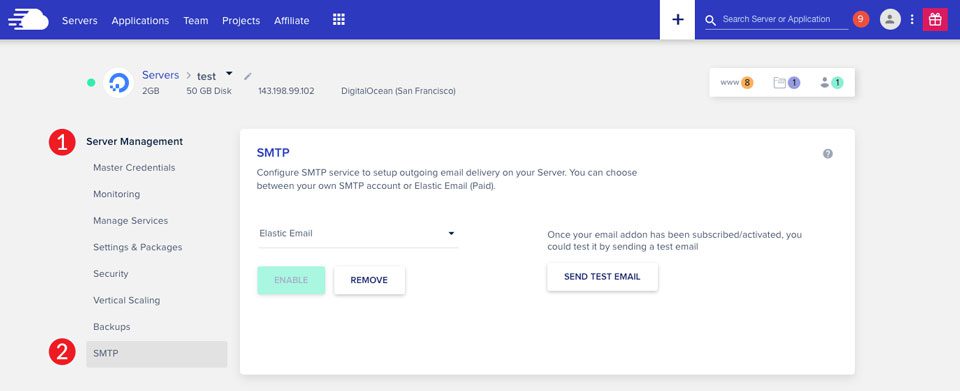
Setting up SMTP for email marketing is a simple process in Cloudways. Once you have determined the provider you’d like to use, you’ll be sending emails from your server in a short time. To get started, login to your Cloudways account and navigate to servers in the main menu.

Next, under Server Management > SMTP, you’ll choose which provider to use for your SMTP service. You can choose between your own SMTP, or Elastic Mail. We’ll go over the options for MailGun, Mandril, SendGrid, and Elastic Mail.
It’s important to note that with any of these configuration options, you’ll need to have a domain connected in Cloudways. Without a connected domain, your emails simply won’t be delivered.
Configuring MailGun for Email Marketing Campaigns in Cloudways
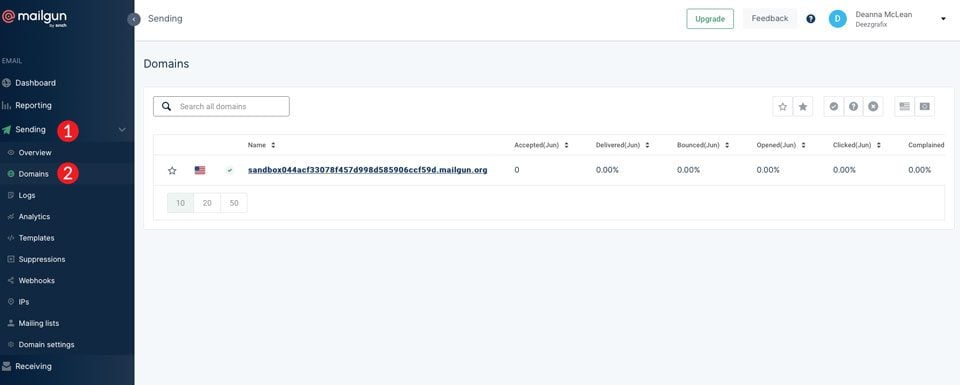
The first step to integrate MailGun with Cloudways is to get your MailGun SMTP credentials. To do this, log in to your MailGun account. Next, navigate to sending in the navigation bar to the left. Choose Domains. If you have more than one domain in MailGun, you’ll need to choose the one that will be tied to your application on Cloudways. In this tutorial, we’re using a sandbox account with a temporary domain, so keep that in mind as we proceed.
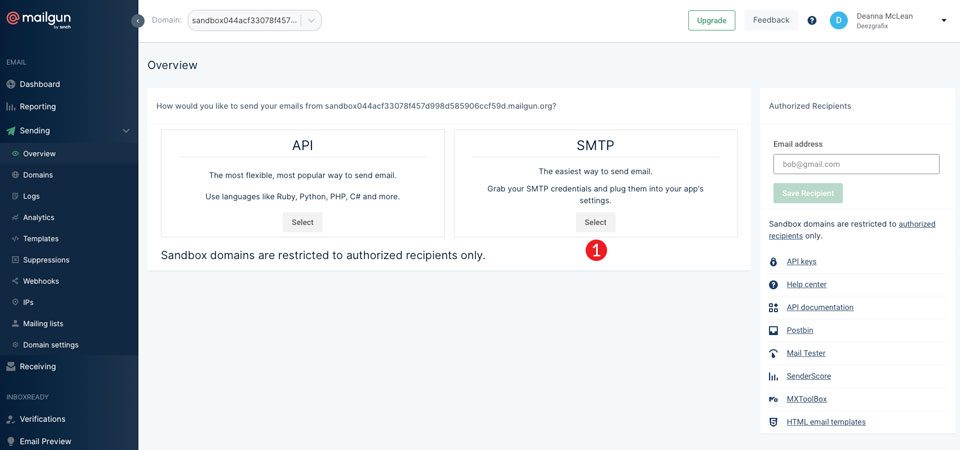
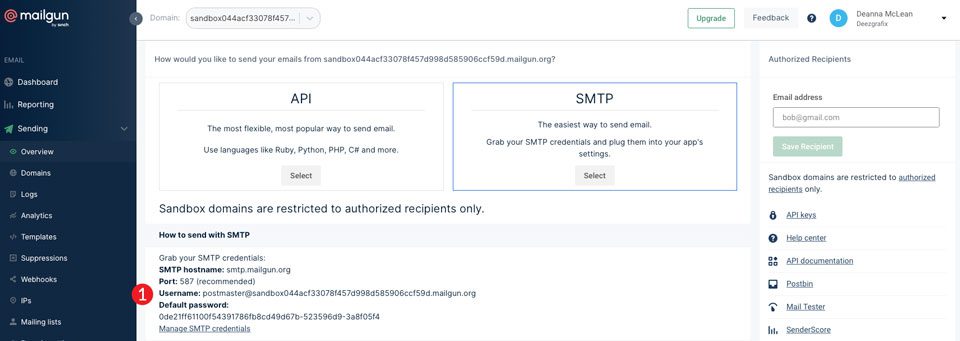
Click on your domain to get the credentials. Choose the SMTP option, then click select.
Copy the information presented to you, and save them to set up your connection in Cloudways.
Head back over to your Cloudways account. In the server management > SMTP screen, select Your Own SMTP, then choose MailGun from the dropdown menu. Paste your MailGun username and password into the fields, then click save.

Once you’ve connected MailGun, it’s a good idea to send a test email to ensure the setup was a success.
Configuring SendGrid for Email Marketing Campaigns in Cloudways
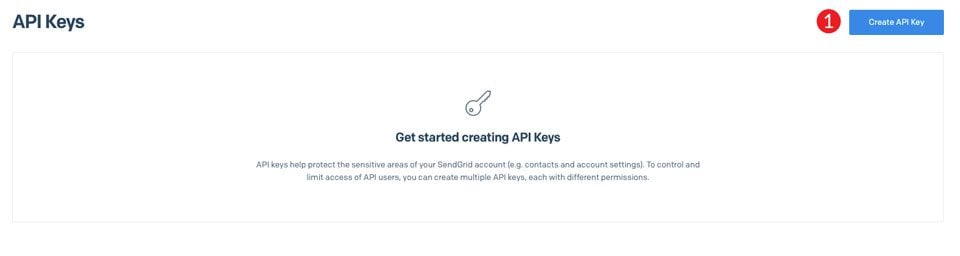
To get started with connecting SendGrid to Cloudways, log in to your SendGrid account. Next, click on settings on the left navigation bar. Click API Keys in the dropdown list.
You’ll need to create a new API key to use to connect Cloudways to your SendGrid account. Click Create API Key.
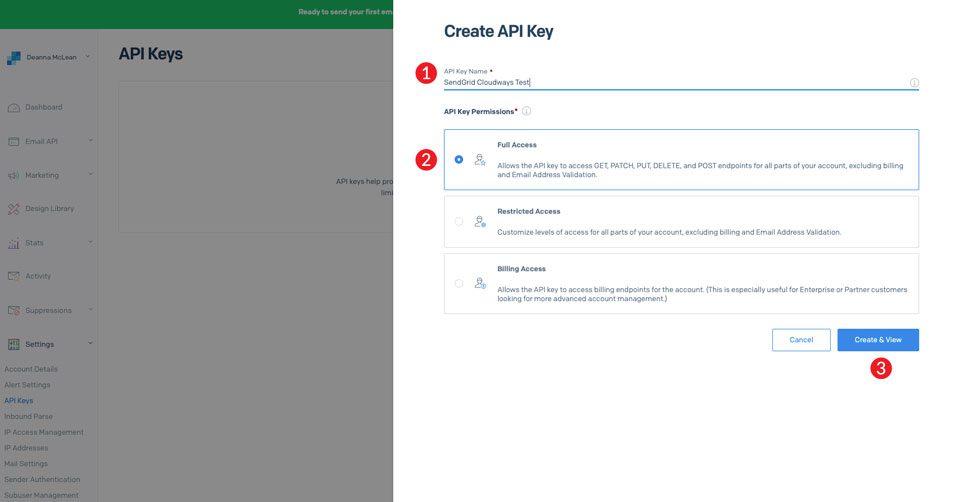
First, create an API Key Name. You can name this anything you like. Under API Key Permissions, select Full Access. Finally, click Create & View.
Click to copy your newly created API key, then click done. Be sure to paste this elsewhere, because we’ll need it in the upcoming steps.

Head back over to Cloudways. Under server management > SMTP, choose Your Own SMTP. Next, select SendGrid from the dropdown menu. Enter your SendGrid username, which could be an email address depending on how you set up your account. Alternatively, you can input your new API key into the field. Next, enter your SendGrid password. If you used your API key as the username, use your SendGrid password here. That being said, if you used your username, input your API key as the password. Finally, click save.

As previously mentioned, it’s good practice to send yourself a test email to make sure everything is set up correctly.
Configuring Mandrill for Email Marketing Campaigns
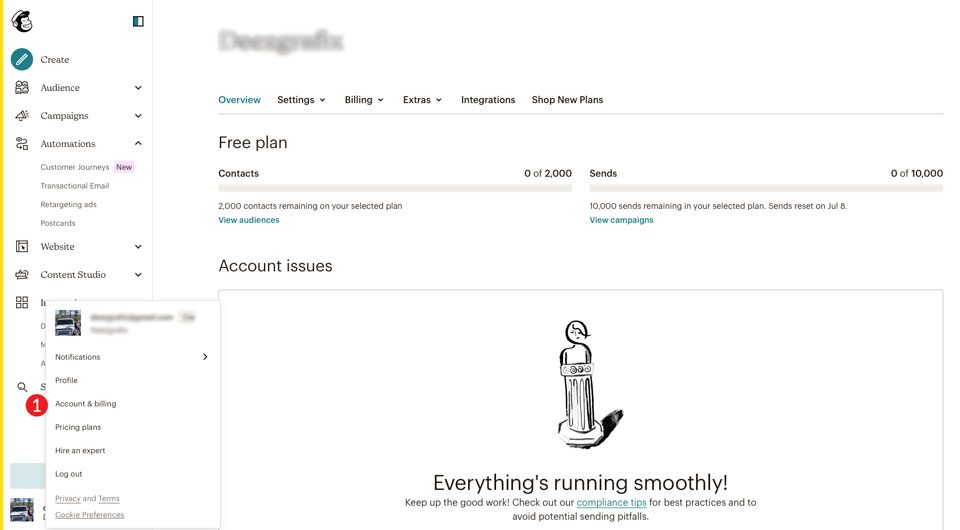
To get started, sign in to your Mandrill account, or sign up for a new one. Scroll all the way down to the bottom of the screen and click on your account icon.
![]()
From the dropdown menu, select Accounts & Billing.
Next, click on extras. Choose API Keys in the dropdown menu.
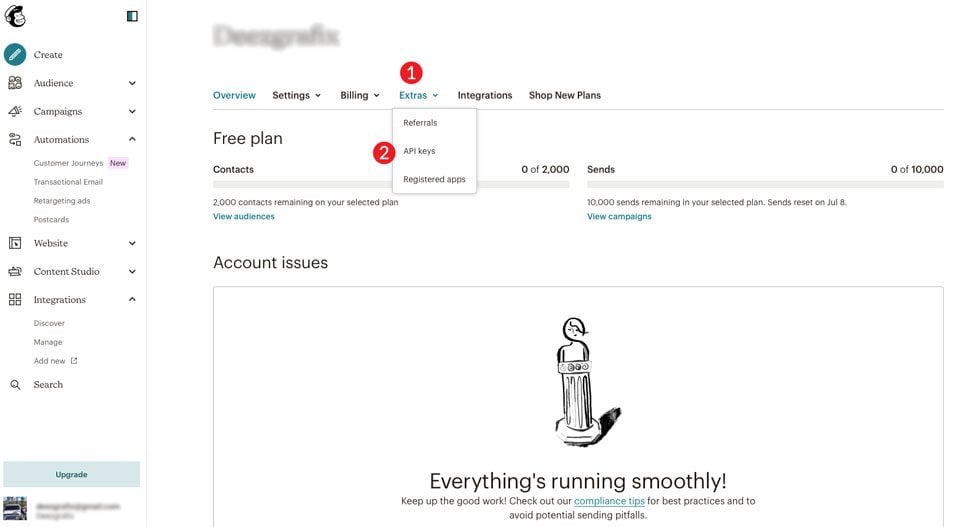
When the page refreshes, scroll down to Your API keys. Click the Create a Mandrill API Key button.
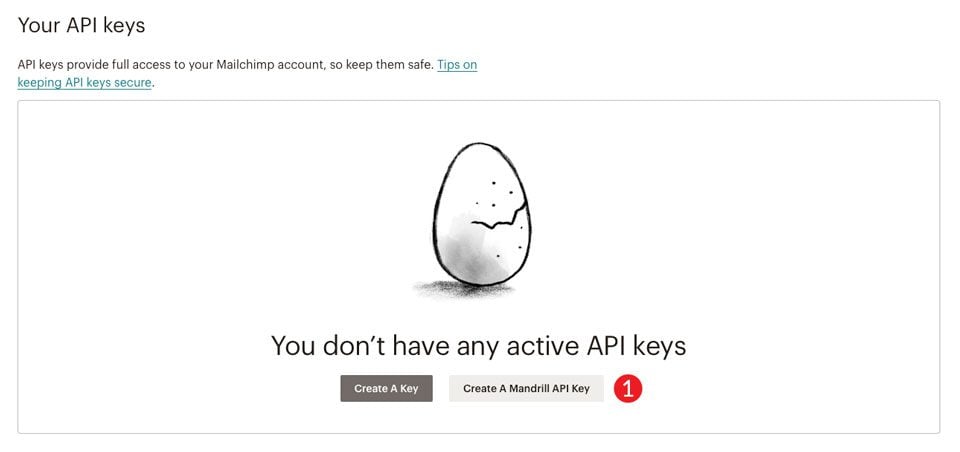
You’ll be redirected to Mandrill. Click the Log in using Mailchimp button.

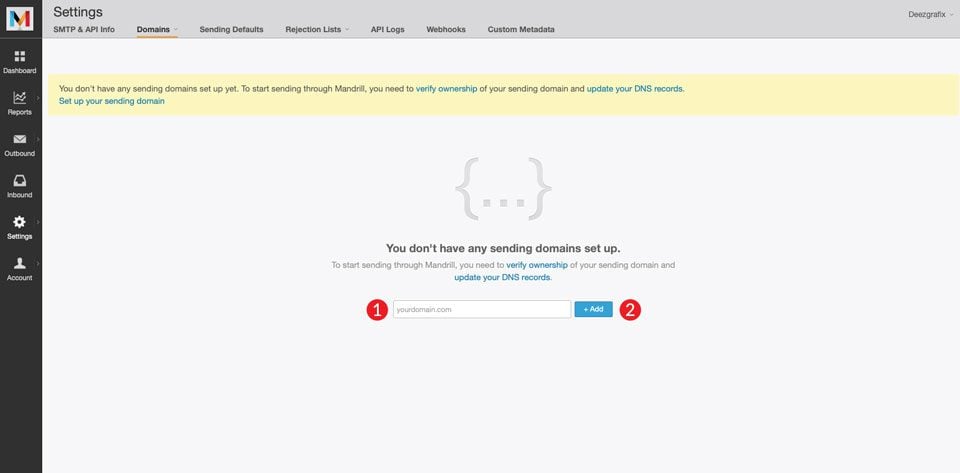
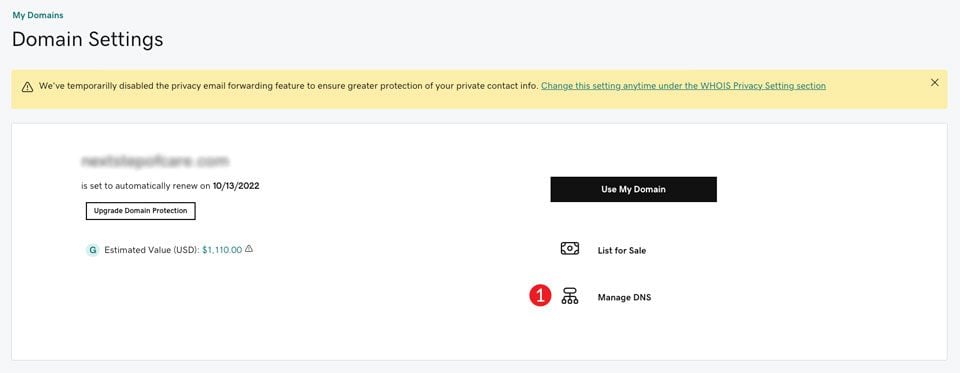
Mandrill will want you to add a domain, if you haven’t already. To do so, click set up your sending domain in the yellow bar at the top of your screen. Type in your domain, and click the +Add button.
Modifying Registrar DNS Records
Mandrill will require you to verify ownership of your domain by adding a few TXT records to your registrar’s DNS. First, you’ll add a TXT record to verify the domain. Use TXT as the type, @ as the name, and add this as the value:
mandrill_verify.1tFI4uR0BLH4nLt-0as5LQ
Next, you’ll need to add a DKIM TXT record. Choose TXT as the type, use mandrill._domainkey.example.com for the name, and add this code for the value:
v=DKIM1; k=rsa; p=MIGfMA0GCSqGSIb3DQEBAQUAA4GNADCBiQKBgQCrLHiExVd55zd/IQ/J/mRwSRMAocV/hMB3jXwaHH36d9NaVynQFYV8NaWi69c1veUtRzGt7yAioXqLj7Z4TeEUoOLgrKsn8YnckGs9i3B3tVFB+Ch/4mPhXWiNfNdynHWBcPcbJ8kjEQ2U8y78dHZj1YeRXXVvWob2OaKynO8/lQIDAQAB;
Note: you’ll need to replace example.com with your domain when adding the DKIM record.
Finally, you’ll need to add a SPF TXT record. Choose TXT for the type, @ as the name, and this as the value:
v=spf1 include:spf.mandrillapp.com ?all
For this tutorial, we’ll use GoDaddy to add the records. Log in to your registrar and navigate to your domain, then click manage DNS.
Add the three TXT records indicated above. Now your DNS should have these three records:

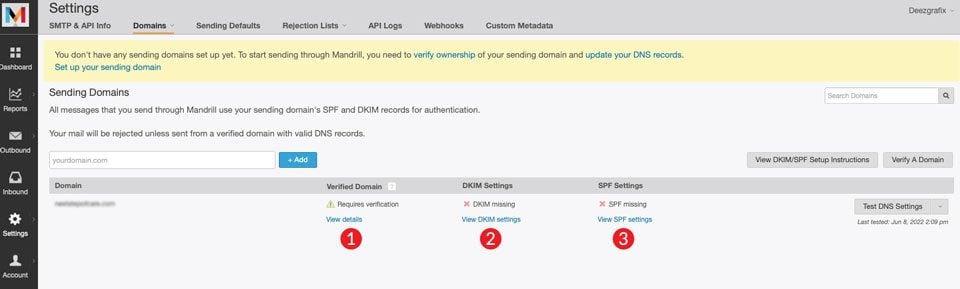
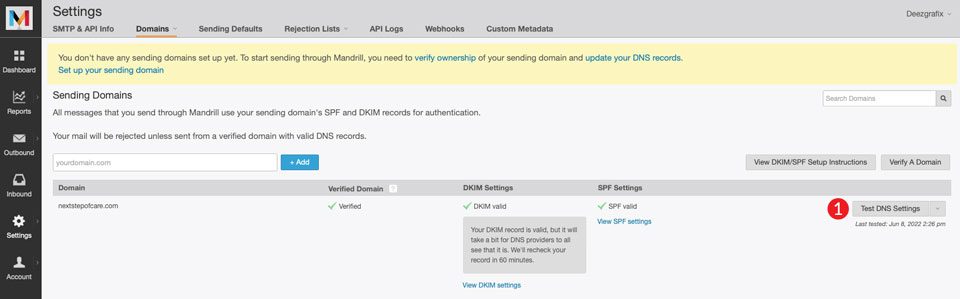
Once you’ve added the records, head back to Mandrill to test your DNS settings. Click the Test DNS Settings button. If everything is correct, you’ll see green check marks next to your settings.
Now that your DNS is set up and ready to go, we can create the API key and connect Mandrill to Cloudways. Click the +API Key button to generate a key.
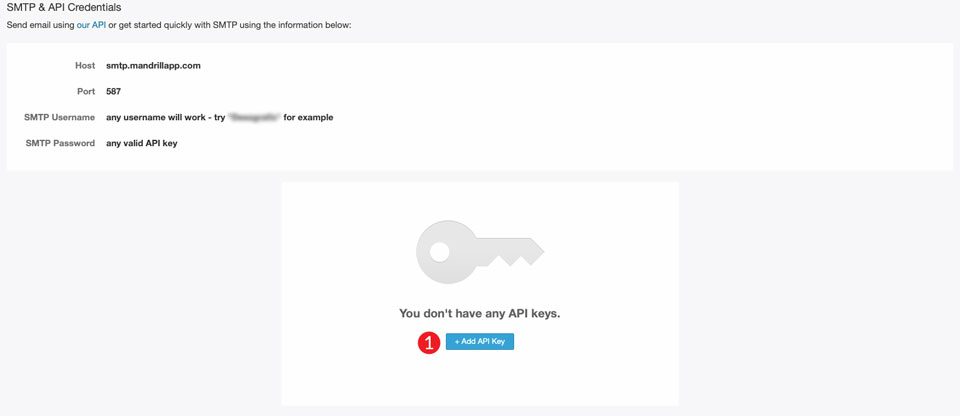
We’ll need to grab the SMTP user credentials as well as the API key to complete the task.
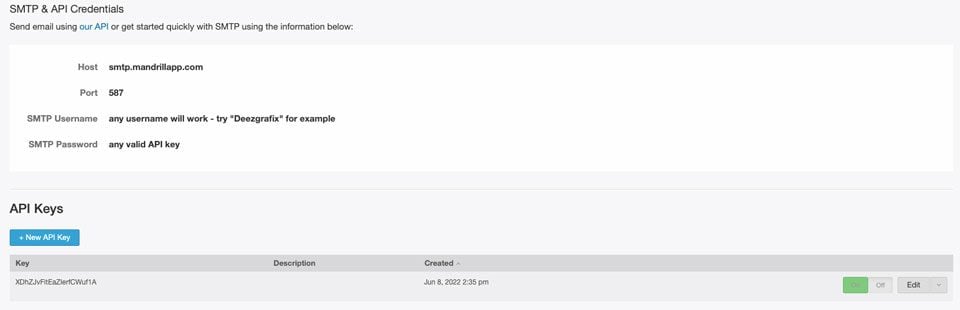
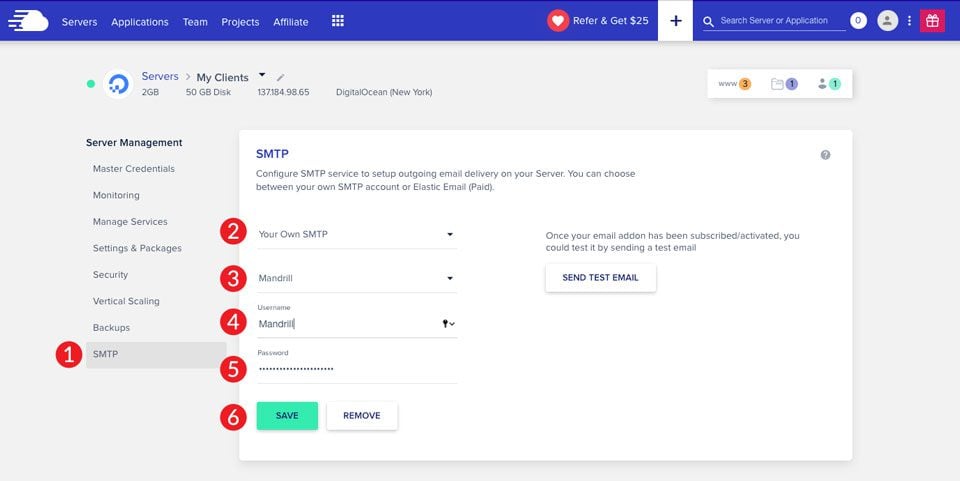
Finally, go back to Cloudways. Choose Your Own SMTP from the first dropdown, and Mandrill from the second dropdown. You can put anything you’d like in the username field. For this example, we’ll use Mandrill. Next, input the API key you generated for the password. Click save. Be sure to remember to test your settings by sending out a test email.
Configuring Elastic Mail for Email Marketing Campaigns in Cloudways
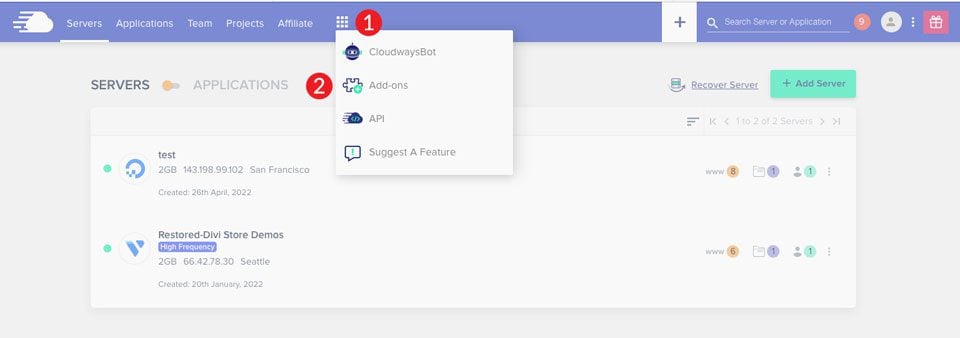
Setting up Elastic Email in Cloudway is the most simple option we’ve covered. Cloudways provides direct integration with Elastic, so there are only a few steps to cover. First, you’ll need to add Elastic Email to your hosting account. To do this, click the grid icon in the main menu, then choose Add Ons from the dropdown menu.
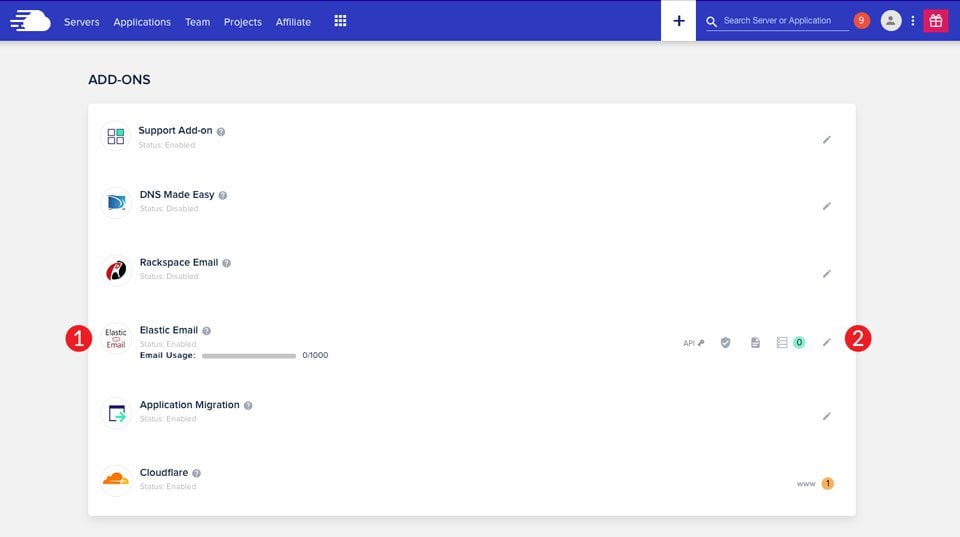
You’ll need to subscribe to Elastic Email to be able to use it as your SMTP service. As previously mentioned, plans begin at .10¢ for every 1000 emails you send. Click the pencil icon to enable Elastic Email.
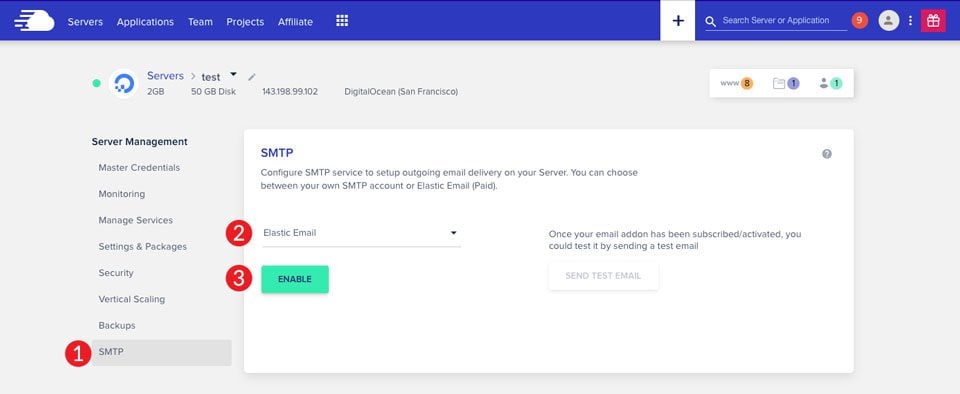
Finally, navigate to server management > SMTP. In the dropdown menu, choose Elastic Email. Then click the enable button. As previously noted, you’ll need to add DNS records for DKIM and SPF to your domain’s registrar in order to use Elastic Email in Cloudways.
Configuring the Cloudways SMTP Add-On
In addition to using one of the providers listed above, you can configure your own SMTP through Cloudways SMTP add-on capability. It allows you to bring in any SMTP provider you’d like One of the easiest to configure is Gmail. Since they offer a built-in SMTP, Gmail is very simple to configure.
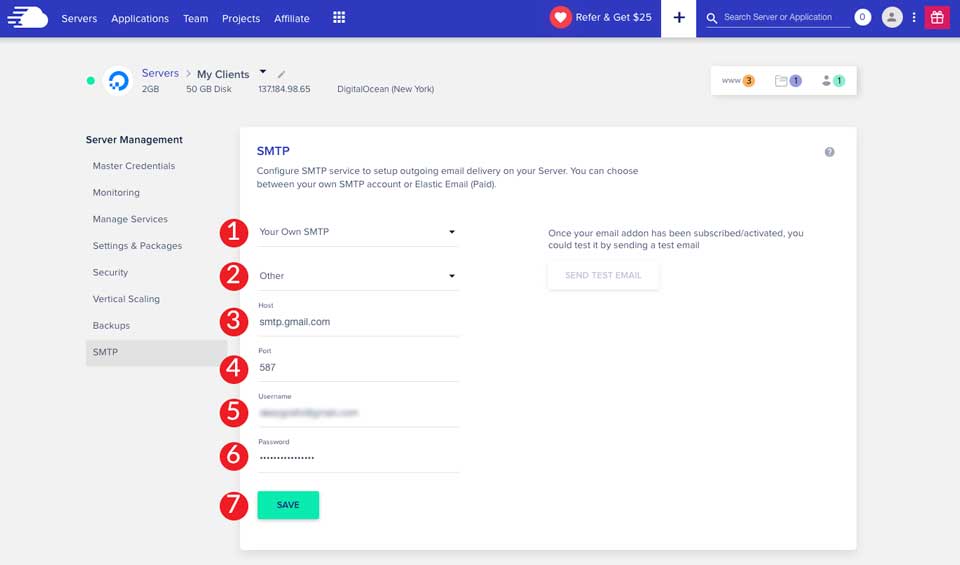
To get started, you’ll need your Gmail login credentials, as well as the server and port information that Gmail uses. Head to server management > SMTP. Like before, choose Your Own SMTP from the dropdown menu.
On the second dropdown menu, choose Other. When the screen refreshes, you’ll input smtp.gmail.com for the server, and 587 for the port. Next, use your gmail login email address for username. Finally, input your gmail password in the password field. Click save.
Connecting Your SMTP Server to FluentCRM
Now that we have SMTP connected to the server, we want to show you how to create email marketing campaigns on Cloudways with the FluentCRM plugin. FluentCRM is a self-hosted automation plugin for WordPress. You can do things like manage customer leads, create email campaigns, monitor user activities, and more, all from the WordPress dashboard.

FluentCRM is free to try, so there’s plenty of incentive to test it out. If you fall in love with it — and we think you might — a single-site license is only $129. That’s a pretty good deal considering you’re getting a full marketing solution that’s easy to manage and allows for contact segmentation, email sequencing, and email marketing automation to manage your business and your customers. In addition to great features, FluentCRM integrates with over 30 other plugins including WooCommerce, LearnDash LMS, Easy Digital Downloads, Zapier, and best of all, Divi. We even have it listed as the best WordPress self-hosted CRM solution on the market right now.
Setting Up FluentCRM in Divi
First, launch your new Divi site and navigate to plugins in the WordPress admin panel. Next, click Add New.
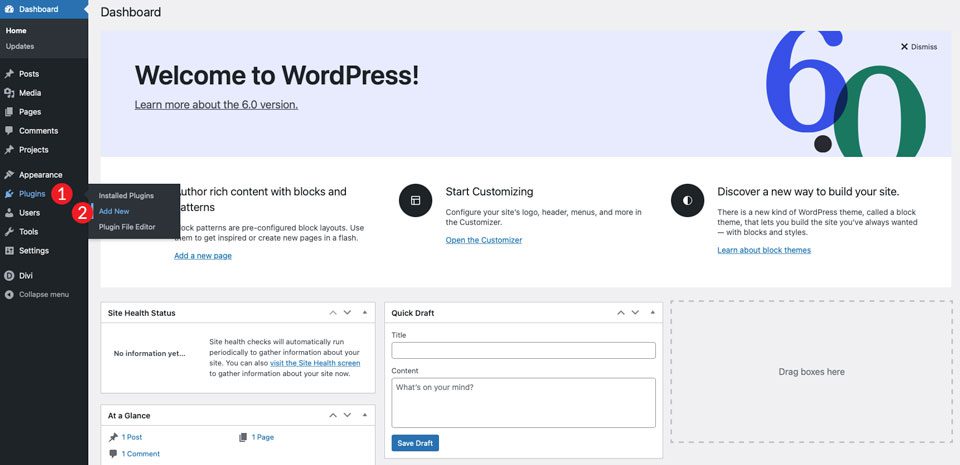
Next, search for FluentCRM in the search bar. Click Install Now.

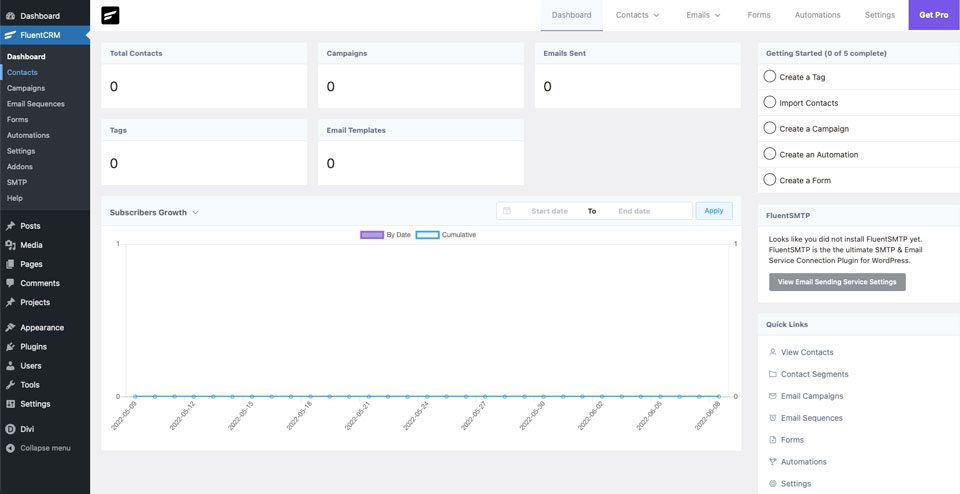
Once you activate the plugin, you’re ready to start setting up your automation. Click the FluentCRM tab in the WordPress dashboard.
Using the FluentSMTP Plugin
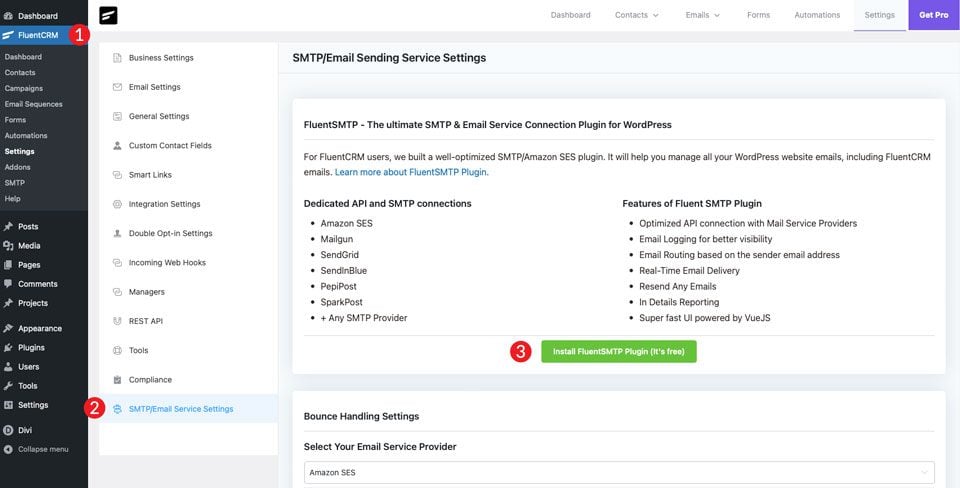
Rather than using Cloudways to set up your SMTP connection, you can directly connect your WordPress site to SMTP via their FluentSMTP Plugin. The steps are generally the same as doing it server side. You can choose from MailGun, Sendinblue, SendGrid, Google Workspace, Amazon SES, and many others. This might be a good option for you if you want to set up a different SMTP provider on individual applications within Cloudways.
To set up FluentSMTP, click on FluentSMTP > Settings > SMTP/Email Service Settings in the WordPress dashboard. You’ll be prompted to install the FluentSMTP plugin automatically. Click Install FluentSMTP Plugin (it’s free). Yes, it’s free.
Cloudways Makes It Easy to Setup Email Marketing Campaigns
Cloudways offers multiple ways to set up SMTP to be able to create email marketing campaigns. Through MailGun, Elastic Mail, SendGrid, and others, you can easily incorporate SMTP to create email automations, promotional mail, and more. Additionally, with the awesome capabilities of FluentCRM, you can forgo the need for additional subscriptions such as Mailchimp to have a full-service marketing automation setup with a very reasonable upfront cost.
Which mail service provider do you use in Cloudways? Let us know by leaving a comment below.


Best article for email marketing tips and tactics. I get a lot of ideas about WordPress email marketing campaign setup. Thank you so much.
Very useful information. Email marketing is very important in Digital marketing. I learn very useful information from your blog. Thanks again.
Hi
Thanks for sharing about Email Marketing.
This is really a nice piece of information.
Thanks for sharing this information
Great blog post. Really informative. Keep up the good work.