")
Most of us are used to reading text from right to left and from top to bottom. But when it comes to web design, it might be a good idea to break free from the norm. One way to do this is with text rotation. Rotating text on your website may seem impractical, but it does seem to have a place. In fact, vertical text orientation seems to be common in modern web design. And, although most rotate text purely for design purposes, the argument can be made that rotated (or vertical) text (although harder to read) can be an effective attention-getting technique.
With Divi you can rotate any element on your page using the built-in transform options. So in this tutorial, I’m going to show you how to successfully rotate text to create unique layout designs in Divi. To do this, I’ll be designing a three-part layout that incorporates examples of rotated text.
Let’s get started.
- 1 Sneak Peek
- 2 Download the Complete Layout from this Tutorial for FREE
- 3 Download For Free
- 4 Things to Keep in Mind When You Rotate Text
- 5 Part 1: Building the Header with Vertical Text
- 6 Part 2: Rotating Text Modules to Create Diagonal Labels
- 7 Part 3: Creating Vertical Headings for Your Content
- 8 Final Design of the Layout with Rotated Text Designs
- 9 Final Thoughts
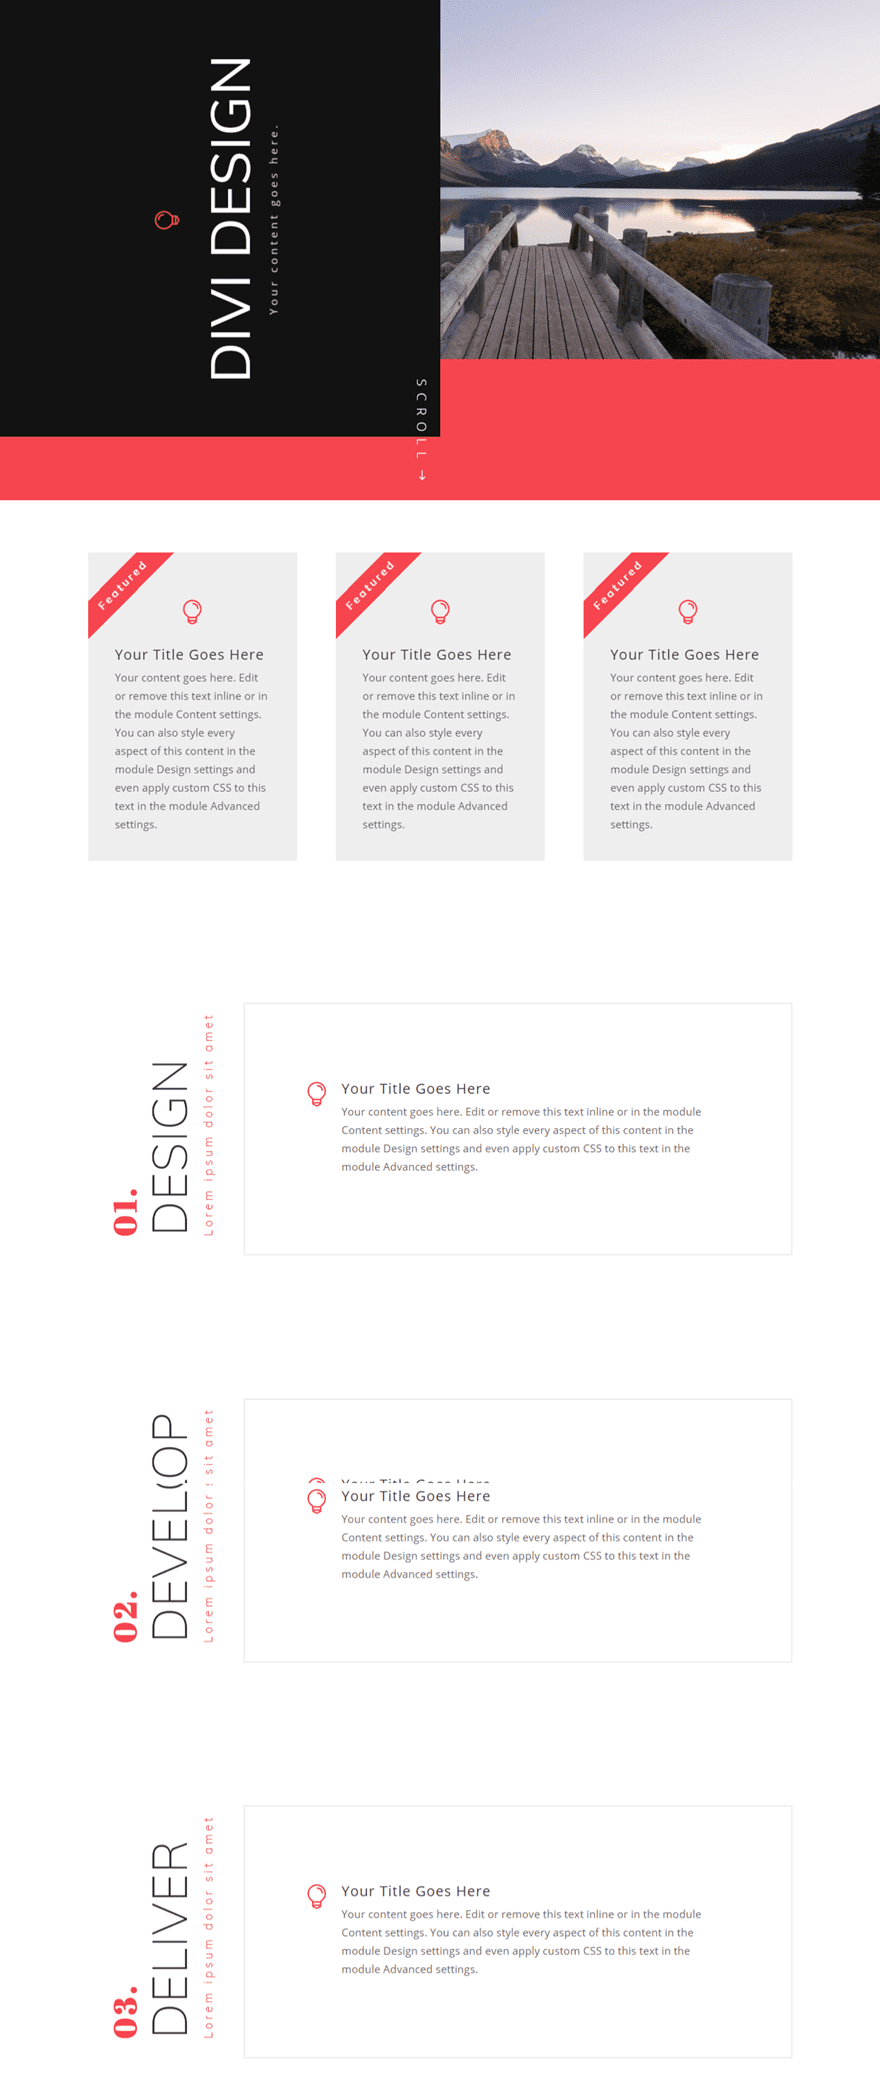
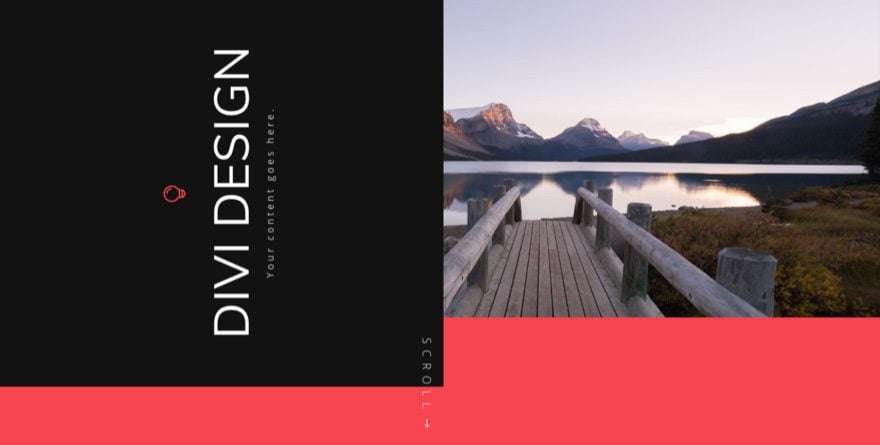
Sneak Peek
Here is a sneak peek of the entire layout we will be building in the tutorial. Notice there are examples of text rotated in three different sections of the layout.

Download the Complete Layout from this Tutorial for FREE
To lay your hands on the free Rotated Text Designs layout, you will first need to download it using the button below. To gain access to the download you will need to subscribe to our newsletter by using the form below. As a new subscriber, you will receive even more Divi goodness and a free Divi Layout pack every Monday! If you’re already on the list, simply enter your email address below and click download. You will not be “resubscribed” or receive extra emails.

To import the layout to your page, simply extract the zip file and drag the json file into the Divi Builder.
Now let’s get back to the tutorial.
Things to Keep in Mind When You Rotate Text
Which Direction Should You Rotate Text?
If you are want to rotate text for a vertical display, you might not be sure which direction to rotate the text. You could rotate the text counterclockwise so that the text reads from bottom to top. Or, you could rotate the text clockwise so the text reads from top to bottom. If you are wondering which one is easier to read, I’m not sure there is an answer. You could try and get a clue from the orientation of book titles on a bookshelf. But different countries do this differently (the standard in the US is clockwise, top to bottom).
In this tutorial, I’m going to rotate text counterclockwise in most cases, mainly because I like the way it looks on the left side of the page (maybe I prefer tilting my head to left). But feel free to try out different directions.
The Blur Problem
On some browsers (like Chrome and Safari), the text is gets a little blurry when using the transform rotate property. To fix the issue, you can add a transform origin value of 51% or 52% along the X-axis. This should fix the issue.
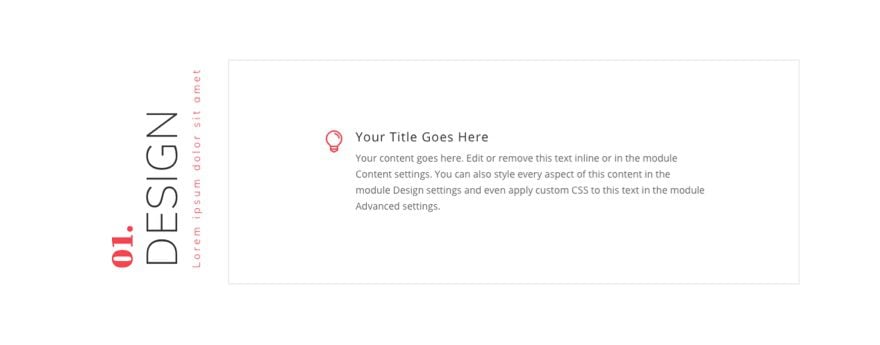
Part 1: Building the Header with Vertical Text
For this first part of the layout, we are going to create a header with vertical text. To do this we will be rotating a blurb module using the transform options.
To start, create a regular section with a two column row.
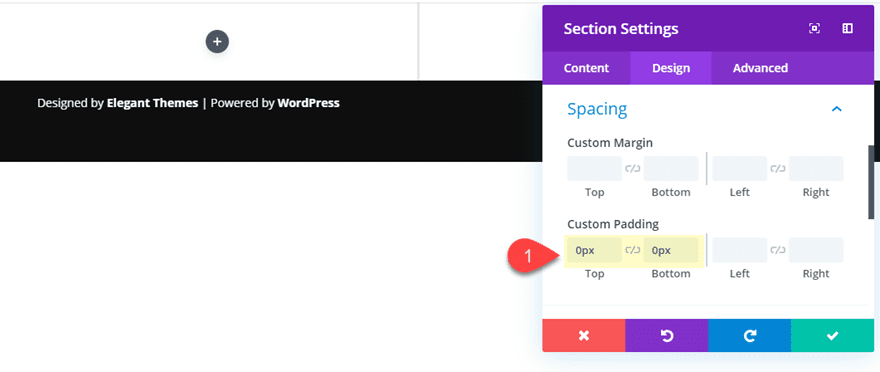
Before you add a module, take out the top and bottom padding of the section by updating the following section settings:
Custom Padding: 0px top, 0px bottom
Next, update the Row settings as follows:
- Background Image: [add image with at least 1920px width]
- Column 1 Background Color: #121212

- Custom Width: 100%
- Gutter Width: 1
- Equalize Column Heights: YES
- Custom Padding (desktop): 0px top, 0px bottom
- Custom Padding (tablet): 40% right
- Custom Padding (phone): 30% right
- Column 1 Custom Padding (desktop): 200px top, 200px bottom
- Column 1 Custom Padding (tablet): 150px top, 150px bottom

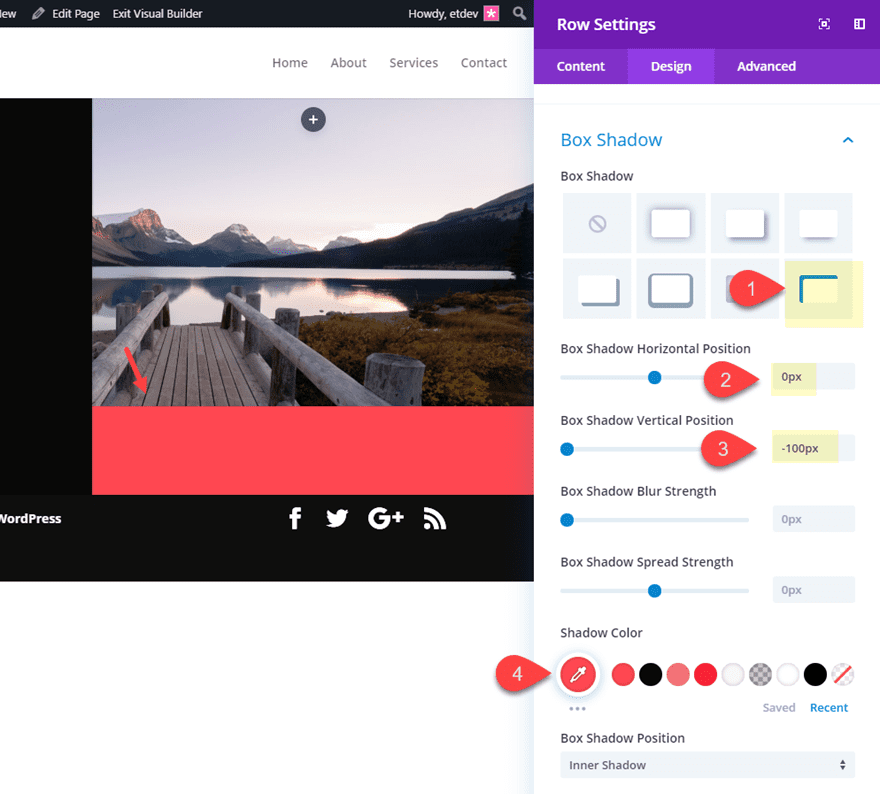
- Box Shadow: see screenshot
- Box Shadow Horizontal Position: 0px
- Box Shadow Vertical Position: -100px
- Shadow Color: #f6454e
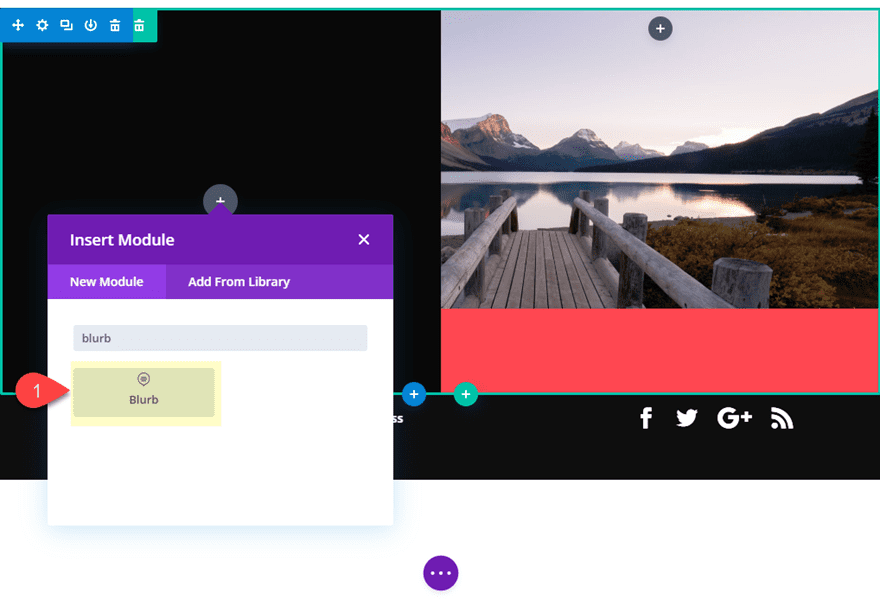
Creating the Blurb Module
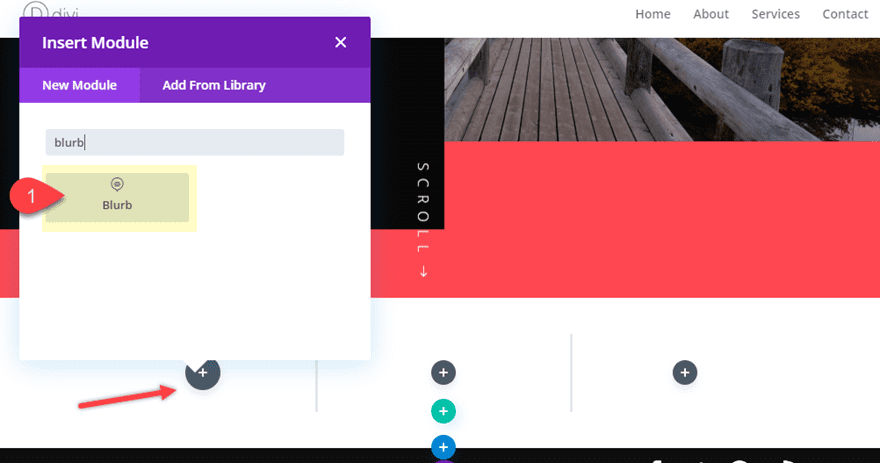
Now we are ready to add our header content. To do this, add a blurb module to the left column of the row.
Update the following content:
- Title: Divi Design
- Content: Your content goes here.
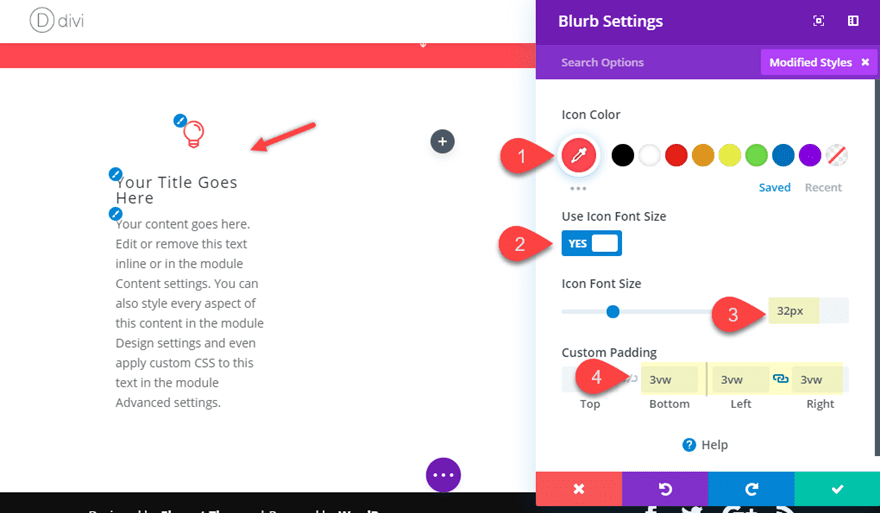
- Use Icon: YES
- Icon: lightbulb
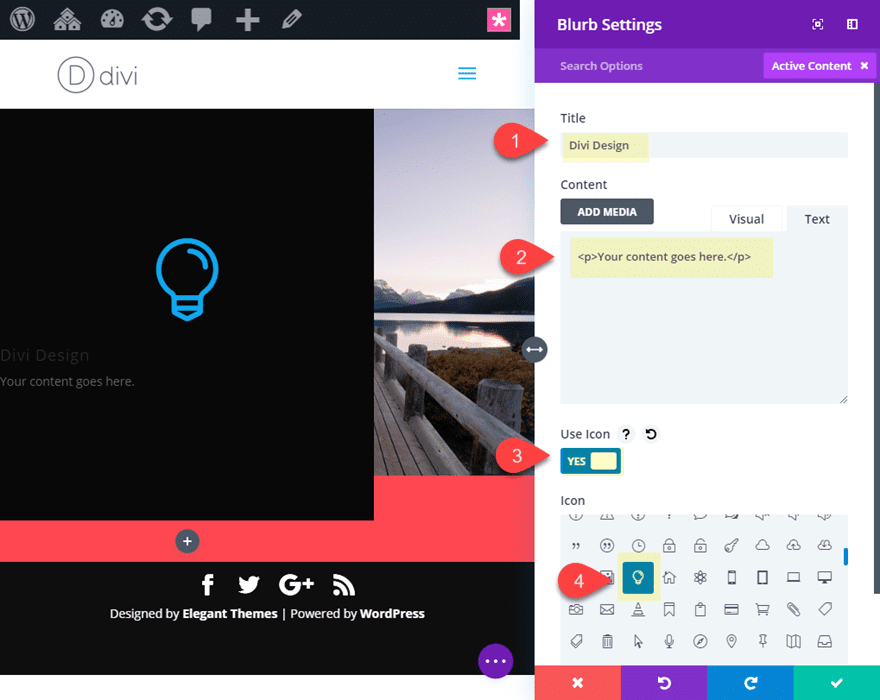
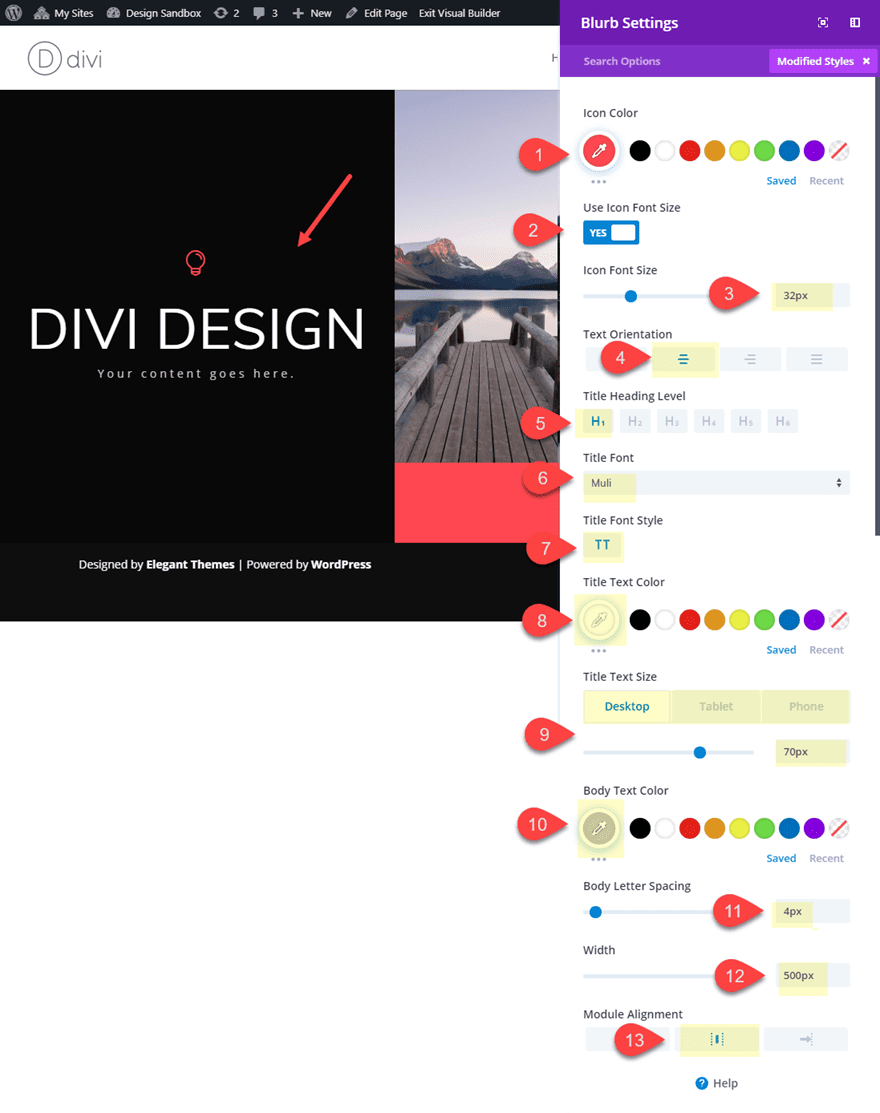
- Icon Color: #f6454e
- Icon Font Size: 32px
- Text Orientation: center
- Title Heading Level: H1 (because it is the main heading of the page)
- Title Font: Muli
- Title Font Style: TT
- Title Text Color: #ffffff
- Title Text Size: 70px (desktop), 50px (tablet), 36px (phone)
- Body Text Color: #cccccc
- Body Letter Spacing: 4px
- Width: 500px
- Module Alignment: center
Important Note: Since we will be rotating the blurb module so that it stands vertically, the custom width of 500px will become the height of the vertical blurb module. So it is important the the content fits inside this module with. For this example, I’m using a small amount of text and resizing the title font on different devices so that the text doesn’t break into a new line and mess up the design.
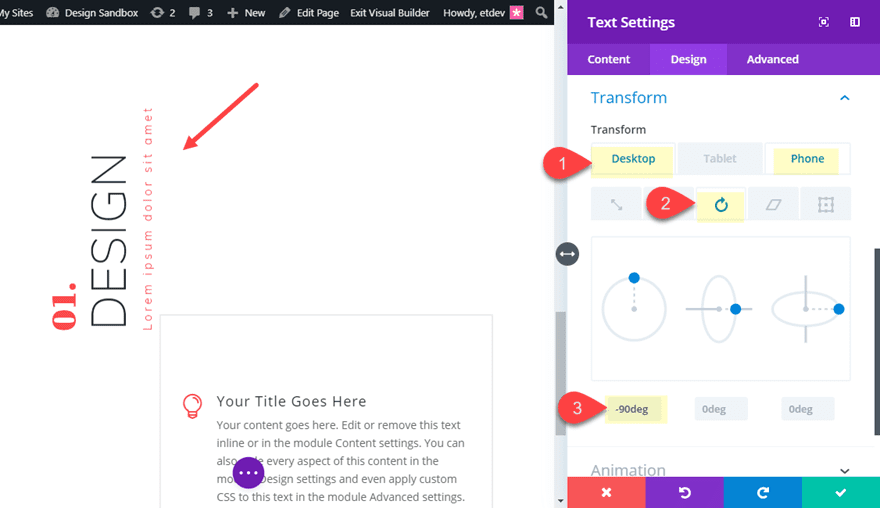
Rotating the Blurb Module using Transform Options
To rotate the blurb module (and all of its content), update the following transform options:
- Transform Rotate X-axis: -90deg
You will have to enter the -90deg value manually. This will give you a bottom to top vertical alignment of the content.
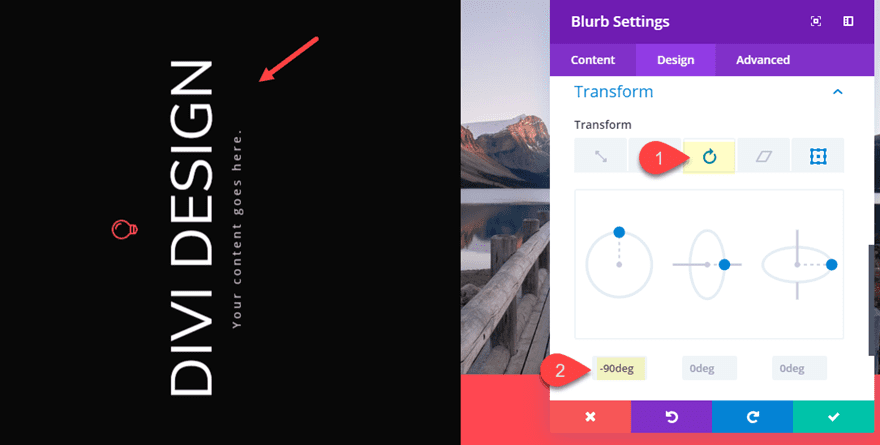
You may notice the the text is a little blurry if you are using Chrome or Safari. This can sometimes happen when using the transform: rotate property. To fix this, you can slightly adjust the Transform Origin as follows:
- Transform Origin Y-axis: 51%
You may have to adjust this value a bit until the text is clear. For example, 52% may look clear on some designs.
Next, we are going to add a button at the bottom of our header to remind the user to scroll down the page. Then we can rotate the button using transform options just like we did to the blurb module.
Create a new row with a one column structure.
Before we add our button module, update the row settings as follows:
- Background Color: #f6454e
- Custom Width: 100%
- Gutter Width: 1
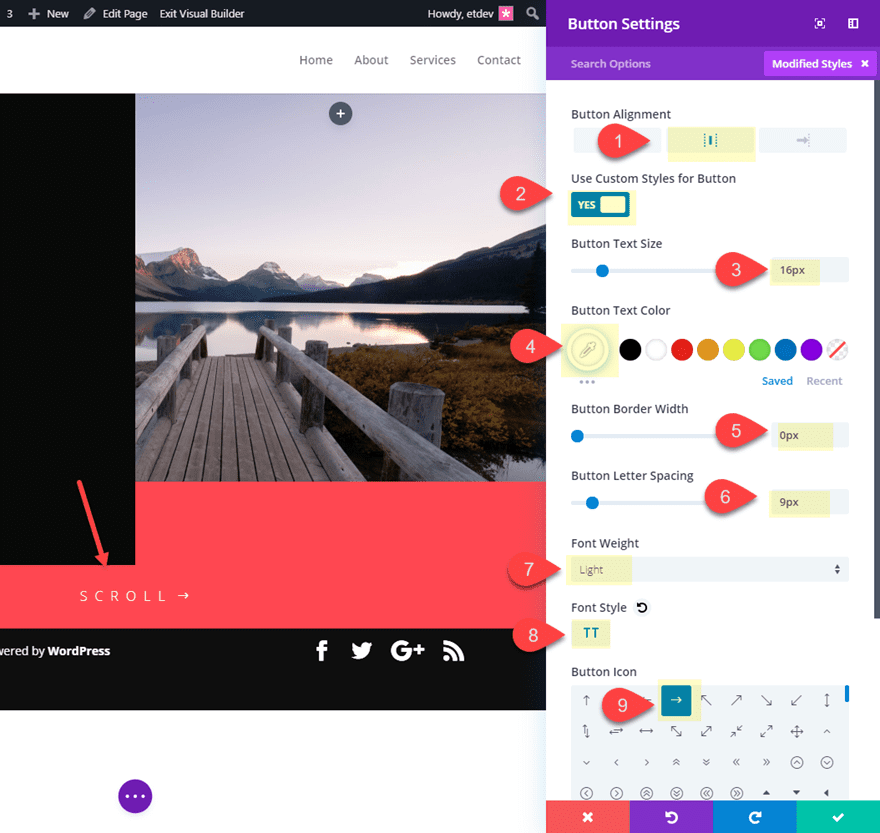
Next, add a button module to the row and update the following button options:
- Button Alignment: center
- Use Custom Styles for Button: YES
- Button Text Size: 16px
- Button Text Color: #ffffff
- Button Border Width: 0px
- Button Letter Spacing: 9px
- Font Weight: light
- Font Style: TT
- Button Icon: right arrow
To rotate and position the button, we will use a combination of margins and transform rotate as follows:
- Custom Margin (desktop): -50px top, 50px bottom, -50px left
- Custom Margin (tablet): 0px left
- Transform Rotate X-axis: 90deg
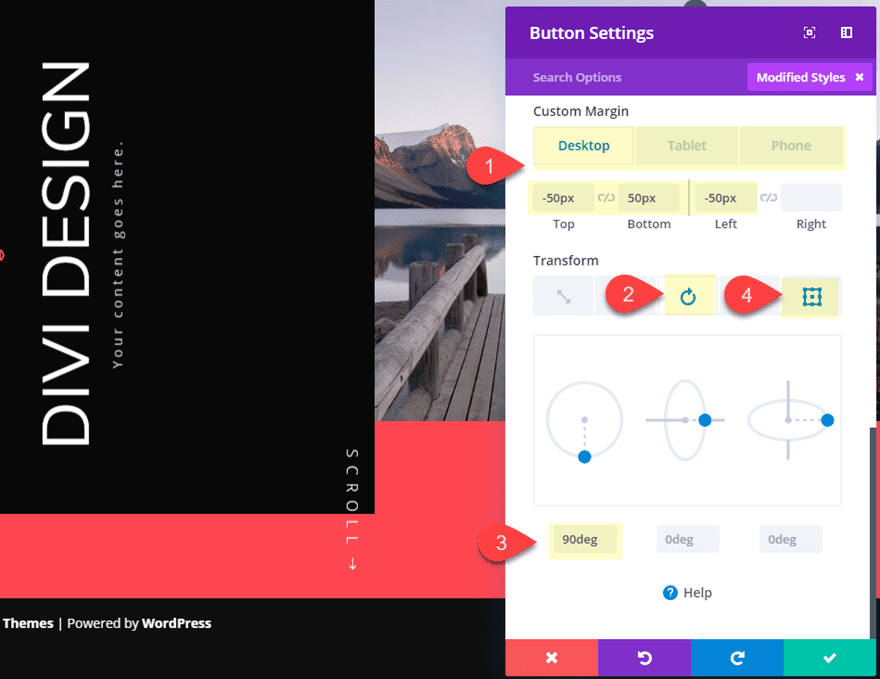
This time the button is rotated 90deg (clockwise) in order to get a top to bottom vertical display for the text. This seems to be fitting since we want the user to scroll down.
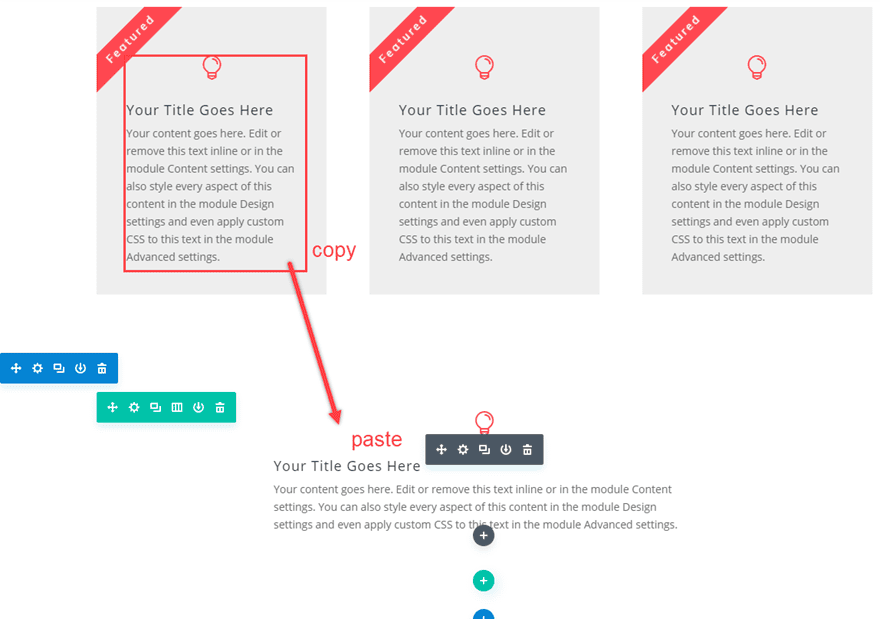
Part 2: Rotating Text Modules to Create Diagonal Labels
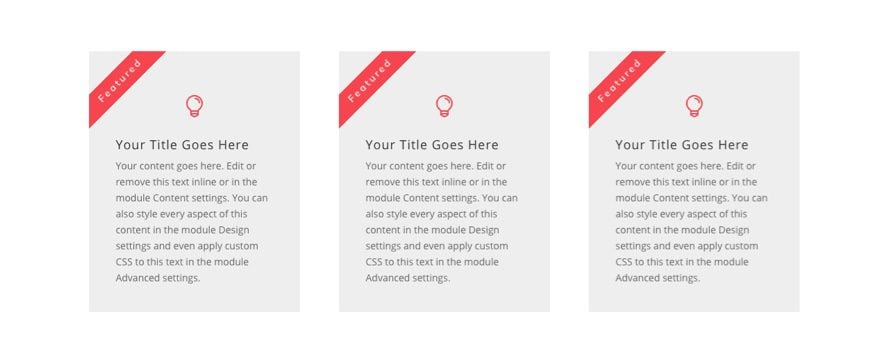
In this next section of the layout, we are going to create three blurbs with rotated text modules used as labels. This is a great way to display featured items on your page.
Here’s how to do it.
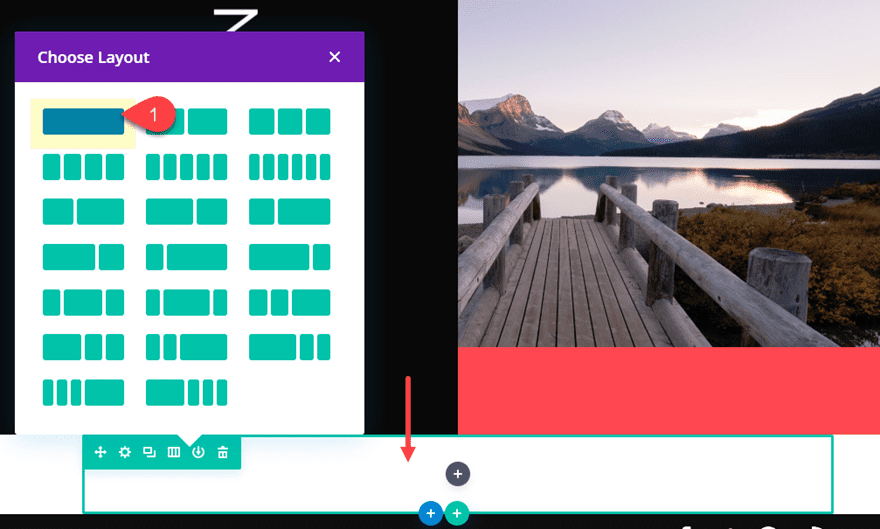
Create a new regular section with a three-column row. Then add a blurb module to the first column.
Choose to use the lightbulb icon instead of the default image.
Then update the blurb module as follows:
- Icon Color: #f6454e
- Icon Font Size: 32px
- Custom Padding: 3vw bottom, 3vw left, 3vw right
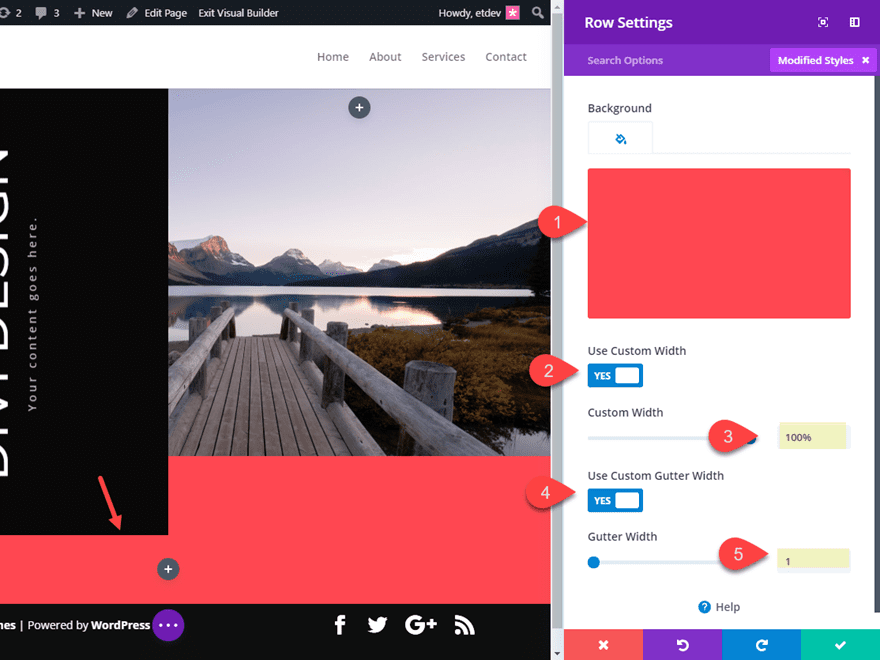
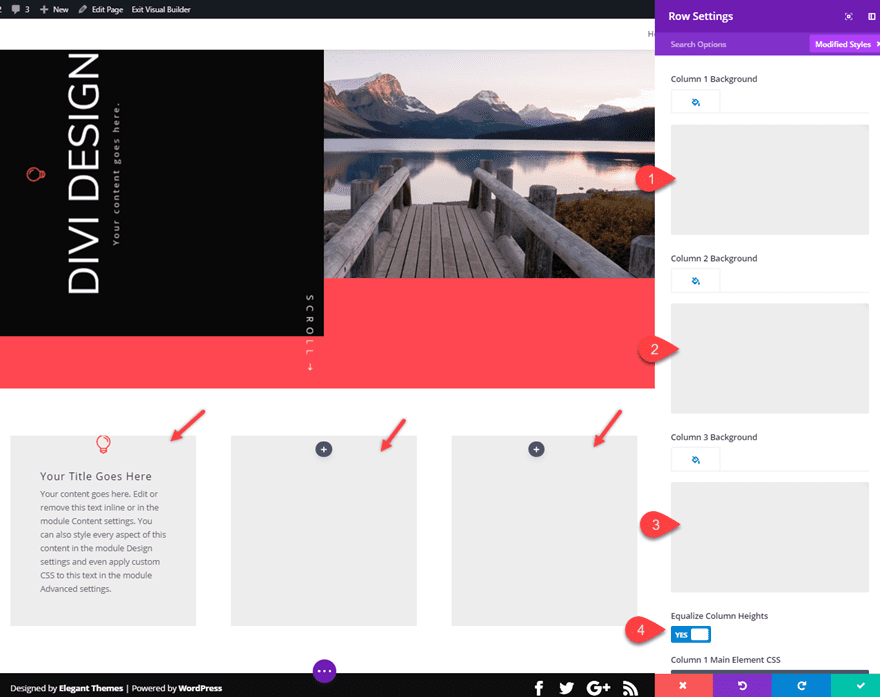
Next, update the row settings as follows:
- Column 1 Background Color: #eeeeee
- Column 2 Background Color: #eeeeee
- Column 3 Background Color: #eeeeee
- Equalize Column Heights: YES
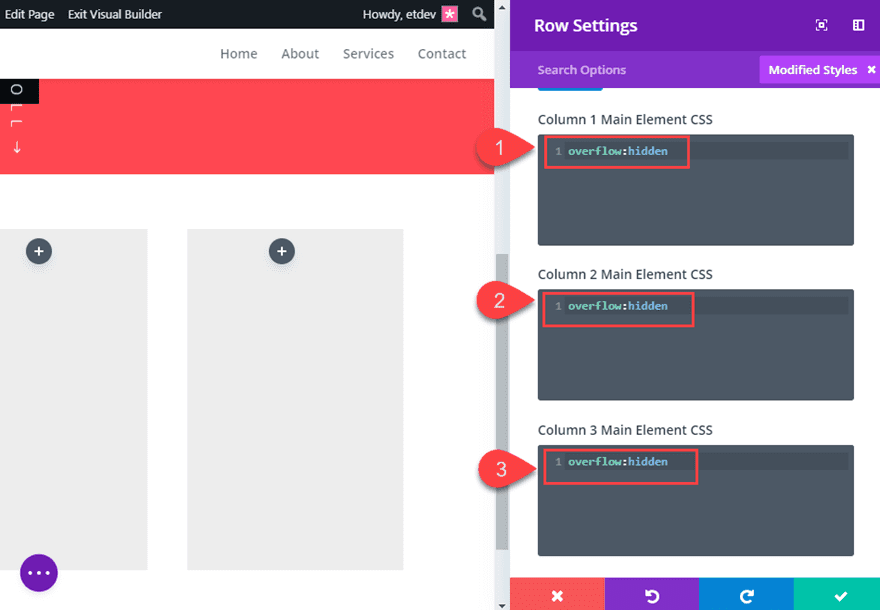
This next step is crucial to for when we add our rotated text module label design. We want the overflow of the text module to be hidden outside of the column. To make sure this happens, we need to add the “overflow: hidden” property to each of the columns as custom CSS.
Under the advanced tab, add the following custom CSS:
Column 1 Main Element CSS:
overflow: hidden;
Column 2 Main Element CSS:
overflow: hidden;
Column 3 Main Element CSS:
overflow: hidden;
Adding and Rotating the Text Module as a Label
Next, add a text module just above the blurb module in column 1.
Update the Text Content with the word “Featured”.
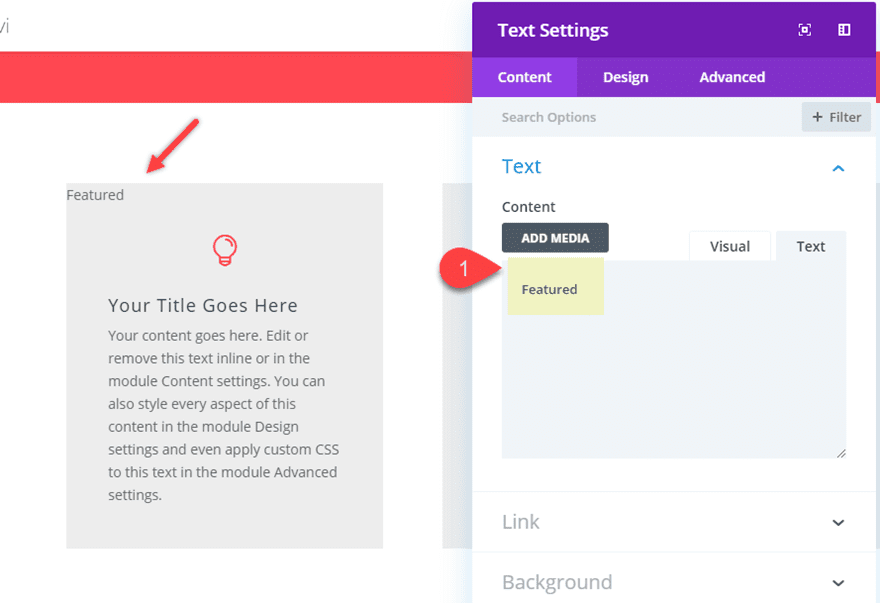
Then style the text module as follows:
- Background color: #f6454e
- Text Font: Muli
- Text Font Weight: Semi Bold
- Text Text Color: #ffffff
- Text Letter Spacing: 3px
- Text Line Height: 2.5em
- Text Orientation: center

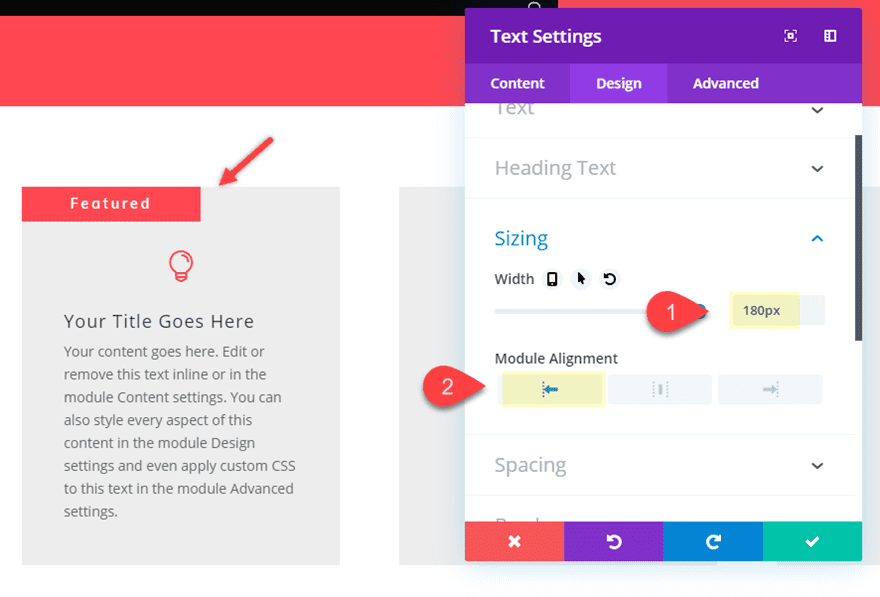
Now give the text module a custom width as follows:
- Width: 180px
- Module Alignment: left
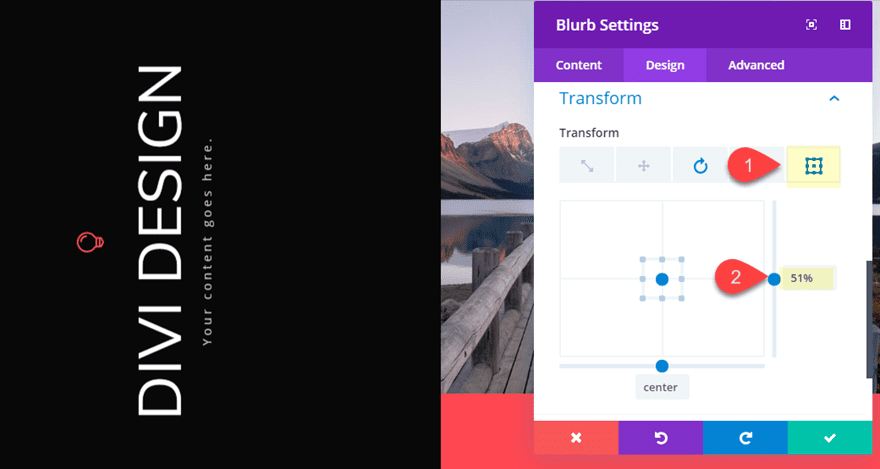
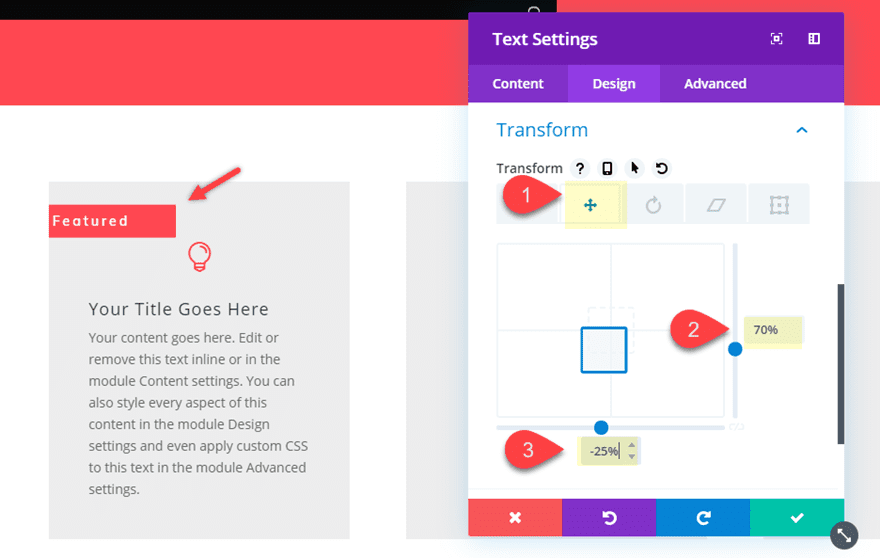
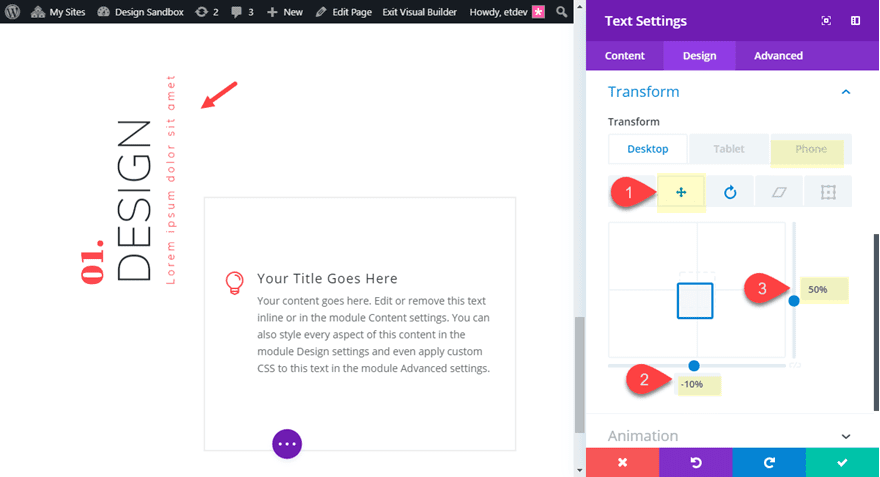
Next, position the text module in the top left corner of the column using the following transform options:
- Transform Translate X-axis: -25%
- Transform Translate Y-axis: 70%
It is important to use percentage values here to make the design more responsive so you will need to enter them in manually.
Transform Rotate X-axis: -45deg
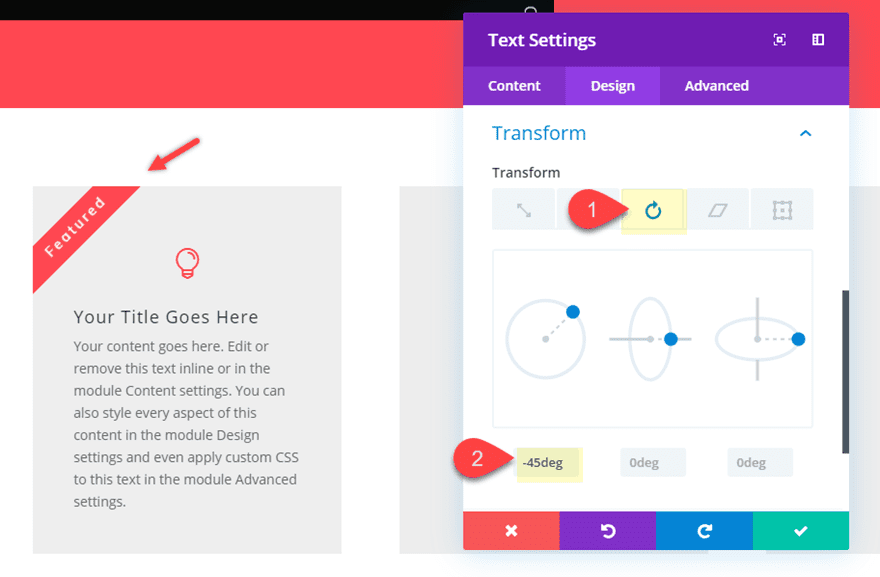
Notice that the overflow of the text module is hidden outside of the column to complete the design.
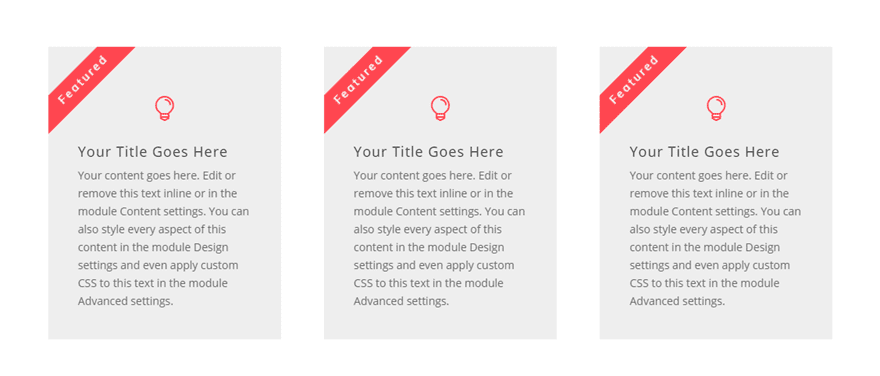
All we have left to do is copy the modules in column one and paste them into column 2 and column 3.
Here is the final result.
Part 3: Creating Vertical Headings for Your Content
This next part of the layout uses similar techniques to rotate and position a text module as a vertical heading for your content. This is a useful layout for showcasing things like services. I’ll also demonstrate a creative way to use lists to create a very unique vertical heading.
Here’s how to do it.
Create a new regular section with a one column row.
Then copy one of the blurb modules in the three column row in the layout above. This will give us a head start on the design.
Then update the blurb settings as follows:
- Image/Blurb Placement: Left
- Custom Margin (desktop): 200px left
- Custom margin (phone): 0px left
- Custom Padding: 100px top, 100px bottom
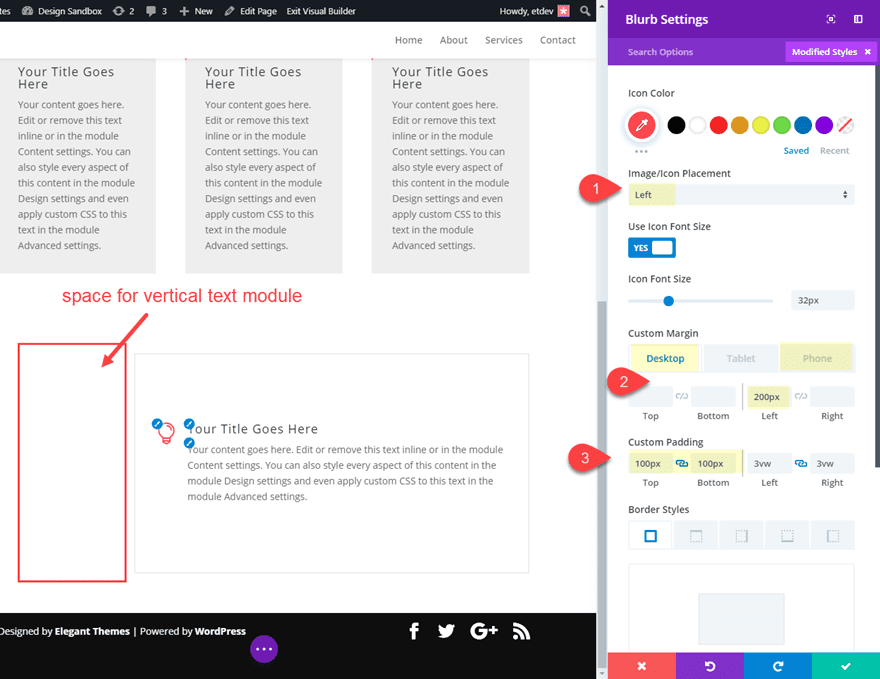
The left margin creates the space we will need for the vertical text module we will add.
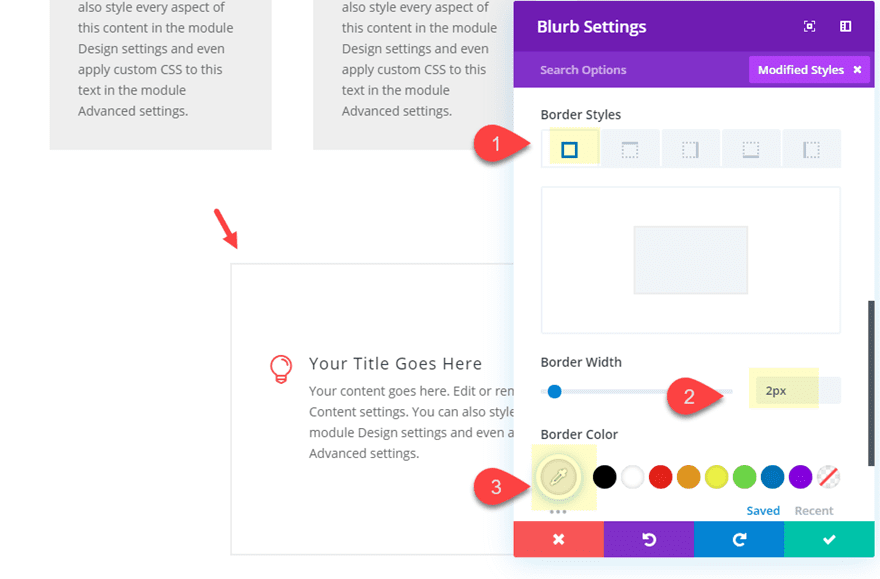
Then add a border to the blurb module as follows:
- Border Width: 2px
- Border Color: #eeeeee
Creating the Text Module
With the blurb content in place, we can now add our text module. Create a new text module and then place it directly above the blurb module.
After that, add the following html in the content box (make sure the text tab is selected):
<ol>
  <li><h5>Design</h5>
    <ul>
      <li>Lorem ipsum dolor sit amet</li>
    </ul>
  </li>
</ol>
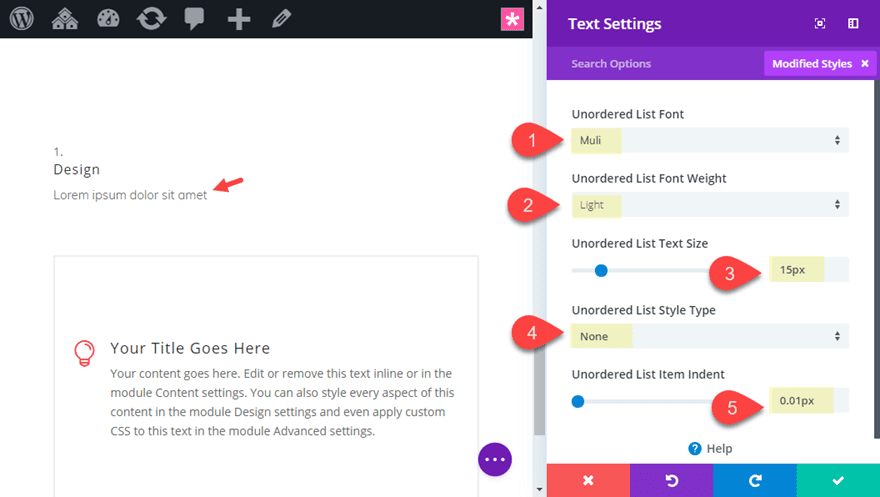
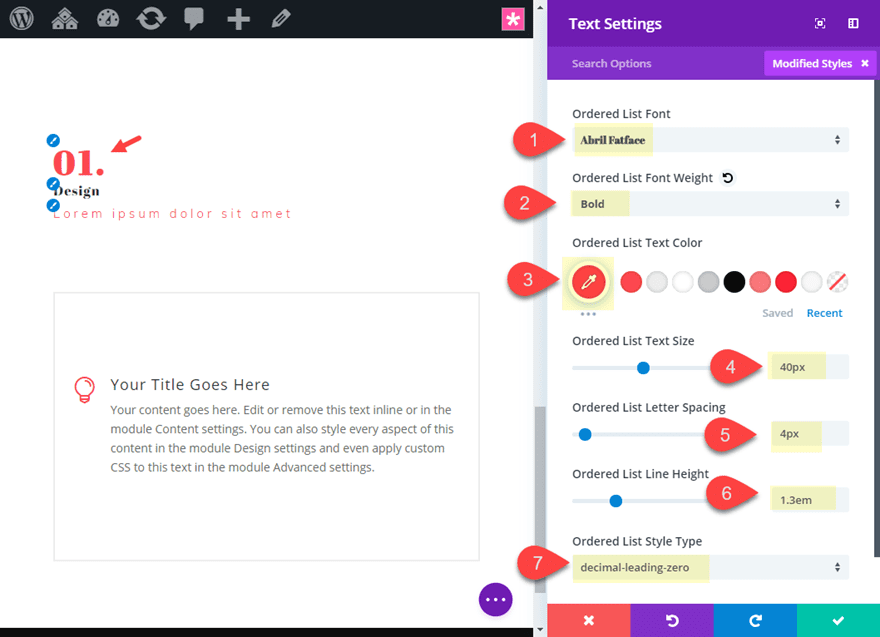
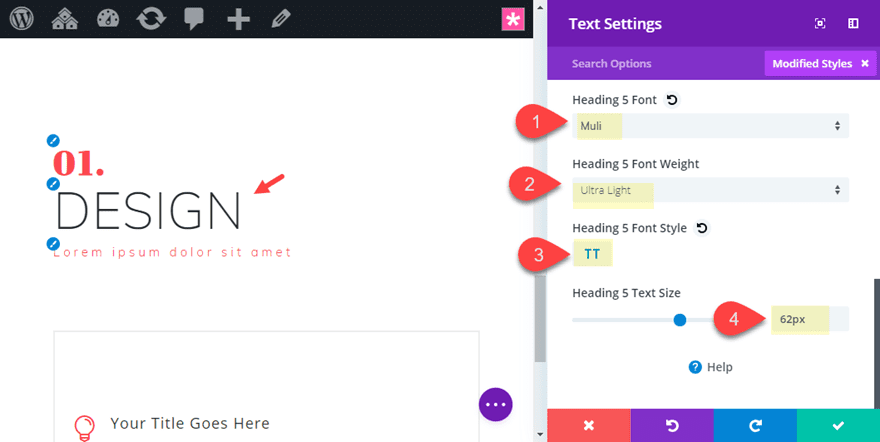
This is html is using an ordered list (ol), an h5 tag, and an unordered list (ul). This allows us to customize each of the list items and the h5 separately using Divi’s built in design options within the text module.
This technique can be used to create some amazing list designs.
Next, jump over to the design tab and update the following:
- Unordered List Font: Muli
- Unordered List Font Weight: Light
- Unordered List Text Size: 15px
- Unordered List Style Type: None
- Unordered List Item indent: 0.01px
- Ordered List Font: Abril Fatface
- Ordered List Text Color:
- Ordered List Text Size: 40px
- Ordered List Letter Spacing: 4px
- Ordered List Line Height: 1.3em
- Ordered List Style Type: Decimal Leading Zero
- Heading 5 font: Muli
- Heading 5 Font Weight: ultra light
- Heading 5 Font Style: TT
- Heading 5 Text Size: 62px
Sizing, Rotating, and Positioning the Text Module
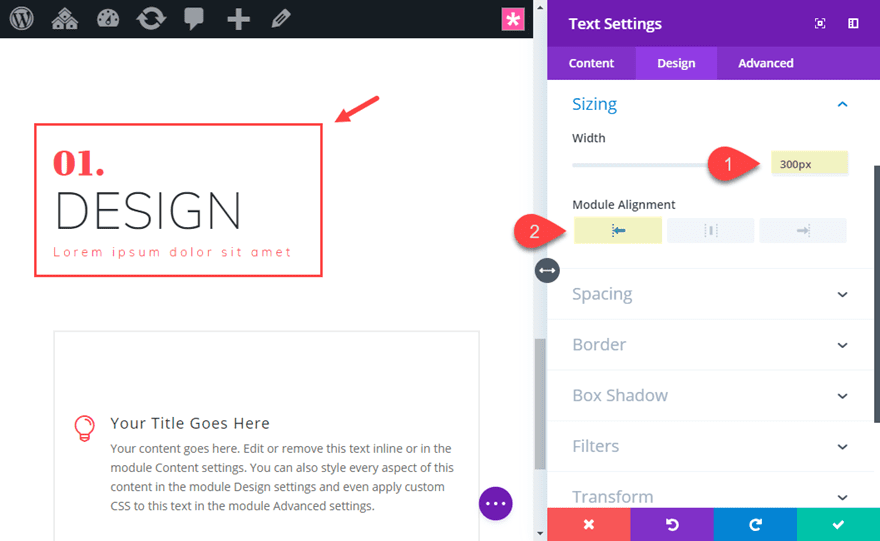
Now that we have the text design in place, let’s give it a custom width. Remember that the width of the module will become the height of the module once we rotate it to display vertically.
- Custom Width: 300px
- Module Alignment: left
To rotate the text, update the following:
- Transform Rotate X-axis: -90deg (desktop), 0deg (phone)
We need to reset the rotation back to 0deg for phone display.
Next update the Transform Translate option:
- Transform Translate X-axis: -10% (desktop), 0% (phone)
- Transform Translate Y-axis: 50% (desktop), 0% (phone)
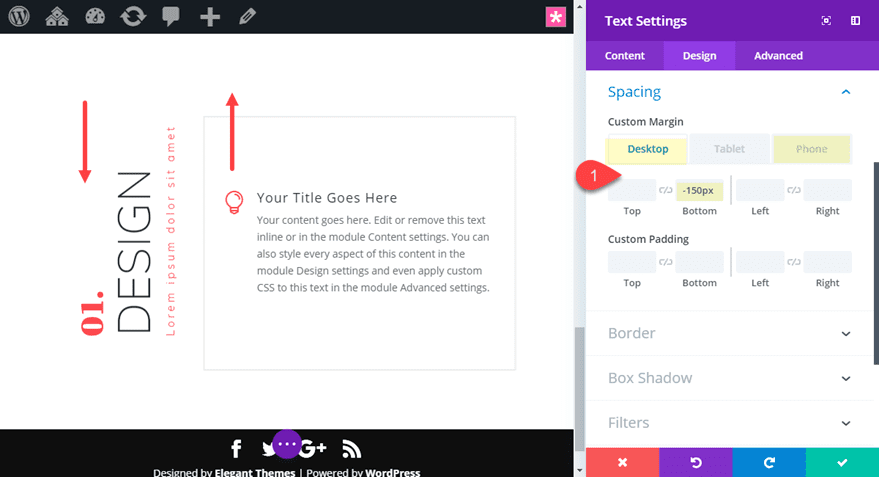
The transform settings adjust the position of the text module slightly. But, in order to get our spacing right, we need to replace the negative space left by the text module above the blurb module. To do this we need to add some negative bottom margin to the text module as follows:
- Custom Margin (desktop): -150px bottom
- Custom Margin (phone): 0px bottom
Duplicate the Section and Update the Ordered List Start Number
To create more sections of this layout, you can duplicate the section. The ordered list number will still be “1”. To change this, you need to replace the opening ordered list (ol) tag with the following:
<ol start="2">
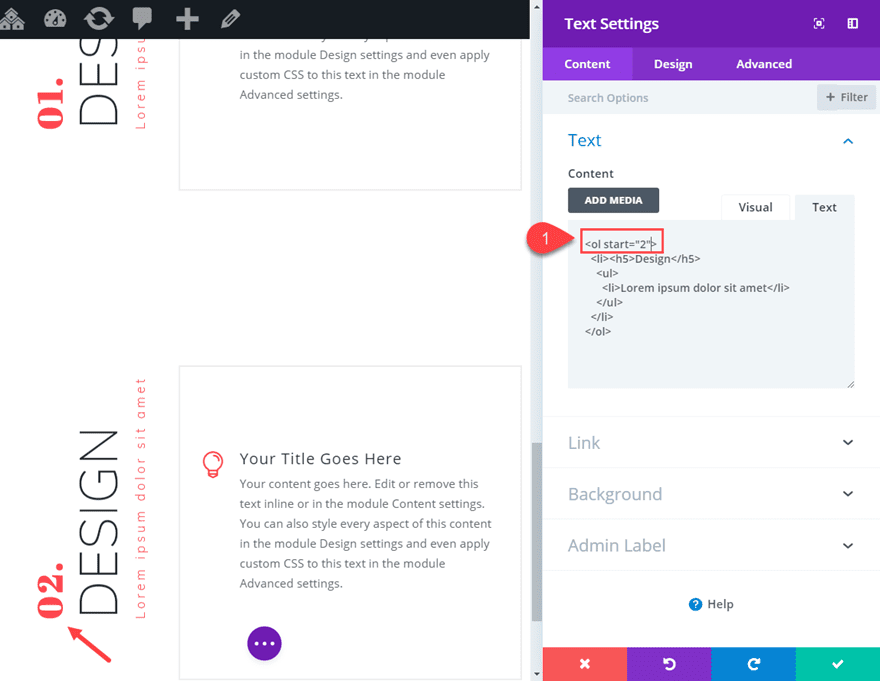
This will allow the list to start with number 2 instead of 1.
That’s it. We are all done!
Final Design of the Layout with Rotated Text Designs
Desktop
Tablet and Phone
Final Thoughts
Knowing how to rotate text (or any content really) in Divi is a great way to draw attention to you content. Plus, if you do it right, it can really make the design standout. I hope this tutorial sparks some inspiration for how you can implement text rotation for even more beautiful designs.
I look forward to hearing from you in the comments.
Cheers!


Thank you so much for providing the FREE layout 🙂
This is great, this makes my designs even better. Thanks for sharing how to do this.
great function! But its acts weird with an animation. It first animates and then it turns 90 degrees…
Thank you very much. I loved the article. For people like me who started in the world of wordpress is really useful. Thank you for sharing this kind of content related to Divi. I am always on the lookout for new updates.
Thanks
This is a great trick, but I’m having problems implementing the last example in my own design. Specifically, when I change the browser width the vertical content goes out of alignment with the blurb module. Is there any way I can ‘lock’ the two together so it works on all browser widths?
This is awesome design… I love it… Thank you
Its very nice information for me……………..thank you for sharing
Thanks so much I always learn something new from these tutorials
You are very welcome, Ayan. Glad to hear it.
this new unique idea seems good and will add up in creativity of the page
I hope so, Egainz. Thanks for the comment.
Grateful to you for the layout design information. Next time I have a client who has never heard of WordPress, I can forward this post to them. That ought to open their eyes.
Thanks, Dinesh!
Hey guys, this is something I see on EVERY post.
“that’s all good, but where’s the theme builder?”
– Is the post about the theme builder? No? Then stop whining about it. People put in good time making content, and all you do is complain about it on an unrelated post. It’s annoying even as a reader to see y’all whining about it on EVERY post. Just stop. Stop.
“What about a preview?”
– Hey, it’s just a layout. And it’s a tutorial on HOW TO MAKE THAT LAYOUT. If you like it, go ahead and follow the tutorial. If not, why does it matter? You can see what it looks like. Stop whining.
Conclusion: Stop whining. ugh.
I echo the comments of my brothers above. Live demo pages of these things would be soooooo nice!
I agree (again) with Divi Power User -the screenshots are great but a link to a demonstration page/site would be great.
Nicely done. Actually, as I was scrolling down and thinking how good/helpful it looks I figured it was from Jason. Got to the bottom and, sure enough, Jason…
🙂
I wonder what happen if its in mobile? Also, im more interested in the THEME BUILDER…. Any update on it?
Juanito,
I’ve included a screenshot of what it looks like on mobile at the end of the article under the title “Final Design of the Layout with Rotated Text Designs”.
And no, I don’t have an update on the theme builder unfortunately.
Thanks!
I wonder what happen if its in mobile? Also, im more interested in the THEME BUILDER…. Any update on it?
Yes! Theme Builder is really important
Hi Jason,
I know that you instruct to rotate on the x axis by -90deg and for all intents and purposes the result looks correct. But, when I inspect the element in chrome I see this:
transform: rotateX(0deg) rotateY(0deg) rotateZ(-90deg);
I’m confused. Am I missing something?
To clarify:
The controls in the settings panel are ordered Z X Y.
Defining rotating on the Z axis, think of a spike coming straight out of your monitor and the element is spinning around like a clock, clockwise or anticlockwise.
For X and Y think of a regular XY graph.
An element turned on the X axis will fall towards or away from you flat onto the ground.
An element turned on the Y axis will swing around like a door on its hinges, or even a revolving door.
Combine all three and your off to the races and might even blow your mind!
Caveat: If you manually write up this in css make sure to get the X Y Z order right:
transform: rotateX(0deg) rotateY(0deg) rotateZ(-90deg);
Else the result will be different.
Irishetcher,
You are correct. I mixed up x-axis and z-axis for transform rotate in this tutorial. I’ll try and get that updated asap. Thanks for keeping me in line. 🙂
Since the transformation functionality was released, I am supper hyped with the possibilities it brings. One of the best updates in months (not that I don’t appreciate previous ones, just this one is exceptionally handy!).
Alex,
Glad you like the new feature! It is pretty cool indeed.
Great tutorial.. again though would it be so bad to actually show the actual effect as actual content instead of static screenshots?
Divi Power User,
Thanks. I’ve provided a json file download for you to try out if you want to see it live.
Great tutorial.. again though would it be so bad to actually show the actual effect as actual content instead of static screenshots?