
Not every visitor comes to your site for the same reason. You probably offer a range of products or services, not just a single option for customers and clients. That’s why having multiple targeted contact forms can help smooth out your site’s UX so that your customers (and potentials) can get in touch with you about exactly what they need with as little friction as possible. Using the Divi contact form module and our conditional logic feature, we are going to walk you through creating the best pipeline between you and your users as possible.
- 1 Preview of the Conditional Contact Form
- 2 What is Conditional Logic?
-
3
How to Create Contact Forms Using Conditional Logic
- 3.1 Load the Divi Builder
- 3.2 Add or Find the Contact Form Module
- 3.3 Enter the Contact Form Settings
- 3.4 Add the First Conditional Question
- 3.5 Add Field Options
- 3.6 Add New Fields for Conditional Responses
- 3.7 Name the Conditional Responses in the New Fields
- 3.8 Add Conditional Logic to the Response Fields
- 3.9 Set Contact Form Fiends ‘Name/Email/Message’ to Appear
- 4 Final Results
- 5 Wrapping Up
Preview of the Conditional Contact Form
When everything is said and done, you will have something similar to this on your site, ready for your visitors to use.
Desktop
Mobile
What is Conditional Logic?
First, we want to briefly address what we mean by conditional logic. What we’re going to do in this tutorial is set up a series of contact forms that appear based on what choices the user makes or does not make.
For instance, you can have a single contact form that adjusts based on what service or product the visitor needs. That way, you can get the information in the format you need instead of them having to write it out. Conditional logic on contact forms can enhance communication and expedite your ability to provide for your users.
With that in mind, let’s dig into creating the targeted contact forms.
How to Create Contact Forms Using Conditional Logic
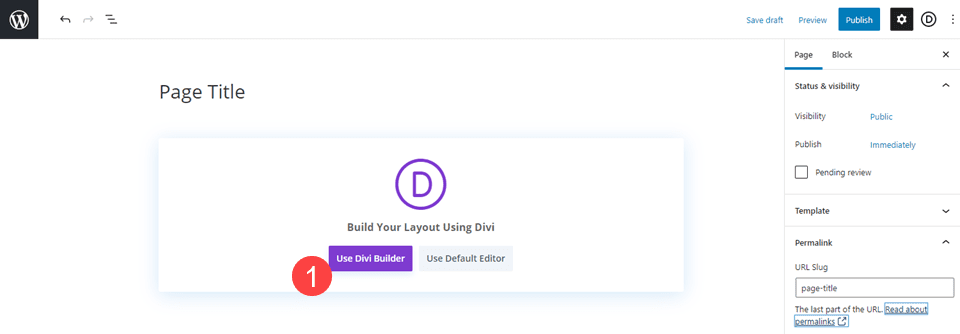
Load the Divi Builder
Since we’re using the Divi Contact Form module, we’re going to need to enter into the Divi Builder. We are going to be using the Landscape Maintenance layout pack as the example in this tutorial. You can use any layout or design you want, but you will need to be able to use and style the Divi Contact Form Module.
To start with enter the Divi Builder from the backend of your WordPress website. Inside the Page Editor, you will see a purple button that says Use Divi Builder (or Edit with Divi Builder if you have already created the Page).
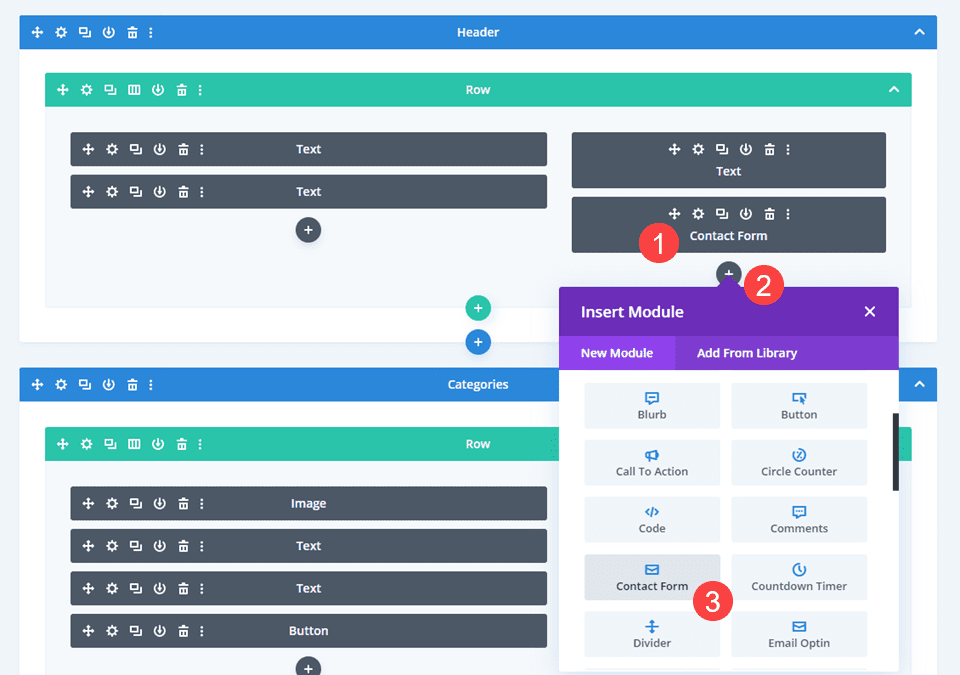
Add or Find the Contact Form Module
Then you will want to find the Contact Form Module that already exists on the page or click the Black + Circle icon and find the Contact Form in the dropdown menu.
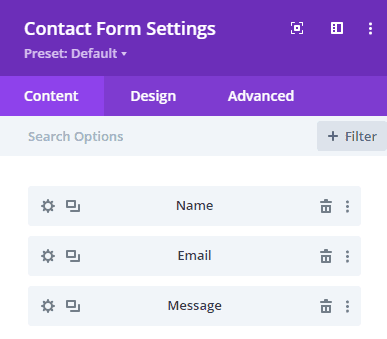
Enter the Contact Form Settings
The Divi Contact Form module comes with 3 fields by default: Name, Email, and Message. What we’re going to do is create a contact form where those options don’t appear until the visitor has given us enough information to be able to direct their query.
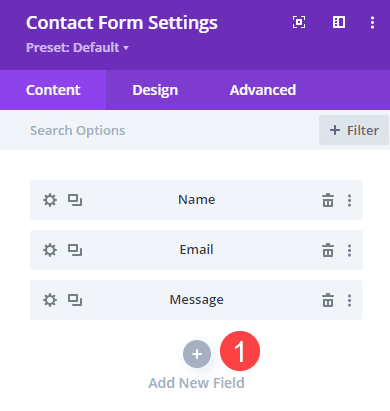
Add the First Conditional Question
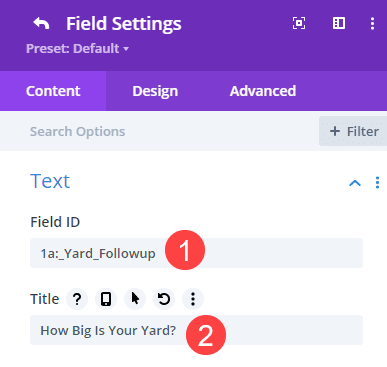
Under the Content tab and beneath any fields already in the form, you will see the Add New Field button. Click that.
Doing so opens the Field Settings window, and you should see places for Field ID and Title entries. The Field ID is for you. That is what appears inside the module settings for you to keep track of. The Title is the text that your visitors will see on the front end of the form. (The Title will appear in the email you get when the form is submitted, too.)
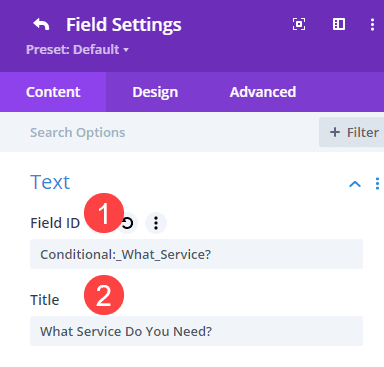
We have labeled the Field ID with “Conditional” because this is the first question the visitor will see on the form. Their response to it will determine what they see next. This is an easy way to track the flow of the form’s question and answers.
Add Field Options
Next, scroll under the Content Tab to the Field Options section. This is where you will add the choices for the user to pick from. Each of these will be a trigger for certain follow-up questions. For this example, we are using Checkboxes as our input type. This means the user can choose as many as they want.
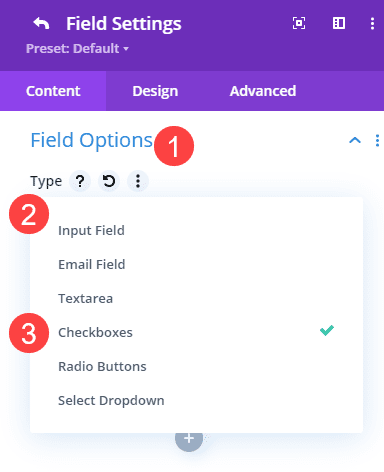
In addition to Checkboxes, Divi also allows for other options: Input Field and Textarea for the user’s own typed responses, Select Dropdown and Radio Buttons for singular choices you provide, as well as Email Field for email address entry. The default Name field is an Input Field, and Message is a Textarea.
With Checkboxes selected, we will enter the choices that we want to trigger different options later. We then want to make sure this is a Required Field so the user can’t submit the form prematurely.
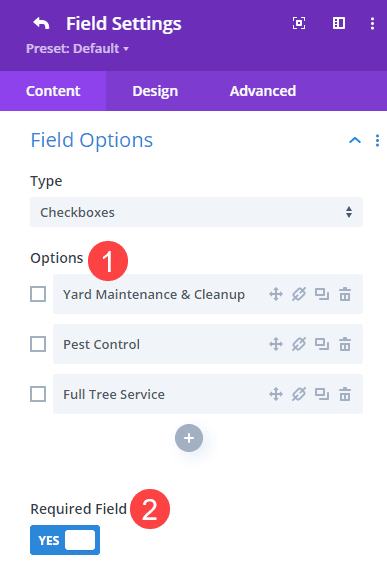
It’s important to note here that we do not add Conditional Logic to this step. This is the trigger, so it appears to the user regardless.
Add New Fields for Conditional Responses
Next, however, we will add Conditional Logic for the new Fields we add as follow-up responses. Because we included 3 options for the initial question, we are going to add 3 new corresponding fields to the form. You will repeat the following steps for each one.
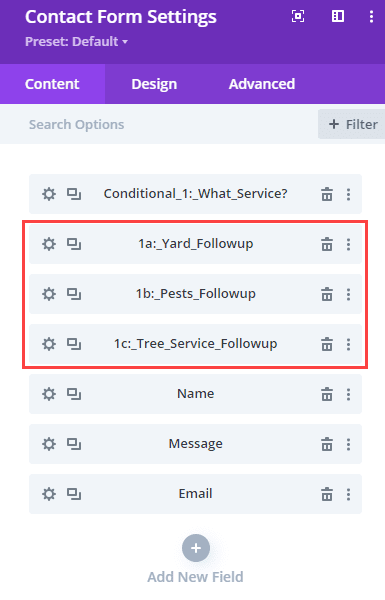
Name the Conditional Responses in the New Fields
Note that we have used a naming convention of Conditional 1 (to indicate the first conditional trigger) and then 1a, 1b, and 1c for follow-up responses. We have also labeled them appropriately so we can keep track of what they are.
Like the first question, we will also enter the Title as the question the visitor will see.
Add Conditional Logic to the Response Fields
After that, scroll down to the Conditional Logic section under the Content tab of that field. Enable the toggle for Conditional Logic. Then, choose the Relation for this one, meaning that you can set it to any (any number of responses can make this option pop up) or all (only the specific combination of responses make this field appear).
If you’re just using a single trigger rule like we are, either any or all will work.
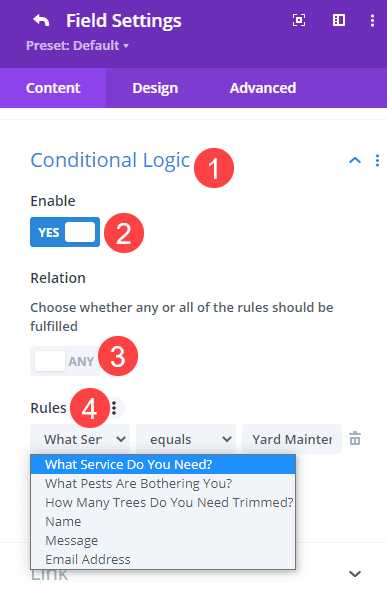
Under Rules, you will see the field that triggers this one, and on the right, you can select which choice will trigger it. The center is the qualifier, such as equals, does not equal, is less than, is greater than, and so on. For this particular field, we are selecting the question that we set as Conditional 1 and then the option within it that specifically triggers this field to appear.
Repeat this for All Conditional Responses
Since we added three different responses to our single conditional question, we are going to repeat this exact process for the other fields, too. Only creating the appropriate correlative responses for that selection.
Set Contact Form Fiends ‘Name/Email/Message’ to Appear
Once you have the responses set up for the conditional logic, we want the visitor to actually be able to submit the form. For that, we are going to adjust the Conditional logic in the Name, Email, and Message fields. The setup for each of these is exactly the same, so once again, you will repeat this 3 times.
Inside the Name, Email, and Message fields settings, go into Conditional Logic. Enable it and add as many as you have final responses to your conditional follow-up questions. In our case, we have 3 follow-up questions, so we are using 3 rules.
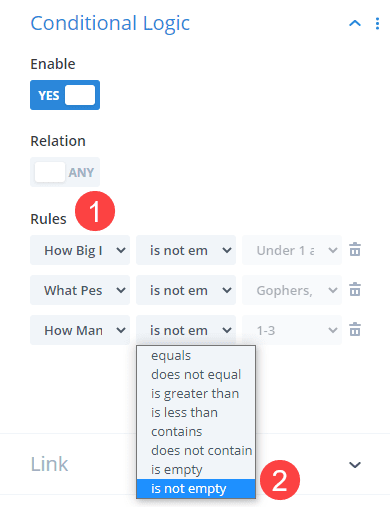
For each rule, choose the follow-up question as the trigger. Set the qualifer to is not empty, meaning that as long as the visitor answered the question, the condition is met. That will grey out the final box, indicating that any answer is sufficient.
Save your changes, and repeat this for any fields you want to appear to allow form submission. And that’s it! Your form will adjust itself to the needs of your users immediately.
Final Results
You can see below how the conditional logic works in practice.
Desktop
Mobile
Wrapping Up
The contact form is one of the most ubiquitous elements of a website. Pretty much every site has one, and pretty much every site needs one. But not every user comes to your site for the same reason. By using Divi’s conditional logic feature, you can customize your contact forms into a versatile tool for your users to communicate with.
What kinds of forms have you made using the Divi Conditional Logic feature?
Article featured image by Kubko / shutterstock.com


Great post. I have used this feature in the past, however I cannot find any details online about how to format the email that the website admin sees when the form is submitted.
When developing websites in Divi I prefer using the default Divi Contact Form. It functions well and the conditional fields are great. Using the default Divi Contact Form eliminates the need for another resource hungry plugin. There are some instances when the Divi Contact Form just can’t do the job (E.g. when you need a file upload field) for for the majority of applications it works just find. Plus it’s FREE!