
Adding a sleek new header design to your page is an effective way to wow your visitors. And designing a unique background for your header is a great place to start. In this tutorial, I’m going to show you how to use Divi to add parallelograms to your header design using gradient backgrounds in creative ways. This adds a nice textural element to the design that breaks away from the traditional box layout.
Let’s get started.
- 1 Sneak Peek
- 2 What You Will Need
- 3 Set Up the Page
- 4 Take out Top Padding of Section and Replace Background Image
- 5 Adjust Row Size and Padding
- 6 Add Gradient Background to Row and Column
- 7 Adjusting the Text Size and Spacing of the Call to Action Module
- 8 Creating an Additional Parallelogram Using Empty Text Modules
- 9 Final Thoughts
Sneak Peek
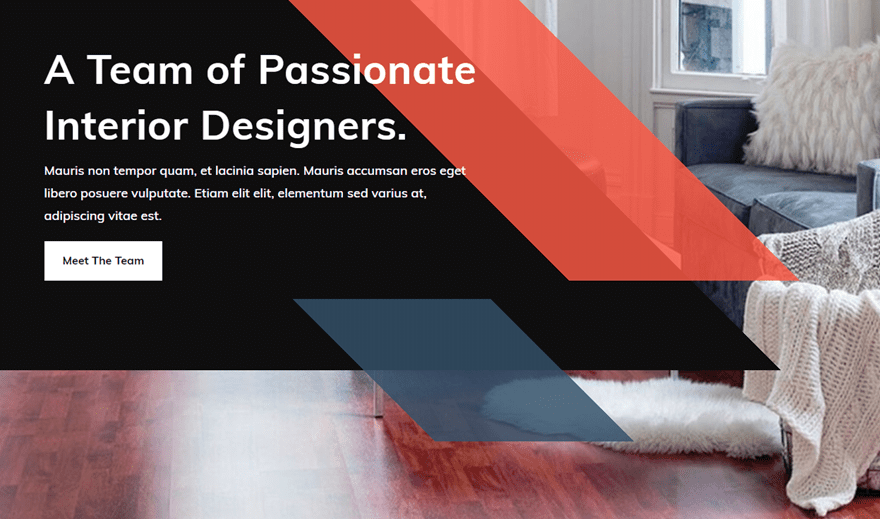
Here is a look at the design we will build.
What You Will Need
To create this design, you will need to main things:
- The Divi Theme
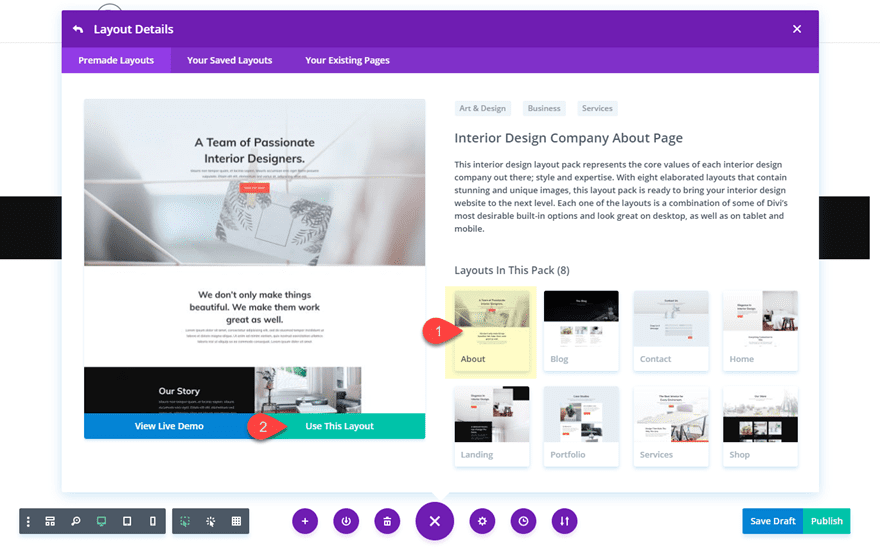
- The Interior Design Company About Page Layout (available from within the Divi Builder)
Set Up the Page
For this tutorial, I’m going to use the Interior Design Company About Page Layout on a new page. Go to your WordPress Dashboard and navigate to Pages > Add New. Then give your page a title and click to use the Divi Builder. Then click the button to deploy the visual builder. Select the option to “Choose a Premade Layout”. Then find and select the Interior Design Layout Pack. Choose the About page layout and then finally click “Use This Layout”.
Once the page has been loaded to the page, you are ready to start editing.
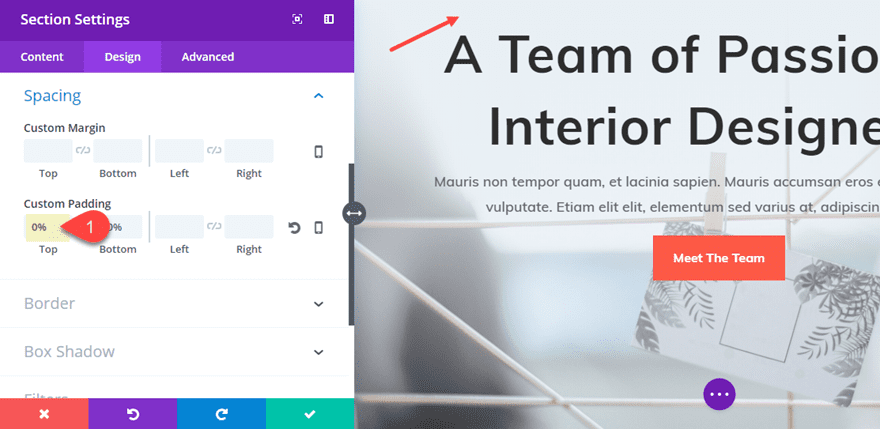
Take out Top Padding of Section and Replace Background Image
This is an easy first step. All you need to do is hover over the top portion of the top header section of the page. You will see that the current top padding is set to 10%. Simply drag the padding down to 0%. Or you can always go into the page settings and set the custom top padding to 0% as well.
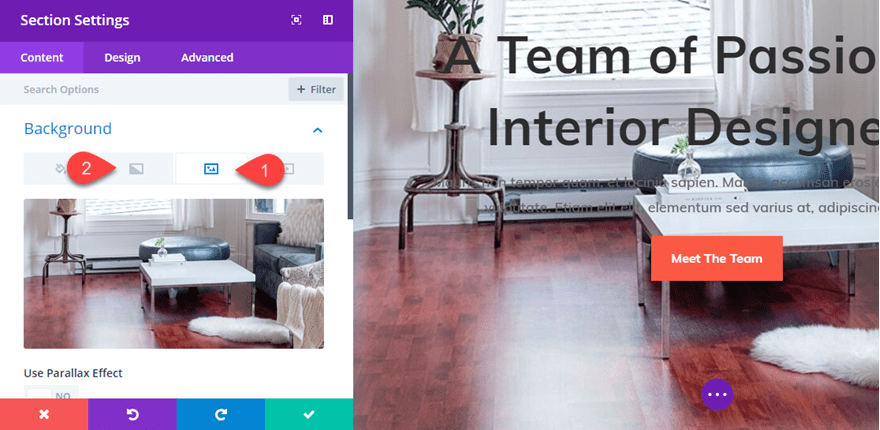
You can also change the background image at this point, but it isn’t necessary. To do that, go to the section settings and change out the background imag eunder the content tab. Then take out the background gradient. This will help make the text (which will be white) more readable on mobile since there will be some text overlapping the background image.
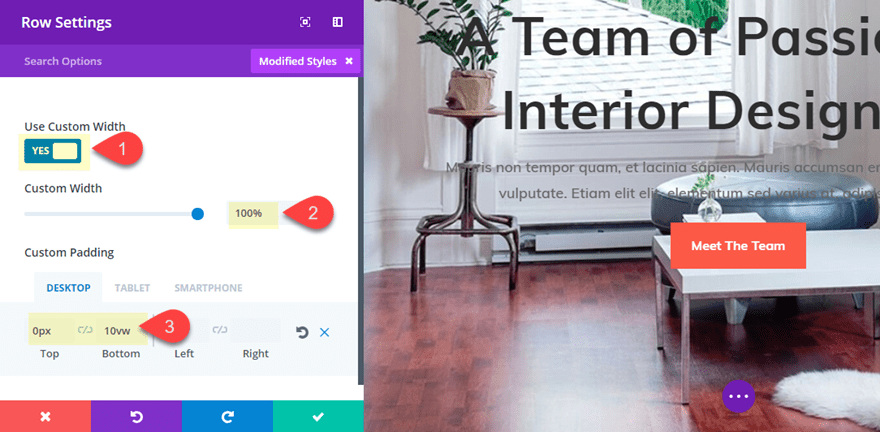
Adjust Row Size and Padding
Next, go to the row settings and under the Design tab, update the following:
Use Custom Width: YES
Custom Width: 100%
Custom Padding: 0px Top, 10vw Bottom
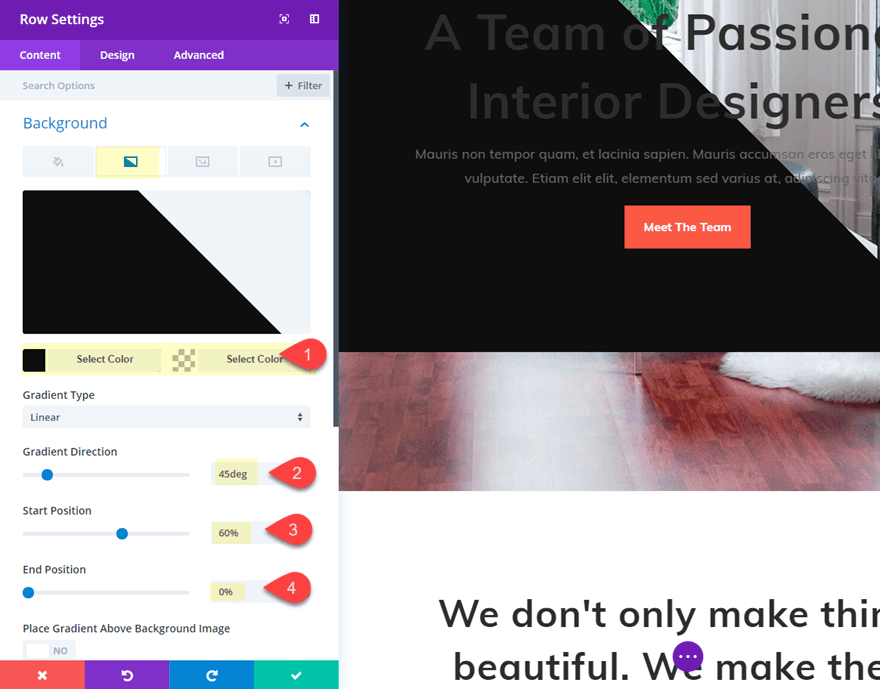
Add Gradient Background to Row and Column
To create this sleek design, we are going to be overlapping gradient backgrounds with different starting and stopping positions. First we need to add a gradient background to the row and then to the column.
Go to the row settings under the content tab and update the following:
Background Gradient Left Color: #1a1a1a
Background Gradient Right Color: rgba(255,255,255,0)
Gradient Direction: 45deg
Start Position: 60%
End Position: 0%
Column 1 Background Gradient Left Color: rgba(244,88,63,0.83)
Column 1 Background Gradient Right Color: rgba(255,255,255,0)
Column Gradient Direction: 45deg
Column Start Position: 66%
Column End Position: 0%
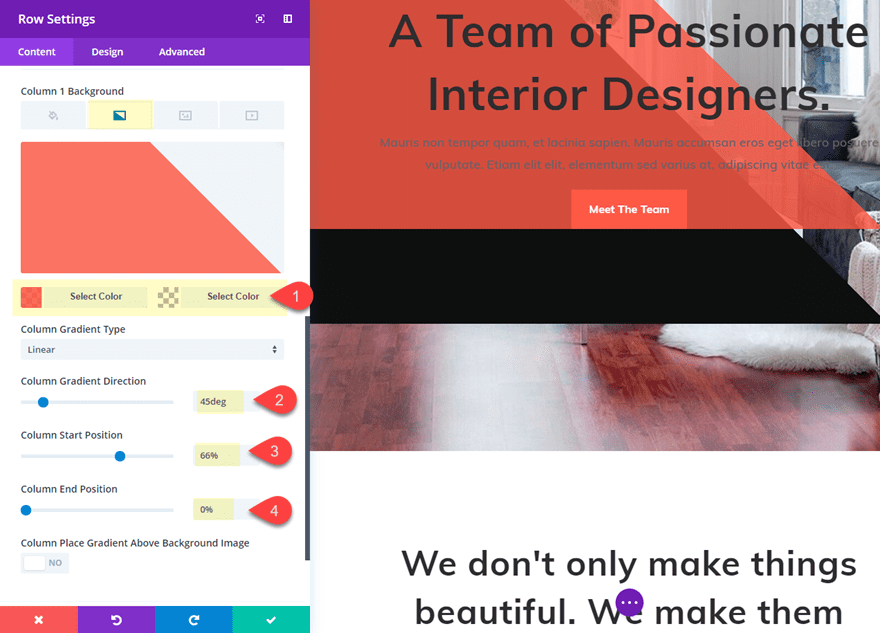
The orange gradient that we added to the column will be used for the first parallelogram in our header design. To create the parallelogram we need to shorten the orange gradient with an left side that is angled at 45deg to match the right side. We will do this by adding a gradient to the call to action module.
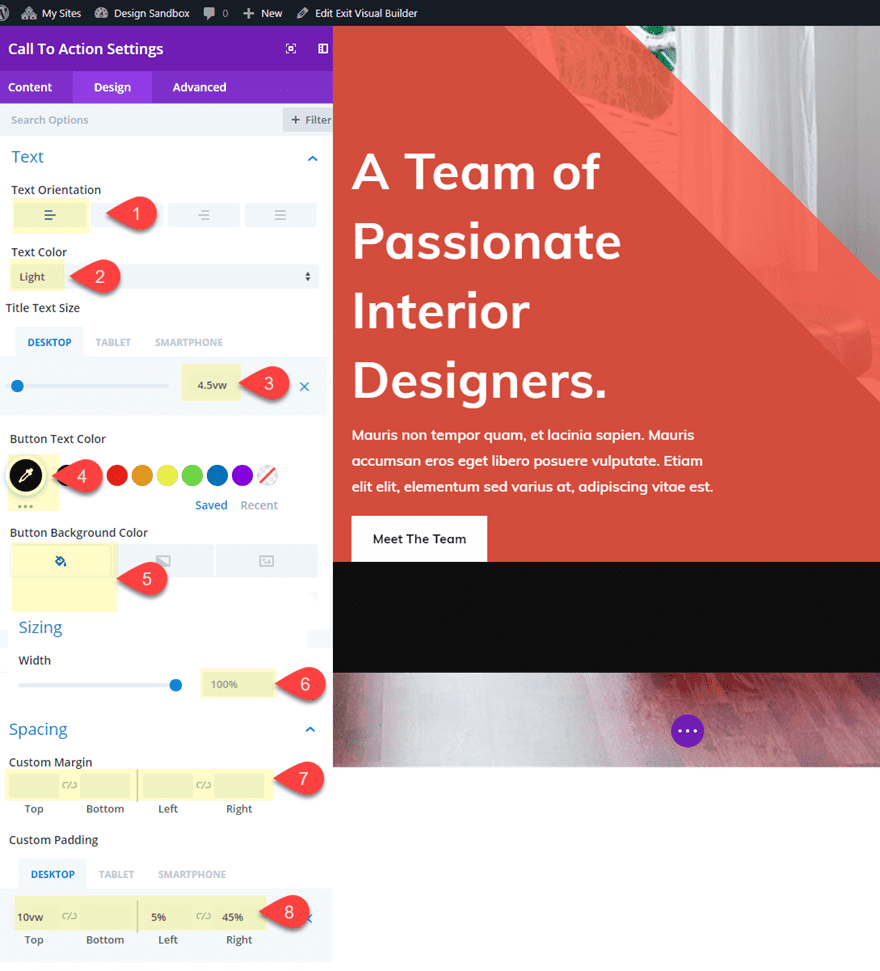
Adjusting the Text Size and Spacing of the Call to Action Module
Before we add our background gradient to the call to action module, let’s get the spacing and text styles dialed in first.
Go to the call to action module settings and update the following under the Design Tab:
Text Orientation: Left
Text Color: Light
Title Text Size: 4.5vw (desktop), 42px (tablet)
Button Text Color: #1a1a1a
Button Background color: #ffffff
Width: 100%
Reset Margins
Custom Padding (desktop): 10vw top, 5% left, 45% right
Custom Padding (tablet): 38% right
Custom Padding (smartphone): 5% right

Now we can add our background gradient to our module. To speed up this process, go over to the row settings and right click and copy the background gradient of the row.
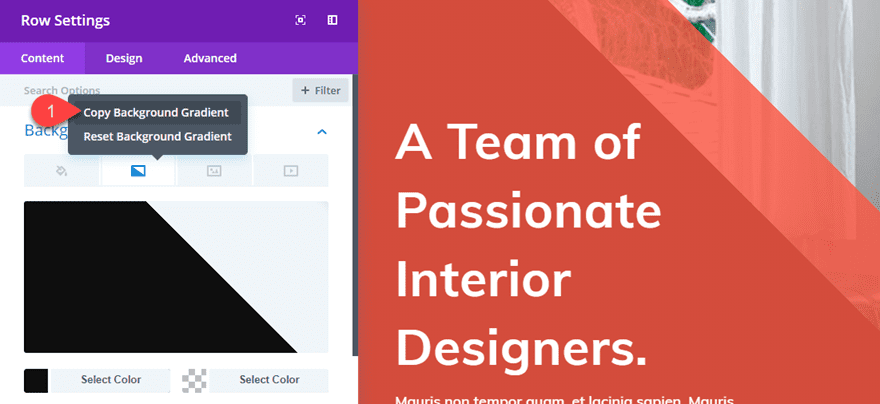
Then go to the call to action module settings, under the content tab, and right click and paste the background gradient to the module. Then adjust the start position to 47%.
As you can see, this creates the effect of a long angled rectangle overlapping the dark gradient background for a unique design element.
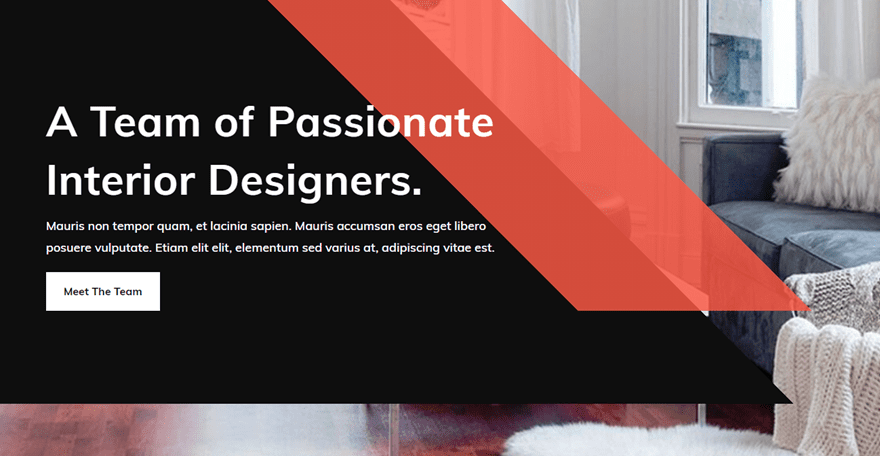
This would be a great design as it stands now, but let’s go ahead and get even more creative by adding an additional parallelogram overlapping the bottom of our row.
Creating an Additional Parallelogram Using Empty Text Modules
The concept for this final phase of the header design involves creating two text modules side by side each with a custom gradient that, when combined, show a single “box” with equally angled sides on the right and left. To do this we must first create a one-column row to hold our text modules. Then we can size and position our modules to stand side by side.
Add a one-column row directly under the section containing our call to action module inside the same section.
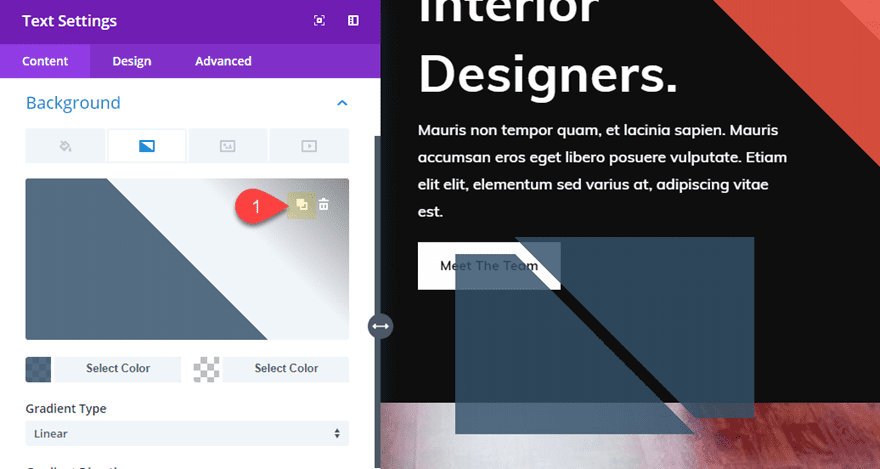
Then add a text module to the left column and update the text module as follows:
Erase all content in the content box (we are going to be using an empty text module)
Background Gradient Left Color: rgba(255,255,255,0)
Background Gradient Right Color: rgba(58,80,107,0.83)
Gradient Direction: 45deg
Start Position: 50%
End Position: 0%

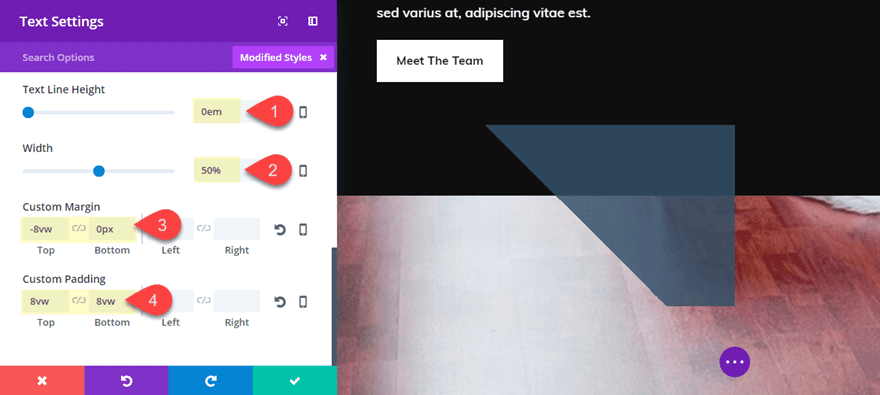
Now jump over the design tab and update the following:
Text Line Height: 0em (this will take out any unwanted spacing)
Width: 50%
Custom Margin: -8vw Top, 0px Bottom
Custom Padding: 8vw Top, 8vw Bottom
Save settings.
From the visual builder, duplicate the module and update the text module settings for the new module as follows:
Hover over the background gradient preview and click the “Switch Gradient” icon to switch the gradient colors from left to right.
Module Alignment: Right
Custom Margin: -16vw Top, 0px Bottom
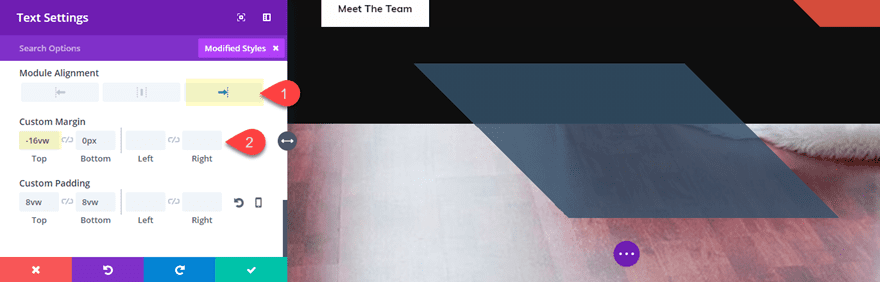
Save settings.
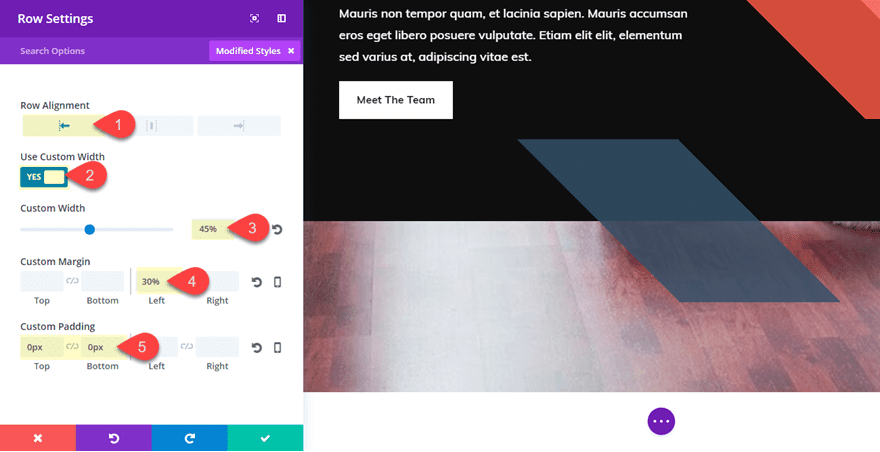
Now that we have our modules aligned, we can adjust the row settings to position our modules and resize them to fit the design. Open the row settings and update the following:
Row Alignment: Left
Use Custom Width: YES
Custom Width: 45%
Custom Margin: 30% left
Custom Padding: 0px Top, 0px Bottom
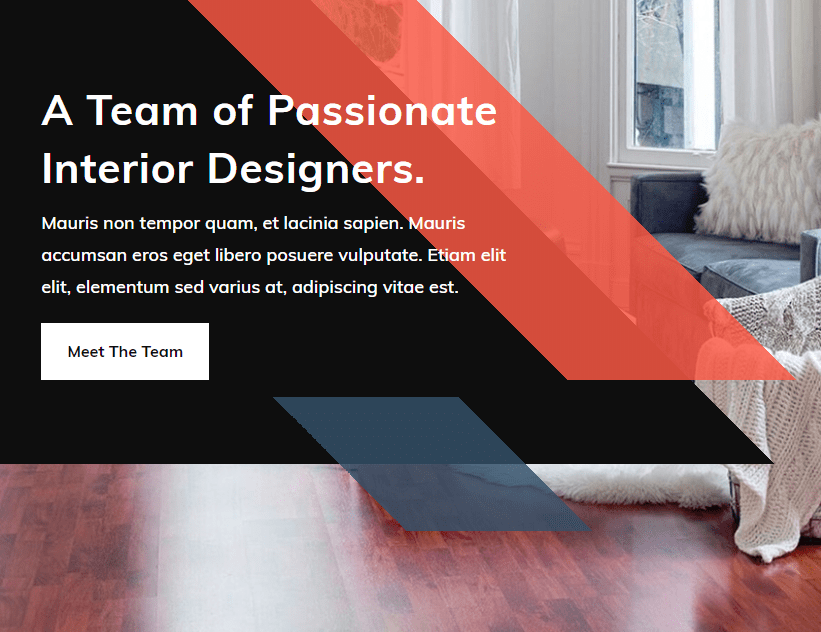
That about does it! Check out the final results.
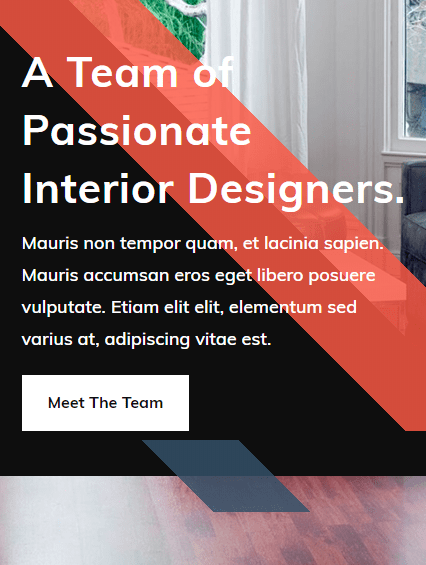
Here it is on tablet and smartphone.
Final Thoughts
I hope this design technique give you a little inspiration for how you can use Divi’s gradient background options to incorporate some sleek parallelograms into your own header design. And, of course, this design isn’t limited to headers. Feel free to explore new areas where this design will work for you. For more inspiration, check out some broken grid design secrets that may help you along the way.
I look forward to hearing from you in the comments.
Cheers!


Hey Jason,
Wondering if you could expound on the thinking behind a simple thing that you did in one of the first steps in “Adjust Row Size and Padding”. You said to set “Custom Padding: 0px Top, 10vw Bottom”.
I am wondering if you are intentionally setting the bottom padding, which is related to the vertical plane (viewport height) to units that reference the viewport width? There is either some clever relationship of this padding to the width, or you really meant to say “10vh”.
Thanks, this is a fun tweak to a header.
Very good lessons thanks, you are a master !!
Very cool!!!
Hi,
very cool 🙂
Since a few days i am searching for some cool header design ideas for my new project.
Your idea is very nice, i will try it with some other colors.
best wishes
Sven
Neat idea.
Thanks!
Hello,
Really a good tutorial !
Thank you
You are very welcome. Glad you liked it, bruno.
Now you’re just showing off… 😀
Nice!!!!
Thanks Pedro!