
Food bloggers and recipe creators know how important it is to have a consistent look at the recipes they publish. A common solution is to use a recipe card plugin but that comes with design limitations. Now, with the Divi Theme Builder, you can create your own recipe card template to use throughout your site and blog. With the help of the Advanced Custom Fields (ACF) plugin, designing a unique and reusable recipe card is easier than ever. This is a total replacement that removes your need for recipe plugins.
In this post, we’ll show you how to create a recipe card template with dynamic content. By using the Divi Theme Builder settings, the design can be applied to the blog posts which include recipes by selecting that specific category. We hope this tutorial will inspire you to create your own style of recipe cards with your very own custom fields.
Let’s take a look at how the design looks across different screen sizes.
- 1 Recipe Card Template Preview
- 2 1. Download and Install Advanced Custom Fields Plugin
- 3 2. Create New Recipe Card Template With Divi Builder
-
4
3. Recreate the Recipe Card Design Using Dynamic Content
- 4.1 Add New Section
- 4.2 Add 1st Row
- 4.3 Column Settings
- 4.4 Add Text Module with Dynamic Content
- 4.5 Add 2nd Text Module with Dynamic Content
- 4.6 Add 2nd Row
- 4.7 Column 1 + 2 + 3 Settings
- 4.8 Add Text Module to Column 1
- 4.9 Duplicate Text Module From Column 1 Twice and Move to Columns 2 and 3
- 4.10 Add 3rd Row
- 4.11 Column 1 + 2 + 3 Settings
- 4.12 Add Image Module with Dynamic Content to Column 1
- 4.13 Add Text Module with Dynamic Content to Column 2
- 4.14 Add Divider Module to Column 2
- 4.15 Add Text Module with Dynamic Content to Column 2
- 4.16 Duplicate all Modules on Column 2 and Move to Column 3
- 4.17 Add 4th Row
- 4.18 Column 1 Settings
- 4.19 Add Post Content Module to Column 1
- 5 4. Edit / Create Post Using ACF Plugin Settings and Recipe Card Template
- 6 Recipe Card Template Preview
- 7 It’s a Wrap!
Recipe Card Template Preview
Let’s take a look at how the design looks across different screen sizes.
Desktop
Tablet
Mobile
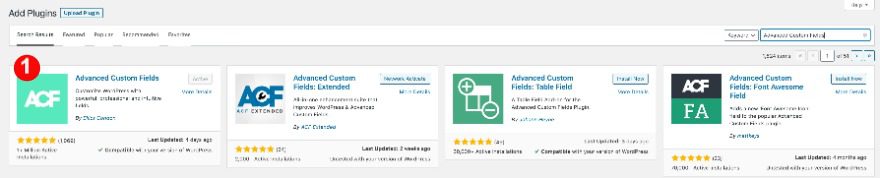
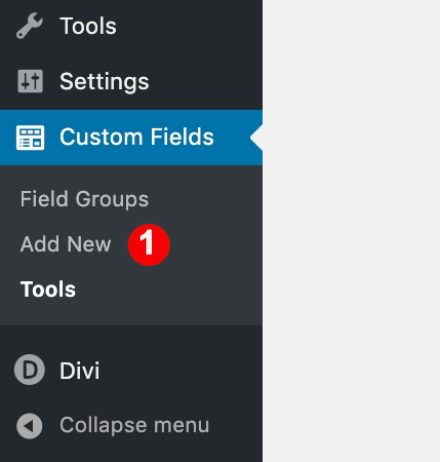
1. Download and Install Advanced Custom Fields Plugin
Search and Install
Find the ACF plugin by searching for ‘Advanced Custom Fields’ in the plugin search bar, install it and activate it.
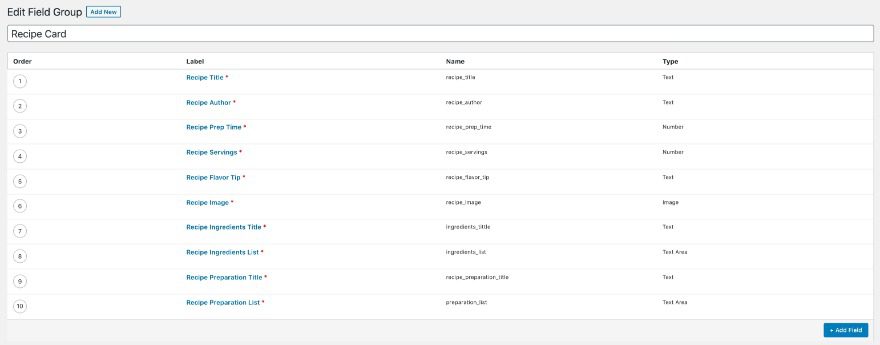
Add New Field Group
Click on the ACF tab and select ‘add new’. Name the group ‘Recipe Card’. Add the custom fields one by one through the ‘add field’ button.
Add Custom Fields
For each custom field, click the ‘add field’ button. Each can be customized for a different type of content. The list below specifies the label and type for each field. Add the word ‘recipe’ at the beginning of each field label so it’s easy to find when building the modules. The field name will autofill once you have added the label.

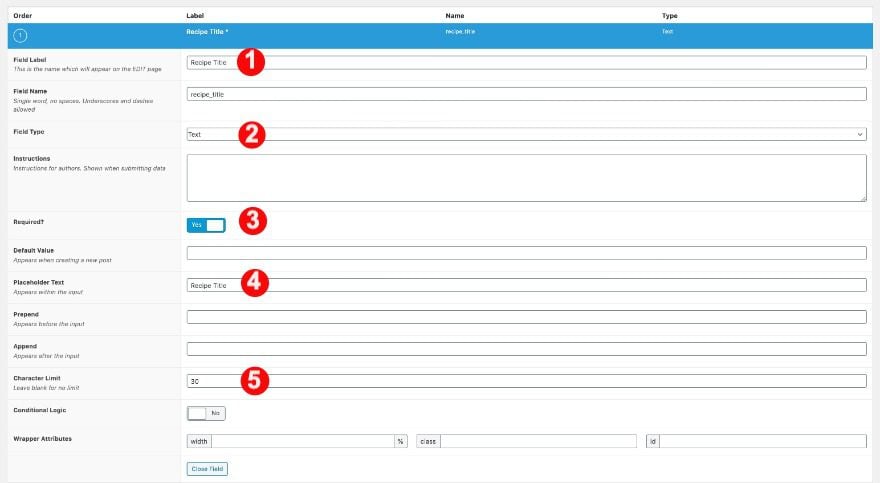
Recipe Title
Start with the recipe title.
- Field Label: Recipe Title
- Field Type: Text
- Required?: Yes
- Placeholder Text: Recipe Title
- Character Limit: 30
Recipe Author
Then, create a field for the author.
- Field Label: Recipe Author
- Field Type: Text
- Required?: Yes
- Placeholder Text: Author

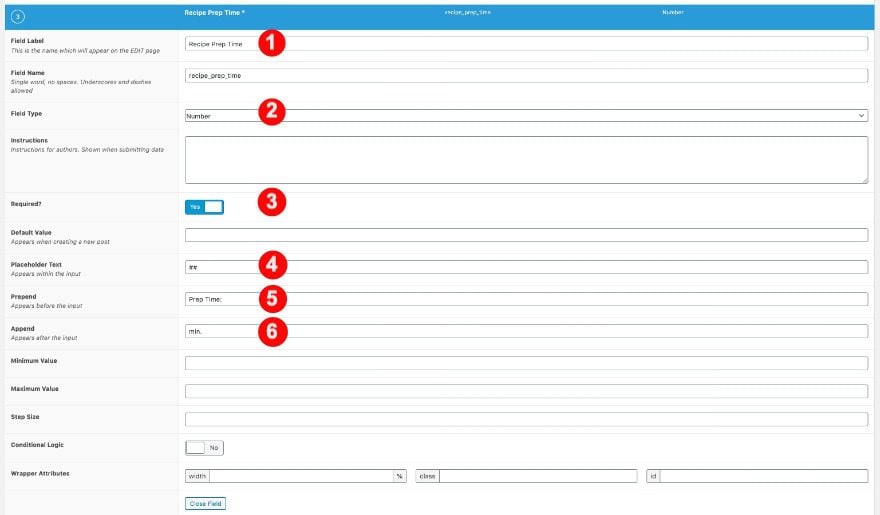
Recipe Prep Time
Follow that with the prep time.
- Field Label: Recipe Prep Time
- Field Type: Number
- Required?: Yes
- Placeholder Text: ##
- Prepend: Prep Time:
- Append: min.
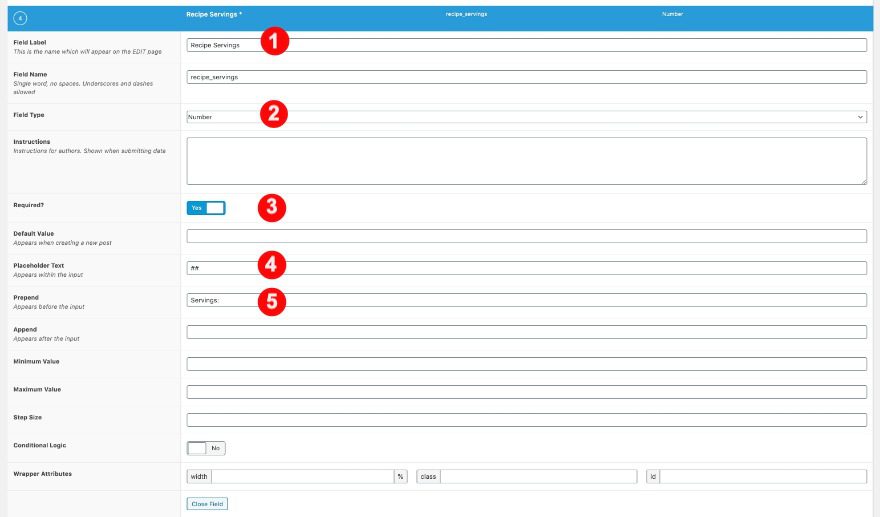
Recipe Servings
Then, the servings.
- Field Label: Recipe Servings
- Field Type: Number
- Required?: Yes
- Placeholder Text: ##
- Prepend: Servings:
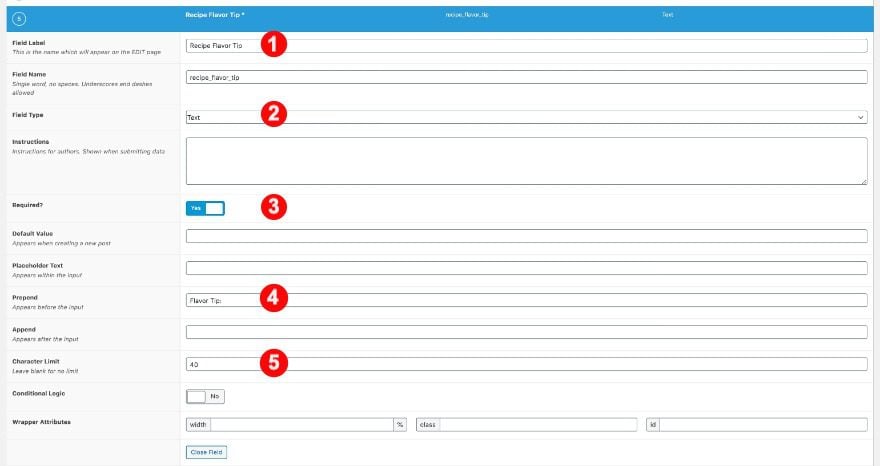
Recipe Flavor Tip
Add a flavor tip field.
- Field Label: Recipe Flavor Tip
- Field Type: Text
- Required?: Yes
- Prepend: Flavor Tip:
- Character Limit: 40
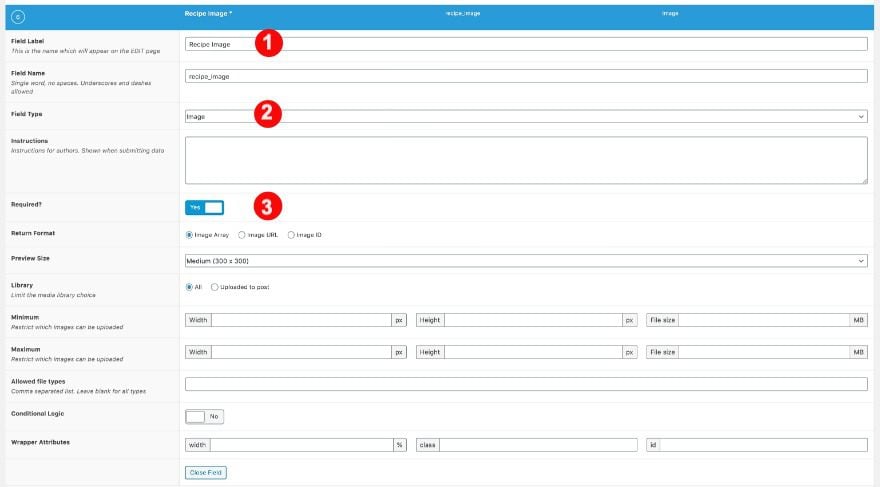
Recipe Image
Now, add the image field.
- Field Label: Recipe Image
- Field Type: Image
- Required?: Yes
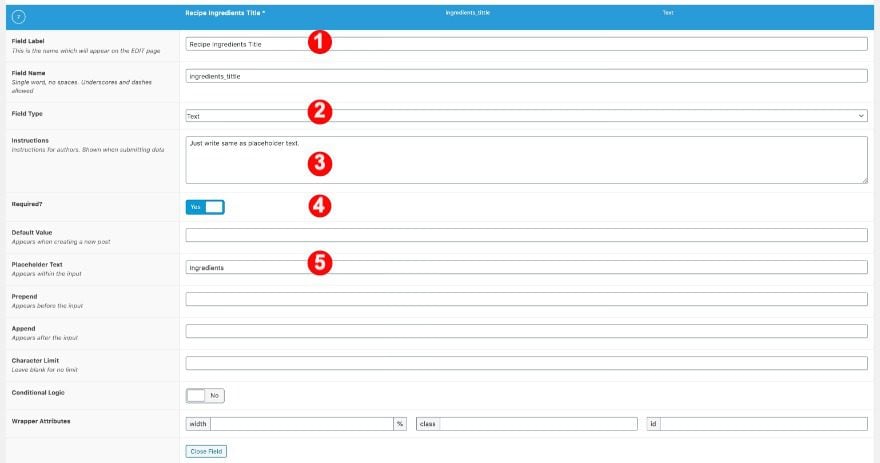
Recipe Ingredients Title
Then, the ingredients title.
- Field Label: Recipe Ingredients Title
- Field Type: Text
- Instructions: Just write the same as placeholder text.
- Required?: Yes
- Placeholder Text: Ingredients
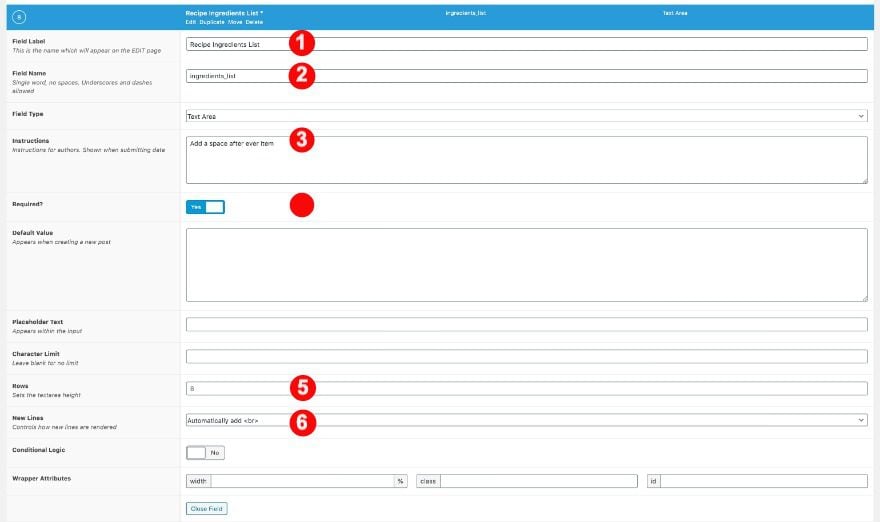
Recipe Ingredients List
Follow that with the ingredients list.
- Field Label: Recipe Ingredients List
- Field Type: Text Area
- Instructions: Add a space after every item
- Required?: Yes
- Rows: 8
- New Lines: Automatically add <br>
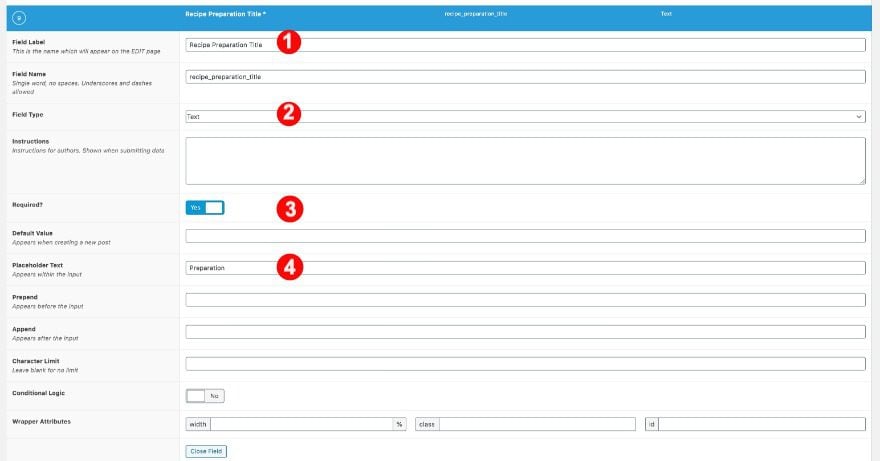
Recipe Preparation Title
Next to last, the preparation title.
- Field Label: Recipe Preparation Title
- Field Type: Text
- Instructions: Just write the same as placeholder text.
- Required?: Yes
- Placeholder Text: Preparation
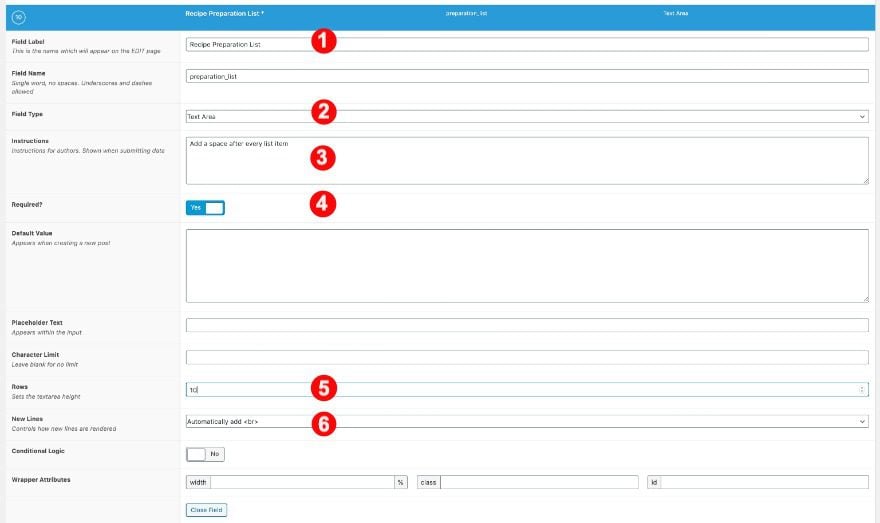
Recipe Preparation List
Finally, the preparation list.
- Field Label: Recipe Preparation List
- Field Type: Text Area
- Instructions: Add a space after every item
- Required?: Yes
- Rows: 10
- New Lines: Automatically add <br>
Publish Field Group
Publish the field group. Your field group window should look like the screenshot below.
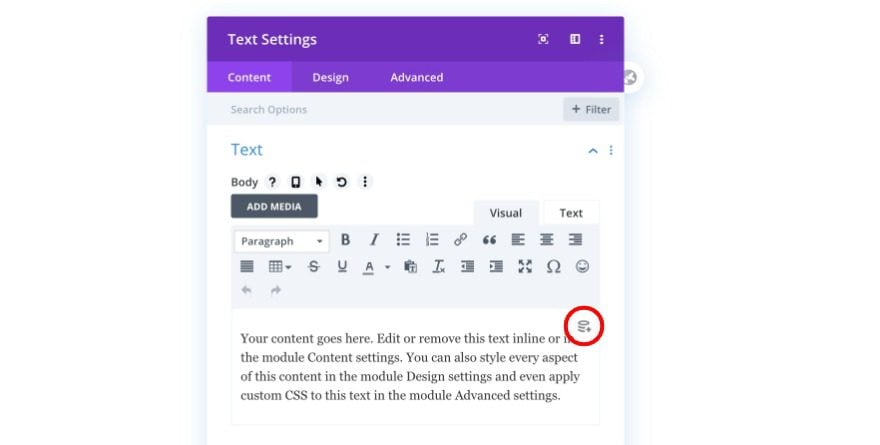
How to Access ACF Plugin Content for Recipe Card Template in The Divi Builder
The advanced custom fields can be added to a Divi module by clicking on the dynamic content icon. This icon is on the top right corner of the content box. This is what it looks like:
2. Create New Recipe Card Template With Divi Builder
Divi Theme Builder Steps
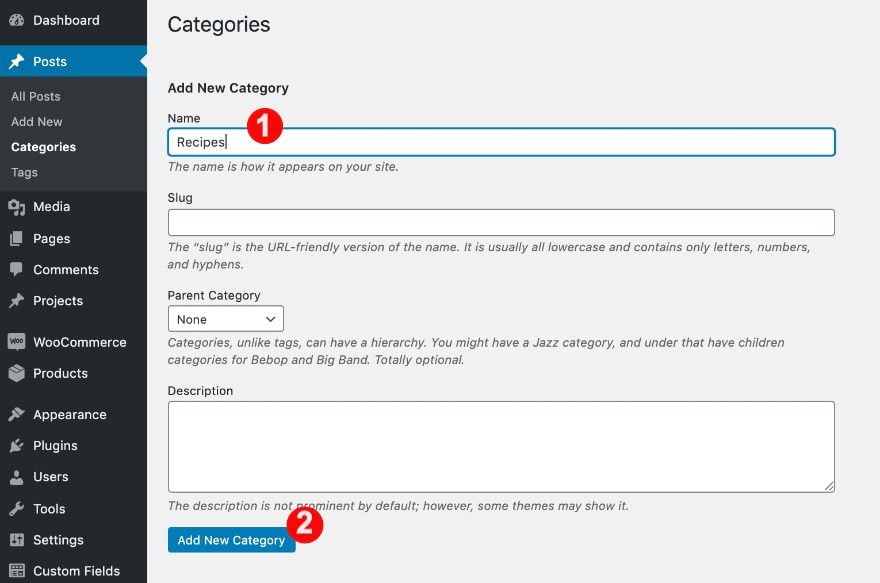
1. Create Recipes Category
You need a category named ‘recipes’ so you can assign the template to it. Add it in the category tab via the dashboard.
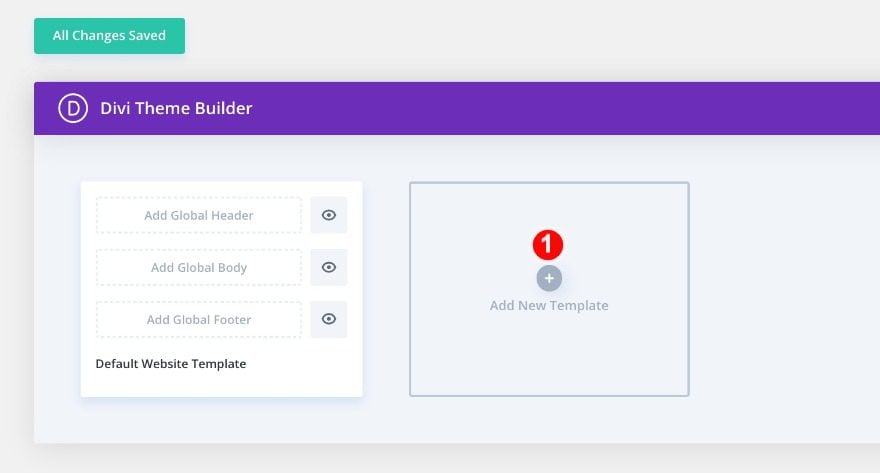
2. Open Divi Theme Builder and Add New Template
Open the Divi theme builder and add a new template.
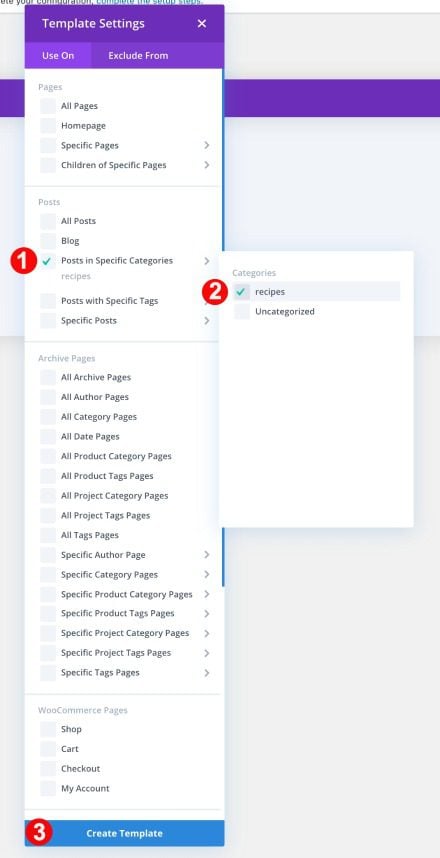
3. Add Global Body
Click on ‘add global body’ and assign the template to posts in specific categories > recipes. Then, click on the ‘create template’ button.
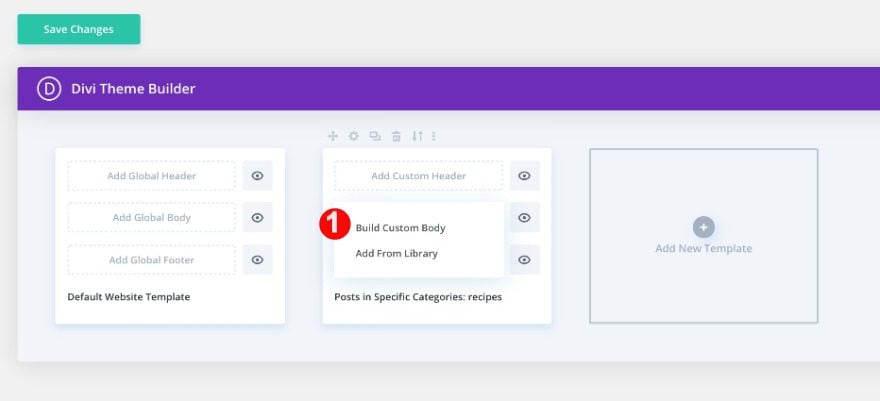
4. Build Custom Body
Click on ‘add global body’ and select ‘add custom body’.
3. Recreate the Recipe Card Design Using Dynamic Content
Add New Section
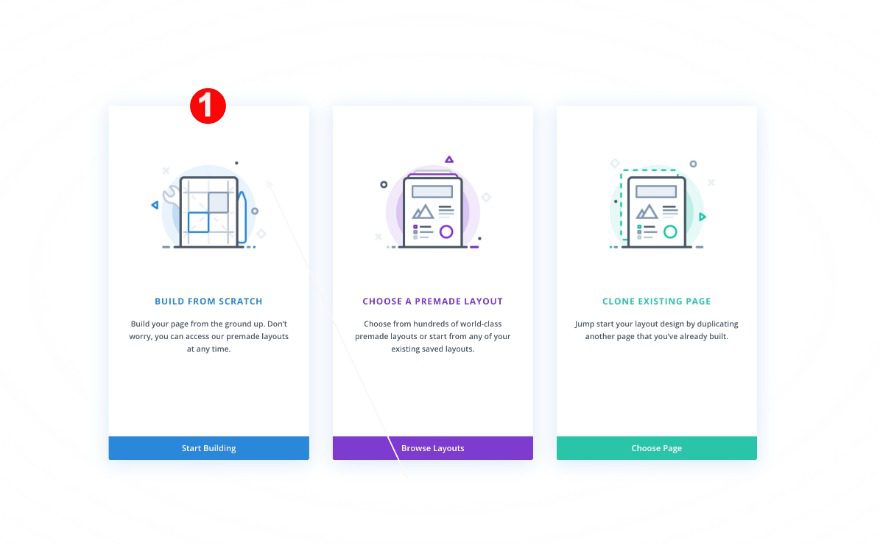
Now, we can start designing the recipe card template. When the Divi builder opens, select ‘build from scratch’. Start by adding a new section.
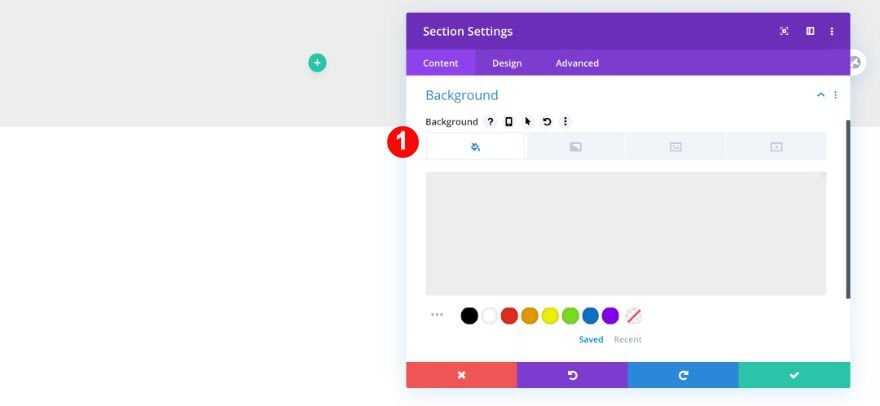
Background
In the section settings, add a background color.
- Background Color: Light Grey #ededed
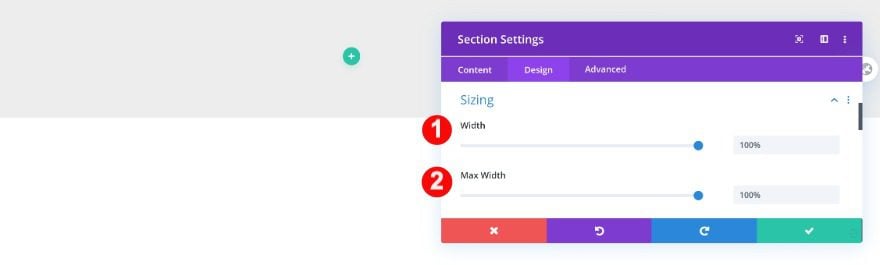
Sizing
Also, adjust the sizing in the design tab.
- Width: 100%
- Max Width: 100%
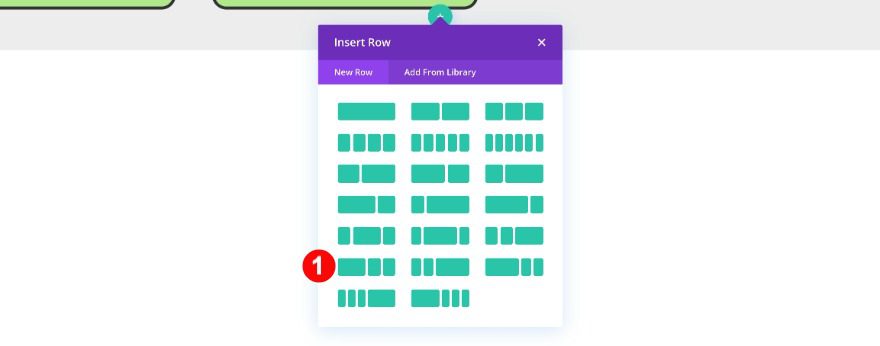
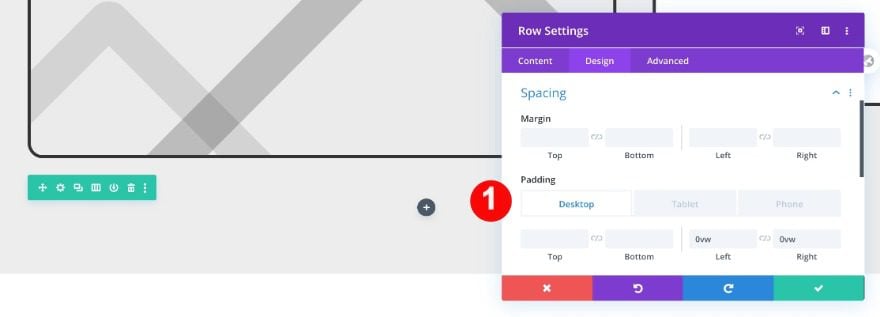
Add 1st Row
Column Structure
Add a new row with one column.

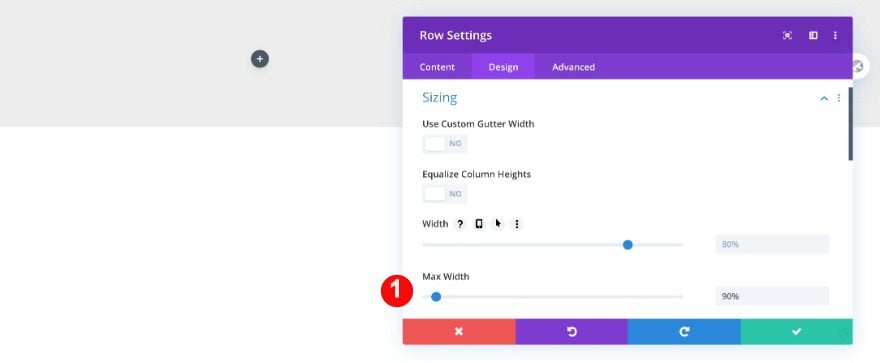
Sizing
Before adding modules, adjust the row’s sizing settings.
- Max Width: 90%
Column Settings
Background
Customize the column settings inside the row. First, add a background color.
- Background Color: White #ffffff
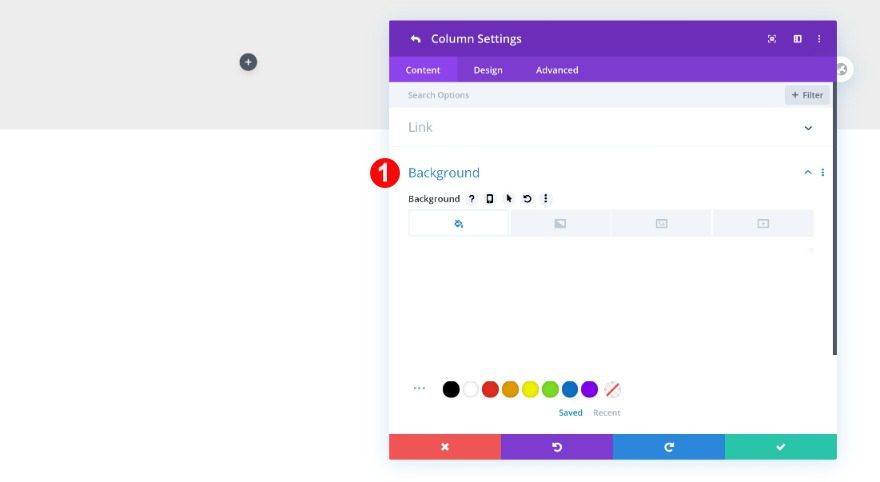
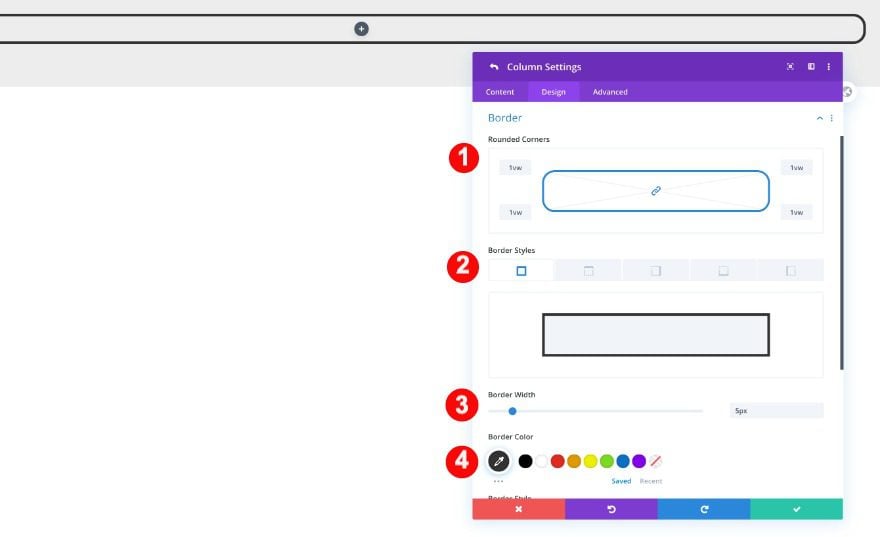
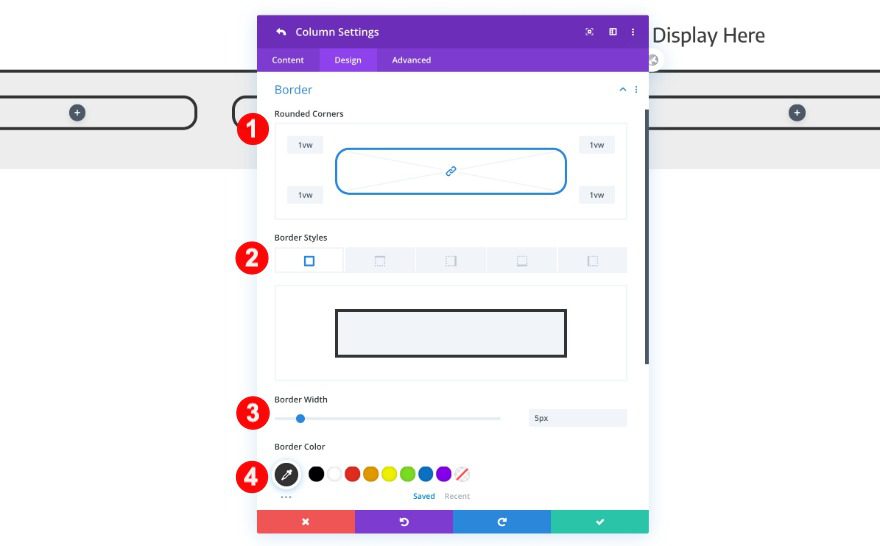
Border
Then, modify the border styles.
- Rounded Corners: 1vw all four corners
- Border Styles: All four sides
- Width: 5px
- Color: Very Dark Grey #333333
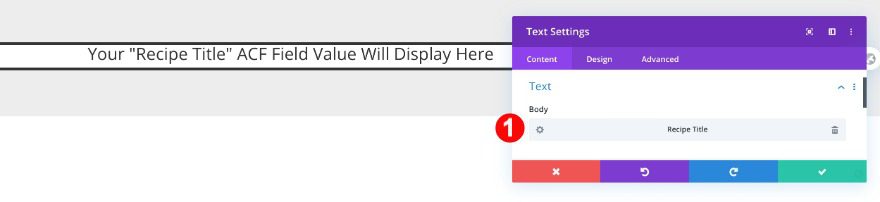
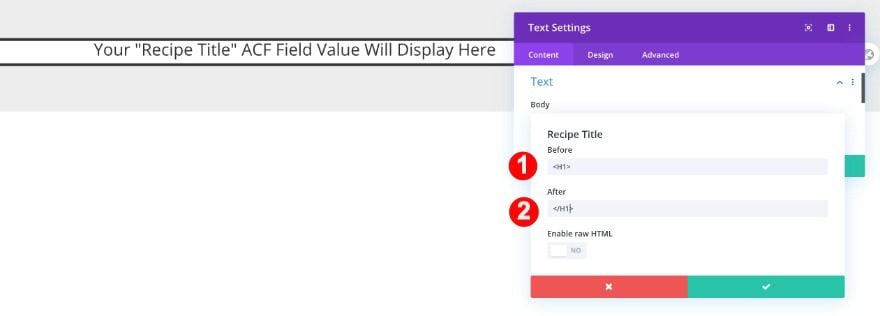
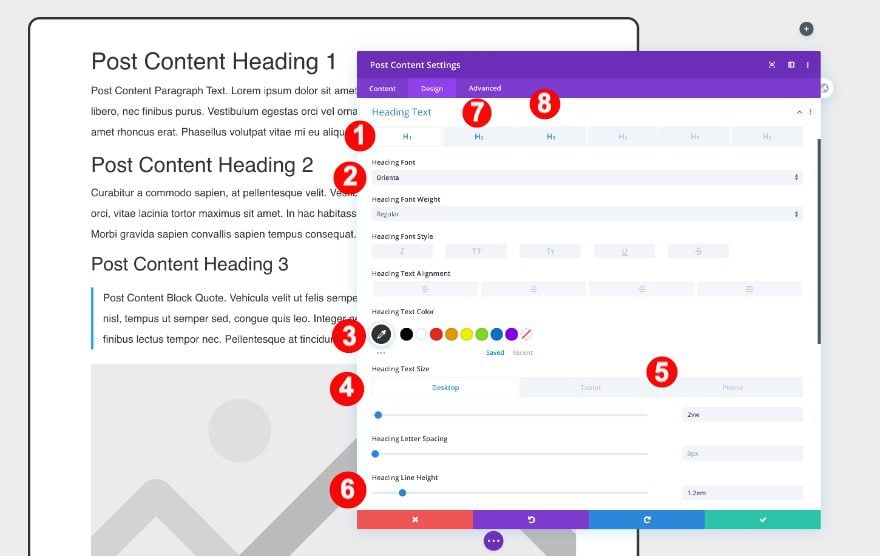
Add Text Module with Dynamic Content
Content
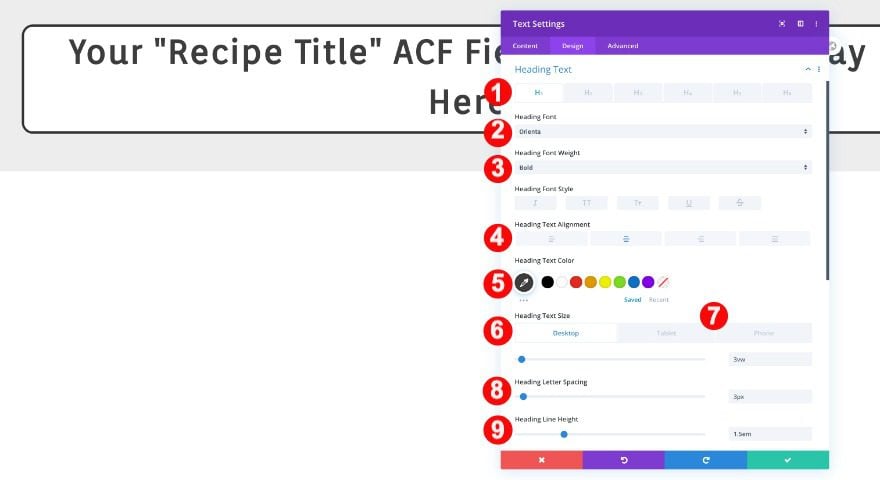
Once you’ve completed the row and column settings, it’s time to add modules. Start by adding a text module. In the content window, select the dynamic content for the recipe title. Once selected, click on the gear icon and input H1 snippets.
- Body: Recipe Title
- Body Settings:
- Before: <H1>
- After:</H1>
Heading Text
Then, style the H1 text settings accordingly:
- Heading Level: H1
- Font: Orienta
- Weight: Bold
- Alignment: Center
- Color: Very Dark Grey #3d3d3d
- Size:
- Desktop: 3vw
- Tablet: 4vw
- Phone: 5vw
- Letter Spacing: 3px
- Line Height: 1.5em
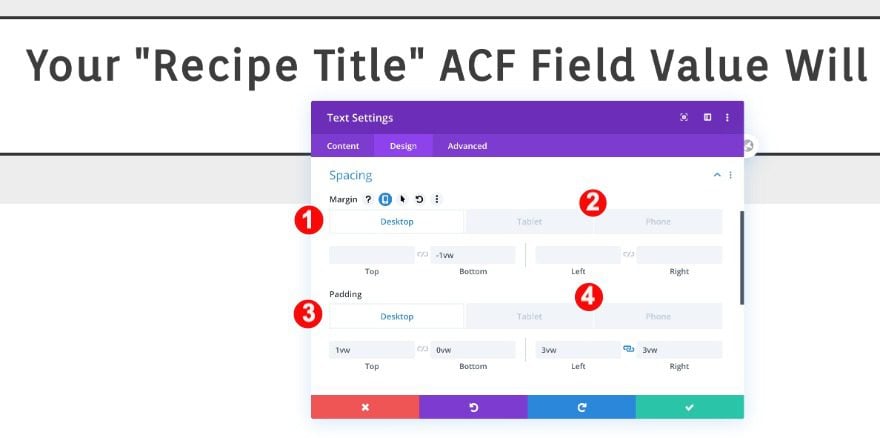
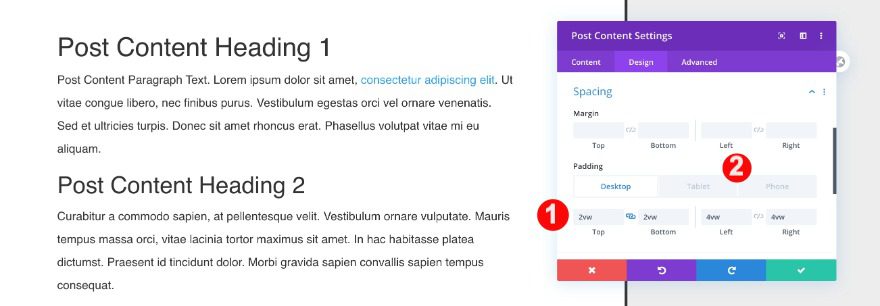
Spacing
Modify the spacing values too.
- Bottom Margin:
- Desktop: -1vw
- Tablet: -2vw
- Phone: -5vw
- Top Padding:
- Desktop + Tablet: 1vw
- Phone: 2vw
- Bottom Padding:0vw
- Left + Right Padding:
- Desktop + Tablet: 3vw
- Phone: 4vw
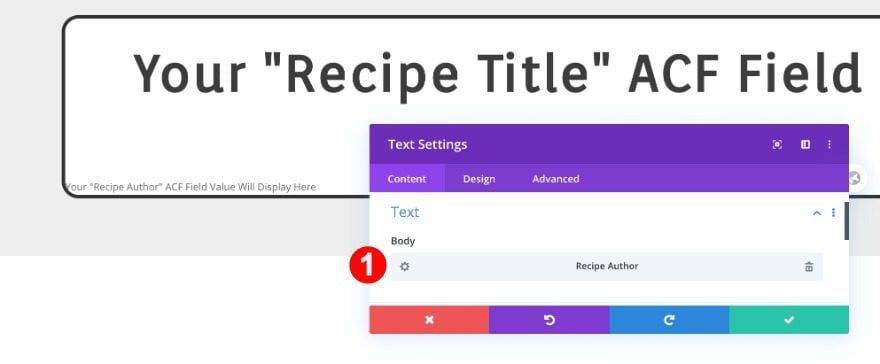
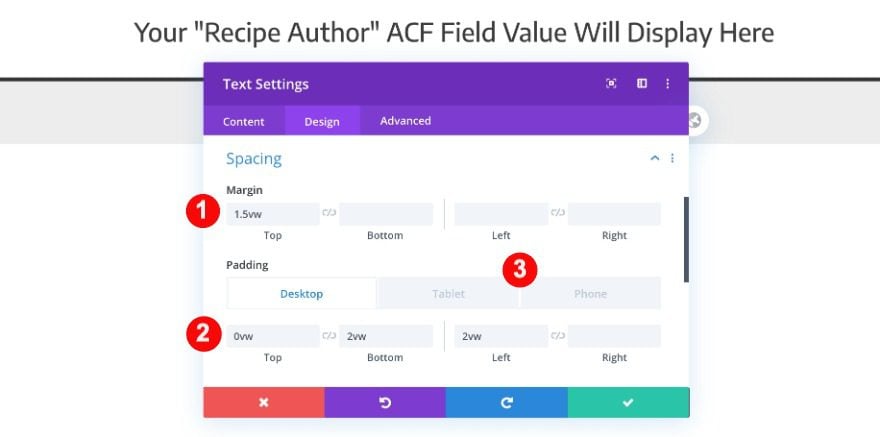
Add 2nd Text Module with Dynamic Content
Content
Add a second text module and select the dynamic content for the recipe author.
- Body: Recipe Author
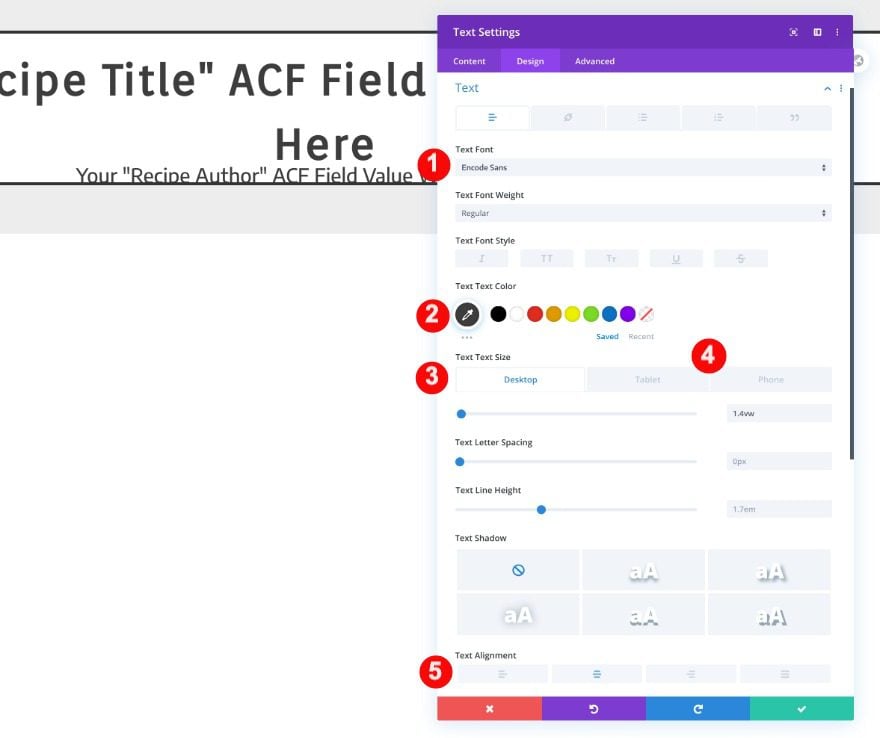
Text
Then, style the text.
- Font: Encode Sans
- Color: Very Dark Grey #3d3d3d
- Size:
- Desktop: 1.4vw
- Tablet: 2.4vw
- Phone: 3vw
- Alignment: Center
Spacing
Afterward, adjust the spacing.
- Top Margin: 1.5vw
- Top Padding:
- Desktop + Tablet: 0vw
- Phone: 2vw
- Bottom Padding: 2vw
- Left + Right Padding:
- Desktop: 2vw
- Tablet + Phone: 3vw
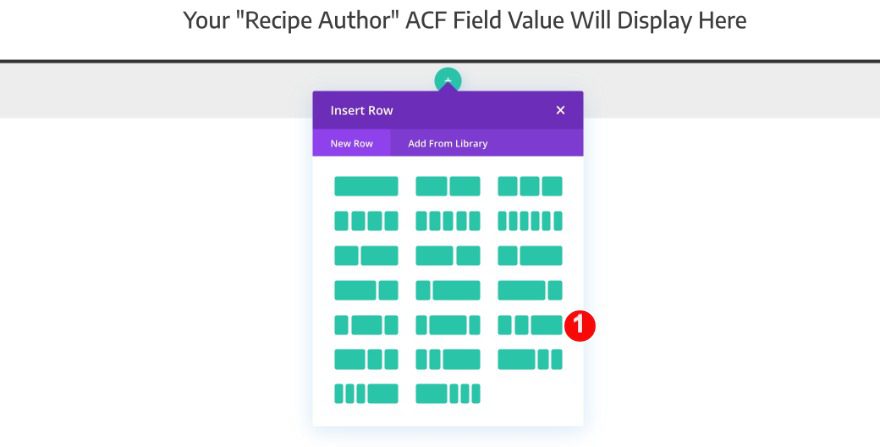
Add 2nd Row
Column Structure
Now, add a second row using the following column structure:
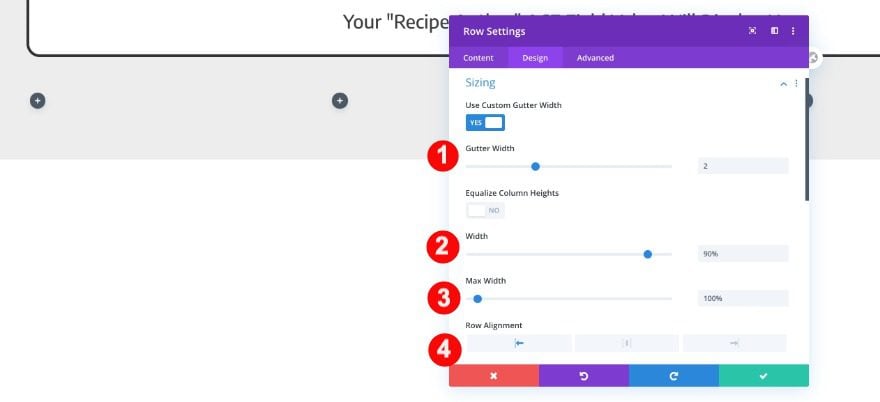
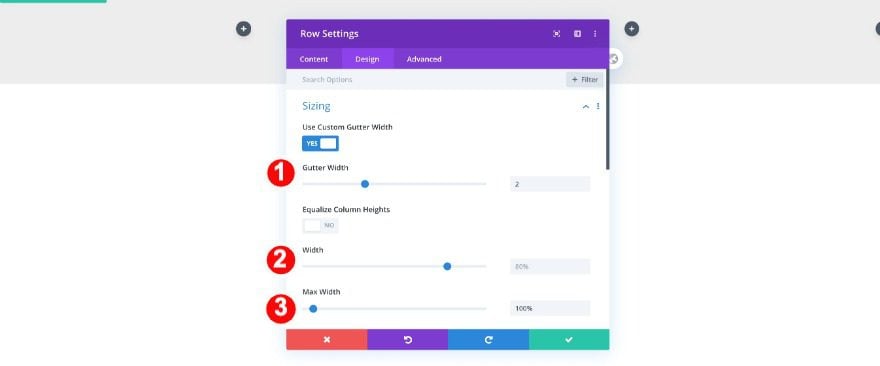
Sizing
Open the row settings and adjust the sizing settings accordingly:
- Gutter Width: 2
- Width: 90%
- Max Width: 100%
- Row Alignment: Left
Spacing
Then, the spacing.
- Top + Bottom Padding: 0.5vw
- Left Padding: 10vw

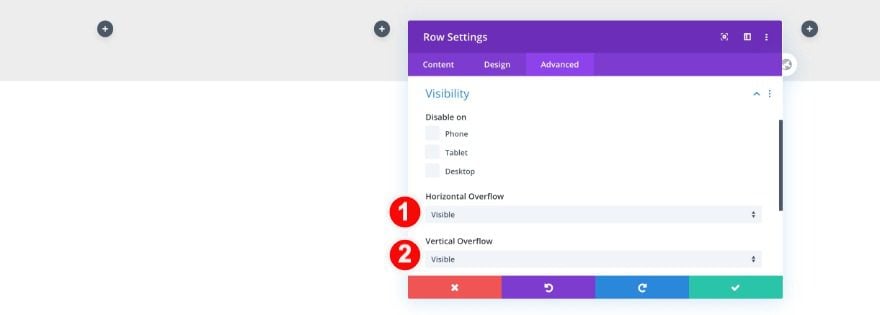
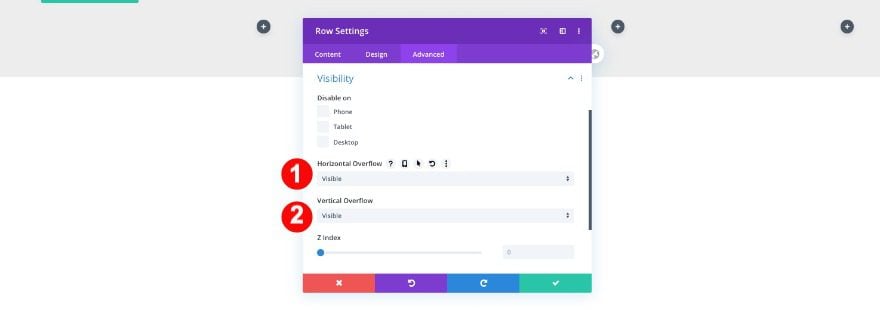
Visibility
Lastly, in the advanced tab, adjust the visibility.
- Horizontal Overflow: Visible
- Vertical Overflow: Visible
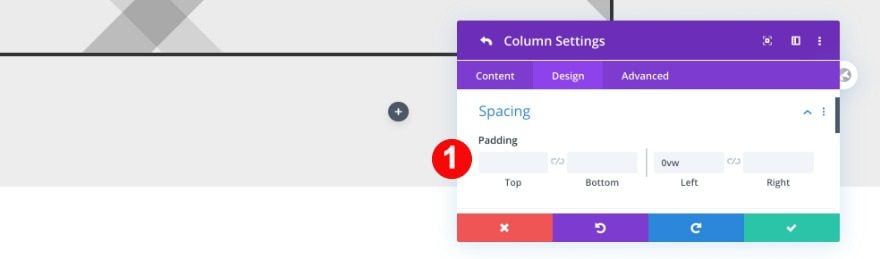
Column 1 + 2 + 3 Settings
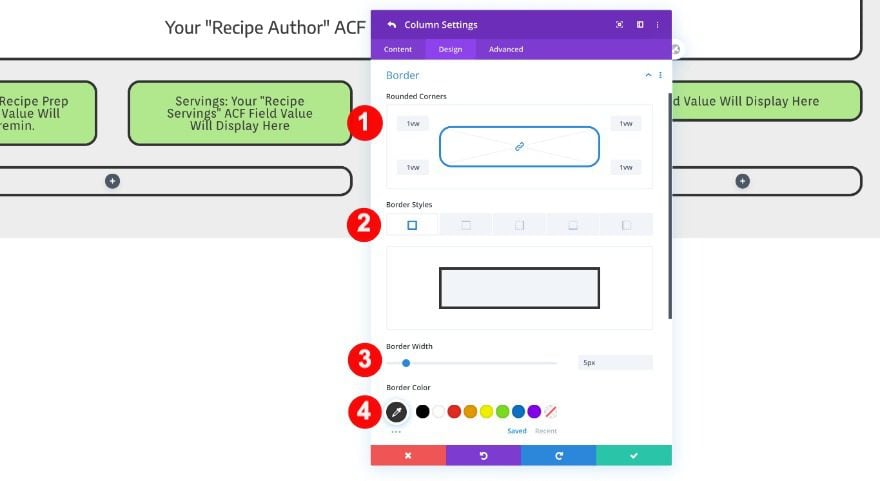
Border
Style all three columns the same way. First, go to the border settings and make some changes. Repeat for all three columns.
- Rounded Corners: 1vw all four corners
- Border Styles: All four sides
- Width: 5px
- Color: Very Dark Grey #333333
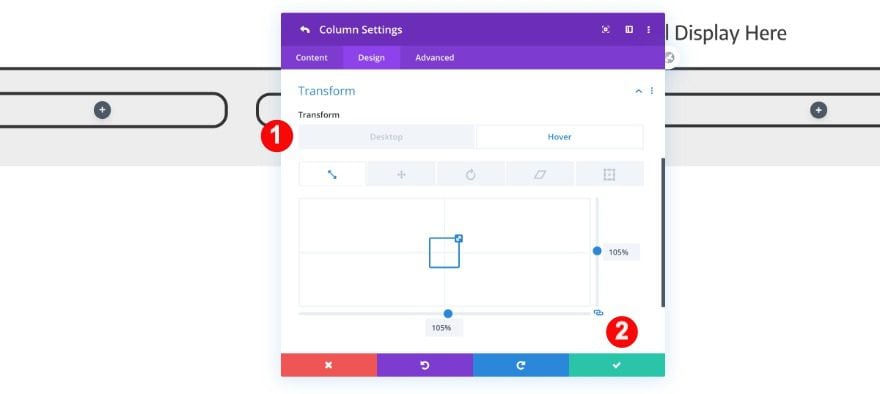
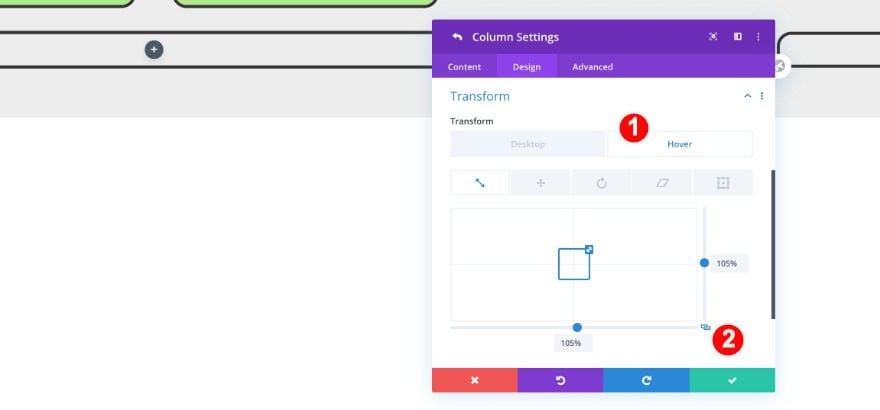
Transform
To give the design a hover effect, adjust the transform settings as follows. Repeat for all three columns.
- Transform Scale On Hover: 105% x 105%
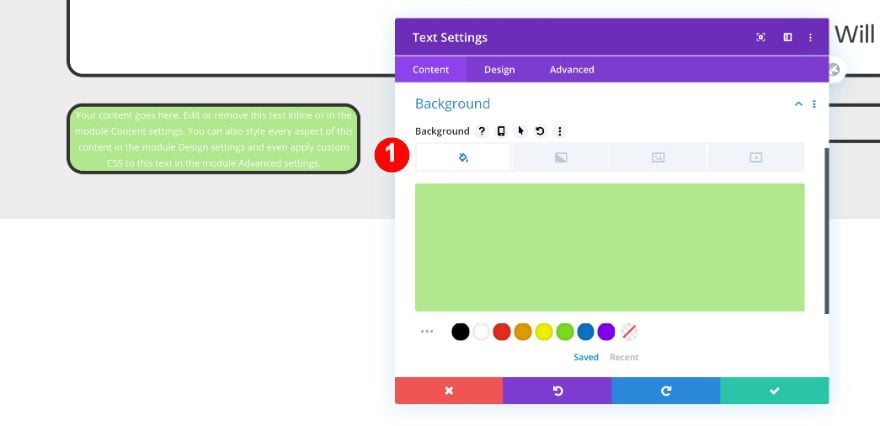
Add Text Module to Column 1
Content
Add a text module and leave the content window empty for now. We’ll add that later.
Background
Add a background color to the module.
- Background Color: Lime Green #b1e88d
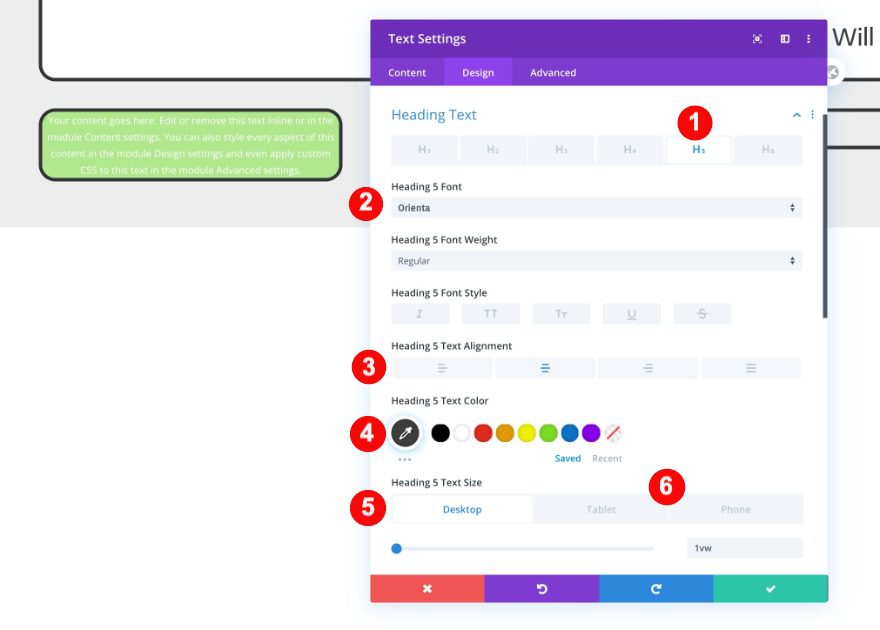
Heading Text
Style the H5 text settings next.
- Heading Level: H5
- H5 Font: Orienta
- H5 Color: Very Dark Grey #3d3d3d
- H5 Size:
- Desktop: 1vw
- Tablet: 2.3vw
- Phone: 3.3vw
- Alignment: Center
Spacing
Finally, adjust the spacing values as follows.
- Top Padding:
- Desktop: 1vw
- Tablet: 1.5vw
- Phone: 3.5vw
- Bottom Padding:
- Desktop: 0.5vw
- Tablet + Phone: 1.5vw
- Left + Right Padding:
- Desktop: 2vw
- Tablet + Phone: 3vw
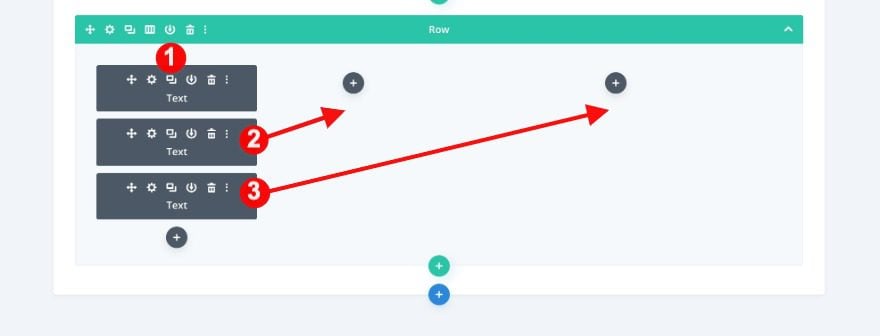
Duplicate Text Module From Column 1 Twice and Move to Columns 2 and 3
In the wireframe view, duplicate the text module in the first column. Then, move the duplicates to column 2 and 3.
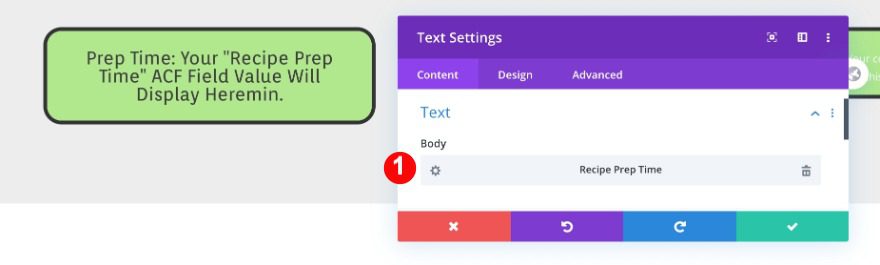
Add Dynamic Content to Text Module in Column 1
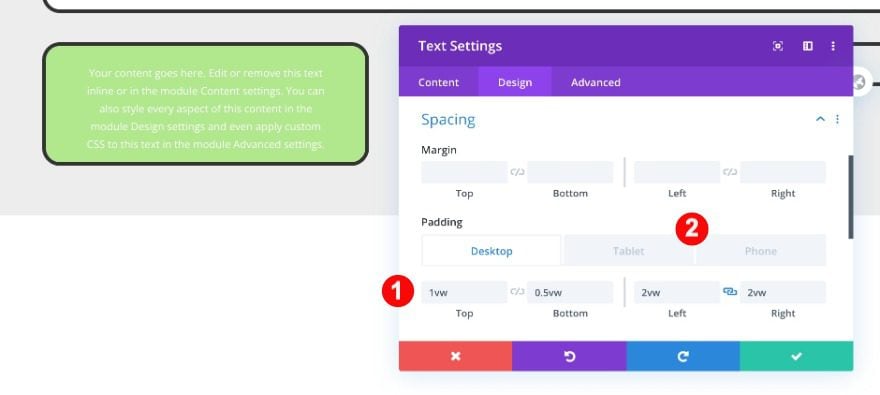
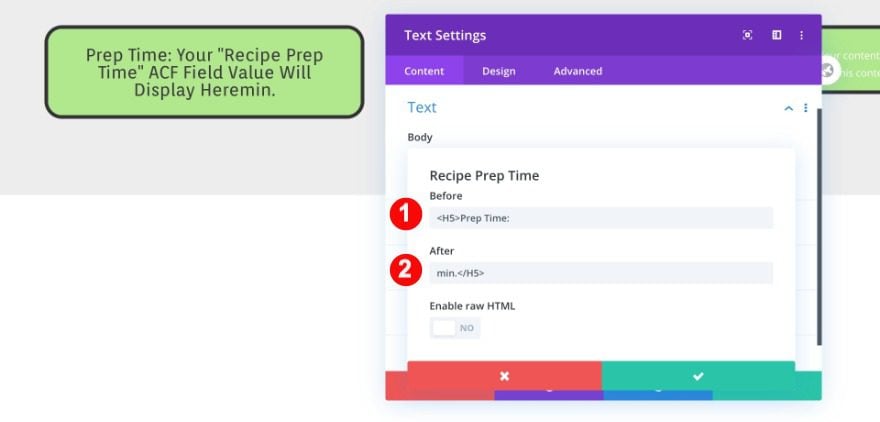
Add the dynamic content for the prep time and adjust the settings.
- Body: Recipe Prep Time
- Body Settings:
- Before: <H5>Prep Time:
- After: min.</H5>
Add Dynamic Content to Text Module in Column 2
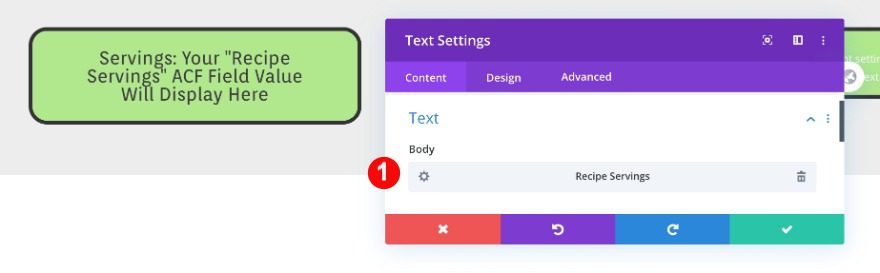
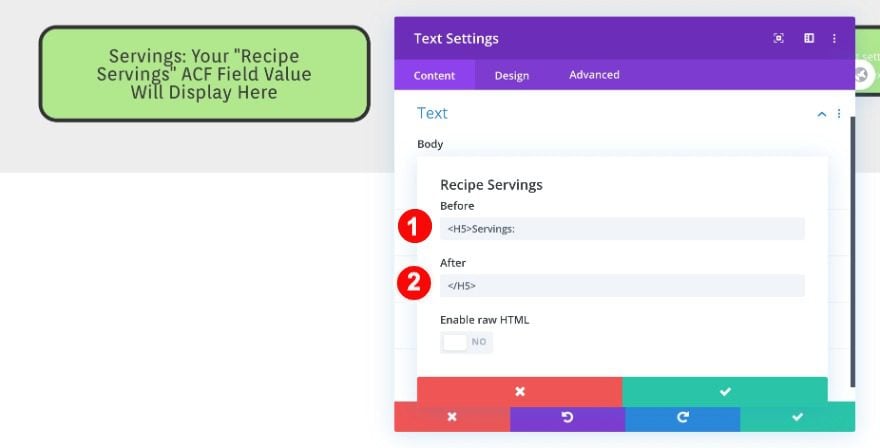
Add the dynamic content for recipe servings and adjust the settings.
- Body: Recipe Servings
- Body Settings:
- Before: <H5>Servings:
- After: </H5>
Add Dynamic Content to Text Module in Column 3
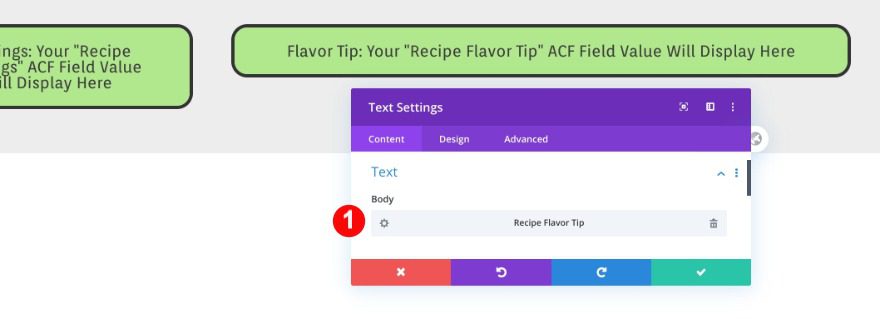
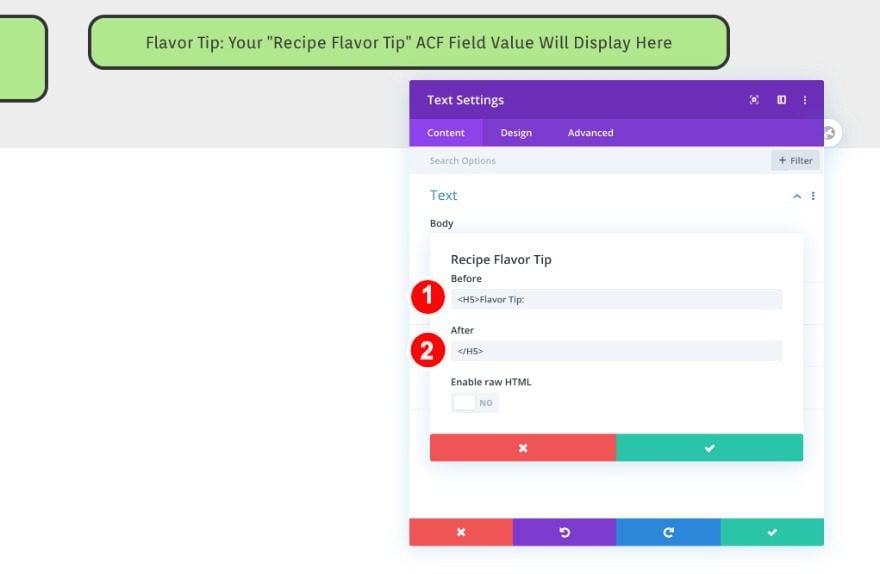
Add the dynamic content for the flavor tip and adjust the settings.
- Body: Recipe Flavor Tip
- Body Settings:
- Before: <H5>Flavor Tip:
- After: </H5>
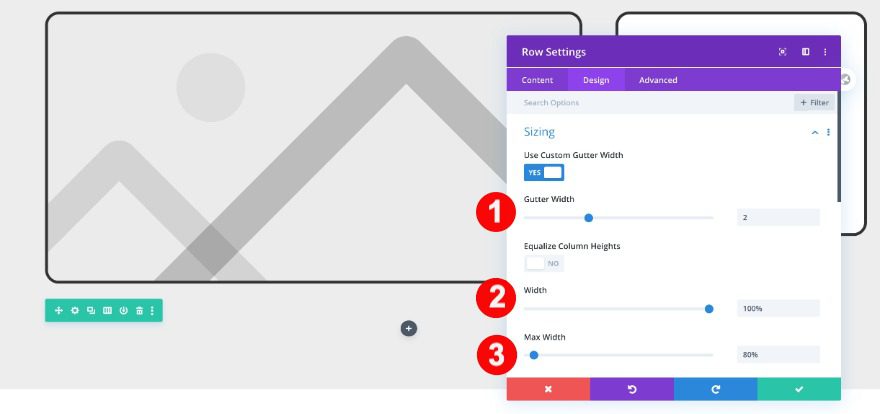
Add 3rd Row
Column Structure
Now add the third row using the following column structure:
Sizing
Before adding any modules, adjust the sizing of the row.
- Custom Gutter Width: 2
- Width: 80%
- Max Width: 100%
Spacing
Also, erase the default top margin.
- Top Margin: 0vw

Visibility
Finally, adjust the visibility in the advanced tab.
- Horizontal Overflow: Visible
- Vertical Overflow: Visible
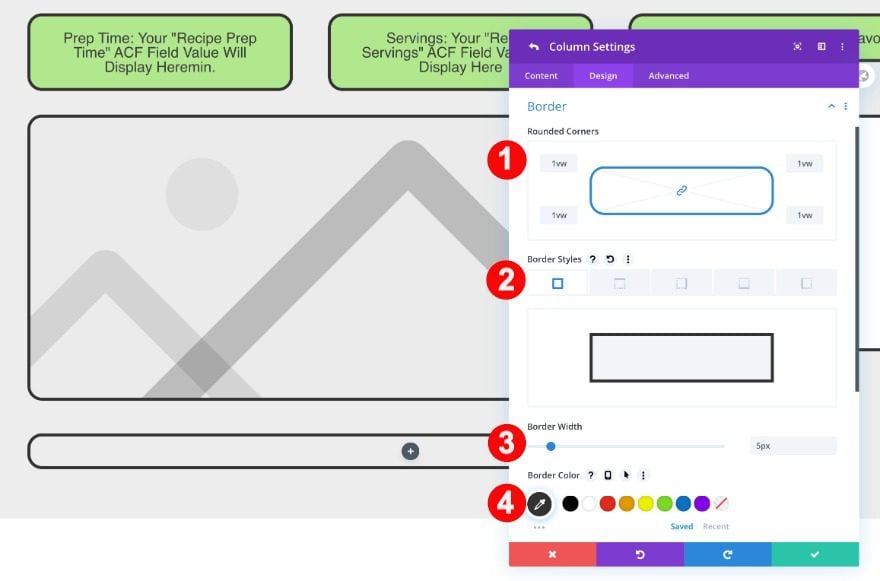
Column 1 + 2 + 3 Settings
Border
Style all three columns the same way, starting with the border settings. Repeat for columns 2 and 3.
- Rounded Corners: 1vw all four corners
- Border Styles: All four sides
- Width: 5px
- Color: Very Dark Grey #333333
Transform
Continue by adding a hover transform in the design tab. Repeat for columns 2 and 3.
- Transform Scale On Hover: 105% x 105%
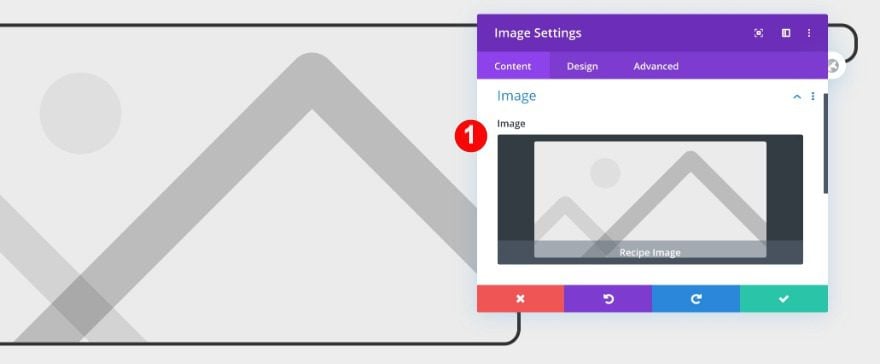
Add Image Module with Dynamic Content to Column 1
Content
Add an image module with dynamic content for the recipe image.
- Image: Recipe Image
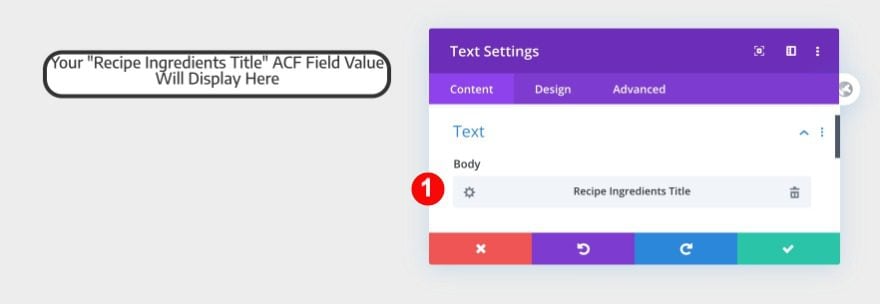
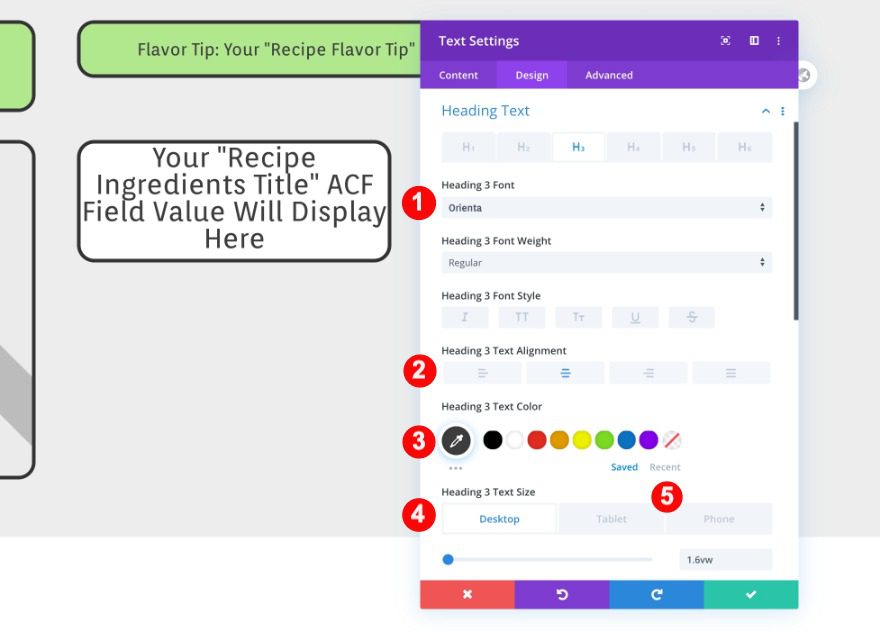
Add Text Module with Dynamic Content to Column 2
Content
Now, add a text module with dynamic content for the ingredients title. Click on the gear icon and enter H3 snippets as follows.
- Text Body: Recipe Ingredients Title
- Body Settings:
- Before: <H3>
- After: </H3>
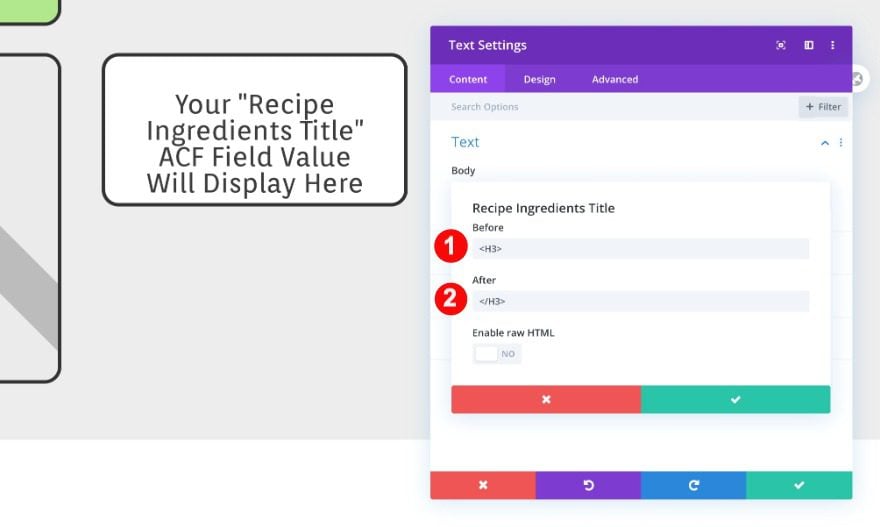
Heading Text
Then, style the heading text.
- Heading Level: H3
- H3Font: Orienta
- H3 Color: Very Dark Grey #3d3d3d
- H3 Size:
- Desktop: 1.6vw
- Tablet: 2vw
- Phone: 5.5vw
- Alignment: Center
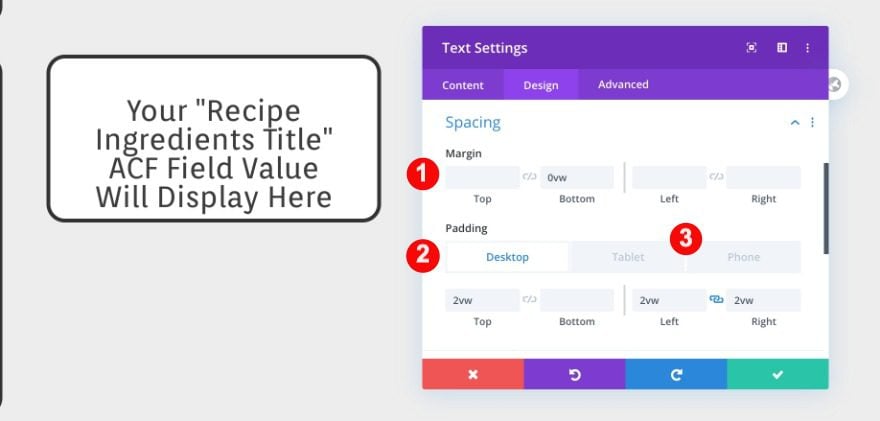
Spacing
Complete the module by adjusting the spacing.
- Bottom Margin: 0vw
- Top Padding:
- Desktop: 2vw
- Tablet: 3vw
- Phone: 4vw
- Left + Right Padding:
- Desktop: 2vw
- Tablet + Phone: 3vw
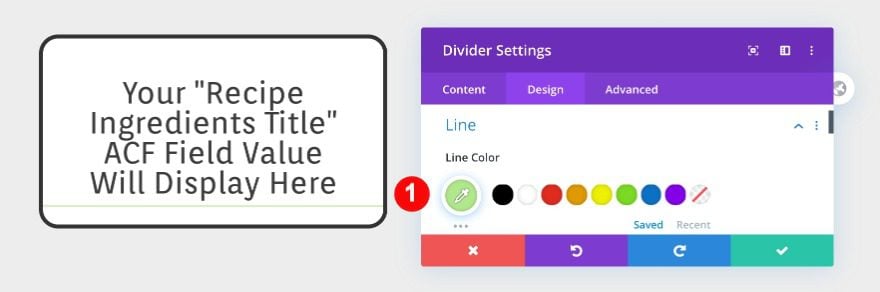
Add Divider Module to Column 2
Line
Add a divider module and style it as follows.
- Color: Lime Green #b1e88d
Sizing
Then adjust the sizing values.
- Weight: 5px
- Width: 40%
- Alignment: Left
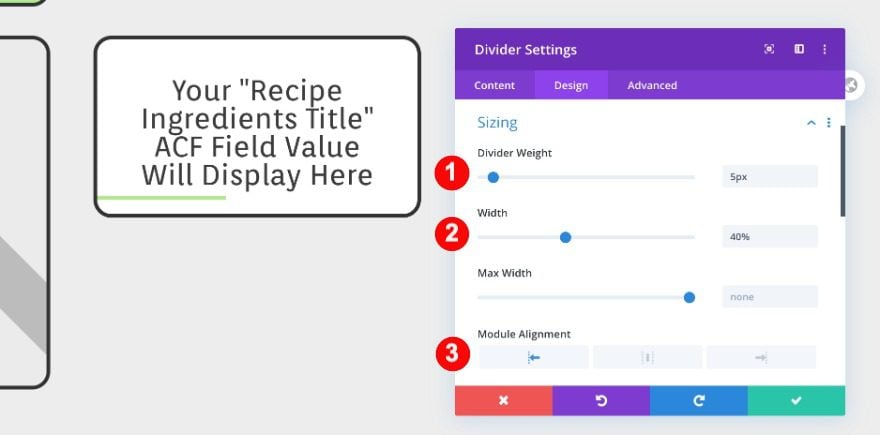
Spacing
Lastly, adjust the spacing.
- Top Margin: 0vw

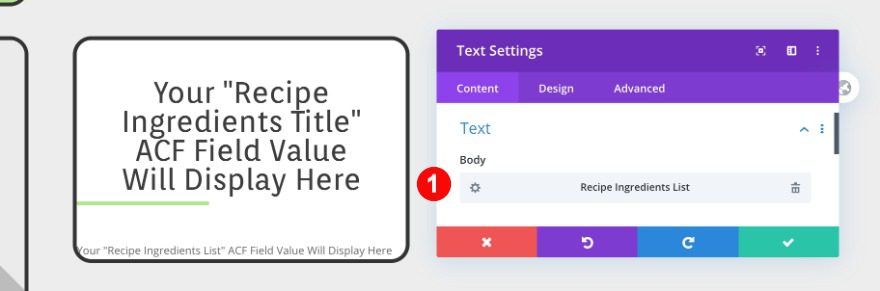
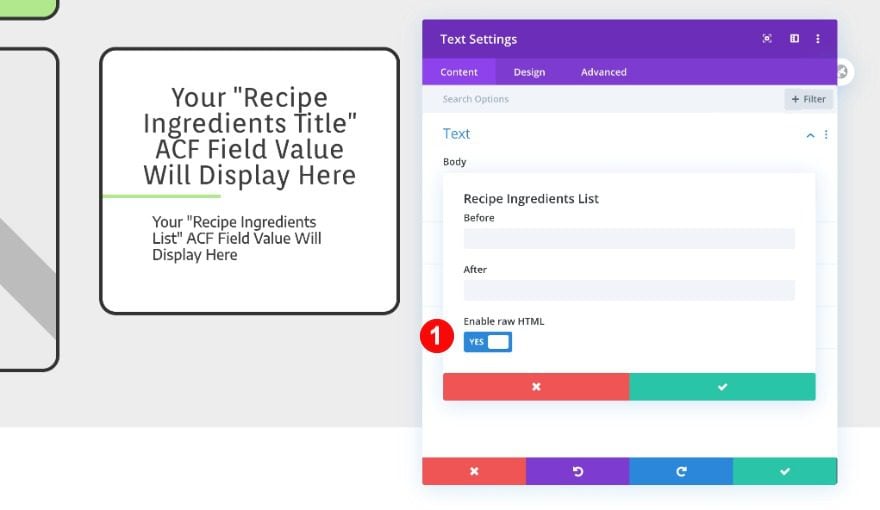
Add Text Module with Dynamic Content to Column 2
Content
Add a text module with dynamic content for the ingredients list. Click on the gear icon in the dynamic content tab and enable raw HTML.
- Text Body: Recipe Ingredients List
- Body Settings: Enable Raw HTML
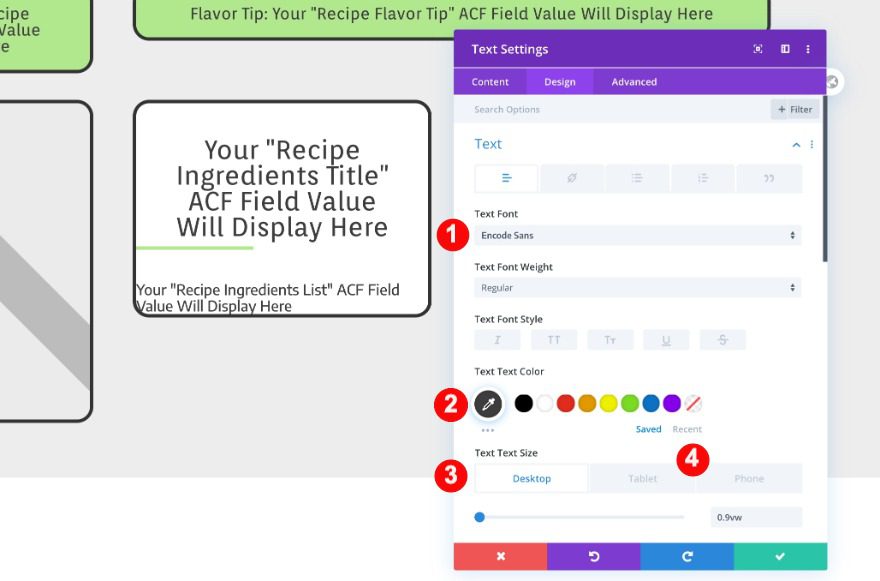
Text
Then, style the text as follows.
- Font: Encode Sans
- Color: Very Dark Grey #333333
- Size:
- Desktop: 0.9vw
- Tablet: 2vw
- Phone: 3vw
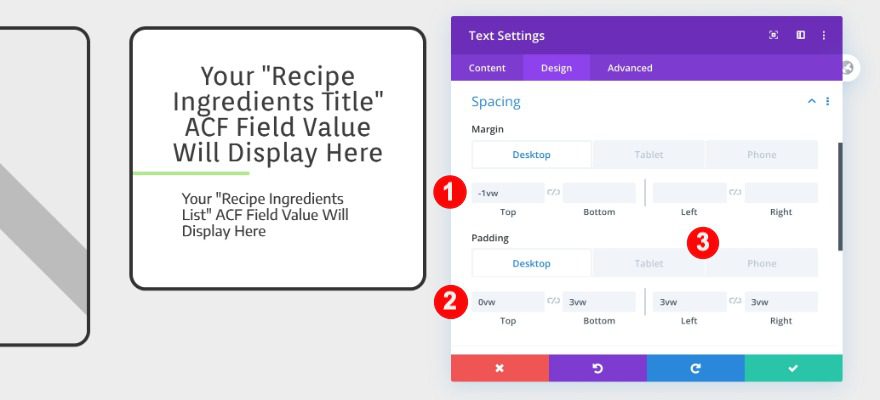
Spacing
Also, adjust the spacing.
- Top Margin:
- Desktop: -1vw
- Tablet: -3vw
- Phone: -5vw
- Top Padding:
- Desktop + Tablet: 0vw
- Bottom Padding:
- Desktop: 3vw
- Tablet + Phone: 4vw
- Left + Right Padding:
- Desktop: 3vw
- Tablet: 4vw
- Phone: 5vw
Duplicate all Modules on Column 2 and Move to Column 3
In the wireframe view, duplicate all modules in column two. Move the duplicated modules to column three in the same order.
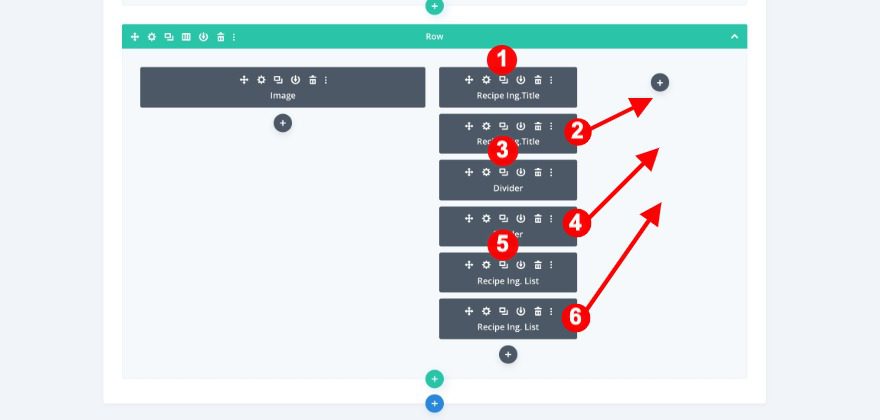
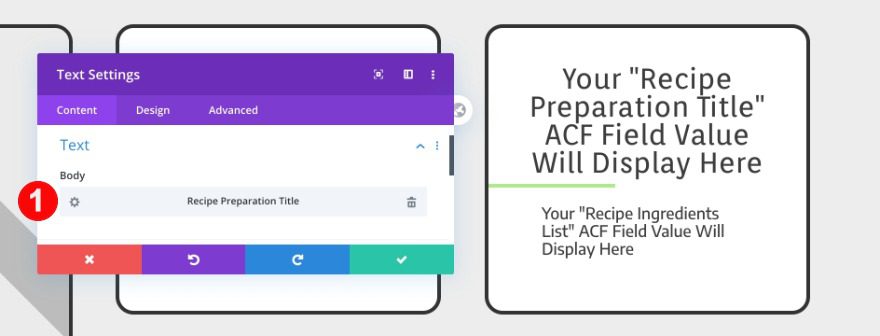
Add Dynamic Content in 1st Text Module in Column 3
Add the dynamic content for the preparation title.
- Body: Recipe Preparation Title
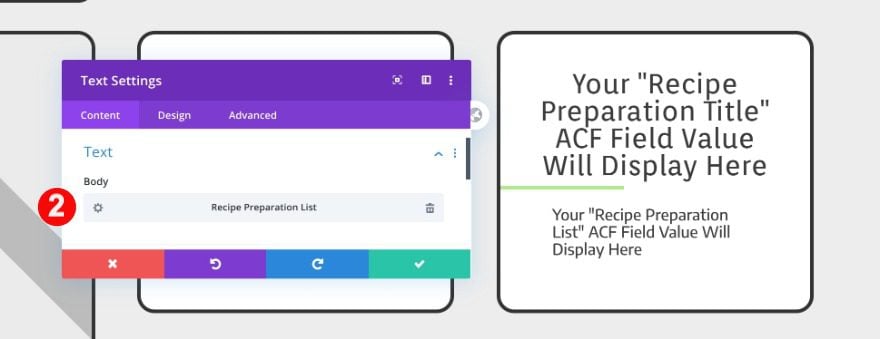
Add Dynamic Content in 2nd Text Module in Column 3
Also, add the dynamic content for the preparations list to the last text module of the column.
- Body: Recipe Preparation List
Add 4th Row
Column Structure
To complete the template, we need a post content module. Add a new row using the following column structure:

Sizing
Before adding a module, adjust the sizing of the row.
- Custom gutter width: 2
- Width: 100%
- Max Width: 80%
Spacing
- Left + Right Padding: 0vw
Column 1 Settings
Background
Style the column to match the recipe card above. First, add a background.
- Background Color: White #ffffff
Spacing
Also, adjust the spacing.
- Left Padding: 0vw

Border
Last but not least, modify the border settings.
- Rounded Corners: 1vw all four corners
- Border Styles: all four sides
- Width: 5px
- Color: Very Dark Grey #333333
Leave Column 2 Empty.
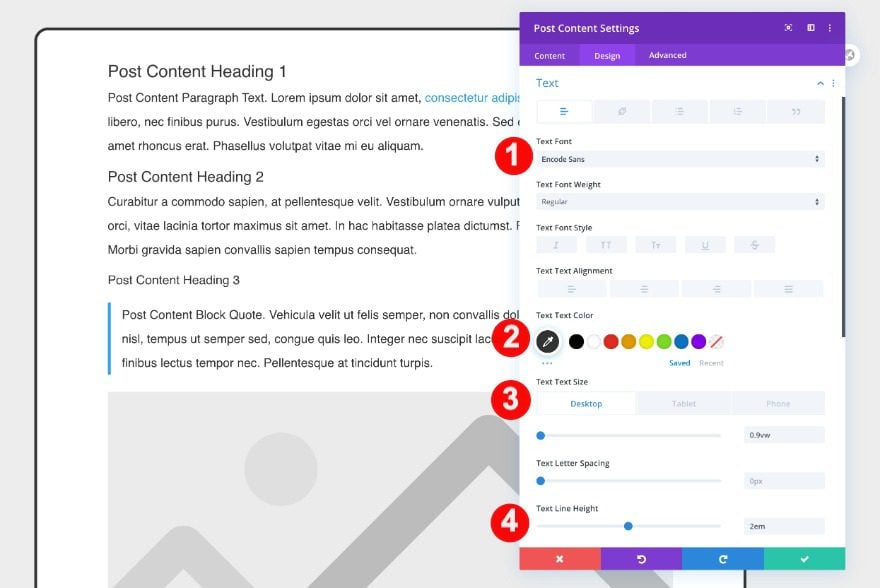
Add Post Content Module to Column 1
Text
Add a post content module to column one and style the text to match the recipe card template.
- Font: Encode Sans
- Color: Very Dark Grey #333333
- Size:
- Desktop: 0.9vw
- Tablet: 2vw
- Phone: 3vw
- Line Height: 2em
Heading 1 Text
- Font: Orienta
- Color: Very Dark Grey #333333
- Size:
- Desktop: 2vw
- Tablet: 5vw
- Phone: 6vw
Heading 2 Text
- Font: Orienta
- Color: Very Dark Grey #333333
- Size:
- Desktop: 1.8vw
- Tablet: 4.5vw
- Phone: 5.5vw
Heading 3 Text
- Font: Orienta
- Color: Very Dark Grey #333333
- Size:
- Desktop: 1.6vw
- Tablet: 4.5vw
- Phone: 5vw
Spacing
To match the style of the recipe card, adjust the spacing values.
- Top + Bottom Padding: 2vw
- Left + Right Padding:
- Desktop: 4vw
- Tablet + Phone: 6vw
If you want to change the color of the blockquote line or link color, you can do that in the theme customizer under accent color.
4. Edit / Create Post Using ACF Plugin Settings and Recipe Card Template
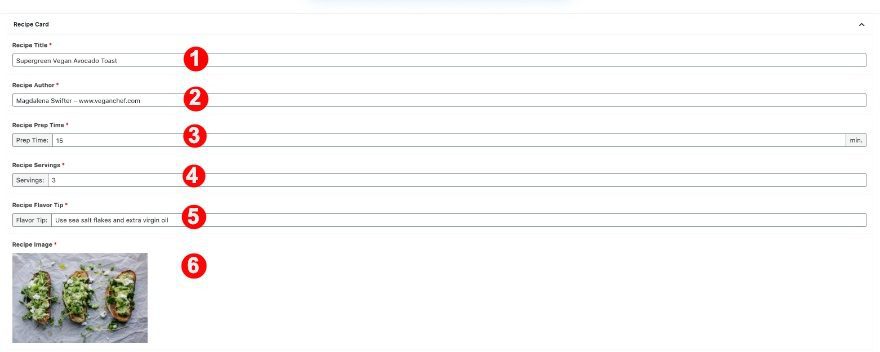
Input Custom Fields
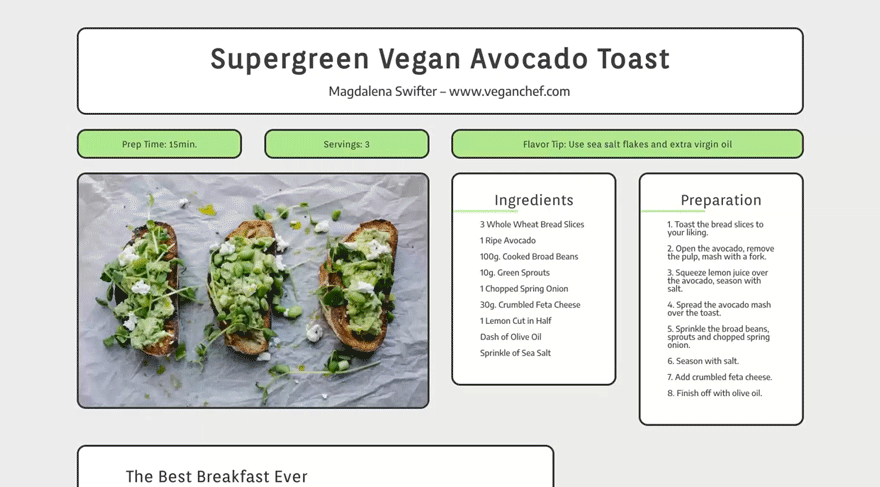
Open or add a post. Below the content area, you will find all the custom fields for the recipe card template. In order to recreate this avocado toast design, fill in the fields as follows.
Recipe Title:
- Supergreen Vegan Avocado Toast
Recipe Author:
- Magdalena Swifter – www.veganchef.com
Recipe Prep Time:
- 15
Recipe Servings:
- 3
Recipe Flavor Tip:
- Use sea salt flakes and extra virgin oil
Recipe Image:
- Avocado Toast Image
Recipe Ingredients Title:
- Ingredients
Recipe Ingredients List:
- 3 Whole Wheat Bread Slices
- 1 Ripe Avocado
- 100g. Cooked Broad Beans
- 10g. Green Sprouts
- 1 Chopped Spring Onion
- 30g. Crumbled Feta Cheese
- 1 Lemon Cut in Half
- Dash of Olive Oil
- Sprinkle of Sea Salt
Recipe Preparations Title:
- Preparation
Recipe Preparations List:
- 1. Toast the bread slices to your liking.
- 2. Open the avocado, remove the pulp, mash with a fork.
- 3. Squeeze lemon juice over the avocado, season with salt.
- 4. Spread the avocado mash over the toast.
- 5. Sprinkle the broad beans, sprouts and chopped spring onion.
- 6. Season with salt.
- 7. Add crumbled feta cheese.
- 8. Finish off with olive oil.

Give the Post a Title
Title
Don’t forget to add a title to your post.
- Avocado Toast Recipe

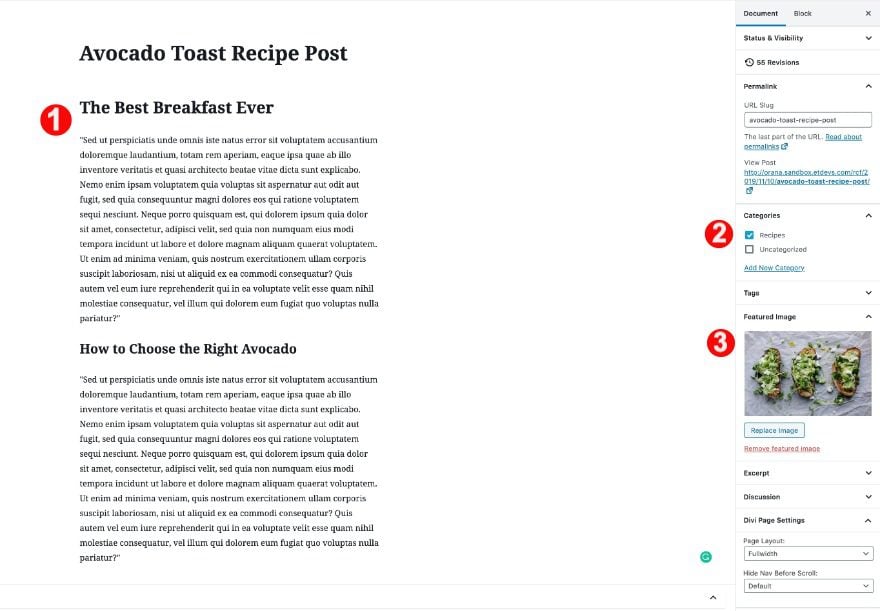
Add Content, Select Category, and Add Featured Image
Write or insert the content of the blog post into the regular editor. Select the recipes category and add a featured image.
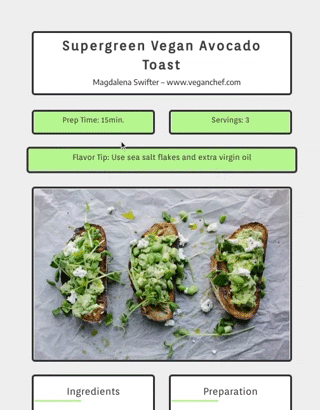
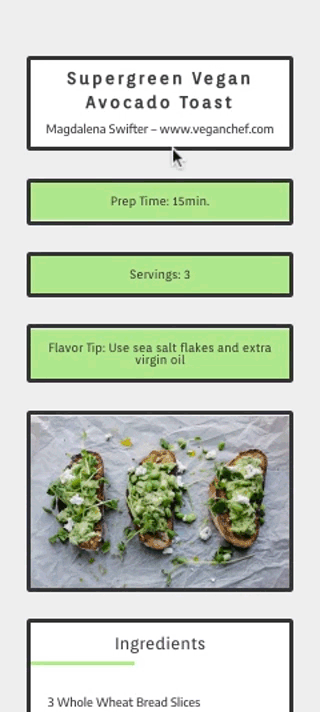
Recipe Card Template Preview
Once again, let’s take a look again at what the finished post with the recipe card template looks like on different screens.
Desktop
Tablet
Mobile
It’s a Wrap!
Let’s quickly review the steps we took to achieve this recipe card template design.
- Install the ACF plugin.
- Set up a recipe card field group.
- Add custom fields.
- Create a new template and assign it to blog posts under the ‘recipes’ category.
- Use dynamic content from ACF fields in the modules.
- Create or edit a blog post by filling in the fields.
- Add blog post content.
Since this design was created as a template with dynamic content, it will stay consistent throughout all recipe blog posts which use the ACF plugin custom fields. We hope that this recipe card template design inspires all sorts of new and innovative recipe templates for your food-related blogs. Let us know your thoughts in the comments.


I am really disappointed that you are sending me to buy someone elses product. I bought divi. You guys should develop a plug in like this if you are going to promote it. Don’t send me to buy ANOTHER plugin. If you are going to promote others products, at the least, start the post by telling me this is not a divi feature and additional purchases are needed to make this design.
Most recipes templates I see, have a selectable ‘servings’ field, which then alters the quantities in the ingredients list.
Would that be possible with ACF?
I’m building a directory (kind-of) website using ACF.
Also checked Sean Bartons ACF modules – good extra’s
I am looking for a way to easily collect the data e.g. a form I can let the participants fill in to create the post.
Not looking forward to have to fill in hundreds of new posts all by my self.
So how to combine with some form – can the divi form get info to push to custom fields?
TIA
Outstanding! Especially considering the cost of one of the better recipe plugins. Thank you!
Oh! loved this template collection. I was wondering if you can suggest me a good plugin for social sharing. These days social sharing plays a vital role in internet marketing.
This is awesome!
A possibility to set it as rich snippet would be fine because of seo,
This is very helpful, especially because I have a client who may need to post recipes on her blog. The only feature that seems to be missing is an option to print out the recipe (if possible, keeping it to 1 page). In that regard, my client may need to stick to using a recipe plugin instead.
Until then, perhaps creating a one page pdf, upload to media library, and use a text or button link to that in the post that says something like ‘Print Recipe’.
Great care!! DIVI 4 is not compatible with WPML. 🙁
Nooooo, what issues are you having?
This is great – why not take it all the way and create a custom post type for Recipes?