
Adding a sticky footer reveal to your website can bring that extra little touch you were looking to give to the footer of your website. The footer reveal effect opens and closes the visibility of the footer as you scroll to and from the bottom of the page (unveiling the footer like a shutter on a window). Usually, this effect requires custom CSS that is limiting and hard to work with. But with Divi’s theme builder options, you can easily add a footer reveal effect to any custom footer design built with Divi’s built-in options.
In today’s Divi tutorial, we’re going to show you how to create a sticky footer reveal in Divi. All it takes is a few easy steps.
Let’s get started!
Sneak Peek
Here is a quick look at the sticky footer reveal design we’ll build in this tutorial.
To lay your hands on the template from this tutorial, you will first need to download it using the button below. To gain access to the download you will need to subscribe to our newsletter by using the form below. As a new subscriber, you will receive even more Divi goodness and a free Divi Layout pack every Monday! If you’re already on the list, simply enter your email address below and click download. You will not be “resubscribed” or receive extra emails.

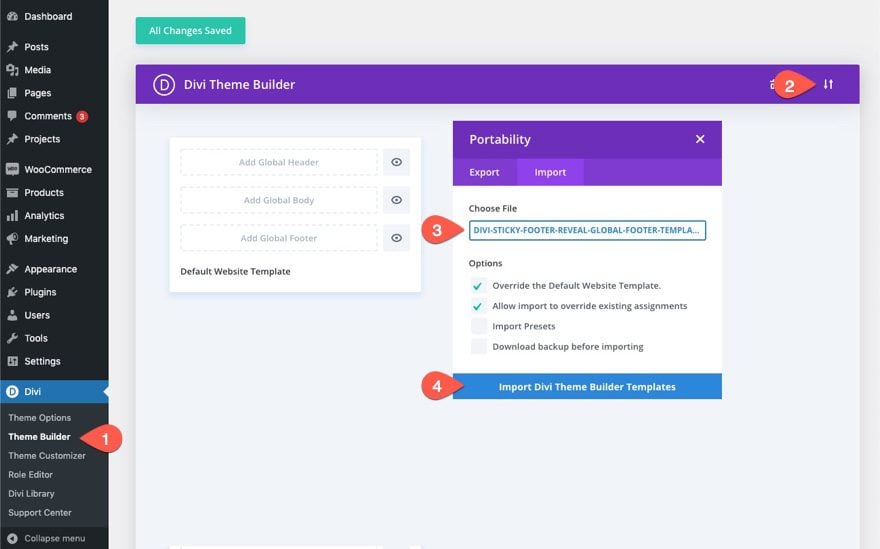
To import the template layout to your website, you will need to go to the Divi Theme Builder and use the portability option to import the .json file to the theme builder.
Let’s get to the tutorial, shall we?
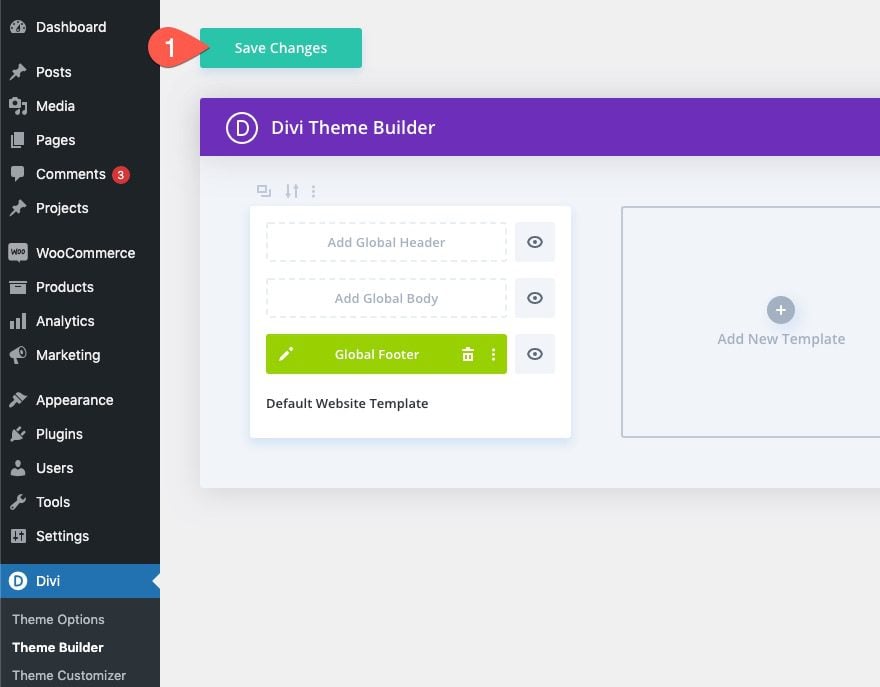
Start by going to the Divi Theme Builder in the backend of your WordPress website. There, add a new global or custom footer.

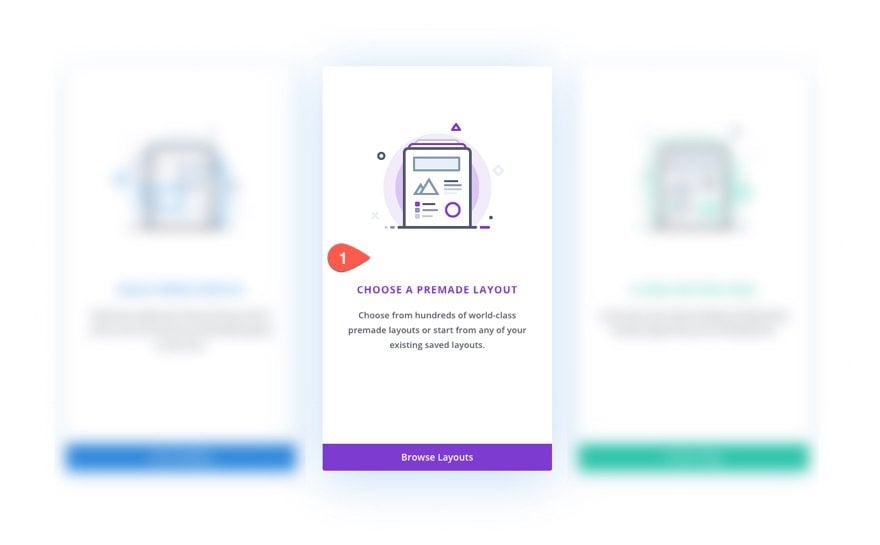
Next, select the option “Choose A Premade Layout”. For this tutorial, we are going to use a premade layout to speed up the design process. But, you could start building one from scratch if you want.
Under the Add From Library popup, find and use the Marina About Page Layout from the Marina Layout Pack.
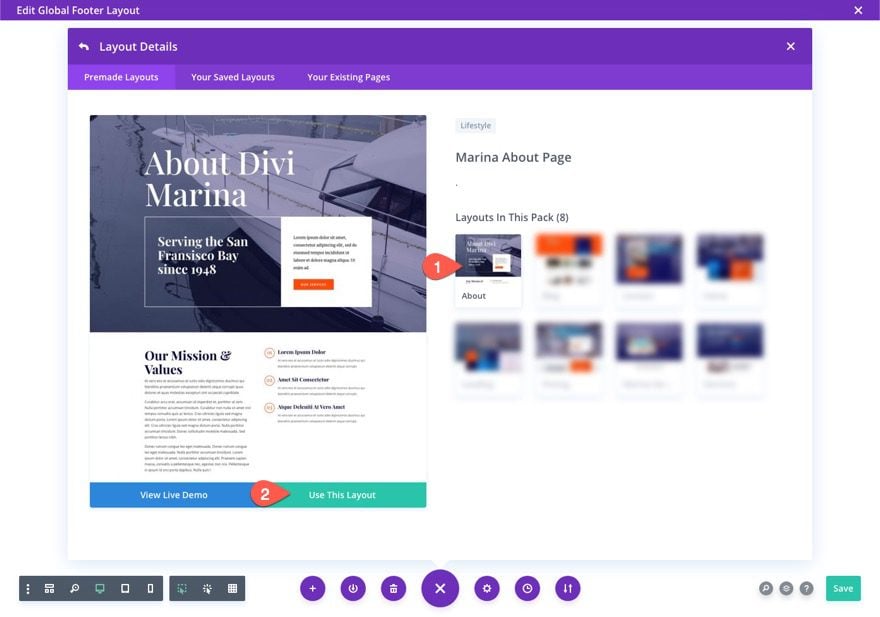
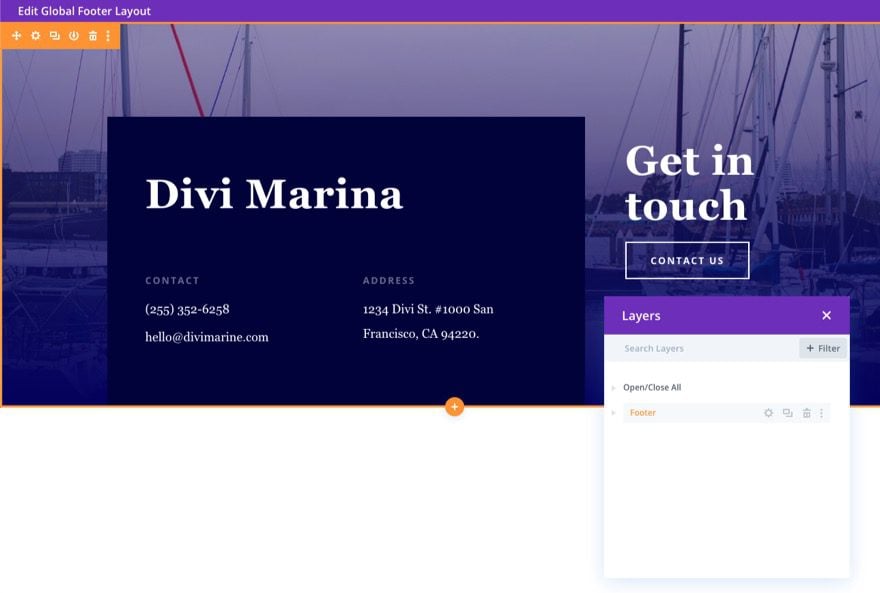
Once the layout has been loaded, delete all the sections except the bottom footer section. We will use this footer section to add the footer reveal effect.
To add the footer reveal effect to the footer section, we will need to do the following.
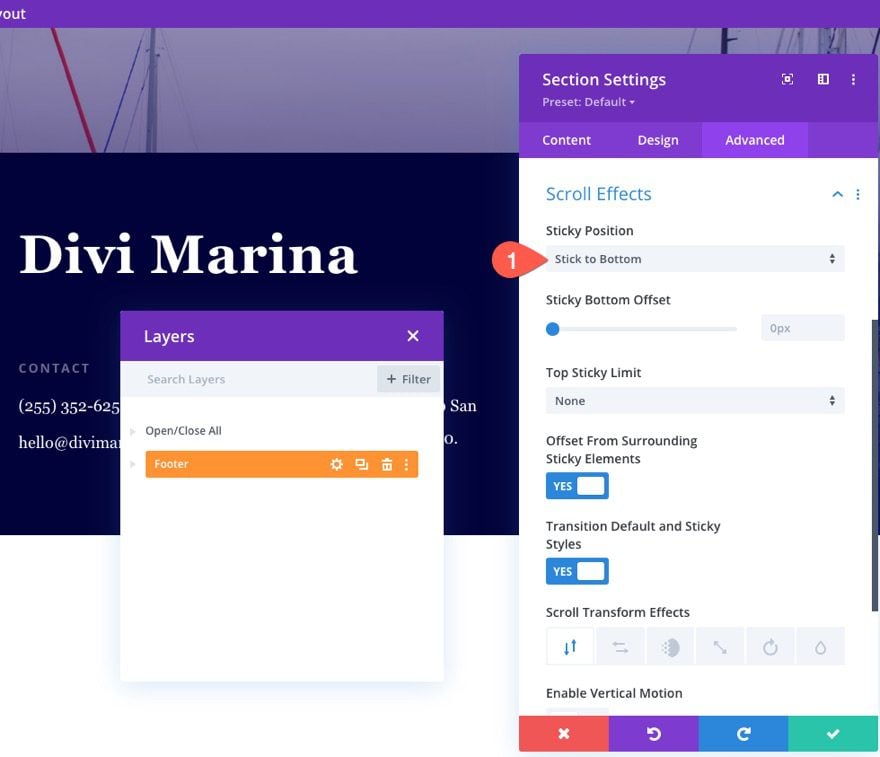
1: Add Sticky Position to Footer Section
First, we need to give the footer section a sticky position. To do this, open the section settings and click the Advanced tab. Under Scroll Effects, update the sticky position so that it sticks to the bottom:
- Sticky Position: Stick to Bottom
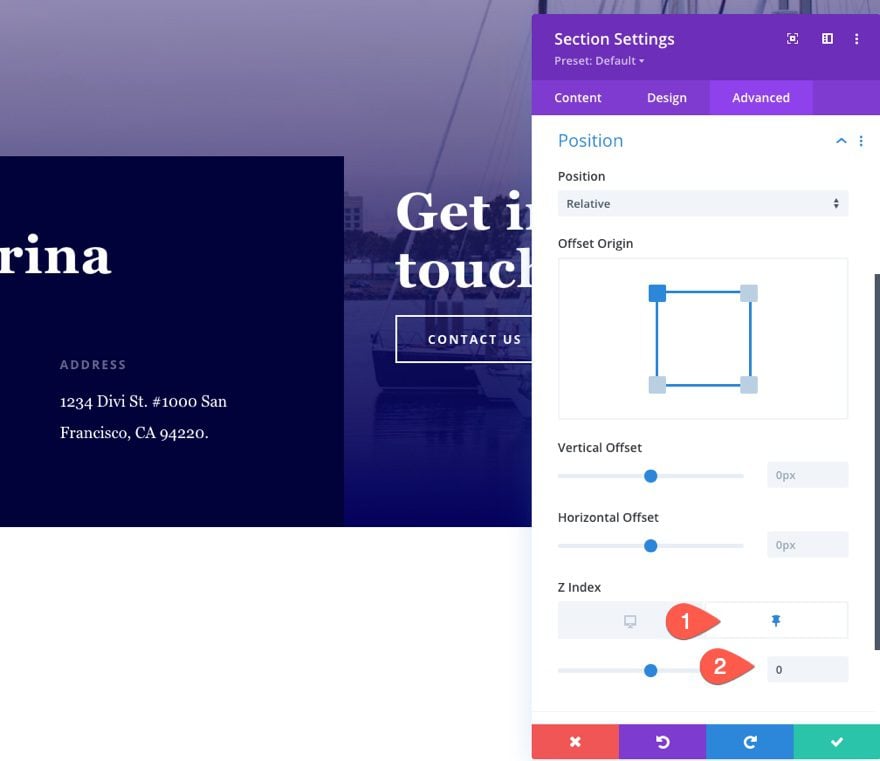
1: Update Z-Index for Sticky State
Next, we need to give our footer section a z-index of 0 when the section is in the sticky state. This will allow the section to sit behind other sections or elements on the body of the page when scrolling.
To do this, update the position Z Index by clicking the sticky icon next to the Z Index option to activate the sticky style tab. Then, update the Z Index to 0 under the sticky tab.
- Z Index (sticky): 0
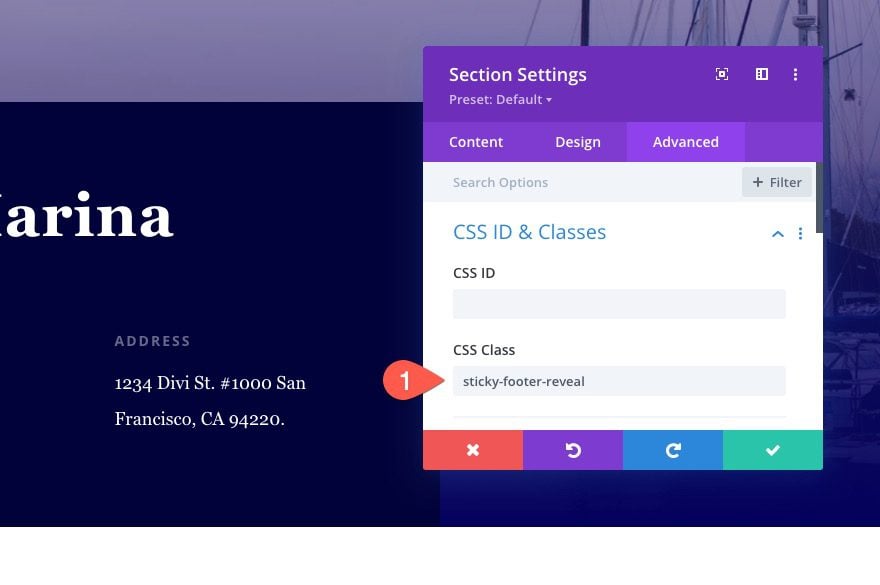
3: Update Sticky Footer Placeholder Z Index
When an element is given a sticky position in Divi, a duplicate placeholder element is also created automatically behind the scenes. This helps deliver the functionality needed for positioning and designing the sticky elements using the Divi Builder. In this instance, a footer section placeholder is created with a default z-index of 1. We don’t want our actual sticky footer section (now with a Z Index of 0) to sit behind the placeholder section, so we need to update the placeholder’s Z Index to -1.
To do this, first add a custom CSS Class to the footer section as follows:
- CSS Class: sticky-footer-reveal
Then open the page settings of the footer template using the builder settings menu. In the Footer Template Settings modal, select the Advanced tab and enter the following CSS in the Custom CSS box:
.sticky-footer-reveal.et_pb_sticky_placeholder {
z-index:-1;
}
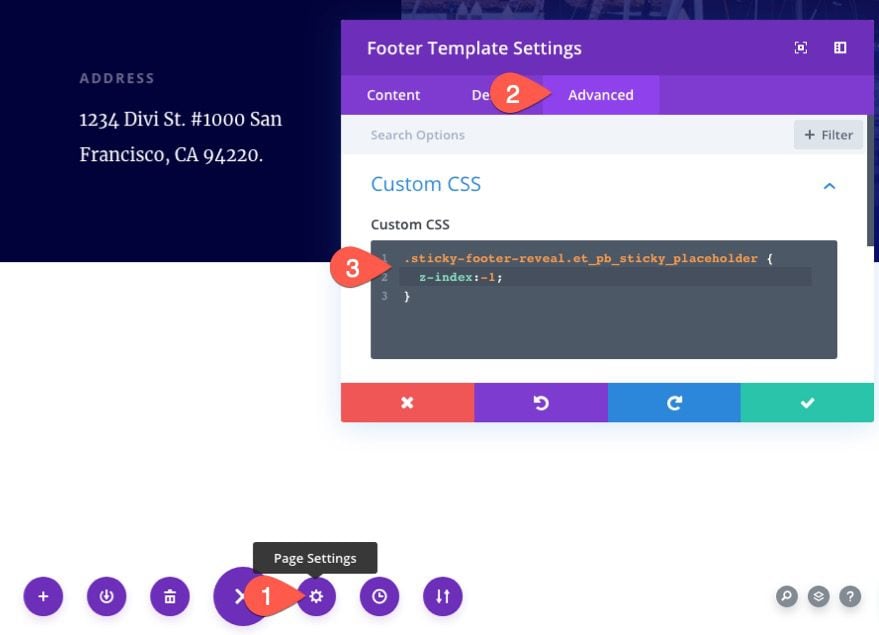
This will force the placeholder section to sit behind the footer with the sticky footer reveal effect so that you can interact with the footer section content.
4: Save Changes
Once done, save the changes to the footer template and theme builder.
Final Result
To view the final result, check out a live page and scroll away. Here it is!
Final Thoughts
In Divi, adding a sticky footer reveal to your website doesn’t require a plugin or complicated custom CSS. Using the theme builder, you can easily create a footer template and design a footer section with the footer reveal effect in minutes. Hopefully, this will provide a subtle boost to the design of your footer with an enticing interaction visitors will enjoy.
I look forward to hearing from you in the comments.
Cheers!


Hopefully, this is helpful for those visiting this post a year later. Currently, the provided CSS doesn’t work in the visual builder, but it does when viewing the published page.
To get it to work in the visual builder as well, you can target the visual builder class as well. Just use this updated CSS:
.sticky-footer-reveal.et_pb_sticky_placeholder, footer .theme-builder-area-content {
z-index: -1 !important;
}
Hope this helps if you are just looking for the css that will work right away.
Can’t get it to work in Divi 5. There is no sticky option beside the z index.
Divi 5 has the full suite of Divi sticky options, position options and scroll effects!
Hi there…
It is a little bit strange that I feel like a stupid boy when I cannot fix the issue if I do everything according to the tutorial.
Yes, I have a fixed footer if to look at the page in Chrome. But if to enable Visual Builder and scroll down – the footer jumps up and does not want to hide if to scroll up!
Why so???
If the Content of the page is too long the sticky reveal issue shows on the middle of the page. Is there any fix on this issue?
My first thought would be to add a custom height to the body of the page that spans the full width of the browser window.
I hope this can be applied to any customized footer you have already saved and just add the sticky feature.
caiylle,
Yes. This should work for any customized footer.
What worked for me was leaving out the CSS code part and lowering the z-index to below zero – instead of setting it to 0 like Jason suggested. I found I did not need any additional CSS after that.
So in short: set the z-index to -10, just as a starting point. And leave out the CSS code.
Hopefully that helps.
Thanks, Paul. Glad you figured out a solution.
This is exactly what worked for mee too. Thanks Paul!
Hi,
I followed step by step, but I am also having display issues.
When I import the .json file everything works, but when I create a section and do all the settings it doesn’t work and the footer stays on top.
What could be the problem?
Thanks
Far,
See my comment to Wendy above. I made the correction in the tutorial. Sorry about that!
Hi Jason,
No, unfortunately there is something going wrong.
I have tried several times. Now after this update, the footer is attached at the bottom of body, instead in your example footer remains below body.
I also tried doing a copy and paste of the section style from your example to my section, but it didn’t work.
Could you please check it?
Far,
Sorry. I was unable to recreate that issue on my end. I would try starting from scratch with a new template and reassign the template to the page(s). Make sure to add the sticky position to the section first. Then set the sticky z index to 0. If it still doesn’t work, I would reach out to support.
Hi Jason,
I started from scratch with a new template and it worked.
Now the problem is that when a page has few content, the footer shows up in the middle of the page.
How is it possible to keep the footer at the bottom of the screen?
Hi! I love this quick and easy way to make a footer feel more special. I used an existing site I have to test it out and followed the step by step directions – setting the z index to 0 and applying stick to bottom, and the class to the section, then adding the CSS to the page styles – but it is still sitting above everything on the page. Is there something in the divi provided file that is not mentioned in the step-by-step instructions?
Wendy,
Sorry about that. I updated the post with the correction. You need to add the sticky position, “stick to bottom”, to the section first. Then update the section’s z-index to 0 for the sticky state. Thanks for letting me know!