
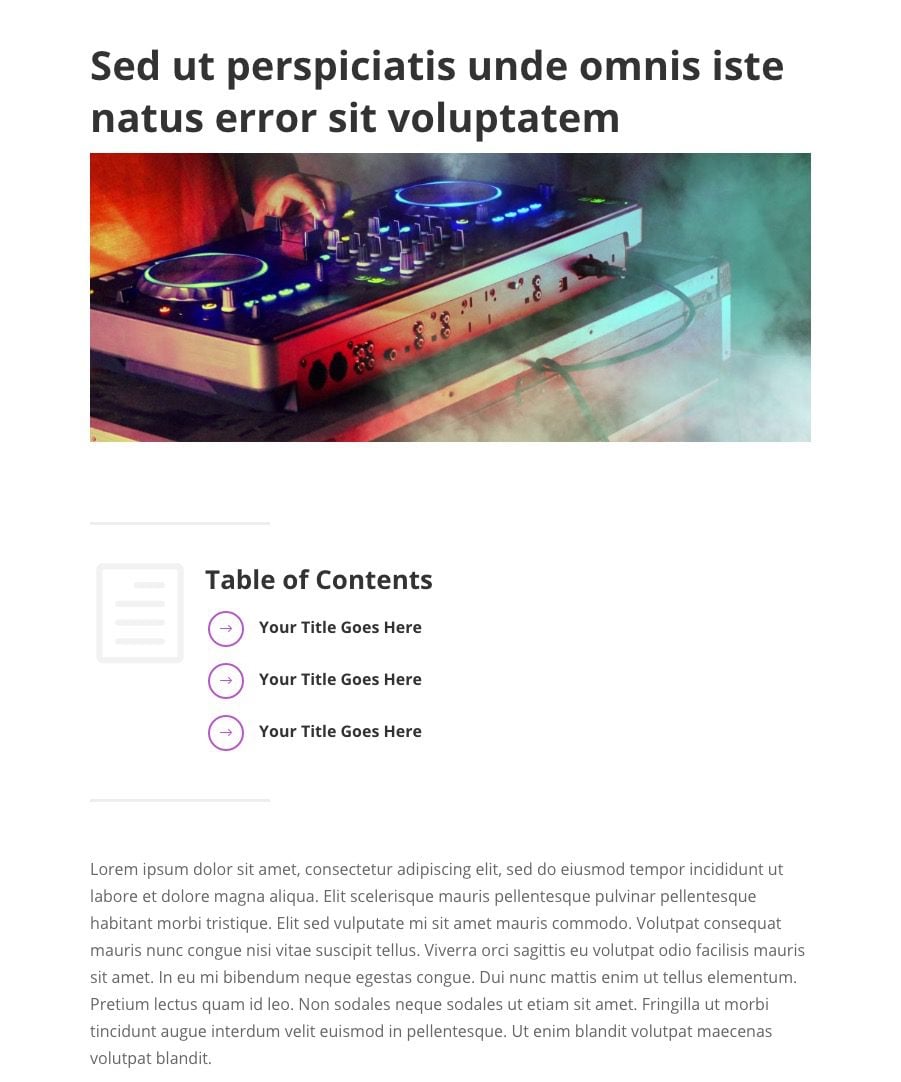
Adding a clickable table of contents to a blog post is a great way to improve user experience. In many cases, a blog post table of contents uses anchor links to help users navigate through the content. And, a table of contents (with anchor links) is really simple to build using basic HTML. However, adding custom design/CSS to customize it can be a challenge. This is where the Divi Layout Block comes in handy.
In this tutorial, we are going to design a clickable table of contents for a single blog post (in Gutenburg) that uses anchor links to bring users to designated headings throughout the post. To do this we will use the Divi Layout block to create the Table of Contents with all the powerful design tools of the Divi builder at our disposal.
Let’s get started!
- 1 Sneak Peek
- 2 Download the Reusable Table of Contents Layout Block for FREE
- 3 Download For Free
- 4 What We Need to Get Started
- 5 Creating a Clickable Table of Contents for a Blog Post with the Divi Layout Block
- 6 Adding the HTML Anchors to the Post Headings
- 7 Final Result
- 8 Adding the Table of Contents as a Reusable Layout Block
- 9 Final Thoughts
Sneak Peek
Download the Reusable Table of Contents Layout Block for FREE
To lay your hands on the Table of Contents layout block from this tutorial, you will first need to download them using the button below. To gain access to the download you will need to subscribe to our newsletter by using the form below. As a new subscriber, you will receive even more Divi goodness and a free Divi Layout pack every Monday! If you’re already on the list, simply enter your email address below and click download. You will not be “resubscribed” or receive extra emails.

How to Use the Download to Import this Layout Block on Your Site
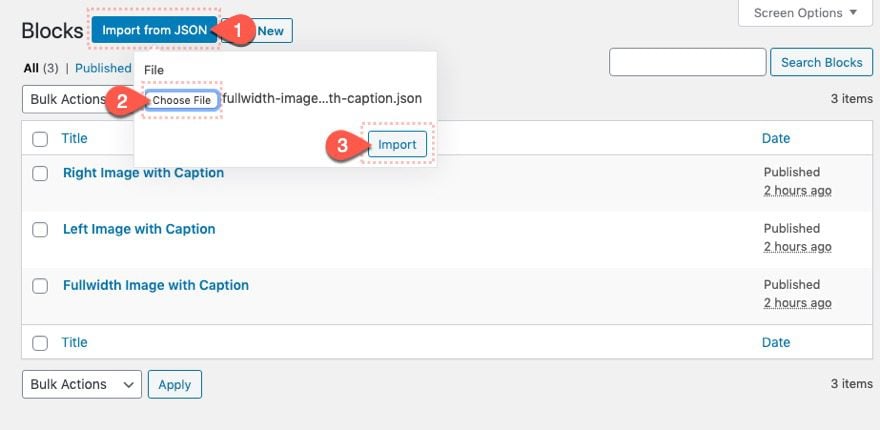
To import these reusable Divi Image Layout Block to your site, first, you need to unzip the download file. There you will find the three JSON files you will need to import to your site.
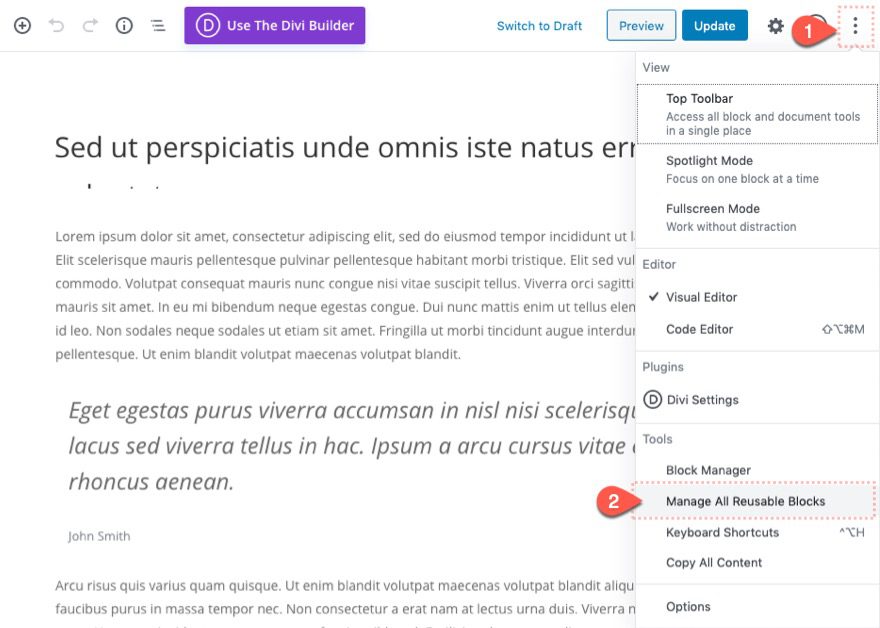
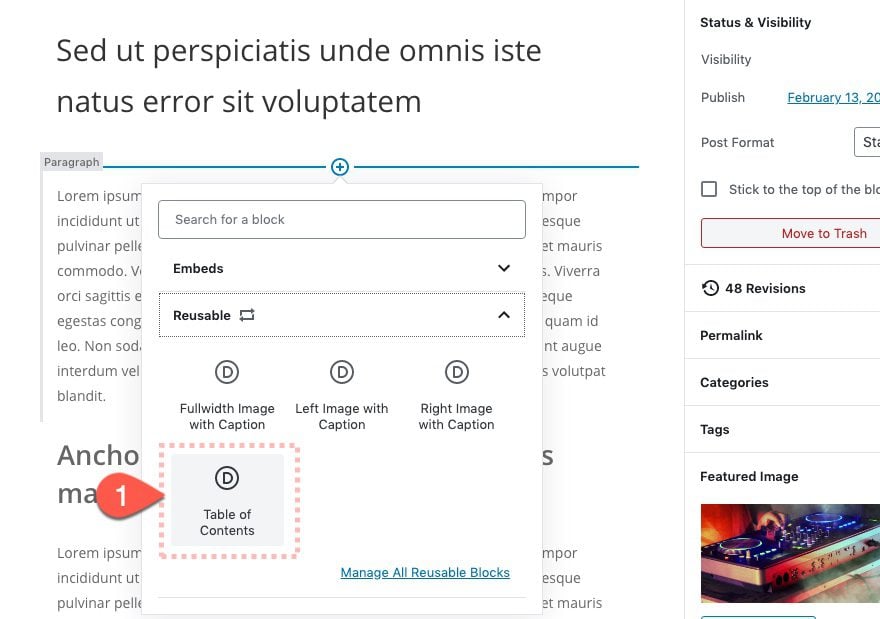
Go to edit a post using the default editor (Gutenberg). Open the “More Tools & Options” menu at the top right of the page and select “Manage all Reusable Blocks”.
Then click the Import from the JSON button. Choose one of the JSON files from the download folder and click the import button.
Once done, add a new block within Gutenberg. We will be able to find the imported Reusable layout blocks under the Reusable option toggle. Simply click the one named “Table of Contents” to add it to your post.
That’s it!
Let’s get to the tutorial, shall we?
What We Need to Get Started
To get started, we will need to do the following:
- If you haven’t yet, install and activate the Divi Theme.
- Create a new post in WordPress and use the default editor (Gutenberg) to add some mock content (title, headings, paragraphs, featured image, etc.). Make sure you create at least three heading blocks with content under each. Since we will be adding anchor links to the table of contents, we need three headings to link to further down the post.
After that, we are ready to start.
Creating a Clickable Table of Contents for a Blog Post with the Divi Layout Block
Add Divi Layout Block
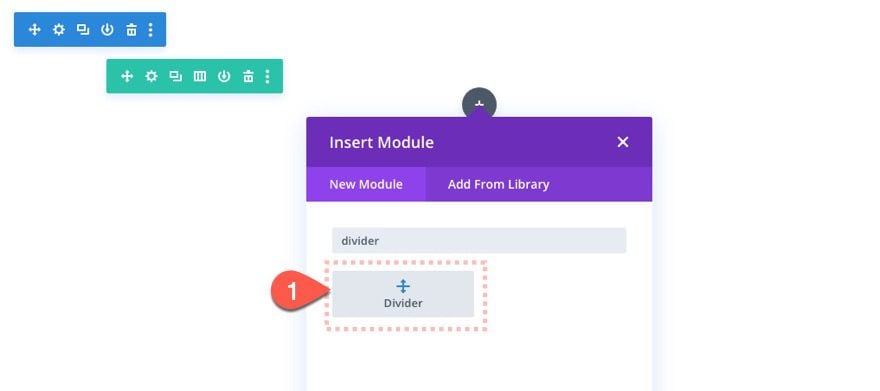
First, add a new Divi Layout Block to the top of your blog post content.
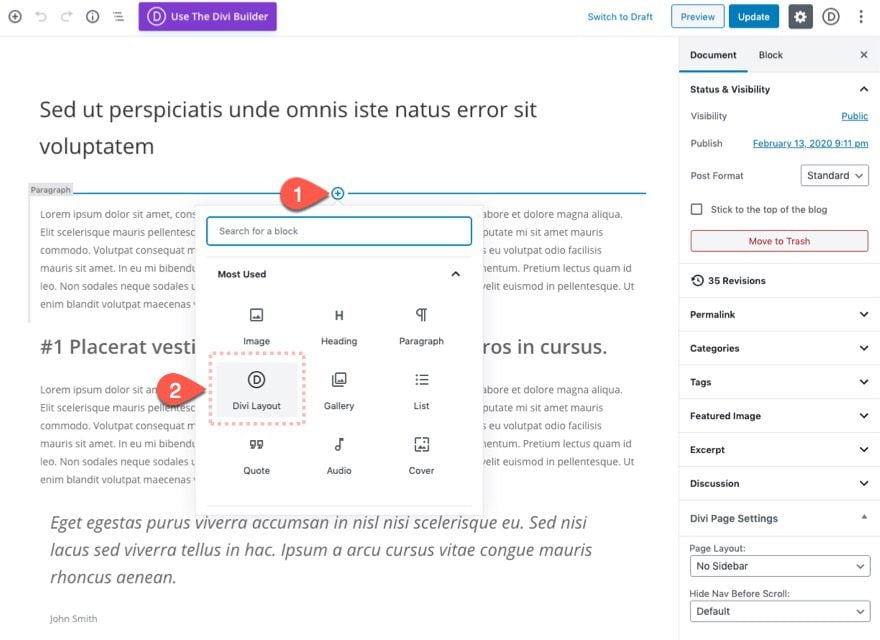
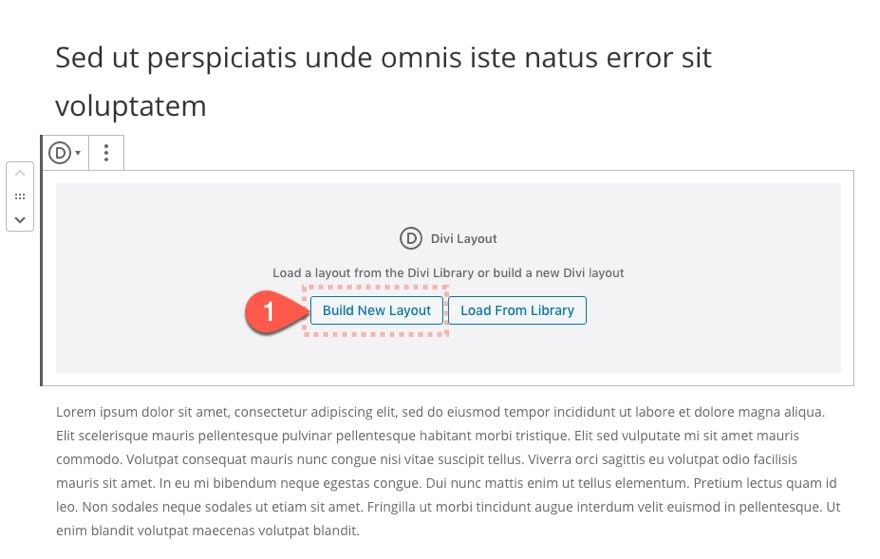
Then click the Build New Layout button. This will deploy the layout editor which is the Divi builder for a layout block.
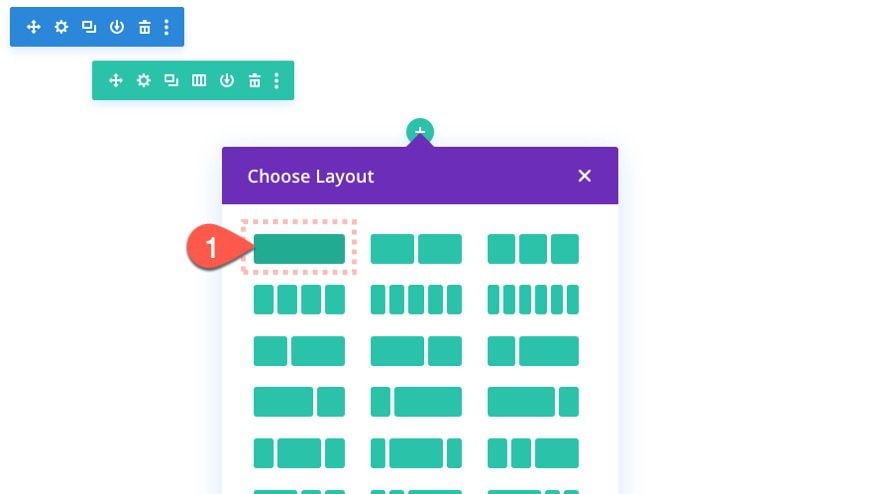
Add Row
In the Layout Editor, kick off the design by adding a one-column row.
Add Top Divider
Inside the column, add a divider module. This will be one of two dividers that we will use to frame the table of contents.
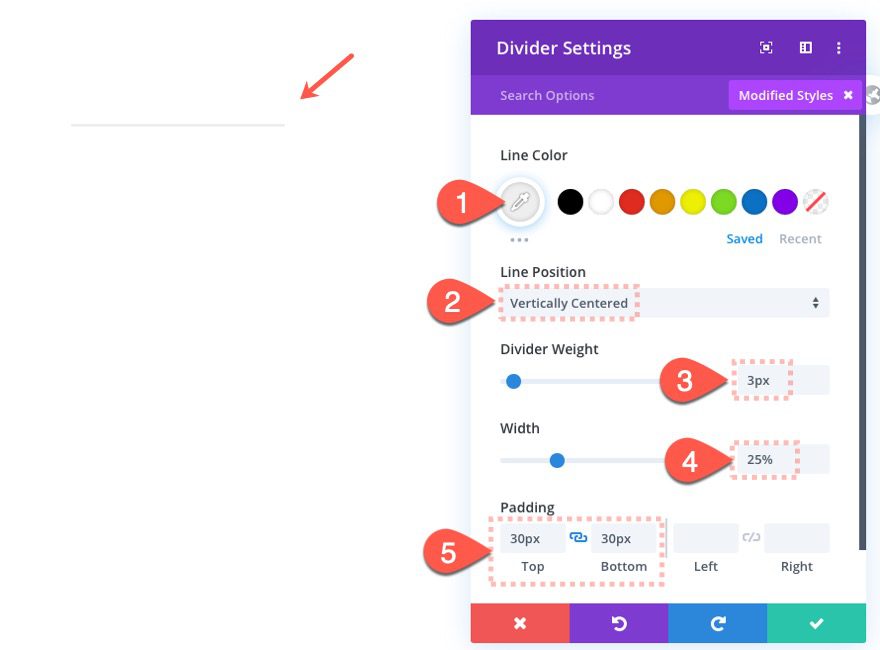
Divider Settings
Next update the divider settings as follows:
- Line Color: #eeeeee
- Line Position: Vertically Centered
- Divider Weight: 3px
- Width: 25%
- Padding: 30px top, 30px bottom
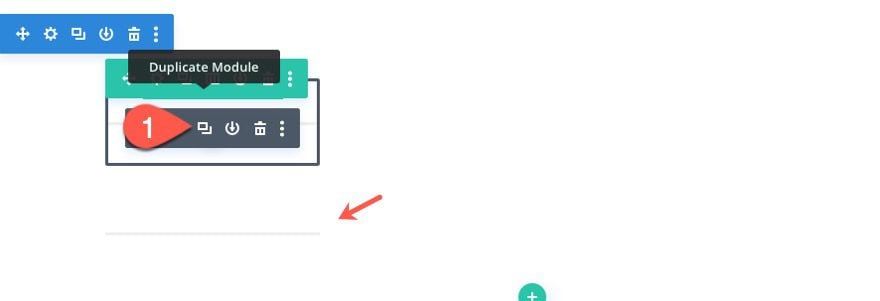
Add Bottom Divider
To create the second divider, duplicate the previous divider.
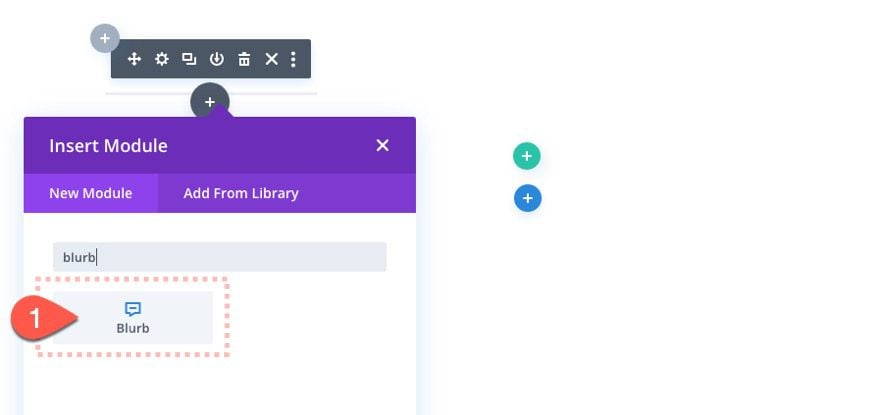
Create the Table of Contents Heading with a Blurb Module
Once the dividers are in place, let’s create our heading for the table of contents.
Add a new blurb module in between the two dividers.
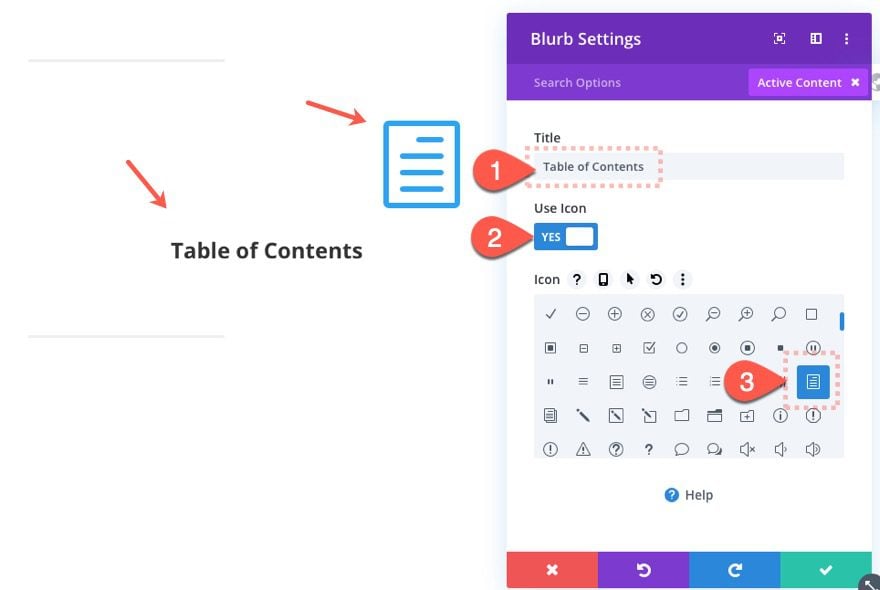
Blurb Content
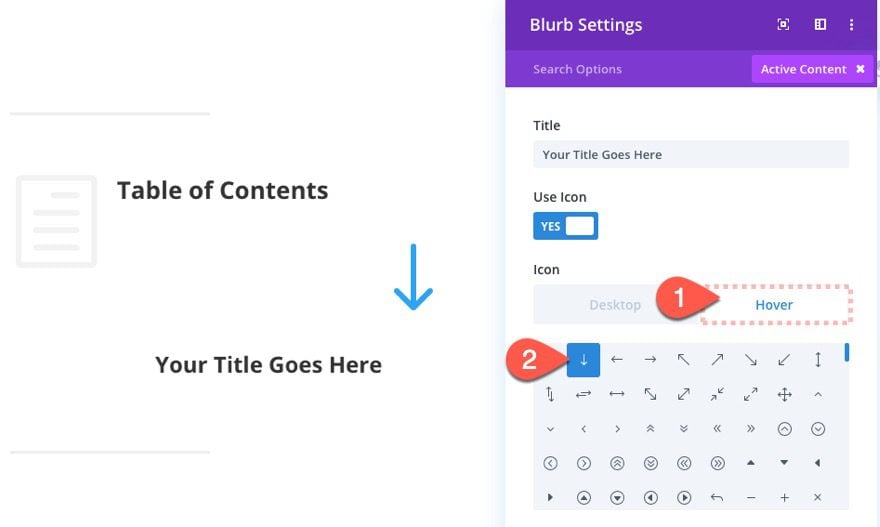
Open the blurb settings and update the content as follows:
- Title: “Table of Contents”
- Use Icon: YES
- Icon: see screenshot
Blurb Design Settings
Under the design tab, update the following:
- Icon Color: #eeeeee
- Image/Icon Placement: Left
- Use Icon Font Size: YES
- Icon Font Size: 100px
- Title Heading Level: H2
- Content Width: 100%
- Height: 38px
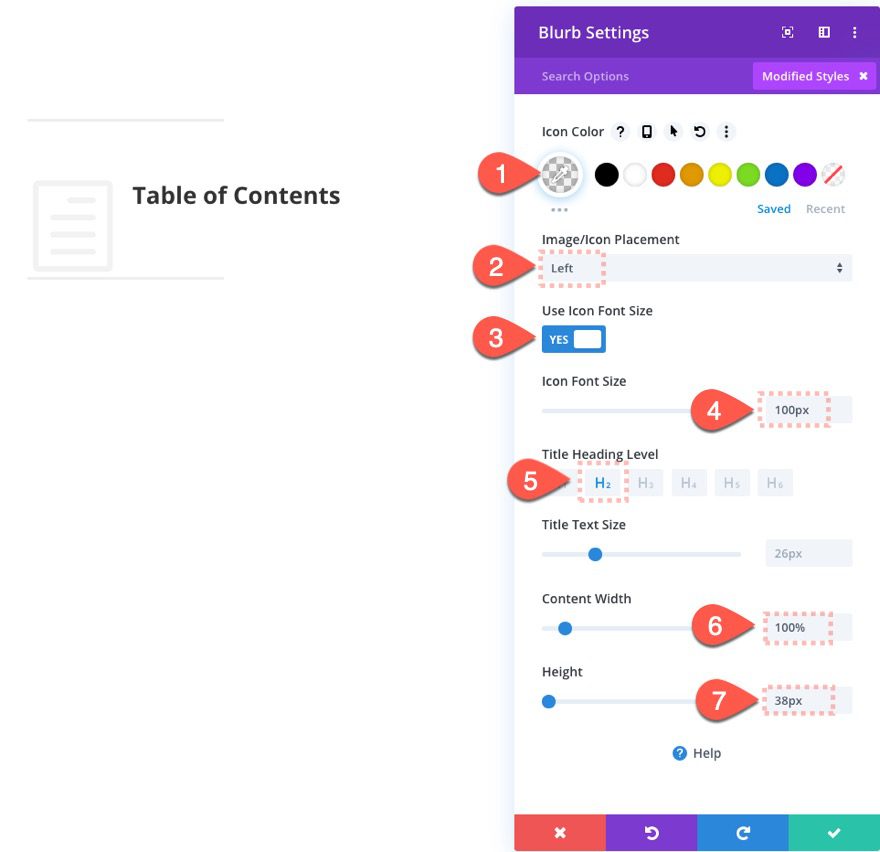
Notice that the height of the blurb is less than the height of the icon. This allows the icon to extend downward next to the blurb items we will add next.
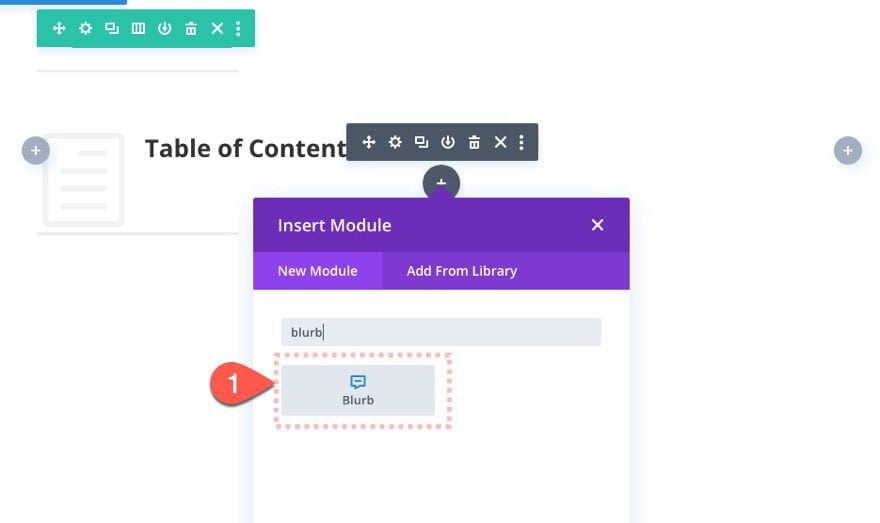
Once the title blurb is in place, we are ready to start adding the clickable items/blurbs that make up our table of contents. To do this, we are also going to use blurb modules.
Add Item #1 Blurb
Add a new blurb module under the title blurb.
Blurb Content
Open the blurb settings and take out the default body content so that only the title is visible. The title is where you will add the block of text that corresponds to the section/heading we want to link to further down the post.
Then update the content with the right arrow icon on desktop.
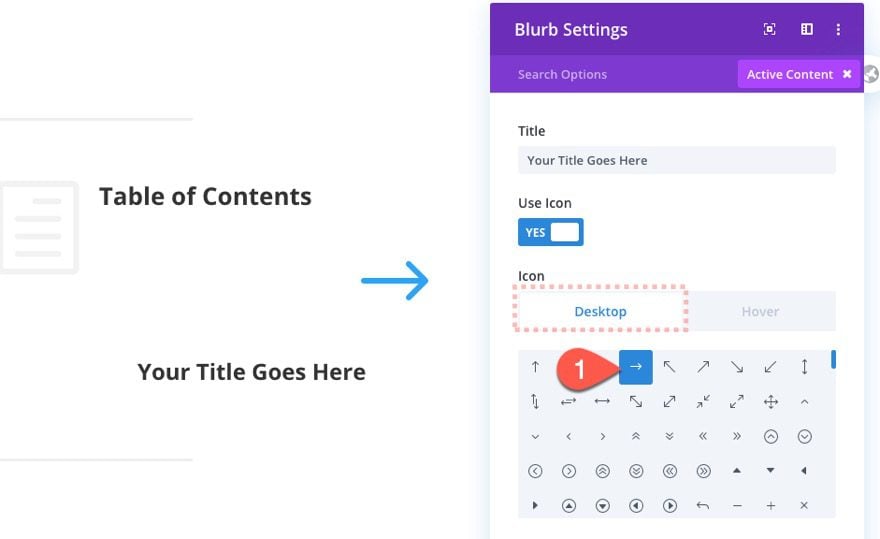
Deploy the hover option for the icon and change the icon to the Down Arrow on hover. This will be a nice micro-interaction the emphasizes the link will scroll to a location down the post.
Blurb Design
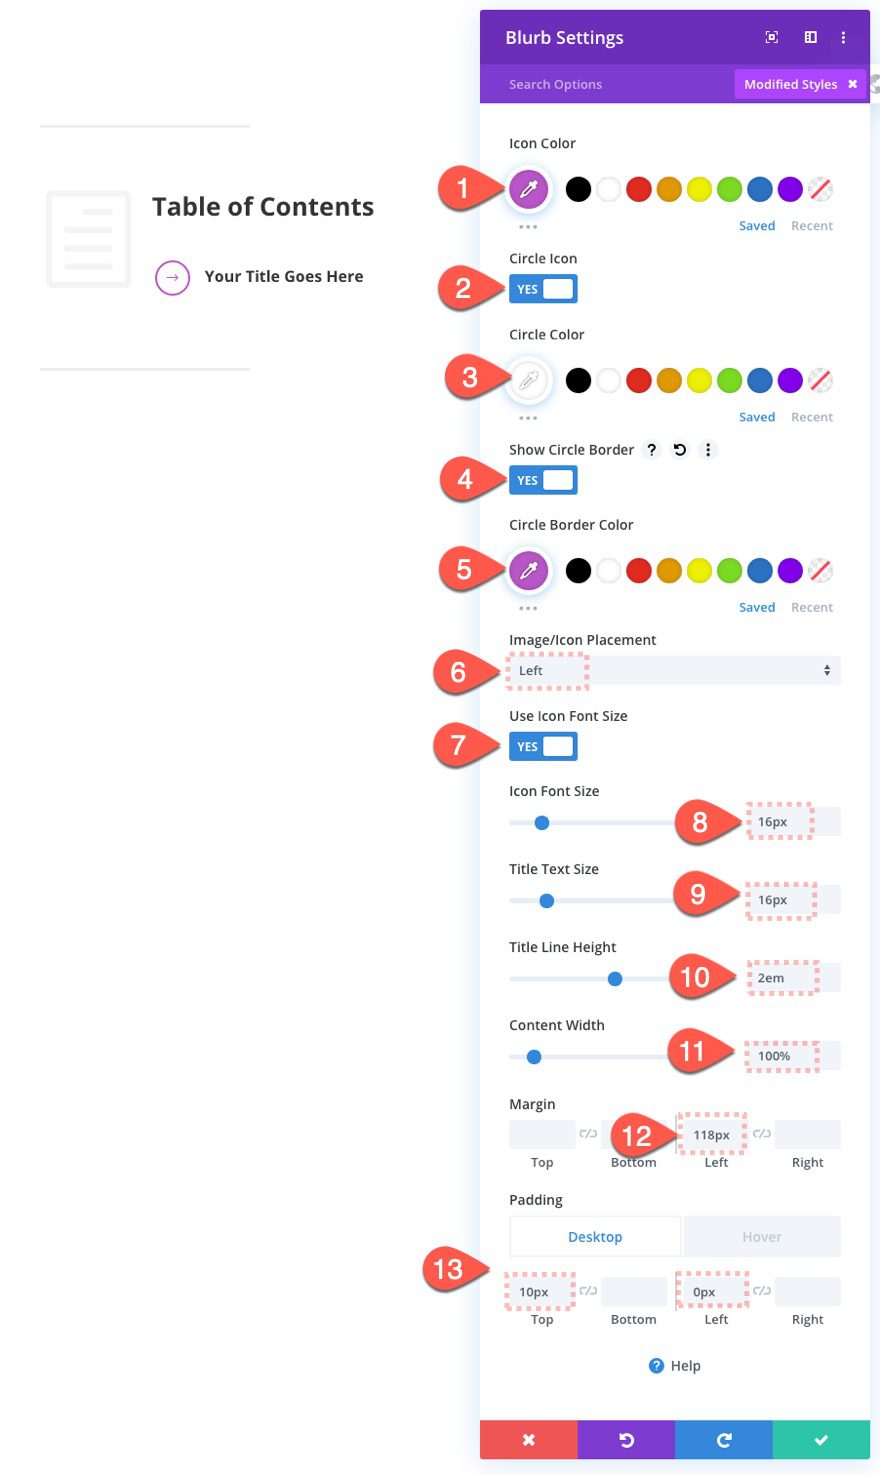
Now we can design the blurb module however we want. For this example, let’s update the blurb settings as follows:
- Icon Color: #b856c7
- Circle Icon: YES
- Circle Color: #ffffff
- Show Circle Border: YES
- Circle Border Color: #b856c7
- Image/Icon Placement: Left
- Use Icon Font Size: YES
- Icon Font Size: 16px
- Text Text Size: 16px
- Title Line Height: 2em
- Content Width: 100%
- Margin: 118px left
- Padding: 10px top
- Padding (hover): 10px left
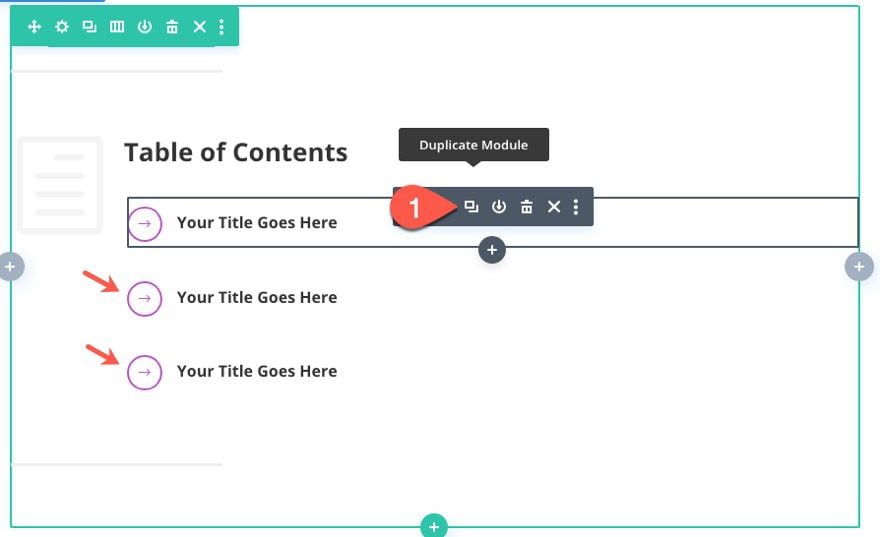
Duplicate Blurb for More Items
Now that our first blurb item is finished, we can duplicate it as many times as needed depending on the number of clickable links we want to include in the post. For now, let’s just duplicate it twice to create a total of three items for our table of contents.
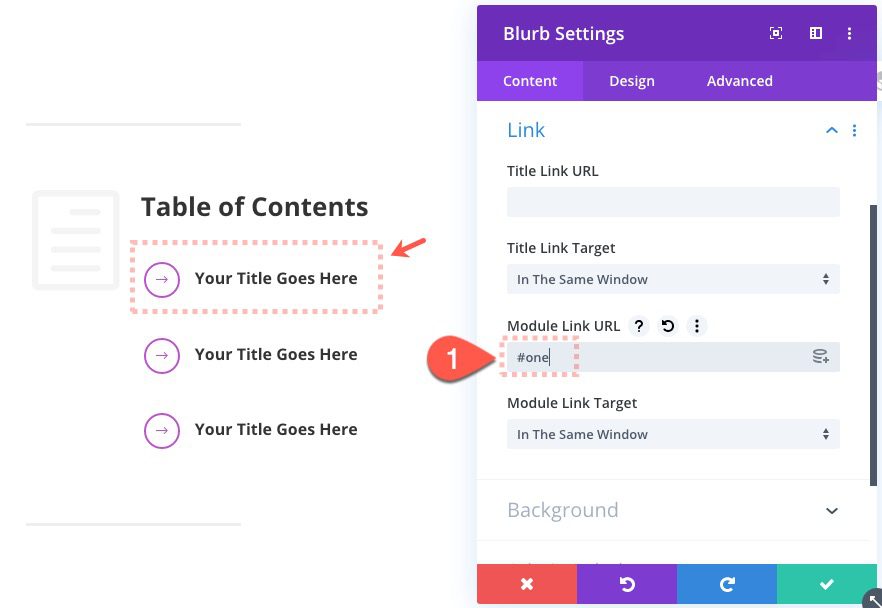
Adding the Anchor Link URLs
Right now our blurb items aren’t clickable so we need to add the necessary anchor link URLs to each of them. The anchor link URL always begins with a hashtag (#) followed by whatever ID you want to include.
Anchor Link #one
For simplicity, we are going to add the anchor link “#one” to the first blurb in the list. To do this, open the settings for the first blurb module in the list (not the title blurb) and update the following:
- Module Link URL: #one
Anchor Link #two
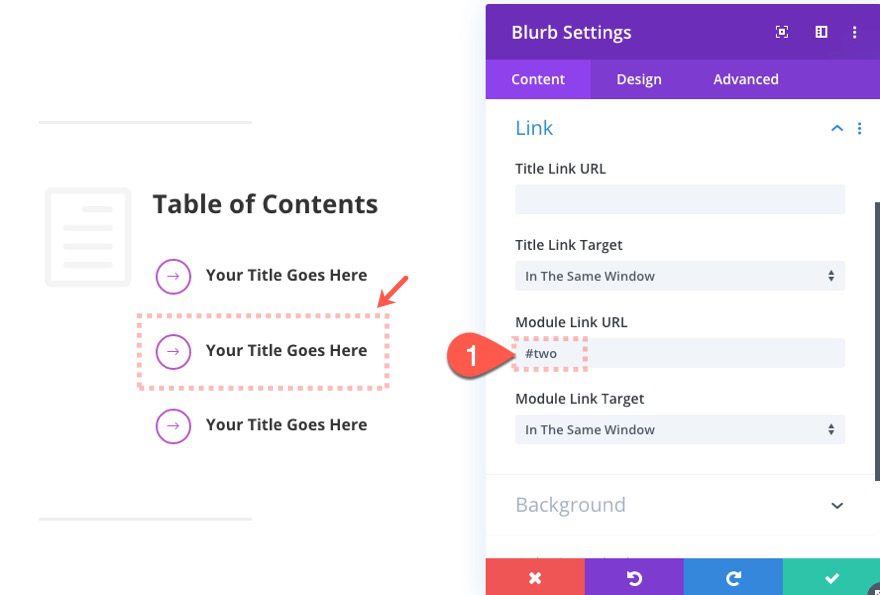
Then open the settings of the second blurb item and add the following link:
- Module Link URL: #two
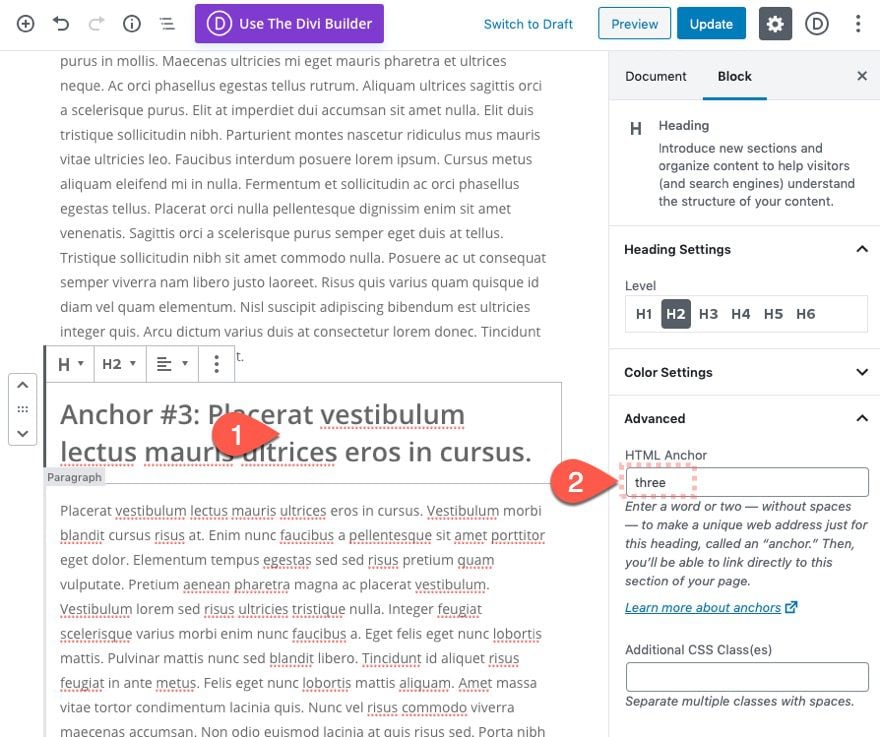
Anchor Link #three
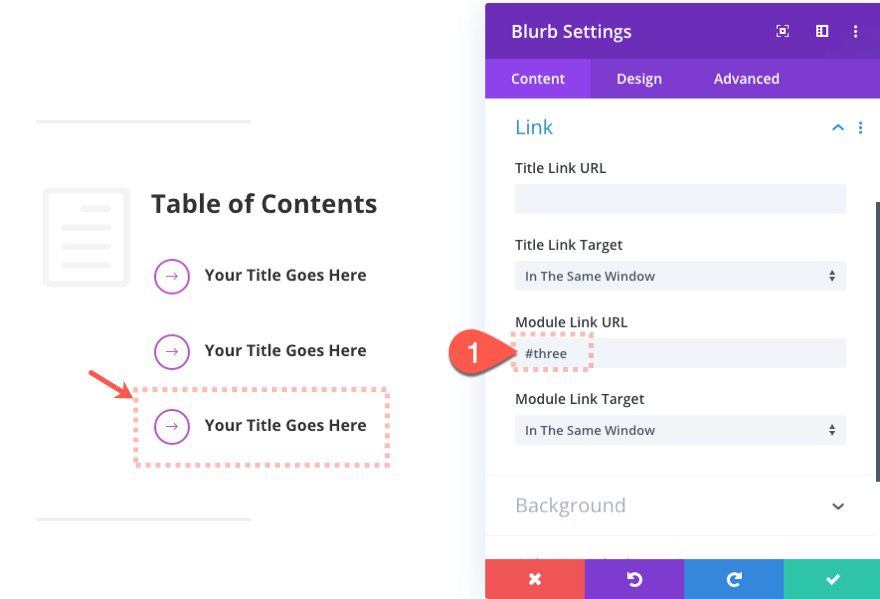
Finally, add the following link to the third blurb item:
- Module Link URL: #three
Tightening Up the Spacing
Row Settings
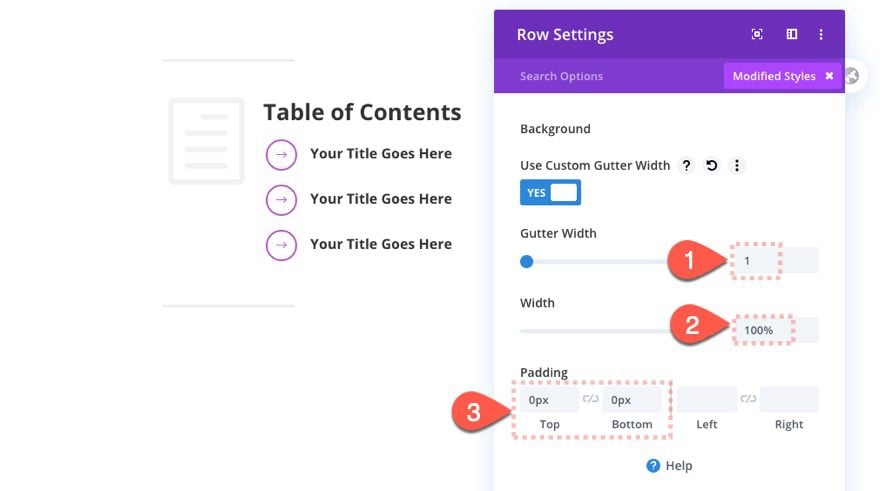
Right now, there is a bit too much space between the elements of our row. To fix this, open the row settings and update the gutter width and padding as follows:
- Gutter Width: 1
- Width: 100%
- Padding: 0px top, 0px bottom
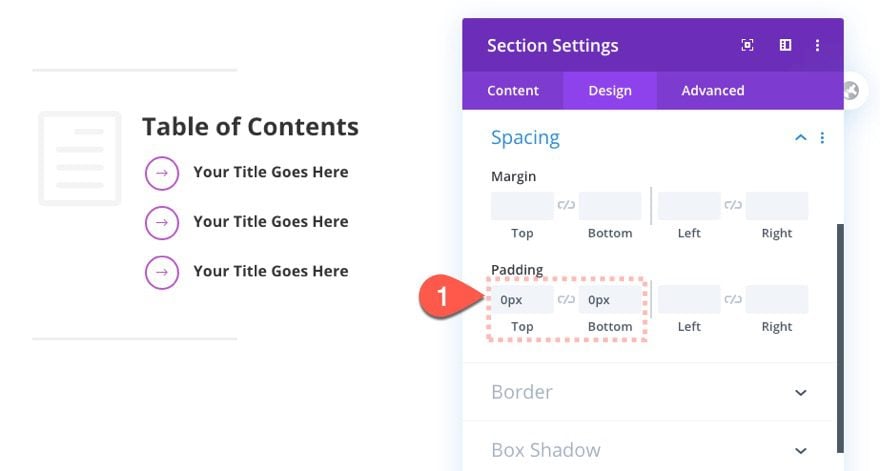
Section Settings
Let’s take out the padding of the section as well. Open the section settings and update the following:
- Padding: 0px top, 0px bottom
Save the Layout
We are done with our table of contents design. Make sure you save and exit the layout editor.
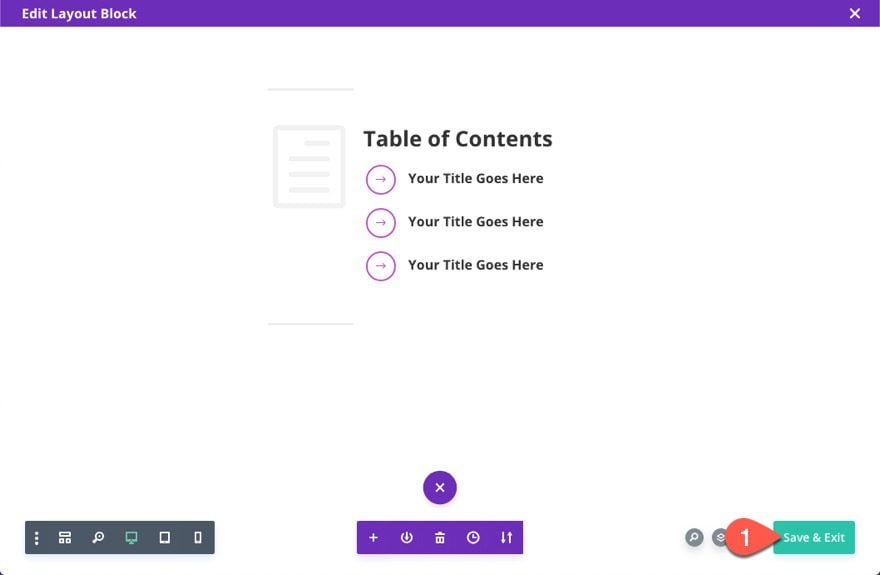
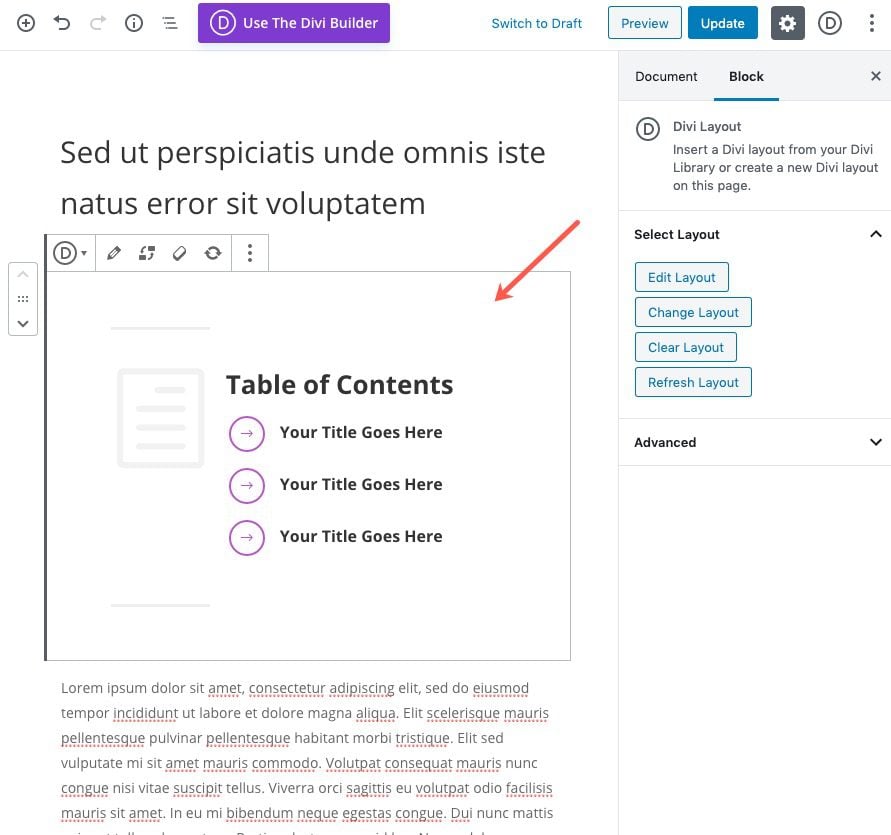
Now you should see your new table of contents inside the default block editor.
Adding the HTML Anchors to the Post Headings
We’ve added the anchor link URLs to each of the blurbs that make up the items of our table of contents. Now we need to add the corresponding CSS ID (or HTML Anchor) to the heading blocks further down the post.
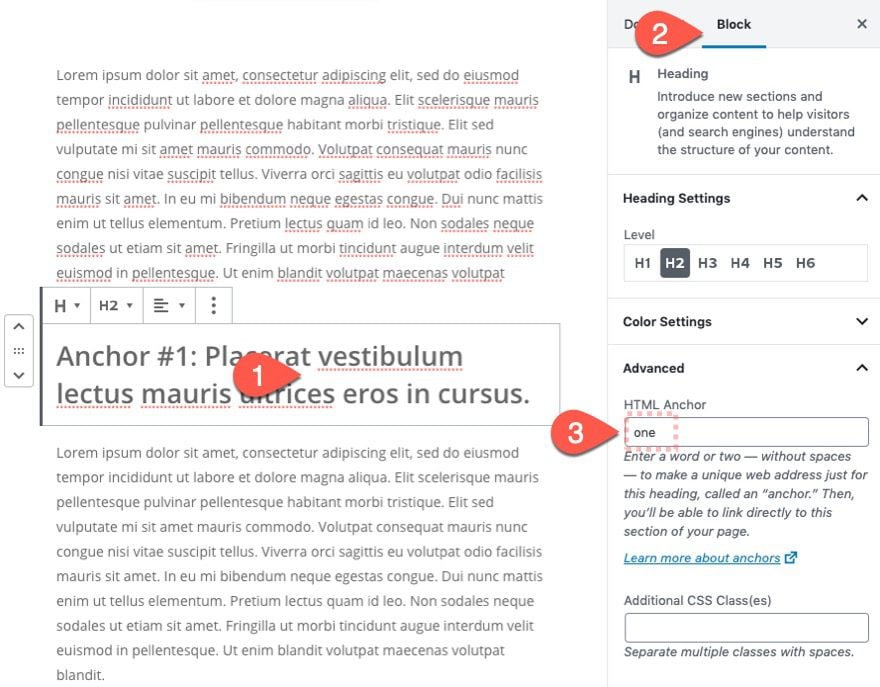
HTML Anchor one
Click on the block containing the first header you want to link/jump to. Then open the settings for that block. Under the Advanced options toggle, add “one” to the HTML Anchor input box :
HTML Anchor: one
Remember, our first blurb item has the URL “#one” which will link to this one. But do not add the hashtag to this HTML Anchor. It isn’t needed.)
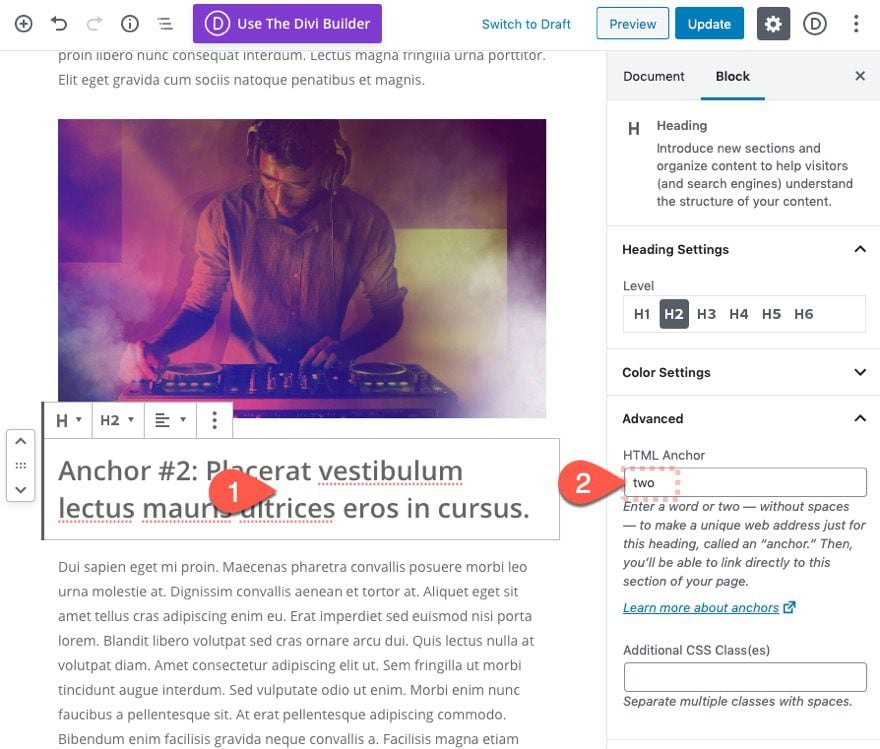
HTML Anchor two
Next, select the second heading block and update the following:
- HTML Anchor: two
HTML Anchor three
And finally, select the third heading block and add the HTML Anchor as follows:
- HTML Anchor: three
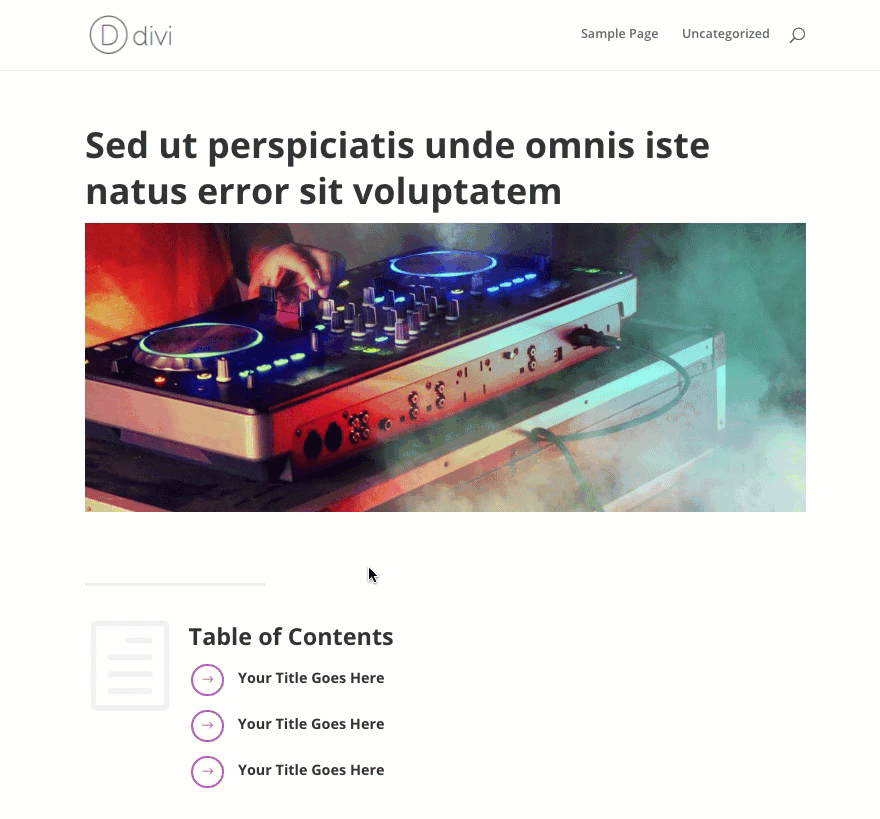
Final Result
Let’s see the final result on the live post.
And here is how the anchor links will function. Notice the hover effect on the icons and how the link scrolls smoothly to the corresponding anchor below the page.

Adding the Table of Contents as a Reusable Layout Block
If you want to keep using this layout block as a template for future posts, it would be a good idea to save the layout block as a reusable layout block. This will allow you to add a “table of contents” block easily from the built-in list of blocks.
To do this, click on the Divi Layout Block containing the table of contents and open the more settings menu. Then select “Add to Reusable Layout Blocks”.
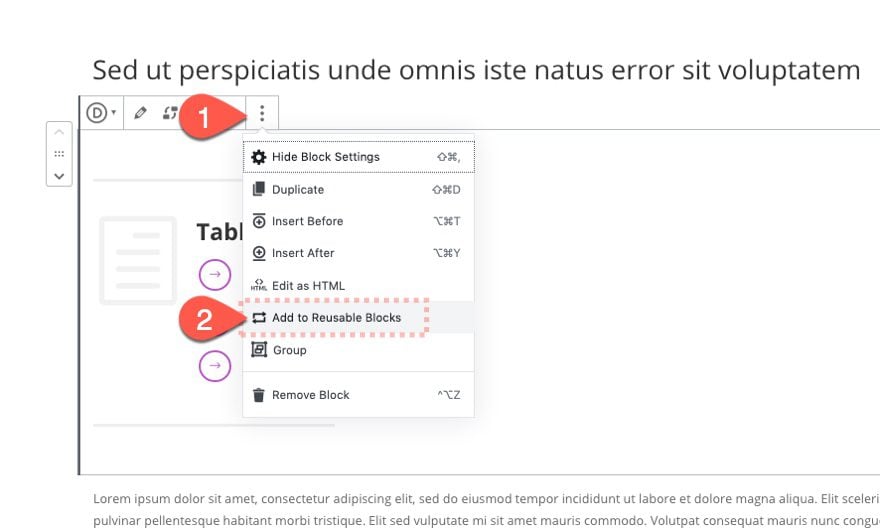
Enter a name for the reusable block (“Table of Contents”) and click save.
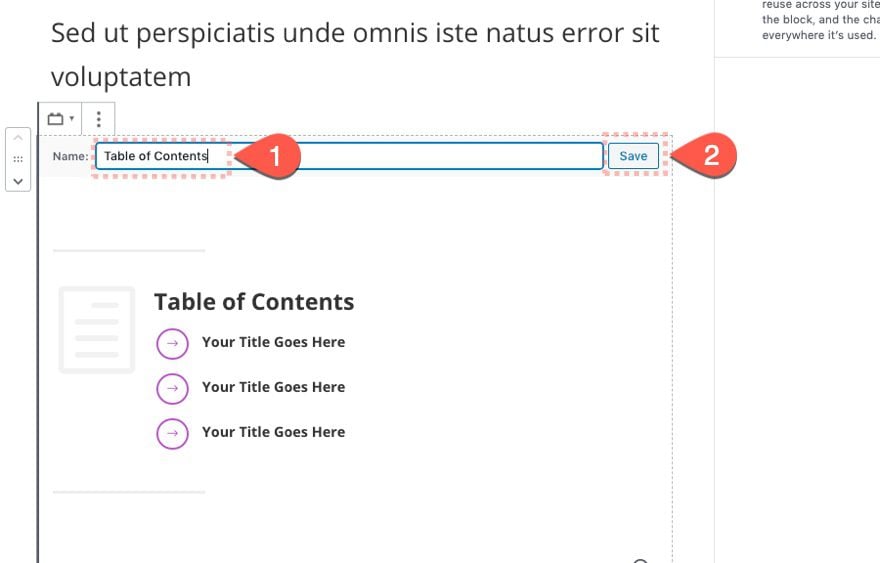
Now you will have the block available under the Reusable Blocks list when adding a new block to the post.
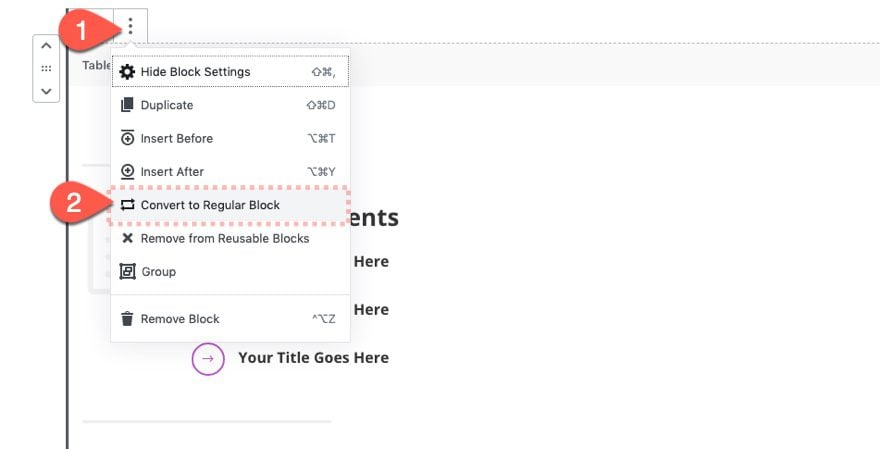
Now the layout block serves as a convenient template for building a table of contents for your post. Don’t forget to convert the block to a regular layout block before customizing it for a particular post. You don’t want to change the reusable layout block.
To do this, open the more settings menu of the reusable layout block and select “Convert to Regular Block”.
Final Thoughts
I hope that this table of contents Divi layout block proves to be helpful for those posts that are long enough to need them. If you are interested in having this done for you dynamically (like building the table of contents for you automatically based on the headings of a post), there are plugins out there like Table of Contents Plus that do this kind of thing for you. This post is for those who like designing with Divi and don’t mind building the table of contents on a post by post basis.
I look forward to hearing from you in the comments.
Cheers!


It’s really cool. I was looking for a long time. Jason Champagne Thank you.
Chuck,
It wouldn’t work with the classic editor because the Divi Layout Block is what allows you to design the TOC with the Divi Builder. Also, you could easily use it on a post designed with the Divi Builder. Hope that answers your question.
Really cool! I added this here.
https://www.philsimon.com/books/
Awesome!
Does this only work with Gutenberg?
Chuck,
It wouldn’t work with the classic editor because the Divi Layout Block is what allows you to design the TOC with the Divi Builder. Also, you could easily use it on a post designed with the Divi Builder. Hope that answers your question.
I was looking for this, thanks for sharing
Great! Glad to help.
A couple months ago I wanted to create a searchable and clickable TOC for ALL my posts. I never found a way.
I also set a new category for ‘Popular Posts’ and wanted to show them only using the blog module. That failed too as it showed all posts even when I tried to restict to that category.
Anything on either of these issues?
Thanks
Chris
Chris,
Not sure why the post by category doesn’t work. You may need to reach out to our support team. As far as the searchable and clickable TOC for All posts, are you looking for a plugin or develop the functionality it yourself?