
Every week, we provide you with a new and free Divi layout pack which you can use for your next project. Along with every layout pack, we also share a use case that’ll help you take your website to the next level.
This week, as part of our ongoing Divi design initiative, we’re going to show you how to add vehicle part search to Divi’s Auto Repair Layout Pack. This will allow your website’s visitors to easily navigate through all of your shop items. They’ll have the possibility to search by make, model, year, engine or category. The easier visitors can find the exact product they’re looking for, the higher the chances of these visitors checking out on your page.
- 1 Sneak Peek
- 2 Part 1: Download & Install WooCommerce
- 3 Part 2: Purchase & Install WooCommerce Vehicle Parts Finder Plugin
- 4 Part 3: Change Theme Accent Color & Typography in Theme Customizer
- 5 Part 4: Add Vehicle Parts Search & Cart to Sidebar
- 6 Part 5: Download Sample CSV File, Create Your Own & Upload it
- 7 Part 6: Assign VPF Terms to New Products Manually
-
8
Part 7: Include Shortcode in Shop Page & Modify Its Appearance
- 8.1 Step 1: Open Shop Page with Visual Builder
- 8.2 Step 2: Add One-Column Row
- 8.3 Step 3: Remove Top Padding of Section
- 8.4 Step 4: Add New Text Module with Vehicle Parts Search Shortcode to Column
- 8.5 Step 5: Link Text Settings
- 8.6 Step 6: Heading 2 Text Settings
- 8.7 Step 7: Sizing
- 8.8 Step 8: Custom CSS for Button
- 9 Final Thoughts
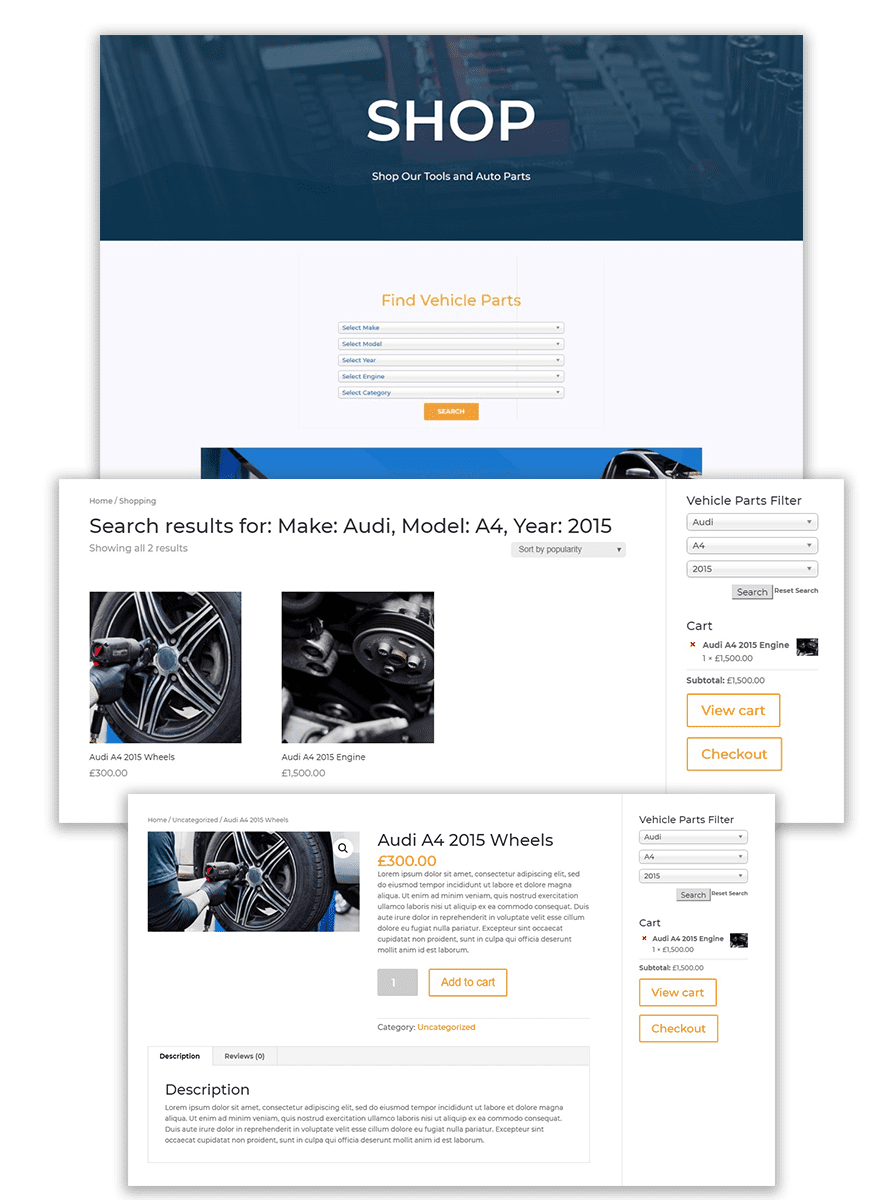
Sneak Peek
Before we dive into the use case tutorial, let’s take a quick look at the end result.
Part 1: Download & Install WooCommerce
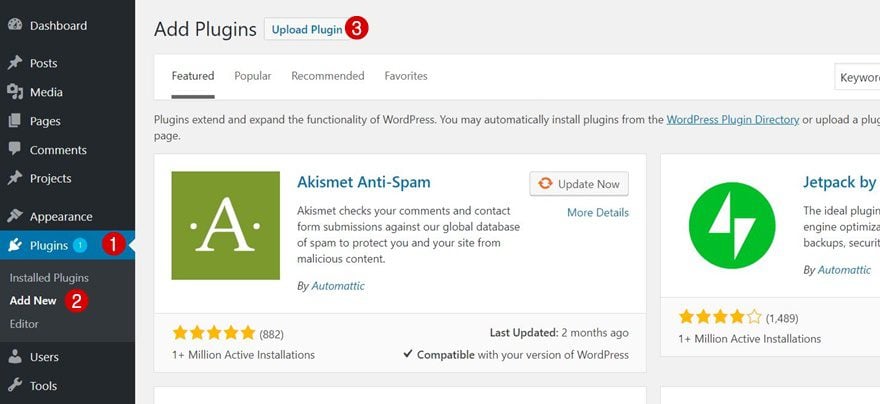
Step 1: Download WooCommerce
To complete this tutorial, we’re working with WooCommerce. Go ahead and download the plugin by going to the following page and clicking on the download button.

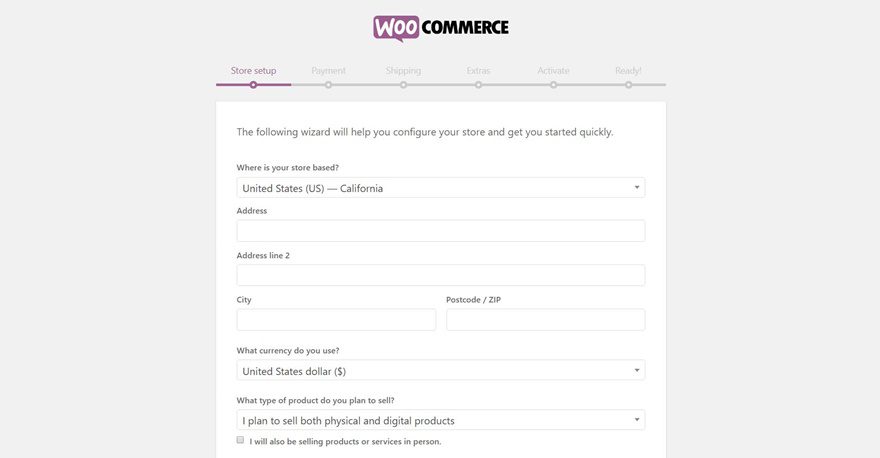
Step 2: Upload, Activate & Set up the Plugin
Upload the WooCommerce plugin, activate it and go through the setup process or skip that part for the time being.
Part 2: Purchase & Install WooCommerce Vehicle Parts Finder Plugin
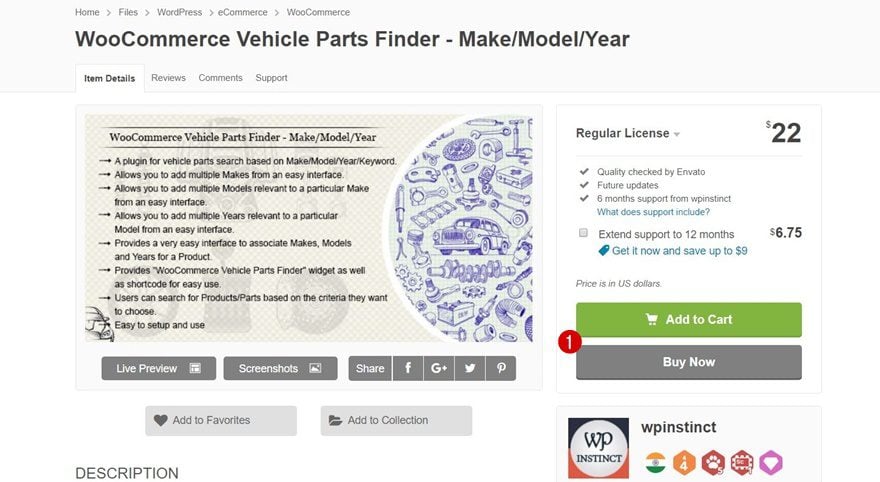
Step 1: Purchase WooCommerce Vehicle Parts Finder
Along with the WooCommerce plugin, we’ll also need the paid WooCommerce Vehicle Parts Finder plugin which you can purchase by going to the following page.
Step 2: Upload & Activate the Plugin
Again, upload the plugin and activate it as well.
Part 3: Change Theme Accent Color & Typography in Theme Customizer
Step 1: Go to the Theme Customizer
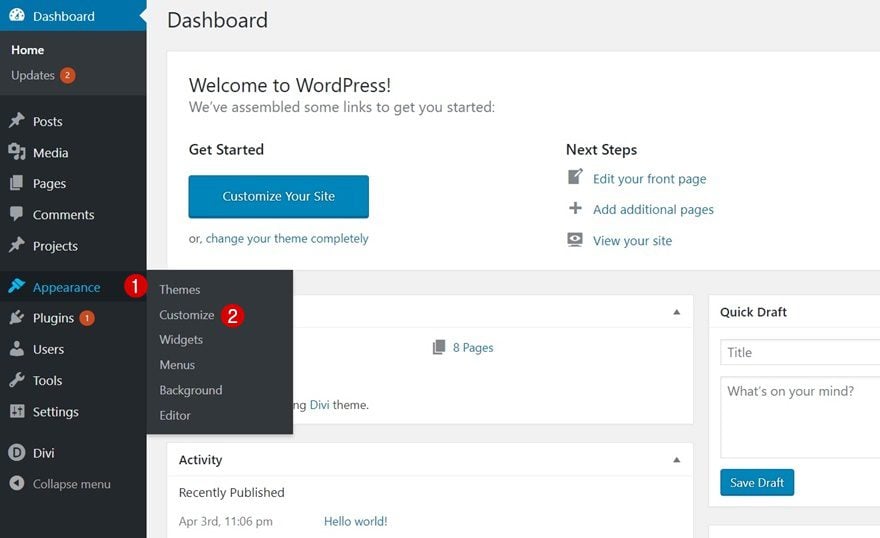
Now, to start off, we’re going to make the Theme Customizer changes we do for every layout pack. Go to Appearance > Customize.
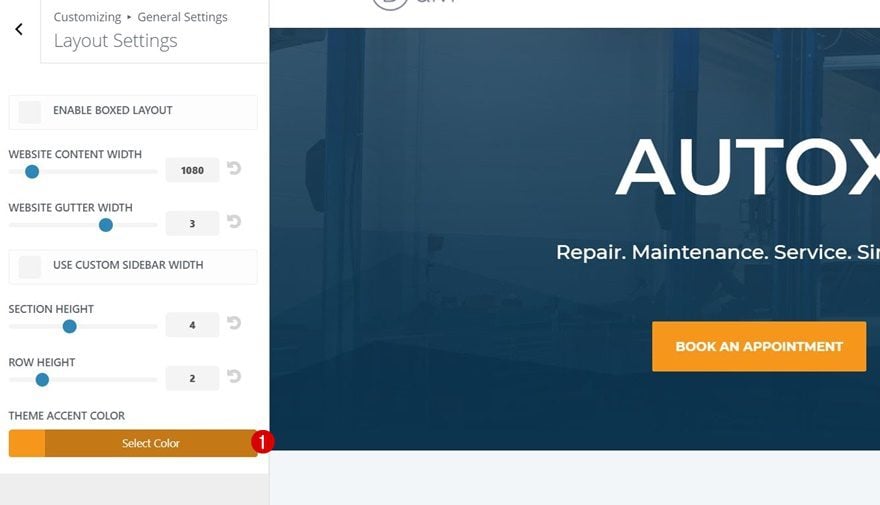
Step 2: Change Theme Accent Color
Then, navigate to General Settings > Layout Settings and change the Theme Accent Color into ‘#f6961b’.
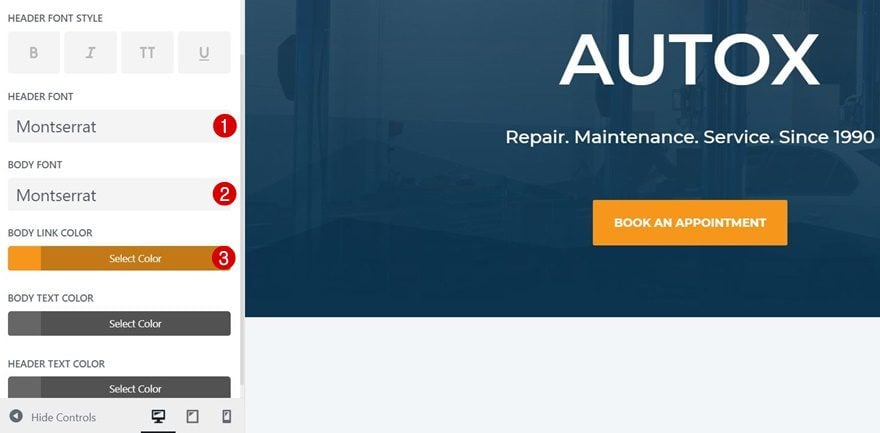
Step 3: Change Typography
We’ll need to change the font families and body link color as well by going back to General Settings > Typography and applying the following changes:
- Header Font: Montserrat
- Body Font: Montserrat
- Body Link Color: #f6961b
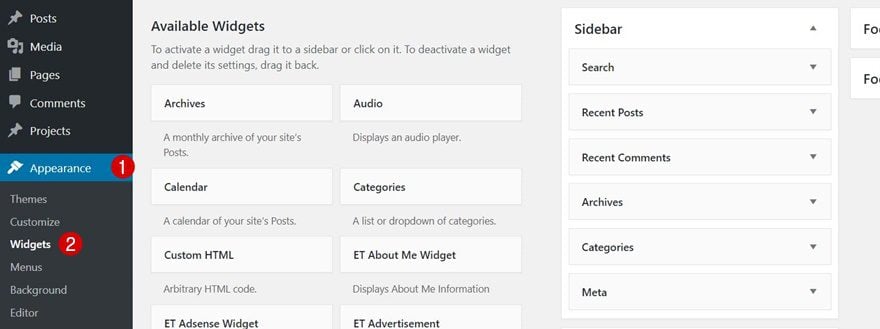
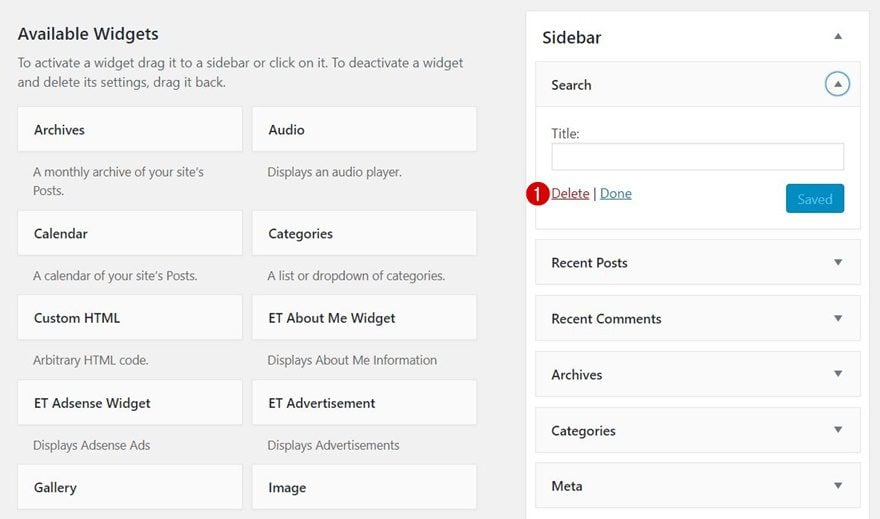
Step 1: Go to Widgets
The first part of creating the vehicle part search is adding the widget to your sidebar. That way, even when people are searching through the products, they’ll have the possibility to setup another search right away. Start by going to Appearance > Widgets.
Then, remove all of the current widgets within your sidebar. The only two things we want to include is the vehicle parts search and the cart.
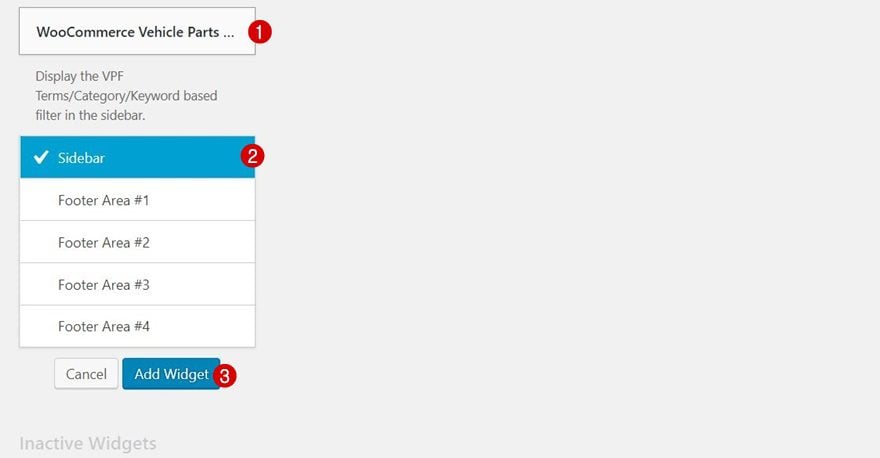
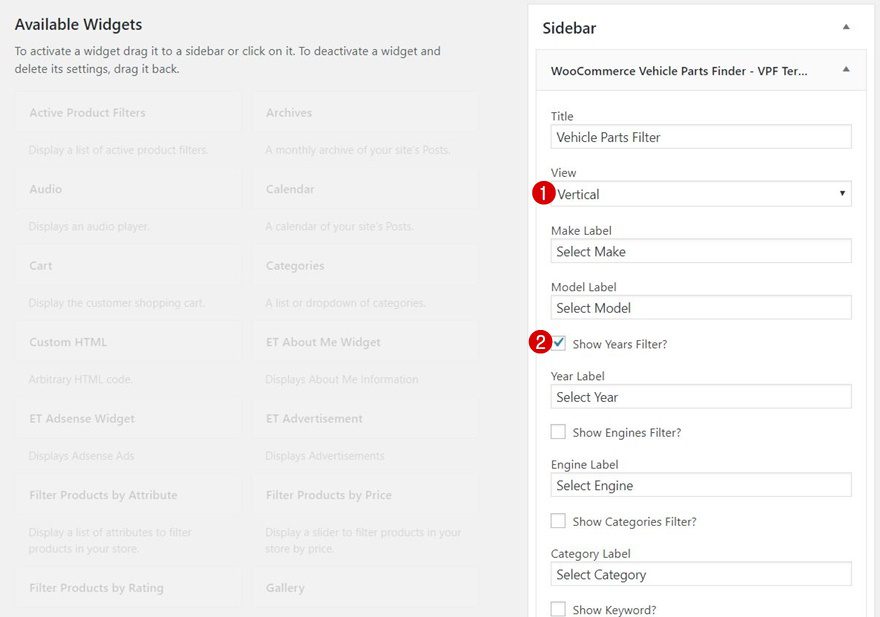
Scroll down your widgets. Once you’ve uploaded and activated your plugin, the Vehicle Parts Finder will appear within your widgets. Add this to your sidebar, use vertical view and enable the ‘year’ filter. You can also enable the other options, depending on your preferences.
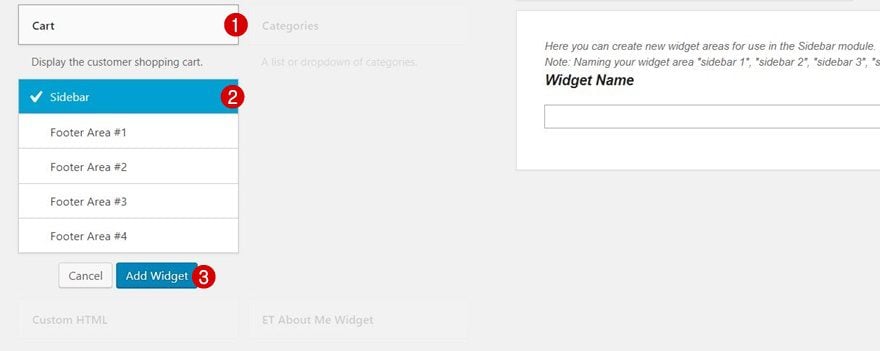
Locate the Cart widget as well and likewise, add it to your sidebar.
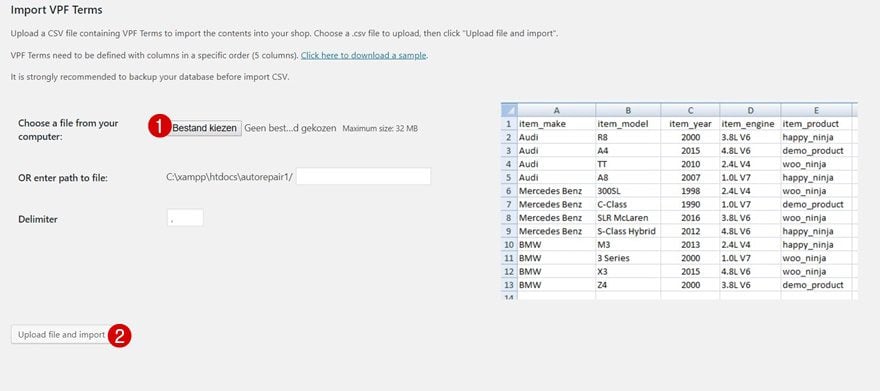
Part 5: Download Sample CSV File, Create Your Own & Upload it
Step 1: Go to ‘Import CSV’
Now that we have the Vehicle Parts Finder and Cart widget in our sidebar, we can start focusing on the different terms you want to add to your website. There are four kinds of terms you can find within this plugin:
- Make
- Model
- Year
- Engine
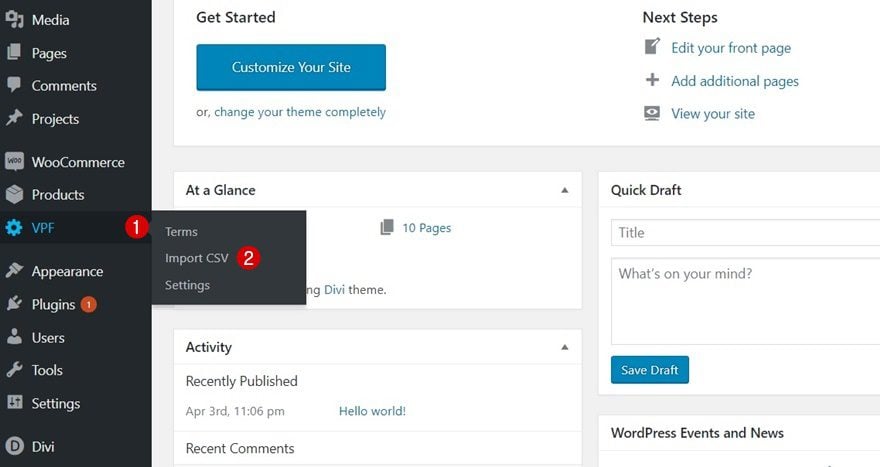
The terms follow up on each other. First, there’s Make, then follows Model, continued by Year and finished by Engine. You could add all of these manually but to make everything easier, this plugin allows you to upload a CSV with exactly that information. Start by going to VPF > Import CSV.
Step 2: Download Sample
Once you’re there, you’ll see a link that will start a sample CSV download. Go ahead and download the sample.
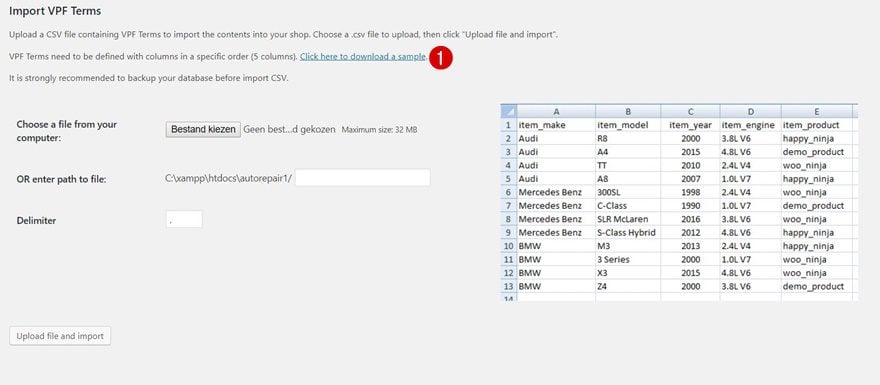
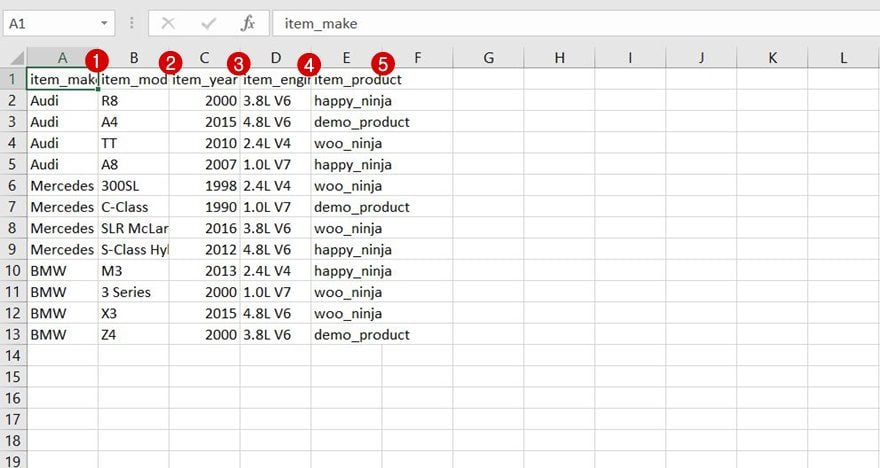
Step 3: Modify Spreadsheet According to Your Products
Then, start modifying the list according to the own products on your website. You can assign multiple products to a make, model, year and engine using the item product column. Use the slug of your product page for that and separate your products by using a comma.
Step 4: Upload New CSV
And lastly, upload this modified CSV again. If you, the, take a look at your terms, you will see all of these have been added automatically to your plugin which saves you a ton of time.
Part 6: Assign VPF Terms to New Products Manually
Step 1: Create Products
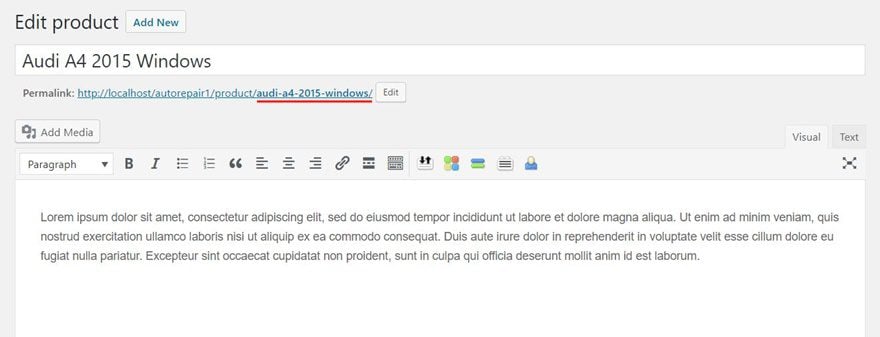
If you’re adding new products after you’ve uploaded the CSV, you can assign terms to them manually. After you’ve created your new products and gone through the general steps (such as adding a featured image, gallery, description, title and price), open each one of them individually.
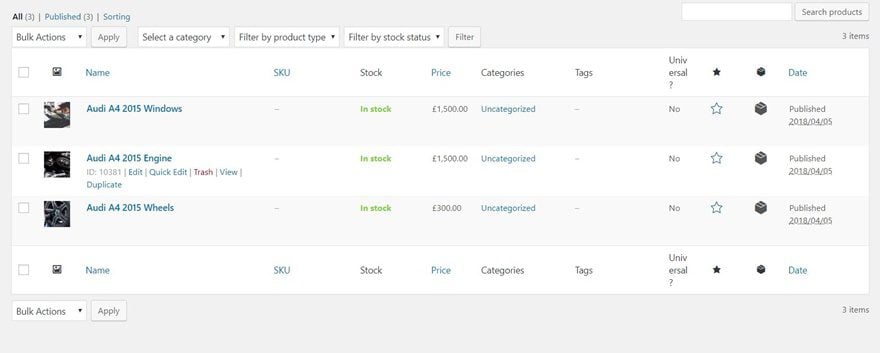
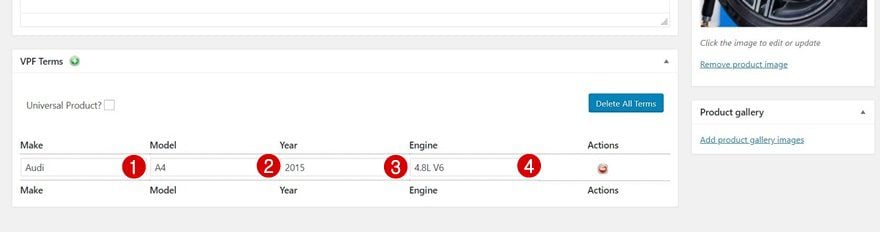
Step 3: Assign VPF Term to Product
Scroll down to the bottom of your product page. There, you can choose which make, model, year and engine your product belongs to. Repeat this step for each one of the new products.
Part 7: Include Shortcode in Shop Page & Modify Its Appearance
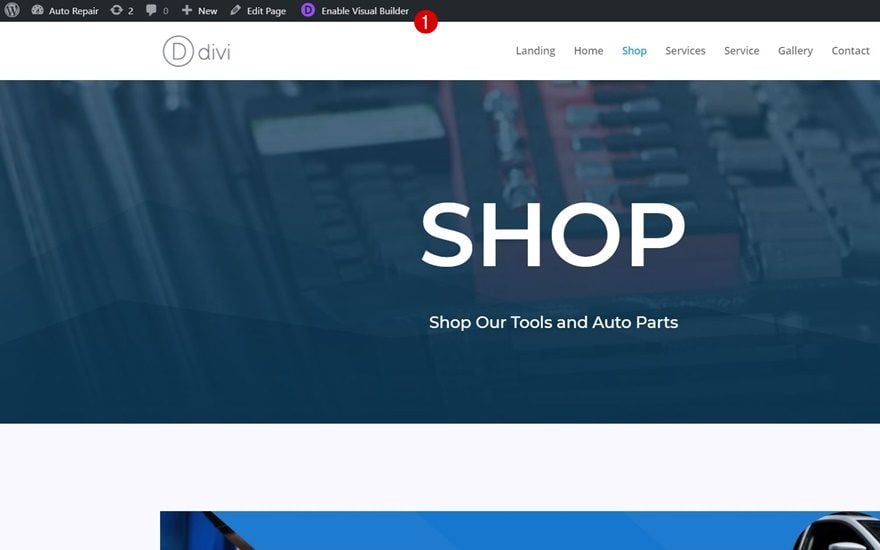
Step 1: Open Shop Page with Visual Builder
Once all your products are linked to the proper terms, it’s time to add the vehicle part search to your shop page. To do that, enable the Visual Builder first.
Step 2: Add One-Column Row
Then, add a column with one row at the beginning of the second section of your page.
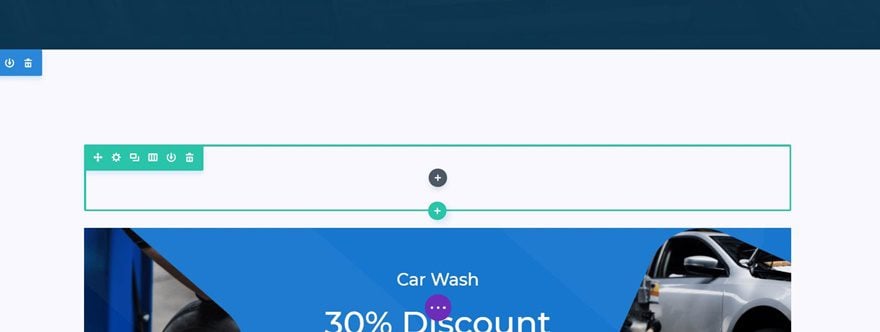
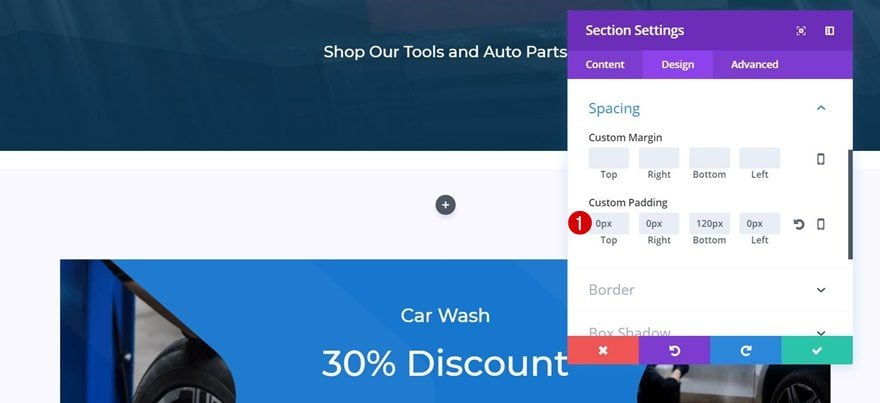
Step 3: Remove Top Padding of Section
To create a better-looking result, remove the top padding of the second section you’re working on.
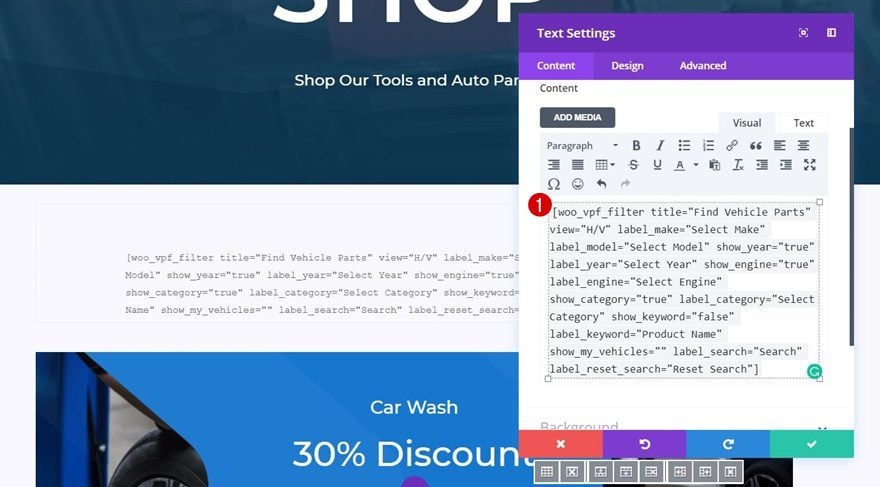
Step 4: Add New Text Module with Vehicle Parts Search Shortcode to Column
Next, add a Text Module to the row you’ve just created and place the following shortcode in the Content box:
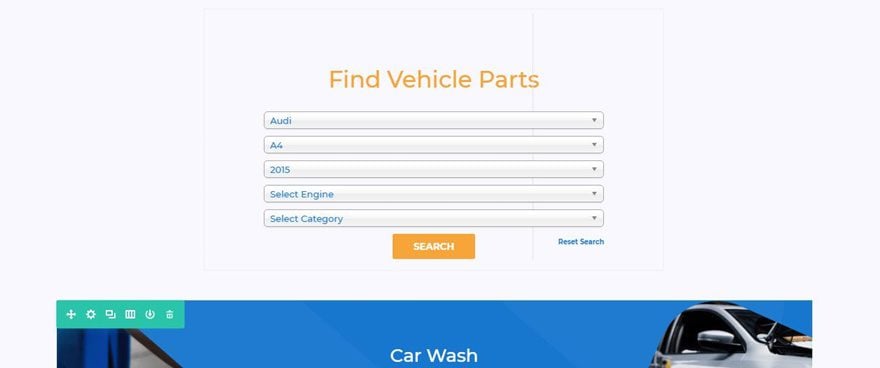
[woo_vpf_filter title="Find Vehicle Parts" view="H/V" label_make="Select Make" label_model="Select Model" show_year="true" label_year="Select Year" show_engine="true" label_engine="Select Engine" show_category="true" label_category="Select Category" show_keyword="false" label_keyword="Product Name" show_my_vehicles="" label_search="Search" label_reset_search="Reset Search"]
This will make the vehicle part search show up on your page.
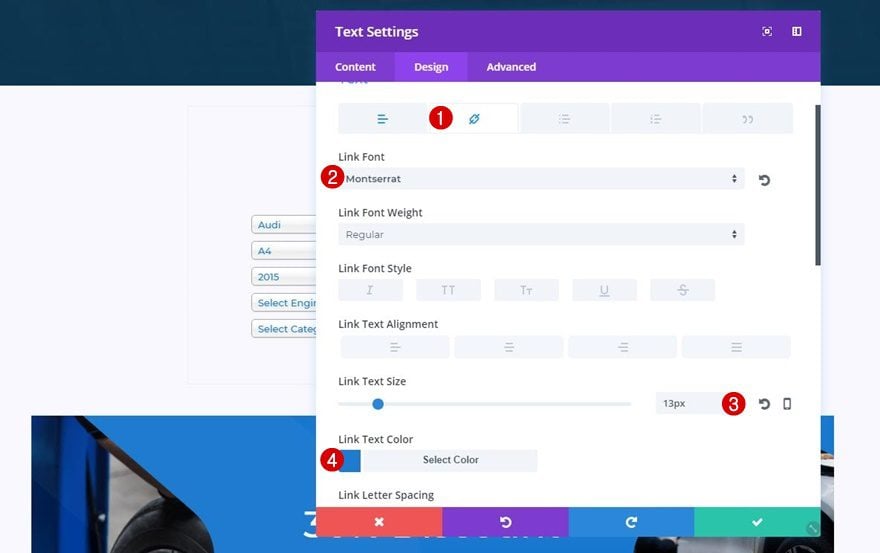
Step 5: Link Text Settings
We can, luckily, make some appearance modifications to this shortcode using Divi’s built-in options. The first thing we’ll do is change the link text using the following settings:
- Link Font: Montserrat
- Link Text Size: 13px
- Link Text Color: #1e7bd0
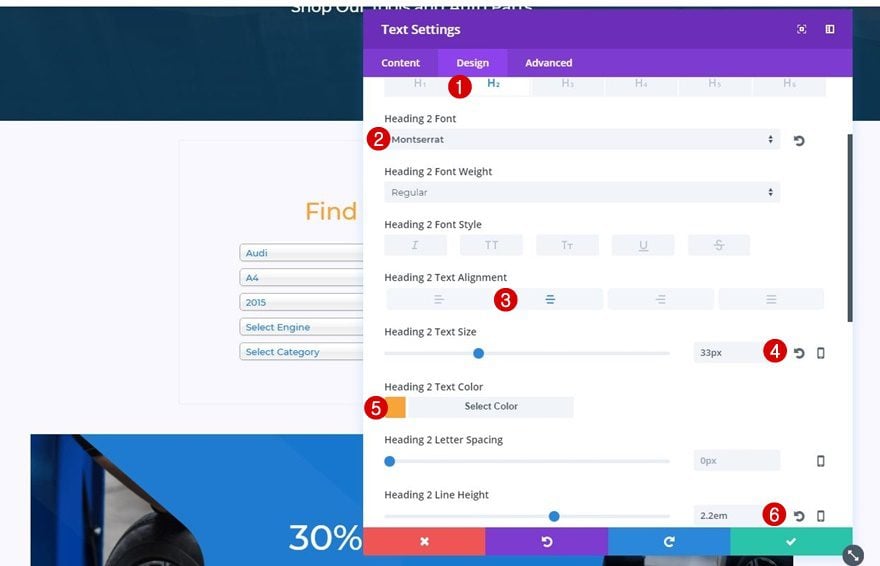
Step 6: Heading 2 Text Settings
We’ll also change the heading 2 text settings using the following settings that match the Auto Repair Layout Pack:
- Heading 2 Font: Montserrat
- Heading 2 Text Alignment: Center
- Heading 2 Text Size: 33px
- Heading 2 Text Color: #f7a439
- Headling 2 Line Height: 2.2em
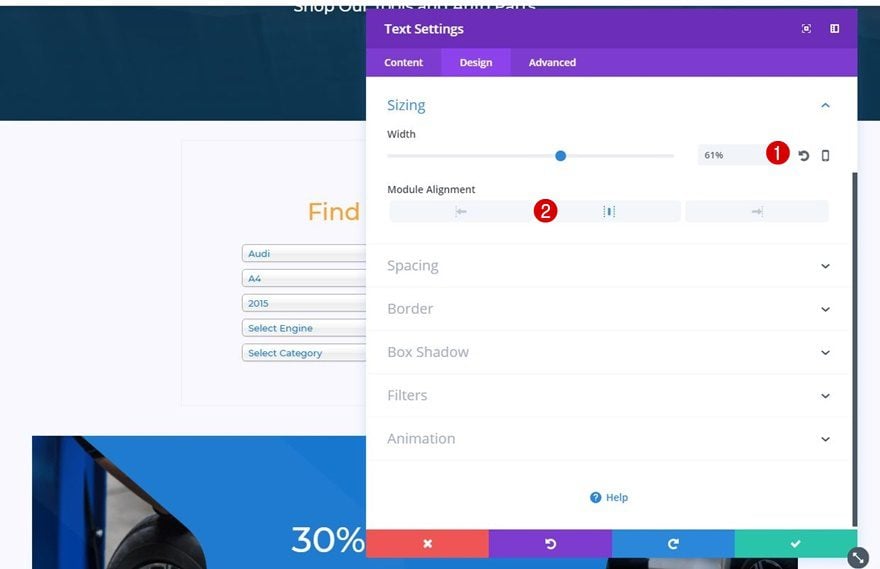
Step 7: Sizing
Next, we’ll make the width of the vehicle part search smaller by using a width of ‘61%’ instead of ‘100%’ for desktop. The width for tablet and phone must remain ‘100%’. Use a center Module Alignment as well.
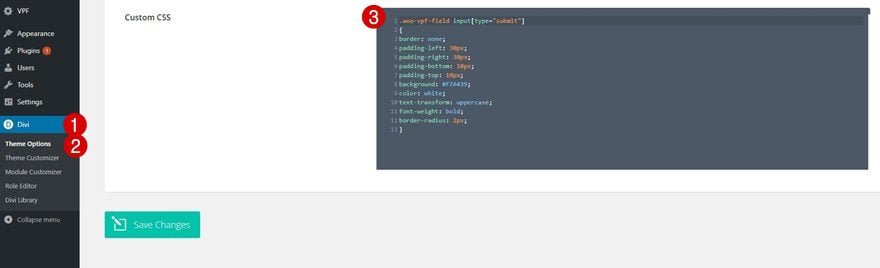
Last but not least, we want the buttons to match the Auto Repair Layout Pack as well. Unfortunately, since this is a third-party plugin, we can’t change that with the Divi Builder. That’s why we’ll add some additional CSS code lines by going to your WordPress Dashboard > Divi > Theme Options > Scrolling down the General tab > Adding the following lines of CSS code to the Custom CSS box:
.woo-vpf-field input[type="submit"]
{
border: none;
padding-left: 30px;
padding-right: 30px;
padding-bottom: 10px;
padding-top: 10px;
background: #F7A439;
color: white;
text-transform: uppercase;
font-weight: bold;
border-radius: 2px;
}
Final Thoughts
In this use case blog post, we’ve shown you how to add vehicle parts search to Divi’s Auto Repair Layout Pack shop page. This use case is part of our ongoing Divi initiative where our design team shares a new layout pack with you each and every week. If you have any questions; make sure you leave a comment in the comment section below!


Can you make a Blog Page for this Auto Repair layout. And you also include a button for colon and your schedule form in the bottom of the page. Can you make a bar schedule now button and phone number that will scroll down the page when you scroll.
Can you make a Blog Page for this Auto Repair layout. And you also include a button for colon and your schedule form in the bottom of the page. Can you make a sticky bar schedule now button and phone number that will scroll down the page when you scroll.
I think you guys may have struck out on this theme. There isnt a garage on the planet that sells parts to the general public. Auto Parts and Accessorys store’s, yes.
Thank you so much for sharing steps on How to Add Vehicle Parts Search to Divi’s Auto Repair Layout Pack Shop Page.I don’t know much about this though, I always search for code for everything and then i make what i actually wanted to do.Now i have found your blog really useful as I’m getting lots of information and tips on various fields.Thank you so much for this.Keep posting often.
This is a very good tutorial. But I am wondering if mechanics will really want to sell auto parts.
I think that Auto repair shops will rather like to have a scheduling or booking service on their website so that customers can schedule when to bring their vehicles in. Do you have any plans to make a tutorial on that?
We’ve actually added bookings in other blog posts so we didn’t want to do it again here. If you search our archive you should find a few good tutorials and booking plugin options.